Smart array 阵列卡介绍
HP_Smart_Array_Controller_Driver_User_Guide
HP Smart Array Controller Driver Guide Sun Solaris10for x86/x64SystemsNinth edition November2009Legal notices©Copyright2007-9Hewlett-Packard Development Company,L.P.Confidential computer software.Valid license from HP required for possession,use or copying.Consistent with FAR12.211and 12.212,Commercial Computer Software,Computer Software Documentation,and Technical Data for Commercial Items are licensed to the ernment under vendor's standard commercial license.The information contained herein is subject to change without notice.The only warranties for HP products and services are set forth in the express warranty statements accompanying such products and services.Nothing herein should be construed as constituting an additional warranty.HP shall not be liable for technical or editorial errors or omissions contained herein. Microsoft and Windows are U.S.registered trademarks of Microsoft Corporation.Intel is a trademark of Intel Corporation in the U.S.and other countries.Java™is a U.S.trademark of Sun Microsystems,Inc.AMD is a trademark of Advanced Micro Devices, Inc.Contents Introduction (4)Package Format and Contents (4)Package Format (4)Package Contents (4)Functionality (5)Package Installation and Configuration (6)System Requirements (6)Hardware Requirements (6)Software Requirements (6)Package Preparation (6)Unpacking the Distribution (7)Creating the DU Diskette (7)Creating the DU CD-ROM (8)Package Installation (8)Applying the DU during OS Installation (8)Installing the Driver on an Existing Installation (10)Installing the Driver Into a GRUB-based Miniroot (10)Installing the Driver Using JumpStart (11)Loading the Driver in Failsafe Mode (11)Configuration (12)Useful References (12)Package Maintenance (13)Package Removal (13)Package Upgrade (13)IntroductionThis document describes methods for applying the HP Smart Array Controller Driver(CPQary3)to aSolaris10for x86/x64Systems Deployment or to a currently deployed Solaris10for x86/x64Systemsinstallation.Included are a description of the driver,and method for applying the driver during manualinstallation as a DU,deployment by jumpstart,integrating the driver with the Solaris10miniroot,andloading a driver under normal or failsafe operation of the Solaris10for x86/x64Systems OperatingSystem.This document is not a general guide to Solaris10for x86/x64Systems deployment on HPProLiant servers.For information on that topic,please refer to the Sun Solaris10Deployment Guide forHP ProLiant Servers,which is located on the HP website at/bc/docs/support/SupportManual/c01153970/c01153970.pdf?jumpid=re g_R1002_USEN.Package Format and ContentsThis section describes the contents,format,and basic functionality of the HP Smart Array Controller Driver package.Package FormatThe CPQary3package is distributed in a compressed tar file,which can be extracted using the gunzip(1) and tar(1)utilities on a system running Solaris10for x86/x64Systems.Multiple images of the CPQary3 package are provided for convenience.All of the images supply the same driver.The tar file contains the following package formats for the driver:∙ 3.5"1.44MB floppy disk image∙CD-ROM ISO image∙Solaris package image∙DU-style directory imagePackage ContentsThe CPQary3package contains HP Smart Array Controller Driver for Solaris10for x86/x64Systemsplatforms(cpqary3(7D))and supporting documentation.The package contains the following files andfolders:∙README.CPQary3:Text file containing brief documentation for the distribution.∙LICENSE.CPQary3:Text file containing the end-user license which governs use of the distribution and its contents.∙RELEASENOTES.CPQary3:Text file containing the release notes for the distribution.∙CPQary3.144:3.5"1.44MB floppy diskette image for the driver(DU floppy).∙CPQary3.iso:CD-ROM ISO image for the driver(DU CD-ROM).∙CPQary3.pkg/:Solaris package for the driver.∙DU/:DU-format directory image of the driver.∙tools/fdwrite.exe:A tool that can be used to copy the DU floppy image to a diskette using Microsoft Windows.Functionalitycpqary3(7D)is a bootable device driver for Solaris10for x86/x64Systems,enabling the HP SmartArray family of disk controllers to be used with Solaris.The CPQary3Driver Update(DU)diskette can be supplied to Solaris at installation time,allowing Solaris to be installed on to disk volumes attached to and configured by a Smart Array controller.Starting from version1.80,CPQary3has online support for theArray Configuration Utility.The online Array configuration utility is an interactive command console that allows users to configure arrays without rebooting to a specialized environment.Package Installation and ConfigurationThis section describes software and hardware requirements for installation of the HP Smart ArrayController Driver.It also addresses package preparation,installation,and configuration of the driver for various deployment scenarios.System RequirementsThis section describes the requirements of the system to which the CPQary3package will be applied. Hardware RequirementsThe server that will use the driver must be a supported HP ProLiant server and must have a supportedembedded or add-on HP Smart Array controller.A list of controllers and other storage hardwaresupported by the driver is available in the RELEASENOTES.CPQary3file included in the distribution.To install Solaris by supplying the driver on a floppy diskette,the following are required:∙A spare3.5"1.44MB floppy diskette.∙An existing system that can be used to create the CPQary3DU diskette.∙The target server must have a legacy3.5"1.44MB floppy drive(For Solaris108/07or prior) NOTE:Solaris108/07onwards USB Floppy drive can be used for DU type of installation To install Solaris by supplying the driver on a CD-ROM(Solaris101/06and beyond),the following are required:∙Blank CD media.∙An existing system that can be used to create the CPQary3DU CD.∙The target server must have a CD-ROM drive.To install Solaris by supplying the driver via HP iLO virtual media(Solaris101/06and beyond),asupported iLO client with access to the target server’s iLO port is required.To apply the DU diskette to a PXE server using the HP PXE Installation Utility(Solaris103/05only),thePXE server must have a3.5"1.44MB floppy drive.During a network-based installation,the DU,and thus a floppy drive or CD-ROM drive,is not needed ifthe DU has previously been applied to the net-install image on the install server.Software RequirementsSolaris10for x86/x64Systems operating system.Package PreparationThis section describes the steps necessary to unpack and create the installation media for variousdeployment scenarios.While the driver must always be unpacked prior to installation,some of thefollowing preparation steps are only necessary for certain deployment scenarios.You should be familiarwith the deployment method you will use,and the requirements of that method before following thedirections in this section.For more information on the various deployment methods,please refer to theHP ProLiant Support Pack for Solaris10User Guide as described in the section“Introduction”.NOTE:In the procedures that follow,x.y.z is the version number of the package.It should besubstituted with the appropriate version when executing the listed commands. Unpacking the DistributionThe HP Smart Array Controller Driver is distributed as a gzip-compressed tar file which must be unpacked before use.The instructions below can be used on Solaris and other similar operating systems for whichthe tar and gzip tools are available.1.Download the CPQary3distribution compressed tar file to a temporary local directory,such as/var/tmp.The name of the tar file has the form CPQary3-x.y.z-solaris10.i386.tar.gz.2.Uncompress and un-tar the compressed tar file to extract the CPQary3package:$cd/var/tmp$gunzip CPQary3-x.y.z-solaris10-i386.tar.gz$tar xvf CPQary3-x.y.z-solaris10-i386.tar$cd CPQary3-x.y.z-solaris10-i386$more LICENSE.CPQary3$more RELEASENOTES.CPQary3You must agree to the terms of the license in order to install and use the CPQary3package and itscomponents.The distribution contains the components described in the section“Package Contents”. Creating the DU DisketteThe procedure below is used to create the Driver Update(DU)diskette.A DU diskette is necessary whenapplying the driver during manual deployment,or to apply the driver to a net-install image using the HPPXE Installation Utility.1.If necessary,unpack the distribution as described above under“Unpacking the Distribution”.2.To create a Solaris10for x86/x64Systems installation DU diskette for the driver under Solaris orother similar operating system,use dd(1)to copy the floppy image to a diskette:WARNING:All existing data on the target floppy diskette will be destroyed.$pwd/var/tmp/CPQary3-x.y.z-solaris10.i386$dd if=CPQary3.144of=path-to-mediaTo create a Solaris10for x86/x64Systems installation DU diskette for the driver under MicrosoftWindows,the fdwrite.exe tool,which is included in the distribution,can be used:WARNING:All existing data on the target floppy diskette will be destroyed.1.Open a command prompt window:Start>Run>cmd2.Copy the floppy image to diskette:C:\...>cd...\CPQary3-x.y.z-solaris10.i386C:\...>tools\fdwrite CPQary3.144a:Creating the DU CD-ROMWith Solaris101/06and beyond,driver updates may be supplied using CD-ROMs instead of floppye of such a CD may be required if the target system does not have a legacy floppy drive.For convenience,a CD-ROM ISO image of the driver update is included in the distribution.1.If necessary,unpack the distribution as described above under Unpacking the Distribution.ing appropriate CD writing software and equipment,create a CD using the CPQary3.iso ISOimage that is included in the distribution.Package InstallationThere are several methods of deploying Solaris10for x86/x64Systems.The various methods are notcovered in this manual.The instructions below describe methods for installing the HP Smart ArrayController Driver during various deployment methods,or to an active Solaris installation.For information regarding deployment of Solaris on HP ProLiant Servers,please refer to HP ProLiant Support Pack forSolaris User Guide as described in the section“Introduction”.Applying the DU during OS InstallationDepending on the deployment method,one of the following methods should be used to apply theCPQary3DU to Solaris10.The DU must be supplied during OS installation if the OS is being installed on disk volumes attached to a Smart Array controller.With Solaris101/06and beyond,the DU may besupplied on a floppy diskette(using a legacy floppy drive),a CD-ROM(USB or other),or via HP iLOvirtual media(using the CD-ROM ISO image).1.If necessary,create a Driver Update(DU)diskette or CD-ROM using the procedures described abovein“Creating the DU Diskette”or“Creating the DU CD-ROM”.2.Boot the Solaris Installation.The following menu prompt will appear:1.Solaris Interactive(default)2.Custom JumpStart3.Solaris InteractiveText(Desktop session)4.Solaris Interactive Text(Console session)5.Applydriverupdates6.Singleuser shell3.Enter the appropriate deployment choice.4.At the following prompt:Insert media and enter media type:Floppy[f],CD/DVD[c]or End[e]do one of the following:○Insert the DU floppy,and choose f,○Insert the DU CD-ROM,and choose c,or○If using virtual media,disconnect the Solaris installation media(if necessary),connect the CPQary3.iso ISO image file included in the distribution,and choose c.Solaris will extract the driver,and the following messages will indicate success:extracting software on cdinstalling driver update in the miniroot5.Following driver application,Solaris will return to the following prompt:Insert media and enter media type:Floppy[f],CD/DVD[c]or End[e]Choose e.Solaris will prompt for re-insertion of the Solaris media;complete this step and proceed with the installation.If using virtual media,disconnect the driver DU ISO image and reconnect the Solaris installation media before continuing.With Solaris103/05,the driver must be supplied using the DU floppy with a legacy floppy drive.1.If necessary,create a Driver Update(DU)diskette using the procedure de-scribed in“Creating theDU Diskette”above.2.Begin the installation by booting Solaris with a Configuration Assistant Diskette or with a Solaris10for x86/x64Systems Software CD1.3.When prompted,press the ESC key to enter the Device Configuration Assistant.4.At the Configuration Assistant screen,choose the F4option F4_Add Driver.5.When the Install Supplemental Drivers screen is displayed,remove the Configuration Assistantdiskette,if used,and insert the CPQary3DU diskette into the floppy drive.6.Select F2_Continue,and Solaris will load the HP Smart Array Controller Driver from the disketteinto memory.7.Add any additional drivers using the DU diskettes provided by the vendors.Once all of the requireddrivers have been added,remove the DU diskette and,if it was used to boot the system,re-insert the Configuration Assistant diskette.Select F4_Done.8.The Identified Device Drivers screen is displayed.Select F2_Continue to proceed with theinstallation of the Solaris10for x86/x64Systems Operating System.9.Near the end of the installation,the installation process will prompt again for the CPQary3DUdiskette.Remove the Configuration Assistant diskette from the floppy drive,if used,and re-insert the CPQary3DU diskette.10.Press ENTER to continue,and the Solaris installation process will install the CPQary3package to thenew system.Messages similar to the following are displayed during a successful driver installation:Installing package CPQary3HP Smart Array Controller Driver(i386)VERSION=x.y.z,REV=2009.04.06.02.01Copyright2009Hewlett-Packard DevelopmentCompany,L.P.All Rights Reserved.11.Remove the DU diskette from the floppy drive,and follow the on-screen instructions to complete theSolaris installation.Installing the Driver on an Existing InstallationThe following procedure should be followed to install the HP Smart Array Controller Driver on to anexisting Solaris10system to use the disk volumes configured on Smart Array controllers.1.If necessary,unpack the distribution as described above under“Unpacking the Distribution”.2.The CPQary3distribution includes an install script that should be used to install the driver package.Execute the install script to install the driver.Driver installation must be performed by the superuser.$pwd/var/tmp/CPQary3-x.y.z-solaris10-i386$su#pkgadd-d‘pwd‘/CPQary3.pkg CPQary3...Installation of<CPQary3>was successful.A message similar to the above is displayed following a successful installation.3.The system must be rebooted in order to configure the driver and identify the attached disk volumes:#touch/reconfigure#init6Installing the Driver Into a GRUB-based MinirootThis section applies to Solaris101/06and beyond.Because the HP Smart Array Controller Driver is not currently shipped on Solaris media,the driver is not present in the Solaris install miniroot or in the Solaris failsafe miniroot.The following procedure can be used to install the HP Smart Array Controller Driver intoa Solaris GRUB-based miniroot.This can be useful for PXE boot-based or other non-interactive installationsas well as for failsafe mode-based recovery.1.If necessary,unpack the distribution as described above under“Unpacking the Distribution”.2.Preserve a backup copy of the miniroot that is to be modified.3.Unpack the miniroot that is to be modified into a temporary directory:$su#/boot/solaris/bin/root_archive unpack.../x86.miniroot/var/tmp/mr4.Install the HP Smart Array Controller Driver into the miniroot:#cd.../CPQary3-x.y.z-solaris10-i386#pkgadd-R/var/tmp/mr-d‘pwd‘/CPQary3.pkg CPQary3NOTE:With Solaris105/09,you may receive a busy message when adding the driver—“add_drv/rem_drv currently busy;try later”.This is due to a lock file in theminiroot which must be removed.Follow these steps to remove the lock file:1.Remove/tmp/AdDrEm.lck from the miniroot:#rm/var/tmp/mr/tmp/AdDrEm.lck2.Add the package as above,ignoring any warning messages you may receive.5.Re-pack the modified miniroot and clean up:#cd/#/boot/solaris/bin/root_archivepack.../x86.miniroot/var/tmp/mr#rm-Rf/var/tmp/mr#exit$Installing the Driver Using JumpStartSuccessful network deployment of Solaris on ProLiants requires:∙The HP Smart Array Controller Driver to be loaded at installation time.∙The driver to be installed in the target root disk so that it is available when the newly-installed system is rebooted.The first requirement can be satisfied by installing the driver into the miniroot,as described in the section“Installing the Driver Into a GRUB-based Miniroot”.The second requirement is usually accomplished using the existing capabilities of JumpStart.This section provides a brief introduction to those features ofJumpStart that can be used to deliver the driver package to the target system during network-basedinstallation.The following Sun documentation should also be consulted:The Solaris10Installation Guide:Custom JumpStart and Advanced Installations guide,specifically theUsing Custom JumpStart section.The Solaris105/09version of this guide is available at/app/docs/doc/820-7014/.Additional information regarding JumpStartdeployment on HP ProLiant servers can be found in the document Deployment Guide for HP ProLiantServers as described in the section“Introduction”.To prepare a JumpStart deployment which includes the HP Smart Array Controller Driver,follow thesesteps.1.If necessary,unpack the driver distribution as described above under“Unpacking the Distribution”.The CPQary3package is included in the distribution tarball in a Solaris package directory formatunder CPQary-x.y-z-solaris10-i386/CPQary3.pkg/:$cd.../CPQary3-x.y.z-solaris10-i386$pkginfo-d CPQary3.pkgsystem CPQary3HP Smart Array Controller Driver2.pkgtrans the CPQary3package to a directory on a network file server.Make this directoryavailable to clients via NFS.For example:$pkgtrans cpqary3.pkg/jumpstart/pkg3.Configure JumpStart to install the CPQary3package during installation.This can be accomplished inone of several ways,two of which are briefly described here(do one of the following):○Add a package directive to the JumpStart profile,specifying the NFS mount path to the directory containing the CPQary3/directory.For example:$package CPQary3add nfs://.../jumpstart/pkg○In a JumpStart finish script,first NFS mount the directory with the pack-age,then run pkgadd and specify the install root using-R.The install root is usually mounted at/a during installation.See the referenced documents for more details.Loading the Driver in Failsafe ModeSolaris101/06and beyond has a failsafe mode boot option.In failsafe mode,GRUB loads a failsafeminiroot from which Solaris is booted.Because the HP Smart Array Controller Driver does not currentlyship on Solaris media,the driver is not present in the failsafe miniroot.In certain situations,it may benecessary to boot a failsafe miniroot(or install miniroot,eg.from CD)that does not have the HP SmartArray Controller Driver,in order to repair an installation on Smart Array-attached disks.The procedure below can be used to load the HP Smart Array Controller Driver at run-time,after booting an unmodified failsafe or install miniroot.This installation of the driver does not persist across reboots;see “Installing the Driver Into a GRUB-based Miniroot”above to affect a persistent installation.1.If necessary,create a Driver Update(DU)diskette or CD-ROM using the procedures described in“Creating the DU Diskette”or“Creating the DU CD-ROM”above.2.Boot the failsafe miniroot or an installation CD.If booting an installation CD,select Single usershell from the initial installation menu.3.Once at the shell prompt,initiate DU installation:#install-duand follow the prompts to install the driver using the DU diskette or CD-ROM.4.After driver installation,have Solaris search for OS installations,if necessary:#install-recoveryConfigurationPlease refer to the cpqary3(7D)man page for complete configuration requirements.In particular,if more than14logical volumes are configured or if a tape drive is connected on any Smart Array Controller,appropriate changes must be made to the system configuration for proper operation.Details of suchconfiguration changes are described in the cpqary3(7D)man page.Useful ReferencesFor more information,please consult the following sources:∙Release Notes The release notes for the CPQary3package are supplied in the distribution tar file as RELEASENOTES.CPQary3.These notes contain information such as the revision history,newfeatures added,obsolete features removed,and a list of known issues.∙man(1)Page The cpqary3(7D)man page is provided with the CPQary3package.It provides detailed information about the HP Smart Array Controller Driver.∙Sun Documentation Solaris10Installation Guide:Basic Installations.See the section titled“x86: Performing an Installation or Upgrade With the Solaris Installation Program”.Available at.∙The HP ProLiant Support Pack for Solaris User Guide available at .Package MaintenanceThis section describes how to perform basic maintenance on an installation of the HP Smart ArrayController Driver,including removal and upgrade.Package RemovalTo remove the CPQary3driver,use the following procedure:WARNING:After removing the driver,all disk volumes attached to the server’s Smart Arraycontrollers will be inaccessible!1.Make sure that a current backup of the server is available,especially any data that resides on diskvolumes attached to Smart Array controllers.2.Verify that the package is currently installed on the system:$pkginfo CPQary3System CPQary3HP Smart Array Controller DriverThe above message is displayed if the CPQary3package is installed.An error message isdisplayed if the package is not installed.3.Remove the package using pkgrm(1M):$su#pkgrm CPQary3WARNING:If the boot controller is a Smart Array controller,the CPQary3package(possibly adifferent version)must be re-installed prior to rebooting or shutting down the system.Failing todo so will result in the system being unable to boot.4.In order to complete the removal of the driver,the system must be rebooted:#touch/reconfigure#init6Package UpgradeTo upgrade the CPQary3package:1.Uninstall the current package as described above in Package Removal,but do not reboot the systemyet.2.Add the new package,following the steps outlined above in“Installing the Driver on an ExistingInstallation”.。
HP ProLiant ML350 G6 服务器 - 使用 SmartStart CD 引导安装 windows 2008 操作系统
HP ProLiant ML350 G6 服务器- 使用SmartStart CD 引导安装windows 2008 操作系统1. 使用SmartStart CD引导安装之前的准备工作:首先,建议用户先根据自己的需要配置好RAID,可以使用开机自检检测到阵列卡时按F8进入ORCA的方法配置,也可以使用SmartStart CD中附带的ACU工具配置。
其次,需要确认BIOS中启动顺序的设置是光驱优先引导,可以开始时按F10键进入BIOS,然后到Standard Boot Order下确认。
2. 准备工作做好后,就可以使用SmartStart CD引导了,下面是引导的画面。
3. 接下来,我们会看到用户界面的第一步,选择安装语言和键盘语言,目前还不支持中文,没有特殊需要的用户,这步默认为英语即可。
4. 然后是终端用户授权许可,点击Agree才能继续下一步。
5. 接下来,到了操作选择页面,此页面可供选择的操作有:Install、Maintenance、SystemErase和Reboot。
Maintenance中包含ACU,可以借此进行阵列配置,也包含Insight Diagnostic,可以用来进行服务器硬件诊断,这里就不做详细介绍,System Erase和Reboot,顾名思义,一个系统擦除、一个重启。
(如图5)我们点击Install,继续下一步。
6. 接下来,出现的页面会显示系统信息,可以查看到BIOS版本、内存和磁盘大小、以及启动控制器,本次演示服务器配备的是Smart Array P410i阵列卡。
对于安装了1块以上阵列控制器的用户朋友,可以在此选择要把系统安装在哪块阵列控制器连接的硬盘上。
7. 然后,我们需要选择要安装的操作系统,本次演示使用的是SmartStart CD 8.30的版本,可以支持引导安装的系统有Windows 2003和2008。
这次我们选择的是Windows server 2008企业版。
如何配置hot spare盘和阵列迁移扩容
如何配置hot spare盘和阵列迁移扩容分别介绍了用F8加HOT SPARE盘,和用ACU加HOT SPARE与阵列的扩容和迁移。
开机自检到阵列卡界面,在阵列卡初始化完之后,会出现配置阵列的快捷键,如图 1 示 :图 1按 F8 进入 ORCA 配置界面 (ORCA=Option Rom Configuration for Arrays):出现主菜单,界面如图 2 示 :图2新硬盘配置新阵列的话,请选择 Create Logical Drive, 进入后,如图 3 示 :图3在配置界面的左侧,是阵列卡所连接的物理硬盘,右侧上面是阵列级别选项,右侧中间是 HOTSPARE 盘的选项,下面是 Maximum Boot partition 选项 ( 此选项用在 Windows NT4.0 操作系统上,用来选择最大启动分区,可选择默认选项 )现在用 2 块硬盘做 raid1 ,加一块硬盘做 HOTSPARE ,选择一块 18.2gb ,一块36.4gb 作为 raid1 ,一块 36.4gb 做 HOTSPARE (注: raid1 级别,两块硬盘容量必须一致,如果不一致,以最小容量的盘为准)按 SPACE 键(空格键)选择 2 块硬盘 , 选择成功后会在 [ ] 前面有 X 的提示,如图 4:图4选择物理盘后,按 TAB 键到右侧上面,来选择阵列级别, ORCA 自动识别为 raid1 如图 5 示 :图5再按 TAB 键到 Spare 选项,来选择 HOTSPARE 盘,依旧按 Space 键来选定,选择后如图 6 示 :图6注:选择 Spare 盘后会在 [ ]Use one drive as spare 选项前多了一个 S ,在没选择的物理盘前面也变成了 [S]按 Enter 创建逻辑盘,会出现如图 7 提示:图7F8 保存配置,结果如图 8-1 , 8-2 示:8-18-2配置完成后,回到主菜单,选择第 2 项查看阵列配置状态,如图 9-1,9-2 示 :9-19-2显示的是新配置的逻辑盘的状态(注意看有 with online spare 的提示, HOTSPARE 盘在阵列中没有任何指示灯提示),再按 Enter 后会出现各个物理盘的状态,如 9-3 所示:至此,按 F8 后进入的 ORCA 配置阵列完成,如果要删除阵列,可以在主菜单选择第 3 项 Delete logical drive 来删除阵列(删除阵列会导致硬盘数据完全丢失)HP SMART ARRAY 系列的阵列卡除了字符界面配置阵列外,还提供了强大的图形化阵列配置工具 Array Configuration Utility-XE(ACU-XE) ,此工具配送在随机所带 Smart Start 光盘里, ACU 可以在 Smart Star 引导服务器后启动(适合任何操作系统),或者在 MicroSoft 系列的 Windows 系列操作系统里启动,然后进行在线配置,配置过程与 Smart Start 引导服务器后启动 ACU 类似首先,将 Smart Start 光盘放进光驱里,然后重新启动服务器,进入 SmartStart 主界面,如图 1-1 示1-1在横向选择页面选择 Maintenance 选项,如 1-2 示1-2选择第一项, array configuration utility, 进入 acu 的配置界面,如 1-3 示 :1-3在 acu 配置菜单的左侧是阵列的型号,如果服务器上有多块 hp 阵列卡,在 acu 里面会全部显示出来,可选择不同的阵列卡进行阵列配置,在中间所显示的是在此阵列卡下的逻辑盘信息,可看到配置了一个 logical drive ,并且有 hotspare 盘,在右侧是阵列配置的相关选项,右上角是阵列卡的相关选项,如图 2-1 示2-1选择 Controller Settings 后进入阵列卡配置界面,可对阵列卡进行相关配置,如图2-2 示2-2普通用户保持默认即可,如需更详细资料,请参阅acu 用户手册选择 Logical Drive Array Accelerator Settings 可对 Logical Drive 启动写缓存功能(需要额外安装阵列卡电池背板 BBWC—BBWC= Battery Backed Write Cache ),某些型号的阵列卡本身不自带 BBWC ,需要额外购买。
阵列(Array)以及逻辑盘(lun)管理
阵列(Array)以及逻辑盘(lun)管理节 1.01如何创建Logical Drive使用fastt最主要的内容,就是首先要创建符合你需求的盘,右键单击下图中所示的项,选择”Create Logical Drive…”单击”Next”你就会看到如下图所示的界面,”RAID level”比较简单了,但是你在这里看不到raid0+1或者raid1+0,如果你要用这种模式的话,请选择raid1。
”Drive selection choices”项默认的是Automatic,这个项的意思就是系统会根据当前fastt的硬盘配置情况,自动作一些组合,提供一种类似于套餐的形式给你。
如果选择”Manual”的话,就可以看到如下的界面:系统会自动地在左边的列把当前所有的硬盘列出,包括容量、转速。
选择所需要的硬盘,添加到右边。
下图中展示的是将位于槽位1,2,3的盘创建为一个raid5硬盘。
槽位4的盘暂时不使用。
然后,再点击”Calculate Capacity”:就得到按照当前的盘的配置以及选择的阵列模式,可以得到的容量:单击”Next”,会有一个确认的菜单,选择”ok”即可:大家在下图中看到的是创建lun的菜单界面,这点是和传统的ssa,scsi存储的一个重要的区别。
这里解释一下lun的概念。
其实很简单。
我们传统的存储使用的概念上一般就是在阵列上通过阵列的功能生成一些raid。
然后,每个这样的一个raid都在aix操作系统里面对应一个逻辑盘,也就是hdisk了,原先的一些scsi的存储以及7133的存储都属于这种情况。
但是,现在新的一些光纤存储稍微做了一些改变。
即在raid的基础上再做”切割”。
这种切割是横向的。
每个切割下来的单元就称为一个lun。
每个lun都有若干块硬盘组成,只见的数据结构还是raid 结构。
这样的话,原先的一个raid就可以分作若干个子raid来用了。
然后,每个Lun在操作系统里面被认作一个逻辑盘,也就是hdisk了。
HP Proliant Gen8阵列卡概述
HP Proliant Gen8 阵列卡概述
1、HP Smart Array P222 控制器- 概述 (1)
产品描述 (1)
产品特性 (2)
软件概述 (3)
2、HP Smart Array P420 控制器- 概述 (3)
产品描述 (3)
产品特性 (4)
软件概述 (5)
3、HP Smart Array P421 控制器- 概述 (5)
产品描述 (5)
产品特性 (6)
软件概述 (7)
4、HP Smart Array Advanced Pack规格 (7)
1、HP Smart Array P222 控制器 - 概述
产品描述
产品特性
软件概述
产品规格和保修信息链接
产品规格概述链接
产品描述
2、HP Smart Array P420 控制器 - 概述产品描述
产品特性
软件概述
产品规格和保修信息链接
产品规格概述链接
增加了服务器正常运行时间。
产品特性
软件概述
3、HP Smart Array P421 控制器 - 概述产品描述
产品特性
软件概述
产品规格和保修信息链接
产品规格概述链接
产品描述
制器,增强了性能、提升了外部连接速率并降低了
维护成本。
RAID
及故障前预警,从而增加了服务器正常运行时间。
产品特性
4、HP Smart Array Advanced Pack规格。
HPE Smart Array存储控制器选件指南

- 2GB FBWC
- RAID or HBA mode - Smart Storage Battery included Optional upgrades - 12 Gb SAS Expander - SmartCache - Secure Encryption
惠普智能阵列控制器(BL系列)
P244br/1GB P246br/1GB
•
升 了2.5 倍; 12Gb/s SAS 扩展卡 扩展了存储容量,可 满足多个工作负载需 求;
•
•
惠普智能主机总线适配器-Smart HBA
面向 HP ProLiant 服务器的可靠高性能 SAS 连接性
简单性
•
灵活性
• • • • • •
效率
•
•
惠普智能存储管理器 (SSA) 提供全面工具用于管理、配 置和诊断连接到控制器的存 储 经济高效的解决方案支持将 SAS 或 SATA 存储连接到 ProLiant
HP Smart Array 控制基本功能
• • • • • • •
支持 RAID 0、1、10、1 (ADM)、10 (ADM)、5、50、6 和 60 高级容量扩充 脱机模式下镜像的拆分和重新组合 驱动器清除 视频点播性能优化 移动和删除个别 LUN 的功能 备份拆分镜像以及回滚 RAID 1、10、1 (ADM) 和 10 (ADM) 镜像修复阵列
- 8 port 12 Gb/s SAS/SATA controller - RAID 0, 1, 5, 6, 60 and ADM - 4GB 72bit FBWC - RAID or HBA Mode Optional upgrades - 12 Gb SAS Expander - SmartCache - Secure Encryption
HP ProLiant ML系列服务器安装指南

本文以HP ProLiant ML370 G3 服务器为例说明了在HP ProLiant 服务器上导航安装 Windows 2000 Server 的正常安装步骤;SmartArray 6400 阵列卡,SmartStart CD 版本以7.1为例。
安装步骤:1.所有硬件连接安装完毕后,开启ML370 G3 服务器,按F9 进入BIOS 设置的主界面,选择要安装的操作系统;2.在BIOS 的主界面进入“Boot Controller Order”一项,更改SmartArray 6402 阵列卡的引导顺序,并保存;3.将SmartStart 光盘放入光驱,并引导;4.SmartStart 导航光盘的主界面;5.Maintenance 中的选项;6.点击“array configuration utility”,进入ACU阵列配置工具;7.选择“Creat Array”,然后选择硬盘,创建一个Array;8.鼠标选中所创建代表Array A,选择右侧的“Create Logical Drive”;9.设置Logical Drive,选择阵列级别等;10.逻辑盘设置完成并保存;11.返回到SmartStart 的主界面,进入Setup,点击Next;12.选择安装的操作系统;文章标题:HP Proliant 系列服务器使用SmartStart 光盘配置阵列卡过程文章关键字:文章路径:/techcenter_staticarticle/29712/29712.html本文说明了Proliant ML 系统、DL 系列服务器使用SmartStart 光盘配置阵列卡过程。
进行测试的机器为ML370 G3 ,加的阵列卡为SmartArray 642 阵列卡,本测试文档可以适用与ML(外加阵列卡) 和DL(机器集成的阵列卡) 系列的服务器,使用的导航光盘为SmartStart 7.3 CD 。
1. 机器的配置信息2. 使用导航光盘启动服务器,出现提示同意信息后,选择同意,进入下图的界面。
HP PC服务器主机阵列配置

HP Proliant系列服务器阵列配置开机自检到阵列卡界面,在阵列卡初始化完之后,会出现配置阵列的快捷键,如图1 示:图1按F8 进入ORCA 配置界面(ORCA=Option Rom Configuration for Arrays):出现主菜单,界面如图 2 示:图2新硬盘配置新阵列的话,请选择Create Logical Drive, 进入后,如图 3 示:图3在配置界面的左侧,是阵列卡所连接的物理硬盘,右侧上面是阵列级别选项,右侧中间是HOTSPARE 盘的选项,下面是Maximum Boot partition 选项( 此选项用在Windows NT4.0 操作系统上,用来选择最大启动分区,可选择默认选项)现在用 2 块硬盘做raid1 ,加一块硬盘做HOTSPARE ,选择一块18.2gb ,一块36.4gb 作为raid1 ,一块36.4gb 做HOTSPARE (注:raid1 级别,两块硬盘容量必须一致,如果不一致,以最小容量的盘为准)按SPACE 键(空格键)选择 2 块硬盘, 选择成功后会在[ ] 前面有X 的提示,如图4:图4选择物理盘后,按TAB 键到右侧上面,来选择阵列级别,ORCA 自动识别为raid1 如图5 示:图5再按TAB 键到Spare 选项,来选择HOTSPARE 盘,依旧按Space 键来选定,选择后如图6 示:图6注:选择Spare 盘后会在[ ]Use one drive as spare 选项前多了一个S ,在没选择的物理盘前面也变成了[S]按Enter 创建逻辑盘,会出现如图7 提示:图7F8 保存配置,结果如图8-1 ,8-2 示:8-18-2配置完成后,回到主菜单,选择第 2 项查看阵列配置状态,如图9-1,9-2 示:9-1显示的是新配置的逻辑盘的状态(注意看有with online spare 的提示,HOTSPARE 盘在阵列中没有任何指示灯提示),再按Enter 后会出现各个物理盘的状态,如9-3 所示:至此,按F8 后进入的ORCA 配置阵列完成,如果要删除阵列,可以在主菜单选择第3 项Delete logical drive 来删除阵列(删除阵列会导致硬盘数据完全丢失)HP SMART ARRAY 系列的阵列卡除了字符界面配置阵列外,还提供了强大的图形化阵列配置工具Array Configuration Utility-XE(ACU-XE) ,此工具配送在随机所带Smart Start 光盘里,ACU 可以在Smart Star 引导服务器后启动(适合任何操作系统),或者在MicroSoft 系列的Windows 系列操作系统里启动,然后进行在线配置,配置过程与Smart Start 引导服务器后启动ACU 类似首先,将Smart Start 光盘放进光驱里,然后重新启动服务器,进入SmartStart 主界面,如图1-1 示1-1在横向选择页面选择Maintenance 选项,如1-2 示1-2选择第一项,array configuration utility, 进入acu 的配置界面,如1-3 示:1-3在acu 配置菜单的左侧是阵列的型号,如果服务器上有多块hp 阵列卡,在acu 里面会全部显示出来,可选择不同的阵列卡进行阵列配置,在中间所显示的是在此阵列卡下的逻辑盘信息,可看到配置了一个logical drive ,并且有hotspare 盘,在右侧是阵列配置的相关选项,右上角是阵列卡的相关选项,如图2-1 示2-1选择Controller Settings 后进入阵列卡配置界面,可对阵列卡进行相关配置,如图2-2 示2-2普通用户保持默认即可,如需更详细资料,请参阅acu 用户手册选择Logical Drive Array Accelerator Settings 可对Logical Drive 启动写缓存功能(需要额外安装阵列卡电池背板BBWC—BBWC= Battery Backed Write Cache ),某些型号的阵列卡本身不自带BBWC ,需要额外购买。
HP MSA存储阵列产品介绍..

缺点 –
•仅支持单机 •利用率低 •扩展性有限
缺点 –
•扩展性有限 •连接的服务器数量有限
缺点 –
•扩展性有限
缺点 –
•无
传统基于服务器的存储模式
之前: 不利于存储的模式
LAN 用户 集中管理困难 每个服务器的 磁盘利用率低 独立的数据池增加了 出现故障的几率 扩展容量需要增加额 外的服务器
DAS, 只能利用存储容量的30%.
•
• • • • •
支持多达14 块热插拔SCSI硬盘
可以混用ultra2, ultra3, ultra320 等不同的LVD硬盘接口 单通道或者双通道ultra320主机接口
冗余风扇
冗余电源 支持约12米长的连接电缆
• 标配4米长连接电缆
•
• • •
与第五代和第六代Smart Array阵列控制器兼容
确保数据安全
• 冗余电源,风扇,阵列控制器 • 支持冗余路径 • ADG • 固件克隆 • Microsoft, Novell, 和 Linux 集群
高性能
• 2Gb 光纤架构 • 最多支持 42 个热插拔硬盘 • 最高 1GB 带电池保护高速缓存
支持DtS!
MSA1500 产品
2 Gb 光纤通道 SAN 附加2U 控制器托架 • 附加 MSA30 SCSI 磁盘柜或 MSA20 SATA 磁盘柜 分别支持最大容量8.1TB 和 24TB • 更低成本, 更高容量 • 用作SCSI 或SATA临近在线存储的主存储 • 可以被构建在以下方案中的平台:
从插槽到驱动器移动磁带的时间 初始化磁带并寻找启始数据的时间 恢复数据到适当的位置
通过对比, 磁盘有片刻的 “time-to-data” 。 通过磁盘直接的存取数据, 作为对比使用磁带库的机械手和 可能的人工干预 。
HP ProLiant DL380服务器-安装windows 2003操作系统
HP ProLiant DL380服务器-安装wind ows 2003操作系统前言:北京ADC企业托管邮箱服务器出现故障,恢复业务时需要重新安装windos2003的操作系统,之前也在虚拟机上安装过同样的系统,并未出现问题,因此对安装这个系统还是比较自信的,结果在hp proliant dl380 g5的服务器上进行安装时并不顺利,出现网卡驱动无法识别,通过下载多个网卡驱动进行安装,仍然不能识别,折腾时间比较长,后来在公司曹总的指导下重新进行了安装,最终解决了问题,因此将安装过程写出来,希望对大家以后的工作有所帮助。
安装过程:1,安装前需要准备好操作系统的驱动引导盘和操作系统盘,如果是新买的服务器,一般会自带相关的驱动引导盘,如果没有,则需要制作一个驱动引导盘,可在/tigertea/item/2b4d391d4ac1777c7b5f25f2此博客下寻找连接进行下载,然后刻成CD盘即可;系统安装盘需要提前备好;2,使用SmartStart CD引导安装之前的准备工作:首先,建议用户先根据自己的需要配置好RAID,可以使用开机自检检测到阵列卡时按F8进入ORCA的方法配置。
其次,需要确认BIOS中启动顺序的设置是光驱优先引导,可以开始时按F10键进入BIOS,然后到Standard Boot Order下确认。
3,准备工作做好后,就可以使用SmartStart CD引导了,下面是引导的画面。
4,接下来,我们会看到用户界面的第一步,选择安装语言和键盘语言,目前还不支持中文,没有特殊需要的用户,这步默认为英语即可。
5,然后是终端用户授权许可,点击Agree才能继续下一步。
6,接下来,到了操作选择页面,此页面可供选择的操作有:Install、Maintenance、System Erase 和Reboot。
Maintenance中包含ACU,可以借此进行阵列配置,也包含Insight Diagnostic,可以用来进行服务器硬件诊断,这里就不做详细介绍,System Erase和Reboot,顾名思义,一个系统擦除、一个重启。
HP存储产品线

产品概览46简单直连存储产品HP StorageWorks 70 模块化智能阵列(MSA70)概述HP StorageWorks 70模块化智能阵列,这款低成本、灵活的分层存储系统最多可提供14.4TB的存储容量,同时支持SAS和SATA驱动器,机箱能够支持2.5英寸通用外形的SAS或SATA硬盘。
借助惠普阵列配置实用程序(ACU),可轻松进行配置和设置。
2U的存储配置可以直接连接到HP ProLiant服务器和HP Integrity动能服务器上。
您还可以对机箱进行1+1级联配置,这样,Smart Array P800控制器的每个端口可以连接4U配置。
1个4U配置最多可容纳50块硬盘,因此整套系统总计可以安装100块硬盘。
技术特性与优势●灵活性—借助2U SFF SAS/SATA机箱,客户可以灵活地选择SAS/SATA磁盘,并在同一存储设备中混合使用。
将分层存储的优势带给直连存储用户。
●简易性:可管理性—借助高度完善的HP SystemsInsight Manager来管理阵列。
●级联能力—最多可将2个机箱连在一起,共同使用一个控制器端口。
可轻松提升存储容量。
●可靠性:热插拨兼容性—可在不引起服务中断的情况下添加或更换硬盘。
不同级别的RAID提供不同级别的数据保护和可用性。
多种RAID级别为客户提供了灵活选择。
采用ADG技术的RAID 6提供了额外的可靠性。
●惠普端到端解决方案组合—惠普提供完整的产品组合,包括SAS存储机箱、智能阵列控制器、HPProLiant服务器以及HP Integrity动能服务器,来打造行业领先的端到端解决方案。
HP StorageWorks 500 G2模块化智能阵列(MSA500)概述HP StorageWorks 500 G2模块化智能阵列采用端到端Ultra320 SCSI技术,可提供一流的性能和快速驱动器重建技术。
它最多可安装14个HP通用磁盘驱动器,能够在本机上升级到MSA1000。
Smart array 阵列卡介绍

这里介绍一下HP Smart Array 阵列卡。
本来想在本地把所有需要总结的内容都总结下来后再发表,但是发现这边论坛大家顶的时间都比较慢,干脆写到那里就发到哪里,还能时时更新自己的帖子,算是占一个小便宜吧。
参考了很多的资料,不过支持自己原创。
下面就开始了:自从HP并购了Compaq之后,就基本上结束了自己本身的Netserver系列的PC 服务器,主要保留了Compaq的Proliant 系列PC服务器。
相应的,NetRaid阵列卡也基本上不再继续开发,进而转入Compaq的Smart Array 系列的阵列卡。
从2001年的Smart Array 221阵列卡到现在已经经历了差不多8年的时间了。
那么这里简单介绍一下HP Smart Array 系列的阵列卡。
当然,主要介绍现在主流的阵列卡,包括SCSI阵列卡和SAS阵列卡。
这些阵列卡主要应用在HP Proliant 系列的ML/DL/BL系列服务器上。
HP Smart Array系列的阵列卡针对不同的企业用户,提供了从入门级到企业级的不同需求的阵列卡。
---拥有包括Ultra 2/3/320以及最新的SAS接口;----单通道、双通道、四通道等不同的通道数量,使得企业在针对自己不同的应用得时候,针对成本、性能有了更多的选择和搭配的方式,四通道的阵列卡也能够满足企业需要更多硬盘容量的要求;----外置的接口能够连接JBOD设备组成DAS结构,为企业提供更高的存储容量;----预报警机制能够为服务器带来更方便的维护方式和提高数据的安全性;----在线的热备盘为数据提供出色的保障;自动的重建功能使得企业维护人员能够在没有专业背景的情况下维护服务器成为可能;----可选的带电池缓存技术能够更大幅度的提高数据的读写性能,并在突然的断电情况下保证数据的安全;----多种阵列级别的支持为用户提供更多的选择;阵列迁移、阵列扩容也为企业硬件升级带来更高的灵活性;----支持包括S.M.A.R.T/Drive parameter tracking / Dynamic Sector Repairing /Environment tracking for external storage system monitor等多种磁盘保护能力-----使用图形化的配置界面、图形化的监控方式都位用户带来更加方便的安装以及维护方式;更能够支持win/linux/unix等多种操作系统这里列举了部分的特征,下面逐一列举现在主流的阵列卡,太老的讨论也没有太大的意义。
浪潮阵列卡参数
浪潮阵列卡参数浪潮阵列卡是一种用于存储系统的关键硬件设备,它的参数对于系统性能和数据可靠性至关重要。
本文将介绍浪潮阵列卡的几个重要参数,并分析其对存储系统的影响。
1. 存储容量存储容量是指阵列卡能够支持的最大存储空间。
浪潮阵列卡通常支持多个硬盘插槽,每个插槽可以插入一块硬盘。
通过搭载不同容量的硬盘,可以实现不同的存储容量。
较大的存储容量可以满足用户对数据存储的需求,但同时也会增加成本和功耗。
2. RAID级别RAID(冗余磁盘阵列)是一种数据存储技术,通过将数据分散存储在多个磁盘上,提高数据的可靠性和性能。
浪潮阵列卡支持多种RAID级别,例如RAID 0、RAID 1、RAID 5和RAID 6等。
不同的RAID级别在数据保护和读写性能上有所区别,用户可以根据实际需求选择合适的RAID级别。
3. 读写性能读写性能是指阵列卡在数据读取和写入时的速度。
浪潮阵列卡的读写性能受到多个因素的影响,包括硬盘的转速、接口类型(如SAS、SATA)以及RAID级别等。
较高的读写性能可以提高数据访问速度,提升系统的响应能力。
4. 冗余机制冗余机制是指阵列卡对数据的保护机制。
浪潮阵列卡通常支持热备插槽和热备份功能,即在一块硬盘故障时,系统可以自动将故障硬盘的数据恢复到热备盘上,从而保证数据的可靠性和持续可用性。
5. 扩展性扩展性是指阵列卡支持扩展的能力。
浪潮阵列卡通常支持多个扩展接口,可以连接额外的扩展柜,从而扩展存储容量和性能。
较强的扩展性可以满足企业不断增长的数据存储需求,提升系统的可扩展性。
6. 连接接口连接接口是指阵列卡与主机或其他设备之间的连接方式。
浪潮阵列卡通常支持多种连接接口,如PCIe、SAS和iSCSI等。
不同的连接接口有不同的数据传输速度和稳定性,用户可以根据实际需求选择合适的连接接口。
浪潮阵列卡的参数对于存储系统的性能和可靠性起着至关重要的作用。
用户在选择和配置阵列卡时,应该充分考虑存储容量、RAID级别、读写性能、冗余机制、扩展性和连接接口等因素,以满足其对存储系统的需求。
HP服务器SmartStart CD使用详解(更改后转载)
在购买HP服务器时,提供了一个SmartStart CD。
SmartStart CD是HP 专门用于Proliant 服务器的工具软件光盘, SmartStart CD可以帮助用户简单的部署和管理服务器。
SmartStart CD光盘提供的功能可以参考如下内容:SmartStart CD是HP 专门用于Proliant 服务器的工具软件光盘, SmartStart CD可以帮助用户简单的部署和管理服务器, SmartStart CD包含以下功能:1.部署操作系统: SmartStart 可以以向导的方式, 帮助用户轻松的部署Windows 2000/2003 操作系统, 并把HP System Insight Manager 系统管理平台的客户端(Agent), 以及服务器内部集成硬件的驱动程序集成到操作系统中, 使用户一次安装就可装好所有必要的工具软件和驱动程序;2.设置阵列: SmartStart 内置Array Configuration Utility (ACU) 阵列设置工具, 可以使用图形GUI界面对服务器内置的HP Smart Array阵列卡以及外置的HP Modular Smart Array 磁盘阵列进行RAID设置;3.阵列诊断: SmartStart 内置Array Diagnostics Utility (ADU) 阵列诊断工具, 可以对服务器内置的硬盘, HP Smart Array阵列卡, 以及外置的HP Modular Smart Array 磁盘阵列进行故障诊断, 硬件检测;4.系统诊断: SmartStart 内置Insight Diagnostics 系统诊断工具, 可以对服务器的所有部件进行故障检测并生成报告;5.系统擦除: SmartStart 内置Erase Utility 系统擦除工具, 可以轻松的恢复服务器的出厂设置, 以便系统恢复.6.安装驱动: SmartStart CD内置服务器支持软件包ProLiant SupportPack(PSP), PSP集成了Prolaint服务器的所有集成硬件及大部分选件的驱动程序, 支持Windows和Linux, 可以一个步骤就安装好所有选定的驱动程序及工具软件.SmartStart CD的使用方法介绍如下:1 .将 SmartStart 光盘放入光驱,并引导;2 . Loading ;3 .选择界面语言种类;4 .使用协议,点击 Agree 继续;5 . SmartStart 导航光盘的主界面;6 . Maintain Server 中的选项;7 .点击“Configure Array” ,进入 ACU 阵列配置工具,配置阵列;8 .退出 ACU ,进入 Deploy Server ,点击 Continue ;9 .选择所要安装的系统;10 .选择系统分区的容量;11 .输入序列号,机器名(必选);12 .配置系统 SNMP 协议(可选);13 .清除启动控制器下连接的所有硬盘或者所有硬盘;14 .存储配置信息;15 .提示插入 win2000 系统光盘;16 .如果插入光盘不符,会提示;17 .插入正确的系统光盘,验证,并复制系统文件至磁盘;。
MIS系统解决方案及拓扑
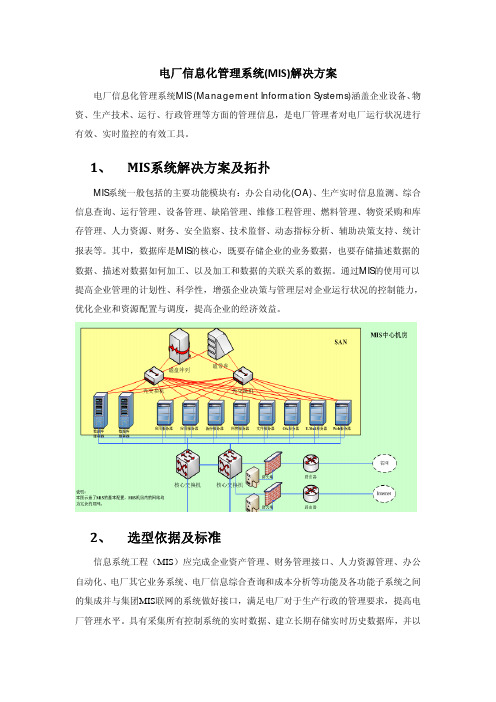
电厂信息化管理系统(MIS)解决方案电厂信息化管理系统MIS (Management Information Systems)涵盖企业设备、物资、生产技术、运行、行政管理等方面的管理信息,是电厂管理者对电厂运行状况进行有效、实时监控的有效工具。
1、MIS系统解决方案及拓扑MIS系统一般包括的主要功能模块有:办公自动化(OA)、生产实时信息监测、综合信息查询、运行管理、设备管理、缺陷管理、维修工程管理、燃料管理、物资采购和库存管理、人力资源、财务、安全监察、技术监督、动态指标分析、辅助决策支持、统计报表等。
其中,数据库是MIS的核心,既要存储企业的业务数据,也要存储描述数据的数据、描述对数据如何加工、以及加工和数据的关联关系的数据。
通过MIS的使用可以提高企业管理的计划性、科学性,增强企业决策与管理层对企业运行状况的控制能力,优化企业和资源配置与调度,提高企业的经济效益。
2、选型依据及标准信息系统工程(MIS)应完成企业资产管理、财务管理接口、人力资源管理、办公自动化、电厂其它业务系统、电厂信息综合查询和成本分析等功能及各功能子系统之间的集成并与集团MIS联网的系统做好接口,满足电厂对于生产行政的管理要求,提高电厂管理水平。
具有采集所有控制系统的实时数据、建立长期存储实时历史数据库,并以此为基础,实现厂级生产过程监视和管理、机组性能计算和分析等基本功能,以及其它可选功能,并向MIS提供过程数据和计算、分析结果,自动产生各类报表以满足电厂对于生产过程的要求,确保机组安全、高效运行。
从上述应用的需求可以得出硬件平台选型的原则:先进性:所采用的技术及设备必须符合当代信息技术发展形势,既有先进技术又发展成熟,并且是各个领域公认的领先产品,选用产品能够最大限度的适应今后技术发展和业务发展变化的需求。
实用性:硬件设备的建设将以满足企业应用系统的需求,同时考虑今后信息量的增加为基点,从主机的处理能力、存储的空间等多方面做到系统的实用性。
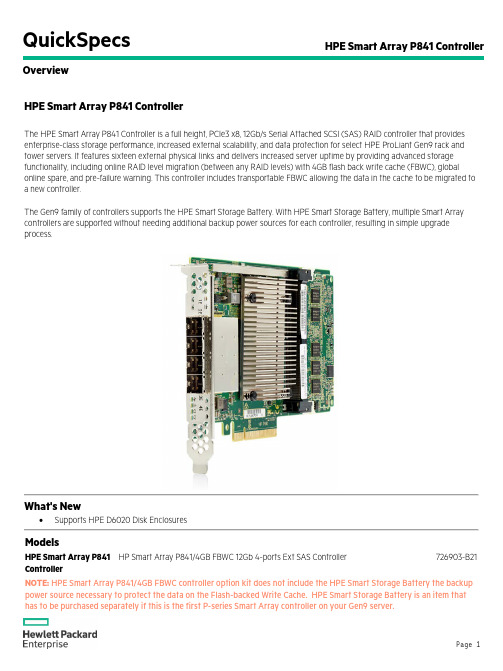
HPE Smart Array P841 控制器概述说明书
QuickSpecs HPE Smart Array P841 Controller OverviewHPE Smart Array P841 ControllerThe HPE Smart Array P841 Controller is a full height, PCIe3 x8, 12Gb/s Serial Attached SCSI (SAS) RAID controller that provides enterprise-class storage performance, increased external scalability, and data protection for select HPE ProLiant Gen9 rack and tower servers. It features sixteen external physical links and delivers increased server uptime by providing advanced storage functionality, including online RAID level migration (between any RAID levels) with 4GB flash back write cache (FBWC), global online spare, and pre-failure warning. This controller includes transportable FBWC allowing the data in the cache to be migrated to a new controller.The Gen9 family of controllers supports the HPE Smart Storage Battery. With HPE Smart Storage Battery, multiple Smart Array controllers are supported without needing additional backup power sources for each controller, resulting in simple upgrade process.What's New•Supports HPE D6020 Disk EnclosuresModelsHPE Smart Array P841HP Smart Array P841/4GB FBWC 12Gb 4-ports Ext SAS Controller726903-B21 ControllerNOTE:HPE Smart Array P841/4GB FBWC controller option kit does not include the HPE Smart Storage Battery the backup power source necessary to protect the data on the Flash-backed Write Cache. HPE Smart Storage Battery is an item that has to be purchased separately if this is the first P-series Smart Array controller on your Gen9 server.Key Features•Storage interface (SAS/SATA)o16 physical links across 4 x4 external portso12Gb/s SAS, 6Gb/s SATA technologyo Mix-and-match SAS and SATA drives to the same controllero Support for SAS tape drives, SAS tape autoloaders and SAS tape libraries• 4 GiBytes Flash-Backed Write Cache (FBWC)•PCI Express Gen3 x8 link•RAID 0, 1, 10, 5, 50, 6, 60, 10 ADM (Advanced Data Mirroring)•RAID or HBA mode•Legacy and UEFI boot operation•Up to 200 physical drives•Up to 64 logical drives•Up to 8 daisy chained HPE D3600 Disk Enclosure and HPE D3700 Disk Enclosure in dualdomain configuration•HPE SmartCache (license included)•HPE Secure Encryption (optional license)•HPE SSD Smart Path•VMware Virtual SAN certified•Rapid Parity Initialization (RPI)•Rapid rebuild•Drive Erase•Performance Optimization-Degraded Reads and Read Coalescing•Power Efficiency•Seamless upgrades to and from other HPE Smart Array controllers•Recovery ROM to protect against controller ROM corruption•Full-height, half-length standard PCI Express plug-in cardo Dimension (excluding bracket): 7.5 in x 9.5 in x 2.25 in (19.05 cm x 24.13 cm x 5.72 cm) Ports•External: 16 SAS/SATA physical links across 4 x4 portPerformance•12Gb/s SAS (1200 MB/s theoretical bandwidth per physical lane)•6Gb/s SATA (600 MB/s theoretical bandwidth per physical lane)•PCI Express Gen3 x8 link width• 4 GiBytes 72-bit wide DDR3-1866 Flash Back Write Cache provides up to 14.9GB/s maximumcache bandwidth•Read ahead caching•Write-back cachingOnline Management Features •Online array expansion•Online capacity expansion•Online logical drive extension•Online RAID level migration•Online stripe size migration•Online mirror split, recombine, and rollback•Online active drive replacement•Online drive firmware upgrade•Online and high performance offline Rapid Parity Initialization (RPI) •Unlimited global online spares assignment•User selectable expand and rebuild priority•User selectable RAID level and stripe size•User selectable read and write cache sizes•Supports Predictive Spare ActivationFault Prevention The following features offer detection of possible failures before they occur, allowing preventive action to be taken:•S.M.A.R.T.: Self Monitoring Analysis and Reporting Technology first developed at HPE detectspossible hard disk failure before it occurs, allowing replacement of the component beforefailure occurs.•Drive Parameter Tracking monitors drive operational parameters, predicting failure andnotifying the administrator.•Dynamic Sector Repairing continually performs background surface scans on the hard diskdrives during inactive periods and automatically remaps bad sectors, ensuring data integrity.•Smart Array Cache Tracking monitors integrity of controller cache, allowing pre-failurepreventative maintenance.Fault Recovery Minimizes downtime, reconstructs data, and facilitates a quick recovery from drive failure•Recovery ROM: This feature provides unique redundancy that protects from a ROM imagecorruption. A new version of firmware can be flashed to the ROM while the controller maintainsthe last known working version of firmware. If the firmware becomes corrupt, the controller willrevert back to the previous version of firmware and continue operating. This reduces the riskof flashing firmware to the controller.•On-Line Spares: There is no limit to the number of spare drives that can be installed prior todrive failure. If a failure occurs, recovery begins with an On-Line Spare and data isreconstructed automatically.•DRAM ECC corrects against single bit data and address corruption.HPE SmartCache The HPE SmartCache feature is a controller-based read and write caching solution in a DASenvironment that caches the most frequently accessed data ("hot" data) onto lower latency SSDs todynamically accelerate application workloads. The HPE SmartCache architecture is flexible andsupports any HPE ProLiant Gen9 supported HDD for bulk storage and any HPE ProLiant Gen9supported SSD as an accelerator. HPE SmartCache is deployed and managed using the HPE SmartStorage Administrator (HPE SSA). HPE SmartCache license comes standard with the P841 controller.For more information please visit: /servers/smartcache.HPE Secure Encryption HPE Secure Encryption is a Smart Array controller-based data encryption solution for ProLiant Gen9 servers that protects sensitive, mission critical data. This is an enterprise-class encryption solution fordata at rest on any bulk storage attached to the HPE Smart Array controllers including data on thecache memory of the controller. HPE Secure Encryption is an optional license per server requiringencryption enablement (see Related Options for more information on the license).The solution is available for both local and remote key management mode deployments. Local KeyManagement Mode is focused on single server deployment where there is one Master key percontroller that is managed by the user. Remote Key Management Mode is for enterprise widedeployments from just a few servers to thousands of servers.For more information on please visit: /servers/secureencryptionHPE SSD Smart Path The HPE SSD Smart Path feature included in the Smart Array software stack improves Solid State Disk (SSD) read performance. With up to 4x better SSD read performance, HPE SSD Smart Path choosesthe optimum path to the SSD and accelerates reads for all RAID levels and RAID 0 writes. HPE SSDSmart Path requires updated firmware, drivers, and configuration utility available at:/servers/ssa. HPE SSD Smart Path is ideal for read intensive workloads and isincluded as a base feature on HPE Smart Array P-series controllers.Warranty The warranty for this device is 3 years parts only.Pre-Failure Warranty: Drives attached to the Smart Array Controller and monitored under InsightManager are supported by a Pre-Failure (replacement) Warranty. For complete details, consult the HPESupport Center or refer to your HPE Server Documentation.Warranty Upgrade Options•Response - Upgrade on-site response from next business day to same day 4 hours•Coverage - Extend hours of coverage from 9 hours x 5 days to 24 hours x 7 days•Duration - Select duration of coverage for a period of 1, 3, or 5 years•Warranty upgrade options can come in the form of Care Packs, which are sold at the HPESystem level to which this product attaches.CompatibilityServer Support HPE ProLiant DL20 Gen9HPE ProLiant DL80 Gen9HPE ProLiant DL180 Gen9HPE ProLiant DL360 Gen9HPE ProLiant DL380 Gen9HPE ProLiant DL560 Gen9 HPE ProLiant ML110 Gen9 HPE ProLiant ML150 Gen9 HPE ProLiant ML350 Gen9 Apollo 4200Apollo 4500Disk Enclosure Support HPE D2600 Disk EnclosureHPE D2700 Disk EnclosureHPE D3600 Disk EnclosureHPE D3700 Disk Enclosure HPE D6000 Disk Enclosure HPE D6020 Disk EnclosureOperating Systems Microsoft Windows ServerMicrosoft Windows Hyper-V ServerVMware vSphere ESXiRed Hat Enterprise Linux (RHEL)SUSE Linux Enterprise Server (SLES)Oracle SolarisOracle LinuxCanonical UbuntuCentOSWind RiverCitrix XenServerNOTE: For a complete and up-to-date list of certified and supported OS versions for HPE SmartArray controllers, please refer to the HPE Smart Array Operating System Support Matrix at:/h20195/v2/GetPDF.aspx/4AA6-6550ENW.pdfNOTE: For more information on HPE's Certified and Supported ProLiant Servers for OS andVirtualization Software, please visit our Support Matrix at: /info/ossupportStorage Management Software Suite HPE Smart Storage Administrator (HPE SSA)Comprehensive management for HPE Smart Storage products with advanced scripting and diagnostic features and simplified and intuitive interface and functionality. For more information please visit: /servers/ssaHPE Systems Insight ManagerPowerful server and server options/storage manager tool with configuration/diagnostic utilities HPE Storage Management UtilityOffers the simplest method for configuring the storage system via Initial System Configuration WizardService and SupportService and Support NOTE: HPE Smart Array controllers are supported as a part of the HPE Server Infrastructure. No separate care packs are needed to be purchased.HPE Technology Services for Industry Standard ServersHPE Technology Services delivers confidence, reduces risk and helps customers realize agility andstability. Connect to HPE to help prevent problems and solve issues faster. Our support technology letsyou to tap into the knowledge of millions of devices and thousands of experts to stay informed and incontrol, anywhere, any time.Protect your business beyond warranty with HPE Care Pack ServicesHPE Care Pack Services enable you to order the right service level, length of coverage and responsetime as you purchase your new server, giving you full entitlement for the term you select.Get connected to HPE to improve your support experience Connecting products to Hewlett Packard Enterprise will help prevent problems with 24x7monitoring, prefailure alerts, automatic call logging, and parts dispatch. With Connected products, you can have a dashboard to manage your IT anywhere, anytime, from any device.HPE Support Center Personalized online support portal with access to information, tools and experts to support Hewlett Packard Enterprise business products. Submit support cases online, chat with HPE experts, accesssupport resources or collaborate with peers. Learn more /go/hpscThe HPE Support Center Mobile App allows you to resolve issues yourself or quickly connect to anagent for live support. Now, you can get access to personalized IT support anywhere, anytime.HPE Insight Remote Support and HPE Support Center are available at no additional cost with a HPEwarranty, HPE Care Pack or Hewlett Packard Enterprise contractual support agreement.NOTE: The HPE Support Center Mobile App is subject to local availabilityParts and materials Hewlett Packard Enterprise will provide HPE-supported replacement parts and materials necessary to maintain the covered hardware product in operating condition, including parts and materials foravailable and recommended engineering improvements.Parts and components that have reached their maximum supported lifetime and/or the maximumusage limitations as set forth in the manufacturer's operating manual, product QuickSpecs, or thetechnical product data sheet will not be provided, repaired, or replaced as part of these services.The defective media retention service feature option applies only to Disk or eligible SSD/Flash Drivesreplaced by HPE due to malfunction.For more information To learn more on services for HPE ProLiant servers, please contact your Hewlett Packard Enterprise sales representative or Hewlett Packard Enterprise Authorized ServiceOne Channel Partner. Or visit:/services/proliantRelated OptionsHPE Secure Encryption HP Secure Encryption per Svr EntitlementNOTE: HPE Secure Encryption licensing is based on the number of serversrequiring encryption for direct attached storage.For more information visit: /go/hpsecureencryptionC9A82AAEHPE Smart Storage Battery HP 96W Smart Storage Battery with 145mm Cable for DL/ML/SL ServersNOTE:HPE 96W Smart Storage Battery provides backup power for up to 16 HPESmart Array controllers or other devices.727258-B21HPE External Cable Options Cable options to be used with HP D3600 and D3700 Disk EnclosuresHP External 0.5m (1ft) Mini-SAS HD 4x to Mini-SAS HD 4x Cable691968-B21 HP External 1.0m (3ft) Mini-SAS HD 4x to Mini-SAS HD 4x Cable716195-B21 HP External 2.0m (6ft) Mini-SAS HD 4x to Mini-SAS HD 4x Cable716197-B21 HP External 4.0m (13ft) Mini-SAS HD 4x to Mini-SAS HD 4x Cable716199-B21 Cable options to be used with D6000 and D6020 Disk EnclosuresHP 0.5m External Mini SAS High Density to Mini SAS Cable691971-B21 HP 1.0m External Mini SAS High Density to Mini SAS Cable716189-B21 HP 2.0m External Mini SAS High Density to Mini SAS Cable716191-B21 HP 4.0m External Mini SAS High Density to Mini SAS Cable716193-B21 HP 6.0m External Mini SAS High Density to Mini SAS Cable733045-B21Summary of ChangesDate Version History ActionDescription of Change19-Aug-2016From Version 1 to 2AddedAdded support for D6020.Changed Overview, Standard Features, Compatibility, and Relatedoptions were revised.Sign up for updates© Copyright 2016 Hewlett Packard Enterprise Development LP. The information contained herein issubject to change without notice. The only warranties for Hewlett Packard Enterprise products andservices are set forth in the express warranty statements accompanying such products and services.Nothing herein should be construed as constituting an additional warranty. Hewlett Packard Enterpriseshall not be liable for technical or editorial errors or omissions contained herein.Microsoft and Windows are registered trademarks or trademarks of Microsoft Corporation in the U.S.and/or other countries.c04545470 - 15200 - Worldwide - V2 - 19-August-2016。
DL160 G6 RAID和Server2003系统安装

HP ProLiant DL160 G6 服务器手动安装Windows server 2003 系统并手动安装所有驱动(图片来自鑫鹏程)硬件环境: DL160G6软件环境: Windows server 2003 SP2阵列卡: HP Smart Array B110i SATA RAID Controller其他设备:U盘操作步骤:1. 如果需要用集成阵列卡做阵列的话,首先F10进BIOS,在Advanced-SATA Configuration的SATA#1 Controller Mode选项下开启集成阵列卡B110i的阵列功能,将其选为RAID。
2. 在BIOS中的Boot选项下,将集成的B110i阵列卡设定为首引导项1st Drive。
3.直接用win2003系统盘引导开机后,如果配置了阵列,那么荧幕下方会有F6提示,需要用U盘加载集成B110i主板集成阵列卡驱动;否则直接跳过即可,在此主要介绍系统的安装步骤:/portal/site/hpsc/template.PAGE/public/psi/swdHome/?sp4ts.oid=3884344&spf_p.tpst=swdMain&spf_p.p rp_swdMain=wsrp-navigationalState%3DswEnvOID%253D1113%257CswLang%253D%257Caction%253DlistDriver&javax.portlet.beg CacheTok=com.vignette.cachetoken&javax.portlet.endCacheTok=com.vignette.cachetoken4. 首先会提示按C键,在未划分的磁盘空间上创建磁盘分区,以便来安装系统:5. 本次实验只分一个C区,当然分区个数和分区容量客户按照自己实际情况自行分配,个人建议C盘容量最好大于10GB;创建好分区后,选中想要安装系统的分区,点击回车键准备开始安装系统:6. 选择文件系统类型,本次试验选择NTFS(快)文件系统格式,并按回车键开始格式化硬盘:7. 格式化过程,此时不要有中途断电或关机等非法操作:8. 格式化完毕后,会将系统光盘中的系统文件拷贝到硬盘相应的分区中:9. 拷贝完毕后,会自动重启服务器:10. 重启画面:11. 会自动完成收集信息,动态更新和准备安装这三个安装步骤:12. 接下来会弹出windows安装向导,按照向导提示点击下一步,进行详细的安装配置:13. 同意许可:14. 设定区域和语言选项:15. 输入使用者姓名和单位名称:16. 选择授权模式,默认为每服务器同时最大连接200个客户端:17. 设置计算机名称和管理员密码:18. 设定日期和时间:19. 保存之前的设置,然后会开始自动安装系统了,安装好后自动重启进入系统即可:20. 在系统下打开设备管理器中,会发现有一些硬件驱动没有安装,显示的是黄色问号,其对应的硬件驱动名称如下:未知设备:HP ProLiant 100-Series Management Controller Driver(文件名是cp012141.exe)和HP NULL IPMI Controller Driver(文件名是cp010950.exe)系统中断控制器:Intel Chipset Identifier(文件名是cp011866.exe)以太网控制器:HP NC-Series Intel E1Q Driver(文件名是cp012044.exe)21. 登录官方网站后,用上述文件名搜寻相关驱动,单线程下载后在系统下双击安装,最后重启机器,再进入设备管理器中验证一下所有驱动都已经安装成功了:。
- 1、下载文档前请自行甄别文档内容的完整性,平台不提供额外的编辑、内容补充、找答案等附加服务。
- 2、"仅部分预览"的文档,不可在线预览部分如存在完整性等问题,可反馈申请退款(可完整预览的文档不适用该条件!)。
- 3、如文档侵犯您的权益,请联系客服反馈,我们会尽快为您处理(人工客服工作时间:9:00-18:30)。
这里介绍一下HP Smart Array 阵列卡。
本来想在本地把所有需要总结的内容都总结下来后再发表,但是发现这边论坛大家顶的时间都比较慢,干脆写到那里就发到哪里,还能时时更新自己的帖子,算是占一个小便宜吧。
参考了很多的资料,不过支持自己原创。
下面就开始了:
自从HP并购了Compaq之后,就基本上结束了自己本身的Netserver系列的PC 服务器,主要保留了Compaq的Proliant 系列PC服务器。
相应的,NetRaid阵列卡也基本上不再继续开发,进而转入Compaq的Smart Array 系列的阵列卡。
从2001年的Smart Array 221阵列卡到现在已经经历了差不多8年的时间了。
那么这里简单介绍一下HP Smart Array 系列的阵列卡。
当然,主要介绍现在主流的阵列卡,包括SCSI阵列卡和SAS阵列卡。
这些阵列卡主要应用在HP Proliant 系列的ML/DL/BL系列服务器上。
HP Smart Array系列的阵列卡针对不同的企业用户,提供了从入门级到企业级的不同需求的阵列卡。
---拥有包括Ultra 2/3/320以及最新的SAS接口;
----单通道、双通道、四通道等不同的通道数量,使得企业在针对自己不同的应用得时候,针对成本、性能有了更多的选择和搭配的方式,四通道的阵列卡也能够满足企业需要更多硬盘容量的要求;
----外置的接口能够连接JBOD设备组成DAS结构,为企业提供更高的存储容量;
----预报警机制能够为服务器带来更方便的维护方式和提高数据的安全性;
----在线的热备盘为数据提供出色的保障;自动的重建功能使得企业维护人员能够在没有专业背景的情况下维护服务器成为可能;
----可选的带电池缓存技术能够更大幅度的提高数据的读写性能,并在突然的断电情况下保证数据的安全;
----多种阵列级别的支持为用户提供更多的选择;阵列迁移、阵列扩容也为企业硬件升级带来更高的灵活性;
----支持包括S.M.A.R.T/Drive parameter tracking / Dynamic Sector Repairing /Environment tracking for external storage system monitor等多种磁盘保护能力
-----使用图形化的配置界面、图形化的监控方式都位用户带来更加方便的安装以及维护方式;更能够支持win/linux/unix等多种操作系统
这里列举了部分的特征,下面逐一列举现在主流的阵列卡,太老的讨论也没有太大的意义。
主要
从HP G3一代的Proliant服务器上用的阵列卡说起,因为现在用G3一代的服务器的用户还有不少。
SAS接口的阵列卡主要应用于G5一代的服务器,G5以前的服务器基本都使用SCSI接口的阵列卡,很少有使用SAS接口的。
接下来我们一一看看:
首先是SCSI阵列卡:
Smart Array 5i:
在HP,带
“i”结尾的都是指集成的意思,一般集成在主板上(不过有时候也会是一块单独的卡,很少)。
也就是说Smart array 5i是集成在主板上的阵列卡,一般使用在DL360 G2、DL380 G2、DL740、DL760 G2。
这都是比较老的服务器了。
特点:
---支持Ultra 2/Ultra 3标准
---32位的结构
---两个SCSI通道(内外各一个,不过外置的不能用来接磁带机,只能接磁盘或者别的SCSI设备)
---数据的平滑迁移(如果两台服务器用的都是5i阵列卡,那么将一台服务器上的所有硬盘放在另一台服务器上,所有的数据能够正确被识别,这里主要是因为所有的Smart Array阵列卡配的阵列,阵列信息都栽硬盘上)
---支持与报警机制
---支持阵列级别的在线迁移(从一个阵列级别迁移至另一个阵列级别)
---在线的扩容
---逻辑盘的在线增容
---全局的在线热被盘
---支持RAID 5/ RAID 1, 1+0
---外置端口:Low V oltage Differential (LVD)
Smart array 5300 :
5300阵列卡包括SA5302/SA5304两种型号,并且可以配不同容量的缓存(128MB/256MB)。
5300是Ultra 3的阵列卡。
该卡最后上市应该在2004年到2005年前后。
一般用在ML350/ML370/DL360/DL380 G2/G3,以及ML530/ML570/DL560/DL580第二代、三代的样子。
具体查起来太多太杂太麻烦,如果大家需要的话我在单独查,或者大家可以打800电话查。
这也都是比较老的服务器了。
这一系列的阵列卡主要
的功能相关如下:
---支持RAID ADG(RAID 6),允许两块硬盘同时出现故障而系统不受影响
---可以对cache进行升级来提高性能(带电池的cache,最大256MB;cache带ECC校验功能);可以从两个通道(SA-5302)升级到四通道阵列卡(SA-5304);可以升级SAN接口模块
---2通道模块能支持最大28块硬盘,4通道模块能够支持最大56块硬盘(单块最大300GB)
---该卡采用第五代体系结构构架,使用新的硬件RAID引擎,能够较以前的阵列卡性能提高更大的幅度
---拥有Recovery ROM功能,防止在更新阵列卡Firmware的时候,更新失败,则该功能可以将阵列卡自动恢复到之前版本的Firmware,以使阵列卡正常工作
---使用Ultra 3标准能够使得数据传输速度达到160MB/s
---升级到4通道的时候,能够提高每一个PCI接口上能够连接的硬盘数量,降低成本
---64位地址寻址,能够支持超过4GB的内存容量
---在线的管理功能,包括:在线扩容、在线阵列级别的迁移、在线的条带大小调整、多热备盘支持(全局)、用户可调整的cache读写比例、用户可选择的扩容或者重建的优先级方便升级以及管理。
---可选的SAN介入模块,为用户提供更灵活的解决方案
---与报警机制保证服务器硬盘数据的安全性
---支持包括S.M.A.R.T、Drive Parameter Tracking、Dynamic Sector Repairing、Smart Array Cache Tracking、Environment Tracking for External Storage System等故障预保护功能。