封闭母线空气循环干燥装置使用说明书
空气干燥机使用说明书

1、注 意 事 項
☆請勿將乾燥機橫放或倒放。
☆請務必接地以防漏電而造 成觸電。
☆請勿變更配電盤內的配線。
☆檢修時,請停止空壓機的運 轉,關閉空氣乾燥機的電源, 並完全排放掉內部的壓縮空 氣。
☆避免頻繁的啟動/停止機台 運轉。
-3-
2、各部名稱及功能
2.1、外觀
配電箱
控制面板
壓縮空氣入口 壓縮空氣出口
0使用說明書冷凍式壓縮空氣除濕設備空氣乾燥機fr20003000w水冷式本空氣乾燥機設計為工業用途請妥為使用請詳讀說明書再依說明操作本設備請保存本說明書以備隨時參考mfr20003000w011前言尊敬的用戶
MFR2000~3000W-01
使用說明書
冷凍式壓縮空氣除濕設備
空氣乾燥機
FR2000~3000W 水冷式
空壓機室
用氣現場
若配管有向上 彎曲情形時
空壓機
儲氣筒
空氣乾燥機
請加裝排水閥
1) 請注意不要弄錯空氣乾燥機的出入口。 2) 在空氣壓縮機及空氣乾燥機之間的配管,應避免有向上彎的配管方式, 若不可避免而需要設置上彎管路時,請裝上洩水閥或自動排水閥以利排水。 3) 空氣乾燥機的出入口之間請配置旁通管路。 4) 請不要將配管的重量直接加在空氣乾燥機上。 5) 在寒冷地區請將室外的配管包覆斷熱材料。室內的配管部份,若是空氣 乾燥機的出口管路有結露的現象時,亦請以斷熱材料包覆。 6) 配管時,請注意不要讓灰塵或異物進入空氣管路。
彈簧
■ 清潔的方法
1) 關閉球閥;
2) 利用空氣槍等工具將過濾網、濾杯等內部的污垢清除;
3) 利用中性清潔劑將分解開的零件加以清洗;
4) 檢查各個零件是否有受損的情形,特別是 O 形環應注意檢查。
闭式循环喷雾干燥机说明书

闭式循环喷雾干燥机说明书
闭式循环喷雾干燥机的工作原理如下:
常温氮气经送风机送入导热油散热器中。
从散热器中出来的热氮气,经热风管道进入干燥塔顶部的整流形热风分配器,热风分配器将热风均匀地送入干燥塔内与雾化后物料混合完成瞬间的干燥,主要产品经塔底收集,尾气经脉冲布袋除尘器收集,尾气由引风机排出经余热换热器后送入冷凝器中,溶剂经冷凝器冷却及气液分离后送入溶剂罐内。
冷凝后的氮气经由送风机再次送入散热器内加热,以此循环完成闭路式干燥。
整个系统为全封闭式设计,符合2010版GMP要求。
无氧气,避免了氧化及爆炸,比普通设备更安全。
设置主箱体泄爆装置。
此外,该设备还具有环保性好的特点:尾气中的溶剂经冷凝器冷凝回收(溶媒回收率可达98%以上),溶媒可循环使用,节约成本,同时不会造成尾气排放对环境污染。
以上内容仅供参考,如需更多信息,建议查阅闭式循环喷雾干燥机使用说明书或咨询厂家。
干燥器使用说明书
干燥器使用说明书
欢迎您使用我们的干燥器产品,为了使用安全、高效,请在使用前仔
细阅读使用说明书。
产品介绍:
我司的干燥器是一种新型的家用节能环保的产品,采用最新技术研发,采用内置凝汽器冷凝原理处理空气,实现空气质量的干燥,温度和湿度的
自动控制,特别适合节能家用环保,能够有效地缓解室内空气干燥的不舒
适感。
使用方法:
1.前期准备:
(1)开机前,请确保有足够的排水管道,并在水池中加入干净的水,以实现有效的干燥效果。
(2)插上电源,开机,使用空调旋钮控制风速,低风将有效缓解室
内干燥的不舒适感。
2.使用方式:
(1)定时模式:可以设定预先开启的时间点,并设定间隔时间,以
及定时关机的时间点,以实现按照设定时间自动运行。
(2)夜间模式:定时模式可以实现几个小时内的定时循环,白天关机,夜间开机,以保证室内湿度,提高睡眠质量。
(3)高效模式:可以根据室内湿度和温度自动调整,高效干燥空气,节能节省。
(4)睡眠模式:室内湿度检测,有效控制室内空气温度和湿度,提高睡眠质量。
注意事项:。
FWY-Ⅴ型母线微正压装置使用说明书
一、FWY-Ⅴ型母线微正压热风装置简介FWY-Ⅴ型母线微正压热风装置是为离相式封闭母线封闭外壳内充以适量干燥的空气的装置,从而提高母线的安全运行能力。
该装置由FWY-Ⅴ型母线微正压热风装置控制柜、空气压缩机(或自备气源)和相应气路连接管件所组成。
FWY-Ⅴ型封闭母线微正压热风装置控制柜是该装置的核心。
功能一,可根据母线内的气体压力指示,对母线进行适量的补气,使得母线内部的压力值保持在一定范围内。
该装置同时还测量母线内部湿度值,当测量值超过湿度上限设定值时,系统自动对其内部进行热吹扫(热风保养),使母线内部的湿度值达到下限设定值后停止吹扫自动进入微正压状态。
功能二,可单独进行湿度控制,当母线内部湿度值超过上限设定值时,系统进行热风吹扫,在母线内部湿度值达到下限设定值后停机,系统处于湿度监控状态。
二、主要技术指标1.技术标准:GB 7251.1-20052.防护等级:IP203.测量范围:压力0~2500Pa(连续可调),湿度0~100%RH(连续可调),温度0~75℃(连续可调)4.测量精度:3%5.设有防止母线充气过压,空气压缩机运行超载、缺相及防止空气加热器干烧的相应保护功能。
6.具有空气压缩机连续工作和定时启动功能。
7.可实现母线内部的微正压和热风除湿(热风保养)功能。
8.使用条件:海拔2000米以下,环境温度0~40℃(室内),环境相对湿度<85%RH,无腐蚀性气体。
9.处理后气体的露点:< -40℃10.处理后气体含微尘直径:<0.05mm11.充气量:0.2~0.4m3/min12.气源:0.6 ~0.8m3/10无油空气压缩机或自备气源13.柜内管路内压力: 0.2~0.4 Mpa14.供电电源:三相50HZ AC380V 带保护接地PE0.6 ~0.8m3/10无油空气压缩机5.5~7.5KW电源经FWY-Ⅴ型母线微正压装置控制柜内引出。
空气加热器2.4KW(3×0.8KW/支、AC380V、角接)电源经FWY-Ⅴ型母线微正压装置控制柜接入。
干燥器操作说明书
干燥器操作说明书
一、安全操作要求
1、本操作手册对干燥器的安全操作、维护和保养,以及操作人员的
安全要求有着严格的规定。
在使用干燥器之前,本指导书必须被操作人员
所熟知,仔细阅读和理解,按照正确的操作方法操作,确保操作人员的安
全并及时发现故障。
2、在使用过程中,请确保使用环境清洁、乾燥、良好的通风环境,
并且在干燥器处不得有易燃易爆物品。
3、使用前请仔细检查干燥器的各个连接部件,以免发生故障。
4、确保在操作前将电源插头插入电源插座,并确保正确地连接。
5、不要在干燥器上施加任何外力,以免损坏外壳。
6、严禁在运行中任意拆开干燥器,拆卸或装配部件,以免造成电击
或相关伤害。
二、启动、停止操作
1、启动操作
(1)打开电源插头,把开关拨到“ON”位置,仪表上显示“POWER”,说明已经启动。
(2)接着可以根据需要按照以下步骤进行操作:
①调整风量:按“风量”按钮,可以调整风量最大值,仪表上显示“F.LOW”,可以重复此过程,限制风量。
②调整加湿量:按“加湿量”按钮,可以调整最大加湿量,仪表上显示“H.MAX”,可以重复此过程,限制加湿量。
干燥器操作说明书
当设定完t3时间值后,可按面板上的“启动/代码”按钮,最高位显示4,表示设定均压时间t4。其余位显示均压时间设定值。按“停止/参数”按钮增加延时值。可使设置值从1逐步增加到30秒,然后再重复进行。
每三个月:
10、前置和后置过滤器芯,检查堵塞情况及可能的损坏,根据需要替换。
11、关闭进/出口阀门或将干燥机旁通,彻底将干燥机系统泄压,打开干燥剂充填口,采样检查干燥剂,如果干燥剂被油污染粉碎,请更换干燥剂。
12、拆下并检查进口气动阀和再生排气阀,清洗和替换磨损的阀座和密封圈。
13、检查气动阀门膜片和气缸是否泄漏或密封件是否磨损。
1.干燥剂扩散器滤网堵塞
2.压缩空气处理量超过额定流量
3.再生气动阀保持打开
4.单向止回阀动作失灵
1.通过吸附筒体压力表和干燥机出口压力表检查
2.采用流量计检测
3.通过手动的方法检查控制气动阀是否正常工作
4.拆下单向止回阀检查
1.更换干燥剂扩散器
2.检查进口气量的情况
3.检查导向气路或电磁阀,根据需要更换
设定完毕,将拨位开关拨向右方,则设定值将被写入E2PROM储存起来,即使断电后仍能保留。如果设置值错误,则“停止/参数”按钮上方的指示灯闪烁,请重新设定参数。
2、 动作时序图
时序图说明:
OA段
AB段
BC段
CO’段
O’A’段
A’B’段
B’C’段
C’O’段
A塔
吸附
静止
再生
均压
发电机封闭母线微正压装置和干燥装置运行分析

发电机封闭母线微正压装置和干燥装置运行分析作者:湛锦康棕榈来源:《科技传播》2016年第09期摘要发电机并网系统(GSY)功能是通过监测发电机和500kV电网的电压和频率,当二者相容时,使发电机实现同步并网。
本文系详细介绍了我厂GSY系统封闭母线微正压装置和干燥装置的工作原理、组成,以及启动和停运的具体流程和注意事项,便于现场人员更好的理解和使用,提高封闭母线的密封性和绝缘水平。
关键词发电机并网系统;微正压装置;干燥装置中图分类号 TM31 文献标识码 A 文章编号 1674-6708(2016)162-0169-021 概述汽轮机输出功率通过GSY系统的封闭母线与主变的低压侧相连与电网并网;同时,也使输出功率经过两个高压厂变送到6.6kV母线,供厂用电。
封闭母线的微正压装置和干燥装置可以保证在母线内微正压状态的同时,以封闭循环的方式逐步吸收母线内的潮气,实现干燥功能,特别适用于机组首次启动前或者检修后启动前母线湿度大、绝缘电阻值较低的情况,大大提高母线安全运行的可靠性。
2 微正压装置2.1 工作原理该装置通过智能压力表检测母线内压力,当母线内压力低于设定值0.5kPa时,压力开关402SP动作使电磁阀打开,形成通路,往母线内吹入经过处理的空气。
母线内压力不断上升,达到1.5kPa时,压力开关403SP动作,关闭电磁阀。
当母线内压力达到3 000Pa时,安全阀904VA动作,卸掉压力。
2.2 工作流程及组成来自仪表用压缩空气系统的空气经过手动阀901VA,经减压阀902VA减压到0.4MPa,依次经过电磁阀和903VA(可以旁通901EL),进入三相母线。
微正压装置包括一个手动阀901VA;一个电磁阀901EL;两个压力开关402/403SP;三通阀903VA;一个减压阀902VA;安全阀904VA,安装在三相母线上的三个安全阀911/912/913VA,一个时间继电器组成,气源来自仪表用压缩空气系统。
干燥器使用说明书

DJKG-A型空气干燥器使用说明书DJKG-A型空气干燥器是东风7型内燃机车为清洁干燥制动系统压缩空气而设的装置,经该装置处理后的压缩空气,进入总风缸可以达到下述净化指标:1.含油率低于10PPM;2.含尘埃的颗粒度不大于20";3.相对湿度低于35%。
采用此装置,将可避免机车空气制动系统中的风缸、管道及各阀类出现凝结水、冰、锈蚀、杂物,以防止由此而发生的制动失灵故障。
一、性能:1.DJKG-A型空气干燥器是与空气压缩机同步工作的单塔无热再生空气干燥装置。
2.DJKG-A型空气干燥器须安装在机车总风缸之前,空压机出气要经过管道冷却以使进入干燥器的空气温度降至低于55C,且比环境温度最高不大于20Co3.DJKG-A型空气干燥器,由滤清筒、再生风缸和排气电磁阀等组成,其结构简单,作用可靠,检修方便,排污性能好。
二、主要技术数据:处理空气量:3~6m3/min工作压力:900KPa吸附剂:。
4~。
7球型分子筛或球形活性氧化铝再生方式:无热、常压进气温度:5~55c三、空气干燥系统的组成及工作原理:1.压缩空气须经过冷却、滤清和干燥三个环节来净化。
空气干燥器要安装在总风缸之前,以解决总风缸及风压系统的排水和锈蚀,同时还可以使空气压缩机达到无负荷情况下启动。
2.DJKG-A型空气干燥器的工作是与空气压缩机的工况相联系的,它的工作状态是通过风泵调压器来控制的。
风泵调压器是将总风缸压力转变为电控信号的装置,当总风缸压力达到800KPa时,调压器发出断电信号,当总风缸压力低于750KPa时,调压器发出通电信号,通断电信号通过中间继电器及接触器来控制压缩机的启动与停止,同时控制空气干燥器的工作。
3.空气的干燥过程是空气压缩机开启后(图一),压缩空气经过冷却管进入滤清筒,将油雾、水分、尘埃过滤后,再进入干燥筒,空气中的水分子被干燥剂吸附后,干燥清洁的压缩空气从干燥筒下端经止回阀进入总风缸,此工作过程为空气的干燥过程。
封闭母线空气循环干燥装置操作说明
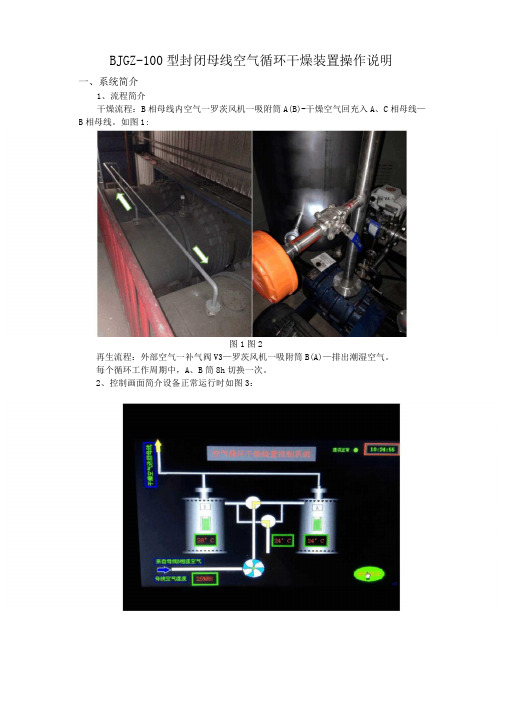
BJGZ-100型封闭母线空气循环干燥装置操作说明一、系统简介1、流程简介干燥流程:B相母线内空气一罗茨风机一吸附筒A(B)-干燥空气回充入A、C相母线—B相母线。
如图1:阀V3图1图2再生流程:外部空气一补气阀V3—罗茨风机一吸附筒B(A)—排出潮湿空气。
每个循环工作周期中,A、B筒8h切换一次。
2、控制画面简介设备正常运行时如图3:依据图中电动三通阀位置,黄色箭头指示母线内空气的干燥流程,蓝色箭头指示再生吸附筒的再生过程。
正常运行中右上角显示风机运行时间和加热器运行时间,一个运行周期结束后清零。
通电后,设备处于停止状态。
如果PLC 与触摸屏通讯正常,右上方以绿色显示“通讯正常”,否则以红色显示“通讯故障”。
4:图5干燥装置有自动、手动两种运行模式,分别对应上图中“自动”和“手动”两个按[2'345M-丁8 g I 0口AEJGH3De l一M° c Q L Rs T©PUX1V诵工 1■口度用户蜀录用A 希|¥1F:|~图4管理员用户登录密码为:111。
正确输入密码后,进入图5画面钮。
正常情况下装置投入自动方式运行。
手动模式运行:点击“手动”按钮,系统进入手动运行模式,此时,该按钮会由绿色变成红色。
“停止”和“自动”两个按钮为绿色。
这时,系统将循环运行,直到按下停止键,系统才停止运行。
手动运行模式时,无论湿度是否高于设定上限,设备均要执行启动命令,并且一直运行下去,直到手动按下停止按钮,系统才停止运行。
自动模式运行:点击自动按钮,系统进入自动模式运行。
自动模式下,当湿度监控器测得母线内湿度超过设定上限(50%)时,PLC根据设定程序启动装置。
程序首先进入A筒吸附,打开(关闭)相应的电动阀门,阀门开闭到位后,启动风机,然后启动再生筒内的加热器。
装置通过热电阻和PLC检测、显示桶内的温度,当温度超过上限设定值(180°C)时,则加热器停止加热。
当温度降至设定下限(130C)时,则加热器重新加热。
基于西门子S7—300的封闭母线空气循环干燥装置的设计

2 aut o l tcl n o ̄ l nier g Lann ehia U i ri , u u a 2 15 C i ) .Fcl f e r a adC n o E g e n , i igT cnc nv sy H L do15 0 , hn y E ci n i o l e t a
・
6 4・
煤
矿
机Leabharlann 电 21 00年第2 期
基 于西 门子 S —0 730的封 闭母 线 空气 循 环 干燥 装 置 的设 计
王新 樊鹏 ,
(. 1潞安矿业 ( 集团 ) 司 和顺一缘 煤业有 限责任公 司,山西 长治 02 0 ; 公 3 70 2 辽宁工程技术大学 电气与控制工程学院 , . 辽宁 葫芦岛 150 ) 2 15
封闭母 线 ( 以下 简称 封母 ) 产 过 程 是 在微 正 生 压装 置产 生的微 正压 环 境 下进 行 的 , 置 的基 本原 装
理是利用空压机向封母 内部充人空气 , 内部保持 其 30~ 0 a左 右 的压 力 , 封 母 处 于 微 正 压 状 0 250P 使 态, 阻止潮气和灰尘进人封母 , 防止污秽侵入及绝缘 子结露 , 提高运行安全 可靠性 和产 品的绝缘性能。 实际运行过程中陆续出现 了微正压装置频繁故障, 不仅对机组在潮湿天气正常投运极易造成影响, 也 使封母在运行中不能始终保持最佳的工作状态, 设 备 的可行性 得不 到持续保 证 , 性 能受 到影 响 , 绝缘 使
De in o co e s b rAi Ci ua in Dr ig Ap a a u sg fEn ls d Bu - a r r lt yn p r t s c o
B s d o e n Cs .0 a e n Sime s PL 7 3 0
空气循环干燥装置说明书
空气循环干燥装置说明书随着电力工业的发展,发电机组容量不断增大,离相封闭母线在电厂中也随之得到越来越多的应用。
多年以来,离相封闭母线以其安装简便、运行维护工作量小、钢结构发热少等特点受到用户的欢迎。
与此同时,由于离相封闭母线是一种密闭管道 , 当运行条件改变(如停机)或气候条件变化(如湿度大)时,其内部容易产生结露现象,从而降低母线的绝缘性能,甚至可能诱发单相接地事故,给电厂的安全运行带来隐患。
为了解决离相封闭母线的结露问题,国内最早也是目前最普遍采用的是微正压装置,但由于密封件老化或检修等原因,运行时间一长,很多母线内部无法建立微正压,因而也就不能达到长期有效驱潮的目的。
后来又出现了热风保养装置,其对母线的密封要求不如微正压装置高,但又带来了耗电量大的缺点(一般功率在二、三十千瓦)。
我厂是生产各种封闭母线的专业厂家,在对市场进行充分调研的基础上,综合微正压装置和热风保养装置的优点,自行开发出了空气循环干燥装置。
一、工作原理本装置采用闭式循环方式。
空气循环干燥装置把封母内空气抽出,并从外界补入少量空气,又重新送入封母,如此周而复始,使母线内的水分越来越少,相对湿度不断降低,露点温度也随之下降,从而保证封闭母线的安全可靠运行。
本装置的动力部分采用质量可靠的罗茨风机,它能比较迅速地循环干燥封闭母线中的空气。
电气部分采用 PLC 控制。
根据天气条件及运行情况,用户可选择工作模式为“手动”或“自动”。
采用“自动”模式时,按下控制面板“自动”按钮,“自动”运行模式开启,适用于空气湿度较低及机组正常运行时。
在这种模式下,温、湿度传感器或精密湿度监控器采集的母线内空气参数,与设定的露点温度值或相对湿度值进行比较。
当测量值大于设定值上限时,由PLC 控制本装置自动投入运行,运行满一个周期后再次检测母线内空气露点温度或相对湿度是否低于设定值下限,如果低于下限,则退出运行;否则继续运行一个周期,直至母线内空气参数值低于设定值下限则停机。
空气干燥器原理及器使用说明书

空气干燥器原理及器使用说明书-CAL-FENGHAI.-(YICAI)-Company One1空气干燥器使用说明书一用途:根据吸附原理对来自空压机的压缩空气进行干燥,它是通过冷却再生吸附对压缩空气的水分进行干燥的。
干燥筒内的粒状干燥剂具有很强的吸附空气中水分子的能力。
432 415系列的单缸干燥器带一个整体的回流截至阀,允许主储气筒的气通过回路保护阀回流,这样就不再需要单独的再生储气筒。
二原理在压力输入阶段,来自空压机的压缩空气经1口打开单向阀(i)进入A腔。
因温度降低产生的冷凝水在这里聚集,经通道C聚集出口(e)处。
经过安装在干燥筒中的精密滤网(g),环道(h),压缩空气到达干燥筒(b)上部,这个过程中,空气将进一步冷却,水蒸汽进一步凝结。
当通过颗粒状滤网时, ,水被吸附在粒状干燥剂表面及颗粒缝隙间。
[直径: 4 x 10⁶ m = 4] .因为尺寸超过4的油粒子不能进入干燥剂颗粒缝隙.这使得干燥剂吸附性能稳定。
蒸发部分的油不被吸收.干燥后的空气经单向阀(c)和21口抵达贮气筒。
同时,干燥后的空气也进入E腔,膜片(O)压力增加,向右弯曲,通过孔(s)打开了E腔和G腔的通道,空气也通过滤网(I)进入H腔,阀(q)压力增加。
一旦克服了预调整的螺栓(r)保持的弹簧力,空气会到达F腔,作用在膜片(o)的另一边,以一个较低的气压保持阀(q)的开启状态。
由于G腔的压力下降,单向阀(c)关闭。
此时再生所需要的空气来自主回路储气筒,因此需要一个允许回流的回路保护阀。
21口的空气通过E腔、孔(s)到G腔,到达干燥罐(b)的底部。
空气从下向上经过干燥罐(b),吸附在干燥剂(a)表面的水分会经过排气口C和打开的排气阀门(e)排出。
当膜片(q)左侧的减小到关闭位置时,回流过程完成。
空气从E腔通过小孔到J腔,作用在膜片(m)上。
当克服弹簧力后,进气阀门(n)打开,活塞(d)下移打开排气阀(e)。
来自空压机的空气经过A腔、排气口C通过排气口3通大气。
封闭母线安装使用说明书
FB封闭母线安装使用说明书Service Manual Of Enclosed Busbar阜新封闭母线有限责任公司FUXIN Enclosed Busbar Co.Ltd目录1、适用范围2、现场验收与保管3、离相封闭母线安装4、TP-LA柜安装5、中性点柜的安装6、负荷开关的安装7、微正压装置的安装8、热风保养装置的安装9、热超导降温除湿装置的安装10、共箱母线的安装11、电伴热式共箱母线的安装12、绝缘共箱母线的安装13、金属箱式电缆母线安装14、现场试验15、运行与维护16、有关事项17、封闭母线可成套供货范围18、制造厂为方便用户可另行提供下列备品备件19、安装工艺流程图1. 适用范围本说明书适用于我公司生产的发电机主回路封闭母线、厂用分支、PT分支回路封闭母线、厂用变压器和启备变压器回路共箱母线、金属箱式电缆母线、发电机励磁回路共箱母线及PT柜、PT-LA柜、负荷开关柜、微正压柜、中性点柜及附属设备的安装。
2. 现场验收与保管2.1 封闭母线运到安装现场,产品应存放在干燥、通风、远离潮湿及含有腐蚀性气体的场所。
开箱验货前甲方应提前通知制造厂人员到达现场共同验收,甲乙双方验货人员应根据由制造厂家提供装箱清单进行验收。
2.2 产品开箱后,首先检查箱内产品有无因运输及其他原因发生的碰撞损坏现象,如有损坏现象,应做好记录。
双方验收人员在此记录签字。
2.3 对于各箱零部件,应根据装箱单仔细核对箱内零部件的名称、代号、数量进行验收。
2.4 对于散部件、标准件,特别是镀银件验收后,应立即运往专用保管库,分类登记,按图样要求及施工进度发放零部件。
防止因存放在露天仓库造成受潮、腐蚀、损坏及丢失。
2.5 对于PT柜或PT-LA柜、中性点柜、微正压装置(柜)、热风保养装置、负荷开关柜、空压机等设备验收后,应立即运往防雨、防潮、安全、不易碰撞的专用仓库保管。
2.6 对于备品备件应根据装箱单上的名称、代号、数量进行验收,验收后应立即运往专用仓库保管。
Emax 空气干燥器说明书
Emax Air Dryer R E F R I G E R A T E D T Y P E C O M P R E S S E D A I R D R Y E R SEDRCF1150029 –EDRCF4602000TABLE OF CONTENTS1. Important safety notes - Please read (1)1.1. Transportation (1)1.2 Positioning (1)1.3 Installation (1)1.4 Before operating (1)1.5 Maintenance by an engineer (1)1.6 Maintenance by the user (1)2. I ntroduction (2)3. O peration (4)4. T echnical specifications (7)5. D iagrams (8)6. G eneral Arrangements (18)7. Main Settings (18)8. D rawings (19)9. C omponents location (60)10. T roubleshooting (61)11. Warranty (63)A) When operating the air dryer the operator must apply safe working methods and observe all local safety instructions and relevant regulations.B) Prior to installation, the dryer and the compressed air system are to be depressurized and disconnected from the electrical main supply.C) The user is responsible for safe operating conditions. Parts and accessories must be replaced if inspection shows that safe operation cannot be assured.D) Installation, operation, maintenance and repair are only to be authorized, trained and skilled engineers.E) The minimum and maximum values stated must be observed, as well as all of the safety precautions described in this manual.F) If any statement in this manual does not comply with the local legislation, the strongest standard is to be applied.1.1. TransportationA) Use care and caution when transporting the dryer. Avoid dropping and other physical abuse.B) A forklift can be used to transport the dryers provided the forks are long enough to support its full width or length and caution is used throughout the move.1.2. PositioningA) The dryer must be installed horizontally. A minimum of 20”clearance around the dryer is necessary to allow a good ventilation and easy access for servicing.B) The ambient temperature in the room should not exceed 122°F and should not be below 39°F, taking the heat radiated by the dryer into account.C) (40 watt for each liter/sec under ISO 7183-A condition or 18 watts for each SCFM under ISO 7183-B condition).1.3. InstallationA) In addition to the general mechanical construction procedures and local regulations, the following instructions need to be emphasized:1) Only authorized, trained and skilled engineers should install the compressed air dryer.2) Safety devices, protecting covers or insulation in the dryers never to be dismantled or modified. Each pressure vessel or accessory installed outside the dryer with air above atmospheric pressure must be fitted with the required pressure relief safety valves.1.4. Before OperatingA) Review all safety precautions.B) The piping must have the correct diameter and be adapted to the operating pressure (see technical specification).C) Never operate the dryer at pressure above the maximum specified on the dryer label (check the technical specs too).1.5. Maintenance by an EngineerA) Maintenance and repairs should only be performed when the air dryer is shut down and depressurized and when the main power switch is turned off.B) Use only the appropriate tools for maintenance and repair.C) Before dismantling a part under pressure, disconnect the pressure sources and depressurize the system.D) Proceed carefully during maintenance and repair. Prevent dirt from entering by covering parts and orifices with a clean cloth, paper or tape. A receiver should never be welded or modified in any way.E) Never leave tools, loose parts or cleaning rags in or on the air dryer.F) Before returning the dryer into service, check the setting of the control and safety devices as well as the pressure and the temperature of the compressed air circuit.1.6. Maintenance by the u serA) Keep the dryer clean.B) Regularly check the correct operation of the condensate drain trap.C) Every six months, check and clean the drain strainer by undoing the access screw and rinsing the filter with tap water to remove the trapped dirt from the inside.D) For air cooled dryers, clean the air condenser as soon as it’s dirty or clogged.E) For optional water-cooled condensers, use only clean water and install a water filter if needed.Use water counter flow to clean condenser if need.F) Check the trouble-shooting list in case of maintenance troubles.G) Check operating pressures, temperatures and time settings after maintenance. If operating and safety devices function properly, the air dryer may be used.A) Manufacturer:B) Purpose of this dryer1) This refrigerated compressed air dryer has been designed to remove water vapor from industrial compressed air.2) This dryer has been designed for indoor operation.3) The minimum and maximum values stated must be observed, as well as the safety precautions describedin this manual.The following label is affixed on the cabinetof the refrigerant compressed air dryer.D) Working details1) Refrigerant circuit:The refrigerant circuit can be divided in 3 parts:a) Low pressure section with an evaporator (heat exchanger)b) High-pressure section including: Condenser, liquid receiver, (if installed) and the filter dryer.c) Control circuit including: Compressor, Expansion valve, by-pass valve (if installed),Fan pressure switch (if installed)2) For water - cooled dryers:a) Water valveb) Safety high pressure switch (if installed)3) The Refrigerant circuit operates as follows:a) The compressor compresses gaseous refrigerant to a high temperature.b) The hot refrigerant condenses in the condenser. Being liquefied it is stored in the liquid receiver (if installed).c) The liquid is taken out the storage vessel and injected in the evaporator (heat exchanger) by an expansion valve. This expansion valve is protected by a filter, which removes particles and humidity that could be in the circuit. d) The injected liquid fills in the refrigerant section of the air / refrigerant heat exchanger and evaporates by taking out the calories from the compressed air. The gaseous refrigerant is sucked in the compressor and the cycle carries on.e) In order to keep the evaporation pressure steady, and thus the refrigerant temperature in the heat exchanger, a by-pass valve is injecting hot gaseous refrigerant in the circuit. On certain dryers, an automatic expansion valve regulates this.4) Compressed air circuita) The saturated hot compressed air flows into the Economiser where it is pre-cooled by the out flowing dry chilledair. In the cold zone of the air refrigerant section it continues to cooldown to dew point and enters the separator where condensates are collected. The outgoing chilled air is then warmed up in the economizer by the hot incoming air.b) The condensates are collected after centrifugal separation and drained out through the automatic trap.c) As long as the compressed air temperature does not drop below dew point, there will be no condensationin the air circuit.5) Refrigerant compressorBeing of the hermetic type, it requires no servicing.6) Condensera) Th e air condensers are equipped with a helecoidal at the condenser refrigerant level.On certain type of dryers, a water-cooled condenser can be fitted.b) In this case, a water valve being driven by the refrigerant circuit is taking care of its regulation.7) Refrigerant circuit protectiona) Klixon: The single phase compressors are equipped with a klixon which is a thermal sensitive switch controlling the temperature of the compressor and possible over intensity.In case of malfunction, the klixon trips but switches on again automatically as soon as the compressor has cooled down.b) High Pressure Security Switch: Refrigerant line is considered as a pressure vessel. That is why it is protected against bursts by the help of manually reset switch. It is set to 362.5 psi for dryers working with R134ac) Filter dryer: A refrigerant circuit is a closed circuit and total water removal in the refrigerant circuit is paramount in order to obtain a correct functioning.d) To avoid problems, the refrigerant circuit must be vacuumed before loading the refrigerant. It is equipped with a filter dryer, which also traps any solid particles, which may have migrated into the circuit during assembly.e) Water-cooled dryers have a safety high-pressure switch.In case of cooling water failure, the safety switch stops the dryer. When the safety switch has tripped out, it has to be manually resettled before switching on the dryer.8) Refrigerant circuit controlsa) Liquid refrigerant injection: The liquid refrigerant is into the evaporator by a control valve. This valve is a thermostatic or pressostatic one maintaining a constant overheats of the refrigerant in the evaporator(s).b) Constant evaporating pressure: In the dryers equipped with a by-pass valve, the evaporating pressure is kept constant by a controlled injection of hot gas from the high-pressure side into the low-pressure section of the circuit. 9) Condensate drain - trap assemblyDismantling the drain is easy because it can be isolated from the air circuit under pressure with a ball valve.The drain has to be depressurized before being dismantled.10) Heat Exchanger Modular designa) The dryers are equipped with a compact Mono Bloc Heat Exchangermodule. This assembly has been specially designed to dry compressed air and ismade of:1) An Economiser which pre-cools the entering hot air with the out flowing cold air.2) An air/refrigerant exchanger cooling down the compressed air.3) A centrifugal separator concentrating all condensates and requiring no maintenance.11) Accessoriesa) Dew point indicator: Located on the control panel, it displays the value of the pressure dew point.b) Temperature switch: Located inside the dryer, this temperature switch is adjustable from 32 °F up to 95 °Fc) Energy Saving Device: (ESD) This device helps dryer save energy when there is not any compressed air flowin the dryer. (Please see the models have standart and optional in next page)d) Filter change alarm on the front panel3.1. OperationA) Control panels: The control panel of the dryer includes the following elements:1) Dewpoint indicator (Standard) 2) Filter change Alarm** 3)Start / Stop B utton 1) Dewpoint indicator (Standard) 2) Start Light 3) N/A4) Filter change Alarm** 5) Main Switch1) ESD3 (Standard) 5) EMERGENCY STOPATTENTION : DN-US range dryers have low pressure drop according its competitors. Do not use DN-US range dryers together with other dryers which have higher pressure drop without getting the confirmation from our technical team.** IMPORTANT NOTE: The Dryer has two Compressed Air Filter inside.It is better to change filter element for the best efficiency when the alarm light is active. It is recommended to keep replacement filter elements in your stock in order to replace them when needed.153.2. During OperationRegularly check the digital temperature controller ESD3 or dew point indicator on dryer.B) Start up and shut-downWarning: Avoid leaving the dryer off when compressed air is still flowing through it.C) Starting for the first time or after a long stop1) Set the rotary switch to “I” This preheats the dryer and turns the drain system on.It is recommended to leave the dryer power on permanently so the crankcase heater runs continuously.3) Follow the daily starting and shut down procedure.D) Daily starting and shut-down1) Push on the green button to start the dryer.2) The start light will indicate that the dryer is running.3) To stop the dryer, first stop the airflow (either shut-down the air compressor or close the inlet/outlet orby-pass valve) When the air flow is stopped set the rotary switch on “ 0 “ Set it again on “ I “ in order to keep the preheating on.4) IMPORTANT NOTE!Avoid leaving the dryer stopped when compressed air is still flowing through it.5) To switch the already preheated dryer on again, simply push the green start button.E) Digital Temperature Control technical features (ESD3)ESD3: PLC clear text multilingual indication of alarms, maintenance and running hours+ Energy Saving Device automatic switching OFF at no load and ON when warm compressed air is entering. (Please see the ESD3 manual which is given with Dryer)Emax Air DryerREFRIGERATED TYPE COMPRESSED AIR DRYERSTechnical Specifications& Diagram5.1AIR FLOW DIAGRAMS EDRCF1150029 - EDRCFR1150144EDRCF2300288-EDRCF46012005.2ELECTRICAL DIAGRAMS EDRCF1150029EDRCF1150058-EDRCF1150144Electrical CircuitEDRCF2300288-EDRCF4600288EDRCF4600575-EDRCF4601200Emax Air DryerREFRIGERATED TYPE COMPRESSED AIR DRYERSGeneral ArrangementsMain SettingsDrawings(*)Available up to EDRCF1150029 and above (**) Available up to EDRCF4600575 and above (***) 1 min. - 5 sec. (up to EDRCF1150144 and above) 5 min. - 4 sec. (up to EDRCF2300288 and above)(****) Available up to EDRCF2300575 and aboveEDRCF1150029EDRCF1150058EDRCF1150115-EDRCF1150144EDRCF2300288-EDRCF4600288EDRCF4600575-EDRCF2300575EDRCF4600850-EDRCF4601200EDRCF1150029EDRCF1150058EDRCF1150115EDRCF1150144EDRCF2300288-EDRCF4600288EDRCF4600575-EDRCF2300575EDRCF4600850EDRCF4601200Refrigerated Dryer WARRANTYPOLICYWhen used under the conditions recommended the heat exchanger will be warranted for five (10) years. This warranty is limited to the replacement of the heat exchangers,Some restrictions as outlined below concerning misuse, abuse or accident. The standard equipment external float drain and automatic drain carry a 2 year-day warranty along with all other components..This warranty will apply to equipment installed, operated and maintained in accordance with the procedures and recommendations as outlined in the owner’s manual published by Emax During the life of this warranty, Emax will repair or replace (at Emax option) any defective part or assembly free of charge if such defect occurred in normal service and was not due to apparent misuse, abuse or accident.. Customer is responsible for shipping charges.This Warranty is not t ransferable.Any warranty service performed in the field must be authorized by Emax Unauthorized service voids the warranty and any resulting charges will not be paid by EmaxEmax makes no other warranties or guarantees, expressed or implied. Emax assumes no liability for indirect or consequential damages.。
空气干燥净化设备操作规程

空气干燥净化设备操作规程
空气干燥净化设备操作规程一、启动前检查与准备检查进出阀门是否开启,各法兰有无渗漏,确认无误后,方可使用。
二、启动操作1、程控器接上电源后,检
查压缩空气的压力是否正常。
2、开启压缩空气进口阀,先调整控制气路压力至0.05-0.25MPa,然后开启程控器,开干燥空气出口阀。
3、调整再生流量阀,将再生气量控制在额定处理气量的14%范围内。
4、全系统进入正常工作状态。
三、停机操作1、关闭压缩空气进口阀,干
燥空气出口阀,放尽两塔内的空气。
2、切断程控器电源。
四、注意事项1、A、B瓶内可再生干燥颗粒每年进行更换一次。
2、A、B在使用时,
每周进行一次排液。
空气干燥器用户手册说明书

123456Emptying condensationEmpty container after each drying operation!1.Pull out condensate container keeping it horizontal.2.Pour out condensation.3.Always push container in fully until it clicks into place.If Í (Container) flashes in the display panel a What to do if..., Page 10.Cleaning the fluff filterClean the fluff filter after each drying operation.1.Open the door, remove fluff from door/door area.2.Pull out and fold open the fluff filter.3.Remove the fluff (by wiping the filter with your hand).If the fluff filter is very dirty or blocked, rinse with warm water and dry thoroughly.4.Close and reinsert the fluff filter.Switching off the dryerTurn the programme selector to Off .Do not leave laundry in the dryer.Removing the laundryThe automatic anti-crease function causes the drum to move at specific intervals, the washing remains loose and fluffy for an hour (two hours if the additional S Reduced Ironing function is also selected-depending on model ).... and adapt to individual requirementsNever start the dryer if it is damaged!Inform your after-sales service.Inspecting thedryer Sorting and loading laundryRemove all items from pockets.Check for cigarette lighters.The drum must be empty prior to loading.See programme overview on page 7.See also separate instructions for “Woollens basket” (depending on model)Your new dryerCongratulations - You have chosen a modern, high-quality Bosch Intended usePreparing for installation, see Page 8Selecting and adjusting the programmeDryingCondensate container Control panelʋfor domestic use only,ʋonly to be used for drying fabrics that have beenwashed with water.Keep children younger than 3 years old away from the dryer.Do not let children make the cleaning andmaintenance work on the dryer without supervision.Do not leave children unsupervised near the dryer.Keep pets away from the dryer.The dryer can be operated by children 8 years old and older, by persons with reduced physical, sensory or mental abilities and by persons with insufficient experience or knowledge if they are supervised or have been instructed in its use by a responsible adult.This appliance is intended for use up to a maximum height of 4000 metres above sea level.Select the drying programme ...123Make sure your hands are dry. Hold the plug only.Connecting themains plugDryingInformation on laundry ...Labelling of fabricsFollow the manufacturer's care information.(c Drying at normal temperature.'c Drying at low temperature a also select V (Low Heat).)c Do not machine dry.Observe safety instructions without fail a Page 11!Do not tumble-dry the following fabrics for example:–Impermeable fabrics (e.g. rubber-coated fabrics).–Delicate materials (silk or curtains made from synthetic material) a they may crease.–Laundry contaminated with oil.Drying tips–To ensure a consistent result, sort the laundry by fabric type and drying programme.–Always dry very small items (e.g. baby socks) together with large items of laundry (e.g. hand towel).–Close zips, hooks and eyelets, and button up covers. Tie fabric belts, apron strings, etc. together.–Do not over-dry easy-care laundry a risk of creasing! Allow laundry to finish drying in the air.–Do not dry woolens in the dryer, only use to freshen them up a Page 7, Woollens finish Programme (depending on model).–Do not iron laundry immediately after drying, fold items up and leave for a while a the remaining moisture will then be distributed evenly.–The drying result depends on the type of water used during washing. a Fine adjustment of the drying result a Page 5/6.–Machine-knitted fabrics (e.g. T-shirts or jerseys) often shrink the first time they are dried a do not use the Extra Dry programme.–Starched laundry is not always suitable for dryers a starch leaves behind a coating that adversely affects the drying operation.–Use the correct dosage of fabric softener as per the manufacturer's instructions when washing the laundry to be dried.–Use the timer programme for small loads a this improves the drying result.Environmental protection / Energy-saving tips–Before drying, spin the laundry thoroughly in the washing machine a the higher the spin speed the shorter the drying time will be (consumes less energy), also spin easy-care laundry.–Put in, but do not exceed, the maximum recommended quantity of laundry a programme overview a Page 7.–Make sure the room is well ventilated during drying.–Do not obstruct or seal up the air inlet.–Keep the air cooler clean a Page 6 “Care and cleaning”.Fine adjustment of the drying resultAdjustment of the levels of dryness1 x to the rightPress and hold V (Low Heat) and turn 5 x to the rightPress V (Low Heat) until the required level is reached Turn to OffTurn toOff DrumAll buttons are sensitive and only need to be touched lightly.Only operate the dryer with the fluff filter inserted!Air inletFluff filterDrum interior light (depending on model)Maintenance flapProgramme end once lights up in the display. Interrupt programme removing or adding laundry.The drying cycle can be interrupted for a brief period so that laundry may be added or removed. The programme selected must then be resumed and completed.Never switch the dryer off before the drying process has ended.Drum and door may be hot!1.Open door, the drying process is interrupted.2.Load or remove laundry and close door.3.If required, select a new programme and additional functions.4.Press the (Start /Stop) button.Programme selectorDisplay panelService indicatorsÍ (Container)n (Clean) Clean the fluff filter and/or air cooler under running water. a Page 4/6.Fineadjustment of the drying resultThe drying result (e.g. Cupboard Dry) can be adjusted over three levels (1 - max. 3) and Super 40’ programmespresetting = 0. After one of these programmes has been finely adjusted, the setting is retained for the others. Further information a Page 5/6.0, 1, 2, 3 Fine adjustment of the drying resultCare and cleaningDryer housing, control panel, air cooler, moisture sensors–Wipe with a soft, damp cloth.–Do not use harsh cleaning agents and solvents.–Remove detergent and cleaning agent residue immediately.Clean the protective filter 5 - 6 times a yearor if n (Clean) flashes after cleaning the fluff filter.Air cooler / Protective filterWhen cleaning, only remove the protective filter. Clean the air cooler behind the protective filter once a year.–Allow the dryer to cool.–Residual water may leak out, so place an absorbent towel underneath the maintenance door.1.Unlock the maintenance door.2.Open the maintenance door fully.3.Turn both locking levers towards each another.4.Pull out the protective filter/air cooler.Do not damage the protective filter or air cooler.Clean with warm water only. Do not use any hard or sharp-edged objects.5.Clean the protective filter/air cooler thoroughly,Allow to drip dry.6.Clean the seals.7.Re-insert the protective filter/air cooler,with the handle facing down.8.Turn back both locking levers.9.Close the maintenance door until the lock clicks into place.Moisture sensorsThe dryer is fitted with stainless steel moisture sensors. The sensors measure the level of moisture in the laundry. After a long period of operation, a fine layer of limescale may form on the sensors.1.Open the door and clean the moisture sensors with a damp spongewhich has a rough surface.Do not use steel wool or abrasive materials.Drying , Iron Dry , Cupboard Dry , Anti-Crease/End are displayed in sequence.Short signal when changing from level 3 to 0, otherwise long signal.Only when switched off!Press the (Start/Stop) button*f o r L C o t t o n s a n d I E as y -C a r e p r o g r a m m e s o n l y .**D r y n e s s l e v e l s c a n b e s e l e c t e d i n d i v i d u a l l y a E x t r a D r y , +c C u p b o a r d D r y a n d | I r o n D r y (d e p e n d i n g o n t h e m o d e l ).D e g r e e o f d r y n e s s c a n b e f i n e l y a d j u s t e d ; m u l t i -l a y e r e d t ex t i l e s r e q u i r e a l o n g e r d r y i n g t i m e t h a n s i n g l e -l a y e r e d i t e m s o f c l o t h i n g . R e c o m m e n d a t i o n : D r y s e p a r a t e l y .Page 11.Connect to an AC earthed socket. If in doubt have the socket checked by an expert.The mains voltage and the voltage shown on the rating plate (a Page 9) must correspond.The connected load and necessary fuse protection are specified on the rating plate.Note the fuse protection of the socket.Make sure that the air inlet remains unobstructedClean and level press and hold selection then turn 3 x to the rightturn to Offsetamperageoff flashesDo not operate the dryer if there is a danger of frost.en Instruction manualDryerWTE84102ME12Remove all items from pockets.Check for cigarette lighters.The drum must be empty prior to loading.See programme overview on page 7.See also separate instructions for “Woollens ba (depending on model)domestic appliance.The condensation dryer is distinguished by its economical energy consumption.Every dryer which leaves our factory is carefully checked to ensure that it functions correctly and is in perfect condition.Should you have any questions, our after-sales service will be pleased to help.Disposal in an environmentally-responsible manner This appliance is labelled in accordance with European Directive 2012/19/EU concerning used electrical and electronic appliances (waste electrical and electronic equipment - WEEE). The guideline determines the framework for the return and recycling of used appliances as applicable throughout the EU.For further information about our products, accessories, spare parts and services, please visit: All buttons are need to be touProgramme selector34Emptying condensationEmpty container after each drying operation!1.Pull out condensate container keeping it horizontal.2.Pour out condensation.3.Always push container in fully until it clicks into place.If Í (Container) flashes in the display panel a What to do if..., Page 10.Cleaning the fluff filterClean the fluff filter after each drying operation.1.Open the door, remove fluff from door/door area.2.Pull out and fold open the fluff filter.3.Remove the fluff (by wiping the filter with your hand).If the fluff filter is very dirty or blocked, rinse with warm water and dry thoroughly.4.Close and reinsert the fluff filter.Switching off the dryerTurn the programme selector to Off .Do not leave laundry in the dryer.Removing the laundryThe automatic anti-crease function causes the drum to move at specific intervals, the washing remains loose and fluffy for an hour (two hours if the additional S Reduced Ironing function is also selected-depending on model ).idual requirementsspecting thedryeroading laundryasket”he programmeDryingCondensate container Control paneldrying programme ...123nnecting the mains plugDryingDrume sensitive and only uched lightly.the dryer with nserted!Air inletFluff filterDrum interior light (depending on model)Maintenance flapProgramme end once lights up in the display. Interrupt programme removing or adding laundry.The drying cycle can be interrupted for a brief period so that laundry may be added or removed. The programme selected must then be resumed and completed.Never switch the dryer off before the drying process has ended.Drum and door may be hot!1.Open door, the drying process is interrupted.2.Load or remove laundry and close door.(Start/Stop) buttonInformation on laundry ...Labelling of fabricsFollow the manufacturer's care information.(c Drying at normal temperature.'c Drying at low temperature a also select V(Low Heat).)c Do not machine dry.Observe safety instructions without fail a Page 11!Do not tumble-dry the following fabrics for example:–Impermeable fabrics (e.g. rubber-coated fabrics).–Delicate materials (silk or curtains made from synthetic material) a they may crease.–Laundry contaminated with oil.Drying tips–To ensure a consistent result, sort the laundry by fabric type and drying programme.–Always dry very small items (e.g. baby socks) together with large items of laundry(e.g. hand towel).–Close zips, hooks and eyelets, and button up covers. Tie fabric belts, apron strings, etc.together.–Do not over-dry easy-care laundry a risk of creasing! Allow laundry to finish drying inthe air.–Do not dry woolens in the dryer, only use to freshen them up a Page 7, Woollens finish Programme (depending on model).–Do not iron laundry immediately after drying, fold items up and leave for a whilea the remaining moisture will then be distributed evenly.–The drying result depends on the type of water used during washing. a Fine adjustment of the drying result a Page 5/6.–Machine-knitted fabrics (e.g. T-shirts or jerseys) often shrink the first time they are drieda do not use the Extra Dry programme.–Starched laundry is not always suitable for dryers a starch leaves behind a coating that adversely affects the drying operation.–Use the correct dosage of fabric softener as per the manufacturer's instructions whenwashing the laundry to be dried.–Use the timer programme for small loads a this improves the drying result.Environmental protection / Energy-saving tips–Before drying, spin the laundry thoroughly in the washing machine a the higher the spin speed the shorter the drying time will be (consumes less energy), also spin easy-carelaundry.–Put in, but do not exceed, the maximum recommended quantity of laundry a programme overview a Page 7.–Make sure the room is well ventilated during drying.–Do not obstruct or seal up the air inlet.–Keep the air cooler clean a Page 6 “Care and cleaning”.Fine adjustment of the drying resultAdjustment of the levels of dryness1 x to the right Press and hold V(Low Heat)and turn 5 x to the right Press V(Low Heat) until the required level is reachedTurn to Off Turn toOffFine adjustment of the drying resultCare and cleaningDryer housing, control panel, air cooler, moisture sensors–Wipe with a soft, damp cloth.–Do not use harsh cleaning agents and solvents.–Remove detergent and cleaning agent residue immediately.Clean the protective filter 5 - 6 times a yearor if n(Clean) flashes after cleaning the fluff filter.Air cooler / Protective filterWhen cleaning, only remove the protective filter. Clean the air coolerbehind the protective filter once a year.–Allow the dryer to cool.–Residual water may leak out, so place an absorbent towelunderneath the maintenance door.1.Unlock the maintenance door.2.Open the maintenance door fully.3.Turn both locking levers towards each another.4.Pull out the protective filter/air cooler.Do not damage the protective filter or air cooler.Clean with warm water only. Do not use any hard or sharp-edgedobjects.5.Clean the protective filter/air cooler thoroughly,Allow to drip dry.6.Clean the seals.7.Re-insert the protective filter/air cooler,with the handle facing down.8.Turn back both locking levers.9.Close the maintenance door until the lock clicks into place.Moisture sensorsThe dryer is fitted with stainless steel moisture sensors. The sensorsmeasure the level of moisture in the laundry. After a long period ofoperation, a fine layer of limescale may form on the sensors.1.Open the door and clean the moisture sensors with a damp spongewhich has a rough surface.Do not use steel wool or abrasive materials.Drying, Iron Dry, Cupboard Dry, Anti-Crease/Endare displayed in sequence.Short signal when changing from level 3 to 0,otherwise long signal.Only when switched off!56*f o r L C o t t o n s a n d I E a s y -C a r e p r o g r a m m e s o n l y .**D r y n e s s l e v e l s c a n b e s e l e c t e d i n d i v i d u a l l y a E x t r a D r y , +c C u p b o a r d D r y a n d | I r o n D r y (d e p e n d i n g o n t h e m o d e l ).D e g r e e o f d r y n e s s c a n b e f i n e l y a d j u s t e d ; m u l t i -l a y e r e d t e x t i l e s r e q u i r e a l o n g e r d r y i n g t i m e t h a n s i n g l e -l a y e r e d i t e m s o f c l o t h i n g . R e c o m m e n d a t i o n : D r y s e p a r a t e l y .Page 11.Connect to an AC earthed socket. If in doubt have the socket checked by an expert.The mains voltage and the voltage shown on the rating plate (a Page 9) must correspond.The connected load and necessary fuse protection are specified on the rating plate.Note the fuse protection of the socket.Make sure that the air inlet remains unobstructedClean and level press and hold selection then turn 3 x to the rightturn to Offsetamperageoff flashesDo not operate the dryer if there is a danger of frost.en Instruction manualDryerWTE84102ME。
空气干燥机操作规程

空气干燥机操作规程
《空气干燥机操作规程》
一、前言
空气干燥机是工业生产中常用的设备,用于去除空气中的水分,保障生产设备正常运行。
为了保障操作安全和设备正常运转,特制定本操作规程。
二、操作程序
1. 开机前检查:在启动空气干燥机之前,需进行仔细的检查,确保设备无故障。
主要检查点包括电源是否正常、风扇是否运转正常、滤网是否清洁等。
2. 启动空气干燥机:将电源开关打开,确保设备正常运行。
3. 设置参数:根据生产需要,设置好空气干燥机的温度、湿度等参数。
4. 监控运行:启动后需随时监控设备的运行情况,确保温度、湿度等参数在设定范围内。
5. 关机前检查:在关闭空气干燥机之前,需再次进行检查,确保设备无故障。
6. 关闭空气干燥机:将电源开关关闭,确保设备停止运行。
三、安全注意事项
1. 操作人员需穿戴好个人防护用品,并遵守相关操作规程。
2. 在操作过程中,绝对不能随意触碰设备内部,以免造成伤害或设备故障。
3. 定期对设备进行维护保养,确保设备的正常运行。
以上为《空气干燥机操作规程》,请操作人员严格按照规程操作,确保设备安全运行。
GZ45-Ⅱ空气循环干燥装置使用说明书
使用说明书
镇江华东电力设备制造厂
GZ45-Ⅱ型封闭母线空气循环干燥装置使用说明书
镇江华东电力设备制造厂
目
录
1. 干燥装置的技术特点 ........................................................................2 2. 干燥装置的主要参数 ........................................................................3 3. 干燥装置的工艺流程及操作 ............................................................4 4. 干燥装置的安装 ................................................................................9 5. 干燥装置的调试与运行 ..................................................................10 6. 干燥装置的维护和检查 ..................................................................12 7. 干燥装置的常见故障及排除方法 ..................................................13 8. 联系方法...........................................................................................15
- 1、下载文档前请自行甄别文档内容的完整性,平台不提供额外的编辑、内容补充、找答案等附加服务。
- 2、"仅部分预览"的文档,不可在线预览部分如存在完整性等问题,可反馈申请退款(可完整预览的文档不适用该条件!)。
- 3、如文档侵犯您的权益,请联系客服反馈,我们会尽快为您处理(人工客服工作时间:9:00-18:30)。
尊敬的用户,感谢您使用我厂的国家专利产品(专利号ZL 02 264577.2)GZ45型封闭母线空气循环干燥装置(简称干燥装置,下同)!
为了您更好、更顺利地安装、使用和维护好本装置,请您认真阅读本说明书。
1.GZ45型干燥装置的技术特点:
1.1该装置采用大流量空气闭式循环干燥方式,对母线内空气循环不断地进行干燥,可使母线内湿度保持很低的水平,同时对母线的密封要求相对不高,是新老电厂离相封闭母线防结露的理想升级产品。
1.2该装置采用精密湿度传感器,实时监测、显示母线内部的相对湿度,观察方便、直观,并通过设定上、下限,自动控制装置的启停。
1.3该装置采用“PLC”控制,运行稳定可靠,可实行无人值守。
1.4该装置采用分子筛作吸附剂,吸湿能力强,使用寿命长。
2.主要参数
2.1主要技术指标
空气循环干燥量:≥45m3/h
干燥后出气相对湿度:≤20%RH (一个工作周期后)
吸附筒最大吸水量:9.40kg×2(一个工作周期)
吸附筒循环工作周期:16h
分子筛用量: 40kg×2
分子筛使用寿命:≥4年
2.2电源
电源: AC380V(3P+N)
总功率: 4.0kW
其中:
风机功率: 1.1kW
电加热器功率: 2.4kW
罗茨风机和电动球阀的参数详见厂家提供的相关使用说明书。
3.工作原理简介
3.1工艺流程简介
干燥流程:B相母线内空气→罗茨风机→吸附筒A(B)→干燥空气回充入A、C相母线→B相母线。
再生流程:外部空气→罗茨风机→吸附筒B(A)→排出潮湿空气。
每个循环工作周期中,A、B筒每8h互换一次。
3.2电气控制原理简介
采用“PLC”控制,有“自动”和“手动”两种运行模式,通过控制箱面板上的转换开关进行转换。
转换开关有三个位置,即“停止”、“手动”和“自动”。
“自动”运行模式:当湿度监控器测得母线内湿度超过设定上限时,监控器输出一个接点信号给“PLC”,“PLC”根据设定程序启动装置。
首先进入的是“A筒干燥吸附,B筒再生排气”程序。
打开(关闭)相应的电动阀门,阀门开闭到位后,启动罗茨风机,然后启动再生筒(B筒)内的加热器。
装置通过热电阻和数显仪监测、显示筒内的温度,当温度超过设定上限时,则加热器停止加热。
当温度降至设定下限时,则加热器重新加热。
排气口也设有测温元件,当排气温度超过设定时,则加热器在该周期内不再加热,B筒再生结束。
8h后,A、B筒互换,装置进入“B筒干燥吸附,A筒再生排气”程序,控制原理与上述类似。
16h后,一个循环工作周期结束,如湿度监控器测得母线内湿度低于设定下限时,则整套装置停止运行,否则,装置继续运行,进入下一个工作周期。
“手动”运行模式:手动运行模式只是通过“启动”和“停止”按钮人为给“PLC”发出启停信号,代替湿度监控器的接点信号,其他与“自动”运行模式完全一致。
无论“自动”还是“手动”运行模式,转换开关打到“停止”位置或按“停止”按钮后,装置均停止运行。
4.装置的安装
4.1安装前的准备工作
4.1.1设备开箱及验收。
根据装箱清单开箱对货物进行清点,检查货物有无缺损,并作好交接记录。
4.1.2熟悉安装图纸及安装使用说明书。
核对母线(主要是三通连接管的连接法兰)
的安装尺寸是否与干燥装置的图纸要求一致。
4.1.3搭好脚手架,准备好起吊设备。
4.1.4母线改造加装干燥装置的,应将母线外壳上原有的漏气开口封闭。
4.2安装步骤
4.2.1将干燥装置本体吊装就位,将底部框架与预埋件焊牢或用膨胀螺栓固定,还应将底部框架可靠接地。
4.2.2安装母线三通连接管,配有截流孔板的,应将相应规格(不同位置对应不同的规格)的截流孔板装上。
如是母线改造加装干燥装置的,则需按图纸要求在母线外壳上开孔,并焊接连接法兰。
安装后应将母线内的铝屑用吸尘器(用户自备)清除干净。
4.2.3按照图纸要求,结合现场实际情况,配接干燥装置的进、出气管道。
然后将出气口压力表等装上。
4.2.4安装湿度探头,按图纸要求接好线。
探头线应用金属软管保护。
4.2.5接好电源。
用户负责将电源线接至干燥装置的控制箱,并负责接送电。
4.2.6补刷油漆。
现场的油漆补刷工作由用户进行。
5.调试与运行
5.1打开干燥装置本体内的回气阀V1(罗茨风机正上方)、进气阀V2(干燥装置的右上方)、补气阀V3(干燥装置的背面,外接空气过滤器),V1、V2、V3为三只手动球阀。
装置正常运行后应调节三只阀门的开度,V1全开,V3二分之一开,并调节V2的开度,使压力表显示为1.6kPa左右。
运行几小时后观察母线上的橡胶伸缩套有无向内收缩现象,如有,说明母线内存在负压,这时可加大补气阀V3的开度。
调整完后将阀门定位,下次启动无需重复调节。
5.2调整电源相序。
将控制箱面板上的“自动/手动”转换开关打到“手动”→合上电源空气开关(上电)→用螺丝刀点按一下风机接触器“5KM”,观察罗茨风机电机的转向是否与转向标示一致→如转向反了,则将电源进线(不能只调罗茨风机电机的电源线,因为电动阀的转向与风机须保持一致)的任意两根相线互调即可。
5.33
秒钟,这时项目“开始”指示灯亮,将监控器的“开始”设定为50%;
I”“报警II”的设定,直至项目指示灯全熄。
将“停止”设定为20%,“报警I”、“报警II”不用设定。
这样设定表示在“自动”方式时,母线内湿度超过50%时,干燥装置将启动除湿,在低于20%时,装置在运行一个周期后将停止运行。
(出厂时已按上述数据设定好,用户一般无须重新设定)。
5.4温度数显调节仪的设定(出厂时已设定好,正常情况下用户不要调整)。
再生筒温
为AL1H),设定值为0℃;第二路报警为下限报警(提示符为AL2L),设定值为120℃。
用户如需调整,再生筒温度数显仪第一路报警上限设定值不得超过250℃,排气温度数显仪第二路报警下限设定值不得超过150℃。
5.5试运行(试运行前,必须保证V1、V2及V3打开)
上述步骤完成后,即可进行装置的试运行。
操作步骤和装置的正常动作过程如下表:
注意:合电源空气开关后,“PLC”及湿度监控器、温度数显调节仪等有5秒左右的自检时间,此时不要进行下一步操作。
5.6运行
装置试运行没有异常,干燥装置即可投入正式运行。
操作步骤按5.5条。
6.维护和检查
6.1罗茨风机应按照《罗茨风机使用说明书》上所要求的检查项目进行日常维护与检查。
观察罗茨风机齿轮箱的油位是否在要求的范围内,油位过低则应及时加注润滑油。
如罗茨风机有异常噪音、电机温度异常升高,则应及时停机检查。
6.2补气阀V3前设空气滤清器,应每周清理空气滤清器一次,确保补气清洁、顺畅。
厂家提供2个空气滤清器备品,如有损坏,请用户自行购买。
6.3封母干燥装置在使用4 年以后,根据实际使用效果,可考虑更换分子筛。
打开干燥筒体底部的分子筛放料口法兰,放完老化的分子筛后,紧上放料口法兰,并打开干燥筒上部的加料口法兰,注入新分子筛至离加料口法兰面下130mm处,用小棍搅拌均匀。
紧上加料口法兰。
注:更换所需分子筛材料由用户自行购买并更换。
化学式:Na
86[(AlO
2
)
86
(SiO
2
)
106
]·XH
2
O
规格:13X
形态:3~5mm球状
6.4长期停用本装置时,请断开电源空气开关,并关闭回气阀V1、进气阀V2、补气阀V3。
7.故障及其排除
干燥装置在调试及运行中可能出现的故障及其排除方法见下表:
8.联系方法
电话: 5614935 地址:镇江市七里甸邮编:212017
传真: 5623761 E-mail:hdld@
镇江华东电力设备制造厂
2005年4月。
