维卡录音系统使用说明书
录音系统使用说明-etlog用户手册(精简)
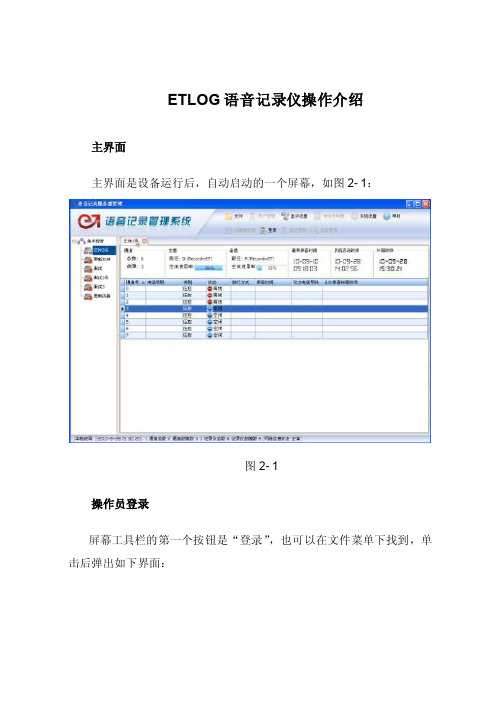
ETLOG语音记录仪操作介绍主界面主界面是设备运行后,自动启动的一个屏幕,如图2- 1:图2- 1操作员登录屏幕工具栏的第一个按钮是“登录”,也可以在文件菜单下找到,单击后弹出如下界面:图2- 2ETLOG语音记录仪出厂前的默认设置有一个超级管理员:1. 操作员:etlog(系统管理员)密码:123(可以更改)如果想为不同的操作人员设置不同的操作员代码,并根据不同的密码进入系统,可以增加新的操作员代码,并设置密码;也可以删除已经存在的操作员。
具体操作参考“用户管理”。
录音查询条件选择图2- 31.根据录音时间查询:输入“起始时间”、“结束时间”,点击“查询”按钮即可,查询时间可以精确到秒。
2.根据所录电话的通道号查询如果你只想选择ETLOG语音记录仪监控的某路电话的录音,请单击“选择”按钮,弹出“通道列表”对话框,选择你要查询的通道,默认查询所有通道的记录,界面如下:图2- 43.根据拨号方式和电话号码查询:1) “拨号方式”项列出了四种类型:所有记录、所有拨入、所有拨出、未接电话,默认为“所有记录”。
2) ETLOG语音记录仪可以记录未接电话,如果你想查询某个被监控电话的未接记录,请选择“未接电话”,录音长度为振铃长度。
3) 如果您想根据主叫方或者被叫方的电话号码来查询,请在“电话号码”框输入相应的电话号码进行查询。
4.根据注释进行查询:选择“注释”项,是根据您所给定的注释条件来查找所需的录音记录;填入注释的关键字即可进行相关的模糊查询;如何给定注释请参考“注释”功能。
5.根据录音时间长度进行查询:如果您想查询录音长度大于多少秒的录音,则可选择“按录音长度”查询。
可以设置最小录音长度,单位是:秒,系统默认查询的是大于5秒的录音记录。
6.排序1)如果想让查询结果按一定的顺序排列,请单击列表某列的表头,进行升序或者降序排列。
2)默认按录音时间降序排列。
查询结果查询条件输入后单击“查询”,就会得到如图2-6所示的查询结果。
录音监听主机(WBT-R16)说明书
录音监听系统(WBT-R16)用户手册(For Windows 2000/XP)(For Windows 7)目录第一章系统简述 ----------------------------------------------------------1.1 基本功能 ------------------------------------------------------1.2 性能特点 ------------------------------------------------------1.3 技术参数 ------------------------------------------------------1.4 硬件配置 ------------------------------------------------------ 第二章系统安装 ----------------------------------------------------------2.1 系统配置 ------------------------------------------------------2.2 录音卡硬件安装 ------------------------------------------------2.3 录音卡驱动程序安装 --------------------------------------------2.4 录音系统软件安装 ---------------------------------------------- 第三章录音系统使用说明 --------------------------------------------------3.1 系统主界面 ----------------------------------------------------3.2 系统管理 ------------------------------------------------------1>、系统参数设置-----------------------------------------------2>、通道参数设置-----------------------------------------------3>、数据库管理------------------------------------------------4>、操作日志管理----------------------------------------------5>、系统最小化------------------------------------------------6>、关闭录音系统----------------------------------------------3.3 录音管理--------------------------------------------------------1>、查询录音--------------------------------------------------2>、备份录音文件----------------------------------------------3>、查询留言---------------------------------------------------3.4 操作员管理------------------------------------------------------1>、修改操作员密码--------------------------------------------2>、增加删除操作员--------------------------------------------第四章特殊操作简述 ------------------------------------------------------4.1 插话监听功能--------------------------------------------------4.2 界面上的三种状态----------------------------------------------4.3 与系统有关的时间-----------------------------------------------4.4 控制流程(状态转换流程-----------------------------------------4.5 界面上显示断电------------------------------------------------4.6系统接线图------------------------------------------------------第一章系统简述数字录音系统是我公司根据通信、电力、证券等行业及其它领域的要求,并结合其应用特点,自主研制并开发的全数字化录音设备。
eVRS系列录音设备操作说明书 - 副本
eVRS系列录音系统操作说明书杭州维卡科技有限公司编者:李贵壮日期:2011-01-12版本号:4.0.0.1所有权声明本文档的内容将做定期性的变动,且不另行通知。
更改的内容将会补充到本手册中。
除特别声明外,此文档所用的公司名称、个人姓名及数据均属为说明的目的而模拟。
文档的版权属杭州维卡科技有限公司所有,受中华人民共和国法律的保护。
本文档所含的任何构思、设计、工艺及其他技术信息均属本公司所有,受中华人民共和国法律的保护。
未经本公司书面同意,任何单位和个人不得擅自摘抄、全部或部分复制本书内容,或者以其他任何方式使第三方知悉。
目录第一章系统简介 ......................................................................................................... - 4 -1.1产品功能 ........................................................................................................ - 5 -1.2产品特点 ........................................................................................................ - 6 -第二章软硬件环境要求............................................................................................... - 7 -第三章主界面介绍...................................................................................................... - 7 -3.1登入界面 ........................................................................................................ - 7 -3.2密码修改 ........................................................................................................ - 8 -3.3界面介绍图..................................................................................................... - 9 -3.3.1导航菜单栏 ........................................................................................ - 10 -3.3.2 快捷菜单栏........................................................................................ - 12 -3.3.3运行状态信息..................................................................................... - 12 -第四章录音查询 ....................................................................................................... - 13 -4.1 录音界面介绍............................................................................................... - 13 -4.1.1录音条件设置区域.............................................................................. - 14 -4.1.2录音文件播放区域.............................................................................. - 14 -4.1.3录音记录的删除、导出和录音文件下载操作 ....................................... - 15 -4.1.4录音记录显示栏目介绍....................................................................... - 15 -第五章通道设置 ....................................................................................................... - 17 -5.1通道列表 ...................................................................................................... - 17 -5.2通道基本信息 ............................................................................................... - 17 -5.3录音启动方式 ............................................................................................... - 18 -5.4录音记录处理 ............................................................................................... - 19 -5.5 通道监控...................................................................................................... - 19 -第六章系统设置 ....................................................................................................... - 20 -6.1全局参数 ...................................................................................................... - 20 -6.2 录音过滤...................................................................................................... - 20 -6.3 设置IP ........................................................................................................ - 20 -6.4 设置时间...................................................................................................... - 21 -6.5 重启系统...................................................................................................... - 21 -6.6 恢复出厂...................................................................................................... - 21 -6.7 系统升级...................................................................................................... - 22 -6.8高级设置 ...................................................................................................... - 22 -第七章号码管理 ....................................................................................................... - 23 -7.1免录号码管理 ............................................................................................... - 23 -7.2白名单.......................................................................................................... - 25 -第八章日志管理 ....................................................................................................... - 27 -8.1操作日志 ...................................................................................................... - 27 -8.2录音查听日志 ............................................................................................... - 28 -8.3设备启动日志 ............................................................................................... - 29 -8.4系统运行日志文件 ........................................................................................ - 30 -第九章话务统计 ....................................................................................................... - 30 -9.1 图表统计...................................................................................................... - 30 -9.2 列表统计...................................................................................................... - 32 -第十章菜单 .............................................................................................................. - 33 -10.1 菜单操作.................................................................................................... - 33 -第一章系统简介维卡新一代eVRS系列嵌入式录音设备,安装使用方便,直接接入网线,用户通过局域网或互联网,对坐席实现电话录音管理。
录音系统使用说明书

二、技术参数
接口方式:模拟中继 录音输入阻抗 直流>= 470K 欧姆 交流(1000HZ 时)>=10K 欧姆 隔离阻抗脚直流均:>= 470K 欧姆 录音模块直流阻抗: >1M 隔离耐压:>=500VDC 录音格式:LAW、ADPCM,GSM 格式的 WINDOWS WAV 文件 数据速率:64 KBPS /32 KBPS /13.6 KBPS 全通道信噪比:>= 42 dB 频响:300~3400HZ 放音输出功率 >= 0.5 W 全通道失真:< 5% 音量调整:-20db ~ +20db 硬盘容量 (20 G 最多可存放 3500 小时)
10. 所有谈话内容录为 wav 格式,可以在任意 WINDOWS 电脑中播放。 11. 可以设置任意多个盘(可以是硬盘、分区或网络映射盘)自动循环录音。 12. 录音启动方式灵活,具有压控、键控、声控三种启动方式。 13. 录音起始时间可以灵活设置,可以是一段时间内录音,也可以是每天 24 小时录 音。 14. 提供不同的压缩率,满足不同用户的需要,20G 的硬盘最多可以保存 3500 多个 小时。 15. 线路适用于电话外线、分机内线、无线对讲机的音频输出线等。 16. 当系统的硬盘将满时,系统将自动清除最先录音的资料,以保证系统可以常年 不间断运行。 17. 方向判别。可以判别出呼叫方向,如呼入还是呼出。 18. 系统具有强大的操作员权限管理功能,除设定每个操作员的权限外,还可以设 置每个操作员可操作的通道。 19. 内置有区号表,可以记录每一次通话的地区。
电话录音系统
操作手册
电话录音系统 . 操作手册
目
录
系统简介 .....................................................................................2 一、基本功能 ..............................................................................2 二、技术参数 ..............................................................................3 系统安装 .....................................................................................4 一、硬件安装 ..............................................................................4 1、1 微机 ..............................................................................4 1、2 PCI 接口录音卡安装 .............................................................4 二、软件安装 ..............................................................................6 2、1 板卡驱动安装 ....................................................................6 2、2 录音系统软件的安装 ............................................................7 软件操作 .....................................................................................8 一、 系统登陆 ............................................................................8 1、1 登陆 ..............................................................................8 1、2 主窗口说明 ......................................................................9 二、 功能操作 .......................................................................... 10 2、1 管理 ............................................................................ 11 1) 查听 ............................................................ 11 2)操作员(权限设置) .............................................. 13 3)日志管理 ........................................................ 14 4)号码薄 .......................................... 错误!未定义书签。 5)区号表 .......................................................... 15 2.2 设 置 ........................................................................... 15 1) 系统设置 ........................................................ 15 2) 通道参数 ........................................................ 16 3) 免录音号码 ...................................................... 18 4) 硬件设置 ........................................................ 19 5) 录音目录 ........................................................ 20 6) 清除策略 ........................................................ 20 7) 备份策略 ........................................................ 21 8) 留言参数 ........................................................ 21 2、3 查 看 ........................................................................... 22 2、4 操作员 ......................................................................... 23 2、5 工 具 ........................................................................... 23 1) 数据备份 ........................................................ 23 2、6 帮 助 ........................................................................... 24
CardioMem CM 4000 ECG 录音器系列说明书

Simplicity and reliability – two of the outstanding quali-ties of the CardioMem ® CM 4000 ECG recorder series . This handy, lightweight recorder supports the user throughout all phases of recording Holter ECGs, from applying the electrodes and entering patient demographic data up to inspecting the ECG waveforms.Compelling Technology, Easy to Handle, Perfect for Everyday UseA large color display with touch screen offers an over-view of all the necessary information. The user is in-tuitively guided through the recorder menus.The CardioMem ® is small, lightweight and ingress protected against splashed water and dust, making it ideal for everyday use. Helpful functions, such as the detection of faulty electrode contacts or continuous battery monitoring, reduce the risk of corrupted or shortened recordings and hence the costs and troubles associated with having to repeat exami-nations. Optional auxiliary information that can aid in the fi nal diagnosis, such as transthoracic impedance variations (which show respiration activity during sleep) and pacemaker function, can be acquiredsimultaneously to the ECG without any additional electrodes. Users can choose between 3, 5, or 7 lead patient cables for different types of re-cordings. An optional Bluetooth ® module allows en-crypted, bi-directional data transfer with a PC. Prior to recording, patient demographic data can be wirelesslytransferred to the recorder , or entered manually using the recorder interface provided. A further feature is the optional voice recorder , which allows the user to dictate relevant patient information to the recorder. At the end of the recording period, the record fi ile is transferred to a PC via the Hi-Speed USB interface. CardioMem ® is then ready for the next patient.CardioMem ® CM 4000 and CM 4000 BBoth recorders are equipped with manual event mar-ker storage. The CardioMem ® CM 4000 has a battery compartment for one LR03 (AAA) battery, which is suffi cient for continuous recordings up to 48 hours.The CardioMem ® CM 4000 B has a slightly larger battery compartment and can operate up to 5 days with one 1.5 V LR6 (AA) battery. For even longer recordings, the battery can be replaced and the recording continued.CardioMem ®CM 4000 and CM 4000 BRecording: 2- or 3-channel ECG, optional respiration Operating time: Up to 5 days Sampling rate: 1024 Hz/12 bitDisplay: 2.4” touch screen, self-orientating Storage medium: Integrated micro SD card Data transfer: Hi-Speed USB, Bluetooth ®Casing: Protected against dust & splashed waterFeaturesMulti-channel digital ECG recorderCardioMem ®CM 4000 and CM 4000 BGeneral Dimensions n 65 mm x 108 mm x 14.5 mm n 65 mm x 108 mm x 16.5 mm Weight w/o battery n 76 g n 78 g with battery n 89 g n 99 gBattery typen 1 x 1.5 V Alkaline (LR03 / AAA) n 1 x 1.2 V NiMH HR03/AAA n 1 x 1.5 V Alkaline (LR6 / AA)n 1 x 1.2 V NiMH HR6/AA Operating time n 48 h n 120 hControls Event key and touch screen, multi-lingualDisplay 2.4”color display, 320 x 240 pixel ConnectorsPatient cableData transfer (Mini-USB)Available patient cables 2 channels (5 leads)3 channels (7 leads) 3 channels (3 leads)Parameters ECG channels2 or3 independent, bipolar chan-nels or 3 Einthoven leads, auto-matic selection via patient cableLower cut-off frequency 0.05 Hz and 0.25Hz, selectable Upper cut-off frequency 100 Hz Input dynamic range ± 6 mV Offset voltage range ± 300 mVPacemaker detection unipolar , bipolar and biventricular systems Pulse width 0.1 ... 2 ms Pulse amplitude 2 ... 250 mV Open lead detection YesAdditional channelsThoracic impedance variationsStorageStorage type Non-removable micro-SD card Sampling rate 1024 Hz Resolution 12 BitData storage 256 Hz, optional 1024 Hz Memory capacity ≥ 1 GBData transfer mode Hi-Speed USB 2.0Data transfer time < 30 s (for 24 h, 3 channel ECG)Wireless transmissionWireless transmission (Online-ECG and settings)Bluetooth ® 2.0 + EDR, Class 2Range (free field) Min. 5 mHF frequency range 2.4 ... 2.5 GHz ISM-Band HF output 0.5 ... 4.5 dBmClassificationsProduct classification IIa in accordance with 93 / 42 / EEC Classification of applied part Type CF (Cardiac Floating)Ingress protection IP 64 according to EN 60529UMDNS code 12-388Operating conditions Temperature 5 °C ... 45 °CRelative humidity 5 ... 95 %, non-condensing Storage and tranport conditionsTemperature –25 ... 70 °C;Relative humidity 0 ... 90 %, non-condensing Scope of deliveryRecorder, patient cable, pouch including waist belt, disposable pouches, batteries, user manual, quick start guide, transport boxn CM 4000 only n CM 4000 B onlyMunzinger Straße 3–579111 Freiburg / Germany Telephone +49 761 4543-0 Telefax +49 761 4543-233kardiologie @ Manufactured byDistributed by 00170-R e v DTechnical DataSubject to changeGETEMEDMedizin- und Informationstechnik AG Oderstraße 77 / 14513 Teltow / Germany Telephone +49 3328 3942-0 Telefax +49 3328 3942-99info @getemed.de / www.getemed.deAmbient pressure 700 ... 1060 hPa Ambient pressure700... 1060 hPa。
技电 Archivist录音系统 说明书
1-3-2 轨 监 ........................................................................................ 23
二、系统告警类别及处置方式........................ 24
三、系统维护作业.................................. 25
(e:\38.54%)空 间 ,而 BST 值 是 供 参 考 用 的 备 份参数值。 录音中:表示系统目前的动作状态,另尚有备份中、休息中、回 删中等。 14:25:43 :表示系统目前的时刻。 主要的功能选项,在下面的各节中均有详细说明。
2
Archivist 录音系统使用手册
1-1 设定
在设定功能选项中有三个选项,一是系统设定,一是工程设定, 一是关闭。本节仅对系统设定与关闭的内容加以说明,有关工程 设定的部份是给合格之技术维护人员参考用。
1-1-1-4 备 设 ................................................................................. 8
1-1-1-5 盘驱动 资 ................................................................... 10
1-1-1 统设 .......................................................................................... 3
1-1-1-1 设 ................................................................................. 4
操作与维护手册-维卡科技
eVRS嵌入式录音设备快速安装手册杭州维卡技术有限公司编者:日期:版本号:本手册专门用于指导您快速使用本产品的功能。
请参照“设备简介”、“设备的安装和准备”以及“使用基本功能”。
安全注意事项1)非厂家授权人员请勿打开设备外壳。
2)本产品采用交流 220V作为电源,请勿带电安装和移动。
目录第一章设备简介........................................................................................................................ - 4 -1.1配件介绍....................................................................................................................... - 4 -1.2 eVRS系列产品部位图................................................................................................. - 4 -1.3指示灯说明................................................................................................................... - 5 -第二章设备的安装和准备........................................................................................................ - 5 -2.1注意事项....................................................................................................................... - 5 -2.2安装步骤....................................................................................................................... - 5 -第三章使用基本功能.............................................................................................................. - 10 -3.1登录............................................................................................................................. - 10 -3.2录音记录查询:......................................................................................................... - 11 -第一章 设备简介在本章中,你将了解设备部位图、接口、指示灯。
唯创电子 WT2000B04 时间录音模块使用说明书

广州唯创电子有限公司MP3录音模块WT2000B04时间录音模块使用说明书V1.072020-08-29WT2000B04模块使用说明书V1.07模块简介WT2000B04是一款功能强大的新型高品质MP3录音模块,从多方位满足客户的要求。
它可以使用文件夹分类,指定文件名播放和指定索引序号播放两种播放方式,可以更灵活组织你的音频文件,并内置时钟芯片,可以读取录音时间并生成对应文件名。
同样也可以在指定文件夹内按照文件名录音或者按照索引序号录音和播放,并且可以指定删除任何一个文件。
具有读取存储器状态和存储器容量查询等功能,让你随时知道你的存储器状态,使用更灵活。
产品简介Array录音功能1.支持TF卡、U盘录音2.内置时钟芯片,支持时间录音3.支持索引录音和文件名录音4.支持MIC录音、LINE-IN录音、AUX录音音频文件类型1.支持WAV、WMA、MP3高品质音频格式播放2.支持采样率8K-48KHz,比特率32~128Kbps的MP3音频文件存储方式1.支持外挂TF卡(最大32G)和U盘(最大32G)2.128kbps比特率下,32GTF卡和32GU盘分别可存大概25小时的语音语音更换方式1.TF卡:可通过USB接口自由更换TF卡内的音频内容(XP系统、WIN7系统、WIN8系统)播放方式1.可外接耳机播放2.可外接功放芯片再推动喇叭时间设置1.可通过发指令设置时钟芯片的时间2.可通过TM.txt文件设置时钟芯片的时间目录1.产品概述 (5)2.产品特性 (5)3.技术规格 (6)4.电气特性 (6)5.模块管脚介绍 (7)6.功能介绍 (8)6.1.ADC按键控制功能 (8)6.2.串口通信控制指令 (8)6.3.控制协议 (9)6.4.播放类写操作指令 (10)6.4.1.写操作指令返回码格式 (10)6.4.2.指定文件索引播放命令 (10)注意:指定播放时,如果指定的曲目不存在时,停止播放。
MV7_guide_zh-CN说明书

MV7播客话筒The Shure MV7 USB cardioid microphone online user guide. Includes specifications and how to set up, update, and troubleshoot the mic. Version: 3.0 (2023-A)Table of ContentsMV7 播客话筒3简要说明3产品特点 3连接 MV7 3快速设置 4触控面板界面4控制部件 5 LED 指示灯运行状态 5 MV7 话筒5 MV7 输出 5安装说明5防风罩 6自动电平模式6近 7远 7其他技巧 7 Shure MOTIV 桌面应用程序7话筒设置:自动电平 8话筒设置:手动模式 9监听混音合成 9 EQ 模式 10高级话筒设置 10关于 MV7 的提示10 Control your Levels 11使用锁定模式锁定您的声音11监听声音11 MV7 播客话筒的三种使用方式11录音时如何避免爆破声11使用 MV7 进行视频通话11如何在 iOS DAW 中将 MV7 设置为聚合设备11故障排除 11 Firmware Update12在更新过程中保持设备连接 12系统要求12系统要求和兼容性:Mac 12系统要求和兼容性:Windows 12系统要求和兼容性:iOS 12系统要求和兼容性:Android 13规格13 MV7 轭架组装 15附件16提供的附件 16可替换配件 17可选配附件 17认证17用户信息 17••••••1.2.3.MV7 播客话筒简要说明Shure MV7 是一款具有专业品质的 USB 动圈话筒,非常适合要求声音清晰且音色均衡的近距离话筒应用场景。
美观耐用的全金属设计,具有可调节的轭架,可安装在各种话筒支架上,从而实现灵活放置。
触控面板用户界面可控制话筒增益、耳机电平、监听混音合成和静音。
产品特点便捷的即插即用操作兼容 Windows 和 Mac 计算机。
Anchor Audio A-Mini MiniV Lite 声音系统用户手册说明书
1. Position the AN-Mini with the front/speaker facing toward your audience
one of the MIC jacks (1/4” MIC jack or 3.5 mm PWR MIC mini jack)
100-0174-000/A - 02/11
1
For System Setup & Operation Videos Visit Our Website:
AN-Mini/MiniVox Lite Owners Manual
MADE IN USA
BASIC SYSTEM OPERATION
Janet Jacobs, President on behalf of all Anchor employees
CONTENTS
MiniVox Lite
(contains AN-Mini speaker monitor, wired microphone, and SOFT-30 soft case)
AN-Mini/MiniVox Lite Owners Manual
MADE IN USA
AN-Mini
A Message from the President
SIX YEAR WARRANTY
Congratulations on purchasing an Anchor Audio sound system, the choice of thousands of satisfied customers including the White House, prestigious universities, school districts nationwide, police and fire departments, and all branches of the U.S. military. Our products are made of the finest materials and built with pride in the U.S.
sE V系列 V BEAT V CLAMP 麦克风说明书
V KICK • V BEAT • V CLAMPUser Manual - EN Thank youWe would like to thank you cordially for choosing this sE product! This manual contains some important instructions for setting up and operating your new equipment. Please take a few minutes to read the instructions below carefully. We hope you will enjoy working with it as much as we enjoyed designing and building it for you.Most Sincerely,Your sE TeamBrief DescriptionsV KICKThe V KICK is a dynamic microphone intended for use with kick (bass) drums and other sources such as miking bass guitar speaker cabinets, floor toms or other large drums where capturing low-frequency energy is of the utmost importance. Its specialized capsule provides a sound character tailored specifically for kick drums, which can be further shaped with the use of two switches on the rear side of the microphone.V BEATThe V BEAT is a dynamic microphone intended for use with snare or tom drums, but it can also be used on sources such as miking electric guitar speaker cabinets or brass instruments. Its specialized capsule provides a highly detailed, natural sound character on snares or toms of any size.V CLAMPThe V CLAMP was designed to be the perfect companion for the V BEAT for snare or tom miking purposes. Its sturdy elastic clamp enables setup and tear-down within seconds, and it fits any popular snare or tom drum available.Product DetailsV KICKThe V KICK’s specialized capsule provides a sound character tailoredspecifically for kick drums, which can be further shaped with the use oftwo switches on the rear side of the microphone.The left-hand switch shapes the microphone’s overall voicing, with twoselectable options:“Classic” provides a more traditional kick drum sound with a familiarlow frequency punch and a warmer, more rounded sound. If a morecontemporary, aggressive sound is desired, the “Modern”settingemphasizes the low end and high end (a “scooped” sound).The right-hand switch specifically tailors the microphone’s high-frequency character: “Classic” provides a typical bite in the upper midrange (presence boost) and a more rounded andfamiliar HF sound, while “Modern” provides an open, clear and transient-rich top end for a more contemporary, aggressive drum sound.Each of these switches is recessed slightly into the mic body and requires a small flathead screwdriver or similar implement to switch between settings.The V KICK also has an integrated swivel joint that allows for easypositioning inside or outside a kick drum. Its extremely low profile allowsit to fit easily through the drum head port, and the XLR cable and micstand mount are in parallel to minimize cable clutter. Please rememberto securely tighten the swivel clamp whenever adjusting it, so as toprevent the mic from sagging during a performance or recording.V BEATThe V BEAT’s ultra-compact design lets it occupy a minimal amount of space on your drum, without interrupting lines of sight any more than necessary, and keeping it out of the way of drum sticks and cymbals. With the XLR connector and stand mount on the bottom of the V BEAT and in parallel with one another, the footprint and cable clutter are further minimized.Its swivel mount also allows theangle of the mic to be adjusted withgreat precision, so it can be aimed atalmost any part of the drum head tochange the character of the sound,and to minimize spill from otherdrums or cymbals.Please remember to securely tighten the swivel clamp whenever adjusting it, so as to prevent the mic from sagging during a performance or recording.V CLAMPThe V CLAMP can be fitted to any popular snare or tom drum availableby carefully stretching the elastic clamp over the drum rims to fit. Theheight and rotation of the connected microphone can be changed byloosening the V CLAMP’s knob and adjusting the position of the rod. Thisallows the mic to be positioned perfectly for any desired drum tone, or tominimize spill from nearby drums. The small hole at the bottom of therod can be used for a tie clip to attach a cable, or as a backup solution incase the knob becomes loose for any reason.What’s in the boxYour packaging should contain the follow items. If anything is missing, please contact your sE Electronics dealer and let them know.•Thread adapter•Zipper pouch•Spare black internal windscreen•Knurled nut for LP® Mic ClawTips for practical useThe closer the distance from the microphone to the source, the more bass you’ll get (“proximity effect”). Use this to your advantage when you want it - and be aware of it when yo u don’t.Aim the microphone towards the desired sound source, and angle it away from other drums and cymbals to reduce bleed and maximize off-axis rejection.Ensure that the microphone & cable do not touch the drum head, as this may affect the sound. Safety and maintenanceRisk of damagePlease make sure that the piece of equipment to which your microphone will beconnected fulfils the safety regulations enforced in your country and is fittedwith a ground lead.Cleaning the microphoneAfter every use, clean the microphone with a dry, soft cloth tissue and store it in a solid case or a zipper pouch.Technical SpecificationsV KICKFrequency Response Polar PatternV BEATFrequency Response Polar PatternSupportIn case you are experiencing any problems or have any questions regarding your sE product, please contact your dealer first for the fastest and more direct service. If an authorized service is required, it will be arranged by that dealer: /dealersIf you still have difficulties with support or assistance, please do not hesitate to contact us directly: /contact-usLastly, remember to register your new gear to extend your warranty to a full three years:/registrationContactFeel free to contact us:sE Electronics International, Inc. 448 Ignacio Blvd, STE 411 ************************* Novato, CA 94949USAOur international distributors and sales representatives: /contact-usThis product conforms to the standards listed in the Declaration of Conformity. Please contact us if you want to order a free copy of the Declaration of ConformityTechnical data subject to change without notice.Bedienungsanleitung - DE DankeWir möchten uns bei Dir herzlich bedanken, dass Du Dich für ein Mikrofon von sE Electronics entschieden hast. Diese Bedienungsanleitung beinhaltet wichtige Hinweise zur Inbetriebnahme und zur Anwendung des Produkts. Bitte nimm Dir daher kurz Zeit, diese Anleitung durchzulesen. Wir hoffen, dass Du mit dem Produkt genauso viel Spaß haben wirst, wie wir bei der Entwicklung sowie der sorgfältigen, händischen Fertigung mit viel Liebe zum Detail.Herzliche Grüße,Dein sE TeamKurzbeschreibungV KICKDas V KICK ist ein hervorragendes Mikrofon für die Abnahme von Basstrommeln (Kick Drum) sowie Anwendungen, bei denen eine Bassbetonung gewünscht wird, wie beispielsweise die Abnahme von Bassgitarren-Lautsprecherboxen, Tomtoms, oder anderen großen Trommeln. Der Charakter des dynamischen Mikrofons wurde speziell für diese Anwendungen konzipiert und kann mithilfe zweier Schalter auf der Rückseite des Mikrofons individuell angepasst werden.V BEATDas V BEAT eignet sich ideal für die Abnahme von Snare und Tomtoms. Die dynamische Kapsel verfügt über einen sehr ausgewogenen, offenen und klaren Klangcharakter und ist daher auch eine hervorragende Wahl für andere Instrumente wie beispielsweise die Abnahme von E-Gitarren-Lautsprecherboxen oder Blechblasinstrumenten.V CLAMPDie Montageklammer V CLAMP wurde als ideale Ergänzung zum V BEAT ausgelegt, um Snare und Tomtoms einfach, rasch und platzsparend zu mikrofonieren. Die robuste, aber dennoch flexible Klammer ermöglicht eine Montage auf fast allen gängigen Trommeln innerhalb von Sekunden. ProduktdetailsV KICKDas V KICK wurde speziell für die Abnahme von Basstrommeln (KickDrums) entwickelt. Mit den beiden Schaltern auf der Rückseite kanndessen Klangcharakter individuell angepasst werden.Der linke Schalter formt den generellen Klangcharakter. Es gibt zweiOptionen:…Classic“bietet einen traditionellen, warmen Klang mit bewussterBassanhebung. …Modern“ sorgt mit seinem zeitgemäßen Charakter miteiner bewussten Tiefen- und Höhenbetonung.Der rechte Schalter beeinflusst den oberen Beriech des Klangspektrums. Es gibt zwei Optionen: …Classic“bietet einen vertrauten, runden Klang mit einer bewussten Präsenzanhebung für mehrBiss. …Modern“ sorgt für einen sehr offenen, klaren und transientenreichen Klang – ideal für moderne oder aggressivere Klangvorstellungen.Die beiden Schalter sind bewusst vertieft angeordnet, um ein unbeabsichtigtes Verstellen zu vermeiden. Für die Betätigung empfehlen wir einen kleinen, flachen Schraubendreher oder ähnliches.Das integriertes Schwenkgelenk ermöglicht eine rasche und flexiblePositionierung des V KICKs - sowohl vor als auch in der Basstrommel. Diegeringen Abmessungen des Mikrofons erleichtern die Einführung durchdie Öffnung im Resonanzfell wesentlich. Der integrierte Stativanschlussund die XLR-Buchse sind parallel zueinander angeordnet, um dieKabelführung zu vereinfachen. Bitte achte immer darauf, vor derAufnahme bzw dem Bühneneinsatz den Feststellknopf fest anzuziehen,damit das Schwenkgelenk zuverlässig in seiner Position bleibt.V BEATDie besonders kompakteFormgebung des V BEATsermöglicht einen sehrplatzsparenden Einsatz, der sowohlbei der Montage als auch beimSpiel entgegenkommt. Derintegrierte Stativanschluss und die XLR-Buchse sind parallel zueinander angeordnet, um die Kabelführung zu vereinfachen. Bitte achte immer darauf, vor der Aufnahme beziehungsweise dem Bühneneinsatz den Feststellknopf fest anzuziehen, damit das Schwenkgelenk zuverlässig in seiner Position bleibt.V CLAMPDie V CLAMP lässt sich durch vorsichtiges Dehnen der flexiblenKlammer sehr einfach auf alle gängigen Trommeln montieren. Die Höheund der Winkel lassen sich durch das Lösen der Feststellschraube undVerstellen des Stabes rasch und einfach individuell anpassen. Durchdiese Verstellmöglichkeiten der Mikrofonposition kann man einerseitsden Klang bewusst beeinflussen und andererseits diesupernierenförmige Richtwirkung der Kapsel nutzen, um Einstreuungen unerwünschter Schallquellen wie beispielsweise HiHat, Becken oder benachbarter Trommeln gezielt zu reduzieren. Die kleine Öffnung am unteren Ende des Stabes ermöglicht die Montage von Kabelbindern oder anderen Hilfsmitteln, aber auch eine zusätzliche Sicherung des Mikrofons, falls sich die Feststellschraube unbeabsichtigt lösen sollte.LieferumfangBitte kontrolliere gleich nach dem Öffnen den Inhalt der Verpackung. Falls sie nicht vollständig ist, kontaktiere bitte Deinen sE Electronics Händler. Folgende Komponenten sollten enthalten sein: •Gewindeadapter•Aufbewahrungstasche•schwarzer, interner Windschutz•Gekordelte Mutter für LP® Mic ClawPraxistippsJe näher sich das Mikrofon an der Schallquelle befindet, desto stärker werden Bassfrequenzen betont, je weiter weg, desto schwächer (Nahbesprechungseffekt). Mache Dir diesen Effekt zu nutze. Richte das Mikrofon direkt und so nah wie möglich auf die Schallquelle, um einen trockenen, direkten Klang zu erhalten und das Auftreten von Rückkopplungen zu verringern.Weder das Mikrofon noch das Kabel sollten die Felle berühren, da dies den Klang beeinflussen könnte.Sicherheit und PflegeBeschädigungsgefahrBitte stelle sicher, dass die an das Mikrofon angeschlossenen Geräte diegültigen Sicherheitsbestimmungen erfüllen und mit einer Sicherheitserdungverbunden sind.Reinigung des MikrofonsWir empfehlen das Mikrofon nach jedem Gebrauch mit einem trockenen, fusselfreien Tuch zu reinigen und es in einem soliden Koffer oder in der mitgelieferten Aufbewahrungstasche aufzuheben.Technische DatenV KICKFrequenzgang PolardiagrammV BEATFrequenzgang PolardiagrammKundenserviceFalls Du zu Deinem sE Mikrofon Fragen hast oder damit Probleme auftreten sollten, wende Dich für eine möglichst rasche Abwicklung bitte direkt an den Händler. Wenn eine technische Unterstützung erforderlich ist, wird diese durch den Händler angefordert./dealersSollten dennoch Probleme beim Kundenservice auftreten, wende Dich bitte direkt an uns: /contact-usAbschließend möchten wir Dich an die 3-Jahres-Garantie von sE Electronics erinnern. Bitte registriere Dich dazu hier: /registrationKontaktSo kannst Du mit uns direkten Kontakt aufnehmen:sE Electronics International, Inc. 448 Ignacio Blvd, STE 411 ************************* Novato, CA 94949USAUnsere internationalen Distributoren und Handelsvertreter:/contact-usDieses Produkt entspricht den in der Konformitätserklärung angegebenen Normen. Du kannst die Konformitätserklärung gerne bei uns kostenlos anfordern. Technische Änderungen vorbehalten.使用手册 - CN 致谢非常感谢您购买我们sE的这款麦克风! 这本使用手册包含了一些如何安装和操作您的新麦克风的使用说明。
维卡仪操作规程(三篇)
维卡仪操作规程维卡仪是一种多功能的智能设备,用于帮助用户完成各种任务。
为了保证用户的安全和使用体验,下面是关于维卡仪的操作规程,希望能够帮助您更好地使用维卡仪。
第一章总则第一条为了正确、安全地使用维卡仪,用户在使用前应仔细阅读本规程,并按照规程进行操作。
第二条用户在使用维卡仪时应遵循法律法规,并尊重他人的合法权益,不得进行任何非法活动。
第三条维卡仪提供的服务仅限于个人和非商业用途,若用户需要进行商业活动,应事先与维卡仪官方联系并获得许可。
第二章设备使用第四条用户在使用维卡仪前应确保设备已经充电并开机。
第五条用户在使用维卡仪时应保持设备与通信设备的连接稳定,并确保设备处于信号良好的区域。
第六条用户在使用维卡仪时应按照说明书的操作指导进行操作,不得随意更改设备设置。
第七条用户在使用维卡仪时应注意避免设备过热、潮湿或遭到撞击。
第八条若用户发现维卡仪出现异常情况,应立即停止使用,并联系维卡仪官方进行维修或更换。
第三章功能操作第九条维卡仪提供了多种功能,用户在使用时应根据需求选择相应的功能,并按照操作指导进行操作。
第十条用户在使用维卡仪时应遵循设备的使用原则,不得滥用功能,造成对他人的侵害或骚扰。
第十一条在使用维卡仪进行语音交互时,用户应清晰地发音,并保持一定的距离,以便设备能够准确识别用户的指令。
第十二条在使用维卡仪进行图像识别时,用户应保持清晰的图像,并按照提示进行操作。
第四章隐私保护第十三条维卡仪在收集和使用用户的隐私信息时应遵循相关法律法规,并保证用户的隐私安全。
第十四条用户在使用维卡仪时应妥善保管个人信息,不得泄露给任何第三方。
第十五条维卡仪在提供服务时,可能会收集用户的个人信息,用户应在使用前仔细阅读隐私政策,并决定是否同意提供个人信息。
第五章安全保障第十六条维卡仪设备有一定的安全风险,用户在使用时应注意保护设备,避免设备被盗或损坏。
第十七条用户在使用维卡仪时应遵守安全规定,不得进行任何可能危害他人或自己的行为。
录音器VM809操作说明书_1(090617)
功能特征:1、音乐文件夹支持播放MP3、WMA音乐格式功能。
2、LQ、SQ、HQ、三种录音类型可供选择,实现高保真语音及线路录音功能:LQ:32Kbps MP3格式录音模式;SQ:64Kbps MP3格式录音模式;HQ:128Kbps MP3格式录音模式;Line In:128Kbps MP3格式立体声录音模式。
3、LINE IN接口线路输入; 实现立体声音源转录功能,实现电话录音。
4、快速分段录音功能。
5、定时录音,可预先设置录音起始时间、录音长度,到设定时间会自动录音功能。
6、声控录音功能,能根据声音信号的大小而自动进行录音。
7、录音时间显示,内存可录时间显示。
8、播放中可快进、快退播放。
可设置播放速度,实现快速、慢速放音功能。
9、背光液晶显示屏,全中文、多种语言选择。
支持歌词同步显示功能。
10、具有多种循环模式、多种音效模式、A-B复读播放功能。
11、自动关机:本机待机状态下,关机设定的时间内没有任何操作自动关机功能。
12、多级数字音量显示控制系统。
13、精密电量监控,低电压提示,录音低压时自动保存功能。
14、真正的USB-2.0(HS)通讯接口。
15、内置单声道麦克风及支持外接麦克风录音,高保真喇叭输出。
16、内置可充电的锂离子电池。
内置超亮的LED可供一般照明使用。
17、密码锁功能,可实现防止文件被他人下载或窃听。
18、时钟功能.19.支持Window98/ME/2000/XP,以及Mac OS 10.X和Linux Kemel2.4.2以上20、用USB插口作为电源可以录音及播放功能.VM-809系列数码录音笔操作说明书目录一、注意事项……………………………………………………二、外观图及各部分名称………………………………………………三、基本操作说明………………………………………………3.1.开机………………………………………………………………………3.2.工作模式及文件夹播放…………………………………………………3.3.关机.…………………………………………………………………….四、录音…………………………………………………………4.1.选择录音类型……………………………………………………………4.2.麦克风录音.………………………………………………………………4.3.录音暂停与停止……………………………………………………………4.4.声控录音设置…………………………………………………………………4.5.LINE IN立体声线路录音…………………………………………………4.6.电话录音…………………………………………………………………4.7.定时录音设置…………………………………………………………………4.8.监听录音设置…………………………………………………………………五、播放功能………………………………………………………5.1音乐文件夹与语音文件夹…………………………………………………5.1.1音乐文件夹……………………………………………………………5.1.2语音文件夹……………………………………………………………5.1.3播放暂停……………………………………………………………5.1.4音量调节……………………………………………………………5.1.5播放中进入录音……………………………………………………………5.2播放效果……………………………………………………………………5.2.1循环模式……………………………………………………………………5.2.2音效模式……………………………………………………………………5.2.3播放速度……………………………………………………………………5.2.4复读模式……………………………………………………………………5.3歌词同步显示………………………………………………………………六、删除……………………………………………………………6.1删除文件……………………………………………………………………6.2删除全部……………………………………………………………………七、背光设置………………………………………………………八、语言选择………………………………………………………九、关机设定………………………………………………………十、储存状况………………………………………………………十一、软件版本………………………………………………………十二、密码设置和密码修改…………………………………………12.1.密码设置.………………………………………………………………12.2.输入密码.………………………………………………………………12.3.密码修改..………………………………………………………………十三、照明灯设置…………………………………………………十四、时钟……………………………………………………………十五、电脑连接……………………………………………………………14.1.系统要求…………………………………………………………………14.2.传输数据…………………………………………………………………十六、充电……………………………………………………………十七、疑难解答……………………………………………………………十八、规格参数……………………………………………………………一、注意事项:●为了保持良好性能,请避免在下列场所放置或使用本机。
WTR-S录音模块使用说明书.doc-1
WTR-S录音模块使用说明书首先,感谢您成为我司的顾客,并使用我司自主研发的WTR-S录音模块,您的选择是明智的。
我司是一家致力于开发和生产语音板块的专业厂家,拥有实力超群的研发团队和研制语音板块的扎实基础,以保证我们所发行产品的稳定性、优越性和专业性。
我司信奉顾客为上帝,为客户提供优质可靠的售后跟踪服务和技术支持,让顾客对我司产品的应用更为从容不迫得心应手。
不断更新的技术支持与优良的售后服务是我司一直屹立在语音板块市场上的主要因素之一。
为了使您更好的使用我们的产品,请您务必在使用之前详读说明书。
最后,再次感谢您选购和使用我司的高科技产品。
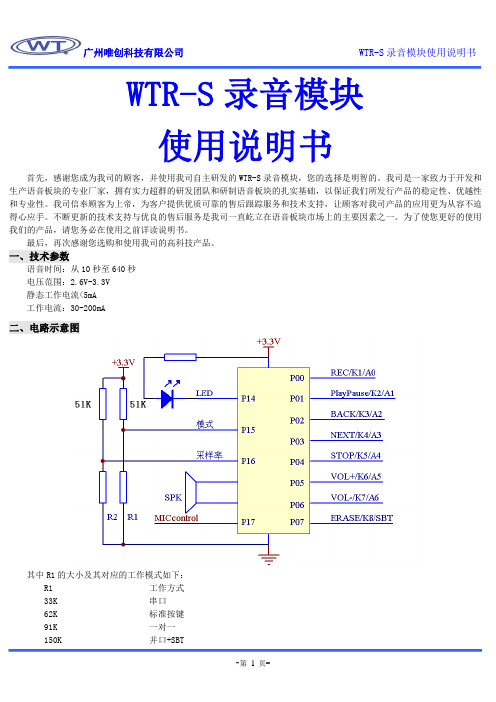
一、技术参数语音时间:从10秒至640秒电压范围:2.6V-3.3V静态工作电流<5mA工作电流:30-200mA二、电路示意图其中R1的大小及其对应的工作模式如下:R1 工作方式33K 串口62K 标准按键91K 一对一150K 并口+SBTR2的大小及其对应的采样率如下:R2 采样率33K 8K62K 12K91K 16K150K 22K在串口模式下,P05为CS线,P06为SCL线,P07为SDA线PCB板面图:三、管脚接线说明序号名称功能1 VCC DC2.6——3.3V,高于3.3V,有可能烧坏芯片2 GND 电源地3 P00 REC/K1/A04 P01 PLAY/PAUSE/K2/A15 P02 BACK/K3/A26 P03 NEXT/K4/A37 P04 STOP/K5/A48 P05 VOL-/K6/A5/CS9 P06 VOL+/K7/A6/SCLK10 P07 ERASE/K8/SBT/SDA11 P10 悬空12 P11 悬空13 P12 悬空14 P13 悬空15 P14 闪灯,外接LED16 P15 通过接不同阻值电阻,进行模式选择,17 P16 通过接不同阻值电阻,进行采样率选择18 P17 悬空19 RST 复位脚,低电平复位。
VITO Voice2Go 用户手册说明书
VITO Voice2Go User's Manual OverviewRequirementsInstallationActivationMain interface and functionsHow to useContact usOverviewVITO Voice2Go is a Pocket PC application that allows managing your Pocket PC with voice only. Using voice commands you can call your contacts, launch and close applications and modify system settings. VITO Voice2Go uses commands that you record by yourself, thus it understands the language you speak!VITO Voice2Go is based on the Voice Recognition Engine originally developed by VITO Technology. It provides precise and accurate voice recognition even in poor conditions. RequirementsWindows Mobile Classic (Pocket PC) 5.0/6.0Windows Mobile Professional (Pocket PC Phone Edition) 5.0/6.0Installation1. Download the program's archive from/en/products/download.php?ID=724&BID=232. Extract the archive into any folder on your computer.3. Connect your Pocket PC to your computer.4. Start the installation by clicking on the setup file.5. Follow the instructions on your screen.ActivationDownloadable version of VITO Voice2Go is fully functional andhas to be purchased and activated for further usage after 14 daystrial period. Please purchase VITO Voice2Go at /en/products/list.php?BID=23&ID=724. To activate:connect your device to Internetstart VITO Voice2Gogo Menu > Aboutpress Activate button, type into the empty field the activationcode from the email you received from VITO Technology afterpurchasing VITO Voice2Go, choose “I have Internet” and press Activate button below.In case you can't connect to Internet from your pocket PC, activation will take more time:start VITO Voice2Gogo Menu > Activatepress Activate button, type into the empty field the activationcode from the email you received from VITO Technology afterpurchasing VITO Voice2Go, choose “I have no Internet” andpress Activate button below. Carefully read instructions on thescreen. After you've performed the necessary action you willreceive an e-mail with the necessary instructions for completingyour activation.Note: as you can see on-line activation is much easier than theoff-line variant, which can take considerably more time. Werecommend you on-line activation. If you have any questions or problems regarding the activation process, please contact oursupport at /en/support/.BackMain Interface and FunctionsAccess the Main menu by tapping Voice2Go Today Plug in. If there is no Voice2Go icon, launch it by tapping its icon in the Programs.Manage CommandsHere you can record new voice commands. Tap: Recordto record a new command Playto play back the recorded command Delete to delete the recorded command. There are 4 sets of commands that can be selected in the top menu by pressing left or right buttons: magic words, applications, contacts, and macros . Magic words list contains the so-called "magic words": Magic Word – starts recognition process Correct - approves recognized voice command Wrong - cancels recognized voice command Turn off - turns off a magic word mode Application list contains all installed applications and some system settings. Select a setting or an application and tap Record to assign a voice command. Contacts list contains all contacts from the Contacts application. Select a contact and tap Record. Note. You can also assign a voice command to a contact from standard contacts: tap and hold any contact and choose Assign voice command from the drop-down menu. Macros list allows recording or deleting macros (sequences of stylus taps). Note. Macro Recorder responsible for recording macros is already included into EXE file, but in case, you wish to install CAB file and use macro recording, you need to download and install Macro Recorder's CAB file from here: /files/VitoMacroRecorder.cab To record a macro: 1. Tap New... 2. VITO MacroRecorder is not found on your device. Install?3. Tap Yes button.4.After VITO MacroRecorder has been installed. GoManage Commands > choose in the upper bar Macrosby tapping left or right.Prepare for recording macros (open/close necessarywindows) and click ok in the dialog box.5. Tap in the desired place of the screen6. Repeat as many times as you need.7. In the end, tap red dot in the center of the screen andenter a name for the macro.Select a macro and tap Record to assign a voice commandto this macro.You can sort items in the lists by tapping letters on akeyboard that are contained in the name after that onlynames with this letters will be displayed.Magic Word mode is off or onTurn Magic word on(off) - enables(disables) the Magic word mode. In this mode, Voice2Go listens to everything you say to your Pocket PC. If you say a "Magic word" (which you pick and record yourself), it activates the recognition dialog. When this mode is on, you don't have to launch Voice2Go tapping on the screen or pressing a hardware button. To enable this mode, you should first record a Magic word in Settings.Important! It's recommended to connect your Pocket PC to an external power source when Magic Word mode is on.Recognizing voice commandsTo start an application, call a contact or perform any other action using previously recorded voice commands press the button “Recognize commands” in the main window of the program. You can do the same by tapping the button with circle in the Voice2Go Today plug-in. Still another way to initiate recognition of your voice commands is to pronounce the Magic Word (Magic Word mode must be on).When the button is active, the application is listening to your command.When the button is active, the application is processing the info.When the button is active, the application has finished recognition of your command.SettingsThis tab contains all general settings.Check Auto start after reset if you want Voice2Go tostart automatically after each reboot of the pocket PC.Magic word is on only with external power optionkeeps magic word mode off until Pocket PC is plugged intoelectric supply. Then it can be switched on.Low magic word sensitivity you may use it in MagicWord mode on when Pocket PC “thinks” that it hears theMagic Word and in fact it just resembles your Magic Word.Check Detect incoming calls if you want Voice2Gopronounce the corresponding recorded command when acontact calls. There should be a voice command assignedto this contact.Uncheck Play sounds if you want to turn off soundsduring recognition process.Uncheck Wait for confirmation if you do not wantVoice2Go to ask for confirmation for every recognizedcommand.If you check Play detected command, Voice2Go will playa recognized command before performing it.Select Language for the Voice2Go interface.Main MenuBackup allows to backup and restore your voicecommands.To backup voice commands (before performing hard-resetor when moving the commands):1. Tap Backup voice tags...2. Select a folder for saving the backup archive3. Tap ProceedTo restore tags from a backup archive:1. Tap Restore tags...2. Select the backup archive file3. Tap ProceedHot buttons. You may assign a hardware button whichstarts voice command recognition process.Help for the manual.About for info about a program and activation.Exit quite speaks for itself.Back How to use1. Set a hardware button or a magic word for starting voice recognition process.In the main window of VITO Voice2Go that appears after tapping the Today plug-in or launching VITO Voice2Go from Programs press Menu > Hot buttons and tick a button.To set a magic word, tap the Today plug-in > Commands, select Magic word and tap Record. Pronounce your command for the Magic Word and close this dialog by tapping OK. Enable the Magic word mode. Pronounce the magic word to start the recognition dialog of Voice2Go.2. Record your voice commands.To record voice commands, tap button Commands, select applications, contacts or macros, select a program or a contact to which you want to assign your voice commands and tap Record.It is strongly recommended to record voice commands in silence. They must be audible and clear, and differ from each other. You can assign as many commands as you need.Voice2Go uses clipping system to cut out silence gaps before and after the voice command. The voice command should contain no silence gaps on each side. Otherwise you should record it again.3. Pronounce the command!To launch an application or dial a contact, pronounce your magic word or press an assigned hardware button. It will start the recognition dialog. Now pronounce your command.If the application has recognized some other command, you can interrupt dialing or launching an application with the assigned button, magic word ("Wrong"), or by tapping Wrong. Tap Correct (or pronounce a magic word for "Correct") if recognition result is correct.Note. To record magic words for "Correct" and "Wrong", select Commands, select magic words, select Correct or Wrong and tap Record.Back Contact usIf you have any questions, comments or suggestions on VITO Voice2Go, please email us at/en/support/.。
电话商务录音系统使用说明书
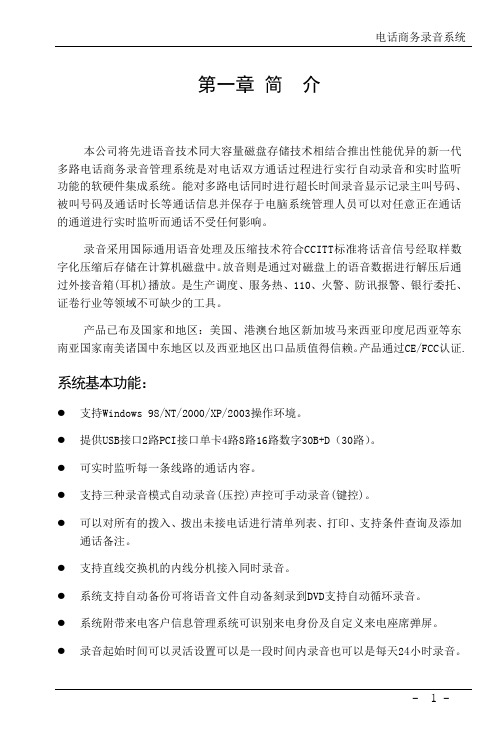
第一章简介本公司将先进语音技术同大容量磁盘存储技术相结合推出性能优异的新一代多路电话商务录音管理系统是对电话双方通话过程进行实行自动录音和实时监听功能的软硬件集成系统。
能对多路电话同时进行超长时间录音显示记录主叫号码、被叫号码及通话时长等通话信息并保存于电脑系统管理人员可以对任意正在通话的通道进行实时监听而通话不受任何影响。
录音采用国际通用语音处理及压缩技术符合CCITT标准将话音信号经取样数字化压缩后存储在计算机磁盘中。
放音则是通过对磁盘上的语音数据进行解压后通过外接音箱(耳机)播放。
是生产调度、服务热、110、火警、防讯报警、银行委托、证卷行业等领域不可缺少的工具。
产品已布及国家和地区:美国、港澳台地区新加坡马来西亚印度尼西亚等东南亚国家南美诸国中东地区以及西亚地区出口品质值得信赖。
产品通过CE/FCC认证.系统基本功能:●支持Windows 98/NT/2000/XP/2003操作环境。
●提供USB接口2路PCI接口单卡4路8路16路数字30B+D(30路)。
●可实时监听每一条线路的通话内容。
●支持三种录音模式自动录音(压控)声控可手动录音(键控)。
●可以对所有的拨入、拨出未接电话进行清单列表、打印、支持条件查询及添加通话备注。
●支持直线交换机的内线分机接入同时录音。
●系统支持自动备份可将语音文件自动备刻录到DVD支持自动循环录音。
●系统附带来电客户信息管理系统可识别来电身份及自定义来电座席弹屏。
●录音起始时间可以灵活设置可以是一段时间内录音也可以是每天24小时录音。
●用户可在特殊号码表里自定义不录音的电话号码如拨打95555,163上网录音系统不启动录音)。
●系统具有完整的操作日志可以记录对系统的所有操作。
●支持每个用户对某些线路拥有操作的权限可设定不同等级的密码保护除了系统管理员使用最高级的密码外还有用户密码、录音文档查询密码等多种保护措施。
●线路适用于普通电话外线、分机内线、ISDN引出的模拟线、无线对讲机的音频输出线等。
VLAN400使用手册

使用手冊VLAN400嵌入式电话录音系统目录VLAN400简介 (1)VLAN400 产品外观介绍 (2)VLAN400 PC 软件功能介绍 (4)PC软件主画面功能分部介绍 (4)录音记录 (12)系统设定 (19)端口参数 (21)声控参数 (24)网络设定 (24)硬盘参数,系统日志 (25)录音时间段 (25)交换机SMDR (26)交换机SMDR通讯设定 (27)其他设定 (28)在线用户 (28)在线账号 (28)账号管理 (29)新增账号 (29)触摸屏操作画面 (30)录音记录 (31)端口监控 (32)端口状态 (32)搜寻记录 (33)嵌入式电话录音系统使用说明书VLAN400简介VLAN400 嵌入式电话录音系统,是最新的嵌入式录音系统,采用最新的硬件架构,CPU 主频达到667MHZ,采用三星最新的ARM芯片,它是一台完全独立无须依赖电脑即可工作的录音设备。
设备最大支持模拟线路同时录音,自带触摸屏,喇叭,网络接口,用户通过触摸屏即可完成基本的操作,以及对线路使用情况进行实时的监控,录音记录查询,声音回放,即时监听等等功能,大大方便了设备的施工,安装,调试,是一台真正意义上的嵌入式录音仪。
VLAN400 设备特点1.开机速度快,20秒钟能够进入系统;2.支持大容量硬盘500GB 1T GB 2T GB SATA接口硬盘;3.支持最大模拟线路同时录音,可以灵活组合8,16,24,32 线;4.自带高清触摸屏,操作简单方便,大部分操作可以在触摸屏操作完成;5.自带网络,方便组网,远程监控;6.自带播放喇叭,声音可以即时播放;7.录音卡片采用抽取式,增加卡片方便简单,支持热拔插;8.硬盘放在硬盘盒内部,方便更换硬盘;9.无需电脑全自动录音,完全嵌入式设备;10.功耗小,发热量小,不用风扇可以7X24X365 开机运行。
VLAN400 PC 软件安装系统需求1.Windows7/Vista/XP/2000;2.Pentium 400MHZ CPU 以上;3.256MB RAM;4.1GB 或更多硬盘容量;5.标准的网络RJ45 ,用于连接录音主机(VLAN400 主机);6.标准的声音输出设备(声音播放,远端监听)。
Jensen JWM72A 移动音频系统用户手册说明书

Installation and Owner's ManualMOBILE AUDIO SYSTEMJWM72AJWM72AIntroduction (3)Disc Notes (4)Installation (5)Wiring (6)Basic Operation (7)Tuner Operation (10)Disc Operation (11)DVD/VCD Operation (12)MP3/USB Operation (14)Bluetooth Operation (16)App Operation (17)Remote Control Operation (18)DVD Setup Menu (20)Care and Maintenance (22)Troubleshooting (22)Specifications (23)FCC Notice (23)INTRODUCTIONDISC NOTESInsert label side up.Do not bend.Never touch theunderside of the disc.INSTALLATIONWIRINGBASIC OPERATIONNote: Beep tone off will not affect the audible tone of the alarm clock.You can connect a USB device directly to USB interface (10) on the front of the JWM72A for playback of compatible files. Press the MODE button repeatedly until USB mode is selectable. Refer to “MP3/USB Operation” on page 13 for NOTE: USB will not support Apple device playback. The USB input suppliesJWM72ANo12 Device StatusUser OperationOperation ResultsRemarksHead UnitHead UnitTVTVPower ON (HDMI ARC)Power ON Power OFF Power OFF Power OFFPower OFFPower OFFPower ONPower OFFPower OFF(Last mode is HDMI ARC before Power OFF)Power OFF(Last mode is HDMI ARC before Power OFF)Power ON(HDMI ARC)DISC ModeDISC disc content TV, AV, USB, HDMI(non HDMI ARC)TV, AV, USB, HDMI(non HDMI ARC)TV, AV, USB, HDMI(non HDMI ARC)TV, AV, USB, HDMI(non - HDMI ARC)TV, AV, USB,HDMI(non- HDMI ARC)Power OFF Head Unit Power ON Head Unit Power ON Head UnitAudio OutAudio Out Audio Out Audio OutAudio Out Audio Out Audio Out No Audio out(No HDMI ARC Audio Out)TV CEC Mode OFF TV Audio Receiver OFF TV Audio Receiver ONTV CEC Mode ON Audio Recevier ONNo Audio OutNo Audio Out No Audio OutNo Audio OutNo Audio Out No Audio OutNo Audio Out TV Speaker ONTV Speaker ON TV Speaker ON TV Speaker ON TV Speaker ONIf the TV can play the device automatically, there will be TV audio out. Otherwise, switch to USB mode to play the device.Power OFF TVPower ON TV HDMI ARC ModeHDMI ARC ModeHDMI ARC ModePower ON (HDMI ARC)Power ON (Last mode before power off)34567 89 Switch Head unit to another mode(Such as FM, Bluetooth, DVD or AUX)Switch TV to another(such asTV, AV, USB, non-HDMI ARC mode)Switch to HDMI ARC Mode and Audio out from Head unit in HDMI ARC mode See the ARC function Operation in the following table:TUNER OPERATIONAutomatically Store / Preset Scan (AS/PS)Automatically StoreSelect a band. Press and Hold the AS/PS button (12) for more than3 seconds and the unit will automatically scan for and store 12 or 18 strongeststations for AM or FM respectively. To stop this function before the automatic storingis complete, press AS/PS again.DISC OPERATION2. Use the or cursor buttons (15) on the remote control to access the TRK ##/## –"1/18" indicates the first of 18 tracks on the CD is currentlyplaying.and “Press the button on the remote control (26) repeatedly to view the following information for elapsed/remaining playing time:00:02:18 –total elapsed playing time of current track;C –00 :34 :37–remaining playing time of current track;2. Use the ◄►or ▲▼cursor buttons (15) on the remote control to accessthe fields on the "PROG" screen.3. Use the number buttons on the remote control to enter a track number in each field.4. Press the u/|| button (17) on the remote control or highlight “PLAY” on screen and then press the ENTER button (5) to begin playback in the numbered order indicated to delete the list, highlight “CLEAR” and then press ENTERPROG to exit the programmed playback screen.TT 5/8 – “5 / 8" indicates the fifth of 8 titles on the DVD is currently playing. CH 2/16 – “2 / 16" indicates that the second of 16 chapters on the DVD is 1/5 ENG –English is the selected audio language out of 5 possible choices;5.1 CH –The current language is recorded in 5.1 surround sound;1/4 ENG –English is the selected subtitle language out of 4 possible choices;OFF –There are no alternate angles recorded for this scene.1Programmed Playback1. Press the PROG button (7) on the remote control to access the programmedMP3/USB OPERATIONSelect one of these icons to access the corresponding media on your disc or USBIf the media type is not present, the icon will not be selectable.Photos:VideoPlay/PausePress the || button (7) to suspend or resume media playback.Track Selector >>| buttons (6, 8) or |<< or >>|button (14) on the remote control toadvance to the next or previous track in the current folder. The selected track number4.Press the ENTER knob (4) to confirm selection.TRK ##/## – “9/150” indicates the ninth of 150 tracks on the disc is currently playing.– “X” indicates repeat play is OFF, “1” indicates repeat song, and “D” indicatesrepeat directory (folder).Press repeatedly to view the following information for elapsed/remaining playing00:02:18 – total elapsed playing time for discC –00 :34 :37 – remaining playing timeRemote Control Direct Track EntryTo select a file directly, use the number pad on the remote control (9). For singledigit entries, press the corresponding number. For two digit entries, press the10+ button followed by the last digit (i.e., for file 16, press 10+ and thenBLUETOOTH OPERATIONPausing PlaybackREMOTE CONTROL OPERATION1920 2122 23 24 25 26 2728TITLERPTANGLEGOTODisplayAS/PSMENUPress to view titlemenu. Use directionalarrows and play buttonto play selected title.May not be supportedby all discs.Repeat track Repeat chapterSOURCEZOOMAUDSelect source forplaybackAccess Audio Menuoptions.Browse preset stations(10 sec. interval). Pressand hold to scan/storestations.Access system MENU.Access system MENU.Access system MENU.Access Audio Menuoptions.Access Audio Menuoptions.Access Audio Menuoptions.Select source forplaybackSelect source forplaybackSelect source forplaybackSelect exact time, trackor chapter for playback.Select exact time, trackor chapter for playback.Select alternate viewingangle, if available.Zoom picture or pressrepeatedly to changemagnification level.Display currentplayback information onthe screen.Display currentplayback information onthe screen.Press to access systemMENU. Press and holdto access DVD MENU.JWM72ADVD SETUP MENU–TV System: This item is used to select a TV signal system to match your TV set. Select one of the following options: AUTO, NTSC or PAL.–Screen Saver: Turn Screen Saver feature On/Off.–TV Type: Select one of the following picture formats: 4:3PS, 4:3 LB or 16:9.4:3 is a letterbox selection, and 16:9 is wide screen.–Password: This item allows the selection of a new four-digit code to use for security purposes.–Rating: Select the parental control level for all DVD play. The security password is required to make changes to this feature.–Default: Use this item to restore default settings at any time. On-Screen Display (OSD) Language: Set the OSD language to one of the following: English, German, Spanish, French.Audio Language: Set the audio language to one of the following:English, Japanese, French, Spanish, Portuguese, Latin or German.Subtitle Language: Set the subtitle language to one of the following: English, French, Spanish, Portuguese, German or OFF.Menu Language: Set the menu language to one of the following: English, French, Spanish, Portuguese, German.While in the setup menus, use your directional arrows to select and changeAudio Out: This item defines the digital output format.Key: This item changes the audio output key.Video SetupDigital Setup The Video Setup menu controls the following features: The Speaker Setup menu controls the following features:–Brightness –Contrast –Hue –Saturation –Sharpness–OP Mode: Select LINE OUT or RF REMOD. –Dynamic Range: Select FULL, 6/8, 4/8, 2/8 or OFF. –Dual Mono: Select STEREO, MONO/L, MONO/R or MIX MONO.JWM72ACARE AND MAINTENANCETROUBLESHOOTING –Keep the product dry. If it does get wet, wipe it dry immediately. Liquids might contain minerals that can corrode the electronic circuits. –Keep the product away from dust and dirt, which can cause premature wear of parts. –Handle the product gently and carefully. Dropping it can damage circuit boards and cases, and can cause the product to work improperly. –Wipe the product with a dampened cloth occasionally to keep it looking new. Do not use harsh chemicals, cleaning solvents, or strong detergents to clean the product. –Use and store the product only in normal temperature environments. Hightemperature can shorten the life of electronic devices, damage batteries,and distort or melt plastic parts. Ignition Interference The most common source of noise in reception is the ignition system. This is a result of the radio being placed close to the ignition system (engine). This type of noise can be easily detected because it will vary in intensity of pitch with the speed of the engine. Usually, the ignition noise can be suppressed considerably by using a radiosuppression type high voltage ignition wire and suppressor resistor in theignition system. (Most vessels employ this wire and resistor but it may benecessary to check them for correct operation.) Another method of suppressionis the use of additional noise suppressors. These can be obtained from mostCB/A radio or electronic supply shops. Radio reception in a moving environment is very different from reception in a stationary environment (home). It is very important to understand the difference.AM reception will deteriorate when passing under a bridge or when passingunder high voltage lines. Although AM is subject to environmental noise, it hasthe ability to receive at great distance. This is because broadcasting signalsfollow the curvature of the earth and are reflected back by the upper atmosphere. Symptom Solution Radio will not turn ON or No front panel operation Radio turns ON,but no sound Bluetooth Device will not connect/pair CD/DVD does notplay correctly CD/DVD does notplay correctlyNo AM or FM reception DVD plays sound but no video Unit does not respond toRemote ControlTry the reset button. Check fuse.Check 12V+ on accessory wire to radio (RED wire)Check Ground.Verify Volume, Fader/Balance, Mute controls are set correctly (see owner's manual). Try the reset button.Verify proper speaker selection.Verify proper speaker connections.Check for shorts or open circuits on speaker wires.ŸIf short on “A” channel, “B & C” channels will continue tofunction.ŸIf short on “B and/or C” channels, “A” channel will continueto function. Make sure the disc is a compatible disc.Make sure unit has power and no other CD/DVD is currently inside.Make sure no devices are already connected. Disconnect any connected devices.On your smart device, turn the Bluetooth off and on and try again.Check to make sure disc is inserted correctly. Verify disc is free from dirt, scratches, etc. Check with factory Cds. Check factory original CDs for compatibility warnings (due tovarious copy-protection, multimedia content, etc.).Verify you are tuned to a valid station.Check your antenna connection on rear of stereo.Try a different antennaMake sure the HDMI cable is routed from the HDMI output tothe input on the television.Verify that you have a clear line of sight for the IR signal.Check the batteries. JWM72ASPECIFICATIONS。
Volvo 汽车音频系统说明书
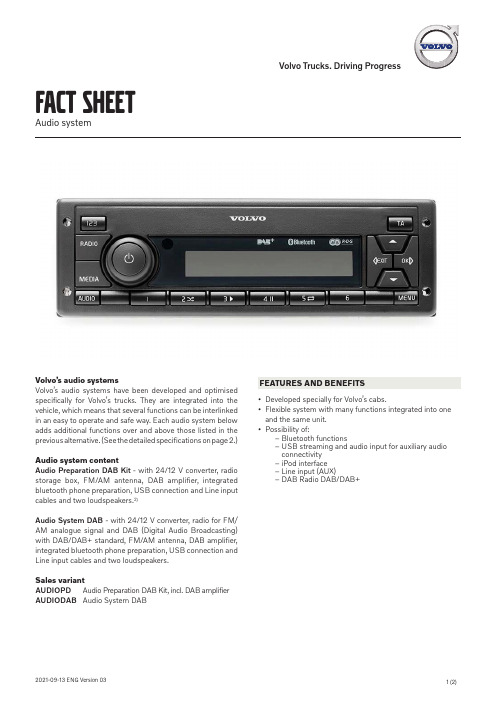
Volvo’s audio systemsVolvo’s audio systems have been developed and optimised specifically for Volvo’s trucks. They are integrated into the vehicle, which means that several functions can be interlinked in an easy to operate and safe way. Each audio system below adds additional functions over and above those listed in the previous alternative. (See the detailed specifications on page 2.) Audio system contentAudio Preparation DAB Kit - with 24/12 V converter, radio storage box, FM/AM antenna, DAB amplifier, integrated bluetooth phone preparation, USB connection and Line input cables and two loudspeakers.2)Audio System DAB - with 24/12 V converter, radio for FM/ AM analogue signal and DAB (Digital Audio Broadcasting) with DAB/DAB+ standard, FM/AM antenna, DAB amplifier, integrated bluetooth phone preparation, USB connection and Line input cables and two loudspeakers.Sales variantAUDIOPD Audio Preparation DAB Kit, incl. DAB amplifier AUDIODAB Audio System DAB FEATURES AND BENEFITS• Developed specially for Volvo’s cabs.• Flexible system with many functions integrated into one and the same unit.• Possibility of:– Bluetooth functions– U SB streaming and audio input for auxiliary audioconnectivity– iPod interface– Line input (AUX)– DAB Radio DAB/DAB+Extended mute functionsMakes the audio system ready for integration of features such as phone, navigation equipment and safety systems. This function automatically disconnects the audio system’s reg-ular sound source to temporarily give priority to other sound sources as needed.BluetoothStandard for wireless communication that can be used between the phone and the vehicle’s audio system to provide a handsfree function. Incoming phone numbers are shown in the driver info display and audio system display. The phone’s microphone is installed in the front shelf and sound is relayed via the audio system’s loudspeakers.It also contains the following features:- Bluetooth audio streaming - Bluetooth handsfree phone - S econd bluetooth handsfree phone with ability to pair-up, use and switch between phones.Line input3.5 mm stereo line input makes it possible to connect an external audio source such as an MP3 player. Additional inputs (at the back of the audio unit) make it possible to connect other peripheral equipment such as a TV and DVD.USB socketMakes it possible to connect a USB memory drive or latest versions of iPod (Nano, Touch, 4,5 and 6G) and/or tablets, which is then controlled via the audio system’s regular controls. For connection of an iPod, it is also necessary to hook up to the line input.1)RDS – Radio Data SystemSwitches automatically to the strongest radio transmitter for the selected channel as you drive along, and also shows programme information and interrupts transmission to provide traffic information.FACT SHEETAudio system1) See the driver’s manual for practical information.NB! The range of audio systems may vary between different markets.• Standard – Not availableVolvo retains the right to modify design and specifications without prior notification.2) For Audio Preparation package AUDIOPD the included ACON-USB andXCON-AUD are not connected/functional. The wires for these equipment´s are normally connected to the radio, and this package do not have a radio.• The USB needs a 12-volt connection, make sure to check what is needed to connect this in a safe way.• The XCON needs to be connected to a radio or media device, that supports XCON.。
Volvo Trucks音频系统说明书
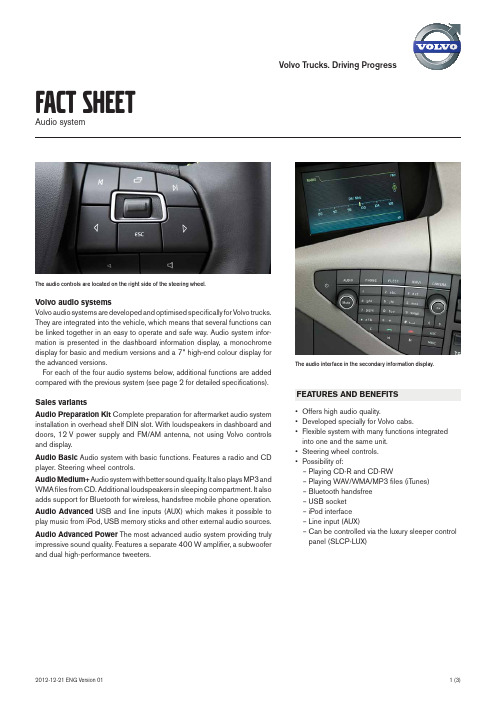
Volvo Trucks. Driving ProgressVolvo audio systemsVolvo audio systems are developed and optimised specifically for Volvo trucks.They are integrated into the vehicle, which means that several functions canbe linked together in an easy to operate and safe way. Audio system infor-mation is presented in the dashboard information display, a monochromedisplay for basic and medium versions and a 7" high-end colour display forthe advanced versions.For each of the four audio systems below, additional functions are addedcompared with the previous system (see page 2 for detailed specifications).Sales variantsAudio Preparation Kit Complete preparation for aftermarket audio systeminstallation in overhead shelf DIN slot. With loudspeakers in dashboard anddoors, 12 V power supply and FM/AM antenna, not using Volvo controlsand display.Audio Basic Audio system with basic functions. Features a radio and CDplayer. Steering wheel controls.Audio Medium+ Audio system with better sound quality. It also plays Mp3 andWMA files from CD. Additional loudspeakers in sleeping compartment. It alsoadds support for Bluetooth for wireless, handsfree mobile phone operation.Audio Advanced USB and line inputs (AUX) which makes it possible toplay music from ipod, USB memory sticks and other external audio sources.Audio Advanced Power The most advanced audio system providing trulyimpressive sound quality. Features a separate 400 W amplifier, a subwooferand dual high-performance tweeters.• Offers high audio quality.• Developed specially for Volvo cabs.• Flexible system with many functions integratedinto one and the same unit.• Steering wheel controls.• possibility of:– playing CD-R and CD-RW– playing WAV/WMA/Mp3 files (iTunes)– Bluetooth handsfree– USB socket– ipod interface– Line input (AUX)– C an be controlled via the luxury sleeper controlpanel (SLCp-LUX) FACT SHEETAudio systemFeAtureS And BeneFitSThe audio controls are located on the right side of the steering wheel.The audio interface in the secondary information display.extended mute functionsprepares the audio system for integration with features such as the mobile phone, navigation equipment and safety systems. It automatically mutes the audio system for temporary priority to other sound sources.different audio formatsOffering support for CD-R and CD-RW, the audio system can play recordable CDs. Audio variants that offer support for WAV/ WMA/Mp3 files (iTunes) can also play these file formats. Bluetooth handsfreeStandard for wireless communication which can be used between the phone and the vehicle’s audio system to provide a handsfree function that is operated via the steering wheel controls. Control of phonebook is possible. The incoming phone number is displayed in the driver information and audio system displays. The phone’s microphone is fitted in the front shelf and sound is relayed via the audio system’s loudspeakers.Line input3.5 mm stereo line input makes it possible to connect an external sound source, e.g. an Mp3 player. Additional inputs (at the back of the unit) make it possible to connect other peripheral equipment such as CD and B/iPodMakes it possible to connect a USB memory stick or an ipod that can be operated by the audio system’s regular controls, e.g. the steering wheel controls. Connection of an ipod also requires con-nection to the line input.1)external memoryMemory details: size up to 2 TB.Control from resting compartmentThe Volvo Audio system can be controlled remotely from the rear wall Luxury sleeper control panel (SLCp-LUX).rdS – radio data SystemSwitches automatically to the strongest radio transmitter for the selected station along your route and also shows programme information and interrupts regular programming whenever traffic information is transmitted.1)See driver’s manual for practical information. NB! The range of audio systems may vary between different markets.2) Separate 400 W amplifier included.3)Not available for European markets.Package contents。
- 1、下载文档前请自行甄别文档内容的完整性,平台不提供额外的编辑、内容补充、找答案等附加服务。
- 2、"仅部分预览"的文档,不可在线预览部分如存在完整性等问题,可反馈申请退款(可完整预览的文档不适用该条件!)。
- 3、如文档侵犯您的权益,请联系客服反馈,我们会尽快为您处理(人工客服工作时间:9:00-18:30)。
电话录音系统操作手册目录系统简介 (3)一、基本功能 (3)二、技术参数 (4)系统安装 (5)一、硬件安装 (5)1、1 微机 (5)1、2 PCI接口录音卡安装 (6)二、软件安装 (8)2、1 板卡驱动安装 (8)2、2 录音系统软件的安装 (9)软件操作 (9)一、系统登陆 (9)1、1 登陆 (9)1、2 主窗口说明 (10)二、功能操作 (12)2、1 管理 (13)1) 查听 (13)2)操作员(权限设置) (15)3)日志管理 (16)4)区号表 (17)2.2 设置 (17)1) 系统设置 (17)2) 通道参数 (18)3) 免录音号码 (21)4) 硬件设置 (21)5) 录音目录 (22)6) 清除策略 (23)7) 备份策略 (23)8) 留言参数 (24)2、3工具 (25)数据备份 (25)系统简介当基于法律需求或责任认定等原因,需要保留电话通讯过程的录音时,配备一套完善的电话录音系统便显得极为重要。
如何准确无误的保留电话录音以及如何高质量的、方便的查听录音记录,均是系统面临的重要课题。
91CTI电话录音系统,是本公司凭借多年来在语音技术方面的专业经验,使用最新数字电子技术,辅以现今为止最先进的电脑及Windows软件所设计完成的一套整合性系统,它可以同时对多路电话通话进行录音、监听和查询。
91CTI电话录音系统可广泛的应用于商业电话录音,电力调度录音,热线服务电话录音,投诉电话录音,关键岗位电话录音,传呼台录音,金融证券录音,公安报警录音,安全部门的监听电话,航空、铁路、交通运输调度录音及各行业的生产调度录音。
一、基本功能1.流行的Windows 98/NT/2000/XP操作环境。
2.单机系统最多64线模拟电话。
3.采用全新的pci接口的即插即用录音卡。
4.录音、监听对通话双方没有任何影响。
5.可实时监听每一条线路的通话内容。
6.可以根据给定的条件对录音进行查听。
7.可以完整的检测并记录所有外拨电话号码与来电显示号码。
8.系统具有自动增益功能,可以自动调节通话双方的音量,而不至于声音太小。
9.报警功能,当线路出现异常,比如断线:系统会通过语音提示报警。
10.所有谈话内容录为wav格式,可以在任意WINDOWS电脑中播放。
11.可以设置任意多个盘(可以是硬盘、分区或网络映射盘)自动循环录音。
12.录音启动方式灵活,具有压控、键控、声控三种启动方式。
13.录音起始时间可以灵活设置,可以是一段时间内录音,也可以是每天24小时录音。
14.提供不同的压缩率,满足不同用户的需要,20G的硬盘最多可以保存3500多个小时。
15.线路适用于电话外线、分机内线、无线对讲机的音频输出线等。
16.当系统的硬盘将满时,系统将自动清除最先录音的资料,以保证系统可以常年不间断运行。
17.方向判别。
可以判别出呼叫方向,如呼入还是呼出。
18.系统具有强大的操作员权限管理功能,除设定每个操作员的权限外,还可以设置每个操作员可操作的通道。
19.内置有区号表,可以记录每一次通话的地区。
20.具有自启动功能,当操作系统启动后会自动运行程序。
21.可以对每个通道进行信号音分析,对于持续多次忙音的电话可以停止录音。
22.系统具有多种管理权限,可以满足多用户的需要。
当操作员未登录或操作员不具有退出系统的权限时,将无法关闭程序甚至操作系统;23.系统具有完整的操作日志,可以记录对系统的所有操作。
二、技术参数接口方式:模拟中继录音输入阻抗直流>= 470K欧姆交流(1000HZ时)>=10K欧姆隔离阻抗脚直流均:>= 470K 欧姆录音模块直流阻抗:>1M隔离耐压:>=500VDC录音格式:LAW、ADPCM,GSM格式的WINDOWS WAV文件数据速率:64 KBPS /32 KBPS /13.6 KBPS全通道信噪比:>= 42 dB频响:300~3400HZ放音输出功率>= 0.5 W全通道失真:< 5%音量调整:-20db ~ +20db硬盘容量(20 G最多可存放3500小时)系统安装一、硬件安装本录音系统硬件由微机(工控机)、录音卡、连线组成。
1、1 微机奔腾以上电脑配置即可。
1、2 PCI接口录音卡安装1.8线语音卡外观示意图2. 8线PCI 录音卡录音输入线(RJ11)分布(自上到下):3. 16线语音卡外观示意图第 二 路第一路第 四 路第三路第 六 路第五路第 八 路第七路插口1 插口2插口3插口4固定片电话线接口 (RJ11)放音输出1号模块插座(第0、1通道)2号模块插座(第2、3通道) 3号模块插座(第4、5通道) 4号模块插座(第6、7通道)固定片1号模块插座(第0、1通道) 2号模块插座 (第 2、3通道) 3号模块插座 (第4、5通道) 4号模块插座5号模块插座 (第8、9通道) 6号模块插座 (第10、11通道) 7号模块插座 (第12、13通道) 8号模块插座H.100总线放音输出4. 16线PCI 录音卡录音输入线(RJ45)分布(自放音输出至下):第一路第二路第三路 第四路第五路第六路第七路第八路第九路 第十路 第十一路 第十二路 第十三路 第十四路 第十五路第十六路5.注意:以上全部设置必须在微机电源关闭的情况下进行。
6.注意:由于电话录音系统一般在无人操作的情况下长时间运行,因此必须关闭CMOS 和WINDOWS 操作系统中的电源管理中有关CPU 、硬盘等省电的选项,使微机始终处于全速运行状态,否则可能导致性能下降或出现意外错误。
电话线接口 (RJ45)插口1插口2插口3插口4二、软件安装PCI总线的显著优势是可以使录音卡成为即插即用(PNP)设备,安装PCI录音卡就象安装PCI的声卡、网卡一样方便。
用户可以省去一大堆繁琐的I/O地址和IRQ设置,并且不用担心出现资源冲突而导致安装失败。
2、1 板卡驱动安装1、关掉待安装微机所有电源,包括所有外设的电源,按需要安装好相应的模块,板卡直接安装在PC机的PCI插槽上,连接好线路即可。
2、开机后从“我的电脑”→“属性”→“硬件””→“设备管理器”中找到新硬件,右击新硬件选择“属性”,再选安装驱动程序。
3、在对话框中点击“下一步”按钮,出现带有选择按钮的窗口,选择第二项:“选择显示指定位置的所有驱动程序列表,以便可从列表中选择所需的驱动程序”(2000下的提示为“显示已知设备驱动程序的列表,从中选择特定驱动程序)”。
4、点击“下一步”按钮,从窗口列表中选择“PCI DEVICE”,在接下来弹出的窗口中,点击“从磁盘安装”按钮。
5、插入驱动程序安装光盘,通过“浏览”按钮找到WIN98或者WIN2000目录中的Tvcsys.inf 文件,点击“确定”按钮。
6、出现“添加新硬件向导”提示框,并列出型号。
在型号列表框中选择所安装板卡的型号,然后点击“下一步”。
7接下来的对话框中,点击“下一步”。
(WIN2000中会提示所装的驱动没有数字签名,并询问是否继续安装,选择继续装)8、系统拷贝文件完成后,点击“完成”。
2、2 录音系统软件的安装启动安装盘目录下的“录音系统.EXE”程序,本程序将指引您在您的计算机上安装本系统。
软件操作一、系统登陆1、1 登陆启动录音系统,进入界面后直接按ENTER键登陆界面,系统默认管理员:首次安装后系统内只有一个操作员administrator默认密码;admin1)登录:用户输入用户名与密码后,可以实现登录,不同的用户可以有不同的权限。
2)注销:用户完成操作后,按ESC或者操作员菜单下的注销可以注销此用户,这样其他用户要操作本系统时必须登录。
3)界面切换:切换主界面中各线路状态的显示方式,详细见主界面一与主界面二。
4)退出:退出时必须登陆。
1、2 主窗口说明主界面一主界面主要功能说明:1.主界面:两个图都是录音系统的主界面,他们之间可以自由切换。
主界面有基本信息在右侧显示2.菜单栏与快捷栏:主界面的最上方是菜单栏,紧接着是快捷按钮。
菜单条与快捷按钮可以实现相同的功能,不过快捷按钮更方便些。
3.通道区域:屏幕中间的大区域为每个通道的状态显示。
按快捷栏的视图可切换显示方式。
屏幕的右方与下方为用户与系统的状态显示。
4.监听:同一时刻只能监听一个通道。
5.音量调节:在基本信息条上最底部有一个音量调节选项,直接设置即可。
6.刷新:按刷新按钮或F5可以刷新屏幕的显示主界面二二、功能操作⏹管理⏹设置⏹查看⏹操作员⏹工具⏹帮助2、1 管理1)查听本功能是录音系统最常用的功能,在这里,用户可以完成录音文件的查听、备份、删除、注释、导出等功能。
查询:用户必须先查询出录音文件,然后才可以对文件进行放音,注释,备份、删除等操作。
1. 查询条件☐方向:拨入还是拨出,默认为不限方向。
☐振铃:被查询的电话记录的振铃次数,输入的数值可以用逗号或空格分开,或用'-'号指定范围,比如输入: 0,1-3,5, 那么系统认为振铃次数为0,1,2,3,5的都符合条件。
☐通话类型:市话还是长途。
☐拨入拨出号码:此号码为用户拨入或拨出的电话号码,如只输入139系统则查询出包含139所有的电话号码。
☐本机号码:查询与输入的本机号码相似的录音记录。
☐通道:匹配通道,允许数字或以逗号,空格,破折号分割的一个范围例如(1,3,4-6)可以查询1,3,4,5,6通道☐用户:指定要查询的用户名,支持模糊查询,比如要查询用户"张三"的所有通话记录,那么输入用户名"张%",注意'%'是通配符。
☐备注:根据用户设置的备注信息进行查询。
☐时间:可以设置查询的开始与结束时间,默认为当天。
☐查询备份的录音记录:缺省情况下,用户从录音盘中查询录音文件的,若用户点击查询备份的录音记录,则系统可以从其他盘中查询录音文件(注意备份方式,详见备份操作)。
查询结果说明:支持右键菜单☐统计:录音数据统计。
☐删除:删除所有选中的语音文件。
☐备注:将选中的语音文件加注释。
☐全选:当用户需要编辑某一录音文件时,需要选中某一、某些录音文件。
方法为鼠标单击某一行,或按Ctrl复选。
当某一行被选中后,该行将被蓝色条框覆盖。
用户点击全选按钮后,所有语音文件将被选中。
☐取消:用户点击全选按钮后,点击视窗内任意空白处取消。
☐保存:导出通话记录为Excel文件☐播放:可批量播放选中的录音文件。
☐双击选中的文件出现下图播放界面:图右下六个按钮功能分别为:自动连续播放;录音实际时间和放音进度的切换;备注;导出;播放导进文件;关闭。
右边横条为音量调节。
2)操作员(权限设置)☐点击左侧的用户列表,右侧屏幕即可显示出该用户的相应权限。