青州码头小型机项目实施方案,文档四、安装配置SUN Cluster 3.2双机软件
小码头工程施工方案

小码头工程施工方案一、项目背景小型码头是连接水上交通和陆上交通的重要基础设施,也是城市建设的重要配套设施。
本项目为某城市新建的小型码头工程,旨在提升城市水上交通运输能力,改善市民生活。
二、施工前准备1. 确定施工图纸和设计方案,明确工程范围和施工要求。
2. 召集工程施工人员和管理团队,确定施工计划和工期安排。
3. 确认施工所需材料、设备和机械,并做好采购和安排。
4. 制定安全生产计划和应急预案,确保施工过程中安全生产。
三、施工方案1. 岩土勘察:在施工前进行岩土勘察,了解施工地质情况,确定地基处理方案。
2. 地基处理:根据岩土勘察结果,对施工地基进行处理,确保码头基础稳固。
3. 海域疏浚:进行海底疏浚,确保水域深度符合港口通航要求。
4. 桩基施工:根据设计要求进行桩基施工,确保码头建筑稳固。
5. 主体建筑施工:进行码头主体建筑的施工,包括码头平台、护岸、栏杆等。
6. 设备安装:安装和调试各种设备和机械,包括码头船台、灯具、验票设施等。
7. 道路和绿化:对码头周边道路进行修建和绿化,确保交通畅通和环境美观。
8. 安全检查和试运行:对施工完成后的码头进行安全检查和试运行,确保设施安全可靠。
四、施工流程1. 岩土勘察:委托专业勘察公司进行岩土勘察,并按照结果制定地基处理方案。
2. 地基处理:进行地基处理,包括挖土填方、石方垫层等工程。
3. 海域疏浚:进行海底疏浚作业,并清理疏浚后的泥沙。
4. 桩基施工:根据设计要求进行桩基施工,包括钻孔、灌注桩等工程。
5. 主体建筑施工:对码头主体建筑进行施工,包括混凝土浇筑、砌体施工等。
6. 设备安装:对各种设备和机械进行安装和调试,确保设施正常运行。
7. 道路和绿化:对码头周边道路进行修建和绿化工程。
8. 安全检查和试运行:对施工完成后的码头进行安全检查和试运行,确保设施安全可靠。
五、安全保障1. 建立安全生产管理制度,加强对施工人员的安全教育和培训。
2. 严格执行施工现场安全规定,加强对施工现场的安全管理和监督。
文档4,安装配置Cluster双机软件

青州码头小型机项目实施方案(Solaris 10 U7 + Oracle 10g + ZFS + Sun Cluster 3.2 U2)文档四、安装配置SUN Cluster 3.2双机软件一、软件安装前的配置工作配置IPMP修改fqoradb1的/etc/hosts信息如下:## Internet host table#::1 localhost127.0.0.1 localhost192.168.11.120 fqoradb1 loghost 192.168.11.130 fqoradb2#IPMP test address192.168.11.121 fqoradb1-e1000g0-test192.168.11.122 fqoradb1-e1000g2-test#logic address192.168.11.140 fqoradb配置e1000g0和e1000g2两张网卡创建/etc/hostname.e1000g0文件填入以下内容fqoradb1 netmask + broadcast + group ipmp0 upaddif fqoradb1-e1000g0-test netmask + broadcast + deprecated -failover up创建/etc/hostname.e1000g2文件填入以下内容fqoradb1-e1000g2-test netmask + broadcast + group ipmp0 deprecated -failover up修改fqoradb2的/etc/hosts信息如下:## Internet host table#::1 localhost127.0.0.1 localhost192.168.11.130 fqoradb2 loghost 192.168.11.120 fqoradb1#IPMP test address192.168.11.131 fqoradb2-e1000g0-test192.168.11.132 fqoradb2-e1000g2-test#logic address192.168.11.140fqoradb配置e1000g0和e1000g2两张网卡创建/etc/hostname.e1000g0文件填入以下内容fqoradb2 netmask + broadcast + group ipmp0 upaddif fqoradb2-e1000g0-test netmask + broadcast + deprecated -failover up创建/etc/hostname.e1000g2文件填入以下内容fqoradb2-e1000g2-test netmask + broadcast + group ipmp0 deprecated -failover up建立两机Cluster通讯环境在根目录下创建.rhosts文件,内容如下:+创建/etc/hosts.equiv文件,内容如下:fqoradb1fqoradb2fqoradb两台服务器都需要进行以上配置。
sun_cluster3.2系统安装文档

sun cluster3.2系统安装文档一、硬件:主机: Sun M5000阵列: EMC 阵列一台二、软件:Sun Cluster 3.2SunCluster_HA_Oracle_3.2三、OS安装情况:Solaris10四、具体安装步骤:(严格按照EIS: Installation Checklist for SunCluster 3.x Systems)1、按用户要求安装OS:预留/globaldevices 512M for clustermetadb 30M for SVM打最新的补丁集2、检查和配置的文件如下:/etc/hosts/etc/clusters/etc/defaultdomain/.rhostseeprom local_mac_address?=true配置/etc/system文件set ce:ce_taskq_disable=1 用ce做传输set md:mirror_root_flag=1# ndd -set /dev/ip ip_strict_dst_multihoming 0修改文件:/kernel/drv/nd.conf 修改did设备数量及metaset的数量。
/kernel/drv/scsi_vhci.conf 配置mpxio配置。
*以上准备工作完毕即可安装SC3.23、在节点1(ismp-sun1)上:Option: 1*** New Cluster and Cluster Node Menu ***Please select from any one of the following options:1) Create a new cluster2) Create just the first node of a new cluster on this machine3) Add this machine as a node in an existing cluster?) Help with menu optionsq) Return to the Main MenuOption: 2*** Establish Just the First Node of a New Cluster ***This option is used to establish a new cluster using this machine asthe first node in that cluster.Before you select this option, the Sun Cluster framework softwaremust already be installed. Use the Java Enterprise System (JES)installer to install Sun Cluster software.Press Control-d at any time to return to the Main Menu.Do you want to continue (yes/no) [yes]?>>> Typical or Custom Mode <<<This tool supports two modes of operation, Typical mode and Custom.For most clusters, you can use Typical mode. However, you might need to select the Custom mode option if not all of the Typical defaultscan be applied to your cluster.For more information about the differences between Typical and Custommodes, select the Help option from the menu.Please select from one of the following options:1) Typical2) Custom?) Helpq) Return to the Main MenuOption [1]:>>> Cluster Name <<<Each cluster has a name assigned to it. The name can be made up of any characters other than whitespace. Each cluster name should beunique within the namespace of your enterprise.What is the name of the cluster you want to establish? cluster >>> Check <<<This step allows you to run sccheck(1M) to verify that certain basichardware and software pre-configuration requirements have been met.If sccheck(1M) detects potential problems with configuring thismachine as a cluster node, a report of failed checks is prepared andavailable for display on the screen. Data gathering and reportgeneration can take several minutes, depending on systemconfiguration.Do you want to run sccheck (yes/no) [yes]?Running sccheck ...scinstall: Requesting explorer data and node report from node1. scinstall: node1: Explorer finished.scinstall: node1: Starting single-node checks.scinstall: node1: Single-node checks finished.Press Enter to continue:>>> Cluster Nodes <<<This Sun Cluster release supports a total of up to 16 nodes.Please list the names of the other nodes planned for the initialcluster configuration. List one node name per line. When finished,type Control-D:Node name (Control-D to finish): node1Node name (Control-D to finish): node2Node name (Control-D to finish): ^DThis is the complete list of nodes:node1node2Is it correct (yes/no) [yes]?>>> Cluster Transport Adapters and Cables <<<You must configure at least two cluster transport adapters for each node in the cluster. These are the adapters which attach to the private cluster interconnect.Select the first cluster transport adapter:1) e1000g12) e1000g23) OtherOption: 1Will this be a dedicated cluster transport adapter (yes/no) [yes]?Searching for any unexpected network traffic on "e1000g1" ... done Verification completed. No traffic was detected over a 10 second sample period.Select the second cluster transport adapter:1) e1000g12) e1000g23) OtherOption: 2Will this be a dedicated cluster transport adapter (yes/no) [yes]?Searching for any unexpected network traffic on "e1000g2" ... doneVerification completed. No traffic was detected over a 10 secondsample period.>>> Quorum Configuration <<<Every two-node cluster requires at least one quorum device. Bydefault, scinstall will select and configure a shared SCSI quorumdisk device for you.This screen allows you to disable the automatic selection andconfiguration of a quorum device.The only time that you must disable this feature is when ANY of theshared storage in your cluster is not qualified for use as a SunCluster quorum device. If your storage was purchased with yourcluster, it is qualified. Otherwise, check with your storage vendorto determine whether your storage device is supported as Sun Cluster quorum device.If you disable automatic quorum device selection now, or if youintend to use a quorum device that is not a shared SCSI disk, youmust instead use scsetup(1M) to manually configure quorum once both nodes have joined the cluster for the first time.Do you want to disable automatic quorum device selection (yes/no) [no]? yes>>> Automatic Reboot <<<Once scinstall has successfully initialized the Sun Cluster softwarefor this machine, the machine must be rebooted. After the reboot,this machine will be established as the first node in the new cluster.Do you want scinstall to reboot for you (yes/no) [yes]?>>> Confirmation <<<Your responses indicate the following options to scinstall:scinstall -i \-C cluster \-F \-T node=node1,node=node2,authtype=sys \-wnetaddr=172.16.0.0,netmask=255.255.248.0,maxnodes=64,maxprivatenets= 10 \-A trtype=dlpi,name=e1000g1 -A trtype=dlpi,name=e1000g2 \-B type=switch,name=switch1 -B type=switch,name=switch2 \-m endpoint=:e1000g1,endpoint=switch1 \-m endpoint=:e1000g2,endpoint=switch2Are these the options you want to use (yes/no) [yes]?Do you want to continue with this configuration step (yes/no) [yes]? Checking device to use for global devices file system ... doneInitializing cluster name to "cluster" ... doneInitializing authentication options ... doneInitializing configuration for adapter "e1000g1" ... doneInitializing configuration for adapter "e1000g2" ... doneInitializing configuration for switch "switch1" ... doneInitializing configuration for switch "switch2" ... doneInitializing configuration for cable ... doneInitializing configuration for cable ... doneInitializing private network address options ... doneSetting the node ID for "node1" ... done (id=1)Checking for global devices global file system ... doneUpdating vfstab ... doneVerifying that NTP is configured ... doneInitializing NTP configuration ... doneUpdating nsswitch.conf ... doneAdding cluster node entries to /etc/inet/hosts ... doneConfiguring IP multipathing groups ...doneVerifying that power management is NOT configured ... doneUnconfiguring power management ... done/etc/power.conf has been renamed to /etc/power.conf.100408143602Power management is incompatible with the HA goals of the cluster.Please do not attempt to re-configure power management.Ensure network routing is disabled ... doneNetwork routing has been disabled on this node by creating /etc/notrouter.Having a cluster node act as a router is not supported by Sun Cluster.Please do not re-enable network routing.Log file - /var/cluster/logs/install/scinstall.log.1585Rebooting ...updating /platform/i86pc/boot_archive...this may take a minute安装完ismp-sun1后,重新启动后安装ismp-sun2root@node2 # scinstall*** Main Menu ***Please select from one of the following (*) options:* 1) Create a new cluster or add a cluster node2) Configure a cluster to be JumpStarted from this install server3) Manage a dual-partition upgrade4) Upgrade this cluster node5) Print release information for this cluster node* ?) Help with menu options* q) QuitOption: 1*** New Cluster and Cluster Node Menu ***Please select from any one of the following options:1) Create a new cluster2) Create just the first node of a new cluster on this machine3) Add this machine as a node in an existing cluster?) Help with menu optionsq) Return to the Main MenuOption: 3*** Add a Node to an Existing Cluster ***This option is used to add this machine as a node in an already established cluster. If this is a new cluster, there may only be asingle node which has established itself in the new cluster.Before you select this option, the Sun Cluster framework software must already be installed. Use the Java Enterprise System (JES) installer to install Sun Cluster software.Press Control-d at any time to return to the Main Menu.Do you want to continue (yes/no) [yes]?>>> Typical or Custom Mode <<<This tool supports two modes of operation, Typical mode and Custom. For most clusters, you can use Typical mode. However, you might need to select the Custom mode option if not all of the Typical defaultscan be applied to your cluster.For more information about the differences between Typical and Custom modes, select the Help option from the menu.Please select from one of the following options:1) Typical2) Custom?) Helpq) Return to the Main MenuOption [1]:>>> Sponsoring Node <<<For any machine to join a cluster, it must identify a node in thatcluster willing to "sponsor" its membership in the cluster. Whenconfiguring a new cluster, this "sponsor" node is typically the firstnode used to build the new cluster. However, if the cluster isalready established, the "sponsoring" node can be any node in thatcluster.Already established clusters can keep a list of hosts which are ableto configure themselves as new cluster members. This machine should be in the join list of any cluster which it tries to join. If thelist does not include this machine, you may need to add it by usingclaccess(1CL) or other tools.And, if the target cluster uses DES to authenticate new machinesattempting to configure themselves as new cluster members, thenecessary encryption keys must be configured before any attempt to join.What is the name of the sponsoring node? node1>>> Cluster Name <<<Each cluster has a name assigned to it. When adding a node to thecluster, you must identify the name of the cluster you are attempting to join. A sanity check is performed to verify that the "sponsoring"node is a member of that cluster.What is the name of the cluster you want to join [cluster]?Attempting to contact "node1" ... doneCluster name "cluster" is correct.Press Enter to continue:>>> Check <<<This step allows you to run sccheck(1M) to verify that certain basic hardware and software pre-configuration requirements have been met. If sccheck(1M) detects potential problems with configuring this machine as a cluster node, a report of failed checks is prepared and available for display on the screen. Data gathering and report generation can take several minutes, depending on system configuration.Do you want to run sccheck (yes/no) [yes]? no>>> Autodiscovery of Cluster Transport <<<If you are using Ethernet or Infiniband adapters as the cluster transport adapters, autodiscovery is the best method for configuring the cluster transport.Do you want to use autodiscovery (yes/no) [yes]? no>>> Cluster Transport Adapters and Cables <<<You must configure at least two cluster transport adapters for each node in the cluster. These are the adapters which attach to the private cluster interconnect.Select the first cluster transport adapter:1) e1000g12) e1000g23) OtherOption: 2Will this be a dedicated cluster transport adapter (yes/no) [yes]? Select the second cluster transport adapter:1) e1000g12) e1000g23) OtherOption: 1Will this be a dedicated cluster transport adapter (yes/no) [yes]? ^C scinstall: scinstall did NOT complete successfully!Log file - /var/cluster/logs/install/scinstall.log.5910root@node2 # scinstall*** Main Menu ***Please select from one of the following (*) options:* 1) Create a new cluster or add a cluster node2) Configure a cluster to be JumpStarted from this install server3) Manage a dual-partition upgrade4) Upgrade this cluster node5) Print release information for this cluster node* ?) Help with menu options* q) QuitOption: 1*** New Cluster and Cluster Node Menu ***Please select from any one of the following options:1) Create a new cluster2) Create just the first node of a new cluster on this machine3) Add this machine as a node in an existing cluster?) Help with menu optionsq) Return to the Main MenuOption: 3*** Add a Node to an Existing Cluster ***This option is used to add this machine as a node in an already established cluster. If this is a new cluster, there may only be asingle node which has established itself in the new cluster.Before you select this option, the Sun Cluster framework software must already be installed. Use the Java Enterprise System (JES) installer to install Sun Cluster software.Press Control-d at any time to return to the Main Menu.Do you want to continue (yes/no) [yes]?>>> Typical or Custom Mode <<<This tool supports two modes of operation, Typical mode and Custom. For most clusters, you can use Typical mode. However, you might need to select the Custom mode option if not all of the Typical defaultscan be applied to your cluster.For more information about the differences between Typical and Custom modes, select the Help option from the menu.Please select from one of the following options:1) Typical2) Custom?) Helpq) Return to the Main MenuOption [1]:>>> Sponsoring Node <<<For any machine to join a cluster, it must identify a node in thatcluster willing to "sponsor" its membership in the cluster. When configuring a new cluster, this "sponsor" node is typically the first node used to build the new cluster. However, if the cluster isalready established, the "sponsoring" node can be any node in thatcluster.Already established clusters can keep a list of hosts which are ableto configure themselves as new cluster members. This machine should be in the join list of any cluster which it tries to join. If thelist does not include this machine, you may need to add it by usingclaccess(1CL) or other tools.And, if the target cluster uses DES to authenticate new machinesattempting to configure themselves as new cluster members, thenecessary encryption keys must be configured before any attempt to join.What is the name of the sponsoring node? node1>>> Cluster Name <<<Each cluster has a name assigned to it. When adding a node to thecluster, you must identify the name of the cluster you are attempting to join. A sanity check is performed to verify that the "sponsoring"node is a member of that cluster.What is the name of the cluster you want to join [cluster]?Attempting to contact "node1" ... doneCluster name "cluster" is correct.Press Enter to continue:>>> Check <<<This step allows you to run sccheck(1M) to verify that certain basichardware and software pre-configuration requirements have been met.If sccheck(1M) detects potential problems with configuring thismachine as a cluster node, a report of failed checks is prepared andavailable for display on the screen. Data gathering and reportgeneration can take several minutes, depending on systemconfiguration.Do you want to run sccheck (yes/no) [yes]? no>>> Autodiscovery of Cluster Transport <<<If you are using Ethernet or Infiniband adapters as the cluster transport adapters, autodiscovery is the best method for configuring the cluster transport.Do you want to use autodiscovery (yes/no) [yes]? no>>> Cluster Transport Adapters and Cables <<<You must configure at least two cluster transport adapters for each node in the cluster. These are the adapters which attach to the private cluster interconnect.Select the first cluster transport adapter:1) e1000g12) e1000g23) OtherOption: 1Will this be a dedicated cluster transport adapter (yes/no) [yes]? Select the second cluster transport adapter:1) e1000g12) e1000g23) OtherOption: 2Will this be a dedicated cluster transport adapter (yes/no) [yes]? >>> Automatic Reboot <<<Once scinstall has successfully initialized the Sun Cluster software for this machine, the machine must be rebooted. The reboot will cause this machine to join the cluster for the first time.Do you want scinstall to reboot for you (yes/no) [yes]?>>> Confirmation <<<Your responses indicate the following options to scinstall:scinstall -i \-C cluster \-N node1 \-A trtype=dlpi,name=e1000g1 -A trtype=dlpi,name=e1000g2 \-m endpoint=:e1000g1,endpoint=switch1 \-m endpoint=:e1000g2,endpoint=switch2Are these the options you want to use (yes/no) [yes]?Do you want to continue with this configuration step (yes/no) [yes]? Checking device to use for global devices file system ... doneAdding node "node2" to the cluster configuration ... doneAdding adapter "e1000g1" to the cluster configuration ... doneAdding adapter "e1000g2" to the cluster configuration ... doneAdding cable to the cluster configuration ... doneAdding cable to the cluster configuration ... doneCopying the config from "node1" ... doneCopying the postconfig file from "node1" if it exists ... doneNo postconfig file found on "node1", continuingdoneSetting the node ID for "node2" ... done (id=2)Verifying the major number for the "did" driver with "node1" ... done Checking for global devices global file system ... doneUpdating vfstab ... doneVerifying that NTP is configured ... doneInitializing NTP configuration ... doneUpdating nsswitch.conf ... doneAdding cluster node entries to /etc/inet/hosts ... doneConfiguring IP multipathing groups ...doneVerifying that power management is NOT configured ... done Unconfiguring power management ... done/etc/power.conf has been renamed to /etc/power.conf.100408144334 Power management is incompatible with the HA goals of the cluster. Please do not attempt to re-configure power management.Ensure network routing is disabled ... doneNetwork routing has been disabled on this node by creating /etc/notrouter. Having a cluster node act as a router is not supported by Sun Cluster. Please do not re-enable network routing.Updating file ("ntp.conf.cluster") on node node1 ... doneUpdating file ("hosts") on node node1 ... doneLog file - /var/cluster/logs/install/scinstall.log.6845Rebooting ...updating /platform/i86pc/boot_archive...this may take a minute同样的补助把节点3 ismp-sun3加入到cluster中创建metadiskset及本机的系统盘镜像Ismp-sun1 系统盘的镜像系统盘的did设备分配1:d200 d300 d400 分给diskset用2:d110-d150 分给ismp-sun1用3:d210-d250 分给ismp-sun1用4: d310-d350 分给ismp-sun3用metainit -f d110 1 1 c0t0d0s0metainit -f d111 1 1 c0t0d0s1metainit -f d113 1 1 c0t0d0s3metainit -f d114 1 1 c0t0d0s4metainit -f d115 1 1 c0t0d0s5metainit -f d120 1 1 c0t1d0s0metainit -f d121 1 1 c0t1d0s1metainit -f d123 1 1 c0t1d0s3metainit -f d124 1 1 c0t1d0s4metainit -f d125 1 1 c0t1d0s5metainit d130 -m d110metainit d131 -m d111metainit d133 -m d113metainit d134 -m d114metainit d135 -m d115metaroot d130lockfs –fa修改vfstab表为/dev/md/dsk/d131 - - swap - no -/dev/md/dsk/d130 /dev/md/rdsk/d130 / ufs 1 no -/dev/md/dsk/d134 /dev/md/rdsk/d134 /export/home ufs 2 yes -#/dev/dsk/c0t0d0s5 /dev/rdsk/c0t0d0s5 /globaldevices ufs 2 yes -/dev/md/dsk/d133 /dev/md/rdsk/d133 /opt ufs 2 yes -/devices - /devices devfs - no -ctfs - /system/contract ctfs - no -objfs - /system/object objfs - no -swap - /tmp tmpfs - yes -/dev/md/dsk/d135 /dev/md/rdsk/d135 /global/.devices/node@1 ufs 2 no Global系统重新启动后做镜像。
Sun cluster 3.x 培训(规划、安装、配置和管理)

Sun cluster3.x
软件架构及切换原理
每一个节点在投票设备上分配了一个64-
重要模块及概念介绍:
Persistent Reservations and Reservation Keys
bit的key;
Su换原理
如果因为某种原因,节点2退出cluster系统,实 际上,节点1会从投票设备上删除节点2的64-bit 的key;
双机系统的规划
1、硬件互联的规划
硬件互联要必须解决的一个关键问题:scsi-initiator-id
双机系统的规划
1、硬件互联的规划
(以T3单端口磁盘阵列为例说明)
主机节点冗余 Redundant Servers
每个节点本身的一些部件是冗余的; 节点之间互为备份是冗余的;
每个节点对外提供服务的网口是冗余的
Redundant Public Networks
两个节点相互通信的网口是冗余的
Redundant Private Networks
2、This is called split-brain operation.
Sun cluster3.x
投票机制:
软件架构及切换原理
重要模块及概念介绍:
1、两个节点首先尝试保留指定的投票设备;
2、第一个获得投票设备的节点将作为cluster成员保留在cluster中; 3、在竞争中,失去投票设备的节点将退出cluster;
Sun cluster3.x
软件架构及切换原理
重要模块及概念介绍:
投票机制:
Sun cluster架构引入了一种投票机制“voting system”,在这个投票系统中: 1、每个节点拥有一票(one vote); 2、被指定为投票设备(quorum devices)的共享硬盘拥有一票; 3、整个系统必须拥有多数票(majority)时才能形成cluster,正常运行; (more than 50 percent of all possible votes present)
码头智能方案策划书3篇

码头智能方案策划书3篇篇一《码头智能方案策划书》一、项目背景随着全球贸易的不断发展和物流行业的日益壮大,码头作为货物运输的重要枢纽,面临着越来越高的效率和管理要求。
为了提升码头的运作效率、降低成本、增强安全性和可持续性,实施智能方案已成为必然趋势。
二、项目目标1. 提高码头货物装卸和运输效率。
2. 优化码头资源配置和调度管理。
3. 提升码头作业的安全性和可靠性。
4. 实现码头运营的智能化和信息化。
三、智能方案内容1. 智能化货物装卸系统引入先进的装卸设备和自动化技术,如智能起重机、自动导引车等,实现货物装卸的高效化和精准化。
2. 智能物流管理系统通过物联网技术,实时监控货物的位置、状态和运输进度,优化物流路径和资源分配。
3. 智能调度系统基于大数据和智能算法,对码头的设备、人员和货物进行科学合理的调度安排。
4. 智能安全监控系统安装高清监控摄像头、传感器等设备,实时监测码头的安全状况,及时预警和处理安全隐患。
5. 智能能源管理系统对码头的能源消耗进行监测和管理,采取节能措施,降低能源成本,实现可持续发展。
四、实施步骤1. 需求调研与方案设计深入了解码头的现状和需求,制定详细的智能方案设计。
2. 设备采购与系统建设采购所需的智能设备和软件系统,进行安装和调试。
3. 人员培训与系统上线对码头工作人员进行智能系统操作和维护培训,确保系统顺利上线运行。
4. 测试与优化对智能方案进行全面测试,根据实际运行情况进行优化和改进。
5. 持续完善与升级随着技术的不断发展和码头业务的变化,持续对智能方案进行完善和升级。
五、项目预算包括设备采购、系统开发、安装调试、人员培训等方面的费用,具体预算根据实际情况进行详细核算。
六、预期效益1. 大幅提高码头的货物吞吐量和作业效率。
2. 降低运营成本和人力投入。
3. 增强码头的竞争力和市场份额。
4. 提升码头的安全性和客户满意度。
七、风险评估与应对措施1. 技术风险:可能出现设备故障、系统兼容性等问题。
智慧码头建设实施方案

智慧码头建设实施方案一、背景分析。
随着全球贸易的不断发展,港口作为物流枢纽的地位日益重要。
然而,传统的港口管理模式已经无法满足日益增长的货运需求,需要更加智慧的码头建设来提高效率、降低成本,以及提升服务质量。
二、目标设定。
智慧码头建设的目标是实现货物的快速、安全、高效流转,提升港口的竞争力和服务水平。
具体目标包括提高装卸效率、优化资源配置、降低能耗成本、提升安全管理水平、提高服务质量等。
三、实施方案。
1. 物联网技术应用。
利用物联网技术,对港口内的各种设备、货物进行实时监测和管理。
通过传感器和无线通信技术,实现对装卸设备、集装箱、货物的实时定位和监控,提高装卸效率和运输安全。
2. 大数据分析。
通过对港口运营数据的收集和分析,实现对港口运营的全面监控和管理。
利用大数据技术,对货物流转、装卸效率、设备利用率等进行分析,为港口运营决策提供科学依据。
3. 人工智能应用。
引入人工智能技术,实现对港口作业的智能调度和管理。
通过智能算法,对装卸作业、货物运输进行优化调度,提高作业效率和降低成本。
4. 5G技术应用。
利用5G技术,实现港口内设备和系统的高速互联互通。
通过5G网络,实现对港口内各种设备的高速数据传输和实时控制,提高港口运营的实时性和稳定性。
5. 绿色环保措施。
在智慧码头建设中,应加强对环保的关注和投入。
采用清洁能源、节能环保设备,减少港口运营对环境的影响,实现港口可持续发展。
四、实施步骤。
1. 确定智慧码头建设的整体规划和目标,明确投资规模和时间节点。
2. 选择合适的物联网、大数据、人工智能、5G技术供应商,进行系统集成和设备采购。
3. 进行智慧码头建设的系统设计和方案论证,制定详细的实施计划和预算。
4. 开展智慧码头建设的设备安装和系统调试,进行相关人员的培训和技术支持。
5. 实施智慧码头建设的运营监管和效果评估,不断优化和改进智慧码头运营模式。
五、风险控制。
在智慧码头建设过程中,需要充分考虑各种风险因素,采取相应的措施进行控制和应对。
SUN 小型机操作系统安装指导书

资料编码产品名称SUN小型机使用对象华为工程师产品版本通用版本编写部门集成产品部资料版本SUN 小型机操作系统安装指导书拟制:陈文日期:20050803审核:陈文日期:20050803审核:日期:批准:日期:华为技术有限公司版权所有侵权必究修订记录日期修订版本描述作者2005-8-3 V1.0 陈文目录第1章安装简介 (1)1.1 前言 (1)1.2 软件安装前提 (1)第2章操作系统安装和配置 (2)2.1 操作系统安装过程 (2)第3章后期设置 (24)3.1 安装系统补丁 (24)第4章常用命令 (27)第5章常用网址 (28)关键词:SUN SOLARIS安装指导书摘要:缩略语清单:参考资料清单:第1章1.11.2 安装简介前言Solaris 操作系统系统是SUN公司专为 SPARC主机服务器开发的unix操作系统。
基于BSD UNIX System V为基础开发。
我公司主要应用的版本有:solaris2.6/solaris8/solaris9软件安装前提Solaris 系统的安装通常有两种方式,第一种是通过在SUN主机的串口上连接一个终端来进行安装,我们把这种安装方式称为suninstall,第二种方式是通过在SUN主机上接显示器,鼠标和键盘进行系统安装,我们把这种方式称为webstart。
两种安装方式的共同点是:安装的主要步骤和提示信息基本是一致。
两种安装方式的不同点是:第一种方式是字符终端界面,第二种方式是图形界面。
就第一种suninstall的安装方式,在SUN主机的串口连接设备上又分为两种情况:第一种情况是,将SUN主机的第一个串口与PC机或者终端的串口,直接用串口线互连起来。
在PC机或者终端上使用终端管理软件,比如超级终端,netterm等,设置串口的连接参数如下:9600,8,no,1,no第二种情况是,将SUN主机的第一个串口与TC的串口,用TC带的串口线互连起来,然后再把TC接到LAN上,在lan上的任意一台主机上通过telnet方式远程登陆到TC上,然后再选择相应的串行端口,即可。
Sun Cluster 快速入门指南

Sun Cluster快速入门指南(适用于Solaris OS)SPARC平台版本Sun Microsystems,Inc.4150Network CircleSanta Clara,CA95054U.S.A.文件号码820–0315–102007年2月,修订版A版权所有2006Sun Microsystems,Inc.4150Network Circle,Santa Clara,CA95054U.S.A.保留所有权利。
对于本文档中介绍的产品,Sun Microsystems,Inc.对其所涉及的技术拥有相关的知识产权。
需特别指出的是(但不局限于此),这些知识产权可能包含一项或多项美国专利,或在美国和其他国家/地区申请的待批专利。
美国政府权利-商业软件。
政府用户应遵循Sun Microsystems,Inc.的标准许可协议,以及FAR(Federal Acquisition Regulations,即“联邦政府采购法规”)的适用条款及其补充条款。
本发行版可能包含由第三方开发的内容。
本产品的某些部分可能是从Berkeley BSD系统衍生出来的,并获得了加利福尼亚大学的许可。
UNIX是X/Open Company,Ltd.在美国和其他国家/地区独家许可的注册商标。
Sun、Sun Microsystems、Sun徽标、Solaris徽标、Java咖啡杯徽标、、OpenBoot,Sun StorEdge,Sun Fire,Sun Ultra,SunSolve,Java和Solaris是Sun Microsystems,Inc.在美国和其他国家/地区的商标或注册商标。
所有SPARC商标的使用均已获得许可,它们是SPARC International,Inc.在美国和其他国家/地区的商标或注册商标。
标有SPARC商标的产品均基于由Sun Microsystems,Inc.开发的体系结构。
ORACLE是Oracle Corporation的注册商标。
码头项目编写方案

码头项目编写方案一、项目概述码头项目是一款基于云平台的物流管理系统,旨在提高企业的物流管理效率,优化物流运作流程,降低物流成本。
主要功能包括货物录入、货物查询、货物出库、订单管理、库存管理等。
二、项目目标1.方便用户随时随地管理货物信息;2.提高物流管理效率,优化物流运作流程;3.降低物流成本,提高企业竞争力;4.为未来大数据分析提供基础数据。
三、项目模块划分1. 用户管理模块用户管理模块包括用户注册、用户登录、个人资料查看、个人资料修改等功能。
用户注册页面需要验证用户输入的姓名、手机号码和密码,用户登录页面需要验证用户的用户名和密码。
个人资料需要显示用户的个人信息,并且支持用户修改自己的个人信息。
2. 货物管理模块货物管理模块包括货物录入、货物查询和货物出库功能。
货物录入需要用户输入货物的名称、数量、重量、体积等信息,货物查询需要支持关键词搜索和筛选功能,货物出库需要用户选择货物并进行出库操作。
3. 订单管理模块订单管理模块包括订单录入、订单查询和订单修改功能。
订单录入需要用户输入订单的基本信息,订单查询需要支持关键词搜索和筛选功能,订单修改需要用户可以查看和修改订单的基本信息。
4. 库存管理模块库存管理模块包括库存查询和库存预警功能。
库存查询需要支持关键词搜索和筛选功能,库存预警需要在货物库存低于一定数量时进行提醒。
四、项目技术选型1.前端页面使用Vue.js框架;2.后端采用Spring Boot框架;3.数据库管理采用MySQL。
五、项目开发流程1.需求分析阶段:明确产品需求,初步设计产品功能和界面;2.设计阶段:确定技术实现方案,绘制用户界面和数据库模型;3.编码阶段:按照设计方案进行编码实现;4.测试阶段:测试产品功能和性能;5.上线阶段:发布产品,进行后续运营和维护。
六、项目预算•人力成本:10000元/人/月•服务器租用费用:1000元/月•其他杂费:10000元总预算:50000元七、项目进度计划阶段时间需求分析阶段1周设计阶段2周编码阶段4周测试阶段1周上线阶段1周八、项目风险管理1.需求变更风险:对需求变更的响应需要及时,避免影响项目进度和质量;2.人员流失风险:需招聘能力强、积极主动的人员,避免人员因各种原因流失;3.技术升级风险:需要对相关技术进行定期的升级和学习,保证系统的稳定性和安全性。
码头项目启动方案

码头项目启动方案1. 背景介绍随着船运业的发展和城市化进程的不断加速,码头作为水路交通的重要载体,日益成为了经济和物流运输的关键节点。
为了适应市场发展需要,应对新时代的挑战,推进水路交通的现代化发展,本公司决定启动一个码头项目,建设一个现代化、高效率的码头。
2. 项目目标本项目旨在建设一个高效、可持续的码头,提高码头的吞吐量,同时满足未来码头发展的需求。
项目的具体目标如下:•建设现代化码头设施,配备先进的自动化设备,提高卸货、装货的效率;•优化码头运营管理,提高码头吞吐量和周转时间;•减少资源浪费,提高码头资源的利用率;•探索新技术和新产品的应用,促进码头可持续发展。
3. 项目计划根据项目目标,本项目将分为以下3个阶段:3.1 前期准备阶段前期准备阶段的主要工作是确定项目需求、分析市场情况、制定项目计划,搭建项目组织架构等。
具体任务如下:•分析市场情况,了解需求;•制定项目计划,安排项目进度、资源分配等;•搭建项目组织架构,确定各部门职责和协作方式;•研究技术和设备,选择适合的设备供应商;•组建项目团队,分配团队任务,明确工作计划。
3.2 实施阶段实施阶段的主要工作是按照计划规定,建设、装备、试运行码头等。
具体任务如下:•码头土地采购和建设规划,包括测绘土地、设计方案;•码头设备及相关系统的采购、安装、测试;•码头配套设施建设,包括码头停车场、码头道路等;•码头试运行和安全评估。
3.3 运营和管理阶段运营和管理阶段的主要工作是对码头设施进行维护和维修,并计划码头后续发展。
具体任务如下:•制定码头维护计划,定期检查设备和系统;•定期组织安全演习,提高应急处理能力;•划分码头使用区域,严格管理停车和装卸货车辆;•定期评估码头的运营情况,提出改进建议;•探索新技术和新产品应用,推进码头可持续发展。
4. 风险分析在项目实施过程中,可能会遇到一些挑战和风险,如技术难题、资金短缺、市场变化等。
为了降低风险,我们将采取如下预防措施:•在前期准备阶段,通过市场分析和技术探讨,尽可能确定项目需求和技术方案;•制定详细的项目计划和进度表,规范项目实施流程;•与设备供应商签订严格的合同,确保供应商按时按质交付设备;•控制项目成本和管理预算,确保资金安全;•定期评估项目实施情况,快速发现并处理潜在的问题。
码头安全配置方案

码头安全配置方案在码头上进行操作和维护时,安全性是至关重要的。
因此,码头需要进行严格的安全配置,以确保操作安全和机器设备的保护。
密码和访问控制为了保护机器设备,应该限制码头的访问。
只有授权人员才能进入码头,并且必须使用密码或其他身份验证方法进行身份确认。
建议定期更改密码并使用强密码,以确保密码不会被猜测或破解。
同时,对于码头上的机器设备,需要限制访问和控制权限。
只有授权人员才能进行操作和维护。
应该为每个人设置不同的访问级别和权限,以确保机器设备的安全。
应该定期更新和审核权限,以保持最终控制。
网络安全和数据保护码头上的机器设备应该在安全的网络环境中运行。
对于所有的网络连接,需要设置防火墙和安全路由器来防范外部攻击和入侵。
应该定期检查网络连接以确保安全性,并制定必要的安全策略和应急响应计划。
数据泄露是一个常见的安全威胁。
码头上的机器设备需要采取措施来保护重要的数据和信息。
应该定期备份数据,定期检查硬件和软件的安全性,以确保数据不会被黑客或其他未经授权的人访问。
物理安全和紧急响应措施对于码头上的机器设备,需要实施物理安全措施。
机器设备需要放置在安全的地方,需要有专业的电气工程师进行电缆连接和电气安装。
还需要进行必要的地面保护和安全防护,以防止电气冲击和其他安全事故。
同时,为应对火灾、水灾等紧急情况,需要建立严格的应急响应计划和紧急措施。
所有的人员都需要接受必要的培训和演练,以确保在紧急情况下能够有效地处理和控制。
总结码头安全配置方案对于保护机器设备、防范安全威胁和应对突发情况具有至关重要的作用。
通过严格的密码和访问控制、网络安全和数据保护、物理安全和紧急响应措施等措施的组合,可以保证码头和机器设备的安全和可靠性。
以上安全配置方案是至关重要的,应该得到严格的实施和监测。
SUN CLUSTER双机服务器安装配置总结

SC双机安装实施文档一、系统规划 (2)1、SCLT_NMSdb配置: (2)2、SCLT_NMSdp配置: (3)3、逻辑主机: (3)4、阵列安装: (3)二、阵列安装 (4)三、双机安装 (8)1、修改SCLT-NMSdp机器的scsi-initiator-id为6 (9)2、修改系统相关配置文件 (9)3、安装双机软件 (10)4、安装双机软件补丁 (17)5、配置CLUSTER (19)6、确定did设备号是否一致 (25)7、安装和配置SDS卷 (27)8、建立和注册双机资源 (29)9、检查资源和双机状态是否正常 (29)四、数据库安装 (32)五、注册SUN CLUSTER FOR SYBASE 资源 (32)一、系统规划两台SUN FIRE 280R,一台3320 SCSI阵列;操作系统为solaris 9,sun cluster 3.1 U4,数据库为Sybase 12.5。
要求两台机器做双机,数据库系统文件和数据文件都安装在阵列中。
卷管理采用SUN 自带的SunDiskSuite,要求数据库采用裸设备。
1、SCLT_NMSdb配置:主机名:SCLT-NMSdbIP 地址:211.95.129.121子网的系统部分:是网络掩码:255.255.255.224主要的网络界面:bge3启用IPv6:否缺省路由∶是路由器IP 地址∶211.95.129.126名称服务:无启用Kerberos:否时区:PRCSolaris 操作环境:Solaris 9 Software 9/05Solaris 软件组:整个群组以及OEM根设备:c1t0d0文件系统:c1t1d0s0 /emv 20480 MBc1t1d0s1 /usr 49500 MBc1t0d0s0 / 20480 MBc1t0d0s1 swap 8192 MBc1t0d0s3 /var 30500 MBc1t0d0s4 /export/home 10240 MBc1t0d0s6 /globaldevices 512 MBc1t0d0s7 /metadb 32 MB2、SCLT_NMSdp配置:主机名:SCLT-NMSdpIP 地址:211.95.129.122子网的系统部分:是网络掩码:255.255.255.224主要的网络界面:bge3启用IPv6:否缺省路由∶是路由器IP 地址∶211.95.129.126名称服务:无启用Kerberos:否时区:PRCSolaris 操作环境:Solaris 9 Software 9/05Solaris 软件组:整个群组以及OEM根设备:c1t0d0文件系统:c1t1d0s0 /emv 20480 MBc1t1d0s1 /usr 49500 MBc1t0d0s0 / 20480 MBc1t0d0s1 swap 8192 MBc1t0d0s3 /var 30500 MBc1t0d0s4 /export/home 10240 MBc1t0d0s6 /globaldevices 512 MBc1t0d0s7 /metadb 32 MB3、逻辑主机:SCLT-NMSapp 211.95.129.1204、阵列配置:SCLT-NMSdisk采用SUN 3320 SCSI 阵列;由14块盘组成,其中1块盘备份,做RAID 5,划分三个slice,一个30G、两个300G,其中30G作为SYBASE 系统安装目录,挂在/U01目录,其他两分区做成裸设备存放数据库数据文件。
文档2、安装配置SUN Enterprise M4000主机

青州码头小型机项目实施方案(Solaris 10 U7 + Oracle 10g + ZFS + Sun Cluster 3.2 U2)文档二、安装配置SUN Enterprise M4000主机一、配置M4000主机控制卡(管理控制台)1. 使用服务器附带的串行电缆将管理控制台连接到串行端口。
2. 打开超级终端,使用以下设置:■波特率:9600 bps■数据长度:8 位■奇偶校验:无■停止位:1 位■流量控制:无3. 将操作面板上的钥匙设置到“维修”位置。
类似扳手的图标指示的是“维修”位置,类似锁的图标指示的是“锁定”位置。
4. 打开输入电源。
5. 出现login 提示时,输入登录名的默认值:default6. 将操作面板上的钥匙设置到“锁定”位置。
7. 按回车键。
先等待五秒钟,将操作面板上的钥匙设置到“维修”位置,然后按回车键。
管理控制台上显示了XSCF Shell 提示符。
XSCF>两台主机均需要配置二、初始化主机控制卡设置1、创建管理用户fqctXSCF>useradd fqctXSCF>password fqctXSCF> setprivileges fqct platadm useradm auditadm fieldeng mode2、配置控制台IP地址XSCF>setupplatform -p networkDo you want to set up networking? [y|n]: yDo you want to set up the XSCF network interfaces? [y|n]: yDo you want to configure xscf#0-lan#0? [y|n]: yxscf#0-lan#0 ip address? []: 192.168.11.123(主机二为192.168.11.133)xscf#0-lan#0 netmask? [255.255.255.0]:xscf#0-lan#0 default gateway? []: 192.168.11.200Are these settings correct? [y|n]: yDo you want to configure xscf#0-lan#1? [y|n]: nDo you want to configure lan#0? [y|n]: nDo you want to configure lan#1? [y|n]: nDo you want to set up the DSCP network? [y|n]: nPrimary DNS server ip address: 218.85.157.99Secondary DNS server ip address:Tertiary DNS server ip address:Domain name: XSCF#0 hostname: qzoradb2Do you want to set up the domain name service? [y|n]: nDo you want to set up the network time protocol? [y|n]: nDo you want to set up ssh? [y|n]: nDo you want to set up https? [y|n]: nDo you want to configure email reports? [y|n]: n三、设置光盘引导准备安装操作系统1、关闭主机电源(若主机是开着的)XSCF>poweroff –f –d 0-f参数代表强行关闭2、设置主机启动进OK模式XSCF>setdomainmode -y -d 0 -m autoboot=off开始安装操作系统后使用以下命令改回正常模式XSCF>setdomainmode -y -d 0 -m autoboot=on3、打开主机电源XSCF>poweron –d 04、放入Solaris 10系统安装光盘,在OK提示符下使用boot cdrom命令开始光盘引导安装系统。
码头试运行方案

码头试运行方案码头试运行方案1. 引言码头试运行是指在正式投入使用之前,对码头设施、设备及操作流程进行测试和验证的过程。
通过试运行,可以发现问题、解决难题,并对码头的运营效率和安全性进行评估。
本文档旨在制定一套码头试运行方案,以确保码头的顺利投入使用。
2. 目标本试运行方案的主要目标如下:- 验证码头设施和设备的功能是否正常;- 测试码头操作流程的有效性和合理性;- 发现并解决潜在问题,确保码头的安全性和可靠性;- 评估码头的运营效率,提出优化建议。
3. 码头试运行步骤3.1 验证设施和设备功能首先,需要对码头的设施和设备进行功能验证。
具体步骤如下:1. 检查码头设施的完整性,包括码头桩、护舷设施、道路、灯光等;2. 验证码头的设备是否正常工作,如起重机、装卸设备、监控系统等;3. 对码头设施和设备进行模拟操作,验证其功能是否正常;4. 记录并汇总功能验证的结果,确保码头设施和设备达到使用要求。
3.2 测试码头操作流程完成设施和设备功能验证后,需要对码头操作流程进行测试。
具体步骤如下:1. 制定码头操作流程图,包括货物卸载、装载、运输等各个环节;2. 安排实际货物进行模拟操作,测试码头操作流程的有效性和合理性;3. 评估操作流程中的各个细节,包括货物进出时间、操作人员协调性等;4. 根据测试结果,修订操作流程,以提高效率和安全性。
3.3 发现和解决问题试运行过程中,可能会发现一些潜在问题。
为了确保码头的安全性和可靠性,需要及时解决这些问题。
具体步骤如下:1. 统计和分析试运行期间出现的问题,如设施故障、操作失误等;2. 根据问题的严重程度,制定解决方案,优先解决重要问题;3. 动员相关人员和部门协调合作,迅速解决问题;4. 确保解决方案的有效性,避免问题再次出现。
3.4 评估运营效率试运行的最后一步是评估码头的运营效率。
通过评估,可以了解码头在实际操作中的表现,并提出优化建议。
具体步骤如下:1. 收集试运行期间的数据,如货物吞吐量、装卸时间、操作人员效率等;2. 分析数据,评估码头的运营效率;3. 根据评估结果,提出优化建议,如改进设备配置、调整操作流程等;4. 评估优化方案的可行性和效果,制定改进计划。
码头泊位设备配置方案

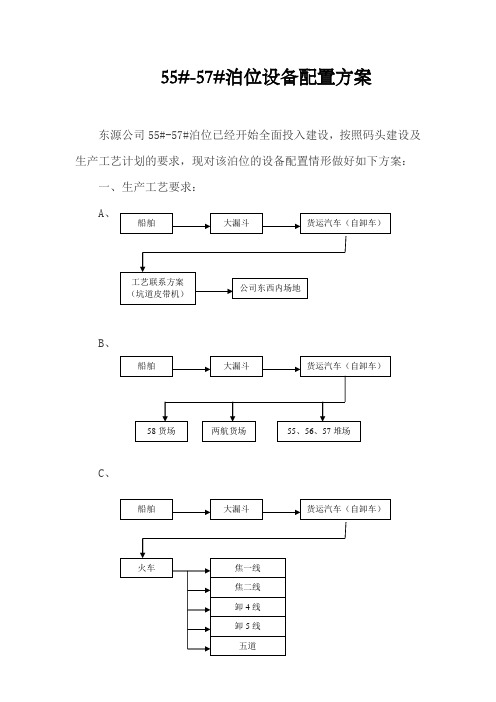
55#-57#泊位设备配置方案东源公司55#-57#泊位已经开始全面投入建设,按照码头建设及生产工艺计划的要求,现对该泊位的设备配置情形做好如下方案:一、生产工艺要求:A、B、C、D、E、F、二、东源公司55#-57#泊位总长为880米,能够同时停放三条开普船,可同时开启27个舱位进行作业,依照第一批的计划要求,应高起点、高标准进行设置,充分考虑该泊位从事件杂货、散货、包头货、木材等多种作业方式,并能够适应超宽型船舶的装卸要求,配置40*45m型号的门机,从而发挥大门机的装卸作业效果,全面提升装卸效率和效益。
40吨电动大漏斗、抓斗(含木材抓斗)应按门机数量进行配置。
三、在装载机配置方面,要同时兼顾装载机下舱作业和装车作业。
其中可选用的机种为:9吨装载机,能够用于装车作业,7吨装载机,能够用于下舱作业。
下舱作业可选用5吨挖掘机,该机型也可用于加高和垛头作业,该型挖掘机需要加长臂,以便扩大作业半径。
改型挖掘性能够考虑选用抓料机加以替代,因抓料机多种机型臂都比同类型的挖掘机要长。
四、叉车、吊车的配置应充分考虑大型货种作业,如大型钢材件,包头货等,同时考虑现场作业的场地和疏港通道,可配置25吨叉车,16吨叉车,6吨(6米门架)叉车,5吨叉车,3吨叉车。
可配置150吨吊车(兼顾门机修理之用),50吨吊车, 25吨吊车用于袋装货的吊运。
五、为了适应大件装卸和输运,应配置40吨和60吨平板车,和60吨拖头,考虑木材装卸作业,可配置7吨木材装载机。
六、按照工艺方案的要求和部署,公司还需要配置至少60台欧曼ETX自卸车用于转场作业。
2013年7月22日55#-57#泊位设备配置清单(生产型设备)55#-57#泊位设备配置清单(辅助型设备)。
- 1、下载文档前请自行甄别文档内容的完整性,平台不提供额外的编辑、内容补充、找答案等附加服务。
- 2、"仅部分预览"的文档,不可在线预览部分如存在完整性等问题,可反馈申请退款(可完整预览的文档不适用该条件!)。
- 3、如文档侵犯您的权益,请联系客服反馈,我们会尽快为您处理(人工客服工作时间:9:00-18:30)。
青州码头小型机项目实施方案
(Solaris 10 U7 + Oracle 10g + ZFS + Sun Cluster 3.2 U2)
文档四、安装配置SUN Cluster 3.2双机软件
文档四、安装配置SUN Cluster 3.2双机软件
文档四、安装配置SUN Cluster 3.2双机软件
一、软件安装前的配置工作
配置IPMP
修改fqoradb1的/etc/hosts信息如下:
#
# Internet host table
#
::1 localhost
127.0.0.1 localhost
192.168.11.120 fqoradb1 loghost
192.168.11.130 fqoradb2
#IPMP test address
192.168.11.121 fqoradb1-e1000g0-test
192.168.11.122 fqoradb1-e1000g2-test
#logic address
192.168.11.140 fqoradb
配置e1000g0和e1000g2两张网卡
创建/etc/hostname.e1000g0文件填入以下内容
fqoradb1 netmask + broadcast + group ipmp0 up
addif fqoradb1-e1000g0-test netmask + broadcast + deprecated -failover up
创建/etc/hostname.e1000g2文件填入以下内容
fqoradb1-e1000g2-test netmask + broadcast + group ipmp0 deprecated -failover up
修改fqoradb2的/etc/hosts信息如下:
#
# Internet host table
#
::1 localhost
127.0.0.1 localhost
192.168.11.130 fqoradb2 loghost
192.168.11.120 fqoradb1
#IPMP test address
192.168.11.131 fqoradb2-e1000g0-test
192.168.11.132 fqoradb2-e1000g2-test
#logic address
192.168.11.140fqoradb
配置e1000g0和e1000g2两张网卡
创建/etc/hostname.e1000g0文件填入以下内容
fqoradb2 netmask + broadcast + group ipmp0 up
addif fqoradb2-e1000g0-test netmask + broadcast + deprecated -failover up
创建/etc/hostname.e1000g2文件填入以下内容
fqoradb2-e1000g2-test netmask + broadcast + group ipmp0 deprecated -failover up
建立两机Cluster通讯环境
在根目录下创建.rhosts文件,内容如下:
+
创建/etc/hosts.equiv文件,内容如下:
fqoradb1
fqoradb2
fqoradb
两台服务器都需要进行以上配置。
二、开始安装SUN Cluster
使用ftp软件将Cluster光盘镜像文件上传到/iso目录下,使用root用户telnet登陆主机挂载镜像如下操作:
#lofiadm –a /iso/SC_32U2_DVD.iso /dev/lofi/1
#mount –F hsfs /dev/lofi/1 /mnt
开始运行安装程序
使用root用户采用xmanager软件登陆主机,打开终端窗口,使用如下命令开始安装;
#cd /mnt/Solaris_sparc
#./Installer
这里选择“以后再配置”
完成安装。
两台服务器都需要安装,重复以上步骤即可。
三、安装Cluster EIS补丁
挂载EIS光盘镜像,如下:
#umount /mnt
#lofiadm –a /iso/eis-dvd.iso /dev/lofi/2
#mount –F hsfs /dev/lofi/2 /mnt
解开补丁文件
#cd /mnt/sun/patch/SunCluster/3.2/10
#unpack-patches
安装补丁
#cd /tmp/10
#./install_patches
四、配置Cluster
在节点fqoradb1上进行以下配置
使用root用户telnet登陆fqoradb1中运行#scinstall
按以下配置:
节点fqoradb2配置
使用root用户telnet登陆fqoradb2中运行#scinstall
按以下配置:
两台服务器在重启完成后配置Cluster共享磁盘法定设备。
更新全局名称空间,使得双机获取对阵列的访问能力。
# cldevice list -v
DID 设备完整设备路径
-------- ------------
d1 fqoradb1:/dev/rdsk/c0t1d0
d2 fqoradb1:/dev/rdsk/c0t0d0
d3 fqoradb1:/dev/rdsk/c3t600A0B8000563C0C000003944AE76E05d0 d4 fqoradb1:/dev/rdsk/c0t3d0
d5 fqoradb1:/dev/rdsk/c3t600A0B800048EFDA000003964AE76DC7d0 更新全局名称空间,从任意群集节点上运行cldevice populate 命令。
上图是命令运行后的变化
给Cluster配置quorum磁盘
在任意节点上运行clsetup
选择1)直接连接的共享磁盘
全局设备就是阵列划分时分出了1G的盘,就在这边使用。
对照下format输出的磁盘信息可知1G盘对应的全局设备为d5 D5 c3t600A0B800048EFDA000003964AE76DC7d0 所以以上填入d5
重置安装模式填y,最后按q退出即可。
确认配置情况可以使用cluster status命令可以查看Cluster状态。
Quorum可以看出已经添加完成了。
