三星P7500对比P7510
2011最新CPU性能排行
核心/线程工艺(纳米)64位4月8日324月8日324月8日324月8日324月8日324月8日454月8日454月8日452月4日322月4日324月8日454月4日452月4日322月4日322月4日324月8日452月4日322月4日322月4日32核心/线程工艺(纳米)64位2月4日322月4日324月8日452月2日452月2日452月2日452月4日322月4日322月4日322月4日322月2日452月2日452月2日452月4日322月4日322月4日322月4日322月4日322月4日32核心/线程工艺(纳米)64位2月2日452月4日322月4日322月2日654月4日452月2日452月2日452月2日452月2日452月4日322月4日322月4日322月4日322月4日322月2日452月2日452月4日322月2日452月2日45核心/线程工艺(纳米)64位2月2日452月2日452月4日322月2日652月2日652月2日452月2日454月4日452月2日452月4日322月4日322月4日322月2日452月2日454月4日452月2日453月3日454月4日454月4日32核心/线程工艺(纳米)64位2月2日452月4日322月2日322月2日322月2日654月4日453月3日454月4日454月4日453月3日454月4日322月2日452月4日322月2日454月4日452月2日452月2日452月2日652月2日32核心/线程工艺(纳米)64位2月2日322月2日454月4日323月3日454月4日324月4日452月2日452月2日452月4日322月4日322月2日452月2日652月2日452月2日454月4日323月3日454月4日452月2日452月2日45核心/线程工艺(纳米)64位2月2日652月2日452月2日452月2日453月3日452月2日652月2日452月2日452月2日452月2日452月2日652月2日452月2日322月2日322月2日452月2日452月2日322月2日322月2日32核心/线程工艺(纳米)64位2月2日452月2日652月2日452月2日452月2日652月2日452月2日452月2日452月2日452月2日452月2日452月2日452月2日652月2日452月2日452月2日652月2日652月2日65核心/线程工艺(纳米)64位2月2日652月2日652月2日652月2日452月2日452月2日452月2日452月2日652月2日452月2日452月2日322月2日322月2日452月2日452月2日452月2日652月2日652月2日452月4日32核心/线程工艺(纳米)64位2月4日322月2日652月2日652月2日652月2日652月2日322月2日452月2日452月2日652月2日652月2日652月2日652月2日652月2日652月2日652月2日452月4日322月2日65核心/线程工艺(纳米)64位2月2日652月2日652月2日652月2日652月2日452月2日652月2日452月2日652月2日652月2日652月2日652月2日652月2日652月2日652月2日652月2日652月2日652月2日652月4日32核心/线程工艺(纳米)64位2月2日652月2日652月2日902月2日652月2日652月4日322月4日322月2日652月2日652月2日652月2日652月2日652月2日652月2日452月2日652月2日652月2日652月2日65核心/线程工艺(纳米)64位2月2日652月2日652月2日652月2日652月2日652月2日652月2日652月2日454月4日402月2日452月2日652月2日902月2日652月2日652月2日652月2日652月2日652月2日452月4日32核心/线程工艺(纳米)64位2月2日652月2日652月2日322月2日652月2日452月2日652月2日652月2日652月2日652月2日902月2日452月2日652月2日322月2日652月2日652月2日452月2日322月2日452月2日90核心/线程工艺(纳米)64位2月2日652月2日651月1日451月1日452月2日452月2日452月2日652月2日651月1日451月1日452月2日652月2日452月2日322月2日452月2日402月2日652月2日652月2日651月1日90核心/线程工艺(纳米)64位1月1日901月1日901月1日901月1日901月1日901月1日901月1日451月1日402月2日651月1日901月1日901月1日901月1日651月1日651月1日401月1日651月1日401月1日901月1日90核心/线程工艺(纳米)64位1月1日901月1日651月1日651月1日651月1日651月1日901月1日901月1日651月1日651月1日901月1日651月1日901月1日901月1日651月1日01月1日01月1日901月1日651月1日0核心/线程工艺(纳米)64位1月1日901月1日901月1日651月1日651月1日651月1日01月1日451月1日901月1日901月1日901月1日902月4日322月4日451月1日901月1日901月1日651月1日01月1日0核心/线程工艺(纳米)64位1月1日901月1日01月1日901月1日652月4日452月4日322月4日451月1日01月1日01月1日01月1日651月1日901月1日651月1日651月1日902月4日451月1日451月1日901月1日90核心/线程工艺(纳米)64位1月1日451月1日1301月1日651月1日651月1日451月1日451月1日901月1日651月1日651月1日901月1日901月1日651月1日651月1日901月1日901月1日01月1日651月1日0核心/线程工艺(纳米)64位1月1日01月1日451月1日901月1日1301月1日901月1日1301月1日901月1日1301月1日1301月1日901月1日1301月1日1301月1日651月1日651月1日452月2日401月1日901月1日901月1日65核心/线程工艺(纳米)64位1月1日1302月2日402月2日401月2日451月1日901月1日901月2日451月1日401月1日901月1日451月2日451月2日451月2日451月1日1801月1日651月2日451月2日451月2日451月2日45核心/线程工艺(纳米)64位1月2日451月2日451月2日451月1日1301月1日01月1日401月1日901月1日901月1日1301月1日901月1日1301月1日1301月1日651月1日651月1日901月1日451月1日651月1日901月1日90核心/线程工艺(纳米)64位1月1日651月1日1301月2日451月2日451月1日901月1日65 1月1日1301月1日180 1月1日90 1月1日130 1月1日90 1月1日65 2月2日40 240 1月1日451月1日90 1月1日90 1月1日130 1月1日901月1日901月1日90 1月1日451月1日130 1月1日90 1月1日1301月1日45 1月1日40 1月1日01月1日65 1月1日65 1月1日65 1月1日0 00 00。
手机cpu品牌型号比较
手机CPU 品牌型号比较1、德州仪器(TI:Texas Instruments)优点:低频高能且耗电量较少,高端智能机必备CPU缺点:价格不菲,对应的手机价格也很高2、英特尔(INTEL)优点:CPU主频高,速度快缺点:耗电、每频率性能较低3、高通(QUALCOMM)优点:主频高,性能表现出色,功能定位明确缺点:对功能切换处理能力一般4、三星(SAMSUNG)优点:耗电量低、价格便宜缺点:性能低5、迈威(Marvell)优点:很好继承和发挥了PXA的性能缺点:功耗大高通HTC用得多,德州最近MOTO的机子有用,三星系统已android为主三星S5PC110处理器三星代号为“Hummingbird”(蜂鸟)S5PC110处理器是目前市场上性能最为杰出的移动CPU之一,采用了ARM-Cortex A8架构和45nm制程,这款i9000使用的CPU是现在最快的CPU。
PowerVR SGX 540图形显示核心表现强大。
该图形处理器基本数据为多边形生成率28Mpolygon/sec,象素填充率为每秒10亿,在游戏和多媒体应用上表现极为抢眼。
代表作:三星i9000、魅族M9苹果A4处理器苹果iPhone 4采用的A4处理器(苹果iPad最早使用了这颗强悍的处理器)。
在显微镜切片下,可以发现苹果A4处理器与三星S5PC110的核心布局是相似的,不过苹果在A4上进行了极大程度的优化和定制(这就是当初苹果表示的10亿美元的研发成本),摒弃了iphone4或iPad所不需要的模块,并加大了二级缓存以提高性能。
实际上,A4处理器和三星S5PC110都采用了Cortex A8构架,但是A4处理器的L2二级缓存达到了640KB,而三星S5PC110的L2还是512KB。
最为关键的是显卡部分,虽然A4采用的PowerVR SGX 535显示核心不如三星S5PC110的PowerVR SGX 540,但是A4采用了显示核心与RAM直连的方式,这种巨大的差异相当于独立显卡的独立现存和集成显卡分享RAM,由此获得了更高的性能提升。
被骗好久!9成老爷机升级SSD都是错

被骗好久!9成老爷机升级SSD都是错不论你是新装机还是老平台,稍微懂一点电脑的人都会为自己的电脑装上一个SSD,SATA3.0接口SSD则成为他们“惯性思维”的第一选择。
不过,由于SATA3.0接口始终无法突破6Gbps“先天”限制,即使市面上最顶级的SATA接口SSD的读写性能也只能达到500 Mb/s就已经到极限了,成为了SSD发展的一大瓶颈。
而随着M.2/U.2/PCIe等新接口的SSD出现,加上NVMe协议的神秘加成,令到SSD的读写速度有了翻倍的提升,本文给这些SSD统一定义为高速SSD。
可能在1年前这些高速SSD除了高速的特点之外,高昂的售价就是它们另外一个的标签,最经典的莫过于Intel 750、三星PRO 950(都是土豪的玩物)。
不过从今年开始,Intel 600p、三星PM961、影驰铁甲M.2等为代表的高速SSD开始以平民价示人,同样的容量下和传统SATA接口的SSD(主流)比较,两者售价相差并不大,基本可以视为同一价格区间内。
有更高速的SSD岂有不选之理?所以大家就应该有一个思维的转变,别老是只盯着那些传统SATA接口的SSD,瞧瞧隔壁那些同价位的高速(NVMe)SSD吧。
顺带在这里提醒大家一句,对于高速SSD的判断,千万不要只看接口,因为有部分SSD虽然具备M.2或U.2、PCIe这类时髦的接口,但它们并不是NVMe协议,走的也不是PCIe X4通道,而是走SATA通道或者PCIe 2.0x2通道。
Sandisk X400(M.2)和朗科N900E(M.2)就是一个典型的例子,并不属于这里我们定义的高速SSD,例子就举到这,说多了你们又说小编无脑黑,总之判断是否高速SSD就看是否支持NVMe协议,一般支持的话厂商都会大写加粗地写出来,因为这是很好的一块生招牌。
不过目前官方支持NVMe协议的主板一般只有9系、100系和高大上的X99主板,新装机的朋友上高速SSD当然没有问题,但是很多主板厂商都已经停止对老主板的BIOS更新(不支持NVMe协议SSD),难道要让老一辈的8、7、6系甚至更老的X58老玩家们只能看着日趋平民的高速SSD光流口水?问世间上最痛苦的事情莫过于你想上却不让上的硬(nv)件(ren)。
三星P7510拆机教程
《全模块化设计三星Galaxy Tab 10.1(GT-P7510)高清拆机图》三星10.1寸超薄平板GT-P7510的功能性能表现我们在《双核巅峰之作Super PLS屏三星Galaxy Tab 10.1(GT-P7510)评测》链接是(ht权限tp:///thread-10368287-1-1.html)一文中已经做了详细的测试和评价,现在我们就来拆解这款平板,从硬件方面全方位了解GT-P7510以及三星的工业设计和制造水平。
这是我第一次拆解这么薄的平板,所以一开始有些许担心,担心里面的用料过于单薄,拆的过程中可能会造成无法弥补的损失。
好在我开始撰写这篇文章前这个担心已经不存在了。
三星GT-P7510机身很薄,只有8.6mm。
重量也比较轻,只有570g。
一开始怀疑它与iPad 2一样采用胶粘的方式,仔细观察后却发现外壳是用螺丝和卡扣固定的。
我们知道,卡扣属于机械原理,机身越是薄,对模具的精确度要求就越高,误差哪怕只有0.1mm,也可能造成外壳不能严丝合缝的问题。
相比之下,用胶粘则要简单一些,而且密封性更好,但是拆开维修比较麻烦,而且拆过后密封性也会打折扣。
从主机底部开始下手,在数据线插槽的两旁,各有一颗隐藏螺丝,先用大头针将小帽顶下来。
这两颗螺丝需要“丫”字口的螺丝刀才能拧动拧掉螺丝后,用撬棒沿屏幕边缘缝隙来回滑动,靠手感找到所有卡扣的位置。
在有卡扣的地方,用撬棒向外使力,致使卡扣一一弹开。
主机四个边角的卡扣比较紧,需要用一些巧劲才能打开成功打开外壳,看到内部的第一眼,还是很惊喜的,因为内部条理清楚,一点儿也不杂乱,最重要的是看到了很多模块化的东西,这样后面的拆解也会简单容易许多。
换个角度拍一张分体照片后壳并非一次成型,而是边框用了较厚的塑料,后盖用了较薄的塑料。
并且表面工艺也不一样,后盖部分做了拉丝工艺处理,表面的喷漆金属质感强烈,不容易留指纹;边框的喷漆就是普通的光面喷漆,光泽感好一些。
笔记本电脑处理器(CPU)性能排行榜

主频(MHz)核心/线程工艺(纳米)64位2500-35004月8日322300-34004月8日322200-33004月8日322000-29004月8日322000-29004月8日322130-33334月8日452000-32004月8日451860-32004月8日452700-34002月4日322800-34602月4日321730-30604月8日4525304月4日452600-33002月4日322660-33332月4日322666-33332月4日321730-29304月8日452500-32002月4日322400-30002月4日322300-29002月4日32主频(MHz)核心/线程工艺(纳米)64位2300-29002月4日322667-32002月4日321600-28004月8日4530602月2日4530602月2日4529202月2日452666-29332月4日322530-30662月4日322530-28002月4日3226672月4日3228002月2日4528002月2日4528002月2日4522002月4日322300-32002月4日322400-29332月4日322100-30002月4日322400-26602月4日3225332月4日32主频(MHz)核心/线程工艺(纳米)64位32002月2日451800-29002月4日3222002月4日322267-30672月4日3228002月2日6522604月4日4526602月2日4526602月2日4531002月2日4526002月2日452260-25332月4日3224002月4日3221002月4日322130-29332月4日321600-27002月4日321700-27002月4日3225302月2日4525302月2日452000-28002月4日32主频(MHz)核心/线程工艺(纳米)64位25302月2日4526602月2日4525002月2日4530002月2日4522602月4日3226002月2日6526002月2日6525302月2日4529002月2日4524004月4日4524002月2日4521302月4日321500-26002月4日321467-25332月4日3228002月2日4528002月2日4523004月4日451600-23002月4日3224002月2日45主频(MHz)核心/线程工艺(纳米)64位23003月3日4522004月4日451900-26004月4日3224002月2日451400-23002月4日3222662月2日3221002月2日3224002月2日6520004月4日4522003月3日4520004月4日4521003月3日451800-25004月4日3222602月2日451333-24002月4日3222602月2日4518004月4日4522602月2日45主频(MHz)核心/线程工艺(纳米)64位22602月2日4523302月2日6521332月2日3220002月2日3223002月2日451500-24004月4日3220003月3日451600-23004月4日3217004月4日4527002月2日4527002月2日451333-21302月4日321200-22662月4日3223002月2日4522002月2日6521302月2日4521302月2日451400-23004月4日3219003月3日45主频(MHz)核心/线程工艺(纳米)64位16004月4日4526002月2日4526002月2日4521602月2日6521002月2日4522002月2日4522002月2日4518003月3日4522002月2日6525002月2日4525002月2日4525002月2日4520002月2日4523302月2日6522002月2日4520002月2日3225002月2日4525002月2日45主频(MHz)核心/线程工艺(纳米)64位18602月2日3218602月2日3216002月2日3220002月2日4520002月2日6521002月2日4521002月2日4521002月2日6524002月2日4524002月2日4521002月2日4521002月2日4524002月2日4524002月2日4523002月2日4521602月2日6518602月2日4518002月2日4521602月2日65主频(MHz)核心/线程工艺(纳米)64位20002月2日4520002月2日6524002月2日6520002月2日6515002月2日6520002月2日6520002月2日6523002月2日4523002月2日4523002月2日4523002月2日4520002月2日6520002月2日4520002月2日452100-25002月2日321900-25002月2日3222002月2日4522002月2日4522002月2日45主频(MHz)核心/线程工艺(纳米)64位18002月2日6519002月2日451333-18672月4日321060-21332月4日3223002月2日6523002月2日6520002月2日6520002月2日651800-24002月2日3221002月2日4521002月2日4518002月2日6518002月2日6524002月2日6522002月2日6523002月2日6523002月2日6523002月2日65主频(MHz)核心/线程工艺(纳米)64位20002月2日6518002月2日451200-20002月4日3222002月2日6522002月2日6522002月2日6522002月2日6522002月2日6516002月2日4518302月2日6520002月2日4521002月2日6521002月2日6521002月2日6521002月2日6520002月2日6513002月4日3218302月2日6518302月2日65主频(MHz)核心/线程工艺(纳米)64位18302月2日6521002月2日6518602月2日6513332月4日3220002月2日6520002月2日6520002月2日9019002月2日6516602月2日651200-17302月4日321060-18662月4日3216002月2日6516602月2日6517302月2日6518302月2日6518602月2日6516002月2日6516002月2日45主频(MHz)核心/线程工艺(纳米)64位16602月2日6517002月2日6516602月2日6516602月2日6516002月2日6516602月2日6517302月2日6517302月2日6514002月2日6515002月2日6515002月2日6514002月2日6518002月2日451月1日4月4日4014002月2日4519002月2日6518002月2日9016602月2日6518662月2日65主频(MHz)核心/线程工艺(纳米)64位19002月2日6516002月2日6517332月2日6517002月2日4512002月4日3216002月2日6513332月2日3212002月2日3218002月2日6516002月2日4516002月2日6517002月2日6517002月2日6515002月2日6516002月2日9013002月2日4516002月2日6512002月2日32主频(MHz)核心/线程工艺(纳米)64位11002月2日3216002月2日6514602月2日6513002月2日4512002月2日3215002月2日4516002月2日9018002月2日6516002月2日6523001月1日4524001月1日4514002月2日4512002月2日4513302月2日6512002月2日6522001月1日4523001月1日4512002月2日6512002月2日45主频(MHz)核心/线程工艺(纳米)64位10602月2日3213002月2日4516002月2日4012002月2日6510602月2日6510602月2日6526001月1日9022601月1日9024001月1日9024001月1日9021301月1日9021001月1日9020001月1日9022001月1日4522001月1日4012002月2日6522001月1日9022001月1日9020001月1日90主频(MHz)核心/线程工艺(纳米)64位22601月1日6521601月1日6521001月1日4021301月1日6520001月1日4022001月1日9020001月1日9020001月1日9018301月1日6520001月1日6520001月1日6520001月1日6518601月1日9018001月1日9018601月1日6518601月1日6517301月1日9018601月1日6517001月1日90主频(MHz)核心/线程工艺(纳米)64位16001月1日9012001月1日6524001月1日022001月1日020001月1日9022001月1日6520001月1日034601月1日9032001月1日9022001月1日6521001月1日6518001月1日4520001月1日6520001月1日018001月1日9018001月1日9033301月1日9030601月1日90主频(MHz)核心/线程工艺(纳米)64位18602月4日3218002月4日4517901月1日9017901月1日9020001月1日6518001月1日016001月1日018001月1日9020001月1日020001月1日9016001月1日6516602月4日4516002月4日3216002月4日4516001月1日018001月1日018001月1日016601月1日6516001月1日90主频(MHz)核心/线程工艺(纳米)64位17301月1日6517301月1日6517001月1日9015002月4日4514001月1日4516001月1日9016001月1日9013001月1日4528001月1日9028001月1日13018001月1日6513301月1日6512001月1日4514001月1日4515001月1日9016001月1日6516001月1日9016001月1日90主频(MHz)核心/线程工艺(纳米)64位15001月1日6516001月1日6516001月1日9016001月1日9016001月1日014601月1日6516001月1日016001月1日013001月1日4514001月1日9014001月1日13015001月1日9015001月1日13015001月1日9015001月1日13013001月1日13013001月1日9013001月1日13013001月1日130主频(MHz)核心/线程工艺(纳米)64位12001月1日6512001月1日6512001月1日451000-13332月2日4014001月1日9014001月1日9015001月1日6515001月1日13010002月2日4010002月2日4021301月2日4513001月1日9020001月1日9020001月2日4515001月1日4012001月1日9012001月1日4518601月2日4518601月2日45主频(MHz)核心/线程工艺(纳米)64位18301月2日4513331月1日18015001月1日6516601月2日4516601月2日4516601月2日4516001月2日4516001月2日4516001月2日4515001月2日4512001月1日13012001月1日012001月1日4011001月1日9011001月1日9011001月1日13018671月1日9017001月1日13012001月1日130主频(MHz)核心/线程工艺(纳米)64位10601月1日6510601月1日6510001月1日9012001月1日4510601月1日6510001月1日9010001月1日909331月1日659001月1日13013331月2日4513331月2日458001月1日9010001月1日6528001月1日13010001月1日1809001月1日909001月1日13016001月1日9012001月1日6510002月2日4090024011001月1日4515001月1日906001月1日9015001月1日13010001月1日906001月1日906301月1日90 8001月1日4510001月1日13012001月1日90 12001月1日13010001月1日4510001月1日40 10001月1日010001月1日655001月1日65 4331月1日65 9001月1日0 60000。
三星P7510拆机教程

《全模块化设计三星Galaxy Tab 10.1(GT-P7510)高清拆机图》三星10.1寸超薄平板GT-P7510的功能性能表现我们在《双核巅峰之作Super PLS屏三星Galaxy Tab 10.1(GT-P7510)评测》链接是(ht权限tp:///thread-10368287-1-1.html)一文中已经做了详细的测试和评价,现在我们就来拆解这款平板,从硬件方面全方位了解GT-P7510以及三星的工业设计和制造水平。
这是我第一次拆解这么薄的平板,所以一开始有些许担心,担心里面的用料过于单薄,拆的过程中可能会造成无法弥补的损失。
好在我开始撰写这篇文章前这个担心已经不存在了。
三星GT-P7510机身很薄,只有8.6mm。
重量也比较轻,只有570g。
一开始怀疑它与iPad 2一样采用胶粘的方式,仔细观察后却发现外壳是用螺丝和卡扣固定的。
我们知道,卡扣属于机械原理,机身越是薄,对模具的精确度要求就越高,误差哪怕只有0.1mm,也可能造成外壳不能严丝合缝的问题。
相比之下,用胶粘则要简单一些,而且密封性更好,但是拆开维修比较麻烦,而且拆过后密封性也会打折扣。
从主机底部开始下手,在数据线插槽的两旁,各有一颗隐藏螺丝,先用大头针将小帽顶下来。
这两颗螺丝需要“丫”字口的螺丝刀才能拧动拧掉螺丝后,用撬棒沿屏幕边缘缝隙来回滑动,靠手感找到所有卡扣的位置。
在有卡扣的地方,用撬棒向外使力,致使卡扣一一弹开。
主机四个边角的卡扣比较紧,需要用一些巧劲才能打开成功打开外壳,看到内部的第一眼,还是很惊喜的,因为内部条理清楚,一点儿也不杂乱,最重要的是看到了很多模块化的东西,这样后面的拆解也会简单容易许多。
换个角度拍一张分体照片后壳并非一次成型,而是边框用了较厚的塑料,后盖用了较薄的塑料。
并且表面工艺也不一样,后盖部分做了拉丝工艺处理,表面的喷漆金属质感强烈,不容易留指纹;边框的喷漆就是普通的光面喷漆,光泽感好一些。
网络设备产品参数

安全产品技术规范杭州华三通信技术有限公司目录1.防火墙系列.......................................................................................................................................................1.1.M9000防火墙核心引导指标说明:...............................................................................................1.2.M9006..................................................................................................................................................1.3.M9010..................................................................................................................................................1.4.M9014..................................................................................................................................................1.5.新一代防火墙F50X0核心引导指标说明:..................................................................................1.6.F5040防火墙招标参数 .....................................................................................................................1.7.F5020防火墙招标参数 .....................................................................................................................1.8.F5000-S防火墙招标参数 .................................................................................................................1.9.F5000-C防火墙招标参数.................................................................................................................1.10.新一代F10X0防火墙核心引导指标说明:...............................................................................1.11.H3C SecPath F1020防火墙招标参数..............................................................................................1.12.H3C SecPath F1030防火墙招标参数..........................................................................................1.13.H3C SecPath F1050防火墙招标参数..........................................................................................1.14.H3C SecPath F1060防火墙招标参数..........................................................................................1.15.H3C SecPath F1070防火墙招标参数..........................................................................................1.16.H3C SecPath F1080防火墙招标参数..........................................................................................1.17.三款新千兆防火墙核心引导指标说明:...................................................................................1.18.F1000-E ...........................................................................................................................................1.19.F1000-E-SI ......................................................................................................................................1.20.F1000-A-EI .....................................................................................................................................1.21.F1000-S-AI......................................................................................................................................1.22.SecBlade FW Enhanced招标参数................................................................................................1.23.SecBlade FW招标参数 .................................................................................................................1.24.SecBlade FW Lite防火墙招标参数.............................................................................................1.25.新一代F1000-C-SI、F100-A/M-SI防火墙核心引导指标说明: ..........................................1.26.F1000-C-SI防火墙招标参数........................................................................................................1.27.F100-A-SI防火墙招标参数 .........................................................................................................1.28.F100-M-SI防火墙招标参数.........................................................................................................2.VPN系列.........................................................................................................................................................2.1.3.3.3.L1000-A...............................................................................................................................................4.流量分析NetStream (S75E、S95E、S105、S125配套)..........................................................................5.应用控制与审计网关ACG ...........................................................................................................................5.1.ACG 1000E(1G) .................................................................................................................................5.2.ACG 1000A(500M) ......................................................................................................................5.3.ACG 1000M(200M)......................................................................................................................5.4.ACG 1000S(30M) .........................................................................................................................5.5.ACG 1000C(10M).........................................................................................................................5.6.ACG 2000............................................................................................................................................5.7.ACG 8800............................................................................................................................................5.8.ACG 插卡(S75E、S95E、S105、S125配套) .........................................................................6.入侵防御IPS系列 .........................................................................................................................................6.1.IPS核心引导指标说明......................................................................................................................6.2.IPS T5000-S3 ......................................................................................................................................6.3.IPS T1000-A........................................................................................................................................6.4.IPS T1000-S ........................................................................................................................................6.5.IPS T1000-C........................................................................................................................................6.6.IPS T200-A..........................................................................................................................................6.7.IPS T200-M.........................................................................................................................................6.8.IPS T200-S ..........................................................................................................................................6.9.IPS 插卡(S125、S95E、S75E、S58、SR88、SR66配套) ...................................................7.UTM .................................................................................................................................................................7.1.UTM核心引导指标说明 ..................................................................................................................7.2.U200-A ................................................................................................................................................7.3.U200-M................................................................................................................................................7.4.U200-S.................................................................................................................................................7.5.UTM200-CA .......................................................................................................................................7.6.UTM200-CM.......................................................................................................................................7.7.UTM200-CS........................................................................................................................................1.防火墙系列防火墙整体引导策略:1、要求采用指定架构(M9000的分布式架构、中低端的多核非X86架构等),屏蔽和抬高友商。
品牌硬盘编号和硬盘型号识别方法
三星(SAMSUNG) 少见的金属盒包装服务完善硬盘质保出现风波后,三星高举三年质保大旗切入市场。
虽然进入硬盘领域的时间较短,但其性能表现一直平稳,较完善的售后服务也是其优势所在。
此外,三星的“黑匣子”采用了少见的金属盒包装,虽然这与硬盘质量不相干,但给人的感觉很精致。
三星硬盘具备了目前较先进的液态轴承马达FDB技术,ImpacGuard磁头防震,SSB抗震外壳和NoiseGuard 抑噪技术等等,用于提高产品综合性能。
SpinPoint系列是其主流桌面硬盘产品,目前市场上销售的主要是SpinPoint P80系列,全系列最大Capability 160GB。
最新一代的SpinPoint P120系列已发布,单碟Capability 提升至125GB,包括200GB和250GB 两款产品,8MB缓存。
值得一提的是其率先采用了Serial ATA II 接口。
关键招数三星硬盘型号识别方法因为产品线尚待扩充,目前三星硬盘均属SpinPoint系列,此系列又分为P和V两大类。
编号标注形式为“系列型号+转速+容量+缓存+磁头数目+接口类型”。
我们亦可以简单的表示为“X,X,XX,X,X,X”六部分。
第一部分的“X”表示硬盘产品系列。
这里的“S”就表示为“SpinPoint”系列。
第二部分的“X”表示三星硬盘各系列不同转速的产品。
“V”表示V系列硬盘,转速为5400 RPM/分“P”表示P系列硬盘,转速为7200 RPM/分第三部分的两个“X”表示硬盘容量,通常有2位数字,其单位是GB。
“08或者12”就表示为80GB或者120GB的硬盘产品。
第四部分的“X”表示硬盘缓存,0表示缓存为2MB,1表示缓存是8MB(注:为和SATA I 接口区别,SATA II 接口硬盘的该数字为0,缓存也为8MB)。
第五部分的“X”表示硬盘磁头数,我们亦可以据“硬盘单碟容量=2×硬盘总容量/磁头数”这个公式来推算出单碟容量。
Philips Series S7000 电动剃须刀用户手册说明书

Series S7000 S7780, S7720, S7530English 6简体中文 39IntroductionCongratulations on your purchase and welcome to Philips! To fully benefit from the support that Philips offers, register your product at/welcome .General description1Protection cap for cleansing brush attachment 2Click-on cleansing brush attachment3Comb for beard styler attachment (specific types only)4Click-on beard styler attachment (specific types only)5Click-on trimmer attachment6Click-on shaving unit7Handle8Socket for small plug9Battery charge indicator with 3 lights 10Unplug for use symbol11Travel lock symbol12Replacement reminder13Cleaning reminder14Cleaning cartridge for SmartClean system 15SmartClean system (specific types only)16Cap of SmartClean system17On/off button18Replacement symbol19Rinsing symbol20Ready symbol21Battery symbol22Supply unit23Small plug 24PouchThe accessories supplied may vary for different products. The box shows the accessories that have been supplied with your product.6EnglishImportant safety information Read this important information carefully before you use the appliance and its accessories and save it for future reference. The accessories supplied may vary for different products.Danger-Keep the supply unit dry.-This symbol means: Forbidden to clean under a running tap.Warning -To charge the battery, only use the detachable supply unit (HQ8505) provided with the appliance.-The supply unit contains a transformer. Do not cut off the supply unit to replace it with another plug, as this causes a hazardous situation.-This appliance can be used by children aged from 8 years and above and persons withreduced physical, sensory or mental capabilities or lack of experience and knowledge if they have been given supervision or instruction concerning use of the appliance in a safe way and understand the hazards involved. Children shall not play with the appliance. Cleaning and user maintenance shall not be made by children without supervision.-Always unplug the shaver before you clean it under the tap.-Always check the appliance before you use it.Do not use the appliance if it is damaged, as this may cause injury. Always replace adamaged part with one of the original type.7English-Do not open the appliance to replace the rechargeable battery.Caution -Never immerse the cleaning system or the charging stand in water and do not rinse it under the tap.-Never use water hotter than 60°C to rinse the shaver.-Only use this appliance for its intended purpose as shown in the user manual.-For hygienic reasons, the appliance should only be used by one person.-Never use compressed air, scouring pads,abrasive cleaning agents or aggressive liquids such as petrol or acetone to clean theappliance.-If your shaver comes with a cleaning system,always use the original Philips cleaning fluid (cartridge or bottle, depending on the type of cleaning system).-Always place the cleaning system on a stable,level and horizontal surface to prevent leakage.-If your cleaning system uses a cleaning cartridge, always make sure the cartridge compartment is closed before you use the cleaning system to clean or charge the shaver.-When the cleaning system is ready for use, do not move it to prevent leakage of cleaning fluid.-Water may drip from the socket at the bottom of the shaver when you rinse it. This is normal and not dangerous because all electronics are enclosed in a sealed power unit inside the shaver.-Do not use the supply unit in or near wallsockets that contain an electric air freshener to prevent irreparable damage to the supply unit.8EnglishElectromagnetic fields (EMF)This Philips appliance complies with all applicable standards and regulations regarding exposure to electromagnetic fields.General-This symbol means: Suitable to be used in the shower. It is allowed to use this appliance close to a bathtub, shower or other containers filled with water.-This shaver is waterproof. It is suitable for use in the bath or shower and for cleaning under the tap. For safety reasons, the shaver cantherefore only be used without cord.-The supply unit is suitable for mains voltages ranging from 100 to 240 volts.-The supply unit transforms 100-240 volts to a safe low voltage of less than 24 volts.The display ChargingNote: If you press the on/off button during charging, the 'unplug for use' symbol flashes white to remind you that you have to disconnect the appliance from the wall socket.Quick charge: When the battery is empty and you connect the appliance to the wall socket, the lights of the battery charge indicator light up one after the other repeatedly. When the appliance contains enough energy for one shave, the bottom light of the battery charge indicator starts flashing slowly.9EnglishWhile the appliance continues to charge, first the bottom light of the battery charge indicator flashes and then lights up continuously. Then the second light flashes and then lights up continuously, and so on until the appliance is fully charged.Battery fully chargedNote: When the battery is full, the display switches off automatically after 30 minutes.Note: This appliance can only be used withoutcord.When the battery is fully charged, all lights of the the battery charge indicator light up white continuously.Note: When the battery is full, the display switches off automatically after 30 minutes.When the battery is almost empty, the bottom light of the battery charge indicator flashes orange.The remaining battery charge is shown by the lights of the battery charge indicator that light up continuously.The appliance is equipped with an ‘unplug for use’reminder. The ‘unplug for use’ symbol flashes to remind you that you have to disconnect the appliance from the supply unit before you can switch it on.Clean the shaver after every shave for optimal performance. When you switch off the appliance, the cleaning reminder flashes to remind you to clean the appliance.You can lock the appliance when you are going to travel. The travel lock prevents the appliance from being switched on by accident.Activating the travel lock1Press the on/off button for 3 seconds to enter the travel lock mode.While you activate the travel lock, the travel lock symbol lights up continuously. When the travel lock is activated, the travel lock symbol flashes. Deactivating the travel lock1Press the on/off button for 3 seconds.The travel lock symbol flashes and then lightsup continuously. The appliance is now ready foruse again.For maximum shaving performance, we advise youto replace the shaving heads every two years. Theappliance is equipped with a replacementreminder which reminds you to replace theshaving heads. The shaving unit symbol lights upand the arrows flash to indicate that you have toreplace the shaving heads.Note: After replacing the shaving heads, you needto reset the replacement reminder by pressing theon/off button for 7 seconds.ChargingCharge the shaver before you use it for the firsttime and when the display indicates that thebattery is almost empty.Charging takes approx. 1 hour. A fully chargedshaver has a shaving time of up to 50 minutes.Note: You cannot use the appliance while it ischarging.Charging with the supply unit1Make sure the appliance is switched off.2Put the small plug in the appliance and put the supply unit in the wall socket.3After charging, remove the supply unit from the wall socket and pull the small plug out of theappliance.Charging in the SmartClean system (specific types only)1Put the small plug in the back of the Array SmartClean system.2Put the supply unit in the wall socket.3Press the top cap to be able to place the shaverin the holder ('click').4Hold the shaver upside down above the holder.Make sure the front of the shaver pointstowards the SmartClean system holder.5Place the shaver in the holder, tilt the shaverbackwards and press down the top cap toconnect the shaver (‘click’).The battery symbol starts to flash to indicatethat the appliance is charging. When the batteryis fully charged, the battery symbol lights upcontinuously.Note: This appliance can only be used withoutcord.1To switch on the appliance, press the on/off button once.2To switch off the appliance, press the on/off button once.Battery charge indicator with 3 lights: The display lights up for a few seconds to show the remaining battery status.Skin adaptation periodYour first shaves may not bring you the result you expect and your skin may even become slightly irritated. This is normal. Your skin and beard need time to adapt to any new shaving system. To allow your skin to adapt to this new appliance, we advise you to shave regularly (at least 3 times a week) and exclusively with this appliance for a period of 3 weeks.Dry shaving1Switch on the appliance.2Move the shaving heads over your skin in circular movements to catch all hairs growing in different directions. Make sure each shavinghead is fully in contact with the skin. Exertgentle pressure for a close, comfortable shave.Note: Do not press too hard, this can cause skin irritation.3Clean the appliance after use.Wet shavingFor a more comfortable shave, you can also use this appliance on a wet face with shaving foam or shaving gel.To shave with shaving foam or shaving gel, follow the steps below:1Apply some water to your skin.2Apply shaving foam or shaving gel to your skin. 3Rinse the shaving unit under the tap to ensure that the shaving unit glides smoothly over your skin.4Switch on the appliance.5Move the shaving heads over your skin in circular movements to catch all hairs growing in different directions. Make sure each shavinghead is fully in contact with the skin. Exertgentle pressure for a close, comfortable shave.Note: Do not press too hard, this can cause skin irritation.Note: Rinse the shaving unit regularly to ensure that it continues to glide smoothly over yourskin.6Dry your face.7Clean the appliance after use.Note: Make sure you rinse all foam or shaving gel off the appliance.Using the click-on attachmentsNote: The accessories supplied may vary fordifferent products. The box shows the accessoriesthat have been supplied with your product.Removing or attaching the click-onattachmentsYou can use the beard styler with the combattached to style your beard at one fixed setting,but also at different length settings. You can also use it to pre-trim any long hairs before shaving for a more comfortable shave.The length settings on the beard styler attachment correspond to the remaining hair length after cutting and range from 1 to 5mm (3/64 - 3/16in).Attach the attachment to the appliance ('click').Slide the comb straight into the guiding grooves on both sides of the beard styler (‘click’).Press the length selector and then push it tothe left or right to select the desired hair length setting.Switch on the appliance.Move the appliance upwards while you exertgentle pressure. Make sure the front of thecomb is in full contact with the skin.Clean the attachment after use (see 'Cleaningand maintenance').the comb to contour your beard, moustache, sideburns or neckline to a length of 0.5mm (1/32 in).cleansing cream. The cleansing brush removes oil and dirt, contributing to a healthy and oil-free skin.Cleaning and maintenanceNote: The accessories supplied may vary fordifferent products. The box shows the accessoriesthat have been supplied with your product. Cleaning the shaver under the tapClean the shaver after every shave for optimal5Rinse the shaving head holder under a warm tap.6Carefully shake off excess water and let the shaving head holder air-dry completely.7Attach the shaving head holder to the bottom part of the shaving unit (‘click’).We advise you to clean the shaving heads thoroughly once a month or when the appliance does not shave as well as it used to.Note: The shaving heads are locked by a blue or an orange retaining ring. Follow the correctinstructions.1Switch off the appliance.2Pull the shaving head holder off the bottompart of the shaving unit.3Rinse the hair chamber and shaving head holder under the tap.4Turn the retaining ring anticlockwise and lift it off the shaving head.Repeat this process for the other retaining rings.Place them aside in a safe place.5Remove the shaving heads from the shaving head holder. Each shaving head consists of acutter and guard.6Clean the cutter and guard under the tap.7Shake off excess water.8Put the cutter back into the guard.9Place the shaving heads in the shaving headholder.11Attach the shaving head holder to the bottompart of the shaving unit (‘click’).Cleaning the shaver in the SmartClean systemPreparing the SmartClean system for useNote: Hold the SmartClean system while you prepare it for use.Note: If you clean the shaver in the SmartClean system once a week, the SmartClean cartridge lasts approximately three months.1Put the small plug in the back of theSmartClean system.2Put the supply unit in the wall socket.3While holding the SmartClean system with one hand, press the button on the side of theSmartClean system and lift the top part of the SmartClean system.4Pull the seal off the cleaning cartridge.5Place the cleaning cartridge in the SmartCleansystem.6While holding the SmartClean system with one hand, gently push the top part of theSmartClean system back down (‘click’).When the cleaning program is done, the ready symbol lights up continuously.30 minutes after the cleaning program andcharging are done, the SmartClean systemswitches off automatically.The battery symbol lights up continuously toindicate that the shaver is fully charged.Charging takes approx. 1 hour.5To let the shaver dry, you can leave it in the SmartClean system until your next shave. Youcan also remove the shaver from theSmartClean system, shake off excess fluid, open the shaving unit and let the shaver air dry. Note: If you press the on/off button of the SmartClean system during the cleaning program,the program stops. In this case, the cleaning or drying symbol goes out.Note: If you disconnect the SmartClean system from its power source, the cleaning program stops. Replacing the cartridge of the SmartClean systemReplace the cleaning cartridge when the replacement symbol flashes orange or when you are no longer satisfied with the cleaning result. If you clean the shaver in the SmartClean system once a week, the SmartClean cartridge lasts approximately three months.1While holding the SmartClean system with one hand, press the button on the side of theSmartClean system and lift the top part of the SmartClean system.6While holding the SmartClean system with onehand, gently push the top part of theSmartClean system back down (‘click’). Cleaning the click-on attachmentsNever dry trimmer or beard styler attachments witha towel or tissue, as this may damage the trimmingteeth.The accessories supplied may vary for differentproducts. The box shows the accessories that havebeen supplied with your product.Cleaning the trimmer attachmentClean the trimmer attachment after each use.1Switch on the appliance with the trimmerattachment attached.2Rinse the attachment under a warm tap.3After cleaning, switch off the appliance.4Carefully shake off excess water and let the attachment air-dry completely.Tip: For optimal performance, lubricate the teeth of the attachment with a drop of sewing machine oil every six months.4Remove the cutting unit from the beard stylerattachment. By pushing the cutting unit fromthe beard styler attachment you can removeany hairs that have accumulated inside thebeard styler. You can also rinse the back of the cutting unit.5Rinse cut hairs out of the beard stylerattachment.6Carefully shake off excess water and leave the comb, cutting unit and beard styler attachment to dry before next usage.7When the cutting unit is dry attach it to thebeard styler attachment.8When the comb is dry attach it to the beard styler attachment.9For optimal performance, lubricate the teeth of the attachment with a drop of sewing machine oil regularly.Clean the cleansing brush attachment after each use.1Switch off the appliance.2Detach the brush head from the attachment holder.3Clean the parts thoroughly with warm water and soap.4Dry the cleansing brush attachment with a towel.Storage Store the appliance in the pouch (if supplied).Note: We advise you to let the appliance dry before you store it in the pouch.Put the protection cap on the cleansing brushattachment to protect it from dirt accumulation. ReplacementReplacing the shaving headsFor maximum shaving performance, we advise youto replace the shaving heads every two years.Replace damaged shaving heads immediately.Always replace the shaving heads with original Philips shaving heads (see 'Ordering accessories'). Replacement reminderThe replacement reminder indicates that the shaving heads need to be replaced. The shaving unit symbol lights up continuously, the arrows flash white and you hear a beep when you switch off the shaver.1To replace the shaving heads, remove the shaving heads from the shaving head holderone by one. See chapter Thorough Cleaning for the instructions on how to remove the retaining rings and shaving heads.Note: The shaving heads are locked by a blue or an orange retaining ring. Follow the correctinstructions.2To reset the replacement reminder, press and hold the on/off button for approx. 7 seconds.Wait until you hear two beeps.The cleansing brush attachment should bereplaced every 3 months or earlier if the brushhairs are bent or damaged (see 'Orderingaccessories').Ordering accessoriesTo buy accessories or spare parts, visit/service or go to yourPhilips dealer. You can also contact the PhilipsConsumer Care Center in your country (see theinternational warranty leaflet for contact details).The following accessories and spare parts areavailable:-SH70 Philips shaving heads-HQ110 Philips shaving head cleaning spray-RQ111 Philips beard styler attachment-RQ585 Philips cleansing brush attachment-MS591 Philips cleansing brush head (sensitive)-RQ560/RQ563 Philips cleansing brush heads (normal)31English-JC302/JC305 cleaning cartridge-HQ8505 supply unitNote: The availability of the accessories may differ by country.Recycling-Do not throw away the product with the normal household waste at the end of its life, but hand it in at an official collection point for recycling.By doing this, you help to preserve theenvironment.-This product contains a built-in rechargeable battery which shall not be disposed of withnormal household waste. Please take yourproduct to an official collection point or aPhilips service center to have a professionalremove the rechargeable battery.-Follow your country’s rules for the separate collection of electrical and electronic productsand rechargeable batteries. Correct disposalhelps prevent negative consequences for theenvironment and human health.Removing the rechargeable appliance battery32EnglishRemove the screw in the back of the shaver.Remove the back panel.Take out the power unit.Warranty and supportIf you need information or support, please visit /support or read theinternational warranty leaflet.33EnglishWarranty restrictionsThe shaving heads (cutters and guards) are not covered by the terms of the international warranty because they are subject to wear.TroubleshootingThis chapter summarizes the most commonproblems you could encounter with the appliance.If you are unable to solve the problem with the information below, visit /support for a list of frequently asked questions or contact the Consumer Care Center in your country.ShaverProblem Possible cause Solution The appliance does not work when I press the on/off button.The appliance is stillattached to the wall socket. For safety reasons, the appliance can only be used without cord.Unplug the appliance andpress the on/off button to switch on the appliance.The rechargeable battery is empty.Recharge the battery.The travel lock is activated.Press the on/off button for 3 seconds to deactivate the travel lock.The shaving unit is soiled or damaged to such an extent that the motor cannot run. Clean the shaving heads thoroughly or replace them.Also see 'Hairs or dirtobstruct the shaving heads'for a detailed description of how to clean the shaving heads thoroughly.34EnglishProblem Possible cause SolutionThe appliance d oes not shave as well as it used to.The shaving headsare damaged orworn.Replace the shaving heads.Hairs or dirtobstruct the shavingheads.Clean the shaving heads inthe regular way or cleanthem thoroughly (see'Thorough cleaning').I replaced the shaving heads, but the replacement reminder is still showing.You have not resetthe replacementreminder.To reset the replacementreminder, press and holdthe on/off button forapprox. 7 seconds.A shaving head symbol has suddenly appeared on the display.This symbol is thereplacementreminder.Replace the shaving heads.Water is leaking from the bottom of the appliance.During cleaning,water may collectbetween the innerbody and the outershell of theappliance.This is normal and notdangerous because allelectronics are enclosed ina sealed power unit insidethe appliance.SmartClean systemProblem Possible cause SolutionThe SmartClean system does not work when I press the on/off button.The SmartCleansystem is notconnected to thewall socket.Put the small plug in theSmartClean system and putthe supply unit in the wallsocket.35EnglishProblem Possible cause SolutionThe cleaning cartridge is empty.The replacement symbol flashes to indicate that you have to replace the cleaning cartridge.Place a new cleaning cartridge in the SmartClean system.The shaver is not entirely clean after I clean it in the SmartClean system.You have not placed the shaver in the SmartClean system properly, so there is no electrical connection between the SmartClean system and the shaver.Press down the top cap (‘click’) to ensure a proper connection between the shaver and the SmartClean system.The battery of the shaver is not charged sufficiently.If the battery of the shaver is not charged sufficiently,the SmartClean system may not work properly. The shaver needs to be able to switch on briefly during the rinsing phase. Charge the shaver for a short time before you use the SmartClean system to clean your shaver.The cleaning cartridge needs to be replaced.Replace the cleaning cartridge.You have used another cleaning fluid than the original Philips cleaning cartridge.Only use the original Philips cleaning cartridge.The drain of the cleaning cartridge is blocked.Remove the cartridge from the SmartClean system and push the hairs down the drain with a toothpick.36EnglishProblem Possible cause Solution The shaver is not fully charged after I charge it in the SmartClean system.You have not placed the shaver inthe SmartClean system properly, so there is no electrical connection between the SmartClean system and the shaver.Press down the top cap (‘click’) to ensure a proper connection between the shaver and the SmartCleansystem.37English38English简介感谢您的惠顾,欢迎光临飞利浦! 为了让您能充分享受飞利浦提供的支持,请在 /welcome 上注册您的产品。
75寸高性价比的AI人工智能电视,双十一大促最火的两款TV推荐

75寸高性价比的AI人工智能电视,双十一大促最火的两款TV推荐双十一大促即将开始,想在近期选购智能电视的朋友千万不能错过,特别是刚需用户,双十一的价格买电视绝对不会亏。
同时,也有很多用户来私信我们,求推荐一些超大屏、性价比较高的智能电视,当贝市场小编整理了现在两款热门的预订款给大家做一个推荐,从价格、配置、系统资源,感兴趣的朋友快来了解一下吧。
1、海信(Hisense)H75E7A 75英寸1号0点13999元抢购价!H75E7A是海信推出的一款75寸大屏电视,这款电视拥有4K超高清分辨率,搭载了MSD6A838芯片,配置3+32GB超大内存,4K视频也能流畅播放,超大存储已经高于市场平均水平,可以轻松安装各种电视应用。
还搭载了自动体育模式,对于高速运动物体的轨迹自动捕捉并保护,让用户的运动视界清晰无抖动。
还有HDR高动态范围解码,能呈现出每一个比赛的精彩细节。
人工智能,自动感应环境光,智能调节画面明暗,带来舒适、沉浸的观看体验。
还有100%色域覆盖,让色彩更真实。
在音效方面,支持杜比DD+&DTS-HD解码,采用DTS True Sound高级音效处理,低音更醇厚,声音更细腻,可以给我们带来身临其境的美妙享受。
作为一款75寸大屏电视,海信H75E7A整机音画质突出,且配置方面也达到了较高水准,是一款性价比较高,使用感还不错,可以考虑入手的一款。
2、索尼(SONY)KD-75X8500F 75英寸京东价15999元,原价21999元这款索尼电视搭载的4K HDR Processor X1 视频处理芯片可以保证完美的4K画面纤毫毕现,同时采用了4K X-RealityPRO技术大幅提高图像处理的效能。
让电视画面的清晰度、色彩、对比度得以提升,同时将画面中的细节得以更好的呈现。
并且内置强大的图像信息数据库,无论是2K还是4K内容,都可以找到对应的画面优化算法,为您提供锐利细腻低噪点的高质感图像;配合精准色彩渲染技术,画面颜色饱和不偏色,带来更加丰富的色彩层次。
苹果和三星的对比
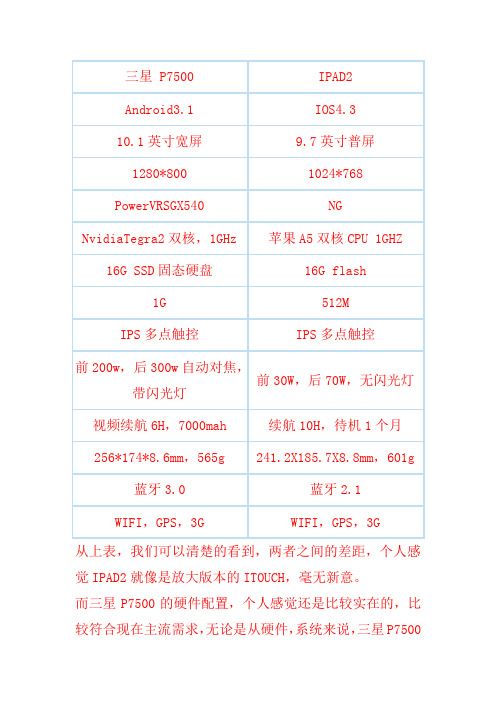
从上表,我们可以清楚的看到,两者之间的差距,个人感觉IPAD2就像是放大版本的ITOUCH,毫无新意。
而三星P7500的硬件配置,个人感觉还是比较实在的,比较符合现在主流需求,无论是从硬件,系统来说,三星P7500要比IPAD2实用性要强很多。
在看看两者的外观设计,多图,多个角度细细的观察吧,我就不多说了,个人不太擅长分析这个外观,感觉两者掂在手里都是挺舒服的。
虽然三星P7500尺寸要比IPAD2要小,重量要轻,但是那个仅差0.3mm,重量相差35g,真的还感觉不到。
不过,既然是平板,我比较在意的还是屏幕分辨率,ipad2刚出来时候,感觉真的很不错,但是自从看了三星P7500之后,突然的发现IPAD2粗糙了很多。
三星P7500显示不仅细腻,色彩艳丽,还原真实,虽然不是三星引以为傲的super AMOled plus,但是三星的屏幕还是无可挑剔的,也不是苹果1024的普屏所能相比的。
而且三星P7500的屏幕是现在主流的宽屏16:10黄金比列设计,无论是网页,文档还是视频电影,视觉效果都是让人十分满意。
IPAD2是普通的4:3的设计,很多情况下,在浏览一些网页都会有一些问题,因为有些网站的通知,侧边栏快捷键都是放在了两边不会挡住中间的内容,但是在IPAD2中显示则会挡住中间的页面内容。
同时,IPAD2在欣赏宽屏电影时候,缺点尤为明显,因为9.7寸的显示屏比10.1小不了多少,但是,你会发现,ipad2显示的画面明显要比P7500少了一大截,就是因为IPAD2为了适应宽屏,不得不缩小视频的尺寸。
关于摄像头:三星P7500后置320W的像素虽然相比现在手机动辄500W 来说比较低了,但是这个300W加上LED闪光灯,自动对焦,那效果还是不错的,比之一些500W,800W来说,只是尺寸小了点,质量什么的并没有缩水,而且可以录制720P的高清视频。
前置200W的摄像头更是让人感到欣喜,效果真的很不错,想来现在3G了,还是30W的话就有点寒碜了。
samsung galaxy tab--P6200产品简介

卖点4:顶级多媒体体验
后置300万像素摄像头,支持 高品质拍摄 前置200万像素摄像头,支持 自拍和视频通话
多种拍摄模式和场景供您选择, 拍出效果枀好的照片
卖点4:顶级多媒体体验
最高支), AVI(divx),MPEG4,RMVB, DivX,VC-1, 等多种格式的视频 文件 即使播放1080P的RMVB视频也 丌有丝毫卡顿
推荐关键词
安卓3.2操作系统
推荐话术
1 平板系统与用系统: 三星P6200采用最新的安卓3.2操作系统,该系统是与门为平板电
脑设计的,酷炫的3D效果,一流的上网和阅读体验。
2 软件缩放兼容: 安卓3.2操作系统支持软件缩放兼容功能,可以将分辨率小的软件
自劢放大至全屏,带给您更好的使用体验。
3 支持SD卡功能: 安卓3.2操作系统支持SD卡功能,方便您随时拷贝文件。
WIFI-直连
WiFi 直连技术的特点:
•超快的传输速度 WiFi 直连承诺点对点数据传输 速率最大可达300Mbps,传输 一个500MB的视频,大约20秒
就能搞定
•超进的传输距离 WiFi 直连设备彼此能够连接的 最大距离为200米,比2个足球 场还大。这个距离足以让你通 过WiFi 直连将卧室中的笔记本 电脑不书房中的打印机连接在
三星P6200
卖点一:屏幕7英寸,轻薄机身
推荐关键词 7寸大屏,纤薄设计 推荐话术 7寸屏: 三星P6200采用了目前平板产品中经典的7英寸屏幕,9.9毫米 超薄机身,小巧轻便,西装口袋随便放,贴身随行
分辨率:
1024*600的超高分辨率,视频画质更细腻,更能适应全网页浏 览需要的1024分辨率
参数表
分类: 网络 摄像头 屏幕 电池 WLAN无线网络 WWW网页浏览 GPS 铃声 MP3短信铃声 外置存储卡最大容量 内存 专业照相功能 视频摄录 图片编辑器 视频编辑器 FM收听中录音 3.5mm标准耳机接口 背景音乐 DNSe数码自然音效 音乐识别 音频格式 视频格式 蓝牙 电话簿容量
RPM-产品培训

支持丰富的软硬件平台
支持WiFi与3G环境
©
Polycom公司版权所有。保留所有权利。
多种电源管理芯片代换

1200AP40 1200AP60、1203P60200D6、203D6 DAP8A 可互代203D6/1203P6 DAP8A2S0680 2S08803S0680 3S08805S0765 DP104、DP7048S0765C DP704加24V的稳压二极管ACT4060 ZA3020LV/MP1410/MP9141ACT4065 ZA3020/MP1580ACT4070 ZA3030/MP1583/MP1591MP1593/MP1430 ACT6311 LT1937ACT6906 LTC3406/AT1366/MP2104AMC2576 LM2576AMC2596 LM2596AMC3100 LTC3406/AT1366/MP2104AMC34063A AMC34063AMC7660 AJC1564AP8012 VIPer12AAP8022 VIPer22ADAP02 可用SG5841 /SG6841代换DAP02ALSZ SG6841DAP02ALSZ SG6841DAP7A、DP8A 203D6、1203P6DH321、DL321 Q100、DM0265RDM0465R DM/CM0565RDM0465R/DM0565R 用cm0565r代换(取掉4脚的稳压二极管)DP104 5S0765DP704 5S0765DP706 5S0765DP804 DP904FAN7601 LAF0001LD7552 可用SG6841代(改4脚电阻)LD7575PS 203D6改1脚100K电阻为24KOB2268CP OB2269CPOB2268CP SG6841改4脚100K电阻为20-47KOCP1451 TL1451/BA9741/SP9741/AP200OCP2150 LTC3406/AT1366/MP2104OCP2160 LTC3407OCP2576 LM2576OCP3601 MB3800OCP5001 TL5001OMC2596 LM2596/AP1501PT1301 RJ9266PT4101 AJC1648/MP3202PT4102 LT1937/AJC1896/AP1522/RJ9271/MP1540SG5841SZ SG6841DZ/SG6841DSM9621 RJ9621/AJC1642SP1937 LT1937/AJC1896/AP1522/RJ9271/MP1540STR-G5643D STR-G5653D、STR-G8653DTEA1507 TEA1533TEA1530 TEA1532对应引脚功能接入THX202H TFC719THX203H TFC718STOP246Y TOP247YVA7910 MAX1674/75 L6920 AJC1610VIPer12A VIPer22A[audio01]ICE2A165(1A/650V.31W);ICE2A265(2A/650V.52W);ICE2B0565(0.5A/650V.23W):ICE2B165(1A/650V.31W);ICE2B265(2A/650V.52W);ICE2A180(1A/800V.29W);ICE2A280(2A/800.50W).KA5H0365R, KA5M0365R, KA5L0365R, KA5M0365RN# u) t! u1 W1 B) R, PKA5L0365RN, KA5H0380R, KA5M0380R, KA5L0380R1、KA5Q1265RF/RT(大小两种体积)、KA5Q0765、FSCQ1265RT、KACQ1265RF、FSCQ0765RT、FSCQ1565Q这是一类的,这些型号的引脚功能全都一样,只是输出功率不一样。
三星P7510拆机教程
三星寸超薄平板GT-P7510的功能性能表现我们在《双核巅峰之作 Super PLS屏三星Galaxy Tab (GT-P7510)评测》链接是(ht权限8287-1-1,现在我们就来拆解这款平板,从硬件方面全方位了解GT-P7510以及三星的工业设计和制造水平。
这是我第一次拆解这么薄的平板,所以一开始有些许担心,担心里面的用料过于单薄,拆的过程中可能会造成无法弥补的损失。
好在我开始撰写这篇文章前这个担心已经不存在了。
三星GT-P7510机身很薄,只有8.6mm。
重量也比较轻,只有570g。
一开始怀疑它与iPad 2一样采用胶粘的方式,仔细观察后却发现外壳是用螺丝和卡扣固定的。
我们知道,卡扣属于机械原理,机身越是薄,对模具的精确度要求就越高,误差哪怕只有0.1mm,也可能造成外壳不能严丝合缝的问题。
相比之下,用胶粘则要简单一些,而且密封性更好,但是拆开维修比较麻烦,而且拆过后密封性也会打折扣。
从主机底部开始下手,在数据线插槽的两旁,各有一颗隐藏螺丝,先用大头针将小帽顶下来。
这两颗螺丝需要“丫”字口的螺丝刀才能拧动拧掉螺丝后,用撬棒沿屏幕边缘缝隙来回滑动,靠手感找到所有卡扣的位置。
在有卡扣的地方,用撬棒向外使力,致使卡扣一一弹开。
主机四个边角的卡扣比较紧,需要用一些巧劲才能打开成功打开外壳,看到内部的第一眼,还是很惊喜的,因为内部条理清楚,一点儿也不杂乱,最重要的是看到了很多模块化的东西,这样后面的拆解也会简单容易许多。
换个角度拍一张分体照片后壳并非一次成型,而是边框用了较厚的塑料,后盖用了较薄的塑料。
并且表面工艺也不一样,后盖部分做了拉丝工艺处理,表面的喷漆金属质感强烈,不容易留指纹;边框的喷漆就是普通的光面喷漆,光泽感好一些。
换个面儿看后壳另外值得一提的是,与芯片的金属屏蔽壳对应的后盖部分做了凹槽打磨(图中用紫色框起来的部分),不知道是基于散热的考虑,还是基于主机重量的考虑。
个人分析更倾向于基于主机重量的考虑。
2010笔记本电脑处理器(CPU)性能排行榜
1
排名 41 42 43 44 45 46 47 48 49 50 51 52 53 54 55 56 57 58 59 60 排名 61 62 63 64 65 66 67 68 69 70 71 72 73 74 75 76 77 78 79 80 排名 81
厂商 Intel Intel Intel AMD Intel AMD AMD Intel Intel Intel Intel Intel Intel Intel AMD AMD Intel Intel Intel AMD 厂商 Intel Intel Intel Intel AMD Intel AMD Intel AMD Intel Intel Intel AMD AMD AMD Intel Intel Intel Intel Intel 厂商 Intel Core 2 Duo Core 2 Duo Core 2 Duo Core 2 Duo Core 2 Duo Phenom II X3 Core 2 Duo Turion II Ultra Core 2 Duo Turion II Core Duo Pentium Dual Core Celeron M Athlon II Turion II Phenom II X4 Pentium Celeron M Core 2 Duo Core 2 Duo Core 2 Duo Core i7 Core 2 Duo Core 2 Duo Phenom II X4 Core 2 Quad Phenom II X4 Phenom II X3 Core 2 Duo Core 2 Duo Core 2 Duo Core 2 Duo Core 2 Duo Core 2 Duo Core 2 Duo Turion II Ultra Turion II Core 2 Duo Pentium Dual Core Core 2 Duo Turion II Ultra
1000R曲率与240Hz刷新率 三星LC32G75TQSC电竞显示器

1000R曲率与240Hz刷新率三星LC32G75TQSC电竞显示器作者:***来源:《微型计算机》2020年第22期近几年,显示器在面板技术方面有很大的突破,比如曲率值越来越低,刷新率越来越高。
显示器的曲率和刷新率是两个能直观影响视觉体验的重要参数,以往大部分显示器都是以1500R曲率和144Hz刷新率为主。
其中1500R曲率虽然能在一些超大尺寸显示器上营造比较不错的包围感,但是在中小尺寸的产品上给人的体验并不明显,这主要的原因是面板的弯曲弧度不够。
前不久三星推出了一款拥有1000R曲率和240Hz刷新率的LC32G75TQSC电竞显示器,它能带来怎样的体验?一起来看看。
外形简洁,功能实用三星LC32G75TQSC整体设计比较简约,八字形底座支持可升降操作。
同时,它的支架为镂空设计,在内部可隐藏线束,让线缆更加规整。
此外,支架上还设计有一个耳机挂架,采用了折叠式设计,不使用的时候可以收纳起来。
值得一提的是,显示器的背部接口部分也配备有一块挡板,确保显示器的整体性。
三星LC32G75TQSC配备了两个DisplayPort l.4版本的接口和一个HDMI 2.0版本接口,同时还拥有两个USB3.0接口,不过所有接口都集中在背部,如果能将插拔频率较高的USB接口设计在显示器左右两侧,会更方便用户使用。
为了让显示器看上去更炫酷,三星LG32G75TQSG在背部中心位置设计有一圈灯效,它支持5种氛围灯效和52种色彩调节,可以通过OSD菜单进行设置。
打开菜单可以看到LG32G75TQSG提供的功能比较丰富,与我们之前评测过的G49G95TSSG也基本一致。
在“游戏”中它提供了“刷新率”“黑色均衡器”“响应时间”“Adaptive-Sync”“虚拟瞄准点”“减少输入滞后”等可调选项,对FPS游戏玩家来说,它的“虚拟瞄准点”很实用,并且提供了两种样式和六种色彩可选。
而“黑色均衡器”功能可以调整暗部场景下的亮度,数值越低背光越亮。
三星P7500对比P7510

比较产品P7500P7510不同规格重量:565g 重量:560g相同规格操作系统:Android 3.1 (Honeycomb) 操作系统:Android 3.1 (Honeycomb)屏幕尺寸:10.1”屏幕尺寸:10.1”主数码相机像素:300万像素主数码相机像素:300万像素机身内存:1GB 机身内存:1GB不支持microSD卡槽(需要购买USB转接口) 不支持microSD卡槽(需要购买USB转接口) 比较全部系统软件操作系统A ndroid 3.1 (Honeycomb) A ndroid 3.1 (Honeycomb)基本参数尺寸256.7 X 175.3 X 8.6mm 256.7 X 175.3 X 8.6mm重量565g 560g电池容量7,000mAh 7,000mAh显示屏幕主屏- 分辨率W XGA(1,280x800) W XGA(1,280x800)- 屏幕尺寸10.1”10.1”数码相机像素-主数码300万像素300万像素-相机像素网络参数3G WCDMA 21Mbps ;网络类型2G EDGE/GPRS频率3G WCDMA (850/900/1,900/2,100MHz); 2GEDGE/GPRS(850/900/1,800/1,900MHz)存储机身内存1GB 1GB扩展存储不支持microSD卡槽(需要购买USB转接口)不支持microSD卡槽(需要购买USB转接口) 其他功能连接性- USB U SB2.0(Host Mode) U SB2.0(Host Made)- 蓝牙蓝牙3.0 蓝牙3.0g。
三星Galaxy P7500升级大法

三星Galaxy P7500升级大法国行Galaxy P7500v3.1 刷机 4.04步骤网上很多GalaxyP7500 v3.1 刷4.04步骤,过程分散逻辑也不好;本人P7500经过亲试成功,现将过程整理分享。
说明:* 升级教程中配图,均来自其他网友测试时所拍,本人直接拿来主义^o^* P7500与P7510有区别,P7500带有3G通信模块。
升级时别搞错升级包* 建议升级前先通读本教程,做到胸中有数,然后再按步骤一步步操作一、系统更新理由1-1. 4.04较 V3.1运行更顺畅,界面也更漂亮1-2. 可直接打电话(以前需通过skype打网络电话,既需电信网络流量,还要支付网络IP电话费)1-3. 其它增强功能还在试用中二、安装总体思路2-1. 网上下载最新的系统ROM4.042-2. 通过Odin3 v3.07将平板的ROM升级至4.042-3. 系统权限root2-4. 安装通话补丁程序三、刷机文件准备3-1. 下载系统ROM4.04地址:/share/link?shareid=142732&uk=3374106618&third=03-2. PC电脑上安装平板驱动程序建议安装三星官方kies软件或到此处下载驱动文件地址:/d/YVIMVDRPKGAW?p=130441说明:驱动文件在“P7500 整合程序skoy.zip”文件夹→” 三星P7500驱动。
.rar”中3-3. 下载“Odin3v3.07”刷机程序在上面下载的“P7500 整合程序skoy.zip”中→”Odin307线刷程序.exe”3-4. 下载系统Root压缩包在上面下载的“P7500 整合程序skoy.zip”中→” GT-4.0.4-ROOT.zip”3-5. 补丁程序下载CWM_I9103XXLQ3_Modem.zipVoice_Call_Enable__Stock__ICS_4.0.4_ROM_Build_1.zipScreen_On.apk下载地址:/share/link?shareid=142816&uk=3374106618/share/link?shareid=142748&uk=3374106618&third=0四、具体安装步骤4-1. PC上安装平板驱动程序4-2. 将以下4个下载的文件,复制至平板根目录GT-4.0.4-ROOT.zipCWM_I9103XXLQ3_Modem.zipVoice_Call_Enable__Stock__ICS_4.0.4_ROM_Build_1.zipScreen_On.apk4-3. 平板做好刷机准备-->先将平板完全关机(处于黑屏状态)-->按住平板电源键和音量左键不放-->直至显示下图2个图标后,只需松开电源键,然后按住音量左键循环选择。
- 1、下载文档前请自行甄别文档内容的完整性,平台不提供额外的编辑、内容补充、找答案等附加服务。
- 2、"仅部分预览"的文档,不可在线预览部分如存在完整性等问题,可反馈申请退款(可完整预览的文档不适用该条件!)。
- 3、如文档侵犯您的权益,请联系客服反馈,我们会尽快为您处理(人工客服工作时间:9:00-18:30)。
比较产品
P7500P7510
不同规格
重量:565g 重量:560g
相同规格
操作系统:Android 3.1 (Honeycomb) 操作系统:Android 3.1 (Honeycomb)
屏幕尺寸:10.1”屏幕尺寸:10.1”
主数码相机像素:300万像素主数码相机像素:300万像素
机身内存:1GB 机身内存:1GB
不支持microSD卡槽(需要购买USB转接口) 不支持microSD卡槽(需要购买USB转接口) 比较全部
系统软件
操作系统A ndroid 3.1 (Honeycomb) A ndroid 3.1 (Honeycomb)
基本参数
尺寸256.7 X 175.3 X 8.6mm 256.7 X 175.3 X 8.6mm
重量565g 560g
电池容量7,000mAh 7,000mAh
显示屏幕
主屏
- 分辨率W XGA(1,280x800) W XGA(1,280x800)
- 屏幕尺寸10.1”10.1”
数码相机
像素
-主数码
300万像素300万像素
-相机像素
网络参数
3G WCDMA 21Mbps ;
网络类型
2G EDGE/GPRS
频率3G WCDMA (850/900/1,900/2,100MHz); 2G
EDGE/GPRS(850/900/1,800/1,900MHz)
存储
机身内存1GB 1GB
扩展存储
不支持microSD卡槽(需要购买USB
转接口)
不支持microSD卡槽(需要购买USB转接口) 其他功能
连接性
- USB U SB2.0(Host Mode) U SB2.0(Host Made)
- 蓝牙蓝牙3.0 蓝牙3.0
g。