giga46 西门子无绳电话说明书
无绳电话iris中文说明书
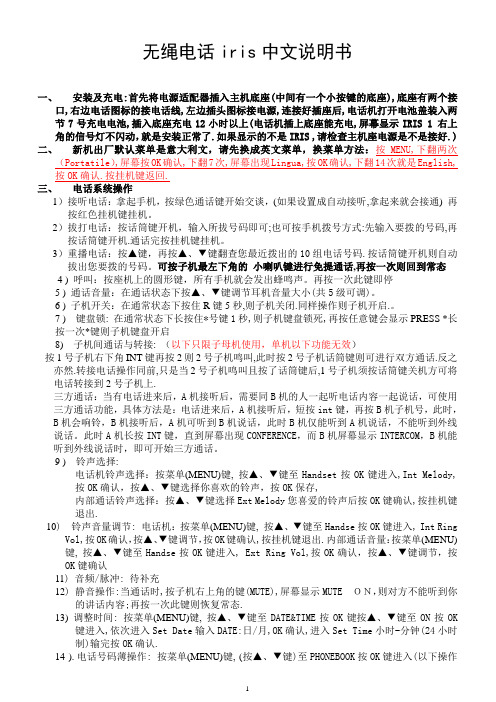
无绳电话iris中文说明书一、安装及充电:首先将电源适配器插入主机底座(中间有一个小按键的底座),底座有两个接口,右边电话图标的接电话线,左边插头图标接电源,连接好插座后,电话机打开电池盖装入两节7号充电电池,插入底座充电12小时以上(电话机插上底座能充电,屏幕显示IRIS 1 右上角的信号灯不闪动,就是安装正常了.如果显示的不是IRIS ,请检查主机座电源是不是接好.)二、新机出厂默认菜单是意大利文,请先换成英文菜单,换菜单方法:按MENU,下翻两次(Portatile),屏幕按OK确认,下翻7次,屏幕出现Lingua,按OK确认,下翻14次就是English,按OK确认.按挂机键返回.三、电话系统操作1)接听电话:拿起手机,按绿色通话键开始交谈,(如果设置成自动接听,拿起来就会接通) 再按红色挂机键挂机。
2)拔打电话:按话筒键开机,输入所拔号码即可;也可按手机拨号方式:先输入要拨的号码,再按话筒键开机.通话完按挂机键挂机。
3)重播电话:按▲键,再按▲、▼键翻查您最近拨出的10组电话号码.按话筒键开机则自动拔出您要拨的号码。
可按子机最左下角的小喇叭键进行免提通话,再按一次则回到常态4 )呼叫:按座机上的圆形键,所有手机就会发出蜂鸣声。
再按一次此键即停5 ) 通话音量:在通话状态下按▲、▼键调节耳机音量大小(共5级可调)。
6 ) 子机开关:在通常状态下按住R键5秒,则子机关闭.同样操作则子机开启.。
7 ) 键盘锁: 在通常状态下长按住*号键1秒,则子机键盘锁死,再按任意键会显示PRESS *长按一次*键则子机键盘开启8) 子机间通话与转接: (以下只限子母机使用,单机以下功能无效)按1号子机右下角INT键再按2则2号子机鸣叫,此时按2号子机话筒键则可进行双方通话.反之亦然.转接电话操作同前,只是当2号子机鸣叫且按了话筒键后,1号子机须按话筒键关机方可将电话转接到2号子机上.三方通话:当有电话进来后,A机接听后,需要同B机的人一起听电话内容一起说话,可使用三方通话功能,具体方法是:电话进来后,A机接听后,短按int键,再按B机子机号,此时,B机会响铃,B机接听后,A机可听到B机说话,此时B机仅能听到A机说话,不能听到外线说话。
西门子 说明书
SIMATICS7/HMISIMATIC Automation Tool SDK V3.1 SP2 Product informationProduct InformationSiemens AG Division Digital Factory A5E45252984-AAⓅ 10/2018 Subject to changeCopyright © Siemens AG 2018.All rights reservedLegal informationWarning notice systemThis manual contains notices you have to observe in order to ensure your personal safety, as well as to preventdamage to property. The notices referring to your personal safety are highlighted in the manual by a safety alertsymbol, notices referring only to property damage have no safety alert symbol. These notices shown below aregraded according to the degree of danger.indicates that death or severe personal injury will result if proper precautions are not taken.WARNINGindicates that death or severe personal injury may result if proper precautions are not taken.CAUTIONindicates that minor personal injury can result if proper precautions are not taken.NOTICEindicates that property damage can result if proper precautions are not taken.If more than one degree of danger is present, the warning notice representing the highest degree of danger willbe used. A notice warning of injury to persons with a safety alert symbol may also include a warning relating toproperty damage.Qualified PersonnelThe product/system described in this documentation may be operated only by personnel qualified for the specifictask in accordance with the relevant documentation, in particular its warning notices and safety instructions.Qualified personnel are those who, based on their training and experience, are capable of identifying risks andavoiding potential hazards when working with these products/systems.Proper use of Siemens productsNote the following:WARNINGSiemens products may only be used for the applications described in the catalog and in the relevant technicaldocumentation. If products and components from other manufacturers are used, these must be recommendedor approved by Siemens. Proper transport, storage, installation, assembly, commissioning, operation andmaintenance are required to ensure that the products operate safely and without any problems. The permissibleambient conditions must be complied with. The information in the relevant documentation must be observed. TrademarksAll names identified by ® are registered trademarks of Siemens AG. The remaining trademarks in this publicationmay be trademarks whose use by third parties for their own purposes could violate the rights of the owner. Disclaimer of LiabilityWe have reviewed the contents of this publication to ensure consistency with the hardware and softwaredescribed. Since variance cannot be precluded entirely, we cannot guarantee full consistency. However, theinformation in this publication is reviewed regularly and any necessary corrections are included in subsequenteditions.Table of contents1 Components of the SIMATIC Automation Tool SDK (4)Components of the SIMATIC Automation Tool SDK 1 The SIMATIC Automation Tool Software Development Kit (SDK) consists of the followingcomponents:●Setup application for installing the SDK●SIMATIC Automation Tool Application Programming Interface (API): a set of .NETinterfaces, classes, and methods to perform network and device operations● A Windows installer package to use in creating a setup for your users. Your users caninstall your custom application from the setup you create. The installer provides for asilent installation of the API and S7 communication components with no licenserequirement.●Product Information●Installation Notes●User Guide●Totally Integrated Automation UPDATER (TIA Software Updater) for performing futureupdates to the SDK。
西门子电话说明书
3
Gigaset W10, CS, A31008-G4010-C102-1-7619
vorberei.fm
27.10.03
使用前的准备
按下按键
功能键和指示灯说明
手机功能键说明
I P 号码存储或拨出 - 进入电话簿 / 设置程序 - 在设置模式中确定已选择的选项 - 离开程序 - 手机跟座机对讲 频道 / 查询 ( 电话簿 / 来电显示记录 / 去电记录 ) 挂断 / 删除 / 手机注册 - 重拨 - 拨号或储存电话时加入暂停 通话 / 挂线 - 来电 进入来电记录模式 - 去电 进入去电记录模式 - 通话时调较音量 - 上下浏览 / 选择 显示其余的电话号码
4
Gigaset W10, CS, A31008-G4010-C102-1-7619
vorberei.fm
27.10.03
使用前的准备
按下按键
通话暂侯 - 来电 进入来电记录模式 - 去电 进入去电记录模式 - 上下浏览 / 选择 - 重拨 / 暂停 - 储存电话号码上加入暂停 挂断 显示其余的电话号码
Gig02-1-7619
vorberei.fm
使用前的准备
使用前的准备
包装内包括了以下的器件
• 座机 • 手机 • 话筒 • 话筒曲线 • 可充电电池 • 充电座 • 电话直线 • 电源适配器 ( 两个 )
使用前安装
27.10.03
1. 将手机电池盖推出 2. 将电池插头插入电池盒里的插座中 并将电池装入电池盒 3. 将电池盖盖好 4. 将装好电池的手机放入充电座上 5. 将较小的接头的电源适配器插入充电座后的插座上 , 然后将电源适
Gigaset A730 A530H 数字无绳电话机 产品使用说明书
Gigaset A730 / CN zh / A31008-M2542-Y101-1-5D19 / Cover_front.fm / 4/24/14A730目录安全预防措施 1使用前的准备 2 检查包装内容 2 安装座机 2 安装子机 3 首次使用充放电 4 设置日期和时间 4座机简介 5 子机简介 6 座机基本操作说明 7 子机基本操作说明 7通话8 拨打/接听 电话 8 通话音量 8 通话闭音 8 来电显示 8使用电话簿与列表9 电话簿 9 IP拨号 9 重拨列表 10 来电列表 10 使用多个子机 11 注册/注销/寻呼 11 内部通话 11 通话转移 12 三方通话 12 座机设置 12 日期时间 12 座机铃声 12 免打扰 12 按键音 12子机设置 13 自动接听 13 子机铃声 13 按键音 13 闹钟设置 13系统设置 14 系统PIN 14 前缀拨号 14 复位 14当电话连接到PABX时的设置 15 拨号方式 15 闪断时间 15 临时切换至音频拨号 15附录 15 保养与遇水处理 15 问题与解答 15 电池参数与续航能力 16参数列表 17菜单树 17安全预防措施注意:使用前请仔细阅读安全须知和操作说明。
教您的孩子正确使用话机,以免发生危险。
本说明书中描述的功能并非在所有国家/地区都适用。
请按座机底部的相关说明使用指定的电源适配器。
请使用指定型号的充电电池(见第16页)。
其它型号的电池或非充电电池,可能会危害健康或对身体造成伤害。
如果发现充电电池有明显损坏,必须立即更换。
本话机使用时可能会影响附近医疗设备的正常工作。
请注意在这些特殊环境中使用的技术要求,例如:在手术室里。
如有使用医疗仪器,例如:起搏器;请联系医疗仪器供应商咨询是否容易受外来高频信号干扰。
Gigaset产品参数(见第17页)当铃声响起或使用免提时,请勿将子机背面靠近耳朵。
因喇叭位置在子机背面,此动作可能会对听觉造成不良影响。
使用说明
Binatone无绳电话使用说明1.所有无绳电话电池出厂仅有少量的电量且充电电池会有记忆,所以第一次使用务必充电充满15个小时再使用,这样会提高电池的寿命。
2.数字无绳电池流行款式现在都是多子机的,对于多子机无绳电话,大的充电底坐即是主机,主机有可能不能打接电话,这可能与以前模拟的子母机有点区别。
因为大的底坐是主机,要发射信号给子机接受,所以当大的底坐没有插电或停电后,子机是无法使用的。
功能介绍打电话输入你想拨打电话号码,如果输错,按清除键删除前一位数字。
如果要删除所有输入,长按清除键,然后按通话键或免提键。
接电话按通话键或免提键挂电话在通话过程中按通话键即挂断电话重拨按通话键或免提键,再按向下键。
重拨最后十组号码中的一组按向下或和向下键选择你要重拨的号码,然后按通话键或免提键重拨。
关闭麦克风在通话过程中按清除键一次,麦克风静音,别人将别不到你的声音如果要恢复,再清除键一次。
存储拨号每个手柄机可存40组号码,最组号码最长可存20个数字。
存一个号码按菜单键显示phonebk按OK键,显示add再按OK键,显示name?输入你想存的英文名称按OK键按OK,显示number?输入你想存储的号码按OK键显示ADD即完成,如果想要返回待机模式,按菜单键删除存储号码按菜单键显示phonebk按OK键,显示add按向下键,显示delete按OK键,按向上或向下键选择你要删除的号码再按OK键即完成。
如果想要返回待机模式,按菜单键拨打存储号码按存储键显示phonebk用向上或向下键选择你要拨打的号码再按通话键或免提键修改存储的号码按菜单键显示phonebk按OK键,显示add按向下键二次,显示modify按OK键,再按向下或向下键选择你要修改号码的名称按OK键按取消键可删除显示的号码,然后输入要修改的正确号码按OK键,显示修改过的号码按OK即完成,如果想要返回待机模式,按菜单键来电显示手柄机可显示30组未接来电,如果号码存在手柄机上,还可以显示来电名称,并且可以显示来电的时间和日期查看来电显示记录按CDS键用向上或向下键查看来电显示记录,按OK键则显示来电的时间和日期如果当你查看到第一条或最后一条记录,将听到嘀的一块叫声。
西门子数字话机 操作说明书
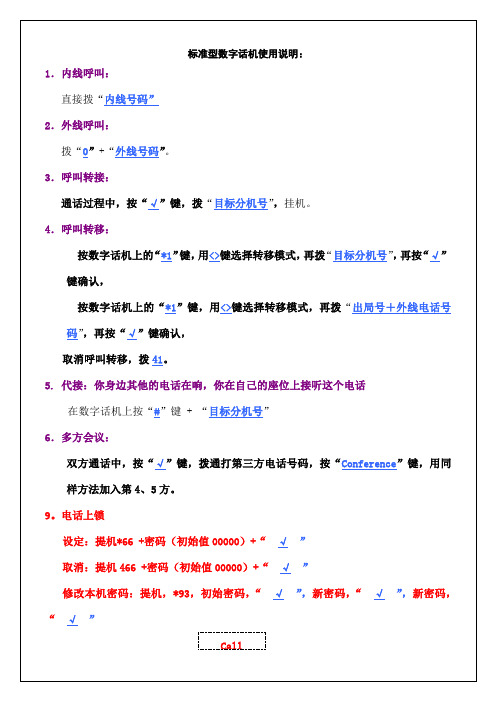
设定:呼叫一个分机,未应答或忙线,拨“*58”挂机。
取消:提机,拨“458”,选择“Delete”,“√”,挂机
12.震铃音量调节
按“+”或“-”,按“<“或”>“,选择“Ring Volume”,“√”,按“+”或“-”,调节音量
13.震铃铃声更换
按“+”或“-”,按“<“或”>“,选择“Ring Tone”,“√”,按“+”或“-”,调节音量
取消:提机466 +密码(初始值00000)+“√”
修改本机密码:提机,*93,初始密码,“√”,新密码,“√”,新密码,“√”
Call
Forward
Conference
Hold
Pick-Up
Release
10.定时提醒
设定:提机*46 + 时间(HHMM)+“<“或”>“,选择一次或每天,“√”
取消:提机4ቤተ መጻሕፍቲ ባይዱ6,“√”
取消呼叫转移,拨41。
5. 代接:你身边其他的电话在响,你在自己的座位上接听这个电话
在数字话机上按“#”键 + “目标分机号”
6.多方会议:
双方通话中,按“√”键,拨通打第三方电话号码,按“Conference”键,用同样方法加入第4、5方。
9。电话上锁
设定:提机*66 +密码(初始值00000)+“√”
标准型数字话机使用说明:
1.内线呼叫:
直接拨“内线号码”
2.外线呼叫:
拨“0”+“外线号码”。
3.呼叫转接:
通话过程中,按“√”键,拨“目标分机号”,挂机。
4.呼叫转移:
西门子 Gigaset S880 S885 数字无绳电话系统 说明书
s西门子Gigaset S880/S885数字无绳电话系统使用说明书For the English user manual, please contact us by E-mail: ccq_@or download from:发行单位:西门子终端通讯设备(上海)有限公司保留所有权利目录安全预防措施 2使用前的准备 3 安装基座 3 安装手柄 4 耳机 5 首次使用时的充放电 5 设置日期和时间 5手柄简介 6 基座简介7注册手柄8 自动注册 8 手动注册 8 注销手柄 8 呼叫手柄 8手柄基本操作说明 9 关闭/开启手柄 9 锁定键盘 9 导航键 9 屏幕软键 9 返回待机状态 10 菜单操作 10 输入校正 10ECO模式 . 10拨打/接听/挂断电话 11 拨打/接听 11 结束通话 11 通话保持 11 来电显示 11使用通讯录与列表 12 通讯录 12 新增条目 12 编辑条目 12 重拨列表 13 来电列表 13 拨号预选 14IP拨号 15 使用多个手柄 16内线通话 16协商通话/三方通话 16呼入等待 17外线监听 17更改手柄名称 17更改手柄编号 17室内监控 18答录机 19打开/关闭答录机 19主人留言 19设置应答模式 20播放留言 20通话录音 21留言监听 21答录机设置 21远程控制答录机 22手柄设置 23语言设置 23显示设置 23自动接听 23通话音量 23铃声设置 24闹钟设置 24手柄复位 24基座设置 25系统PIN 25基座铃声 25等待音乐 25基座复位 25当电话连接到PABX时的设置26拨号方式 26闪断时间 26DTMF26附录 27菜单树 30字符表 3112安全预防措施注意:使用前请仔细阅读安全须知和操作说明。
教您的孩子正确使用话机,以免发生危险。
$ 请按基座底部的相关说明使用指定的电源适配器。
请使用指定型号的充电电池(见28页)。
使用其它型号的电池或非充电电池,可能会危害健康或对身体造成伤害。
Siemens 电子产品说明书

全集成自动化 — 机场解决方案西门子(中国)有限公司工业业务领域工业自动化集团驱动技术集团楼宇科技集团本宣传册中提供的信息只是对产品的一般说明和特性介绍。
文中内容可能与实际应用的情况有所出入,并且可能会随着产品的进一步开发而发生变化。
仅当相关合同条款中有明确规定时,西门子方有责任提供文中所述的产品特性。
宣传中涉及的所有名称可能是西门子公司或其供应商的商标或产品名称,如果第三方擅自使用,可能会侵犯所有者的权利。
如有变动,恕不事先通知订货号:E20001-A-0163-C700-X-5D007018-SH905836-05101西门子公司版权所有北方区北京北京市朝阳区望京中环南路7号邮政编码:100102电话:(010)6476 8888传真:(010)6476 4915济南济南市舜耕路28号舜华园商务会所5楼邮政编码:250014电话:(0531)8266 6088传真:(0531)8266 0836西安西安市高新区科技路33号高新国际商务中心28层邮政编码:710075电话:(029)8831 9898传真:(029)8833 8818天津天津市和平区南京路189号津汇广场写字楼1401室邮政编码:300051电话:(022)8319 1666传真:(022)2332 8833青岛青岛市香港中路76号青岛颐中皇冠假日酒店405室邮政编码:266071电话:(0532)8573 5888传真:(0532)8576 9963郑州郑州市中原中路220号裕达国贸中心写字楼2506室邮政编码:450007电话:(0371)6771 9110传真:(0371)6771 9120唐山唐山市建设北路99号火炬大厦1308房间邮政编码:063020电话:(0315)317 9450/51传真:(0315)317 9733太原太原市府西街69号国际贸易中心西塔16层1610B 邮政编码:030002电话:(0351)868 9048传真:(0351)868 9046乌鲁木齐乌鲁木齐市五一路160号鸿福饭店C 座918室邮政编码:830000电话:(0991)582 1122传真:(0991)584 6288洛阳洛阳市中州西路15号洛阳牡丹大酒店4层415房间邮政编码:471003电话:(0379)6468 0295传真:(0379)6468 0296兰州兰州市东岗西路589号锦江阳光酒店21层2111室邮政编码:730000电话:(0931)888 5151传真:(0931)881 0707石家庄石家庄市中山东路303号石家庄世贸广场酒店1309室邮政编码:050011电话:(0311)8669 5100传真:(0311)8669 5300烟台烟台市南大街9号金都大厦16F1606室邮政编码:264001电话:(0535)212 1880传真:(0535)212 1887淄博淄博市张店区共青团西路95号钻石商务大厦19层L 单元邮政编码:255036电话:(0533)230 9898传真:(0533)230 9944无锡无锡市解放路1000号金陵饭店24层2401-2403邮政编码:214007电话:(0510)8273 6868传真:(0510)8276 8481徐州徐州市彭城路93号泛亚大厦18层邮政编码:221003电话:(0516)8370 8388传真:(0516)8370 8308合肥合肥市濉溪路278号财富广场27层2701、2702室邮政编码:230041电话:(0551)568 1299传真:(0551)568 1256宜昌宜昌市东山大道95号清江大厦2011室邮政编码:443000电话:(0717)631 9033传真:(0717)631 9034连云港连云港市连云区中华西路千樱小区B 幢3单元601室邮政编码:222042电话:(0518)8231 3929传真:(0518)8231 3929扬州杨州市江阳中路43号九州大厦7楼704房间邮政编码:225009电话:(0514)8778 4218传真:(0514)8787 7115杭州杭州市西湖区杭大路15号嘉华国际商务中心1710室邮政编码:310007电话:(0571)8765 2999传真:(0571)8765 2998温州温州市车站大道高联大厦9楼B1室邮政编码:325000电话:(0577)8606 7091传真:(0577)8606 7093苏州苏州市新加坡工业园苏华路2号国际大厦11层17-19单元邮政编码:215021电话:(0512)6288 8191传真:(0512)6661 4898宁波宁波市沧海路1926号上东商务中心25楼2511室邮政编码:315040电话:(0574)8785 5377传真:(0574)8787 0631南昌南昌市北京西路88号江信国际大厦1401室邮政编码:330046电话:(0791)630 4918传真:(0791)630 4918常州常州市关河东路38号九洲寰宇大厦911室邮政编码:213001电话:(0519)8989 5801传真:(0791)8989 5802绍兴绍兴市解放北路玛格丽特商业中心西区2幢玛格丽特酒店10层1020 室邮政编码:312000电话:(0575)8820 1306传真:(0575)8820 1632/1759南通南通市人民中路20号中城大酒店(汉庭酒店)9楼9988邮政编码:226001电话:(0513)8532 2488传真:(0513)8532 2058扬中扬中市扬子中路199号华康医药大厦703室邮政编码:212200电话:(0511)8327 566传真:(0511)8323 356华南区广州广州市天河路208号天河城侧粤海天河城大厦8-10层邮政编码:510620电话:(020)3718 2888传真:(020)3718 2164福州福州市五四路136号中银大厦21层邮政编码:350003电话:(0591)8750 0888传真:(0591)8750 0333南宁南宁市金湖路63号金源现代城 9层 935室邮政编码:530022电话:(0771)552 0700传真:(0771)556 0701深圳深圳市华侨城汉唐大厦9楼邮政编码:518053电话:(0755)2693 5188传真:(0755)2693 4245东莞东莞市南城区宏远路1号宏远大厦1403-1405室邮政编码:523087电话:(0769)2240 9881传真:(0769)2242 2575厦门厦门市厦禾路189号银行中心21层2111-2112室邮政编码:361003电话:(0592)268 5508传真:(0592)268 5505佛山佛山市汾江南路38号东建大厦19楼 K 单元邮政编码:528000电话:(0757)8232 6710传真:(0757)8232 6720海口海口市大同路38号海口国际商业大厦1042房间邮政编码:570102电话:(0898)6678 8038传真:(0898)6678 2118珠海珠海市景山路193号珠海石景山旅游中心229房间邮政编码:519015电话:(0756)337 0869传真:(0756)332 4473汕头汕头市金海湾大酒店1502房邮政编码:515041电话:(0754)848 1196传真:(0754)848 1195湛江湛江市经济开发区乐山大道31号湛江皇冠假日酒店1616单元邮政编码:524022电话:(0759)338 1616/3232 传真:(0759)338 6789西南区成都成都市人民南路二段18号川信大厦18/17楼邮政编码:610016电话:(028)8619 9499传真:(028)8619 9355重庆重庆市渝中区邹容路68号大都会商厦18层1809-12邮政编码:400010电话:(023)6382 8919传真:(023)6370 0612昆明昆明市北京路155号红塔大厦1204室邮政编码:650011电话:(0871)315 8080传真:(0871)315 8093攀枝花攀枝花市炳草岗新华街泰隆国际商务大厦B 座16层B2-2邮政编码:617000电话:(0812)335 9500/01传真:(0812)335 9718宜宾宜宾市长江大道东段67号华荣酒店0233号房邮政编码:644002电话:(0831)233 8078传真:(0831)233 2680绵阳绵阳市高新区火炬广场西街北段89号长虹大酒店四楼商务会议中心邮政编码:621000电话:(0816)241 0142传真:(0816)241 8950贵阳贵州省贵阳市新华路富中国际广场15层C 区邮政编码:550002电话:(0851)551 0310传真:(0851)551 3932西宁西宁市新宁路新宁花苑A 座紫恒国际公寓16楼21613室邮政编码:800028电话:(0971)550 3390传真:(0971)550 3390售后维修服务中心西门子工厂自动化工程有限公司(SFAE )北京市朝阳区仙桥东路9号A1栋8层邮政编码:100016电话:(010)8459 7000传真:(010)8459 7070上海西门子工业自动化有限公司(SIAS ) 上海市中山南二路1089号徐汇苑大厦22-25楼邮政编码:200030电话:(021)5410 8666 传真:(021)6757 9500技术培训北京:(010)8459 7518上海:(021)6281 5933-305/307/308广州:(020)3810 2015武汉:(027)8548 6688-6400沈阳:(024)22949880/82518219重庆:(023)6382 8919-3002 技术资料北京:(010)6476 3726技术支持与服务热线电话:400-810-4288传真:(010)6471 9991E-mail :*************************Web: 亚太技术支持(英文服务)及软件授权维修热线电话:(010)6475 7575传真:(010)6474 7474Email:***********************************银川银川市北京东路123号太阳神大酒店A 区1507房间邮政编码:750001电话:(0951)786 9866传真:(0951)786 9867塘沽天津经济技术开发区第三大街广场东路20号滨海金融街东区E4C 座三层15号邮政编码:300457电话:(022)5981 0333传真:(022)5981 0335东北区沈阳沈阳市沈河区北站路59号 财富大厦E 座13层邮政编码:110013电话:(024)8251 8111传真:(024)8251 8597大连大连市高新园七贤岭广贤路117号邮政编码:116001电话:(0411)8369 9760传真:(0411)8360 9468哈尔滨哈尔滨市南岗区红军街15号奥威斯发展大厦30层A 座邮政编码:150001电话:(0451)5300 9933传真:(0451)5300 9990长春长春市西安大路569号长春香格里拉大饭店401房间邮政编码:130061电话:(0431)8898 1100传真:(0431)8898 1087包头包头市钢铁大街 66号国贸大厦 2107室邮政编码:014010电话:(0472)590 8380传真:(0472)590 8385鞍山鞍山市铁东区园林路333号鞍山四海大酒店716室邮政编码:114010电话:(0412)6388 888传真:(0412)6388 716呼和浩特呼和浩特市乌兰察布西路内蒙古饭店15层1508房间邮政编码:010010电话:(0471)693 8888-1508传真:(0471)628 8269华东区上海上海市浦东新区浦东大道1号中国船舶大厦10楼邮政编码: 200120 电话: (021)3889 3889传真: (021)5879 5155 长沙长沙市五一大道456号亚大时代2101房邮政编码:410011电话:(0731)8446 7770传真:(0731)8446 7771南京南京市玄武区中山路228号地铁大厦18层邮政编码:210008电话:(025)8456 0550传真:(025)8451 1612武汉武汉市汉口江汉区建设大道709号建银大厦18层邮政编码:430015电话:(027)8548 6688传真:(027)8548 6668目录机场全集成自动化2机场的首选:SIMATIC 控制器可根据机场大小和吞吐量选择型号 4高效的操作和监视:SIMATIC HMI6从传送系统直至机场运行中心的统一通讯:SIMATIC NET8随需应变的可靠驱动解决方案 10功能强大的高效传感器:SIMATIC 传感器 14全集成智能楼宇控制系统 16多样的化的产品为您提供更多解决方案 17稳定可靠的配电系统 18致力于满足您的业务需求 20技术支持与服务 — 卓越的国际化技术支持与服务团队与您携手共步成功! 22精彩实例:北京机场行李处理系统 24应用实例25机场是一个综合性项目,通过创新和整合推动一个机场的变革,使其运营更为高效以下是西门子为优化机场运营,提高客户满意度,增强机场安保措施,绿色节能等理念,提出的全方位系统解决方案。
西门子自动化设备安装说明书

ML +6 mmVerlegen Sie Potenzialausgleichs- und Datenleitungen parallel mit minimalem Abstand. Verwenden Sie Leitungsschirme nicht zum Potenzialausgleich.Route equipotential bonding conductors and data cables in parallel with minimum clearance. Do not use conductor shields for equipotential bonding.以最小间距,平行敷设等电位联结导线和数据电缆。
请勿对等电位联结应用导线屏蔽。
/WW/view/en/47182890/133300Dieses Dokument ist lediglich eine Montageanleitung. Sicherheitshinweise, sowie die vollständige Montage und Inbetriebnahme sind in der Betriebsanleitung beschrieben.This document provides simple installation instructions. Complete installation, commisioning and safety instructions are described in the operating instructions manual.本文档仅仅是安装说明。
完整的安装、调试以及安全指南,可参考操作说明手册。
x y z 155010Nur DC 24 V!Only 24 VDC!仅限 24 VDC!EGB – Elektrostatisch Gefährdete Bauteile/BaugruppenAchten Sie beim Anschließen auf Erdung von Mensch, Arbeitsplatz und Verpackung.ESD – Electrostatic Sensitive DeviceWhen mounting the HMI device, make sure that the person, the workplace and the packaging are properly grounded.ESD - 静电敏感设备安装 HMI 设备时,请确保人员、工作台和整体设备正确接地。
西门子A100无绳电话说明书
其他功能
按 菜单 键 v u 选择 Phonebook 确认
此时您可以选择下列功能:
New Entry
增加新的联系人条目
List entry
显示所选联系人的电话号码
Edit Entry
编辑修改所选联系人信息
Delete Entry
删除电话簿中所选联系人信息
Delete all
删除电话簿中所有联系人信息
按照右图所示方向插上电池后盖
打开电池后盖
请参照下图,用指甲抵住电池盖上端的凹槽,用力向下推开电池后盖
4
将手柄放在充电座上充电
将手柄放在充电座上充电,正面向前。
首次使用时的充放电
首次充电时请参照以下步骤进行: • 将手柄放在基座上连续 8 小时以上不间断充电 • 完全充电后取下手柄,待电池完全耗尽后再次放回基座充电
使用来电列表拨号 前提:已开通来电显示功能
手柄:按 来电 键 v u 选择来电列表中的号码 v 按通话键
其他功能
按 来电 键 v u 选择来电列表中的号码 v 按 菜单 键
此时您可以选择下列功能:
save Number
将该条目复制到电话簿保存
பைடு நூலகம்
edit entry
编辑该条目
Delete Entry
删除来电列表中该条目信息
REGISTRATION 确认 v 输入 PIN(默认为0000) 确认 SEARCHING 注册成功后手柄会被分配一个可用的最小编号 (1-4)。例如: “GIGASET 1”,这说明手柄已被分配了第1个内部编号。如果所有 的内部编号(1-4)都被分配完(有4个手柄注册到基座上), 则 想要注册另外手柄需要先注销某个手柄。
Ip dialing
西门子数码控制系统用户指南说明书
Release NotesSeagate® Nytro™ WarpDrive® and Nytro XP6000 Application Acceleration Cards Package Version 13.00.xx.xxNWD-BFH6-1200NWD-BFH6-2400NWD-BFH8-1600NWD-BFH8-3200NWD-BLP4-400NWD-BLP4-800NWD-BLP4-1600XP6209-4A1024XP6209-4B2048XP6210-4A2048XP6210-4B2048XP6302-8B1536XP6302-8B2048XP6302-8B4096100767759December 2015Revision HistoryDate Description of ChangesDecember 2015NA© 2015, Seagate Technology LLC All rights reserved.Publication number: 100767759, December 2015Seagate, Seagate Technology and the Wave logo are registered trademarks of Seagate Technology LLC in the United States and/or other countries. Nytro, Nytro WarpDrive and SeaTools are either trademarks or registered trademarks of Seagate Technology LLC or one of its affiliated companies in the United States and/or other countries. All other trademarks or registered trademarks are the property of their respective owners.No part of this publication may be reproduced in any form without written permission of Seagate Technology LLC. Call 877-PUB-TEK1(877-782-8351) to request permission.When referring to drive capacity, one gigabyte, or GB, equals one billion bytes and one terabyte, or TB, equals one trillion bytes. Your computer’s operating system may use a different standard of measurement and report a lower capacity. In addition, some of the listed capacity is used for formatting and other functions, and thus will not be available for data storage. Actual quantities will vary based on various factors, including file size, file format, features and application software. Actual data rates may vary depending on operating environment and other factors. The export or re-export of hardware or software containing encryption may be regulated by the U.S. Department of Commerce, Bureau of Industry and Security (for more information, visit ), and controlled for import and use outside of the U.S. Seagate reserves the right to change, without notice, product offerings or specifications.Seagate Technology Support ServicesFor Nytro Support, visit: /products/solid-state-flash-storage/accelerator-cards/For information regarding online support and services, visit: /contacts/For information regarding Warranty Support, visit: /support/warranty-and-replacements/ For information regarding data recovery services, visit:/services-software/seagate-recovery-services/recover/For Seagate OEM, Distribution partner, and reseller portal, visit: /partnersSeagate Nytro WarpDrive and Nytro XP6000 Application Acceleration Card Release Notes1Release Notes OverviewThese release notes correspond to the current release of the firmware, drivers, and utilities for the Seagate® Nytro™WarpDrive® and Nytro XP6000 Application Acceleration cards release version 13.00.xx.xx. Table1 shows the packageversions of individual devices and models.This release of the Nytro WarpDrive and Nytro XP6000 card includes the Nytro command line interface support. Formore information about the supported Nytro CLI commands and DDCLI commands to Nytro CLI commands mapping,refer to the Seagate Nytro Command Line Interface User Guide.For a complete list of features supported, refer to the Seagate Nytro XP6000 Series Application Acceleration Cards ProductBrief and Seagate Nytro XP6000 Application Acceleration Card User Guide.2Supported ProductsTable1 shows the supported products, their model name, firmware, firmware version, package version, Flash Module,Flash Module Firmware version and usable capacity.Table1 Supported ProductsD EVICE N AME M ODEL N AMEN YTROF IRMWAREP ACKAGEVERSIONN YTRO F LASHM ODULEN YTRO F LASHM ODULE F IRMWAREV ERSIONU SABLEC APACITYNytro WarpDrive 6301NWD-BFH6-120013.00.08.002E256PROLUI6A1200 GB Nytro WarpDrive 6301NWD-BFH6-240013.00.08.002E512PROLUI6A2400 GB Nytro WarpDrive 6301NWD-BFH8-160013.00.08.002E256PROLUI6A1600 GB Nytro WarpDrive 6301NWD-BFH8-320013.00.08.002E512, 1E512PROLUI6A3200 GB Nytro WarpDrive 6203NWD-BLP4-40013.00.08.003E128PROLUI6A400 GB Nytro WarpDrive 6203NWD-BLP4-80013.00.08.002E256, 3E256PROLUI6A800 GB Nytro WarpDrive 6203NWD-BLP4-160013.00.08.002E512PROLUI6A1600 GB Nytro XP6209XP6209-4A102413.00.08.001M256PROLUI6A930 GB Nytro XP6209XP6209-4B204813.00.13.002M512PROLU6171796 GB Nytro XP6210XP6210-4A204813.00.08.001M512PROLUI6A1860 GB Nytro XP6210XP6210-4B204813.00.08.001E512PROLUI6A1860 GB Nytro XP 6302XP6302-8B153613.00.11.001E256PROLUI6C1300 GB Nytro XP 6302XP6302-8B204813.00.11.001E192PROLUI6C1750 GB Nytro XP 6302XP6302-8B409613.00.04.001E512PROLU6173512 GB3Software Components and DriversThe following table lists the current versions of the software components for the Nytro WarpDrive and Nytro XP6000cards.Table2 Nytro WarpDrive and Nytro XP6000 Cards Software ComponentsO PERATING SYSTEM D RIVER V ERSIONWindows® Server ® 2012 R2 x64Version 2.10.68.01Windows Server 2008 R2 x64Version 2.10.68.01Windows Server 2008 R2 SP1 x64Version 2.10.68.01SUSE® Linux® Enterprise Server (SLES™) x64 and x32Version 20.00.00.00Version 11 SP3Operating system built-in driver Oracle® Solaris® x86 x64 and x32Version 10 U10Version 11Operating system built-in driver Solaris® x32 and x64SPARC Version 10 U10SPARC Version 11 and 11.2Version 20.00.00.00CentOS® x64 and x32Version 6.4 and 6.5Ubuntu® x64 and x32Version 20.00.00.00Version 12.04 and 14.04 LTSVersion 20.00.00.00Debian® x64 and x32Version 6.05 and 7.0Fedora® x64 and x32Version 20.00.00.00Version 19 and 20Version 20.00.00.00Red Hat® Enterprise Linux (RHEL) x64 and x32Version 5.9 and 5.10Version 6.5 and 6.6Version 7.0Version 20.00.00.00Oracle Enterprise Linux (OEL™) x64 and x32Version 5.9 and 5.10Version 6.5VMware® ESXi x64Version 18.00.00.00.1VMWVersion 5.1 and 5.5FreeBSD® x64 and x32Version 19.255.03.00Version 9.0 and 9.2Version 10N YTRO W ARP D RIVE AND N YTRO XP6000 F IRMWARE/BIOS F IRMWARE P ACKAGE V ERSION Nytro WarpDrive and Nytro XP6000 firmware revision See, Table 1, Supported Products, on page 4Nytro WarpDrive and Nytro XP6000 BIOS revision110.00.01.00Nytro WarpDrive and Nytro XP6000 UEFI BIOS7.18.07.00To download the latest software components and drivers, visit the following website: /products/solid-state-flash-storage/accelerator-cards/.4Ne w Fe ature sThis section lists new features included in the current release of the Nytro WarpDrive and Nytro XP6000 firmware.⏹UNMAP to NCQ TRIM translation support allows you to conditionally convert all of the SCSI UNMAPs into avendor-defined TRIM command before issuing it to the SATA drives. This substantially improves the WarpDrive's SCSI UNMAPs performance.⏹512 Emulation (512e) drive support helps reporting of various values for Logical Blocks Per Physical BlockExponent in READ_CAP(16) so that software applications can optimize data alignment and block-size according to the hardware.⏹This release of the Nytro WarpDrive package includes support for Simple Network Management Protocol (SNMP)-based management.5Defects Fixed Since Version 12.00.03.00 ReleaseThis section lists the critical defects fixed since the 12.00.03.00 release of Nytro WarpDrive.⏹DDCLI now displays the World Wide Unique ID (WWID) of the individual Nytro Flash Modules.⏹I/Os occasionally failed with an error if run with task management continuously for a longer duration. This issue is fixed.⏹The I/Os stopped when the cable breaker script is run. This issue is fixed.⏹Multiple fixes for the Nytro Flash Module Locked State / Panic issues in Nytro Flash Module firmwares.⏹uEFI BIOS issue of the HP G9 servers fixed.N YTRO F LASH M ODULEV ERSIONNytro Flash ModulesSee, Table 1, Supported Products, on page 4S EAGATE U TILITYV ERSIONDDCLI for Linux, Windows, VMware, FreeBSD, and Solaris Version 112.00.21.00SNMPVersion 112.51.04.00Table 2 Nytro WarpDrive and Nytro XP6000 Cards Software Components (Continued)Seagate Technology LLCAMERICAS Seagate Technology LLC 10200 South De Anza Boulevard, Cupertino, California 95014, United States, 408-658-1000ASIA/PACIFIC Seagate Singapore International Headquarters Pte. Ltd. 7000 Ang Mo Kio Avenue 5, Singapore 569877, 65-6485-3888EUROPE, MIDDLE EAST AND AFRICA Seagate Technology SAS 16-18 rue du Dôme, 92100 Boulogne-Billancourt, France, 33 1-4186 10 00。
Siemens型号+产品+安装指南说明书

Before You Begin:•Make sure under normal condition the piping will be full. Fluid must be conductive with a conductivity of 5 micro siemens or higher.•Install the meter with the arrow pointing in the correct direction; with flow (can be fixed with programming if not).•Use grounding rings to prevent electrical noise interference. See manual for proper installation andconnection of grounding rings. Be sure the metal from the grounding ring is connected to the metal on the meter tube with some sort of grounding strap or wire suitable for the environment (not provided by Siemens). A hole at 12 o’clock on each flange is drilled and tapped to accept a 6 x 16 mm bolt (not provided by Siemens). This makes for a positive ground connection to the mag body. If grounding rings are not used, it is recommended you ground the meter tube to the adjacent metal pipe flange. See appendix C. •User supplied gaskets should be installed between any metal surfaces; Example installation: Pipe flange, Gasket, Grounding Ring, Gasket, Mag Tube Flange. Repeat on other side.•The user can decide whether to mount the transmitter integral to the meter tube (see page 2)or remotely from the meter tube (see page 4). If you choose remote mount, a double shielded cable kit and a wall mount bracket must be ordered in addition to the meter.•It is recommended that a sunshield be used in outdoor applications where sun exposure is unavoidable. The LCD display must be protected from the Sun. Siemens offer Sunshields and sun lids.•It is recommended that a remote wall mount kit and potting kit be used for any meter tube going below grade (susceptible to floods).•Avoid locations with strong vibrations.•Use good wiring practices; don’t run AC and DC wires in the same tray; use drip loops etc.How to Install a Siemens MagmeterMag 5100W, 3100 series, 1100 series, Mag 5000 and 6000 TransmittersIntegral (Compact) Mounted Transmitter (for remote mount go to pg.4)Mag 6000 or 5000 Polyamide TransmitterCommunication Module (Optional)Circuit board; screws into the mag tube terminal box;Seats on top of the Sensor PromSensor Prom; contains the unit identityMag tube terminal boxMag tube/ SensorIntegral Mount (compact installation) –The Mag 5000 or 6000transmitter is mounted directly on the Mag TubeIntegral MountSensor Prom•When you receive the mag tube, themag tube terminal box shown to the leftwill have a 3 prong plug and a 2 prongplug with wires extending into the neckof the mag tube and a 6 Prong teal“Sensor Prom”. The 2 plugs are labeled83, 0, 82 and 85, 86 respectively.•For an integral mount installation wewill leave the sensor prom in the factorylocation and the terminal board willinstall above the sensor prom. Makesure the Prongs from the Sensor Promseat properly in the terminal board•Install the terminal board using provided screws; make sure the 6 pin connector lines up with sensor prom. Do not over tighten the screws.•Bring the Black plugs up from under the board and install into the corresponding terminals on the board. 82,0,83 corresponds to the terminals 82,0,83 and 85,86 correspond to 85,86 labeled on the terminal board.•Connect the earth wire from the terminal board to the bottom of the terminal box.•If the plugs are not hooked up properly the meter will not function properly.Integral Mounted Transmitter•Power is always landed at the transmitter terminal box. Power has designated terminals labeled L,N, Ground.•Signal wire should be landed on the proper terminals dependent on your application;•4-20 mA; 31 and 32 (Sourcing Output)•Relay Output; 44,45,46Remote Mount Mag Meter (for integral mount go to pg.2)•In a remote installation the Mag 5000 or 6000 electronics aremounted in a different location than the mag tube for various reasons.•You will require a special cable kit and wall mount kit from Siemens; Potting kit is recommended for applications where the mag tube is located below grade.•The next steps assume you have already installed the mag tube and wall mount kit in their respectivelocations correctly.Sensor Prom in Mag Tube Terminal Box from Factory Sensor Prom Moved to RemoteTerminal Box•The first and most critical step in remote mounting a Siemens Mag is the placement of the sensor prom to the location of the remote transmitter.•Install the terminal board in the remote terminal box and land the ground wire to the base frame.Preparing the Remote Terminal BoxPreparing the Mag Tube Terminal Box•Once the sensor prom is moved from the mag tube terminal box to the remote terminal box, you should install theremote terminal blocks into the mag tube terminal box.•Install the black plugs into the terminal blocks as shown.•**If the junctions are not done correctlythe mag meter will not function properly.Remote Terminal BlocksBlack PlugsPreparing the Remote Cables•Prepare the Coil and ElectrodeCables as shown at both ends•Only 2 colored wires will be used from the coil cable •Trim the overall braided shield from 1 end of the electrode cable •See Appendix A for details on preparing cables.Prepared Coil Cable NOTE: only 2 wires will be used; Shield atboth endsPreparedElectrode Cable NOTE: Only 1 Overall Shield is used at MagTubeTerminating Cables at the Mag TubeElectrode Cable•The overall shield should be tiedto the mag tube terminal boxchassis via one of the screws; Willnot be used in remote terminalbox!•81 = Brown Shield•82 = Brown Copper•0 = Both Blue Shield and Copper•83 = Black Copper•84 = Black ShieldCoil Cable•85 = Brown•86 = Blue•The black wire was taped back•Shield is tied to the mag tubeterminal box chassis; Will also betied to remote terminal box. NOTE: It is best practice to only use as much wire in the terminal boxes as needed. Any exposed wires without the shield can act as an antenna for Electromagnetic Interference. The electrode and coil cables must be kept separate to prevent interference.Terminating at the Remote Terminal BoxThe Electrode cable will be terminated to terminals 81-82-0-83-84 matching the color and position previously done in the mag tube with one exception: DO NOT tie the overall braided shield to ground in the remote terminal box / transmitter location.81 = Brown Shield82 = Brown Copper0 = Both Blue Shield and Copper83 = Black Copper84 = Black ShieldShield = cut back and taped/ Not usedTerminating at the Remote Terminal Box Contd•The Coil cable will be terminated to terminals 85-86-Ground matching the color and position previously done in the mag tube. Unlike the electrode cable we will terminate the overall shield at both ends for the coil cable. •85 = Brown •86 = Blue•The black wire was taped back•Shield is tied to the Ground Lug on the terminal boardElectrode Cable in Remote Terminal Box ; Overall Shieldis not usedCoil Cable in Remote Terminal Box; Overall Shield is used•Power is always landed at the transmitter terminal box. Power has designated terminals labeled L,N, Ground.•Signal wires should be landed on the proper terminals dependent on your application;•4-20 mA; 31 and 32 (Sourcing Output)•Relay Output; 44,45,46•Pulse or Frequency Output ( Active or Passive); 56,57,58•See Appendix B for Wiring DiagramPowerSignal TerminalsFinal Steps•Once the Wiring is complete and a functional check has been completed tighten the cable glands to ensure no water will get into either terminal box.•If using a potting kit, mix equal parts A and B then pour into the Mag Tube terminal box. ONLY DO THIS ONCE YOU HAVE CONFIRMED ALL CONNECTIONS ARE CORRECT AND THE MAG TUBE IS FUNCTIONING PROPERLY. Power should be off when pouring the potting kit into the mag tube terminal box. Follow the instructions with the kit.•NOTE: if using conduit directly to the mag terminal box, be sure to plug the entries with Duct Seal compound or something similar to prevent the potting kit fromemptying into the conduit.•Allow the potting kit to cure for 24 hrs without power. Once cured Install the MagTube terminal box cover (black square).AppendixA.) Preparing the Remote Cables•In the special cable kit you will receive an Electrode cable (3-20 gage wires with individual braided shields and an overall braided shield) and a Coil cable (3-16 gage wires with an overall braided shield).•To prepare the Either Cable for termination at the mag tube you will need to strip back the overall grey insulation exposing the overall braided shield. Only strip enough for the install. Too much exposed cable becomes an antenna for “noise”.•To get a clean shield wire we recommend pulling the individual cables through the shield leaving the braided shield in-tact; This is done by pushing the shield back forming a “bubble” in the shield then bending the wires 90 degrees. Pull the wires through the shield, then twist the shield into a tight wire. Make sure there are no whiskers that can cause shorts.A.) Preparing the Remote Cables Contd•Once you have the individual cables separated from the overall shield you need to strip the insulation from the individual wires. This will expose copper wire on the coil cable and expose individual shields on the electrode cable.•Electrode Cable: Use a small flat head to separate the shields from the coloredinsulation. Keep the shield clean and unfrayed; Remove the overall shield from oneend, it will only be used at the mag tube.•Coil Cable remove the 3rd colored wire; it is not needed.B.) Wiring DiagramPower4-20 mA SignalRemote Electrode cable;Overall Shield tied atmag tube only!Remote CoilC.) Grounding with or without Grounding RingsGrounding without Rings;Only for Metal Pipes; metal toMetal connection requiredRemove the plastic plug in tothe flange at 12 oclock toreveal the M6x16 thread。
西门子 PLC 控制器说明书
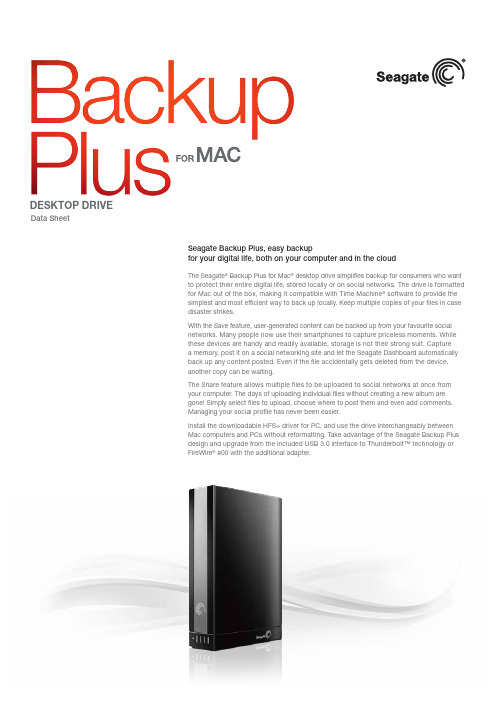
Seagate Backup Plus, easy backupfor your digital life, both on your computer and in the cloudThe Seagate ® Backup Plus for Mac ® desktop drive simplifies backup for consumers who want to protect their entire digital life, stored locally or on social networks. The drive is formatted for Mac out of the box, making it compatible with Time Machine ® software to provide the simplest and most efficient way to back up locally. Keep multiple copies of your files in case disaster strikes.With the Save feature, user-generated content can be backed up from your favourite social networks. Many people now use their smartphones to capture priceless moments. While these devices are handy and readily available, storage is not their strong suit. Capture a memory, post it on a social networking site and let the Seagate Dashboard automatically back up any content posted. Even if the file accidentally gets deleted from the device, another copy can be waiting.The Share feature allows multiple files to be uploaded to social networks at once from your computer. The days of uploading individual files without creating a new album are gone! Simply select files to upload, choose where to post them and even add comments. Managing your social profile has never been easier.Install the downloadable HFS+ driver for PC, and use the drive interchangeably between Mac computers and PCs without reformatting. Take advantage of the Seagate Backup Plus design and upgrade from the included USB 3.0 interface to Thunderbolt™ technology or FireWire ® 800 with the additional adapter.Data SheetDESKTOP DRIVEDESKTOP DRIVEHFS+ driver for PC operability available by downloadCompatibility may vary depending on user’s hardware configuration and operating system.When referring to drive capacity, one terabyte, or TB, equals one trillion bytes.AMERICAS Seagate Technology LLC 10200 South De Anza Boulevard, Cupertino, California 95014, United States, +1 408 658 1000ASIA/PACIFIC Seagate Singapore International Headquarters Pte. Ltd. 7000 Ang Mo Kio Avenue 5, Singapore 569877, +65 6485 3888E UROPE, MIDDLE EAST AND AFRICA Seagate Technology SAS 16-18 rue du Dôme, 92100 Boulogne-Billancourt, France, +33 1 41 86 10 00© 2013 Seagate Technology LLC. All rights reserved. Seagate, Seagate Technology and the Wave logo are trademarks or registered trademarks of Seagate Technology LLC or one of its affiliated companies in the United States and/or other countries. Thunderbolt and the Thunderbolt logo are trademarks of Intel Corporation in the USA and/or other countries. All other trademarks or registered trademarks are the property of their respective owners. When referring to drive capacity, one gigabyte, or GB, equals one billion bytes and one terabyte, or TB, equals one thousand billion bytes. Your computer’s operating system may use a different standard of measurement and report a lower capacity. In addition, some of the listed capacity is used for formatting and other functions and will not be available for data storage. Complying with all applicable copyright laws is the responsibility of the user. Seagate reserves the right to change, without notice, product offerings or specifications. DS1759.4-1302GB。
西门子电子家居设备指南说明书
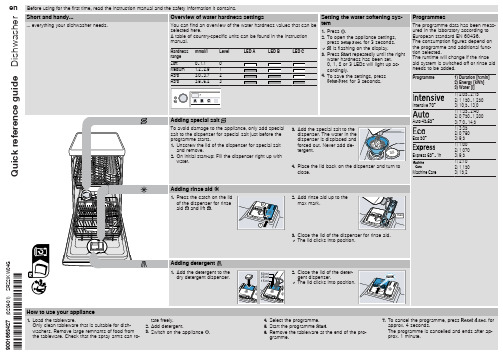
7. To cancel the programme, press
for
approx. 4 seconds.
The programme is cancelled and ends after ap-
prox. 1 minute.
Cleaning filters
1. After each wash check the filters for
2. Pull up the lower spray arm to remove.
3. Check the outlet nozzles on the spray arms for blockages under running water and remove any foreign bodies.
Siphon connection is still sealed. ▶ Check the connection to the siphon and open if necessary.
Cover of the wastewater pump is loose. ▶ Secure the cover of the Wastewater pump so it clicks into
gether and lift
1
the coarse filter
out .
Cleaning spray arms
1. Unscrew the upper spray arms and
2
pull down to remove .
1 2
Clean wastewater pump
1. Disconnect the appliance from the power supply. 2. Remove the filter system. 3. Scoop out any water. 4. Prise off the pump cover using a
西门子Gigaset M46数字无绳电话
西门子Gigaset M46数字无绳电话
佚名
【期刊名称】《《新潮电子》》
【年(卷),期】2004(000)009
【摘要】习惯了移动电话的自由自在,人们早已看不惯家中绳牵线绕的老电话,纷纷换成了无绳电话。
然而,新的烦恼又接踵而至:由于模拟无绳电话的工作频段为45~48MHz,该频段存在较多干扰源,由于信道数量少,当子机与主机距离稍远,干扰信号就有可能严重影响通话质量。
反过来,模拟无绳电话在工作时,也会对其他无线电设备产生干扰,如干扰电视节目伴音。
此外,模拟无绳电话所采用的低频信号穿透能力较差,在混凝土结构的多居室住宅中使用时.常常会出现通话死角,另一方面,与早前模拟移动电话类似.模拟无绳电话也存在保密性差的问题,旁人甚至使用普通调频收音机即可监听到通话内容。
【总页数】2页(P56-57)
【正文语种】中文
【相关文献】
1.无线激情西门子M46无绳电话 [J], 瘦客
2.网罗百家——西门子Gigaset S450Y无绳电话 [J],
3.首款彩信无绳电话——西门子Gigaset SL740 [J],
4.此地无“绳”胜有“绳”——西门子Gigaset M46数字无绳电话 [J],
5.数字无绳电话——西门子Gigaset C88 [J],
因版权原因,仅展示原文概要,查看原文内容请购买。
Panasonic KX-TGL46x系列电话系统用户指南说明书
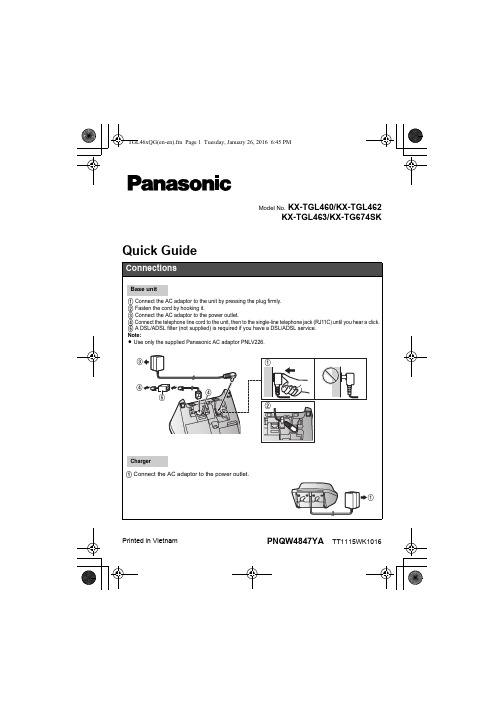
PNQW4847YATT1115WK1016Printed in Vietnam Model No. KX-TGL460/KX-TGL462KX-TGL463/KX-TG674SKQuick GuideTGL46xQG(en-en).fm Page 1 Tuesday, January 26, 2016 6:45 PM– 2 –– 3 –TGL46xQG(en-en).fm Page 4 Tuesday, January 26, 2016 6:45 PMPairing a Bluetooth cellular phone1Base unit:Press and hold {CELL 1} or {CELL 2} for about 5 seconds.L After the corresponding CELL indicator on the base unit starts flashing, the rest of the procedure must be completed within 5 minutes.2Your cellular phone:While the corresponding CELL indicator is flashing, follow the instructions of your cellular phone to enter the pairing mode.L Depending on your cellular phone, it may ask you to enter the Bluetooth PIN (default: “0000”).L If your cellular phone prompts you to confirm the passkey, tap {OK} or otherwise to accept the pairing request.3Base unit:Wait until a long beep sounds.L It may take more than 10 seconds to complete pairing.L When the corresponding CELL indicator lights up, the cellular phone is connected to the base unit. You are ready to make cellular calls.Note:L Make sure that your cellular phone is set to connect to this product automatically. Refer to your cellular phone’s operating instructions.Base unit: CELL indicatorsStatus MeaningOn A cellular phone is connected. Ready to make/receive cellularcalls.Flashing−The cellular line is in use.−Phonebook entries are being copied from a cellular phone.−The base unit is searching for the paired cellular phone.−The base unit is pairing a cellular phone.−A cellular call is put on hold.Flashing rapidly A cellular call is being received.Light off−A cellular phone is not paired to the base unit.−A cellular phone is not connected to the base unit.Handset: Link to cell display itemst d A cellular line is in use.*1L When flashing: The cellular call is put on hold.L When flashing rapidly: A cellular call is being received.*1Corresponding cellular lines (1, 2: cellular line) are indicated next to the item. x d A cellular phone is connected.*1 Ready to make/receive cellular calls.L When turned off: A cellular phone is not connected to the base unit.*1Corresponding cellular lines (1, 2: cellular line) are indicated next to the item. uv− A cellular call is in progress on that line.−The cellular line is selected for the setting.– 4 –TGL46xQG(en-en).fm Page 5 Tuesday, January 26, 2016 6:45 PMConnecting/disconnecting the cellular phone (Handset)Auto connection to the Bluetooth devices (cellular phones)The unit connects to the Bluetooth devices at regular intervals if the connection is lost. To change the interval (default: “1 min”), see the operating instructions.L When 3 Bluetooth devices (2 cellular phones and 1 headset) are paired to the base unit, only 2 Bluetooth devices can be used with the unit at the same time, and the base unit loses its connection from other Bluetooth devices. To automatically resume the connection to Bluetooth devices, leave the auto connection on.Connecting/disconnecting the cellular phone manuallyIf you will not be using the paired cellular phone’s link to cell feature temporarily (for example, you do not want the unit to ring when your cellular line receives a call), you can disconnect your cellular phone from the base unit. If you want to use it again, reconnect the cellular phone to the base unit.L After you disconnect a paired cellular phone from the base unit manually, it will automatically be connected to the base unit in 30 minutes. If you do not use the link to cell feature anymore, unpair the cellular phone.L A disconnected cellular phone is not unpaired from the base unit, so pairing it to the base unit again is unnecessary.1To connect/disconnect:For CELL 1: {MENU}(6251For CELL 2: {MENU}(6252L A long beep sounds.2{OFF}Cellular line only mode (If you do not use the landline) (Handset)If you do not use the landline, we recommend setting the unit to the cellular line only mode. The default setting is “Off”.L If you turn on the “Cell line only mode”, disconnect the telephone line cord from the base unit. Otherwise the “Cell line only mode” cannot be activated.1{MENU}(1572To turn on:{r}: “On”s{SELECT}s{r}: “Yes”s{SELECT}To turn off:{r}: “Off”s{SELECT}– 5 –Making/Answering calls (Handset)Making cellular calls1Dial the phone number. s{CELL}L When the cellular line only mode is set, you can also press{C/s} instead of {CELL}.L When only 1 cellular phone is paired, the unit starts dialing.2When 2 cellular phones are paired:{r}: Select the desired cellular phone. s{SELECT} Making landline calls1Dial the phone number.2To make the call using the receiver, press {C/s}.To make the call using the speakerphone, press and hold {C/s}for a few seconds.Answering calls To answer the call using the receiver, press {C/s}.To answer the call using the speakerphone, press and hold {C/s} fora few seconds.To hang up{OFF}To adjust the receiver/speaker volumePress {+} or {-} repeatedly while talking.Making a call using the redial list 1{>} (Redial/CID)L If the caller list is displayed, press {>} (Redial/CID) again to switch to the redial list.2{r}: Select the desired entry.3To make a cellular call:When only 1 cellular phone is paired: {CELL}orWhen 2 cellular phones are paired:{CELL}s{r}: Select the desired cellular phone. s {SELECT}To make a landline call:{C/s}To adjust the ringer volume (cellular line/landline)Press {+} or {-} repeatedly to select the desired volume while ringing.TGL46xQG(en-en).fm Page 6 Tuesday, January 26, 2016 6:45 PM– 6 –TGL46xQG(en-en).fm Page 7 Tuesday, January 26, 2016 6:45 PMPhonebook (Handset)Adding entries1{<}k s{MENU}2{r}: “Add new entry”s{SELECT}3Enter the party’s name (16 characters max.). s{OK}4Enter the party’s phone number (24 digits max.). s{OK}5{r}: Select the desired group. s{SELECT} 2 times s{OFF}L In step 3, you can switch the language for entering characters.(s{r}: Select the desired language. s{OK} Making calls1{<}k s{r}: Select the desired entry.2To make a cellular call:When only 1 cellular phone is paired: {CELL}orWhen 2 cellular phones are paired:{CELL}s{r}: Select the desired cellular phone. s{SELECT}To make a landline call:{C/s}Answering system for the landline (Base unit)Answering on/off Press {ANSWER ON/OFF} to turn on/off the answering system. Listening to messages{P} (PLAY)Answering system for the landline (Handset)Listening to messages To listen to new messages:{PLAY} or {MENU}(323To listen to all messages:{MENU}(324– 7 –TGL46xQG(en-en).fm Page 8 Tuesday, January 26, 2016 6:45 PMCopying phonebook entries from a Bluetooth cellular phone (phonebook transfer)You can copy phonebook entries from the paired cellular phones or other cellular phones (not paired) to the unit’s phonebook.1Handset: {MENU}(6182Handset:To copy from paired cellular phones:{r}: Select the desired cellular phone. s{SELECT}L Copied items are stored to the group (“Cell 1” or “Cell 2”) which the cellular phone is paired to.To copy from other cellular phones (not paired):{r}: “Other cell”s{SELECT}s{r}: Select the group you want to copy to. s{SELECT}3Handset:When“Use the cell to transfer phone book”is displayed: Go to step 4.When“Select mode”menu is displayed:{r}: Select “Auto” or “Manual”. s{SELECT}“Auto”: Download all entries from the cellular phone automatically. Go to step 5.“Manual”: Copy entries you selected.L“Select mode” menu is displayed only when the cellular phone supports PBAP (Phone Book Access Profile) for Bluetooth connection.4Cellular phone:Follow the instructions of your cellular phone to copy phonebook entries.L For other cellular phones (not paired), you need to search for and select the base unit. The Bluetooth PIN (default: “0000”) may be required.L If your cellular phone prompts you to confirm the passkey, tap {OK} or otherwise to accept the pairing request.L The entries being copied are displayed on the handset.5Handset:Wait until “Completed” is displayed. s{OFF}– 8 –– 9 –Question Cause/solutionWhy is _ displayed?L The handset is too far from the base unit. Move closer.L The base unit’s AC adaptor is not properly connected. ReconnectAC adaptor to the base unit.L The handset is not registered to the base unit. Register it.1Handset:{MENU}(13)2Base unit: Press and hold {LOCATOR} for about 5 seconds.3Handset: Press {OK}, then wait until a long beep sounds.Why am I unable to pair a cellular phone to the base unit?L Depending on the compatibility of the cellular phone, you may not be able to pair it to the base unit. For more information, please visit: /bluetooth-phoneL Confirm that the Bluetooth feature of your cellular phone is turned on. You may need to turn this feature on depending on your cellular phone.Why is there no dial tone? (cellular line)L Make sure that the CELL indicator lights up and the cellular phone is connected to the base unit.L The cellular phone has not been paired to the base unit. Pair the cellular phone.How can I increase thehandset volume level?L Press the volume key {+} repeatedly while talking.Why is the conversation noisy or cutting off?L Try to relocate the base unit so that distance to the handset is minimized.L If the same problem occurs even if the handset is next to the base unit, please visit: /supportCan I add another accessory handset to my base unit?L Yes, you can add up to 6 handsets (including the handset(s) sold with your base unit) to a single base unit.L To purchase additional accessory handset(s) (KX-TGLA40), please visit: /supportTTY users (hearing or speech impaired users) can call 1-877-833-8855.Can I keep the batteries charging all the time?L You can leave the handset on the base unit or charger anytime. This will not harm the batteries.How can I answer a call waiting call (2nd call)?L Press {ACCEPT} when you hear the call waiting tone.TGL46xQG(en-en).fm Page 10 Tuesday, January 26, 2016 6:45 PM– 10 –。
通用无绳电话说明
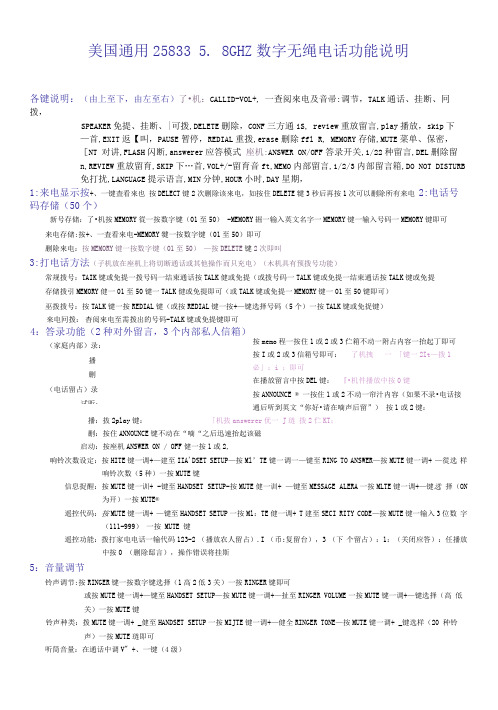
美国通用25833 5. 8GHZ 数字无绳电话功能说明各键说明:(由上至下,由左至右)了•机:CALLID-VOL+, 一查阅來电及音帚:调节,TALK 通话、挂断、冋拨,SPEAKER 免提、挂断、|可拨,DELETE 删除,CONF 三方通iS, review 重放留言,play 播放,skip 下 —首,EXIT 返【叫,PAUSE 暂停,REDIAL 重拨,erase 删除ffl R, MEMORY 存储,MUTE 菜单、保密,[NT 对讲,FLASH 闪断,answerer 应答模式 座机:ANSWER ON/OFF 答录开关,1/22种留言,DEL 删除留 n,REVIEW 重放留育,SKIP 下…首,VOL+/-留育音ft,MEMO 内部留言,1/2/3内部留言箱,DO NOT DISTURB 免打扰,LANGUAGE 提示语言,MIN 分钟,HOUR 小时,DAY 星期,1:来电显示按+、一键査看來也 按DELECT 键2次删除该來电,如按住DELETE 犍3秒后再按1次可以删除所有来电 2:电话号码存储(50个)新号存储:了•机按MEMORY 從一按数字键(01至50) -MEMORY 掘一输入英文名字一MEMORY 键一输入号码一MEMORY 键即可 来电存储:按+、一査看來电-MEMORY 犍一按数字键(01至50)即可删除來电:按MEMORY 键一按数字键(01至50) —按DELETE 键2次即叫3:打电话方法(子机放在座机上将切断通话或其他操作而只充电)(木机具有预拨号功能)常规拨号:TAIK 键或免提一拨号码一结束通话按TALK 健或免提(或拨号码一TALK 键或免提一结束通话按TALK 键或免提 存储拨引MEMORY 健一01至50键一TALK 健或免提即可(或TALK 键或免提一MEMORY 键一01至50键即可)巫拨拨号:按TALK 键一按REDIAL 键(或按REDIAL 键一按+—键选择号码(5个)一按TALK 键或免捉键)按memo 程一按住1或2或3伫箱不动一附占内容一抬起丁即可 按I 或2或3信箱号即可: 了机拽 一 「键一2It —拨1必」:i ;即可 在播放留言中按DEL 键: 『•机件播放中按0键 按ANNOUNCE ® 一按住1或2不动一帘汁内容(如果不录•电话接通后听到英文“你好•请在嘀声后留”) 按1或2键: 播:抜2play 键: 「机抜answerer 优一 J 琏 拨2伫KT ;删:按住ANNOUNCE 键不动在“嘀“之后迅速抬起该磁启动:按座机ANSWER ON / OFF 健一按1或2,响铃次数设定:按HITE 键一调+—建至IIA'DSET SETUP —按Ml’TE 键一调一—键至RING TO ANSWER —按MUTE 键一调+ —從选 样响铃次数(5种)一按MUTE 键信息捉醒:按MUTE 键一训+ -键至HANDSET SETUP-按MUTE 健一训+ —键至MESSAGE ALERA 一按MLTE 键一调+—键选 择(ON为开)一按MUTE®遥控代码:按MUTE 键一调+ —键至HANDSET SETUP 一按Ml :TE 健一调+ T 建至SECI RITY CODE —按MUTE 键一输入3位数 字(111-999) 一按 MUTE 键遥控功能:拨打家电电话一输代码123-2 (播放农人留占).I (币;复留台),3 (下 个留占):1:(关闭应答):任播放中按0 (删除邸言),操作错误将挂斯5:音量调节铃声调节:按RINGER 键一按数字键选择(1高2低3关)一按RINGER 键即可或按MUTE 键一调+—键至HANDSET SETUP —按MUTE 键一调+—扯至RINGER VOLUME 一按MUTE 键一调+—键选择(高 低关)一按MUTE 键铃声种类:拨MUTE 键一调+ _健至HANDSET SETUP 一按MIJTE 键一调+—健全RINGER TONE —按MUTE 键一调+ _键选样(20 种铃声)一按MUTE 琏即可听筒音量:在通话中调V" +、一键(4级)杳阅來电至需拨出的号码-TALK 键或免提键即可 來电冋拨:4:答录功能(2种对外留言,3个内部私人信箱)(家庭内部)录:播删(电话留占)录试听:6:注册子机按 MIITE 键一调 +T建至 HANDSET SETUP一按 MUTE 键一调 + -键.至 REGISTRATION—按 MIJTE 键一调+ —键至 YES-按 Ml TE 键—按住座机卩AGE健3至5秒即可7:解除子机按 \IUTE 键一调 +—健至 HANDSET SETUP—按 MUTE 健一调 +—键至 DEREGISTRATION一按 MUTE 键一调+ —健至 YES—按MITE 键一调+ —健至YES (再次确认)一按MUTE健即可8:按键音设置按MUTE键一调+—健至HANDSET SETUP一按MUTE键一调+—键至KEY TONE—按MUTE键一调+ —徒选择(ON为开,OFF为关)一按MUTE键即町9:语言设置按MUTE键一调+ —健至HANDSET SETUP—抜MIJTE琏一调+ —键至SET IANGUAGE—按MIJTE键一调+ —键选择(1英语2法语3 西班才语)一按MUTE健即可10:手机名称按MUTE f建一调+—键至HANDSET SETUP—按MLTE键一调+—键至KEYTONE一按MUTE键一训+ —键选样(ON为丿|;・OFF为关)一按MUTE键即可11:座机时间设置按住应机MIN键3秒一再连续按MIN键设定分钟,按住座机HOUR键3秒-再连续按HOUR键设定小时,按住座机DAY键3秒一再连续按DAY健设定星期•听时间:按CI1ACK 即可12:座机答录提示语言连续按座机LANGUAGE键选择(英断法语、西班才语)13:免打扰按座机DO NOT DISTURB键(灯亮为开),打入电话将不响铃14:保密功能在通话中如暂时不便对方听到叫•先按MUTE键.恢复通话再按MUTE置即可15:房间监听(2个以上子机)按MUTE從一调+—琏至ROOM MONITOR-^ MUTE健一妆被监听的T•机编号即叽结朿按EDIT键即町16:呼叫功能座机按PAGE键呼叫f机(多了机可对讲)17:对讲功能(2个以上子机)子机按INT键和了机编号,被叫了机按INT健与之对讲18:三方通话(2个以上子机)r机接通外线后按INT键和了机编号于貝他J'机对讲.对讲后任怠访conf健即可三方会谈19:子机耳脉接听(最好选用有开关及音最调节的耳脉;尺寸:2. 5mm)20:电池初次使用连续允电12小时,电吊低提示注意事项:1:本机如接入ADSL线路中必需在本机前加接ADSL分离器(接在PHONE端口),否则会造成电话有杂音或不对码、掉网、不稳定等现象。
西门子电话机培训
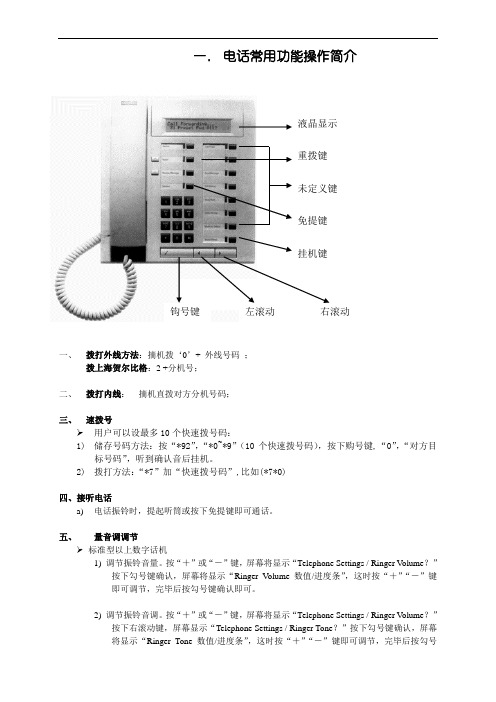
一. 电话常用功能操作简介一、 拨打外线方法:摘机拨‘0’+ 外线号码 ;拨上海贺尔比格:2 +分机号;二、 拨打内线: 摘机直拨对方分机号码;三、 速拨号➢ 用户可以设最多10个快速拨号码:1) 储存号码方法:按“*92”,“*0~*9”(10个快速拨号码),按下购号键,“0”,“对方目标号码”,听到确认音后挂机。
2) 拨打方法:“*7”加“快速拨号码”,比如(*7*0)四、接听电话a) 电话振铃时,提起听筒或按下免提键即可通话。
五、 量音调调节➢ 标准型以上数字话机1) 调节振铃音量。
按“+”或“-”键,屏幕将显示“Telephone Settings / Ringer V olume ?”按下勾号键确认,屏幕将显示“Ringer V olume 数值/进度条”,这时按“+”“-”键即可调节,完毕后按勾号键确认即可。
2) 调节振铃音调。
按“+”或“-”键,屏幕将显示“Telephone Settings / Ringer V olume ?”按下右滚动键,屏幕显示“Telephone Settings / Ringer Tone ?”按下勾号键确认,屏幕将显示“Ringer Tone 数值/进度条”,这时按“+”“-”键即可调节,完毕后按勾号液晶显示未定义键重拨键右滚动左滚动 钩号键 免提键挂机键键确认即可。
3)调节免提音量。
按下免提键时,直接按“+”“-”键即可。
➢普通模拟话机(以西门子8000-2型为例)1)调节振铃音量。
提起听筒或按下免提,按下“SET”键,再按“5”键,这时当前铃声被振响,按“1~7”可以调节7级音量大小,满意后按“SET”键确认。
2)调节振铃音调。
提起听筒或按下免提,按下“SET”键,再按“6”键,这时当前铃声被振响,按“1~4”可以调节,满意后按“SET”键确认。
3)调节免提音量。
按下免提键时,直接按“+”“-”键即可。
六、协商➢标准型以上数字话机通话情况下,如果要和第三方协商,但不愿被对方听到,可以在屏幕显示“Enquiry?”时按勾号键(如果屏幕显示不对,则可按左右滚动翻出),然后可以和一边的人协商交谈,通话对方听到的是转接音乐。
