Netvox Catalog(Simplified Chinese Version)120316
思科中文版WEB-IOU使用手册
思科超强模拟器WEB-IOU使用手册
本教程里所使用工具:WEB-IOU、CRT、VM9.0,我已打包上传,请自行下载研究!WEB-IOU里的镜像及iourc都已内置,无需改动其他!
最新版镜像:路由器为15.2版本交换机为:L2Golden版本
原版WEB-IOU为英文版,为方便大家使用而简单汉化网页,不喜勿喷!网页背景如需自定义请
e-mail:索取教程,打造个性化的WEB-IOU!后续会有视频教程发布
因为这是第一次做教程,做的有点粗略,还请各位见谅,菜鸟教程,老鸟勿喷!
在此得感谢那些提供出如果强大模拟器的老鸟们!
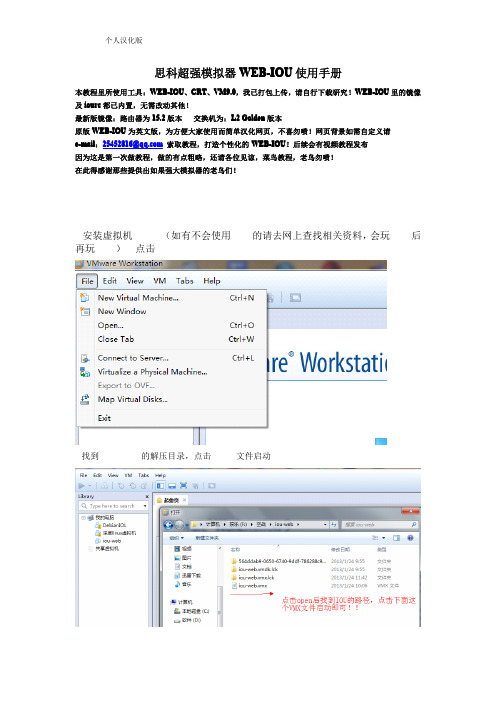
1.安装虚拟机VM9.0(如有不会使用VM的请去网上查找相关资料,会玩VM后再玩IOU)---点击open
2.找到WEB-IOU的解压目录,点击VMX文件启动
3.启动过程...选择第一个启动(默认第一个)
4.启动成功后进入登录界面:用户名root密码cisco
生成VM1和VM8两张网卡,此处我用的是VM8网卡)
如果地址没在同一网段,请下图的命令进行地址修改!
6.确保linux能和本机VM8网卡通信!
7.连通性没问题后,即可用浏览器输入linux 的IP 地址进入WEB-IOU 界面,以下图片就是对WEB-IOU 的一些使用技巧和注意事项!(网页的背景图片不喜勿喷,可以邮件给我教你自定义修改背景图片)
总结:总的来说就是先让linux和本机能够正常通信...在通信的基础上去访问linux里面的WEB-IOU,访问成功后,就得学着如果使用IOU来搭建拓扑,命令write保存配置!
注意点:工具里面的导出和导入实验我个人认为作用不大,因为导出来你用其他软件不能用!。
versioncatalog 使用方法
versioncatalog 使用方法要使用 versioncatalog 工具,您需要按照以下步骤进行操作:1. 下载并安装 versioncatalog 工具:您可以从 versioncatalog 的官方网站或 GitHub 存储库下载二进制文件或源代码,并按照相关说明进行安装。
确保您的计算机上已安装 Java 运行时环境(JRE)。
2. 创建配置文件:在使用 versioncatalog 之前,您需要创建一个配置文件来指定要管理的版本号。
配置文件是一个简单的YAML 文件,可以列出不同软件或项目的不同版本。
您可以在配置文件中指定版本的名称、号码和其他相关信息。
例如:```- name: software-aversions:- name: version-1number: 1.0.0- name: version-2number: 2.0.0- name: software-bversions:- name: version-1number: 1.0.0- name: version-2number: 2.0.0```3. 运行 versioncatalog 命令:在命令行界面输入 versioncatalog 命令,指定配置文件的路径,以及其他可能的参数和选项。
例如:```versioncatalog --config <配置文件路径>```4. 查看版本列表:versioncatalog 会读取配置文件并显示版本号的列表。
您可以查看不同软件或项目的不同版本,并进行其他需要的操作。
5. 执行其他操作(可选):versioncatalog 还提供一些其他功能,例如查找特定版本的详细信息、对版本进行排序、筛选版本等。
您可以使用 versioncatalog 的命令行选项或自定义脚本来执行这些操作。
请注意,versioncatalog 是一个命令行工具,您需要在命令行界面中使用它。
Eaton 网络关闭模块 V3 - 适用于 VMware ESXi 虚拟架构的扩展版用户指南说明书

Network Shutdown Module V3User manual extension for VMware ESXi virtualarchitectureRevision HistoryRevisionDescription 24FEV2010Change Shutdown ScriptContents1 Introduction (3)2 Installation (4)2.1 Prerequisites (4)2.1.1 vSphere SDK for Perl (4)2.1.2 VIMA/vMA installation (4)2.1.3 VMware ESXi configuration (4)2.1.4 EATON hardware architecture (6)2.1.5 Network architecture (7)2.1.6 Installation (8)2.1.7 NSM configuration for VMware ESXi (10)3 Appendix (11)3.1 References (11)1 IntroductionEATON is a world first class supplier of hardware and software to optimize business continuity on your VMware virtual platforms. It means controlling proper boot and shutdown of the virtual machines hosted on a same physical machine, assuring data integrity on each virtual machine.Network Shutdown Module is EATON’ solution to automate various data security functions.It:•Continuously waits for information from the Mgt. Proxy or Mgt. Card connected to the EATON UPS.•Warns administrators and users if AC power fails•Proceeds system shutdown before the end of battery backup power is reached.•Restarts machines when AC power restarts.VMware® ESXi does not have administrative console and hence we cannot install Network Shutdown Module (NSM) on that machine. However We can install NSM on VMware Infrastructure Management Assistant VIMA 1.0 or on vSphere Management Assistant(vMA 4.0). Using that we can manage and shutdown the VMware ESXi in case of UPS and power anomalies. We can also configure ESXi to safely suspend or shutdown guest operating system. This way we can have only one NSM shutdown agent on only one guest operating system (VIMA, vMA).There are various benefits to install NSM client on the VIMA, vMA instead of each Virtual Machine: •Only one binary of NSM client on the VIMA/ vMA to manage all Virtual Machines.•Dynamic management of virtual machines configuration with a personalized script.This guide will help to install and configure NSM client on VIMA, vMA.NSM client is tested on VMware virtualization server with two guest operating systems for electrical power events, shutdown, low battery and reboot.EATON tested virtualization security in a standalone power supply configuration, for system shutdown, electrical shutdown, and reboot.2 InstallationThis guide provides information about installing and configuring NSM on VIMA or vMA. These recommendations guide you through the installation process of NSM as a shutdown agent for VMware ESXi architecture to allow electric continuity.2.1 PrerequisitesThe following are prerequisites:1. VMware ESX/ESXi Server Machine2. Virtual Machine with vSphere SDK for Perl (vSphere Management Assistant , or other Linuxor Windows Platforms supported by VMware)3. VSphere Client4. NSM Package5. SSH client like putty for installation and configuration6. SCP Client like WinSCP to upload packages to VIMA/vMA.2.1.1 vSphere SDK for PerlPlease visit /support/developer/viperltoolkit/ for more information about download and installation of vSphere SDK for Perl.2.1.2 VIMA/vMA installationPlease visit /support/developer/vima/ for more information aboutdownload and installation of VIMA or vMA on ESXi host machines.2.1.3 VMware ESXi configuration•For the automatic OS boot on startup: you must configure the physical machine to allow automatic OS boot on startup. This setting is present in your machine’s BIOS. For further information, see specific technical hardware documentation.•To allow interactions between physical and virtual machines, VMware tools have to be installed on each virtual machine. For further information, see VMware ESXi Server documentation.•You can configure the automatic startup and shutdown properties of guests operating systems as per requirement. But to work NSM properly, VIMA/vMA needs to be configured as o Automatic Shutdown of VIMA/vMA when ESXi host is going down ando Automatic Startup of VIMA/vMA when ESXi host is startingFollowing procedure will explain about configuration of VIMA/vMA shutdown and startup propertiesFrom the Virtual Infrastructure Client interface select topmost item ESXi host server from lefthand side tree hierarchy, go in the1. Select “Configuration” tab2. Select “Virtual machine startup / shutdown” menu -> Click “Properties” present in right hand cornerFollowing window will appear on screen,Select VIMA/vMA guest machine and click on edit button and configure as shown aboveStartup SettingsClick Use specified settingsStartup delay – 10 SecondsShutdown SettingsClick Use specified settingsShutdown delay – 30 seconds•For the automatic virtual machine boot of other guest machines on VMware ESXi start-up: From the Virtual Infrastructure Client interface, go in the“Virtual machine startup / shutdown” menu “Configuration” “Properties” “Start andstop VMs with the system”, and tick “enable.”Note: In the « Properties…» page, you also have the possibility to define the Startup Orderof your virtual Machines.Start and Stop VMs with the system : EnabledDefault Startup Delay : x SecondsDefault Shutdown Delay : x SecondsStartup Order : Automatic StartupThis configuration is illustrated on the following screenshot:2.1.4 EATON hardware architectureThe prerequisites for Network Shutdown Module V3 installation are described in the "Network Shutdown Module V3 – User Manual" chapter: “Installation Prerequisites“. (/)For UPS systems compatibility, please refer to the chapter “Appendix -> Compatibility List”2.1.5 Network architectureAll hardware elements must have an operational network configuration that allows them to dialog freely with each other.Make sure in particular that the Virtual Machine firewall with NSM software authorises: •connections on tcp port 4679 and 4680 to enable a remote access for supervision and configuration through Web Browser. These ports are reserved at IANA().•Connections through TCP port 80. It must be opened as a destination port (for output) on the machine hosting Network Shutdown Module. (To enable communication betweenNetwork Shutdown Module and Network Management Card)•Example on the vMA:iptables -I OUTPUT -p tcp --dport 80 -j ACCEPTiptables -I OUTPUT -p tcp --dport 5000-j ACCEPTiptables -I INPUT -p tcp --dport 4679 -j ACCEPTiptables -I INPUT -p tcp --dport 4680 -j ACCEPTiptables -I INPUT -p udp --dport 4679 -j ACCEPTiptables -I INPUT -p udp --dport 4680 -j ACCEPT•Save firewall settings using following commandservice iptables saveTo configure your VMWare ESXi Server for the network, please refer to the user manual.2.1.6 InstallationDownload on EATON’s website the latest version of Network Shutdown Module Console version. This shutdownESXi.pl script will be installed at <installation folder>/bin/tools, by default/usr/local/EATON/NetworkShutdownModule/bin/tools , this script use the VMware API and must have the vSphere SDK for Perl to work.•Download the latest version of Network Shutdown Module v3, available on EATON’s website, in downloads section “EATON Power Management Software Suite (Solution-Pac2)”:/Support/Software-Drivers/default.aspThen:> select “Network solution”.> select Linux as Operating System> download Linux version for ESXi, known as: « Network Shutdown Module Linux x86Console «Network Shutdown Module Linux x86_64 Console», named «nsm_linux_x86_64_cli_3_xx_xx.run».•Upload the package on your VIMA/vMA environment, with a SCP Client (Example under windows environment : WinSCP)•Connect with SSH to the VMware server (Example under Windows environment: Putty).You must have corresponding rights to execute and install programs on VIMA/vMA. Referto VMware ESXi for further information.•In the upload folder, add execution right to the package, by typing:chmod 755 nsm_linux_x86_64_cli_3_xx_xx.runNote: If you store the installation file on the shared vmfs resources in a SAN.When you start the installer you could have an error messages"./nsm_linux_x86_64_cli_3_xx.run: cannot execute binary file".Solution: copy the installation source onto the local drive of the ESX server•Note: If you are not the root user when you start the installer you will be asked for a password:./nsm_linux_x86_64_cli_3_xx.runPassword:Solution: Enter "sudo -s" to get a root console and run the installer again.•Install Network Shutdown Module by typing:./nsm_linux__x86_64_cli_3_xx_xx.run -install –silentTo configure a personalized package, please refer to Network Shutdown Module v3manual.•At the end, connect to Network Shutdown Module using your web browser by typing : http://<@IP-or-name-of-vMA>:4679/eaton/ (for a HTTP access)https://<@ IP-or-name-of-vMA>:4680/eaton/ (For a HTTPS access)•You are now in front of Network Shutdown Module v3 interface:•In the menu, click on the Configuration Power devices item,Enter the default Login «admin» and default Password «admin»•Then click on the Add button and Enter the IP address of the Network Management Card (or Proxy).•Save your configuration•Configure your password (recommended)•In Configuration -> System, select the option: Enable only TCP mode•Save your configuration•For the multi ups configurations, please refer Network Shutdown Module manual.2.1.7 NSM configuration for VMware ESXi•In the menu, click on the Configuration Access(advanced) item,Enter the default Login «admin» and default Password «admin»•Click on System shutdown from Action list and then click on Settings.•In action parameters provide the following values../bin/tools/shutdownESXi.pl –-server $@IPorName –-username $USERNAME –-password $PASSWORD1. $@IPorName : is the IP or the name of the ESXi that you will shutdown2. $USERNAME: is the username of an administrator's user on the ESXi that have the right toshutdown the server3. $PASSWORD: is the password of the administrator's user•Save your configuration using Save changes(s) button3 Appendix3.1 References•« Network Shutdown Module v3 user manual » : downloadable from, « download » section « Software » « Solution-Pac 2 »« Network solution »•References documents for VMware ESX Server are available on VMware website : /support/•Please visit /support/developer/viperltoolkit/ for more information about download and installation of vSphere SDK for Perl.•Please visit /support/developer/vima/ for more information about download and installation of VIMA or vMA on ESX/ESXi host machines.。
vcenter 使用手册

以下是VMware vCenter Converter的基本使用手册:
步骤1:下载和安装
访问VMware官方网站或VMware产品下载页面,找到并下载vCenter Converter。
安装vCenter Converter。
在安装过程中,按照向导指示进行配置。
步骤2:启动vCenter Converter
安装完成后,启动vCenter Converter。
单击“Convert Machine”。
步骤3:选择源和目标平台
在Converter控制台中,选择源平台和目标平台。
选择源操作系统和目标操作系统。
步骤4:配置源机器
输入源机器的详细信息,如IP地址、用户名和密码等。
选择要转换的虚拟机。
步骤5:开始转换
单击“Start”开始转换过程。
监控转换过程。
步骤6:保存转换后的虚拟机
转换完成后,单击“Save”保存转换后的虚拟机。
选择保存位置和命名虚拟机。
步骤7:配置目标平台
在Converter控制台中,选择目标平台。
输入目标平台的详细信息,如IP地址、用户名和密码等。
将转换后的虚拟机导入目标平台。
以上是VMware vCenter Converter的基本使用手册。
请注意,在使用Converter进行虚拟机转换时,请确保源平台和目标平台的版本和版本号相同或兼容。
同时,请确保在转换过程中保持网络连接稳定,并避免进行任何可能影响转换过程的操作。
Quest NetVault Backup Oracle解决方案介绍说明书

Protecting business-critical data stored in Oracle databases while keepingthat data online and available is easier when you have a solution with a plug-in specifically designed for Oracle. With Quest® NetVault Backup, you’ll be able to take full advantage of the world’s leading relational database management system. NetVault Backup gives you confidence that you can recover your Oracle environments, including Oracle Real Application Clusters (RAC) and Data Guard, while eliminating the need for complex scripting. Through an intuitive user interface and automated workflow processes, NetVault Backup offers a centralized console to help you set up, configure and define backup and restore policies for all your Oracle databases. Plus, you have the flexibility to select your preferred backup method without having to learn Oracle database internals, thanks to support for online backups via simple user-managed or full-featured Recovery Manager (RMAN) backups. NetVault Backup also offers granular control that minimizes downtime, providing youwith faster and more reliable backups and restores of complete databases, individual tablespaces or individual datafiles. Through automatic integration with a wide range of backup devices, you can be confident that your Oracle data is protected and safely stored off site to meet your disaster recovery and business continuity goals.NetVault Backup supports important features such as Oracle RAC, Data Guard, Automated Storage Management (ASM), Flashback Database and Transparent Data Encryption, and offers you advanced backup and recovery options in case of hardware failure or data loss. Protect your business-critical Oracle data with confidence and agility.NetVault Backup for OracleAward-winning protection for business-critical data stored in Oracle databasesBENEFITS:• User-managed or RMAN-basedonline backups• Support for RMAN compression• Protection for single-instance,multi-instance RAC and DataGuard environments• Protection for Oracle datain third-party (non-RAC)clustered environments• Backup Parameter, Control,Archived Redo Log Files andExternal Configuration Files• Protection down to datafile levels• Automatic instance configuration• Point-and-click graphic userinterface (GUI)KEY BENEFITSReduce risk with flexible backup and recovery — NetVault Backup gives you tools to simplify backup and recovery of business-critical Oracle databases. With NetVault Backup, you can create a comprehensive and flexible backup policy without the need to understand Oracle database internals. You have the flexibility to choose between simple user-managed or full-featured RMAN-based backups. Through point-and-click automated options, NetVault Backup reduces reliance on human interaction, which eliminates syntax errors caused by manual intervention.Minimize downtime by speeding uprestores (restore only what is needed) — NetVault Backup ensures databases remain online and fully accessible during backup operations, ensuring no user downtime. Integration withOracle’s Flashback Database maximizes availability by enabling you to rewind to a previous time to correct problems caused by logical data corruptions or user errors without restoring physical datafiles. When needed, you can perform full, incremental, and time-, SCN- and log sequence number-based, point-in-time restores. NetVault Backup is designedfor granular recoveries, enabling you to recover complete databases, individual tablespaces or individual datafiles.Increase business continuity through automatic integration with a widerange of backup devices — With off-site backups being an important part of the data protection plan for business-critical applications, NetVault Backup integrates with a wide range of storage devices, enabling you to store backup data on disk, in a virtual tape library (VTL) or on tape.ABOUT QUESTQuest helps our customers reducetedious administration tasks so they can focus on the innovation necessary for their businesses to grow. Quest® solutions are scalable, affordable and simple-to-use, and they deliver unmatched efficiency and productivity. Combined with Quest’s invitation to the global community to be a part of its innovation, as well as our firm commitment to ensuring customer satisfaction, Quest will continue to accelerate the delivery of the mostcomprehensive solutions for Azure cloud management, SaaS, security, workforcemobility and data-driven insight.Quest, NetVault and the Quest logo are trademarks and registered trademarks of Quest Software Inc. For a complete list of Quest marks, visit /legal/trademark-information.aspx. All other trademarks and registered trademarks are property of their respective owners.© 2017 Quest Software Inc. ALL RIGHTS RESERVED.DataSheet-NVBU4Oracle-US-KS-25712Quest4 Polaris Way, Aliso Viejo, CA 92656 | If you are located outside North America, you can find local office information on our Web site.。
泰格速印标签打印软件安装使用说明

泰格标签的安装与注意事项Windows XP下的安装1.运行泰格标签安装程序:LabelProfessional.exe根据向导的提示安装完成程序。
2.如果文件提取完成之后,如果出现以下对话框。
此时可以点[是]按钮(下载地址:/fwlink/?LinkId=51424),程序将自动从网上下载dotnetfx.exe进行安装。
也可以直接运行安装目录下的dotnetfx.exe安装程序。
根据向导将完成.net 2.0的安装。
安装完成后再运行泰格标签打印软件.exe程序重新安装泰格标签打印标签软件。
3.如果在安装.net 2.0时出现的不是上面这个安装界面,而是提示:缺少系统必备程序microsoft windows installer 3.0,那么可以点击提示中的链接/downloads/details.aspx?displaylang=zh-cn&FamilyID= 889482FC-5F56-4A38-B838-DE776FD4138C下载windows installer 3.1。
或是直接运行安装目录下的WindowsInstaller-KB893803-v2-x86.exe文件。
如下图:完成安装后再运行dotnetfx.exe安装程序。
4.总结Windows XP下安装速印标签的步骤:▪安装windows installer 3.1:运行WindowsInstaller-KB893803-v2-x86.exe文件(SP1以上版本己经存在该更新,此时不需要安装)▪安装.net 2.0:运行dotnetfx.exe文件(大部分电脑己经存在该更新,此时不需要安装)▪安装泰格标签打印软件∙Windows 2000下的安装1.在Windows 2000下的安装首先需要检查Windows 2000的版本。
如果是SP3及以下版本。
则首先需要安装:Windows 2000 SP4安装包。
2.在Windows 2000 SP4的基础上安装windows installer3.1:运行WindowsInstaller-KB893803-v2-x86.exe文件。
wonderware historian 10安装配置

wonderware historian 10安装配置安装文件为:
1.关闭用户控制
1.配置dcom。
1.安装.net framework 3.5
2.安装sql server,打sp1补丁
3.安装Historain
停止ww服务
安装sp1包
重启机器,启动ww服务
4、安装opc link。
如果有必要可以安装kepware。
5、配置opc link的topc
然后保存配置文件。
1.在smc中创建i/o server。
注意,如果是Ridas还需要先创建idas,建议开启断线存
储配置
1.创建topc,注意名字必须和opc link的topc一样
1.配置tag点
注意如果是模拟量(Analog)在item Name属性中,在原item name基础上增加r前缀,如item:TR_AA.GRitem.4#ValveKDFK,则在需要填入rTR_AA.GRitem.4#ValveK DFK。
字符串(String)类型的则前缀为m
如果配置成功opc link的界面将出现连接的topc否则topc将不会再界面上出现,正常情况如下:
同时,数据库中也可以查询到item的实时值。
注意,这里在38分15秒之前数据异常,这时候错误日志显示为
原因:双方服务器时间未同步导致的异常。
双方服务器时间同步后,数据存储开始恢复。
附录
附录I安装指导概述这些指导将应用于Windows 95/98/Me、NT/2000/XP操作系统和Novell Netware服务器。
该安装指导按照安装类型(单机版standalone、网络服务器network server或网络用户network client)被分类在开始安装以前请确认:●目标计算机上的所有其它的程序已经被终止。
●使用系统管理员的身份登陆。
●具有完全访问目标计算机上的安装目录(通常为Program Files)的权利(对网络用户来说,还必须具有读/写访问服务器的权利)。
●阅读在每一个安装类型部分结尾的适合你的操作系统类型的注意内容。
文件的许可权将在下面的每一个安装类型中被详细的论述。
注意,安装程序采用一个保守的方法更新系统DLL和ActiveX控制,这些成分只有当CD-ROM安装程序中包括的成分的版本号比目标计算机中该成分的版本号新时才能被更新。
要开始进行安装,将CD插入CD-ROM驱动器,正常情况下,安装程序将自动的启动。
如果安装程序没有自动启动,从Windows“Start”菜单中选择“Run”然后点击“Browse”,现在导航到CD-ROM驱动器,打开“disk1”文件夹并选择“Setup.exe”程序,在“Run”对话框上选择“OK”开始进行安装。
●如果你正将Hazop+软件安装到一个单独的PC或一个网络服务器,请参考“单机版/网络服务器”安装类型,Hazop+软件使用的licence系统在这两种类型的安装之间没有差别。
●如果你已经将Hazop+软件安装到你的网络服务器上并且现在正在安装一个网络用户,请参考“网络用户”安装类型。
注意,在完成安装以后,你需要参考“获得你的Hazop+ Licence”部分的内容以指导你激活Hazop+软件的所有功能。
如果你正在以一个网络服务器/用户配置安装Hazop+,在安装网络用户以前,请先安装Hazop+的网络服务器拷贝并获得该拷贝的授权。
1WindowsServer活动目录简介精品PPT课件

• 活动目录发展史
Page 4/38
活动目录架构
• 活动目录架构:用来定义数据类型、语法规则、命名约定 和其他更多的内容;它是活动目录的基本结构,是组成活 动目录的规则
• 活动目录架构中主要定义了两方面内容
• LDAP是一种访问活动目录服务的通信协议,管理员或用户 通过它查询与更新AD中的数据
• Windows Server 2003域利用“LDAP命名路径”来表示对象在 AD内的位置,利用它来访问在AD内的对象
• LDAP命名路径包含以下内容:
– 可分辨名称:即AD中的完整路径,DC表示DNS域名中的组件,即 活动目录域的DNS名称,OU为组织单位,其他的都是CN,如 CN=user1,OU=Office1,DC=Shanghai,DC=com
• 活动目录是由至少一个域所构成的集合,即域是活动目录的 分区单位
• 构建一个域环境首先需要在一台服务器上安装活动目录,而 安装了活动目录的服务器就成为域控制器(DC)
• 在Windows Server 2003活动目录中的域用三Cor角e.ed形u 表示
Page 9/38
域树的概念
• 域树:是由一组具有连续命名空间的域组成,命名空间的 命名遵循DNS域名空间结构标准
• 我们知道,域是安全的最小边界,而域树是由多个域组成 的,因此多个域之间相互访问时就需要一种信任关系
• 信任的特点
– 方向性 – 可传递性 – 自动性
域树
Page 10/38
林
• 林是一棵或多棵域树组成,每棵域树独享连续的命名空间, 即不同域树之间没有命名空间的连续性,但它们逻辑上处于 同一个林中
netdata 汉化方法

netdata 汉化方法【原创版4篇】目录(篇1)DATA 简介DATA 的作用DATA 汉化方法及工具DATA 汉化的注意事项5.结论正文(篇1)DATA 简介ETDATA 是一款功能强大的网络数据采集工具,可以实时监控网络流量,帮助用户了解网络状态,分析网络问题,优化网络性能。
它支持多种网络协议,包括 TCP/IP、UDP、ICMP 等,适用于各种规模的网络环境。
DATA 的作用ETDATA 的主要作用有以下几点:- 实时监控网络流量,显示网络带宽使用情况- 统计网络数据包,帮助用户分析网络问题- 检测网络延迟和丢包,提升网络性能- 提供多种视图,方便用户查看网络状态DATA 汉化方法及工具对于 NETDATA 的汉化,通常采用以下几个步骤:- 找到需要翻译的文本:在 NETDATA 的界面中,找到需要翻译的文本,这些文本通常是显示在界面上的提示信息、菜单、工具栏等。
- 使用翻译工具进行翻译:可以使用在线翻译工具,如 Google 翻译,将找到的文本翻译成中文。
需要注意的是,翻译工具可能无法准确翻译一些专业术语,需要人工校对。
- 更新翻译文件:将翻译好的文本替换到原来的文件中,保存文件。
这样,下次运行 NETDATA 时,界面上就会显示中文文本。
DATA 汉化的注意事项在汉化过程中,需要注意以下几点:- 保持原文本的格式:在翻译时,要尽量保持原文本的格式,以便正确显示在界面上。
- 注意专业术语的翻译:在翻译专业术语时,要尽量使用规范的中文术语,以便其他用户理解。
- 测试汉化后的软件:在完成汉化后,要运行 NETDATA,检查汉化是否成功,有无出现乱码等问题。
5.结论ETDATA 是一款实用的网络数据采集工具,通过汉化,可以让更多的中文用户方便地使用该软件。
目录(篇2)DATA 简介DATA 的汉化方法DATA 的汉化步骤DATA 的汉化工具DATA 的汉化注意事项正文(篇2)ETDATA 是一款非常实用的网络数据分析工具,能够帮助用户收集、分析和监控网络数据。
oracle ebs 应用服务器安装过程详细步骤
1、检查RapidWiz版本确实为12.1.1.13#cd /data/StageR12/startCD/Disk1/rapidwiz/./rapidwizVersion2、运行rapidwiz命令,启动安装界面3、RapidWiz欢迎界面4、该界面可选择新安装还是升级到12.1.1,此次选择安装12.1.15、该界面用于输入Oracle Support网站用户账号及密码,此次不输入跳过6、该界面可创建安装选项,还是加载已有安装选项文件,此次选新建7、该界面可选择将来ERP系统运行时用到的网络端口,Port Pool是端口偏移量。
此次选默认值08、该界面可选择安装数据库类型,例如Vision Demo演示数据库,还是Fresh空数据库;以及安装到哪个服务器的哪个目录下选择Fresh空数据库定义数据库名为TEST,更改OS User为之前创建的oratest,并设置安装的Base目录为/data/TEST9、点击上图中的Edit Paths可进入该界面,查看或更改Oracle Home或数据文件的安装目录。
此次安装没有更改10、点击Next后安装界面报错11、根据查看安装日志,发现是因为/oracle/TEST目录不存在,因此手工创建/oracle/TEST目录,并分配至oratest用户,同时chmod设置为dba组用户具备读写权限Component Licensing是按模块设置许可。
此次选后者13、该界面是选择具体模块许可。
按项目组要求及软件合同,分别对以下模块安装许可。
14、安装针对中国特有功能15、对软件添加简体中文(Simplified Chinese),考虑未来可能安装其它语种,因此更改数据库字符集(Database character set)为UTF8。
Default territory(默认地区)不要改16、该界面设置应用服务安装到哪个服务器、操作系统用户及安装目录17、点击上图中Edit Paths可查看更改应用服务组件的安装目录,此次无需更改,点击Cancel18、再次确认安装涉及的数据库服务器节点以及应用服务器界节点。
netwag使用方法 -回复

netwag使用方法-回复“Netwag使用方法”详细指南Netwag是一个用于网络管理的图形界面工具,它基于TCP/IP协议栈,并且提供了一系列用于网络配置和分析的功能。
本文将逐步介绍如何使用Netwag来进行网络管理。
第一步:安装和启动Netwag1. 在官方网站(2. 双击安装程序并按照提示完成安装过程。
3. 在安装完成后,从开始菜单或应用程序列表中找到Netwag,并双击打开。
第二步:创建一个新项目1. 在Netwag的主界面上,单击“文件”菜单,然后选择“新建”。
2. 在弹出的对话框中,输入项目的名称和描述,并选择适当的项目类型。
点击“确定”继续。
第三步:配置网络接口1. 在项目视图中,单击“网络接口”选项卡。
2. 单击“添加”按钮来添加一个新的网络接口。
3. 在弹出的对话框中,输入网络接口的名称和描述,并选择适当的接口类型。
点击“确定”继续。
第四步:配置网络地址1. 在网络接口视图中,选择一个网络接口。
2. 单击“IP地址”选项卡来配置网络地址。
3. 单击“添加”按钮来添加新的IP地址。
4. 在弹出的对话框中,输入IP地址和子网掩码,并选择适当的配置类型。
点击“确定”继续。
第五步:配置网络路由1. 在网络接口视图中,选择一个网络接口。
2. 单击“网络路由”选项卡来配置网络路由表。
3. 单击“添加”按钮来添加新的网络路由。
4. 在弹出的对话框中,输入目标网络和下一跳IP地址,并选择适当的路由类型。
点击“确定”继续。
第六步:配置网络服务1. 在项目视图中,单击“网络服务”选项卡。
2. 单击“添加”按钮来添加新的网络服务。
3. 在弹出的对话框中,输入服务的名称和描述,并选择适当的端口和协议。
点击“确定”继续。
第七步:配置网络防火墙1. 在项目视图中,单击“网络防火墙”选项卡。
2. 单击“添加”按钮来添加新的网络防火墙规则。
3. 在弹出的对话框中,选择适当的规则类型,并填写相关的防火墙规则信息。
vCenter Server 7.0 安装指南
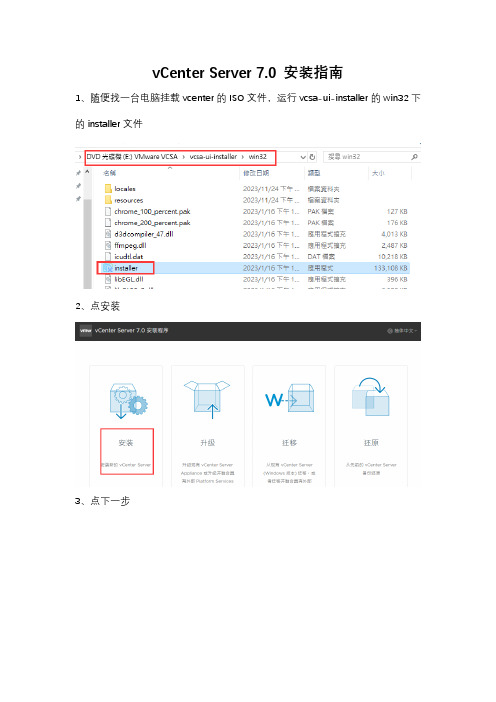
vCenter Server 7.0 安装指南
1、随便找一台电脑挂载vcenter的ISO文件,运行vcsa-ui-installer的win32下的installer文件
2、点安装
3、点下一步
4、接受许可,下一步
5、输入打算放置vcenter虚拟机的ESXi主机信息
6、不用管警告,点是
的密码
8、部署大小一般选小型可满足大部分人需求
9、选择安装在哪个存储上,注意启用磁盘精简模式
10、确认无误后点下一步
11、点完菜开始第一阶段安装
12、点继续开始第二阶段安装
13、时间同步模式,一般选禁用或与NTP服务器同步时间,SSH访问建议启用
14、这里配置的是从web登录vcenter的用户名和密码,SSO域名设置为默认的vsphere.local
15、下一步
16、确认无误后点完成
17、忽略警告,点确认
18、开始第二阶段安装
19、安装完后从浏览器访问vcenter
20、输入步骤14配置的账号和密码登录
21、默认是评估许可证,点新建许可证输入自己的许可证密钥即可
22、点鼠标右键,先建立数据中心
23、名称随意
24、建好数据中心后,如果只有一台Esxi主机,可以直接点添加主机,如果有多台Esxi主机想配置HA、DRS,先新建集群,这里选新建集群
25、新建集群时,DRS、HA、vSAN可以先默认不启用,后面根据自己需求再启用
26、在集群下添加主机
27、输入ESXi主机的IP和root密码
28、勾选后点确定
29、点下一页
30、点完成就添加好了
31、主机已添加,目前上面只有vCenter这一台虚拟机。
WES7 SP1 组件中英文对照表

Windows Embedded Standard 7 中英文对照表:Feature Packages 功能包_.NET Framework _.NET框架_.NET Framework 2.0 _.NET框架2.0_.NET Framework 2.0 Client Profile _.NET Framework 2.0的客户端配置文_.NET Framework 3.0 _.NET框架3.0_.NET Framework 3.0 Client Profile _.NET框架3.0客户端配置文件_.NET Framework 3.5 _.NET框架3.5_.NET Framework 3.5 Client Profile _.NET框架3.5客户端配置文件_Application Support _应用程序支持_COM OLE Application Support _COM OLE应用程序支持_COM+ Application Support _COM +应用支持_MSMQ _MSMQ_Win32 Application Runtimes and Libraries _Win32应用程序运行和库_Boot Environments _启动环境_Enhanced Write Filter Boot Environment _增强型写入过滤器引导环境_Windows Boot Environment _Windows引导环境_Browsers _浏览器_Internet Explorer 8_Internet Explorer 8 _IE8_ Internet Explorer 8 Browser _IE8浏览器_Internet Explorer 8 Engine and Display _IE8的引擎和显示_Internet Explorer 8 Foundation _IE 8的基础_Data Access and Storage _Data访问和存储_Windows data Access Components _Windows数据访问组件_Windows data Access Components SQL _Windows数据访问组件SQL_Data integrity _Data完整性_Shadow Copy Volume Interface _Shadow副本卷接口_Shadow Copy Volume Service _Shadow副本卷服务_Windows Backup And Restore _Windows备份和恢复_Windows Side By Side _Windows并排_Devices and Printers _设备和打印机_Device Framework _设备框架_Device User Experience _设备用户体验_Driver Frameworks _驱动框架_Fax and Scan _传真和扫描_Printing Utilities and management _打印实用程序和管理_Sensor and Location Platform _传感器和定位平台_Standard Windows USB Stack _标准Windows USB协议栈_Diagnostics _Diagnostics _Common Diagnostic Tools _常用的诊断工具_Performance Monitoring _性能监控_Problem Reports and Solutions _问题报告和解决方案_User _用户_Embedded Enabling Features _嵌入式启用特点_Edition Branding _可编辑商标_unbranded startup Screens _无商标的启动画面_Windows Embedded Standard Startup Screens _Windows嵌入式标准启动画面_Bootable Windows USB Stack _可启动的Windows USB协议栈_Custom Logon Desktup Background Images _自定义登录桌面背景图片_Dialog Box Filter _对话框过滤器_Enhanced Write Filter With HORM _增强型写入滤波器HORM_File Based Writer Filter(FBWF) _基于文件的过滤器(FBWF)_Hide Boot Screens _隐藏启动画面_Message Box Default Reply _消息框的默认回复_RAM Disk Controller _RAM磁盘控制器_Registry Filter _注册表过滤器_SD Boot _SD启动_WSDAPI for .NET _WSDAPI的.NET_Fonts _字体_Bitmap Fonts _位图字体_Simplified Chinese Fonts _简体中文字体_True Type Fonts _True Type字体_Western Fonts _西方字体_Graphics and Multimedia _图形和多媒体_Premium Codecs _高级编解码器_Microsoft AC3 Encoder _Microsoft的AC3编码器_Microsoft DTV-DVD Audio Decoder(MPEG-2,AAC)(license required) _数字电视,音频解码2,AAC许可证_Microsoft DTV-DVD Video Decoder(MPEG-2,H.264)(license required) _数字电视,视频解码2,H.264许可证_MPEG Layer-3 Audio Codes (MP3)(license required) _MPEG Layer - 3音频编码(MP3)_MPEG-2 Audio and Video Encoder(license required) _MPEG - 2音频和视频编码器(许可证)_MPEG-4 Decoders(license required) _MPEG - 4解码器(许可证)_Audio and Video Engines and Media Foundation _音频和视频引擎及媒体基础_DriectX and Windows Device Experience _DriectX和Windows设备体验_Graphics Platform _图形平台_Image Mastering API V2 _V2的图像控制API_Windows Media Player 12 _Windows媒体播放器12_International _International _IME _IME_IME Base Components _IME基本组件_IME japanese Support _IME日本的支持_IME Korean Support _IME韩国支持_IME Simplified Chinese Support _IME简体中文支持_IME Traditional Chinese Support _IME繁体中文支持_International Components and Language Services _国际组件及语言服务_Language Pack Setup _语言包安装_Internet Information Services-IIS _Internet信息服务中的IIS _IIS 7.0 _IIS 7.0_IIS 7.0 _IIS 7.0 _Windows Process Activation Service _Windows进程激活服务_Management _管理_System Management _系统管理_Group Policy Management _组策略管理_Microsoft managements Console(MMC) _Microsoft管理层控制台(MMC)_System Management Administrative Tools _系统管理系统管理工具_System Management Utilities _系统管理实用程序_Windows Management Instrumentation(WMI) _Windows管理规范(WMI)_Windows update _Windows更新_Windows Update Standalone Installer _Windows更新独立安装程序_Windows Update User Interface _Windows更新用户界面_Parental Control _家长控制_Power Management _电源管理_Windows Application Compatibility _Windows应用程序兼容性_Windows PowerShell 2.0 _Windows的PowerShell 2.0_MediaCenter _媒体中心_Media Center _媒体中心_Networking _网络_Base _基础_Extensible Authentication Protocol(EAP) _可扩展身份验证协议(EAP)_Internet Authentication Service _Internet验证服务_Networking Base _网络基础_Networking Foundation _联网基础_TelnetServer _TelnetServer _Telnet Server _Telnet服务器_BITS _BITS_Bluetooth _蓝牙_Domain Services _域服务_IRDA and UNIMODEM _红外线和调制解调器_Network Access Protection _网络访问保护_Network and Sharing Center _网络和共享中心_Network Diagnostics _网络诊断_Peer Networking _点对点网络_Quality of Service _服务质量_Remote Access Service(RAS) _远程访问服务(RAS)_Small Networking Services _小网络服务_Telephony API Client _客户电话服务接口_Windows Firewall _Windows防火墙_Wireless Networking _无线网络_Remote Connections _远程连接_Remote Desktop Connection _远程桌面连接_Security _安全_Security Credentials _安全证书_Credential Roaming Service _凭据漫游服务_Credentials and Certificate management _凭据和证书管理_Windows Authorization Manager(AZMAN) _Windows授权管理器(AZMAN)_System Security Management _系统安全管理_Windows Security Center _Windows安全中心_Active Directory Rights Management _激活目录权限管理_AntiMalware _反恶意软件_Application Security _应用安全_Bitlocker Secure Startup _Bitlocker安全启动_Encrypted File System(EFS) _文件加密系统(EFS)_Security Base _安全基地_Trusted Platform Module (TPM) Management _可信平台模块(TPM)管理_SKU Compliance _SKU Compliance _WS7C _WS7C_WS7E _WS7E_WS7P _WS7P_System Services _系统服务_File System _文件系统_Advanced File System _高级文件系统_Core File System _核心文件系统_File and Folder Synchronization _文件和文件夹同步_File Compression Utility _文件压缩工具_Remote Client _远程客户端_Simplified message Block (SMB) _简单的消息块(SMB)_Remote Procedure Call _远程过程调用_Windows Installer _Windows安装程序_User Interface _用户界面_Help _帮助_Embedded Core Help Content _嵌入式核心帮助内容_Help and Support Engine _帮助和支持引擎_Remote Assistance _远程协助_Microsoft Speech API _Microsoft语音接口_Speech and Text _语音和文本_Speech Chinese Simplified _简体中文语音_Windows Shell _Windows外壳_Accessories _附件_Application User Experience _应用程序用户体验_Shell Controls and UI Support Functions _外壳控制和用户界面支持功能_Shell Foundation _外壳基础_System Control Panel _系统控制面板_Windows Exporer Shell _Windows资源管理器壳_Windows Exporer Shell Resources _Windows资源管理器外壳资源_Accessibility _辅助功能_Command Prompt Shell With Custom Shell Support _命令提示符壳的自定义外壳支持_DVD Maker _DVD Maker_Mobility Center and SideShow _移动中心和SideShow_Natural Language 6 _自然语言6_Photo Viewer _照片查看器_Search Indexing _搜索索引_Tablet PC Support _平板电脑支持_Text Services Framework _文本服务框架_Windows Search _Windows搜索_Language Packages _语言包_en-US _en-US_English (US) Language Pack _English(US)语言包。
Novalnet 订阅模块用户指南说明书

Feringastr. 485774 UnterföhringGermanyTel: +49 89 9230683-19Fax: +49 89 9230683-11 User Guide forNovalnet Subscription ModuleTABLE OF CONTENTS1MANAGING SUBSCRIPTION (3)1.1Subscription Configuration (3)1.1.1 Additional Subscription Configuration (4)1.2Product Configuration (5)1.2.1Additional Product Configuration (6)2MANAGING RECURRING PROFILES (8)2.1Subscription profile overview (8)2.2Recurring profile overview (9)2.3Subscription Cancellation from Shop admin panel (10)2.4Subscription Cancellation from Webshop (10)2.5Pause / Reactivating subscriptions (11)3TECHNICAL SUPPORT THROUGH NOVALNET (12)1MANAGING SUBSCRIPTIONThis extension streamline product buying and selling, through subscriptions and recurring payments to develop consistent revenue yields. The shop admin can create subscription plans which vary in fee types (trial, initial, % of regular), subscription extending options and much more.The Novalnet Subscription extension for magento comes with the below features:∙Allow customers to buy one-off products and subscriptions in one mixed cart.∙Setup subscription payment for multiple products with ease.∙Configure customizable email alerts for customer and shop admin.This extension version (1.0.0) supports the following versions of Magento 2:2.3.0 - 2.4.3-p11.1Subscription ConfigurationConfigure the extension after installing the Subscription extension. Navigate to STORES → Configuration as shown belowFigure 1Navigate to Subscription → Subscription Management and configure the required additional subscription settings as shown below:Figure 21.1.1 Additional Subscription ConfigurationSupported PaymentsOne or more payment methods selected here will be displayed for subscription products purchase on the checkout page.Figure 3Display Subscription Cancellation Option for End UserChoose Yes to display cancellation option and if you allow the end user to cancel subscriptons.Figure 4Notify Subscription Cancellation to emailAn automated notification mail will be sent to the e-mail address updated there, as soon as the customer cancels the subscription.Figure 5Shipping costEnable the below option to calculate the shipping amount in every recurring order in the checkout page.Figure 6Send Subscription renewal reminder to emailBy enabling the below option, a reminder mail is sent two days prior for every recurring order.Figure 71.2Product ConfigurationTo configure subscription for products, navigate to CATALOG Products as shown belowFigure 8Click Edit to the right of each product to configure the subscription as shown belowFigure 9Then navigate to Subscription tab and configure the subscription settings for the product as shown below:Figure 10Finally, click Save to save the settings as shown belowFigure 111.2.1Additional Product ConfigurationEnable SubscriptionBy enabling this option as “Yes”, the product will become a subscription product.Figure 12Product Purchase OptionYou can choose between two options - Subscription only and Either (Single Purchase or Subscription) which are both explained below.Subscription only - This is the default setting.Select this option to sell product only as a subscription purchase.Figure 13Either (Single Purchase or Subscription) - Select this option to allow product buying as an one-time purchase or as a subscription purchase.Figure 14Note: In product detail page, the subscription plans and Single Purchase options will be displayed. if you want to place single purchase order,kindly choose Single Purchase in the product detail page.Manage Subscription IntervalThis option allows to set time period within billing occurrences for an automated recurring billing subscription. There can be several combinations of Billing Period Unit and Billing Frequency. Subscription interval comes with options like: days, weeks, months and years.Figure 15Click Add, to add different subscription intervals for the product.Initial FeeBy entering this field, the amount of the initial fee can be set. It adds a one-time fixed amount payment, which is taken upfront on subscribing to a product.Figure 16Trial Billing Period UnitChoose optional duration of time for trial billing period (Example: days). End users will not be charged for this period.Figure 17Trial Billing FrequencyEnter the length of the trial billing period you will offer (Example: 2). End users will not be charged for this period.Figure 18After configuring the product, click Save in your shop system to display the product information on your Magento product page as shown below.Figure 19Cron NoteThe shop system automatically performs the cronjob in exact time and date, for recurring orders.2MANAGING RECURRING PROFILES2.1Subscription profile overviewManage the recurring payment profiles by navigating to SALES Recurring Profiles as shown below:Figure 20Click View to the right of an order as shown belowFigure 21Click Profile Information in the menu and to view the subscription details displayed under Ordered Items as shown belowFigure 222.2Recurring profile overviewYou can view the recurring order details in Related Orders menu, as shown belowFigure 232.3Subscription Cancellation from Shop admin panelTo cancel subscription, navigate to SALES → Recurring Profiles in your shop admin panel and choose the subscription order. Next, click Cancel as shown belowFigure 24Once the subscription gets cancelled in the shop admin panel, subscription reactivation is not possible.2.4Subscription Cancellation from WebshopTo cancel subscription from webshop (front-end), navigate to My Account→My Subscriptions as shown belowFigure 25Click View to view subscription orders and click CANCEL as shown below respectively,Figure 26Figure 272.5Pause / Reactivating subscriptionsYou can pause or reactivate an existing subscription for a certain period, for example, due to the products’ unavailability. Navigate to SALES Recurring Profile and choose the subscription order.Click PAUSE for a product under Ordered Items, to change the ACTIVE status to PAUSED status.Figure 28To reactivate a subscription, click REACTIVATE for the product under Ordered Items as shown belowFigure 29Once, the subscription is reactivated you can see the updated subscription status under Status as shown belowFigure 303TECHNICAL SUPPORT THROUGH NOVALNETFor any questions or further enquiries please contact one of the following departments as per your requirement. Our in-house experts are ready to assist you in case of queries or issues.For setup assistance and any recommendation or suggestion for improvements? Kindly share your thoughts to develop our payment modules further *******************or call us at +49 89 9230683-19.For our License details, refer the URL - https:///payment-institution/。
OpenManage Integration for VMware vCenter 4.0.1 We

OpenManage Integration for VMware vCenter Version 4.0.1Web 用戶端安裝指南註、警示與警告:「註」表示可以幫助您更有效地使用產品的重要資訊。
:「警示」表示有可能會損壞硬體或導致資料遺失,並告訴您如何避免發生此類問題。
:「警告」表示可能的財產損失、人身傷害或死亡。
版權所有 © 2017 Dell Inc. 或其子公司。
版權所有,翻印必究。
Dell、EMC 與其他商標均為 Dell Inc. 或其子公司的商標。
其他商標為其各自所有者的商標。
章1: 簡介 (4)OpenManage Integration for VMware vCenter 授權 (4)購買並上傳軟體授權 (4)上傳授權後的選項 (5)強制執行 (5)重要的參考注意事項 (5)硬體需求 (6)部署模式的系統需求 (6)軟體需求 (6)連接埠資訊 (7)先決條件核對清單 (8)安裝、設定與升級 OMIVV (8)使用 vSphere Web 用戶端來部署 OMIVV OVF (9)以非管理員使用者身分登錄 vCenter 伺服器 (10)註冊 OpenManage Integration for VMware vCenter 與匯入授權檔案 (12)升級已登錄的 vCenter (15)驗證安裝 (15)將 OMIVV 從現有版本升級至最新版本 (15)從 3.x 移轉到 4.0.1 (16)取消註冊舊版 OMIVV 後復原 OMIVV (17)章2: VMware vCenter 的裝置組態 (18)透過組態精靈執行的組態工作 (18)檢視組態精靈歡迎對話方塊 (18)選取 vCenter (18)建立連線設定檔 (19)排程清查工作 (20)執行保固擷取工作 (21)設定事件與警報 (21)透過「設定」標籤進行的設定工作 (21)裝置設定 (22)vCenter 設定 (23)建立機箱設定檔 (24)章3: 從 Dell EMC 支援網站存取文件 (26)章4: 相關說明文件 (27)目錄31簡介本指南可逐步指示您在 Dell PowerEdge 伺服器上安裝與設定 OpenManage Integration for VMware vCenter (OMIVV)。
Netra Blade X3-2B(Sun Netra X6270 M3 Blade)安装指南说明书
Netra Blade X3-2B(以前称为Sun Netra X6270M3Blade)-适用于VMware ESXi 安装指南文件号码E37796–012012年9月版权所有©2012,Oracle和/或其附属公司。
保留所有权利。
本软件和相关文档是根据许可证协议提供的,该许可证协议中规定了关于使用和公开本软件和相关文档的各种限制,并受知识产权法的保护。
除非在许可证协议中明确许可或适用法律明确授权,否则不得以任何形式、任何方式使用、拷贝、复制、翻译、广播、修改、授权、传播、分发、展示、执行、发布或显示本软件和相关文档的任何部分。
除非法律要求实现互操作,否则严禁对本软件进行逆向工程设计、反汇编或反编译。
此文档所含信息可能随时被修改,恕不另行通知,我们不保证该信息没有错误。
如果贵方发现任何问题,请书面通知我们。
如果将本软件或相关文档交付给美国政府,或者交付给以美国政府名义获得许可证的任何机构,必须符合以下规定:ERNMENT END USERS:Oracle programs,including any operating system,integrated software,any programs installed on the hardware,and/or documentation,delivered to ernment end users are"commercial computer software"pursuant to the applicable Federal Acquisition Regulation and agency-specific supplemental regulations.As such,use,duplication,disclosure,modification,and adaptation of the programs,including any operating system, integrated software,any programs installed on the hardware,and/or documentation,shall be subject to license terms and license restrictions applicable to the programs.No other rights are granted to the ernment.本软件或硬件是为了在各种信息管理应用领域内的一般使用而开发的。
netdata汉化方法
netdata汉化方法Netdata是一个开源的实时性能监控工具,允许用户在Web界面上查看服务器和应用程序的实时性能数据。
虽然Netdata本身不提供官方的汉化版本,但用户可以通过对配置文件进行修改来实现汉化。
本文将介绍汉化Netdata的具体步骤。
2.找到配置文件:安装完成后,您需要找到Netdata的配置文件。
在大多数Linux发行版上,配置文件位于"/etc/netdata/netdata.conf"。
3.备份配置文件:在修改任何配置文件之前,强烈建议您首先创建一个原始文件的备份。
这样,在出现问题时,您可以恢复到原来的状态。
可以使用以下命令来创建备份文件:```sudo cp /etc/netdata/netdata.conf/etc/netdata/netdata.conf.bak```4.打开配置文件:```sudo nano /etc/netdata/netdata.conf```5.修改配置文件:在打开的配置文件中,查找语言设置的部分。
默认情况下,该部分应如下所示:```# The language of the netdata web GUI# This option accepts four options: auto, none, en_US.UTF-8 and the name of a language# e.g.: English - en_US.UTF-8, Spanish - es_ES.UTF-8, etc# If set to auto, then the language is selected by your browser settings.# If set to none, then the language is English.# If an invalid value is set, English is used.#;# language = auto```。
网维菜单安装方法简介

网维菜单安装方法简介
1、在服务器上面打开“网维菜单服务端.exe”,按默认进行安装(默认是安装到I:\iCafe8目录下面)。
2、安装完成之后,打开在“开始--程序--网维菜单--网维控制台程序”,会弹出如下图所示界面,直接点击“登陆”即可。
3、登陆之后会弹出“网维网吧管理软件”并弹出“授权信息”界面,如下图所示:
在此对话框中输入申请网吧ID和密码,然后再点击“设置”按钮,提示验证成功之后这个窗口会自动消失。
4、添加客户机到默认分组。
如下组图所示:
注:上图中的编号范围根据实际机器编号范围填写;IP地址定义里要根据网吧机器的起始IP和结束IP来填写(不要完全按照图里的来填写)。
5、运行“资源包.exe”,按默认进行安装即可。
6、运行“客户端.exe”,按默认进行安装,安装的时候会弹出一个配置文件界面,将“ServIP=”后面的IP改成这台机的IP,并保存退出。
注:如果不小心关闭了配置文件窗口请打开“G:\NBMSClient\iCafe8.ini”进行更改IP。
- 1、下载文档前请自行甄别文档内容的完整性,平台不提供额外的编辑、内容补充、找答案等附加服务。
- 2、"仅部分预览"的文档,不可在线预览部分如存在完整性等问题,可反馈申请退款(可完整预览的文档不适用该条件!)。
- 3、如文档侵犯您的权益,请联系客服反馈,我们会尽快为您处理(人工客服工作时间:9:00-18:30)。
&产品目录2 0 1 2近年来,人们的工作生活与通信、信息的关系日益紧密,信息化社会在改变我们生活方式与工作习惯的同时,也对传统的住宅提出了挑战。
随着经济快速发展、生活水平日益提高,人们对住宅功能的要求也越来越高,小区智能化带来的多元化信息和安全、舒适与便利的生活环境已成为现代家庭追求的理想目标。
如今,智慧家居正逐渐平民化、普遍化,并以大众化的价格在向我们走来。
智能家居系统利用家庭内部的电器、智慧电气控制中心、宽带网络等设备,通过综合布线,将电、水、气等设备连成一体,并与外部互联网相连,从而达到自主控制、管理,并实现如家庭防盗、报警、通过互联网遥控家电等强大的功能的现代化家居集成系统。
智能家居的基本目标,就是为人们提供一个舒适、安全、方便和高效率的生活环境,提供一种富有人性化的服务。
为此大洋通信推出了自己家居智慧控制网络技术,ZigBee无线家庭智能化系统是基于ZigBee无线通信技术构建的的家庭控制网络。
那么,什么是ZigBee?ZigBee是一种短距离、低功耗的无线通信技术。
这一名称来源于蜜蜂的八字舞。
其特点是近距离、低复杂度、低功耗、低数据速率、低成本。
主要适合用于自动控制和远程控制领域,可以嵌入各种设备。
它是一种介于无线标记技术和蓝牙之间的技术提案。
主要用于近距离无线连接。
它依据802.15.4标准,在数千个微小的传感器之间相互协调实现通信。
这些传感器只需要很少的能量,以接力的方式通过无线电波将数据从一个传感器传到另一个传感器,所以它们的通信效率非常高。
简而言之,ZigBee就是一种相对便宜的,低功耗的近距离无线组网通讯技术。
ZigBee Home Automation *注意:若无特别说明,本目录中凡符合ZigBee协议的产品,其通道容量默认值为7。
大洋通信有限公司开发的ZigBee 智能家居能为您做些什么呢?在家居内任何位置灵活处理照明设备,冷暖空调系统;自动化控制多种家居系统以改善管理,方便及安全;改善用能源的消耗;安装,升格和接驳家居控制系统亦无需更改装修或重新布线;由一个遥控,便可配置及运作多重系统;简易地安装无线感应器以监察各位置的情况变化;察觉到不平常的情况时,能自动接收到预警通知;设备弱电警告;定期检测设备是不是存在网络,故障或脱网,并传送及显示异常讯息;开关设备目前状态(ON or OFF),将本地讯息经其它媒介(internet, mobile phone service)传送到远程;从远程经其它媒介(internet, mobile phone service)控制本地设备。
系统可以提供的主要功能包括:1234……………………………………………………………………………………………………………….低功耗弹性距离无线控制控制灯光开关,市电插座,音响,影视,空调及甚至电饭煲!! ... 等等高容量可采用星状、片状和网状网络结构, 同时主节点还可由上一层网络节点管理,最多可组成65000 个节点的大网。
…………………………………………………………………………………….……….....……………………………………………………….….…………………………………………………….……………………………………..8大理由选择ZIGBEE ® 智能家居系统可依据需求决定传输距离。
相邻节点间传输范围一般介于10~100 m 之间,在增加RF 发射功率后,亦可增加到1000m。
如果通过路由和节点间通信的接力,传输距离将可以更远。
在低耗电待机模式下,2 节5 号干电池可支持1个节点工作6~24个月,甚至更长。
这是ZigBee的突出优势。
相比较, 蓝牙能工作数周、WiFi可工作数小时。
5互联网连接您可在世界任何地方控制及监察您的系统………………………………….…….……….本系统全部采用ZigBee智能家居协议兼容设备,用户可以根据自己的情况选择所需的模块,就像是度身定做的一样。
6扩展性强………..…….………………….…..7时间制功能为电器设定最佳的使用时间,以达致节能、节省金钱及保安的效果…………….……..8改装简单容易安装,简单的连接和直接替换你现有的照明开关和市电插座大洋通信ZigBee 无线智能家居系统简单示意图ZigBee 与ZigBee PRO2007年,新规格「ZigBee PRO 」制订完成。
与以往的ZigBee 相比,ZigBee PRO 提供更多的优点,包括更有效率的网络传输路径、最佳化的地址搜寻功能、同步广播通讯功能、通讯质量管理功能以及数据分割传送等一系列灵活丰富的网络管理功能。
全新ZigBee Pro 规范构建于ZigBee 之上,不但提供了增强型功能,而且在某些网络条件下还具有向后兼容性。
ZigBee 特性集提供了树寻址、AODV 网状路由、单播、广播和群组通信、以及安全等特性。
相比之下,ZigBee PRO 用随机寻址取代了树寻址;其虽然包括了ZigBee 规范中所使用的相同的AODV 路由,但是却提供了多对一源路由备选方案。
ZigBee PRO 还增加了有限的广播寻址功能,并增加了对“高级”安全性的支持功能。
ZigBee 和ZigBee PRO 特性集均对可选频率捷变和拆分提供了更多的支持。
大洋通信的所有ZigBee 产品都采用了最新的ZigBee PRO 技术,为用户提供更具竞争力的解决方案。
ZIGBEE ® 智能家居系统破碎探测ZigBee网关烟感,煤气感应窗磁红外光感开关应急按钮阀门开关警报器电话机ZigBee 遥控器墙面开关目录Z501A/B/C 四键简易遥控器26Z503多功能遥控器27Z508 家居信息显示屏28ZB01A/B/C 红外动作感应器07ZB01D 红外动作感应器08Z302A 窗磁感应器09Z302B 灯控光感器10Z302C 窗戶感应器11Z302D 紧急报警器12Z302E 物品标签13Z302G 光线感应器14Z302H ZigBee 调光器15Z306 跌倒感应器16Z307 跌倒感应器套件17ZA01A/02E 烟雾探测器18ZA01B/C/D 可燃气体探测器19ZA10 智能阀门开关20Z601A/B 警报器21Z711/712/713 温湿度感应器29Z716A/B 温湿度感应器30Z725A/R 高功率戶外感应器31Z100 RF 模组52Z100A RF 模组53Z100ED RF 模组54Z110P RF 模组55Z103A/B USB 接口模组56Z201 ZigBee 网络协调器57Z202 Internet 通信网关58Z202C ZigBee 网关协调器59Z210 ZigBee 红外线控制器60ZL01A Rs232 适配器61ZL01B Rs485 适配器62ZL01C 乙太網适配器63ZL01D GPIO 适配器64ZL01E USB 适配器65手机控制程序iPhone AP 66网络控制中心ZiG-BUTLER 67ZigBee 定位与跟踪系统68ZigBee 环境监测系统71Netvox ZBHA API 75ZigBee 的其它應用領域76ZB02A/B/C 墙面开关22ZB02E 门铃23ZC06 可调光LED 灯管24ZD01A/B 幕帘控制器25Z800 电流检测插座32Z800R 网络中继器33Z801Rx/Tx 开关控制器34Z801TxB 传感信号模块35Z801WLS 水浸传感器36Z802 开关控制模块37Z803 电流检测排插38Z805 开关控制模块39Z806 开关控制单元40Z808A 电流检测插座41Z808B 调光插座42Z810B 电能监测开关43Z811 开关控制模块44Z812A 开关控制模块45Z815I/J/K 墙面开关46Z815L/M 墙面调光开关47Z816A/B/F/G 墙插48Z817A 吸顶开关模块49ZB01A/B/CZB01红外动作感应器主要特点ZB01是一款集合了ZigBee 无线技术的红外动作感应器,通过红外感应房间内人的动作,同时还能感应室内温度。
当安防系统预位时,ZB01还可作为入侵检测设备,能够探测到房间内的非法闯入。
ZB01A 为红外探测器。
当检测到红外线时,会向安防管理中心发送信息,可作为安防设备使用;ZB01B 为无线路灯控制器。
在环境光线不足的情况下,当有人接近,ZB01会控制与其绑定的灯设备,使其亮30秒,为行人提供照明。
ZB01C 除同时具备ZB01A 和ZB01B 功能之外,还具备温度测量的功能,可每个30秒向绑定设备发送当前环境温度。
• ZigBee 设备类型:IAS Zone / On Off Light Switch /Temperature Sensor • 与CIE 报警设备配合使用• 兼容ZigBee 智能家居协议• 两种电源可供选择:12V 直流或CR123A 电池• 宽角度探测• 感应室内温度工作电源:两节3V CR123A 电池或12V 直流探测类型:动作探测发送电流:38mA 接受电流:38mA 探测方式:被动红外探测区域:半径6m,130°安装高度: 2.5m 初始化时间:30”通信距离:50m 工作温度:-10~50℃工作湿度:最大95%RH技术参数ZB01A 红外探测器ZB01B 路灯控制器ZB01C红外探测+路灯控制+温度探测产品型号ZB01DZB01D 红外动作感应器主要特点ZB01是一款集合了ZigBee 无线技术的红外动作感应器,通过红外感应房间内人的动作,并将探测到状态回报给绑定的目标设备。
在红外实时探测状态下,如果有人或动物等生命体在监测区内活动,ZB01D 可探测到红外信号,并将该状态信息报告给指定设备,用户可根据回报状态设置不同的状态执行不同的指令或场景。
• ZigBee 设备类型:Occupancy Sensor • 兼容ZigBee 智能家居协议• 两种电源可供选择:12V 直流或CR123A 电池• 宽角度探测工作电源:两节3V CR123A 电池或12V 直流探测类型:动作探测发送电流:38mA 接受电流:38mA 探测方式:被动红外探测区域:半径6m,130°安装高度: 2.5m 初始化时间:30”通信距离:50m 工作温度:-10~50℃工作湿度:最大95%RH产品尺寸:80mm ×60mm ×34mm技术参数Z302A窗磁感应器Z302A 无线窗磁感应器Z302A 是基于ZigBee Pro 标准设计的无线窗磁传感器。
它的本体与门磁的磁铁部分别安装在门或窗户的缝隙的两边,当门或窗被打开,它将发出报警信息给安防中心。
Z302A 具有安装简便,超低功耗等特点,无需任何布线,并配备了最新的节电技术,所需电量只需一颗纽扣电池即可提供,并可持续工作两年。
