云南大学java程序Lab5
lab5
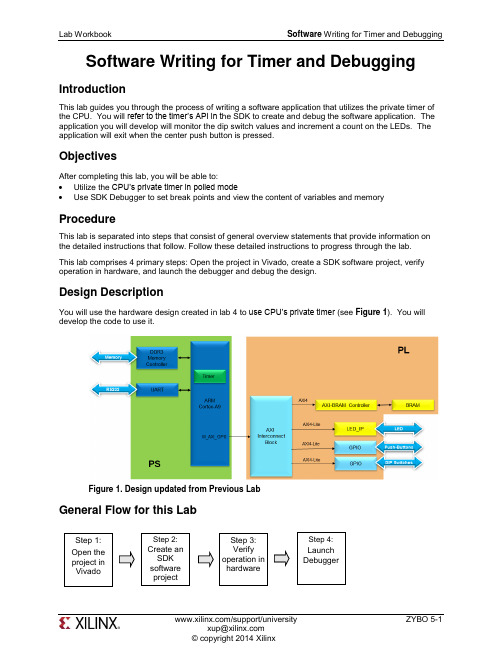
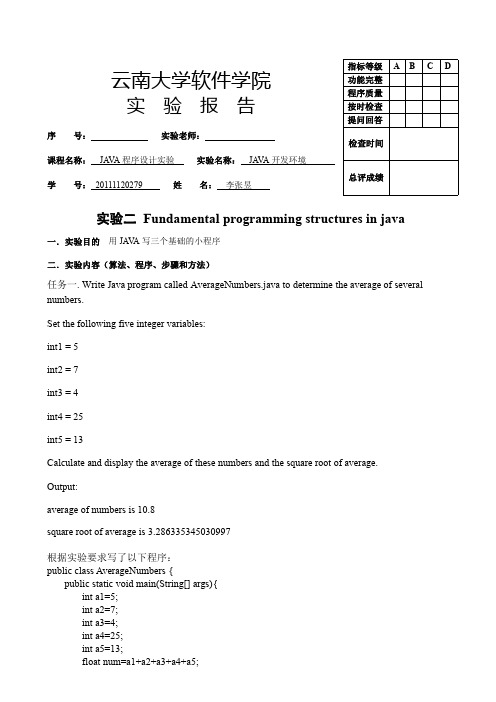
Software Writing for Timer and DebuggingIntroductionThis lab guides you through the process of writing a software application that utilizes the private timer of the CPU. You will refer to the timer’s API in t he SDK to create and debug the software application. The application you will develop will monitor the dip switch values and increment a count on the LEDs. The application will exit when the center push button is pressed.ObjectivesAfter completing this lab, you will be able to:∙ Utilize the CPU’s private timer in polled mode∙ Use SDK Debugger to set break points and view the content of variables and memoryProcedureThis lab is separated into steps that consist of general overview statements that provide information on the detailed instructions that follow. Follow these detailed instructions to progress through the lab. This lab comprises 4 primary steps: Open the project in Vivado, create a SDK software project, verify operation in hardware, and launch the debugger and debug the design.Design DescriptionYou will use the hardware design created in lab 4 to use CPU’s private timer (see Figure 1). You will develop the code to use it.Figure 1. Design updated from Previous LabGeneral Flow for this LabStep 1: Open theproject in VivadoStep 2: Create an SDKsoftware project Step 3: Verify operation in hardware Step 4: Launch DebuggerOpen the Project in Vivado Step 1 e the lab4 project from the last lab or, use the lab4 from the labsolution directory, and save it as lab5. Open the project in Vivado and then export to SDK.1-1-1.If you wish to continue using the design that you created in the previous lab, open the lab4 project from the previous lab, or open the lab4 project in the labsolution directory, and Save it as lab5 to the labs/ directorySince we will be using the private timer of the CPU, which is always present, we d on’t need tomodify the hardware design.1-1-2.Open the Block Design and notice that the status changes to synthesis and implementation out-of-date. Since the bitstream is already generated and will be in the exported directory, we cansafely ignore the warning.unch SDK by selecting File > Export > Export Hardware for SDK in Vivado1-1-4.Check the Launch SDK box only and click OK.You may see the following message when SDK opens. Ignore this warning.Create an SDK Software Project Step 2 2-1.Create a new empty application project called lab5 utilizing already existing standalone_bsp_0 software platform. Import the lab5.c source file.2-1-1.In the Project Explorer in SDK, right click on lab4 and select Close Project2-1-2.Select File > New > Application Project. the project lab5, and for the board Support Package, select Use Existing (standalone_bsp) and click Next.2-1-4.Select Empty Application and click Finish.2-1-5.Select lab5 > src in the project explorer, right-click, and select Import.2-1-6.Expand General category and double-click on File System.2-1-7.Browse to c:\xup\embedded\sources\lab5 folder, select lab5.c and click OK, and then click Finish.You will notice that there are multiple compilation errors. This is expected as the code isincomplete. You will complete the code in this lab.2-2.Refer to the Scutimer API documentation.2-2-1.Select the system.mss tab (if it is not open, open it from standalone > system.mss)2-2-2.Click on Documentation link corresponding to scutimer (ps7_scutimer) peripheral under the Peripheral Drivers section to open the documentation in a default browser window.2-2-3.Click on the Files link to see available files related to the private timer API.2-2-4.Click on the xscutimer.h link to see various functions and data structures available in the API.Look at the XScuTimer_LookupConfig( ) and XScuTimer_CfgInitialize( ) API functions which must be called before the timer functionality can be accessed.Look at various functions available to interact with the timer hardware, includingFigure 2. Useful Functions2-3.Correct the errors.2-3-1.In SDK, in the Problems tab, double-click on the first red unknown type name x for the parse error. This will open the source file and bring you around to the error place.Figure 3. First error2-3-2.Add the include file for the XScuTimer.h. Save the file and the errors should disappear.2-3-3.Scroll down the file and notice that there are few lines intentionally left blank with some guiding comments.Figure 4. Fill in Missing Codeing the API functions list, fill those lines. Save the file and correct errors if any.2-3-5.Scroll down the file further and notice that there are few more lines intentionally left blank with some guiding comments.Figure 5. More Code to be completeding the API functions list, complete those lines. Save the file and correct errors if necessary.Figure 6. Portions of the completed CodeVerify Operation in Hardware Step 3 3-1.Make sure that the JP7 is set to select USB power. Connect the board witha micro-usb cable and power it ON. Establish the serial communicationusing SDK’s Terminal tab.3-1-1.Make sure that the JP7 is set to select USB power.3-1-2.Make sure that a micro-USB cable is connected to the JTAG PROG connector (next to the power supply connector). Turn ON the power.3-1-3.Select the tab. If it is not visible then select Window > Show view > Terminal.3-1-4.Click on and if required, select appropriate COM port (depends on your computer), and configure it with the parameters as shown. (These settings may have been saved from previous lab).3-2.Program the FPGA by selecting Xilinx Tools > Program FPGA and assigning system_wrapper.bit file. Run the TestApp application and verify the functionality.3-2-1.Select Xilinx Tools > Program FPGA.3-2-2.Click on the Search button of the Bitstream field, select system_wrapper.bit, and click OK.3-2-3.Click the Program button to program the FPGA.3-2-4.Select lab5 in Project Explorer, right-click and select Run As > Launch on Hardware (GDB) to download the application, execute ps7_init, and execute lab5.elfDepending on the switch settings you will see LEDs counting with corresponding delay.Flip the DIP switches and verify that the LEDs light with corresponding delay according to theswitch settings. Also notice in the Terminal window, the previous and current switch settings are displayed whenever you flip switches.Figure 7. Terminal window outputLaunch Debugger Step 4 unch Debugger and debug4-1-1.Right-click on the Lab5 project in the Project Explorer view and select Debug As > Launch on Hardware (GDB).The lab5.elf file will be downloaded and if prompted, click Yes to stop the current execution of the program.4-1-2.Click Yes if prompted to change to the Debug perspective.At this point you could have added global variables by right clicking in the Variables tab andselecting Add Global Variables … All global variables would have been displayed and you could have selected desired variables. Since we do not have any global variables, we won’t do it.4-1-3.Double-click in the left margin to set a breakpoint on various lines in lab5.c shown below. A breakpoint has been set when a “tick” and blue circle appear in the left margin beside the linewhen the breakpoint was set.The first breakpoint is where count is initialized to 0. The second breakpoint is to catch if thetimer initialization fails. The third breakpoint is when the program is about to read the dip switch settings. The fourth breakpoint is when the program is about to terminate due to pressing ofcenter push button. The fifth breakpoint is when the timer has expired and about to write to LED.Figure 8. Setting breakpoints4-1-4.Click on the Resume () button to continue executing the program up until the first breakpoint is reached.In the Variables tab you will notice that the count variable may have value other than 0.4-1-5.Click on the Step Over () button or press F6 to execute one statement. As you do step over, you will notice that the count variable value changed to 0.4-1-6.Click on the Resume button again and you will see that several lines of the code are executed and the execution is suspended at the third breakpoint. The second breakpoint is skipped. This is due to successful timer initialization.4-1-7.Click on the Step Over button to execute one statement. As you do step over, you will notice that the dip_check_prev variable value changed to a value depending on the switch settings on your board.4-1-8.Click on the memory tab. If you do not see it, go to Window > Show View > Memory.4-1-9.Click the sign to add a Memory MonitorFigure 9. Monitor memory location4-1-10.Enter the address for the private counter load register (0xF8F00600), and click OK.Figure 10. Monitoring a Memory AddressYou can find the address by looking at the xparameters.h file entry to get the base address(), and find the load offset double-clicking on the xscutimer.h in the outline window followed by double-clicking on the xscutimer_hw.h and then selectingXSCUTIMER_LOAD_OFFSET.Figure 71. Memory Offset4-1-11.Click on the Step Over button to execute one statement which will load the timer register.Notice that the address 0xF8F00604 has become red colored as the content has changed. Verify that the content is same as the value: dip_check_prev*325000000. Y ou will see hexadecimalequivalent (displaying bytes in the order 0 -> 3).E.g. for dip_check_prev = 1; the value is 0x13D92D40; (reversed: 0x402DD913)4-1-12.Click on the Resume button to continue execution of the program. It will stop at the writing to the LED port (skipping fourth breakpoint as center push button as has not occurred).Notice that the value of the counter register is changed from the previous one as the timer wasstarted and the countdown had begun.4-1-13.Click on the Step Over button to execute one statement which will write to the LED port and which should turn OFF the LEDs as the count=0.4-1-14.Double-click on the fifth breakpoint, the one that writes to the LED port, so the program can execute freely.4-1-15.Click on the Resume button to continue execution of the program. This time it will continuously run the program changing LED lit pattern at the switch setting rate.4-1-16.Flip the switches to change the delay and observe the effect.4-1-17.Press center push button and observe that the program suspends at the fourth breakpoint. The timer register content as well as the control register (offset 0x08) is red as the counter value had changed and the control register value changed due to timer stop function call. (In the Memorymonitor, you may need to right click on the address that is being monitored and click Reset torefresh the memory view.)4-1-18.Terminate the session by clicking on the Terminate () button.4-1-19.Exit the SDK and Vivado.4-1-20.Power OFF the board.ConclusionThis lab led you through d eveloping software that utilized CPU’s private timer. You studied the API documentation, used the appropriate function calls and achieved the desired functionality. You verified the functionality in hardware. Additionally, you used the SDK debugger to view the content of variables and memory, and stepped through various part of the code.。
《Java语言程序设计》上机实验指导手册
《Java语⾔程序设计》上机实验指导⼿册《Java语⾔程序设计》上机实验指导⼿册实验⼀ Java环境演练【⽬的】①安装并配置Java运⾏开发环境;②掌握开发Java应⽤程序的3个步骤:编写源⽂件、编译源⽂件和运⾏应⽤程序;③学习同时编译多个Java源⽂件。
【内容】1.⼀个简单的应⽤程序实验要求:编写⼀个简单的Java应⽤程序,该程序在命令⾏窗⼝输出两⾏⽂字:“你好,很⾼兴学习Java”和“We are students”。
程序运⾏效果⽰例:程序运⾏效果如下图所⽰:程序模板:Hello.javapublic class Hello{public static void main (String args[ ]){【代码1】//命令⾏窗⼝输出"你好,很⾼兴学习Java"A a=new A();a.fA();}}class A{void fA(){【代码2】//命令⾏窗⼝输出"We are students"}}实验后的练习:3.编译器怎样提⽰将System写成system这⼀错误?4.编译器怎样提⽰将String写成string这⼀错误?2.联合编译实验要求:编写4个源⽂件:Hello.java、A.java、B.java和C.java,每个源⽂件只有⼀个类,Hello.java是⼀个应⽤程序(含有main⽅法),使⽤了A、B和C类。
将4个源⽂件保存到同⼀⽬录中,例如:C:\100,然后编译Hello.java。
程序模板:模板1:Hello.javapublic class MainClass{public static void main (String args[ ]){【代码1】 //命令⾏窗⼝输出"你好,只需编译我"A a=new A();a.fA();B b=new B();b.fB();}}模板2 :A.javapublic class A{void fA(){【代码2】 //命令⾏窗⼝输出"I am A"}}模板3 :B.javapublic class B{void fB(){【代码3】 //命令⾏窗⼝输出"I am B"}public class C{void fC(){【代码4】 //命令⾏窗⼝输出"I am C"}}实验后的练习:5.将Hello.java编译通过后,不断修改A.java源⽂件中的代码,⽐如,在命令⾏窗⼝输出“我是A类”或“我被修改了”。
云南大学-软件学院--汇编实验5
实验五 80x86分支,循环,子程序,宏程序设计姓名:学号:序号:班级:分数:1.编写设计一个2,10,16进制的码制转换程序,要求:①程序有友好的运行界面;②输入任意类型进制的数据,转换为其余两种进制类型;③要求程序有方便的输入输出功能;④要求程序能够处理基本的错误信息;⑤程序的基本结构采用子程序结构;源程序:.8086.model small.datastr db 0ah,0dh,'please input 1 to 8 to choise the function',0ah,0dhdb '1.btd',0ah,0dhdb '2.bth',0ah,0dhdb '3.dth',0ah,0dhdb '4.dtb',0ah,0dhdb '5.htb',0ah,0dhdb '6.htd',0ah,0dhdb '7.again',0ah,0dhdb '8.end',0ah,0dh,'$'b db 'Please input a Binary number',0ah,0dh,'$'d db 'Please input a decimal number',0ah,0dh,'$'h db 'Please input a Hexadecimal number',0ah,0dh,'$'agai db 'Please input again',0ah,0dh,'$'wr db 'A wrong number!',0ah,0dh,'$'num db 6,?,6 dup (?)num1 db 16,?,16 dup (?).codestart:mov ax,@datamov ds,axchoice:lea dx,strmov ah,9int 21hmov ah,1int 21hjmp C1mov ah,2int 21hmov dl,0dhmov ah,2int 21hjmp choiceMo: mov dx,offset agai mov ah,9int 21hjmp choiceC1: cmp al,'1'jnz C2call btdjmp againC2: cmp al,'2'jnz C3call bthjmp againC3: cmp al,'3'jnz C4call dthjmp againC4: cmp al,'4'jnz C5call dtbjmp againC5: cmp al,'5'jnz C6call htbjmp againC6: cmp al,'6'jnz C7call htdjmp againC7: cmp al,'7'jnz C8jmp Mojnz wrongen: mov ah,4chint 21hwrong:lea dx,wrmov ah,9int 21hjmp Mobtd procmov dx,offset bmov ah,9int 21hmov dx,offset num1mov ah,0ahint 21hmov dl,0ahmov ah,2int 21hmov dl,0dhmov ah,2int 21hmov di,offset num1mov ch,[di+1]zq2: mov dl,[di+2]cmp dl,39hjg zqsub dl,30hjmp zq1zq: sub dl,37hzq1: mov dh,0or bx,dxcmp ch,1jz zq3rol bx,1zq3: inc didec chjnz zq2jj1: cmp bx,10000 jc jjsub bx,10000inc sijmp jj1jj: mov dx,siand dx,0fhadd dl,30hmov ah,2int 21hxor si,siL1: cmp bx,1000jc L2sub bx,1000inc sijmp L1L2: mov dx,siand dx,0fhadd dl,30hmov ah,2int 21hxor si,siL3: cmp bx,100jc L4sub bx,100inc sijmp L3L4: mov dx,siand dx,0fhadd dl,30hmov ah,2int 21hxor si,siL5: cmp bx,10jc L6sub bx,10inc sijmp L5L6: mov dx,simov ah,2int 21hxor dx,dxmov dx,bxand dx,0fhadd dl,30hmov ah,2int 21hretbtd endpbth procmov dx,offset bmov ah,9int 21hmov dx,offset num1mov ah,0ahint 21hmov dl,0ahmov ah,2int 21hmov dl,0dhmov ah,2int 21hmov di,offset num1mov ch,[di+1]K1: mov al,[di+2]sub al,30hor bl,alrol bx,1inc didec chjnz K1ror bx,1mov ch,4mov cl,4K4: rol bx,clmov dl,bland dl,0fhadd dl,30hjmp K3K2: add dl,37hK3: mov ah,2int 21hdec chjnz K4retbth endpdth proclea dx,dmov ah,9int 21hmov dx,offset nummov ah,0ahint 21hmov dl,0ahmov ah,2int 21hmov dl,0dhmov ah,2int 21hmov di,offset nummov cl,[di+1]add di,2mov dl,[di]sub dl,30hmov al,10mul dlmov ch,0dec cxI: inc dimov dl,[di]sub dl,30hmov dh,0add ax,dxcmp cx,1jz I1mov bx,axI1: loop Imov bx,axmov si,offset nummov ch,[si+1]inc chinc chmov cl,4O: rol bx,clmov dl,bland dl,0fhcmp dl,9jg MMadd dl,30hjmp PPMM: add dl,37h PP: mov ah,2int 21hdec chjnz Oretdth endpdtb proclea dx,dmov ah,9int 21hmov dx,offset nummov ah,0ahint 21hmov dl,0ahmov ah,2int 21hmov dl,0dhmov ah,2int 21hmov di,offset nummov cl,[di+1]add di,2mov al,10mul dlmov ch,0dec cxc: inc dimov dl,[di]sub dl,30hmov dh,0add ax,dxcmp cx,1jz ccmov bx,10mul bxmov bx,axcc: dec cxjnz cmov bx,axmov cx,16x: rol bx,1mov dl,bland dl,01hadd dl,30hmov ah,2int 21hloop xretdtb endphtb procmov dx,offset hmov ah,9int 21hmov dx,offset nummov ah,0ahint 21hmov dl,0ahmov ah,2int 21hmov dl,0dhmov ah,2int 21hmov ch,[di+1]Z1: mov bl,[di+2]cmp bl,39hjg ZZsub bl,30hjmp ZXZZ: sub bl,37hZX: mov cl,4mov bh,4shl bl,clZ: rol bl,1mov dl,bland dl,01hadd dl,30hY: mov ah,2int 21hdec bhjnz Zinc didec chjnz Z1rethtb endphtd procmov dx,offset hmov ah,9int 21hmov dx,offset nummov ah,0ahint 21hmov dl,0ahmov ah,2int 21hmov dl,0dhmov ah,2int 21hmov di,offset nummov ch,[di+1]u2: mov dl,[di+2]sub dl,30hjmp u1u: sub dl,37h u1: mov dh,0or bx,dxcmp ch,1jz Rmov cl,4rol bx,cl R: inc didec chjnz u2xor si,sis1: cmp bx,1000jc s2sub bx,1000inc sijmp s1s2: mov dx,siand dx,0fhadd dl,30hmov ah,2int 21hxor si,sis3: cmp bx,100jc s4sub bx,100inc sijmp L3xor si,sis4: cmp bx,10jc s5sub bx,10inc sijmp s3s5: mov dx,siand dx,0fhadd dl,30hmov ah,2int 21hmov dx,bxand dx,0fhadd dl,30hmov ah,2int 21hrethtd endpend start实验结果:。
云大JAVA实验10Lab #10(陆歌浩)
云南大学软件学院实验报告课程:Java程序设计实验学期:2012-2013学年第一学期任课教师:陆歌浩专业:软件工程学号:序号:姓名:成绩:实验10 事件处理一、实验目的练习Java中事件处理的应用。
二、实验内容Program 1Create an application ChangeBallColor that displays a panel. This panel will contain two buttons (one for red and one for blue). It will also display a filled in circle. When the user clicks on a button, the circle should change to that color. So, if a user clicks the blue button, the circle will change to blue. Similarly, if a user clicks the red button, the circle will turn to red.实验代码:package b10;import java.awt.*;import javax.swing.*;import java.awt.event.*;import java.awt.geom.*;public class ChangeBallColor {public static void main(String[] args) {EventQueue.invokeLater(new Runnable(){public void run(){ChangeColorFrame frame = new ChangeColorFrame();frame.setDefaultCloseOperation(JFrame.EXIT_ON_CLOSE);frame.setVisible(true);}});}}class ChangeColorFrame extends JFrame{public ChangeColorFrame(){setTitle("孙金文-20101120007");setSize(DEFAULT_WIDTH, DEFAULT_HEIGHT);setLocation(450,250);drawball = new DrawBall();drawball.setColor(Color.BLUE);JPanel northPanel = new JPanel();blueButton = new JButton();redButton = new JButton();blueButton.setText("变蓝");blueButton.setForeground(Color.YELLOW);blueButton.setBackground(Color.BLUE);redButton.setText("变红");redButton.setForeground(Color.YELLOW);redButton.setBackground(Color.RED);northPanel.add(blueButton);northPanel.add(redButton);add(northPanel,BorderLayout.NORTH);add(drawball);blueButton.addActionListener(new ActionListener() {public void actionPerformed(ActionEvent evt) {drawball.setColor(Color.BLUE);drawball.repaint();}});redButton.addActionListener(new ActionListener() {public void actionPerformed(ActionEvent evt) {drawball.setColor(Color.RED);drawball.repaint();}});}private DrawBall drawball;private JButton blueButton;private JButton redButton;private static final int DEFAULT_WIDTH = 400;private static final int DEFAULT_HEIGHT = 300;}class DrawBall extends JPanel{Color color = null;public void setColor(Color c){this.color = c;}public void paintComponent(Graphics g){Graphics2D g2 = (Graphics2D)g;super.paintComponent(g);Ellipse2D circle = new Ellipse2D.Double();circle.setFrameFromCenter(BALL_X, BALL_Y,BALL_X+RADIUS,BALL_Y+RADIUS);g2.setPaint(color);g2.fill(circle);g2.draw(circle);}public static final int BALL_X=190,BALL_Y = 100,RADIUS = 80;}运行截图:。
《Java程序设计》教材第五章练习题答案
习题一、选择题1. 面向对象程序设计的基本特征是(BCD)。
(多选)A.抽象B.封装C.继承D.多态2.下面关于类的说法正确的是(ACD)。
(多选)A.类是Java 语言中的一种复合数据类型。
B.类中包含数据变量和方法。
C.类是对所有具有一定共性的对象的抽象。
D.Java 语言的类只支持单继承。
上机指导1.设计银行项目中的注册银行用户基本信息的类,包括账户卡号、姓名、身份证号、联系电话、家庭住址。
要求是一个标准Java类(数据私有,提供seter/getter),然后提供一个toString方法打印该银行用户的信息。
答:源代码请参见“CH05_LAB\src\com\inspur\ch05\BankUser.java”2.设计银行项目中的帐户信息,包括帐户卡号、密码、存款,要求如“练习题1”。
答:源代码请参见“CH05_LAB\src\com\inspur\ch05\Account.java”3.设计银行项目中的管理员类,包括用户名和密码。
要求如“练习题1”。
答:源代码请参见“CH05_LAB\src\com\inspur\ch05\Manager.java”4.创建一个Rectangle类。
添加两个属性width、height,分别表示宽度和高度,添加计算矩形的周长和面积的方法。
测试输出一个矩形的周长和面积。
答:源代码请参见“CH05_LAB\src\com\inspur\ch05\Rectangle.java”5.猜数字游戏:一个类A有一个成员变量v,有一个初值100。
定义一个类,对A类的成员变量v进行猜。
如果大了则提示大了,小了则提示小了。
等于则提示猜测成功。
答:源代码请参见“CH05_LAB\src\com\inspur\ch05\Guess.java”6.编写一个Java程序,模拟一个简单的计算器。
定义名为Computer的类,其中两个整型数据成员num1和num1,编写构造方法,赋予num1和num2初始值,再为该类定义加、减、乘、除等公有方法,分别对两个成员变量执行加减乘除的运算。
云南大学软件学院数据结构实验报告五

云南大学软件学院数据结构实验报告(本实验项目方案受“教育部人才培养模式创新实验区(X3108005)”项目资助)实验难度: A □ B □学期:2012秋季学期任课教师:实验题目: 树及其应用小组长:联系电话:完成提交时间:2012年12月10日云南大学软件学院2012学年秋季学期《数据结构实验》成绩考核表学号: 20111120 姓名:本人承担角色:小组长综合得分:(满分100分)指导教师:年月日(注:此表在难度为C时使用,每个成员一份。
)云南大学软件学院2012学年秋季学期《数据结构实验》成绩考核表学号: 20111120 姓名:人承担角色:组员综合得分:(满分100分)指导教师:年月日(注:此表在难度为C时使用,每个成员一份。
)一、【实验构思(Conceive)】(10%)(本部分应包括:描述实验实现的基本思路,包括所用到的离散数学、工程数学、程序设计、算法等相关知识)本实验要求设计一个哈夫曼编码译码器,要求通过统计一段电文中的各字符频率编写哈夫曼码并进行翻译。
首先要解决如何进行哈夫曼编码,然后设计对电文进行编码,最后还有有译码过程。
本程序使用二叉树进行哈夫曼编码,使用文本文档保存电文处理。
利用程序设计的相关知识:贯彻设计程序所必需的五大步骤,目标分析->设计算法->程序编写->后期调试->售后服务的流程完成这个项目。
利用算法设计相关知识:该算法具有有穷性、确定性、可行性、有0个或多个输入、有一个或多个输出、正确性、可读性、健壮性的特性。
离散数学相关知识:正确合理使用与或非之间的关系,进行程序分支判断,保证程序正常进行,以及二叉树的使用。
二、【实验设计(Design)】(20%)本次实验使用C进行编写,自定义函数7个:void SortHufmtree(hufmtree *tree){//将哈夫曼树n个叶子结点由大到小排序Codetype* HuffmanCode(hufmtree *tree){//哈弗曼编码的生成hufmtree* BuildHuffmanTree(hufmtree *tree){//构建叶子结点已初始化的哈夫曼树hufmtree* CreateHuffmanTreeFromSourceFile(){//通过解析源文件建立哈夫曼树hufmtree* Encoding(hufmtree *tree){//对源文件进行编码并保存hufmtree* Decoding(hufmtree *tree)//对存有编码的源文件进行译码并保存主函数为功能选择界面三、【实现描述(Implement)】(30%)主函数显示开始界面,选择相应的功能进行哈夫曼编码译码。
云大设计模式实验6 命令模式
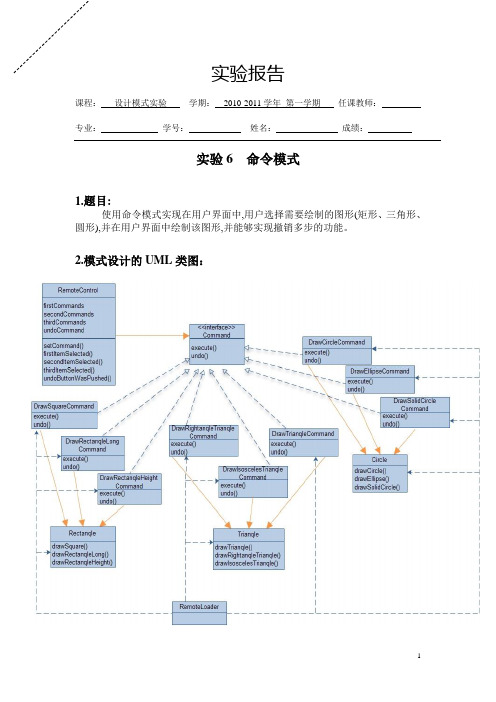
实验报告课程:设计模式实验学期:2010-2011学年第一学期任课教师:专业:学号:姓名:成绩:实验6 命令模式1.题目:使用命令模式实现在用户界面中,用户选择需要绘制的图形(矩形、三角形、圆形),并在用户界面中绘制该图形,并能够实现撤销多步的功能。
2.模式设计的UML类图:3.程序源代码:(1)命令接口Command.java:public interface Command{public void execute();public void undo();}public class NoCommand implements Command{public void execute(){}public void undo() {}}(2)绘制图形的各个类:import java.awt.*;import java.awt.geom.*;import javax.swing.*;public class DrawSquare extends JPanel{private static DrawSquare panel=new DrawSquare();public static DrawSquare getJPanel(){ return panel; }public void paintComponent(Graphics g){Graphics2D g2 = (Graphics2D)g;super.paintComponent(g);double rectX =130;double rectY = 40; //设置坐标的初始值double width = 100;double height = 100;Rectangle2D rect = newRectangle2D.Double(rectX,rectY,width,height);g2.draw(rect);}}public class DrawRectanqleLong extends JPanel{private static DrawRectanqleLong panel=new DrawRectanqleLong();public static DrawRectanqleLong getJPanel(){ return panel; }public void paintComponent(Graphics g){Graphics2D g2 = (Graphics2D)g;super.paintComponent(g);double rectX = 110;double rectY = 40; //设置坐标的初始值double width = 150;double height = 100;Rectangle2D rect = newRectangle2D.Double(rectX,rectY,width,height);g2.draw(rect);}}public class DrawRectanqleHeight extends JPanel{private static DrawRectanqleHeight panel=new DrawRectanqleHeight();public static DrawRectanqleHeight getJPanel(){ return panel; }public void paintComponent(Graphics g){Graphics2D g2 = (Graphics2D)g;super.paintComponent(g);double rectX = 135;double rectY = 30; //设置坐标的初始值double width = 85;double height = 130;Rectangle2D rect = newRectangle2D.Double(rectX,rectY,width,height);g2.draw(rect);} }public class DrawTrianqle extends JPanel{private static DrawTrianqle panel=new DrawTrianqle();public static DrawTrianqle getJPanel(){ return panel; }public void paintComponent(Graphics g){Graphics2D g2 = (Graphics2D)g;super.paintComponent(g);double point1X =180;double point1Y = 40; //设置坐标的初始值double point2X =130;double point2Y = 120;double point3X =210;double point3Y = 150;Line2D line1 = newLine2D.Double(point1X,point1Y,point2X,point2Y);Line2D line2 = newLine2D.Double(point1X,point1Y,point3X,point3Y);Line2D line3 = newLine2D.Double(point2X,point2Y,point3X,point3Y);g2.draw(line1); g2.draw(line2); g2.draw(line3);}}public class DrawRightanqleTrianqle extends JPanel{private static DrawRightanqleTrianqle panel=new DrawRightanqleTrianqle();public static DrawRightanqleTrianqle getJPanel(){ return panel; }public void paintComponent(Graphics g){Graphics2D g2 = (Graphics2D)g;super.paintComponent(g);double point1X =180;double point1Y = 20; //设置坐标的初始值double point2X =130;double point2Y = 150;double point3X =230;double point3Y = 150;Line2D line1 = newLine2D.Double(point1X,point1Y,point2X,point2Y);Line2D line2 = newLine2D.Double(point1X,point1Y,point3X,point3Y);Line2D line3 = newLine2D.Double(point2X,point2Y,point3X,point3Y);g2.draw(line1); g2.draw(line2); g2.draw(line3);}}public class DrawIsoscelesTrianqle extends JPanel{private static DrawIsoscelesTrianqle panel=new DrawIsoscelesTrianqle();public static DrawIsoscelesTrianqle getJPanel(){ return panel; }public void paintComponent(Graphics g){Graphics2D g2 = (Graphics2D)g;super.paintComponent(g);double point1X =150;double point1Y = 20; //设置坐标的初始值double point2X =150;double point2Y = 150;double point3X =250;double point3Y = 150;Line2D line1 = newLine2D.Double(point1X,point1Y,point2X,point2Y);Line2D line2 = newLine2D.Double(point1X,point1Y,point3X,point3Y);Line2D line3 = newLine2D.Double(point2X,point2Y,point3X,point3Y);g2.draw(line1); g2.draw(line2); g2.draw(line3);}}public class DrawCircle extends JPanel{private static DrawCircle panel=new DrawCircle();public static DrawCircle getJPanel(){ return panel; }public void paintComponent(Graphics g){Graphics2D g2 = (Graphics2D)g;super.paintComponent(g);double circleX = 180;double circleY = 90;double radius = 50; //设置坐标的初始值Ellipse2D circle = new Ellipse2D.Double();circle.setFrameFromCenter(circleX,circleY,circleX+radius,circleY+radius);g2.draw(circle); //画圆}}public class DrawEllipse extends JPanel{private static DrawEllipse panel=new DrawEllipse();public static DrawEllipse getJPanel(){ return panel; }public void paintComponent(Graphics g){Graphics2D g2 = (Graphics2D)g;super.paintComponent(g);double ellipseX = 115;double ellipseY = 30; //设置坐标的初始值double width = 150;double height = 100;Rectangle2D rect = newRectangle2D.Double(ellipseX,ellipseY,width,height);Ellipse2D ellipse = new Ellipse2D.Double();ellipse.setFrame(rect);g2.draw(ellipse);}}public class DrawSolidCircle extends JPanel{private static DrawSolidCircle panel=new DrawSolidCircle();public static DrawSolidCircle getJPanel(){ return panel; }public void paintComponent(Graphics g){Graphics2D g2 = (Graphics2D)g;super.paintComponent(g);double circleX = 180;double circleY = 90;double radius = 50; //设置坐标的初始值Ellipse2D circle = new Ellipse2D.Double();circle.setFrameFromCenter(circleX,circleY,circleX+radius,circleY+radius);g2.setPaint(Color.BLUE); //设置圆的颜色g2.fill(circle);g2.draw(circle); //画圆}}(3)实现各种命令的类:public class DrawSquareCommand implements Command{DrawSquare drawSquare;public DrawSquareCommand(DrawSquare drawSquare){ this.drawSquare = drawSquare; }public void execute(){drawSquare.setVisible(true);DrawFrame.getJFrame().add(drawSquare);}public void undo(){drawSquare.setVisible(true);DrawFrame.getJFrame().add(drawSquare);} }public class DrawRectanqleLongCommand implements Command{DrawRectanqleLong drawRectanqleLong;public DrawRectanqleLongCommand(DrawRectanqleLongdrawRectanqleLong){ this.drawRectanqleLong = drawRectanqleLong; }public void execute(){drawRectanqleLong.setVisible(true);DrawFrame.getJFrame().add(drawRectanqleLong);}public void undo(){drawRectanqleLong.setVisible(true);DrawFrame.getJFrame().add(drawRectanqleLong);} }public class DrawRectanqleHeightCommand implements Command{DrawRectanqleHeight drawRectanqleHeight;public DrawRectanqleHeightCommand(DrawRectanqleHeightdrawRectanqleHeight) { this.drawRectanqleHeight = drawRectanqleHeight; }public void execute(){drawRectanqleHeight.setVisible(true);DrawFrame.getJFrame().add(drawRectanqleHeight);}public void undo(){drawRectanqleHeight.setVisible(true);DrawFrame.getJFrame().add(drawRectanqleHeight);} }public class DrawTrianqleCommand implements Command{DrawTrianqle drawTrianqle;public DrawTrianqleCommand(DrawTrianqle drawTrianqle){ this.drawTrianqle = drawTrianqle; }public void execute(){drawTrianqle.setVisible(true);DrawFrame.getJFrame().add(drawTrianqle);}public void undo(){drawTrianqle.setVisible(true);DrawFrame.getJFrame().add(drawTrianqle);} }public class DrawRightanqleTrianqleCommand implements Command {DrawRightanqleTrianqle drawRightanqleTrianqle;public DrawRightanqleTrianqleCommand(DrawRightanqleTrianqledrawRightanqleTrianqle) { this.drawRightanqleTrianqle = drawRightanqleTrianqle; } public void execute(){drawRightanqleTrianqle.setVisible(true);DrawFrame.getJFrame().add(drawRightanqleTrianqle);}public void undo(){drawRightanqleTrianqle.setVisible(true);DrawFrame.getJFrame().add(drawRightanqleTrianqle);} }public class DrawIsoscelesTrianqleCommand implements Command {DrawIsoscelesTrianqle drawIsoscelesTrianqle;public DrawIsoscelesTrianqleCommand(DrawIsoscelesTrianqledrawIsoscelesTrianqle) { this.drawIsoscelesTrianqle = drawIsoscelesTrianqle; } public void execute(){drawIsoscelesTrianqle.setVisible(true);DrawFrame.getJFrame().add(drawIsoscelesTrianqle);}public void undo(){drawIsoscelesTrianqle.setVisible(true);DrawFrame.getJFrame().add(drawIsoscelesTrianqle);} }public class DrawCircleCommand implements Command{DrawCircle drawCircle;public DrawCircleCommand(DrawCircle drawCircle){ this.drawCircle = drawCircle; }public void execute(){drawCircle.setVisible(true);DrawFrame.getJFrame().add(drawCircle);}public void undo(){drawCircle.setVisible(true);DrawFrame.getJFrame().add(drawCircle);} }public class DrawEllipseCommand implements Command{DrawEllipse drawEllipse;public DrawEllipseCommand(DrawEllipse drawEllipse){this.drawEllipse = drawEllipse;}public void execute(){drawEllipse.setVisible(true);DrawFrame.getJFrame().add(drawEllipse);}public void undo(){drawEllipse.setVisible(true);DrawFrame.getJFrame().add(drawEllipse);} }public class DrawSolidCircleCommand implements Command{DrawSolidCircle drawSolidCircle;public DrawSolidCircleCommand(DrawSolidCircle drawSolidCircle) { this.drawSolidCircle = drawSolidCircle; }public void execute(){drawSolidCircle.setVisible(true);DrawFrame.getJFrame().add(drawSolidCircle);}public void undo(){drawSolidCircle.setVisible(true);DrawFrame.getJFrame().add(drawSolidCircle);} }(4)遥控控制类RemoteContro.java:import java.util.ArrayList;public class RemoteControl{Command[] firstCommands;Command[] secondCommands;Command[] thirdCommands;ArrayList<Command> undoCommand =new ArrayList();Command noCommand=new NoCommand();public RemoteControl(){firstCommands = new Command[3];secondCommands = new Command[3];thirdCommands = new Command[3];for(int i=0;i<3;i++){firstCommands[i] = noCommand;secondCommands[i] = noCommand;thirdCommands[i] = noCommand;}}public void setCommand(int slot,Command firstCommand,CommandsecondCommand,Command thirdCommand) {firstCommands[slot] = firstCommand;secondCommands[slot] = secondCommand;thirdCommands[slot] = thirdCommand;}public void firstItemSelected(int slot){firstCommands[slot].execute();undoCommand.add(firstCommands[slot]);}public void secondItemSelected(int slot){secondCommands[slot].execute();undoCommand.add(secondCommands[slot]);}public void thirdItemSelected(int slot){thirdCommands[slot].execute();undoCommand.add(thirdCommands[slot]);}public void undoButtonWasPushed(){if(undoCommand.size()>1){undoCommand.get(undoCommand.size()-1).undo();undoCommand.remove(undoCommand.size()-1);}elseSystem.out.println("Here is end, you can't undo");}}(5)用户界面类DrawFrame.java:import java.awt.*;import javax.swing.*;import java.awt.event.*;public class DrawFrame extends JFrame{private static DrawFrame frame = new DrawFrame();public static DrawFrame getJFrame(){ return frame; }public DrawFrame() {super("XXXXX");setSize(DEFAULT_WIDTH, DEFAULT_HEIGHT);setDefaultCloseOperation(javax.swing.WindowConstants.EXIT_ON_CLOSE);initComponents();}private void initComponents() {remoteControl.setCommand(0, square, rectanqleLong, rectanqleHeight);remoteControl.setCommand(1, trianql, rightTrianqle, isoscelesTrianqle);remoteControl.setCommand(2, circl, ellipse, solidCircle);northPanel = new JPanel();southPanel = new JPanel();nullJPanel = new JPanel();JLabel rectanqleLabel = new JLabel("矩形 ",SwingConstants.LEFT);JLabel trianqleLabel = new JLabel("三角形",SwingConstants.CENTER);JLabel circleLabel = new JLabel("圆形",SwingConstants.RIGHT);rectanqleBox = new JComboBox();trianqleBox = new JComboBox();circleBox = new JComboBox();undoButton = new JButton("撤销");rectanqleBox.addItem(""); rectanqleBox.addItem("正方形");rectanqleBox.addItem("长方形(长>宽)");rectanqleBox.addItem("长方形(长<宽)");trianqleBox.addItem("");trianqleBox.addItem("一般三角形");trianqleBox.addItem("直角三角形");trianqleBox.addItem("等腰三角形");circleBox.addItem("");circleBox.addItem("一般圆");circleBox.addItem("椭圆");circleBox.addItem("实心圆");northPanel.setLayout(new GridLayout(2,3));northPanel.add(rectanqleLabel);northPanel.add(trianqleLabel);northPanel.add(circleLabel); northPanel.add(rectanqleBox);northPanel.add(trianqleBox); northPanel.add(circleBox);southPanel.add(undoButton);add(northPanel,BorderLayout.NORTH);add(southPanel,BorderLayout.SOUTH);add(nullJPanel);rectanqleBox.addActionListener(new ActionListener() //事件处理{public void actionPerformed(ActionEvent event){if(((String)rectanqleBox.getSelectedItem()).equals("正方形")){nullJPanel.setVisible(false);DrawSquare.getJPanel().setVisible(false);DrawRectanqleLong.getJPanel().setVisible(false);DrawRectanqleHeight.getJPanel().setVisible(false);DrawTrianqle.getJPanel().setVisible(false);DrawRightanqleTrianqle.getJPanel().setVisible(false);DrawIsoscelesTrianqle.getJPanel().setVisible(false);DrawCircle.getJPanel().setVisible(false);DrawEllipse.getJPanel().setVisible(false);DrawSolidCircle.getJPanel().setVisible(false);remoteControl.firstItemSelected(0);}else if(((String)rectanqleBox.getSelectedItem()).equals("长方形(长>宽)")){ nullJPanel.setVisible(false);DrawSquare.getJPanel().setVisible(false);DrawRectanqleLong.getJPanel().setVisible(false);DrawRectanqleHeight.getJPanel().setVisible(false);DrawTrianqle.getJPanel().setVisible(false);DrawRightanqleTrianqle.getJPanel().setVisible(false);DrawIsoscelesTrianqle.getJPanel().setVisible(false);DrawCircle.getJPanel().setVisible(false);DrawEllipse.getJPanel().setVisible(false);DrawSolidCircle.getJPanel().setVisible(false);remoteControl.secondItemSelected(0);}else if(((String)rectanqleBox.getSelectedItem()).equals("长方形(长<宽)")){ nullJPanel.setVisible(false);DrawSquare.getJPanel().setVisible(false);DrawRectanqleLong.getJPanel().setVisible(false);DrawRectanqleHeight.getJPanel().setVisible(false);DrawTrianqle.getJPanel().setVisible(false);DrawRightanqleTrianqle.getJPanel().setVisible(false);DrawIsoscelesTrianqle.getJPanel().setVisible(false);DrawCircle.getJPanel().setVisible(false);DrawEllipse.getJPanel().setVisible(false);DrawSolidCircle.getJPanel().setVisible(false);remoteControl.thirdItemSelected(0);} }});trianqleBox.addActionListener(new ActionListener() //事件处理{public void actionPerformed(ActionEvent event){if(((String)trianqleBox.getSelectedItem()).equals("一般三角形")) {DrawSquare.getJPanel().setVisible(false);DrawRectanqleLong.getJPanel().setVisible(false);DrawRectanqleHeight.getJPanel().setVisible(false);DrawTrianqle.getJPanel().setVisible(false);DrawRightanqleTrianqle.getJPanel().setVisible(false);DrawIsoscelesTrianqle.getJPanel().setVisible(false);DrawCircle.getJPanel().setVisible(false);DrawEllipse.getJPanel().setVisible(false);DrawSolidCircle.getJPanel().setVisible(false);remoteControl.firstItemSelected(1);}else if(((String)trianqleBox.getSelectedItem()).equals("直角三角形")){ nullJPanel.setVisible(false);DrawSquare.getJPanel().setVisible(false);DrawRectanqleLong.getJPanel().setVisible(false);DrawRectanqleHeight.getJPanel().setVisible(false);DrawTrianqle.getJPanel().setVisible(false);DrawRightanqleTrianqle.getJPanel().setVisible(false);DrawIsoscelesTrianqle.getJPanel().setVisible(false);DrawCircle.getJPanel().setVisible(false);DrawEllipse.getJPanel().setVisible(false);DrawSolidCircle.getJPanel().setVisible(false);remoteControl.secondItemSelected(1);}else if(((String)trianqleBox.getSelectedItem()).equals("等腰三角形")){ nullJPanel.setVisible(false);DrawSquare.getJPanel().setVisible(false);DrawRectanqleLong.getJPanel().setVisible(false);DrawRectanqleHeight.getJPanel().setVisible(false);DrawTrianqle.getJPanel().setVisible(false);DrawRightanqleTrianqle.getJPanel().setVisible(false);DrawIsoscelesTrianqle.getJPanel().setVisible(false);DrawCircle.getJPanel().setVisible(false);DrawEllipse.getJPanel().setVisible(false);DrawSolidCircle.getJPanel().setVisible(false);remoteControl.thirdItemSelected(1);} }});circleBox.addActionListener(new ActionListener() //事件处理{public void actionPerformed(ActionEvent event){if(((String)circleBox.getSelectedItem()).equals("一般圆")){nullJPanel.setVisible(false);DrawSquare.getJPanel().setVisible(false);DrawRectanqleLong.getJPanel().setVisible(false);DrawRectanqleHeight.getJPanel().setVisible(false);DrawTrianqle.getJPanel().setVisible(false);DrawRightanqleTrianqle.getJPanel().setVisible(false);DrawIsoscelesTrianqle.getJPanel().setVisible(false);DrawCircle.getJPanel().setVisible(false);DrawEllipse.getJPanel().setVisible(false);DrawSolidCircle.getJPanel().setVisible(false);remoteControl.firstItemSelected(2);}else if(((String)circleBox.getSelectedItem()).equals("椭圆")){DrawSquare.getJPanel().setVisible(false);DrawRectanqleLong.getJPanel().setVisible(false);DrawRectanqleHeight.getJPanel().setVisible(false);DrawTrianqle.getJPanel().setVisible(false);DrawRightanqleTrianqle.getJPanel().setVisible(false);DrawIsoscelesTrianqle.getJPanel().setVisible(false);DrawCircle.getJPanel().setVisible(false);DrawEllipse.getJPanel().setVisible(false);DrawSolidCircle.getJPanel().setVisible(false);remoteControl.secondItemSelected(2);}else if(((String)circleBox.getSelectedItem()).equals("实心圆")){ nullJPanel.setVisible(false);DrawSquare.getJPanel().setVisible(false);DrawRectanqleLong.getJPanel().setVisible(false);DrawRectanqleHeight.getJPanel().setVisible(false);DrawTrianqle.getJPanel().setVisible(false);DrawRightanqleTrianqle.getJPanel().setVisible(false);DrawIsoscelesTrianqle.getJPanel().setVisible(false);DrawCircle.getJPanel().setVisible(false);DrawEllipse.getJPanel().setVisible(false);DrawSolidCircle.getJPanel().setVisible(false);remoteControl.thirdItemSelected(2);} } });undoButton.addActionListener(new ActionListener() {public void actionPerformed(ActionEvent evt) {nullJPanel.setVisible(false);DrawSquare.getJPanel().setVisible(false);DrawRectanqleLong.getJPanel().setVisible(false);DrawRectanqleHeight.getJPanel().setVisible(false);DrawTrianqle.getJPanel().setVisible(false);DrawRightanqleTrianqle.getJPanel().setVisible(false);DrawIsoscelesTrianqle.getJPanel().setVisible(false);DrawCircle.getJPanel().setVisible(false);DrawEllipse.getJPanel().setVisible(false);DrawSolidCircle.getJPanel().setVisible(false);remoteControl.undoButtonWasPushed();} }); }RemoteControl remoteControl = new RemoteControl();DrawSquareCommand square = new DrawSquareCommand(DrawSquare.getJPanel());DrawRectanqleLongCommand rectanqleLong = newDrawRectanqleLongCommand(DrawRectanqleLong.getJPanel());DrawRectanqleHeightCommand rectanqleHeight = newDrawRectanqleHeightCommand(DrawRectanqleHeight.getJPanel());DrawTrianqleCommand trianql = newDrawTrianqleCommand(DrawTrianqle.getJPanel());DrawRightanqleTrianqleCommand rightTrianqle = newDrawRightanqleTrianqleCommand(DrawRightanqleTrianqle.getJPanel());DrawIsoscelesTrianqleCommand isoscelesTrianqle = newDrawIsoscelesTrianqleCommand(DrawIsoscelesTrianqle.getJPanel());DrawCircleCommand circl = new DrawCircleCommand(DrawCircle.getJPanel()); DrawEllipseCommand ellipse = new DrawEllipseCommand(DrawEllipse.getJPanel());DrawSolidCircleCommand solidCircle = newDrawSolidCircleCommand(DrawSolidCircle.getJPanel());private JPanel northPanel;private JPanel southPanel;private JPanel nullJPanel;private JComboBox rectanqleBox;private JComboBox trianqleBox;private JComboBox circleBox;private JButton undoButton;private static final int DEFAULT_WIDTH = 400;private static final int DEFAULT_HEIGHT = 300;}(6)遥控器类RemoteLoader.java:import javax.swing.JFrame;public class RemoteLoader {public static void main(String[] args) {DrawFrame.getJFrame().setDefaultCloseOperation(JFrame.EXIT_ ON_CLOSE);DrawFrame.getJFrame().setVisible(true);} }。
云南大学JAVA程序设计实验三
实验报告序号:实验老师:陆歌皓课程名称:JA V A程序设计实验实验名称:JA V A开发环境学号:20111120279 姓名:李张昱实验三Fundamental programming structures in java:Control Flow, Big Numbers, Arrays and Vectors一.实验目的练习java基本编程结构,包括字符串、输入输出控制流。
二.实验内容(算法、程序、步骤和方法)任务一. Write a Java program called AverageNumbers2.java that calculates the average of numbers 1 to 50 using the for loop. Do it again using the while loop.Output:average of numbers is 25.5根据实验要求写了以下程序:public class AverageNumbers2{public static void main(String[] args){float sum=0;for(int i=1;i<=50;i++)sum+=i;float average=sum/50;System.out.println("average of numbers 1 to 50 is "+average);}}任务二.Write a Java program called InputParms.java that accepts 3 arguments in the main method using an array. Iterate through the array looking for your name using a for loop. Display the message "The name <your name> was found" if your name is found.For example, using the following commandJava InputParms I am MichaelOutput:The name Michael was found.根据实验要求写了以下程序:import java.util.Scanner;public class InputParms {public static void main(String[] args){Scanner in = new Scanner(System.in);System.out.println("you can input 3 number of name at will");int a=3;String[] name=new String[a];for(int i=0;i<a;i++){System.out.println("please input number of "+(i+1)+" name:");name[i]=in.next();}System.out.println("please input your name:");String myname=in.next();for(int k=0;k<a;k++)if(name[k].equals(myname)){System.out.println("The name "+name[k]+" was found");}}}任务三.Write a Java program called BreakLoop.java that uses a for loop with the variable "count" and count 1 to 10.. Display "count=<count>" each time you loop through. Break out of the loop at 5. At the end of the program display "Broke out of the loop at count = 5".Output:count = 1count = 2count = 3count = 4Broke out of the loop at count = 5根据实验要求写了以下程序:public class BreakLoop {public static void main(String[] args){int i=1;for(i=1;i<=10;i++){if(i==5)break;System.out.println("count="+i);}System.out.println("Broke out of the loop at count = "+i);}}任务四.Write a Java program called ContinueLoop.java that uses a for loop with the variable "count" and count 1 to 10.. Display "count=<count>" each time you loop through. Skip the display statement using the continue statement if count = 5. At the end of the program display "Used continue to skip printing 5".Output:count = 1count = 2count = 3count = 4count = 6count = 7count = 8count = 9count = 10Used continue statement to skip printing 5根据实验要求写了以下程序:public class ContinueLoop {public static void main(String[] args){for(int i=1;i<=10;i++){if(i==5)continue;System.out.println("count="+i);}System.out.println("Used continue to skip printing 5");}}三.数据记录和计算任务一运行结果:任务二运行结果:任务三运行结果:任务四运行结果:四.结论break 跳出语句块,执行下面的语句。
lab5-网络攻防基本步骤
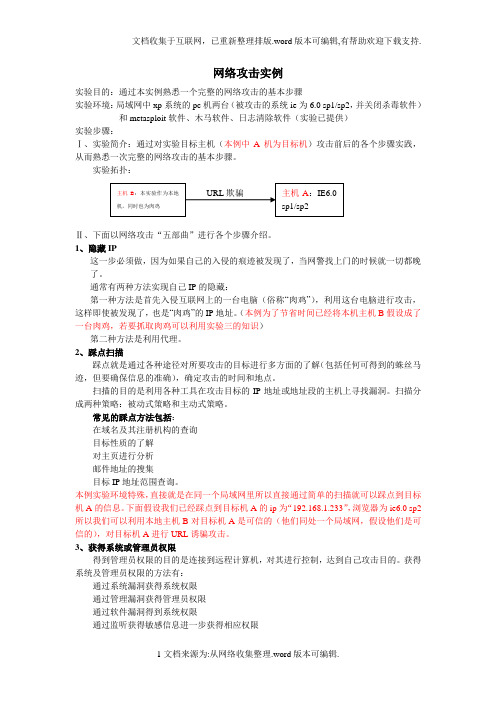
网络攻击实例实验目的:通过本实例熟悉一个完整的网络攻击的基本步骤实验环境:局域网中xp系统的pc机两台(被攻击的系统ie为6.0 sp1/sp2,并关闭杀毒软件)和metasploit软件、木马软件、日志清除软件(实验已提供)实验步骤:Ⅰ、实验简介:通过对实验目标主机(本例中A机为目标机)攻击前后的各个步骤实践,从而熟悉一次完整的网络攻击的基本步骤。
实验拓扑:Ⅱ、下面以网络攻击“五部曲”进行各个步骤介绍。
1、隐藏IP这一步必须做,因为如果自己的入侵的痕迹被发现了,当网警找上门的时候就一切都晚了。
通常有两种方法实现自己IP的隐藏:第一种方法是首先入侵互联网上的一台电脑(俗称“肉鸡”),利用这台电脑进行攻击,这样即使被发现了,也是“肉鸡”的IP地址。
(本例为了节省时间已经将本机主机B假设成了一台肉鸡,若要抓取肉鸡可以利用实验三的知识)第二种方法是利用代理。
2、踩点扫描踩点就是通过各种途径对所要攻击的目标进行多方面的了解(包括任何可得到的蛛丝马迹,但要确保信息的准确),确定攻击的时间和地点。
扫描的目的是利用各种工具在攻击目标的IP地址或地址段的主机上寻找漏洞。
扫描分成两种策略:被动式策略和主动式策略。
常见的踩点方法包括:在域名及其注册机构的查询目标性质的了解对主页进行分析邮件地址的搜集目标IP地址范围查询。
本例实验环境特殊,直接就是在同一个局域网里所以直接通过简单的扫描就可以踩点到目标机A的信息。
下面假设我们已经踩点到目标机A的ip为“192.168.1.233”,浏览器为ie6.0 sp2 所以我们可以利用本地主机B对目标机A是可信的(他们同处一个局域网,假设他们是可信的),对目标机A进行URL诱骗攻击。
3、获得系统或管理员权限得到管理员权限的目的是连接到远程计算机,对其进行控制,达到自己攻击目的。
获得系统及管理员权限的方法有:通过系统漏洞获得系统权限通过管理漏洞获得管理员权限通过软件漏洞得到系统权限通过监听获得敏感信息进一步获得相应权限通过弱口令获得远程管理员的用户密码通过穷举法获得远程管理员的用户密码通过攻破与目标机有信任关系另一台机器进而得到目标机的控制权通过欺骗获得权限以及其他有效的方法。
lab5-控制流结构程序(2)

expr ……
expr2
…… break; …...
假(0)
真(非0)
真(非0)
break;
……
假(0) expr3
相关知识点
continue语句 p163 功能:结束本次循环,跳过循环体中 一部分尚未执行的语句,进行下一次 是否执行循环体的判断 仅用于循环语句中
相关知识点
for expr1 expr2 …… 假(0) …… continue; …... 真(非0) while 假(0)
6学时 实验5报告提交时间:
实验项目性质
验证性
实验内容
编程调试典型程序
实验步骤—1.计算最大公约数和最小公倍数
编写一个程序,输入两个正整数m和n,求其 最大公约数和最小公倍数
屏幕提示用户输入两个正整数 输出这两个整数的最大公约数和最小公倍数
实验步骤—2.水仙花数
打印出所有的“水仙花数”,所谓“水仙花数” 是指一个三位数,其各位数字立方和等于该数 本身。 如:153=13+53+33
do
真(非0)
expr
……
真(非0)
continue;
…...
while expr
continue; ……
假(0) expr3
相关知识点
break语句 p159
功能:在循环语句和switch语句中,终止并 跳出循环体 说明: – break只能终止并跳出最近一层的结构 – break不能用于循环语句和switch语句 之外的任何其它语句之中
相关知识点
for while 假(0) do …… break; …... 真(非0) expr whil e expr1
云南大学JAVA程序设计实验二
云南大学软件学院实验报告序号:实验老师:课程名称:JAV A 程序设计实验实验名称:JAV A 开发环境学号:20111120279姓名:李张昱实验二Fundamental programming structures in java一.实验目的用JAV A 写三个基础的小程序二.实验内容(算法、程序、步骤和方法)任务一.Write Java program called AverageNumbers.java to determine the average of several numbers.Set the following five integer variables:int1=5int2=7int3=4int4=25int5=13Calculate and display the average of these numbers and the square root of average.Output:average of numbers is 10.8square root of average is 3.286335345030997根据实验要求写了以下程序:public class AverageNumbers {public static void main(String[]args){int a1=5;int a2=7;int a3=4;int a4=25;int a5=13;float num=a1+a2+a3+a4+a5;指标等级A B C D 功能完整程序质量按时检查提问回答检查时间总评成绩float average=num/5;System.out.println("the average of these numbers:"+average);System.out.println("the square root of average:"+Math.sqrt(average));}}任务二.Write a temperature conversion Java program called FarheheitToCentigrade.java.Set a variable called tempFarenheit=98.6.Calculate the Centigrade temp(tempCelcius)by using the formula Centigrade=5/9(Fahrenheit-32) Output:Centigrade equivalent:37.0根据实验要求写了以下程序:public class FarheheitToCentigrade{public static void main(String[]args){double Farenheit=98.6;double Centigrade;Centigrade=(double)5/(double)9*(Farenheit-32);System.out.println("the Centigrade value is:"+Centigrade);}}任务三.Write a Java payroll program called Payroll.java that determines pay and taxes.Set the following variables:pay=$25per hourhoursWorked=40Calculate grossPay by multiplying pay*hoursWorked.Calculate taxesWithheld by multiplying grossPay*.15.Calculate netPay by subtracting taxesWithheld from grossPay.Display all variables.Output:Gross pay:$1000.0Withholding tax:$150.0Net pay:$850.0根据实验要求写了以下程序:public class Payroll{public static void main(String[]agrs){double Pay=25;int hoursWorked=40;double grossPay=Pay*hoursWorked;double taxesWithheld=grossPay*0.15;}}三.数据记录和计算任务一运行结果:任务二运行结果:任务三运行结果:四.结论通过这次的实验,我学习了基本入门的Java编程,实验过程中也犯了一些很低级的小错误,例如写错字母、没有区分大小写以及没有注意数据类型等等,但也让我明白了在以后写大程序时候就是这些你可能不会注意的小错误会导致程序无法运行,并且难以发现,导致工作效率降低。
云南大学软件学院JAVA实验十
云南大学软件学院JAVA实验十报告姓名:王增伟学号:班级:软件工程日期:全文结束》》、11、24 成绩:JAVA实验一、实验目的:熟悉Java中文本域以及组合框组件的使用,学会Swing界面简单布局。
二、实验要求:Write a Swing application for a video store named Video、java、 Place the names of10 of your favorite movies in a drop-downlist、 Let the user select the movie he or she wants to rent、 Charge $2 for most movies, and $2、50 for your personal favorite movie、 Display the total rental fee、三、实验内容:实验代码部分:package Lab10;import java、awt、*;import javax、swing、*;import java、awt、event、*;public class Video extends JFrame implements ActionListener {//创建组件JButton jb1;//显示总租金按钮JPanel jp1,jp2,jp3,jp4;JLabel jl1,jl2,jl3,jl4;//标签JboBox jcb1;//下拉框double pay=0;//初始的租金为0public static void main(String[] args){// TODO Auto-generated method stubVideo video=new Video();}//构造函数public Video(){jp1=newJPanel();jp2=new JPanel();jp3=new JPanel();jp4=new JPanel();//设置按钮jb1=new JButton("购买此电影票");//注册监听jb1、addActionListener(this);jb1、setActionmand("OK");//设置标签jl1=new JLabel("我喜欢的电影列表:");jl2=new JLabel("《三傻大闹宝莱坞》和《肖申克的救赎》票价$2、50,其余的全部$2、00、");jl3=new JLabel("总租金为:");jl4=new JLabel("0$");//此标签用来显示租金//定义一个电影的数组String[]movies={"蜘蛛侠","人狗奇缘","三傻大闹宝莱坞","极乐世界","厨子戏子痞子","未知死亡","玩命快递","死亡飞车","肖申克的救赎","年度街舞大赛"};jcb1=new JboBox(movies);//将数组信息添加到下拉框//设置网格布局this、setLayout(new GridLayout(4,1));//添加组件jp1、add(jl1);jp1、add(jcb1);jp2、add(jl2);jp3、add(jl3);jp3、add(jl4);jp4、add(jb1);this、add(jp1);this、add(jp2);this、add(jp3);this、add(jp4);this、setSize(500,300);this、setDefaultCloseOperation(JFrame、EXIT_ON_CLOSE);this、setVisible(true);}public void actionPerformed(ActionEvent e){// TODO Auto-generated method stubif(e、getActionmand()、equals("OK")){//获取下拉框中的选项if(jcb1、getSelectedItem()、equals("三傻大闹宝莱坞")||jcb1、getSelectedItem()、equals("肖申克的救赎")){pay+=2、5;}else{pay+=2、0;}//将租金转换成字符型String,并且赋给jl4标签jl4、setText(String、valueOf(pay)+"$");}}}实验运行结果:初始运行界面:选择普通电影后,点击购买电影票后支付总金额增加2、0:选择《三傻大闹宝莱坞》和《肖申克的救赎》这两部电影,点击购买电影票支付总金额增加2、5四、实验总结:本次实验主要将窗体组件和事件管理器的组合运用,使得自己在JAVA编程中的灵活运用能力进一步提高!指导教师签名:。
云南大学JAVA实验11
fileWriter.write(String.valueOf(args[i])+" ");
}
fileWriter.flush(); fileWriter.close();
云南大学软件学院
实验报告
姓名:
学号:
班级:
日期:
成绩:
JAVA 实验十一
一、 实验目的:
熟悉 Java 中有关文件的相关操作,学会读写文件。
二、实验要求:
Use FileAccessTest as a shell and write a program to read data from a file - users.txt, write data out to another file - emailnames.txt and log activity at different levels (log file location: "D:\log\").
FileOpertion file=new FileOpertion();
if(args[0].equals("copy")){ if(!args指[1导].教is师Em签pt名y(:)){ file.copyFile(args[1],
args[2]); file.log(args);
System.out.print(args[0]+" "+args[1]+" "+args[2]+" commplete!");
云南大学软件学院计算机网络原理实验六实验报告3
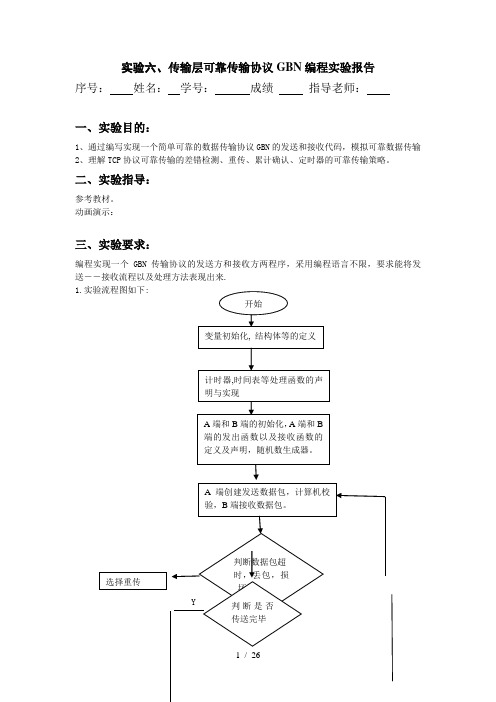
实验六、传输层可靠传输协议GBN编程实验报告序号:姓名:学号:成绩指导老师:一、实验目的:1、通过编写实现一个简单可靠的数据传输协议GBN的发送和接收代码,模拟可靠数据传输2、理解TCP协议可靠传输的差错检测、重传、累计确认、定时器的可靠传输策略。
二、实验指导:参考教材。
动画演示:三、实验要求:编程实现一个GBN传输协议的发送方和接收方两程序,采用编程语言不限,要求能将发送――接收流程以及处理方法表现出来.1.实验流程图如下:N2.实验截图与代码如下: 截图: 传送下一个数据包结束代码及注释:一、GBN.h#pragma once#include <stdio.h>//基础功能模块的数据结构声明#define BIDIRECTIONAL 1 /* change to 1 if you're doing extra credit andwrite a routine called B_output *//* a "msg" is the data unit passed from layer 5 (teachers code) to layer4 (students' code). It contains the data (characters) to be delivered tolayer 5 via the students transport level protocol entities. */struct msg{ char data[20];};/* a packet is the data unit passed from layer 4 (students code) to layer3 (teachers code). Note the pre-defined packet structure, which allstudents must follow. */struct pkt{int seqnum;int acknum;int checksum;char payload[20];};#define WINDOWSIZE 8#define MAXBUFSIZE 50#define RTT 15.0#define NOTUSED 0#define NACK -1#define TRUE 1#define FALSE 0#define A 0#define B 1//网络仿真部分数据结构声明***********************************************************struct event{float evtime; /* event time */int evtype; /* event type code */int eventity; /* entity where event occurs */struct pkt *pktptr; /* ptr to packet (if any) assoc w/ this event */ struct event *prev;struct event *next;};/* possible events: */#define TIMER_INTERRUPT 0#define FROM_LAYER5 1#define FROM_LAYER3 2#define OFF 0#define ON 1//基础功能模块的函数声明******************************************************************* void ComputeChecksum(struct pkt *packet);//计算校验和int CheckCorrupted(struct pkt packet);//检查数据是否出错void A_output( struct msg message);//A端向外发送数据void A_input(struct pkt packet);//A端接收数据void A_timerinterrupt();//A计时器超时void A_init();//A端初始化void B_output(struct msg message);void B_input(struct pkt packet);void B_timerinterrupt();void B_init();//网络仿真部分的函数声明**************************************************void init(); //初始化仿真器float jimsrand();//随机数发生器[0,1]//处理事件列表部分的函数声明*********************************************void generate_next_arrival();//产生下一个到达的分组void insertevent(struct event *p);//向事件列表中插入一条新的事件void printevlist();//打印事件列表//******************************************************************** //**********************计时器模块*********************************** void stoptimer(int);//停止计时器void starttimer(int,float);//启动计时器//******************************************************************** *//**************************网络各层之间传送模块***********************void tolayer3(int AorB,struct pkt packet);//向第3层发送信息void tolayer5(int AorB,char datasent[20]);//向第5层发送信息二、GBN.c#include "GBN.h"#include <stdio.h>#include <string.h>#include <stdlib.h>extern int TRACE = 1; /* for my debugging */为我的调试extern int nsim = 0; /* number of messages from 5 to 4 so far */目前为止信息的数字是从5到4extern int nsimmax = 0; /* number of msgs to generate, then stop */如果信息产生的数字为0,然后就停止extern float time = 0.000;float lossprob; /* probability that a packet is dropped */数据包可能会丢失float corruptprob; /* probability that one bit is packet is flipped*/这一点的数据包可能会被弹出去float lambda; /* arrival rate of messages from layer 5 */ 第五层到达的信息的次序int ntolayer3; /* number sent into layer 3 */被传送到第三层的数据static int nlost = 0; /* number lost in media */在媒介中数据丢失static int ncorrupt = 0; /* number co rrupted by media*/被媒介毁坏的数据static int expectedseqnum = 0; /* expected se quence number at receiver side */在接收者这边接收到预期的序列数据static int nextseqnum; /* next sequence number to use in sender side */下一个序列数据使用在发送者这边static int base; /* t he head of sender window */发送者的头窗口struct pkt winbuf[WINDOWSIZE]; /* window packets buffer */数据包缓冲区窗口static int winfront,winrear; /* front and rear points of wind ow buffer */窗口缓冲区的前方点和后方点static int pktnum; /* packet number of window buffer */窗口缓冲区的数据包个数struct msg buffer[MAXBUFSIZE]; /* sender message buffer */发送消息缓冲区int buffront,bufrear; /* front and rear pointers of buffer */缓冲区的前指针与后指针static int msgnum; /* message number of buffer */信息数量的缓冲int packet_lost =0;int packet_corrupt=0;int packet_sent =0;extern int packet_correct=0;extern int packet_resent =0;int packet_timeout=0;extern struct event *evlist = NULL; /* the event list *///计算校验和void ComputeChecksum( struct pkt *packet){int checksum;int i;checksum = packet->seqnum;checksum = checksum + packet->acknum;for ( i=0; i<20; i++ )checksum = checksum + (int)(packet->payload[i]);checksum = 0-checksum;packet->checksum = checksum;}//检查是否出错int CheckCorrupted(struct pkt packet){int checksum;int i;checksum = packet.seqnum;checksum = checksum + packet.acknum;for ( i=0; i<20; i++ )checksum = checksum + (int)(packet.payload[i]);if ( (packet.checksum+checksum) == 0 )return (FALSE);elsereturn (TRUE);}//A端向外发送数据/* called from layer 5, passed the data to be sent to other side */ void A_output(struct msg message){int i;struct pkt sendpkt;/* if window is not full */if ( nextseqnum < base+WINDOWSIZE ){printf("----A: New message arrives, send window is not full, send new messge to layer3!\n");/* create packet */sendpkt.seqnum = nextseqnum;sendpkt.acknum = NOTUSED;for ( i=0; i<20 ; i++ )sendpkt.payload[i] = message.data[i];/* computer checksum */ComputeChecksum (&sendpkt);/* send out packet */tolayer3 (A, sendpkt);/* copy the packet to window packet buffer */winrear = (winrear+1)%WINDOWSIZE;pktnum ++;winbuf[winrear] = sendpkt;for (i=0; i<20; i++)winbuf[winrear].payload[i]= sendpkt.payload[i];/* update state variables */nextseqnum = nextseqnum+1;starttimer(A,RTT);B_input(sendpkt);A_input(sendpkt);}/* if window is full */else{printf("----A: New message arrives, send window is full,");/* if buffer full, give up and exit*/if ( msgnum == MAXBUFSIZE){printf (" Error: Sender buffer is full! \n");exit (1);}/* otherwise, buffer the message */else{printf("buffer new message!\n");bufrear = (bufrear+1) % MAXBUFSIZE;for (i=0; i<20; i++)buffer[bufrear].data[i] = message.data[i];msgnum ++;}}}//B端向外发送数据/* called from layer 5, passed the data to be sent to other side */ void B_output(struct msg message){int i;struct pkt sendpkt;/* if window is not full */if ( nextseqnum < base+WINDOWSIZE ){printf("----A: New message arrives, send window is not full, send new messge to layer3!\n");/* create packet */sendpkt.seqnum = nextseqnum;sendpkt.acknum = NOTUSED;for ( i=0; i<20 ; i++ )sendpkt.payload[i] = message.data[i];/* computer checksum */ComputeChecksum (&sendpkt);/* send out packet */tolayer3 (A, sendpkt);A_input(sendpkt);/* copy the packet to window packet buffer */winrear = (winrear+1)%WINDOWSIZE;pktnum ++;winbuf[winrear] = sendpkt;for (i=0; i<20; i++)winbuf[winrear].payload[i]= sendpkt.payload[i];/* if it is the first packet in window, start timeout */ //if ( base == nextseqnum )//{//starttimer(A,RTT);//printf("----A: start a new timer!\n");// }/* update state variables */nextseqnum = nextseqnum+1;}/* if window is full */else{printf("----A: New message arrives, send window is full,");/* if buffer full, give up and exit*/if ( msgnum == MAXBUFSIZE){printf (" Error: Sender buffer is full! \n");exit (1);}/* otherwise, buffer the message */else{printf("buffer new message!\n");bufrear = (bufrear+1) % MAXBUFSIZE;for (i=0; i<20; i++)buffer[bufrear].data[i] = message.data[i];msgnum ++;}}}//A端接收数据void A_input(struct pkt packet){struct pkt sendpkt;int i;/* if received packet is not corrupted and ACK is received */if ( (CheckCorrupted(packet) == FALSE) && (packet.acknum != NACK) ) {printf("----A: ACK %d is correctly received,",packet.acknum);packet_correct++;/* delete the acked packets from window buffer */winfront = (winfront+(packet.acknum+1-base)) % WINDOWSIZE; pktnum = pktnum - (packet.acknum+1-base);/* move window base */base = packet.acknum+1;stoptimer(A);if ( base < nextseqnum){//starttimer(A,RTT);printf ("\n\n\nsend new packets!");}/* if buffer is not empty, send new packets */while ( (msgnum!=0) && (nextseqnum<base+WINDOWSIZE) ) {/* create packet */sendpkt.seqnum = nextseqnum;sendpkt.acknum = NOTUSED;buffront = (buffront+1) % MAXBUFSIZE;for ( i=0; i<20 ; i++ )sendpkt.payload[i] = buffer[buffront].data[i];/* computer checksum */ComputeChecksum (&sendpkt);/* if it is the first packet in window, start timeout */if ( base == nextseqnum ){//starttimer(A,RTT);printf ("send new packets!\n");}/* send out packet */tolayer3 (A, sendpkt);/* copy the packet to window packet buffer */winrear = (winrear+1)%WINDOWSIZE;winbuf[winrear] = sendpkt;pktnum ++;/* update state variables */nextseqnum = nextseqnum+1;/* delete message from buffer */msgnum --;}}elseprintf ("----A: NACK is received, do nothing!\n");}//B端接收数据*****************************************************一定要调用这个/* Note that with simplex transfer from a-to-B, there is no B_output() */ /* called from layer 3, when a packet arrives for layer 4 at B*/void B_input(struct pkt packet){struct pkt sendpkt;int i;/* if not corrupted and received packet is in order */if ( (CheckCorrupted(packet) == FALSE) && (packet.seqnum == expectedseqnum)){printf("\n----B: packet %d is correctly received, send ACK!\n",packet.seqnum);/* send an ACK for the received packet *//* create packet */sendpkt.seqnum = NOTUSED;sendpkt.acknum = expectedseqnum;for ( i=0; i<20 ; i++ )sendpkt.payload[i] = '0';/* computer checksum */ComputeChecksum (&sendpkt);/* send out packet *///tolayer3 (B, sendpkt);/* update state variables */expectedseqnum = expectedseqnum+1;printf("----B:expectedseqnum = %d\n",expectedseqnum);/* deliver received packet to layer 5 *///tolayer5(B,packet.payload);}/* otherwise, discard the packet and send a NACK */else{printf("----B: packet %d is corrupted or not I expects, send NACK!\n",packet.seqnum);/* create packet */sendpkt.seqnum = NOTUSED;sendpkt.acknum = NACK;for ( i=0; i<20 ; i++ )sendpkt.payload[i] = '0';/* computer checksum */ComputeChecksum (&sendpkt);/* send out packet */tolayer3 (B, sendpkt);}}//A计时器超时/* called when A's timer goes off */void A_timerinterrupt(){int i;printf("----A: time out,resend packets!\n");/* start timer */starttimer(A,RTT);/* resend all packets not acked */for ( i=1; i<=pktnum; i++ ){packet_resent++;tolayer3(A,winbuf[(winfront+i)%WINDOWSIZE]);}}//B计时器超时/* called when B's timer goes off */void B_timerinterrupt(){int i;printf("----B: time out,resend packets!\n");/* start timer */starttimer(B,RTT);/* resend all packets not acked */for ( i=1; i<=pktnum; i++ ){packet_resent++;tolayer3(B,winbuf[(winfront+i)%WINDOWSIZE]);}}//A端初始化/* entity A routines are called. You can use it to do any initialization */void A_init()base = 0;nextseqnum = 0;buffront = 0;bufrear = 0;msgnum = 0;winfront = 0;winrear = 0;pktnum = 0;}//B端初始化/* entity B routines are called. You can use it to do any initialization */void B_init(){expectedseqnum = 0;}//初始化仿真器void init() /* initialize the simulator */{int i;float sum, avg;float jimsrand();FILE *fp;fp = fopen ("parameter.txt","r");printf("----- Stop and Wait Network Simulator Version 1.1 -------- \n\n");printf("Enter the number of messages to simulate: ");//fscanf(fp,"%d",&nsimmax);scanf("%d",&nsimmax);printf("\nEnter packet loss probability [enter 0.0 for no loss]: "); //fscanf(fp, "%f",&lossprob);scanf("%f",&lossprob);printf("\nEnter packet corruption probability [0.0 for no corruption]: "); //fscanf(fp,"%f",&corruptprob);scanf("%f",&corruptprob);printf("\nEnter average time between messages from sender's layer5 [ > 0.0]: ");//fscanf(fp,"%f",&lambda);scanf("%f",&lambda);printf("\nEnter TRACE: ");//fscanf(fp,"%d",&TRACE);scanf("%d",&TRACE);printf("\n\n");srand(9999); /* init random number generator */sum = 0.0; /* test random number generator for students */for (i=0; i<1000; i++)sum=sum+jimsrand(); /* jimsrand() should be uniform in [0,1] */avg = sum/1000.0;/*if(avg < 0.25 || avg > 0.75){printf("It is likely that random number generation on your machine\n" ); printf("is different from what this emulator expects. Please take\n"); printf("a look at the routine jimsrand() in the emulator code. Sorry. \n");exit(0);}*/printf("%f",avg);ntolayer3 = 0;nlost = 0;ncorrupt = 0;time=0.0; /* initialize time to 0.0 */generate_next_arrival(); /* initialize event list */}//随机数发生器float jimsrand(){double mmm = 2147483647; /* largest int - MACHINE DEPENDENT */float x; /* individual students may need to change mmm */x = rand()/mmm; /* x should be uniform in [0,1] */return(x);}//**************************************************************************************//*******************************事件处理部分*******************************************void generate_next_arrival(){double x,log(),ceil();struct event *evptr;float ttime;int tempint;//if (TRACE>2)//printf("-----------------GENERATE NEXT ARRIVAL: creating new arrival\n");x = lambda*jimsrand()*2; /* x is uniform on [0,2*lambda] *//* having mean of lambda */evptr = (struct event *)malloc(sizeof(struct event));evptr->evtime = time + x;evptr->evtype = FROM_LAYER5;if (jimsrand()<0.5){evptr->eventity = A;}evptr->eventity = B;insertevent(evptr);}//向事件列表中插入一条新的事件void insertevent(struct event *p){struct event *q,*qold;if (TRACE>2){//printf(" INSERTEVENT: time is %lf\n",time);//printf(" INSERTEVENT: future time will be %lf\n",p->evtime);}q = evlist; /* q points to front of list in which p struct inserted */if (q==NULL)/* list is empty */{evlist=p;p->next=NULL;p->prev=NULL;}else{for (qold = q; q !=NULL && p->evtime > q->evtime; q=q->next) qold=q;if (q==NULL)/* end of list */{qold->next = p;p->prev = qold;p->next = NULL;}else if (q==evlist)/* front of list */p->next=evlist;p->prev=NULL;p->next->prev=p;evlist = p;}else /* middle of list */{p->next=q;p->prev=q->prev;q->prev->next=p;q->prev=p;}}}//打印事件列表void printevlist(){struct event *q;int i;printf("--------------\nEvent List Follows:\n");for(q = evlist; q!=NULL; q=q->next){printf("Event time: %f, type: %d entity: %d\n",q->evtime,q->evtype,q->eventity);}printf("--------------\n");}//启动计时器void starttimer(int AorB,float increment){struct event *q;struct event *evptr;if (TRACE>2)printf("\n----A: START TIMER: starting timer at %f\n",time);/* be nice: check to see if timer is already started, if so, then warn *//* for (q=evlist; q!=NULL && q->next!=NULL; q = q->next) */for (q=evlist; q!=NULL ; q = q->next)if ( (q->evtype==TIMER_INTERRUPT && q->eventity==AorB) ){//printf("Warning: attempt to start a timer that is already started\n");return;}/* create future event for when timer goes off */evptr = (struct event *)malloc(sizeof(struct event));evptr->evtime = time + increment;evptr->evtype = TIMER_INTERRUPT;evptr->eventity = AorB;insertevent(evptr);}//停止计时器/* called by students routine to cancel a previously-started timer */ void stoptimer(int AorB) /* A or B is trying to stop timer */{struct event *q,*qold;if (TRACE>2)printf("\n----A: STOP TIMER: stopping timer\n");/* for (q=evlist; q!=NULL && q->next!=NULL; q = q->next) */for (q=evlist; q!=NULL ; q = q->next)if ( (q->evtype==TIMER_INTERRUPT && q->eventity==AorB) )/* remove this event */{if (q->next==NULL && q->prev==NULL)evlist=NULL; /* remove first and only event on listelse if (q->next==NULL) /* end of list - there is one in front */ q->prev->next = NULL;else if (q==evlist) /* front of list - there must be event after */{q->next->prev=NULL;evlist = q->next;}else /* middle of list */{q->next->prev = q->prev;q->prev->next = q->next;}free(q);return;}//printf("Warning: unable to cancel your timer. It wasn't running.\n");}//向第三层发送信息/************************** TOLAYER3 ***************/void tolayer3(int AorB,struct pkt packet){struct pkt *mypktptr;struct event *evptr,*q;float lastime, x, jimsrand();int i;ntolayer3++;/* simulate losses: */if (jimsrand() < lossprob){nlost++;if (TRACE>0)printf(" TOLAYER3: packet being lost\n");return;}/* make a copy of the packet student just gave me since he/she may decide *//* to do something with the packet after we return back to him/her */ mypktptr = (struct pkt *)malloc(sizeof(struct pkt));mypktptr->seqnum = packet.seqnum;mypktptr->acknum = packet.acknum;mypktptr->checksum = packet.checksum;for (i=0; i<20; i++)mypktptr->payload[i] = packet.payload[i];if (TRACE>2){printf(" TOLAYER3: seq: %d, ack %d, check: %d ", mypktptr->seqnum,mypktptr->acknum, mypktptr->checksum);for (i=0; i<20; i++)printf("%c",mypktptr->payload[i]);printf("");}/* create future event for arrival of packet at the other side */evptr = (struct event *)malloc(sizeof(struct event));evptr->evtype = FROM_LAYER3; /* packet will pop out from layer3 */ evptr->eventity = (AorB) % 2; /* event occurs at other entity */evptr->pktptr = mypktptr; /* save ptr to my copy of packet *//* finally, compute the arrival time of packet at the other end. medium can not reorder, so make sure packet arrives between 1 and 10 time units after the latest arrival time of packetscurrently in the medium on their way to the destination */lastime = time;/* for (q=evlist; q!=NULL && q->next!=NULL; q = q->next) */for (q=evlist; q!=NULL ; q = q->next)if ( (q->evtype==FROM_LAYER3 && q->eventity==evptr->eventity) ) lastime = q->evtime;evptr->evtime = lastime + 1 + 9*jimsrand();/* simulate corruption: */if (jimsrand() < corruptprob){ncorrupt++;if ( (x = jimsrand()) < .75)mypktptr->payload[0]='Z'; /* corrupt payload */else if (x < .875)mypktptr->seqnum = 999999;elsemypktptr->acknum = 999999;if (TRACE>0)printf(" TOLAYER3: packet being corrupted\n");}//if (TRACE>2)//printf(" TOLAYER3: scheduling arrival on other side\n");insertevent(evptr);}//向第五层发送信息/************************** TOLAYER5 ***************/void tolayer5(int AorB,char datasent[20]){int i;if (TRACE>2){printf(" TOLAYER5: data received: ");for (i=0; i<20; i++)printf("%c",datasent[i]);printf("\n");}}三、GBN-CS.c#include "GBN.h"#include <stdio.h>#include <string.h>#include <stdlib.h>extern int TRACE ; /* for my debugging */extern int nsim ; /* number of messages from 5 to 4 so far */extern int nsimmax; /* number of msgs to generate, then stop */extern float time;extern int packet_correct;extern int packet_resent;extern struct event *evlist;int main(){struct event *eventptr;struct msg msg2give;struct pkt pkt2give;int i,j;char c;init();A_init();B_init();while (1){eventptr = evlist; /* get next event to simulate */ if (eventptr==NULL)goto terminate;evlist = evlist->next; /* remove this event from event list */if (evlist!=NULL)evlist->prev=NULL;if (TRACE >= 2){printf("\nEVENT time: %f,",eventptr->evtime);printf(" type: %d",eventptr->evtype);if (eventptr->evtype==0)printf(", timerinterrupt ");else if (eventptr->evtype==1)printf(", fromlayer5 ");elseprintf(", fromlayer3 ");printf(" entity: %d\n",eventptr->eventity);}time = eventptr->evtime; /* update time to next event time*/if (nsim==nsimmax)break; /* all done with simulation */if (eventptr->evtype == FROM_LAYER5 ){generate_next_arrival(); /* set up future arrival *//* fill in msg to give with string of same letter */j = nsim % 26;for (i=0; i<20; i++)msg2give.data[i] = 97 + j;if (TRACE>2){printf(" MAINLOOP: data given to student: ");for (i=0; i<20; i++)printf("%c", msg2give.data[i]);printf("\n");}nsim++;if (eventptr->eventity == A){A_output(msg2give);}else{B_output(msg2give);}}else if (eventptr->evtype == FROM_LAYER3){pkt2give.seqnum = eventptr->pktptr->seqnum;pkt2give.acknum = eventptr->pktptr->acknum;pkt2give.checksum = eventptr->pktptr->checksum;for (i=0; i<20; i++)pkt2give.payload[i] = eventptr->pktptr->payload[i];if (eventptr->eventity == A) /* deliver packet by calling */ A_input(pkt2give); /* appropriate entity */elseB_input(pkt2give);free(eventptr->pktptr); /* free the memory for packet */ }else if (eventptr->evtype == TIMER_INTERRUPT){if (eventptr->eventity == A)A_timerinterrupt();elseB_timerinterrupt();}else{printf("INTERNAL PANIC: unknown event type \n");}free(eventptr);}terminate:printf(" Simulator terminated at time %f\n after sending %d msgs from layer5\n",time,nsim);printf(" correctly sent pkts: %d \n", packet_correct);printf(" resent pkts: %d \n", packet_resent);system("pause");}附源代码及注释四. 实验小结通过本次试验了解了编程实现简单可靠的数据传输GBN协议,模拟了可靠数据传输理解了TCP协议可靠传输的差错检测、重传、累计确认、定时器的可靠传输策略。
12年云南大学Java期中考试题
12年秋季学期Java程序设计期中考试题目
1、假定要为某个公司编写雇员工资支付程序。
这个公司有各种类型的雇员,不同类型的雇员按不同的方式支付工资:
●经理(Manager)每月获得一份固定的工资,经理固定工资为3000
元。
●销售人员(Salesman)在基本工资的基础上每月还有销售提成,
销售人员基本工资为1500元,提成为当月销售额的10%。
●一般工人(Worker)则按他每月工作的天数计算工资。
提示:设计一个抽象类――雇员(Employee)描述雇员的共同特性,例如姓名(name)、岗位名称(position)。
这个类还应提供一个计算工资的抽象方法computeSalary(),使得可以通过该方法计算各类雇员的工资。
经理(Manager)类、销售人员(Salesman)类、一般工人(Worker)类,再设计一个演示用的类,可选择工作类型,输入相关参数(销售人员的销售额,工人的工作天数)并计算输出工资数额。
2、在前面的基础上对工人工资计算程序进行扩充,即将一般工人再细分为计时工人(DailyWorker)和计件工人(PieceWorker)两类,计时工人按天计算工资额(每小时20元),而计件工人按其生产的产品件数计算工资额(每件50元)。
提示:设计这两个类,与前面的程序结合在一起,修改一下演示程序,演示这些类的用法,即选择雇员类别时,若选择为工人还要选择工人的种类,再根据工种录入工作时间或生产件数,计算得到相应的工资数额。
(请完成第二题后,直接用第二题结果进行检查)。
云南大学软件学院计网实验五传输层可靠传输协GBN编程

创建A端发送的数据包到达B端事件,插入到事件 队列中
B_input(packet)
当发送端发送的数据到达接收端时,接收
端的传输层调用此函数从网络层接收数据 如数据正确,则构造响应包发送到网络层, 同时将数据提交到接收端的应用层 tolayer5(calling_entity,message)。 否则,构造NACK包,通过网络层发送给发 送端
stoptimer(AorB)
由发送端或接收端调用,终止定时器
A_timerinterrupt()
超时事件发生时,调用此函数 功能:重传所有发送但为确定的包
初始化操作
init()
– 在真实的网络环境中,应用层的消息按照一定 的速率到达运输层(100个消息每秒?),而 且在可靠数据传输协议中,丢包概率和坏包概 率都不为0,我们分别设置成0.2。
常量TRACE
TRACE=1,模拟了丢包和产生坏包的情 况; TRACE >= 2,正常的发送和接收数据包
随机数的产生
产生的随机数在(0.25,0.75)范围内,否
则不符合要求,将最大整数值 2147483647改为65535。
运行结果
运行结果
实验5
设计图
函数的功能A_output(message)
当发送端应用层有数据时调用此函数, message是要发送的数据。协议要保证 接收端是按序、正确的接收到发送的数据。
struct msg { char data[20]; };
starttimer(calling_entity,increment)
