HUMA1000 Video Presentation
HIFIMAN HM1000便携式DAC说明书

User GuideWelcomeThank you for purchasingthe HM1000 Portable DAC(Bluetooth & USB-C) Please read this quick guide before using the HM1000.Quick startExteriorOperationInterface4.4mm wiring specification for balanced line outputDACSpecificationsSupported music formats Safety InstructionsWarranty & customer service 02 03 04 08 09 15 18 19 20 22Table of Contents1. 2. 3.1. 2. 3. 4. 5.Power on and confirm that the Bluetooth light on the main panel is working normally (blue light flashing). Search for devices on a mobile phone or other Bluetooth source device, find HIFIMAN-HM1000 and select itY ou may now enjoy high-definition Bluetooth music with headphones connected to your HM1000.Follow the instructions in the operation guide's DAC Setup to correctly install the driver.Connect the HM1000 to a computer using a USB-C cable. Press the Input button once to turn the light of the main panel green and always on.Set the playback device on the computer to HM1000. Now you can Listen to music from your computer on the HM1000.Note: Please check the Bluetooth connection and supported protocol to ensure the best connection. Bluetooth Direct ConnectionUSB DACQuick StartExteriorCharging SwitchUSB – C power and Data Input3.5mm Balance/Single-ended4.4mm Balanced 4.4mm Balanced LineOut 3.5mm Single-ended OutputPower ButtonVolume+-Micro SD Card slot (Update Firmware Only)InputGain (High/Low/Super low)Power On / Power Off1. Press 3 seconds to turn the HM1000 on or o .Volume+/-1. Press volume+ to increase the volume.Increase the volume one level at a time.The maximum volume is 32.2. Press volume- to decrease the volume.Decrease the volume one level at a time.The minimum volume is 0.3. The body has no screen to show the volume.Output Selection1. When powering on for the first time, the default outputjack is balanced 3.5mm balanced. When this jack isselected, it corresponds to the bottom of the deviceand will display a green light.2. Press the output selection key once. The output jack will remain the same, however the output will change toSingle-Ended. When this option is selected, it corresponds to the bottom of the device output and will displaya red light.3. Press the output selection key again. This will change the output jack to the4.4mm Balanced headphone jack. When this is selected, it will display a green light.4. Press the output selection button again to change the output jack to the 4.4mm Balanced line output / 3.5mm single-ended line output. When selected it will display a green light.5. The HM1000 will remember the most recent outputconfiguration was used when last powered and willresume the same output status.Input Selection1. After powering on, the input defaults to Bluetooth mode. If the blue light is flashing it is in pairing mode, and will remain blue when connected.2. When connecting via USB, press the input selectionkey one time. The input mode will switch to USB AUDIO mode. After switching successfully to USB AUDIO,the light will remain green.Gain Selection1. Gain selection is divided into three options: high, low and super-low. High gain’s driving force is relatively large,suitable for lower sensitivity and higher impedanceheadphones. Low gain’s driving force is relatively small, suitable for matching with headphones of highersensitivity and lower impedance. Super-low gain’sdriving force is smaller still, suitable for in-ear monitors(IEM) with very high sensitivity and very low impedance.2. Selection is made by sliding the switch.Charge1. Connect a charging cable from a power supply to the HM1000. The charging status light will be a steady red. The light will turn green when fully charged.2. Press the charge button to switch to non chargingmode. In this state, the charging status light will flash red and green.3. When the battery is low, the charging status light will flash red. If the battery is too low for operation,it will shut down.InterfaceUSB-C1. Connect a type-C USB data cable to a computer fordata transmission.2. Use a type-C USB power cable with a power supplyto charge the HM1000.3. Use a type-C to type C USB cable to connect to amobile phone for USB DAC Features.Note: Phone must support USB AUDIO OTG. Headphone Sockets/Lineout1. With 3.5mm / 4.4mm headphone outputs, match3.5mm /4.4 mm with the appropriate headphone use. 2. The 3.5mm headphone socket supports balanced andsingle-ended modes, meaning it accepts both TRRS and TRS jacks.3. The4.4mm Headphone socket defaults to balanced mode.4. Never connect headphones before selecting output, and never connect headphones with the line out optionselected as it may damage the headphone or thelistener’s hearing.5. Line-out may be connected to amplifiers or other adapted audio equipment. (Cables must be purchased separately)4.4mm balanced Plug schematic is as follows:For 4.4mm Balanced to dual XLR connections, the balanced output should be as wired as follows:4.4mm balanced to single-ended RCA connections should be made as follows:4.4mm balanced to dual mono 6.3mm connections should be made as follows:4.4mm balanced to dual stereo 6.3mm connections should be made as follows:4.4mm balanced to single-ended 3.5mm connections should be made as follows:Please note:Do not use an ungrounded connector as prolonged use may damage the HM1000.Connect the Type-C USB cable to a computer or phone to enable the USB DAC function. Your phone must support the USB AUDIO and OTG function. For iOS devices, we recommend connecting a Light-ning cable to a USB Camera Converter. (Lightning to USB3 Camera Converter. Type-C to Lighting cables cannot be used. Please use Apple’s Type-C to Type-A adapter when connecting to MAC.)Note: When connecting theHM1000 to products running iOS, first change the charging button to the no-charging mode, then connect the HM1000 to the device, and switch the input mode ofHM1000 to USB AUDIO mode.USB DACUSB DAC DriverFor MAC there’s no need to install the driver.This driver supports Windows XP to Windows 10.Driver installation and usage:1. Please go to HIFIMAN’s O cialwebsite(www.hifi)→Service and support→ Driver, and download the HM1000 driver.2. Unzip the compressed package, select the driver and continue to install the driver.3. Use a type-C USB data cable to connect the HM1000 to the computer.4. Set the HM1000 to USB DAC mode.5. In Windows controls set "Control Panel→Sound→Play," and select "HM1000."6. Now you can use the HM1000 listen to audio from the computer.SpecificationsSize ( LxWxH ) : 115mmx62mmx18mmFrequency Response: 20Hz-40kHzBattery Life : 9.5hOutput Options : 3.5mm Single-ended, 3.5mm balanced, 4.4mm balanced,3.5mm Line output, 4.4mm Line out Bluetooth Version: Bluetooth 5.0Codecs: LDAC, aptX-HD, aptX, AAC, SBCSampling Rate: up to 24bit/384kHzSupported Music FormatsOther Music Formats: MP3, OGG, AAC, WMA DSD file support to DSD64 (DFF and, DSF)Warning1. Do not expose the player to water or other solvents.2. Do not expose the player to humidity, dust, smoke and other harsh conditions.3. A suitable operating temperature environment should be between -6℃ T o 40℃. Storage should be at normal room temperature.4. Do not use any chemicals or detergents to clean the player.5. Do not use while driving or operating motorized vehicles.6. If you experience physical discomfort, pleasediscontinue use and consult your audiologist.Disposal and RecyclingThe disposal of your player should be separated from household waste because the player contains electronic parts a and battery. When your player reaches the end of its life, please contact your local environmental depart-ment for disposal and recycling information or you could simply send it back to us. The battery will be removed and properly recycled.European Union—Disposal information:This symbol means that according to local laws and regulations your product should be disposed of separately from household waste. When this product reaches its end of life, take it to a collection point designated by local authorities. Consumers can be punished by penalty for inappropriate disposal of electronic device. The separate collection and recycling of your product at the time of disposal will help conserve natural resources and ensure that it is recycled in a manner that protects human health and the environment.This device complies with Part 15 of the FCC Rules. Operation is subject to the following two conditions: (1) This device may not cause harmful interference, and (2) this device must accept any interference received, including interference that may cause undesired operation.NOTE 1: This equipment has been tested and found to comply with the limits for a Class B digital device, pursuant to part 15 of the FCC Rules. These limits are designed to provide reasonable protection against harmful interference in a residential installation. This equipment generates uses and can radiate radio frequency energy and, if not installed and used in accordance with the instructions, may cause harmful interference to radio communications. However, there is no guarantee that interference will not occur in a particular installation. If this equipment does cause harmful interference to radio or television reception, which can be determined by turning the equipment o and on, the user is encouraged to try to correct the interference by one or more of the following measures:- Reorient or relocate the receiving antenna.- Increase the separation between the equipment and receiver.- Connect the equipment into an outlet on a circuitdi erent from that to which the receiver is connected. - Consult the dealer or an experienced radio/TV technician for help.NOTE 2: Any changes or modifications to this unit not expressly approved by the party responsible for compliance could void the user's authority to operate the equipment.HIFIMAN warrants this product to be free of defects in material or workmanship for a period of one year from the date of original retail purchase. If your product is found to be defective during the warranty period, HIFIMAN will, at its sole option, either repair the product or replace the product with a new or factory reconditioned or substantially equivalent model. This limited warranty does not apply to any defects attributable to damage beyond the reasonable control of HIFIMAN including damage caused by abuse, misuse, misapplication or modifications performed by anyone other than HIFIMAN.If your product is under warranty and a problem appears, please contact HIFIMAN customer service or your authorized dealer. If necessary, and at our discretion, we will provide a warranty repair or replacement of your product.Caution: do not disassemble or modify the product in any way. Tampering with or modifying your HIFIMAN product will void its warranty.This Limited Warranty does not apply to :1. Defective or discolored parts if damage is caused by fluids, dirt, missing keys, broken plastic parts orimproper use.2. Damage caused by misuse with another product.3. Use of the product for other than its normal intended use, including, without limitation, failure to use theproduct in accordance with the supplied Owner’sGuide.4. Damage caused by accident, abuse, neglect or misuse.5. If you do not have a valid dated receipt showingproof of purchase.6. Damage caused by services / repairs or othermodifications to the system carried out by anyoneother than HIFIMAN or an authorized HIFIMANdistributor or dealer.7. Damage caused by self-repair or if the unit has been disassembled or modified in any way.HIFIMAN greatly desires your satisfaction and will do everything reasonable to achieve that. If you have any questions or concerns with your product, simply contact your authorized dealer or HIFIMAN directly (if purchasedfrom us) and explain the issue in detail. Should a return be required, a Return Authorization will be issued. Return shipping to HIFIMAN or authorized service facility will be at the owner’s expense.The warranty applies to the first purchaser and is not transferable.For further information, please contact your authorized HIFIMAN dealer or email us directly at customerservice @.Customer Service Tel: +1 201-443-4626 E-mail:*************************** Website: 。
海美迪H1000产品介绍

海美迪H1000产品介绍我是一个喜欢玩影音数码、喜欢烧片的影音发烧友,市面上的4K蓝光硬盘播放器几乎都有接触过,在综合比较了产品、研发技术、实力、以及服务等各方面之后,最终选择了海美迪品牌的4K蓝光硬盘播放器,你可能会问为什么不选择oppo蓝光机,因为它不支持在线影视,所以在国内众多品牌中选择了海美迪,萝卜青菜各有所爱,以下是个人的把玩体验报告,愿跟有志同道合的朋友相互学习探讨。
谈到海美迪的研发能力和固件升级速度,想必听过海美迪的朋友都有所耳闻,我08年用的第一台播放器也是海美迪牌子,时隔10年也一直在玩这块,也是情怀原因再次选择了海美迪H1000这款具备双HDMI输出智能真4K蓝光硬盘播放器,软硬件内容等各方面实力都没让我失望。
在硬件上方面,采用了海思64位4K影院级高端处理器3798CV200处理器,支持4K分辨率、10Bit色深、HDR高动态、BT.2020高色域、60P高帧数的UHD超高清蓝光解码,支持Dolby Vision、HDR 10多种高动态格式,声效上支持杜比全景声、DTS-X,Dolby Digital Plus、7.1声道源码输出到功放,搭配2GB DDR3双通道高速内存及16GB eMMC5.0 高速闪存,添加了“双HDMI输出”及RS232串口端口,并深度对接智能家居控制模式,支持Control4中控主机一体化网络控制,支持各主流品牌中控主机RS232串口控制等,具有内置的SATA3.0硬盘仓、USB3.0接口、千兆网口、光纤接口、同轴接口及CVBS复合视频接口,支持2.4GHz/5GHz双频WiFi、蓝牙4.0+EDR技术。
更重要的是,在海美迪研发团队的努力下,H1000加入了4K蓝光原盘全功能导航菜单、海报墙智能导航系统、支持外挂ASS等特效字幕、在线字幕下载等,当然还具备在线影视播放等机顶盒功能,是我目前用过的功能比较全面的蓝光播放器,那么其实测效果如何呢,且看下面的个人体验报告。
Himalaya A1100HD产品方案文档
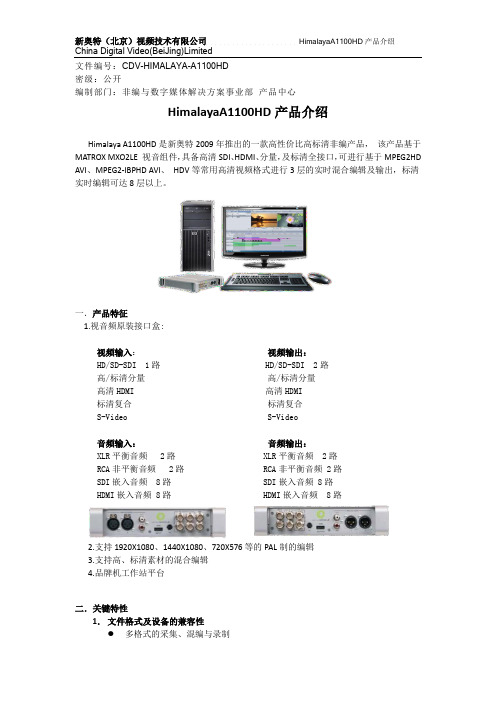
文件编号:CDV-HIMALAYA-A1100HD密级:公开编制部门:非编与数字媒体解决方案事业部产品中心HimalayaA1100HD产品介绍Himalaya A1100HD是新奥特2009年推出的一款高性价比高标清非编产品,该产品基于MATROX MXO2LE 视音组件,具备高清SDI、HDMI、分量,及标清全接口,可进行基于MPEG2HD AVI、MPEG2-IBPHD AVI、HDV等常用高清视频格式进行3层的实时混合编辑及输出,标清实时编辑可达8层以上。
一.产品特征1.视音频原装接口盒:视频输入:视频输出:HD/SD-SDI 1路 HD/SD-SDI 2路高/标清分量高/标清分量高清HDMI 高清HDMI标清复合标清复合S-Video S-Video音频输入:音频输出:XLR平衡音频 2路 XLR平衡音频 2路RCA非平衡音频 2路 RCA非平衡音频 2路SDI嵌入音频 8路 SDI嵌入音频 8路HDMI嵌入音频 8路 HDMI嵌入音频 8路2.支持1920X1080、1440X1080、720X576等的PAL制的编辑3.支持高、标清素材的混合编辑4.品牌机工作站平台二.关键特性1.文件格式及设备的兼容性多格式的采集、混编与录制支持视音频采集格式包括:高清无压缩、DVCPROHD、MPEG2-I100~300M、MPEG2-IBPHD、DVCAM、DVCPRO、DVCPRO50、MPEG2-I、MPEG2-IBP、MPEG4-IBP、WMV、HDV等●各类视音频文件的直接导入编辑或输出支持SONY XDCAM通过USB、1394、FTP方式直接导入及导出以下格式文件:DVCAM、IMX30、IMX40、IMX50、MPEG2HD18(25、35);支持SONY EX设备SXS卡素材的导入及编辑;支持通过USB导入、导出PDW-U1蓝光素材;支持HDVCF卡文件的原码编辑;支持通过USB导入、直接编辑及导出P2卡文件,文件包括:DVCPROHD、DVCAM、DVCPRO25、DVCPRO50支持各种标准的AVI、MXF、MOV、GXF等文件的导入、编辑及导出;支持各种流媒体文件的导入并编辑包括:MOV、WMV、RM、RMVB、TS、PS、VOB、DAT、.MP4、.MPG等文件●支持与第三方AAF工程交互;●可将字幕输出成带通道的无压缩AVI或MOV文件,供第三方程序叠加新奥特字幕;●可将视音频素材输出XML文件供新奥特制作播出网,及第三方系统登记视音频文件的元数据;2.字幕功能●自动唱词录制,1小时的同期声唱词字幕只需几分钟即可完成字幕叠加,省去人工拍录的辛苦。
Super Seek Wah 高级音效 педаль说明书

OVERVIEW:This product is a far more advanced version of our original Seek Wah and Seek Wah II. Basically the Super Seek Wahis sort of a combination of a tremolo pedal and a wah wah pedal. If you’re familiar with seventies synths, it’s exactly like an analog sequencer controlling a mellow band pass filter. New features include: tap tempo, MIDI tempo control, glis-sando, expression pedal control over tempo and glissando, adjustable number of stages from 1 to 16, automatic tempo slowing or speeding (delta), savable/loadable presets and more!GETTING STARTED:Important Note: In order to accommodate all of the Super Seek Wah’s features, there are some instances where a knob may control more than one parameter. This is indicat-ed on controls that have a slash in their label. For example: the 16 mini step knobs can be set to control either the “wah” for that individual step, or “groove” for that individual step. A mini toggle switch labeled “groove/wah” assigns the function of those 16 mini knobs. Another couple examples of this type of multi-function are the “tap div/delta” and “steps/preset” knobs. These are not your father’s knobs! They are rotary encoders, kind of a cross between a knob and a switch. They can turn like regular knobs, they can be pushed down and turned, they can be pushed down and held, and they can be pushed and released. The parameter to the left of the slash is controlled by turning the knob nor-mally. The parameter to the right of the slash is controlled by pushing down the knob and turning it while depressed. We’ll cover all of that specifically later.If you’ve used a Ringtone before you’ll see the familiar Step/ Seq /Rnd mini toggle switch on the upper left. Seq and Rnd are modes where the pedal’s brain moves you from step to step, either sequentially or randomly. Step mode al-lows you to advance from step to step manually by tapping on the “tap/hold” button.SPEED CONTROL:There are four different ways to control tempo. The “speed” knob, the “tap/hold button”, MIDI clock input (from a computer or other MIDI device), and the expression pedal input (a 1/4” standard TRS synth-type expression pedal). You’ll see quickly that adjusting the speed control overrides the previous tap tempo setting, tapping then overrides the previous speed control setting, and MIDI overrides all. TYPE: Vexter Series [V] | MODEL: SUPER SEEK WAH™SPEED KNOB:Set as you like.TAP TEMPO:Tap Tempo has become a fairly common way to manually enter tempos into time based pedals like delays, tremolos, etc. The Super Seek Wah powers up in Tap Tempo mode. Tap Tempo captures and uses the time between your last 2 taps as a foundational pulse. From there, you turn the “tap div/delta” knob normally (without pushing) to select how many steps the sequencer travels in between tap pulses. The chart below lays out your options in multiples.STEP MULTIPLIER:MIDI CONTROLLED TEMPO:The Super Seek Wah may be clocked by any device that outputs MIDI clock information. It considers only the clock portion of MIDI data. MIDI clock will take priority over the speed knob, tap tempo, and expression pedal controls. If the MIDI clock is stopped at any time, the sequencing will freeze until you tap in a new tempo, turn the speed control, or MIDI clocking resumes. The “tap div” control applies to MIDI clock similarly to tapped tempos. But now your op-tions are the note values listed below.STEP NOTE:NUMBER OF STEPS:The “steps/preset” knob allows you to choose how many total steps are in your sequence. Turn the knob without pushing to select how many steps before the sequence starts over. You can select any number from 1 to 16. ADJUSTING THE WAH SEQUENCE:Adjusting the individual sequence controls (there are 16of them) will change the wah sounds when the “groove/ wah” mini toggle switch on the right hand side of the pedal switch is set on “wah”.Congratulations!You’re the proud owner of the Z.Vex Effects Vexter Super Seek Wah!™1 2 3 4 5 6 7 8²/ 1 2 3 4 6 8 16³Page 1 of 4ADJUSTING THE GROOVE () SEQUENCE: If you wish, you can individually change the rate at which each step moves to the next, causing less of a sudden step and more of a glide to the next step in the sequence. Set the “groove/wah” switch to “groove” to access this feature. ADJUSTING THE GLISSANDO GLOBALLY:There’s a knob on the upper right labeled “gliss” which globally adjusts all glissando rates between steps to the same value. It’s labeled differently from the “groove” switch to remind you that it adjusts all of them at once, so it’s not quite as “groovy.” ADJUST THIS ONE FIRST. If youadjust the individual groove settings and then try to adjust the global glissando setting, it will erase all of the groove settings and every step will follow the global glissando con-trol alone. You can, of course, go back and set your groove settings, but remember this to save yourself time and ag-groovation… set the glissando first, then get groovy, baby. Just to try to help you understand these controls, here is a not-so-brief summary. If you never adjust the gliss knob or set the switch on the right to groove and twist any of the16 sequence knobs, your steps will all be hard and quick, jumping from one to the next very quickly like, well, steps. You can smooth out the movement between steps with the gliss knob, and they’ll all smoothly move the same from step to step, getting more smeary as you turn it up. Or, you can switch the small toggle on the right to groove and individu-ally adjust how much glissando is applied to each step, causing some steps to be sudden and others to glide. Or, you can do both… adjust the whole bunch of them glob-ally with the gliss knob and then set the groove switch and groove on using the 16 small knobs, but please do it inthat order, and do not go back and adjust the gliss knob or you’ll have to start grooving all over again. Got it? Probably not. Just go screw around with it and something good will happen.DELTA CONTROL:We came up with this mode where the tempo can speed up and slow down, and the rate at which that happens we call DELTA.To activate DELTA mode, push and release both the “tapdiv/delta” and “steps/preset” knobs at the same time. Each push moves the mode led next to the “tap/hold” button. Stop when you get to delta.When the “tap div/delta” knob is held down and turned, it adjusts the delta rate. This controls the rate of change when the pedal is speeding up or slowing down. Selecting the little arrow pointing left on the mini toggle switch causes the tempo to decelerate when you step on the “tap/hold” but-ton. When you release that button, the speed snaps back to the original tempo. Fun, huh? If you choose the little arrow pointing right then press and hold the “tap/hold” button, it speeds up until you let go of the “tap/hold” button. Then it again snaps back to the original tempo. Want even more fun? Put that little switch in the middle between the arrows. Now, when you hold down the “tap/ hold” button it’ll alternately slow down and stay there (when you release the button), then speed back up and stay there (after the next hold and release) and so on, alternating faster to slower. This middle position of Delta behaves a little differently when the pedal is being clocked by a MIDI device. It will alternately speed up and slow down as before, but instead of remaining at the tempo when released, it will snap back to the MIDI clock. Remember, the rate at which this all takes place is controlled by the “tap div/delta” knob… just hold down and turn the “tap div/delta” knob to adjust it to one of the sixteen different rates. HOLD:When the “tap div/delta” and “steps/preset” knobs are pushed simultaneously for a moment, you can change the function of the “tap/hold” switch and select HOLD mode.In this mode, the sequencing stops when you push and hold the “tap/hold” switch, and continues when you let go. This feature works with MIDI clocking and all other tempo choices.GO TO 1:This is another function of the “tap/hold” button. Whenever you want the sequence to go directly to 1 and collect $200, tap the “tap/hold” switch ONCE. You have to be in TAP TEMPO mode (to get there, push and release both the “tap div/delta” and “steps/preset” knobs to cycle through the modes). Important Note: this is a really cool trick, butif you tap too close together you will wind up entering a new tempo. Using this feature with MIDI is really fun, and you don’t have to worry about tapping too often. You can interrupt your sequence at any time, and jump back to the beginning. This allows you change the sensation of your sequence by moving the apparent start point. You can also stutter the beginning of your sequence to complicate the pattern.EXPRESSION PEDAL INPUT:You can control either tempo or global glissando settings with an external expression pedal. Simply plug an expres-sion pedal into the input on the back of the Super Seek Wah with a ¼” TRS cable. Set the expression pedal mini toggle switch to either “gliss” or “speed”. That assigns control of the selected parameter to the expression pedal, and simultaneously disables the corresponding knob on the pedal. When using the Super Seek Wah without an external expression pedal, put the expression selector switch in the OFF position. And there’s one more secret thing you cando with the expression pedal. If you have the expression set to control “speed” but you also have the Step/Seq/Rnd toggle in “Step” you’d think nothing would happen, right? Wrong! In this setting you can glide forward and backward through the stages dependent on the position of the expres-sion pedal.I N D I V I D U A L G L I S S A N D OPage 2 of 4EXTERNAL TAP IN/OUT:There’s one more ¼” jack on the back that lets you slave your other Super Seekers(as well as most other pedals with a ¼” tap tempo in/out jack) together, or use an external momentary switch to tap in tempo remotely. When Super Seekers are connected to each other’s tap in/out jack, tap-ping on any one of them will cause all of them to jump to that tapped tempo.SAVING PRESETS:If you come up with a favorite program and you want to be able to recall it later, there are 8 “slots” in which a com-plete setup can be stored. To prepare for storage, push the “steps/preset” knob down and turn it to one of the 8 slots (one led in the first 8 steps will indicate which slot you’ve selected). Next, get your programming all done, adjusting your individual settings and fine-tuning the pedal until you’re happy. When you’re ready to save your settings, hold down the “steps/preset” knob and then push and hold down the “tap/hold” button until you see a couple of LEDs flicker next to that button. Your program is saved and will remain in memory even if the battery is removed from the pedal. What exactly gets saved? Glissando and groovy settings, last tempo settings, your last chosen mode (HOLD, DELTA, TAP),your chosen number of stages, tap/midi division, and DELTA setting. The DELTA toggle position and STP/SEQ/RNDtoggle position are also saved. The expression toggle position and GROOVE/WAH toggle position are not saved. RECALLING PRESETS:To access a saved preset, push down and turn the “steps/ preset” knob until you get to the slot you wish to recall. Re-lease, and voila! You’ve recalled your preset. You might have to reset the expression toggle position and GROOVE/WAH toggle, those settings are not saved.HOW TO SAVE A SETUP WHEN YOU’RE NOT IN THE SLOT WHERE YOU WANT TO SAVE IT:That was a mouthful. When you’re fooling around with the Super Seek Wah and come up with a really cool setup that you want to save, you may suddenly realize that you aren’t parked in the slot where you want to save it. In fact, you may be parked in a slot that you really don’t want to write over. What to do? Very simple, really, but be careful. Pick a slot that you (probably) don’t care about, or may be empty. Push in the “steps/preset” knob and rotate it to the slot that you want to over write. DON’T RELEASE IT! Now push down the “tap/hold” switch and wait until you see the happy blinky LEDs illuminate next to it. You’ve just saved your set-tings in the selected slot.If you accidentally release the “steps/preset” knob before you push and hold the “tap/hold” switch, you’ll wind up loading whatever preset was chosen (if there was one stored there), and lose the settings you were trying to save. Also, if you chose a slot that you thought contained nothing important and it was actually a really wonderful setup that you never ever ever wanted to lose, you just lost it. DON’T DO THAT! There are 8 program slots for you to fill with your creative genius. We left ourselves a little extra room in the Super Seek Wah’s brain for code updates. Just in case we think of something really fun to add later. Although activat-ing more features may eventually require pushing all buttons at once, while rubbing your nose on the back of the unit. INTERNAL CONTROLS:Inside the pedal you’ll find a trim pot for changing the global Q setting (frequency sweep from top to bottom) of the wah. The pot is set here at the shop for maximum range. POWERING YOUR PEDAL:We highly recommend that you use a high-quality 9VDC power supply with your Super Seek Wah with at least100mA capability. It should have a center-negative BOSS-type barrel connector. The pedal can operate using a 9V battery but do not expect much battery life… this thingis a power hog because of all of the LEDs and the micro controller.WARRANTY:As with all Z.Vex Effects, we will be very happy to help you out and fix up any damaged or defective Z.Vex product. To extend your Vexter’s warranty from 1 year to 2, please fill out the enclosed warranty card and mail it to us, or contact **********************************.Feelfreetocontact ********************/************************* questions.Enjoy!WE’VE INCLUDED A PHOTO OF THE SUPER SEEK TREM™ON THE REVERSE OF THIS PAGE FOR YOUR CONVENIENCE!Page 3 of 4P |*************|****************Last Updated: December 2013Page 4 of 4。
harman kardon avr 161用户指南说明书

Transform your living space into your own private screening room.Harman Kardon® AVR 161Introducing the Harman Kardon® AVR 161, a powerful and versatile 5.1-channel audio/video receiver designed for those home entertainment enthusiasts who demand great sound and a variety of connectivity options. Equipped with five HDMI® inputs, integrated Bluetooth® technology and an MHL input, this high-performance AVR has everything you need and more.Because you have multiple ways to store and access your entertainment, it’s important that your audio/video receiver can deliver them. The Harman Kardon AVR 161 features five 3D-ready HDMI inputs (including one that’s MHL-compatible), HARMAN TrueStream Bluetooth technology, EzSet/EQ TM III calibration and compatibility with vTuner TM Internet radio, DLNA® 1.5 networking and the Roku Streaming Stick TM dongle. So whether you’re connected via cable or streaming wirelessly, you’ll experience high-fidelity audio from this 425-watt, 5.1-channel, networked audio/video receiver. It’s even lightweight, thanks to HARMAN GreenEdge TM certification; you’ll get all the power you love, in an environmentally friendly form.Highlights• Five 85-watt-per-channel amplifiers with high-performance digital power supply• Bluetooth technology and DLNA 1.5 compliance• HARMAN TrueStream technology• Built-in vTuner (Internet radio) streaming• Five 3D-ready HDMI inputs including one with MHL• Front-panel USB port for connection to compatible Apple products or USB sticks• MHL connectivity• Dolby® TrueHD and DTS-HD® Master Audio decoding • EzSet/EQ III auto-calibration• HARMAN GreenEdge technology• New, compact design• Colour-coded connectors and binding-post speaker terminals• Multidevice, programmable remote control• Harman Kardon remote app for compatible iOS® and Android TM smartphones and tablets485 watt, 5.1-channel, Roku Ready TM networked audio/video receiver with HARMAN TrueStream Bluetooth®technology and five HDMI® inputs including a Mobile High-Definition Link (MHL) port HARMAN KARDON® AVR 161Key FeaturesFive 85-watt-per-channel amplifiers with high-performance digital power supplyThe AVR 161 high-performance audio/video receiver pumps out 85 watts per channel to power a full five-channel, networked surround-sound system. It can also connect to a powered subwoofer to provide enhanced low-frequency performancefor all your entertainment. While the amplifiers retain the time-tested Harman Kardon® high-current capacity (HCC) ultrawide-bandwidth design to ensure the most accurate, dynamic sound with enhanced clarity and realism – even at the highest listening levels, a digitally based power supply gives the amplifiers all the wattage they need without the weight of traditional power-supply designs and their heavy transformers. The net result is a great-sounding AVR in a small form that is friendly to the environment. Bluetooth technology and DLNA 1.5 complianceThe AVR 161 can stream audio from virtually any portable device. You can connect an Apple device, such as an iPad, iPhone or iPod touch, directly to the front-panel USB jack and playback without the need for an external adapter. For other tablets, smartphones and laptops, you can take advantage of the AVR 161’s integrated HARMAN TrueStream Bluetooth technology. The AVR is also DLNA 1.5 compliant, which gives you more options for delivering content over your home network. HARMAN TrueStream technologyThe HARMAN TrueStream guarantee ensures the best possible listening experience when you stream audio wirelessly via Bluetooth technology. HARMAN TrueStream tech delivers the most current, most advanced wireless option to ensure the highest-quality sound, no matter what application or source device you use.Built-in vTuner (Internet radio) streamingThe AVR 161 features vTuner Internet radio to connect you to a whole world of online audio entertainment. As soon as it’s out of the box, you can stream over-the-air radio stations from around the globe as well as stream from a wide range of Internet-only radio stations.Five 3D-ready HDMI inputs including one with MHLFive HDMI inputs with 3D and 30/36-bit Deep Color deliver high-definition digital video at resolutions up to 1080p with full-fidelity audio through a single cable. There is no loss of video or audio quality because of format conversion, just full-impact Hollywood excitement as its creators meant you to experience it.Front-panel USB port for connection to compatible Apple products or USB sticksThe AVR 161 gives you multiple options for audio playbackwith its front-panel USB port. Simply connect an iPhone, iPad, iPod or USB stick to play your stored tracks through your home entertainment system.MHL connectivityWhether it’s captured by your camera, phone or tablet, or streamed from a Roku Streaming Stick dongle, you can deliver high-definition audio/video content directly to your HDTV via the AVR 161’s MHL connection. Dolby TrueHD and DTS-HD Master Audio decodingThe AVR 161 delivers high-resolution audio that matches the digital video quality of Blu-ray Disc TM formats, unlocking the full potential of movie soundtracks formatted with Dolby TrueHD and DTS-HD Master Audio decoding. No matter what mode or mood you are in, you’ll always hear audio playback at its finest.EzSet/EQ III auto-calibrationThe new HARMAN EzSet/EQ III auto-calibration process precisely adjusts the AVR 161’s volume levels, speaker distance/delaytime settings and equalisation to optimise audio performance automatically for your specific speaker system and room conditions. The system features an easy-to-follow menu display and includes a plug-in calibration microphone.HARMAN GreenEdge technologyThe HARMAN GreenEdge logo assures you that the AVR 161’s design is environmentally friendly without compromising the premium performance for which HARMAN products are known. Thanks to an advanced power supply, the AVR 161 can deliver high-quality audio in a small, light chassis that uses less metal and plastic. The small design means that less fuel is used in transportation with the end result being a lower carbon footprint. New, compact designThe AVR 161 takes the award-winning Harman Kardon look to a new level with a flush volume control and more compact design. Because of the lighter weight made possible by an advanced digital power supply, the unit weighs less without sacrificing performance so that it is the perfect match for the thin glass shelves of today’s open TV/entertainment furniture.Colour-coded connectors and binding-post speaker terminals All connections on the AVR 161 are colour-coded to simplify hook-up and reduce errors. Colour-coded binding post speaker terminals on all output channels accept pin connectors or bare wire to provide secure links for your speaker cables. Multidevice, programmable remote controlThe AVR 161 simplifies your life with a programmable infrared (IR) remote control. It works seamlessly with the receiver’s multilingual on-screen display, guiding you through system setup and operation with consummate ease. The multidevice remote can also control your TV, cable boxes, satellite tuners and other playback sources. For further installation flexibility, there is a 12-volt trigger output and a remote IR sensor input.Harman Kardon remote app for compatible iOS and Android smartphones and tabletsTaking control to the next level, the Harman Kardon remote app is available from the iTunes App Store for iOS devices and the Google Play service for compatible Android products. It willlet you use your compatible smartphone or tablet to drive the AVR 161 without picking up the remote.Beautiful sound for all of your treasured devicesWhat’s in the box• 1 Harman Kardon® AVR 161 A/V receiver• 1 programmable remote control• 1 EzSet/EQ III microphone with 6.7m (22') cable • 1 AM loop antenna with 0.6m (2') cable• 1 FM antenna with 1.8m (6') cable• 2 AAA batteries• 1 1.8m (6') AC power cord• Quick-start guide• Warranty card• Safety sheetAvailable Downloads• Remote-control application for compatible iOS products from the iTunes App Store• Remote-control application for compatible Android products from the Google Play service• Harman Kardon Media Manager fromHarman Kardon AVR 161Audio Section• Stereo power: 85W per channel, two channels driven @6/8 ohms, 20Hz – 20kHz, <0.1% THD• Multichannel power: 85W per channel, two channels driven @ 6/8 ohms, 20Hz – 20kHz, <0.1% THD• Input sensitivity/impedance: 250mV/27k ohms• Signal-to-noise ratio (IHF-A): 100dB• Surround-system adjacent channel separation:• Dolby Pro Logic®/DPLII: 40dB• Dolby Digital: 55dB• DTS®: 55dB• Frequency response (@ 1W): 10Hz – 130kHz (+0dB/–3dB) • High instantaneous current capability (HCC): ±29 amps• Transient intermodulation distortion (TIM): Unmeasurable • Slew rate: 40V/sec FM Tuner Section• Frequency range: 87.5MHz – 108.0MHz• Usable sensitivity IHF: 1.3µV/13.2dBf• Signal-to-noise ratio (mono/stereo): 70dB/68dB• Distortion (mono/stereo): 0.2%/0.3%• Stereo separation: 40dB @ 1kHz• Selectivity (±400kHz): 70dB• Image rejection: 80dB• IF rejection: 80dBAM Tuner Section• Frequency range: 522kHz – 1,620kHz• Signal-to-noise ratio: 38dB• Usable sensitivity (loop): 425µV• Distortion (1kHz, 50% mod): 1.0%• Selectivity (±10kHz): 30dBVideo Section• Television format: PAL• Input level/impedance: 1Vp-p/75 ohms• Output level/impedance: 1Vp-p/75 ohms• Video frequency response (composite video):10Hz – 8MHz (–3dB)• HDMI: Supports up to 4K x 2KGeneral Specifications• Power requirement: 220V – 240V AC / 50Hz – 60Hz• Power consumption: <0.5W (standby); 450W maximum • Dimensions (H x W x D): 121mm x 440mm x 300mm(4-3/4" x 17-5/16" x 11-13/16")• Weight: 4.6kg (10 lb)Go online to register your purchase and access tips that will show you just how beautiful sound can get. /registermyproductHARMAN International Industries, Incorporated8500 Balboa Boulevard, Northridge, CA 91329 USA© 2013 HARMAN International Industries, Incorporated. All rights reserved. Harman Kardon is a trademark of HARMAN International Industries, Incorporated, registered in the United States and/or other countries. EzSet/EQ, GreenEdge and the “beautiful/sound” logo are trademarks of HARMAN International Industries, Incorporated. Apple, AirPlay, iPad, iPhone, iPod, iPod touch and iTunes are trademarks of Apple Inc., registered in the U.S. and other countries. iPod, iPhone and iPad not included. Android is a trademark of Google Inc. Use of these trademarks is subject to Google Permissions. The Bluetooth word mark and logo are registered trademarks and are owned by the Bluetooth SIG, Inc., and any use of such marks by HARMAN International Industries, Incorporated, is under license. Blu-ray, Blu-ray Disc and their respective logos are trademarks of the Blu-ray Disc Association. DLNA and the DLNA logo are registered trademarks of the Digital Living Network Alliance. Dolby, the double-D symbol and Pro Logic are registered trademarks of Dolby Laboratories. DTS and the DTS logo are registered trademarks of DTS, Inc. DTS-HD Master Audio is a trademark of DTS, Inc. HDMI, the HDMI logo and High-Definition Multimedia Interface are trademarks or registered trademarks of HDMI Licensing LLC. iOS is a registered trademark of Cisco Systems, Inc., and/or its affiliates in the United States and certain other countries. Roku, the Roku logo and the Roku Ready logo are registered trademarks of Roku Inc. in the United States and other countries. Roku Ready and Roku Streaming Stick are trademarks of of Roku Inc. in the United States and other countries. vTuner is a trademark of Nothing Else Matters Software, Ltd., Inc.Features, specifications and appearance are subject to change without notice.All the power you need to enjoy the things you love。
横河记录仪MV1000

低电压指令: 符合EN61010-1,测量类型II,污染程度2
C-Tick:符合AS/NZS CISPR11,Class A Group 1
● 高耐压半导体继电器 MVAdvanced使用横河电机开发的高耐压半导体继电器作为切换 输入信号的扫描仪。高耐压半导体继电器由实现了1500VDC高耐 压及3nA低漏电流的MOSFET和光电耦合 器构成,能够达到125ms/48ch(MV2048) 的高速扫描,延长了扫描仪的使用寿命, 并且消除了噪声。
■ 丰富的网络功能
具有目前最新的网络技术,网络功能更加完善。除了E-mail、Web服务器和FTP功能,还具有时间同步(SNTP)和自动网络配置(DHCP)功 能。
● E-mail传输功能
MVAdvanced能够通过E-mail发送报警信息、定时瞬时值、报表 数据和其他信息。另外,还可进行传输认证,具有POP Before SMTP功能。
通过使用SNTP客户端功能,可以将MVAdvanced的时间与SNTP 服务器同步。也可通过设定将MVAdvanced作为SNTP服务器使 用。
● Modbus/TCP功能、Modbus/RTU功能 通过Modbus协议,可与其他设备连接,实现数据的读取和写入。
Modbus/RTU(RS-422/485থ)
०ڦڇยۨօየ๑ᆩࢽీࠕ߸ں ਸ๔֪ଉƽ
ൣည၂๖
גൣညLCD၂๖ೡă ߸ेጝሁڦ၂๖হ௬ƽ
ీݴဆ
ൟথPCLjํ၄ీ ຕݴဆƽ
ő! ۅܠ BesCtl-aisns
! MV1000: 24ཚڢ MV2000: 48ཚڢ
ő! ߛ੍ႠLj้क़٪ ئBesCtl-aisns
新奥特HIMALAYAA1100HD高标清兼容非线性编辑系统产品方案V1.0

新奥特HIMALAYAA1100HD⾼标清兼容⾮线性编辑系统产品⽅案V1.0Himalaya A1100HD产品介绍⽬录系统总述: (2)规格参数: (2)⼀.主要技术特点 (3)⼆、主要功能| 输⼊与输出 (8)三.主要功能| 专业化的素材管理及查找 (11)四、主要功能| 灵活⽽精细的编辑⼯具 (12)五、主要功能| 字幕插件 (14)六、主要功能| ⾳频编辑 (15)七、主要功能| 实时特效处理 (17)⼋、主要功能| 视⾳频内容技术质量保障 (19)九、喜玛拉雅整机产品主要特征附表 (20)系统总述:Himalaya A1100HD是⼀款全功能⾼清⾮编产品,⾼标清兼容,内嵌字幕操作系统,该产品基于MATROX MXO2LE 视⾳组件,具备⾼清SDI、HDMI、分量,及标清全接⼝,可进⾏基于DNxHD、MPEG2HD AVI等常⽤⾼清视频格式进⾏实时混合编辑及输出。
规格参数:系统配置(主机平台HPZ420专业图形⼯作站)处理器Intel E5 1620(3.4Ghz 4核⼼)内存DDR3 1600MHZ 8GB专业⾼端显卡蓝宝⽯HD7750 1G GDDR5专业图形卡⽩⾦版刻录光驱DVD+RW刻录光驱系统硬盘500GB SATAIII接⼝素材盘4TB企业级硬盘进⼝MXO2LE(原装视⾳频接⼝盒)⼴播级专业视⾳频采集器显⽰器22⼨宽屏液晶显⽰器键盘⿏标光电键⿏套装操作系统Window 7 64bit专业版正版操作系统软件Himalaya 5.0⾼标清兼容专业⾮线性编辑系统(内嵌专业字幕软件)接⼝⽀持HD/SD-SDI视频输⼊1路HD/SD-SDI输⼊HD/SD-SDI视频输出2路HD/SD-SDI输出模拟视频输⼊分量(⾼、标清)复合标清S端⼦模拟视频输出分量(⾼、标清)复合标清S端⼦HDMI视频输⼊1路HDMI输⼊HDMI视频输出1路HDMI输出平衡⾳频输⼊2路专业平衡模拟⾳频,XLR接⼝平衡⾳频输出2路专业平衡模拟⾳频,XLR接⼝⾮平衡⾳频输⼊2路专业⾮平衡模拟⾳频,RCA接⼝⾮平衡⾳频输出2路专业⾮平衡模拟⾳频,RCA接⼝SDI嵌⼊⾳频输⼊8路内嵌⾳频SDI嵌⼊⾳频输出8路内嵌⾳频HDMI嵌⼊⾳频输⼊8路内嵌⾳频HDMI嵌⼊⾳频输出8路内嵌⾳频同步输⼊采⽤三电平同步(Tri-Sync)设备控制Sony? RS422 录机控制端⼝1394 i.LINK 接⼝(IEEE 1394,6 芯)USB ⾼速USB (USB 2.0) 端⼝A 类接⼝FTP ⽀持FTP协议,采⽤PORT模式视⾳频标准⾼清格式⽀持1080i50、1080i29.97、720p50、720p59.94、1080p23.98标清格式⽀持576/25 PAL(4:3)、576/25 PAL(16:9)、480/29.97 NTSCSDI标准SMPTE 259M、292/296M视频采样4:2:2⾊彩精度4:2:2 8-bit⾊彩空间4:2:2⾳频采样电视标准的48KHZ,16bit量化采集卡类型PCI Express 1通道,兼容1、4、8、16通道PCIe插槽处理⾼清下变换软件下变换实时特效采⽤GPU+CPU加速渲染技术⼀.主要技术特点1.64位处理能⼒64位引擎能更容易处理更复杂的编解码、更⼤幅的画⾯,内存中能存储更多的帧,让Himalaya开⾜马⼒,实现快速、灵敏的剪辑,每⼀步操作都即时呈现效果。
TASCAM DV-RA1000HD高分辨率音频 DSD主机录音机说明书

239PRICEVOCOP RO CDR1000-P RO CD-R/RW RECORDER A standalone CD burnerdesigned for quick burning of music and vocals on the road or on stage without acomputer. It has the ability to burn music to CD-R, CD-RW live in real-time, erasedata from CD-RW discs and create separate tracks while recording live. It featuresa digital coaxial audio input (compatible with 44.1 kHz), RCA and balanced XLR audioline in/out connections, headphone jack, and recording level control. It is 1RU andcomes rackmount ready.ITEM DE S CRIPTION PRICE CDR1000-PRO ...........CD-R/RW recorder, 1RU ...............................................................399.00 UBLISHING EZ Dupe’s Publishing Plant is a full-on produc-tion facility for all of your DVD or CD media needs. The Publishing Plant is only 23 inches wide and 21 inches deep. Its engineering design segues into an Epson Artisan 50 printer, creating a fully automatic system. It writes DVDs at 20x speed, and CDs at 48x. It features a 100 disc capacity, and is compatible with most DVD and CD formats. Includes an LICATION All models come standard with a 160GB HDD and USB2.0 interconnect. Stand-alone tower models only. Professional duplication with up to 20x speed for DVD+/-R, 8x for DVD+/-RW, 8x for DVD+/-DL, 52x for CD-R, and up to 32x for CD-RW. Available in 2- to 11-target configurations. Models shown below are most popular configurations, call for others. PRICEEPSON PP-100 DISCPRODUCER SERIESDISC PRINTERS Offering the lowest cost per print,and Epson’s renowned print quality, Discproducer has amaximum output of 100 disc per session, with an hourlyrate of 30 CDs or 15 DVDs. In print-only mode, thePP-100 can print up to 45 discs per hour. The networkedversion can receive up to five jobs at the same time andhas been optimized for working in groups. The security version is designed for applica-tions requiring top-level security and archived data protection. The Autoprinter can printonto 100 CDs and/or DVDs in one session, with an hourly rate of 95 discs. All modelsfeature bi-directional printing and print at resolutions of up to 1440x1440 dpi.ITEM DE S CRIPTION PRICEPP-100......................Epson Discproducer ...................................................................2695.00PP-100N worked version of PP-100 ..........................................................CALLPP-100NS worked version of PP-100 w/security .........................................CALLPP-100AP .................Epson Autoprinter ......................................................................1950.00AccessoriesPJIC-SET ...................Set of 6 ink cartridges, 1 in each color .......................................230.00PJIC1-C .....................Cyan ink cartridge .........................................................................40.00PJIC2-LC ...................Light cyan ink cartridge ................................................................40.00PJIC3-LM ...................Light magenta ink cartridge .........................................................40.00PJIC4-M ....................Magenta ink cartridge ...................................................................40.00PJIC5-Y .....................Yellow ink cartridge .......................................................................40.00PJIC6-K .....................Black ink cartridge ........................................................................40.00C13S020476 .............N E W !240EZ DU E MEDIA MIRROR MULTI-FORMAT DUPLICATOR The Media/Mirror backs up audio andvideo DVDs and CDs, many types of media cards (CFI/II, SD, MS-Pro Duo are most common types), andUSB media devices. Features multi-session technology,which permits several memory cards or USB devices tobe placed on a single DVD or CD. It will also place mediafrom media cards larger than CD or DVD capacity ontomultiple discs. Professional duplication with up to 20x for DVD±R, 8x for DL DVD±R, DVD+RW, 6x for DVD-RW, 56x for CD-R, and 32x for CD-RW. All units carry a 3-year manufacturer’s warranty.ITEM DE S CRIPTION PRICE MM01PIB ..................Single-target multi-format duplicator .........................................389.00MM02PIB ..................Dual-target multi-format duplicator ...........................................459.00MM03PIB ..................Triple-target multi-format duplicator ..........................................529.00EZ DUPE MEDIA MAVEN SERIES DVD /CD /MEDIACARD DUPLICATION SYSTEM This series of profes-sional duplicators is lightning fast in reproducing mirror-image copies of virtually every type of media card with theoptional media expander. It features a SATA drives for themost accurate transfer of data. Create DVD & CD cop-ies from USB directly to disc with the touch of a button.Professional duplication with up to 8x speed for DVD, 52xon CD. Optional media expander writes to Micro SD, MS/MS Duo, Mini SD, SD/SDHC and MMC cards.ITEM DE S CRIPTION PRICE MMM30 .....................1 source, 3 target DVD/CD duplicator .........................................479.00MMM50 .....................1 source, 5 target DVD/CD duplicator .........................................629.00MMM70 .....................1 source, 7 target DVD/CD duplicator .........................................769.00MMM90 ..................... 1 source, 9 target DVD/CD duplicator .......................................1019.00MMMEX .....................11 target media expander for multi-media maven .......................22.95MICROBOARDS COPYWRITER® ive bring digital-quality audio to your church, school, studio, or boardroom. Record from practically any audio source, including live feed from a microphone, a cassette deck, a mixer, and many MICROBOARDS COPY WRITER & COPY WRITER PRO CD/These towers feature industrial Optiarc recorders that copy both DVD and CD formats. In addition these support bit to bit data verification, ensuring a perfect burn every time. These support nearly every format like DVD Video, DVD ROM, DVD+R/-R, DVD-RW, DVD+RW, and dual layer DVD. Supported CD formats are CD-DA (Red Book), CD-ROM modes 1&2, XA forms 1&2, ISO 9660, Photo CD, CD-Extra, HFS, and Hybrid. The Pro versions feature onboard 320GB hard disc drives. EZ DUP E P ORTABLE USBDUPLICATORS These por-table, stand-alone USB dupli-cation systems feature userfriendly 4-key control with L CD, 2GB per minute USB duplication andbit-by-bit Compare function to confirm successful copies. No warm-up or cool-down is required. Other features include test and check functions for USB drives, real-time display of detailed information, and ergonomic, portable design.ITEM DE S CRIPTION PRICE 2CUSB .......................2 target, portable USB duplicator/tester .....................................149.956CUSB .......................6 target, portable USB duplicator/tester .....................................989.002CUSB 6CUSB MICROBOARDS G3 SERIES DISC PUBLISHERS The G3P-1000 DVD/CD disc publisher has a single recorder, with 50 disc input capacity. It burns 24x for DVDs, and 48x for CDs. Utilizes HP inkjet technology to produce images at up to 4800dpi via a single tri-color cartridge (GX-300HC). The G3PBD-1000 shares the same features but adds 8x Blu-Ray disc publish-ing capability. The G3A-1000 is an autoprinter version only. Compatible with Pentium 4 3.0GHz or greater machines running: Windows and Intel-based Macs OSX 10.5+ compatible. Comes MICROBOARDS CX-1 DVD/CD/BLU-RAY low cost-per-unit. Comes with PRINTWRITE-2 disc EZ DUPE STUDIO STANDARD RACKMOUNT SERIESDurable, stylish, and rugged designs with heavy-duty housing which are ideal for an industrial environment. These commonly feature a 250W, 350W, and 400W industrial power supply with safety approved selectable voltage, 8cm ball bearing fan to maxi-mize ventilation, and 80GB hard drive standard. Professional duplication with up to 20x speed for DVD+/-R, 8x for DVD+/-RW, 10x for DVD+/-DL, 40x for CD-R, and up to 32x for CD-RW. Units carry a 4-year manufacturer’s warranty.ITEM DE S CRIPTION PRICE RK3TDVDSOB ..3-target CD/DVD rackmt duplicator, Sony, 80 GB HDD, black ................589.00RK5TDVDSOB ..5-target CD/DVD rackmt duplicator, Sony, 80 GB HDD, black ................759.00RK7TDVDSOB ..7-target CD/DVD rackmt duplicator, Sony, 80 GB HDD, black ................899.00RK9TDVDSOB ..9-target CD/DVD rackmt duplicator, Sony, 80 GB HDD, black ..............1099.00Shop anytime. Buy online. Honesty and Valuesince 1971242MICROBOARDS QD/QDH SERIES DVD/CD DUP LICATORSAffordable duplication solutions for copying audio, video,or data. They feature small desktop footprints, anduse an easy-to-use 4 button touch panel interface.Supported formats include DVD-R, DVD+R, DVDVideo, DVD-ROM, DVD-DL, All CD formatsincluding CD+G. Also features copyverification & track extractionfeatures, USB 2.0 intercon-nect, and Zulu2 disc masteringsoftware. 1 year manufacturer’sRECORDEX RX-100 SERIES CD DUP LICATORSThese small, high-capacitysional gravity disc feeding system (as opposed to roboticpicking arms) that can load and unload a disc in just 3seconds. You can leave it unattended for hours with the100-disc input and output bin. Duplicators feature singletiple simultaneous operations. Enclosed design systemkeeps the unit dust-free and nearly silent. The RX-100PCincludes a premium software suite that allows it to ripCDs to MP3s, back up data, create and restore ISO files,erase RW discs, duplicate data discs, and burn copies ofaudio files. In addition to MP3, the unit supports WMA, WAV, and OGG formats. The RO™ COMMERCIAL RINTERS These are auto printers that create photo-quality results in under a minute. They have a smart dual cartridge system which prints true black while saving the color cartridge specifically for color applications tridges. Compatible with most major brands of optical media. Both printers use standard off-the-shelf HP ink cartridges (HP56 black, HP57 color). Minimum system requirements – Pentium Designed for industrial environments, the MX-1 and MX-2 come with 1 or 2 high-speed DVD/CD recorders, and a low cost-per-disc inkjet printer (4800dpi) for a complete publishing solution. The PF-Pro (PFP-1000) is a printer only, with no recorders. All units feature 100-disc input/output and enhanced automation for reliable loading & unloading of discs. Ships with software for Mac/PC and connects via USB2.0. Please call to verify sions are also available. Comes with PRINTWRITE-2 disc publishing software.This small autoloader has 3 recording drives, a 250GB hard drive and can make 60 discs a run. Records at speedsup to 24x for DVD±Rs & DVD±RWs, and 48x for CD-R &CD-RWs. Writes at speeds up to 40x for CD-Rs, 24x forCD-RWs, DVD-Rs, and DVD+Rs, 8x for DVD+RWs, and 6x forN E W !Tenemos ventas y servicio en Español.Expertos que hablan Español disponibles en x1178 y x1164.Honesty and Valuesince 1971。
MAX1000操作说明
在键盘加电启动时,按住 LCD 显示屏左手边向上的键即可进 入键盘的设置模式。
在设置模式中,LCD 显示屏会提示用户用数字键盘输入需要的 信 息 。按 回 车 键 或 向 下 键 进 入 下 一 设 置 菜 单 ,按 向 上 的 键 返 回 上 一 设 置 菜 单 ,设 置 完 键 盘 地 址 、通 讯 波 特 率 、和 操 纵 杆 速 度 范 围 后 ,一 定 要 保 存 这 个 设 置 。保 存 设 置 时 要 确 保 键 盘 在 桌 面 上 是 水 平 的 ,操 纵 杆 要 回 到 0的 位 置 。 设 置 信 息 保 存 在 芯 片 中 一 直 到 下 一 次 被 修 改 。
2.1、输入需要的数字
如何、为什么要输入数字 ? 在这一本手册中讨论的几乎所有的 CCTV 键盘操作, 都和数字
的输入有联系。 例如:选择一台摄像机或者为一个轮巡设置一个时 间间隔等。
用 CCTV 键 盘 上 的 选 择 面 板 输 入 需 要 的 数 字 ,当 输 入 的 数 字 位 数
比设定的数字位数要少时,要按
1
北京文豪科贸有限公司广州分公司 Kenzo
第1章 概 述
1.1、简介
MAX-1000闭路电视 (CCTV) 管理系统实际上是一台控制视频切 换矩阵系统的计算机。 操作员可以通过 CCTV 键盘把不同的摄像机 图 像 切 换 在 不 同 的 监 视 器 上 显 示 ,操 作 员 也 可 以 通 过 CCTV 键 盘 上 的 操 纵 杆 和 其 它 键 对 有 上 、下 、左 、右 、镜 头 控 制 功 能 的 摄 像 机 进 行 遥控。
音乐发烧友的归宿 HIFIMAN HM1000云音乐高清播放器

48
低中高三频方面,HIFIMAN HM1000的整 体表现可总结为均衡和自然。低频下潜得恰到好 处,诸如在蔡琴的歌曲《渡口》中,鼓点有着不错 的下潜和弹性;中频方面,人声紧致不松散,各 种风格的歌曲,HIFIMAN HM1000都能驾驭得 轻松写意,并且得益于强大的底噪抑制,人声足 够纯净,特别是在听类似《渡口》这样的吟唱时, 声音极富感染力,仿佛歌者就在面前;至于高频, HIFIMAN HM1000的声音够亮,张力十足,且 没有毛刺感。
Hands-on 品鉴
音乐发烧友的归宿 HIFIMAN HM1000
云音乐高清播放器
在音乐 播放器 的圈子,提 到“ 太子”二字,大 都 会 想 到H FI M A N家的R 2R 2 0 0 0 云 音乐高清 播放器。而 在 前不久,H I FI M A N又 推 出了H I FI M A N H M10 0 0 云 音乐高清播放器(以下简 称H I FI M A N H M10 0 0),即“ 太 上 皇”。从辈分 来 看,“ 太 上 皇”要 高于“ 太子”,那么实际 体验是否如此呢?咱们不妨来一探究竟。
在 实 际 的 体 验 过 程 中 ,H I F I M A N HM1000利用USB DAC模式可以最高支持 24bit/384KHz的无损音频文件,对于音乐发烧 友来说,满足聆听音乐的需求完全不在话下,通 过这种模式还能够连接手机、平板电脑等智能 设备进行DFF和DSF解码需求。而将HIFIMAN HM1000作为DAC来使用时,同样的音乐,经过 HIFIMAN HM1000“润色”之后,带来了更纯 正、纯净的音质,同时对底噪的控制也非常棒。
这种体验的区别很明显,哪怕自嘲是“木耳”的 同学,也能在短时间内听出差别。
那 么 落 脚 到 具体 的 音 质 环 节,H I F I M A N H M10 0 0 距 离“天 花 板 ”又有多远 呢 ?得 益 于 两颗PCM1702芯片,HIFIMAN HM1000还原 的 声 音从 清 晰 度、通 透 度、细 节 表 现 力 都 是 普 通 A PE、FL AC所 达不 到 的。同时,声场方面, HIFIMAN HM1000给人的感觉是定位清晰,在 聆听一些交响乐的时候,乐器方位能够很好地辨 认,空间感明显—当然,想要获得明显的空间 感,除了播放器解析到位,耳机也不能太差,如果 你对空间感很在意,建议入手HIFIMAN家的平 板振膜耳机。
北京协和医学院内分泌博士课程02-潘慧生长激素缺乏性矮小症20110907

FDA已经批准的rhGH十大适应症
___________________________________________
___
适应症
批准时间
———————————————————————
GHD患儿的长期治疗
1995.3.25
AIDS相关的代谢病和消瘦 PWS患儿的长期治疗
1996.8.23 2000.6.20
Gonads
T E2
Liver
IGF-1
Bone epiphysis
GH轴
主要作用
激素对生长的作用
GH 细胞数目
RI
T4
T
F
细胞质增添 细胞数目 细胞质增添 抑制生长
与GH关系
缺乏RI, 与GH有协 促进GH 可能减低
GH作用 同作用
分泌 GH释放
DNA合成
细 RNA合成 胞 蛋白质合成 甚至在停食及 仅在进食及
1956年首次从人垂体中提取phGH 1958年用于临床治疗GHD病人
1984年发现:phGH治疗后发生慢病毒脑炎, 被禁止使用。
1979年采用基因重组技术,rhGH问世。 80年代开始用于临床
目前国内已生产至少5种rhGH
生长激素替代治疗
常用重组人生长激素
➢金磊 ➢珍怡 ➢思真 ➢安苏萌 ➢赛高璐 ➢海之元
☆ 生长速度的改变
(与同年龄、性别儿童的比较)
☆ 生长速度的标准差记分(SDS)
SDS=(患儿生长速度-正常儿童生长速度)/正常儿童生长 速度的标准差
正常生长曲线
男
女
生长曲线:不同年龄的生长轨迹.
2个快速生长期 婴儿期
青春发育期
GH分泌型式 紧密随着睡眠期
安利4K HD MPX摄像头用户手册说明书

1. Dans le mode de visionnement en direct, double-cliquer sur le canal sur lequel la caméra est connectée pour l’ouvrir en mode plein écran.
2. Passez la souris près du haut du canal où la caméra est connectée et cliquez
bloc d’alimentation non stabilisée et non conforme peut endommager le produit et annuler la garantie. • N’utilisez que le bloc d’alimentation stabilisée fourni avec le produit. L’utilisation de tout autre bloc d’alimentation peut endommager le produit et annuler la garantie. • Le câble fourni est conçu uniquement pour un montage en surface (type CM). Les câbles pour installations encastrées et verticales sont vendus séparément (type CMR). Ces câbles ainsi que d’autres types de câbles sont offerts sur .
CAcotnivneerclatifnognctthioenCaaudmioedraesla caméra
沃玛WPM1000系列电子糖果炸麦机及熔化站操作指南说明书

WPM1000 SeriesPOPCORN MAKER WITH MELTING STATIONFor your safety and continued enjoyment of this product,always read the instruction book carefully before using.Table of ContentsImportant Safeguards (2)Special Cord Set Instructions (4)Parts (5)Popping Instructions (6)Popping Chart (6)Popping Additional Batches of Popcorn (7)Melting Station Instructions (8)Tips & Hints (9)Cleaning & Maintenance (10)Recipes (12)IMPORTANT SAFEGUARDS When using any electrical appliance, basic safety precautions should always be taken, including the following:1. R EAD ALL INSTRUCTIONS.2. Always unplug this appliance when not in use.3. Do not use this appliance for other than intended use.4. T he use of accessory attachments not recommendedby Waring may cause injuries.5. K EEP OUT OF REACH OF CHILDREN. Close supervisionis necessary when this appliance is used by or nearchildren.6. D o not allow cord to hang over any edge where a childcan reach it. Arrange cord to avoid pulling, tripping orentanglement.7. D o not operate the appliance with a damaged cord or plug,or after the appliance malfunctions or has been damagedin any manner. Send the unit to the nearest authorizedservice center for examination, repair or adjustment.(ONLY technicians should open up the unit.)8. E XTREME CAUTION must be used when emptyingpopcorn maker. Always empty popcorn over a countertop so that residual hot oil or water will not drip out. Alwaysturn the popping plate away from you when turning.POPPING PLATE SURFACE IS VERY HOT.9. E xtreme caution must be used when moving an appliancecontaining hot oil or other hot liquids. Allow hot parts tocool down before handling or moving the appliance.10. Do not attempt to repair this appliance yourself.11. Do not attempt to pop corn kernels without using oil.12. D o not touch hot surfaces. Always use handles or knobsto operate.13. T his popcorn maker will not shut off automatically.To avoid overheating, add oil and then corn kernels before plugging in and turning on the unit (as specified in thePopping Instructions on page 6).14. D o not use this appliance or any parts on the stovetop,under the broiler, in the freezer, or in the oven.15. Do not use this appliance outdoors.16. T o protect against electric shock, do not immerse cord,plug or other electrical parts in water or other liquids.17. T urn both switches to OFF position before disconnectingpower plug from the wall outlet.18. After popping OR melting, unplug cord from wall outlet.19. N ever leave appliance unattended when it is plugged intoan outlet.20. K eep the cord away from hot parts of the appliance andhot surfaces during operation.21. Do not clean using any abrasive material.22. Never force any part or gear into position.23. D o not operate popcorn maker without popcorn kernels,oil, popping pan and bowl.24. Do not operate the melting station without ingredients.25. A LL PARTS ARE NOT DISHWASHER SAFE. SeeCleaning & Maintenance for instructions.26. U nit should be in the OFF position when the popping panis removed.27. D o not operate your appliance in an appliance garageor under a wall cabinet. When storing in an appliancegarage, always unplug the unit from the electricaloutlet. Not doing so could create a risk of fire, especiallyif the appliance touches the walls of the garage or the door touches the unit as it closes.28. U nplug from outlet when not in use and before cleaning.Allow to cool before putting on or taking off parts, andbefore cleaning the appliance.29. D o not place on or near a hot gas or electric burner,or in a heated oven.30. D o not let cord hang over edge of table or counter,or touch hot surfaces.31. T he melting station is not a fondue pot or deep fryer andis not intended for use with oil.32. D o not operate melting station for more than 10consecutive minutes.SAVE THESE INSTRUCTIONS FOR HOUSEHOLD USE ONLY SPECIAL CORD SET INSTRUCTIONSThis appliance is for 120 volts only and should not be used with a converter.This appliance has a polarized plug (one blade is wider than the other). To reduce the risk of electric shock, this plug will fit in a polarized outlet only one way. If the plug does not fit fully in the outlet, reverse the plug. If it still does not fit, contact a qualified electrician. Do not modify the plug in any way.1. A short power supply cord is provided to reduce the riskof becoming entangled in or tripping over a long cord.2. E xtension cords may be used if care is exercisedin their use.3. If an extension cord is used:A. T he marked electrical rating of the extension cordshould be at least as great as the electrical ratingof the appliance.B. T he longer cord should be arranged so that it will notdrape over the countertop or tabletop where it can bepulled on by children or tripped over unintentionally.CONTROL PANEL*M elting Pot ceramic nonstick coating is PTFE and PFOA free.BEFORE FIRST USEAfter unpacking the Popcorn Maker with Melting Station, follow the Cleaning & Maintenance instructions on page 10. POPPING INSTRUCTIONS1. P lace the popcorn maker and melting station base on aflat, dry surface.2. Place popping plate on base.3. It is not necessary to preheat the unit.4. P our the recommended amount of oil onto the poppingplate (do not add more oil than recommended and do notsubstitute with butter, margarine, shortening or lard, asthese will burn and cause excessive smoking).N OTE: You may use either vegetable, peanut or canola oilfor popping.5. A dd the recommended amount of corn kernels spread outevenly across the popping plate.POPPING CHARTOil CornYieldVegetable, Peanut, Canola KernelsMinimum Batch 1½ tablespoons ½ cup Up to 13 cups Maximum Batch 2 tablespoons 2∕3 cup Up to 20 cups 6. P lace popping bowl on the popping plate, making surehandles of the popping bowl line up and fit into the handles on the popping plate.7. D o not place black lid on the popping bowl during thepopping process. The vents in the popping bowl willallow steam to release during the popping process. 8. P lug into an outlet and turn the unit on by turning therocker switch to the left of the control panel to the POPposition. The stirring rod will rotate as long as the popcorn maker is in the POP position. In approximately 3½ minutes (depending on quantity and type of kernels being popped), the popping cycle will be complete and you will no longerhear the corn popping. Turn the popcorn maker powerswitch to the OFF position and unplug from outlet if you are not utilizing the melting station.N OTE: Do not shake the popcorn maker during thepopping cycle.9. I mmediately after the popping cycle is complete, firmlyplace the black lid on the top of the popping bowl, grasp handles and flip the popping bowl along with the popping plate upside down, turning the popping plate away fromyou (the popping bowl becomes a serving bowl).W ARNING: POPPING PLATE IS HOT. TOUCH ONLYDESIGNATED HANDLES.N OTE: Do not leave popped corn on the popping plateafter the popping cycle has been completed, as thepopping plate surface is still hot and could cause thepopped corn to overcook or burn.10. P opcorn is now ready to serve. Top with salt or followthe melting pot instructions to top popcorn with butter,chocolate, caramel and more!11. F or consecutive batches, wipe popping plate with cleancloth after each batch.POPPING ADDITIONAL BATCHESOF POPCORNIf you plan to pop multiple batches, transfer popcornfrom popping bowl to another serving bowl. Follow steps1 through 11.CAUTION: Popping plate is extremely hot after multiple batches.MELTING STATION INSTRUCTIONSBefore popping popcorn, begin melting the toppings. Typical melting times will vary, as indicated on page 9. You may also wish to pop multiple batches of popcorn while using the melting station.1. R2. Pproperly.3. A4. A5. Ais locked into place.6. Tsection.N OTE: When melting new ingredients, begin by setting the control dial to LOW and adjust if needed. The LOW setting is similar to the LOW setting on a stovetop, while the HIGH setting is similar to the MEDIUM setting on a stovetop.Ingredients Setting Time12 oz. Milk Chocolate Chips LOW4–6 minutes8 tbsp. Butter HIGH3–5 minutes7. T hroughout the melting cycle, look through the lid to seethat ingredients are mixing properly and that nothing hasinterfered with the stirrer.N OTE: During the melting process, ingredients may rise up and interfere with the stirring process. If this occurs, simply realign the stirring arm with the gear assembly and be sure that it is rotating properly.8. O nce melted, remove the melting pot, mix and pour themixture over freshly made popcorn or as described in therecipe section. Use caution when removing the meltingpot from the base as the handle may be hot. Do notuse metal utensils to mix ingredients or scrape excessingredients from the melting pot.9.Turn the melting station control dial to the OFF position. TIPS & HINTS• D o not fill the melting pot with ingredients past the MAX fill line (2 cups).• M elting pot has a nonstick interior, but to further reduce the chance of sticking, spray cooking spray on the bottom of the melting pot and on stirrer.• U se a heatproof spatula to remove/scoop ingredients from the melting pot.• S oak the melting pot with stirrer in hot water immediately after using. Some ingredients, such as caramel, will bestubborn to remove.• S emisweet chocolate chips do not melt well. Use milk chocolate for best results.• S pread ingredients out as evenly as possible in the melting pot for faster results.• D uring the melting process, ingredients may rise up and interfere with the stirring process. If this occurs, simply realign the stirring mechanism and be sure that it is rotating properly.• W hile ingredients are melting, minimize the amount of times that you open the lid, as this will interfere with the stirringmechanism and ingredients may get dislodged. CLEANING & MAINTENANCEBefore performing any cleaning and maintenance operations, be sure that the popcorn maker and melting station controls are both in the OFF position and that the unit is unpluggedand cooled. Clean the popcorn maker and melting pot after every use.NOTE: Do NOT place parts in an automatic dishwasher. Melting pot is NOT dishwasher safe.To Clean the Popcorn Maker1. W ash popping bowl, popping plate and lid in warm, soapywater with a dishcloth or sponge. Rinse thoroughly anddry. Do not use scouring pads or abrasive powder on lid as these could cause scratching.2. C lean surface of base with a damp, soapy dishcloth,sponge or nylon scouring pad such as Scotch BriteCookware Scrub ’n Sponge®. Wipe surface with a dampcloth and dry. Do not use abrasive scouring pads orpowders on nonstick finish, as scratching may occur. After consistent use, the nonstick finish may discolor. To remove discoloration, use a soft cloth saturated with lemon juiceor vinegar and rub over finish. Then wipe the finish with adamp cloth and dry.To Clean the Melting StationDue to the type of ingredients being melted in the melting pot, it is best to empty and clean the melting pot immediately after each melting cycle is complete. Clean all parts by hand as described below. Melting pot and parts are not dishwasher safe.1. R emove the melting pot from the base and remove the lid.CAUTION: Melting pot and base are hot.2. R emove the stirring arm from the lid by releasing the tabson the inside of the lid. Press down and out on the tabsand gently pull the lid off. Wipe the stirring arm clean with a damp, non-abrasive cloth. Do not submerge the stirringarm in water.3. W ash the lid, stirrer and melting pot in the sink with warmsoapy water, being sure to remove all residue. Do not use metal utensils to scrape the inside of the melting pot. NOTE: If you find that ingredients are sticking to the bottom of the melting pot, you can fill the melting pot with hot water upto the max fill line. Replace the melting pot into the base, along with the stirrer, lid and stirring arm properly assembled. Turn the control knob to HIGH and run for approximately 3–5 minutes. This will help to release any stubborn ingredients. After this, repeat steps 1–3 above.4. I f any ingredients drip into the base of the melting pot, usea damp, non-abrasive cloth to wipe clean. CAUTION: HOT.5. B e sure that all parts are thoroughly dry beforereassembling.Any other servicing should be performed by an Authorized Service Representative.RECIPESAll recipes are meant to be eaten with 18 cups of popcorn.Simply Chocolate Popcorn12 oz. (1 bag) milk chocolate chips (or chocolate madefor melting)With the stirrer in place, pour milk chocolate chips into themelting pot.Align the cover with the gear in the housing and the center of the stirrer. Set the control dial to LOW and melt for approximately 5½ minutes. Mix the chocolate and drizzle over popcorn.It is best to clean the melting pot immediately after melting cycle is complete. To clean the melting pot and stirrer, refer to the Cleaning & Maintenance instructions on page 11.Simply Butter Popcorn8 t ablespoons butter (for quicker results useroom-temperature butter)With the stirrer in place, cut butter into ¼-inch pieces and evenly place them in the melting pot. Align the cover with the gear in the housing and the center of the stirrer. Set the control dial to HIGH until the butter is melted. This will take approximately 5 minutes. Turn the control dial to the OFF position. Remove the cover and mix until you have a smooth consistency. Drizzle melted butter over popcorn.It is best to clean the melting pot immediately after melting cycle is complete. To clean the melting pot and stirrer, refer to the Cleaning & Maintenance instructions on page 11.Peanut Butter Popcorn10 oz. (1 bag) peanut butter chipsWith the stirrer in place, pour peanut butter chips into the melting pot. Align the cover with the gear in the housing and the center of the stirrer. Set the control dial to LOW and melt for approximately7 minutes. Turn the control dial to the OFF position. Remove the cover and mix until you have a smooth consistency. Drizzle melted mixture over popcorn.It is best to clean the melting pot immediately after melting cycleis complete. To clean the melting pot and stirrer, refer to the Cleaning & Maintenance instructions on page 11.Sesame Ginger Soy Mix Popcorn½ cup soy sauce3 teaspoons sugar2 teaspoons sesame oil2 teaspoons freshly grated ginger2 tablespoons toasted sesame seedsWith the stirrer in place, combine soy sauce, sugar and sesame oil in the melting pot. Align the cover with the gear in the housing and the center of the stirrer. Set the control dial to HIGH. At the 6-minute mark, turn the control dial to the OFF position, tilt open the cover and add the grated ginger to the melting pot. Replace the top and turn it back to HIGH, allowing it to cook for one more minute. Turn the control dial to the OFF position. Stir the mixture and pour over the popcorn. Toss the popcorn with the sesame seeds so that all the ingredients combine evenly.It is best to clean the melting pot immediately after melting cycle is complete. To clean the melting pot and stirrer, refer to the Cleaning & Maintenance instructions on page 11.Cilantro Herb Buttered Popcorn½ s tick salted butter (for quicker results useroom-temperature butter)½ teaspoon cumin¼ teaspoon garlic powder¼ teaspoon paprika1 tablespoon freshly chopped cilantro½ teaspoon saltWith the stirrer in place, cut butter into ¼-inch pieces and evenly place them in the melting pot, along with the cumin, garlic powder and paprika. Align the cover with the gear in the housing and the center of the stirrer. Set the control dial to HIGH. After approximately 4½ minutes (or once the butter has melted), turn the control dial to the OFF position. Mix thoroughly, and then drizzle the mixture over popcorn, alternating with a sprinkling of the freshly chopped cilantro, making sure to toss so that the popcorn is evenly coated. Once butter mixture is added you can season with ½ teaspoon of salt to taste.It is best to clean the melting pot immediately after melting cycle is complete. To clean the melting pot and stirrer, refer to the Cleaning & Maintenance instructions on page 11.S’mores Popcorn5 oz. milk chocolate chips2 oz. mini marshmallows1½ to 2 c ups chopped graham crackers (or graham cracker crumbs)With the stirrer in place, pour milk chocolate chips into the melting pot. Align the cover with the gear in the housing and the center of the stirrer. Set the control dial to LOW. After approximately 5½ minutes, turn the control dial to the OFF position. Remove cover and mix for smooth consistency. Drizzle melted chocolate over popcorn, and then add the marshmallows and graham crackers. Combine the entire mixture together and let sit until the chocolate has set.It is best to clean the melting pot immediately after melting cycle is complete. To clean the melting pot and stirrer, refer to the Cleaning & Maintenance instructions on page 11.Peanut Butter Bacon Popcorn4 t ablespoons butter (for quicker results useroom-temperature butter)10 oz. (1 package) peanut butter chips16 oz. (1 package) thick-cut bacon, cooked and cutinto bite- size piecesWith the stirrer in place, cut butter into ¼-inch pieces and evenly place them in the melting pot. Then add the peanut butter chips to the melting pot. Align the cover with the gear in the housing and the center of the stirrer. Set the control dial to LOW. After approximately 10 minutes, turn the control dial to the OFF position. Remove the cover and mix until you have a smooth consistency. Drizzle melted mixture over popcorn and sprinkle in the bacon.It is best to clean the melting pot immediately after melting cycle is complete. To clean the melting pot and stirrer, refer to the Cleaning & Maintenance instructions on page 11.Caramel Popcorn2 oz. mini marshmallows¹/³ cup brown sugar3 t ablespoons butter (for quicker results useroom-temperature butter)With the stirrer in place, cut butter into ¼-inch pieces and evenly place them in the melting pot. Then add the mini marshmallows and brown sugar. Align the cover with the gear in the housing and the center of the stirrer. Set the melting station control dial to HIGH. After approximately 10 minutes, turn the control dial to the OFF position. Remove the cover, stir the caramel until it has a smooth consistency and drizzle caramel over the popcorn. Mix with tongs or spoon until caramel is evenly distributed.It is best to clean the melting pot immediately after melting cycle is complete. To clean the melting pot and stirrer, refer to the Cleaning & Maintenance instructions on page 11.Sriracha Popcorn6 t ablespoons butter (for quicker results useroom-temperature butter)¼ cup Sriracha® hot sauce*With the stirrer in place, cut butter into ¼-inch pieces and evenly place them in the melting pot, then add Sriracha sauce. Align the cover with the gear in the housing and the center of the stirrer. Set the control dial to HIGH and cook for approximately 7 minutes. Turn control dial to the OFF position, remove cover and pour evenly over popcorn.It is best to clean the melting pot immediately after melting cycle is complete. To clean the melting pot and stirrer, refer to the Cleaning & Maintenance instructions on page 11.*If desired, cut the heat by adding a little bit of grated Parmesan or crumbled blue cheese to the mixture after the Sriracha and butter have been added to the popcorn.Birthday Party Popcorn3 t ablespoons butter (for quicker results useroom-temperature butter)½ cup sugar1 teaspoon pure vanilla extract2 ounces mini marshmallows¹/³cup rainbow sprinkles1 teaspoon salt (to taste)With the stirrer in place, cut butter into ¼-inch pieces and evenly place them in the melting pot, then add the sugar, vanilla extract and marshmallows. Align the cover with the gear in the housing and the center of the stirrer. Set the temperature knob to HIGH, and after approximately 10 minutes, turn the knob to OFF and remove the cover. Mix well and then evenly coat the popcorn with the marshmallow mixture. While mixing the popcorn mixture, distribute the sprinkles on the popcorn. Salt to taste.It is best to clean the melting pot immediately after melting cycle is complete. To clean the melting pot and stirrer, refer to the Cleaning & Maintenance instructions on page 11.NOTES_______________________________________________________________________________________ _______________________________________________________________________________________ _______________________________________________________________________________________ _______________________________________________________________________________________ _______________________________________________________________________________________ _______________________________________________________________________________________ _______________________________________________________________________________________ _______________________________________________________________________________________ _______________________________________________________________________________________ _______________________________________________________________________________________ _______________________________________________________________________________________ _______________________________________________________________________________________ _______________________________________________________________________________________ _______________________________________________________________________________________ _______________________________________________________________________________________ _______________________________________________________________________________________ _______________________________________________________________________________________ _______________________________________________________________________________________ _______________________________________________________________________________________ _______________________________________________________________________________________ _______________________________________________________________________________________ _______________________________________________________________________________________ _______________________________________________________________________________________ _______________________________________________________________________________________ _______________________________________________________________________________________ _______________________________________________________________________________________ _______________________________________________________________________________________ _______________________________________________________________________________________ _______________________________________________________________________________________ _______________________________________________________________________________________ _______________________________________________________________________________________ ______________________________________________________________________________________________________________________________________________________________________________ _______________________________________________________________________________________ _______________________________________________________________________________________ _______________________________________________________________________________________ _______________________________________________________________________________________ _______________________________________________________________________________________ _______________________________________________________________________________________ _______________________________________________________________________________________ _______________________________________________________________________________________ _______________________________________________________________________________________ _______________________________________________________________________________________ _______________________________________________________________________________________ _______________________________________________________________________________________ _______________________________________________________________________________________ _______________________________________________________________________________________ _______________________________________________________________________________________ _______________________________________________________________________________________ _______________________________________________________________________________________ _______________________________________________________________________________________ _______________________________________________________________________________________ _______________________________________________________________________________________ _______________________________________________________________________________________ _______________________________________________________________________________________ _______________________________________________________________________________________ _______________________________________________________________________________________ _______________________________________________________________________________________ _______________________________________________________________________________________ _______________________________________________________________________________________ _______________________________________________________________________________________ ______________________________________________________________________________________________________________________________________________________________________________ _______________________________________________________________________________________ _______________________________________________________________________________________ _______________________________________________________________________________________ _______________________________________________________________________________________ _______________________________________________________________________________________ _______________________________________________________________________________________ _______________________________________________________________________________________ _______________________________________________________________________________________ _______________________________________________________________________________________ _______________________________________________________________________________________ _______________________________________________________________________________________ _______________________________________________________________________________________ _______________________________________________________________________________________ _______________________________________________________________________________________ _______________________________________________________________________________________ _______________________________________________________________________________________ _______________________________________________________________________________________ _______________________________________________________________________________________ _______________________________________________________________________________________ _______________________________________________________________________________________ _______________________________________________________________________________________ _______________________________________________________________________________________ _______________________________________________________________________________________ _______________________________________________________________________________________ _______________________________________________________________________________________ _______________________________________________________________________________________ _______________________________________________________________________________________ _______________________________________________________________________________________ _______________________________________________________________________________________。
hm1000播放器固件升级流程

hm1000播放器固件升级流程
固件升级是什么,固件升级就是我们通常说的刷机,也有别的说法,比如:固件刷新,固件刷写,重写,烧录。
高清播放机固件升级指的是把自己需要的新固件写入高清播放机的芯片中,来替换原有的固件,从而实现升级的过程。
对于所有的数码产品大多数都可以升级固件,由于数码产品的众多,固件的种类和样式更是数不胜数,这里主要讲一下高清播放机固件升级的方法和步骤。
方法/步骤
首先从官网上或高清机论坛上下载适合自己机型的固件版本和固件升级软件,高清播放机的固件分为通用性和专用型。
把下载的固件放到移动储存设备的根目录下,注意是根目录,不要放在其他的文件夹中,否则高清播放机无法识别,然后将移动储存设备插在高清播放机的usb接口上,等待高清机读取固件。
进入高清机,选择系统设置——杂项——U盘升级然后确定,接下来机器将自动升级,等待升级完成将自动运行进入到主界面。
强制升级的操作步骤:
和上面的操作一样,把固件储存到移动设备的根目录下,然后连接高清播放机的usb接口,注意:接下来的操作时,在没有接通电源的情况下,按住高清播放机的RESET键不放,然后接通电源开机,在高清机启动进入开机界面的第一个画面的时候,松开按键,接下来高
清机将自动进入刷机的过程,等待固件升级完成将自动进入主界面,使用强制升级没有成功的情况下,建议重复操作一次强制升级的步骤。
注意事项
如果在升级的过程中发生断电或者升级失败的情况下,可以使用强制升级。
TOA 1000系列混音器说明书

S TEREO MIXERSTOA 1000 seriesOPERATING INS TRUCTIONSM-1264M-1212ET H E LIG H TNING FLAS H WIT H ARROWH EAD WITH IN A TRIANGLE IS INTENDED TO TELL TH E USER TH AT PARTS INSIDE TH E PRODUCT ARE A RISK OF ELECTRIC S H OCK TO PERSONS.T H E EXCLAMATION POINT WIT H IN A TRIANGLE IS INTENDED TO TELL TH E USER T AT IMPORTANT OPERATING AND SERVICING INSTRUCTIONS ARE IN T H E PAPERS WIT H T H E APPLIANCE.Please follow the instructions in this manual to obtain the optimum results from this unit.We also recommend you to keep this manual handy for future reference.CAUTIONTO REDUCE TH E RISK OF ELECTRICAL S H OCK, DO NOT REMOVE COVER.NO USER SERVICEABLE PARTS INSIDE.REFERSERVICING TO QUALIFIEDSERVICE PERSONNELTOA CorporationCONTENTSHandling PrecautionsGeneral DescriptionFeaturesNomenclature (Front Panel)Nomenclature (Rear Panel)Input Transformer MountingPhantom Power SupplyInput and Output SpecificationsBlock Diagrams and Level DiagramsSpecificationsAccessoriesAppearanceHANDLING PRECAUTIONSOperating voltage is 120V AC ± 10% (120 V version) or 220-240V AC ± 10% (220-240 V version).Avoid using the power voltage exceeding these ranges.Do not expose the unit to corrosive chemicals or salt water. Also, keep your beverages away from the unit because they may be spilt.When there is a failure, refer the unit to qualified service personnel.Observe the following polarity of the XLR connector:Pin #1: Ground, Pin #2: Cold, Pin #3: HotGENERAL DESCRIPTIONThe TOA M-1264 is a 19" rack-mountable stereo mixer with multiple inputs and outputs. Inputs can be expanded by using the M-1212E expansion unit.FEATURESSix monaural inputs (expandable using the M-1212E), four stereo inputs and one auxiliary stereo input.One each of output: stereo, group (L/R), stereo sum, monitor (L/R), AUX, and headphone.A compressor built in each monaural input minimizes signal distortion caused when there is an extremely largeinput. The activation of the compressor can be indicated by a compressor activation lamp.Motorized stereo/group output volume controls can be remotely adjusted from a control device. The adjusted control position is indicated on the control device.The M-1212E can function as a sub-mixer because it has mixing outputs (stereo L/R, group L/R, AUX, and cue).Phantom power (+24V DC) can be supplied to each monaural input.A channel switch with an "easy-to-see" indicator provided for each input improves the signal-to-noise ratio andsimplifies operations.4-step stereo/group send selection switch (stereo to group/group to stereo bus/group to post-stereo output control/ OFF).A 3-step input level selection switch (LINE/MIC/MIC (H PF)) allows selection of either a line or microphonelevel input for each monaural input. The MIC (HPF) position cuts undesired frequencies using a highpass filter.Electronically-balanced monaural input can be changed to a transformer-balanced input using an optional input transformer.Security cover.NOMENCLATURE [Front Panel][M-1264] (Main unit)[M-1212E] (Expansion unit)L/C/R assign switch [L/C/R]Bus assign switch [ASSIGN]Aux assign switch [AUX]Cue switch [CUE]Input level controlChannel switch/indicatorStereo output level control [STEREO]Adjusts the level to send out a mixed input signal from the stereo bus to the stereo output. This control can be remotely operated.Group output level control [GROUP]Adjusts the level to send out a mixed input signal from the group bus to the group output. This control can be remotely operated.Sum output level control [SUM]Adjusts the stereo sum output signal level.Aux output level control [AUX]Adjusts the level of signals going to the AUX output.Monitor output level control [MONITOR]Adjusts the level to transmit a signal from the stereo bus or cue bus to the monitor output and headphone output.Cue indicator [CUE]Lights when any cue switch is pressed, indicating that the cue bus signal is being sent to both the monitor and headphone outputs. If the indicator is off, the stereo bus signals are sent to both outputs.Headphone jack [PHONES]Outputs the signal adjusted with the monitor output level control. Connect a headphone with 8 ohms or higher impedance.Power indicator [POWER]Power switchTurns on the power when this switch is pressed (the power indicator lights). To turn off the power, press this switch again (the indicator is extinguished).L/C/R assign switches [L/C/R]Assign each monaural input signal to L, R, or both L and R lines of the group or stereo bus selected with the bus assign switch _ .Bus assign switches [ASSIGN (ST/GR)](ON:bus.group/stereogrouptheAssign the monaural input signal adjusted with the input level control toorOFF: stereo)Aux assign switches [AUX]Send the input signal to the AUX bus.Cue switches [CUE]Send the input signal to the cue bus regardless of the position of the channel switch , allowing monitoring of the signal at the headphone or monitor output.Input level controlsAdjust each input signal level.Channel switches/indicatorsSend the input signal to the bus selected with both the L/C/R assign switch _ and bus assign switch © or with the AUX assign switch . At the same time, the corresponding channel indicator lights green for monaural inputor yellow for stereo input. If the monaural channel indicator lights red, this indicates that the corresponding compressor is activated. In such cases, adjust the input level using the input level control, as required. (The compressor is activated when the signal level exceeds +17 dB.)NOMENCLATURE [Rear Panel][M-1264] (Main unit)[M-1212E] (Expansion unit)Input level selection switches [LINE/MIC/MIC (HPF) ]Set each monaural input level for Line, Mic or Mic with highpass filter.Monaural input XLR connectors [MONO INPUT 1~6 (M-1264) /1~12 (M-1212E) ]This electronically-balanced input can be changed to the transformer-balanced type using an optional input transformer. (Refer to the section "Input Transformer Mounting" on page 8.) Phantom power (+24V DC) can also be supplied to each input.Stereo input RCA jacks [S TEREO INPUT 1~4 L/MONO, R]Unbalanced stereo input.Auxiliary stereo input phone jacks [ST BUSS IN L/MONO, R]Unbalanced stereo input to send signals to the stereo bus.Bus-link input terminal [BUSS LINK IN]Connects to the M-1212E's bus-link output for monaural input expansion. (For connection, use the cable supplied with the M-1212E.)Sum output XLR connector [SUM OUT]Electronically-balanced stereo sum output.AUX output phone jack [AUX OUT]Unbalanced AUX output.Monitor output phone jacks [MONITOR OUT L, R]Unbalanced monitor output.Stereo output XLR connectors [S TEREO OUT L, R]Electronically-balanced stereo output.S tereo/group send selection switchFour-step selection switch.• STEREO TO GROUP position: Sends the stereo bus signal to the group bus.• OFF• GROUP TO STEREO(PRE) position: Sends the group output signal to the stereo bus.• GROUP TO STEREO(POST) position: Sends the group output signal mixed with the stereo signal adjusted with the stereo output level control to the stereo output.Group output phone jacks [GROUP OUT L, R]Unbalanced group output.Remote terminals [REMOTE]Used for remotely operating the stereo output level control and group output level control. There are four following terminals:UP : While this terminal and COM terminal are shorted, the level control rotates clockwise.DOWN : While this terminal and COM terminal are shorted, the level control rotates counter-clockwise.COM : Common terminalPOSI : The voltage of 0 to +5V DC is output between this terminal and COM terminal depending on the knob setting (0-10).Note : Do not leave the UP and DOWN terminals shorted for longer than necessary.Fuse and fuse holderWhen replacing, be sure to use the specified type and ratings of fuse to avoid the risk of fire. (1.5 A/250 V for 120V AC version, and T315 mA/250 V for 220-240V AC version)AC power cordGround loop break switchThis switch, when set to "LIFT" position, breaks a hum-generating ground loop formed when the unit is connected to external components. Normally, set this switch to "NORM" position.Bus-link output terminal [BUSS LINK OUT]Connects to the M-1264's bus-link input terminal.Bus-link input terminal [BUSS LINK IN]Connects to other M-1212E's bus-link output terminal for monaural channel expansion. (For connection, use the cable supplied with the M-1212E.)Stereo mixing output phone jacks [S TEREO MIX OUT L, R]Unbalanced stereo bus mixing output.Group mixing output phone jacks [GROUP MIX OUT L, R]Unbalanced group bus mixing output.AUX mixing output phone jack [AUX MIX OUT]Unbalanced AUX bus mixing output.Cue mixing output phone jack [CUE MIX OUT]Unbalanced cue bus mixing output.INPUT TRANSFORMER MOUNTINGCAUTIONTH ESE SERVICING INSTRUCTIONS ARE FOR USE BY QUALIFIED PERSONNEL ONLY. TO AVOID ELECTRICSH OCK, DO NOT PERFORM ANY SERVICING OTH ER TH AN TH AT CONTAINED IN TH E OPERATINGINSTRUCTIONS UNLESS YOU ARE QUALIFIED TO DO SO. REFER ALL SERVICING TO QUALIFIED SERVICEPERSONNELThe M-1264's (M-1212E's) monaural inputs are electronically balanced.They can be made transformer-balanced inputs using the optional input transformer LT-101 or LT-102.How to mount the input transformerSet the power switch to OFF and remove the power cord from a wall outlet.Remove the unit's case by loosening six side panel screws (three each on both sides) and two rear panel screws.Fix two sleeves to the bottom chassis using screws, then mount the transformer to the sleeves using other screws. (The sleeves and screws are supplied with the transformer.) When stacking two transformers due to the number or arrangement of channels, use the sleeves supplied with the M-1264 (M-1212E).When changing the inputs 1, 3, 5, etc. located in the upper section, detach connector from CN-104 connector, connect the detached connector to the transformer connector , and connect the transformer lead tothe CN-104. When changing the inputs 2, 4, 6, etc. in the lower section, detach connector from CN-105 connector, connect the detached connector to the transformer connector , and connect the transformer lead tothe CN-105.Replace the case.MONO INPUTCH-1 (CH-2)[Note] *1: For the upper inputs.*2: For the lower inputs.Top view Bottom chassisSleeves supplied withthe M-1264 (M-1212E)Sleeves suppliedwith the optionaltransformerSide viewMatching Transformer S pecifications* 0 dB = 0.775 Vrms** Specifications are subject to change without notice.PHANTOM POWER SUPPLYCAUTIONTHESE SERVICING INSTRUCTIONS ARE FOR USE BY QUALIFIED PERSONNEL ONLY. TO AVOID ELECTRIC SH OCK, DO NOT PERFORM ANY SERVICING OTH ER TH AN TH AT CONTAINED IN TH E OPERATING INSTRUCTIONS UNLESS YOU ARE QUALIFIED TO DO SO. REFER ALL SERVICING TO QUALIFIED SERVICE Phantom power (+24V DC) can be supplied to each monaural input using the internal phantom power switch.Set the power switch to OFF, and remove the power cord from a wall outlet.Remove the unit's case by loosening six side panel screws (three each on both sides) and two rear panel screws.Set the phantom power switch of the desired input to ON.Replace the case.[Precautions]:To avoid electric shocks, do not touch the unit's internal components except when installing the input transformer and setting the phantom power switch.Leave the phantom power switch in the OFF position for inputs not receiving the phantom power. (The unit is factory-preset as shown in the figure below.)ModelImpedanceFrequency response Constant loss DistortionLT-10110k :10kWithin ± 0.15 dB (30 Hz~20 kHz)Within 1.5 dB (1 kHz)0.2 % or less (50 Hz / +5 dB*)LT-102600 : 600Within ± 0.15 dB (30 Hz~20 kHz)Within 1.5 dB (1 kHz)0.2 % or less (50 Hz / +5 dB*)Upper switch Lower switchUpper inputs (CH-1, 3, 5, ..)Lower inputs (CH-2, 4, 6, ..)M-1264 (M-1212E) rear panelPERSONNEL.INPUT AND OUTOUT SPECIFICATIONSInput/Output LevelLine Monaural Input MicMic (with HPF)-10 dB -60 dB -60 dB -10 dB +4 dBStereo Input (L, R)Auxiliary Stereo Input (L, R)Stereo Output (L, R)+4 dB Sum Output+4 dBGroup Output (L, R)+4 dB Monitor Output (L, R)+4 dB AUX Output+4 dBMixing Output (M-1212E)Stereo MixingGroup MixingAUX MixingCue Mixing+4 dB+4 dB+4 dB+4 dBImpedance Connector50 k1 k1 k50 kXLR 3-pin connectorRCA jack10 k Unbalanced phone jack600or more(Matched load)XLR 3-pin connector600or more(Matched load)1 k1 k1 kUnbalanced phone jack1 k1 k1 k1 kUnbalanced phone jackBLOCK DIAGRAM AND LEVEL DIAGRAM[M-1212E]SPECIFICATIONSModel M-1264M-1212ETotal Harmonic DistortionNoise Level(IH F- A) Maximum voltagegain Compressor (monaural input) Power consumption Dimensions Weight0.15 % or less (Monaural Input to Stereo Output +4 dB*, 1 kHz)0.01 % or less (Stereo Input to Stereo Output, +4 dB*, 1 kHz)(1)When all volume controls are inminimum position.Stereo Output : - 100 dB or less(2) When the stereo volume control is inmaximum position and all other controlsin minimum position.Stereo Output :—98 dB or less (Only M-1264 used)—92 dB or less (Both M-1264 andM-1212E used)(3) When the stereo volume control and onemonaural input level control are inmaximum position, and all other controlsin minimum position.Stereo Output : -62 dB or less(1) When all volume controls are in minimumposition.Stereo Mixing Output : -94 dB or less(2) When one monaural input level control isin maximum position and all othercontrols in minimum position.Stereo Mixing Output : -62 dB or lessMonaural input (Mic) to stereo output : 64 dBMonaural input (Line) to stereo output : 14 dBStereo input to stereo output : 14 dBActivation signal level : +17 dB or moreCompression ratio : 10:1 (Compression curve : Soft knee)25 W (120V AC version)28 W (220-240V AC version)26 W (1 20V AC version)28 W (220-240V AC version)482.6 (W) x 88.4 (H) x 311.8 (D) mm (18.82" x 3.45" x 12.16")5.2kg (11.47lb.)0 dB = 0.775 Vrms.Specifications are subject to change without notice. ACCESSORIES[M-1264]Security cover x 1Security cover fixing screw x 2Fuse (250 V, 1.5 A) (for 120V AC version) x 1Fuse (250 V, T315 mA) (for 220-240V AC version) x 1 Rack mounting screw x 4Transformer mounting sleeve x 6Warranty card (for USA and Canada) x 1Operating instructions x 1[M-1212E]Security cover x 1Security cover fixing screw x 2Fuse (250 V, 1.5 A) (for 120V AC version) x 1Fuse (250 V, T315 mA) (for 220-240V AC version) x 1 Rack mounting screw x 4Transformer mounting sleeve x 12Bus-link cable (1 m) x 1Warranty card (for USA and Canada) x 1Operating instructions x 1FrequencyResponse20Hz~20kHz(+0,-1.5dB)APPEARANCE [M-1264][M-1212E]133-12-150-2B。
菲律宾Cignal高清直播系统HUMAX高清专用机XH-7000-PH

菲律宾Cignal高清直播系统HUMAX高清专用机XH-7000/PH环我国沿海的埘边地区,除了早已运作的日本、韩国的高清直播外,去年新加坡、越南和香港地区,开播了高清卫视。
最近,菲律宾、台湾地区也跟进了,相继推出了高请卫星频道。
以上这些,都使用各自专有的高清机型。
要么采用鲜有的加密方式,要么机卡捆绑,把共享消灭在萌芽中。
菲宾在146上的标清直播,虽然早在8年前就有了,但受到共享的灾难性打击,今年以来,随着系统升级纠N3之后,先足国际大腕频道相继离开,跟着又是体育套餐纷纷关闭,已经没人再感兴趣了。
而108.2上菲律宾另一个直播系统,正方兴未艾。
并且打出了高清的旗号。
替代梦幻直播,是迟早的事情。
菲律宾Cignal直播系统菲律宾的MediaQuest Holdings,是一家从事多媒体事业并进行设备销售的公司,隶属于PLDT集团。
其分支机构Medjascape最近开展了DTH业务,也就是Cignal卫星直播计划。
图1是本机卡片正面的图案,也是Cignal直播电视的LOGO。
Cignal直播系统位于108.2度NSS-11(新天11号)卫星上。
目前占据3个带宽为36MHz的标准Ku转发器,播送22套标清电视,7套高清电视,8套广播。
其中,高清电视将最终增加到8套。
表1中的055频道,很可能会上美国NBA。
Cignal的执行总裁Benjle Fernandez表示:“菲律宾是一个篮球风靡的国家,通过对NBA总决赛的实时高清直播,Cignal希望能籍此将HDTV带进千家万户,让更多爱好体育的菲律宾人都负担得起。
”事实上,Cignal的收费标准,要比同类服务的艺华及越南高清要高一些。
表2可见,如果全开标清和高清,也就是套餐1,年费高达15480披索,相当于人民币2270元。
这比艺华同样的套餐要贵,更比越南贵很多。
菲律宾作为一个英语国家,Cignal的最大亮点,除了具有146梦幻上的一些当地频道,还有大量的美国原版频道,包括HBO、国家地理、历史频道等等,这些都是Cignal有别于越南高清和艺华高清的的独有特色。
HME 27 HMD 27 HMDC 27 专业广播头戴器说明书

FEATURES• Highest wearing comfort due to the lightweight circu-maural design and the splitted headband (no pressure on the sensitive fontanelle)• Accurate and linear sound reproduction for very de-manding monitoring • HMD 27/HMDC 27: dynamic Microphone, which standsout due to a strong and powerful sound pattern for an audio transmission in highest broadcast quality even in noisy environments • HME 27: pre-polarized condenser microphone withcardioid directivity for a precise audio reproduction and higher intelligibility in highest broadcast quality even in noisy environments • ActiveGard© (on/off switch) for protected hearingagainst noise peaks > 110 dB • Modular concept of different cables and boom arms tooffer highest flexibility • cable of the cable 26-II series are compatible • Swiveling ear cap for single sided listening• Microphone can be worn either on right or left handside • wide headband padding is included that converts thetwo-piece headband into a compact single pieceThe new HME / HMD / HMDC 27 series invites the Broadcast Commentators and Audio Engineers to experience the highest level of wearing comfort. The headsets have a closed and circumaural earcup design to provide a high passive attenuation but nevertheless unusually lightweight and comfortable over long working hours. Soft circumaural earpads ensure a comfortable fit.The headsets are similar to the HMS 26 series equipped with the automatically opening two-piece headband, hence no pressure on the sensitive fontanelle. For those users who still prefer a conventional headband, a wide headband padding is included that converts the two-piece headband into a compact single piece.The top-of-the-line model is the HMDC 27, which features NoiseGard TM (active noise reduction) to perform well in very loud environments. By actively reducing the noise level by additional 15dB this headset increases intelligibility while at the same time protecting the user’s hearing and avoiding stress and fatigue due to noise. NoiseGard TM does not require the usual batteries but is conveniently powered via the microphone power supply from the broadcast desk or intercom system. (Phantom powered P48).PRODUCT VARIANTSHME 27Art. no. 506899HMD 27Art. no. 506902HMDC 27Art. no. 506978DELIVERY INCLUDES• HME 27/HMD 27 without a cable orHMDC 27 including the II-X3K1 cable • large headband padding • cable clip • windshield • quick guide •safety guideSPECIFICATIONSHeadphones:HME 27HMD 27HMDC 27Transducer principle dynamic, closed dynamic, closed dynamic, closedEar coupling circumaural circumaural circumaural Frequency response8 Hz to 18 kHz8 Hz to 18 kHz8 Hz to 18 kHz Impedance64 Ω64 Ω600 Ω (ANR switched on)200 Ω (ANR switched off) Load capacity500 mW500 mW500 mWSensitivity112 dB SPL/1 V rms/1 kHz(ActiveGard™ switched off)112 dB SPL/1 V rms/1 kHz(ActiveGard™ switched off)112 dB SPL/1 V rms/1 kHz(ANR switched on,ActiveGard™ switched off)107 dB SPL/1 V rms/1 kHz(ANR switched off,ActiveGard™ switched on/off)Maximum SPL ActiveGard™ switched off:128 dB SPL @ 1 kHzActiveGard™ switched on:110 dB SPL @ 1 kHz ActiveGard™ switched off:128 dB SPL @ 1 kHzActiveGard™ switched on:110 dB SPL @ 1 kHz115 dB SPL @ 1 kHz(ActiveGard™ switched off,ANR switched on)128 dB SPL @ 1 kHz(ActiveGard™ switched off,ANR switched off)110 dB SPL @ 1 kHz(ActiveGard™ switched on,ANR switched on/off)Ambient noise reduction Max. 32 dB Max. 32 dB Max. 32 dB (passive,ANR switched off)Additional max. 15 dB (ANRswitched on)Total harmonic distortion(THD)< 0.1% @ 1 kHz, 100 dB SPL< 0.1% @ 1 kHz, 100 dB SPL< 0.1% @ 1 kHz, 100 dB SPLSupply voltage--Phantom powering P12–P48,12 V to 48 V, ≤ 10 mA Contact pressure approx. 3.3 N approx. 3.3 N approx. 3.3 NAmbient temperature Operation: -15° C to +55° CStorage: -55° C to +70° C Operation: -15° C to +55° CStorage: -55° C to +70° COperation: -15° C to +55° CStorage: -55° C to +70° CWeight without cable approx. 240 g approx. 240 g approx. 240 g Microphones:BKE 10-4BMD 434BMD 434 Transducer principle pre-polarized condensermicrophonedynamic dynamicPick-up pattern Cardioid Hyper-cardioid Hyper-cardioid Frequency response40 Hz to 20 kHz40 Hz to 18 kHz40 Hz to 18 kHz Sensitivity16 mV/Pa @ 1 kHz0.5 mV/Pa @ 1 kHz0.5 mV/Pa @ 1 kHz Impedance-300 ohms300 ohms Maximum SPL150 dB SPL, 1 kHz, 0.5%THD--Connection type Phantom powering P48--Power supply12 V to 48 V--Sennheiser electronic GmbH & Co. KG · Am Labor 1 · 30900 Wedemark · Germany · 。
ARRIS CAP-1000 Deployment Services说明书

CAP-1000 Deployment Services ARRIS Global ServicesARRIS Deployment Services offer the expertise to help customers successfully deploy the ARRIS CAP-1000 product line of digital video processing equipment.The CAP-1000 product line (formerly CherryPicker), consisting of the models DM 6400 and CAP-1000,provides rate shaping, re-multiplexing, and ad insertion capability.CAP-1000 Deployment Services provide professional planning and deployment of CAP-1000 products. Theseservices include:1.Coordinated planning and installation2.Review of customer’s rate shaping, re -multiplexing, and ad insertion system design3.Configuration of CAP-1000 model DM 6400 and CAP-10004.Acceptance testing and technical supportARRIS Global Services has the expertise in system integration, field engineering, and project management required to successfully deploy CAP-1000 products. With the help of ARRIS, customers can be assured of installation and configuration with minimal downtime and risk. In addition, customers are guaranteed that configuration is done in accordance with their rate shaping and ad insertion requirements. SERVICE OVERVIEW:SERVICE BENEFITS:•Enable the headend for optimal rate shaping and ad insertion•Reduce deployment downtime and risk•Provide expert knowledge and capabilities to programmatically performimplementation•Contain costs of deployment•Minimize interruption of service•Ensure interoperability of headend components (ad servers)•Execute using proven methodology, planning, and testing•Deploy systems more efficiently•Provide 75 years of video experience•Offer proven methodology and track record of deploymentARRIS CAP-1000 Service DeliverablesThe CAP-1000 Deployment Service execution requires the coordinated support of ARRIS personnel and Customer site DAC and network personnel. Based on the assumptions and prerequisites noted below, ARRIS will deliver:Comprehensive Project ManagementAn ARRIS Project Manager will:• Coordinate planning and installation activities from project kick-off through postlaunch support.•Create and maintain a project plan together with the customer’s project management team.• Track and report weekly on status and action items.• Identify risk items and mitigation strategies.Pre-Installation Design ReviewARRIS personnel will:•Review and revise the customer’s system design to identify and resolve any issues with channel planning, network design, or component selection.• Assist with site surveys and review for errors and completeness.• Gather all information required for configuration of system components.• Document channel group mapping.System ConfigurationARRIS personnel will:• Assign the IP addresses provided by the customer to the CAP-1000 unit.• Configure the CAP-1000 unit.• Verify that CAP-1000 unit is correctly configured and operational.Acceptance Testing and Technical SupportARRIS personnel will provide onsite support during the customer’s system acceptance testing.Assumptions and PrerequisitesThis list of assumptions and pre-requisites is not intended to be exhaustive. Prior to the commencement of services and thereafter, ARRIS will inform the customer of any additional responsibilities necessary for the performance of the services. AssumptionsARRIS and the customer will provide a single point of contact for the project.ARRIS will provide services only for the work described above. Other issues should be handled through normal escalation methods.PrerequisitesThe customer will:•Provide space, power, and cooling for the equipment, and ensure all equipment is racked and cabled prior to the start of work. •Ensure readiness, provide access, and provide support for all DAC, billing, and headend networks.•Provide all necessary documentation, including, but not limited to, IP addresses, channel maps, network diagrams and headend design.•Provide applicable Electronics Industry Association (EIA) channels on the physical plant and ensure those channels are clear and available at the time of the integration.•Stage equipment at remote sites with site personnel who will assist with the physical setup.•Provide support for any and all networks (both physical and logical) that are located between, and include, any devices such as ethernet fiber transmitters, routers, and switches.ARRIS Global Services ValuesAccelerate time to market:Stay competitive with rapid deployment of new servicesReduce costs:Contain costs on deployment, integration, and supportMaximize revenue and profits:Optimize operations, ensure service quality, increase customer loyalty, grow revenue and profit marginsWhy ARRIS ?Multi-technology experience that is unique in the industry:ARRIS has designed, delivered, and optimized end-to-end network solutions for service providers.Flexible business model and approach:ARRIS can build a customized operations solution for virtually any network operations requirement.World-class support:ARRIS provides support from committed and highly trained, experienced professionals, complete with state-of-the-art local support centers, test labs, and repair depots.Voice, Data, and Video Technology leadership:ARRIS has a wealth of experience and expertise in introducing and operating new technology network systems.CAP-1000 Deployment ServicesTo order these services, contact your sales representative.ORDERING INFORMATIONPart Number Description476666-087-00 CAP-1000 Configuration Service556421-001-00 CAP-1000 DM 6400 MinorConfiguration Service556421-002-00 CAP-1000 DM 6400 MajorConfiguration ServiceIMPORTANT NOTICE: THIS DATA SHEET IS FOR INFORMATION PURPOSES ONLY AND REMAINS SUBJECT TO CHANGE BY ARRIS UNLESS AND UNTIL A FIRM ORDER FOR SERVICES IS ACKNOWLEDGED AND ACCEPTED BY ARRIS SUBJECT TO ARRIS STANDARD TERMS AND CONDITIONS WHICH WOULD FORM THE BASIS OF AGREEMENT BETWEEN THE PARTIES.Copyright Statement: ©ARRIS Enterprises, Inc. 2014 All rights reserved. No part of this publication may be reproduced in any form or by any means or used to make any derivative work (such as translation, transformation, or adaptation) without written permission from ARRIS Enterprises, Inc. (“ARRIS”). ARRIS reserves the right to revise this publi cation and to make changes in content from time to time without obligation on the part of ARRIS to provide notification of such revision or change. ARRIS and the ARRIS logo are all trademarks of ARRIS Enterprises, Inc. Other trademarks and trade names may be used in this document to refer to either the entities claiming the marks and the names of their products. ARRIS disclaims proprietary interest in the marks and names of others.©ARRIS Enterprises, Inc. 2014 All rights reserved. No part of this publication may be reproduced365-095-17585 x.3 08/14。
高品质与高画质的结合--Humax PR-HD1000高清接收机

高品质与高画质的结合--Humax PR-HD1000高清接收机娄军
【期刊名称】《卫星电视与宽带多媒体》
【年(卷),期】2006(000)011
【摘要】@@ 在介绍Humax PR-HD1000接收机之前,我们要感谢上海文广新近开播的高清电视频道"新视觉",是它让我们第一次接触到 DVB-8PSK和DVB-S2."新视觉"高清节目采用DVB-8PSK信道编码方式对外播出,而DVB-S2是一种新工业标准,如同我们的电脑从奔腾1、奔腾2一直升级到奔腾4,它们最大的特点是在现有(信号)信道带宽基础上,可以传送更多的节目,尤其是高清电视节目,从而节省信道带宽资源和传送费用.他们同样也存在兼容性的问题,这也就是我们使用现有接收机可以接到央视高清节目,却接收不到"新视觉"的原因.
【总页数】3页(P38-39,41)
【作者】娄军
【作者单位】无
【正文语种】中文
【中图分类】TN94
【相关文献】
1.菲律宾Cignal高清直播系统HUMAX高清专用机XH-7000/PH [J], 杨建平
2.我是iCord——Humax iCord双Tuner PVR高清卫星接收机测试报告(一) [J], 娄军
3.我是iCord——Humax iCord 双 Tuner PVR高清卫星接收机测试报告(二) [J], 娄军
4.我是iCord-Humax iCord双Tuner PVR高清卫星接收机测试报告(三) [J],
5.我是iCord——Humax iCord双Tuner PVR高清卫星接收机测试报告(四) [J], 娄军
因版权原因,仅展示原文概要,查看原文内容请购买。
- 1、下载文档前请自行甄别文档内容的完整性,平台不提供额外的编辑、内容补充、找答案等附加服务。
- 2、"仅部分预览"的文档,不可在线预览部分如存在完整性等问题,可反馈申请退款(可完整预览的文档不适用该条件!)。
- 3、如文档侵犯您的权益,请联系客服反馈,我们会尽快为您处理(人工客服工作时间:9:00-18:30)。
Argument 1
Human are born to be selfish Human be self-centered, initiative to chase or maximize their benefit using any method they have, even takeover others belongings. Therefore a force should be appear to protect each other. E .g Children before having education would get things they want by instinct , they would not ask whether they could get it or not.
Colonialism
Counter argument
Some may argue that there are goodness and moral standard in the society. There are charity, voice for protecting the environment, force against the crime. They are come from education, knowleged and experience, but not part of the human nature. Moral standards and actions called as “goodness” are based on human’s perspective, which are acts and behaviors that good for human society, in some ways it can treated as the self-centered of the whole species
HUMA1000 Video Presentation
Lam Hang On 20273122 T1O
The Essay
Topic: 1. “Human nature is bad.”-- Xunzi / "人之性惡." -- 荀子 Explain why you agree or disagree with Xunzi's statement. My thesis statement: Agree with Xunzi’s statement which Human nature is bad , to be precise , Human be selfish and focus on their own benefit all the time, yet they could become goodness as a result of education.
E.g Stopping crime is to create a safe environment to protect everyone’s belongings ; protecting environment is to maintain a place for human to survive.
Define the meaning of “Human nature is bad” Discuss the view pints between two sides ( Mengzi and Xunzi) Definition of “Human Nature”: the behaviors of Human have since they’re born but not told by others. Definition of “Bad” : Human are selfish and greedy in order to have better life, sometimes their acts and behaviors may harm others benefit , therefore are considered as bad for the whole society.(Foe example, Crime)
Essay structure
This essay will contain five paragraphs, including: Introduction Argument 1
Argument 2
Counter argument Conclusion
Introduction
Argument 2
Human first considered survive ,moral standards build-up after fulfilling basic needs, everyone could maintain their living with enough recourses. Under lack of resources , desire of survival always be the top preference. Peace usually happens on regions having advance development and rich resources, war began when people facing lack of resources.
Concusion
Summary of arguments and counter argument, restate my stance.
Thank you!