flex+spring整合
Xfrie与spring整合

xfire+sping整合webservice服务器端:1、建立一个新的项目springXfireWebService(客户端)2、在官网/Download中下载:xfire-distribution-1.2.6.zip(在建立项目后将所有jar包放到lib包中,测试删掉几个发现不行,似乎都是需要的,忘高手指明不足)和xfire-all-1.2.6.jar。
3、建立webService:package com.ebiz.xfire.service;import java.util.List;import com.ebiz.xfire.domain.CscProject;/***@author Wu,Yang*/public interface CscWebService{/***@author Wu,Yang*@desc"加载项目库数据"*@date2009-09-28*/List<CscProject>getCscProjectList(CscProject t);}4、实现:package com.ebiz.xfire.service.impl;import com.ebiz.xfire.service.WyWebService;/***@author Wu,Yang*/public class WyWebServiceImpl implements WyWebService{public void printHello(){System.out.println("Hello!");}}5、引入jar包:xfire-distribution-1.2.6.zip里面的包、xfire-all-1.2.6.jar和spring-2.5.6.jar。
6、与spring整合spring-context.xml:<?xml version="1.0"encoding="UTF-8"?><beans xmlns="/schema/beans" xmlns:xsi="/2001/XMLSchema-instance"xmlns:p="http://www.springfram /schem a/p"xmlns:context="http://www.springfram /schem a/context"xmlns:jee="http://www.springfram /schem a/jee"xmlns:aop="/schema/aop"xmlns:tx="http://www.springfram /schem a/tx"xsi:schem aLocation="http://www.springfram /schem a/beans/schema/beans/spring-beans-2.5.xsd/schema/context/schema/context/spring-context-2.5.xsd/schema/aop/schema/aop/spring-aop-2.5.xsd/schema/jee/schema/jee/spring-jee-2.5.xsd/schema/tx/schema/tx/spring-tx-2.5.xsd"default-autowire="byName"><import resource="classpath:org/codehaus/xfire/spring/xfire.xml"/><!--====================testSpringXfire=================--> <bean id="wyWebServiceImpl" class="com.ebiz.xfire.service.impl.WyWebServiceIm pl"/><bean id="addressingHandler" class="org.codehaus.xfire.addressing.AddressingInHandler"/><bean nam e="webService"class="org.codehaus.xfire.spring.ServiceBean"> <property nam e="serviceBean"ref="wyWebServiceImpl"></property><property nam e="serviceClass" value="com.ebiz.xfire.service.WyWebService"></property><property nam e="inHandlers"><list><ref bean="addressingHandler"/></list></property></bean></beans>7、配置web.xml:<?xml version="1.0"encoding="UTF-8"?><web-app id="WebApp_ID"version="2.4"xmlns="/xml/ns/j2ee" xmlns:xsi="/2001/XMLSchema-instance"xsi:schemaLocation="/xml/ns/j2ee/xml/ns/j2ee/web-app_2_4.xsd"><display-name>XFireTest</display-name><welcome-file-list><welcome-file>index.html</welcome-file><welcome-file>index.jsp</welcome-file></welcome-file-list><context-param><param-name>contextConfigLocation</param-name><param-value>classpath:spring-context.xml</param-value></context-param><listener><listener-class>org.springframework.web.context.ContextLoaderListener</listener-class> </listener><servlet><servlet-name>XFireServlet</servlet-name><servlet-class>org.codehaus.xfire.spring.XFireSpringServlet</servlet-class></servlet><servlet-mapping><servlet-name>XFireServlet</servlet-name><url-pattern>/servlet/XFireServlet/*</url-pattern></servlet-mapping><servlet-mapping><servlet-name>XFireServlet</servlet-name><url-pattern>/services/*</url-pattern></servlet-mapping></web-app>8、启动项目springXfireWebService(客户端),没有出错第一步OK啦!!客户端:1、建立新的项目springXfireClient(客户端)2、建立service:package com.ebiz.xfire.service;/***@author Wu,Yang*@version2009-09-28*/public interface WyWebService{/***@desc"打印Hello"*/void printHello();}注意:这里的包的目录结构一定要和客户端的包的结构一定要一样(本人吃过亏的~~~~(>_<)~~~~)3、建立test.javapackage com.testxfire.client;import .MalformedURLException;import org.codehaus.xfire.XFireFactory;import org.codehaus.xfire.client.XFireProxyFactory;import org.codehaus.xfire.service.Service;import org.codehaus.xfire.service.binding.ObjectServiceFactory;import com.ebiz.xfire.service.WyWebService;public class Test{public static void main(String[]args){Service serviceModel=new ObjectServiceFactory().create(WyWebService.class);XFireProxyFactory factory=new XFireProxyFactory(XFireFactory.newInstance().getXFire());String url= "http://localhost:8080/springXfireWebService/services/WyWebService";try{WyWebService cws=(WyWebService)factory.create(serviceModel, url);cws.printHello();}catch(MalformedURLException e){e.printStackTrace();}}}4、在控制台出现:Hello完成。
整合Flex和Java--配置篇
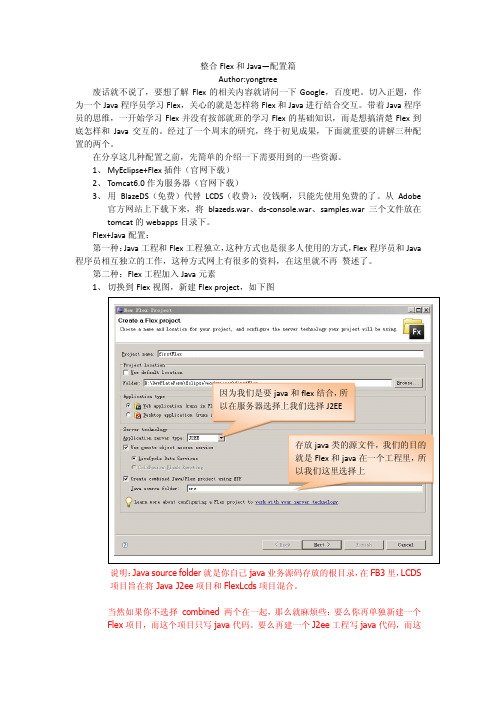
3、 将该工程发布到 tomcat 下,并启动 tomcat。 (注:一定要启动 tomcat,因为在后面 的设置中,它要验证工程的路径) 4、 然后在该工程上右键Flex Project NatureAdd Flex Project Nature
配置正确的显示
配置服务器路径
建议不要修改这里的配置
<mx:Script> <![CDATA[ import mx.rpc.events.ResultEvent; function gg(evnet:ResultEvent):void{ var ff:String = evnet.result as String; ggg.text = ff; } function remotingSayHello():void{ var sname:String = nameInput.text; h.hello(sname); } ]]> </mx:Script> <mx:RemoteObject destination="hello" id="h" result="gg(event)" endpoint="http://localhost:8080/flexweb/messagebroker/amf" > </mx:RemoteObject>
<listener-class>flex.messaging.HttpFlexSession</listener-class> </listener> <!-- MessageBroker Servlet --> <servlet> <servlet-name>MessageBrokerServlet</servlet-name> <display-name>MessageBrokerServlet</display-name> <servlet-class>flex.messaging.MessageBrokerServlet</servlet-class> <init-param> <param-name>services.configuration.file</param-name> <param-value>/WEB-INF/flex/services-config.xml</param-value> </init-param> <load-on-startup>1</load-on-startup> </servlet> <servlet-mapping> <servlet-name>MessageBrokerServlet</servlet-name> <url-pattern>/messagebroker/*</url-pattern> </servlet-mapping>
最佳实践:Flex Spring JAVA BLAZEDS整合
BlazeDS初始化时用于动态创建services, destinations, and adapters。
SpringRemotingDestinationBootstrapService扩展AbstractBootstrapService。
SpringRemotingDestinationBootstrapService 自动导出包含"@Service标注及以FlexService结尾"的Spring Bean为RemoteObject。
@SuppressWarnings("all")public class SpringRemotingDestinationBootstrapService extends AbstractBootstrapService {public static final String DEFAULT_INCLUDE_END_WITH_BEANS = "FlexService";private static Logger logger =LoggerFactory.getLogger(SpringRemotingDestinationBootstrapService.cla ss);private String destChannel;private String destSecurityConstraint;private String destScope;private String destAdapter;private String destFactory;private String serviceId;private String includeEndsWithBeans;@Override/***初始化入口*/public void initialize(String id, ConfigMap properties) { serviceId = properties.getPropertyAsString("service-id", "remoting-service");destFactory = properties.getPropertyAsString("dest-factory", "spring");destAdapter = properties.getProperty("dest-adapter");destScope = properties.getProperty("dest-scope");destSecurityConstraint =properties.getProperty("dest-security-constraint");destChannel = properties.getPropertyAsString("dest-channel", "my-amf");includeEndsWithBeans =properties.getPropertyAsString("includeEndsWithBeans",DEFAULT_INCLUDE_END_WITH_BEANS);Service remotingService = broker.getService(serviceId);if (remotingService == null)throw createServiceException("not found Service with serviceId:" + serviceId);createSpringDestinations(remotingService);}private ServiceException createServiceException(String message) {ServiceException ex = new ServiceException();ex.setMessage(message);return ex;}/***将Spring的Service Name自动定义为destination*/private void createSpringDestinations(Service remotingService) { WebApplicationContext wac = WebApplicationContextUtils.getWebApplicationContext(broker.getServletContext());List<String> addedBeanNames = new ArrayList();for (String beanName : wac.getBeanDefinitionNames()) {Class type = wac.getType(beanName);logger.debug("{}: {}", new Object[]{beanName,type.getName()});boolean isCreateSpringDestination = !type.isAnnotationPresent(com.grgbanking.platform.core.flex.NoneRemoti ngObject.class)|| beanName.endsWith(includeEndsWithBeans) || isCreateDestination(beanName, type);if (isCreateSpringDestination) {createSpringDestination(remotingService, beanName);addedBeanNames.add(beanName);}}("[Auto Export Spring toRemotingDestination],beanNames={}", addedBeanNames);}protected boolean isCreateDestination(String beanName, Class type) {return false;}/** <!-- 动态生成的配置内容 --> <destination id="sampleVerbose"><channels> <channel* ref="my-secure-amf" /> </channels> <adapter ref="java-object" /> * <security> <security-constraint ref="sample-users" /> </security> * <properties> <source>pany.SampleService</source>* <scope>session</scope> <factory>myJavaFactory</factory></properties>* </destination>*/protected void createSpringDestination(Service service, String destinationId) {flex.messaging.services.remoting.RemotingDestinationdestination = (flex.messaging.services.remoting.RemotingDestination) service.createDestination(destinationId);destination.setSource(destinationId);destination.setFactory(destFactory);if (destAdapter != null) {destination.createAdapter(destAdapter);}if (destScope != null) {destination.setScope(destScope);}if (destSecurityConstraint != null) {destination.setSecurityConstraint(destSecurityConstraint);}if (destChannel != null) {destination.addChannel(destChannel);}service.addDestination(destination);}2)修改SpringFactory并扩展FlexFactory根据destination的id,将Flex的destination映射为Spring的Beanpublic class SpringFactory implements FlexFactory {private static final String SOURCE = "source";/***This method can be used to initialize the factory itself.It is called*with configuration parameters from the factory tag which defines the id*of the factory.*/public void initialize(String id, ConfigMap configMap) {}/***This method is called when we initialize the definition of an instance*which will be looked up by this factory.It should validate that the*properties supplied are valid to define an instance.Any valid properties*used for this configuration must be accessed to avoid warnings about *unused configuration elements.If your factory is only used for *application scoped components,this method can simply return a factory*instance which delegates the creation of the component to the*FactoryInstance's lookup method.*/public FactoryInstance createFactoryInstance(String id, ConfigMap properties) {SpringFactoryInstance instance = new SpringFactoryInstance(this, id, properties);instance.setSource(properties.getPropertyAsString(SOURCE, instance.getId()));return instance;} // end method createFactoryInstance()/***Returns the instance specified by the source and properties arguments.*For the factory,this may mean constructing a new instance, optionally*registering it in some other name space such as the session or JNDI, and*then returning it or it may mean creating a new instance and returning *it.This method is called for each request to operate on the given item*by the system so it should be relatively efficient.*<p>*If your factory does not support the scope property,it report an error*if scope is supplied in the properties for this instance.*/public Object lookup(FactoryInstance inst) {SpringFactoryInstance factoryInstance = (SpringFactoryInstance) inst;return factoryInstance.lookup();}/***Spring工厂实例,执行实际的查找动作.**@author yrliang**/static class SpringFactoryInstance extends FactoryInstance { SpringFactoryInstance(SpringFactory factory, String id, ConfigMap properties) {super(factory, id, properties);}@Overridepublic String toString() {return"SpringFactory instance for id="+ getId() + " source=" + getSource() + " scope=" + getScope();}@Overridepublic Object lookup() {Logger logger =LoggerFactory.getLogger(SpringFactory.class);ApplicationContext appContext = WebApplicationContextUtils .getWebApplicationContext(flex.messaging.FlexContext.getServletCo nfig().getServletContext());String beanName = getSource();try {logger.debug("lookup(): bean id=" + beanName);//flex.messaging.FlexContext.getHttpRequest().getSession().getAttribute (arg0);return appContext.getBean(beanName);} catch (NoSuchBeanDefinitionException nexc) {ServiceException e = new ServiceException();String msg = "Spring service named '"+ beanName + "' does not exist.";e.setMessage(msg);e.setRootCause(nexc);e.setDetails(msg);e.setCode("Server.Processing");logger.error("",nexc);throw e;} catch (BeansException bexc) {ServiceException e = new ServiceException();String msg = "Unable to create Spring service named '" + beanName + "' ";e.setMessage(msg);e.setRootCause(bexc);e.setDetails(msg);e.setCode("Server.Processing");logger.error("",bexc);throw e;}}}}3)配置service-config.xml<?xml version="1.0" encoding="UTF-8"?><services-config><factories><factory id="spring"class="com.grgbanking.platform.core.flex.spring.SpringFactory"/> </factories><services><service-include file-path="remoting-config.xml" /><service-include file-path="proxy-config.xml" /><service-include file-path="messaging-config.xml" /><service id="spring-remoting-service"class="com.grgbanking.platform.core.flex.spring.SpringRemotingDestina tionBootstrapService"><!-- 其它生成的RemotingDestination默认属性<adapters><adapter-definition id="java-object"class="flex.messaging.services.remoting.adapters.JavaAdapter"default="true" /></adapters><default-channels><channel ref="my-amf" /></default-channels>--><properties><!--<service-id></service-id><dest-factory></dest-factory><dest-adapter></dest-adapter><dest-scope></dest-scope><dest-channel></dest-channel><dest-security-constraint></dest-security-constraint><includeEndsWithBeans></includeEndsWithBeans>--></properties></service></services>4)FLEX客户端调用this.blogFlexService = new RemoteObject("blogFlexService");//这里需要指定endpoint,因为是动态的RemotingDestination,而静态的RemotingDestination ,flex编译器会将endpoint编译进源代码.//这个也是flex编译器需要指定配置文件而导致使用flex经常会犯的错误之一.this.blogFlexService.endpoint = '../messagebroker/amf';3.公司应用案例这种整合最早是在2010年的FEEL View 5.0中使用,后台的统一平台,FEEL View5.1中都采用这种方法进行整合。
整合flex-spring-mybatis

整合flex-spring-mybatis开发工具:myeclipse8.5 flash builder 4 jdk1.6运行环境:tomcat6 db2框架:spring3.0 mybatis3 flex blazeDs1.新增web工程2.把blazeDs.war中web-inf的内容覆盖3.更改项目类型,添加flex项目类型4.应用程序服务器类型:J2EE使用远程对象访问服务,选择BlazeDs5.根文件夹:所建工程的WebRoot路径输出文件夹:编译好的flex应用程序的位置6点击finish后,工程有报错信息右键单击,并选择重新生成HTML模板7. 新增文件夹flex-src进入工程属性页面,选择flex构建模块修改主源文件夹:flex-src修改输出文件夹:http://localhost:8080/flexDoc/flexDoc-bin/把flexDoc.mxml移动至flex-src文件夹下面8. 以web application 的方式运行flexDoc.mxml9. 建一个java类,在WebRoot/flex/remoting-config.xml中注册该类例如:<destination id="helloWorld"><properties><source>cn.riahome.java.HelloWorld</source></properties></destination>10.在mxml中调用java类<mx:RemoteObject id="say" destination="helloWorld"></mx:RemoteObject><mx:Script><![CDATA[public function remotingSayHello(event:Event):void{say.getHelloWorld(tiName.text);}]]></mx:Script>11.整合spring(1)导入spring的相关jar包,添加spring的配置文件(2)编写一个工厂类,继承flexFactory(3) 在WebRoot/WEB-INF/flex/services-config.xml中添加<!-- 整合spring--><factories><factory id="spring" class="com.sand.factories.SpringFactory"/> </factories>(4) 在application-façade.xml(spring IOC配置文件)中添加<bean id="loginFacade"class="com.sand.facade.login.LoginFacade"scope="prototype"><property name="loginService"ref="loginService"/></bean>(5) 在WebRoot/WEB-INF/flex/remoting-config.xml中添加<destination id="login"><properties><factory>spring</factory><source>loginFacade</source></properties></destination>12.整合mybatis(1) 导入mybatis的相关jar包,添加与spring整合的配置文件<bean id="loginFacade"class="com.sand.facade.login.LoginFacade"scope="prototype"><property name="loginService"ref="loginService"/></bean>(2) 导入mybatis的相关jar包,添加与spring整合的配置文件<!-- mybatis--><bean id="sqlSessionFactory"class="org.mybatis.spring.SqlSessionFactoryBean"><property name="configLocation"value="classpath:mybatis-config.xml"/><property name="dataSource"ref="dataSource"/></bean>(3) 在mybatis-config的配置文件中添加映射文件<mappers><mapper resource="com/sand/mapper/FlexDemoMapper.xml"/></mappers>(4) 根据需要编写FlexDemoMapper.xml<!-- 根据usercode pwd查询 --><select id="getFlexDemoForLogin"parameterType="com.sand.pojo.FlexDemo"resultType="com.sand.pojo.FlexDemo"resultMap="flexDemoMap">SELECT * from FLEXDEMO FDWHERE ER_CODE = #{userCode} and FD.PWD = #{pwd} </select>(5)编写接口FlexDemoMapper.javapublic interface FlexDemoMapper {public FlexDemo getFlexDemoForLogin(FlexDemo flexDemo);}(6)编写DAO ,继承SqlSessionDaoSupport后,可以通过getSqlSession,获取mybatis的sessionpublic class LoginDaoImpl extends SqlSessionDaoSupport implements LoginDao{public FlexDemo getFlexDemo(String id){return (FlexDemo)getSqlSession().selectOne("com.sand.mapper.FlexDemoMapper.getFlexDemo ", id);}public FlexDemo getFlexDemo(FlexDemo flexDemo){return(FlexDemo)getSqlSession().selectOne("com.sand.mapper.FlexDemoMapper.g etFlexDemoForLogin", flexDemo);}}(7)在spring的配置文件中添加事物管理功能<!--声明式事务通知--><tx:advice id="txAdvice"transaction-manager="transactionManager"><tx:attributes><tx:method name="save*"propagation="REQUIRED"rollback-for="ng.Exception"/><tx:method name="insert*"propagation="REQUIRED"rollback-for="ng.Exception"/><tx:method name="update*"propagation="REQUIRED"rollback-for="ng.Exception"/><tx:method name="delete*"propagation="REQUIRED"rollback-for="ng.Exception"/><tx:method name="import*"propagation="REQUIRED"rollback-for="ng.Exception"/><tx:method name="rcpersist*"propagation="REQUIRED" rollback-for="ng.Exception"/><tx:method name="parse*"propagation="NEVER"rollback-for="ng.Exception"/></tx:attributes></tx:advice><aop:config><aop:pointcut id="serviceOperation"expression="execution(* com.sand.service..*Service.*(..))"/><aop:advisor pointcut-ref="serviceOperation"advice-ref="txAdvice"/></aop:config>。
FLEX4系列教程

RIA 是什么?RIA 是富网络应用(Rich Internet Application)的缩写,也即丰富互联网应用程序。
它只是一种技术形式而不是具体的技术。
RIA 出现的背景在 RIA 出现之前,软件开发都是基于 C/S(Client/Server)或 B/S(Browser/Server)架构,但两者各有缺点。
C/S 的主要缺点:1.开发、部署成本高传统 B/S 结构的软件需要针对不同 OS 开发对应的版本,且软件更新换代的速度越来越快自然成本会很高。
2.维护成本高服务器和客户端都需要维护管理,工作量较大且技术支持复杂。
B/S 的主要缺点:1.受限于 HTML 技术,很难像 C/S 那样产生丰富,个性的客户端界面;2.存在浏览器兼容性差问题;3.Server 端负荷较重,响应速度慢;绝大多数处理都集中在 Server 端,并且每次响应都要刷新页面(利用 Ajax 技术会有所缓解)。
随着软件的飞速发展,此时需要出现一种能够摒弃上诉缺点的新的技术形式– RIA 出现了。
目前比较流行的 RIA 技术▪Adobe 的Flex▪微软的Silverlight▪Sun 的JavaFX以上三种技术各有优势,本教程只关注目前应用较广泛的 Flex。
Flex 和 Flex SDK 是什么?Flex 是一个开源、免费的框架,用于构建在Adobe® Flash® Player 或Adobe AIR® runtimes 环境内运行的跨浏览器、桌面和操作系统的富网络应用。
Flex SDK(Flex Software Development Kit)除了包括 Flex 框架以外还包括 compilers(编译器)和debugger(调试器)等开发工具。
(这也意味着没有 Flash Builder 等 IDE 同样可以开发 Flex 应用,但效率会很低。
)授权Mozilla Public License, version 1.1 (MPL)开发语言Flex Framework : Action Script 3.0开发者Adobe Systems IncorporatedFlex 应用运行环境–Adobe® Flash® Player 和Adobe AIR® Runtimes两者都是运行环境,前者基于浏览器,后者基于桌面。
基于Flex和Spring的应用开发架构研究
基于Flex和Spring的应用开发架构研究摘要:传统的java ee应用程序使用采用某种mvc框架作为前端用户界面,随着技术的发展,使用者对用户体验方面有了更高的要求,flex作为富客户端技术在web技术中的应用,在一定程度上提升了用户交互性和用户体验度,为使用者提供了更酷的界面,更短的响应时间及接近于桌面程序的体验。
本文主要讨论如何将flex 技术集成至一个现有的基于spring的java ee应用程序中,阐述了flex技术在java ee应用程序中的实现解决方案。
关键词:java ee;flex;web应用程序;开发框架中图分类号:tp311.52 文献标识码:a 文章编号:1007-9599 (2012) 17-0000-021 引言flex 是一个高效、免费的开源框架,可用于构建具有表现力的web 应用程序,这些应用程序利用 adobe flash player和 adobe air,运行时跨浏览器、桌面和操作系统实现一致的部署。
java ee 是基于组件模型的、分层的、可用于分布式环境下的开发与部署企业级应用程序的一系列服务和规范的集合。
本文结合已有的基于spring的java ee框架应用程序的基础上,对flex开发环境进行配置,使用flex进行程序开发。
2 java ee应用程序加入flex支持现有一个现有的java ee应用程序,程序结构如图1所示此web应用程序是典型的java ee应用的程序。
传统程序交互界面一般采用html的形式,用户在进行操作时,每次点击相应该的链接都需要重新的刷新界面。
如采用flex作为与用户交互的界面,将会给用户带来更好的体验。
本文以系统中权限管理模块中的“资源查询”为例,对现有的框架整合flex应用进行阐述。
2.1 ssh框架概述如图1中所示,按照分层架构的形式对资源进行划分, action 包中存放控制器类,service中存放业务接口类,在impl中存放业务实现类,utils包中存放实用程序类,在vo包中存放实体类;其中,applicationcontext-dao.xml为spring的配置文件,struts.xml为struts2的配置文件。
深度整合Flex和Spring

2 1 年第 7 00 期
C m u e DS fw r n p t c t o s o p t rC o ta ea dA p i合 Fe l x和 S r g pi n
史 红 军
( 四川建筑职业技 术学院 ,四川德 阳 6 8 0 1 00)
摘 要 : 文讨论 了基 于 S r g l e S nertn 的 H x与 Sn g的整合 方 案 , 出把 来 自 F x的请 求映射 到 b zDS 本 p n b zD it ao i a g i e pn 给 l e le a 的方 法 ,说 明 了在 S r g 配置 文件 中为 F x 露 ba 方法 。 pn 的 i l 暴 e e n的
te m eh n h w o ma t e r q e tfo te Flx t e blz DS,a d e c b w o e po e be n’ e od i t e s in h tod o o t p e u s r m h e o t a e h h n d s r e ho t x s a Sm t n pr g i h h
关键词 :Fe ;p n l e tga o ;p n en l S r gba DSi e rt nS r gb a x i z n i i
中图分类号 :T 3 P1
文献标识码 :A
文章鳊号:10 - 5 9 2l) 7 02 — 3 0 7 9 9 (oo 0 - 15 0
Flx a d S rn n e r t n I - e t e n p i gI t g a i n d p h o
c n g r il st teF e o f u ef e o h l x. i Ke wor : e S i gblz D Si tg ai n;p i gbe y dsF x;prn a e ne r to S rn a l n
在Spring中使用Flex

使 用 一 个 反转 控 制 容 器 ,组 件 不 需 要 实 例 化 ,甚 至 不 需 要 查 找 他们 的 依 赖 ( 起 和 它们 工 一 作 的对象 ) 。容 器 的 职 责 是 在 创 建 组 件 时 注 入 这 些 依赖 ( 因此 术 语 “ 依赖 式 注 入 ” 也 被 用 于 描 述
3 你可 以 使 用 Re t bet 件 直接 调 用 部 . moe jc组 O
什么 是 Fe ? lx
Fe 提 供 了一 个 构 建 富 Itre应 用程 序 的 完 lx ne t n 整 解 决 方 案 。Fe 编 程 模 型 由下 面 几 部 分 组 成 : lx ・ A t n cit 个 兼 容 的E MASr t面 向 ci S r : o p一 C ci , p 对 象 的 编 程 模 型 。除 了 一 些 语 法 不 同 之 外 , A t n cit 起 来 和 Jv  ̄ 常相 似 ,它 也 支 持 同 ci Sr 看 o p aa 样 的 面 向 对 象 构 造 :包 、类 、继 承 、接 口、强 类 型 ( 过 也 是 动 态 的 )等 等 。 不 ・ M×ML一 个 基 于 X L的 语 言 ,提 供 了在 : M Aco Sr t 础 上 的抽 象 ,允 许 公 开 构建 部 分 应 t n ci 基 i p 用程 序 ( 有 代 表 性 的是 Ve 。 具 i w)
Fe 源 代码 ( ml . 文 件 ) 编译 成 在 使 l x . mx 和 a s 被
用 即 时 编 译 器 的客 户端 Fah 拟 机 上执 行 的 Fah l 虚 s l s
架 的 基 础是 一 个 实 现 了反 转控 制 ( C)模 式 的轻 I o
Flex讲解
Flex事件机制(二) 事件机制( 事件机制
Event类作为创建Event对象的基类,当发生事件时,Event对象将作为参数传递 给事件侦听器。如MouseEvent、KeyboardEvent • Event类有几个常用的公共属性: ◆是否冒泡:bubbles; ◆目标对象:target; ◆所处阶段:eventPhase; ◆当前对象:currentTarget; Flex事件机制中的自定义事件,也就是向监听器传递自己定义的事件类型,同 时可以通过事件传递参数。 • 1.创建自定义事件名称的Event dispatchEvent(newEvent(“myEvnet”,true,false)); • 2.创建自定义事件类 Public class MyEvent extends Event{ dispatchEvent是EventDispatcher的方法: publicfunctiondispatchEvent(event:Event):Boolean将事件调度到事件流中。事件 目标是对其调用dispatchEvent()方法的EventDispatcher对象。 •
控件简介(二)
• • • • • • • • • • • • • • • • • • • 5:flex控件: 警告alert弹出警告框 下拉列表combobox下拉数据列表 选色器colorpicker可选择的调色盘 数据表格datagrid 数据表格 日期选择器datechooser选择日期控件 日期条 datefield 单击弹出日期选择器 水平列表horizontalList 水平列表项目 水平尺/垂直尺 hrule vrule单个水平或垂直标尺 水平、垂直滑竿 hslider,vslider 图像 image 支持gif jpeg png svg swf 列表list 可滚动的数据组 计数器numericstepper单击向上的按钮增加数据,单击向下的按钮减少数据 进度条progressbar 当前操作进度 滚动条 水平,垂直滚动 scrllbar,hscrollbar,vscrollbar swf加载器 显示swf文件 列表条tabbar一组水平的列表 排列列表tilelist类似表格的行列对正排列的项目 树tree、以展开树的方式显示继承关系的数据 音像videodisplay flex应用中的数据流媒体
flex 整合spring

Flex整合Spring
一个完好的flex与Java工程,加入spring相关的包后,先在web.xml中启动spring,即在web.xml 文件中加入一下代码:
如果我们想让flex前端调用的Java类是通过flex自身的配置文件获得的,那么我们只需要在remoting-config.xml中配置好需要的Java类即可,具体添加如下类似代码:
启动了spring后,如果我们想让容器中的Java类的实例通过spring来管理,则需要先自己写一个类冲当factory,使flex调用java类的时候从spring配置好的容器中去取,当然仍需要给出相关的配置具体步骤如下:
手写Factory类
该类实现FlexFactory接口,并按照图片中的方式覆写其中的两个方法,接着在services-config.xml 中加入以下代码(最好加在末尾):
以上配好了好,我们就可以按常规的方式在spring中配置我们需要的Java类了,如:
注意我们到此为止,只是实现了让Java类的实例的管理归结于spring,而在flex前端调用Java的类,只能识别在remoting-config.xml中进行配置的类,因此我们仍需要在remoting-config.xml进行配置,只不过此时配置的类,最终指向的是spring中类,即在remoting-config.xml中加入如下代码:
到此为止,个完整的flex和spring的整合已经完成,很有成就感吧···。
flex和spring

随着Adobe Flex 技术的成熟,越来越多的企业开始采用Adobe Flex 技术开发RIA (Rich Internet Application)。
在常见的RIA 应用程序架构中,客户端用Adobe Flex 渲染出漂亮的界面,而渲染界面所需要的数据则从服务器端的应用程序获取。
在Java EE 领域,服务器端的应用程序通常是运行在Java EE 应用服务器中,以获取安全,事务,高可靠性等企业级特性,这直接催生了整合Abode Flex 和Java EE 应用服务器的需求。
而Spring 又是当前应用最广泛的Java EE 应用服务器之一,本文将主要介绍如何整合这两种技术,使你能够轻松构建既健壮又漂亮的Web 应用程序。
整合Adobe Flex 和Spring 的关键就在于提供一种方法使得Adobe Flex 客户端程序可以很容易访问到Spring 管理的Bean,并避免过多的配置。
利用开源框架BlazeDS 和Spring BlazeDS Integration 来集成Adobe Flex 和Spring 可以帮助你做到这一点。
BlazeDS 和Spring BlazeDS IntegrationBlazeDS, BlazeDS 是Adobe 公司的一个开源项目,用于实现基于Flex 的前端与基于Java 的后端应用程序之间的远程调用和消息传送。
而Spring BlazeDS Integration 是Adobe 和Spring 联合开发的一个开源集成项目,目标是使得开发人员可以轻松创建前端采用Flex 而后台采用Spring 的RIA 应用程序,同时避免过多的配置。
图1展示了Spring BlazeDS Integration 的工作原理。
首先,在web.xml 中注册Spring Web MVC 框架的DispatcherServlet,用于处理Spring 请求,通常DispatcherServlet 只是将接收到的Spring 请求转给相应的处理器(handler),处理器会处理接收到的请求并返回一个响应。
spring框架集成flyway项目的详细过程
spring框架集成flyway项⽬的详细过程什么是SpringSpring是⼀个开源框架,它由Rod Johnson创建。
它是为了解决企业应⽤开发的复杂性⽽创建的。
Spring使⽤基本的JavaBean来完成以前只可能由EJB完成的事情。
然⽽,Spring的⽤途不仅限于服务器端的开发。
从简单性、可测试性和松耦合的⾓度⽽⾔,任何Java应⽤都可以从Spring中受益。
⽬的:解决企业应⽤开发的复杂性功能:使⽤基本的JavaBean代替EJB,并提供了更多的企业应⽤功能范围:任何Java应⽤它是⼀个容器框架,⽤来装javabean(java对象),中间层框架(万能胶)可以起⼀个连接作⽤,⽐如说把Struts和hibernate粘合在⼀起运⽤。
简单来说,Spring是⼀个轻量级的控制反转(IoC)和⾯向切⾯(AOP)的容器框架。
Flyway简介Flyway是⼀个数据库版本化管理⼯具,通过SQL脚本实现DB Migration⾃动化升级,⽀持独⽴运⾏,也可以和构建⼯具或者Spring开发环境集成。
最近给公司项⽬集成flyway,由于我们项⽬移动端使⽤的是spring框架,⽹上看了很多博客,感觉这⽅⾯的东西还是很少的,毕竟现在是springboot的天下,⼤多数都是springboot集成flyway。
但是还是有不少公司遗留有spring框架的项⽬。
这⾥就⾃⼰肝⼀篇,希望能帮到更多想把flyway添加到spring项⽬中的⼈。
由于使⽤的是spring框架。
因此我们选择低版本的flyway。
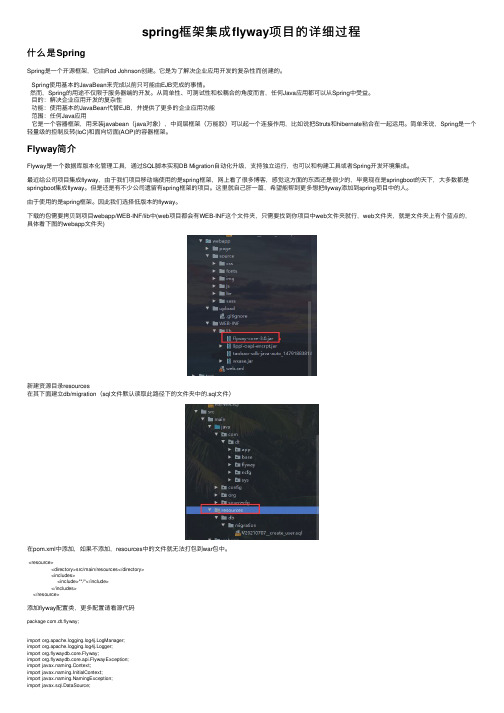
下载的包需要拷贝到项⽬webapp/WEB-INF/lib中(web项⽬都会有WEB-INF这个⽂件夹,只需要找到你项⽬中web⽂件夹就⾏,web⽂件夹,就是⽂件夹上有个蓝点的,具体看下图的webapp⽂件夹)新建资源⽬录resources在其下⾯建⽴db/migration(sql⽂件默认读取此路径下的⽂件夹中的.sql⽂件)在pom.xml中添加,如果不添加,resources中的⽂件就⽆法打包到war包中。
Java EE第十六周之Spring的整合

洛阳师范学院信息技术学院
内容概要
Spring与Struts2的整合
管理Action (IoC)
分层设计:dao和service 层的依赖注入 (IoC)
管理dataSource和SessionFactory (IoC)
Spring与Hibernate的整合
分层设计: dao和service 层的依赖注入 (IoC)
Spring和Hibernate整合(二-1)
管理dataSource和SessionFactory (IoC)
方式二:取消hibernate.cfg.xml ( 此方法需添加commons-dbcp.jar和commons-pool.jar) Spring的applicationContext.xml中
声明式事务管理 (AOP)
Spring框架的组成
图 Spring的六大模块
支撑Spring绝大部 分功能的根基其实 是少许基本理念 , 其中核心有两个: 1, IOC (DI) 2, AOP
Spring整合Struts2(一)
第一步,为项目添加库struts2-springplugin-2.0.14.jar
<bean id= "dataSource" class="mons.dbcp.BasicDataSource" > <property name ="driverClassName" value="org.h2.Driver" /> <property name ="url" value="jdbc:h2:~/test;AUTO_SERVER=TRUE" /> <property name ="username" value="sa" /> <property name ="password" value="" /> <!-- 连接池启动时的初始值 --> <property name ="initialSize" value="1" /> <!-- 连接池的最大值 --> <property name ="maxActive" value="500" /> <!-- 最大空闲值.当经过一个高峰时间后,连接池可以慢慢将已经用不到的连接慢慢释放一部分,一直减少到maxIdle为止 --> <property name ="maxIdle" value="2" /> <!-- 最小空闲值.当空闲的连接数少于阀值时,连接池就会预申请去一些连接,以免洪峰来时来不及申请 --> <property name ="minIdle" value="1" /> </bean>
flex-java-spring集成

import org.springframework.beans.factory.NoSuchBeanDefinitionException;
import org.springframework.context.ApplicationContext;
import org.springframework.web.context.support.WebApplicationContextUtils;
import flex.messaging.FactoryInstance;
import flex.messaging.FlexFactory;
</servlet-mapping>
<welcome-file-list>
<welcome-file>index.html</welcome-file>
<welcome-file>index.jsp</welcome-file>
</welcome-file-list>
+ "' does not exist.";
e.setMessage(msg);
e.setRootCause(nexc);
e.setDetails(msg);
e.setCode("Server.Processing");
throw e;
<listener>
<listener-class>flex.messaging.HttpFlexSession</listener-class>
flex整合spring,hibernate例子完整版
1. 建立数据表Oracle数据库建表语句create table flexuser (userid number(10),username varchar(20),pass varchar(20),email varchar(20), primary key (userid));2. 插入测试数据insert into flexuservalues('1','testuser','testuser','flex@');3. 新建flex项目按NEXT进入下一步1.必须设置J2EE运行服务器目标。
第一次设置时需要新建。
点击New,选择ApacheTomcat v6.0 Server,如图:2.点击下一步,设置apache-tomcat-6.0.16的目录,如图:3.点击完成,J2EE运行服务器目标设为Apache Tomcat v6.0,如图:点击FINISH4 测试flex+bleazeds的web环境是否正确。
在myEclipse视图下在src下构建一个class,模拟服务器端的一个远程对象. package com.surekam.flexandjava;publicclass HelloWorld {public StringsayHelloTo(String name){return"你好!" + name;}}在flex视图下在WEB-INF/flex/remotiong-config.xml中注册这个远程对象<destination id="hello"><properties><source>com.surekam.flexandjava.HelloWorld</source></properties></destination>5 在flexsrc/flexTest.mxml中添加以下代码:<?xml version="1.0" encoding="utf-8"?><s:Application xmlns:fx="/mxml/2009"xmlns:s="library:///flex/spark"xmlns:mx="library:///flex/mx" minWidth="955" minHeight="600"><fx:Script><![CDATA[import mx.controls.Alert;import mx.rpc.events.FaultEvent;import mx.rpc.events.ResultEvent;protected function ro_resultHandler(event:ResultEvent):void{// TODO Auto-generated method stubmessage.text = event.result as String;}protected function ro_faultHandler(event:FaultEvent):void{// TODO Auto-generated method stubAlert.show("失败原因:" + event.toString());}protected functionbutton1_clickHandler(event:MouseEvent):void{// TODO Auto-generated method stubro.sayHelloTo(username.text);}]]></fx:Script><fx:Declarations><!--将非可视元素(例如服务、值对象)放在此处 --><s:RemoteObject id="ro" destination="hello"result="ro_resultHandler(event)" fault="ro_faultHandler(event)" endpoint="/flexTest/messagebroker/amf"></s:RemoteObject></fx:Declarations><s:Button x="355" y="65" label="按钮"click="button1_clickHandler(event)"/><s:Label id="message" x="219" y="125" text="标签" height="32" width="206"/><s:TextInput id="username" x="219" y="65"/></s:Application>工程发布运行,测试一下。
WF-SpringflexWire
WF-SpringflexWire™Clear/Wire Reinforced Suction & Delivery HoseSpringflexWire™ is an extremely tough and flexible non-toxic transparent PVC hose, allowing easy identification of blockages. UV compounded to maintain clarity. Excellent resistance to pressure, vacuum, abrasion and accidental crushing with a coarse pitch and placement ofGriflex Clear/Wire Reinforced Suction & Deliverywww.griflex.comWF - SpringflexWire™ Clear/Wire Reinforced Suction & Delivery Hose (i)Maximum working pressure is based on a factor of safety of 3:1 on short term burst pressure at 20°C. If the temperature increases, please refer to the temperature pressure charts.(ii) Lengths detailed above are as standard, however variations may be available subject to minimum order quantities. Weights are approximate dependent upon working tolerance and density ofmaterials.(iii) Bending diameter information is intended as a guide to the minimum bend radius at 20°C ambient temperature without restricting the bore. It does not mean that the hose cannot be bentbelow the given dimensions but restriction is likely to occur.od outside diameter idinternal diameterodidGriflex Clear/Wire Reinforced Suction & DeliveryAll sizes are nominal and normal manufacturing tolerances apply.Special Sizes are available on request but may be subject to Minimum Order Quantities and Leadtimes.。
j2ee项目整合flex

j2ee项目整合flex写了这么多,因此我顺便贴我的空间里吧,校内日志我也摘抄了一份!我用的环境是MyEclipse6.0+JDK5.0+Tomcat5.5+ Flex3.0 Builder For Eclipse Plugin+LCDSMyEclipse6.0的安装,不说了JDK5.0的安装,不说了Tomcat5.5也不说了要注册Adobe账号,只是是免费使用的FlexBuilder3下载去网上找一个FB3_WWEJ_Plugin().exe,安装完成后,在你的MyEclipse中Help->Software Updates->Manage Configuration-> Add an Extension Location指向你FB3_WWEJ_Plugin().exe 的安装路径就能够了!或者在你的Eclipse的安装目录下,有个links文件夹,在里面新建一个com.adobe.flexbuilder.feature.core.link文件,里面写着X:/Program Files/Adobe/Flex Builder 3 Plug-in,“X”表示你安装Flex Builder 3 Plug-in的盘符!1.首先创建一个Web项目,如图所示:2.然后把这个项目部署到Tomcat服务器上的,我用的是Tomcat5.5.。
3.接下来,假如你已把LCDS安装好了的话,那么你就到LCDS文件夹下面把lcds下的WEB-INF里的lib,flex两个文件夹考到你的FlexDemo项目里的WEB-INF下。
4.接下来就是向现有的项目中添加FLEX特性了。
回到你的MyEclipse中在你的项目上右击->Flex Project Nature->add Flex Project Nature ,如图所示:点Next注意了!!!!!这里的Root folder要指向你Tomcat下的Webapps里的项目下面,Root URL是你用来调试用的,localhost后面的FlexDemo名子要与上面Root folder里的FlexDemo要相同,Context root 这里也是的,output folder这里要指向你MyEclipse项目里的WebRoot下面,这样就好了,如图所示:这里点一下Validate Configuration进行校验一下,就能够了!!然后点Finish完成!接下来就是配置环境了,关于初学者来说,这很烦恼也很乱,只是不要紧,你一点点理清了,也不是件难事!呵呵,俺就是这样过来的!回到你的MyEclipse中在你的项目上右击->Properties会出现下面图形:点Flex Build Path选项,在Source path 选项卡中,点Add Folder在弹出的对话框中写上flex_src。
深度整合Flex和Spring
深度整合Flex和Spring
史红军
【期刊名称】《计算机光盘软件与应用》
【年(卷),期】2010(000)007
【摘要】本文讨论了基于Spring blazeDS integration的Flex与Spring的整合方案,给出把来自Hex的请求映射到blazeDS的方法,说明了在Spring的配置文件中为Flex暴露bean的方法.
【总页数】3页(P125-127)
【作者】史红军
【作者单位】四川建筑职业技术学院,四川德阳,618000
【正文语种】中文
【中图分类】TP31
【相关文献】
1.基于Flex+Spring小区信息系统的设计与实现 [J], 陈志宇;胡秀兵;杨朔;杨威
2.基于Flex+Spring体系的网络数据挖掘系统的设计与实现 [J], 朱小英
3.基于Flex和Spring的应用开发架构研究 [J], 张海建
4.基于Flex+Spring+Hibernate框架技术的RIA教学测评系统的设计与实现 [J], 拓守恒
5.Flex+Spring体系下的网络数据挖掘系统方案设计 [J], 于洪
因版权原因,仅展示原文概要,查看原文内容请购买。
基于Flex+Spring的营销互通平台的分析与设计的开题报告

基于Flex+Spring的营销互通平台的分析与设计的开题报告一、选题依据及意义近年来,随着互联网、移动互联网的发展,越来越多的企业开始重视数字营销,通过互动营销、社交营销等渠道,增强品牌知名度,提升销售额。
这些渠道需要通过不同的平台进行互通,如微信、微博、APP等多个平台。
因此,基于Flex+Spring的营销互通平台的分析与设计具有重要的现实意义和应用价值。
该平台可以为企业提供一个统一的营销管理平台,集成各种不同的营销工具,加强各种平台之间的互通,提高企业的数字营销效果。
二、研究目的及内容本文的研究目的是基于Flex+Spring的技术框架,对营销互通平台进行分析和设计,实现企业在数字营销过程中对各种营销工具的集成,并提高不同平台之间的数据互通性,以达到提高企业数字营销效果的目的。
本文具体研究内容如下:1. 对Flex+Spring的技术框架进行介绍,分析其优缺点;2. 对营销互通平台的需求进行分析;3. 对系统的整体架构进行设计;4. 对系统的各个模块进行详细设计;5. 根据设计结果,进行系统的编码和实现;6. 对系统进行测试和优化。
三、研究方法和步骤本文将采用以下研究方法和步骤:1. 文献资料法:通过查阅相关资料、文献,了解Flex+Spring的技术框架以及其在平台设计中的应用等方面的最新进展;2. 系统分析法:通过对营销互通平台的需求进行分析,确定其功能模块和技术特点,建立系统分析模型;3. 系统设计法:参考系统的需求分析模型和各种技术文献资料,对整个系统进行分析、设计,建立系统设计模型;4. 编码实现法:对系统进行编码实现,采用Flex+Spring的技术框架,采用Java构建后端程序,采用Flex实现前端程序;5. 测试优化法:对系统进行功能测试、性能测试和安全测试,并对系统进行优化。
四、论文结构安排本文共分为七个章节:第一章:绪论。
本章主要介绍选题背景、研究意义、研究目的以及研究方法和步骤等。
- 1、下载文档前请自行甄别文档内容的完整性,平台不提供额外的编辑、内容补充、找答案等附加服务。
- 2、"仅部分预览"的文档,不可在线预览部分如存在完整性等问题,可反馈申请退款(可完整预览的文档不适用该条件!)。
- 3、如文档侵犯您的权益,请联系客服反馈,我们会尽快为您处理(人工客服工作时间:9:00-18:30)。
如下文档说明在flex中如何和spring利用lcds进行通讯,导入spring的jar包应该不陌生了吧,如果有不熟悉的请自行学习,在此不在赘述,好的,开始,环境:tomcat6+flex4+actionscript3.0+jdk5+spring 3这个是大概的工程目录,相信大家不会陌生,上面代码是spring3的自动扫描,在配置context后能自动扫描对应的base-package包下面的java类,使响应的注解如autowrited或者service等生效如上的personDaoImpl就能自动注入在spring工厂中,也是同样的道理重点是说如何注入flex以及使用flex和java通讯大家知道,spring有三种注入的方式:set/get、构造方法、jndi Flex采用jndi的方式注入,因此需要一个SpringFactory 其源码网上有下载大致如下如上我们的程序代码准备完毕,接下来我们来说明怎么在flex的配置文件中配置通讯通道在flex目录下有如上所示的几个配置文件,就是用于通讯通道的建立我们主要要修改的是remoting-config.xml 和services-config.xml打开services-config.xml 可以看到其中框框中的部分比较重要,其他的部分可以不用做任何修改,红色表示通道的建立使用工厂来建立,工厂的id为spring 这个比较重要,必须唯一,后面的class就是你建立的springFactory的类名包名,其意思为,使用yl.yelangking.flexfactory.SpringFactory这个类完成工厂,其次是remoting-config.xml的配置,主要配置如下到此为止我们的配置工作已经完成,剩下来的就是flex端的开发和调用了我们使用actionscript定义一个类,其请注意这个类的需要和远程的java类进行绑定,使用如上的语法,【bindable】,[remoteclass(alias="yl.yelangking.pojo.person")]还有就是要注意get和set方法的写法,上述的都是不对的类似于这个比较标准在flex中入如果要实现构造方法多态的话可以使用如下的代码。
在java中表示不定长数组<?xml version="1.0" encoding="utf-8"?><s:Application xmlns:fx="/mxml/2009"xmlns:s="library:///flex/spark"xmlns:mx="library:///flex/mx"minWidth="955" minHeight="600" contentCreationComplete="myList();init();"><fx:Declarations><!-- 将非可视元素(例如服务、值对象)放在此处 --><mx:RemoteObject id="myid" destination="topoMap" showBusyCursor="true"><mx:method name="getPerson" result="myresult(event)" fault="faultHandle(event)" ></mx:method><mx:method name="getMsg1" result="method2Handle(event)" fault="faultHandle(event)"></mx:method><mx:method name="getList" result="getListHandle(event)" fault="faultHandle(event)"></mx:method><mx:method name="savePerson" result="savePersonHandle(event)"fault="faultHandle(event)"></mx:method></mx:RemoteObject></fx:Declarations><fx:Script><![CDATA[import cn.flexVo.Person;import mx.collections.ArrayCollection;import mx.collections.ArrayList;import mx.controls.Alert;import mx.rpc.events.FaultEvent;import mx.rpc.events.ResultEvent;/*protected function resulth(event:ResultEvent):void{label.text="Succeed!";}*//*protected function faulth(event:FaultEvent):void{label.text="failed!";}*/[Bindable]private var listArray:ArrayCollection;protected function myresult(event:ResultEvent):void{var persion:Person = event.result as Person;Alert.show(persion.Age+"");Alert.show();Alert.show("有结果");}protected function init():void{var person:Person = new Person("彭志能大将军",22);//person.setAge(22);///person.setName("吴祖湖");Alert.show("初始化数据");myid.savePerson(person).send();Alert.show(person.Age+"===="+);}protected function method2Handle (event:ResultEvent):void{Alert.show("结果二");}protected function getListHandle(event:ResultEvent):void{ Alert.show("对象结合");listArray = event.result as ArrayCollection;}protected function faultHandle(event:FaultEvent):void{ Alert.show("调用失败,请查看详细信息!");}protected function myClick(event:MouseEvent):void{myid.getPerson.send();}protected function myList():void{myid.getList.send();}protected function onCallback(event: ResultEvent):void{ var persion:Person = event.result as Person;Alert.show(persion.Age+"");Alert.show();}protected function myCallback(event: ResultEvent):void{var ac: String = event.result as String;Alert.show("ddd"+ac);}protected function savePersonHandle(event:ResultEvent):void{}]]></fx:Script><mx:Image x="84" y="155" width="227" height="173" source="cn/source/images/1.JPG"/><s:Button label="测试返回单个对象" x="88" y="96" width="100" click="myClick(event)"/><mx:DataGrid x="350" y="155" width="600" height="150" dataProvider="{listArray}"><mx:columns><mx:DataGridColumn headerText="姓名" dataField="name"/><mx:DataGridColumn headerText="年龄" dataField="age"/> </mx:columns></mx:DataGrid></s:Application>上面是代码:首先定义的是上面是一些处理方法:这里是主要的界面调用最后把这个服务部署到你的服务中,启动服务器输入地址可以看到谅!。