SolidWorks2016安装教程
CAESAR2016安装教程
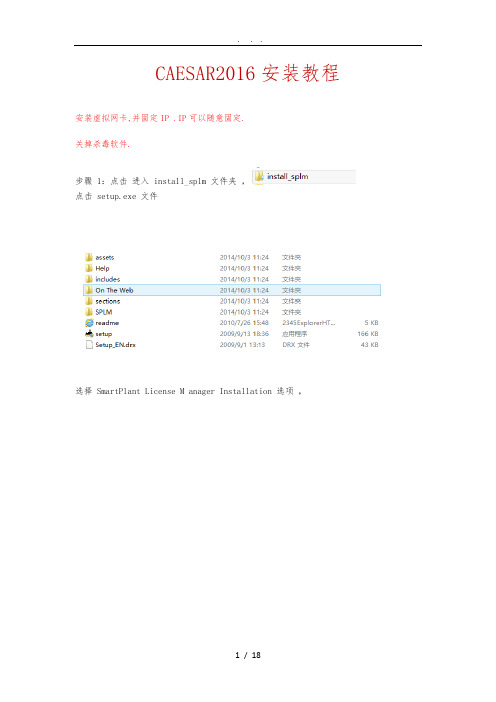
CAESAR2016安装教程安装虚拟网卡,并固定IP .IP可以随意固定.关掉杀毒软件.步骤 1:点击进入 install_splm 文件夹,点击 setup.exe 文件选择 SmartPlant License M anager Installation 选项,点击 2次 next 按钮,再点击 display ... 按钮会跳出一个 PDF 文档关闭后 Yes 按钮由灰色变成黑色,点击 Yes 按钮后,选择 License Machine 选项最后点击 finish 按钮即安装完毕。
步骤 2:点击 windows 的开始按钮,点击“所有程序”按钮,运行 Intergraph SmartPlant License M anager 下的 Generate Machine ID 程序点击“是(Y)”按钮点击 .. 按钮 (选择要存储 ID 文本的目录 ),再点击 OK 按钮。
程序运行完后会在你选择的存储目录下生成一个 txt 文件即为 Machine ID 文档(不要是默认的地址,有可能创建了你找不到)打开生成的文档,里面有你的的机器码,以后还有用处步骤 3:点击 keygen 文件夹 keygen.exe 和 SPKeygen.exe(个别系统可能会出现无法运行 SPKeygen.exe 这个文件,处理方法:①杀毒软件添加信任②重启电脑)。
复制 Hardware fingerprint: 后面 8位字母或数字把这八个字母或数字粘贴进运行 keygen.exe 出现界面中的 HWID :下面的围,把keygen.exe 出现界面中 Name :里的字母(我这里是 Administrator )粘贴进SPKeygen.exe 程序界面 Name :里,把 keygen.exe 出现界面中 Serial :里的系列号粘贴进 SPKeygen.exe 程序界面 Key :里,然后点击 OK SPKeygen.exe 提示成功进入新界面。
2016版SW安装教程
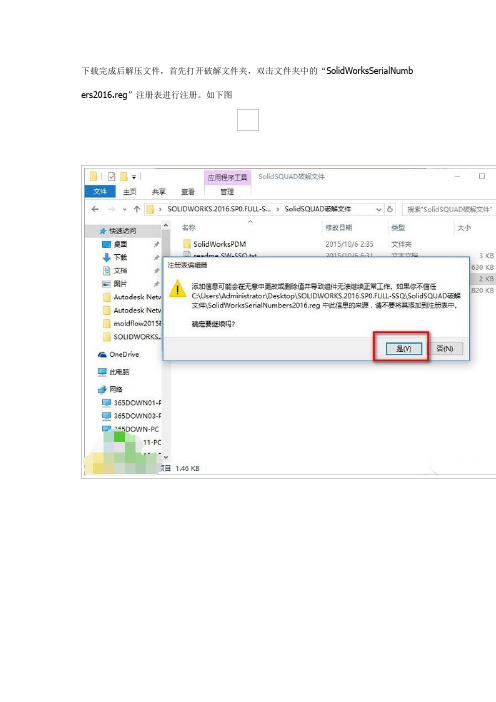
下载完成后解压文件,首先打开破解文件夹,双击文件夹中的“SolidWorksSerialNumb ers2016.reg”注册表进行注册。
如下图3.然后断开电脑网络(安装程序过程中最好一直断开网络)2.然后安装软件.双击“setup.exe“进行安装。
如下图。
3.双击安装后会弹出安装界面。
选中”单机安装“,点击下一步。
4.断开网络安装会发现序列号已经自动加载。
点击“下一步”继续安装,如下图5.然后安装界面会提示“无法连接到Solidworks服务器...”在这里选择“取消”.如下图6.点击取消后软件会自动安装。
然后选择安装路径和条款。
一般7down 小编选择默认安装路径。
即C:\Program Files\SOLIDWORKS Corp.然后选中“我接受 Solidworks 条款”。
点击“现在安装”.如下图7.然后软件进行安装。
安装过程非常长。
大概半个小时。
如下图8.软件安装完成后打开网络9.接下来破解软件.打开破解文件夹中的“SW2010-2016.Activator.GUI.SSQ.exe”.打开后会出来如下界面,点击最下方“√Activate”.稍等片刻,会有提示.点击“OK”如下图10.之后软件成功能破解.可以启动软件SW2016了序列号:Solidworks standard、Professional、Premium或solidNerWork9000 0000 0016 9675 P4DF 35DD SOLIDWORKS FLOW SIMULATION9000 0000 0003 3107 V8F3 PG44 SOLIDWORKS MOTION9000 0000 0002 7942 9KW4 9FBC SOLIDWORKS PLASTIC9000 0100 0000 6563 49GC HFDH SOLIDWORKS SIMULATION9000 0000 0001 8043 TB9T SGD9。
soliderworks 安装

目录SolidWorks安装及管理指南 (5)单机安装或管理映像 (5)启动SolidWorks安装 (6)单机安装 (7)在单台计算机上安装 (7)单机安装的管理 (9)修改安装 (9)修复安装 (9)将单机安装退回到先前的Service Pack (9)移除安装 (10)升级到新的发行版 (10)产品共存规则 (11)多个安装 (12)调用到多个客户端 (12)使用管理映像 (12)从安装管理程序创建管理映像 (12)管理映像选项编辑器 (13)通过电子邮件将管理映像调用到客户端 (15)将管理映像宣传给客户端 (16)命令行调用 (16)从命令行创建管理映像 (16)准备客户端以便通过命令行从管理映像进行安装 (17)通过命令行从管理映像安装 (24)命令行属性 (26)使用Microsoft Active Directory调用管理映像 (34)多个安装的管理 (36)将管理映像升级到新的发行版 (36)Service Pack产品更新管理 (38)移除安装 (40)Workgroup PDM (41)Workgroup PDM Viewer (42)安装Workgroup PDM服务器 (43)为客户端配置Workgroup PDM (43)配置Workgroup PDM Viewer以连接到其它库位置 (43)为文档下载配置Mime类型 (43)Workgroup PDM客户端访问 (44)Workgroup PDM VaultAdmin管理 (44)初次登录到Workgroup PDM VaultAdmin (44)升级Workgroup PDM Vault Server (45)升级Workgroup PDM客户端 (45)许可管理 (47)管理个人许可 (47)激活许可 (47)转移许可 (48)使用SolidNetWork许可管理器管理许可 (48)激活SolidNetWork许可 (49)转移SolidNetWork许可 (50)安装和配置SolidNetWork许可 (50)SolidNetWork许可管理 (55)疑难解答 (60)安装管理程序日志文件 (60)SolidWorks安装管理程序下载文件夹 (60)SolidNetWork许可故障排除 (62)访问SolidNetWork许可日志文件 (62)无法获得SolidWorks许可。
SOLIDWORKS Education Edition 2015 -2016 安装说明书
SOLIDWORKS® Education Edition 2015-2016Installation InstructionsPreparation•These installation instructions apply to SolidNetWork (SNL), floating licenses of:o SOLIDWORKS Education Edition products: CAD, Electrical and Composer•Before proceeding with your SOLIDWORKS installation, please do the following:o Verify that your systems (license server and client machines) meet the criteria specified in /System_Requirements.•SOLIDWORKS 2015-2016 Education and Student products are designed for use on Windows® 7 (64-bit only) and Windows 8 operating systems ONLY. They will not work on Windows XP or Vista.o Uninstall any alpha, beta, or pre-release versions of the SOLIDWORKS software.o Back up all SOLIDWORKS files you have created and wish to continue using (e.g. parts, assemblies, and drawings, document templates, sheet formats, library features, form tools,Toolbox parts (as applicable)) before upgrading to SOLIDWORKS.o Please note: files you open and save in SOLIDWORKS 2015 cannot be opened in earlier versions.•To minimize disk space consumed, please consider uninstalling your older SOLIDWORKS products and using a new installation of the new SOLIDWORKS product (Education Edition users may wish to keep an older version).If you uninstall the older version, please be sure to also uninstall Simulation products, along with older versions of eDrawings®, and other products, etc.•You must transfer your license before upgrading your SNL Server (or if you wish to move your SNL server license to a new computer), please be sure to transfer your license before uninstalling the software. Please do this as follows:o Open SolidWorks SolidNetWork License Manager (on your license server machine), go to Server Administration tab.o Under License Information select Modifyo New screen select Transfer a software license and click Next.o Select the license you are transferring and click Nexto Select Finish after license has been transferred.Installation• Locate your Serial Number(s) from your product package or email from DS-SOLIDWORKS or yourschool. If you cannot find or you have misplaced your number, contact your local educational reseller to obtain one.• Serial numbers vary by product type:o SOLIDWORKS Education Edition, the number typically begins with 9710 (Network)Installation and Licensing ProcessYou are ready to begin your installation of theSOLIDWORKS ® Education Edition! Network Users OnlySection 2Section 1 Ver. 1Steps for Section 1: NETWORK INSTALLATION1.Remove previous SolidNetWork (SNL) License Managers(be sure to transfer your server license first, as noted above)2.Remove previous SOLIDWORKS software3.Install 2015 SolidNetWork (SNL) License Manager4.Activate your 2015 SNL Manager5.Install SOLIDWORKS software on individual clientsSection 1 | SOLIDWORKS® Education Edition SNL Manager Installation (Network)Note:If you are installing SOLIDWORKS on a Network with Restricted Rights, please go to the Customer Portal for additional documentation or contact your local reseller for assistance.This step is only for users who are on NETWORK. If you purchased a Standalone license, please proceed to Section 2 of the installation process.Note:•All previous SOLIDWORKS License Managers must be removed from your computer before beginning the installation of the new SOLIDWORKS License Manager (i.e. 2014 must be removed before installing 2015).•The SOLIDWORKS License Manager must be installed on the machine that will be used to distribute SOLIDWORKS licenses on your network.•The SOLIDWORKS License Manager for 2015 will license all SOLIDWORKS EDU Edition applications, including SOLIDWORKS Simulation, SOLIDWORKS Sustainability, eDrawings and PhotoView 360, etc.Remove previous SolidNetWork License Managers (SNL) Please note, the 2015 SNL Manager is required to run SOLIDWORKS 2015 software. It can be used to manage older versions of SOLIDWORKS. For a complete list of requirements for SOLIDWORKS SNL and SOLIDWORKS Electrical Servers, please visit: /systemrequirements1.Stop the Licensing Service on the hostmachine using Windows Task Manager asfollows:With the SolidNetWork license managerrunning, open the Windows TaskManager.On the Applications tab, browse to theSolidNetWork license manager then right-mouse-click and select Go to Process.Then select End Process to stop theprocess(see image for Windows 7).unch Add/Remove Programs and uninstall the previous version of the SolidWorks SolidNetWork LicenseManager.Access Add/Removeprograms from Start >Control Panel > Add/RemovePrograms. Locate theSOLIDWORKS SolidNetWorkLicense Manager and selectRemove.-Once the remove option isselected you will beprompted to confirm theproducts to uninstall.-The product will thenuninstall. A progress only boxwill appear.-After the product uninstall is complete, close the Add/Remove programs window and launch Windows Explorer.Locate the folder where the licensemanager was previously installed anddelete it.By default the license manager isinstalled to: C:\ProgramFiles\SOLIDWORKS SolidNetWorkLicense Manager.Remove previous SOLIDWORKS Software from client machines1.If required, uninstall SOLIDWORKS using Add/Remove Programs.2.If required, delete SOLIDWORKS folders located in C:\Program Files\SolidWorks CorpBegin 2015 SolidNetWork License (SNL) Manager Install1.Insert your 2015 SOLIDWORKS DVD in your local DVD Drive to begin the software installation process. If SOLIDWORKS Master Setup does not come up automatically, select My Computer and double click the DVD drive, this is generally your D: drive. You may also launch the Installation Manager downloaded from the SOLIDWORKS Customer Portal by browsing to your download and select “setup.exe”.Note: Once DVD is placed in your local DVD Drive, the SOLIDWORKS 2015 Installation Manager will appear. Select Server products and then select “Install SolidNetWork License Manager (distributed licensing) on this computer.”Select Next.2.The next screen will prompt you for your SOLIDWORKS and associated products serial number. Enteryour product serial number. Select Next.3.Confirm the Summary page and click “Install Now”.Note: Server Installation Progress will appear. Once done checking for Updates, the SOLIDWORKS SolidNetWork License Manager Setup will appear. Click Next.4.After the installation is complete there will be a confirmation of the successful install. Oncecompleted the Installation Manager confirms the product(s) are installed correctly.5.Select Finish and close the Installation Manager.This completes the installation of the SOLIDWORKS SolidNetWork License Manager. Please tell us your installation experience, the following Survey will be displayed in your Internet Browser. Thank you for your feedback.Activate 2015 SolidNetWork (SNL) LicenseBeginning with SOLIDWORKS 2010 release, a new licensing method has been introduced for network licenses. The new process will require internet connectivity to ‘activate’ the license on the SOLIDWORKS server.What does this mean for the user? The end user will no longer need a license file or existing dongle. The dongle must be returned to your value added reseller.1.To activate the newly installed software go to: Start > All programs > SOLIDWORKS 2015 > SOLIDWORKSLicense Manager > SolidNetWork License Manger.A server information dialog will appear that will allow you to choose the license server port(s) and applyan options file if desired. It is recommended that you select the option for firewall in use on this server.Select Next to continue.Note: You will need to add exceptions in your firewall software, example shown is Windows® 7 Firewall settings on the next page. For Windows 7, go to Windows 7 settings.For Windows® 7 Firewall1.Add program exceptions to the Windows 7 Firewall.In SNL Server setup, change image to show that the Windows firewall option is selected.2.Please go to Control Panel and select System and Security3.Allow programs through the firewall.4.Click “allow another program”And Browse to the folder where you installed the SOLIDWORKS SolidNetWork License Manager.Add both executables: Lmgrde.exe and sw_d.exeWhen lmgrd.exe is added successful to the exceptions list, it will appear as ‘Acresso Software Inc.’ in the list of Allowed programs and features:For Windows 7 FirewallWhen sw_d is allowed successfully, it will as sw_dn in the allowed programs list.SolidNetWork License (SNL) InstallThe SOLIDWORKS Product Activation window willappear and you will be required to provide an email to associate to the activation. Enter an email address and select Next.Note: If you do not have internet access (or email),please contact your Value Added Reseller.The product will now activate via internet.After a successful activation there will be a succeeded message which will show all the products associatedwith your serial number.Select Finish, completing activation. The license managerwill appear and you can close it out to complete the activation process.SolidNetWork License (SNL) Install is complete.NOTE: You have now finished installing the SOLIDWORKS License Manager.•You must now go to your client computers and proceed as follows on steps.•Before beginning the installation process, please be sure to close out of all SOLIDWORKS programs currently open on your computer.•You can also install SOLIDWORKS on your server machine. Follow the instructions in the next section.Section 2 | SOLIDWORKS® Education Edition Installation(Client installation)Note: for SOLIDWORKS Network installations, the software does not get installed on the network machine (License Server) by default. Normally SOLIDWORKS should be installed on the user machines (Client). Before beginning the installation process, please be sure to close out of all SOLIDWORKS programs currently open on your computer.1.On the CLIENT Machine Insert DVD or launch the Installation Manager downloaded from the SOLIDWORKSCustomer Portal. Select Individual (on this computer). Click Next in lower right corner.2.For new installation enter your serial number below (24 digits). Click Next.Note: the message in the center of the window under the green bar, “Connecting to SOLIDWORKS” will appear. You may see a screen stating that a newer version is available, ALWAYS select continue installing from DVD and click Next.3.After you have clicked Next, the SOLIDWORKS 2015 Installation Manager will guide you through theinstallation. Accept Defaults on the screen (DO NOT change anything) Click Install Now to continueinstallation.Optional: if you have purchased a license for a SOLIDWORKS Electrical products and have entered a serial number (separate Serial Number for Student products only) you will also see the following information (default selections shown).Expand the ‘Electrical Options’ as desired to check values and setting (default values shown below).Return ‘Back to Summary’ then select “Next” to start the installation.Note: For the client installation of a network license, you will be asked for your license server name as below. Please enter your license server and the port number that you specified in the server setup steps. The default******************************************************“OK”4. Installation is Complete! Confirm if you would like to tell us your installation experience in a survey or participate in the Customer Experience program, then click Finish.Note: Depending upon your computer configuration you may or may not need to restart your computer.For client installation of a network license, your SOLIDWORKS is ready now since your network license server has been activated in Section 1 and your client SOLIDWORKS is connected with your license server.====================================================================================For STANDALONE license installation, when you start SOLIDWORKS Education Edition for the first time, the SOLIDWORKS Product Activation dialog will appear to guide you through the activation process. Click Next, to continue with activation. (Please refer to the separate SOLIDWORKS Education Edition Standalone license installations for more detail.To activate you SOLIDWORKS product you must enter a serial number from SOLIDWORKS. The SOLIDWORKS Product Activation will help you collect the information necessary to activate your product.Choose which method for how you would like to activate. Enter your email address and then click Next.Now you are done registering your SOLIDWORKS Education Edition. Click Finish.You can now run your SOLIDWORKS® Education Edition license!。
SolidWorks网络版客户端安装指南 V2016

SolidWorks 网络版客户端安装指南一、客户端操作系统要求因Microsoft (微软)公司已停止对XP 系统及32位系统的支持,故主流3D CAD 软件均已停止了对这些系统的支持。
SolidWorks 网络版客户端(或单机版)对操作系统的要求如下表:(** Windows 系统均要求是专业版或以上(旗舰版)版本。
安装分区可用空间不小于8-10G 。
SolidWorks 2014及以上版本要求是Windows 7 SP1×64专业版或以上,或者Windows 8.1版本。
二、客户端SolidWorks 安装步骤提示:安装前请先退出或关闭杀毒软件,如360安全卫士、360杀毒、百度杀毒之类的软件。
1. 进入SolidWorks 2016安装文件根目录下的sldim 文件夹下,选择sldIM.exe ,右键选择“以管理员身份运行”,如下:2.启动安装管理程序,进入欢迎界面:3.指定安装类型:“单机安装(此计算机上)”,下一步4.输入SolidWorks序列号,下一步:输入公司SolidWorks序列号:XXXX XXXX XXXX XXXX XXXX XXXX5.输入SolidWorks序列号,下一步,会自动联网检测该SolidWorks序列号授权信息。
如能联网,则会自动进行到下一步;如不能联网,返回询问“重试”和“取消”对话框,选择“取消”,会进行下一步6.摘要页,可选择安装产品模块,指定安装路径7.点击“产品”项右侧的“更改”,打开安装产品选择*把SolidWorks Plastics、SolidWorks Electrical、SolidWorks Composer Player这三项前面的打勾去掉;SolidWorks Flow Simulation、PhotoView 360 Network Render Client这两项可去可不去。
(如需安装SOLIDWORKS Electrical,则勾选之。
solidworks2016安装指南
Solidworks2016安装教程
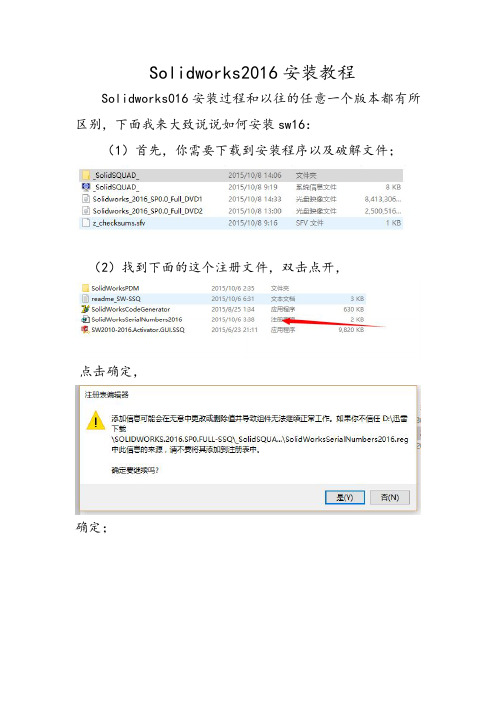
Solidworks016安装过程和以往的任意一个版本都有所区别,下面我来大致说说如何安装sw16:
(1)首先,你需要下载到安装程序以及破解文件;
(2)找到下面的这个注册文件,双击点开,
点击确定,
确定;
(3)以上步骤及完成了注册工作,然后对盘1点击装载,
进入光盘内,用管理员方式点击setup,
再次之前记得断网,在整个安装过程中最好都不要联网,点击进去我们发现序列号已经自动填写完毕,升序步骤和以前版本一致,如还有困难,可以自行百度。
注:西北狼(164874561)专注于全3D,参数化自上而下设计理论的研究及运用,目前涉及领域结构,机构,钣金,模具,管道以及钢结构,3d打印机研发等。
现面对北京地区进行solidworks以及creo中高端培训,以及面对您企业现有研发困境实施最优化解决方案绝对为你创造最高的价值,将您的研发队伍运用最先进设计手段和研发理念,在最短时间锻造成一只真正的团队,同时承接各种设计兼职,毕业设计,课程设计等,价格公道,服务合理。
SolidWorks2016中文版完全自学手册
SolidWorks2016中⽂版完全⾃学⼿册SolidWorks 2016中⽂版完全⾃学⼿册⼀、本书特⾊⼆、本书的组织结构和主要内容三、光盘使⽤说明四、致谢彩图插页1 SOLIDWORKS 2016⼊门1.1 SOLIDWORKS的设计思想1.1.1 三维设计的3个基本概念1.1.2 设计过程1.1.3 设计⽅法1.2 SOLIDWORKS 2016简介1.2.1 启动SOLIDWORKS 20161.2.2 新建⽂件1.2.3 SOLIDWORKS⽤户界⾯1.3 ⽂件管理1.3.1 打开⽂件1.3.2 保存⽂件1.3.3 退出SOLIDWORKS 20161.4 SOLIDWORKS⼯作环境设置1.4.1 设置⼯具栏1.4.2 设置⼯具栏命令按钮1.4.3 设置快捷键1.4.4 设置背景1.4.5 设置实体颜⾊1.4.6 设置单位1.5 SOLIDWORKS术语2 草图绘制基础2.1 草图绘制的基本知识2.1.1 进⼊草图绘制2.1.2 退出草图绘制2.1.3 草图绘制⼯具2.1.4 绘图光标和锁点光标2.2 草图绘制2.2.1 绘制点2.2.2 绘制直线与中⼼线2.2.3 绘制圆2.2.4 绘制圆弧2.2.5 绘制矩形2.2.6 绘制多边形2.2.7 绘制椭圆与部分椭圆2.2.8 绘制抛物线2.2.9 绘制样条曲线2.2.10 绘制草图⽂字2.3 草图编辑2.3.1 绘制圆⾓2.3.2 绘制倒⾓2.3.3 等距实体2.3.4 转换实体引⽤2.3.5 草图剪裁2.3.6 草图延伸2.3.7 分割草图2.3.8 镜向草图2.3.9 线性草图阵列2.3.10 圆周草图阵列2.3.11 移动草图2.3.12 复制草图2.3.13 旋转草图2.3.14 缩放草图2.3.15 伸展草图2.4 尺⼨标注2.4.1 度量单位2.4.2 线性尺⼨的标注2.4.3 直径和半径尺⼨的标注2.4.4 ⾓度尺⼨的标注2.5 ⼏何关系2.5.1 添加⼏何关系2.5.2 ⾃动添加⼏何关系2.5.3 显⽰/删除⼏何关系2.6 综合实例——拨叉草图3 基础特征建模3.1 特征建模基础3.2 参考⼏何体3.2.1 基准⾯3.2.2 基准轴3.2.3 坐标系3.3 拉伸特征3.3.1 拉伸实体特征3.3.2 实例——圆头平键3.3.3 拉伸切除特征3.3.4 实例——盒状体3.4 旋转特征3.4.1 旋转凸台/基体3.4.2 实例——乒乓球3.4.3 旋转切除3.4.4 实例——酒杯3.5 扫描特征3.5.1 凸台/基体扫描3.5.2 切除扫描3.5.3 引导线扫描3.5.4 实例——台灯⽀架3.6 放样特征3.6.1 设置基准⾯3.6.2 凸台放样3.6.3 引导线放样3.6.4 中⼼线放样3.6.5 ⽤分割线放样3.6.6 实例——电源插头3.7 综合实例——摇臂4 附加特征建模4.1 圆⾓特征4.1.1 等半径圆⾓特征4.1.5 变半径圆⾓特征4.1.6 实例——电机4.2 倒⾓特征4.2.1 创建倒⾓特征4.2.2 实例——混合器4.3 圆顶特征4.3.1 创建圆顶特征4.3.2 实例——螺丝⼑4.4 拔模特征4.4.1 创建拔模特征4.4.2 实例——球棒4.5 抽壳特征4.5.1 创建抽壳特征4.5.2 实例——移动轮⽀架4.6 孔特征4.6.1 创建简单直孔4.6.2 创建异型孔4.6.3 实例——锁紧件4.7 筋特征4.7.1 创建筋特征4.7.2 实例——轴承座4.8 ⾃由形特征4.9 ⽐例缩放4.10 综合实例——⽀撑架5 特征编辑5.1 阵列特征5.1.1 线性阵列5.1.2 圆周阵列5.1.3 草图阵列5.1.4 曲线驱动阵列5.1.5 表格驱动阵列5.1.6 实例——电容5.2 镜向特征5.2.1 创建镜向特征5.2.2 实例——台灯灯泡5.3 特征的复制与删除5.4 参数化设计5.4.1 ⽅程式驱动尺⼨5.4.2 系列零件设计表5.5 综合实例——螺母紧固件系列6 特征管理6.1 库特征6.1.1 库特征的创建与编辑6.1.2 将库特征添加到零件中6.2 查询6.2.1 测量6.2.2 质量属性6.2.3 截⾯属性6.3 零件的特征管理6.4 综合实例——斜齿圆柱齿轮7 模型显⽰7.1 视图显⽰7.1.1 显⽰⽅式7.1.2 剖⾯视图7.2 模型显⽰7.2.1 设置零件的颜⾊7.2.2 设置零件的照明度7.2.3 贴图7.2.4 布景7.2.5 光源7.2.6 相机7.3 PhotoView 360渲染7.3.1 加载PhotoView 360插件7.3.2 编辑渲染选项7.3.3 整合预览7.3.4 预览渲染7.3.5 最终渲染7.3.6 排定渲染7.4 综合实例——茶叶盒8 曲线创建8.1 三维草图8.1.1 绘制三维草图8.1.2 实例——办公椅8.2 创建曲线8.2.1 投影曲线8.2.2 组合曲线8.2.3 螺旋线和涡状线8.2.4 实例——弹簧8.2.5 分割线8.2.6 实例——茶杯8.2.7 通过参考点的曲线8.2.8 通过XYZ点的曲线8.3 综合实例——螺钉9 曲⾯创建9.1 创建曲⾯9.1.1 拉伸曲⾯9.1.2 旋转曲⾯9.1.3 扫描曲⾯9.1.4 放样曲⾯9.1.5 等距曲⾯9.1.6 延展曲⾯9.1.7 缝合曲⾯9.1.8 实例——花盆9.2 编辑曲⾯9.2.1 延伸曲⾯9.2.2 剪裁曲⾯9.2.3 填充曲⾯9.2.4 中⾯9.2.5 替换⾯9.2.6 删除⾯9.2.7 移动/复制/旋转曲⾯9.3 综合实例——茶壶模型9.3.1 绘制壶⾝9.3.2 绘制壶盖10 钣⾦设计10.1 概述10.2 钣⾦特征⼯具与钣⾦菜单10.2.1 启⽤钣⾦特征⼯具栏10.2.2 钣⾦菜单10.3 转换钣⾦特征10.3.1 使⽤基体-法兰特征10.3.2 ⽤零件转换为钣⾦的特征10.4 钣⾦特征10.4.1 法兰特征10.4.2 边线法兰10.4.3 斜接法兰10.4.4 褶边特征10.4.5 绘制的折弯特征10.4.6 闭合⾓特征10.4.7 转折特征10.4.8 放样折弯特征10.4.9 切⼝特征10.4.10 展开钣⾦折弯10.4.11 断开边⾓/边⾓剪裁特征10.4.12 通风⼝10.4.13 实例——板卡固定座10.5 钣⾦成形10.5.1 使⽤成形⼯具10.5.2 修改成形⼯具10.5.3 创建新成形⼯具10.6 综合实例——裤形三通管11 焊接设计11.1 概述11.2 焊接基础11.2.1 焊缝形式11.2.2 焊接接头11.3 焊件特征⼯具与焊件菜单11.3.1 启⽤焊件特征⼯具栏11.3.2 焊件菜单11.3.3 启⽤焊件特征⼯具栏11.4 焊件特征11.5 结构构件特征11.5.1 结构构件特征说明11.5.2 结构构件特征创建步骤11.5.3 ⽣成⾃定义结构构件轮廓11.6 剪裁/延伸特征11.6.1 剪裁/延伸特征选项说明11.6.2 剪裁/延伸特征创建步骤11.7 顶端盖特征11.7.1 顶端盖特征选项说明11.7.2 顶端盖特征创建步骤11.8 ⾓撑板特征11.8.1 ⾓撑板特征选项说明11.8.2 ⾓撑板特征创建步骤11.9 圆⾓焊缝特征11.9.1 圆⾓焊缝特征选项说明11.9.2 圆⾓焊缝特征创建步骤11.9.3 实例——⼿推车车架11.10 焊件切割清单11.10.1 更新焊件切割清单11.10.2 将特征排除在切割清单之外11.10.3 ⾃定义焊件切割清单属性11.10.4 焊件⼯程图11.10.5 在焊件⼯程图中⽣成切割清单11.10.6 编辑切割清单11.10.7 添加零件序号11.10.8 ⽣成焊件实体的视图11.11 装配体中焊缝的创建11.11.1 焊接类型11.11.2 焊缝的顶⾯⾼度和半径11.11.3 焊缝结合⾯11.11.4 创建焊缝11.12 综合实例——篮球架11.12.1 绘制底座11.12.2 绘制⽀架11.12.3 绘制篮板11.12.4 渲染12 装配体设计12.1 装配体基本操作12.1.1 创建装配体⽂件12.1.2 插⼊装配零件12.1.3 删除装配零件12.2 定位零部件12.2.1 固定零部件12.2.2 移动零部件12.2.3 旋转零部件12.2.4 添加配合关系12.2.5 删除配合关系12.2.6 修改配合关系12.2.7 SmartMates配合⽅式12.2.8 实例——绘制茶壶装配体12.3 零件的复制、阵列与镜向12.3.1 零件的复制12.3.2 零件的阵列12.3.3 零件的镜向12.4 装配体检查12.4.1 碰撞测试12.4.2 动态间隙12.4.3 体积⼲涉检查12.4.4 装配体统计12.5 爆炸视图12.5.1 ⽣成爆炸视图12.5.2 编辑爆炸视图12.6 装配体的简化12.6.1 零部件显⽰状态的切换12.6.2 零部件压缩状态的切换12.7 综合实例——轴承12.7.1 轴承外圈12.7.2 轴承内圈12.7.3 滚动体12.7.4 ⼦装配体12.7.5 保持架12.7.6 装配零件13 ⼯程图的绘制13.1 ⼯程图的绘制⽅法13.2 定义图纸格式13.3 标准三视图的绘制13.4 模型视图的绘制13.5 派⽣视图的绘制13.5.1 剖⾯视图13.5.2 旋转剖视图13.5.3 投影视图13.5.4 辅助视图13.5.5 局部视图13.5.6 断裂视图13.6 操纵视图13.6.1 移动和旋转视图13.6.2 显⽰和隐藏13.6.3 更改零部件的线型13.6.4 图层13.7 注解的标注13.7.1 注释13.7.2 表⾯粗糙度13.7.3 形位公差13.7.4 基准特征符号13.8 分离⼯程图13.9 打印⼯程图13.10 综合实例——轴⽡⼯程图14 SOLIDWORKS Routing布线与管道设计14.1 SOLIDWORKS Routing基础14.1.1 启动SOLIDWORKS Routing插件14.1.2 SOLIDWORKS Routing装配结构14.1.3 SOLIDWORKS Routing中的⽂件名称14.1.4 线路的类型14.2 Routing系统选项14.2.1 ⼀般步路设定14.2.2 管道/管筒设计14.2.3 电⽓电缆14.3 SOLIDWORKS设计库14.4 步路库管理14.4.1 Routing⽂件位置14.4.2 步路零部件向导14.4.3 电缆电线库14.5 步路⼯具14.5.1 连接点和线路点14.5.2 ⾃动步路14.5.3 电缆夹14.5.4 实例——视频接线14.6 电⽓14.6.1 按“从/到”开始14.6.2 通过拖/放来开始14.6.3 折弯14.6.4 编辑线路14.6.5 平展线路14.6.6 实例——LED灯14.7 管道和管筒14.7.1 弯管零件14.7.2 法兰零件14.7.3 焊接缝隙14.7.4 定义短管14.7.5 管道⼯程图14.8 综合实例——分流管路14.8.1 管路三维模型14.8.2 管路⼯程图思维导图防⽌博客图床图⽚失效,防⽌图⽚源站外链:)思维导图在线编辑链接:。
solidworks2016安装教程及破解方法
solidworks2016安装教程及破解方法Solidworks2016安装教程及破解方法。
Solidworks是一款功能强大的三维设计软件,广泛应用于工程设计、机械设计、产品设计等领域。
在进行Solidworks2016的安装和破解之前,我们需要先下载软件安装包和破解工具。
接下来,我将为大家详细介绍Solidworks2016的安装步骤及破解方法。
第一步,下载Solidworks2016安装包。
首先,我们需要从官方网站或可靠的软件下载网站下载Solidworks2016的安装包。
确保下载的安装包是完整的,没有被篡改或损坏。
第二步,解压安装包。
下载完成后,我们将安装包解压到指定的文件夹中。
确保解压后的文件完整无损,没有任何错误。
第三步,安装Solidworks2016。
双击安装包中的安装程序,按照提示逐步进行安装。
在安装过程中,需要填写一些基本信息,并选择安装路径和组件。
安装完成后,确保程序能够正常启动。
第四步,破解Solidworks2016。
在安装完成后,我们需要进行破解操作。
首先,打开破解工具,并按照其提供的方法进行操作。
通常情况下,破解工具会要求我们选择安装目录,并生成破解文件。
在生成破解文件后,将其复制到Solidworks2016安装目录中,替换原有的文件即可完成破解。
第五步,激活Solidworks2016。
完成破解后,我们需要进行激活操作。
打开Solidworks2016程序,按照提示输入激活码或进行在线激活。
完成激活后,我们就可以正常使用Solidworks2016了。
总结。
通过以上步骤,我们成功地完成了Solidworks2016的安装和破解。
在进行安装和破解时,需要注意选择可靠的安装包和破解工具,确保操作的准确性和安全性。
希望以上内容能够对大家有所帮助,祝大家使用愉快!。
- 1、下载文档前请自行甄别文档内容的完整性,平台不提供额外的编辑、内容补充、找答案等附加服务。
- 2、"仅部分预览"的文档,不可在线预览部分如存在完整性等问题,可反馈申请退款(可完整预览的文档不适用该条件!)。
- 3、如文档侵犯您的权益,请联系客服反馈,我们会尽快为您处理(人工客服工作时间:9:00-18:30)。
SolidWorks2016 安装教程安装前准备,1.关闭电脑UAC;2.关闭杀毒软件(防止错误拦截)
开始安装
下载的安装包示意图
被标记的三个文件是必须要的,其他文件可以不要.
第一步,添加序列号.
打开_SolidSQUAD_文件夹,解压_SolidSQUAD_.7z压缩包。
如果找不到这些文件,有可能是被杀毒软件杀了,所以下载的时候要注意不要被杀毒软件杀了。
找到SolidWorksSerialNumbers2016.reg文件,双击运行,然后点“是”,然后点“确定”。
第二步,回到安装包,用虚拟光驱加载Solidworks_2016_SP0.0_Full_DVD1.iso。
电脑上没装虚拟光驱的先装一个虚拟光驱(在360软件管家里面搜虚拟光驱,安装一个即可),然后进入加载的虚拟光驱里面,
第三步,启动setup.exe;
这步报错的概率不低。
而且错误的种类也很多,无法像出书一样把所有错误都一一列出来好。
所有,我们的安装教程只以一般的正常状态,做示范。
请谅解。
如果安装过程中弹出这个界面,这是提示你换盘,(我们的安装包里面有两个iso文件,用虚拟光驱加载第二iso文件)
等待安装完成之后,点完成即可。
这个时候不要急着去启动软件,我们的安装步骤还有最后几步。
打开_SolidSQUAD_文件夹,找到SW2010-2016.Activator.GUI.SSQ.exe文件。
双击运行。
点击“ok”,,安装结束。
可以启动软件了。