S6506R设备操作手册
护理清洁6500 6100用户手册说明书

6500/6100English 6简体中文 18繁體中文 356EnglishImportantRead this user manual carefully before you use theappliance and save it for future reference.Danger-Keep the charger away from water. Do not place orstore it over or near water contained in a bathtub,washbasin, sink etc. Do not immerse the charger inwater or any other liquid. After cleaning, make surethe charger is completely dry before you connect it tothe wall socket.Warning-The mains cord cannot be replaced. If the mains cordis damaged, discard the charger.-Always have the charger replaced with one of theoriginal type in order to avoid a hazard.-Do not use the charger outdoors or near heatedsurfaces.-If the appliance is damaged in any way (brush head,toothbrush handle or charger), stop using it. Thisappliance contains no serviceable parts. If theappliance is damaged, contact the Consumer CareCenter in your country (see chapter 'Warranty andsupport').-This appliance can be used by children and personswith reduced physical, sensory or mental capabilitiesor lack of experience and knowledge if they havebeen given supervision or instruction concerning useof the appliance in a safe way and understand thehazards involved. Cleaning and user maintenanceshall not be made by children without supervision.-Children shall not play with the appliance. Caution-Do not clean the brush head, the handle or thecharger in the dishwasher.-If you have had oral or gum surgery in the previous 2months, consult your dentist before you use thetoothbrush.7English-Consult your dentist if excessive bleeding occurs afterusing this toothbrush or if bleeding continues to occurafter 1 week of use. Also consult your dentist if youexperience discomfort or pain when you use thePhilips Sonicare.-The Philips Sonicare toothbrush complies with thesafety standards for electromagnetic devices. If youhave a pacemaker or other implanted device, contactyour physician or the device manufacturer of theimplanted device prior to use.-If you have medical concerns, consult your doctorbefore you use the Philips Sonicare.-This appliance has only been designed for cleaningteeth, gums and tongue. Do not use it for any otherpurpose. Stop using the appliance and contact yourdoctor if you experience any discomfort or pain.-The Philips Sonicare toothbrush is a personal caredevice and is not intended for use on multiplepatients in a dental practice or institution.-Stop using a brush head with crushed or bent bristles.Replace the brush head every 3 months or sooner ifsigns of wear appear. Do not use other brush headsthan the ones recommended by the manufacturer.-If your toothpaste contains peroxide, baking soda orbicarbonate (common in whitening toothpastes),thoroughly clean the brush head with soap and waterafter each use. This prevents possible cracking of theplastic.Electromagnetic fields (EMF)This Philips appliance complies with all applicablestandards and regulations regarding exposure toelectromagnetic fields.Radio Equipment Directive-Radio Equipment in this product operates at 13.56MHz-Maximum RF power transmitted by the RadioEquipment is 30.16dBm8EnglishIntroductionCongratulations on your purchase and welcome toPhilips! To fully benefit from the support that Philipsoffers, register your product at/welcome.Your Philips Sonicare (Fig. 1)1Hygienic travel cap2Smart brush head(s)*3Handle4Power on/off button5Intensity light6Mode/intensity button7Mode light8Brush head replacement reminder light9Battery indication10Charging base11Travel case (specific types only)**Note: The content of the box may vary based on themodel purchased.Brush headsYour Philips Sonicare comes with one or more brushheads which are designed to deliver superior results foryour oral care needs.Philips Sonicare BrushSync TechnologyYour brush head(s) are enabled with BrushSynctechnology. This technology enables 2 features with thistoothbrush:1Brush head mode pairing (see 'Features andAccessories')2Brush head replacement reminder (see 'Features andAccessories')This symbol indicates the brush head is equipped withBrushSync technology. (Fig. )Brushing modesYour power toothbrush is equipped with 3 differentmodes to accommodate all your oral care needs.9EnglishTo change modes, press the mode/intensity button whilethe toothbrush is off.The following modes are available:Clean modeClean is a 2-minute mode, recommended to be used withintensity level 3. It gives you a thorough and completeclean and is recommended to be used with the C2Optimal Plaque Control brush head.White modeWhite is a 2-minute 30-seconds mode, recommended tobe used with intensity level 3 and the W2 Optimal Whitebrush head.Gum Care modeGum Care is a 3-minute mode, recommended to be usedwith intensity level 3 and the G2 Optimal Gum Care brushhead.Intensity settingsYour power toothbrush gives you the option to choosebetween 3 different intensity levels: low, medium andhigh. (Fig. ) Based on the brush head you attach, theintensity will be selected. The intensity can be changed bypressing the mode/intensity button while brushing. Foroptimal results it is recommended to use theautomatically selected intensity. The intensity cannot bechanged as long as the handle is powered off or paused. Using your Philips SonicareBrushing instructions1Press the brush head onto the handle in such a waythat the bristles will face the front of the handle. (Fig. )2Firmly press the brush head down onto the metalshaft until it stops.Note: It is normal to see a slight gap between thebrush head and the handle.3Wet the bristles. (Fig. )10English4Apply a small amount of toothpaste on the bristles.(Fig. )5Place the toothbrush bristles against the teeth at aslight angle (45 degrees), pressing firmly to make thebristles reach the gumline or slightly beneath thegumline. (Fig. )Note: A change in vibration (and a slight change insound) alerts you when you apply too much pressurewhile brushing.Note: Keep the center of the brush in contact with theteeth at all times.6Press the power on/off button to turn on the PhilipsSonicare. (Fig. )7Gently keep the bristles placed on the teeth and in thegumline. Brush your teeth with small back and forthmotion so the bristles reach between the teeth. (Fig. )Note: The bristles should slightly flare. Do not scrub.8To clean the inside surfaces of the front teeth, tilt thebrush handle semi-upright and make several verticaloverlapping brushing strokes on each tooth. (Fig. )9To make sure you brush evenly throughout themouth, divide the mouth into 4 sections using theQuadpacer feature. (Fig. ) The quadpacer featurebeeps after 30 seconds.10Brush for the full 2 minutes following the Quadpacer.(Fig. ) After 2 minutes, the toothbrush willautomatically shut off.In white mode, after 2 minutes the handle willcontinue to brush for 30 seconds so that you canbrighten and polish your front teeth. During theextra time, the Quadpacer beeps every 15 seconds.In gum care mode, after 2 minutes the handle willcontinue to brush for an additional minute so youcan gently stimulate and massage your gums.During the extra time, the Quadpacer beeps every15 seconds.-After you have completed the brushing cycle, you canspend additional time brushing the chewing surfacesof your teeth and areas where staining occurs. (Fig. )11EnglishNote: Your Philips Sonicare toothbrush is safe to useon:- Braces (brush heads wear out sooner when used onbraces)- Dental restorations (fillings, crowns, veneers)Note: When the Philips Sonicare toothbrush is used inclinical studies, it must be used in the Clean mode (forplaque and gum health claims) or in White mode (forwhitening claims) at high intensity with EasyStartturned off.Features-EasyStart-Brush head replacement reminder-Pressure sensor-Brush head mode pairing-QuadpacerEasy-startThis Philips Sonicare model comes with the EasyStartfeature deactivated. The EasyStart feature gentlyincreases the power over the first 14 brushings to helpyou get used to the brushing with the Philips Sonicare.Brush head replacement reminderYour Philips Sonicare is equipped with BrushSynctechnology that tracks the wear of your brush head. (Fig.)1When attaching a new smart brush head for the firsttime the brush head replacement reminder lightblinks green three times. This confirms you have aPhilips brush head with BrushSync technology.12English2Over time, based on the pressure you apply and theamount of time used, the handle will track brush headwear in order to determine the optimal time tochange your brush head. This feature gives you theguarantee for the best cleaning and care of yourteeth.3When the brush head replacement reminder lightPressure sensorYour Philips Sonicare is equipped with an advancedsensor that measures the pressure you apply whilebrushing. If you apply too much pressure, the toothbrushwill provide immediate feedback to indicate that youneed to reduce the pressure. This feedback is given by aBrush head mode pairingAn RFID chip inside the brush head communicates withthe toothbrush handle. When you attach a brush head,the handle automatically recognizes the brush head andselects the right mode and intensity level to optimizeyour brushing performance.QuadpacerThe Quadpacer is an interval timer that has a short beepand pause to remind you to brush the different sectionsof your mouth. Depending on the brushing mode youhave selected (see 'Brushing modes'), the Quadpacerbeeps at different intervals during the brushing cycle. Activating or deactivating featuresYou can activate or deactivate the following features ofyour toothbrush:-EasyStart-Brush head replacement reminder-Pressure sensor13EnglishTo activate or deactivate these features, follow theinstructions below:EasyStart1Put the handle on the plugged-in charger.2Press and hold the power on/off button while thehandle remains on the charger.3Keep the power on/off button pressed until you heara single short beep (after 2 seconds).4Release the power on/off button.-Triple tone of low-med-high means the EasyStartfeature has been activated. The brush headreplacement light and battery light will also blinkgreen 2 times in unison to confirm activation.-Triple tone of high-med-low means the EasyStartfeature has been deactivated. The brush headreplacement light and battery light will also blinkamber 2 times in unison to confirm deactivation.Note: To achieve clinical efficacy, EasyStart needs to bedeactivated.Brush head replacement reminder1Put the handle on the plugged-in charger.2Press and hold the power on/off button while thehandle remains on the charger.3Keep the power on/off button pressed until you heara series of two short beeps (after 4-5 seconds).4Release the power on/off button.-Triple tone of low-med-high means the Brushhead replacement reminder feature has beenactivated. The brush head replacement light andbattery light will also blink green 2 times in unisonto confirm activation.-Triple tone of high-med-low means the Brushhead replacement reminder feature has beendeactivated. The brush head replacement lightand battery light will also blink amber 2 times inunison to confirm deactivation.Pressure sensor1Put the handle on the plugged-in charger.14English2Press and hold the power on/off button while thehandle remains on the charger.3Keep the power on/off button pressed until you heara series of three short beeps (after 6-7 seconds).4Release the power on/off button.-Triple tone of low-med-high means the pressuresensor feature has been activated. The brush headreplacement light and battery light will also blinkgreen 2 times in unison to confirm activation.-Triple tone of high-med-low means the pressuresensor feature has been deactivated. The brushhead replacement light and battery light will alsoblink amber 1 time in unison to confirmdeactivation.If you continue holding the power on/off button afterthe three short beeps, the activate/deactivate sequencerepeats.Battery status and charging1Put the plug of the charger in an electrical outlet.2Place the handle on the charger.-The charger will emit 2 short beeps to confirm thatthe handle is placed properly.-The flashing light of the battery level indicatorshows that the toothbrush is charging.-When handle is fully charged on the charger, thebattery light shows solid green for 30 seconds andswitches off.Note: Your toothbrush comes pre-charged for first use.After first use, charge for at least 24 hours.Battery status (when handle is not on charger)When removing the Philips Sonicare from the charger,the battery light at the bottom of the toothbrush willindicate the status of the battery life.-Solid green LED: full battery-Flashing green LED: medium battery-Flashing amber LED and three beeps: low battery15English-Flashing amber LED and two sets of five beeps: Nobrushing sessions left (charge toothbrush) CleaningNote: Do not clean the brush head, handle or travel casein the dishwasher.Toothbrush handle1Remove the brush head and rinse the metal shaft areawith warm water. Make sure you remove any residualtoothpaste (Fig. ).Note: Do not push on the rubber seal on the metalshaft with sharp objects, as this may cause damage.2Wipe the entire surface of the handle with a dampcloth.Note: Do not use isopropyl rubbing alcohol, vinegar orbleach to clean handle as this may causediscoloration.Brush head1Rinse the brush head and bristles after each use (Fig. ).2Remove the brush head from the handle and rinse thebrush head connection with warm water at least oncea week.Charger1Unplug the charger before you clean it.2Wipe the surface of the charger with a damp cloth.Make sure you remove any toothpaste or otherresidue from the charger surfaces.StorageIf you are not going to use your Philips Sonicare for anextended period of time, unplug the charger from thewall socket, clean it and store it in a cool and dry placeaway from direct sunlight.Locating the model numberLook on the bottom of the Philips Sonicare toothbrushhandle for the model number (HX684x/HX685x).16EnglishRecycling-Do not throw away the product with the normalhousehold waste at the end of its life, but hand it in atan official collection point for recycling. By doing this,you help to preserve the environment.-This product contains a built-in rechargeable batterywhich shall not be disposed of with normal householdwaste. Please take your product to an officialcollection point or a Philips service center to have aprofessional remove the rechargeable battery.-Follow your country’s rules for the separate collectionof electrical and electronic products and rechargeablebatteries. Correct disposal helps prevent negativeconsequences for the environment and humanhealth.Removing the rechargeable batteryWarning: Only remove the rechargeable battery whenyou discard the appliance. Make sure the battery iscompletely empty when you remove it.To remove the rechargeable battery, you need a towel orcloth, a hammer and a flat-head (standard) screwdriver.Observe basic safety precautions when you follow theprocedure outlined below. Be sure to protect your eyes,hands, fingers, and the surface on which you work.1To deplete the rechargeable battery of any charge,remove the handle from the charger, turn on thePhilips Sonicare and let it run until it stops. Repeat thisstep until you can no longer turn on the PhilipsSonicare.2Remove and discard the brush head. Cover the entirehandle with a towel or cloth (Fig. ).3Hold the top of the handle with one hand and strikethe handle housing 0.5 inch above the bottom end.Strike firmly with a hammer on all 4 sides to eject theend cap (Fig. ).Note: You may have to hit on the end several times tobreak the internal snap connections.4Remove the end cap from the toothbrush handle. Ifthe end cap does not release easily from the housing,repeat step 3 until the end cap is released (Fig. ).17English5Holding the handle upside down, press the shaftdown on a hard surface. If the internal componentsdo not easily release from the housing, repeat step 3until the internal components are released (Fig. ).6Remove the rubber battery cover.7Wedge the screwdriver between the battery and theblack frame at the bottom of the internalcomponents. Then pry the screwdriver away from thebattery to break the bottom of the black frame (Fig. ).8Insert the screwdriver between the bottom of thebattery and the black frame to break the metal tabconnecting the battery to the green printed circuitboard. This will release the bottom end of the batteryfrom the frame (Fig. ).9Grab the battery and pull it away from the internalcomponents to break the second metal battery tab(Fig. ).Caution: Be aware of the sharp edges of thebattery tabs so as to avoid injury to your fingers.10Cover the battery contacts with tape to prevent anyelectrical short from residual battery charge. Therechargeable battery can now be recycled and therest of the product discarded appropriately (Fig. ). Warranty and supportIf you need information or support, please visit/support or read the internationalwarranty leaflet.Warranty restrictionsThe terms of the international warranty do not cover thefollowing:-Brush heads.-Damage caused by use of unauthorized replacementparts.-Damage caused by misuse, abuse, neglect, alterationsor unauthorized repair.-Normal wear and tear, including chips, scratches,abrasions, discoloration or fading.18简体中文注意事项使用本产品之前,请仔细阅读本使用说明书,并妥善保管以备日后参考。
6506R维护手册

6506R维护手册一介绍6506R对比6506而言,在6506机箱上增加了一个插槽,原来6506的一槽位插入SRPU单板,其它业务板后移.如下图各个单板的槽位和软件标号如上图中的各个标号.6506R的0和1 槽位的SRPU单板实现互为备分,实现路由交换单板故障业务无间断功能,提供高可靠性业务保证!二基本使用方法1.基本配置要求6506R的基本硬件要求为:SRPU单板的逻辑为04以及以上版本,该版本的逻辑支持SRPU单板6506和6506R互换使用,LPU的逻辑版本为03以及以上版本,支持65系列互换使用!机框上单板数目大于3时,交流电源个数应该使用2(包括2)个以上.6506R的基本软件要求为:SRPU和LPU单板的BOOTROM版本为303以及以上版本;使用正式归档的6506R应用文件版本,注意,6506与6506R的软件不能互相兼用.(可以根据6506和6506R的应用文件归档版本命名来区分产品应用文件6506的应用文件命名一般为S6506+版本号.app 例如S6506011.app6506R的应用文件命名一般为S6506R+版本号.app 例如s6506R011.app) 2.升级方法6506R的升级包括BOOTROM和应用文件的升级两个部分,升级过程可能会造成系统业务的中断,所以在未经华为相关部门授权,禁止自行升级。
1:BOOTROM升级BOOTROM升级可使用两种方法第一种在bootrom界面中进行升级,升级操作和6506完全相同。
第二种在应用程序中进行升级要注意这种升级方法分如下几种情况,请严格按照下列方法进行升级(1)当前应用程序版本非011版本(即低于011版本,特别是R01版本)第一步整机断电后启动系统,并将0和1槽位的单板进入BOOTROM界面第二步在0和1槽位的BOOTROM界面中升级BOOTROM第三步整机断电启动系统第四部用FTP协议下载业务板BOOTROM的升级文件到flash第五步用下面的命令升级接口板的BOOTROM<Quidway>boot bootrom 业务板BOOTROM文件名称slot slot_NO(单板槽位号)(2)当前应用程序版本为011以及以上版本第一步在应用程序的视图模式下载主控板和业务板的BOOTROM升级文件到系统flash中第二步使用下面的命令升级0槽位单板的BOOTROM<Quidway>boot bootrom 主控板BOOTROM升级文件名称slot 0例如boot bootrom srpubtm.app slot 0第三步将主控板BOOTROM升级文件拷贝到1槽位主控板的flash中<Quidway>copy flash:/主控板BOOTROM升级文件名称slot1#flash:/(可以不用参数)例如<Quidway>copy flash:/ srpubtm.app slot1#flash:/srpubtm.app(可以不要该文件名称)Copy flash:/ srpubtm.app to slot1#flash:/srpubtm.app ?[Y/N]:y第四步用下面的命令升级1槽位的主控板的bootromboot bootrom 主控板BOOTROM升级文件名称slot 1第五步升级业务板的bootrom如果在console连接下升级boot bootrom 业务板BOOTROM升级文件名称slot slot_NO(注意slot_NO为2~7,千万不要是0或1)如果是在telnet 模式下升级,请先执行下面的命令<Quidway>t d% Current terminal debugging is on<Quidway>t m% Current terminal monitor is on然后再用boot bootrom 业务板BOOTROM升级文件名称slot slot_NO(注意slot_NO为2~7,千万不要是0或1)注意:以上所有BOOTROM的升级只有在终端显示BOOTROM升级成功的字样后才能进行其它操作!不然会导致极其严重的后果!2:应用程序升级(1)当前应用程序版本非011版本(即低于011版本,特别是R01版本)第一步整机断电后启动系统,并将0和1槽位的单板进入BOOTROM界面第二步在0和1槽位的BOOTROM界面中升级加载应用文件到flash中第三步将加载的文件设为启动文件第四步整机断电启动系统如果原来的版本是老命令行,需要注意将其翻译为新命令行的配置文件第五步等待备板启动完全,使用save命令保存配置文件,使主备配置文件一致注意我们缺省0为主,1槽位为备,所以1槽位单板回比0槽位的主控板慢3分钟启动完全!可以用命令<Quidway>dis sw s来看如果为HA FSM State: Realtime and routine backup.说明备板启动完全,并且可以进行主备倒换!其它全不能倒换!倒换的命令为<Quidway>sl swCaution!!! Confirm switch slave to master[Y/N]? Y第六步整机断电启动系统由于应用程序版本非011版本(即低于011版本)不能自动更新主备之间的设备MAC,所以必须增加一次重新启动保证主备MAC一致。
6R使用说明书

6R使用说明书一、部分按键的部分功能简介F/W 短暂按压后屏幕左下方出现“F”图标,持续2-3秒后消失,在该时间内按压其它键,用于启用其它按键的第二功能。
连续按压超过1秒钟,左下方的“F”图标和屏幕上方的频道号均闪动,可进行频道储存操作。
BAND 在VFO状态下短暂按压用于选择波段,该波段最后一次使用的频率将自动记忆。
连续按压超过1秒钟,启动VFO扫描动作。
MODE 短暂按压用于改变接收模式,在AUTO/WFM/AM/FM间选择合适的接收模式。
0/SET 按压F/W后按之,进入设置菜单。
V/M 切换VFO和信道存储模式二、记忆存储:1. 在VFO模式下选择需要的频率,如果需要存储如CTCSS或者DCS,发射功率,收发频差等也可在此时设置好。
2. 按压“F/W”键一秒钟3. 放开“F/W”键五秒钟内,旋转“DIAL”旋钮选择需要的记忆频道(按“P/DMR”键选择频道号码的百位)。
此时如果频道号闪动,说明您当前选择的这个信道是空闲未存储的。
4. 按压“F/W”键,频率将被存储。
5. 此时VX-6R仍然保持在VFO模式下,输入新的频率并保存,只需重复以上的操作。
一般微处理器将自动选择下一未存储的信道。
三、存储独立的收发频率:1. 先选择一个频率作为接收频率存储起来(例如将145.325MHz存储在101信道中)。
2. 然后再选择一个频率作为发射频率(例如438.325MHz)。
3. 按压“F/W”键一秒钟。
4. 放开“F/W”键五秒钟内,旋转“DIAL”旋钮选择存储接收频率的频道(选择到101信道)。
5. 按压“PTT”键的同时按压“F/W”键,则发射频率被存储。
此时进入MR模式,旋转“DIAL”旋钮选择101信道,可看到液晶屏幕上方显示“[+][-]”,这是异频操作的标志。
此时接收频率为145.325MHz,发射频率为438.325MHz。
四、删除存储的频率1.选择一个需要删除的存储频道。
2.按压“F/W”键一秒钟。
华为网络原理——根据S6506R操作手册节选

华为网络原理——根据S6506R操作手册节选华为网络原理——根据S6506R操作手册节选我这里只讲原理,因为配置命令各个厂商之间并不是通用的。
第1章以太网端口配置1.1 以太网端口简介S6500 系列以太网交换机支持的以太网端口特性如下:10Base-T/100Base-TX 以太网端口支持MDI/MDI-X 自适应,可以工作在半双工、全双工或自协商模式下,可以与其他网络设备协商确定工作方式和速率,自动选择最合适的工作方式和速率。
100BaseFX-SMF/MMF 以太网端口工作在百兆全双工模式下。
双工模式可以设置为full(全双工)和auto(自协商),速率可以设置为100(100Mbit/s)和auto(自协商)。
1000Base-X(GBIC)和1000Base-X(SFP)以太网端口工作在千兆全双工模式下。
双工模式可以设置为full(全双工)和auto(自协商),速率可以设置为1000(1000Mbit/s)和auto(自协商)。
10/100/1000Base-T 以太网端口支持MDI/MDI-X 自适应,工作方式为:1000M全双工,100M 半双工/全双工或10M 半双工/全双工。
对于万兆以太网端口,双工模式只能设置为full(全双工),速率只能设置为10000(10000Mbit/s)。
1.2.4 设置以太网端口双工状态当希望端口在发送数据包的同时可以接收数据包,可以将端口设置为全双工属性;当希望端口同一时刻只能发送数据包或接收数据包时,可以将端口设置为半双工属性;当设置端口为自协商状态时,端口的双工状态由本端口和对端端口自动协商而定。
缺省情况下,端口的双工状态为auto(自协商)状态。
1.2.5 设置以太网端口速率可以使用以下命令对以太网端口的速率进行设置,当设置端口速率为自协商状态时,端口的速率由本端口和对端端口双方自动协商而定。
缺省情况下,以太网端口的速率处于auto(自协商)状态。
华为交换机配置命令华为QuidWay交换机配置命令手册
华为交换机配置命令华为QuidWay交换机配置命令⼿册1、开始建⽴本地配置环境,将主机的串⼝通过配置电缆与以太⽹交换机的Console⼝连接。
在主机上运⾏终端仿真程序(如Windows的超级终端等),设置终端通信参数为:波特率为9600bit/s、8位数据位、1位停⽌位、⽆校验和⽆流控,并选择终端类型为VT100。
以太⽹交换机上电,终端上显⽰以太⽹交换机⾃检信息,⾃检结束后提⽰⽤户键⼊回车,之后将出现命令⾏提⽰符(如<Quidway>)。
键⼊命令,配置以太⽹交换机或查看以太⽹交换机运⾏状态。
需要帮助可以随时键⼊"?"2、命令视图(1)⽤户视图(查看交换机的简单运⾏状态和统计信息)<Quidway>:与交换机建⽴连接即进⼊(2)系统视图(配置系统参数)[Quidway]:在⽤户视图下键⼊system-view(3)以太⽹端⼝视图(配置以太⽹端⼝参数)[Quidway-Ethernet0/1]:在系统视图下键⼊interface ethernet 0/1(4)VLAN视图(配置VLAN参数)[Quidway-Vlan1]:在系统视图下键⼊vlan 1(5)VLAN接⼝视图(配置VLAN和VLAN汇聚对应的IP接⼝参数)[Quidway-Vlan-interface1]:在系统视图下键⼊interface vlan-interface 1(6)本地⽤户视图(配置本地⽤户参数)[Quidway-luser-user1]:在系统视图下键⼊local-user user1(7)⽤户界⾯视图(配置⽤户界⾯参数)[Quidway-ui0]:在系统视图下键⼊user-interface3、其他命令设置系统时间和时区<Quidway>clock time Beijing add 8<Quidway>clock datetime 12:00:00 2005/01/23设置交换机的名称[Quidway]sysname TRAIN-3026-1[TRAIN-3026-1]配置⽤户登录[Quidway]user-interface vty 0 4[Quidway-ui-vty0]authentication-mode scheme创建本地⽤户[Quidway]local-user huawei[Quidway-luser-huawei]password simple huawei[Quidway-luser-huawei] service-type telnet level 34、VLAN配置⽅法『配置环境参数』SwitchA端⼝E0/1属于VLAN2,E0/2属于VLAN3『组⽹需求』把交换机端⼝E0/1加⼊到VLAN2 ,E0/2加⼊到VLAN3数据配置步骤『VLAN配置流程』(1)缺省情况下所有端⼝都属于VLAN 1,并且端⼝是access端⼝,⼀个access端⼝只能属于⼀个vlan;(2)如果端⼝是access端⼝,则把端⼝加⼊到另外⼀个vlan的同时,系统⾃动把该端⼝从原来的vlan中删除掉;(3)除了VLAN1,如果VLAN XX不存在,在系统视图下键⼊VLAN XX,则创建VLAN XX并进⼊VLAN视图;如果VLAN XX已经存在,则进⼊VLAN视图。
Samsung SER-6500II和6540II操作手册 版本2.0说明书

Samsung SER-6500II and 6540II operating ManualSeries SER-6500II/6540IIOperator’s ManualAll specifications are subject to change without notice. ©2005, CRS, Inc.OM-SER6500/6540 Version 2.0CRS, Inc.Limited Warranty and Disclaimers of WarrantyThis manual has been developed by CRS, Inc. It is intended for the use of its customers and service personnel and should be read in its entirety before attempting to install, use or program the product(s).Nothing contained in this manual shall be deemed to be, and this manual does not constitute, a warranty of, or representation with respect to, the product or any of the products to which this manual applies. This manual is subject to change without notice and CRS, Inc. has no obligation to provide any updates or corrections to this manual. Further, CRS, Inc. also reserves the right, without prior notice, to make changes in equipment design or components as it deems appropriate. No representation is made that this manual is complete or accurate in all respects and CRS, Inc. shall not be liable for any errors or omissions contained in this manual. In no event shall CRS, Inc. be liable for any incidental or consequential damages relating to or arising out of the use of this manual. This document contains proprietary information that is protected by copyright. All rights are reserved. No part of this document may be photocopied or reproduced without prior written consent of CRS, Inc.NOTICEIF ANY WARRANTY IS EXTENDED TO YOU WITH REGARD TO THE PRODUCT(S) TO WHICH THIS MANUAL APPLIES, IT IS A WARRANTY FROM THE ENTITY OR INDIVIDUAL FROM WHOM YOU DIRECTLY PURCHASED THE PRODUCT(S). SUBJECT TO THE FOREGOING, UNLESS YOU ARE A DIRECT END USER CUSTOMER OF CRS, INC., CRS, INC. DOES NOT EXTEND TO YOU ANY EXPRESS WARRANTY OR ANY IMPLIED WARRANTY AND EXPRESSLY DISCLAIMS ANY IMPLIED WARRANTY OF MERCHANTABILITY, FITNESS FOR USE, OR FITNESS FOR ANY PARTICULAR PURPOSE, OR ANY WARRANTY OF NON-INFRINGEMENT OF INTELLECTUAL PROPERTY RIGHTS IN CONNECTION WITH THE PRODUCT(S) OR ANY SOFTWARE, DRIVERS, OR PROGRAMMING PRODUCT, WHETHER EMBEDDED IN PRODUCT(S) OR PROVIDED AS A SEPARATE PROGRAM, OR USED IN CONJUNCTION WITH THIS/THESE PRODUCT(S). CRS, INC. SPECIFICALLY DOES NOT WARRANT THAT THE OPERATION OF ANY DRIVERS, SOFTWARE, OR PROGRAMMING PRODUCTS LICENSED HEREUNDER, WHETHER EMBEDDED IN PRODUCTS OR PROVIDED AS SEPARATE PROGRAMS, SHALL BE UNINTERRUPTED OR ERROR FREE OR THAT FUNCTIONS CONTAINED IN SUCH DRIVERS, SOFTWARE OR PROGRAMMING PRODUCTS SHALL OPERATE IN COMBINATION(S) WHICH MAY BE SELECTED FOR USE BY YOU OR OTHERWISE MEET YOUR REQUIREMENTS.CRS, Inc. is not responsible for any damages or loss, either direct, indirect, special, incidental or consequential, which you may experience as a result of your purchase or use of the product(s). Your sole remedy in the event that you encounter any difficulties with the product(s) is against the entity or individual from whom you purchased the product(s).Revision 2.0 - April 1, 2005WARNING - U.S.THIS EQUIPMENT GENERATES, USES AND CAN RADIATE RADIO FREQUENCY ENERGY, AND IF NOT INSTALLED AND USEDIN ACCORDANCE WITH THE INSTRUCTIONS MANUAL, MAY CAUSE INTERFERENCE TO RADIO COMMUNICATIONS. IT HASBEEN TESTED AND FOUND TO COMPLY WITH THE LIMITS FOR A CLASS A COMPUTING DEVICE PURSUANT TO SUBPART JOF PART 15 OF FCC RULES WHICH ARE DESIGNED TO PROVIDE REASONABLE PROTECTION AGAINST SUCHINTERFERENCE WHEN OPERATED IN A COMMERCIAL ENVIRONMENT. OPERATIONS OF THE EQUIPMENT IN ARESIDENTIAL AREA IS LIKELY TO CAUSE INTERFERENCE IN WHICH CASE THE USER, AT HIS OWN EXPENSE, WILL BE REQUIRED TO TAKE WHATEVER MEASURES MAY BE REQUIRED TO CORRECT THE INTERFERENCE.NOTICE - CANADATHIS APPARATUS COMPLIES WITH THE CLASS “A” LIMITS FOR RADIO INTERFERENCE AS SPECIFIED IN THE CANADIAN DEPARTMENT OF COMMUNICATIONS RADIO INTERFERENCE REGULATIONS.CET APPAREIL EST CONFORME AUX NORMES CLASS “A” D’INTERFERENCE RADIO TEL QUE SPECIFIER PAR MINISTRE CANADIEN DES COMMUNICATIONS DANS LES REGLEMENTS D’INTERFERENCE RADIO.ATTENTIONThe product that you have purchased may contain a battery that may be recyclable. At the end of its useful life, under various stateand local laws, it may be illegal to dispose of the battery into the municipal waste system.Check with your local solid waste officials for details concerning recycling options or proper disposal.ContentsIntroduction5 About the Samsung SER-6500II Series (5)Using This Manual (6)Features and Options (7)Standard Features (7)Optional Features (8)Display (9)Special Messages Displayed (10)Error Messages (11)Printer (15)Model: Samsung ERP-400 (15)Logo Stamp (15)Character Chart (16)Sample Receipt (17)Two-Line Print Conditions (17)Changing Paper & Print Ribbon (18)Changing/Installing the Printer Ribbon Cartridge (18)Loading the Receipt Printer: (18)Initial Loading of the Detail Printer (19)Keylock (20)Control Lock Access (20)Keys (20)Keyboards (21)Operating Guide23 Introduction (23)Keyboards (24)Samsung SER-6500 (24)Keyboard Legend (25)Clerk Sign-On / Sign-Off (29)Push Button Sign-On (29)Secret Code Sign-On (29)Direct Sign-On (29)Item Entry (30)PLU Key Entries (32)% Key Entries (33)Void Key Operations (38)Merchandise Return Operations (39)Add Check Operations (41)Tax Shift Operations (42)Tax Exempt Operations (43)Tendering Operations (44)Food Stamp Tender Operation (46)Tendering with Foreign Currency (Conversion) (46)Post Tendering (47)Receipt on Request Operation (47)Validation Operations (48)Non-add Number Entry Operation (49)No Sale Operation (49)Received On Account Operations (50)Paid Out Operation (51)VOID Position (Transaction Void) Operations (52)Cancel Operations (53)Size and Modifier Keys (54)PROMO Function (55)WASTE Function (55)SCALE Key (56)Drive Thru / Food Service Features (58)Eat-In, Take-out, and Drive Thru Destination Only Keys (59)Condiments Kitchen Printing (61)PRINT Key (62)Sending the Receipt to the Remote Printer (63)Drive-Up Window Operatons (64)Food Service / Table Service (68)Check Tracking (68)Picking Up an Existing Balance (69)Closing or Paying a Guest Check (70)Soft Check Operations (74)Transferring Guest Checks to Another Server (76)Combining Guest Checks for Payment (76)Scanning (77)PLU PRICE Key (77)Time Keeping Features (79)Clocking In (79)Clocking Out (79)X-Mode Programming80 Introduction (80)X-Mode Override / Manager Mode (80)77 SBTL - Set Default Size (81)78 SUBTOTAL - Set Default Modifier (82)88 SBTL - Enter/Exit Training Mode (83)99 SBTL - Receipt On / Off (84)X-Mode Cash Declaration (85)P-Mode Programming89 Introduction (89)PLU Programming (89)Clerk/Cashier Programming: (89)Time Keeping Adjustments (89)Date and Time Programming (89)PLU Programming (90)200 SBTL - PLU Price / HALO Programming (91)300 SBTL - PLU Descriptor Programming (92)Clerk/Cashier Programming (94)800 SBTL - Secret Sign-on Code Programming (94)810 SBTL - Clerk Descriptor Programming (94)820 SBTL - Clerk Status Programming (96)830 SBTL - Labor Group Descriptor Programming (96)835 SBTL - Time Keeping Adjustments (96)1400 SBTL - Date and Time Programming (97)SER-6500II/6540II Reports99 Overview (99)Report Table (101)Report Examples (104)Financial Report (104)Financial Report Notes (105)IRC Reports (106)Sales Time Report (107)PLU Reports (108)All Clerks/Cashiers Report Individual Clerk/Cashier Report (109)Drawer Reports (110)Financial Group Report (111)Labor Groups Report (112)Daily Sales Report (113)Time Keeping Reports (114)Items by Group Report (115)Open Check Reports (116)Clear Pre-polling memory (117)String Reports (118)Balancing Formulas (119)。
骨干路由交换机RG-S6506产品手册(200607)
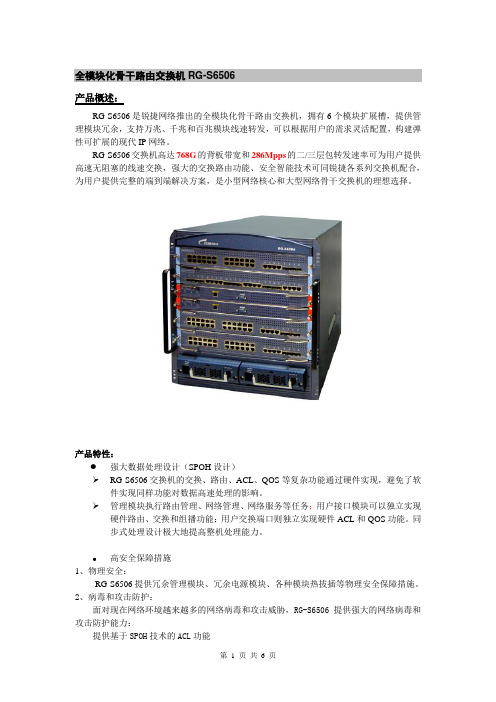
全模块化骨干路由交换机RG-S6506产品概述:RG-S6506是锐捷网络推出的全模块化骨干路由交换机,拥有6个模块扩展槽,提供管理模块冗余,支持万兆、千兆和百兆模块线速转发,可以根据用户的需求灵活配置,构建弹性可扩展的现代IP网络。
RG-S6506交换机高达768G的背板带宽和286Mpps的二/三层包转发速率可为用户提供高速无阻塞的线速交换,强大的交换路由功能、安全智能技术可同锐捷各系列交换机配合,为用户提供完整的端到端解决方案,是小型网络核心和大型网络骨干交换机的理想选择。
产品特性:●强大数据处理设计(SPOH设计)RG-S6506交换机的交换、路由、ACL、QOS等复杂功能通过硬件实现,避免了软件实现同样功能对数据高速处理的影响。
管理模块执行路由管理、网络管理、网络服务等任务;用户接口模块可以独立实现硬件路由、交换和组播功能;用户交换端口则独立实现硬件ACL和QOS功能。
同步式处理设计极大地提高整机处理能力。
●高安全保障措施1、物理安全:RG-S6506提供冗余管理模块、冗余电源模块、各种模块热拔插等物理安全保障措施。
2、病毒和攻击防护:面对现在网络环境越来越多的网络病毒和攻击威胁,RG-S6506提供强大的网络病毒和攻击防护能力:提供基于SPOH技术的ACL功能支持防源IP地址欺骗、防DOS/DDOS攻击,防IP扫描等功能提供多端口同步监控技术,支持灵活的网络监控,提升网络监控能力3、设备管理安全:提供SSH的加密登陆和管理功能,避免管理信息明文传输引发的潜在威胁Telnet/Web登录的源IP限制功能,避免非法人员对网络设备的管理SNMPV3提供加密和鉴别功能:确保数据从合法的数据源发出(引擎ID);确保数据在传输过程中不被篡改(采用MD5和SHA认证协议);加密报文,确保数据的机密性(采用DES56加密协议)4、接入安全:硬件支持IP、MAC、端口绑定,提高用户接入控制能力。
支持802.1X技术,满足6元素绑定接入限制支持IGMP源端口检查,可有效控制非法组播源,提高网络安全。
华为6506访问以太网交换机配置

访问以太网交换机目录目录第1章产品介绍 ....................................................................................................................... 1-11.1 产品简介............................................................................................................................. 1-11.2 功能特性列表 ..................................................................................................................... 1-2 第2章访问以太网交换机......................................................................................................... 2-12.1 通过配置口访问以太网交换机............................................................................................ 2-12.2 通过Telnet访问以太网交换机........................................................................................... 2-32.2.1 通过微机Telnet到以太网交换机............................................................................. 2-32.2.2 通过以太网交换机Telnet到以太网交换机 .............................................................. 2-52.3 通过Modem拨号访问以太网交换机.................................................................................. 2-62.4 Line配置 ............................................................................................................................ 2-82.4.1 Line简介.................................................................................................................. 2-82.4.2 Line配置.................................................................................................................. 2-92.4.3 进入Line配置模式 ................................................................................................ 2-102.4.4 配置AUX(即Console)口属性........................................................................... 2-102.4.5 配置终端属性......................................................................................................... 2-112.4.6 Line用户配置 ........................................................................................................ 2-132.4.7 Modem属性配置................................................................................................... 2-162.4.8配置重定向功能 .................................................................................................... 2-162.4.9 Line的监控和维护................................................................................................. 2-17 第3章命令行接口.................................................................................................................... 3-13.1 命令行接口......................................................................................................................... 3-13.2 命令行模式......................................................................................................................... 3-13.3 命令行特性功能.................................................................................................................. 3-43.3.1 命令行在线帮助....................................................................................................... 3-43.3.2 命令行错误信息....................................................................................................... 3-73.3.3 历史命令.................................................................................................................. 3-83.3.4编辑特性 ................................................................................................................. 3-83.3.5显示特性 ................................................................................................................. 3-9第1章产品介绍1.1 产品简介随着Internet市场的不断发展,用户对通信的需求已从传统的电话、传真、电报等低速业务逐渐向高速的Internet接入、可视电话、视频点播(Video OnDemand,VOD)等宽带业务领域延伸。
HSR-JR650机器人机械操作维护手册

HSR-JR650 机器人
机械电气操作维护手册
重庆华数机器人有限公司
本手册所含内容若有变更,恕不另行通知。本手册所内容不可视作华数的承诺。 华数对本手册可能出 现的任何错误不承担责任。
华数对本文档及其所含信息保留所有权利。未经明确许可,严禁复制、使用本文档或将其内容透露给 第三方。
I
目录
3.4.2 润滑的空间方位............................................................................................................20 3.4.3 J1/J2/J3/J4 轴减速机、马达座齿轮箱的润滑油更换步骤 .........................................20 3.4.4 手腕部件的润滑油更换步骤........................................................................................21 3.4.5 释放润滑油槽内残压....................................................................................................23 4 故障处理 ....................................................................................................................................24 4.1 调查故障原因的方法 ......................
Genie S-60和S-65操作手册说明书

S-60 CES-65带有维修信息原始说明的翻译Eighth EditionFirst PrintingPart No. 1258795CS操作手册 第八版 • 第一次印刷S-60 • S-65产品号 1258795CS要点操作机器前,应阅读、理解并遵守这些安全规则和操作说明。
只有训练有素且经过授权的人员方允许操作该机器。
应将此手册当作机器的一部分并始终与机器放在一起。
如有任何问题,请联系我们。
请与我们联系:网址:电子邮件:*********************目录简介 ...................................................................1 符号和危险图示定义 ..........................................3 一般安全 ............................................................5 人员安全 ............................................................8 工作区安全 ........................................................9 图例 .................................................................18 控制器 .............................................................19 检查 .................................................................27 操作说明 ..........................................................38 运输和提升说明 ...............................................50 运输和提升说明 ...............................................51 维护 .................................................................55 规格 .. (59)1995 Terex Corporation 版权所有第八版:2014 年 9 月第一次印刷Genie 和“S”是 Terex South Dakota, Inc. 在美国和其他许多国家/地区的注册商标。
华数机器人 HSR-JR680 650L 机器人 机械操作维护手册说明书

HSR-JR680/650L机器人机械操作维护手册V23.0.1重庆华数机器人有限公司本手册所含内容若有变更,恕不另行通知。
本手册所含内容不可视作华数的承诺;华数对本手册可能出现的任何错误不承担责任。
华数对本文档及其所含信息保留所有权利。
未经明确许可,严禁复制、使用本文档或将其内容透露给第三方。
前言本系列说明书介绍了HSR-JR680/650L型6轴工业机器人的机械电气组成及各部分的功能和示教器、伺服驱动器故障代码说明及处理对策等,是用户快速学习和使用的基本说明书。
本说明书的更新事宜,由华数机器人有限公司授权并组织实施。
未经本公司授权或书面许可,任何单位或个人无权对本说明书内容进行修改或更正,本公司概不负责由此而造成的客户损失。
在HSR-JR680/650L型6轴工业机器人用户说明书和伺服驱动故障代码说明及处理对策中,我们将尽力叙述各种与该型号机器人操作相关的事件。
由于篇幅限制及产品开发定位等原因,不能也不可能对系统中所有不必做或不能做的事件进行详细的叙述。
因此,本说明书中没有特别描述的事件均可视为“不可能”或“不允许”的事件。
本产品的额定功率、规格、外部尺寸等如需改良而进行变更,恕不另行通告。
技术数据和插图仅作为供货参考,保留更改权利此说明书的版权归华数机器人有限公司,任何单位与个人进行出版或复印均属于非法行为,我公司将追究其法律责任。
的搬运、安装、运行、保养维修进行了全面的说明,在操作机器人前,请务必认真阅读并充分理解本说明书进行相应作业。
HSR-JR680/650L安全手册》中有详细描述,在阅读本说明书前本说明书中的图解,有的为了说明细节取下外壳进行绘制,运转此类部件时,务必按照规定将盖子或安全罩还原后,按照说明书进行运行。
说明书中的图及照片,为示意图片,实物可能与图片有所不同。
操作机器人前请按下HSR-JR680/650L控制柜及示教器上的急停按钮,确认机器人的急停功能正常,此时示教器使能图标变红,并显示报警信息。
中型矩阵系统ST-MS650说明

T9 T10 T11 T12 T13 T14 T15 T16
T17 T18 T19 T20 T21 T22 T23 T24
T25 T26 T27 T28 T29 T30 T31 T32
T33 T34 T35 T36 T37 T38 T39 T40
T41 T42
T44
T46 T47 T48
T49 T50 T51 T52 T53 T54 T55 T56
Байду номын сангаас-4-
ST-MS650 矩阵开关系统使用手册 2.1.3 摄像机及监视器的选择
进入系统后,随意选择摄像机及监视器连接系统的任何摄像机及监视器,都有可以如下 图所示进行任意组合。
摄像机1
摄像机2
ST-RC120R
监视器1
监视器2
3
2
1
ST-MS650
控制器
总体步骤: 1、在控制器上选择监视器。 2、在控制器上选择摄像机。 3、被选择的摄像机图像显示在被选择的监视器上。 ■ 监视器选择 用控制器选择监视器,使监视器与控制器连接,此时,监视器显示最后所提供的摄像 机输出信号,按数字键(1—32)然后按监视器(M0N)键以选择监视器。
1.5 切换模式
ST-MS650 总共有三种切换模式:定点切换、巡回切换、群组切换。其中巡回切换共有 64 组,每组 64 步。群组切换共有 9 组,每组 64 步。
1.6 星期定时事件
ST-MS650 全年定时事件按星期划分,每天有八个事件,可以设定巡回切换或群组切换每天 的开始时间。
1.7 星期定时报警事件
对摄像机的操作限制每一个操作员通过编程可以禁止使用每台摄像机摄像机的范围为1对群组的操作权限每一个操作员通过编程可以禁止使用每组群组群组的范围为1对巡回的操作权限每一个操作员通过编程可以禁止使用每组巡回巡回的范围为1对控制器设置时间的权限每一个操作员通过编程可以禁止在控制器上设置矩阵时钟
S6506R设备操作手册

S6506R设备操作手册
华为S6506R设备维护指导手册
一、华为S6506R功能简介
华为S6506R以太网交换机是华为开发的一系列大容量、模块化、L2/L3线速以太网交换机,支持双交换引擎,提供引擎的冗余备份(双引擎各占1个槽位)及6个业务板槽位。
目前应用在忻州、原平、代县、五台、保德、偏关、神池、五寨、岢岚、静乐、宁武。
二、华为S6506R设备简介
1、S6506R以太网交换机的机箱及槽位示意图如下:
SRPU:Switch & Route Processing Unit,交换路由板
LPU:Line Processing Unit,线路处理板(简称业务板)
PWR:Power,电源模块
FAN:风扇框
各部分模块均支持热插拔功能,其中:
单板区共有8个横插拔的单板槽位,最上面的2个槽位固定为交换路由板(SRPU)槽位,S6506R以太网交换机为用户提供了SRPU 冗余备份功能,其余6个槽位为业务板槽位,支持各种业务板的混插。
风扇区位于机箱的右侧,为竖插拔结构。
电源区位于机箱的底部,对应交流(AC)输入、直流(DC)输入两种供电方式,需分别选用交流电源模块、直流电源模块。
2、板卡介绍
2.1 SRPU
SRPU上依次排列有CF卡接口、4个1000Base-X-SFP接口、Console 口、10Base-T/100Base-TX接口、系统状态指示灯、系统复位键(RESET),其面板图如下所示。
Salience III (LS81SRPG)面板示意图
CF卡接口
面板开口,支持标准的CF卡热插拔,可以用来存放主机版本,能方便地进行交换机软件的在线升级。
Console口。
三星SER-6500 6540电子现金记账机操作员和编程手册说明书
S6506R日常维护
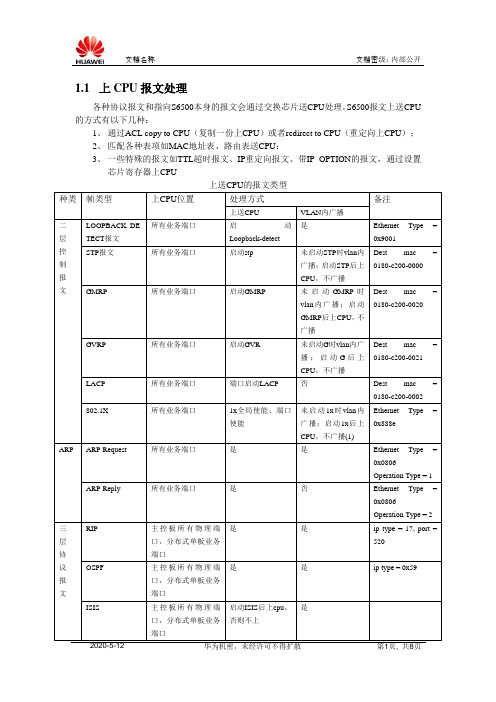
1.1上CPU报文处理各种协议报文和指向S6500本身的报文会通过交换芯片送CPU处理。
S6500报文上送CPU 的方式有以下几种:1、通过ACL copy to CPU(复制一份上CPU)或者redirect to CPU(重定向上CPU);2、匹配各种表项如MAC地址表、路由表送CPU;3、一些特殊的报文如TTL超时报文、IP重定向报文、带IP OPTION的报文,通过设置芯片寄存器上CPU一、如何查看报文上CPU:1)使用平台的系统调试命令,查看相关协议模块的报文收发情况:示例:查看ARP模块接收和发送的报文< S6506R>terminal debugging< S6506R>terminal monitor< S6506R>debugging arp packet二、如果协议模块的报文收发异常,建议从驱动层开始分析:1、确认报文是从那块单板上CPU,特别是对于集中式业务板,有些报文是先上业务板的CPU,然后再转发到主控板CPU,有些报文则是业务板透传到上主控板的CPU。
2、确认上CPU的报文特征,主要有:目的MAC、源MAC、VLAN、帧类型、源IP、目的IP、IP类型、入端口号、广播、多播、单播、CPU接收(RX)、CPU发送(TX)3、使用display rxtx <type> slot <slot>选择要看的报文;4、使用debugging rxtx –c <num> pkt slot <slot>打开调试开关查看报文;举例,查看是否有目的mac为00e0-fc0f-8c06的报文送往5槽位CPU:a) 选择报文:[S6506R S6506R-testdiag]dis rxtx dest_mac 00e0-fc0f-8c06 s 5b) 最多打印10个:< S6506R>debug rxtx -c 10 pkt slot 5结果显示的每个报文的可能形式如下:*0.15515370 S6506R S6506R RXTX/8/pkt: received packet from chip4,port7,reason=0x1000,cos=7,len=68*0.15515491 S6506R S6506R RXTX/8/pkt:---------------------------------------------------------------00 e0 fc 0f 8c 06 00 e0 fc 0a 15 e0 81 00 00 01ff ee 00 05 00 00 00 00 00 37 03 e5 72 24 00 0008 00 00 00 00 00 00 00 00 00 00 00 00 00 00 0000 00 00 00 00 00 00 00 00 00 00 00 00 00 00 00---------------------------------------------------------------c) 使用完毕后注意恢复选择开关:[S6506R-testdiag]display rxtx all slot 5三、设置端口镜像,通过专用抓包工具如Sniffer等对报文进行分析:示例:将G5/0/1的入报文和出报文镜像到G5/0/2[S6506R]mirroring-group 1 inbound g5/0/1 mirrored-to g5/0/2[S6506R]mirroring-group 1 outbound g5/0/1 mirrored-to g5/0/2说明:S6500有关镜像的注意事项请参见后面的章节分析完后注意删除已经配置的镜像组1.2报文转发故障排查:一、查询单板状态:1、查看单板状态是否正常,如果单板状态异常,建议复位单板恢复业务。
EWS650洗衣机 说明书
部件说明
1. 洗涤剂抽屉盒 2. 程序表 3. 控制面板 4. 门锁指示灯 5. 门把手 6. 排水泵
7. 水平调整脚
门锁指示灯
整个程序运行时,指示灯亮,表明门处于关闭状态。 如灯熄灭,表明门可以开启
洗涤剂料盒
预洗洗涤剂投放格 主洗洗涤剂投放格 柔软剂、上浆剂投放格
8
使用
排水
排水管末端可用三种方式放置: ·使用随机提供的塑料弯夹装在排水管末端 上,将其挂在水槽壁上。在此情况下,应确 保洗衣机在排水时,排水管不能掉下。可将排 水管系在水龙头上或固定在墙上。
·排水管接于水槽的排水分支。排水分支必 须位于下水道上方并使弯曲部分最少高于 洗衣机放置平面 60cm。
电气连接
·此洗衣机使用单相 220V/50Hz 电源。 ·确保家用供电线路能承受所要求的最大负 载,同时须考虑其它电器同时工作时的负 载。
确保家庭环境中的噪音达到最小。 用水量和用电量可以根据洗衣量和衣物种类自动调节,使使用成本最经济。 本机配有活力魔术球,确保更低的耗水量、耗电量和洗涤剂用量,经济环保。 超静音避震系统和自动平衡控制系统,有效降低振动和噪音。 由意大利衣物护理专家研发的针对“羊毛、手洗织物、丝绸和精细织物”的特殊洗涤程
当您选择了预约功能,相应被选的预约时间 指示灯点亮。 启动机器后,相应的指示灯显示剩余的时 间。 程序开始时,只有“运行”指示灯点亮。当 程序结束时,“结束”指示灯点亮。
闪烁 4 下:门开着 闪烁 2 下:排水问题 闪烁 1 下:进水问题 更多信息,请参考“故障诊断”章节。
8 温度旋钮
转动旋钮,选择所需要的温度。 当要洗的衣服不脏,可使用冷水洗涤(转至 位置冷水*处)。
1
- 1、下载文档前请自行甄别文档内容的完整性,平台不提供额外的编辑、内容补充、找答案等附加服务。
- 2、"仅部分预览"的文档,不可在线预览部分如存在完整性等问题,可反馈申请退款(可完整预览的文档不适用该条件!)。
- 3、如文档侵犯您的权益,请联系客服反馈,我们会尽快为您处理(人工客服工作时间:9:00-18:30)。
华为S6506R设备维护指导手册一、华为S6506R功能简介华为S6506R以太网交换机是华为开发的一系列大容量、模块化、L2/L3线速以太网交换机,支持双交换引擎,提供引擎的冗余备份(双引擎各占1个槽位)及6个业务板槽位。
目前应用在忻州、原平、代县、五台、保德、偏关、神池、五寨、岢岚、静乐、宁武。
二、华为S6506R设备简介1、S6506R以太网交换机的机箱及槽位示意图如下:SRPU:Switch & Route Processing Unit,交换路由板LPU:Line Processing Unit,线路处理板(简称业务板)PWR:Power,电源模块FAN:风扇框各部分模块均支持热插拔功能,其中:单板区共有8个横插拔的单板槽位,最上面的2个槽位固定为交换路由板(SRPU)槽位,S6506R以太网交换机为用户提供了SRPU 冗余备份功能,其余6个槽位为业务板槽位,支持各种业务板的混插。
风扇区位于机箱的右侧,为竖插拔结构。
电源区位于机箱的底部,对应交流(AC)输入、直流(DC)输入两种供电方式,需分别选用交流电源模块、直流电源模块。
2、板卡介绍2.1 SRPUSRPU上依次排列有CF卡接口、4个1000Base-X-SFP接口、Console 口、10Base-T/100Base-TX接口、系统状态指示灯、系统复位键(RESET),其面板图如下所示。
Salience III (LS81SRPG)面板示意图2.1.1提供接口CF卡接口面板开口,支持标准的CF卡热插拔,可以用来存放主机版本,能方便地进行交换机软件的在线升级。
Console口该接口采用RJ45连接器,使用普通异步串行口电缆,既可用来连接终端计算机以进行系统的本地调试、配置、维护、管理及主机软件程序加载等工作,也可用来连接Modem设备以进行系统的远程调试、配置、维护、管理等工作。
管理用以太网口(10Base-T/100Base-TX)该接口采用RJ45连接器,可用来连接计算机以进行系统的程序加载、调试等工作,也可以接远端的网管工作站等设备以实现系统的远程管理。
该接口状态指示灯的说明如下表所示。
业务口交换路由板提供4个千兆全双工的SFP接口, 其接口线缆如下表所示。
该接口状态指示灯的说明如下表所示。
2.1.2系统指示灯S6506R 以太网交换机的主用主控板指示灯含义与下面给出的说明一致,其备用主控板的指示灯除了SRPG 指示灯含义与主用主控板一致外,其他灯都是全灭状态。
单板指示灯SRPG :对应交换路由板的状态。
LPU1、LPU2、LPU3(LPU4、LPU5、LPU6):对应3个(S6503交换机)或6个(S6506和S6506R 交换机)业务板的状态。
说明:如果指示灯处于快速闪烁中,表示单板正处于启动过程中,并没有正常工作。
在系统初始启动时,ALM指示灯会亮一段时间,并不表示单板有故障。
电源指示灯(PWR1、PWR2、PWR3)PWR1、PWR2、PWR3:对应三个电源(交流或直流)模块的状态。
风扇指示灯(FAN)FAN:对应风扇框的状态。
2.1.3系统复位键如果采用非双主控,按下主控板上的RESET按钮后,整个交换机将复位。
如果在S6506R上采用双主控系统时,按下主用板的RESET按钮后,主用板复位;备用板就会马上倒换成主用板。
2.2 LS81FP48-48端口100Base-FX(SFP)百兆以太网业务板该业务板提供48个百兆全双工的SFP接口。
2.2.1单板面板及指示灯LS81FP48面板示意图如下:LS81FP48指示灯含义如下:指示灯指示灯状态说明LINK/ACT灯灭表示线路没有连通,灯亮表示线路已经连通,灯闪烁表示有数据收发2.2.2单板接口线缆SFP模块名称中心波长接口连接器类型接口光纤规格光纤最大传输距离SFP-FE-SX-MM13101310nm LC50µm/125µm多模光纤2km62.5µm/125µm多模光纤eSFP-FE-LX-SM1310 1310nm LC9µm/125µm单模光纤15km SFP-FE-LH40-SM1310 1310nm LC9µm/125µm单模光纤40km SFP-FE-LH80-SM1550 1550nm LC9µm/125µm单模光纤80kmSFP-FE-LX-SM1310-BIDI1550(收)/1310nm(发) LC9µm/125µm单模光纤15kmSFP-FE-LX-SM1550-BIDI1310(发)/1550nm(收) LC9µm/125µm单模光纤15km2.3 LS81GP8UB-8端口1000Base-X(SFP)千兆以太网业务板该业务板提供8个千兆全双工的SFP接口。
2.3.1单板面板及指示灯LS81GP8UB面板示意图如下:LS81GP8UB指示灯含义如下:指示灯指示灯状态说明LINK/ACT灯灭表示线路没有连通,灯亮表示线路已经连通,灯闪烁表示有数据收发2.3.2单板接口线缆SFP模块名称中心波长接口连接器类型接口光纤规格光纤最大传输距离eSFP-GE-SX-MM850 850nm LC 50µm/125µm多模光纤550m 62.5µm/125µm多模光纤275mSFP-GE-LX-SM13101310nm LC9µm/125µm单模光纤10kmSFP-GE-LH40-SM1310 40kmSFP-GE-LH40-SM15501550nm LC9µm/125µm单模光纤40kmSFP-GE-LH70-SM1550 70km eSFP-GE-ZX100-SM1550 100km eSFP-LH40-SM1471-CW 1470nm LC9µm/125µm单模光纤70km2.4 LS82GP20A-20端口1000Base-X(SFP)千兆以太网业务板该业务板提供20个千兆全双工的SFP接口。
2.4.1单板面板及指示灯LS82GP20A面板示意图如下:LS82GP20A指示灯含义如下:指示灯指示灯状态说明灯灭表示线路没有连通,灯亮表示线路已经连通,灯闪烁表示LINK/ACT有数据收发2.4.3单板接口线缆同2.3.2的单板接口线缆三、设备登录方式1、通过Console口搭建配置环境第一步:如图2-1所示,建立本地配置环境,只需将PC机(或终端)的串口通过配置电缆与以太网交换机的Console口连接。
图2-1 通过Console口搭建本地配置环境第二步:在PC机上运行终端仿真程序(如Windows 3.X的Terminal 或Windows 9X的超级终端等),设置终端通信参数为:波特率为9600bit/s、8位数据位、1位停止位、无校验和无流控,并选择终端类型为VT100,如图2-2至图2-4所示。
第三步:以太网交换机上电,终端上显示以太网交换机自检信息,自检结束后提示用户键入回车,之后将出现命令行提示符(如<Quidway>)。
第四步:键入命令,配置以太网交换机或查看以太网交换机运行状态。
需要帮助可以随时键入“?”2、通过Telnet搭建配置环境第一步:在通过Telnet登录以太网交换机之前,需要通过Console口在交换机上配置欲登录的Telnet用户名和认证口令。
第二步:建立配置环境,只需将PC机以太网口通过局域网与以太网交换机的以太网口连接。
PC和交换机之间必须存在互相到达的路由。
第三步:在PC机上运行Telnet程序,交换机IP地址(loopback地址或互联地址),第四步:终端上显示“Login authentication”,并提示用户输入已设置的登录口令,口令输入正确后则出现命令行提示符(如<Quidway>)。
如果出现“All user interfaces are used, please try later!”的提示,表示当前Telnet到以太网交换机的用户过多,则请稍候再连(Quidway系列以太网交换机最多允许5个Telnet用户同时登录)。
第五步:使用相应命令配置以太网交换机或查看以太网交换机运行状态。
需要帮助可以随时键入“?”四、常用命令:1、在任意命令模式下,只要在系统提示符后面输入一个问号(?),就会显示该命令模式下可用命令的列表。
利用在线帮助功能,还可以得到任何命令的关键字和参数列表。
2、查询软硬件版本:display version<Quidway> display versionHuawei Versatile Routing Platform SoftwareVRP(R) software, Version 3.10, Release 3021Copyright (c) 1998-2007 Huawei Technologies Co.,Ltd. All rights reserved. Quidway S6506R uptime is 0 week, 0 day, 0 hour, 43 minutesSRPG 0:uptime is 0 weeks,0 days,0 hours,43 minutesQuidwayS6500 with 1 MPC8245 Processor256M bytes SDRAM32768K bytes Flash Memory512K bytes NVRAM MemoryPCB Version:VER.ABootROM Version:500CPLD Version:002Software Version :S6506R-3009LPU 2:uptime is 0 weeks,0 days,0 hours,42 minutes QuidwayS6500 LPU with 1 MPC850 Processor64M bytes SDRAM0K bytes Flash Memory0K bytes NVRAM MemoryPCB Version:VER.0BootROM Version:403CPLD Version:003Software Version :S6506R-3009表:display version显示域说明表3、显示CPU使用情况:display cpu [ slot slot-num ]slot slot-num:槽位号,该参数表示显示指定槽位上单板的CPU状态。
举例:# 显示0槽位单板上的CPU使用状态。
<Quidway> display cpu slot 0Board 0 CPU busy status:18% in last 5 seconds19% in last 1 minute19% in last 5 minutes表:显示信息说明表3、显示CPU和内存资源使用情况:display memory [ slot slot-num ]【举例】# 显示交换机0槽位单板上的内存使用状态。