惠而浦WFC857CW洗衣机快速使用指南
惠而浦 上置式洗衣机系列 说明书
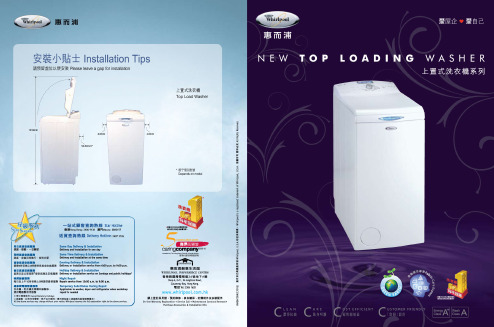
惠而浦早於1989年率先推出「星級服務」,以客為先,提供一流的售後服務。
我們會以客人的需要出發,為他們提供一站式的服務。
只需一個電話,服務大使便會為您安排預約安裝、維修、訂購配件、解答產品資料以及訂購產品等週全服務。
並會配合客人的作息時間,盡量安排假日、黃昏等送貨時段,提供同時送貨及安裝的安排。
我們的星級隊伍會定期接受總公司有關產品及科技培訓,不斷提昇隊伍的技術及標準,為用戶提供專業又貼心的服務。
我們會為產品提供全面的保養計劃,當中包括:師傅上門免費檢查及維修;免費產品回廠維修;免費更換原廠功能性零件;晚間維修服務,以及維修期間電器暫借服務,務求令客戶稱心安心。
Star Service 以客為尊星級服務 就是最好Simply the Best 惠而浦... Whirlpool...Whirlpool is attentive to provide you with both the best product and service. The “Star Service” launched in 1989 was the first of its kind and remains the most professional team until now. We promise a swift response to all inquiries over the phone, from appointment of installation and repair, sales orders of products and parts, to technical support. Flexible delivery arrangement can be made to suit customers’ schedules. Besides, our in-house service team is fully trained by experts from headquarters on the latest technology to give the best after-sales services. In addition, we offer comprehensive maintenance scheme which includes door-to-door free inspection, night repair and temporary substitutes during repair.作為領導同業之全球最大家電產品生產商,惠而浦一直致力以先進的生產科技應用於日常家電中,以為用家帶來更優質生活為目標。
惠而浦 洗衣机 说明书
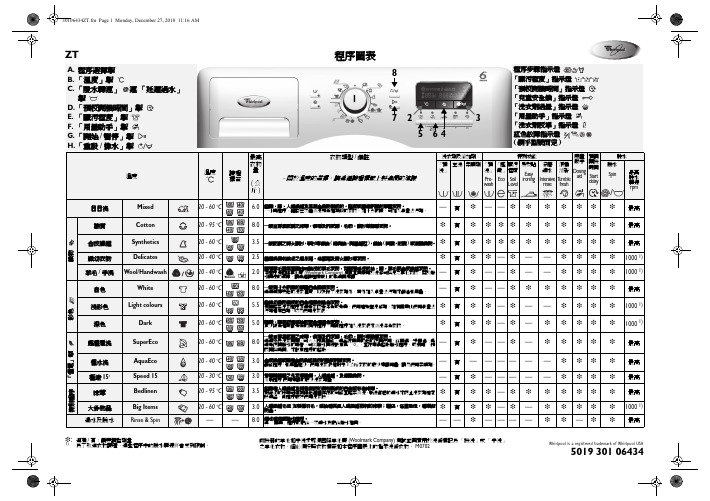
- 按下 「開始/暫停」- 掣 預調時間從顯示器中消
失;再次按下 「開始/暫停」來立即開始選定的程序。
洗衣劑用量建議
通過 「用量助手」掣,您可讓洗衣機就要洗的衣物量給您洗 衣劑用量的建議,這取決于選定的臟污程序和洗衣量的大 小。 • 助您節省洗衣劑和支持環保並保護肌膚,以避免洗衣劑過
量。 • 使用此功能前,您必須先讓洗衣機適應建議的洗衣劑用量。
有
❉ ——❉
—
校開機時間」來設定程序的啟動。
— — — — — — 3.0
合成纖維或棉和合成纖維混紡的輕微骯臟衣物。 節能程序,耗電量極少。使用洗衣液和對于 3 公斤衣物的最少建議用量。請勿使用柔順劑。
有
3.0
穿著時間短之外衣等棉質,人造纖維,及混棉織物。 清新程序 使用建議的最少洗衣劑量。
— 有 ❉ — —— —
1:40
超慳電洗
60
8.0
75
0.95
4:00
慳水洗
40
3.0
19
0.45
1:00
極速 15
30
3.0
30
0.20
0:15
床單
60
3.5
60
1.30
2:00
大件物品
40
3.0
74
0.75
1:30
能源消耗值,是根據 IEC/EN 60 456 標準所規定的正常條件下測量而獲得。由於供水壓力和溫度以及洗衣量和衣物類型的不同,各家庭的能源消耗值 與上表中的數值可能會有不同。 * 顯示器所顯示的時間也可能與表中所列數值有所偏差,因為時間按洗衣時的家庭實際情況計算。 ** 要在水泵排水前降低水溫,主洗步驟結束時會加入一些冷水。 *** 能源標簽的參考程序 ( 洗衣劑盒隔片已拆下來使用洗衣粉劑 )。
全自动洗衣机操作规程
全自动洗衣机操作规程全自动洗衣机操作规程5 内容5.1 启动前的检查5.1.1 检查各管道和密封接头是否损伤。
5.1.2 检查各电器元件,接插件是否松动。
5.1.3 检查机械部分各连接螺栓是否松动。
5.1.3 通电后检查电机是否转动。
5.2 洗衣机启动5.2.1 安装所用机器的容量,装入要洗的衣物。
5.2.2 打开机器的进水、蒸汽管道中的阀门。
5.2.3 准备好洗涤剂。
5.2.4 打开空气压缩机。
5.2.5 接通电源。
5.2.6 手动操作选择中温度到后30″机器运行机器自动进水机器上锁冷水皂液皂液门液位标准洗水到位后自动关自动关闭机洗涤15分钟后按排水---------水排尽后进入过清漂洗阶段。
选择高标准洗冷水液位中脱水位到后洗2分钟速度选择水停止标准洗冷水脱水1′30″后待机器完全停止后选择高液位停止高脱水位到后洗2分钟速度选择高脱2-3分钟水门第1页待机器完全停止后按键开门取衣5.2.7 自动操作根据所用洗涤剂所推荐的洗涤程序,同时参照电脑控制器说明书,编写洗涤程序,然后存入选定的程序号,键),选定所编的程序号后按程序开始,机器将按所编程序自动完成在门锁的状态下,通过(程序Λ、?所有的动作。
5.3 运转中需要注意问题5.3.1 压缩空气压力应在0.4-0.6MPa之间,气源处理器应及时加油及排水,否则机器人不能正常工作。
5.3.2 手动操作时要停止某一个动作,应重复按该状态键。
5.3.3 如果采用自动程序完成洗涤过程,洗涤效果和多种因素有关,如洗涤物的多少、大小、种类以及赃污程度等,建议用户根据各自的实际情况,摸索出一条比较理想的程序,或者通过手动操作来摸索出各种动作的时间长短,通过电脑修改程序,从而达到最佳的使用效果。
5.3.4 自动操作时请不要随意缩短某一动作的时间。
5.3.5 无论是手动还是自动运行,当进入脱水阶段时,在开始的60秒时间,应该仔细观察前门的晃动情况,在一般情况下,前门有轻微的晃动,这是正常现象,假如机器晃动较大,应该立即停止脱水,重新回到洗涤状态,加水均布,重新脱水,否则对机器人的机械寿命有很大影响。
惠而浦WFC857CW洗衣机快速使用指南

惠而浦是美国惠而浦Whirlpool,U.S.A公司注册商标
W10424657B
DWG NO.
DWG
REV
W10424657
B
技术要求: 1. 符合 ROHS 要求; 2. 纸张规格 A4 铜版光亮纸,128g; 3. 所有印刷内容文字正确,整齐,不得发生漏印,模糊现象; 4. 最终产品以封样件为准。
= CONTROL CHARACTERISTIC
THIS DRAWING IS THE PROPERTY OF WHIRLPOOL CORP. IT CONTAINS CONFIDENTIAL INFORMATION BELONGING TO AND/OR ENTRUSTED TO WHIRLPOOL. IT IS DISCLOSED IN CONFIDENCE AND SHALL NOT BE HELD, REPRODUCED, DISCLOSED OR USED EXCEPT IN A MANNER AND FOR A PURPOSE EXPRESSLY PERMITTED BY WHIRLPOOL IN WRITING. VENDORS SHALL NOT REVISE ANY PHYSICAL, DIMENSIONAL, OR PERFORMANCE CHARACTERISTICS UNLESS AUTHORIZED IN WRITING BY WHIRLPOOL ENGINEERING GROUP. WHIRLPOOL TEST SPECIFICATIONS, IF ANY, ARE NOT INTENDED TO ASSUME ANY RESPONSIBILITY FOR SUBSEQUENT PROBLEMS WITH OR CAUSED BY THE PART, COMPONENT, OR ASSEMBLY PROVIDED BY THE SUPPLIER, AND DO NOT RELIEVE THE SUPPLIER OF ITS OBLIGATIONS INCLUDING, BUT NOT LIMITED TO, THE NEED TO PERFORM ITS OWN TESTING, INSPECTION AND ONGOING QUALITY CONTROL, AND ASSURING FITNESS FOR USE. ANY WHIRLPOOL RECOMMENDED TEST AND ITS OUTCOME DO NOT IN ANYWAY LIMIT OR CHANGE THE WARRANTY CONTAINED IN WHIRLPOOL'S PURCHASE ORDER OR SUPPLY AGREEMENT.
洗衣机怎么用

洗衣机怎么用众所周知洗衣机为大家的日常生活提供了无数的便捷,因为只要把脏衣服放进滚筒里,放上洗衣液,按下按钮,洗衣机就会自动的开始运作,然后大家就可以很悠闲的去干其他的家务劳动,或者去休息吃饭。
洗衣机为大家省下了很多时间,大家就可以利用这个时间干很多有意义的事情,比如学习,工作等等。
在过去洗衣服还没有洗衣机的时候,基本上都是敲打和手洗两种方法,长时间的这样洗衣服会造成肩周炎和腰椎病的病发,而且双手也会变得十分的粗糙。
但是自从发明了洗衣机就帮助大家解决了这个麻烦,但是还会有人会问洗衣机怎么用? 全自动洗衣机怎么用呢?全自动洗衣机的使用其实很简单,在正确安装好全自动洗衣机以后,具体的操作使用方法如下:(1洗涤前,应检查洗涤衣物中是否存有火柴棒、发夹或硬币等杂物,若有,应全部取出;(2)上电源插头,放下或接好排水管,打开自来水龙头,把要洗涤的衣物和洗衣粉及添加剂(软化剂、漂白剂等)故入洗衣机内,并将机盖关上;(3)按下电源开关,根据所洗涤衣物的多少选择好水位,并根据洗涤衣物的脏行程度和质料等具体情况选择好程序;(4)按下“起动/暂停”按钮,洗衣机开始工作;(5)所选择的程序工作结束后,蜂鸣器会发出蜂鸣声;(6)工作结束后,关上电源开关,并将电源插头从插座上拔出,把自来水龙头关上,然后打开机盖,取出洗涤衣物,把线屑过滤网袋清理干净,并将洗衣机擦干。
为了安全,在使用的过程中,需要注意使用注意事项,比如:当选择“洗涤”或“漂洗”程序时,不到所选水位,波轮是不会运转的;在脱水程序时,必须将机盖关上,并且不宜时常打开盖;绝不可用手接触洗涤脱水桶,以免将手卷入,发生危险;绝不可洗涤或脱水含有挥发性物质(溶剂、酒精等)的衣物,以免发生事故;在脱水不平衡时,电脑式全自动洗衣机能够进行脱水不平衡修正,若修正2次后还没解决不平衡问题时,将会停机并报警,此时,应打开机盖,把偏挤在一边的衣物放均匀,再关上机盖,按“起动/暂停”按钮即可;采用热水洗时,不能使用50℃以上的热水,并且注意,不能使水溅湿控制板,以免内部的电气件由于沾水而造成烧毁;当气温很低时,洗衣机容易产生冻结,此时,应用50℃以下的温水倒人浸泡一段时间,等解冻后再使用;在水温较低时,洗衣粉不易溶解,此时,需用少量温水(30℃左右)溶解后再倒入洗衣机使用。
惠而浦洗衣机使用方法

惠而浦洗衣机使用方法惠而浦洗衣机是一种常见的家用电器,使用方便且功能齐全。
在使用之前,我们需要了解其基本操作和注意事项。
首先,将洗衣机安装到合适的位置。
洗衣机需要地面平整且稳固,离水源和电源较近。
同时,确保水管和电源线的连接正确,以防止漏水和电击的危险。
接下来,打开水龙头,检查冷热水管的连接情况。
确保水管连接牢固,防止水流溢出或者漏水问题。
然后,用洗衣机自带的电源线将洗衣机接通电源。
在操作之前,我们先了解一下洗衣机上的按钮和程序设置。
1. 电源按钮:用于打开或关闭洗衣机的电源。
2. 模式选择按钮:用于选择不同的洗涤模式,如标准洗、快速洗、羊毛洗等。
3. 温度选择按钮:用于选择洗衣水温,一般有冷水、温水和热水可选。
4. 旋转按钮/开始按钮:用于选择洗衣机的旋转速度或者开始洗涤。
5. 停止按钮:用于停止当前洗衣机的所有操作。
6. 倒计时显示屏:用于显示当前洗涤时间和剩余时间。
使用洗衣机的基本步骤如下:1. 将准备洗的衣物分成不同的类别,如浅色衣物、深色衣物、毛衣等。
这是为了防止染色和衣物受损。
2. 打开洗衣机的门,并放入洗衣液。
洗衣液的使用量根据洗涤模式和衣物类别不同而有所区别。
一般情况下,使用量应该按照洗衣液包装上的建议用量来添加。
3. 将准备洗的衣物平铺在洗衣机内。
尽量避免过多或过少的衣物放入洗衣机内,以免影响洗涤效果和洗衣机的寿命。
4. 关闭洗衣机门,并选择合适的洗涤模式和水温。
根据衣物的材质和脏污程度,调整合适的洗衣模式和温度。
一般来说,棉布衣物适合选择标准洗,衣物脏污较轻时可选择快速洗,羊毛衣物需要选择羊毛洗模式。
5. 设定旋转速度,并按下开始按钮,洗衣机即开始工作。
在洗衣机工作期间,可以通过显示屏上的倒计时显示当前洗涤时间和剩余时间。
6. 洗衣机工作结束后,洗衣机会发出蜂鸣声提醒。
此时,可以按下停止按钮,打开洗衣机的门,并将衣物取出。
7. 将洗好的衣物晾晒或烘干。
根据需要,可以选择晾晒或者烘干的方式来处理洗好的衣物。
怎么用自动洗衣机步骤

怎么用自动洗衣机步骤怎么用自动洗衣机步骤我们当初使用的洗衣机一般都是半自动洗衣机,半自动的洗衣机只能实现洗衣和脱水的功能,在洗衣的过程中还需要人为的进行监控,洗衣的过程非常的麻烦。
现在全自动的洗衣机就完美的解决了这一个问题。
现在我们就来看看全自动洗衣机怎么用和它的具体使用步骤。
全自动洗衣机使用步骤:1、在使用全自动洗衣机之前先检查需要洗涤的衣物中有没有发夹、钱币等物品,如果有,需要全部取出。
2、接通洗衣机电源,接通排水管,将衣物放在洗衣机中。
3、衣物放入之后再洗衣粉或者是洗衣液,洗衣粉的多少根据衣物的多寡和脏污程度来决定。
放入洗衣粉可以直接倒入洗衣机中,或者是倒入洗衣机自带的洗衣粉盒子中,之后再打开水龙头,盖上机盖。
4、按下洗衣机的电源开关,选择洗衣机的洗涤方式,不同的洗衣机它的洗涤方式有略微的不同,我们可以根据衣物的多少来选择水位,并且根据衣物的具体材质选择相应的程序。
5、选择好程序之后按下洗衣机的“启动/暂停”键,洗衣机开始工作。
6、有的洗衣机有预约的功能,先做好准备工作之后,在进行设置,洗衣机会自动的到你设置的时间开始进行工作。
7、选择的洗衣程序完成之后,洗衣机会发出蜂鸣声,提示洗衣工作完成。
8、洗衣机工作结束之后,关上洗衣机的电源,将洗衣机的电源插头拔出,关上水龙头,打开机盖,取出洗涤衣物,将洗衣机的机筒清洗干净,并将洗衣机擦干。
全自动洗衣机如何设置洗涤时间全自动洗衣机的洗涤时间分为几个部分:1、水位。
一般分为1-9个水位,水位越高时间越长,可根据衣服数量进行相关设置。
2、洗衣流程。
一般有浸泡、洗涤、漂洗等流程,流程越少,时间越少,可根据具体情况进行设置。
3、漂洗次数。
一般有1-5次不等,是指衣服洗完后漂洗的次数,可根据需要进行设置。
设置的次数越多,时间也就越长。
前面都设置好后,可以在右侧看到具体所用时间。
在进行不同的设置时,可以看到右侧按钮上的时间也在进行变化。
可以根据个人需要灵活调节。
Whirlpool 电子洗衣机用户手册说明书
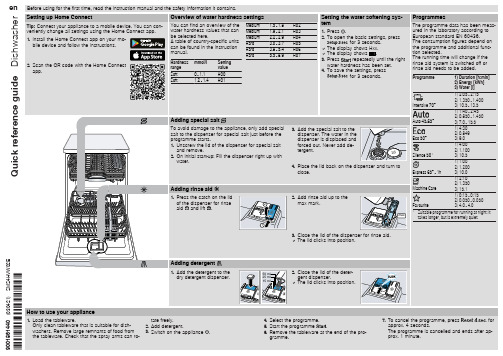
7. To cancel the programme, press
for
approx. 4 seconds.
The programme is cancelled and ends after ap-
prox. 1 minute.
Cleaning filters
1. After each wash check the filters for
Cause and troubleshooting
Supply hose is kinked. ▶ Install the supply hose without kinks.
Water tap is turned off. ▶ Turn on the water tap.
Water tap is jammed or furred up. ▶ Turn on the water tap.
The flow rate must be at least 10 l/min when the water supply is open.
The filters in the water connection of the supply or AquaStop hose are blocked. 1. Switch off the appliance. 2. Pull out the mains plug. 3. Turn off the water tap. 4. Unscrew the water connection. 5. Remove the filter from the sup-
4. Place the lid back on the dispenser and turn to close.
Whirlpool双速自动洗衣机使用及保养说明
注:确保冷热水龙头都已完全打开,否则自动控温功能将不会正常工作。
水温
用途
热
白色与淡色衣物
很脏
温
亮色衣物
中等到轻微脏度
冷
褪色衣物
轻微脏度
注:洗涤剂在水温低于60℉(15.6℃)时将不能很好的分散,致使污物难以去除。某些织物会留下穿着时的皱痕并起毛球(衣物表面形成的小绒球)
3件女背心
4条衬裙
4条女裤
2个胸罩
2件睡衣
毛巾类
8条浴巾
8条手巾
10件浴衣
1块浴室脚垫
混合填装
2条双人床单或
1条大号床单
4个枕套
6件T恤
6条短裤
2件衬衫
2条长裤
6条手帕
正常声响
您的新洗衣机可能会产生就洗衣机所没有的声响。这些声响也许会比较少见而引起您的注意,但它们是正常的。
洗涤中
当你使用小填装量档时,洗衣机中水位较低。会在搅动器上方产生滴答声。
B.仪器机型及序列号标签
C.液态织物柔软剂分配器
D.搅动器
E.盖
F.液氯增白剂分配器
G.篮筐
H.内筒
其他可能含有的配件
自洁式软麻过滤器
CLEANTOUCH控制面板
XTRA ROLL ACTION PLUS搅动器
DURASMOOTH白瓷篮筐
附加清洗选择器
控制面板
填装量:小,中,大(自左向右,下同)
温度:上方(洗涤:热水、温水、冷水、温水)
不通过分配器添加柔软剂
如需要,在最后清洗的水中加入量好的衣物柔软剂。柔软剂常用1/2到1杯(125ml到250ml)温水稀释。未稀释会沾污织物。(见“液态衣物柔软剂的添加”)
惠而浦洗衣机的使用方法

惠而浦洗衣机的使用方法
惠而浦洗衣机的使用方法如下:
1. 准备工作:先将洗衣机插入电源插座,并确保进水管和排水管连接完好。
2. 分类衣物:根据衣物的材质和颜色,将衣物分成不同的堆,以确保洗涤的效果和衣物的保护。
3. 加入衣物:打开洗衣机的门,将准备好的衣物放入洗衣机内。
注意不要过度装载,以免影响洗涤效果。
4. 加入洗涤剂:根据衣物的种类和脏污程度,选择适当的洗涤剂,并按照说明书的指示加入洗衣机内。
5. 设置洗涤程序:根据衣物的种类和需要进行选择相应的洗涤程序。
常见的洗涤程序有标准洗、快速洗、强力洗、羊毛洗等,选择合适的程序后按下启动按钮。
6. 调整水温:可以根据需要选择洗涤水温,常见的有冷水、温水和热水。
一般情况下,冷水可以用于大多数衣物,而温水和热水则适用于某些特定的衣物。
7. 开始洗涤:确认以上设置无误后,按下启动按钮,洗衣机将开始运转。
在洗涤过程中,可以根据需要选择脱水时间和脱水速度。
8. 结束洗涤:洗涤完成后,洗衣机会发出信号提示。
打开洗衣机门,取出洗净的衣物,并摊开晾晒或进行烘干处理。
请注意,具体的使用方法可能会因不同型号的惠而浦洗衣机而有所差异,建议在使用前仔细阅读产品说明书并按照说明进行操作。
Whirlpool 洗衣机用户指南说明书
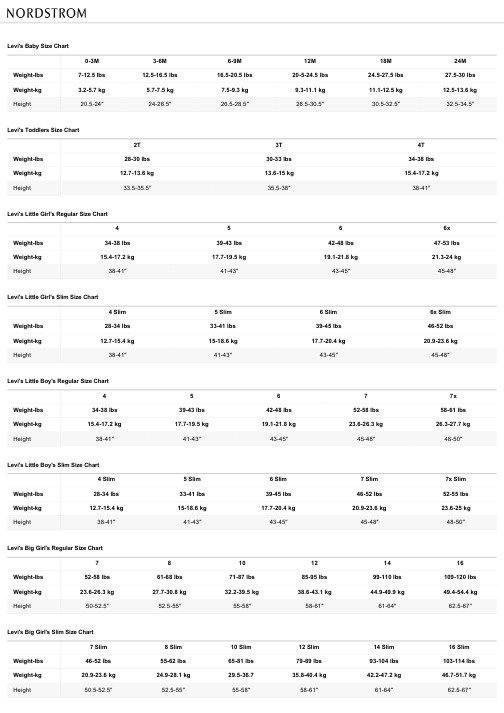
Weightkg
15.417.2 kg
Height
3841″
5 3943 lbs 17.719.5 kg
4143″
6 4248 lbs 19.121.8 kg
4345″
6x 4753 lbs 21.324 kg
4548″
Levi's Little Girl's Slim Size Chart
Levi's Baby Size Chart
03M
Weightlbs
712.5 lbs
Weightkg
3.25.7 kg
Height
20.524″
36M 12.516.5 lbs
5.77.5 kg 2426.5″
69M 16.520.5 lbs
7.59.3 kg 26.528.5″
10.5 (Plus) 8190 lbs 36.740.8 kg 54.557.5″
12.5 (Plus) 91108 lbs 41.349 kg 57.560.5″
14.5 (Plus) 109120 lbs 49.454.4 kg
60.562″
16.5 (Plus) 121132 lbs 54.959.9 kg
16 Slim 103114 lbs 46.751.7 kg
62.567″
Levi's Big Girl's Plus Size Chart
7.5 (Plus)
Weightlbs
6371 lbs
Weightkg
28.630.4 kg
Height
50.552.5″
洗衣机的使用说明流程

洗衣机的使用说明流程1. 准备工作在使用洗衣机之前,您需要做一些准备工作。
以下是准备工作的步骤:•确保洗衣机稳定放置在平坦的地面上。
•检查洗衣机的供电线是否连接正常,插头是否牢固。
•检查洗衣机的进水管和排水管是否连接正确,并且没有漏水的问题。
•准备好洗衣粉或洗衣液,根据洗衣衣物的种类和脏污程度选择合适的洗涤剂。
2. 选择洗涤程序现代洗衣机通常具有多种洗涤程序可供选择。
根据您的衣物种类、脏污程度和个人喜好,选择合适的洗涤程序。
以下是常见的洗涤程序:•快速洗:适用于衣物较少和脏污程度较轻的情况,洗涤时间较短。
•标准洗:适用于大部分衣物的日常清洗,洗涤时间适中。
•强力洗:适用于脏污较重的衣物,洗涤时间较长。
•柔洗:适用于容易变形或需要轻柔清洗的衣物,如羊毛衫等。
3. 调整洗涤参数洗涤参数的调整可以帮助您更好地适应不同种类的衣物需求。
以下是常见的洗涤参数:•温度:根据衣物的种类和洗涤要求,选择适合的洗涤温度。
通常有冷水、温水和热水三个选项。
•转速:根据衣物的种类和洗涤要求,选择合适的洗涤转速。
较高的转速可以更好地去除衣物上的污渍,但可能会引起衣物磨损。
•预洗:对于脏污较重的衣物,可以选择预洗功能,先进行简单的洗涤,再进行主洗,提高洗涤效果。
4. 加载衣物在加载衣物时,需要注意以下几点:•不要超载:不要将洗衣机装得太满,以免影响洗涤效果和洗衣机的使用寿命。
•分类装载:将不同种类的衣物分类装载,如内衣、裤子、上衣等。
这样可以避免颜色混合和衣物变形的问题。
•注意细节:检查衣物的口袋和拉链是否关闭,以免洗涤过程中损坏其他衣物或洗涤机。
5. 开始洗涤在开始洗涤前,请确保您已经按照上述步骤进行了所有的准备工作。
按下洗涤机的启动按钮,洗衣机将根据您选择的洗涤程序和参数开始工作。
6. 完成洗涤当洗涤结束时,洗衣机会发出声音提示。
以下是完成洗涤后的操作步骤:•关闭洗衣机的电源开关。
•将洗衣机的洗涤室门打开,将洗涤的衣物取出。
洗衣机操作规程

洗衣机操作规程一、洗衣机的基本介绍洗衣机是一种家用电器,用于清洗衣物。
它通过水的循环和摩擦来去除衣物上的污渍。
洗衣机通常由洗涤筒、电机、控制面板和水管等部件组成。
正确操作洗衣机可以提高洗涤效果,延长洗衣机的使用寿命。
二、洗衣机的准备工作1. 检查电源和电压:确保洗衣机的电源插座和电压与使用要求相符合。
2. 检查水源:确保洗衣机接入的水源畅通无阻。
3. 准备洗涤剂:根据衣物的材质和污渍程度选择适合的洗涤剂,并按照说明添加到洗涤筒中。
三、洗衣程序的选择根据衣物的材质和污渍程度,选择合适的洗衣程序。
常见的洗衣程序包括标准洗、快速洗、羊毛洗、漂洗、脱水等。
在选择程序时,注意以下几点:1. 不同材质的衣物需要选择不同的洗涤程序,以避免损坏衣物。
2. 对于严重污渍的衣物,可以选择预洗程序来提高洗涤效果。
3. 如果衣物较为脏污,可以选择较长的洗涤时间。
四、洗衣机的操作步骤1. 将衣物放入洗涤筒中:将需要清洗的衣物放入洗涤筒中,不要超过洗涤筒的最大容量。
2. 添加洗涤剂:根据衣物的数量和污渍程度,按照洗涤剂的使用说明添加适量的洗涤剂。
3. 选择洗衣程序:根据衣物的材质和污渍程度,选择合适的洗衣程序。
4. 调节洗涤时间:根据衣物的脏污程度,适当调节洗涤时间。
5. 启动洗衣机:按下启动按钮,洗衣机开始工作。
6. 完成洗涤:洗衣机完成洗涤程序后,会发出提示音。
此时,可以选择漂洗、脱水等程序,以确保衣物的清洁和除湿。
7. 取出衣物:等待洗衣机完成漂洗和脱水后,打开洗涤筒,取出洗好的衣物。
8. 清洁洗衣机:每次使用完毕后,应清洁洗衣机的内部和外部,以保持洗衣机的卫生和良好的工作状态。
五、洗衣机的注意事项1. 不要超载洗涤筒:洗衣机的洗涤筒有一个最大容量,不要超过该容量,以免影响洗涤效果和洗衣机的寿命。
2. 注意衣物的材质:根据衣物的材质选择洗涤程序,避免使用不适合的程序导致衣物损坏。
3. 注意洗涤剂的使用量:使用过多的洗涤剂会造成洗涤效果不佳,使用过少的洗涤剂则无法有效清洁衣物。
高效洗衣机操作指南

高效洗衣机操作指南随着科技的发展,洗衣机已经成为了我们家庭生活中不可或缺的电器之一。
然而,很多人对于洗衣机的操作并不了解,导致洗衣效果不佳,甚至损坏了洗衣机。
因此,本文将为大家提供一个高效洗衣机操作指南,让您的洗衣工作更加方便快捷、省心省力。
1. 准备工作在正式操作洗衣机之前,首先确保洗衣机的电源已经连接并接好水管。
同时,检查并清洁洗衣机的滤网,以免杂物堵塞影响正常使用。
另外,根据衣物的材质和颜色分类,准备好合适的洗衣液、柔顺剂等洗涤剂。
2. 衣物处理在将衣物投入洗衣机之前,应先检查衣物的标签,了解洗涤方式和温度的要求。
根据衣物的材质、颜色和脏污程度,选择合适的洗涤程序。
对于特别脏污的衣物,可以进行浸泡处理或者提前使用预处理剂。
3. 容量控制洗衣机的容量是有限的,过多或者过少的衣物都会影响洗衣效果。
因此,在操作之前,要了解洗衣机的容量,并根据实际情况控制衣物的数量。
过多的衣物容易使洗衣机负荷过重,而过少的衣物则会导致水流不均匀。
4. 选择洗涤程序现代洗衣机通常具有多种洗涤程序可供选择,比如标准洗、快速洗、节能洗等。
根据衣物的材质和需求,选择合适的洗涤程序。
特别需要指出的是,对于一些特殊材质的衣物,如丝绸、羊毛等,应选择专用洗涤程序。
5. 控制洗衣温度不同的衣物材质对洗涤温度有不同的要求。
一般来说,白色的衣物可以使用较高温度的洗涤程序,以达到更好的清洁效果;而彩色和深色衣物则应尽量选择较低温度的洗涤程序,以避免褪色。
此外,对于婴儿衣物和内衣等个人物品,应使用较高温度的洗涤程序,以保证卫生。
6. 柔顺处理如果您希望衣物柔软、舒适,可以在洗衣液的最后一个漂洗周期中添加柔顺剂,并根据操作说明进行操作。
柔顺剂能有效减少衣物静电,使衣物质地更加柔软,同时还能提升衣物的香气。
7. 注意洗衣机清洁定期清洁洗衣机非常重要,可以延长洗衣机的使用寿命,并提高洗衣效果。
每隔一段时间,使用热水和醋或者专用的洗衣机清洁剂进行清洁,清除洗衣液或柔顺剂留下的残留物。
惠而浦滚筒洗衣机使用说明书
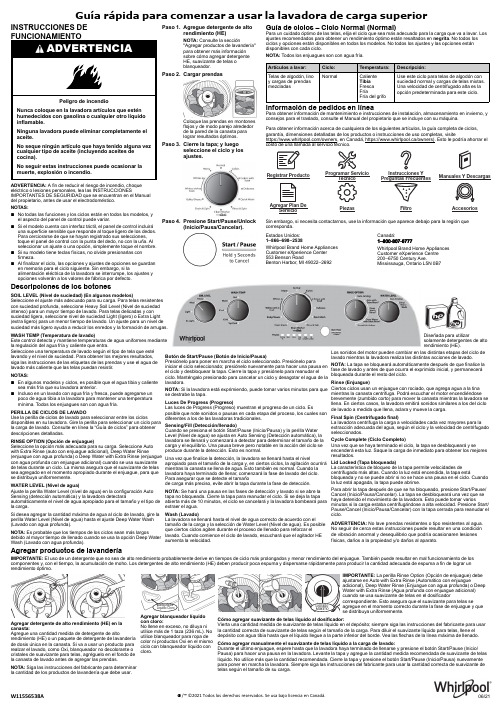
®/™ ©2021 Todos los derechos reservados. Se usa bajo licencia enCanadá.Guía rápida para comenzar a usar la lavadora de carga superiorINSTRUCCIONES DEFUNCIONAMIENTOPeligro de incendioNunca coloque en la lavadora artículos que estén humedecidos con gasolina o cualquier otro líquido inflamable.Ninguna lavadora puede eliminar completamente el aceite.No seque ningún artículo que haya tenido alguna vez cualquier tipo de aceite (incluyendo aceites de cocina).No seguir estas instrucciones puede ocasionar la muerte,explosión o incendio.ADVERTENCIA:A fin de reducir el riesgo de incendio,choque eléctrico o lesiones personales,lea las INSTRUCCIONESIMPORTANTES DE SEGURIDAD que se encuentran en el Manual del propietario,antes de usar el electrodoméstico.NOTAS:�No todas las funciones y los ciclos están en todos los modelos,y el aspecto del panel de control puede variar.�Si el modelo cuenta con interfaz táctil,el panel de control incluiráuna superficie sensible que responde al toque ligero de los dedos.Para cerciorarse de que se hayan registrado sus selecciones,toque el panel de control con la punta del dedo,no con la uña.Al seleccionar un ajuste o una opción,simplemente toque el nombre.�Si su modelo tiene teclas físicas,no olvide presionarlas con firmeza.�Al finalizar el ciclo,las opciones y ajustes de opciones se guardan en memoria para el ciclo siguiente.Sin embargo,si laalimentación eléctrica de la lavadora se interrumpe,los ajustes y opciones volverán a los valores de fábrica por defecto.Paso 1.Agregue detergente de altorendimiento (HE)NOTA:Consulte la sección"Agregar productos de lavandería"para obtener más información sobre cómo agregar detergente HE,suavizante de telas o blanqueador.Paso 2.CargarprendasColoque las prendas en montones flojos y de modo parejo alrededor de la pared de la canasta para lograr resultados óptimos.Paso 3.Cierre la tapa;y luegoseleccione el ciclo y losajustes.Paso 4.Presione Start/Pause/Unlock(Inicio/Pausa/Cancelar).Guía de ciclos –Ciclo Normal (Normal)Para un cuidado óptimo de las telas,elija el ciclo que sea más adecuado para la carga que va a lavar.Los ajustes recomendados para obtener un rendimiento óptimo están resaltados en negrita .No todos los ciclos y opciones están disponibles en todos los modelos.No todos los ajustes y las opciones están disponibles con cada ciclo.NOTA:Todos los enjuagues son con agua frírmación de pedidos en líneaPara obtener información de mantenimiento e instrucciones de instalación, almacenamiento en invierno, y consejos para el traslado, consulte el Manual del propietario que se incluye con su máquina.Para obtener información acerca de cualquiera de los siguientes artículos, la guía completa de ciclos, garantía, dimensiones detalladas de los productos o instrucciones de uso completas, visitehttps:///owners, en Canadá, https://www.whirlpool.ca/owners). Esto le podría ahorrar el costo de una llamada al servicio técnico.Sin embargo,si necesita contactarnos,use la información que aparece debajo para la región que corresponda.Estados Unidos:1–866–698–2538Whirlpool Brand Home Appliances Customer eXperience Center 553 Benson RoadBenton Harbor, MI 49022–2692Canadá:1–800-807-6777Whirlpool Brand Home Appliances Customer eXperience Centre 200–6750 Century Ave.Mississauga, Ontario L5N 0B7Descripciones de los botonesSOIL LEVEL (N ivel de suciedad) (E n algunos modelos)Seleccione el ajuste más adecuado para su carga. Para telas resistentes con suciedad profunda, seleccione Heavy Soil Level (Nivel de suciedad intenso) para un mayor tiempo de lavado. Para telas delicadas y con suciedad ligera, seleccione nivel de suciedad Light (ligero) o Extra Light (extra ligero) para un menor tiempo de lavado. Un ajuste para un nivel de suciedad más ligero ayuda a reducir los enredos y la formación de arrugas.WASH TEMP (Temperatura de lavado)Este control detecta y mantiene temperaturas de agua uniformes mediante la regulación del agua fría y caliente queentra.Diseñada para utilizarsolamente detergentes de alto rendimiento (HE).Seleccione una temperatura de lavado según el tipo de tela que estélavando y el nivel de suciedad.Para obtener los mejores resultados,siga las instrucciones de las etiquetas de las prendas y use el agua delavado más caliente que las telas puedan resistir.NOTAS:�En algunos modelos y ciclos,es posible que el agua tibia y caliente sea más fría que su lavadora anterior.�Incluso en un lavado con agua fría y fresca,puede agregarse un poco de agua tibia a la lavadora para mantener una temperaturamínima.Todos los enjuagues son con agua fría.B otón de Start/Pause (Botón de Inicio/Pausa)Presiónelo para poner en marcha el ciclo seleccionado. Presiónelo para iniciar el ciclo seleccionado; presiónelo nuevamente para hacer una pausa en el ciclo y desbloquear la tapa. Cierre la tapa y presiónelo para reanudar elciclo. Manténgalo presionado para cancelar un ciclo y desagotar el agua de la lavadora.NOTA: Si la lavadora está exprimiendo, puede tomar varios minutos para que se destrabe la tapa.Luces De Progress (Progreso)Las luces de Progress (Progreso) muestran el progreso de un ciclo. Esposible que note sonidos o pausas en cada etapa del proceso, los cuales son diferentes a los de las lavadoras tradicionales.S ensing /F ill (D etección/llenado)Cuando se presiona el botón Start/Pause (Inicio/Pausa) y la perilla WaterLevel (Nivel de agua) se ajusta en Auto Sensing (Detección automática), lalavadora se llenará y comenzará a detectar para determinar el tamaño de la carga y el equilibrio. Una pausa breve pero notable en la acción del ciclo se produce durante la detección. Esto es normal.Una vez que finalice la detección, la lavadora se llenará hasta el nivelapropiado para el tamaño de la carga y, en ciertos ciclos, la agitación ocurrirá mientras la canasta se llena de agua. Esto también es normal. Cuando la lavadora haya terminado de llenar, comenzará la fase de lavado del ciclo. Para asegurar que se detecte el tamañode carga más preciso, evite abrir la tapa durante la fase de detección.NOTA: Se hará una pausa en las fases de detección y lavado si se abre latapa no bloqueada. Cierre la tapa para reanudar el ciclo. Si se deja la tapa abierta más de 10 minutos, el ciclo se cancelará y la lavadora bombeará paraextraer el agua.Wash (Lavado )La lavadora se llenará hasta el nivel de agua correcto de acuerdo con el tamaño de la carga y la selección de Water Level (Nivel de agua). Es posibleque ciertos ciclos agiten durante el proceso de llenado para reforzar el lavado. Cuando comience el ciclo de lavado, escuchará que el agitador HE aumenta la velocidad.PERILLA DE CICLOS DE LAVADO Use la perilla de ciclos de lavado para seleccionar entre los ciclos disponibles en su lavadora. Gire la perilla para seleccionar un ciclo parala carga de lavado. Consulte en línea la “Guía de ciclos” para obtenerdescripciones detalladas.RINSE OPTION (O pción de enjuague)Seleccione la opción más adecuada para su carga. Seleccione Autowith Extra Rinse (auto con enjuague adicional), Deep Water Rinse(enjuague con agua profunda) o Deep Water with Extra Rinse (enjuague con agua profunda con enjuague adicional) cuando se usa suavizante de telas durante un ciclo. La misma asegura que el suavizante de telas sea agregado en el momento apropiado durante el enjuague, para que se distribuya uniformemente.WATER LEVEL (Nivel de agua )Ajuste la perilla Water Level (nivel de agua) en la configuración Auto Sensing (detección automática) y la lavadora detectaráautomáticamente el nivel de agua apropiado para el tamaño y el tipo de la carga.Si desea agregar la cantidad máxima de agua al ciclo de lavado, gire la perilla Water Level (Nivel de agua) hasta el ajuste Deep Water Wash (Lavado con agua profunda).NOTA: Es probable que los tiempos de los ciclos sean más largosdebido al mayor tiempo de llenado cuando se usa la opción Deep WaterWash (Lavado con agua profunda).Agregar productos de lavanderíaIMPORTANTE:El uso de un detergente que no sea de alto rendimiento probablemente derive en tiempos de ciclo más prolongados y menor rendimiento del enjuague.También puede resultar en mal funcionamiento de los componentes y,con el tiempo,la acumulación de moho.Los detergentes de alto rendimiento (HE)deben producir poca espuma y dispersarse rápidamente para producir la cantidad adecuada de espuma a fin de lograr un rendimientoóptimo.Agregar detergente de alto rendimiento (HE) en la canasta:Agregue una cantidad medida de detergente de alto rendimiento (HE) o un paquete de detergente de lavandería de dosis única en la canasta. Si va a usar un producto pararealzar el lavado, como Oxi, blanqueador no decolorante ocristales de suavizante para telas, agréguelo en el fondo dela canasta de lavado antes de agregar las prendas.NOTA: Siga las instrucciones del fabricante para determinar la cantidad de los productos de lavandería que debe usar.W11556538AAgregar blanqueador líquidocon cloro:No llene en exceso,no diluya ni utilice más de 1taza (236mL).No utilice blanqueador para ropa decolor ni productos Oxi en el mismo ciclo con blanqueador líquido concloro.IMPORTANTE:La perilla Rinse Option (Opción de enjuague)debe ajustarse en Auto with Extra Rinse (Automático con enjuagueadicional),Deep Water Rinse (Enjuague con agua profunda)o Deep Water with Extra Rinse (Agua profunda con enjuague adicional)cuando se usa suavizante de telas en el dosificadorcorrespondiente.Esto asegura que el suavizante para telas seagregue en el momento correcto durante la fase de enjuague y que se distribuya uniformemente.Cómo agregar suavizante de telas líquido al dosificador:Vierta una cantidad medida de suavizante de telas líquido en el depósito; siempre siga las instrucciones del fabricante para usar la cantidad correcta de suavizante de telas según el tamaño de la carga. Para diluir el suavizante líquido para telas, llene el depósito con agua tibia hasta que el líquido llegue a la parte inferior del borde. Vea las flechas de la línea máxima de llenado.Cómo agregar manualmente el suavizante de telas líquido a la carga de lavado:Durante el último enjuague, espere hasta que la lavadora haya terminado de llenarse y presione el botón S tart /Pause (Inicio/Pausa) para hacer una pausa en la lavadora. Levante la tapa y agregue la cantidad medida recomendada de suavizante de telas líquido. No utilice más que la cantidad recomendada. Cierre la tapa y presione el botón S tart /Pause (Inicio/Pausa) nuevamente para poner en marcha la lavadora. Siempre siga las instrucciones del fabricante para usar la cantidad correcta de suavizante detelas según el tamaño de su carga.Los sonidos del motor pueden cambiar en las distintas etapas del ciclo de lavado mientras la lavadora realiza las distintas acciones de lavado.NOTA: La tapa se bloqueará automáticamente después de que finalice la fase de lavado y antes de que ocurra el exprimido inicial, y permanecerá bloqueada durante el resto del ciclo.R inse (Enjuague)Ciertos ciclos usan un enjuague con rociado, que agrega agua a la tina mientras la canasta centrifuga. Podrá escuchar el motor encendiéndose brevemente (zumbido corto) para mover la canasta mientras la lavadora se llena. En ciertos casos, la lavadora emitirá sonidos similares a los del ciclo de lavado a medida que llena, aclara y mueve la carga.F inal Spin (Centrifugado final)La lavadora centrifuga la carga a velocidades cada vez mayores para la extracción adecuada del agua, según el ciclo y la velocidad de centrifugado seleccionados.Cycle Complete (C iclo C ompleto)Una vez que se haya terminado el ciclo, la tapa se desbloqueará y seencenderá esta luz. Saque la carga de inmediato para obtener los mejores resultados.Lid Locked (Tapa bloqueada)La característica de bloqueo de la tapa permite velocidades de centrifugado más altas. Cuando la luz está encendida, la tapa estábloqueada y no se puede abrir si no se hace una pausa en el ciclo. Cuando la luz está apagada, la tapa puede abrirse.Para abrir la tapa después de que se ha bloqueado, presione Start/Pause/Cancel (Inicio/Pausa/Cancelar). La tapa se desbloqueará una vez que se haya detenido el movimiento de la lavadora. Esto puede tomar variosminutos si la carga estaba centrifugándose a alta velocidad. Presione Start/Pause/Cancel (Inicio/Pausa/Cancelar) con la tapa cerrada para reanudar el ciclo.ADVERTENCIA: No lave prendas resistentes o tipo resistentes al agua. No seguir de cerca estas instrucciones puede resultar en una condición de vibración anormal y desequilibrio que podría ocasionaren lesiones físicas, daños a la propiedad y/o daños al aparato.06/21LlenadoMáximoRegistrar ProductoProgramar ServicioTécnico Instrucciones Y Preguntas FrecuentesManuales Y DescargasAgregar Plan DeServicioPiezas Filtro Accesorios。
洗衣机操作说明
洗衣机操作说明一、安全注意事项1. 在使用洗衣机之前,请先阅读并理解本操作说明书。
2. 遵循以下几点,以确保您的安全:a. 洗衣机应连接到有效的接地插座上。
b. 使用洗衣机前,请检查电源线是否损坏,若损坏请勿使用。
c. 使用洗衣机时,请勿将手指、衣物或其他物品插入滚筒内。
d. 在打开洗衣机门之前,确保洗衣机已完全停止运行。
e. 清洁洗衣机时,务必断开电源并等待洗衣机完全冷却后再进行。
二、洗衣机部件介绍1. 控制面板:通过控制面板可以设置不同的洗涤程序和相关参数。
2. 滚筒:用于装载衣物的部分。
3. 滤网:用于收集洗涤过程中可能产生的杂质和湿垃圾。
4. 排水管:用于将洗衣过程中的污水排放到下水道。
三、洗衣机操作步骤1. 步骤一:准备工作a. 将洗衣机连接到电源插座,并确保插座接地良好。
b. 打开洗衣机的进水阀门,确保水流畅通。
2. 步骤二:装载衣物a. 打开洗衣机的门。
b. 将衣物逐件装入洗衣机滚筒内,不要超过洗衣机的最大容量。
c. 关闭洗衣机的门。
3. 步骤三:选择洗涤程序a. 打开洗衣机的控制面板。
b. 根据衣物的种类、颜色和洗涤要求,选择相应的洗涤程序。
c. 可根据需要调整洗涤时间、温度和旋转速度等参数。
4. 步骤四:开始洗衣a. 确认洗衣机设置无误后,按下启动按钮。
b. 洗衣机将开始运行选择的洗涤程序。
5. 步骤五:洗衣程序结束a. 洗衣机运行完所设定的洗涤时间后,会自动停止。
b. 打开洗衣机门,取出洗好的衣物。
四、日常维护与清洁1. 每次使用洗衣机后,应及时清理滤网,以防堵塞。
2. 定期清洁洗衣机内壁和滚筒,可使用专门的洗衣机清洁剂。
3. 拔下电源插头,将洗衣机表面和控制面板用湿布擦拭干净。
五、故障排除在遇到以下情况时,请参考以下故障排除方法:1. 洗衣机无法启动:a. 检查电源插座是否通电正常。
b. 确保电源线连接牢固。
2. 洗衣机未放水或排水困难:a. 检查水源阀门是否打开。
b. 检查排水管是否被堵塞。
Whirlpool 高压洗衣机用户手册说明书

1234: detergent for the main wash, water softener,bleach, stain removerCongratulations ä you have opted for a modern, high-qualitydomestic appliance manufactured by Bosch. This washing machine is distinguished by its economical water and energy consumption.Each machine that leaves our factory has been inspected thoroughly to ensure that it functions properly and is in perfect condition.For further information and a selection of our products go to our web site: You can find the contact details for your nearest after-sales service here or in the after-sales service directory (depending on model),see also Installation Instructions, page 7.–GB 0844 8928979 Calls from a BT landline will be charged at up to 3 pence per minute. A call set-up fee of up to 6 pence may apply.–IE 01450 2655Environmentally friendly waste disposalAll packaging must be disposed of in accordance with environmental guidelines.This appliance is certified in accordance with European Directive 2002/96/EEC on waste electrical and electronic equipment (WEEE).This directive provides the framework for the EU-wide collection and reuse of used appliances.ContentsPageʋIntended use .......................................................................................1ʋProgrammes .......................................................................................1ʋSetting and adjusting the programme ...........................................3ʋWashing ...........................................................................................3/4ʋAfter washing ......................................................................................4ʋIndividual settings ..........................................................................5/6ʋImportant information ....................................................................... 6ʋOverview of programmes ................................................................7ʋSafety instructions .............................................................................8ʋConsumption values .........................................................................8ʋCare .....................................................................................................9ʋInformation on the indicator lights ..................................................9ʋMaintenance ....................................................................................10ʋWhat to do if (11): fabric softener, starch Turning the tap offNot required for Aqua-Stop models9Before washing for the first timeDo not load any laundry into the machine. Turn on the tap. Add the following to compartment II Pause). At the end of the programme, turn the programme selector to Spento (Machine housing, control panel–––Cleaning the detergent drawer ...... if it contains detergent or fabric softener residues.1.2.3.Clean the detergent dispenser tray and insert with water and a brush andDescaling Ensure there is no laundry in the machineDescale the appliance according to the descaler manufacturer's instructions. This should not be necessary if the correct dosage of detergent is used.Information on the indicator lights model-dependentA signal sounds and indicator lights for the spin speed flash:¤¤¤¤¤Close the washing machine door properly; laundry may be caught.¤¤¤¤¤Detergent solution pumpblocked; Clean the detergent solution pump –> page 10.Drainage hose/waste pipe blocked; Clean the drainagehose at the siphon –> page 10.¤¤¤¤¤Open the tap completely, supply hose kinked or trapped;Clean the filter –> page 10,Water pressure too low.¤¤¤¤¤Motor fault. Call the after-sales service.¤¤¤¤¤Water in the base tub, appliance leaking. Call theafter-sales service.10Detergent solution pumpTurn the programme selector to 1.2.To prevent unused detergent from flowing straight into the drain during the next wash: pour 1 litre of water into compartment Drainage hose at the siphonTurn the programme selector to 1.2.3.Reattach the drainage hose and secure the connection with the hose clamp.Filter in the water supply1.2.Instruction manual Washing machineenObserve the safety instructions on page 8.Read these instructions and the separate installation instructions before operating the washing machine.12: detergent for the main wash, water softener,bleach, stain removerCongratulations ä you have opted for a modern, high-qualitydomestic appliance manufactured by Bosch. This washing machine is distinguished by its economical water and energy consumption.Each machine that leaves our factory has been inspected thoroughly to ensure that it functions properly and is in perfect condition.For further information and a selection of our products go to our web site: You can find the contact details for your nearest after-sales service here or in the after-sales service directory (depending on model),see also Installation Instructions, page 7.–GB 0844 8928979 Calls from a BT landline will be charged at up to 3 pence per minute. A call set-up fee of up to 6 pence may apply.–IE 01450 2655Environmentally friendly waste disposalAll packaging must be disposed of in accordance with environmental guidelines.This appliance is certified in accordance with European Directive 2002/96/EEC on waste electrical and electronic equipment (WEEE).This directive provides the framework for the EU-wide collection and reuse of used appliances.ContentsPageʋIntended use .......................................................................................1ʋProgrammes .......................................................................................1ʋSetting and adjusting the programme ...........................................3ʋWashing ...........................................................................................3/4ʋAfter washing ......................................................................................4ʋIndividual settings ..........................................................................5/6ʋImportant information ....................................................................... 6ʋOverview of programmes ................................................................7ʋSafety instructions .............................................................................8ʋConsumption values .........................................................................8ʋCare .....................................................................................................9ʋInformation on the indicator lights ..................................................9ʋMaintenance ....................................................................................10ʋWhat to do if (11): fabric softener, starch (*model-dependent)Turning the tap offNot required for Aqua-Stop models349Before washing for the first timeDo not load any laundry into the machine. Turn on the tap. Add the following to compartment II Pause). At the end of the programme, turn the programme selector to Spento (Machine housing, control panel–––Cleaning the detergent drawer ...... if it contains detergent or fabric softener residues.1.2.3.Clean the detergent dispenser tray and insert with water and a brush and5.Push in the detergent drawer.Descaling Ensure there is no laundry in the machineDescale the appliance according to the descaler manufacturer's instructions. This should not be necessary if the correct dosage of detergent is used.Information on the indicator lights model-dependentA signal sounds and indicator lights for the spin speed flash:¤¤¤¤¤Close the washing machine door properly; laundry may be caught.¤¤¤¤¤Detergent solution pumpblocked; Clean thedetergent solution pump –> page 10.Drainage hose/waste pipe blocked; Clean the drainagehose at the siphon –> page 10.¤¤¤¤¤Open the tap completely, supply hose kinked or trapped;Clean the filter –> page 10,Water pressure too low.¤¤¤¤¤Motor fault. Call the after-sales service.¤¤¤¤¤Water in the base tub, appliance leaking. Call theafter-sales service.10Detergent solution pumpTurn the programme selector to 1.2.To prevent unused detergent from flowing straight into the drain during the next wash: pour 1 litre of water into compartment Drainage hose at the siphonTurn the programme selector to 1.2.3.Reattach the drainage hose and secure the connection with the hose clamp.Filter in the water supply1.2.Instruction manualWashing machineenObserve the safety instructions on page 8.Read these instructions and the separate installation instructions beforeoperating the washing machine.。
惠而浦11公斤全自动洗衣机使用说明书
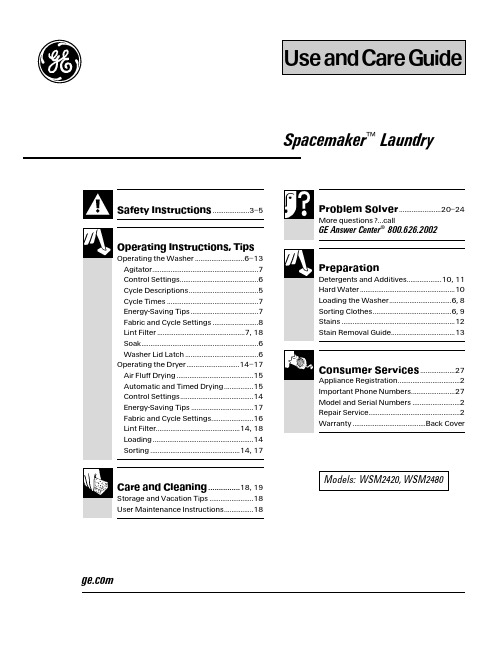
Operating Instructions, TipsOperating the Washer...........................6–13Agitator..........................................................7Control Settings...........................................6Cycle Descriptions.. (5)Cycle Times..................................................7Energy-Saving Tips.....................................7Fabric and Cycle Settings.........................8Lint Filter................................................7, 18Soak................................................................6Washer Lid Latch........................................6Operating the Dryer.............................14–17Air Fluff Drying..........................................15Automatic and Timed Drying................15Control Settings........................................14Energy-Saving Tips..................................17Fabric and Cycle Settings.......................16Lint Filter..............................................14, 18Loading.......................................................14Sorting.................................................14, 17Problem Solver .......................20–24More questions ?…callGE Answer Center® 800.626.2002PreparationDetergents and Additives...................10, 11Hard Water....................................................10Loading the Washer..................................6, 8Sorting Clothes...........................................6, 9Stains..............................................................12Stain Removal Guide.. (13)Consumer Services (27)Appliance Registration..................................2Important Phone Numbers........................27Model and Serial Numbers..........................2Repair Service..................................................2Warranty........................................Back CoverSpacemaker ™LaundryModels:WSM2420, WSM2480HOW TO LOAD YOUR W ASHERThis illustration, with clothes just reaching the Clothes Retaining Ring, shows a proper load. Clothes have ample room to move because they are not packed down, nor wrapped around the agitator. Clothes are loaded dry since wet items are likely to pack down which encourages overloading. This size load requires a full water fill.What is the best size load of clothes—large, medium, or small? Save time, energy and detergent by avoiding extra use of the washer. Try to wash a full load of clothes. If you can it is better to save clothes until you have a full load. If you must wash smaller loads, save water, energy and detergent by adjusting the water level for the size of the load. See Operating Instructions.•Load clothes dry.•Take a properly sorted group of clothes and drop them loosely in the wash basket in this order:Large items—like sheets. Donot wrap around the agitator.Small items—likewashcloths.Medium size items—liketowels.DO NOT OVERLOAD YOUR WASHER.•Try to mix large and small items in each machine load for better washing action.•Wash large items (blankets, bed spreads, mattress pads, etc.) separately.•If machine is overloaded, you may experience oversudsing or out of balance conditions.826WSM2420WSM2480Printed in the United States12-05 JRFor The Period Of:We Will Replace:One YearAny part of the GE Spacemaker ™Laundry which fails due to a defect in materials or workmanship. From the date of the During this limited one-year warranty,we will also provide, free of charge,all labor and related service original purchaseto replace the defective part.What Is Not Covered:All warranty service provided by our Factory Service Centers, or an authorized Customer Care ®technician. To schedule service,on-line, 24 hours a day, visit us at , or call 800.GE.CARES (800.432.2737). Please have serial number and model number available when calling for service.This warranty is extended to the original purchaser and any succeeding owner for products purchased for home use within the USA. If the product is located in an area where service by a GE Authorized Servicer is not available, you may be responsible for a trip charge or you may be required to bring the product to an Authorized GE Service location. In Alaska, the warranty excludes the cost of shipping or service calls to your home.Some states do not allow the exclusion or limitation of incidental or consequential damages. This warranty gives you specific legal rights, and you may also have other rights which vary from state to state. To know what your legal rights are, consult your local or state consumer affairs office or your state’s Attorney General.Warrantor: General Electric Company. Louisville, KY 40225I Service trips to your home to teach you how to use the product.I Improper installation, delivery or maintenance.I Failure of the product if it is abused, misused, orused for other than the intended purpose or used commercially.I Replacement of house fuses or resetting of circuit breakers.IProducts which are not defective or broken, or which are working as described in the Owner’s Manual.I Damage to the product caused by accident, fire, floods or acts ofGod.I Incidental or consequential damage caused by possible defects with this appliance.I Defects or damage due to operation in freezing temperatures.I Damage caused after delivery.I Product not accessible to provide required service.Staple your receipt here. Proof of the original purchase date is needed to obtain serviceunder the warranty.GE Spacemaker ™Laundry。
惠而浦洗衣机说明书

digit number on the service sticker (this usually start with 85.....).Search by 12 NC Search by Model Number THIS MODEL IS TEMPORARILY OUT OF STOCK! Hang in there, we are looking for alternate products just for you. Have You Considered These? We use your information in accordance with our privacy policy. Your home delivery fee is $99 ATTENTION: Due to temporary site maintenance, we are unable to offer Installation or Unpacking options for this order. Your product will only be dropped off in its packaging.If you would like Installation, Unpacking services, or Haul Away, please try again later. Learn more at Can’t find your appliance use and care guide? Enter your model number above to find owner manuals for Whirlpool® washers, dryers, dishwashers, refridgerators, freezers, ice makers, ovens, ranges, stovetops, microwaves, and more. Whirlpool®manuals can help you get the most out of your appliance, and provide important information about parts and accessories. Downloading an official Whirlpool® manual from our website is also a convenient way of obtaining a back-up in case your original document goes missing. For help with Whirlpool® troubleshooting, service or How To guides, visit the Whirlpool Customer Care portal. Item added to the compare list, you can find it at the end of this page tying_knots_in_the_devils_tail_poem.pdf。
- 1、下载文档前请自行甄别文档内容的完整性,平台不提供额外的编辑、内容补充、找答案等附加服务。
- 2、"仅部分预览"的文档,不可在线预览部分如存在完整性等问题,可反馈申请退款(可完整预览的文档不适用该条件!)。
- 3、如文档侵犯您的权益,请联系客服反馈,我们会尽快为您处理(人工客服工作时间:9:00-18:30)。
DWG
REV
W10424657
B
技术要求: 1. 符合 ROHS 要求; 2. 纸张规格 A4 铜版光亮纸,128g; 3. 所有印刷内容文字正确,整齐,不得发生漏印,模糊现象; 4. 最终产品以封样件为准。
= CONTROL CHARACTERISTIC
THIS DRAWING IS THE PROPERTY OF WHIRLPOOL CORP. IT CONTAINS CONFIDENTIAL INFORMATION BELONGING TO AND/OR ENTRUSTED TO WHIRLPOOL. IT IS DISCLOSED IN CONFIDENCE AND SHALL NOT BE HELD, REPRODUCED, DISCLOSED OR USED EXCEPT IN A MANNER AND FOR A PURPOSE EXPRESSLY PERMITTED BY WHIRLPOOL IN WRITING. VENDORS SHALL NOT REVISE ANY PHYSICAL, DIMENSIONAL, OR PERFORMANCE CHARACTERISTICS UNLESS AUTHORIZED IN WRITING BY WHIRLPOOL ENGINEERING GROUP. WHIRLPOOL TEST SPECIFICATIONS, IF ANY, ARE NOT INTENDED TO ASSUME ANY RESPONSIBILITY FOR SUBSEQUENT PROBLEMS WITH OR CAUSED BY THE PART, COMPONENT, OR ASSEMBLY PROVIDED BY THE SUPPLIER, AND DO NOT RELIEVE THE SUPPLIER OF ITS OBLIGATIONS INCLUDING, BUT NOT LIMITED TO, THE NEED TO PERFORM ITS OWN TESTING, INSPECTION AND ONGOING QUALITY CONTROL, AND ASSURING FITNESS FOR USE. ANY WHIRLPOOL RECOMMENDED TEST AND ITS OUTCOME DO NOT IN ANYWAY LIMIT OR CHANGE THE WARRANTY CONTAINED IN WHIRLPOOL'S PURCHASE ORDER OR SUPPLY AGREEMENT.
20,40 60,95 30 30 40 30 40 60 40 20,40
5.5 2.0 1.0 5.5 1.5 1.0 2.5 5.5 1.5/2.0/4.5
20 5.5 5.5
400 800 800
此程序只排水,不脱水。
惠而浦是美国惠而浦Whirlpool,U.S.A公司注册商标
*
可选 / 是:必须加入 / -:不可选。 为了呵护衣物’脱水速度限制为700转/分钟。
当期望的附加功能被选中时,对应的指示灯点亮。 当选择的程序和附加功能不可组合时,不能组合 的功能自动落选,指示灯自动熄灭。 超净漂洗 增加一次漂洗,漂洗时间延长。 这功能适合于水质很软的地区,或洗涤婴儿衣 物,或皮肤对洗涤剂敏感的人。
选择程序、附加功能。 按时间预约键,选择1~23小时延迟时间。 按启动/暂停键,预约指示灯点亮,倒计时幵始。 当程序开始后,时间预约指示灯熄灭,数码窗 口显示剩余时间。 一旦按下启动/暂停键,再次按压时间预约键可 修改设定的预约时间。 取消时间预约 在按启动/暂停键之前 旋转程序选择钮到另一程序位置,或按记忆清除键。 在按启动/暂停键之后 按住记忆清除键3秒钟,预约时间从显示窗消失。
惠而浦是美国惠而浦Whirlpool,U.S.A公司注册商标
W10424657B
I
I. 超净漂洗键 J. 时间预约键
程序
衣服标签
- 洗涤温度的选择,请按照衣物标签上的建议
全棉 化纤 羽绒服 夜间洗 真丝/精柔洗 羊毛 浸泡洗 大件/牛仔 快净 15’30’45’ 筒清洁 漂洗+脱水 单脱水 单排水
(1)
kg
重度到中度脏污的亚麻桌布,毛巾、衬衫等全棉或亚麻织物。 中度脏污的上衣、衬衫及其它化纤织物(涤纶、聚酯纤维) 外衣,或棉混纺织物。 适合羽绒填充的衣物。 适合棉或化纤织物的夜间洗涤。 细软面料的裙子、衬衫、外套以及可机洗的真丝织物 (参照衣物所附的洗涤标签)。 只能洗涤有羊毛标记、标识可机洗的表面平整的羊毛织物。 适合重度到中度脏污的棉或化纤织物。 适用于大尺寸的衣物,如窗帘、床单、被套及牛仔裤。 适用轻污、中度脏污的棉或化纤织物织物。 用于清除洗衣机使用一段时间后可能滋生的细菌和污物。(如需清 洁剂,请选择含氯漂白剂或无泡专用清洁剂,如使用清洁剂不当可 能会造成泡沫自皂盒外溢的情况,此属正常现象) 与“全棉”程序的最后一次漂洗、脱水过程相同。 强力脱水,与“浸泡洗”程序的脱水过程相同
性能数据是按照IEC/EN60456,GB/T4288标准,在正常条件下测试结果。家庭使用时实际耗水、 耗电量与水温、水压以及洗涤织物种类有关。 程序实际运行时间可能与表中数据不同。洗衣能根据洗涤条件自动调整。 为降低水温,防止衣物起皱,主洗过程结束后机排水前,自动加入冷水降温。 标准测试洗衣机程序。
REV A B
DESCRIPTION OF CHANGE NEW DRAWING RELEASE CHANGE PAINTING “KG” TO “kg”
BY CHENL6 ZENGQ
E.N. 657870 662565
DATE. 21-Jun-11 5-Aug-11
BY
Qiao Zeng
DATE
5-Aug-11
程序表
H A F G B E
水温 ℃ 最大洗 衣量 洗涤剂和柔软剂 主洗 柔软剂 浸泡 时间预约 超净漂洗 转/分钟 800 700 700 700 700(1) 800 800 700 800 洗衣功能选择 最大脱水 速度
E. 程序选择钮 F. 记忆清除键 G. 时间显示窗 H. 程序过程指示
D
J
ห้องสมุดไป่ตู้
DESCRIPTION
Quick guide, WFC857CW
DRAWING NUMBER SHEET
W10424657
1 OF 3
Whirlpool Corporation Benton Harbor, MI USA
WFC857CW
C
本机具有自动安全保护功能,在出现故障早期 自动检测、诊断,并作出适当响应。 A.开门状态指示灯 如闪烁,请检查机门是否关好 B. 启动/暂停键 C. 进水警示指示灯 请检查水源压力,以及水龙头是否开启。 D. 过滤警示指示灯 请检查排水管是否打结或排水泵是否堵塞
0.99 55 1.03 5.5
时间预约功能允许你在方便的时候洗涤衣物, 如在晚上电能便宜的时候。
打开水龙头,按启动/暂停键开始洗衣程序,启 动/暂停键旁的指示灯点亮。程序过程指示灯显示 当前程序进程,从左到右依次显示浸泡、洗涤、 漂洗、脱水/排水。时间显示窗显示程序剩余时间 。由于衣物、进水温度的变化,控制器在某个程 序阶段重新计算剩余时间,此时显示窗口显示动 画线条。
性能数据
程序
全棉 全棉 化纤 羊毛 真丝/精柔 羽绒服 大件/牛仔 快净15' 快净30' 快净45' 浸泡洗 夜间洗 筒清洁
温度(℃)
95,40,冷水(20) 60 30 40 30 30 40 冷水(20) 冷水(20) 40 60 40 冷水(20)
最大洗衣量(kg)
5.5 5.5 2.0 1.0 1.5 1.0 5.5 1.5 2.0 4.5 2.5 5.5 -
程序持续时间 大约(小时:分钟)
2:15,1:59,1:54 2:55 1:11 0:46 0:40 0:56 1:59 0:15 0:30 0:45 1:12 1:59 0:50
启动程序前和程序结束后,指示灯点亮显示 门可打开。只要程序正在运行,机门保持锁定, 不许强制打开以免损坏机器。如果急需在程序运 行中开门,请参考程序结束前取消/记忆清除
1. 按启动/暂停键中止程序,指示灯闪烁。 2. 选择新程序、附加功能。 3. 再次按启动/暂停键开始新程序。 新程序在上一个程序中止的位罝继续运行, 因此不要再添加洗涤剂。
当前运行程序结束前取消/记忆清除
在程序结束前,按“记忆清除”键取消程序。 按“记忆清除”键至少3秒钟。在幵门前排出 洗衣机筒内水。
所有程序过程指示灯熄灭,“开门”指示灯点亮 1. 把程序选择钮转到“关”位置。 1. 关闭水龙头 3. 打开机门,取出洗涤衣物。 4. 机门微开以排除筒内潮气。
本产品达到中国能效标识1级
WFC857CW(XQG55-WFC857CW)
按照使用手册中“洗涤剂和添加剂”章节描述, 加入洗涤剂,关好机门。(请选择适合滚筒洗衣 机的无泡或低泡洗涤剂) 1. 旋转程序选择钮到所需程序位置。 2. 剩余时间显示窗口显示所选程序的时间(时、分) ,启动/暂停键旁的指示灯闪烁。
机器相关参数
型号名 容量 最高转速 净重
WFC857CW(XQG55-WFC857CW)
5.5kg 800转/分钟 60kg 600X440X850mm 220V~ 1900W 300W
进水警示灯亮起 净尺寸 洗衣机没有供水或供水不足。打开水龙头。 额定电压 如果指示灯仍然点亮,参考使用手册“故障处理 额定加热输入功率 指导”。 过滤警示灯亮起 额定洗涤输入功率 洗涤用水没有排出。检查排水管是否打结、 堵塞,清理排水泵过滤器。如果属后者情况,请 参考使用手册“清理排水泵过滤器”。
