xerox施乐 phaser 3125,打印机,说明书,故障维护,操作手册
施乐v330复印机维修手册
施乐v330复印机维修手册!诊断(C/E)模式如何进入诊断(C/E)模式按住数字板上“0”按扭的同时接通电源。
·控制面板上所有发光二级管(LED)发亮。
当你按下数字板或停止/清除钮时。
“E1卡纸”、“E3卡纸”和“色粉空”三个LED开始闪烁。
其余LED熄灭。
注意:配有10格分页装订器的机器。
其手动装订灯和补充装订针灯交替闪烁。
进入链码、功能码、设定值如果你进入了一个错误的链码或功能码,按停止清除钮,再重新进入一个正确的代码。
·如果进入了一个不存在的链码、功能码或设定值,显示“Er”。
如何退出诊断(C/E)模式关闭电源再接通。
诊断功能和操作程序输入检查功能:以“H”或“L”方式显示传感器或开关的输入电压。
程序:1·进入诊断模式。
2·进入待检查部件的链码,然后按后动钮。
3.进入待检查部件的功能码,然后按启动钮。
4.操作待检查的部件·电压为高时,显示“H”;电压为低时,显示“L”。
5.在检查中,按一次停止清除钮,功能码被清除。
按两次停止清除钮,链码被清除。
A/D输入检查功能:以数字值方式显示传感器输入电压。
程序:1.进入诊断模式。
2.进入待检查部件的链码,然后按启动钮。
3.进入待检查部件的功能码,然后按启动钮。
·以0-FF方式显示电压值,显示随电压值变化而变化。
4.在检查中,按一次停止清除钮,功能码被清除,按两次停止清除钮,链码被清除。
控制面板按钮检查(2-1)功能:检查控制面板上除停止清除钮以外的任何按扭。
程序:1.进入诊断模式。
2.进入链码“2”,然后按启动钮。
3.进入功能码“1”,然后按启动钮。
4.按下/松开除停止清除钮以外的任何其它按钮,显示值增加2。
5.在检查中,按一次停止清除钮,功能码被清除,按两次停止清除钮,链码被清除。
功能:同时检查原稿尺寸传感器1-4程序:1.进入诊断模式。
2.进入链码“2”,然后按启动钮。
3.进入功能码“1”,然后按启动钮。
富士施乐 WorkCentre Pro 320 31 用户说明书

用户手册 目录1.介绍 1.1关于本手册 1.1用户手册约定 1.12.开始 2.1介绍 2.1控制部位和功能 2.1前视 2.2右视 2.3后视/内视 2.3内视 2.4后视/内视 2.4使用控制面板 2.5加纸 2.9使用旁路纸盘 2.11编制 WorkCentre Pro 2.12可编程性能 2.12可编程性能表 2.133.打印机设置 3.1介绍 3.1连接 WorkCentre Pro与计算机 3.2使用USB适配器连接 3.3使用外接打印服务器(EPS) 3.4使用网络接口卡(NIC) 3.54.打印 4.1介绍 4.1打印作业管理 4.2使用在线帮助系统 4.2..................................................... ..................................................... ..................................................... ..................................................... ..................................................... ..................................................... ................................................. ...................................................... ...................................................... ...................................................... ............................................... ......................................... .................................. ........................................... ...................................... .......................................... ................................................. .............................................. ..................................................... ............................................... ............................................. ............................................ ........................................ ................................................ .......................................... ................................................ ............................................操作系统(OS)兼容性 4.3性能有效性 4.45.复印 5.1使用原稿玻璃 5.1中断打印作业转至复印 5.2制作副本 5.1复印装订原稿 5.2手动双面复印 5.36.寻找故障 6.1排除故障 6.2判别故障 6.2故障代码标签6.2避免卡纸提示 6.2故障代码渐进介绍C代码 6.3 6.3C1: 纸盒1和下纸路卡纸 6.3C2: 纸盒2和下纸路卡纸 6.4C3: 旁路纸盒纸张用完或卡纸 6.5C4: 纸张卡在纸盒1和出口门之间 6.5C5: 纸盒1内纸张用完 6.6C6: 选购的纸盒2内纸张用完 6.6C7: 纸盒1被打开 6.6C8: 选购的纸盒2被打开 6.6C9: 纸张卡在纸盒1和纸盒2之间6.7E代码 6.7E1: 纸张没有全部到达输出盘 6.7E5: 左侧门或前盖被打开或未妥善锁定 6.8J代码 6.8 6.8J1: 鼓组件内的色粉用完: 鼓组件插入不当或未装J3 6.8 6.9 6.9J7: 需要更换鼓组件: 装入机器中的鼓组件型号有误 ............................ ............................J8 6.9U代码U1,U2,U3,U4,U5,U6,U7,U8和U96.9.......................................................................................................................................................................................................................................................................................................................................................................................................................................................................................................................................................................................................................................................................................复印机故障排除表 6.10打印机故障排除表 6.127.机器保养和维护 7.1鼓组件和色粉瓶 7.1不同使用层面下期望的色粉寿命 7.2加粉 7.3更换鼓组件 7.5清洁 WorkCentre Pro7.6 清洁原稿玻璃 7.6空间要求 7.7移动式 WorkCentre Pro 放置 7.8固定式 WorkCentre Pro 放置 7.9搬运 WorkCentre Pro 7.10安装运输销 7.10.................................................................................................................................................................................................................................................................................................................................................................................................................................................................................................................................................................................................................................................................................................................................................................................................................................................................................................................................................................................................................... ......................................................................................................................................................................................................................................................................................................8.通用信息和安全8.1通用信息 8.1测试打印 7.12客户支持/维修 8.1消耗材料 8.2规格纸张尺寸和方向 8.3纸张 纸张规格 8.6专用纸张规格表安全批准和证明 8.88.8欧洲法规电磁达标8.9特别注意事项激光安全8.128.10安全标准8.13这是非法的8.148.88.78.48.6.............................................................................................................................................................................................................................................................................................................................................................................................................................................................................................................................................................................................................................................................................................................................................................................纸盒容量 8.6.................................................................................................................................................................................................显示信息7.11查看总印数 7.11印张 7.11显示鼓组件寿命7.12.................................................................................................................................................................................................1.222.1第二章开始介绍本手册提供WorkCentre Pro 320/315 参考资料控制部位和功能为熟悉WorkCentre Pro 320/315,花一点时间回顾一下以下各页中显示的主要部件和它们的位置。
胜利VC3125说明书中文
厂商声明本公司向最初该仪器的购买者承诺:自购买之日起一年内在正常使用的情况下出现质量问题给予免费保修(保险丝、测试线除外)。
本公司不承担在非正常的条件下或不规范使用本表造成的仪器和人员损伤的责任。
要获得本公司的服务,请您与本公司最近的服务中心联系(或将产品连同有关产生问题的说明、邮资一起寄到最近的服务中心)。
本公司不承担在邮递过程中的损坏。
在保修期内且正常使用的情况下,出现质量问题,本公司将免费维修、更换或退款。
然而,如果本公司检测出损坏是由于误操作、更换、事故或不正常的条件下使用或操作而引起的,本公司将收取适当的维修费用,并将修好的产品返还给您。
运回产品维修或校准仪器需经过统一包装”快递”到本公司。
最好将仪器装入出厂纸板箱里以便运输。
如果没有可用的纸板箱,请使用合适且牢固的替代品进行包装,但要保证替代品的减震效果!防止因为运输过程中的震动而使仪器损坏。
对最初购买者有关在运输中的损坏声明仪器运送到购买者处,购买者应立即全面检查仪器,盒子里的所有材料应该对照附带的包装条目进行核对检查,如果仪器以任何方式损坏,应及时通知运送者。
如要修理由于运输而损坏的仪器,请与本公司最近的服务中心联系。
由于运输损坏与运输员的赔偿协商应由顾客来完成。
目录项目页一、安全警告 (5)二、本手册适用型号 (8)三、特点 (8)四、技术规格 (10)五、仪器布局 (16)仪器正面视图 (16)仪器侧面视图 (18)LCD显示 (18)六、测试前的准备 (21)开机 (21)自动关机功能 (21)背光功能 (21)自动关闭背光 (21)检查电池电压 (21)连接测试导线 (22)七、测量 (23)电压测量 (23)绝缘电阻测量 (24)连续测量 (26)定时器测量功能 (26)极化指数测量 (27)吸收比测量 (28)步进电压测量 (29)泄露电流测量 (30)测量端口的电压特性 (31)保护线的使用 (31)温度显示 (32)时间显示 (32)八、使用存储器及通信功能 (33)存储数据 (33)手动存储模式(SAVE) (33)作业存储模式(LOG) (34)阅读存储器数据 (34)清除存储器数据 (35)使用通信功能 (35)九、更该仪器设置 (37)选择设置选项 (37)十、电池更换 (39)十一、专用电源适配器使用方法 (41)十二、保养与维护 (42)十三、注意事项 (43)一. 安全警告本仪器的设计、制造和检测均达到IEC61010-1:2001、IEC61557-1:1997、EC61557-2:1997安全标准要求,本手册包括确保仪器的安全使用及保证仪器的安全状态,使用者所必须遵守的警告和安全条例。
施乐系列打印机使用说明
ApeosPort -III C3300/2200 DocuCentre -III C3300/C2200/C2201用户操作实用手册Fuji Xerox (China) LimitedCustomer Service & Support Operation12一、复印1、基本复印步骤---------------------5正确放置原稿--------------------7使用手送纸盘复印环保纸、厚纸、信封等非标准纸张---8色彩模式----------------------102、常用的复印应用复印双面文件--------------------11对图像进行缩放-------------------12将图像移位或自动居中----------------13消除副本四周的阴影-----------------15复印书刊----------------------16同时复印不同尺寸的原稿---------------17将文件进行分页/装订----------------18印制小册子或套印A3红头文件------------19复印身份证---------------------20把多页文件印到单页纸上---------------21自制大型海报--------------------22将一个图像重复多个印在单页纸上-----------23在文件中添加注释------------------24加附封面或套印A4红头文件------------25目录3进行样本复印--------------------26储存常用的复印功能-----------------27调用已储存的复印功能----------------28二、打印1、基本打印步骤---------------------292、常用的打印应用进行机密打印或样本打印---------------30把多页文件打印到单页纸上--------------32打印小册子---------------------33打印封面页或套印红头文件--------------34设置喜好设定--------------------35正确打印环保纸、厚纸、信封等非标准纸张-------36添加自定义尺寸纸张-----------------37设置打印首选项-------------------38无纸化发送传真-------------------393、多媒体打印(选配)多媒体打印概况--------------------40注意和限制事项--------------------41多媒体部件----------------------42多媒体打印照片/文件-----------------43三、传真1、基本传真步骤--------------------452、常用的传真应用将一份传真发到多个接收方--------------46将多页原稿发送在单页纸上--------------47重发未发送的文件------------------48查看传真是否发送成功----------------49四、扫描1、扫描(新建机密信箱) -----------------50(信箱保存)-------------------51从信箱中提取扫描的文件--------------532、扫描到邮件---------------------543、扫描到PC保存-------------------554、扫描输出格式--------------------56五、计数器确认---------------------57六、确认消耗品的用量------------------58七、控制面板的使用介绍-----------------5943. 在菜单中选择[复印]。
Xerox打印机控制面板说明书
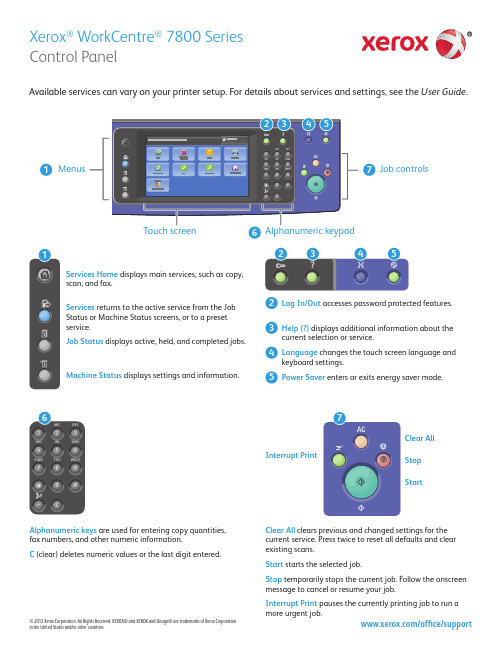
72345Control PanelAvailable services can vary on your printer setup. For details about services and settings, see the User Guide .Job controlsServices Home displays main services, such as copy, scan, and fax.Services returns to the active service from the Job Status or Machine Status screens, or to a preset service.Log In/Out accesses password protected features.Help (?) displays additional information about thecurrent selection or service.Language changes the touch screen language andkeyboard settings.Power Saver enters or exits energy saver mode.Clear AllStop Interrupt PrintStartJob Status displays active, held, and completed jobs.Machine Status displays settings and information.Alphanumeric keys are used for entering copy quantities, fax numbers, and other numeric information.C (clear) deletes numeric values or the last digit entered.Clear All clears previous and changed settings for the current service. Press twice to reset all defaults and clear existing scans.Start starts the selected job.Stop temporarily stops the current job. Follow the onscreen message to cancel or resume your job.Interrupt Print pauses the currently printing job to run a more urgent job.Machine StatusBilling and Usage InformationThe Machine Status menu provides access to supplies status, printer information, and settings. Some menus and settings require log in using the administrator name and password.In the Machine Status menu, touch the Billing Information tab for basic impression counts. Touch the Usage Counters button for detailed usage counts. The drop-down menu provides more count categories.Printer TourOptional accessories can be part of your printer setup. For details, see the User Guide .Second Bias Transfer RollPaper HandlingLoading PaperPaper OrientationFor a complete list of paper that works with your printer, see the Recommended Media List at:/paper (U.S./Canada)/europaperFor details about trays and paper, see the User Guide .When printing, select options in the print driver.For best results, fan the edges of the paper. Adjustguides to fi t the paper size. Do not load paper above the maximum fi ll line.CopyingFor details, see the Copying chapter in the User Guide located on your Software and Documentation disc or online.354Change the settings as needed.Select number of copies. Press Start.Scanning and EmailingThe printer is connected typically to a network rather than a single computer, so you select a destination for the scanned image at the printer.This guide covers techniques to scan documents without preparing special setups:• Scanning documents to an email address.• Scanning documents to a saved Favorite, Address Book listing, or USB Flash drive• Scanning documents to the Public folder on the printer hard drive, and retrieving them using your Web browser.For details and more scan setups, see the Scanning chapter in the User Guide . For details about address book and workfl ow template setup, see the System Administrator Guide .the Address Book or saved as a Favorite.Xerox ® WorkCentre ® 7800 Series4then enter the address using the touch screen keypad. Touch +Add to add addresses to the list, then _PUBLIC , or insert your USB Flash drive and touch USB . Address Book to enter saved email addresses.1Retrieving Scan fi lesTo retrieve your scanned images from the _PUBLIC folder, use CentreWare Internet Services to copy the scan fi les from the printer to your computer. You can also use CentreWare Internet Services to set up personal mailboxes and workfl ow scanning templates. For details, see the User Guide .If the IP Address does not show in the upper left corner of the touch screen, press Machine Status and check the information fi eld.CentreWareInternet Services4.1 4.2CentreWare Internet Services43Type the printer IP address in a Web browser, then press Enter or Return .Select the Default Public Folder , then click Go to download the scan.Click the Scan tab./office/supportFaxingYou can send a fax in one of four ways:• Embedded Fax scans the document and sends it directly to a fax machine.• Server Fax scans the document and sends it to a fax server, which transmits the document to a fax machine.• Internet Fax scans the document and emails it to a recipient.• LAN Fax sends the current print job as a fax.For details, see the Faxing chapter in the User Guide . For details about LAN Fax, see the print driver software. For details about fax setup and advanced settings, see the System Administrator Guide ./office/support254For fax numbers, use the alphanumeric keypad to enter fax numbers. Touch Dialing Characters to insert special characters. Touch +Add to add additional numbers.For Internet Fax email addresses, touch New Recipient , then enter the address using the touch screen keypad. Touch +Add to add addresses to the list, then touch Close .Use the Address Book or Favorites to enter stored numbers or email addresses.Change the settings as needed.Press Start .Faxing/office/support13Printing from USBYou can print .pdf, .tiff, .ps, and .xps fi les directly from a USB Flash drive. For more information, see the Printing chapter in the User Guide located on your Software and Documentation disc or online. To set up this feature, see the System Administrator Guide .© 2012 Xerox Corporation. All Rights Reserved. XEROX® and XEROX and Design® are trademarks of Xerox Corporationin the United States and/or other countries.Press Touch USB drive , then select a fi le or folder./office/support25Press Start .Once the desired fi le is selected, adjust the job quantity and select desired print settings.Printing from USB。
施乐+简易操作资料
施乐+简易操作资料维修模式Service Info 服务信息General Information 一般资料Product code:VDR 产品代码:VDRSerial No: VDR549558 序号:VDR549558Total Images:901226 图片总数:901226Images Since Last Call: 39 自上次通话的图像:39 Software Version:040.033.53259 软件版本:040.033.53259IP Address:192.168.1.80 IP地址:192.168.1.80Last 40 Fault History 最后40故障记录Software Versions 软件版本Fault Counters 故障计数器CRU/HFSI 配件寿命---------------------------------------------------------------------------------------------------------Diagnostics 诊断dc330 component Control dc330 组件控制dc335 Image Disk Diagnostics dc335 映像磁盘诊断dc612 Print Test Pattern dc612 打印测试图案Launch Routine 启动例行----------------------------------------------------------------------------------------------------------Adjustments 调整dc129 System Registration dc129 系统注册dc131 NVM Read/Write dc131 NVM读/写dc301 NVM Initialization dc301 NVM初始化dc527 DADF Size Detection dc527 输稿器尺寸检测dc671 Measurement Cycle dc671 测量周期dc673 Control Sensor Check dc673 控制传感器检查dc675 Registration Control Setup dc675 注册控制设置dc740 MSI Side Guide Adjustment dc740 微星侧导板调整dc919 Color Balance Adjustment dc919 色彩平衡调整dc924 TRC Manual Adjust dc924 牵引力控制手动调节dc937 PCON On/Off Print dc937 电源控制寄存器开/关打印dc945 llT Calibration dc945 电机校准dc950 ATC Sensor dc950 ATC传感器dc956 Belt Edge Learn dc956 皮带调整dc991 Tone Up/Down dc991 颜色调整Launch Routine 启动例行-----------------------------------------------------------------------------------------------------------Maintenance 保养dc120 Fault Counters dc120 故障计数器dc122 Last 40 Fault History dc122 最后40故障记录dc135 CRU/HFSI dc135 配件寿命dc710 No Paper Run dc710 无纸运行dc726 Paper Path Timing dc726 纸张路径定时Launch Routine 启动例行-----------------------------------------------------------------------------------------------------------Call Closeout 呼叫收尾Reset Counters 重置计数器Reboot Copier 重新启动复印机Reboot Network Controller 重新启动网络控制器Closeout call 收尾通话□■□■□■□■□■□■□■□■□■□■□■□■□■□■□■□■□■□■□■□■□■□■□■□■□■□■□■管理员模式Log in/Out 登录/注销User Name用户名Next 下一步Password 密码Enter 进入Machine Information 机器信息Paper Tray Status 纸张的状态General lnformation 基本信息Print Reports 打印报告Customer Support 客户支持 Installed Options 安装的选项Machine Serial number 机器序列号 Maintenance Assistant 维护助手〓〓〓〓〓〓〓〓〓〓〓〓〓〓〓〓〓〓〓〓〓〓〓〓〓〓〓〓〓〓〓〓〓〓〓〓〓〓〓〓〓〓〓〓〓〓〓〓〓Faults 故障Current Faults 当前故障Current Messages 当前消息Fault History 故障记录〓〓〓〓〓〓〓〓〓〓〓〓〓〓〓〓〓〓〓〓〓〓〓〓〓〓〓〓〓〓〓〓〓〓〓〓〓〓〓〓〓〓〓〓〓〓〓〓〓Supplies 耗材% Life Remaining 剩余使用寿命Charge Corotron 充电电晕管Black Drum Cartridge 黑色硒鼓盒Color Drum Cartridge 彩色硒鼓盒Color Drum Cartridge 彩色硒鼓盒Color Drum Cartridge 彩色硒鼓盒Fuser 定影Waste Container 废弃物容器〓〓〓〓〓〓〓〓〓〓〓〓〓〓〓〓〓〓〓〓〓〓〓〓〓〓〓〓〓〓〓〓〓〓〓〓〓〓〓〓〓〓〓〓〓〓〓〓〓Billing Information 账单信息Machine Serial Number: 机器序列号:Black 黑白Color 彩色Total 总数Usage Counters 使用计数器〓〓〓〓〓〓〓〓〓〓〓〓〓〓〓〓〓〓〓〓〓〓〓〓〓〓〓〓〓〓〓〓〓〓〓〓〓〓〓〓〓〓〓〓〓〓〓〓〓【Tools 工具菜单】Device Settings 设备设置Calibration 校准Copy Calibration 复印校准Print Calibration 打印校准Rest Copy calibration 休息复印校准Rest Print calibration 休息打印校准-----------------------------------------------------------------------General 常规Energy Saver 能源节约Set Date & Time 设置日期和时间GMT Offset GMT偏移Language/Keyboard Layout 语言/键盘布局Xerox Customer Support 施乐客户支持-----------------------------------------------------------------------Input 输入Color Recognition 颜色识别Photo/Text Settings 图片/文字设置-----------------------------------------------------------------------Output 输出Contention Management 冲突管理Within job Offsetting 内作业抵销-----------------------------------------------------------------------Tests & Resets 测试与复位Image Quality Test Patterms 图像质量测试新模式Network Echo Test 网络回声测试Software Reset 软件复位-----------------------------------------------------------------------Timers 定时器Auto Resume Timer 自动恢复定时器Held job Timer 举行工作定时器System Timer 系统定时器-----------------------------------------------------------------------Reports 报告Print Reports 打印报告Configuration Report Access 配置报告访问-----------------------------------------------------------------------Paper Tray Management 纸盒管理Paper Settings 纸张设置Paper Type & Color 纸张类型和颜色Paper Substitution 纸张替换Standard Size Required 所需的标准尺寸-----------------------------------------------------------------------Tray Settings 纸盒设置Tray Settings 纸盒设置Tray Contents 托盘内容-----------------------------------------------------------------------User interface Settings 用户界面设置General 常规Entry Screen Default 输入屏幕默认Measurements 测量Audio Tones 语音模式Reset Ui to Factory Settings 将用户界面重置到出厂设置----------------------------------------------------------------------- Common Service Settings 常见的服务设置Custom Keyboard Button 自定义键盘按钮Edge Erase Presets 边缘删除预置----------------------------------------------------------------------- Copy Service Settings 复印服务设置Feature Defaults 功能默认Color Preset Screen 颜色预置画面Image Shift Presets 图像移位预置Reduce/Enlarge Presets 缩小/放大预设Reading Order Options 阅读顺序选项Auto Image Rotation 自动旋转影像-----------------------------------------------------------------------Embedded Fax Settings 嵌入式传真设置Fax Setup 传真设置Feature Defaults 功能默认Fax Country Setting 传真国家设置Line 1 Setup 1号线安装Incoming Fax Defaults 接收传真默认Transmission Defaults 变速箱默认Mailbox & Polling Policies 邮箱和轮询策略Mailbox Setup 邮箱设置Setup Fax Reports 设置传真报告Print Fax Reports 打印传真报告-----------------------------------------------------------------------Job sheets 工作表Banner Sheets 横幅表Output Error Sheets 输出错误表Paper Type & Color 纸张类型和颜色-----------------------------------------------------------------------Restrictions 限制Interrupt Printing 中断打印-----------------------------------------------------------------------Connectivity & Network Setup 连接和网络设置General 常规Online/Offline 在线/离线Remote Software Upgrade 远程软件升级Configuration Report 配置报告-----------------------------------------------------------------------Advanced 高级Network Settings 网络设置-----------------------------------------------------------------------Accounting 会计Accounting Enablement 会计启用Accounting Mode 会计模式Copy Activity Report 复印活动报告-----------------------------------------------------------------------Security Settings 安全设置Authentication 认证User/Administrator Accounts 用户/管理员帐户Job Deletion 作业删除-----------------------------------------------------------------------Image Overwrite Security 图像覆盖安全Immediate Overwrite 立即覆盖On Demand Overwrite 对需求覆盖-----------------------------------------------------------------------Recipient Settings 收件人设置Valid Recipients 有效的收件人□■□■□■□■□■□■□■□■□■□■□■□■□■□■□■□■□■□■□■□■□■□■□■服务器设置Status Jobs Print Scan Properties Support Login | Home | Index | Site Map | Help状态工作打印扫描属性支持登录 | 首页| 首页| 网站地图| 帮助------------------------------------------Status----《状态》-----------------------------------------StatusWelcome StatusWelcomeDescription & Alerts 说明及警报器Billing Information 账单信息Usage Counters 使用计数器Configuration 组态Consumables 耗材Trays 托盘SMart eSolutions 聪明的商企电贸服务---------------------------------------------Jobs----《工作》------------------------------------------Job Name Owner Status Type Copy Count工作名称所有人状态类型复印数量No Jobs 没有工作Refresh 刷新Name: 姓名:localhost 本地IP Address: IP地址:192.168.1.80 192.168.1.80Location: 地点:machine location not set 不设置机器位置Status: 状态:WARNING, Needs attention 警告,需要注意--------------------------------------------Print----《打印》-------------------------------------------Job Submission 作业提交Submit Job 提交作业 Clear 清除File Name: 文件名:Note: Please wait for Job Submission confirmation window before navigating to anotherpage. Otherwise, job will be deleted.注:请等待??作业提交确认窗口,然后导航到另一个页面。
施乐DW6057, 3037维修手册零件手册第二章

夏普数码复印机维修手册

上海金顶办公设备有限公司姓名:龙工专业:OA办公设备维修2010年11月9日编写夏普数码复印机出现小人灯,太阳灯的解决方法清除夏普AR-1818保养代码(SHARP AR 163/161/160/200/201/1820/206等机型适用)夏普复印机出现小人灯是指维修保养,清保养计数器就可以排除故障。
显影剂灯(小太阳),是指显影计数满,清零就可以。
这是厂家为了在保证质量的输出质量的情况下设定的,并不代表显影剂老化。
维修代码:C---插入/暂停---数字键0---插入/暂停,此时面板灯全灭,20-1复印键(已经清好维修保养灯);再按清除键c(面板上无显示,灯全灭),42-1复印键(已经清好显影灯),按两下清除键退出。
如果中间不小心退出请重复C---插入/暂停---数字键0---插入/暂停(每个机型都有所不同)进入维修模式。
不可乱试其它调试代码!!!!!!维修保养灯是指要维护,最好清倒废粉,清洁个个部件。
(通常设为鼓的寿命数,鼓到寿命后要更换)显影剂灯是提醒你要更换显影剂,如要求质量,则需更换,如果不要求,还可继续使用。
通常用到以下代码:21-1,保养周期设定20-1,保养计数消除42-1,显影计数消除夏普全系列维修手册进入维修代码方式进入工厂代码方式SF1118/1025/AR161/AR200C插入0插入C Ca0CAR275/AR255#插入C插入#插入0CM350/M450P*C*P*0CAR158C浓度C浓度C浓度C倍率AR2818m160m205m276#插入C插入*插入CA插入夏普便携复印机鼓计数清零方法1、按曝光开机,现在除准备灯外所以指示灯都会点亮2、按住曝光约十秒钟直到三个灯同时点亮,松开曝光3、重新开机故障代码U(主板电池电压低)L(原稿台未回到规定位置)H(热辊定影器故障)F(暴光灯或定影灯温度保险断掉) 维修方式:按清除键-重复键-加法键-减法键进入1 解除故障2 读出主计数器内容3 读出总计数器内容4读出维修计数器内容5 维修计数器复位夏普模拟复印机维修代码维进:C-插入- 0-插入或清除键-插入键-0键-插入键-清除键厂进:C- Ca - 0- C纸盒键按4秒进用户模式1-01:测试光学系统反光镜动作检测1-02:光学系统传感器检查(缺纸灯、卡纸灯)1-03:镜头动作检查1-04:镜头动作老化检查2-01:ADF进行原稿输送动作2-02:ADF传感器检查2-03:ADF单独装纸动作检查(给纸电机反向旋转)2-04:ADF单独装纸动作检查(给纸电机正向旋转)2-05:ADF单独装纸动作检查(输纸电机正向旋转)2-06:ADF单独装纸动作检查(输纸电机反向旋转)2-07:ADF单独装纸动作检查(原稿限位器电磁阀接通)2-08:ADF单独装纸动作检查(送纸限位器)2-10:ADF单独装纸动作检查3-02:分页器传感器检查3-03:分页器单独装纸动作检查(输纸电机)3-04:分页器单独装纸动作检查(纸库电机)3-05:分页器单独装纸动作检查(蜂鸣器)3-06:分页器单独装纸动作检查(直线马达)(只适用于SF-S54)3-07:分页器单独装纸动作检查(钳夹马达)(只适用于SF-S54)5-01:操作面板显示检查(LED灯全亮5秒)5-02:加热灯检查(以0.5秒间隔亮灭加热灯)5-03:复印灯点亮检查5-04:DL 光度检查(放电灯亮30秒)5-05:BL 光度检查(消电灯以5秒间隔亮灭)6-01:输纸系统装纸动作(离合器/ 电磁阀)通断30次6-02:给纸电机动作检查(仅SP-2118)6-10:主纸盒半圆辊动作7-01:预热时间显示和老化预热计时并显示(秒)7-04:预热省略7-06:间歇老化7-08:预热时间显示8-01:显影偏压输出(30秒)8-02:主/ 转印充电输出/ 栅极检查(ME)8-03:主/ 转印充电输出/ 栅极检查(PE)8-04:主/ 转印充电输出/ 栅极检查(T / S)8-07:分离充电器输出(30秒)9-02ADU传感器检查测试指令9-05门电磁铁启动10 :色粉电机转动14 :故障消除(除U2故障外)15废色粉装满(小人灯闪亮)取消16U2 故障取消17消除PF故障20-01 保养计数器(小人灯亮)清零21-01 保养周期设定0=50000张1=2500张2=5000张3=10000张4=25000张5=关闭21-02显影器小修设置0=80000张1=5000张2=10000张21-03彩色显影器小修设置0=10000张1=5000张22-01:保养计数器显示22-02:保养预置计数器显示22-03:卡纸存储器显示22-04:总卡纸存储器显示22-05:总计数器显示22-06:DV 计数器显示22-07:DV 预置计数器显示(载体更换周期)22-08:ADF 送纸数显示22-10:装订计数显示22-15:故障记忆显示(显示最近20个错误代码)24-01:卡纸存储器/ 总卡纸计数器清零24-02:故障记忆清除24-04:ADF 计数器清零24-05:装订计数清零24-06:显影剂调整时间清零24-07:鼓调整时间清零24-06:纸盒计数器清零25-01:主驱动系统检查25-02:自动显影剂调整(更换载体后执行)(厂代中80-2调浓度与漏粉)26-01:选购件设定(输入选购件所表数值之和)26-05:计数器方式设定( 0A3计数 3 A4计数)26-06:目的地设定(设为10)26-07:转鼓灵敏度设定校正复印灯电压(1-3初始为2)26-10:AE 原稿浓度设定(1低浓度原稿2正常浓度原稿)26-13:预热方式设定(0 正常1主电机转至预热结束)26-20:后缘空白设定(0 有空白1无空白)26-29:交流电压调整(0 100V1 200V)30-01:复印机传感器检查(纸检测)42-01:清除小太阳符号换载体后43-01:定影温度设定(倍率键选择)44-01:成像控制动作设定(输入校正方式代码总和,栅压校正+1光学尘埃校正+2鼓磨损校正+4)44-05:栅极电压较正(显示图介浓度传感器A/D输入值)44-06:栅极电压较正强行执行44-07:图像浓度/ 转鼓标记传感器动作试验(F-J中0表示鼓标不能检测,1表示能检到)44-08:成像控制数据显示44-09:成像控制数据显示(最新值)44-10:栅极电压较正(转鼓表面/ 斑纹)数据显示44-11:初级栅极偏压设定44-12:中央控制处理器关闭时对复印功能进行检测主代码子代码内容46-01:曝光调整47:AE 传感器增益自动调整(先在稿台上放几张A3白纸)48-01:前/ 后(垂直)放大倍率调整(A值调100%B调200%C调50%)48-02:输纸方向放大倍率调整(反光镜速度校正)50-01:复印件前缘调整50-02:前缘调整(简单型)(C值为245 显示为A45)51-02:阻力量调整(A 托盘阻力B手动给纸)53-01:ADF 停止位置调整值(普通纸)设定53-03:ADF 停止位置调整值(薄纸)设定53-04:ADF 阻力传感器、宽度传感器调整53-05:ADF出纸传感器调整53-06:ADF 时间传感器调整54-03:除去蜂鸣装置57删边量调整58 -1纸头调整58-2 空白区调整60原稿尺寸检测97补粉夏普模拟复印机故障代码L1-00:反光镜进给故障(传感器坏、主板坏、反光镜传动索缺油)L3-00:反光镜返回故障L4-01:主电机故障L5-00:镜头初始误差检测L5-02:镜头故障L5-03:第4/5反光镜电机故障L5-04:第4/5反光镜电机MHPS故障L5-05:镜头电机故障L5-06:镜头原位检测出错L5-8:镜头原位传感器故障L6:加粉电机故障L8-01:零交叉脉冲故障L8-03:AE传感器故障(执行47时,AE输入无变化)L9:分页器故障H2-00:定影热敏电阻开路故障(热敏电阻输入超过3.81V)H3-00:定影高温故障(定影温达240度,热敏电阻输入在0.36V下) H4-00:定影低温故障U1:存储器电池电压底于2.2V,指令“13”,复位U2-01:后备储存器故障U3-08:镜架驱动电机检测异常U3-10:镜架原位传感器故障U3-20:反光镜电机锁定U3-21:反光镜原始位置出错U3-40:时钟脉冲故障U4-02:ADU对位板操作错误检测U4-04:ADU后端板故障U5-00:ADF通信错误U5-01:A马达错误检测U5-03:时序传感器故障U5-04:空传感器故障U5-11:给纸电机故障U5-12:输纸电机故障U6-00:机架通信错误U6-01:1纸盒电机错误U6-02:2纸盒电机错误U6-03:3纸盒电机错误U6-08:机架24V线路出错U6-10:机架送纸电机错误U6-09:机架LCC电机过电流检测F1-00:分页器通信错误F1-02:输纸电机故障F1-04:纸库上限/下限故障F1-05:纸库原位传感器故障F1-06:纸库电机故障F1-14:输纸电势故障F2-02:色粉粉斗电机错误F2-31:图象浓度传感器故障(传感器脏、删边灯脏、鼓处插线坏)F2-32:鼓标记传感器故障F2-35:栅级电压校正故障F3-12:上纸盒升起电机故障F3-22:下纸盒升起电机故障C2:高压发生器故障电极丝短路或断路CC:原稿尺寸传感器误检测EE-EU:色粉不足EE-EL:色粉过多CH:长亮是门未关紧或门打开闪烁是显影组件安装不到位或无显影组件等等。
富士施乐复印机多功能一体机使用手册说明书
使用手冊- 適用於單機操作 -目錄重要的安全說明 (5)保護您的個人資料 (7)控制面板的說明 (8)使用液晶面板 (10)調整控制面板角度 (12)省電功能 (12)當關閉電源時 (13)電源故障後自動重新開機 (14)處理紙張和原稿選擇紙張 (16)放入紙張 (17)記憶卡的使用方法 (19)插入記憶卡 (19)移除記憶卡 (19)放置原稿 (21)自動進紙器 (ADF) (21)工作平台 (23)複印模式複印文件 (26)複製 / 修復相片 (28)複印模式選單清單 (31)相片模式列印相片 (34)使用各種版面配置列印 (36)列印格線紙 (38)列印相片賀卡 (40)從外部 USB 裝置進行列印 (43)備份資料至外部儲存裝置 (44)相片模式選單清單 (45)傳真模式連接電話線 (48)使用傳真專用的電話線路 (48)與電話裝置共用電話線路 (48)檢查傳真連線 (50)設定傳真功能 (51)設定快速撥號項目 (51)設定群組撥號項目 (52)建立標題資訊 (54)傳送傳真 (56)輸入或重撥傳真號碼 (56)使用快速撥號 / 群組撥號 (57)依次撥號發送 (58)在指定時間發送傳真 (60)透過連接的電話機發送傳真 (62)接收傳真 (63)自動接收傳真 (63)手動接收傳真 (65)輪詢接收傳真 (66)列印報告 (67)透過電腦發送傳真 (68)傳真模式選單清單 (69)掃描模式掃描至記憶卡 (72)掃描至電腦 (74)掃描模式選單清單 (75)設定模式 (維護)檢查墨水卡匣存量 (78)檢查和清潔印字頭 (79)校正印字頭 (81)設定 / 更改時間和區域 (83)透過數位相機列印 (85)設定選單清單 (87)解決方法錯誤訊息 (90)更換墨水卡匣 (91)清除夾紙 (94)夾紙 - 印表機內部 (1) (94)夾紙 - 印表機內部 (2) (98)夾紙 - 自動進紙器 (ADF) (99)夾紙 - 印表機內部 (3) (100)無法拉出紙匣 (103)列印品質 / 版面的問題 (105)傳真問題 (106)附錄 (107)2關於這本使用手冊當閱讀操作說明時,請遵守這些指導方針:w c Q R&警告:請務必小心遵守,以免身體受傷。
施乐维修手册需求规格说明书
施乐维修手册需求规格说明书一、概述施乐维修手册是为了方便用户维修和使用施乐产品而制定的指南。
本手册详细介绍了施乐产品的各项功能、故障排除方法、维护保养建议等内容,旨在为用户提供全面准确的信息支持。
二、产品概述本维修手册适用于所有施乐的产品型号,包括但不限于打印机、复印机、扫描仪等。
具体的产品型号和规格请参考相应产品资料。
三、操作指南1. 开机与关闭(1) 开机:按下电源按钮,等待设备启动完成并显示主界面。
(2) 关闭:在设备主界面点击“关机”,等待设备完全关闭后,再拔掉电源线。
2. 打印操作(1) 连接打印机:将打印机与电脑或其他设备连接,确保打印机正常工作。
(2) 选择打印选项:在打印设置界面选择页面大小、打印质量、打印份数等参数。
(3) 打印文件:选择需要打印的文件,点击打印按钮,等待打印完成。
3. 复印操作(1) 放置原件:将需要复印的文件放入扫描仪上的进纸口,并按照指示进行调整。
(2) 选择复印选项:在复印设置界面选择复印数量、色彩模式、纸张大小等参数。
(3) 开始复印:点击开始复印按钮,等待复印完成。
4. 故障排除在使用中遇到问题时,用户可以根据以下方法尝试解决:(1) 检查电源和连接:确保设备连接正常,电源供应稳定。
(2) 清洁保养:定期清理设备,拆卸并清理打印头或扫描仪上的灰尘。
(3) 参考故障代码:根据设备显示的故障代码,在故障代码手册中查找对应的故障原因和解决方法。
四、维护保养1. 清洁保养(1) 打印机:定期清理打印头、纸路等部件,防止灰尘积累影响打印质量。
(2) 复印机:清洁复印机扫描仪上方的玻璃板,以确保复印的文件清晰。
(3) 扫描仪:使用专用扫描仪清洁剂擦拭扫描仪的感光部件和玻璃面板。
2. 耗材更换(1) 打印机:根据打印机显示的墨盒或墨粉低量提醒,及时更换耗材。
(2) 复印机:更换复印纸时,请使用符合要求的纸张规格和质量。
五、安全注意事项1. 电源使用:使用正规的电源插座,并定期检查电源线是否磨损。
上海电气 SCU3125 智能通信单元 用户手册说明书

5.1 主页面 ........................................................................................................ 12 5.2 WEB菜单.................................................................................................... 12
7 设备监控 ......................................................................................................... 15 8 设备维护 ......................................................................................................... 16
3 端口简介 ........................................................................................................... 3
3.1 以太网端口接线............................................................................................. 3 3.2 RS485端口接线 ............................................................................................ 4 3.3 DI输入干接点接线 ......................................................................................... 5 3.4 DO输出干接点接线........................................................................................ 6 3.5 PT100端口接线............................................................................................. 7 3.6 模拟量端口接线............................................................................................. 8 3.7 24Vdc供电端口接线 ...................................................................................... 9
Xerox多功能设备的安全安装和操作说明书
Secure Installation and Operation of Your Xerox Multi-Function Device Version 1.0August 6, 2012Secure Installation and Operation of Your Xerox Multi-Function Device Purpose and AudienceThis document provides information on the secure installation and operation of a Xerox Multi-Function Device (MFD). All customers, but particularly those concerned with secure installation and operation of these machines, should follow these guidelines.OverviewThis document lists some general customer information and guidelines that will ensure that your Xerox MFD is operated and maintained in a secure manner.Some Xerox MFDs have their own product-specific secure installation and operation guidelines; if that is the case the product-specific guidelines supersede and should be used in place of the general guidelines documented here.Not every Xerox MFD may have all of the security functions discussed in these guidelines; follow only those guidelines belowthat apply to the security function(s) provided with your Xerox MFD.Guidelines1.Please follow the general guidelines below for secure installation, setup and operation of a Xerox MFD1:a).The security functions that should be set up by the System Administrator are:•Immediate Image Overwrite•On Demand Image Overwrite•Disk Encryption•IP Filtering•Audit Log•Secure Sockets Layer (SSL)•Trusted Certificate Authorities•IPSec•SNMP v3•Local, Remote or Smart Card Authentication (if so equipped)•Local Authorization and Personalization•802.1x Device Authentication•Session Inactivity Timeout•Secure PrintSystem Administrator login to either the Local User Interface (Local UI) or Web User Interface (Web UI), as applicable, is required when accessing the security features or when implementing the guidelines and recommendations specified in this document. To log into either the Local UI or Web UI as an authenticated System Administrator, follow the applicable instructions in the System Administration Guide (SAG) for your Xerox MFD.Also follow the appropriate instructions located in the SAG for your Xerox MFD to set up the security functions or to implement the guidelines noted in this document, except as indicated in the items below. Note that whenever the SAG requires that the System Administrator provide an IPv4 address, IPv6 address or port number the values should be those that pertain to the particular machine being configured.b).Change the Administrator password2 as soon as possible after installation.•Set the Administrator password to a minimum length of eight alphanumeric characters.•Change the Administrator password once a month.•Ensure that all passwords are strong passwords (e.g., passwords use a combination of alphanumeric and non-alphanumeric characters; passwords don’t use common names or phrases, etc.).c).The following passcodes should be changed on a regular basis, chosen to be as random as possible and set to the indicatedminimum lengths:•Smart Card or CAC passcode/password – 8 characters (alphanumeric)•Secure Print passcode/password – 6 numeric digits•Scan To Mailbox passcode/password – 8 characters (alphanumeric)1 In this document the guidelines included only apply when the MFD has the feature(s) to which the guidelines apply. For example, guidelines covering creation of individual user accounts would not apply to an MFD that does not have the ability to set up local user accounts.2In this document the term “passcode” will be used to represent a password that consists entirely of digits and the term “password” will be used to represent a password that consists of alpha-numeric and special characters.d).The System Administrator should establish or ensure that unique user accounts are established for all users, and that localusernames established on the Xerox MFD match domain names and both map to the same individual.The System Administrator should also ensure that the ‘Minimum Length’ passwords for any unique user accounts established for all users should be set to at least 8 (alphanumeric) characters unless applicable internal procedures require a minimum password of a greater length. The ‘Maximum Length’ can be set to any value between 8 and 63 (alphanumeric) characters consistent with the same internal procedures.e).The ability to delete a job at either the Local UI or Web UI should be set so that only the System Administrator can delete ajob.f).For customers concerned about document files on the hard disk drive(s) or Embedded Fax card memory the ImmediateImage Overwrite and On Demand Image Overwrite security features, which come installed on a Xerox MFD, must be properly configured and enabled.Notes:•Immediate Image Overwrite of a delayed or secure print job will not occur until after the machine has printed the job.•If an Immediate Image Overwrite fails, an error message will appear at the top of the screen indicating that there is an Immediate Image Overwrite error and that an On Demand Image Overwrite should be run. This error message will persist until an On Demand Image overwrite is initiated by the System Administrator.•If there is a power failure or system crash while a network scan job is being processed, an Immediate Overwrite of the residual data will occur upon job recovery. However, the network scan job may not appear in the Completed Job Log.•If there is a power failure or system crash of the network controller while processing a print job, residual data might still reside on the hard disk drive(s). The System Administrator should immediately invoke an On Demand Image Overwrite once the machine has been restored.•Once a manual or scheduled On Demand Image Overwrite has been initiated from either the Local UI or Web UI, as applicable, it cannot be aborted.•The System Administrator has the option of scheduling either a Standard or Full On Demand Image Overwrite from the Web UI.•Before invoking an On Demand Image Overwrite verify that:•There are no active jobs, pending print or scan jobs, no active processes that will access the hard drive(s).•No user is logged into a session via network accounting, Xerox Standard Accounting, or the internal auditron, or into a session accessing a directory on the hard disk drive(s).•After a power on of the machine all subsystems must be properly synced and, if printing of Configuration Reports is enabled, the Configuration Report must have finished printing.•For any previously initiated On Demand Image Overwrite request the confirmation sheet must have finished printing.•The Embedded Fax card must have the correct software version and must be properly configured.•When invoked from the Web UI the status of the completed On Demand Image Overwrite will not appear on the Local UI but can be ascertained from the On Demand Overwrite Confirmation Report that is printed after the system reboots.•If an On Demand Image Overwrite fails to complete because of an error or system crash, a system reboot or software reset should first be initiated by the System Administrator from either the Local UI or the Web UI and be allowed to complete; otherwise, the Local UI may become unavailable. If the Local UI does become unavailable the Xerox MFD will have to be powered off and then powered on again to allow the system to properly resynchronize. Once the system reboots or software reset has completed the System Administrator should immediately perform another On Demand Image Overwrite.•If there is a failure in the hard disk drive(s)a message recommending that an On Demand Image Overwrite be run will appear on the Local UI screen. An Immediate Image Overwrite Error Sheet will also be printed or may contain incomplete status information. The System Administrator should immediately perform the requested On Demand Image Overwrite.•If an On Demand Image Overwrite is successfully completed, the completion (finish) time shown on the printed On Demand Overwrite Confirmation Report will be the time that the system shuts down.•The System Administrator should perform an On Demand Image Overwrite immediately before a Xerox MFD is decommissioned, returned, sold or disposed of.g).The Xerox MFD can be restricted to use only SSLv3/TLSv1 by putting the device into “FIPS mode”. See the SAG forinstructions.h).For SSL to work properly the machine must be assigned a valid, fully qualified machine and domain name (FQDN).i).When utilizing (SSL):•Any self-signed digital certificate or digital certificate signed by a Trusted Certificate Authority should have a maximum validity of 180 days.•If a self-signed certificate is to be used the generic Xerox root CA certificate should be downloaded from the Xerox MFD and installed in the certificate store of the user's browser.j).Enable HTTPS. The HTTPS protocol should be used to send scan jobs to any remote IT product.k).When utilizing Secure Sockets Layer (SSL) for secure scanning:•SSL should be enabled and used for secure transmission of scan jobs.•When storing scanned images to a remote repository using an https: connection, a Trusted Certificate Authority certificate should be uploaded to the Xerox MFD so the Xerox MFD can verify the certificate provided by the remote repository.•When an SSL certificate for a remote SSL repository fails its validation checks the associated scan job will be deleted and not transferred to the remote SSL repository. The System Administrator should be aware that in this case the job status reported in the Completed Job Log for this job will read: “Job could not be sent as a connection to the server could not be established”.l).Remote authentication using Kerberos will not work with Windows Server 2003. In the case of LDAP/LDAPS the System Administrator should ensure that SSL is enabled.m).In viewing the Audit Log the System Administrator should note the following:•Deletion of a file from the Reprint Saved Job folders or deletion of the Reprint Saved Job folder itself is recorded in the Audit Log.•Deletion of a print or scan job or deletion of a scan-to-mailbox job from its scan-to-mailbox folder may not be recorded in the Audit Log.•Extraneous process termination events (Event 50) may be recorded in the Audit Log when the Xerox MFD is rebooted or upon a Power Down / Power Up. Extraneous security certificate completion status (Created/Uploaded/Downloaded) events (Event 38) may also be recorded.n).In downloading the Audit Log the System Administrator should ensure that Audit Log records are protected after they have been exported to an external trusted IT product and that the exported records are only accessible by authorized individuals. o).IP Filtering is not available for either the AppleTalk protocol or the Novell protocol with the ‘IPX’ filing transport. Also, IP Filtering will not work if IPv6 is used instead of IPv4.p).Before enabling disk encryption the System Administrator should make sure that the Xerox MFD is not in diagnostics mode and that there are no active or pending scan jobs:q).IPSec should be used to secure printing jobs; HTTPS (SSL) should be used to secure scanning jobs. Note: IPSec is not available for either the AppleTalk protocol or the Novell protocol with the ‘IPX’ filing transport.The default values for IPSec parameters should be used whenever possible for secure IPSec setup. The following default values typically not listed in the product System Administrator Guide should also be used for secure IPSec setup:•For defining policies the options listed for ‘Hosts’, ‘Protocols’ and ‘Action’ are all defaults; the System Administrator should choose the particular option that pertains to whether the hosts and protocols in each case are to be allowed or discarded and the corresponding desired action.•The Host Group address type defaults to ‘Specific’.•Protocol Group Custom Protocol defaults to being disabled. If Custom Protocol is enabled then the protocol defaults to ‘TCP’ and the Xerox MFD IS type defaults to ‘Server’.•The IPSec New Actions keying method defaults to ‘Internet Key Exchange (IKE)’.•If ‘Manual Keying’ is selected “AH” alone should not be selected as the IPSec Security option.r).The software verification test feature initiated from the Web UI that checks the integrity of the executable code by comparing a calculated hash value against a pre-stored value to ensure that the software has not changed.s).The System Administrator should enable the session inactivity timers (termination of an inactive session), for both the Web UI and Local UI.t).Private folders are available for storing confidential information when using the Scan to Mailbox feature. To use private folders, the scan policies for the Scan to Mailbox feature should be set as follows:•Deselect [Allow Scanning to Default Public Folder].•Deselect [Require per Job password to public folders].•Select [Allow additional folders to be created]•Select [Require password when creating additional folders].•Select [Prompt for password when scanning to private folder].•Deselect [Allow access to job log data].u).Print jobs (other than a LANFax job) submitted to a Xerox MFD from a client or from the WebUI should be submitted as a secure print job.v).Software upgrades via the network should normally be disabled except for those periods when software upgrades are being deployed.2.Change the SNMP v1/v2c public/private community strings from their default string names to random string names.3.Sign up for the RSS3 subscription service available via the Xerox Security Web Site (Security@Xerox) at /securityto receive the latest Xerox Product Security Information and timely reporting of security information about Xerox products, including the latest security patches .4. A Xerox MFD should be installed in a standard office environment. Office personnel should be made aware of authorized servicecalls (for example through appropriate signage) to discourage unauthorized physical attacks such as attempts to remove the internal hard disk drive(s). The System Administrator should also ensure that office personnel are made aware to pick up the outputs of print and copy jobs in a timely manner.5.Customers who encounter or suspect software problems should immediately contact the Xerox Customer Support Center toreport the suspected problem.6.Caution: the Xerox MFD allows an authenticated System Administrator to disable functions like Image Overwrite Security thatare necessary for secure operation. System Administrators are advised to periodically review the configuration of all installed machines in their environment to verify that the proper configuration is maintained.7.Depending upon the configuration of a Xerox MFD, two IPv4 addresses - a primary IPv4 address and a secondary IPv4 address -may be utilized.The System Administrator selects whether the primary IPv4 address will be obtained statically or dynamically via DHCP.The second IPv4 address is assigned via APIPA (Automatic Private IP Addressing) when the System Administrator enables the ‘Self Assigned Address’ option.If the ‘Self Assigned Address’ option is enabled (which is the default case), this secondary IPv4 address will not be visible to the SA4. Xerox recommends that the ‘Self Assigned Address’ option be disabled unless either APIPA is used or Apple Rendezvous/Bonjour support is required.8.If a system interruption such as power loss occurs a job that is in process may not be fully written to the hard disk drive(s).Inthat case any temporary data created will be overwritten during job recovery but a corresponding record for the job may not be recorded in the completed job log or audit log.9.If IPv6 is disabled and then a software upgrade is performed by a Xerox Service Technician using an AltBoot, IPv6 will still bedisabled even though both the Local UI and Web UI show that IPv6 is enabled. IPv6 can be enabled again by re-enabling it on the Web UI.10.A unique Embedded Fax or Scan-to-Mailbox mailbox should be established for each authenticated user.11.Remote Polling should only be used by the System Administrator.12.The Embedded Fax cover sheets should be set to not be printed with an Embedded Fax job.ers should be aware that correct remote repository document pathnames for the receipt of workflow scanning jobs shouldstart with one ‘\’ as opposed to the two ‘\’s shown in a number of SAG documents.ers should undergo appropriate training on how to use a Xerox MFD in a secure manner before being assigned user accountsto access the device.3 Really Simple Syndication – A lightweight XML format for distributing news headlines and other content on the Web. Details for signing up for this RSS Service are provided in the Security@Xerox RSS Subscription Service guide posted on the Security@Xerox site at/go/xrx/template/009.jsp?view=Feature&ed_name=RSS_Security_at_Xerox&Xcntry=USA&Xlang=en_US.4 The primary IPv4 address will always be displayed on the Configuration Report.ContactFor additional information or clarification on any of the product information given here, contact Xerox support.DisclaimerThe information provided in this Xerox Product Response is provided "as is" without warranty of any kind. Xerox Corporation disclaims all warranties, either express or implied, including the warranties of merchantability and fitness for a particular purpose. In no event shall Xerox Corporation be liable for any damages whatsoever resulting from user's use or disregard ofthe information provided in this Xerox Product Response including direct, indirect, incidental, consequential, loss of businessprofits or special damages, even if Xerox Corporation has been advised of the possibility of such damages. Some states do not allow the exclusion or limitation of liability for consequential damages so the foregoing limitation may not apply.©2012 Xerox Corporation. All rights reserved. Contents of this publication may not be reproduced in any form without permission of Xerox Corporation. XEROX®, XEROX and Design®, CentreWare®, Phaser®, ColorQube®, Document Centre®, WorkCentre®, and WorkCentre Pro® are trademarks of Xerox Corporation in the United States and/or other countries. Adobe® and PostScript® are registered trademarks or trademarks of Adobe Systems, Incorporated. All other trademarks are the property of their respective manufacturers.The information in this document is subject to change without notice.。
Xerox WorkCentre 3215 3225多功能打印机维护手册(2014年6月版)说明书
PL 8.1 Control Panel ....................................................................................................... Part Number Index .......................................................................................................... ........................................................................................................................................
Xerox® WorkCentre® 3215/3225 Multifunction Printer Service Manual
June 2014 5-5
Parts Lists
PL 2.1
PL 2.2 Middle Cover
Item
1 2 3 4 5 6 7 8 9 10 11 12
Part
002N03157 002N03158 140N63726 – – – – – 004N00286 – – –
ADF Feed Roll Assembly ADF Drive Motor ADF Retard Pad
Parts Lists
PL 1.2
June 2014 5-4
Xerox® WorkCentre® 3215/3225 Multifunction Printer Service Manual
上海施乐客户服务部 THE DOCUMENT COMPANY XEROX 学生手册
THE DOCUMENT COMPANYXEROXWorkCentre Pro 320/315学生手册April, 2001上海施乐客户服务部WorkCentre Pro 320/315学生手册Mar. 20011第1章 介绍欢迎进入WorkCentre Pro 320/315维修培训教程,该教程用于:l 解释培训教程l提供充足的知识以使你能维修WorkCentre Pro 320/315主要目标主要目标是:l 在培训期间识别,诊断和修理机器,执行所需的全部管理工作。
l 在安装的同时使客户了解机器。
本章目标本章将提供:l 培训包内容综述l 学生手册综述l 各章要点l 培训策略综述l 教程规则l培训包内容除WorkCentre Pro 320/315机器,PC 和工具之外,你的培训包提供你成功完成教程所需的全部资源,内容有:l 学生手册l 用户操作手册l 维修手册l 机器安装程序(维修手册第九节)l操作原理学员必需具备的条件假设l你具有维修WorkCentre Pro 320/315机器和执行Xerox 维修政策所需的技能和知识。
l 你已成功通过新雇员培训l 你已成功通过必要的先行培训l 你已成功通过激光安全培训或先前已通过激光产品考核l你已具备诊断和维修机器故障时运用维修文件和基本工具所需的知识学生手册描述学生手册向你提供:l 你必须达到的目标l 产品知识l 了解机器配置l 机器操作方法l 了解维修策略学生手册由下列章组成:l 第1章——介绍——回顾培训教程l 第2章——熟悉机器——复习用户操作手册,机器功能l 第3章——部件拆卸——复习维修手册和机器内部部件l 第4章——岗位培训要求——教你执行所有必要的操作以及如何与客户交流WorkCentre Pro 320/315学生手册Mar. 20012培训策略本培训教程属自我调整型,从第1章至第4章依次进行。
培训包,工具,机器,PC ,用户操作手册和教员是成功完成维修培训所必备的资源。
Xerox DocuMate 3125扫描仪 用户指南说明书
2016 年 9 月05-0944-000扫描仪扫描仪用户指南用户请确保在使用机器之前阅读本说明书。
阅读完本说明书之后,请妥善保管。
Design © 2016 Xerox 公司。
保留所有权利。
XEROX®、XEROX and Design® 和 DocuMate® 是Xerox 公司在美国和/或其他国家/地区的注册商标,其使用需经 Xerox 公司许可。
Visioneer 已得到Xerox® 的商标许可。
Content © 2016 Visioneer, Inc. 保留所有权利。
Visioneer 品牌名和 OneTouch® 徽标是 Visioneer, Inc. 的注册商标。
请前往,选择您的产品型号,然后点击 “保修计划” 链接,查看扫描仪的保修条款和条件。
未经书面许可,不得复制、改编或翻译,除非版权法允许。
所声明的版权保护包括各种内容的受版权保护的材料和信息,这些材料和信息现在被法规或司法所允许或在本文中得到许可,包括但不限于从屏幕上所显示的软件程序中生成的材料,如样式、模板、图标、屏幕显示、外观等。
文档版本:05-0944-000(2016 年 09 月)Mac® 和 Mac OS® 是 Apple, Inc. 在美国和/或其他国家的注册商标。
Adobe®、Adobe® Acrobat®、Adobe® Reader® 以及 Adobe® PDF 徽标是 Adobe Systems Incorporated 在美国和/或其他国家的注册商标。
Post-It® 是 3M 在美国和/或其他国家的注册商标。
TWAIN™ 是 TWAIN Working Group 的注册商标。
Intel® 和 Pentium® 是 Intel Corporation 在美国和/或其他国家的注册商标。
施乐全系列复印机维修手册
施乐全系列复印机维修手册引言施乐(Xerox)是全球知名的办公设备制造商,其复印机产品广泛应用于各个行业和机构。
为了帮助用户更好地了解和维护施乐全系列复印机,本手册将介绍施乐复印机的基本组成部分、常见故障及维修方法,以帮助用户解决复印机使用中的问题。
一、施乐复印机的基本组成部分施乐复印机由以下几个主要组成部分构成:1. 控制面板:复印机的操作界面,用户可以通过控制面板进行复印、打印、扫描等操作。
2. 扫描模块:负责将要复印的纸张转换成电子信号,并传输给打印模块。
3. 打印模块:将扫描模块传输过来的电子信号转换成图像,并通过墨盒喷射或激光技术将图像打印到纸张上。
4. 纸张进纸系统:负责将待复制的纸张传送至扫描模块和打印模块,并控制纸张的进纸速度和位置。
5. 墨盒/碳粉盒:负责存储和供应打印所需的墨盒或碳粉盒。
6. 故障检测模块:负责监控复印机的运行状态,及时发现并报告可能存在的故障。
二、常见故障及维修方法1. 故障现象:打印质量差可能原因:- 墨盒/碳粉盒耗尽:检查墨盒/碳粉盒的剩余量,如有需要,更换新的墨盒/碳粉盒。
- 墨盒/碳粉盒安装不当:检查墨盒/碳粉盒的安装位置和方式,确保正确安装。
- 打印头堵塞:清洗打印头,确保无堵塞物。
2. 故障现象:纸张卡纸可能原因:- 纸张质量不良:更换纸张,使用质量良好、符合规格要求的纸张。
- 纸张进纸系统故障:检查纸张进纸系统是否正常运转,如有需要,修复或更换故障部件。
3. 故障现象:扫描功能无法正常使用可能原因:- 扫描模块故障:检查扫描模块的连接情况,如有需要,更换故障模块。
- 软件设置错误:检查设置是否正确,如有需要,重新设置。
三、维护注意事项1. 定期清洁- 清洁扫描模块和打印模块:使用专用清洁工具和清洁剂,轻轻擦拭扫描模块和打印模块的表面。
- 清理纸张进纸系统:定期清理进纸系统内的纸屑和灰尘,保持纸张的顺畅进纸。
2. 规范使用- 使用合适的纸张:使用符合规格要求的纸张,避免使用过厚或过薄的纸张,以免卡纸或影响打印质量。
Phaser 3125 A4黑白激光打印机 说明书
Phaser 3125/N 规格本小册子中提及的其他名称都是相应公司的商标。
尽管所载信息在打印时正确无误,富士施乐亚太区保留随时更改所述机器规格参数而不另外通知的权利。
视产品购买所在国家或地区,规格参数、选件名称和供货情况可能会不尽相同。
FXCL 0809北京 北京市朝阳区建国路甲92号世茂大厦904 电话:010-********上海 上海市淮海中路300号香港新世界大厦29F/30F/32F 电话:021-********广州 广州市东风中路410-412号健力宝大厦15楼 电话:020-********深圳 深圳市福田区益田路4068号卓越时代广场32楼01~08、10室 电话:0755-********成都 成都市锦江区滨江东路9号成都香格里拉中心办公楼6层 电话:028-********沈阳 沈阳市和平区南京北街206号城市广场第二座1406室 电话:024-********天津 天津市南京路75号国际大厦502室 电话:022-********长春 长春市南关区亚泰大街3218号通钢国际大厦A 座21层01室 电话:0431-********青岛 青岛市香港中路59号青岛国际金融中心37层2号 电话:0532-********/69大连 大连市西岗区中山路147号森茂大厦1202E 电话:0411-********/80哈尔滨 哈尔滨市南岗区民益街76号网通广场20楼 电话:0451-********杭州 杭州市潮王路240号银地大厦一层 电话:0571-********武汉 湖北省武汉市建设大道568号I座21层2105-2107室 电话:027-********长沙 长沙市芙蓉区韶山北路159号通程国际大酒店写字楼1208室 电话:0731-*******郑州 郑州市中原中路220号裕达国际贸易中心A 座22层2212 电话:0371-********温州 温州市车站大道高联大厦9B3 电话:0577-********合肥 合肥市淮河路303号安徽邮电大厦11层D 座2号 电话:0551-*******南京 南京市汉中路89号金鹰国际商城21层B2-C1座 电话:025-********常州 常州市延陵西路23、25、27、29号投资广场17层1706单元 电话:0519-********无锡 无锡市中山路343号东方广场商务楼11层GH 座 电话:0510-********苏州 苏州工业园区苏华路2号国际大厦1610单元 电话:0512-********东莞 东莞市南城区胜和路3号胜和广场C 座11C 电话:0769-********厦门 厦门思明区鹭江道8号国际银行大厦12层H 室 电话:0592-*******福州 福州市五四路国贸广场29楼C1 电话:0591-********西安 西安市南关正街88号长安国际广场B 座1006室 电话:029-********重庆 重庆市渝中区邹容路68号大都会商厦2301室 电话:023-********昆明 昆明市北京路155号附1号红塔大厦1201室 电话:0871-*******乌鲁木齐 新疆乌鲁木齐中山路86号中泉广场13楼B 室 电话:0991-*******富士施乐在华分支机构富士施乐全国服务热线:800-820-5146 400-820-5146/Phaser 3125/N 激光打印机具有让人信赖的高品质,同时价格低廉。
- 1、下载文档前请自行甄别文档内容的完整性,平台不提供额外的编辑、内容补充、找答案等附加服务。
- 2、"仅部分预览"的文档,不可在线预览部分如存在完整性等问题,可反馈申请退款(可完整预览的文档不适用该条件!)。
- 3、如文档侵犯您的权益,请联系客服反馈,我们会尽快为您处理(人工客服工作时间:9:00-18:30)。
Supplied software .................................................................................................................................................... 3.1 Printer driver features .............................................................................................................................................. 3.2 System requirements .............................................................................................................................................. 3.2
CONTENTS
1. Introduction
Special features ...................................................................................................................................................... 1.1 Printer overview ...................................................................................................................................................... 1.2 Control panel overview ............................................................................................................................................ 1.3 Finding more information ........................................................................................................................................ 1.3 Selecting a location ................................................................................................................................................. 1.4
of Microsoft Corporation. • PostScript 3 is a trademark of Adobe System, Inc. • UFST® and MicroType™ are registered trademarks of Monotype Imaging Inc. • TrueType, LaserWriter, and Macintosh are trademarks of Apple Computer, Inc. • All other brand or product names are trademarks of their respective companies or organizations.
This manual is provided for information purposes only. All information included herein is subject to change without notice. Xerox Corporation is not responsible for any direct or indirect damages, arising from or related to the use of this manual. © 2006 Xerox Corporation. All rights reserved.
6. Basic printing
Printing a document ................................................................................................................................................ 6.1 Canceling a print job ............................................................................................................................................... 6.1
7. Ordering supplies and accessories
Toner cartridge ........................................................................................................................................................ 7.1 How to purchase ..................................................................................................................................................... 7.1
4. Network setup(Phaser 3125/N only)
Introduction ............................................................................................................................................................. 4.1 Supported operating systems ............................................................................................ 4.1
8. Maintenance
Cleaning the printer ................................................................................................................................................. 8.1 Maintaining the toner cartridge ................................................................................................................................ 8.3 Printing a configuration page .................................................................................................................................. 8.5 Maintenance parts ................................................................................................................................................... 8.5
• Phaser 3124/B, Phaser 3125/B, and Phaser 3125/N are model names of Xerox Corporation. • Xerox and Xerox logo are trademarks of Xerox Corporation. • Centronics is a trademark of Centronics Data Computer Corporation. • IBM and IBM PC are trademarks of International Business Machines Corporation. • PCL and PCL 6 are trademarks of Hewlett-Packard company. • Microsoft, Windows, Windows 98, Windows Me, Windows 2000, Windows NT 4.0, Windows XP(32/64 bit) and Windows 2003 are registered trademarks
2. Basic setup
Printing a demo page .............................................................................................................................................. 2.1 Using toner save mode ........................................................................................................................................... 2.1