RIP路由配置 思科
Cisco路由器配置RIP动态路由
Cisco路由器配置RIP动态路由本⼈是⽹络⼯程专业毕业的,可是当年⽹络学的⼀般般。
⽬前也致⼒于Linux和开发⽅⾯的⽅向。
可是每⼀次去⾯试,别⼈看了我的简历就要问我⼏个⽹络⼯程的问题。
在⼀些中⼩公司也待了近10年,每每⽤的最多的就是静态路由了,静态路由虽然⽐较死板,但是效率还是挺⾼的。
⽽且⼤部分设备都⽀持。
哪怕是在Windows系统⾥做个route add -p 192.168.10.0 mask 255.255.255.0 192.168.20.254 .就这⼀条windows⾥的命令,也⾮常实⽤啊。
如果要查看路由表,就是route print.但是很多⼤公司⾥⽤的都是rip ospf bgp .所以我也想把这些协议都写下来,防⽌下次⾯试的时候⼜忘记了。
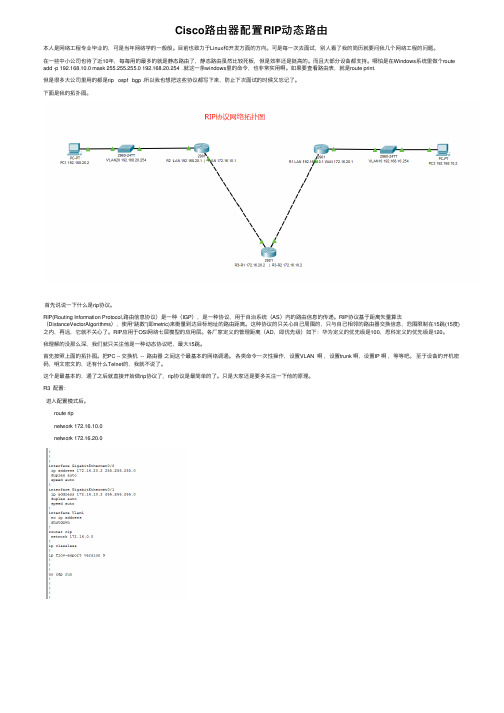
下⾯是我的拓扑图。
⾸先说说⼀下什么是rip协议。
RIP(Routing Information Protocol,路由信息协议)是⼀种(IGP),是⼀种协议,⽤于⾃治系统(AS)内的路由信息的传递。
RIP协议基于距离⽮量算法(DistanceVectorAlgorithms),使⽤“跳数”(即metric)来衡量到达⽬标地址的路由距离。
这种协议的只关⼼⾃⼰周围的,只与⾃⼰相邻的路由器交换信息,范围限制在15跳(15度)之内,再远,它就不关⼼了。
RIP应⽤于OSI⽹络七层模型的应⽤层。
各⼚家定义的管理距离(AD,即优先级)如下:华为定义的优先级是100,思科定义的优先级是120。
我理解的没那么深,我们就只关注他是⼀种动态协议吧,最⼤15跳。
⾸先按照上⾯的拓扑图。
把PC -- 交换机 -- 路由器之间这个最基本的⽹络调通。
各类命令⼀次性操作,设置VLAN 啊,设置trunk 啊,设置IP 啊,等等吧。
⾄于设备的开机密码,明⽂密⽂的,还有什么Telnet的,我就不说了。
这个是最基本的,通了之后就直接开始做rip协议了,rip协议是最简单的了。
只是⼤家还是要多关注⼀下他的原理。
思科设备路由器rip协议配置

本次讲解路由器rip协议的配置:RIP是基于D-V算法的路由协议,使用跳数(Hop Count)来表示度量值(Metric)。
跳数是一个数据报到达目标所必须经过的路由器的数目。
RIP认为跳数少的路径为最优路径。
路由器收集所有可达目标网络的路径,从中选择去往同一个网络所用跳数最少的路径信息,生成路由表;然后把所能收集到的路由(路径)信息中的跳数加1后生成路由更新通告,发送给相邻路由器:最后依次逐渐扩散到全网。
RIP每30s发送一次路由信息更新。
本例配置模型图命令行:RA命令配置:Router>enableRouter#conf tEnter configuration commands, one per line. End with CNTL/Z.Router(config)#hostname R1R1(config)#router rip //使用rip协议R1(config-router)#version 2 //使用RIPv2版本R1(config-router)#network 192.1.1.0 255.255.255.0 //指定与该路由器直接相连的网络R1(config-router)# network 202.1.1.5 //指定与该路由器直接相连的网络R1(config-router)#no shutdownR1(config-router)#exitR1#show ip route //查看路由信息Codes: C - connected, S - static, I - IGRP, R - RIP, M - mobile, B - BGPD - EIGRP, EX - EIGRP external, O - OSPF, IA - OSPF inter areaN1 - OSPF NSSA external type 1, N2 - OSPF NSSA external type 2E1 - OSPF external type 1, E2 - OSPF external type 2, E - EGPi - IS-IS, L1 - IS-IS level-1, L2 - IS-IS level-2, ia - IS-IS inter area* - candidate default, U - per-user static route, o - ODRP - periodic downloaded static routeGateway of last resort is not set//目前没有配置RB路由器,所以上述没有rip协议的配置生成R1#conf tEnter configuration commands, one per line. End with CNTL/Z.R1(config)#int s1/0R1(config-if)#ip address 202.1.1.5 255.255.255.252 //将模型图中的IP配置划分到对应端口R1(config-if)#no shutdown%LINK-5-CHANGED: Interface Serial1/0, changed state to downR1(config-if)#exitR1(config)#int f0/0R1(config-if)#ip address 192.1.1.1 255.255.255.0 //将模型图中的IP配置划分到对应端口R1(config-if)#clock rate 64000 //配置时钟模式DCE端R1(config-if)#bandwidth 64R1(config-if)#no shutdownR1#wrBuilding configuration...[OK]RB命令配置:Router>enableRouter#conf tEnter configuration commands, one per line. End with CNTL/Z.Router(config)#router rip //使用rip协议Router(config-router)#version 2 //使用rip协议v2版本Router(config-router)#network 192.168.2.0 //指定与该路由器直接相连的网络Router(config-router)#network 202.1.1.6 //指定与该路由器直接相连的网络Router(config-router)#exitRouter(config)#int s1/0Router(config-if)#ip address 202.1.1.6 255.255.255.252 //将模型图中的IP配置划分到对应端口Router(config-if)#bandwidth 64 //配置时钟模式DTE端Router(config-if)#no shutdown%LINK-5-CHANGED: Interface Serial1/0, changed state to upRouter(config-if)#exitRouter(config)#%LINEPROTO-5-UPDOWN: Line protocol on Interface Serial1/0, changed state to upRouter(config)#int f0/0Router(config-if)#ip address 192.168.2.1 255.255.255.0 //将模型图中的IP配置划分到对应端口Router(config-if)#no shutdown%LINK-5-CHANGED: Interface FastEthernet0/0, changed state to up%LINEPROTO-5-UPDOWN: Line protocol on Interface FastEthernet0/0, changed state to upRouter(config-if)#exitRouter(config)#exitRouter#%SYS-5-CONFIG_I: Configured from console by consoleRouter#show ip route //查看路由配置信息Codes: C - connected, S - static, I - IGRP, R - RIP, M - mobile, B - BGPD - EIGRP, EX - EIGRP external, O - OSPF, IA - OSPF inter areaN1 - OSPF NSSA external type 1, N2 - OSPF NSSA external type 2E1 - OSPF external type 1, E2 - OSPF external type 2, E - EGPi - IS-IS, L1 - IS-IS level-1, L2 - IS-IS level-2, ia - IS-IS inter area* - candidate default, U - per-user static route, o - ODRP - periodic downloaded static routeGateway of last resort is not setR 192.1.1.0/24 [120/1] via 202.1.1.5, 00:00:08, Serial1/0 //已配置的rip协议C 192.168.2.0/24 is directly connected, FastEthernet0/0202.1.1.0/30 is subnetted, 1 subnetsC 202.1.1.4 is directly connected, Serial1/0Router#wrBuilding configuration...[OK]Router#说明:上述两路由器配置结束以后,可以互相把四台PC机相互Ping通测试。
启用RIP路由进程和RIP参数的配置步骤及示例

7.4.1 启用RIP路由进程和RIP 参数的配置步骤及示例 2010-10-19 14:48 王达 华中科技大学出版社 我要评论(0)∙ 摘要:《路由器配置与管理完全手册-Cisco 篇》第7章Cisco 路由器静态/RIP 和策略路由配置,本章主要介绍的就是Cisco 路由器中的这两类比较简单的路由配置方法。
并在本章最后介绍了Cisco 路由器中基于策略的路由配置方法。
本节为大家介绍启用RIP 路由进程和RIP 参数的配置步骤及示例。
∙ 标签:路由器 Cisco 路由器配置与管理完全手册-Cisco 篇∙以下示例是设置路由器应用一个值为10的度量偏移到流出路由度量中。
1.offset-list 21 out 10以下示例是设置路由器应用一个值为10的度量偏移到从ethernet 0接口上学习到的路由度量上。
1.offset-list 21 in 10 ethernet 0以下示例设置每隔5秒广播一次路由更新。
如果一个路由器在15内没有被侦听到,则本地路由器将视为那个路由器不可达。
再过15秒,就要发送抑制消息。
在被抑制的最后,则到达那个路由器的路由将从路由表中删除。
1.router rip2. timers basic 5 15 15 30【经验之谈】表7-4所示的参数其实就是设置一个路由完整的生命周期中的各个阶段所需经过的时间值:路由的产生→路由的失效→路由的阻止→路由的删除。
Update参数设置的是路由更新包间发送的时间间隔,也就是每隔多少时间发送一次路由更新包。
相当于路由的产生。
Invalid参数设置的是在路由宣告无效后,可以继续用来转发数据包的时间段,相当于路由失效了。
Holddown参数设置的是当路由过了无效期后,在不允许新的路由淹没原路由前所需等待的时间,相当于路由被阻止了。
Flush参数是用来设置接受了新的更好的路由,在从路由表中删除原路由前所需等待的时间,相当于路由的删除。
具体参见本章前面的7.3.2节。
RIP协议配置

RIP协议及配置RIP(Routing Information Protocol,路由信息协议)是使用最广泛的距离向量路由协议,本节阐述了RIP协议的特点以及思科路由器RIP协议的配置。
RIP协议概述Xerox公司在20世纪70年代开发的,是IP所使用的第一个路由协议,现在RIP已经成为从UNIX系统到各种路由器的必备路由协议。
RIP协议有以下特点:(1)RIP是自治系统内部使用的协议即内部网关协议,使用的是距离向量算法。
(2)RIP使用UDP的520端口进行RIP进程之间的通信。
(3)RIP主要有两个版本:RIPv1和RIPv2。
RIPv1协议的具体描述在RFC1058中,RIPv2是对RIPv1协议的改进,其协议的具体描述在RFC1723中。
(4)RIP协议以跳数作为网络度量值。
(5)RIP协议采用广播或组播进行通信,其中RIPv1只支持广播,而RIPv2除支持广播外还支持组播。
(6)RIP协议支持主机被动模式,即RIP协议允许主机只接收和更新路由信息而不发送信息。
(7)RIP协议支持默认路由传播。
(8)RIP协议的网络直径不超过15跳,适合于中小型网络。
16跳时认为网络不可达。
(9)RIPv1是有类路由协议,RIPv2是无类路由协议,即RIPv2的报文中含有掩码信息。
思科路由器RIP协议的配置1.RIP中的定时器(1)更新定时器:用于设置路由信息的更新时间,RIP的默认值是30秒。
(2)失效定时器:如果路由器在实效定时到达后,没有收到某个路由的任何信息,则认为该路由失效,RIP的默认值是180秒。
(3)保持定时器:就是抑制定时器。
在某条路由被告知为不可达时,启动定时器。
RIP默认值是180秒。
(4)清除定时器:当某条路由成为无效路由后,从路由表中删除这条路由所需等待的时间。
RIP默认值是240秒。
2. RIP配置中的常用命令(1)启用RIP命令Router(config)#router ripRouter(config-router)#(2)启用通告RIP的网段Router(config-router)#network network(3)在某个接口上启用或禁用水平分割Router(config-if)#ip split-horizon(4)指定RIP邻居路由器Router(config-router)#neighber ipaddress (5)指定RIP版本Router(config-router)#version[1|2](6)指定接口发送RIP保文版本Router(config-if)#ip rip send version <[1] [2]> (7)指定接口接收RIP保文版本Router(config-if)#ip rip receive version <[1] [2]> (8)禁止接口转发路由更新信息Router(config-router)#passive-interface iftype ifnumber (9)修改更新时间Router(config-router)#update-time seconds(10)修改保持时间Router(config-router)#holdown-time seconds(11)关闭自动汇总功能Router(config-router)#no auto-summaryRIP配置示例通过三台路由器互连的网络中,每个路由器的局域网段通过一台交换机连接了两台计算机,通过配置路由器RTA、RTB和RTC的动态路由协议RIP ,使全网可以通讯。
思科路由器配置命令详解及实例
思科路由器配置命令详解及实例思科路由器配置命令详解及实例1.概述1.1 路由器的基本概念1.2 Cisco路由器的基本配置1.3 Cisco路由器的命令行界面(CLI)2.初始配置2.1 配置路由器主机名2.2 配置管理接口2.3 配置登录认证2.4 配置时钟参数2.5 配置域名解析2.6 保存配置3.界面及IP配置3.1 查看接口状态3.2 配置接口IP地质3.3 配置子接口3.4 配置IP地质池3.5 配置默认网关4.静态路由配置4.1 配置静态路由4.2 查看静态路由表4.3 清除静态路由5.动态路由配置5.1 配置动态路由协议(如OSPF、EIGRP、RIP)5.2 查看动态路由表5.3 清除动态路由6.NAT配置6.1 配置静态NAT6.2 配置动态NAT6.3 配置PAT7.ACL配置7.1 配置标准ACL7.2 配置扩展ACL7.3 配置ACL应用8.VPN配置8.1 配置IPSec VPN8.2 配置SSL VPN8.3 配置GRE隧道9.服务配置9.1 配置DHCP服务9.2 配置DNS服务9.3 配置NTP服务10.安全配置10.1 AAA认证配置10.2 配置SSH远程访问10.3 配置防火墙11.故障排除11.1 查看日志信息11.2 执行连通性测试11.3 清除路由表11.4 恢复出厂设置12.附件附件1:示例配置文件13.法律名词及注释- 路由器:一种网络设备,用于在多个网络之间转发数据包的设备。
- Cisco路由器:思科公司生产的路由器设备,广泛用于企业和服务提供商的网络中。
- CLI:命令行界面,一种提供给用户输入命令的界面。
- IP地质:Internet协议地质,用于唯一标识网络中的设备。
- 接口:路由器上的物理或逻辑接口,用于与其他设备进行通信。
- 静态路由:管理员手动配置的路由表项,用于指定数据包传输的下一跳。
- 动态路由:通过路由协议自动学习并更新的路由表项,用于实现自动化的路由选择。
Cisco路由器静态、动态路由配置
Cisco路由器静态、动态路由配置2010-07-22 20:31Cisco路由器静态、动态路由配置本文介绍Cisco路由器静态、动态路由配置,动态路由协议这里只介绍RIP、EIGRP、OSPF三种。
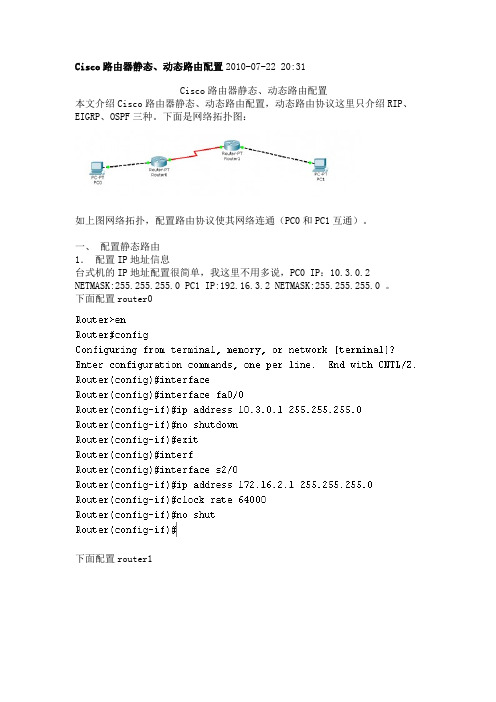
下面是网络拓扑图:如上图网络拓扑,配置路由协议使其网络连通(PC0和PC1互通)。
一、配置静态路由1.配置IP地址信息台式机的IP地址配置很简单,我这里不用多说,PC0 IP:10.3.0.2 NETMASK:255.255.255.0 PC1 IP:192.16.3.2 NETMASK:255.255.255.0 。
下面配置router0下面配置router1这里我们来试试PC0和PC1互通性PC0 ping PC1如图所示:这里我们看到PC0和PC1并不能相通。
PC1 ping PC0如图所示:这里我们看到PC1和PC0也并不能相通。
2.配置静态路由协议Router(config)#ip route 192.16.3.0 255.255.255.0 172.16.2.2 R1(config)#ip route 10.3.0.0 255.255.255.0 172.16.2.1 下面我们再来试试PC0和PC1互通性PC0 ping PC1如图所示:这里我们看到PC0和PC1能相通,我们配置的静态路由协议起作用了。
PC1 ping PC0如图所示:这里我们看到PC1和PC0能相通,我们配置的静态路由协议也起作用了。
二、 RIP路由协议的配置1. 配置IP地址信息配置IP地址信息见上面配置静态路由中配置IP地址信息,我这里不多说。
这里配置了ip地址以后如静态路由中一样,PC0和PC1不能相通。
2. 配置rip路由协议配置router0Router(config)#router ripRouter(config-router)#version 2Router(config-router)#network 10.3.0.0Router(config-router)#network 172.16.2.0配置router1R1(config)#router ripR1(config-router)#version 2R1(config-router)#network 192.16.3.0R1(config-router)#network 172.16.2.03. 查看rip路由信息查看router0查看router1这里我们可以看到R开头的路由信息即是通过rip协议得到的路由信息。
思科交换机路由器常规配置命令

思科交换机路由器常规配置命令你还在为不知道思科交换机路由器常规配置命令而烦恼么?接下来是小编为大家收集的思科交换机路由器常规配置命令教程,希望能帮到大家。
思科交换机路由器常规配置命令一、基本路由器的检验命令show versionshow processesshow protocolsshow memshow ip routeshow startup-configshow running-configshow flash>show interfaces二、基本路由配置命令进入:config terminal/memory/network配置网络时常采用的命令:copy和load1.标识:hostname 标识名2.启动标识:banner 启动标识3.接口:interface 端口号4.密码:line 0 6loginpasswd 口令enable password/secret 口令5.接口:1)配置端口interface 端口号clock rate 时钟速率(64000)/* 在串口中配置 */bandwidth 带宽(缺省56) /* 在串口中配置 */ media-type 介质类型 /* 在以太网口上 */early-token release /* 在令牌环网口上 */ring-speed 16 /* 在令牌环网口上 */no shutdownwrite memory2)检验端口show interfacesshow controllers6. 配置环境1) 引导方式boot system flash IOS-filenameboot system tftp IOS-filename tftp-address boot system rom2) 配置Register值config-register 0x21027. 查看邻居路由show cdp interfaceshow cdp neighbors [detail]show cdp entry routerA8.IP Address 配置Ip address 网络地址掩码Ip host 主机名 addressIp name-server 服务器地址1 服务器地址2 。
cisco思科路由器设置
cisco思科路由器设置思科cisco是全球领先且顶尖的通讯厂商,出产的路由器功能也是很出色的,那么你知道cisco路由器详细知识吗?下面是小编收集整理的cisco思科路由器设置范文,欢迎借鉴参考。
cisco思科路由器设置(一)1. Cisco交换机支持的命令:交换机基本状态:switch: ;ROM状态,路由器是rommon>hostname> ;用户模式hostname# ;特权模式hostname(config)# ;全局配置模式hostname(config-if)# ;接口状态交换机口令设置:switch>enable ;进入特权模式switch#config terminal ;进入全局配置模式switch(config)#hostname ;设置交换机的主机名switch(config)#enable secret xxx ;设置特权加密口令switch(config)#enable password xxa ;设置特权非密口令switch(config)#line console 0 ;进入控制台口switch(config-line)#line vty 0 4 ;进入虚拟终端switch(config-line)#login ;允许登录switch(config-line)#password xx ;设置登录口令xxswitch#exit ;返回命令交换机VLAN设置:switch#vlan database ;进入VLAN设置switch(vlan)#vlan 2 ;建VLAN 2switch(vlan)#no vlan 2 ;删vlan 2switch(config)#int f0/1 ;进入端口1switch(config-if)#switchport access vlan 2 ;当前端口加入vlan2switch(config-if)#switchport mode trunk ;设置为干线switch(config-if)#switchport trunk allowed vlan 1,2 ;设置允许的vlanswitch(config-if)#switchport trunk encap dot1q ;设置vlan 中继switch(config)#vtp domain ;设置发vtp域名switch(config)#vtp password ;设置发vtp密码switch(config)#vtp mode server ;设置发vtp模式switch(config)#vtp mode client ;设置发vtp模式交换机设置IP地址:switch(config)#interface vlan 1 ;进入vlan 1switch(config-if)#ip address ;设置IP地址switch(config)#ip default-gateway ;设置默认网关switch#dir flash: ;查看闪存交换机显示命令:switch#write ;保存配置信息switch#show vtp ;查看vtp配置信息switch#show run ;查看当前配置信息switch#show vlan ;查看vlan配置信息switch#show interface ;查看端口信息switch#show int f0/0 ;查看指定端口信息2. 路由器支持的命令:路由器显示命令:router#show run ;显示配置信息router#show interface ;显示接口信息router#show ip route ;显示路由信息router#show cdp nei ;显示邻居信息router#reload ;重新起动路由器口令设置:router>enable ;进入特权模式router#config terminal ;进入全局配置模式router(config)#hostname ;设置交换机的主机名router(config)#enable secret xxx ;设置特权加密口令router(config)#enable password xxb ;设置特权非密口令router(config)#line console 0 ;进入控制台口router(config-line)#line vty 0 4 ;进入虚拟终端router(config-line)#login ;要求口令验证router(config-line)#password xx ;设置登录口令xxrouter(config)#(Ctrl+z) ;返回特权模式router#exit ;返回命令路由器配置:router(config)#int s0/0 ;进入Serail接口router(config-if)#no shutdown ;激活当前接口router(config-if)#clock rate 64000 ;设置同步时钟router(config-if)#ip address ;设置IP地址router(config-if)#ip address second ;设置第二个IProuter(config-if)#int f0/0.1 ;进入子接口router(config-subif.1)#ip address ;设置子接口IProuter(config-subif.1)#encapsulation dot1q ;绑定vlan中继协议router(config)#config-register 0x2142 ;跳过配置文件router(config)#config-register 0x2102 ;正常使用配置文件router#reload ;重新引导路由器文件操作:router#copy running-config startup-config ;保存配置router#copy running-config tftp ;保存配置到tftprouter#copy startup-config tftp ;开机配置存到tftprouter#copy tftp flash: ;下传文件到flashrouter#copy tftp startup-config;下载配置文件ROM状态:Ctrl+Break ;进入ROM监控状态rommon>confreg 0x2142 ;跳过配置文件rommon>confreg 0x2102 ;恢复配置文件rommon>reset ;重新引导rommon>copy xmodem: flash: ;从console传输文件rommon>IP_ADDRESS=10.65.1.2 ;设置路由器IP rommon>IP_SUBNET_MASK=255.255.0.0 ;设置路由器掩码rommon>TFTP_SERVER=10.65.1.1 ;指定TFTP服务器IP rommon>TFTP_FILE=c2600.bin ;指定下载的文件rommon>tftpdnld ;从tftp下载rommon>dir flash: ;查看闪存内容rommon>boot ;引导IOS静态路由:ip route ;命令格式router(config)#ip route 2.0.0.0 255.0.0.0 1.1.1.2 ;静态路由举例router(config)#ip route 0.0.0.0 0.0.0.0 1.1.1.2 ;默认路由举例动态路由:router(config)#ip routing ;启动路由转发router(config)#router rip ;启动RIP路由协议。
计算机网络实验六RIP路由协议配置

太原理工大学现代科技学院计算机通信网络课程实验报告专业班级学号姓名指导教师实验名称 同组人 专业班级 学号 姓名 成绩 一、实验目的 计算机通信网络实验指导书 掌握RIP 动态路由协议的配置、诊断方法; 二、实验任务 1、配置RIP 动态路由协议,使得3 台Cisco 路由器模拟远程网络互联; 2、对运行中的RIP 动态路由协议进行诊断; 三、实验设备 Cisco 路由器3 台,带有网卡的工作站PC2 台,控制台电缆一条,交叉线、V35 线若干; 四、实验环境 五、实验步骤 1、运行Cisco Packet Tracer 软件,在逻辑工作区放入3 台路由器、……………………………………装………………………………………订…………………………………………线………………………………………两台工作站PC,分别点击各路由器,打开其配置窗口,关闭电源,分别加入一个2 口同异步串口网络模块WIC-2T,重新打开电源;然后,用交叉线Copper Cross-Over按图6-1其中静态路由区域所示分别连接路由器和各工作站PC,用DTE 或DCE 串口线缆连接各路由器router0 router1,注意按图中所示接口连接S0/0 为DCE,S0/1 为DTE;2、分别点击工作站PC1、PC3,进入其配置窗口,选择桌面Desktop项,选择运行IP 设置IP Configuration,设置IP 地址、子网掩码和网关分别为PC1:/24 gw: PC3:/24 gw: 3、点击路由器R1,进入其配置窗口,点击命令行窗口CLI项,输入命令对路由器配置如下:点击路由器R2,进入其配置窗口,点击命令行窗口CLI项,输入命令对路由器配置如下:同理对R3 进行相应的配置:4、测试工作站PC 间的连通性;从PC1 到PC3:PC>ping 不通5、设置RIP 动态路由接前述实验,继续对路由器R1 配置如下:同理,在路由器R2、R3 上做相应的配置:6、在路由器R1 上输入show ip route 命令观察路由信息,可以看到增加的RIP 路由信息;同理,在路由器R2、R3 上输入show ip route 命令观察路由信息; 从PC1 到PC3:PC>ping 通,六、实验体会在实验中,我们掌握RIP动态路由协议的配置、诊断方法;对运行中的RIP动态路由协议进行诊断,在对设备路由器的连接时,先将路由器的电源开关关闭,加入2个WIC-2T,再关上电源,路由器之间进行连接应注意端口的;从实验中,对RIP配置的了解有一定的认识与理解,使自己在计算机领域的知识又有了一定的提高;。
思科路由器配置命令简写与完整对照

简写命令
完整命令
1 Router>
2 Router>en
用户模式: Router>
特权模式: Router>enable
Router#
Router# 全局配置模式
3 Router#conf t
Router#config terminal
Router(config)#
Router(config)#
Router(config-subif)#
Router(config-subif)#
line模式:
6 Router(config)#lin c 0
Router(config)#line console 0
Router(config-line)#
Router(config-line)#
路由模式
7 Router(config)#router rip(rip是一种路由协议)
14 Router(config)#in f1/0 (有些写成e0/1,e0) Router(config-if)#ip ad 10.20.30.40 255.0.0.0
Router(config)#interface f1/0 (有些写成e0/1,e0) Router(config-if)#ip address 10.20.30.40 255.0.0.0
Router(config-if)#no shutdown Router(config-if)#exit
Router(config)#ip route 目标网段 目标网段掩码 下一跳入口IP地址 Router(config)#ip route 目标网段 目标网段掩码 下一跳入口IP地址
默认路由的配置
Cisco-Packet-Tracer实验7:RIP-路由协议的配置

实验7:RIP 路由协议的配置一、实验目的1、练习RIP 动态路由协议的基本配置;2、掌握了解RIP 路由协议原理二、实验环境:Packet tracer 5.0三、关于RIP 的基础知识RIP(Routing Information Protocol)是最常使用的部网关协议(Interior Gateway Protocol)之一,是一种典型的基于D-V 算法的动态路由协议。
通过UDP(User Datagram Protocol)报文交换路由信息,使用跳数(Hop Count)来衡量到达目的地的距离(被称为路由权-Routing cost)。
由于在RIP 于或等于16 的跳数被定义为无穷大(即目的网络或主机不可达),所以RIP 一般用于采用同类技术的中等规模的网络,如校园网及一个地区围的网络,RIP 并非为复杂、大型的网络而设计。
启动RIP,进入RIP 视图:router Rip关闭RIP:no rip在指定的网络上使能RIP network{ network-number| all }在指定的网络上禁用RIP no network{ network-number| all四:实验步骤:拓扑图如下所示:配置过程:Router1:Router>enable //进入特权模式Router#conf ter //进入全局配置模式Enter configuration commands, one per line. End with CNTL/Z.Router(config)#int f0/0 //配置Fa0/0 接口Router(config-if)#ip add 1.1.1.2 255.255.255.0Router(config-if)#no shutdown%LINK-5-CHANGED: Interface FastEthernet0/0, changed state to upRouter(config-if)#%LINEPROTO-5-UPDOWN: Line protocol on Interface FastEthernet0/0, changed state to upRouter(config-if)#exitRouter(config)#int s0/0/0 //配置串口Router(config-if)#ip add 1.1.6.1 255.255.255.0Router(config-if)#clock rate 64000Router(config-if)#no shutdown%LINK-5-CHANGED: Interface Serial0/0/0, changed state to downRouter(config-if)#exitRouter(config)#int s0/0/1 //配置串口Router(config-if)#ip add 1.1.2.1 255.255.255.0Router(config-if)#clock rate 64000Router(config-if)#no shutdown%LINK-5-CHANGED: Interface Serial0/0/1, changed state to downRouter(config-if)#exitRouter(config)#router rip //进入RIP 视图Router(config-router)#network 1.0.0.0 //发布直连网络Router(config-router)#exitRouter(config)#exitRouter#%SYS-5-CONFIG_I: Configured from console by consoleRouter#show ip route //查看路由表Codes: C - connected, S - static, I - IGRP, R - RIP, M - mobile, B - BGPD - EIGRP, EX - EIGRP external, O - OSPF, IA - OSPF inter areaN1 - OSPF NSSA external type 1, N2 - OSPF NSSA external type 2E1 - OSPF external type 1, E2 - OSPF external type 2, E - EGPi - IS-IS, L1 - IS-IS level-1, L2 - IS-IS level-2, ia - IS-IS inter area * - candidate default, U - per-user static route, o - ODRP - periodic downloaded static routeGateway of last resort is not set1.0.0.0/24 is subnetted, 1 subnetsC 1.1.1.0 is directly connected, FastEthernet0/0Router#Router2:Router>enableRouter#conf terEnter configuration commands, one per line. End with CNTL/Z.Router(config)#int f0/0Router(config-if)#ip add 1.1.5.2 255.255.255.0Router(config-if)#no shutdown%LINK-5-CHANGED: Interface FastEthernet0/0, changed state to up%LINEPROTO-5-UPDOWN: Line protocol on Interface FastEthernet0/0, changed state to upRouter(config-if)#exitRouter(config)#int s0/0/1Router(config-if)#ip add 1.1.2.2 255.255.255.0Router(config-if)#clock rate 64000Router(config-if)#no shutdown%LINK-5-CHANGED: Interface Serial0/0/1, changed state to upRouter(config-if)#exitRouter(config)#int s0/0/0Router(config-if)#ip add 1.1.3.1 255.255.255.0Router(config-if)#clo rate 64000Router(config-if)#no shutdown%LINK-5-CHANGED: Interface Serial0/0/0, changed state to downRouter(config-if)#exitRouter(config)#router ripRouter(config-router)#network 1.0.0.0Router(config-router)#exitRouter(config)#exitRouter#%SYS-5-CONFIG_I: Configured from console by consoleRouter#Router#show ip routeCodes: C - connected, S - static, I - IGRP, R - RIP, M - mobile, B - BGPD - EIGRP, EX - EIGRP external, O - OSPF, IA - OSPF inter areaN1 - OSPF NSSA external type 1, N2 - OSPF NSSA external type 2E1 - OSPF external type 1, E2 - OSPF external type 2, E - EGPi - IS-IS, L1 - IS-IS level-1, L2 - IS-IS level-2, ia - IS-IS inter area * - candidate default, U - per-user static route, o - ODRP - periodic downloaded static routeGateway of last resort is not set1.0.0.0/24 is subnetted, 3 subnetsR 1.1.1.0 [120/1] via 1.1.2.1, 00:00:11, Serial0/0/1C 1.1.2.0 is directly connected, Serial0/0/1C 1.1.5.0 is directly connected, FastEthernet0/0Router#Router3:Router>enRouter#conf terEnter configuration commands, one per line. End with CNTL/Z.Router(config)#int f0/0Router(config-if)#ip add 1.1.4.2 255.255.255.0Router(config-if)#no shutdown%LINK-5-CHANGED: Interface FastEthernet0/0, changed state to up%LINEPROTO-5-UPDOWN: Line protocol on Interface FastEthernet0/0, changed state to upRouter(config-if)#exitRouter(config)#int s0/0/0Router(config-if)#ip add 1.1.6.2 255.255.255.0Router(config-if)#clo rate 64000Router(config-if)#no shutdownRouter(config-if)#%LINK-5-CHANGED: Interface Serial0/0/0, changed state to upRouter(config-if)#exitRouter(config)#int s0/0/1Router(config-if)#ip add 1.1.3.2 255.255.255.0Router(config-if)#clock rate 64000Router(config-if)#no shutdown%LINK-5-CHANGED: Interface Serial0/0/1, changed state to upRouter(config-if)#exitRouter(config)#router ripRouter(config-router)#%LINEPROTO-5-UPDOWN: Line protocol on Interface Serial0/0/1, changed state to upRouter(config-router)#network 1.0.0.0Router(config-router)#exitRouter(config)#exitRouter#%SYS-5-CONFIG_I: Configured from console by consoleRouter#show ip rouRouter#show ip routeCodes: C - connected, S - static, I - IGRP, R - RIP, M - mobile, B - BGPD - EIGRP, EX - EIGRP external, O - OSPF, IA - OSPF inter areaN1 - OSPF NSSA external type 1, N2 - OSPF NSSA external type 2E1 - OSPF external type 1, E2 - OSPF external type 2, E - EGPi - IS-IS, L1 - IS-IS level-1, L2 - IS-IS level-2, ia - IS-IS inter area * - candidate default, U - per-user static route, o - ODRP - periodic downloaded static routeGateway of last resort is not set1.0.0.0/24 is subnetted, 6 subnetsR 1.1.1.0 [120/1] via 1.1.6.1, 00:00:02, Serial0/0/0R 1.1.2.0 [120/1] via 1.1.6.1, 00:00:02, Serial0/0/0[120/1] via 1.1.3.1, 00:00:10, Serial0/0/1C 1.1.3.0 is directly connected, Serial0/0/1C 1.1.4.0 is directly connected, FastEthernet0/0R 1.1.5.0 [120/1] via 1.1.3.1, 00:00:10, Serial0/0/1C 1.1.6.0 is directly connected, Serial0/0/0之后按照图示配置好主机的IP 地址,使用ping 命令测试相互之间的连通性,主机之间可以相互ping 通的,如下所示:。
思科CISCO动态路由与RIP协议详解

思科CISCO动态路由与RIP协议详解动态路由是计算机网络中常用的一种路由选择机制。
与静态路由相比,动态路由可以根据网络状态自动调整路由表,提高网络的效率和可靠性。
思科CISCO作为网络设备的领导厂商,提供了丰富的动态路由协议,其中之一就是RIP协议。
一、动态路由的基本概念动态路由是指通过交换路由信息,自动构建和维护路由表的路由选择方法。
它主要包括路由器之间通过路由协议交换信息、计算最佳路径、更新路由表等步骤。
与静态路由相比,动态路由的优势在于提供了一种自动化的方式,可以根据网络环境的变化来调整路由路径,适应网络的动态变化。
二、RIP协议概述RIP(Routing Information Protocol)是思科CISCO提供的一种最常见的动态路由协议。
RIP协议使用跳数(即经过的路由器个数)来衡量路径的优劣,在路由选择时选择跳数最少的路径。
RIP协议简单易用,适用于小型网络,但是在大型网络中由于其算法的局限性,可能会产生一些问题。
1. RIP协议的工作原理RIP协议中的路由器使用路由信息表(Routing Table)来存储路由信息,每个路由器定期向相邻的路由器广播自己的路由信息,并接收和更新其他路由器的路由信息。
RIP协议中,每个路由器最初将其直连网络的距离设置为0,并随着接收到的路由信息更新路由表。
当路由器检测到相邻路由器的距离发生变化时,它会更新路由表,并将新的路由信息通知其他路由器。
2. RIP协议的特点RIP协议具有以下几个特点:- 距离向量协议:RIP协议以跳数作为衡量路径优劣的标准,采用的是距离向量算法。
这意味着RIP协议只关心路径中路由器的数量,而不考虑路径的带宽、延迟等其他因素。
- 路由更新频繁:RIP协议的路由更新频率较高,通常为30秒一次。
这样可以及时响应网络拓扑的变化,但也会导致网络中产生大量的路由更新报文,增加网络带宽的消耗。
- 发送完整路由表:RIP协议在路由更新时,会发送完整的路由表信息,而不是只发送变化的部分。
思科路由器基本配置与常用配置命令.

本文针对实际操作问题,详细的给大家罗列出思科路由器基本的配置和常用的配置命令,相信看过此文会对你有所帮助。
启动接口,分配IP地址:router> router> enable router# router# configure terminalrouter(config# router(config# interface Type Port router(config-if# no shutdown router(config-if# ip address IP-Address Subnet-Mask router(config-if# ^z 配置RIP路由协议:30秒更新一次router(config# router riprouter(config-if# network Network-Number <--通告标准A,B,C类网-->router(config-if# ^z 配置IGRP路由协议:90秒更新一次router(config# router igrp AS-Number <-- AS-Number范围1~65535--> router(config-if# network Network-Number <--通告标准A,B,C类网--> router(config-if# ^z配置Novell IPX路由协议:Novell RIP 60秒更新一次router(config# ipx routing [node address] router(config# ipx maximum-paths Paths <--设置负载平衡,范围1~512--> router(config# interface Type Port router(config-if# ipx network Network-Number [encapsulation encapsulation-type] [secondary] <--通告标准A,B,C类网--> router(config-if# ^z配置DDR:router(config# dialer-list Group-Number protocol Protocol-Type permit [list ACL-Number] router(config# interface bri 0 router(config-if# dialer-group Group-Number router(config-if# dialer map Protocol-Type Next-Hop-Address name Hostname Telphone-Number router(config-if# ^z配置ISDN:router(config# isdn swith-type Swith-Type <--配置ISDN交换机类型,中国使用basic-net3--> router(config-if# ^z 配置Frame Relay:router(config-if# encapsulation frame-relay [cisco ietf ] router(config-if# frame-relay lmi-type [ansi cisco q933a ] router(config-if# bandwidth kilobitsrouter(config-if# frame-relay invers-arp [ Protocol ] [dlci ] <--配置静态Invers ARP 表:router(config# frame-relay Protocol Protocol-Address DLCI [ Broadcast ] [ ietf cisco ] [ payload-compress packet-by-packet ] --> <--设置Keepalive间隔:router(config-if# keepalive Number --> <--为本地接口指定DLCI:router(config-if# frame-lelay local-dlci Number --> <--子接口配置:router(config-if# interface Type Port.Subininterface-Number [ multipoint point-to-point ] router(config-subif# ip unnumbered Interface router(config-subif# frame-lelay local-dlci Number --> router(config-if# ^z配置标准ACL:router(config# access-list Access-List-Number [ permitdeny ] source [ source-mask ] <-- Access-List-Number 范围:1~99标准ACL;100~199扩展ACL;800~899标准IPX ACL;900~999扩展IPX ACL;1000~1099 IPX SAP ACL;600~699Apple Talk ACL--> router(config# interface Type Port router(config-if# ip access-group Access-List-Number [ in out ] router(config-if# ^z配置扩展ACL:router(config# access-list Access-List-Number [ permit deny ] [ Protocol Protocol-Number ] source source-wildcard [ Source-Port ] destination destination-wildcard [ Destination-Port ] [ established ] router(config# interface Type Port router(config-if# ip access-group Access-List-Number [ in out ] router(config-if# ^z配置命名ACL:router(config# ip access-list [ standard extended ] ACL-Name router(config [ std- ext- ] nacl# [ permit deny ] [ IP-Access-List-Test-Conditions ] router(config [ std- ext- ] nacl# no [ permit deny ] [ IP-Access-List-Test-Conditions ] router(config [ std- ext- ] nacl# ^z router(config# interface Type Port router(config-if# ip access-group [ACL-Name 1~199 ] [ in out ] router(config-if# ^z配置DCE时钟:router# show controllers Type Port <--确定DCE接口--> router(confin-if# clock rate 64000 <--进入DCE接口设置时钟速率--> router(config-if# ^z配置PPP协议:router(config# username Name password Set-Password-Here <--验证方建立数据库--> router(config# interface Type Port router(config-if# encapsulation ppp <--启动PPP协议--> router(config-if# ppp outhentication [ chap chap pap pap chap pap ] <--选择PPP认证--> router(config-if# ppp pap sent-username Name password Password <--发送验证信息--> router(config-if# ^zPAP单向认证配置实例:验证方:router-server(config# username Client password 12345 <--验证方建立数据库--> router-server(config# interface serial 0 router-server(config-if# encapsulation ppp router-server(config-if# ppp authentication pap <--选择使用PAP实现PPP认证--> router-server(config-if# ^z 被验证方:router-client(config-if# encapsulation ppp router-client(config-if# ppp pap sent-username Client password 12345 <--发送验证信息--> router-client(config-if# ^zPAP双向认证配置实例。
思科网络实验报告4ripv2(宝典)
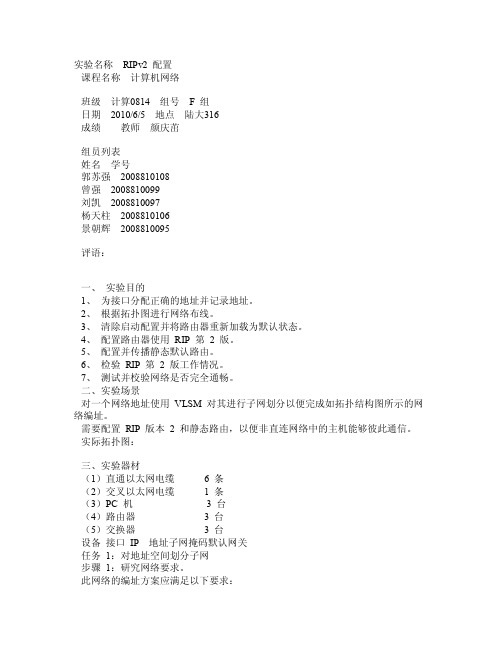
实验名称RIPv2 配置课程名称计算机网络班级计算0814 组号 F 组日期2010/6/5 地点陆大316成绩教师颜庆茁组员列表姓名学号郭苏强2008810108曾强2008810099刘凯2008810097杨天柱2008810106景朝辉2008810095评语:一、实验目的1、为接口分配正确的地址并记录地址。
2、根据拓扑图进行网络布线。
3、清除启动配置并将路由器重新加载为默认状态。
4、配置路由器使用RIP 第2 版。
5、配置并传播静态默认路由。
6、检验RIP 第2 版工作情况。
7、测试并校验网络是否完全通畅。
二、实验场景对一个网络地址使用VLSM 对其进行子网划分以便完成如拓扑结构图所示的网络编址。
需要配置RIP 版本2 和静态路由,以便非直连网络中的主机能够彼此通信。
实际拓扑图:三、实验器材(1)直通以太网电缆 6 条(2)交叉以太网电缆 1 条(3)PC 机 3 台(4)路由器 3 台(5)交换器 3 台设备接口IP 地址子网掩码默认网关任务1:对地址空间划分子网步骤1:研究网络要求。
此网络的编址方案应满足以下要求:ISP LAN 使用209,165,200,224/27 网络。
ISP 和HQ 之间的链路使用209.165.202.128/27 网络。
必须使用VLSM 对192.168.40.0/24 网络划分子网,以供其它链路使用。
HQ LAN1 需要50 个主机IP 地址。
HQ LAN2 需要50 个主机IP 地址。
BRANCH LAN1 需要30 个主机IP 地址。
BRANCH LAN2 需要12 个主机IP 地址。
HQ 和BRANCH 之间的链路两端各需要1 个IP 地址。
步骤2:创建网络设计时请思考以下问题:需要为192.168.40.0/24 网络创建多少个子网?__5个____总共需要从192.168.40.0/24 网络获得多少个IP 地址?___144_______HQ LAN1 子网将使用什么子网掩码?___255.255.255.192_______该子网最多有几个主机地址可供使用?__62___HQ LAN2 子网将使用什么子网掩码?___255.255.255.192_______该子网最多有几个主机地址可供使用?__62___BRANCH LAN1 子网将使用什么子网掩码?___255.255.255.224____该子网最多有几个主机地址可供使用?___30__BRANCH LAN2 子网将使用什么子网掩码?___255.255.255.240____该子网最多有几个主机地址可供使用?___14__HQ 和BRANCH 路由器之间的链路将使用什么子网掩码?__255.255.255.252___该子网最多有几个主机地址可供使用?__2___步骤3:为拓扑图分配子网地址。
思科 模拟器路由器操作命令
•配置用户user1,密码为digitalchina,使用此用户名的用户群为普通用户,不可以进入特权模式–Router#configRouter_config#username user1 password digitalchina –Router_config#aaa authentication for_login login local–Router_config#line console 0–Router_config_line#login authentication for_login–Router_config_line#–Router_config#enable password digitalchina level 15实训五十八HDLC封装•RouterA配置•指定封装协议为HDLC协议–RouterA_config#interface serial 2/0–RouterA_config_s2/0#encapsulation hdlc•指定接口的IP地址以及子网掩码–RouterA_config_s2/0#ip address 11.1.1.1 255.255.255.0–RouterA_config_s2/0#no shut•RouterB配置–Router_config#interface serial 1/0–Router_config_s1/0#encapsulation hdlc–Router_config_s1/0#ip address 11.1.1.2 255.255.255.0–指定此端口(DCE端)的内时钟信号频率–Router_config_s1/0#physical-layer speed 64000端口状态察看•Router#show interface serial 2/0•Serial2/0 is up, line protocol is up•。
思科Cisco路由器配置——RIP路由配置实验详解
思科Cisco路由器配置——RIP路由配置实验详解本⽂实例讲述了思科Cisco RIP路由配置实验。
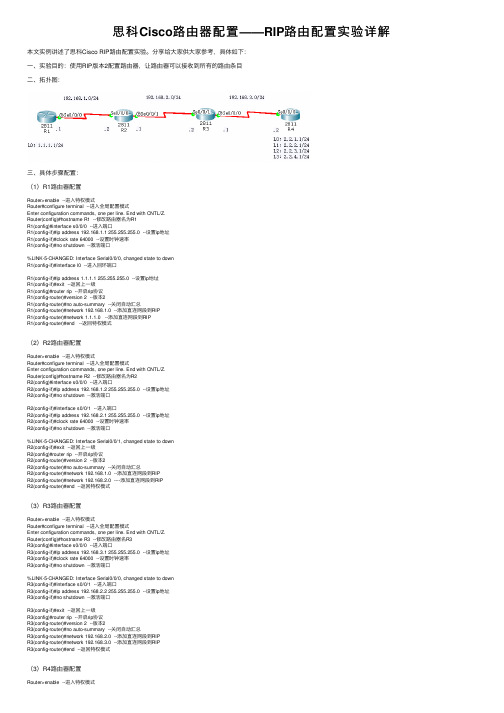
分享给⼤家供⼤家参考,具体如下:⼀、实验⽬的:使⽤RIP版本2配置路由器,让路由器可以接收到所有的路由条⽬⼆、拓扑图:三、具体步骤配置:(1)R1路由器配置Router>enable --进⼊特权模式Router#configure terminal --进⼊全局配置模式Enter configuration commands, one per line. End with CNTL/Z.Router(config)#hostname R1 --修改路由器名为R1R1(config)#interface s0/0/0 --进⼊端⼝R1(config-if)#ip address 192.168.1.1 255.255.255.0 --设置ip地址R1(config-if)#clock rate 64000 --设置时钟速率R1(config-if)#no shutdown --激活端⼝%LINK-5-CHANGED: Interface Serial0/0/0, changed state to downR1(config-if)#interface l0 --进⼊回环端⼝R1(config-if)#ip address 1.1.1.1 255.255.255.0 --设置ip地址R1(config-if)#exit --返回上⼀级R1(config)#router rip --开启rip协议R1(config-router)#version 2 --版本2R1(config-router)#no auto-summary --关闭⾃动汇总R1(config-router)#network 192.168.1.0 --添加直连⽹段到RIPR1(config-router)#network 1.1.1.0 --添加直连⽹段到RIPR1(config-router)#end --返回特权模式(2)R2路由器配置Router>enable --进⼊特权模式Router#configure terminal --进⼊全局配置模式Enter configuration commands, one per line. End with CNTL/Z.Router(config)#hostname R2 --修改路由器名为R2R2(config)#interface s0/0/0 --进⼊端⼝R2(config-if)#ip address 192.168.1.2 255.255.255.0 --设置ip地址R2(config-if)#no shutdown --激活端⼝R2(config-if)#interface s0/0/1 --进⼊端⼝R2(config-if)#ip address 192.168.2.1 255.255.255.0 --设置ip地址R2(config-if)#clock rate 64000 --设置时钟速率R2(config-if)#no shutdown --激活端⼝%LINK-5-CHANGED: Interface Serial0/0/1, changed state to downR2(config-if)#exit --返回上⼀级R2(config)#router rip --开启rip协议R2(config-router)#version 2 --版本2R2(config-router)#no auto-summary --关闭⾃动汇总R2(config-router)#network 192.168.1.0 --添加直连⽹段到RIPR2(config-router)#network 192.168.2.0 ----添加直连⽹段到RIPR2(config-router)#end --返回特权模式(3)R3路由器配置Router>enable --进⼊特权模式Router#configure terminal --进⼊全局配置模式Enter configuration commands, one per line. End with CNTL/Z.Router(config)#hostname R3 --修改路由器名R3R3(config)#interface s0/0/0 --进⼊端⼝R3(config-if)#ip address 192.168.3.1 255.255.255.0 --设置ip地址R3(config-if)#clock rate 64000 --设置时钟速率R3(config-if)#no shutdown --激活端⼝%LINK-5-CHANGED: Interface Serial0/0/0, changed state to downR3(config-if)#interface s0/0/1 --进⼊端⼝R3(config-if)#ip address 192.168.2.2 255.255.255.0 --设置ip地址R3(config-if)#no shutdown --激活端⼝R3(config-if)#exit --返回上⼀级R3(config)#router rip --开启rip协议R3(config-router)#version 2 --版本2R3(config-router)#no auto-summary --关闭⾃动汇总R3(config-router)#network 192.168.2.0 --添加直连⽹段到RIPR3(config-router)#network 192.168.3.0 --添加直连⽹段到RIPR3(config-router)#end --返回特权模式(3)R4路由器配置Router>enable --进⼊特权模式Router#configure terminal --进⼊全局配置模式Enter configuration commands, one per line. End with CNTL/Z. Router(config)#hostname R4 --修改路由器名为R4R4(config)#interface s0/0/0 --进⼊端⼝R4(config-if)#ip address 192.168.3.2 255.255.255.0 --设置ip地址R4(config-if)#no shutdown --激活端⼝R4(config-if)#interface l0 --进⼊回环端⼝R4(config-if)#ip address 2.2.1.1 255.255.255.0 --设置ip地址R4(config-if)#interface l1 --进⼊回环端⼝R4(config-if)#ip address 2.2.2.1 255.255.255.0 --设置ip地址R4(config-if)#interface l2 --进⼊回环端⼝R4(config-if)#ip address 2.2.3.1 255.255.255.0 --设置ip地址R4(config-if)#interface l3 --进⼊回环端⼝R4(config-if)#ip address 2.2.4.1 255.255.255.0 --设置ip地址R4(config-if)#exit 返回上⼀级R4(config)#router rip --开启rtp协议R4(config-router)#version 2 --版本2R4(config-router)#no auto-summary --关闭路由汇总R4(config-router)#network 192.168.3.0 --添加直连⽹段到RIPR4(config-router)#network 2.2.1.0 --添加直连⽹段到RIPR4(config-router)#network 2.2.2.0 --添加直连⽹段到RIPR4(config-router)#network 2.2.3.0 --添加直连⽹段到RIPR4(config-router)#network 2.2.4.0 --添加直连⽹段到RIPR4(config-router)#end --返回特权模式四、验证:(1)查看路由器路由表(2)测试ping通性。
思科网络设备常用命令

网络设备安装与调试考纲要求1、IPV4地址划分(判断网络号,网段)2、交换机、路由器基本知识及配置3、交换机、路由器的Telnet远程登入4、虚拟局域网VLAN的配置5、PPP协议基本配置6、静态路由、缺省路由、RIP、OSPF的基本配置7、Ipconfig、Ping、Telnet等常用命令的应用一、交换机、路由器基本配置1.配置模式切换1.用户模式进入特权模式sw>enableSw#2. 特权模式进入全局配置模式Sw#configure terminalSw(config)#3. 全局配置模式进入接口配置模式Sw(config)#interface fastEthernet 0/1Sw(config-if)#2.路由器端口IP地址的配置Router(config)#interface fastEthernet 0/1 -----进入相应接口(进入F0/1接口)Router (config-if)#no shutdown -----开启端口(路由器默认为关闭)Router (config-if)#ip address 192.168.1.1 255.255.255.0 -----设置IP地址IP地址掩码备注:输入shutdown可关闭对应的端口或(可使用图形界面):(路由器端口默认是关闭,需要把On打钩)3.配置设备名称Switch(config)#hostname SW -----在配置模式输入hostname+名字或:二、交换机、路由器的Telnet远程登入Telnet 默认是开启,需要在设备接口配置可连通的IP地址,路由器在具体的物理接口上配置IP地址,交换机在VLAN上配置IP地址,确保PC机可以连通远程登入的设备(使用PING测试)。
可以连通在做如下操作(1)只配置登入密码Sw(config)#line vty 0 4 ---启用5条线路让5个用户接入,并进入line配置模式Switch(config-line)#password abc ----设置登录密码abcSwitch(config-line)#login ----要求密码登入(只要输入密码)(2)配置登入账号以及密码Sw(config)#username admin password admin ---------配置账号密码Sw(config)#line vty 0 4 ----启用5条线路让5个用户接入,并进入line配置模式Switch(config-line)#login local ----要求本地账号登入(需要输入账号以及密码)(3)无账号密码登入Sw(config)#line vty 0 4 ---启用5条线路让5个用户接入,并进入line配置模式Switch(config-line)#no login ----无账号密码登入注意1:在设置密码后如果无法登入,需要在输入命令login\login local,也就是login\login local需在设置完密码后输入。
思科路由器命令大全详解

思科路由器命令大全详解思科路由器命令大全详解本文档旨在提供一份最新最全的思科路由器命令详解,供读者参考使用。
以下为各个章节的详细内容:1、连接管理1.1 连接路由器1.1.1 使用串行接口连接路由器1.1.2 使用以太网接口连接路由器1.2 断开与路由器的连接1.3 查看当前连接状态2、基本配置2.1 配置路由器主机名2.2 设置密码和特权级2.2.1 设置密码2.2.2 设置特权级密码2.3 配置路由器接口2.3.1 配置IP地质2.3.2 配置子网掩码 2.3.3 配置默认网关 2.4 查看路由器配置信息2.5 保存路由器配置3、路由配置3.1 配置静态路由3.2 配置动态路由3.2.1 RIP协议配置 3.2.2 OSPF协议配置 3.2.3 BGP协议配置3.3 查看路由表4、网络地质转换(NAT)配置 4.1 配置静态NAT4.2 配置动态NAT4.3 配置PAT4.4 查看NAT配置信息5、访问控制列表(ACL)配置5.1 配置标准ACL5.2 配置扩展ACL5.3 应用ACL到接口5.4 查看ACL配置6、路由器安全性配置6.1 配置SSH访问6.2 配置Telnet访问 6.3 配置访问类别6.4 配置防火墙6.5 配置AAA认证7、接口配置7.1 配置以太网接口 7.2 配置串行接口7.3 配置VLAN接口 7.4 配置隧道接口附件:本文档附带以下附件:1:思科路由器命令示例图表2:思科路由器配置实例法律名词及注释:1、版权:法律规定的对原创作品的独占使用权。
2、许可证:许可证是通过行政机关的批准,对依法许可的活动设定限制和要求。
3、违约:违反合同中的任何条款或条件的行为或事件。
- 1、下载文档前请自行甄别文档内容的完整性,平台不提供额外的编辑、内容补充、找答案等附加服务。
- 2、"仅部分预览"的文档,不可在线预览部分如存在完整性等问题,可反馈申请退款(可完整预览的文档不适用该条件!)。
- 3、如文档侵犯您的权益,请联系客服反馈,我们会尽快为您处理(人工客服工作时间:9:00-18:30)。
测试 完成各点对点连线的连通情况,此处必须确保各连线点对点是可以 ping 通 三、完成 RIP 路由的配置 R1
router rip version 2 network 10.10.10.0 network 192.168.10.0
R2
router rip version 2 network 192.168.11.0 network 192.168.10.0
no sh R02
int S0/3/0 ip address 192.168.10.2 255.255.255.0 no sh int S0/3/1 ip address 192.168.11.1 255.255.255.0
佛山职业技术学院物联网应用技术
no sh R03 int S0/3/0 ip address no sh clock rate int S0/3/1 ip address no sh clock rate R04 192.168.12.1 255.255.255.0 2000000 192.168.12.2 255.255.255.0
另外一台交换机 SWB Int vlan 1 Ip add 10.10.11.1 255.255.255.0 No sh ip default-gateway 10.10.11.254 Ress 10.10.10.254 255.255.255.0
no sh
int S1/0 ip address 192.168.10.1 255.255.255.0
佛山职业技术学院物联网应用技术
R3 router rip version 2 network 192.168.11.0 network 192.168.12.0
R4 router rip version 2 network 192.168.12.0 network 192.168.13.0 R5
router rip version 2 network 192.168.13.0 network 10.10.11.0 测试
OZZY
第 2 页,共 4 页
2000000
int S0/3/0 ip address 192.168.13.1 255.255.255.0 no sh int S0/3/1 ip address 192.168.13.2 255.255.255.0 no sh R05
int F0/0 ip address 10.10.11.254 255.255.255.0 no sh int S1/0 ip address 192.168.13.2 255.255.255.0 no sh clock rate 2000000
OZZY
第 4 页,共 4 页
(1) 通过连通性测试(全部都通)
SW1R1R2R3R4R5SW2 SW2R5R4R3R2R1SW1
R3R2R1SW1 R3R4R5SW2 (2) 查看各路由表情况(特权模式下:sh ip route )
OZZY
第 3 页,共 4 页
佛山职业技术学院物联网应用技术
佛山职业技术学院物联网应用技术
RIP 路由配置
项目目的:
了解和掌握 RIP 路由的基本配置。
网络结构:
OZZY
第 1 页,共 4 页
环境准备:
网线: 直连线*2 条、S DTE 线*4 条 交换机:2950-24*2 台 路由器:2811*2 台、2901*3 台
项目实施:
一、 在 PT6 模拟环境中添加路由器,交换机,完成线路的连接并标上相关的注释; 二、完成对应端口 IP 地址的配置和终端 对于交换机 SWA Int vlan 1 Ip add 10.10.10.1 255.255.255.0 No sh ip default-gateway 10.10.10.254
