锐捷AP内置web认证
锐捷认证客户端无线认证功能使用说明

锐捷认证客户端无线认证功能使用说明一、限制列表锐捷网络RG-Supplicant(下文简称Su)软件从Su3.63版本开始支持无线认证功能。
此功能要依赖微软操作系统的相关无线组件,微软公司不同版本操作系统的无线组件功能上稍有差别,Su的无线功能对操作系统的依赖列表如下:A、Windows XP sp2系统可以使用Su的无线认证功能,但需要确保安装微软msxml6.msi补丁以及WindowsXP-KB918997-v6补丁,在使用Su的无线功能前还需要确保开启Wireless Zero Configuration服务,并确保此服务能正常使用。
B、Windows XP sp3系统不需要安装无线补丁即可使用Su的无线认证功能。
但要确保开启Wireless Zero Configuration服务,并确保此服务能正常使用。
C、Vista以及Vista Sp1系统默认就支持无线认证,不需要额外安装补丁,但需要确保WLAN AutoConfig服务被开启,并且此服务能正常使用。
D、Su的无线认证功能不支持在Windows 2000、XP(无补丁)、XP sp1以及Windows2003系统下使用。
Su支持的无线网络认证类型为WPA- Enterprise 以及WPA2- Enterprise,不支持共享式(WPA-Personal、WPA2-Personal)无线连接,开放式无线认证方案请使用原有的EAP-MD5进行认证,结合无线网络功能所支持的无线802.1x认证类型固定为PEAP-MSCHAPv2认证,暂不支持证书认证。
安全的无线认证功能不支持使用中文用户名以及中文服务名进行认证(Su以及微软操作系统自带无线客户端均不支持中文用户名认证),这一点要同有线认证功能区分开。
原有的开放式无线认证支持使用中文用户名以及服务名进行认证。
二、无线客户端的使用方法Su在发到用户手上的时候,无线网络一般情况下是被定制好的,用户只需按照安装时的提示要求进行安装,然后重启系统即可使用。
OpenPortalServer 开源Portal协议 WEB认证服务器 支持华为 H3C 锐捷---说明
OpenPortalServer开源Portal协议WEB认证服务器作者:LeeSonQQ:25901875E-Mail:LeeSon@OpenPortal官方交流群119688084该软件是基于华为AC/BAS PORTAL协议的服务端程序,Java编写,开源。
最新源代码下载地址:https:///lishuocool https:///SoftLeeSon/支持Huawei H3C Portal V1 V2协议PAP CHAP认证方式的Portal服务器-------------------------------------------------------------------------------------------新手安装配置说明:-------------------------------------------------------------------------------------------windows环境下:1.首先保证已有JDK1.7环境,MySQL环境,tomcat72.解压路径无中文及空格3.配置文件说明\webapps\ROOT\WEB-INF\classes\jdbc.properties首先修改该数据库配置文件创建openportalserver数据库UTF-8字符集导入数据库文件OpenPortalServer.sql后台账号:admin 密码:admin4.配置AC设备安装和配置Radius服务如果使用AC模拟器进行模拟测试则可忽略这步如果使用页面展示、本地接入用户认证方式不用配置radius5.运行bin/startup.bat 快捷方式6.浏览器http://服务器IP7.如果使用AC模拟器测试用户名密码随意如果真实环境(不用我废话了)-------------------------------------------------------------------------------------------Linux环境: 安装jdk1.7 mysql tomcat7 将解压目录下的webapps目录替换对接配置说明:超时设置3-5秒日志记录是否输出详细日志到文件验证码设置是否开启用户登陆的验证码用户心跳是否进行用户离线检测超时重复次数一次检查周期内用户在线检测超时几次算已经下线计费检测周期间隔多长时间检测一次用户是否在线,余额是否够认证方式页面展示,本地接入用户,外接radius自助注册开关是否允许自助注册接入用户,默认每个新用户给10分钟的时长设备账号对应设备的local-user用户账号密码,在本地接入用户和页面展示认证方式时必须配置,而且设备用默认domain设备密码对应设备的local-user用户账号密码,在本地接入用户和页面展示认证方式时必须配置,而且设备用默认domain-------------------------------------------------------------------------------------------本地用户认证模式则下面交换机不用设置[SWITCH] domain 设备账号密码就是交换机的账号密码-------------------------------------------------------------------------------------------以华为S5700交换机为例,配置信息详细说明:交换机配置如下配置步骤步骤1创建VLAN 并配置接口允许通过的VLAN,保证网络通畅。
锐捷网络认证系统使用说明
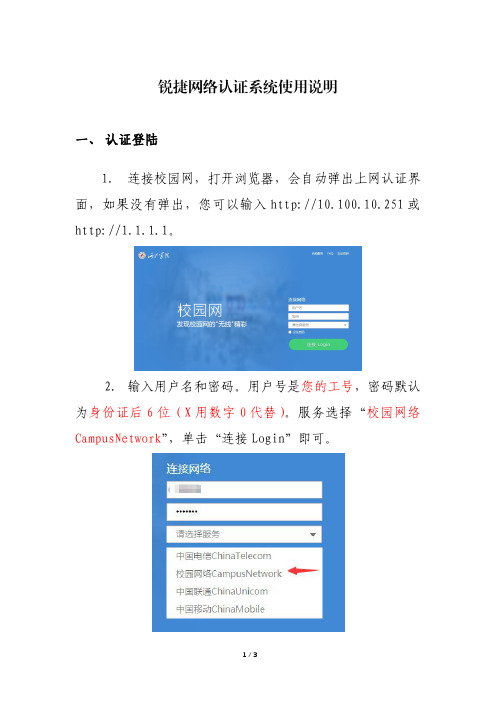
锐捷网络认证系统使用说明
一、认证登陆
1.连接校园网,打开浏览器,会自动弹出上网认证界面,如果没有弹出,您可以输入http://10.100.10.251或http://1.1.1.1。
2.输入用户名和密码。
用户号是您的工号,密码默认为身份证后6位(X用数字0代替)。
服务选择“校园网络CampusNetwork”,单击“连接Login”即可。
二、密码修改
登陆后,单击界面左上角的“自动服务”,再找到“密码修改”链接,修改密码即可。
密码应具有一定的复杂度,并保管好密码。
三、密码重置
方法一:自助找回。
您事先要在自助服务平台(http://10.100.10.250:8080)上的安全中心登记您的邮箱,在忘记密码时就可以在登录界面使用“找回密码”功能,自行重置密码。
方法二:持身份证等有效证件到东区逸夫楼608现代教育技术中心办公室办理重置手续。
RG-AC系列无线控制器RGOS 10.4(1b19)p2版本WEB管理手册(V2.0)

13
AC WEB 管理配置
图表 19 配置说明 限速信息:指定用户的上下行速率的限制情况。
图表 20 限速信息 流量走势:指定用户最近 24 小时的总体流量走势。
1.3.3.4.1 流氓AP
图表 23 流氓 AP 配置说明: 显示系统扫描到的流氓 AP 信息。
图表 12 系统日志 配置说明: 显示系统日志,输入需要查询的关键字可以查询匹配的日志记录。 1.3.3.2 AP信息 通过菜单项“AP 信息”使用该功能。
11
AC WEB 管理配置
图表 13 AP 信息 配置说明: 显示 AP 的概览信息。点击“详情”,可以显示指定 AP 的射频信息、流量走势、详细信息和连 接历史。点击“编辑”,会跳转到“无线配置管理”。
技术支持 4008-111-000
前言
版本说明
本手册对应的软件版本为:RGOS 10.4 (1b19)p2
读者对象
本书适合下列人员阅读 网络工程师 技术推广人员 网络管理员
技术捷网络在线客服:。 锐捷网络远程技术支持中心:/service.aspx 。 7×24 小时技术服务热线:4008-111-000 锐捷网络技术论坛: 锐捷网络技术支持与反馈信箱:service@
1.3.3 系统监控
1.3.3.1 AC信息 通过菜单项“AC 信息”使用该功能。AC 信息页面包括“系统状态”、“接口状态”和“系统 日志”三部分。
1.3.3.1.1 系统状态
图表 9 系统状态 配置说明: 系统信息:显示系统信息。 系统状态走势:显示在线 AP 饱和度和在线用户饱和度在最近 10 小时内的走势。在线 AP 饱和度 =在线 AP 数 / 最大 AP 数。在线用户饱和度=在线用户数/最大用户数。点击“更多”链接可以链 接到“系统监控 > AC 信息”页面。
如何使用锐捷认证无线上网
如何使用锐捷认证无线上网
锐捷认证是一种常见的无线上网认证方式,许多学校、企事业单位和公共场所都采用这种认证方式来保障网络安全。
本文将详细介绍如何使用锐捷认证无线上网。
第一步:打开无线网络连接
首先,在电脑或移动设备中打开无线网络连接,找到可用的无线网络列表。
第二步:选择要连接的网络
在无线网络列表中,找到并选择要连接的锐捷认证无线网络。
通常,这些网络名称(SSID)前面会标有锐捷或学校/公司名称,并且可能需要输入账号和密码才能连接。
第三步:打开浏览器
第四步:输入账号和密码
第五步:点击认证按钮
输入完账号和密码后,点击认证按钮进行认证。
如果账号和密码正确且网络正常,您将会被成功认证并获得访问网络的权限。
第六步:备注或保存认证信息
一些锐捷认证系统可能会要求用户选择是否保存认证信息或备注个人设备名称。
这样,在下次连接同一个网络时,可以直接选择之前保存的认证信息,而无需重复输入账号和密码。
第七步:浏览网络
温馨提示:
1.锐捷认证无线上网通常会在一段时间后自动断开连接,因此,如果
网络中断,请重新进行认证并重新连接网络。
总结:
使用锐捷认证无线上网并不复杂,只需要按照以上步骤进行操作即可。
锐捷认证是一项重要的安全措施,可以保护无线网络免受未经授权的访问
和攻击。
锐捷交换机配置指南-安全说明书
配置指南-安全本分册介绍安全配置指南相关内容,包括以下章节:1. AAA2. RADIUS3. TACACS+4. 802.1x5. Web认证6. SCC7. 全局IP+MAC绑定8. PASSWORD-POLICY9. 端口安全10. STORM CONTROL11. SSH12. URPF13. CPP14. DHCP Snooping15. DHCPv6 Snooping16. ND Snooping17. ARP Check18. DAI19. IP Source Guard20. IPv6 Source Guard21. SAVI22. 防网关ARP欺骗23. NFPP24. DoS保护25. Snooping跨设备同步1 AAA1.1 概述AAA是Authentication Authorization and Accounting(认证、授权和记账)的简称,它提供了对认证、授权和记账功能进行配置的一致性框架,锐捷网络设备产品支持使用AAA。
AAA以模块方式提供以下服务:认证:验证用户是否可获得访问权,可选择使用RADIUS协议、TACACS+协议或Local(本地)等。
身份认证是在允许用户访问网络和网络服务之前对其身份进行识别的一种方法。
授权:授权用户可使用哪些服务。
AAA授权通过定义一系列的属性对来实现,这些属性对描述了用户被授权执行的操作。
这些属性对可以存放在网络设备上,也可以远程存放在安全服务器上。
记账:记录用户使用网络资源的情况。
当AAA记账被启用时,网络设备便开始以统计记录的方式向安全服务器发送用户使用网络资源的情况。
每个记账记录都是以属性对的方式组成,并存放在安全服务器上,这些记录可以通过专门软件进行读取分析,从而实现对用户使用网络资源的情况进行记账、统计、跟踪。
尽管AAA是最主要的访问控制方法,锐捷产品同时也提供了在AAA范围之外的简单控制访问,如本地用户名身份认证、线路密码身份认证等。
锐捷网络RG-RAP1200(FE)无线设备AP_3.0(1)B11P59 WEB管理手册说明书

RG-RAP1200(FE)无线设备文档版本 V1.0 归档日期 2021-12-15版权声明copyright © 2021 锐捷网络保留对本文档及本声明的一切权利。
未得到锐捷网络的书面许可,任何单位和个人不得以任何方式或形式对本文档的部分或全部内容进行复制、摘录、备份、修改、传播、翻译成其他语言、将其部分或全部用于商业用途。
、、和其他锐捷网络商标均为锐捷网络的商标。
本文档提及的其他所有商标或注册商标,由各自的所有人拥有。
免责声明您所购买的产品、服务或特性等应受商业合同和条款的约束,本文档中描述的部分或全部产品、服务或特性可能不在您的购买或使用范围之内。
除非合同另有约定,锐捷网络对本文档内容不做任何明示或默示的声明或保证。
由于产品版本升级或其他原因,本文档内容会不定期进行更新。
锐捷网络保留在没有任何通知或者提示的情况下对文档内容进行修改的权利。
本手册仅作为使用指导。
锐捷网络在编写本手册时已尽力保证其内容准确可靠,但并不确保手册内容完全没有错误或遗漏,本手册中的所有信息也不构成任何明示或暗示的担保。
前言读者对象本书适合下列人员阅读●网络工程师●技术推广人员●网络管理员技术支持●锐捷睿易官方网站:https:///●锐捷睿易在线客服:https:///?p=smb●锐捷网络官方网站服务与支持版块:https:///service.aspx●7天无休技术服务热线:4001-000-078●锐捷睿易技术论坛:/●常见问题搜索:https:///service/know.aspx●锐捷睿易技术支持与反馈信箱:*********************.cn●锐捷网络服务公众号:【锐捷服务】扫码关注本书约定1. 图形界面格式约定界面图标解释举例《》按钮点击《保存配置》按钮> 分级页面,子菜单项依次点击“无线管理 > 无线设置”“”配置项,提示信息,链接按钮等提示“保存配置成功” 点击“开启”选项点击“忘记密码”链接2. 各类标志本书还采用各种醒目标志来表示在操作过程中应该特别注意的地方,这些标志的意义如下:警告表示用户必须严格遵守的规则。
锐捷交换机(web开启方法)
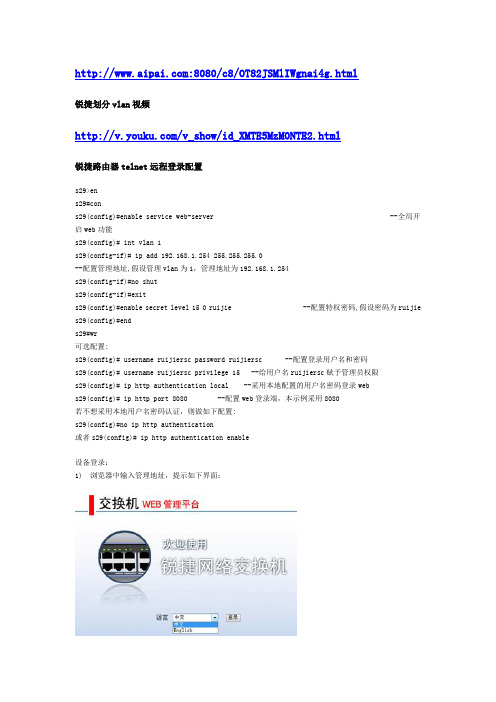
:8080/c8/OT82JSMlIWgnai4g.html锐捷划分vlan视频/v_show/id_XMTE5MzM0NTE2.html锐捷路由器telnet远程登录配置s29>ens29#cons29(config)#enable service web-server --全局开启web功能s29(config)# int vlan 1s29(config-if)# ip add 192.168.1.254 255.255.255.0--配置管理地址,假设管理vlan为1,管理地址为192.168.1.254s29(config-if)#no shuts29(config-if)#exits29(config)#enable secret level 15 0 ruijie --配置特权密码,假设密码为ruijie s29(config)#ends29#wr可选配置:s29(config)# username ruijiersc password ruijiersc --配置登录用户名和密码s29(config)# username ruijiersc privilege 15 --给用户名ruijiersc赋予管理员权限s29(config)# ip http authentication local --采用本地配置的用户名密码登录webs29(config)# ip http port 8080 --配置web登录端,本示例采用8080若不想采用本地用户名密码认证,则做如下配置:s29(config)#no ip http authentication或者s29(config)# ip http authentication enable设备登录:1) 浏览器中输入管理地址,提示如下界面:2)输入特权密码,用户名任意。
配置本地认证时,输入配置的用户名密码。
3)Web界面显示注意:目前支持web管理的交换机包括S23系列,S26系列,S27系列,S29系列,支持版本为10.2(4)及以上版本。
- 1、下载文档前请自行甄别文档内容的完整性,平台不提供额外的编辑、内容补充、找答案等附加服务。
- 2、"仅部分预览"的文档,不可在线预览部分如存在完整性等问题,可反馈申请退款(可完整预览的文档不适用该条件!)。
- 3、如文档侵犯您的权益,请联系客服反馈,我们会尽快为您处理(人工客服工作时间:9:00-18:30)。
内置Web认证配置(本地认证) >>
功能介绍:
Web认证是一种对用户访问网络的权限进行控制的身份认证方法,这种认证方法不需要用户安装专用的客户端认证软件,使用普通的浏览器软件就可以进行身份认证。
未认证用户使用浏览器上网时,接入设备会强制浏览器访问特定站点。
在指定的web站点进行认证操作。
锐捷Web认证有2个版本,不同版本的Web认证流程不同,我们将其分别称为锐捷一代Web认证和锐捷二代Web认证。
此外我司在设备端也实现了一个简易版的portal服务器功能,称为内置web认证。
适用场景说明
Web认证是一种对用户访问网络的权限进行控制的身份认证方法,这种认证方法不需要用户安装专用的客户端认证软件,使用普通的浏览器软件就可以进行身份认证。
适合无线终端不想或不能安装认证客户端(特别是手机、平板电脑等)但是又想对网络中的客户做准入控制
优点:无线终端不需要安装客户端,使用web浏览器即可
缺点:需要增加radius服务器(用于储存客户端用户名和密码的设备)、内置portal服务功能比较弱
一、组网需求
客户需要通过使用AP内部提供的页面对无线用户进行认证,启用AP内置Web认证功能。
网络中没有radius服务器,认证账号也创建在AP上。
二、组网拓扑
三、配置要点
部署web认证前,请确保前期网络部署已经完成,数据通信都正常。
下面的配置只截取的web认证的相关配置
1、启用内置portal AAA认证
2、配置本地帐号
3、放通网关和sta的arp报文
4、开启内部重定向端口
5、在AP上对wlan1开启web认证
四、配置步骤
1、启用内置portal AAA认证
ruijie#config terminal
ruijie (config)#aaa new-model ------>启用AAA认证功能
ruijie (config)#aaa accounting network default start-stop none ------>关闭审
计功能
ruijie (config)#aaa authentication iportal default local ------>内置portal使用本地账号认证,local表示本地
2、配置本地帐号
ruijie (config)#username ruijie password ruijie ------>配置本地帐号ruijie,密码
ruijie。
该账号即是web本地认证部署,认证用户的账号和密码
3、放通网关和sta的arp报文
ruijie (config)#http redirect direct-arp 192.168.51.1 ------>必须开放网关arp
4、开启内部重定向端口
ruijie (config)#http redirect port 8081 ------>此端口默认生成不能进行修改及配置
5、在AC上对wlan1开启web认证功能
ruijie (config)#web-auth template iportal----->【11.X需要增加的命令】配置内置portal
ruijie (config.tmplt.iportal)#exit
ruijie (config)#wlansec 1 ------>这个wlansec后面的数字,取决于配置无线信号发射时使用的wlan-id,这里假设配置的是wlan 1
ruijie (config-wlansec)#web-auth portal iportal ------>启用内置web认证
ruijie (config-wlansec)#webauth ------>启用web认证功能
ruijie (config-wlansec)#end
ruijie #write ------>保存配置
注:热备环境下不支持web 一代认证及内置web认证
五、配置验证
1、用户连接到无线网络,打开网页弹出认证界面,输入密码提示认证正常并且能正常使用网络。
2、登陆到AP上通过show web-auth user all 确认无线用户认证状态。
ruijie#show web-auth user all
Statistics:
Type Online Total Accumulation
-------------- ------- ------- ------------
v1 portal 0 0 1
v2 Portal 0 0 11
Intra Portal 1 1 2
-------------- ------- ------- ------------
Total 1 1 14
V1 Portal Authentication Users
Index Address Online Time Limit Time used Status
----- ---------------------------------------- ------ ------------ ------------ -------
----- ---------------------------------------- ------ ------------ ------------ -------
Intra Portal Authentication Users ------>内置web认证用户
Index Address Online Time Limit Time used Status
----- ---------------------------------------- ------ ------------ ------------ -------
1 192.168.51.29 On 0d 00:00:00 0d 00:00:00 Active
----- ---------------------------------------- ------ ------------ ------------ -------
V2 Portal Authentication Users
Index Address Online Time Limit Time used Status
----- ---------------------------------------- ------ ------------ ------------ -------
----- ---------------------------------------- ------ ------------ ------------ -------。