IN2011S蓝牙模块规格书-立体声音频
Sonora SON4 32 Sounder和Xenon绿Sal模块说明书
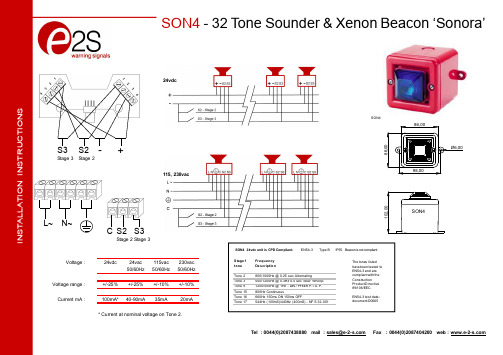
Tel:0044(0)2087438880mail:******************:0044(0)2087404200web:-+L~N~S3Stage 3S2Stage 2C S3Stage 3S2Stage 2123 44321ISN0605-B No liabil ity i s acce pted for an y con sequen ce of the u se of this docum ent. T he te chnica l spe cification of th is uni t is subject to change with out no tice due to our policy of con tinual produ ct de velopm ent. All di mensio ns are approximat e.Thi s unit is sold su bject to ou r stan dard condit ions o f sal e, a copy of which is a vaila ble on request.>100dB(A)@1m.A TTENTIONTone Selection / switch setting.•Switch settings are shown in the tone table. Black squares are the switch levers in the ON position.•Les réglages des com mutateurs s ont indiqués sur le tableau de tonalités. Les carrés noirs représentent les leviers des commutateurs en position MARCHE(ON).•Die Schaltereinstellungen sind in der Tabelle der Töne angegeben. Die schwarzen Quadratekennzeichnen die Ein-Positionen der Schalter.•Le impostazioni degli interruttori sono mos trate nella tabella dei segnali acustici. I riquadri neri indicanole leve degli interruttori nella posizione ON.•Los ajustes de interruptor se m uestran en la tabla de tonos. Los cuadros negros repres entan laspalancas de los interruptores en la pos ición ON.•Os ajustes dos interruptores estão indicados na tabela de sons. Os quadrados pretos indicam que asalavancas dos interruptores estão na posição LIGADA.•Kontaktindstillingerne fremgår af toneskemaet. Et sort felt betyder, at kontakten er aktiv (“ON”).•De schakelinstellingen staan vermeld in de toontabel. Zwarte vierkanten zijn de schakelaars in de standAAN.•Bryterinnstillinger er bes krevet i tonetabellen. De svarte firkantene indikerer bryterposisjonene i PÅ-posisjon.•Brytarins tällningarna visas i s ignaltabellen. De svarta fyrkanterna är brytarna i ON-läge.•Disconnect from pow er source to prev ent electrical shock before installing and serv icing•Couper l’alime ntati on pour empêcher tout choc électrique av ant d’effectuer des trav aux d’i nstal lation etd’entre tie n.•Vor der I nstall ation und Wartung v on der Spannungsquell e abnehmen, um el ektri sche S chläge zuv erme iden.•Pri ma del l’ins tallazione e del la manutenzione s pegne re l’a limentazione ele ttric a per ev ita re scosseele ttric he.•Des conecte la alimentación para ev itar de scarga s eléctrica s antes de la instala ción y mantenimie nto•Antes de instal ar ou de fa zer a manutenção desligue se mpre da alimentação eléctrica para ev ita r choqueseléctricos.•Strømmen skal a fbrydes v ed insta lleri ng og eftersyn for at undgå elektrisk stød.•Los koppel en v an de e lektri sche v oeding om e lektri sche schok vóór i nstal latie en onderhoud te v oorkomen.•Før monte ring e ller v edlik ehold,må spenningen koples fra for å unngå s trømstøt.•Bryt strömmen innan instal lation och underhåll för att förhindra elektriska stöta r stötar.Switch Stage 2Stage 3 Stage 1Frequency Description.123456(S2)(S3)•Tone Selection•Sélection de la tonalité•Tonwahl•Selezione tono •Seleção de tons •Selección Tono•V alg af tone •Toonselectie•Velge tone•Tonval •Switch 6 is not used; Switch 8 ‘ON’ = Intermediate volume; Switch 7 ‘ON’= M ax.volume; Switch 7 & 8 ‘OFF’ = Standard v olume.•Le commutateur 6 n’es t pas utilisé ; Commutateur 8 « MARCHE » (ON) = Volum e intermédiaire ; Commutateur 9 « MARCHE » (ON) =Volume max. ; Commutateurs 7 et 8 « ARRET » (OFF) = Volume standard.•Schalter 6 wird nicht verwendet; Schalter 8 …Ein” = mittlere Lautstärke; Schalter 7 …Ein” = max. Lautstärke; Schalter 7 und 8 …Aus” = Standard-Lautstärke•Interruttore 6 non viene utilizzato; Interruttore 8 ‘ON’ = Volume intermedio; Interruttore 7 ‘ON’= Volume massimo; Interruttori 7 e 8 ‘OFF’ =Volume standard.•El interruptor 6 no se utiliza; Interruptor 8 ‘ON’ = volumen interm edio; Interruptor 7 ‘ON’= máxim o volumen; Interruptor 7 y 8 ‘OFF’ = volumenestándar.•Interruptor 6 não é utilizado; Interruptor 8 ‘LIGADO’ = volume intermédio; Interruptor 7 ‘LIGADO’ = volume máximo; Interruptor 7 e 8‘DESLIGADOS’ = volume padrão.•Kontakt 6 bruges ikke. Kontakt 8 aktiveret (“ON”) = mellemvolumen. Kontakt 7 aktiveret (“ON”)= højeste volumen. Kontakt 7 og 8 deaktiveret(“OFF”) = standardvolumen.•Schakelaar 6 wordt niet gebruikt; schakelaar 8 ‘ON’ = tussenvolume; Schakelaar 7 ‘ON’= max.volume; Schakelaar 7 & 8 ‘OFF’ =standaardvolume.•Bryter 6 er ikke i bruk. Bryter 8 PÅ ( ‘ON’) = m ellomhøy lydstyrke. Bryter 7 PÅ (‘ON’) = Maks. lyds tyrke.; Bryter 7 & 8 AV (‘OFF’) = Standardlydstyrke.•Brytare 6 används ej; Brytare 8 ‘ON’ = Mellanvolym; Brytare 7 ‘ON’= Max.volym; Brytare 7 & 8 ‘OFF’ = Standardvolym.NOTE: Please check factory settings and ensure the correct alarm tone is selected for your country or application.Pas op: bij ingebruikstelling dient u zich ervan te overtuigen dat de unit op de juiste toon is ingesteld.。
深圳市芯中芯科技有限公司蓝牙模块F-6988 V3.1产品规格书说明书

F-6988 V3.1 产品规格书Specification产品名称Product name : 蓝牙模块Bluetooth module产品型号Product model:F-6988 V3.1文件编号Document No:XZX-SPEC-BT-RD-023文件版本Document Version:V2.5生效日期Availability date:2018-7-11文件含芯中芯(C-CHIP)机密文件,未经许可,不可外传File include (C-CHIP) confidential documents, without permission, can not be disclosedF-6988 V3.1目录(Content)一、产品概述Product overview: (4)二、应用领域A pplication area: (4)三、基本特性Features: (5)四、性能参数performance parameter: (5)五、方框图Module block diagram (6)六、模块尺寸图The size of the module graph: (7)七、模块的封装物料高度尺寸Module packaging material height dimensions: (8)八、引脚功能说明Pin definition: (9)九、电路连接注意Design notes: (11)十、注意事项Note: (11)十一、推荐回流温度Recommended reflow temperature: (12)F-6988 V3.1 一、产品概述Product overview:F-6988 蓝牙模块为本公司自主开发的智能型无线音频数据传输产品,是低成本的高性价比的立体声无线传输方案,模块采用了 BEKEN 的BK3266 芯片 QFN32 封装设计。
F-6988 蓝牙模块采用免驱动方式,客户只需要把模块接入应用产品,就可以快捷地实现音乐的无线传输,享受无线音乐的乐趣,而且支持简单的数据传输功能。
深圳市昇润科技HY-40R201低功耗蓝牙5.0模块规格书说明书

HY-40R201深圳昇润科技对本手册中可能出现的和/或规格书的权利,恕不另行通知用作生命支持设备或系统中的关键标是由美国蓝牙SIG公司所有.R201低功耗蓝牙 5.0模块规格书(40 pin)文档版本:V2.02017年10月25日深圳市昇润科技有限公司版权所有现的错误不承担责任。
此外,昇润科技保留随时行通知,并不承诺更新此处所包含的信息。
昇润的关键组件。
以及不承担各种专利或知识产权的.密级:公开资料留随时更改硬件,软件。
昇润的产品不被授权产权的授权使用;蓝牙商1.简述 (1)1-1应用: (1)1-2主要特征: (1)2. 产品型号 (2)2-1.(4 种天线形式可供选择)/( 可选: 带屏蔽罩或不带屏蔽罩) (2)2-2: HY-40R201PC机种屏蔽罩上FCC ID &( IC ID 待定义)印刷内容: (2)3. 模块尺寸与图片 (2)3.1 HY-40R201P / WMD40R201SR6P0 PCB IFA天线 (2)3-2.HY-40R201I /WMD40R201SR6I0 IPEX RF外接天线连接端子 (3)3-3. HY-40R201W / MD40R201SR6W0 金属线天线 (1/4波长偶极子天线) (3)3.4. HY-40R201C/ WMD40R201SR6C0 (陶瓷天线) (3)(4). 应用注意事项: (4)5.引脚分配和端口功能说明 (5)6. 电气特性 (6)6-1. 射频特性 及 电流功耗: (6)6-2. 绝对最大额定值 (7)6-3. ESD 额定值 (7)6-4.建议工作条件 (7)6-5.GPIO DC特性 (7)6-6. 时序要求 (8)6-7. 动作状态切换时序特性 (8)7. 模块方块图 (8)8.IC功能方块图 (9)9. 工作模式架构图 (9)10. 回流焊曲线建议 (无铅锡膏: Sn 96.5%, Ag 3%, Cu 0.5%) (10)11. HY-40R201PC / WMD40R201SR6PC 模块 FCC及 IC声明 (11)12.联系我们 (13)HY-40R201提供蓝牙低功耗特性:无线电,蓝牙协议栈,配置文件和客户应用程序的所需空间。
博根通信MIC1S电子迷你混音器说明书
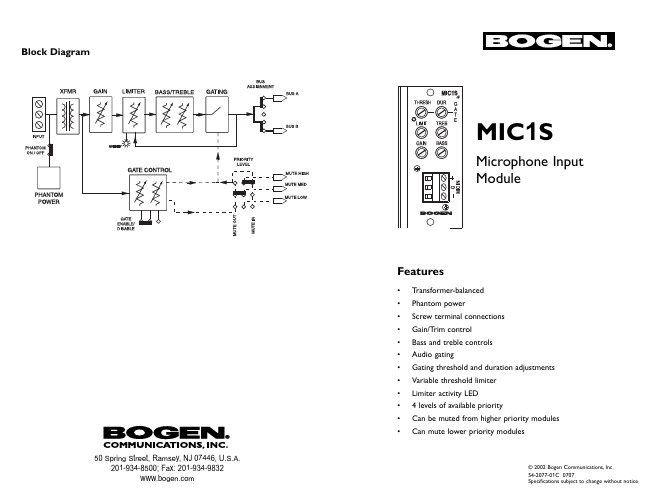
Limiter (Limit)
Sets the signal level threshold at which the module will begin to limit the level of its output signal. Clockwise rotation will allow more output signal before limiting, counterclockwise rotation will allow less. The limiter monitors the module’s output signal level, so increasing Gain will affect when limiting takes place. An LED indicates when the Limiter is active.
WARNING: Turn off power to unit and make all jumper selections before installing module in unit.
Priority Level*
This module can respond to 4 different levels of priority. Priority 1 is the highest priority. It mutes modules with lower priorities and is never muted. Priority 2 can be muted by Priority 1 modules and mutes modules set for 3 or 4. Priority 3 is muted by either Priority 1 or 2 modules and mutes Priority 4 modules. Priority 4 modules are muted by all higher priority modules. * The number of priority levels available is determined by the amplifier the modules are used in.
聆思科技双麦离线语音交互芯片C4203-L02C产品规格书说明书

双麦离线语音交互芯片 产品规格书 型号:C4203-L02C文档密级:对外公开 Version 1.2 2021.1.18L I S T E N A I _f o r _L I S T E NAI_for _LISTENAI_for_LISTE N A I _f o r _L I S T E N A I _f o r _LI S T E N A I _f o r _声明 本手册由聆思科技版权所有,未经许可,任何单位和个人都不得以电子的、机械的、磁性的、光学的、化学的、手工的等形式复制、传播、转录和保存该出版物,或翻译成其它语言版本。
一经发现,将追究其法律责任。
聆思科技保证本手册提供信息的准确性和可靠性。
聆思科技保留更改本手册的权利,如有修改,恕不相告。
请在订购时联系我们以获得产品最新信息。
对任何用户使用我们产品时侵犯第三方版权或其它权利的行为聆思科技概不负责。
另外,在聆思科技未明确表示产品有该项用途时,对于产品使用在极端条件下导致一些失灵或损毁而造成的损失概不负责。
L I S T E N A I _f o r _L IS T E NAI_for _LISTENAI_for_LISTE N A I _f o r _L I S T E N A I _f o r _L I S T E N A I _f o r _变更记录L I S T E N A I _f o r _L IS T E NAI_for _LISTENAI_for_LISTE N A I _f o r _r _目录 声明 ............................................................................................................................................................... 1 变更记录 ..................................................................................................................................................... 2 1产品简介 .................................................................................................................................................. 5 1.1 方案介绍 ......................................................................................................................................... 5 1.2 方案特性 ......................................................................................................................................... 5 2产品能力介绍 ......................................................................................................................................... 7 2.1 功能介绍 ......................................................................................................................................... 7 2.2 AI 技术特点 ..................................................................................................................................... 7 2.2.1双麦降噪 ....................................................................................................................................... 7 2.2.2 噪声抑制 ...................................................................................................................................... 8 2.2.3 语音唤醒 ...................................................................................................................................... 8 2.2.4 离线识别 .. (8)2.2.5 播报打断 (8)2.3 效果介绍 (9)3使用场景 (10)4 模组介绍 (11)4.1 模组配置 (11)4.2 系统框图 (12)4.3 芯片框图 (12)4.4 封装 ................................................................................................................................................ 13 L I S T E N A I _f o r _L IS T E NAI_for _L ISTENA I_for_L ISTE N A I _f o r _L I S T E N A I _f o r _L I S T E N A I _f o r _4.5 芯片引脚说明 .............................................................................................................................. 14 4.6 电气特性 ....................................................................................................................................... 15 5 开发流程 ............................................................................................................................................... 16 6 可靠性测试 .......................................................................................................................................... 18 6.1 外观 ................................................................................................................................................ 18 6.2 盐雾测试 ....................................................................................................................................... 18 6.3 高温高湿存储测试 ..................................................................................................................... 18 6.4 温度冲击测试 .............................................................................................................................. 18 6.5 低温存储测试 .............................................................................................................................. 19 6.6 85/85实验 ..................................................................................................................................... 19 6.7 有毒有害物质检测 ..................................................................................................................... 19 6.8 连接测试 ....................................................................................................................................... 19 6.9 振动测试 (19)6.10 高温运行测试 (19)6.11 低温运行测试 (20)6.12 开关机测试 (20)L I S T E N A I _f o r _L IS T E NAI_for _LISTENAI_for_L ISTE N A I _f o r _L I S T E N A I _f o r _L I S T E N A I _f o r _1产品简介 1.1 方案介绍 随着人工智能行业的迅猛发展,人工智能技术开始应用在各种用户场景,智能硬件产品开始逐步普及,走向千家万户。
MT5931+MT6622 蓝牙 WiFi二合一模块(NT-SM01B-6622 )规格书

Power Level Spectrum Mask at fc ±11MHz at fc ±20MHz at fc ≥ ± 30MHz Constellation Error (EVM) Freq. Tolerance Chip Clock Freq. Tolerance
Items
Contents
Specification
IEEE802.11b
Mode
DSSS/CCK
Channel frequency
,2,5.5,11Mbps
TX Characteristics
Min.
Typ.
Power Level 1st side lobes ( to fc ±11MHz)
z 2.4GHz single stream 802.11 b/g/n MAC/BB/RF z Bluetooth :UART, PCM z 802.11 b/g/n compliant z Security:WFA WPA/WPA2 personal,WPS2.0,WAPI(hardware) z Supports 802.11n optional features:STBC,A-MPDU,Blk-Ack,RIFS,MCS Feedback,20/40 z Supports 802.11w protected managed frames z Interface:SDIO 2.0(4-bit&1-bit)
3.Ordering Information
Module
Description
MT5931+MT6622-CM WiFi+BT Combon Module
4.Module Block Diagra
sena sr10-说明书.pdf 蓝牙双向无线电转接器 用户指南

用户指南蓝牙双向无线电转接器© 1998-2012 Sena Technologies, Inc.所有权力均保留,Sena Technologies, Inc保留任何对于其产品的变更及改善权利,无需提前告知。
Sena™是Sena Technologies, Inc.或其所属子公司在美国及其它国家的注册商标,SMH10™、SMH5™、SPH10™、SPH10S™、SPH10H™、SR10™、SR10™是Sena Technologies, Inc.或其所属子公司的注册商标,在未经Sena公司明确表达准许之前不得使用这些注册商标。
Bluetooth®的文字与商标为Bluetooth SIG, Inc.所拥有,Sena是经过授权使用这些标志;Harley-Davidson®是H-D Michigan, Inc.及Harley-Davidson, Inc.的注册商标;Honda(R)及Gold Wing®是Honda Motor Co., Ltd.的注册商标;Sena Technologies, Inc.并非隶属于Harley-Davidson、H-D Michgan, Inc.或Honda Motor Co., Ltd.。
其它提及的商标商品名称均分属各该拥有者所有。
1.简介2. 包装內容3. 安装SR103.1安装于车把手上3.2挂在皮带/口袋上4.启动/关闭电源与充电4.1启动/关闭电源4.2检查电池4.3充电4.4车充套件4.5低电量警示5.将SR10与蓝牙装置配对5.1与蓝牙耳机配对5.2与行动电话配对6. 使用SR106.1 使用双向无线电6.2 安装有线PTT 键6.3 插座与缆线6.4 使用行动电话6.5音讯通道开启与关闭目录468889999991010101111111213136.6 恢复出厂设置6.7 故障复位7. 快速参考电池信息维护与保养废弃处置认证与安全许可• FCC符合性声明• FCC RF暴露声明• FCC警示• CE符合声明• 加拿大工业部声明•蓝牙许可弃权与一般豁免声明• 2年有限保固•责任限度•全额退款警告14 1516 17 18 19 20 20 21 21 21 22 22 23 25 26 26 271. 简介感谢您选择Sena SR10。
Scosche S3CR02 S3-1 车载音频接口说明书
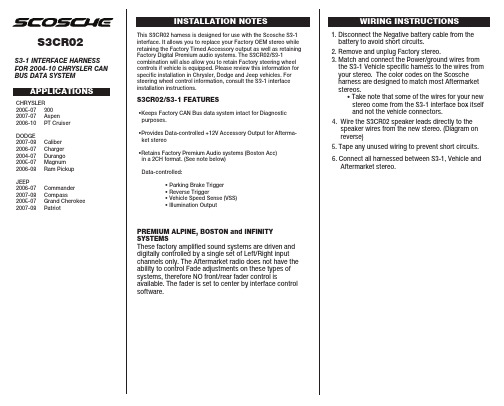
This S3CR02 harness is designed for use with the Scosche S3-1 interface. It allows you to replace your Factory OEM stereo while retaining the Factory Timed Accessory output as well as retaining Factory Digital Premium audio systems. The S3CR02/S3-1 combination will also allow you to retain Factory steering wheel controls if vehicle is equipped. Please review this information for specific installation in Chrysler, Dodge and Jeep vehicles. For steering wheel control information, consult the S3-1 interface installation instructions.S3CR02/S3-1 FEATURES•Keeps Factory CAN Bus data system intact for Diagnosticpurposes.•Provides Data-controlled +12V Accessory Output for Afterma- ket stereo•Retains Factory Premium Audio systems (Boston Acc)in a 2CH format. (See note below)Data-controlled:• Parking Brake Trigger• Reverse Trigger• Vehicle Speed Sense (VSS)• Illumination OutputPREMIUM ALPINE, BOSTON and INFINITY SYSTEMSThese factory amplified sound systems are driven and digitally controlled by a single set of Left/Right input channels only. The Aftermarket radio does not have the ability to control Fade adjustments on these types of systems, therefore NO front/rear fader control is available. The fader is set to center by interface control software.1. Disconnect the Negative battery cable from thebattery to avoid short circuits.2. Remove and unplug Factory stereo.3. Match and connect the Power/ground wires from the S3-1 Vehicle specific harness to the wires from your stereo. The color codes on the Scoscheharness are designed to match most Aftermarket stereos.• Take note that some of the wires for your new stereo come from the S3-1 interface box itself and not the vehicle connectors.4. Wire the S3CR02 speaker leads directly to thespeaker wires from the new stereo. (Diagram on reverse)5. Tape any unused wiring to prevent short circuits.6. Connect all harnessed between S3-1, Vehicle and Aftermarket stereo.S3CR02S3-1 INTERFACE HARNESS FOR 2004-10 CHRYSLER CAN BUS DATA SYSTEM CHRYSLER2005-07 3002007-07 Aspen2006-10 PT CruiserDODGE2007-08 Caliber2006-07 Charger2004-07 Durango2005-07 Magnum2006-08 Ram PickupJEEP2006-07 Commander2007-08 Compass2005-07 Grand Cherokee2007-08 PatriotWhite = Left Front Positive (LF+) Gray = Right Front Positive (RF+)White/Black = Left Front Negative (LF-) Gray/Black = Right Front Negative (RF-)Green = Left Rear Positive (LR+) Violet = Right Rear Positive (RR+)Green/Black = Left Rear Negative (LR-) Violet/Black = Right Rear Negative (RR-)Black = Chassis Ground Orange = IlluminationYellow = +12V Constant Power Blue/White = +12 Remote Output (Amp,Red = +12V Accessory / R.A.P output radio on signal)Blue = +12V Power AntennaNAVIGATION CONNECTIONS:Violet/White = VSS Vehicle speed pulse signalRed/White = Reverse light trigger (+12V when in reverse gear)Yellow/Black = Parking Brake trigger (-12V when park brake ON)Orange/White = Auto illumination (Data controlled lighting)NOTE: The RED Accessory output wire from the S3-1 interface is rated at 10A Max output for most Aftermarket headunit demands. We do NOT recommended connecting additional +12V switched accessories to this output source as that may cause damage to the S3-1 module itself. If 10A output is not sufficient, then a relay is needed. (Relay not included)NOTE: Illimination & Auto illumination outputs are designed for headunit connections only.S3CR02S3-1 INTERFACE HARNESS FOR 2004-10 CHRYSLER CAN BUS DATA SYSTEMSCOSCHE STEREO INSTALLATION COMPONENTS STEREO DASH KITS。
Sennheiser IEM Series SR 2050 IEM 双立体音频无线传输器说明说明书
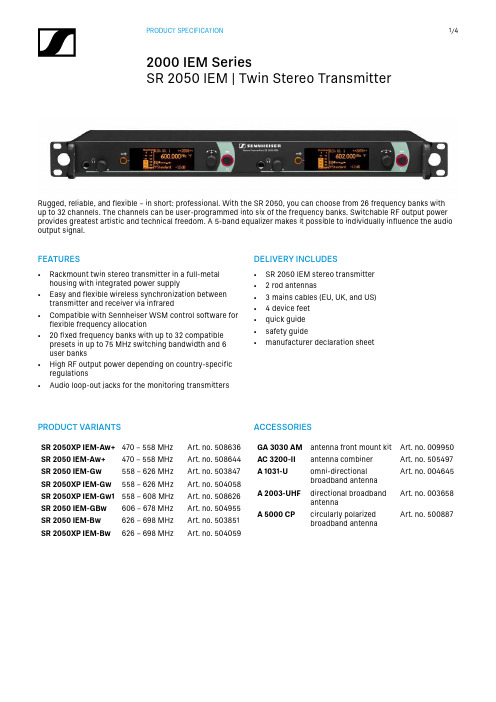
FEATURES• Rackmount twin stereo transmitter in a full-metal housing with integrated power supply• Easy and flexible wireless synchronization between transmitter and receiver via infrared• Compatible with Sennheiser WSM control software for flexible frequency allocation• 20 fixed frequency banks with up to 32 compatible presets in up to 75 MHz switching bandwidth and 6user banks• High RF output power depending on country-specific regulations• Audio loop-out jacks for the monitoring transmitters DELIVERY INCLUDES• SR 2050 IEM stereo transmitter • 2 rod antennas• 3 mains cables (EU, UK, and US)• 4 device feet• quick guide• safety guide• manufacturer declaration sheetRugged, reliable, and flexible – in short: professional. With the SR 2050, you can choose from 26 frequency banks with up to 32 channels. The channels can be user-programmed into six of the frequency banks. Switchable RF output power provides greatest artistic and technical freedom. A 5-band equalizer makes it possible to individually influence the audio output signal.PRODUCT VARIANTSSR 2050XP IEM-Aw+470 – 558 MHz Art. no. 508636 SR 2050 IEM-Aw+470 – 558 MHz Art. no. 508644 SR 2050 IEM-Gw558 – 626 MHz Art. no. 503847 SR 2050XP IEM-Gw558 – 626 MHz Art. no. 504058 SR 2050XP IEM-Gw1558 – 608 MHz Art. no. 508626 SR 2050 IEM-GBw606 – 678 MHz Art. no. 504955 SR 2050 IEM-Bw626 – 698 MHz Art. no. 503851 SR 2050XP IEM-Bw626 – 698 MHz Art. no. 504059ACCESSORIESGA 3030 AM antenna front mount kit Art. no. 009950 AC 3200-II antenna combiner Art. no. 505497 A 1031-U omni-directionalbroadband antennaArt. no. 004645A 2003-UHF directional broadbandantennaArt. no. 003658A 5000 CP circularly polarizedbroadband antennaArt. no. 500887SPECIFICATIONSRF characteristicsModulation Wideband FM stereo(MPX pilot tone)Frequency ranges Aw+GwGw1GBwBw 470 – 558 MHz 558 – 626 MHz 558 – 608 MHz 606 – 678 MHz 626 – 698 MHzTransmitting frequencies Max. 3000 frequencies,adjustable in 25 kHz steps20 frequency banks, eachwith up to 32 factory-pre-set channels, no intermo-dulation6 frequency banks withup to 32 programmablechannelsSwitching bandwidth up to 75 MHzNominal/peak deviation±24 kHz / ±48 kHzMPX pilot tone(frequency/deviation)19 kHz/±5 kHz Frequency stability±10 ppmAntenna output BNC socket, 50 ΩRF output power at 50 Ωswitchable:Low: 10 mWStandard: 30 mWHigh: 50 mWMaximum: 100 mW (XPversions only)AF characteristicsCompander system Sennheiser HDXAF frequency response25 Hz to 15 kHzAF inputBAL AF IN L (I)/BAL AF IN R (II)2x XLR-3/¼" (6.3 mm) jackcombo socket,electronically balanced Max. input level+22 dBuTotal harmonic distortion(THD)<0.9 %Signal-to-noise ratio (atnominal load and peakdeviation)>90 dBAF outputLOOP OUT BAL L (I)/LOOP OUT BAL R (II)¼" (6.3 mm) stereo jacksocket,balancedOverall deviceTemperature range-10 °C to +55 °C(14 °F to 131 °F)Power supply100 - 240 V ACCurrent consumption0.2 ADimensions Approx. 217 x 483 x 43 mm(8.54" x 19.02" x 1.69") Weight Approx. 2,700 g (5.95 lbs)PRODUCT OVERVIEW AND CONNECTIONSDIMENSIONSARCHITECT‘S SPECIFICATIONThe rack-mount dual channel stereo transmitter shall be for use with a companion receiver as part of a wireless RF moni-toring system. Each channel of the stationary transmitter shall provide the following features and performance:The transmitter shall operate within five UHF frequency ranges, with a switching bandwidth of up to 75 MHz: 470 –558 M Hz, 558 – 626 MHz, 558 – 608 MHz, 606 – 678 MHz, 626 – 698 MHz; transmitting frequencies shall be 3,000 per range and shall be tunable in 25 kHz steps. The transmitter shall feature 20 fixed frequency banks with up to 32 compa-tible frequency presets and 6 user banks with up to 32 user programmable frequencies.The transmitter shall be menu-driven with a backlit LC display showing the current frequency, frequency bank and chan-nel number, metering of AF level, transmission status, transmission power, equalizer setting, input sensitivity, and lock status. An auto-lock feature shall be provided to prevent settings from being accidentally altered.The parameters of associated receivers shall be configurable in the transmitter menu and synchronized with the receivers via an integrated infrared interface.Frequency stability shall be ±10 ppm. RF output power at 50 Ω shall be switchable between 10 mW (low), 30 mW (stan-dard), 50 mW (high) and 100 mW (Maximum, XP version only).The stereo audio input shall utilize two discrete (left/right) electronically balanced ¼" (6.3 mm) jack/XLR-3F combo sockets; the audio output shall utilize a balanced ¼" (6.3 mm) jack socket; an audio loop output shall be provided utilizing two balanced ¼" (6.3 mm) jack sockets. A headphone output with headphone volume control shall be provided and shall utilize a ¼" (6.3 mm) stereo jack socket. The transmitter shall have an Ethernet port (RJ-45) for remote network-based monitoring and control using the Sennheiser Wireless System Manager software. One 50 Ω BNC-type input socket shall be provided for connecting the antenna.Nominal/peak deviation shall be ±24 kHz/±48 kHz. The transmitter shall incorporate the Sennheiser HDX compander system and shall include a 19-kHz MPX pilot tone with a ±5 kHz deviation. The audio frequency response shall range from 25 –15,000 Hz. Maximum input level shall be +22 dBu. Total harmonic distortion (THD) at 1 mV and nominal deviation shall be < 0.9 %. Signal-to-noise ratio at nominal load and peak deviation shall be > 90 dB.The following features and performance shall be provided to supportnboth transmitter channels:Power shall be supplied to the transmitters by the internal power supply with auto-switching mains voltage of 100 – 240 VAC at 50/60Hz. Current draw shall be maximum 0.2 A. The transmitter chassis shall be fabricated from metal and shall be capable of mounting in a standard 19“ equipment rack without additional hardware; case dimensions shall be approxi-mately 8.54“ x 19.02“ x 1.69“ (217 x 483 x 43 mm). Weight shall be 102.29 oz (2900 grams). Operating conditions shall be ambient temperature +14°F to +131°F (-10°C to +55°C).The stationary dual channel stereo transmitter shall be the Sennheiser SR 2050 IEM.Sennheiser electronic GmbH & Co. KG · Am Labor 1 · 30900 Wedemark · Germany · 。
BC05 立体声蓝牙模块规格书

四.产品方块图:
VTL-1698A
cyd16988@
五.尺寸标注:
VTL-1698A
cyd16988@
VTL-1698A
六.管脚说明:
管脚号
名称
1,21,32,40,43, 48,56,58
GND
2
PIO1
3
PIO0
串口输出端 串口输出端 数字 IO 口 数字 IO 口 数字 IO 口 数字 IO 口 数字 IO 口 数字 IO 口 数字 IO 口 低电平复位端 调试端口 调试端口 调试端口 调试端口 接红色 LED,显示电源相关信息 接蓝色 LED,显示蓝牙工作状态相关信息 开关机/接听电话等多功能按键输入端 内置 DC-DC 输出电压,供主芯片使用,尽量不要外接其他器件以防干扰 电池供电(3.3-4.2V) 充电端口(5V) 左声道音频输差分出端 左声道音频输差分出端 右声道音频输差分出端 右声道音频输差分出端 右声道 MIC 差分输入端 右声道 MIC 差分输入端 左声道 MIC 差分输入端 左声道 MIC 差分输入端 MIC 工作偏置电压 数字 IO 口 数字 IO 口 天线接口
36
LED1
37
LED0
38
VREN
39
1.8V
41
VBAT
42
V_CHG
44
SPK_A_P
45
SPK_A_N
46
SPK_B_P
4MIC_B_P
50
MIC_B_N
51
MIC_A_P
52
MIC_A_N
53
MIC_BIAS
54
PIO3
55
PIO2
57
ANT
STICK-ON SERIES Model ST-MX2 双输入音频混音器说明书
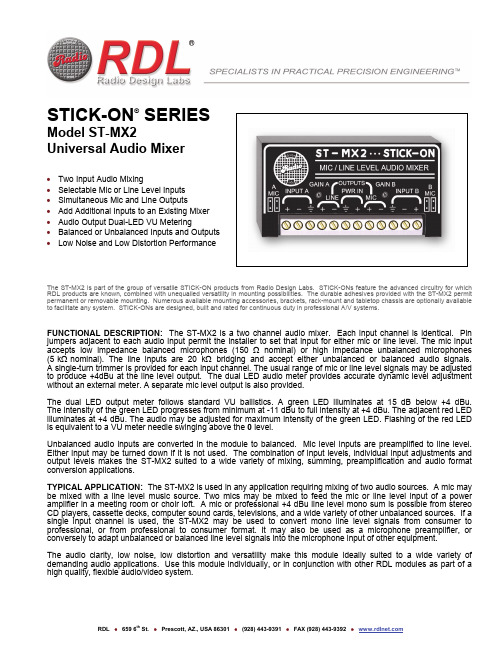
STICK-ON® SERIESModel ST-MX2∙Two Input Audio Mixing∙Selectable Mic or Line Level Inputs∙Simultaneous Mic and Line Outputs∙Add Additional Inputs to an Existing Mixer∙Audio Output Dual-LED VU Metering∙Balanced or Unbalanced Inputs and Outputs∙Low Noise and Low Distortion PerformanceThe ST-MX2 is part of the group of versatile STICK-ON products from Radio Design Labs. STICK-ONs feature the advanced circuitry for whichRDL products are known, combined with unequalled versatility in mounting possibilities. The durable adhesives provided with the ST-MX2 permit permanent or removable mounting. Numerous available mounting accessories, brackets, rack-mount and tabletop chassis are optionally availableto facilitate any system. STICK-ONs are designed, built and rated for continuous duty in professional A/V systems.FUNCTIONAL DESCRIPTION: The ST-MX2 is a two channel audio mixer. Each input channel is identical. Pin jumpers adjacent to each audio input permit the installer to set that input for either mic or line level. The mic input accepts low impedance balanced microphones (150 Ω nominal) or high impedance unbalanced microphones(5kΩnominal). The line inputs are 20 kΩbridging and accept either unbalanced or balanced audio signals.A single-turn trimmer is provided for each input channel. The usual range of mic or line level signals may be adjustedto produce +4dBu at the line level output. The dual LED audio meter provides accurate dynamic level adjustment without an external meter. A separate mic level output is also provided.The dual LED output meter follows standard VU ballistics. A green LED illuminates at 15 dB below +4 dBu. The intensity of the green LED progresses from minimum at -11 dBu to full intensity at +4 dBu. The adjacent red LED illuminates at +4 dBu. The audio may be adjusted for maximum intensity of the green LED. Flashing of the red LEDis equivalent to a VU meter needle swinging above the 0 level.Unbalanced audio inputs are converted in the module to balanced. Mic level inputs are preamplified to line level. Either input may be turned down if it is not used. The combination of input levels, individual input adjustments and output levels makes the ST-MX2 suited to a wide variety of mixing, summing, preamplification and audio format conversion applications.TYPICAL APPLICATION: The ST-MX2 is used in any application requiring mixing of two audio sources. A mic maybe mixed with a line level music source. Two mics may be mixed to feed the mic or line level input of a power amplifier in a meeting room or choir loft. A mic or professional +4 dBu line level mono sum is possible from stereoCD players, cassette decks, computer sound cards, televisions, and a wide variety of other unbalanced sources. If asingle input channel is used, the ST-MX2 may be used to convert mono line level signals from consumer to professional, or from professional to consumer format. It may also be used as a microphone preamplifier, or conversely to adapt unbalanced or balanced line level signals into the microphone input of other equipment.The audio clarity, low noise, low distortion and versatility make this module ideally suited to a wide variety of demanding audio applications. Use this module individually, or in conjunction with other RDL modules as part of ahigh quality, flexible audio/video system.RDL ∙ 659 6th St. ∙ Prescott, AZ., USA 86301 ∙ (928) 443-9391 ∙ FAX (928) 443-9392 ∙STICK-ON® SERIES Model ST-MX2Universal Audio MixerTYPICAL PERFORMANCEInputs (2): Selectable mic or lineInput range for +4 dBu output:Mic: -45 dBu to -65 dBu; max input: -28 dBuLine: -18 dBV to +10 dBu max input: +22 dBu Input impedance: Mic: 200 Ω; Line: 20 kΩ bridgingInput or output configuration: Balanced or unbalancedOutputs (2): MIC and LINEOutput impedance: 150 Ω (mic or line)Frequency Response:Mic: 25 Hz to 50 kHz (± 1 dB)Line: 10 Hz to 30 kHz (± 0.25 dB)THD+N: Mic: < 0.05% (25 Hz to 20 kHz)Line: <0.005%IMD: <0.004% Output Level: Mic: -45 dBu; line: +4 dBu Headroom:Mic Input: > 22 dB (rel. –50 dBu)> 32 dB (rel. –60 dBu)Line Input: > 18 dB (rel. +4 dBu)Output: > 20 dB (rel. +4 dBu)Noise (below +4 dBu):Mic: < -70 dB (150 Ω source, 50 dB gain),< -80 dB (200 Ω source, 50 dB gain)Line: < -90 dB (reference +4 dBu, unity gain) CMRR:Mic: > 65 dB (50 Hz to 120 Hz)Line: > 45 dB (50 Hz to 120 Hz)Ambient Operating Environment: 0° C to 55° CPower Requirement: GROUND REFERENCED,24 Vdc @ 60 mAInstallation/OperationDeclaration of Conformity available from .Sole EMC specifications provided on product package.Specifications are subject to change without notice.891-1075CRadio Design Labs Technical Support Centers U.S.A. (800) 933-1780, (928) 778-3554; Fax: (928) 778-3506 Europe [NH Amsterdam] (++31) 20-6238 983; Fax: (++31) 20-6225-287。
杰理蓝牙模块说明书
JL蓝牙模块规格书一.模块功能描述JL模块是一个高集成度,低成本,低功耗的蓝牙立体声带通话功能+U盘+TF卡+FM+Line in全功能单芯片模块,符合Bluetooth2.1+JL规范。
(同时预留有LCD点阵屏,还可以做mic录音,支持红外遥控,支持文件传输但这些需增强版本软件支持)。
1.可播放MP3/WMA/WAV/SBC2.蓝牙立体声传输,蓝牙通话3.FM收音4.TF/SD卡控制,支持USB(slave)功能,从而可以实现读卡器功能5.立体声Line-in输入6.IR遥控7.支持3X3矩阵按键8.两个可控LED、支持外部功放mute功能9.内部集成电源管理10、支持U盘控制10、内部集成2x1W功放,支持双通道功放直接输出(建议用2x6欧喇叭,功率约为2x0.75W)11、带高速UART调试及升级接口二.模块产品应用该模块主要用于短距离的音乐传输,可以方便地和笔记本电脑,手机,PDA等数码产品的蓝牙设备相连,实现音乐的无线传输,由于集成了FM与MMC卡的播放功能,使本产品具有有极高的性价比。
1.蓝牙音箱单芯片解决方案,集成Line in、FM、IR、TF/SD卡、U盘及功放2.蓝牙立体声耳机3.蓝牙无线音频传输4.读卡器、蓝牙拔号器、蓝牙伴侣等产品三.模块产品规格蓝牙版本Bluetooth V2.1+EDR调制方式PSK 3Mbps,π/4-DQPSK和8DPSK支持HFP/HSP,OPP,A2DP/AVRCP,PBAP profiles灵敏度(0.1% BER) -82dBm发射功率满足class2 and class3的发射功率要求,可以最大提供+7dbm的发射功率供电电压 3.2V~4.2V耗电电流正常工作电流45mA,播放暂停时32mA信噪比70dB 分离度50dB工作温度-20 ~ +50℃尺寸26mmx19mm x2.05mm八.注意事项:A.关于无线蓝牙的使用环境,无线信号包括蓝牙应用都受周围环境的影响很大,如树木、金属等障碍物会对无线信号有一定的吸收,从而在实际应用中,数据传输的距离受一定的影响。
便携式蓝牙无线扬声器用户手册 SMPS-621说明书

Portable Bluetooth Wireless SpeakerUSER MANUALSMPS-621This device complies with Part 15 of the FCC Rules. Operation is subject to the following two conditions:(1) this device may not cause harmful interference, and(2) this device must accept any interference received, including interference that maycause undesired operation.NOTE : This equipment has been tested and found to comply with the limits for a Class B digital device, pursuant to Part 15 of the FCC Rules. These limits are designed to provide reasonable protection against harmful interference in a residential installation. This equipment generates, uses and can radiate radio frequency energy and, if not installed and used in accordance with the instructions, may cause harmful interference to radio communications. However, there is no guarantee that interference will not occur in a particular installation. If this equipment does cause harmful interference to radio or television reception, which can be determined by turning the equipment off and on, the user is encouraged to try to correct the interference by one or more of the following measures:- Reorient or relocate the receiving antenna.- Increase the separation between the equipment and receiver.- Connect the equipment into an outlet on a circuit different from that to which the receiver is connected.- Consult the dealer or an experienced radio/TV technician for help.CAUTION: Changes or modifications not expressly approved by the party responsible for compliance could void the user’s authority to operate the equipment.Selecting fine audio equipment such as the unit you've just purchased is only the start of your musical enjoyment. Now it's time to consider how you can maximize the fun and excitement your equipment offers. This manufacturer and the Electronic Industries Association's Consumer Electronics Group want you to get the most out of your equipment by playing it at a safe level. One that lets the sound come through loud and clear without annoying blaring or distortion and, most importantly, without affecting your sensitive hearing. Sound can be deceiving. Over time your hearing "comfort level" adapts to higher volumes of sound. So what sounds "normal" can actually be loud and harmful to your hearing. Guard against this by setting your equipment at a safe level BEFORE your hearing adapts.To establish a safe level:Start your volume control at a low setting.Slowly increase the sound until you can hear it comfortably and clearly, and without distortion.Once you have established a comfortable sound level. Set the dial and leave it there.T ake a minute to do this now will help to prevent hearing damage or loss in the future. After all, we want you listening for a lifetime.We Want You Listening For a LifetimeUsed wisely, your new sound equipment will provide a lifetime offun and enjoyment. Since hearing damage from loud noiseis often undetectable until it is too late, this manufacturer andthe Electronic Industries Association's Consumer ElectronicsGroup recommend you avoid prolonged exposure to excessivenoise.Customer's Record:The serial number of this product is found on its bottom. You should note the serial number of this unit in the space provided as a permanent record of your purchase to aid in identification in the event of theft of loss.Model Number: SMPS-621 Serial Number: ____________________This system is equipped with non-skid rubber ‘feet’ to prevent the product from moving when you operate the controls. These ‘feet’ are made from non-migrating rubber material specially formulated to avoid leaving any marks or stains on your furniture. However certain types of oil based furniture polishes, wood preservatives, or cleaning sprays may cause the rubber ‘feet’ to soften, and leave marks or a rubber residue on the furniture. To prevent any damage to your furniture we strongly recommend that you purchase small self-adhesive felt pads, available at hardware stores and home improvement centers everywhere, and apply these pads to the bottom of the rubber ‘feet’ before you place the product on fine wooden furniture.The SMPS-621 is a Bluetooth portable stereo speaker with the following features: •Wireless playback of music from your Bluetooth enabled device via the Bluetooth connection.•With NFC (Near Field Communication) function.•Hands-free Bluetooth Speakerphone.•Up to 33 feet (10 meters) operating range.•Auxiliary input jack to play music from your iPod or digital audio player.•Digital volume control.ACCESSORIES INCLUDEDCarefully remove the unit and all the accessories from the gift box. Please verify that you have all the following accessories before recycling the gift box.•User manual•USB cable1. BATTERY INDICATOR2. VOLUME - BUTTON3. PLAY/PAUSE / PAIRING / PHONE BUTTON4. MICROPHONE5. VOLUME + BUTTON6. BLUETOOTH STATUS INDICATOR7. CHARGING JACK (MICRO USB JACK)8. LINE IN JACK9. POWER ON/OFF SWITCHThe SMPS-621operates on a built-in Li-ion battery that can be recharged using either the USB port on your computer or from a USB power adaptor (not included) with a rated output of DC 5V/500mA and up.Note: The micro USB CHARGING JACK located on this unit is only designed for charging the built-in Li-ion battery.CHARGING THE BATTERY FOR FIRST TIME1.) Charge the built-in Li-ion battery a minimum of 2 hours prior to first use.Plug the unit into the USB port on your computer or into a USB power adaptor (not included) using the included USB cable.2.) The BATTERY INDICATOR (Red) (#1) will turn “ON” while charging and turn“OFF” when the unit is fully charged. Unplug the USB cable from the power source once the battery is fully charged.RECHARGING THE INTERNAL BATTERYAfter prolonged use, the internal battery will become weak and the operation may become intermittent. When the internal battery charge is low, the BATTERYINDICATOR (Red) (#1) will turn “ON and FLASH”alerting you to recharge the internal battery as soon as possible.Plug the SMPS-621 into a USB port on your computer or into a USB power adaptor, DC 5V/500mA and up, (not included) using the included USB cable. Disconnect the USB cable from the speaker as soon as it is fully charged.Note: 1. Charging time will vary if you are listening to music while charging the internal battery at the same time. We recommend you switch off theSMPS-621 power during the charging process.2. To prolong the life of a rechargeable battery, it is recommended tocompletely discharge it before fully charging it again.3. Rechargeable batteries need to be cycled for maximum performance andlonger battery life. If you don’t use the player that often, be sure to rechargethe battery at least once a month in order to keep the internal batteryworking properly.Battery Note and CareDo not burn or bury batteries.Do not puncture or crush.Do not disassemble.Do not dispose of batteries in fire, batteries may explode or leakLi-ion batteries must be recycled. Do not dispose of in the trash.Use only chargers rated for Li-ion cells. Be sure the charger’s voltage and current settings are correct for the battery pack being charged.Charge batteries on a fireproof surface and away from flammable items or liquids. Batteries should NEVER be left unattended while charging. Only adults should charge the batteries.Follow the manufacturer’s instructions for charging the product and do not charge longer than recommended. Unplug the charger when the battery is charged or not in use.NOTE: The speaker is not magnetically shielded and may cause color distortion on the screen of some TVs or video monitors. To avoid this, you may need to move the unit further away from the TV or monitor if an unnatural color shifts or image distortion occurs.ABOUT PAIRINGPairing is the term used when two Bluetooth devices are connected wirelessly for the first time. This allows the devices to see each other and sets up a one to one communication channel between both devices.To begin pairing with a Bluetooth device1. Slide the POWER ON/OFF SWITCH (#9) to ON to turn on the unit. TheBLUETOOTH STATUS INDICATOR (#6) will light blue and flash and the melody “TRI-TONE” is heard. The unit is now ready to pair (link) with your Bluetooth device.[ Make sure an audio cable is not connected to LINE IN JACK (#8)]2. Turn on Bluetooth function of your device and enable the search or scan functionto find SMPS-621. (see your device’s instructions to add or setup a Bluetooth device).3. Select "SMPS621" from the device list when it appears on your device screen. Ifrequired, enter the pass code “0000” to pair (link) SMPS-621 with your device.4. If you are pairing (linking) your computer to the speaker using Bluetooth, you mayneed to set the SMPS-621 as your computer’s default sound device.5. Once paired with a device, the BLUETOOTH STATUS INDICATOR (#6) willlight steadily and you will hear the sound“DOM”to confirm that pairing is completed.6. If you want SMPS-621 change to pair with another Bluetooth Enable Device. Pressand hold the //PAIRING button (#3) for about 4~5 seconds. The BLUETOOTH STATUS INDICATOR (#6) will flash, the melody “CALYPSO” will be heard to confirm the unit will go into Pairing/Discoverable mode again. Repeat steps 2 and 3.To connect a previously paired Bluetooth deviceThe SMPS-621 can store one previously paired device for quick pairing during the power on cycle. When the unit is powered on and the previously paired device is found within the operating range, the unit will pair and connect with the device automatically.NOTE:•Due to different operating systems found in Bluetooth devices, the time to complete the pairing process might be different from unit to unit. If the pairing is not successful the first time, please try restarting the pairing process again by pressing and holding the //PAIRING button (#3) until the BLUETOOTH STATUS INDICATOR (#6) flashes.•The pairing time might be longer the first time pairing or when pairing a new Bluetooth device.•Make sure you have the latest firmware for your Bluetooth mobile devices. •Make sure your device is working properly. Check your device’s manual for details on Bluetooth pairing and linking.•Refer to manual of your cell phones, tablet PC, computer or other Bluetooth enabled device for Bluetooth operation since it may vary from model to model.You can play music from your Bluetooth device wirelessly to SMPS-621 after successfully pairing.1. Selecting your favorite song, press the PLAY button on your Bluetooth device orthe //PAIRING button (#3) on SMPS-621 to play or pause the Bluetooth device playback.2. Slowly adjust both the VOLUME +/- buttons (#2/#5) of your SMPS-621 and yourBluetooth device until you reach a comfortable listening level.Notes:1. Your Bluetooth enabled device will not play the music through the speaker,even if connected (linked), if the device does not support the A2DP Bluetooth profile.2. Remember to turn off the SMPS-621 when you have finished listening, s et thePOWER ON/OFF SWITCH (#9) to the “OFF” position.3. Don't forget to switch off the power of your external audio device as wellTo use your Bluetooth speaker as a speakerphone for receiving a phone call from a Bluetooth enabled phone.1. Follow the “PAIRING WITH YOUR BLUETOOTH DEVICE” section to set up theBluetooth connection with your smartphone.2. When a call is received while music is playing, the music will be replaced by aringtone. Press the //PAIRING button (#3) once to answer the call.3. Use the VOLUME +/- buttons (#2/#5) to adjust the desired volume level.4. To ignore an incoming call, simply press and hold the //PAIRING button(#3) for about3 to 4 seconds, a beep sound will be heard and the call was ignored.5. When the call is completed, press the //PAIRING button (#3) once to endthe call. If you were playing music from the SMPS-621 before answering the call, the music will automatically resume playing when you hang up.6. Tap the //PAIRING button (#3) twice to re-dial the last number you dialed.ABOUT NFCNFC (Near Field Communication) is a technology enabling short-range wireless communication between various devices, such as mobile phones and IC tags. Thanks to the NFC function, data communication can be achieved easily just by touching the relevant symbol or designated location on NFC compatible devices.1. Make sure your Smartphone and the NFC function is turned on.2. Hold the back of your smartphone against the “JENSEN” logo on the SMPS-621until hear a confirmation tone is heard to confirm the pairing is completed.3. Some smartphones may ask you to confirm the pairing if they were not pairedbefore.NOTE: If you have multiple NFC compatible devices, just touch the smartphone to a different device to switch the connection to that device. For example, when your smartphone is connected with NFC compatible headphones, just touch the smartphone to the system to change the Bluetooth connection to the system (one touch connection switching).You can play other music sources (iPod, MP3 or other digital audio players) through the speakers of this unit by connecting the LINE IN JACK (#8) to your external player’s audio out jack or headphone jack.1. Plug one end of an audio cable (not included) into the LINE IN JACK (#8) and theother end of the cable to the headphone jack of your digital audio player.2. Set the POWER ON/OFF SWITCH (#9) to t urn on the unit. The BLUETOOTHSTATUS INDICATOR (#6) will light Green steadily.3. Start playing the device you plugged into the LINE IN JACK (#8).4. Slowly adjust both the volume controls of your SMPS621 and the external deviceuntil you reach a comfortable listening level.5. Turn off your iPod, MP3 player etc. when finish listening.6. Set the POWER ON/OFF SWITCH (#9) to the “OFF” position to turn SMPS-621off and unplug the AUX IN Jack.NOTE:Play/Pause control only works in Bluetooth mode and not in Line In mode.If you are connected to the Line Out Jack of your external device then you only need to adjust the volume control on the SMPS-621. If you’re connected to the Headphone Jack of your external device, then you may need to adjust both the volume control of your external device and the SMPS-621 to obtain the most desirable volume setting.If you use Line In function when playing Bluetooth audio, Bluetooth audio will be temporarily disconnected when the audio cable is plugged in. Unplugging the audio cable will resume Bluetooth audio. We suggest you turn off the Bluetooth function of your Smartphone to save battery power when playing music via Line In mode.1. Avoid operating your unit under direct sunlight or in hot, humid or dusty places.2. Keep your unit away from heating appliances and sources of electrical noise suchas fluorescent lamps or motors.CLEANING THE UNIT•To prevent fire or shock hazard, disconnect your unit from the USB port of power source when cleaning.•The finish on the unit may be cleaned with a dust cloth and cared for as other furniture. Use caution when cleaning and wiping the plastic parts.•If the cabinet becomes dusty wipe it with a soft dry dust cloth. Do not use any wax or polish sprays on the cabinet.•If the cabinet becomes dirty or smudged with fingerprints it may be cleaned with a soft cloth slightly dampened with a mild soap and water solution. Never use abrasive cloths or polishes as these will damage the finish of your unit. CAUTION :Never allow any water or other liquids to get inside the unit while cleaning.Symptom Possible Problem SolutionThe USB power adaptor (notincluded) is not plugged into a wall outlet or the USB cable (included) is not plugged into the mini USB jack on theSMPS-621. Plug the USB power adaptor (not included) into a wall outlet and plug the USB cable (included) into the mini USB jack on the SMPS-621.Wall outlet is not functioning. Plug another device into the same outlet to confirm the outlet is working.No ChargingComputer USB port is not functioning. Make sure your computer power is turned on and try another USB port.The SMPS-621 battery isexhausted.Recharge the SMPS-621 battery.The SMPS-621 is not linked with the Bluetooth enabled device. Go through “Pairing with your Bluetooth device” process to link the speaker.The SMPS-621 placement out of range. Relocate the SMPS-621 within Bluetooth operating range (30 feet).No SoundVolume set too low. Press the Volume + button to increase the sound level.Volume level is set too high. Decrease the volume of the speaker.If the source sound file is of poor quality,distortion and noise are easily noticed withhigh-power speakers. Try a different audiosource such as a music CD.Sound isdistorted. Sound source is distorted. If you are using an external sound source likeolder generation of iPod, try reducing theoutput volume on the device itself. Also tryturning bass boost OFF or change the EQsetting.Unit gets warmafter extended play at high volume.This is normal.Turn the speaker off for a period of time orlower the volume.Power requirement:DC input: DC 5V 500mA (micro USB)Battery built-in rechargeable Lithium-ion batteryBluetooth Bluetooth Specification version 3.0Support profile A2DP / HFPAudio power output 2.5W (rms).Dimensions 83mm (H) x 82.5cm(W) x 82.5cm(D)Weight 292gAt Spectra, environmental and social responsibility is acore value of our business. We are dedicated tocontinuous implementation of responsible initiatives withan aim to conserve and maintain the environmentthrough responsible recycling.Please visit us at /green.htm for more information on Spectra’s green initiatives or to find a recycler in your area.Bluetooth® is a registered trademark of Bluetooth SIG, Inc.SPECTRA MERCHANDISING INTERNATIONAL, INC. warrants this unit to be free from defective materials or factory workmanship for a period of 90 days from the date of original customer purchase and provided the product is utilized within the U.S.A. This warranty is not assignable or transferable. Our obligation under this warranty is the repair or replacement of the defective unit or any part thereof, except batteries, when it is returned to the SPECTRA Service Department, accompanied by proof of the date of original consumer purchase, such as a duplicate copy of a sales receipt.You must pay all shipping charges required to ship the product to SPECTRA for warranty service. If the product is repaired or replaced under warranty, the return charges will be at SPECTRA’s expense. There are no other express warranties other than those stated herein. This warranty is valid only in accordance with the conditions set forth below:1. The warranty applies to the SPECTRA product only while:a. It remains in the possession of the original purchaser and proof of purchase isdemonstrated.b. It has not been subjected to accident, misuse, abuse, improper service, usage outsidethe descriptions and warnings covered within the user manual or non-SPECTRA approved modifications.c. Claims are made within the warranty period.2. This warranty does not cover damage or equipment failure caused by electrical wiring notin compliance with electrical codes or SPECTRA user manual specifications, or failure to provide reasonable care and necessary maintenance as outlined in the user manual.3. Warranty of all SPECTRA products applies to residential use only and is void whenproducts are used in a nonresidential environment or installed outside the United States. This warranty gives you specific legal rights, and you may also have other rights which vary from state to state. TO OBTAIN SERVICE please remove all batteries (if any) and pack the unit carefully and send it freight prepaid to SPECTRA at the address shown below. IF THE UNIT IS RETURNED WITHIN THE WARRANTY PERIOD shown above, please include a proof of purchase (dated cash register receipt) so that we may establish your eligibility for warranty service and repair of the unit without cost. Also include a note with a description explaining how the unit is defective. A customer service representative may need to contact you regarding the status of your repair, so please include your name, address, phone number and email address to expedite the process.IF THE UNIT IS OUTSIDE THE WARRANTY PERIOD, please include a check for $20.00 to cover the cost of repair, handling and return postage. All out of warranty returns must be sent prepaid.It is recommended that you contact SPECTRA first at 1-800-777-5331 or by email at ************************for updated information on the unit requiring service. In some cases the model you have may be discontinued, and SPECTRA reserves the right to offer alternative options for repair or replacement.SPECTRA MERCHANDISING INTERNATIONAL, INC.4230 North Normandy Avenue,Chicago, IL60634, USA.1-800-777-5331T o register your product, visit the link on the website below to enter your information./wform.htm0214 Printed in China。
Mini40 2x20W 数字蓝牙音频放大器说明文件说明书
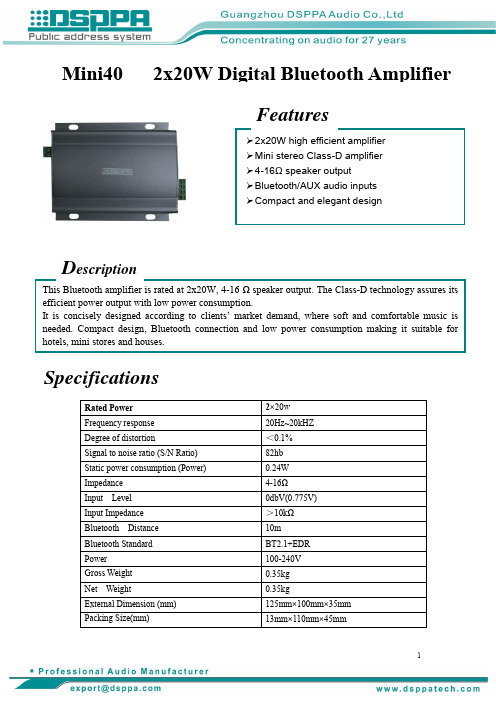
Mini40 2x20W Digital Bluetooth Amplifier2x20W high efficient amplifier Mini stereo Class-D amplifier 4-16Ω speaker output Bluetooth/AUX audio inputs Compact and elegant designSpecificationsRated Power 2×20w Frequency response 20Hz~20kHZ Degree of distortion <0.1% Signal to noise ratio (S/N Ratio)82hb Static power consumption (Power)0.24W Impedance 4-16Ω Input Level 0dbV(0.775V) Input Impedance >10k Ω Bluetooth Distance 10m Bluetooth Standard BT2.1+EDR Power 100-240V Gross Weight 0.35kg Net Weight0.35kgExternal Dimension (mm) 125mm×100mm×35mm Packing Size(mm) 13mm×110mm×45mmFeaturesThis Bluetooth amplifier is rated at 2x20W, 4-16 Ω speaker output. The Class-D technology assures its efficient power output with low power consumption. It is concisely designed according to clients’ market demand, where soft and comfortable music isneeded. Compact design, Bluetooth connection and low power consumption making it suitable forhotels, mini stores and houses. D escription2. Appearance1.Speaker outputs 2.Bluetooth status 3. AUX input 4.Power supplyNotice:When the power connects and line input, the indicator flashes in red. When the Bluetooth connects, the indicator lights in red.3.1 InstallationA. Horizontal Installment1. 4 screws is installed in the needed place.1234B.Vertical Installment2.4 screws is installed in the needed place.C.Put on the ceiling1.Connect the lines of power input and amplifier input.2.According to the need to connect the input lines.3.Be sure that the installment is secure or not. Packing ListElements NumberBluetooth Conveyer 1Screw 4Manual 1。
Logitech LS11 2.0 Stereo Speaker System 说明书
PACKAGE SPECIFICATIONS
Part# Bar Code (EAN-13) Part# (UK version) Bar Code (EAN-13) Weight Length (Width) Width (Depth) Height/Depth Volume 1 Single Carton 1 Case Pack 1 Outer Case Pack 1 Pallet EURO 1 Container 20ft 1 Container 40ft
Logitech®
LS11 2.0 Stereo Speaker System™
TECHNICAL SPECIFICATIONS
• Total FTC power: 3 watts RMS - Satellites: 1.5 watts RMS x 2 (into 4 ohms, @ 1 kHz, @ 10% THD)
• Total peak power: 6 watts
Speaker • Drivers: 5.1 cm (2") high-excursion metallic drivers • Dimensions (H x W x D): 16.3 x 8.5 x 8.1 cm (6.4" x 3.35" x 3.2")
clear acoustics give you quality sound • Headphone jack:
private listening provides privacy • Auxiliary input jack:
plug in MP3 or DVD players for more versatility • Cable management:
带充电指示 蓝牙立体声音响说明书

蓝牙立体声音响蓝牙立体声音响,为了使您能发挥本产品全部性能,请在使用前详细阅读此手册。
■ 描述立体声蓝牙音响适用于笔记本电脑和带蓝牙的便携设备,使多媒体产品不用连接线便能欣赏2.0功放输出的立体声音乐,本音响采用蓝牙V2.1+EDR ,工作在2.4G ISM 频段,具有2.1Mbps 的数据传输速率,是普通蓝牙技术的三倍,直线无障碍的传输距离为10米,音质好,失真度低。
◆ 支持蓝牙V2.1+EDR 立体声。
◆ 具有2.1Mbps 的数据传输速率。
◆ 2.0功放输出。
◆ 提供一路Line IN 输入◆ 配有三个按键:PREV / VOL-,PLAY/PAUSE ,NEXT / VOL+。
◆ 供电 :内置电池 3.7V / 500MA /1000MA 可选。
◆ MINI USB 充电。
◆ 输出功率:2 X 2W 。
■ 按键说明1. PREV / VOL-:上一曲,长按音量减2. PLAY/PAUSE :播放/暂停3.NEXT / VOL+:下一曲,长按音量加NEXT / VOL+PLAY/PAUSEPREV / VOL- 电源开关LED 指示灯焊接处蓝牙天线功放IC■ 使用说明:1.本模块通电有一声长的提示音后自动连接上一次配对好的设备,没连接上时,LED 以2次/秒的频率闪烁,连接后LED 间隔4秒的频率连闪2次;如果20秒内连接不上,则进入搜索频段的状态,LED 以1次/秒的频率闪烁;其它设备搜索到该蓝牙设备后,会提示输入密码,本设备的默认密码为"0000",本设备的名称为"BT Audio SPK";连接成功后会有一声短的提示音。
2.连接成功后播放电脑或其它便携设备里面的音乐,本音响即可播放音乐,在使用过程中, 2.连接成功后播放电脑或其它便携设备里面的音乐,本音响即可播放音乐,在使用过程中, 可使用三个按键来控制播放/暂停/上一曲/下一曲/音量加/音量减的功能。
矽源特科技 ChipSourceTek NNSS44224499 AB类 D类切换、超低EMI、无需
N S 4249用户手册V 1.1深圳市矽源特技有限公司2011年05月矽源特科技Ch i p S o u r c e T e k目 录1 功能说明...........................................................................................................................................................42 主要特性...........................................................................................................................................................43 应用领域...........................................................................................................................................................4 4 典型应用电路....................................................................................................................................................45 极限参数...........................................................................................................................................................56 电气特性...........................................................................................................................................................5 7芯片管脚描述 (6)7.1 封装管脚分配图...............................................................................................................................6 7.2引脚功能描述 (7)8NS4249典型参考特性......................................................................................................................................7 9NS4249应用说明............................................................................................................................................11 9.1 芯片基本结构描述.........................................................................................................................11 9.2 NS4249工作模式...........................................................................................................................12 9.3 上电 ,掉电噪声抑制.......................................................................................................................13 9.4 EMI 增强技术..................................................................................................................................13 9.5 效率.................................................................................................................................................14 9.6保护电路 (14)10 NS4249应用注意事项...................................................................................................................................14 11 芯片的封装尺寸图 (15)矽源特科技Ch i p S o u r c e T e k图 目 录图1 NS4249典型应用电路.............................................................................................................................4 图2 封装管脚分配图(top view).......................................................................................................................6 图3 NS4249原理框图...................................................................................................................................11 图4 立体耳机工作电路示意图.....................................................................................................................12 图5 EMI 测试频谱图......................................................................................................................................13 图6 NS4249加磁珠应用电路.......................................................................................................................14 图7 SOP16封装尺寸图 (15)表 目 录表1 芯片最大物理极限值...............................................................................................................................5 表2 NS4249电气特性.....................................................................................................................................5 表3 NS4249管脚描述.....................................................................................................................................7 表4 NS4249工作模式设置 (12)矽源特科技Ch i p S o u r c e T e k1功能说明NS4249是一款带AB 类/D 类工作模式切换功能、超低EMI 、无需滤波器、3W 双声道音频功放。
marantz Model SM-11S1 说明书

这一承诺作为消费者法定权利的补充 , 不能以任何方式改变这些 法定权利。
警 告
- 不要让本器材暴露于雨水、湿气、滴水或溅水之中。 - 不要移除本器材的外盖。 - 不要从通风孔将任何物品推入本器材内。 - 不要用潮湿的手处理主电源电线。 - 不要使诸如桌布、报纸、窗帘等任何物品遮盖住通风口。 - 不要将诸如点燃的蜡烛等明火火源置于本器材上。 - 当丢弃废旧的电池之前,请遵守当地的政府法规及环境保护规
设备主电源作业设定 .......................................................................................................................................................3 版权 ..........................................................................................................................................................................................3 不适合安装的位置 ............................................................................................................................................................3
7 附件的确认
打开包装箱后,请首先确认下列附件是否齐全。 • AC电源线
计isto 620 Bluetooth 无线扬声器与 Bluetooth USB 转接器使用手册说明

Calisto 620Bluetooth Wireless Spearkerphone + Bluetooth USB Adapter使用手冊目錄歡迎使用3系統需求3包裝盒內容4基本功能5喇叭擴音器控制6為喇叭擴音器充電7電池充電狀態7電量不足警示8配對9初始配對9重新配對 Bluetooth USB 轉接器9重新連線9連接 PC 和通話10Bluetooth USB Adapter LED Indicators10配對行動電話和通話11功能12喇叭擴音器和 Bluetooth 行動電話撥號功能12進階功能12使用喇叭擴音器的重要秘訣13Plantronics Spokes 軟體14「裝置」索引標籤14「應用程式」索引標籤14疑難排解15歡迎使用感謝您購買新的 Plantronics Calisto® 620 無線喇叭擴音器。
本使用手冊內含 Calisto 620喇叭擴音器及 BT300C Bluetooth USB 轉接器的設定與使用說明。
(P620 無線喇叭擴音器及一個 BT300C Bluetooth USB 轉接器)Calisto 620 重點特色和功能•個人 Bluetooth®無線喇叭擴音器週邊裝置。
•連線至您的 PC 和 Bluetooth 相容行動電話。
•絕佳的音質 (PC 為寬頻,行動電話為窄頻)。
•全雙工音訊,雙方通話如同面對面談話一般自然。
•360° 麥克風含雙自動切換麥克風 (降低室內噪音傳輸,讓遠端和您通話的人聽得更清楚)。
•透過 Plantronics Spokes 軟體整合通話控制與其他功能•軟體電話及統合通訊用戶端通話控制功能 - 通話接聽/結束,調高/調低音量,麥克風靜音/解除靜音,拒絕來電•最長達 7 小時通話時間 / 5 天待機時間•體積小巧便於攜帶,含便攜包。
附註在安裝或使用前,請參考另附的安全說明,以瞭解重要的產品安全資訊。
- 1、下载文档前请自行甄别文档内容的完整性,平台不提供额外的编辑、内容补充、找答案等附加服务。
- 2、"仅部分预览"的文档,不可在线预览部分如存在完整性等问题,可反馈申请退款(可完整预览的文档不适用该条件!)。
- 3、如文档侵犯您的权益,请联系客服反馈,我们会尽快为您处理(人工客服工作时间:9:00-18:30)。
INNO 档“AD201:IN201系列立体声音频蓝牙模组UART配置说明”。
Rev 1.1 8/12
Copyright © by INNO Technology
IN2011S
4 PCB 设计
Confidential IN2011S模组PCB设计请参考设计文档“AD202:IN201系列立体声音频蓝牙模组硬件设计指南及问题说明”
10Biblioteka GND接地Rev 1.1 8/12
Copyright © by INNO Technology
IN2011S
蓝牙开关输入端;
11
BT_ON
长按触发与 BT_MFB 配合使用,控制蓝牙模组与主设备的连接与断开
蓝牙模组多功能输入端;
Confidential 12
BT_MFB
短按触发为控制音乐播放与暂停;
态时,LED灯为闪烁状态,闪烁间隔时间约为0.5s;当蓝牙处于连接好状态时,LED灯为闪烁状态,闪烁间 隔时间约为1s。 7、 BT_ON为蓝牙手动开关控制,BT_MFB为蓝牙多功能控制。IN2011S模组的固化软件默认为蓝牙自动连 接,当模组设置为自动连接时,可不使用BT_ON、BT_MFB管脚。如果需要使用手动开关及配对时,一般 将此两管脚连接在一起由同一个按键控制(见原理图)。此按键需要长按超过2s。BT_MFB短按触发时, 作为控制音乐播放与暂停的功能。详细说明请参见设计文档AD202。 8、 IN2011S不支持音量调节功能,因而需要额外增加可调节通道音量大小的控制电路。详细说明请参见设计 文档AD202。 9、 IN2011S支持UART串行接口控制,可通过串口对模组进行控制及状态检测。如果使用UART串口时,则无 需使用其他按键硬线接口(BWD、FWD、BT_ON、BT_MFB、LED)。详细串口指令说明请参见设计文
4.5 4.5 --- --- 0.3*VIO 85 2.480 -80
6 ---
单位
V V °C °C
单位
V V mA V V °C GHz dBm dBm dBm bps
1. 逻辑信号为BWD、FWD、PA_EN、BT_ON、BT_MFB、UART_TX、UART_RX。
IN2011S
5 封装信息
Confidential IN2011S 模组尺寸为 12mmX15.5mm,厚度 2mm。
18
PA_EN
外置音频功放工作的使能,可用为系统音频 Mute 控制
19
VREFB
内部电源端输入,VREF_OUT 连接到 VREFB
20
NC
不连接
注:IN2011S各功能管脚的详细说明和使用请见参考设计文档“AD202:IN201系列立体声音频蓝牙模组硬
件设计指南及问题说明”
INNO
正确错误
Rev 1.1 8/12
Copyright © by INNO Technology
与系统的其他部分IO电平保持一致。电源部分设计详见参考设计文档AD202。
3、 VREF为模组内部电源,无需其他外部电源输入。VREF_OUT为内部电源输出,直接连接到模组的VREFA、
Rev 1.1 8/12
Copyright © by INNO Technology
IN2011S
VREFB管脚。
主要需要注意的有如下几点: 1、 模组下方尽可能不要有任何走线,保持完整的GND接地铜皮。 2、 “VREF_OUT”管脚的输出需要先连接“VREFA”与“VREFB”的管脚滤波电容,然后再连接到
“VREFA”与“VREFB”的管脚,如下图所示。
3、 模组尽可能放置在单板边缘,模组上的天线部分需要伸出单板边缘外,必须保证天线上方,下方均没有 铜皮。如天线部分不能伸出单板边缘外,则需要将天线相应地方的单板挖空。如下图示意。
C
1、 音频功放部分仅为示意设计图,设计时请具体参考实际使用的音频功放的设计资料。
O 2、 IN2011S模组有三处电源供电:VBAT、VCC、VIO。VBAT供电电压范围为3.4V~4.5V,建议可以直接连 N 接系统电池;VCC供电电压范围为2.8V~4.5V,由于此电源供电需要的工作电流约为60mA,因而VCC的 IN 供电电源的输出电流需要大于60mA(考虑到峰值,100mA输出为佳)。VIO为输入输出IO的参考电平,
INNO
Rev 1.1 8/12
Copyright © by INNO Technology
IN2011S
3 典型应用电路图
nfidential o 注:实际设计时,请务必仔细阅读参考设计文档“AD202:IN201系列立体声音频蓝牙模组硬件设计指南及问题
说明”或者联系亿诺科技的工程设计人员(联系方式见文档最后一页)。
4、 VCC、VBAT、VREF、VIO电源管脚的滤波电容C101~C106尽可能靠近模组电源管脚,并先通过滤波电
容,再连接入模组管脚。
Confidential 5、 第18管脚为PA_EN管脚,作为“音频功放使能”功能控制,蓝牙模组工作时,输出低电平0V;蓝牙模组未 工作时,输出高电平VIO。详细说明请参见设计文档AD202。 6、 蓝色LED灯为蓝牙状态指示灯。IN2011S模组的固化软件配置蓝色LED灯指示状态,当蓝牙处于未连接状
IN2011S
立体声音频蓝牙模组
Stereo Audio Bluetooth Module
Confidential 特 征
¾ 12mm×15.5mm超小封装 ¾ 内置蓝牙天线 ¾ 支持BluetoothV2.0+EDR协议 ¾ 支持A2DPV1.2,AVRCPV1.4 ¾ 支持HSPV1.2,HFPV1.5 ¾ -82dBm超低接收灵敏度 ¾ 集成晶体,无需外置时钟 ¾ 集成EEPROM,无需软件设计
¾ 支持噪声消除, 回音抵消功能 ¾ 提供上一首、下一首控制输入 ¾ 提供蓝牙开关,手动按键配对
功能输入 ¾ 提供蓝牙LED指示管脚输入 ¾ 提供音频功放使能控制输出 ¾ 提供UART串行接口, 可配置工
作模式及状态
描述
管脚定义
IN2011S模组为封装极小的立体声蓝牙模组,模组大小仅为12mm×15.5mm, 并内置蓝牙天线。IN2011S模组实现蓝牙射频接收,并输出高质量的立体声语音
IN2011S 模组 TopView
INNO 信号。
功能框图
Rev 1.1 8/12
Copyright © by INNO Technology
应用 ¾ 立体声蓝牙音箱 ¾ 立体声蓝牙耳机 IN2011S
IN2011S
Confidential 目录
1 性能参数 ............................................................................................................................................................. 2 1.1 极限电气参数 ............................................................................................................................................. 2 1.2 性能参数 ..................................................................................................................................................... 2
en 1.2
性能参数
fid (工作电压VBAT=3.8VVCC=3.3V,TA=25°C) 参数名称
最小值 典型值 最大值
供电电压 VBAT
3.4
n 供电电压 VCC
2.8
o 工作电流 ICC
---
数字逻辑高电平1
0.7*VIO
C 数字逻辑低电平1
---
环境温度
-20
工作频率(f)
2.402
O 静态接收灵敏度(Sensitivity)@0.1%BER2 ---
发射级别
最大发射功率 2
2
N最大接收功率@0.1%BER2
-10
UART 数据传输速率
IN 备注:
3.8 --- 60 --- --- 25 --- -82 Class2 4 0 9600
INNO 4
VREFA
内部电源端输入,VREF_OUT 连接到 VREFA
5
AUDIO_ROUT 音频右声道输出
6
AUDIO_LOUT 音频左声道输出
7
AUDIO_COM 音频公共端输出
8
LED
蓝牙状态指示 LED 灯输入端
9
VBAT
电源端输入;输入电压范围 3.4V~4.5V;供电电流无要求
INNO
Rev 1.1 8/12
Copyright © by INNO Technology
IN2011S
1 性能参数
1.1
极限电气参数
参数名称
l 供电电压VBAT tia 供电电压VCC
工作温度 储存温度
符号
VBAT VCC TOP TSTG
值
-0.4to4.5 -0.4to4.2 -40to85 -55to150
长按触发与 BT_ON 配合使用,控制蓝牙模组与主设备的连接与断开
13
UART_TX
UART 接口 TX 信号
14