PMC BB5i监听音箱
新入书架箱PMCTB2i,简单听感汇报

新入书架箱PMCTB2i,简单听感汇报偶HIFI音乐和影院2/8开,这两年净折腾影院设备了,目前影院效果自己还算满意!但用我签名这套系统听音乐,总觉得差强人意,听CD音乐开始还好,越听越不耐听,声音硬且脆有毛刺感,人声口型也散。
于是打算置套入门的设备专门听音乐,到器材店听了几次,最后决定先入一对书架箱PMC TB2i,前天到器材店又去听,觉得满意,一咬牙就交钱提货了。
PMC TB2i箱的技术指标就不介绍了,网搜一大堆。
直接说说我的听感吧!和我的杰士RF83箱及用了10年的德国密力HIFI箱MAGNAT VECTOR 77对比一下。
对比用的其它器材为碟机剑桥550C,前级糠MC-12HD, 后级ATI1807(用其2声道)。
播放曲目:蔡琴的《恰似你的温柔》《遇见》《被遗忘的时光》童丽的《烟花三月》《葬花吟》电影原声音乐《黄飞鸿》里面第一首(记不清曲名了)朱哲琴《阿姐鼓》之《卓玛的卓玛》对比感觉:蔡琴那醇厚的嗓音透着沉静、知性和成熟女人迷人的万般风情,听着她“糯糯”的哦吟,那些逝去的时光和在心中沉睡的记忆,便会慢慢苏醒。
TB2i表现的非常突出,非常耐听,属暖色调,而RF83的人声表现有些硬;蔡琴的《遇见》,除了蔡琴饱满有感情的歌声,晚上郊外天籁的背景声...青蛙叫,蟋蟀声,触手可及,把灯灭掉,真的以为自己就在现场,TB2i 表现的很自然、真实,RF83细节表现也不差,但对比之下,就有些不自然,密力77的表现稍好些。
《恰似你的温柔》里面琴弦的泛音RF83的有些尖、略刺耳,TB2i 好多了,密力77的表现也不尽人意。
童丽甜美、清润的嗓音,再加上出色的江南小调风格,容易让人有耳目一新的感觉,自然融合“气声”、“真声”、“戏曲唱腔”的发声方法是童丽最大的特色,TB2i演绎的很甜美,对比之下RF83的人声厚度、磁性虽有,但中高音音硬、脆的毛病又出来了。
密力77表现还好。
《卓玛的卓玛》是该碟中低频最丰富而最具弹性的一曲。
OMOY我魅 蓝牙音箱产品参数
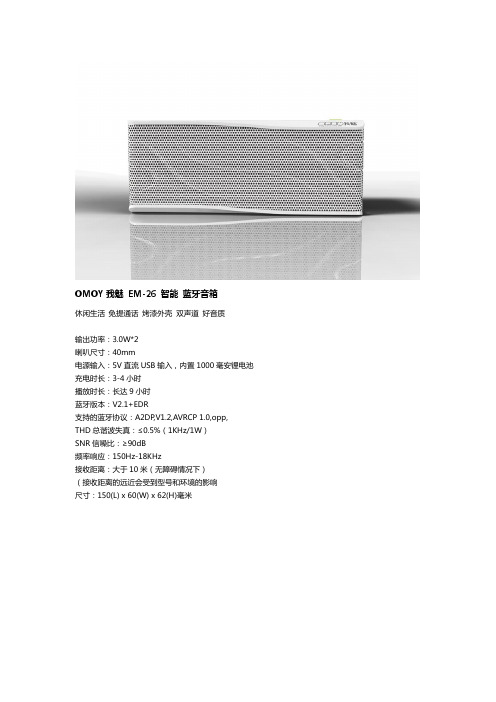
OMOY我魅EM-26 智能蓝牙音箱休闲生活免提通话烤漆外壳双声道好音质输出功率:3.0W*2喇叭尺寸:40mm电源输入:5V直流USB输入,内置1000毫安锂电池充电时长:3-4小时播放时长:长达9小时蓝牙版本:V2.1+EDR支持的蓝牙协议:A2DP,V1.2,AVRCP 1.0,opp, THD总谐波失真:≤0.5%(1KHz/1W)SNR信噪比:≥90dB频率响应:150Hz-18KHz接收距离:大于10米(无障碍情况下)(接收距离的远近会受到型号和环境的影响尺寸:150(L) x 60(W) x 62(H)毫米OMOY我魅EM-28 智能蓝牙音箱休闲生活免提通话蒙特里安风格双声道重低音喇叭震撼音效输出功率:3W*2电源输入:内置1000毫安锂电池;5伏USB接口;充电时长:3小时;工作时长:高达8小时;蓝牙版本:V4.0支持的蓝牙协议:HSP,HFP,A2DP,AVRCP总谐波失真:≤0.5% (1千赫兹/1瓦)信噪比:≥90分贝频响范围:90赫兹-18000赫兹接收距离:大于10米(无障碍物的情况下)(接收距离的远近会受到型号和环境的影响)尺寸;155(L)*54(W)*59(M)毫米OMOY我魅EM-A3 便携蓝牙音箱休闲生活手机影音输出功率:2.5V;喇叭尺寸:40MM内置锂电池:3.7V 400mAh输入电流:5V支流电充电时长:2-3小时播放时长:长达5小时蓝牙版本:V3.0+EDR支持的蓝牙协议:A2DP,HFP,HSP阻抗:4Ω总谐波失真:≤1%(1Khz/1W信噪比:>80dB频响范围;160Hz-18KHz接收距离:远达10米材料:ABS,喷橡胶油音源:电脑/平板/IPOD/MP3/MP4/手机/游戏播放器等等尺寸:60(L)x60(W)x68(H)毫米重量:75克OMOY我魅EM-A5 便携蓝牙音箱休闲生活自在享受五角密封设计品牌:OMOY我魅蓝牙协议:V3.0支持协议: A2DP频率响应: 2.402GHz-2,480GHz传输距离:Class 2 (10米)播放时间:3~4小时充电时间:约2~3小时内置锂电池容量:400mAh喇叭单元:40MM输出功率:2.5W频响范围:160-18KHz信噪比:≥80dBOMOY我魅EM-A7 便携蓝牙音箱休闲生活自在享受个性手雷造型射击游戏者最爱蓝牙规范:V3.0+EDR支持多种蓝牙协议: A2DP,HFP,HSP传输距离(种类):10米(Class 2)播放时间:3~4小时充电时间:2~3小时内置锂电池容量:400mAh喇叭单元:40MM输出功率:2.5W频响范围:160-18KHz信噪比:≥80dBOMOY我魅EM-A8 智能蓝牙音箱休闲生活免提通话烤漆外壳大喇叭好音质输出功率:3W电源输入:USB 5V直流电插口,内置500mAh锂电池充电时长:2小时播放时长:长达6小时蓝牙版本:V4.0支持的蓝牙协议:HSP,HFP,A2DP,AVRCP总谐波失真:≤0.5% (1Khz/1W)信噪比:≥90dB频率响应:100Hz-18KHz接收距离:大于10米(无障碍情况下)(接收距离的远近会受到型号和环境的影响)尺寸:71(D)*74(H)毫米OMOY我魅EM-X3 智能蓝牙音箱休闲生活免提通话多功能金属外壳输出功率:3瓦喇叭单元:50毫米内置锂电池:3。
驻极体电容喇叭(ECM)型号GMI4522P-2C46DB的规格表说明书
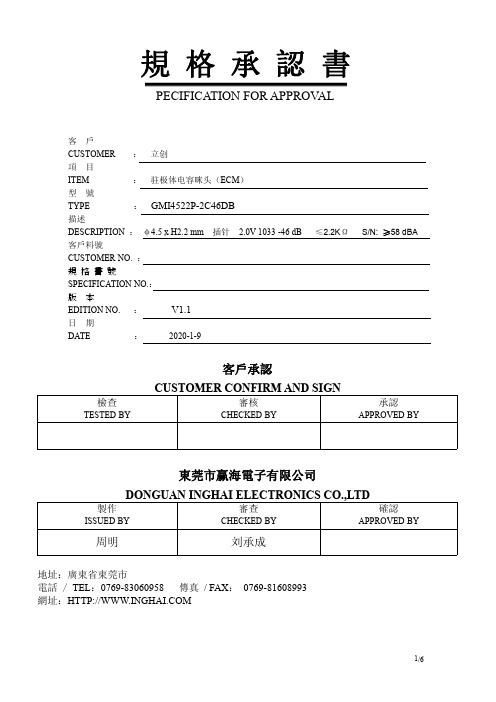
規格承認書PECIFICATION FOR APPROVAL客戶CUSTOMER:立创項目ITEM:驻极体电容咪头(ECM)型號TYPE:GMI4522P-2C46DB描述DESCRIPTION:φ4.5x H2.2mm插针 2.0V1033-46dB≤2.2KΩS/N:≥58dBA 客戶料號CUSTOMER NO.:規格書號SPECIFICATION NO.:版本EDITION NO.:V1.1日期DATE:2020-1-9客戶承認CUSTOMER CONFIRM AND SIGN檢查TESTED BY審核CHECKED BY承認APPROVED BY 東莞市赢海電子有限公司DONGUAN INGHAI ELECTRONICS CO.,LTD製作ISSUED BY審查CHECKED BY確認APPROVED BY周明刘承成地址:廣東省東莞市電話/TEL:*************傳真/FAX:*************網址:A.SCOPEThis specification applies electret condenser microphone,GMI4522P-2C46DB B.SPECIFICATION■Test condition:RL=2.2KΩVS=2.0V TEMP=25℃±2℃Related humidity=65±5% No.Item Symbol Unit Specification Condition1Directivity Omnidirectional2Sensitivity S dB-46±3f=1KHz,1Pa 0dB=1V/Pa3Standard operating voltage V s V 2.04Output impedance Z out KΩ≤2.2f=1KHz,1Pa 5Frequency Hz100-10,0006Max operating voltage V.107Sensitivity reduction△S-V s dB-3f=1KHz,1PaVs=1.5VDC to3VDC8Max.current consumption I DSS mA≤0.59Signal to noise ration S/N dBA≥58f=1KHz,P in=1Pa10Max input sound level SPL dB11011Operation temp.℃-30~+7012Storage temp.℃-40~+8513Dimension mmφ4.5xH2.2See appearance drawing14Terminal Terminal See appearance drawing15Approvals RoHs FCCWe use“Pascal(Pa)”indication of sensitivity as per the recommendation of I.E.C.(International Electro technical Commission)TheSensitivity of“Pa”will increase20dB comparing with“ubar”indicationExample:-60dB(0dB=1V/ubar)=-40dB(1V/Pa)C.TYPICAL FREQUENCY RESPONSE CURVE全指向性10K5K 3K1K 500200100-50+5Frequency(Hz)R e l a t i v e R e s p o n s e (d B )Frequency R esponseD.APPEARANCE DRAWINGE.MEASUREMENT CIRCUITF:Explode DrawingNO.PARTSPCBFilm(PPS)HolderSpacerBack plate(FEP)Outer most shell(Al)Protection fleeceFETCapacitance。
pa2025pii欧比克合并式功放说明书

pa2025pii欧比克合并式功放说明书PA2025PII欧比克合并式功放是一种强大而高性能的音频设备,专门设计用于扩音系统、演出、KTV和其他场所的音频放大需求。
它具有卓越的音质、可靠的性能和灵活的操作,为用户提供了卓越的音频体验。
一、产品特点1. 专业级音质:PA2025PII功放采用先进的放大技术,能够提供高保真度的音质。
它能够输出透明而不失真的音频信号,使得听众能够享受到高质量的音乐。
2. 高功率输出:该功放具备强大的功率输出能力,能够满足大型活动和演出的需求。
它能够驱动大功率扬声器,使得音乐能够在大范围内传达,并为听众带来强烈的音乐感受。
3. 多种输入接口:PA2025PII功放提供了多种输入接口,包括XLR、RCA和TRS等,以满足用户多样化的音频输入需求。
用户可以通过连接各种音频设备,如音源、混音台和麦克风,来实现更灵活的音频处理和控制。
4. 可鉴别负载:该功放具备自动负载鉴别功能,能够实时检测负载阻抗,并根据负载情况进行合适的调节。
这可以确保功放的工作稳定和长期可靠性,提高音频传输的效果。
5. 全面的保护措施:PA2025PII功放配备了全面的保护机制,包括过热保护、短路保护和过载保护等。
当功放工作异常或超出安全参数时,它会自动切断电源,以保护功放和与之相连的设备。
二、操作指南1. 连接音频源:通过选择合适的输入接口,将音频源(如混音台、CD播放器或电脑音频输出)与功放连接。
确保连接线的稳固和正确。
2. 设置音量:根据实际需求和场景要求,调节功放的音量。
适当调节音量,确保音乐的传播范围和音质。
3. 调节音质:通过音频源设备或使用自带的均衡器,对音频进行调节,以获取所需的音质效果。
根据具体要求,调节低音、中音和高音的均衡,以实现理想的声音效果。
4. 监控和保护:定期检查功放的工作状态,并确保其正常工作。
如果发现异常情况,例如过热或短路等,应立即关闭功放,并检查并解决问题。
三、注意事项1. 请务必遵守产品使用说明书中的安全要求,并确保使用与产品性能相匹配的电源。
小度写范文读友信箱-读友模板

读友信箱|读友“初哥”的一大堆问题Q本人是“初哥”,对器材知识一窍不通,有很多问题要向各位编辑请教。
以下是近年陆续所购器材:音箱:燕飞利仕SM85、B&W 601S2、B&W S805 AV功放:ARTISA AV-R8100(日产冠傲)两套纯功放:1、安桥P301前级,M501后级;2、音乐传真A3.2 CR前级,A3.2 CR后级CD 机:JVC XL-GM800PTN(七碟连播)DVD机:先科AEP-826PB(支持HDCD)脚架:1、君子黑武士;2、杂牌木脚架电源滤波器:G&W 2D和3D 以上器材有部分是我弟所购,他到外地工作后全部归我。
由于环境等因素所限,对于现场音乐会和高档器材组合所发出的美妙声音无法亲身体验,再加上工作较忙,无充裕时间去折腾这些东西,故对现有器材组合的素质及声音特征心中无数,只好请编辑解惑。
1、音乐传真A3.2 CR前后级(130W)和安桥前后级(150W)各能推出S805几成效果?如不适合,应配什么箱子比较好?(打算以后再配一对箱子,世霸与丹拿孰好?)2、现有JVC碟机档次太低,请介绍一台性价比较高的机器(SACD、CD均可)。
本人听过音乐传真A3.2碟机,感觉该机通电后空机状态下开大音量后有一定噪声(功放也是如此!技术指标上信噪比是很高的,不知怎么回事?)“英国之宝”合适否?推荐的器材请告知沪、杭、宁地区代理商的联系电话,或国内总代理的电话。
3、请推荐2套中价位线材:电源线、信号线、音箱线各2款。
本人不懂外文,推荐的器材和线材请附上中文译名,并告知参考价格,以免被宰。
本人听音室3.1m×4.5m,硬调子结构。
喜欢人声、弦乐、钢琴,希望声音清晰、甜美、温暖,高频通透、中频圆润、低频结实有力。
浙江富阳市桂花路52-4 骆建光A你是谦虚吧,懂得关注房间的声学调性,还配了非常不错的功放和音箱,真不象是初哥。
B&W 805、音乐传真A3.2CR前后级、安桥P301/M501都是相当Hi-Fi的器材,搭配也没有任何问题,放心好了,你现有的器材完全能再现美妙的音乐。
监听的本色 PMC音箱的绝配

PMC厂方特别强调,COR是一台纯模拟的合并功放,无论是高低音控制还是音量控制,都是纯模拟线路设计,高低音控制方面更是采用世界顶级调音台的技术,以保证音色的纯正。COR采用A/B类放大,全分立元器件设计,功率管方面采用了达灵顿晶体管设计,达灵顿晶体管即是将两个三极管串联,以组成一只等效的新的三极管,这只等效三极管的放大倍数是原二者之积,因此它的特点是放大倍数非常高。虽然这是上个世纪研发出来的技术,但是经过新科技、新技术的变革,现在可以将达灵顿晶体管全部封装在一起,所以现在每声道只要使用1颗新的达灵顿功率晶体,就能够提供每声道95W(8Ω)的功率输出,4Ω负载时更可以提供达140W输出功率,其总谐波失真小至0.001%。
此外,厂方表示他们在研发音箱时需要用功放来搭配试听,可是在这个过程中却常常发现功放有各种的问题发生,而不是PMC的音箱本身的问题。故此,厂方也认为用户在搭配自家的音箱时,同样会发生各样的问题,从而不能展现PMC音箱应有的声音。既然如此,PMC本来就有有源音箱产品,在设计放大线路上并不是问题,那就干脆自己来设计一台功放好了!于是,花费了4年的时间才完成这台COR合并功放。
作为一家音箱公司的PMC,为什么会推出COR合并功放?其实,早在新世纪之前,世界上不少大型的录音棚、电台、电视台、电影混音室等监听音箱就已经逐渐向有源音箱转变,PMC也不例外,除了一些音箱内置专属的功放之外,PMC也为一些大型监听音箱系统特别定制专属的功放,厂家可以根据自己音箱的特性选择或开发功放,非常有针对性,制作人在混音的时候不需要将功放等的音色表现考虑其中。现时有源音箱已经成为录音室、制作室当中主流的监听系统,因此笔者对于PMC推出COR合并功放用于推动自家民用系列的音箱产品并不感到意外,相信这也会成为新的趋势。
我所听过的66款书架箱(添加了西湖LC3W12V和黑胶一号DIY箱)(1)
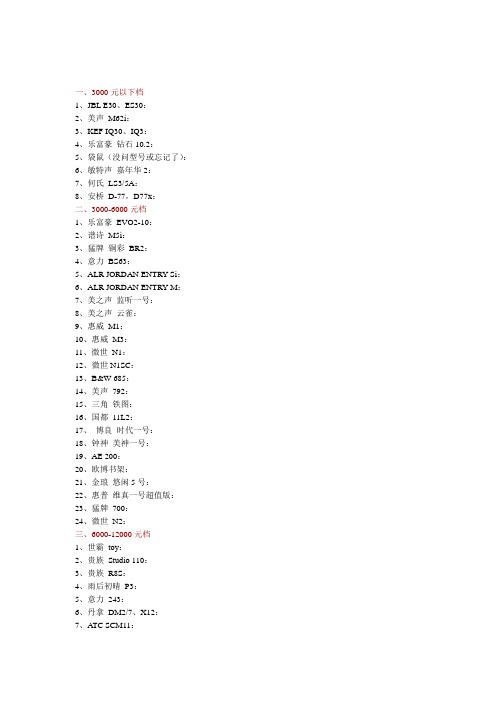
一、3000元以下档1、JBL E30、ES30:2、美声M62i:3、KEF IQ30、IQ3:4、乐富豪钻石10.2:5、袋鼠(没问型号或忘记了):6、敏特声嘉年华2:7、何氏LS3/5A:8、安桥D-77,D77x:二、3000-6000元档1、乐富豪EVO2-10:2、谱诗M5i:3、猛牌铜彩BR2:4、意力BS63:5、ALR JORDAN ENTRY Si:6、ALR JORDAN ENTRY M:7、美之声监听一号:8、美之声云雀:9、惠威M1:10、惠威M3:11、微世N1:12、微世N1SC:13、B&W 685:14、美声792:15、三角铁图:16、国都11L2:17、博良时代一号:18、钟神美神一号:19、AE 200:20、欧博书架:21、金琅悠闲5号:22、惠普维真一号超值版:23、猛牌700:24、微世N2:三、6000-12000元档1、世霸toy:2、贵族Studio 110:3、贵族R8S:4、雨后初晴P3:5、意力243:6、丹拿DM2/7、X12:7、ATC SCM11:8、AE 1:9、金琅悠闲6号:10、思奔达S3/5R:11、达尼新款皇太子:12、XTZ(名韵)99.26:13、丹拿听众42:14、高度风某书架:15、丹拿听众52se:16、卓丽Reference 300:17、ATC 7老款:18、贵族T2000S:19、卓丽星座1号、2号:四、12000-24000元档:1、ALR JORDAN NOTE3:2、贵族D1:3、雨后初晴C7:4、世霸concertino 小乐琴:5、世霸mini vintage:6、JBL 4425MK2:五、24000-48000元档:1、世霸electa amator 大情人:六、48000-96000元档:1、西湖LC3W12V:七、非卖品1、黑胶一号(烧友DIY)正文本人听了几年的HIFI耳机,耳朵算有一点分辨能力吧。
BMW

宝马车系音响解码技术解析车型配备:宝马M3、528i、Z3这三款车选用了四种机型,分别为:KE-94型、KZBE-96型、BE0074型、KE-91型。
芯片应用93C46、LC46、DH001、24C16,为第一类存储机型。
只能用专用仪器来解密码。
代用芯片为2444P、X2444P、24C08。
528i和540i车型中所使用的仪表及音响也是基本相同的,这几种车选用了三种机型:PH7850、KEJ-8001S、KEJ-8001A。
一眼看上去很可能把5系和3系音响看成是一样的,其实是不同的,芯片应用93C46、DH001、DH004。
这几种机型解码要用仪器来解。
如需代用芯片,可用LC46、X2444P。
注意在取芯片时一定不要让烙铁温度过高,过高会影响或损坏芯片。
在宝马Z3和540i车型上选装二种音响。
其中一种型号为CM5901,另一种Z3装BE0074型。
因为540i和528i车上也选装过同种机型KZBE-96型,540i同时也安装CM5908型。
宝马M5、850ci这两种车型全部安装了CM5908型阿尔派音响。
CM5908型在比较老款的宝马车上应用比较多,仅次于CM5908J型机。
一般在 95年以前的宝马车系上如:525i、535i、745iL、750iL、850ci、740iL等车型上普遍选装。
但也有其它一少部分别类机型。
宝马525i车型选用了四种型号音响,CM5908、CM5908J、BP1830和BLAUPUNKT厂家生产的插卡式防盗音响,有很少部分奔驰车也有选装这类机型。
在这里我们不考虑这种机型,因为它并不需要密码,此卡可以把它看成一个功放电路开关罢了,BP1830机型是德国贝克公司生产的,属于第一类机型,其芯片型号为93C14。
代用芯片型号LC46或93C46。
密码查寻需专用仪器。
在宝马850Csi车型和323is车型上选装有CM5908J机型和先锋公司生产的KE-85和贝克公司生产的BE0774机型。
JBL 4305P 主动演播监听器 用户手册说明书
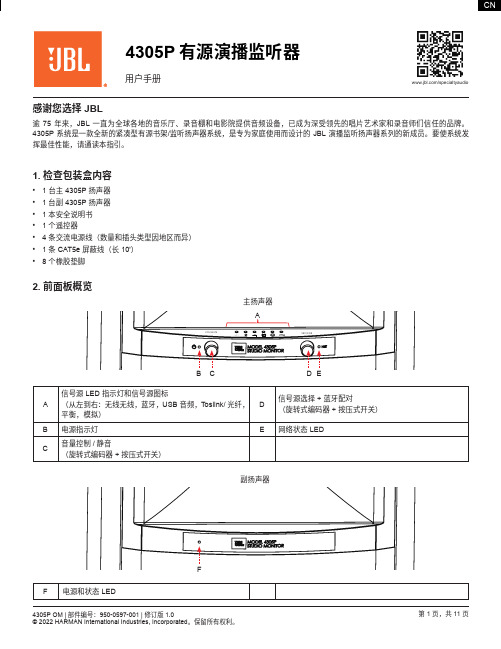
/specialtyaudio 一直为全球各地的音乐厅、录音棚和电影院提供音频设备,已成为深受领先的唱片艺术家和录音师们信任的品牌。
演播监听扬声器系列的新成员。
要使系统发3.背面面板概览A BCD E FA XLR / ¼" 平衡输入灵敏度选择 – 选项包括 -10dB (高灵敏度模式)和 +4dB (低灵敏度/保护输入前端,避免过载) K 低音轮廓开关: 用于调整边界补偿B 左右 XLR / ¼" 平衡输入L 低音炮输出:使用低音炮时,系统会激活一个 80Hz 高通滤波器C 以太网:连接至路由器的可用端口,进行有线网络方式的流媒体播放M 主扬声器数字链接:使用 CAT5e 或更高级的电缆(最长 6m )在主和副扬声器之间建立有线连接D USB-A + 维护按钮:仅用于维护/固件更新(不可用于音频或 USB 充电)N L/R 分配选择器:根据主扬声器的摆放位置以选择 L (左)或 R (右)E 重置:出厂设置 – 按住直到前面板上的指示灯开始闪烁O 主扬声器电源开关 -F 主扬声器同步按钮:用于以无线方式连接至副扬声器P 副扬声器同步按钮:用于以无线方式连接至主扬声器G 主扬声器 IEC 电源连接 – 配备一个通用电源,以便在国内和其他国家/地区使用这些扬声器。
Q 副扬声器数字链接:使用 CAT5e 或更高级的电缆(最长 6m )在主和副扬声器之间建立有线连接H 3.5mm 模拟立体声输入R 副扬声器 IEC 电源连接 - 配备一个通用电源,以便在国内和其他国家/地区使用这些扬声器。
I Toslink /光纤数字输入S副扬声器电源开关JUSB-B 数字直接 PCM 输入4.一般摆放/设置室内摆放每个扬声器的摆放位置应与位于顶部的高音扬声器互相垂直。
摆放扬声器时,应确保收听位置和两个扬声器能够形成一个等边三角形。
根据扬声器到各侧边界(如墙壁、书柜内/储藏柜内、或地板支架上)的距离,以设置主扬声器背面的低音增益开关。
丝路音乐:PMC音箱述评

丝路⾳乐:PMC⾳箱述评为什么监听⾳箱有这样的地位? 这是源⾃它的作⽤和功能。
什么⾳箱可以称之为监听⾳箱呢?就本意来说,它是⽤于节⽬制作时监听⾳质的⾳箱,由此可见它的重要。
我们⾃⼰买⼀对⾳箱,如果有⽑病只会对⾃⼰和家⼈聆听有影响,⽽监听⾳箱有缺陷其影响就⾮同⼩可。
我们常讲某某公司、某某录⾳师录⾳效果好,之所以有好的录⾳效果,取决于录⾳师的经验与⽔平、对⾳乐的修养和理解,还取决于录⾳的器材和设备。
但是监听⾳箱的质量才是最重要的。
对于监听⾳箱既有技术指标⽅⾯的要求,⼜有⾳⾊⽅⾯的要求,它可以说是录⾳师另外⼀对⽿朵。
顺便提⼀下,⼈之所以能对⾳箱重放⾳乐,有⼀个好环优劣的评价,其原因就在于我们的头脑中储存了⼀个声⾳的母本,以后听到的声⾳是与母本相⽐较,从⽽得出⽐它好或⽐它坏的结论。
母本愈好判断能⼒愈⾼。
有⼈讲⾳箱听不出好坏。
能响就⾏。
不是听不出好坏,⽽是没有听过好的优质的⾳箱,没有建⽴⼀个良好的范本,这也是好⾳箱的价值之⼀。
这样就产⽣了⼀种兴趣,以对PMC做进⼀步的、全⽅位的、深⼊的了解。
对⼀个⾳箱的了解,和对其他事物了解有类似之处,即⾸先要判断它是真好还是假好,如果好,好在什么地⽅,再进⼀步收集资料,研究分析⼀下为什么好,供我们学习借鉴。
1 监听扬声器与⾼保真扬声器的异同 PMC的⾳箱最初是⽤来作监听⾳箱,后来⼜作了⼀些⾼保真⽤⾳箱,但作为监听⾳箱还有⼀些特殊的要求。
(1)不染⾊。
染⾊是从⽇常⽣活中借来的词汇。
⾐服沾上油渍、墨⽔渍、颜料渍等,即使洗⼲净,但污痕犹在。
⾳箱重放声⾳、⾳乐时我们也希望它是纯净的、⽆瑕的。
有了染⾊,我们在欣赏⾳乐时总会发现某种缺点,但正像⼈⽆完⼈、⾦⽆⾜⾚⼀样,绝对没有染⾊的⾳箱是不存在的,⾄少在当今是不存在的。
⽽有⼀部分国家⾼保真⾳箱有时则利⽤这种染⾊,就像宣纸上掉下⼀点墨迹,⾼明的画家涉笔成趣,这⼀点可变成⼀朵花或者⼀条鱼。
要做到这⼀点并不容易,要有悟性,不是什么⼈都可以办到的。
PMC-24 产品说明书
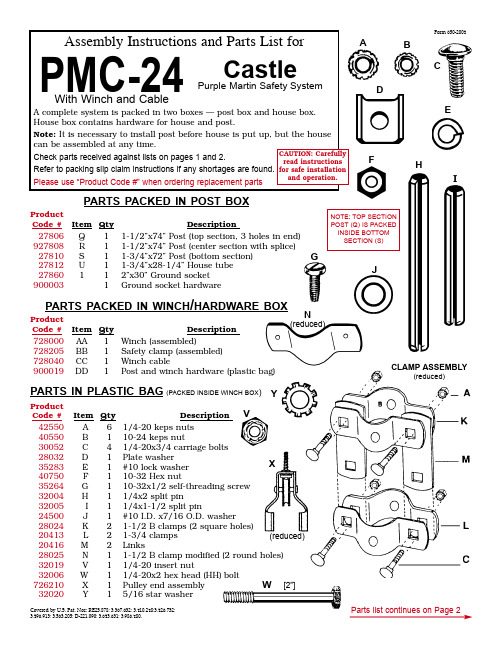
PARTS IN PLASTIC BAG (PACKED INSIDE WINCH BOX )Item A B C D E F G H I J K L M N V W X Y Product Code #4255040550300522803235283407503526432004320052450028024204132041628025320193200672621032020Qty 614111111122211111Description 1/4-20 keps nuts 10-24 keps nut 1/4-20x3/4 carriage bolts Plate washer#10 lock washer10-32 Hex nut 10-32x1/2 self-threading screw 1/4x2 split pin 1/4x1-1/2 split pin #10 I.D. x7/16 O.D. washer 1-1/2 B clamps (2 square holes)1-3/4 clamps Links 1-1/2 B clamp modified (2 round holes)1/4-20 insert nut 1/4-20x2 hex head (HH) bolt Pulley end assembly 5/16 star washerPARTS PACKED IN POST BOXItem Q R S U 1 ProductCode #27806927808278102781227860900003Qty 111111Description 1-1/2”x74” Post (top section, 3 holes in end)1-1/2”x74” Post (center section with splice)1-3/4”x72” Post (bottom section)1-3/4”x28-1/4” House tube 2”x30” Ground socket Ground socket hardwarePARTS PACKED IN WINCH /HARDWARE BOXItem AA BB CC DD ProductCode #728000728205728040900019Qty 1111DescriptionWinch (assembled)Safety clamp (assembled)Winch cable Post and winch hardware (plastic bag)Covered by U.S. Pat. Nos: RE25,878; 3,367,632; 3,410,248;3,426,732;3,496,913; 3,563,205; D-221,090; 3,643,631; 3,986,480.BJN(reduced)CLAMP ASSEMBLY(reduced)IW [2”]X YV Form 650-2004Parts list continues on Page 2ACDEGH(reduced)Parts list continued from Page 1Parts packed in house box and winch hardware boxThis house has an opening through the center which takes a 1-3/4”O.D. tube (house tube). This tube is clamped to the top of the ceiling and to the bottom of the lower floor. The house and tube slide up and down the pole and is raised and lowered by the cable over a pulley at the top of the pole. See drawing.Page 2PMC-24 Instructions232425222130PARTS IN SMALL PLASTIC BAGItem 2122232425Product Code #3526142550352523525935288Qty 124121212Description6-32x5/16 pan head machine screws (PHMS)1/4-20 keps nuts 6-32 keps nuts#6 Sheet metal screws (SMS)6-32 acorn nutsPARTS IN PLASTIC BAGItem 3031Product Code #2730043101Qty22Description Kit wrench U bolts HOUSE PARTS PACKED IN THIS BOXItem 11a 2345678910111214Product Code #82740082740182741082742265649250408274062803427415656489250658274282624135286Qty 31616242411242412412DescriptionFloor assemblyBottom floor assembly Roof sections Ceilings6-32x25-1/2 tie rods DoorsCompartment dividersCable tube FinialDoor rods Winter door stops (in two plastic bags)Perch assembly Floor traysFlat C nuts (pre-installed on roof and ceiling)Pulley Cable (CC)Clamp and CeilingCable Tube (7)Splice 1-3/4” O.D.House Tube (U)Winch (AA)ClampPost BottomSection (S)Post Center Section (R)Post Top Section (Q)Safety Clamp (BB)17-1/2”14Page 3 PMC-24 InstructionsAssembly Instructions Read all instructions before starting assembly.This will acquaint you with each step required.3. Place bottom floor assembly [1a] on cardboard box with mounting plate between carton flaps in order that floor may be held level. Position so that about 6”extends over end of carton (for easy access to under-side of floor at Step 7). Install six door rods [9] in two holes at top of each doorway on bottom floor (do not install doors yet).4.Nest second floor. (Note: Riveted seams on this floor should be over seams on first floor.)Locate in proper position over dividers below by inserting the two round top tabs on each divider into the round holes in floor. BE SURE that round tabs are to the inside of each divider front on second floor. Door rods [9] for second floor can now be added.2. Repeat this procedure on other three floors, but do not stack floors together at this point.1. Start with bottom floor.(Note that ceiling [3] and bottom floor have mounting plate rivet-ed in place.) Place one compartment divider [6] on floor assembly [1] as shown. Ventilation holes are up.The three square tabs go into “D” holes in floor. Bend tabs against straight side of “D” on underside of floor. Place another divider [6] adjacent to first and slide flange near cen-ter into slot provided. Bend tabs to hold in place. Repeat with balance of dividers for bottomfloor. Slide last divider into slot and flange from above, interlocking all pieces around center. Wipe protective oily coating from all martin house parts surfaces prior to assembly.Page 4PMC-24 Instructions5.Proceed with third and fourth floors using samesteps as used on page 3.6. Ceiling [3] is installed over top floor in same manner.Mounting plate goes up. MAKE SURE flange onmounting plate faces in same direction as mountingplate on bottom floor.7.Install one 6-32 keps nut [23] on each of the six tierods [4]. Use kit wrench [30] after starting. On ceilinglocate six round holes between each set of “D” holes,about two inches from edge. These holes are for tierods. Insert tie rods [4] into round holes over edge ofcarton. Use nail to align holes in assembly if required.Guide rod through hole in top floor, then rotate rodslowly and it will drop through assembly. Thread 6-32keps nut [23] onto lower end of tie rod on underside ofbottom floor. Do not tighten completely at this time.Slide house to other end of carton and install tie rodsin the two holes now exposed. Rotate house and installfinal two tie rods. Assembly must be handled withcare until all tie rods are in place.Nuts can now betightened until snug.Page 5PMC-24 Instructions8. Turn house on side and inspect round end tabs and door rods for correct location. Readjust if required.9. Hook doors [5] over door rods [9]. Do not force. Doors should hinge freely and snap into door clips on floor.10. Turn house back to horizontal position, rotate until notch in mounting plate is on lower side. Insert cable tube [7] from either end through hole in center of house and drop into notch. Flange on ends of tube should be on outside of mounting plates. Seam ofcable tube is to be towards center of house.11. Assemble two U-bolts [31] with mounting plates on ceil-ing and bottom floor, using four 1/4-20 keps nuts [22] as shown.12.Cable is attached at point shown to mounting plate on ceiling using 10-32x1/2 self-threading screw [G]. Insert screw from inside mounting plate. Place plate washer [D]over screw with bevel out. Loop end of cable [CC] is now placed over screw and plate washer [D]. Add #10 washer [J], #10 lock washer [E], 10-32 hex nut [F] and tighten securely with cable in perpendicular position to ceiling.31Page 6PMC-24 InstructionsExploded viewNumbers/lettersrefer to partsidentificationnumbers/lettersmentioned inthe instructions.Page 7 PMC-24 Instructions13. Install house tube [U] through house and U-bolts. Tighten nuts with slotted end of tubetwo inches above ceiling and with slots at 90° to cable hole in ceiling as shown. This assemblyshould be quite tight but care must be taken not to distort house tube. Make sure that 1-1/2”x74” post center section [R] slips into house tube freely. The notch in house tube, wheninstallation is complete, engages with a pin below pulley on 1-1/2”x74” post top section [Q] andlimits the height to its proper position and prevents the house from turning on pole.14. Starting with two roof sections [2] and using twelve6-32x5/16 PHMS [21] and twelve 6-32 acorn nuts [25],attach six roof sections to each other as shown. Headof screw should be on outside and acorn nut on insideof smaller section. Do not tighten at this time.15. Place finial [8] over roof peak and using six #6 SMS[24] fasten in place. Tighten all screws on roof. Roof isnot attached to house until Step P9.Page 8PMC-24 InstructionsGS 1.Assemble tube clamps [2] as shown. Start 1/4-20 keps nuts [3] but do not tighten. Place assembly over slotted end of MPS galvanized tube [1] and tighten nuts until snug. GS 2. Insert 1/4-20x2-1/4 HH bolt [5] in hole near bottom of 2”O.D.x30” long galvanized tube [1]. Place 1/4-20 keps nut [3]on end of 1/4-20x2-1/4 HH bolt [5] and tighten.GS 3.Slide post bottom section (S) into ground socket 24” and tighten 1/4-20 keps nuts [3] until post section is secure.GS 4.Dig hole 8” diameter and 34” deep. Put coarse gravel in bottom of hole until top of ground socket is to ground level [30”]. GS 5. Place crumpled newspaper inside lower end of socket to prevent concrete from sealing post. This will allow any water to drain from inside post.GS 6.Place ground socket/post section assembly in center of hole. Fill with concrete mix to just below slots in upper end of the socket [approx. 4” from ground surface]. This will require approximately 80 to 90 pounds of mix. Use guy wires or rope to hold assembly in vertical position while concrete sets. BE SURE to allow sufficient clearance above concrete to use wrench on clamp.GS 7.After concrete has hardened, loosen clamps and slide post section to bottom of socket. Re-tighten clamps securely.MPS Ground Socket InstallationGround socket allows the pole and house to be moved to another locationwithout losing the post bottom section.Please use “Product Code #” when ordering replacement partsBottom postsection [S]HARDWARE PACKED IN POST BOX WITH MPSItem 12345Product Code #2786020413425503005332003Qty12321Description 2”O.D.x30” long galvanized tube Tube clamps 1/4-20 keps nuts 1/4-20x1-1/4 carriage bolts 1/4-20x2-1/4 hex head (HH) boltPage 9PMC-24 Instructions P 1. Assemble clamps as shown using 1/4-20 keps nuts [A], 1/4-20x3/4 carriage bolts [C], “B” clamps [K], 1-3/4 clamps [L], and links [M]. Place 1-3/4 clamps [L] over top end of post bottom sec-tion [S]. Top is end with four rings. Tighten nuts on 1-3/4 clamps [L] securely. Leave “B” clamp [K] nuts loose.P 2. As safety clamp [BB] will be used in assembly, adjust at this time. Slide clamp over either end of center post section [R]. Adjust by tightening nut with handle against post until snug. Handle is down when nut is adjusted and to right side of pole. Raise and lower handle a few time.P 3.If handle is not locking tight,turn nut 1/2 turn tighter; if tooP 6. Slip center post section [R] into top post section [Q] as shown. Post should be assembled on a level surface such as a sidewalk or lawn. Turn post sections until holes in splice are in accurate alignment through post; then tap 1/4x1-1/2 split pin [I] through post until flush.NOTE: This pre-alignment is essential and pin should drive through assembly with ease.Post Installation InstructionsPage 10PMC-24 InstructionsP 7. With post assembly supported in a horizontal position, slidemartin house over post from lower end. Slip safety clamp over postand lock into position 18-1/2 inches from bottom end of post tolower edge of clamp. Note:In order to support post, it is suggest-ed that two chairs be used.The safety clamp was designed for the user’s protection. Alwayskeep the safety clamp above your head when making installa-tion, raising or lowering of house.P 8.Thread cable over pulley at top end of post. Insert throughcable tube and from bottom of house pull cable until slack hasbeen taken up. Make sure cable is not twisted above house.P 9. Slip roof over top end of post and fasten to house using six #6sheet metal screws [24]. Note that flange on roof is located over flatC nut [14] on ceiling tab and screw is installed at an upward angle.Page 11PMC-24 Instructions P 10. Place 5/16 star washer [Y] over threadedstud above pulley, then add perch assembly[11]. Fasten in place using 10-24 keps nut [B].(Refer to exploded view on page 6.)P 11. House is ready to install in bottom post section [S]. Itis best to use two people on this phase of the installa-tion.Pick the house and post assembly up and with post invertical position insert into the bottom post. Allow assemblyto rest on safety clamp (installed at Step P 7) and tightennuts on “B” clamp [K].NATURE HOUSE MARTIN SAFETY SYSTEMSARE THE ONLY MARTIN HOUSES OFFEREDWITH SAFETY FEATURES FOR THE USER’SPROTECTION.P 12.Release safety clamp and raise clamp and house man-ually a few inches so that winch can be installed. Re-lockclamp.Winch [AA] is attached to center post section [R] just above“B” clamp [K]. Use 1-1/2 “B” clamp modified [N] and two1/4-20 keps nuts [A].Note: Label on winch case cover should be to the right.Align winch drum under cable hole in bottom of house andwith pulley. (Cable will be parallel to post.) Again, checkcable to make sure it is free.Winch DrumPage 12PMC-24 Instructions P 13. Loosen wing nut on winch drum, thread cable endthrough either hole in drum face from inside of drum. Windcable around stud, between plate washer and round washer,and tighten wing nut. Cable end should be at least 1/2”beyond washers. Slack cable can be wound onto drum byturning winch handle in clockwise direction. DO NOT RAISEHOUSE YET!Two safety features are designed into the winch. First, abrake mechanism to carry the weight of the house and, sec-ond, a ratchet and pawl to hold weight of house. The pawllever is on upper left of winch. In operation, it is necessaryto disengage pawl to lower house. To adjust brake, tightenspring tension by turning wing nut on lower right in clock-wise direction until brake will hold weight of house. Raisehouse an inch or two and release pawl. If house slips down,tighten brake further.Floor trays [12] can now be placed in house. Flanges on sides of floortrays go down.Use winter door stops [10] to close house during winter months. To install door stops, remove door, place door stop upside down on a flat surface and press door onto door stop then rehang door.To reduce tampering with installation, pawl and winch case can be fastened together throughholes provided. If this is desired, use bolt and nut, wire or padlock for this purpose.For replacement parts or accessories call toll-free 877-833-2478 or 800-255-2692Nature House products byERV A TOOL & MFG CO INC3100 W GRAND A VE, CHICAGO IL 60622-4324Phone800-342-3782E-mail<**********************>Fax800-342-3781Nature House — bringing the benefits of nature to your house。
PMC BB5i监听音箱

PMC BB5i监听音箱
锐志
【期刊名称】《现代音响技术》
【年(卷),期】2010(000)006
【摘要】@@ 对于喜爱英国PMC喇叭的支持者采说,BB5监听喇叭堪称PMC旗下最具传奇的代表之作,名声虽然响亮,但真正听过的朋友却不多,尽管在各大音响展上,我们曾经见识到BB5i的靓声和魅力,不过在音晌展上,毕竟是参展人又多,又较吵杂的环境,得见PMC旗舰扬声器的雄伟气势,也难觅BB5i声音的细腻所在.这次在广州,代理方面再度将体积庞大的传奇BB5i监听喇叭请了出来,加之一整套发烧器材,为我们奉献了一次精彩的听觉盛宴.
【总页数】4页(P44-47)
【作者】锐志
【作者单位】
【正文语种】中文
【相关文献】
1.活力小钢炮PMC TB2+书架式监听音箱 [J], 程明超
2.PMC MB2监听音箱系列 [J],
3.旗舰之音——PMC BB5i音箱 [J], 子墨
4.最买得起的顶级监听音箱Barefoot Sound Footprint 02有源监听音箱 [J], 阿毕;晨光(图)
5.PMC TB2S-A-100有源监听音箱 [J],
因版权原因,仅展示原文概要,查看原文内容请购买。
Fame Audio MT-115B 子频音箱商品说明书

Manuals+— User Manuals Simplified.Fame Audio MT-115B Subwoofer Passive Speaker InstructionsHome » Fame Audio » Fame Audio MT-115B Subwoofer Passive Speaker InstructionsFame Audio MT-115B Subwoofer Passive SpeakerContents1 Important safety instructions! Please read before connection!2 Symbols on device and packaging3 Installation4 Congratulations on your new Fame Explorer 2.10!5 Your Fame Team6 Intended use7 Set up8 Connections and controls9 Operation10 Mono mode11 Technical data12 Troubleshooting13 Environmental protection14 Documents / Resources14.1 References15 Related PostsImportant safety instructions! Please read before connection!DANGER! (Electrical shock due to high voltages in the device)The housing must not be removed! There are no parts to be maintained in the device.Inside the unit there are components which are under high electrical voltage.Before each use, check the device for damage or the absence of components, protective devices or housing parts. If this is the case, the device must not be used!Leave maintenance and repair work to a qualified service workshop or contact your dealer. In the case of a malfunction of the device, operation must also be stopped immediately until the device has been repaired by a specialist!DANGER! (Electric shock due to short circuit)Modifications to the power cord or plug are prohibited. If the power cord is damaged in any way, it must be replaced immediately with an original spare part from the manufacturer.Always make sure that the grounding of the device is maintained. Use only the supplied power cords and always maintain the side grounded contacts. Make sure that the sockets used have a properly functioning protective earth.Failure to do so may result in fire or death due to electric shock!DANGER! (For babies and children)Dispose of or store any packaging material properly! Packaging material must be kept out of the reach of babies and children due to the risk of suffocation.Ensure that children never use the appliance unattended! In addition, make sure that children do not remove (small) parts from the device, as they could suffocate by swallowing parts!DANGER! (Hearing damage)Professional speaker systems are able to generate harmful sound levels. Even the influenceof seemingly harmless sound levels over a longer period of time can lead to permanent damage to the hearing (from approx. 95 dBA SPL).Therefore, always wear professional hearing protection (earplugs or capsule ear protectors) during operation!Hint! (Fire hazard due to overheating)The maximum permissible ambient temperature of this device is 40°C.Ensure that the unit is placed in a well-ventilated location away from direct heat sources, naked flames, combustible materials, and liquids. A minimum distance of 1 m is required.Do not tape or cover the ventilation slots of the unit, or insert objects into the unit.Hint! (Operating conditions)In advance, it must be clarified with the manufacturer whether the device is also suitable for outdoor use. Always keep a minimum distance of 20 cm from walls or other structural objects.Never expose the device to direct rain, moisture or liquids, as this can lead to damage.Vibrations, dust or sunlight can also cause damage, avoid them!Hint! (Power supply)It is essential that you check that the device voltage matches your local mains voltage. It is highly recommended that you fuse your mains socket with a residual current circuit breaker (FI).If you do not use your device for a longer period of time or carry out maintenance work,disconnect the device from the mains in order to minimize danger. The same applies to storm conditions such as thunderstorms, floods, etc.Hint! (Fuses)Replace fuses only with IEC127 type (5x20mm) and the correct rating to ensure optimum performance! It is forbidden to use short-circuited fuses or to bridge the fuse holder.Fuses may only be replaced by qualified personnel.Hint! (Condensation)To avoid condensation in the unit, the unit should adapt to the ambient temperature before commissioning.Hint! (Unwanted odours)A new product can sometimes lead to unwanted odours. This reaction is normal and disappears after a few minutes.Hint! (Possible damage due to magnetic fields)Speakers cause a static magnetic field. Ensure sufficient distance from equipment that may be affected.Symbols on device and packagingThe lightning flash symbol warns the user of uninsulated voltages and the risk of electric shock.The exclamation mark symbol draws the user’s attention to important maintains and operating instructions in the manual.The lightning warns you of dangerous voltage accessible from the outside. A connection to any terminal marked with this symbol may only be made with a ready-made cable that complies with the manufacturer’s recommendations or with cables installed by qualified personnel.This symbol warns of hot surfaces. To avoid burns – DO NOT touch!Only suitable for indoor use.Read the manualPlease read and follow the warnings and recommendations carefully to ensure safe and trouble-free use. InstallationBe sure to check the unit for damage before use. Use the original packaging or a suitable transport or storage packaging to protect the product from dust, moisture, etc. when not in use.During assembly, suitable protective equipment (in particular head protection, gloves and safety shoes) must be worn and only suitable climbing aids (ladders, scaffolding, etc.) must be used.The responsibility for this lies solely with the installation company.The installation may only be carried out by experts and only at mounting points with sufficient load-bearing capacity, if necessary taking construction requirements into account. The fixing material (screws, dowels, etc.) specified by the manufacturer in the assembly instructions must be used. Screw connections must be secured against loosening by suitable measures.Fixed or mobile installations shall be protected against falling by two independently acting devices. Loose additional parts or parts which come loose must be able to be caught by suitable devices. National regulations must be observed when using fasteners and fixing elements as well as slings. With regard to the dimensioning of the securing devices, possible dynamic loads (jerking forces) must also be taken into account.ATTENTION! (Inspection measures)After installation, check the suspension of the system consisting of bracket and loudspeaker for secure fastening. The operator of loudspeaker systems (stationary or mobile) is obliged to regularly inspect all system components or have them inspected in accordance with the relevant national regulations and to have any damage repairedATTENTION! (Load capacity)When loudspeakers are longer or permanently used outdoors, wind loads, snow and ice loads as well as thermal influences must be taken into account for the stability and loadbearing capacity of structures and surfaces.In particular, the load-bearing points of flown systems should be dimensioned with sufficient safety reserves. The national regulations must be observed.WARNING! (Risk of injury from overturning)Improper installation can cause considerable injury and damage! During transport and installation, ensure that only aids specified by the manufacturer (e.g. trolleys, stands, tripods, brackets, etc.) are used and always follow the manufacturer’s instructions!Hint! (Special measures)Special measures may also be required to prevent spectators from behaving dangerously.Tripods must not be set up in escape and rescue routes. When installing in traffic routes, the required width of the paths and proper blocking and marking must be ensured. When setting up and setting down a special hazard. Suitable aids must be used for this purpose.The national regulations must be observed.Using this device with sinusoidal, square-wave or other measuring signals at higher levels will causeScope of delivery:Content Quantity Subwoofer1Satellite2Manual1Power cable1Speaker Cable2Intended useThe product Fame Explorer 2.10 is optimized for use with music and speech signals. The device may only be used for this purpose and in accordance with the operating instructions. Other purposes as well as operation under other operating conditions are expressly not intended and can lead to damage to property or personal injury! No liability is assumed for damage resulting from improper use.It must be ensured that the device is operated exclusively by trained and competent users who are in full possession of their mental, physical and sensory abilities. The use of other persons is expressly only permitted at the request of a person responsible for their safety, who instructs or supervises the use.Set upAll connections of the device should be made before switching on. Only use high-quality and undamaged cables that are as short as possible for the connections.Configuration of the audio input connectorCH1 – CH4XLR/jack (6,35mm) – jack combo, balancedCH5 – CH6RCA/Cinch – Mono/Stereo (6,35mm)AUX, 3,5mm Stereo-JackConnections and controlsNo.Designation No.Designation1Setup Switch Left: Stereo-ModeRight: Mono-Mode12EchoControl for setting the echo effect2CH1 – CH4 InputXLR/Jack (6,35mm) mono balance Input13DelayControl for setting the delay effect3CH1 – CH4 Level – ControlVolume control for the individual inputs14Subwoofer Volume ControlControl for adjusting the volume of the subwoofer4CH1 – CH4 MIC/Line Select Switch to adjust the input level:LINE: for audio devices with line outputMIC: for microphone15Master Volume ControlVolume control for the overall volume5CH1 – CH4 Tone ControlThose switches allow you to adjust the tone effect, boost the low and high frequencyonce reduce midrange.16POWER/LIMIT LEDLED shines blue: The system is connected and switched on.LED shines red: Lights when the signal level istoo high or a current overload is detected.6CH5-CH6 InputRCA/Cinch Mono/Stereo (6,35mm)17Monitor OutputFor connection to a stereo monitor system7CH6 – CH6 Level – ControlVolume control for the individual inputs18Speaker LEDThis two-color LED indicates the status of eachspeaker output:Green – active speaker outputRed – inactive speaker output8CH7 – CH8 Input 3,5mm Stereo-jack socket for connecting MP3 or CD players, tablets, smartphones and PCs or Bluetooth-function19L/R Speaker Outputfor included satellite speakers9Bluetooth Control Pressing a key activates the pairing mode. The LED flashes during pairing and lights up constantly when aconnection is established.To reset a connection, press the key again.20Power switch10Bluetooth LED Display LED off: Bluetooth function switched offpermanent lights: Bluetooth function activatedLED flashes: Pairing mode21FuseT3.15AL/250V11Switch CH7-CH8Switch to select AUX input or Bluetooth function22Power OutletOperationThe Fame Explorer 2.10 can be operated in stereo mode as well as in mono mode. The setting is done via the setup switch (1) on the back of the subwoofer.Stereo modeIn stereo mode both outputs are active and the two satellite speakers are split to be used as a 2.1 sound system.1. Insert the pole socket in speaker stand2. Take out satellite from SUB3. Slip the satellite to comment with SUB socket4. install another satellite. 2.1 stereo system is done.Mono modeIn mono mode, only the left output is active and the two satellite speakers are connected together to concentrate their power on one output. Mono mode includes either a compact mono setup (A) or the standard mono setup (B). MONO ETUP INCLUDECOMPACTMONO ET PA D TANDARD MONO SETUP A BELOW:Notice:Please note that the tripods are not included in the scope of delivery, but must be purchased as an option. The Explorer Tripod SET from Fame (item number PAH0021771-000) is recommended as a suitable tripod.Technical dataModel Explorer 2.10Type Subwoofer SatelliteQuantity12Mono-Mode: 60 Watt RMS Power Output250 Watt RMSStereo-Mode: 120 Watt RMS Subwoofer10“WF: 4,75“SatelliteTW: 1“Power Output Total350 Watt RMSFuse T3.15AL/250VFrequency fange50 Hz – 160 Hz155 Hz – 20 kHzSystem frequency50 Hz – 20 kHz, +/-3 dBLimiter Soft LimitInput XLR/Jack-Combo, RCA/Cinch, 3,5mm Stereo-JackOutput TS Stereo Monitor OutputBluetooth-function YesPower connect IECPower supply220-240 VAC – 50/60 HzMax. SPL123 dBMono-Mode: 125 dBStereo-Mode: 130 dB Material PlasticDimensions (H x W x D)458 x 350 x 407 mm227 x 140 x 155 mmWeight14 kg 4 kgColour BlackTroubleshootingThe following overview serves as an aid for quick troubleshooting. If you are unsure, contact the manufacturer, the dealer or the corresponding specialist personnel. Never open the device on your own!Symptom TroubleshootingNo function Check the network connection and the fuseNo sound from loudspeaker, but power LED lights up Check the cable connections at the inputs and outputsThe speaker or XLR cables may be defective. Please replace themIf the specified corrections have not led to success, please contact our service staff. The contact details can be found at www.musicstore.deDisposal of packaging:Ensure that paper packaging, plastic materials, etc. are separately recycled. Observe the corresponding disposal instructions on the packaging.Disposal of batteries:Batteries do not belong in the garbage! Please keep batteries in accordance with the official collection points or disposal stations in accordance with the specifications.Disposal of your old device:Do not dispose of the device with household waste! This device is subject to the WEEE Directive (Waste Electrical and Electronic Equipment) in its currently valid version.The device will be disposed of by an approved waste disposal company or your local waste disposal office. The regulations valid in your country must be observed!Manufacturer: MUSIC STORE professional GmbH,Istanbulstraße 22-26,51103 Cologne, GermanyDocuments / ResourcesFame Audio MT-115B Subwoofer Passive Speaker [pdf] InstructionsMT-115B Subwoofer Passive Speaker, MT-115B, Subwoofer Passive Speaker, Passive Speaker, SpeakerReferencesMusic Store Online-Shop für Musikinstrumente | MUSIC STORE professionalMusic Store Online-Shop für Musikinstrumente | MUSIC STORE professionalManuals+,。
一套易于升级的优秀音响组合

一套易于升级的优秀音响组合
龙泉
【期刊名称】《家庭电子(维修版)》
【年(卷),期】2002(000)011
【摘要】笔者近期受朋友之托选购一套音响组合,由于朋友平时听音乐范围很广,他不喜欢音染过浓的声音,要求各种音乐重放真实耐听。
同时作为工薪阶层他希望日后能够更换或添加某一器材来提高音质,于是笔者为他选配了美之声监听1号改良版音箱、斯巴克 Cayin-265Ai放大器,CD 音源采用山灵 CD-50。
该套器材的选用重点是音箱,因为笔者朋友的听音室面积约为17m^2。
故选用书架式音箱以避免过强的低频驻波,同时考虑到声音还原的真实性,选用了以声音真实准确著称的珠海美之声监听1号改良版书架式音箱,该音箱采用经过改良的中低音单元和高音单元,分频网络采用低通-6dB/oct、高通为更好的-18dB/oct 并增加阻抗补偿网络,使指向性更理想,低频响应的线性更平滑,中频顺滑干净,瞬态响应快捷,高频的延伸性更佳,而且灵敏度也提高到87dB,具有监听器材特性,性价比也高。
【总页数】1页(P43-43)
【作者】龙泉
【作者单位】无
【正文语种】中文
【中图分类】TN912.271
【相关文献】
1.ONIX一套顶级音响组合 [J],
2.原来美在这里——一套音乐味表现极强的音响组合 [J], 邹宁
3.物以稀为贵追想一套早年的天龙音响组合 [J], 庄宏道
4.高档品质普罗消费——我的一套音响组合 [J], 东歌
5.一套易于升级的优秀音响组合 [J], 龙泉
因版权原因,仅展示原文概要,查看原文内容请购买。
音响问答
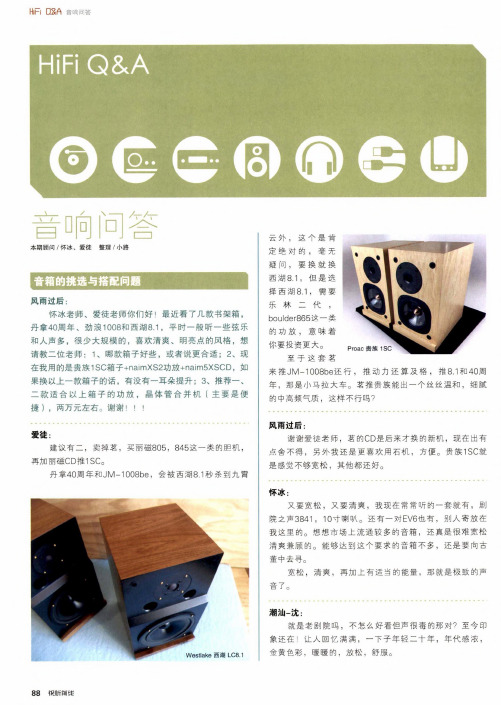
HiFi Q&A
甘响冋合
本期顾问/怀冰、爱徒 整理/小路
音箱的挑选与搭配问题
风雨过后: 怀冰老师、爱徒老师你们好!最近看了几款书架箱,
丹拿40周年、劲浪1008和西湖&4,平时一般听一些弦乐 和人声多,很少大规模的,喜欢清爽、明亮点的风格,想 请教二位老师:1、哪款箱子好些,或者说更合适;2、现 在我用的是贵族1SC箱子+naimXS2功放+naim5XSCD,如 果换以上一款箱子的话,有没有一耳朵提升;3、推荐一、 二款适合以上箱子的功放,晶体管合并机(主要是便 捷),两万元左右。谢谢!! !
都觉得中意了,之后再来发图片问怀冰兄或者小弟我,可
以的话连音箱品牌型号一起发出来,后级300WX2,建议
找落地音箱。
线材有CD到前级平衡线、前后级平衡线、后级电源 线、前级电源线、CD电源线、音箱线一对,2米即可。电 源线3条,平衡线2对,例如:NBS蛇仔这一类就可以了。
另外,为你太太准备一个德生BT蓝牙解码,让她用手 机蓝牙连接BT50这样听歌曲吧。
88 视flRfli 坠
一两千元能发烧吗?
乐通电子: 一直以来就喜欢听怀冰老师的HIFI天地,好像所介绍
的都是几千上万,甚至几十万。但苦于囊中羞涩,有没有 几百或一两千元就可以听到比较好的音乐。
tianjian:
你能接受的话,是有的,但是一两千还是少了一点
点,3千刚好。CD—千,国产山灵,斯巴克,度高都有二
音箱是英国Q牌的AV环绕音箱,900多元买的,低频
较差。以前使用过深圳超新星的一对小音箱,就有很强的
低频,500多元。这对音箱很好看,终于被朋友抢走了。 我的功放是一位DIY师傅做的,数字放大10W,电池
Philips BTM1360 超迷你音響系統用户指南说明书

設定時鐘
1 在待機模式中,按住 CLOCK 超過二
秒,即可進入時鐘設定模式。 »» 隨即顯示 [24H] 或 [12H]。 8 ZH-TW
選擇來源
在主音樂系統
重複按 SOURCE 以選擇來源。 • [DISC] :光碟插槽中的光碟 • [USB] :儲存在連接 USB 儲存裝置中
警告
•• 請勿打開產品外殼。 •• 請勿在本產品的任何部位使用潤滑油。 •• 請勿直視本產品內的雷射光。 •• 請勿將本產品放置在其他電器上。 •• 請勿讓本產品直接曝曬於陽光下,或靠近未隔離
的火燄或熱源。
•• 請確認電源線、插頭或變壓器位於容易取得的地
方,以方便中斷產品電源。
• 請勿將裝置置於滴水或濺水的環境。 • 請勿在裝置上放置危險物品 (如盛裝液
h SLEEP/TIMER • 設定睡眠定時器。 • 設定鬧鐘定時器。
i CLOCK • 設定時鐘。 • 檢視時鐘資訊。
j PROG • 編排曲目。 • 編排廣播電台。 • 自動儲存 FM 廣播電台。
k • 靜音或還原音量。
l SOUND • 採用數位音效控制 (DSC) 讓聲音 更豐富。
m VOL +/• 調整音量。
1 連接右揚聲器時,找到主裝置背面標有
「R」的插孔。
2 將紅色電線插入紅色 (+) 插孔,並將黑
色電線插入黑色 (-) 插孔。
3 連接左揚聲器時,找到主裝置上標有
「L」的插孔。
4 重複步驟 2,插入左揚聲器線。
若要插入每條揚聲器線:
1 壓開插孔擋板。 2 完全插入揚聲器線。 3 放開插孔擋板。
將電源線連接至電源插座。
備註
宝丽昌音响与您分享?英国PMCtwenty5.26落地音箱

宝丽昌音响与您分享英国PMCtwenty5.26落地音箱传输线(Transmission line)理论并非新事物,基于同一理论所设计的扬声器,无论是音响品牌出品还是DIY习作,可说是早已有之。
但假如以此佐证某些发烧友挂在口边的「新不如旧」、「还是以前那一套」,便捉错用神了。
音响是科技,随时代进步,新款器材的还原录音真貌能力只会愈来愈好。
就如传输线,在英国PMC手中变成ATL(Advanced Transmission Line),效果超前市场其他采用传输线理论的扬声器。
当品牌的产品研发职责传至创办人之子,他引入来自一级方程的流体力学技术,设计出Laminair导流器,将之应用在twenty5系列,将低音分析力推至更高层次。
广告进步,永不停步电声科技与声学设计,一如其他科技领域,只会一次又一次地超越以往。
正如当年PMC的ATL,结合理论与实际经验,得出各种独家技术以及心得,改变传统传输线容易令低音过量、缓慢等问题。
ATL 技术之下,传输线长度不一定完全跟足低音四分一波长原则,同一时间,折叠方式、管道阔窄及形状、导管开口大小与位置,还有吸音物种类、厚薄、如何分配在声箱不同位置等等,都有独门计算方法。
展开剩余88%品牌创办人Peter Thomas成立PMC之前,就一直利用英国广播公司BBC的资源,去完善他的扬声器设计理论,故此一再与政府机构合作,那就不足为奇。
近年他们和英国国家物理实验室合作,以3D镭射测量技术RAOS(Rapid Acousto-Optic Scanning)直接记录空气变化,等同直接将声波在立体空间内的情况形像化,藉此协助扬声器设计。
导入顶级赛车技术Peter Thomas之子Oliver Thomas遗传了父亲的科学天赋,根据他在Linkedln的公开履历,早于2006年经已在PMC担任R&D工程师;2009年成为Red Bull车队的电子硬件工程师,曾参与设计一级方程式赛车;2011年于Oxford Brookes University毕业,主修赛车工程,同一年,他亦离开了Red Bull车队;2012年是他回归PMC的年份,成为了R&D主管,标志着品牌成立二十五周年的twenty5系列就是由他主导产品开发。
- 1、下载文档前请自行甄别文档内容的完整性,平台不提供额外的编辑、内容补充、找答案等附加服务。
- 2、"仅部分预览"的文档,不可在线预览部分如存在完整性等问题,可反馈申请退款(可完整预览的文档不适用该条件!)。
- 3、如文档侵犯您的权益,请联系客服反馈,我们会尽快为您处理(人工客服工作时间:9:00-18:30)。
成 功改救
箱体的美观 和i 系列设计的特殊意义 .
重要的是这 些成斜 体特 殊蟛状的 “ j l 样围绕在高音单元框架的外圈是具有声
j
m ■■“
设 计 的 考 量 的 ,这 样 的 结 构 可 以 进 一步 提 演 出 一 样 。 在 低 音 方 面 , 1 ’八 爪 低 音单 逅 .犹 如 置身 现场 .这或 许就 是 真实 中频 的
大机。
这一种在前 级扩大机上使 用的电源
锚
蚕} 游÷ 涠 层捕 不 箱 这 毛
能够承受新改敕后更优异的动态表现 .茌 巨大的箱体中更使用全新的方法来接台 . 让音箱结构更为强 固。降f B 5 f Bi  ̄ 在高音压 震动下而有可能产生 潴摄的状 况。B 5 B 箱体采用的是三啻路分音设计 .并捂载了 P MC与S AS E 共同研发的S OL X ON E 丝质 较半球高音单元 .这只新的高音单元属于 P MC自己的专属型号 .在市面上是买不 到。在高音单元 当中的音圈采用的是轻赝 量的铝 质音 圈.可 以显 著提 升暂态的反 应和频宽 ,让高音单元 的频 率响应达至 2k z 5 H .并在上面装载了透气孔以利于单 元的散热 .也强化了功率承受能力 尤其 是扩散角度比 以锰 的PMC音箱更加开阔
一
●文, 摄影 锐志
B 5监 听音 箱 Bi
于 喜爱 英[ P 喇叭 的支 持者来 说 ,B 5 听喇 叭堪 称P 旗 下最 具 C 4 9 . 2 H / 4 i1.这颗DA ] MC B监 MC S 3 8 1 9 k z2 bt C拥 / 传 奇 的代 表之 作 。名声 虽然 响亮 ,但 真正 听过 的朋 友却 不多 .尽管 在 有1 8 、 2 倍超取样的性能.可以让输出的模 各大 音响 展上 , 们 曾经 见识 到 B 5 靓声 和 魅力 。不 过在 音响 展 上 .毕 拟波形更接近原音 当然了拜事通也特别 我 Bi 的 竟是 参展 人又 多 .又较 吵杂 的 环境 ,得 见P 旗舰 扬声 器的 雄伟 气 势 ,也 MC 重视B CD一 的电源电路 .为机 身特 别规 1 难觅 B 5声音 的细 腻所 在 。这次 在 广州 , 理 方面 再度将 体 积庞 大 的传 奇 Bi 代
升高 音的扩散性 .带来更 多细节的声音 元的性能已经非常强大.现场所听.在大动 厚 实魅 力 了。 表现 箱体中还捂载有知名的7 mm “ 5 馒 态时更让整对B 5 扬声器造就出威猛、强 Bi 在演示现场.B 5 Bi 在小音量时的均衢
B 5监听 喇叭 请 了出来 ,加 之一 整 套发 烧器 材 ,为 我们奉 献 了一 次 精彩 的 Bi 样可以为讯源提供纯净又充足的电源给所 听觉盛 宴。
有的组件使用 .而厂方对电路板上铜藩供 电路径对 声音 信号 的影响也不会掉 以轻 心.这样可以让B CD一1 呈现 更丰 富细腻
如 果你仔细观察一下 ,就 可以发l 在这只高音单元周围有一豳放射状 “ i
拥 有强大 的单元 搭配
第一眼看到这教PMC旗舰 扬声船 就会被它硕大的 身形所震撼。光 是单 S 5音箱的重量就重选7 k .厂方为 Bi 3g
字刻痰.这是P MC这一波i 系列升级的j 同特征.当然了这样的设计不仅仅是为
划了完全分离的数字与模拟供 电电路.这
L壹 的发烧阵窖
在延伸现场 ,摆放了一 对高达10 m的庞大音箱 .加上稳 固的 4
支槊作支撑,那一种架势 .让我醇觉犹如走进了专业级的录音室 . 这对扬声器就是本玫试听的主角P C 5改版的监听扬声器。 M BB i 现场搭配这 只旗舰 的音响器材都是发烧铭器 .推动这只扬声 器的是一对来 自加拿大拜事通2 B S T 后级功放组 .它的驱动力 8 S 2 可谓力大无穷.具备非常强劲的功率输出 ,超过1 0 W的驱动 力可 00 以足够驾驭任何一款扬声器 .无论是由最高输出至最低输出.仍然 保持音色线性曲线表现 措载这对后级扩 大机 更可 以发挥出极度细腻的分析力 .正如 本玫搭配这对P B i MC B 5扬声器如此硕大.在现 场的推动力依然游 刃有余。现场所听,带来值得赞叹的浓烈的音乐味。电源方面 .用 上柏林之声9 8 4 电源处理器和OCT V 的P we u py A E o r p l电源供给前 S 级.这样各自供应相应器材 .为本攻音 响系统提供稳定而充沛的 电量供应.让 系统声音得 以更佳 发挥 。讯源则采用拜事通BC D一1 CO播放 器 .加 上同长的BOA一' 置式解 码髂作 为解码 .连 同 外 OC A 的J be r电源分离前级扩大机控制系统.组成一整套 T VE u i e Pe l 极致发烧级的音响系统。 这一教BC D一1 内置了C y t l r sa 的复合多位Det Sg 芯片 l a— ima
的 声音 细 节 与 更 宽广 澎 湃 的 动 态 。
此 外.这款 B 一1 CD 播放器特别之处 就是舍弃一般CD g l 盘使用的OP 放大器芯 片.而采用晶体管、电阳与电容等分立元 器件组成纯甲类放大电路 .这个设计 更能 切合觳宇模拟转换芯片后端的需要.也能 有更充沛的输出.对于输入与输出阻抗的 匹配可以做得更好.分立的元器件也能与 其电源供应更契台而降低失真与噪声.为 系统的播放带来更真实而干净的讯源 值 得一 提的 是 .前级 也 是来 头不 善 .J ble P e u i r 前级扩大机德 国HiE d e —n 真空管扩大机品牌Oca e tv 的旋舰机型 . 机身采用电源分离式结构 .它的OC A E TV 的P we u py o rS p l电源供给前级部分就有 1k 2 g.而除掉电源的P e r 前级部分 更是重 达3 k 0 g.真是一歙 育份 量的前级控制扩
