专业级拾音器使用说明书
拾音器的作用和安装方法

拾音器的作用和安装方法
拾音器名列录音设备的王冠,它是一种大家耳熟能详的录音工具,它的功能主要用于收集录音信号,是录音的门槛和硬件配置的重要组
成部分,是新手录音师获取精彩录音的必备设备。
本文将重点介绍拾
音器的作用及安装方法,以期为新手提供帮助。
首先,拾音器的作用很重要,它能将被录制音频抓取,并转换成
有用的数字音频信号,后在电脑、混音台等设备中通过数据传输的方
式处理。
拾音器的类型也各不相同,一般可分为动圈、气动、电容和
磁悬浮等,这些类型的拾音器都有独特的特点,适于不同的录音场景,也有不同的参数,灵敏度更高的拾音器可以捕获更精准的音色。
其次是安装方法,要安装拾音器,相当简单,首先要找到合适的
拾音器,判断使用场景,如歌唱、技术录音或者调音等,依据个人的
具体需求进行选择。
然后在确定型号后,拾音器的安装就是根据承装
支架,将设备安装在桩座上即可。
最后,拾音器的安装要求细心,合理分配信号线,安装完毕之后,还要对设备进行检测,实现有效贴合,确保是次录音工作取得心满意
足的效果。
拾音器是录音室不可或缺的必备设备,它可以实现数字信号的抓取,并传输至参与录音的硬件设备,是新手录音师获得精彩录音的必
备工具。
遵循上述的安装步骤,新手也可轻松操作安装拾音器,掌握
基础录音技术,实现专业录音效果。
Seymour Duncan Mag Mic声学吉他音孔拾音器说明书
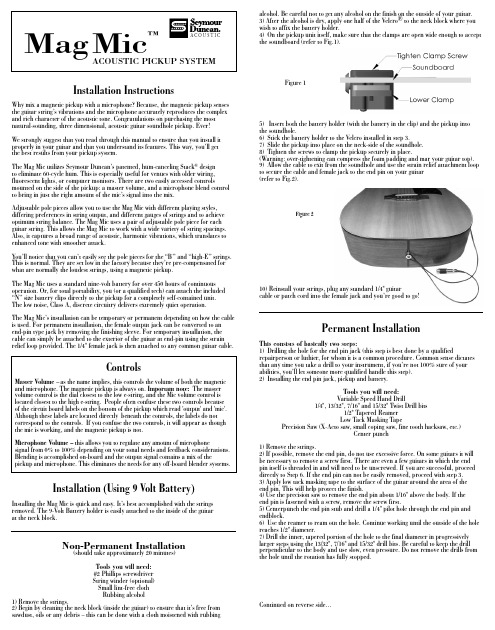
Installation InstructionsWhy mix a magnetic pickup with a microphone? Because, the magnetic pickup senses the guitar string’s vibrations and the microphone accurately reproduces the complex and rich character of the acoustic tone. Congratulations on purchasing the most natural-sounding, three dimensional, acoustic guitar soundhole pickup. Ever!We strongly suggest that you read through this manual to ensure that you install it properly in your guitar and that you understand its features. This way, you’ll get the best results from your pickup system.The Mag Mic utilizes Seymour Duncan’s patented, hum-canceling Stack ® design to eliminate 60-cycle hum. This is especially useful for venues with older wiring, fluorescent lights, or computer monitors. There are two easily accessed controlsmounted on the side of the pickup: a master volume, and a microphone blend control to bring in just the right amount of the mic’s signal into the mix.Adjustable pole pieces allow you to use the Mag Mic with different playing styles, differing preferences in string output, and different gauges of strings and to achieve optimum string balance. The Mag Mic uses a pair of adjustable pole piece for each guitar string. This allows the Mag Mic to work with a wide variety of string spacings. Also, it captures a broad range of acoustic, harmonic vibrations, which translates to enhanced tone with smoother attack.You’ll notice that you can’t easily see the pole pieces for the “B” and “high-E” strings. This is normal. They are set low in the factory because they’re pre-compensated for what are normally the loudest strings, using a magnetic pickup.The Mag Mic uses a standard nine-volt battery for over 450 hours of continuous operation. Or, for total portability, you (or a qualified tech) can attach the included “N” size battery clips directly to the pickup for a completely self-contained unit. The low noise, Class A, discrete circuitry delivers extremely quiet operation.The Mag Mic’s installation can be temporary or permanent depending on how the cable is used. For permanent installation, the female output jack can be converted to an end-pin type jack by removing the finishing sleeve. For temporary installation, the cable can simply be attached to the exterior of the guitar at end-pin using the strain relief loop provided. The 1/4" female jack is then attached to any common guitar cable.Installation (Using 9 Volt Battery)Installing the Mag Mic is quick and easy. It’s best accomplished with the strings removed. The 9-Volt Battery holder is easily attached to the inside of the guitar at the neck block.Non-Permanent Installation(should take approximately 20 minutes)Tools you will need: #2 Phillips screwdriver String winder (optional)Small lint-free cloth Rubbing alcohol1) Remove the strings.2) Begin by cleaning the neck block (inside the guitar) to ensure that it’s free from sawdust, oils or any debris – this can be done with a cloth moistened with rubbingalcohol. Be careful not to get any alcohol on the finish on the outside of your guitar.3) After the alcohol is dry, apply one half of the Velcro® to the neck block where you wish to affix the battery holder.4) On the pickup unit itself, make sure that the clamps are open wide enough to accept the soundboard (refer to Fig.1).Figure 15) Insert both the battery holder (with the battery in the clip) and the pickup into the soundhole.6) Stick the battery holder to the Velcro installed in step 3.7) Slide the pickup into place on the neck-side of the soundhole.8) Tighten the screws to clamp the pickup securely in place.(Warning: over-tightening can compress the foam padding and mar your guitar top).9) Allow the cable to exit from the soundhole and use the strain relief attachment loop to secure the cable and female jack to the end pin on your guitar (refer to Fig.2).Figure 210) Reinstall your strings, plug any standard 1/4" guitarcable or patch cord into the female jack and you’re good to go!Permanent InstallationThis consists of basically two steps:1) Drilling the hole for the end pin jack (this step is best done by a qualifiedrepairperson or luthier, for whom it is a common procedure. Common sense dictates that any time you take a drill to your instrument, if you’re not 100% sure of your abilities, you’ll let someone more qualified handle this step).2) Installing the end pin jack, pickup and battery.Tools you will need: Variable Speed Hand Drill1/4", 13/32", 7/16" and 15/32" Twist Drill bits1/2" Tapered Reamer Low Tack Masking TapePrecision Saw (X-Acto saw, small coping saw, fine tooth hacksaw, etc.)Center punch1) Remove the strings.2) If possible, remove the end pin, do not use excessive force. On some guitars it will be necessary to remove a screw first. There are even a few guitars in which the end pin itself is threaded in and will need to be unscrewed. If you are successful, proceed directly to Step 6. If the end pin can not be easily removed, proceed with step 3.3) Apply low tack masking tape to the surface of the guitar around the area of the end pin. This will help protect the finish.4) Use the precision saw to remove the end pin about 1/16" above the body. If the end pin is fastened with a screw, remove the screw first.5) Centerpunch the end pin stub and drill a 1/4" pilot hole through the end pin and endblock.6) Use the reamer to ream out the hole. Continue working until the outside of the hole reaches 1/2" diameter.7) Drill the inner, tapered portion of the hole to the final diameter in progressively larger steps using the 13/32", 7/16" and 15/32" drill bits. Be careful to keep the drill perpendicular to the body and use slow, even pressure. Do not remove the drills from the hole until the rotation has fully stopped.Continued on reverse side...ControlsMaster Volume – as the name implies, this controls the volume of both the magnetic and microphone. The magnetic pickup is always on. Important note: The master volume control is the dial closest to the low e-string, and the Mic volume control is located closest to the high e-string. People often confuse these two controls because of the circuit board labels on the bottom of the pickup which read 'output' and 'mic'. Although these labels are located directly beneath the controls, the labels do not correspond to the controls. If you confuse the two controls, it will appear as though the mic is working, and the magnetic pickup is not.Microphone Volume – this allows you to regulate any amount of microphonesignal from 0% to 100% depending on your tonal needs and feedback considerations. Blending is accomplished on-board and the output signal contains a mix of thepickup and microphone. This eliminates the needs for any off-board blender systems.1) Lay the pickup upside down on a flat surface. Locate the two pairs of solder padsthat the battery clips will be mounted to.2) Press the mounting tabs on the bottom of the battery clips into the appropriate holesin the PCB that serves as the bottom cover. Be sure that the dimpled tabs that contactthe battery are both oriented toward the outside edges of the pickup (refer to Fig.4).Figure 43) Tin the solder iron tip and lay it on the inside bottom of one of the clips.Heat the clip at one end until you are able to smoothly flow solder in between the clipand the solder pad. Move the soldering iron to the other end of the clip and solderagain. Repeat the process for the second clip.4) Check your solder job, all joints should look smooth and shiny (not lumpy andgray). These solder joints are all that is mechanically holding the battery clips in place.5) It is optional to cut the 9-volt battery holder off – your choice.6) Installation of the pickup into the guitar is the same as either of the two previouslydescribed methods, depending on whether you desire a permanent or non-permanentinstallation of the end-pin jack.When to Change to BatteryWith hard plucking of notes, you will notice distortion on the attack of the note.When this occurs, your battery is starting to get low. At this point, you’ll get at least 20hours of use before it dies completely (four with the “N” battery). However, you shouldchange the battery at this point in order to preserve the great tone of the pickup.keep in mind that the “N” battery clips are secured to the PCB by the solder jointonly. Not to overly stress this point, but please take care when changing thebattery.Seymour Duncan Acoustic5427 Hollister AvenueSanta Barbara, CA 93111-2345Phone: 805-964-9610 Fax: 805-964-9749Hand built in Santa Barbara, California. Velcro is a registered trademark of Velcro Industries B.SpecificationsMagnetic pickupDC Resistance – 3.8k OhmsResonant Frequency – 16kHzGauss Strength – 780 max (adjustable)Microphone capsulePattern – Omni-directionalSensitivity - -35dBFrequency range – 20 to 20kHzS/N ratio - >62dBCurrent consumption – 0.5mAOnboard electronics2 Channels, summed at the outputSupply Voltage – 9VdcCurrent consumption – 1.1mA (preamp + mic capsule)Battery Life – 450+ hoursMaximum signal swing – 1.5V @ onset of clip w/9V power supplyThd – 0.02% @ onset of clippingNoise:·Pickup channel – -102dBV with 5k ohm source impedance·Mic channel – -96dBV with mic capsule attachedInstalling the end pin jack, pickup and batteryTools you will need:1/2" Open End Wrench3/32" Allen Wrench#2 Phillips screwdriverString winder (optional)Small lint-free clothRubbing alcohol1) Remove the strap button, small dress hex nut, and small dress washer from thefemale jack; and then remove the black plastic sleeve.2) From the inside (cable side) of the guitar, keep the large hex nut, large dress washerand star washer on the interior side of the jack and slide it through the end pin hole.The jack should protrude from the outside surface between 5/16" and 11/32". If it isnot within this range, it must be removed and the position of the large hex nut adjustedaccordingly.3) Install the small dress washer and the smaller hex nut. Hold the jack in place withthe allen wrench and use the 1/2" open end wrench to tighten the nut.4) Screw on the strap button and hand tighten.5) Clean the neck block to ensure that it’s free from sawdust, oils or any debris –this can be done with a cloth moistened with rubbing alcohol (be careful not to get anyalcohol on the finish of your guitar).6) After the alcohol is dry, apply one half of the Velcro® to the neck block where youwish to affix the battery holder.7) Insert both the battery holder (with the battery in the clip) and the pickup into thesoundhole.8) Stick the battery holder to the Velcro installed in step 2.9) On the pickup unit itself, make sure that the clamps are open wide enough to acceptthe soundboard.10) Slide the pickup into place on the neck-side of the soundhole.11) Tighten the screws to clap securely (warning: over-tightening can compress the foampadding and mar your guitar top).12) Reinstall strings and plug in a standard 1/4" guitar cable to the end pin jack andyou’re done.13) Make great music!Installation (Using “N” Battery)By installing the “N” battery clips, the Mag Mic becomes a single, integrated unit forthe ultimate in portability. However, this entails some compromises. Battery life isseverely limited: you’ll get 50 hours with an “N” battery as opposed to 450 with astandard 9 volt. Also, when inserting an “N” battery, you must ensure that it’spolarized correctly. The positive end of the battery must be oriented toward the “plus”symbol next to the microphone on the underside of the pickup (refer to Fig.4).Installing the “N” battery clips is a tricky process and requires high-level solderingabilities and a good quality iron with the correct tip. It is essential that the work bedone properly. Even when done perfectly, the clip will still not stand much abuse.It is advisable that care be used when installing and changing batteries. If you’re notentirely confident that you posses these abilities, please have this procedure done bya qualified electronics technician. Here are the steps:Installation of ClipsTools you will need:50 watt, pencil type soldering iron with medium, spade type tipRosin core solder PN# 501050-105 Rev BA C O U S T I C。
FISHMAN PRESYS BLEND 301中文说明

FISHMAN PRESYS BLEND 301拾音器中文说明Fishman presys blend国内吉他爱好者一般称之为301,这款拾音器价格适中,效果能满足大多数吉他爱好者们的需要,因此在国内比较受追捧,也有不少的吉他上面使用的这款拾音器。
今天我们就给大家介绍一下这款拾音器的使用,这是由原文的英文说明书翻译改动而来的。
虽然是301拾音器的说明,但是拾音器都是大同小异,你可以举一反三,用在别的拾音器上。
拾音器调制快速上手1,控制旋钮的基本设置。
将volume,mic blend 和notch这三个旋钮设置为关闭状态,然后再将bass,middle, 和treble 这三个旋钮调节到正中心位置。
2,接通电源。
将拾音器与音箱或者功放用一条1/4英寸大小的乐器连接线连接起来。
当看到电池指示灯(batt)快速闪动的时候,则表示电源已经正常接通了。
3,正式启动。
将volume 旋钮增大,同时根据你所喜欢的音响效果,适当调整bass,middle 和treble这三个旋钮。
4,与麦克风的混合。
将mic blend旋钮调大,可以让内置麦克风(与拾音器)进行混合。
拾音器控制旋钮功能介绍Volume(音量):为了获得干琴的清音效果,我们需要将volume这个旋钮尽可能地增大,前提是不能大到失真或者导致声音产生回馈。
Bass(低频):将这个旋钮增大,可以让我们的吉他音色更加饱和,厚实。
Middle(中频):将middle旋钮向左调小,然后将音量增大,可以获得一种被“挖空”了的平滑的音色效果。
另外,你也可以将middle旋钮向右边调大(默认是正中心位置),可以让吉他的中音区听起来像被什么东西“紧紧咬住不放”的那种结实的音响效果。
Treble(高频):调节这个旋钮,可以让你的吉他音色在多乐器的混合演奏中不至于被“淹没”掉。
(调节这个旋钮),可以削减吉他音色的圆润度,同时也可以适当控制音响效果。
Notch(滤波器):调节notch 这个滤波器控制旋钮,可以移除掉那些很低端,嘈杂的声音回馈。
拾音器使用方法
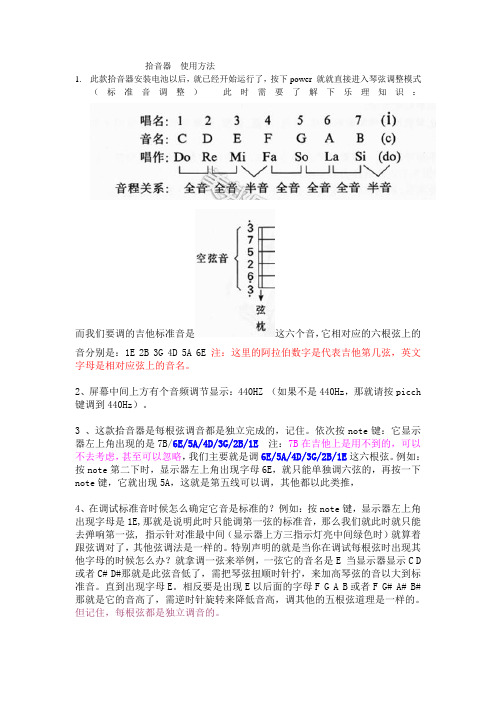
拾音器使用方法1.此款拾音器安装电池以后,就已经开始运行了,按下power 就就直接进入琴弦调整模式(标准音调整)此时需要了解下乐理知识:而我们要调的吉他标准音是这六个音,它相对应的六根弦上的音分别是:1E 2B 3G 4D 5A 6E注:这里的阿拉伯数字是代表吉他第几弦,英文字母是相对应弦上的音名。
2、屏幕中间上方有个音频调节显示:440HZ (如果不是440Hz,那就请按picch 键调到440Hz)。
3 、这款拾音器是每根弦调音都是独立完成的,记住。
依次按note键:它显示器左上角出现的是7B/6E/5A/4D/3G/2B/1E注:7B在吉他上是用不到的,可以不去考虑,甚至可以忽略,我们主要就是调6E/5A/4D/3G/2B/1E这六根弦。
例如:按note第二下时,显示器左上角出现字母6E,就只能单独调六弦的,再按一下note键,它就出现5A,这就是第五线可以调,其他都以此类推,4、在调试标准音时候怎么确定它音是标准的?例如:按note键,显示器左上角出现字母是1E,那就是说明此时只能调第一弦的标准音,那么我们就此时就只能去弹响第一弦, 指示针对准最中间(显示器上方三指示灯亮中间绿色时)就算着跟弦调对了,其他弦调法是一样的。
特别声明的就是当你在调试每根弦时出现其他字母的时候怎么办?就拿调一弦来举例,一弦它的音名是E 当显示器显示C D 或者C# D#那就是此弦音低了,需把琴弦扭顺时针拧,来加高琴弦的音以大到标准音。
直到出现字母E。
相反要是出现E以后面的字母F G A B或者F G# A# B#那就是它的音高了,需逆时针旋转来降低音高,调其他的五根弦道理是一样的。
但记住,每根弦都是独立调音的。
phase键:相位键——抗回向,相位转功能可用于插电演出时抑制吉他与音响之间所产生的电流杂音。
开启这个按钮的时候,可以在低音量时候,改善低音,以及在高音量的时候,抑制反馈。
Vol.键:音量控制——改变音量输出的大小NOTCH键:音色调节——调节线波,改变音质效果,当音量旋钮提升的时候,若有反馈发生,就慢慢扭动该旋钮,使反馈消失BASS键:低音调节MIDD键:中音调节TREB键:高音调节Tuner键:调音。
专业级拾音器使用说明书
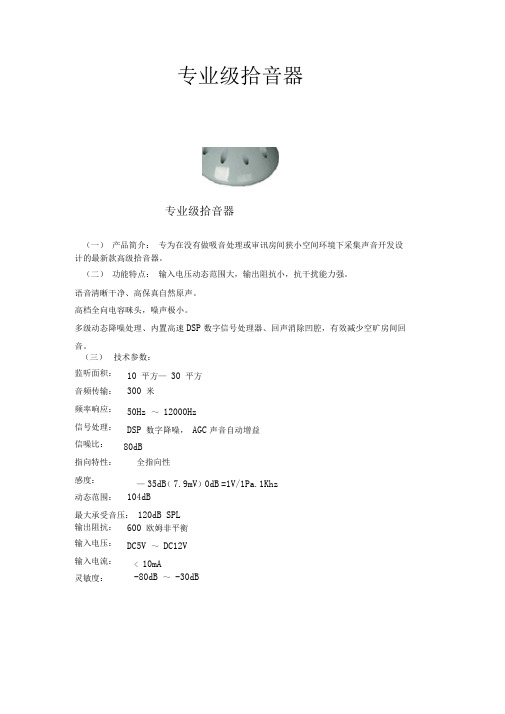
专业级拾音器
专业级拾音器
(一)产品简介:专为在没有做吸音处理或审讯房间狭小空间环境下采集声音开发设计的最新款高级拾音器。
(二)功能特点:输入电压动态范围大,输出阻抗小,抗干扰能力强。
语音清晰干净、高保真自然原声。
高档全向电容咪头,噪声极小。
多级动态降噪处理、内置高速DSP 数字信号处理器、回声消除凹腔,有效减少空旷房间回
音。
(三)技术参数:
监听面积:10 平方—30 平方
音频传输:300 米
频率响应:50Hz ~12000Hz
信号处理:DSP 数字降噪,AGC声音自动增益
信噪比:80dB
指向特性:全指向性
感度:—35dB(7.9mV)0dB =1V/1Pa.1Khz
动态范围:104dB
最大承受音压:120dB SPL
输出阻抗:600 欧姆非平衡
输入电压:DC5V ~DC12V
输入电流:< 10mA
灵敏度:-80dB ~-30dB。
Fishman Classic 4T 电子拾音器系统说明书
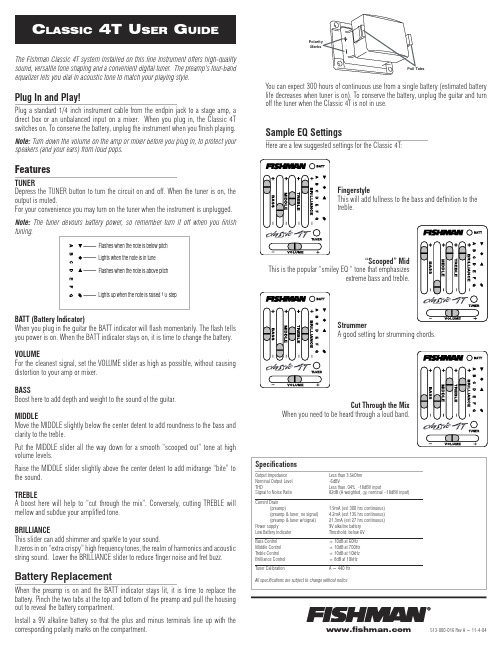
When the preamp is on and the BATT indicator stays lit, it is time to replace the battery. Pinch the two tabs at the top and bottom of the preamp and pull the housing out to reveal the battery compartment.
Flashes when the note is below pitch
Lights when the note is in tune
Flashes when the note is above pitch
Lights up when the note is raised 1/2 step
Polarity Marks
Features
TUNER Depress the TUNER button to turn the circuit on and off. When the tuner is on, the output is muted. For your convenience you may turn on the tuner when the instrument is unplugged. Note: The tuner battery power, so remember turn it off when you finish tuning.
MIDDLE Move the MIDDLE slightly below the center detent to add roundness to the bass and clarity to the treble.
二胡拾音器的使用方法与作用
二胡拾音器的使用方法与作用
二胡器是二胡的一种协助道具,具体有什么用处呢?下面就让小编跟大家讲解一下吧!希望对大家有所帮助!
二胡拾音器的作用
拾音器是捡拾音频原声,把原声变成相应电信号的一种装置。
二胡拾音器是将二胡的原声变成相应的电信号的独特装置。
它与别的拾音器不同的是,体积小,重量轻,能方便地固定在二胡音窗附近,最大限度地获取纯净的原声,同时又不影响二胡演奏的操作。
二胡拾音器的使用方法
1、调整放大器音量旋钮,改变二胡电信号的大小,在乐队中达到音量与别的乐器匹配,不至于太大或太小;
2、调整放大器音量旋钮,改变二胡电信号的大小,在伴奏中达到与歌唱者音量匹配,不至于太大或太小;
3、调整放大器混响旋钮,对二胡原声进行润色,使之更加柔美动人;
4、将拾音器的电信号输入录音设备,实现录制;
5、将拾音器的电信号输入电脑,可在网上实现远程教学;
6、在网上一些一对一的交流或者娱乐活动。
值得提及的是,拾音器除了供给录音、电脑外,其他场合要听到声音需配备单独或者共用的功率放大器才能实现。
智能会议拾音器 Dolphin520 说明书

This device complies with part 15 of the FCC Rules. Operation is subject to the following two conditions: (1) this device may not cause harmful interference, and (2) this device must accept any interference received, including interference that may cause undesired operation.Any changes or modifications not expressly approved by the party responsible for compliance could void the user's authority to operate the equipment.NOTE: This equipment has been tested and found to comply with the limits for a Class B digital device, pursuant to Part 15 of the FCC Rules. These limits are designed to provide reasonable protection against harmful interference in a residential installation. This equipment generates, uses and can radiate radio frequency energy and, if not installed and used in accordance with the instructions, may cause harmful interference to radio communications. However, there is no guarantee that interference will not occur in a particular installation.If this equipment does cause harmful interference to radio or television reception,which can be determined by turning the equipment off and on, the user is encouraged to try to correct the interference by one or more of the following measures:-- Reorient or relocate the receiving antenna.-- Increase the separation between the equipment and receiver.-- Connect the equipment into an outlet on a circuit differentfrom that to which the receiver is connected.-- Consult the dealer or an experienced radio/TV technician for help.The device has been evaluated to meet general RF exposure requirement. The device can be used in portable exposure condition without restriction。
拾音器系列说明
拾音器系列说明
产品说明
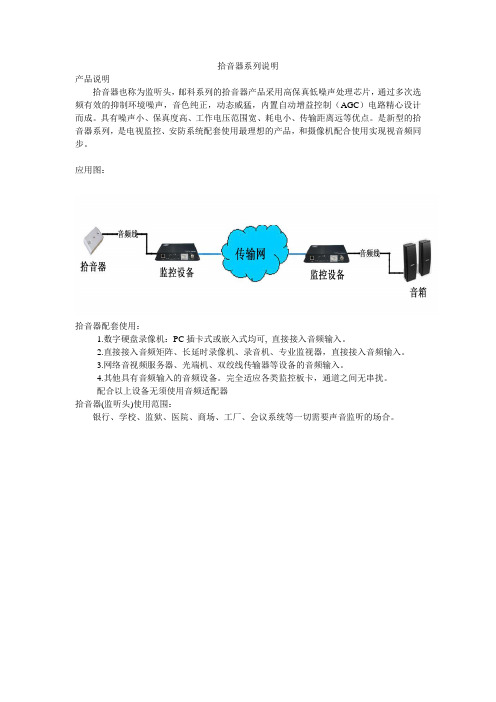
拾音器也称为监听头,邮科系列的拾音器产品采用高保真低噪声处理芯片,通过多次选频有效的抑制环境噪声,音色纯正,动态威猛,内置自动增益控制(AGC)电路精心设计而成。
具有噪声小、保真度高、工作电压范围宽、耗电小、传输距离远等优点。
是新型的拾音器系列,是电视监控、安防系统配套使用最理想的产品,和摄像机配合使用实现视音频同步。
应用图:
拾音器配套使用:
1.数字硬盘录像机:PC插卡式或嵌入式均可, 直接接入音频输入。
2.直接接入音频矩阵、长延时录像机、录音机、专业监视器,直接接入音频输入。
3.网络音视频服务器、光端机、双绞线传输器等设备的音频输入。
4.其他具有音频输入的音频设备。
完全适应各类监控板卡,通道之间无串扰。
配合以上设备无须使用音频适配器
拾音器(监听头)使用范围:
银行、学校、监狱、医院、商场、工厂、会议系统等一切需要声音监听的场合。
德博加振拾音器s1pro说明书
德博加振拾音器s1pro说明书德博加振拾音器s1pro是一款专为乐器演奏者设计的振拾音器。
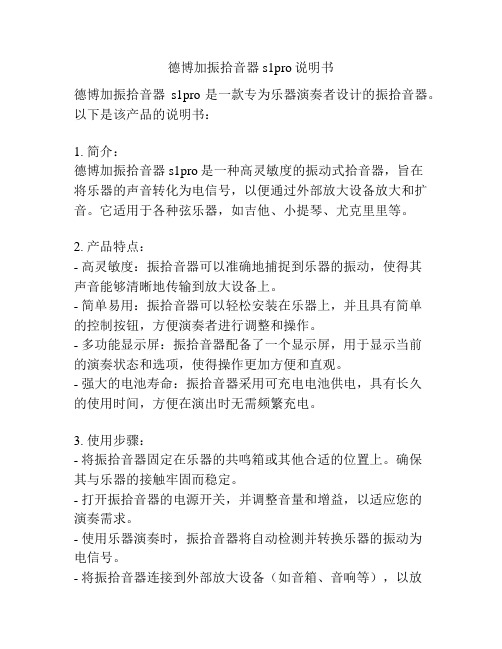
以下是该产品的说明书:1. 简介:德博加振拾音器s1pro是一种高灵敏度的振动式拾音器,旨在将乐器的声音转化为电信号,以便通过外部放大设备放大和扩音。
它适用于各种弦乐器,如吉他、小提琴、尤克里里等。
2. 产品特点:- 高灵敏度:振拾音器可以准确地捕捉到乐器的振动,使得其声音能够清晰地传输到放大设备上。
- 简单易用:振拾音器可以轻松安装在乐器上,并且具有简单的控制按钮,方便演奏者进行调整和操作。
- 多功能显示屏:振拾音器配备了一个显示屏,用于显示当前的演奏状态和选项,使得操作更加方便和直观。
- 强大的电池寿命:振拾音器采用可充电电池供电,具有长久的使用时间,方便在演出时无需频繁充电。
3. 使用步骤:- 将振拾音器固定在乐器的共鸣箱或其他合适的位置上。
确保其与乐器的接触牢固而稳定。
- 打开振拾音器的电源开关,并调整音量和增益,以适应您的演奏需求。
- 使用乐器演奏时,振拾音器将自动检测并转换乐器的振动为电信号。
- 将振拾音器连接到外部放大设备(如音箱、音响等),以放大和扩音乐器的声音。
4. 技术规格:- 输入:1/4英寸大头插孔- 输出:3.5毫米立体声插孔- 工作温度:-10至60°C- 电池寿命:约10小时- 充电时间:约2小时以上是德博加振拾音器s1pro的说明书。
请按照说明书中的步骤正确使用该产品,以确保良好的演奏效果和体验。
如果有任何问题,请咨询产品供应商或生产商。
srt2拾音器使用说明
srt2拾音器使用说明
srt2拾音器的使用方法:
1、首先在电箱吉他侧面,有个调音模块,打开模块的电池盒,给拾音器装上电池,一般是用方块电池,注意正负极;
2、将电箱吉他尾部的音频输出孔,插上音频线后,接入到吉他专用音箱的输入端,并打开音箱电源;
3、打开电箱琴的调音模块的电源,同时通过模块面板上的主音量和失真音量对音色进行调节即可。
拾音器,又称监听头。
简而言之就是用来采集现场环境声音然后再传送到后端设备的一个器件,一般而言它是由麦克风和音频放大电路构成,简而言之其就是用来采集现场声音的一个配件,一种靠接收声音震动,将声音放大的电声学仪器。
TRADIO拾音器用户手册

第7页
拾音器用户手册
双路混音适配器APM210 主要功能:两个拾音器的声音混合成一路后输出。
③
④
②
①
① 通道1和通道2音量调节旋钮; ② 混音输出音量调节旋钮; ③ 通道1和通道2监听耳机插孔; ④ 混音输出监听耳机插孔;
⑧ ⑦ ⑥
⑨
⑩
⑤
⑤ 六芯绿色端子,每3个接一个拾音器:V-红线、A黄线、G黑线; ⑥ 通道一、通道二、混音的音频输出端子:A-音频线、G-地线; ⑦⑩ 通道一、通道二的RCA音频输出接口,可接DVR、音视频矩阵等; ⑧⑨ 混音后的RCA音频输出接口,可以分别接两种不同的音频设备;
修改承诺
本手册的修改无需预先通知。厂商不对本文的内容作转述和承诺,特别不对商品 做暗示性承诺。本公司保留修改本指南的权利,且无须提前通知其他方而随时变更本 文。
法律承担责任
TRADIO® 系列拾音器(或称监听头)专为安防系统音视频监控配套设备所使用,不 得用于中国或其他国家法律所禁止的行为。 TRADIO® 电声产品仅供单位安防工程使 用,请个人用户勿扰。本公司不对用户使用本产品而引起的经济及法律纠纷承担任何 责任。
TRADIO中国推广
2005年,TRADIO品牌拾音器首次引入中国,以其清晰自然的高保真音质改变了以往 质次价廉的音频监控工程形象。快鱼科技公司同年获得TRADIO品牌在中国的全部知 识产权及商标。 2006年,TRADIO拾音器大量应用于全国检察院和公安局的审讯同步录音录像。 2007年,快鱼科技生产并改良的TRADIO拾音器返销国外,在欧洲市场打开局面。 2008年,首都机场T3航站楼候机大厅安装数百只原声拾音器,为奥运安保提供服务。 2009年,TRADIO获得中国安防十大创新品牌。 2010年,荣获中国安防最具影响力十大品牌、十大领先品牌、中国监所推荐品牌。 2011年,快鱼拾音器荣获中国安防十大最具竞争力品牌。 2012年,快鱼科技品牌荣获中国安防十大民族品牌,产品进入十八大主会场。
FISHMAN PRESYS BLEND 301中文说明
FISHMAN PRESYS BLEND 301拾音器中文说明Fishman presys blend国内吉他爱好者一般称之为301,这款拾音器价格适中,效果能满足大多数吉他爱好者们的需要,因此在国内比较受追捧,也有不少的吉他上面使用的这款拾音器。
今天我们就给大家介绍一下这款拾音器的使用,这是由原文的英文说明书翻译改动而来的。
虽然是301拾音器的说明,但是拾音器都是大同小异,你可以举一反三,用在别的拾音器上。
拾音器调制快速上手1,控制旋钮的基本设置。
将volume,mic blend 和notch这三个旋钮设置为关闭状态,然后再将bass,middle, 和treble 这三个旋钮调节到正中心位置。
2,接通电源。
将拾音器与音箱或者功放用一条1/4英寸大小的乐器连接线连接起来。
当看到电池指示灯(batt)快速闪动的时候,则表示电源已经正常接通了。
3,正式启动。
将volume 旋钮增大,同时根据你所喜欢的音响效果,适当调整bass,middle 和treble这三个旋钮。
4,与麦克风的混合。
将mic blend旋钮调大,可以让内置麦克风(与拾音器)进行混合。
拾音器控制旋钮功能介绍Volume(音量):为了获得干琴的清音效果,我们需要将volume这个旋钮尽可能地增大,前提是不能大到失真或者导致声音产生回馈。
Bass(低频):将这个旋钮增大,可以让我们的吉他音色更加饱和,厚实。
Middle(中频):将middle旋钮向左调小,然后将音量增大,可以获得一种被“挖空”了的平滑的音色效果。
另外,你也可以将middle旋钮向右边调大(默认是正中心位置),可以让吉他的中音区听起来像被什么东西“紧紧咬住不放”的那种结实的音响效果。
Treble(高频):调节这个旋钮,可以让你的吉他音色在多乐器的混合演奏中不至于被“淹没”掉。
(调节这个旋钮),可以削减吉他音色的圆润度,同时也可以适当控制音响效果。
Notch(滤波器):调节notch 这个滤波器控制旋钮,可以移除掉那些很低端,嘈杂的声音回馈。
TRADIO拾音器用户手册
第2页
拾音器用户手册
第四章 拾音器及拾音器接线
快鱼TRADIO品牌拾音器目前共有24个系列多款拾音器,其中分基本型和定制型。 产品参数及图例请见快鱼官方网站和宣传资料。
TRADIO拾音器接线方式分两种,大多数款型是外接3芯线,少部分为三芯接线端 子。如下图所示:
红线(V) DC12V电源正极; 黑线(G) 电源负极和音频地; 黄线(A) 音频线;
拾音器灵敏度高,同一个房间扩音/放音容易引起声音自激及啸叫
4. 严禁室外使用户内型拾音器
TRADIO户内型拾音器的咪头和电路没有做防水处理,容易损坏。 2012年11月
用户手册
版权声明
本手册为北京快鱼科技有限公司版权所有。在未经书面许可的前提下不得以任何形 式或方法复印、传播、转录、存档或翻译成其他语言及电脑语言。公司品牌和产品名 称TRADIO® 为商标或注册商标。本公司不对本文的内容作转述和承诺,特别不对商 品作暗示性承诺。本公司保留修改本手册的权利,无须提前通知其他方而变更本文。 在未经本公司许可的前提下,不得部分或全部复制本手册。
修改承诺
本手册的修改无需预先通知。厂商不对本文的内容作转述和承诺,特别不对商品 做暗示性承诺。本公司保留修改本指南的权利,且无须提前通知其他方而随时变更本 文。
法律承担责任
TRADIO® 系列拾音器(或称监听头)专为安防系统音视频监控配套设备所。 TRADIO® 电声产品仅供单位安防工程使 用,请个人用户勿扰。本公司不对用户使用本产品而引起的经济及法律纠纷承担任何 责任。
第5页
拾音器用户手册
然后从电源适配器到设备用其他线缆: 1、使用两端带BNC接口的视频电缆连接到DVR、音视频矩阵、音视频采集卡等其他 设备;
峰火拾音器说明书手册(DOC)

音频监控拾音器说明书编制单位:广州市峰火电子科技有限公司2017年目录一、PeakFire BM环境主动降噪_语音分离数字监听头(效果世界一流) (3)1.1 BM-M-1 吸顶式环境降噪拾音器 (3)1.2 BM-M-2 高清环境降噪拾音器 (5)1.3 BM-M-3 86面板环境降噪拾音器 (7)1.4 BM-W-1 窗口环境降噪数字拾音器 (10)1.5 BM-W-2 环境降噪数字拾音器 (12)1.6 BM-W-3 室外环境降噪拾音器 (14)1.7 BM-X-1 86阵列语音增强数字拾音器 (16)1.8 BM-X-3 阵列语音增强数字拾音器 (18)二、PeakFire PK高保真降噪拾音器系列(效果全球第一) (20)2.1 PK-020VH 窗口柜台数字拾音器 (20)2.2 PK-040H 碟型数字降噪拾音器 (22)2.3 PK-050H 界面式麦克风数字拾音器 (24)2.4 PK-060H 微型数字降噪拾音器 (26)2.5 PK-080VH 针孔数字降噪拾音器 (29)2.6 PK-10N 宽动态数字降噪拾音器 (31)2.7 PK-20N 高保真降噪数字拾音器 (33)2.8 PK-30N 车载降噪数字拾音器 (35)2.9 PK-40N 无源监控拾音器海康网络摄像机专用 (37)2.10 PK-01D 定向数字降噪拾音器 (39)2.11 PK-05D 超指向型小距离数字拾音器 (42)2.12 PK-10D 超指向型中距离数字拾音器 (44)2.13 PK-30D 超指向型长距离数字拾音器 (46)三、PeakFire WM 动态降噪拾音器系列(性价比中国第一) (48)3.1 WM-025N 子弹防水型拾音器 (48)3.2 WM-030N 桌面型拾音器 (50)3.3 WM-040VN 高清针孔拾音器 (52)3.4 WM-045VN 86面板拾音器 (55)3.5 WM-050N 飞碟防水(暴)拾音器 (57)3.6 WM-100VN 原声级拾音器 (59)3.7 WM-PLUS 高保真拾音器《工程专用设备》 (61)3.8 WM-150N 烟感型拾音器 (63)3.9 WM-200N 高级原声拾音器 (65)附件一、PA-100 单路电源适配器 (67)附件三、音频疑难问题解决方案二(解决MIC IN接入方式) (74)附件四、音频设备安装示意图例 (75)一、BM环境主动降噪_语音分离数字监听头(效果世界一流)1.1 BM-M-1 吸顶式环境降噪拾音器1、BM-M-1吸顶式环境降噪拾音器,专业环境声音采集器,原装进口套件组装。
吉他拾音器lc-4说明书

吉他拾音器lc-4说明书
1、吉他拾音器是搭配电吉他,使用的时候把振动讯号转变成电信号,会有麦克风的效果,一般有两种类型,分别是主动拾音器和被动拾音器。
2、在安装的时候需要先把琴弦和尾钉卸掉,之后用12毫米的钻头在吉他尾部正中间开一个孔,拾音器前级输出的尾钉部分从小孔穿过,把下琴码取掉,再使用3毫米的钻头在琴码凹槽的左右两端分别开一个小孔,可以方便压条从琴码下穿过。
3、安装的时候主控,装在音孔下方,然后麦克风,装在琴桥下方,另一边用来连接主控,前级输出尾钉,之后穿过吉他尾部,连接主控,然后使用黑色电源线连接电池和主控,接下来使用白色压条装在琴码下方,最后将杂乱的电线整理好,最后安装电池就完成了。
4、安装的时候需要注意压条要穿过桥上面的两个孔,还要确保压条可以水平的充满整个凹槽。
5、琴码在安装的时候最好是小心的压住压条,琴码的下方位置还有压条就会改变吉他的弦距,打磨琴码的时候最好是打磨平整,确保琴码不会影响压条拾音。
蓝牙拾音器操作方法

蓝牙拾音器操作方法
蓝牙拾音器的操作方法主要包括以下几个步骤:
1. 开启蓝牙:在拾音器上找到开关,打开蓝牙功能。
2. 打开设备的蓝牙功能:在手机或其他设备上打开蓝牙设置,确保蓝牙功能已经打开。
3. 搜索蓝牙设备:在手机或其他设备的蓝牙设置中,搜索附近的蓝牙设备,等待设备列表刷新并显示拾音器名称。
4. 连接蓝牙设备:在设备列表中找到拾音器的名称,点击连接按钮或者输入匹配码进行配对。
5. 监听音频:连接成功后,可以开始使用蓝牙拾音器进行音频获取。
根据拾音器的不同,可能需要在相应的音频软件或应用中设置音频输入源为蓝牙拾音器。
需要注意的是,不同品牌和型号的蓝牙拾音器具体操作方法可能有所不同。
因此,在使用之前,最好阅读对应的使用说明书或者咨询相关厂商或品牌的技术支持。
拾音器说明书
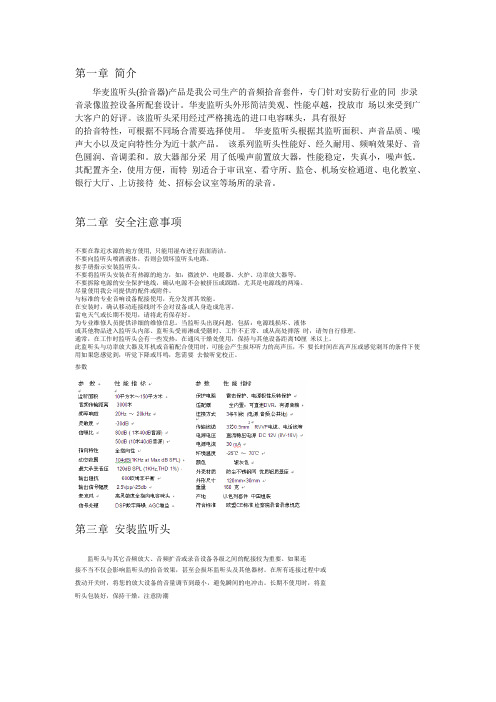
第一章 简介华麦监听头(拾音器)产品是我公司生产的音频拾音套件,专门针对安防行业的同 步录音录像监控设备所配套设计。
华麦监听头外形简洁美观、性能卓越,投放市 场以来受到广大客户的好评。
该监听头采用经过严格挑选的进口电容咪头,具有很好的拾音特性,可根据不同场合需要选择使用。
华麦监听头根据其监听面积、声音品质、噪声大小以及定向特性分为近十款产品。
该系列监听头性能好、经久耐用、频响效果好、音色圆润、音调柔和。
放大器部分采 用了低噪声前置放大器,性能稳定,失真小,噪声低。
其配置齐全,使用方便,而特 别适合于审讯室、看守所、监仓、机场安检通道、电化教室、银行大厅、上访接待 处、招标会议室等场所的录音。
参数第三章 安装监听头第二章 安全注意事项不要在靠近水源的地方使用, 只能用湿布进行表面清洁。
不要向监听头喷洒液体,否则会毁坏监听头电路。
按手册指示安装监听头。
不要将监听头安装在有热源的地方,如:微波炉、电暖器、火炉、功率放大器等。
不要拆除电源的安全保护地线,确认电源不会被挤压或踩踏,尤其是电源线的两端。
尽量使用我公司提供的配件或附件。
与标准的专业音响设备配接使用,充分发挥其效能。
在安装时,确认移动连接线时不会对设备或人身造成危害。
雷电天气或长期不使用,请将此有保存好。
为专业维修人员提供详细的维修信息。
当监听头出现问题,包括:电源线损坏、液体或其他物品进入监听头内部、监听头受雨淋或受潮时、工作不正常、或从高处摔落 时,请勿自行修理。
通常,在工作时监听头会有一些发热,在通风干燥处使用,保持与其他设备距离10厘 米以上。
此监听头与功率放大器及耳机或音箱配合使用时,可能会产生损坏听力的高声压,不 要长时间在高声压或感觉刺耳的条件下使用如果您感觉到,听觉下降或耳鸣,您需要 去做听觉校正。
监听头与其它音频放大、音频扩音或录音设备各级之间的配接较为重要。
如果连接不当不仅会影响监听头的拾音效果,甚至会损坏监听头及其他器材。
XM-045WL 拾音器说明书
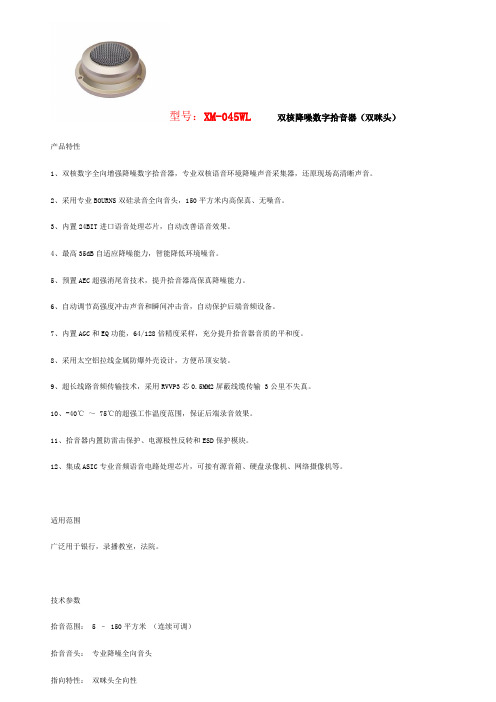
型号:XM-045WL双核降噪数字拾音器(双咪头)产品特性1、双核数字全向增强降噪数字拾音器,专业双核语音环境降噪声音采集器,还原现场高清晰声音。
2、采用专业BOURNS双硅录音全向音头,150平方米内高保真、无噪音。
3、内置24BIT进口语音处理芯片,自动改善语音效果。
4、最高35dB自适应降噪能力,智能降低环境噪音。
5、预置AEC超强消尾音技术,提升拾音器高保真降噪能力。
6、自动调节高强度冲击声音和瞬间冲击音,自动保护后端音频设备。
7、内置AGC和EQ功能,64/128倍精度采样,充分提升拾音器音质的平和度。
8、采用太空铝拉线金属防爆外壳设计,方便吊顶安装。
9、超长线路音频传输技术,采用RVVP3芯0.5MM2屏蔽线缆传输 3公里不失真。
10、-40℃~ 75℃的超强工作温度范围,保证后端录音效果。
11、拾音器内置防雷击保护、电源极性反转和ESD保护模块。
12、集成ASIC专业音频语音电路处理芯片,可接有源音箱、硬盘录像机、网络摄像机等。
适用范围广泛用于银行,录播教室,法院。
技术参数拾音范围: 5 – 150平方米(连续可调)拾音音头:专业降噪全向音头指向特性:双咪头全向性灵敏度:-28dB(1 kHz@99dB SPL)信噪比: 85 dB (1 kHz@94dB SPL)失真:≧ 0.2% (74dB声压、A加权)最大音压: 130dB 声压(1 kHz ≤ 1% THD、A加权)频率响应: 150Hz ~ 16kHz(1 kHz@90dB SPL)输出电平: 2.5Vpp/105dB声压(A加权)语音平台: 16BIT、16K/24K采样处理器编码方式: 24K PCM/I²存储器: 1024K EEPROM软件加密: 128BIT AES信号处理: DSP高保真语音处理(软著0421337)降噪能力: 10~36dB(自适应降噪)动态范围: 105dB(1KHz at Max dB SPL)输出阻抗: 600-1000欧姆非平衡保护电路:反接保护、雷击保护、ESD保护连接方式:三线制:电源线(红色)、音频(白色)、公共地(黑色)信号传输: 3000米双绞线、屏蔽电缆(电磁复杂环境请用屏蔽电缆或传输器)电源电压:线性稳压电源DC 8V-18V(建议使用12V/0.5A以上)电磁兼容性:符合GB 9254-2008可靠性指标: MTNF≧80000小时预置功能(可选): AEC(消回音)、AGC(自动增益)、EQ(均衡)环境温度:-40℃~ 75℃外壳材质:太空铝+双层不锈钢网罩产地:中国北京。
- 1、下载文档前请自行甄别文档内容的完整性,平台不提供额外的编辑、内容补充、找答案等附加服务。
- 2、"仅部分预览"的文档,不可在线预览部分如存在完整性等问题,可反馈申请退款(可完整预览的文档不适用该条件!)。
- 3、如文档侵犯您的权益,请联系客服反馈,我们会尽快为您处理(人工客服工作时间:9:00-18:30)。
专业级拾音器
(一) 产品简介:
专为在没有做吸音处理或审讯房间狭小空间环境下采集声音开发设计的最新款高级拾音器。
(二) 功能特点:
输入电压动态范围大,输出阻抗小,抗干扰能力强。
语音清晰干净、高保真自然原声。
高档全向电容咪头,噪声极小。
多级动态降噪处理、内置高速DSP 数字信号处理器、回声消除凹腔,有效减少空旷房间回音。
(三) 技术参数:
监听面积: 10平方—30平方
音频传输: 300米
频率响应: 50Hz ~12000Hz
信号处理: DSP 数字降噪,AGC 声音自动增益
信噪比: 80dB
指向特性: 全指向性
感度: —35dB (7.9mV ) 0dB =1V/1Pa.1Khz
动态范围: 104dB
最大承受音压:120dB SPL
输出阻抗: 600欧姆非平衡
输入电压: DC5V ~DC12V
输入电流: < 10mA
灵敏度:
-80dB ~-30dB
专业级拾音器。