WPF创建登陆画面
在 WPF 中创建可换肤的用户界面
在 WPF 中创建可换肤的用户界面 这篇文章讨论的是在 WPF 中如何创建可以在运行时换肤的用户界面 换肤的用户界面的一些基础知识, 我们将验证 换肤的用户界面 WPF 对用户界面皮肤的支持,并通过一个简单的示例程序来展示如何使用这些特性。
背景 当皮肤这个术语被应用到用户界面中来时,就是指被运用于用户界面上的所有界面元素的可视 化样式.一个可换肤的用户界面既可以是在编译时也可以是在运行时被定制(制定皮肤).WPF 为用 户界面的"换肤"提供了强大的支持. 对于一个软件来说在很多情形下"换肤"也许将变得非常重要.它可以被用来允许最终用户根据 个人审美观念来定制自己的软件界面.还有一种情形也许会用到"换肤",就是当一个公司开发的应用 程序被分发成多种客户端,也许每个客户端得拥有它自己的 Logo,颜色,字体等等,如果这些程序被 有意地设计成可换肤的话,那么只需要付出一点点的努力就可以很轻松的完成这项任务了. 三大基础 解决这一难题需要三大基础,在该部分我们只对它们做一个简要的介绍,可以参考本文的结尾处 的"外部链接"部分以获得更多相关信息.如果你对"层次型资源","合并的资源字典"以及"动态资源" 比较熟悉的话,你可以跳过该部分. 层次型资源 为了实现软件"换肤",你必须明白 WPF 的资源系统是如何运作的.在 WPF 中有很多类型都拥有 一个 ResourceDictionary 类型的公开属性 Resources,该字典包含了一个"键-值"对列表,其中" 键"可以是任意类型的对象,其"值"就是一个资源(“值"也可以是任意类型的对象).大多数时候我们 放入资源字典中的"键"都是 string 类型的对象,而有时也可能是其他类型.所有的资源都被存放到 这样的资源字典中,而资源查找程序正是使用它们来查找所需的资源. 在应用程序中,资源是按照一种层次关系被组织在一起的.当定位资源(比如画刷,样式,数据模 板或气体任意类型的对象)时,软件就会执行一个导航于这个层次组织间的查找程序来查找与指定" 键"相对应的资源. 它(资源查找程序)会首先检查需求该资源的元素自己所拥有的那些资源,如果没有找到,则它会 检查该元素的"父元素",看该"父元素"是否拥有所需的资源.如果"父元素"也没有所需的资源,则它 会继续沿着"元素树"向上检查该元素的每一个"祖先".如果仍然没有找到,则它最终会向 Application 对象询问该资源,在本文中我们可以忽略在那之后还会发生什么. 合并的资源字典ResourceDictionary 类中有一个属性允许你从其它的 ResourceDictionary 实例来合并资 源字典,这就像集合的"并集".这个属性名叫 MergedDictionaries,其类型为 Collection.下面这段 话是 SDK 文档中用于解释资源合并时的域规则: 在合并字典中的资源仅仅当它们被合并到主资源字典域中之后才在资源查找域中占有一个位 置.尽管在独立的字典中其资源"键"必须是互不相同的,但在合并字典中一个"键"却可能出现多次. 因此,被返回的资源就来自于被合并的资源字典集合中的最后一个字典.如果这些被合并的资源字典 是用 XAML 定义的话,那么它们在合并字典中的顺序就于它们在 XAML 语言中被标记的顺序一致. 如果一个"键"既包含于主字典又包含于其它被合并的字典,那么在主字典中的资源将被返回.这些规 则既适合动态资源引用也适合于静态资源引用. 转到本文末尾处的"外部链接"部分你可以找到关于资源合并的帮助页链接. 动态资源引用 解决这一难题(软件换肤)的最后一个基础点是通过元素的属性动态地访问可视化资源的这一 机制,这也就是扩展标记 DynamicResource 所做的事情.动态资源引用就向数据绑定一样,当资源 在运行时被替换后那些使用该资源的属性将被赋予新的资源. 比如说我们有一个 TextBlock 对象,它的 Background 属性必须被设定为有当前皮肤决定的任 意的 Brush,我们可以为该 TextBlock 对象的 Background 属性建立一个动态资源引用,当在运行 是软件的皮肤被更换后,与之相应的画刷就将被应用于该 TextBlock.动态资源引用将会自动地用新 画刷来更新 TextBlock 对象的 Background 属性. 正如下面的 XAML 所描述的一样: 以下是引用片段: 以下是引用片段: <TextBlock Background="" Text="Whatever..." /> 转到本文末尾处的"外部链接"部分参考在代码中是如何做到的. 应用三大基础 每个皮肤的资源都被放到独立的 ResourceDictionary 中,它们都属于自己的 XAML 文件.在运 行时我们可以加载一个包含的所有皮肤所需资源的 ResourceDictionary(此后我们称之为"皮肤字 典"),并将它插入到 MergedDictionaries 中(其为 Application 对象的 ResourceDictionary),通 过将皮肤字典插入到应用程序资源中,应用程序的所有的元素都可以使用该皮肤字典中所包含的资 源了. 界面上所有支持换肤的元素都应该通过动态资源引用来引用皮肤资源,这就使得我们可以在运 行时进行换肤以及让这些元素拥有新的皮肤资源.最简单的完成这项任务的方式是让元素的 Style 属性被指定为动态资源引用.通过使用元素的 Style 属性,我们可以让皮肤字典包含那些可以设置任意个属性的 Style,这就比从皮肤字典中为每 一个单独的属性设置动态资源引用更容易编写和维护代码. 示例程序是什么样子的 我们可以在本文的顶部位置下载到这个示例程序,其包含了一个可以设置三种皮肤的简单窗体. 当你使用默认皮肤启动程序时,其如图所示:当你右击窗体的任意位置时,会弹出一个上下文菜单允许你更换皮肤,如下图所示:作为一个实际的应用程序以这样的方式来允许用户选择皮肤似乎有一点奇怪了,但这仅仅是一个示 例.如果用户在下拉列表中选择代理商的名称为"David"并且在上下文菜单中选择绿色,那么"绿色 皮肤"将被应用,软件界面将如下图所示:注意:选择最后一个代理商的名字与现在软件界面为绿色并没有任何联系. 我创建的最后一个皮肤有一点点怪异,但我喜欢,当应用蓝色皮肤时软件界面看起来是这样的:示例程序是如何运作的 下面是在 Visual Studio 的解决方案浏览器中我们的示例程序的项目结构:允许用户更改皮肤的上下文菜单被定义在 MainWindow 的 XAML 文件中,如下所示: 以下是引用片段: 以下是引用片段: <Grid.ContextMenu> <ContextMenu MenuItem.Click="OnMenuItemClick"> <MenuItem Tag=".ResourcesSkinsBlackSkin.xaml" IsChecked="True"> <MenuItem.Header> <Rectangle Width="120" Height="40" Fill="Black" /> </MenuItem.Header> </MenuItem> <MenuItem Tag=".ResourcesSkinsGreenSkin.xaml"> <MenuItem.Header> <Rectangle Width="120" Height="40" Fill="Green" /> </MenuItem.Header> </MenuItem> <MenuItem Tag=".ResourcesSkinsBlueSkin.xaml"> <MenuItem.Header> <Rectangle Width="120" Height="40" Fill="Blue" /> </MenuItem.Header> </MenuItem> </ContextMenu> </Grid.ContextMenu> 当用户在菜单中选择一个新的"皮肤"时,在 MainWindow 的后台代码文件中以下代码将被执 行: 以下是引用片段: 以下是引用片段: void OnMenuItemClick(object sender, RoutedEventArgs e) { MenuItem item = e.OriginalSource as MenuItem; // Update the checked state of the menu items. Grid mainGrid = this.Content as Grid; foreach (MenuItem mi in mainGrid.ContextMenu.Items) mi.IsChecked = mi == item; // Load the selected skin. this.ApplySkinFromMenuItem(item); } void ApplySkinFromMenuItem(MenuItem item) { // Get a relative path to the ResourceDictionary which // contains the selected skin.string skinDictPath = item.Tag as string; Uri skinDictUri = new Uri(skinDictPath, UriKind.Relative); // Tell the Application to load the skin resources. DemoApp app = Application.Current as DemoApp; app.ApplySkin(skinDictUri); } DemoApp 对象的 ApplySkin 方法的调用将导致下面的代码被执行: public void ApplySkin(Uri skinDictionaryUri) { // Load the ResourceDictionary into memory. ResourceDictionary skinDict = Application.LoadComponent(skinDictionaryUri) as ResourceDictionary; Collection mergedDicts = base.Resources.MergedDictionaries; // Remove the existing skin dictionary, if one exists. // NOTE: In a real application, this logic might need // to be more complex, because there might be dictionaries // which should not be removed. if (mergedDicts.Count > 0) mergedDicts.Clear(); // Apply the selected skin so that all elements in the // application will honor the new look and feel. mergedDicts.Add(skinDict); } 现在我们来看一个界面元素如何使用皮肤资源的例子,下面的 XAML 代码诚信了窗口左边的 "Agents"区域,其包含了一个包含保险业代理商名字的下拉列表控件,其标题为"Agents". <USERCONTROL< p> 以下是引用片段: 以下是引用片段: <UserControl x:Class="SkinnableApp.AgentSelectorControl" xmlns="/winfx/2006/xaml/presentation" xmlns:x="/winfx/2006/xaml" > <Border <STRONG>Style=""</STRONG>> <Grid><Grid.RowDefinitions> <RowDefinition Height="Auto" /> <RowDefinition Height="*" /> </Grid.RowDefinitions> <!-- AGENT SELECTOR HEADER --> <Border <STRONG>Style=""</STRONG>> <StackPanel Orientation="Horizontal"> <Image Margin="4,4,0,4" Source=".ResourcesIconsagents.ico" /> <TextBlock FontSize="20" Padding="8" Text="Agents" VerticalAlignment="Center" /> </StackPanel> </Border> <!-- AGENT SELECTION LIST --> <ListBox Background="Transparent" BorderThickness="0" Grid.Row="1" IsSynchronizedWithCurrentItem="True" ItemsSource="" <STRONG>ItemTemplate="" </STRONG> ScrollViewer.HorizontalScrollBarVisibility="Hidden" /> </Grid> </Border> </UserControl> 下图是 AgentSelectorControl 使用默认皮肤时的样子:如上所示,在 AgentSelectorControl 中, DynamicResource 扩展标记供使用了三处,它们每 次引用的资源都必须存在于皮肤字典中.。
详细WINCC用户登录系统画面
关于WINCC用户登录画面的详细解决办法本人在网上找了很多关于这类的文章和解决办法,但效果都不是很好,要么过于简单.要么有问题,现本人整理了下.方便大家解决这个问题.1.首先打开WINCC用户管理器.如图:1.新建用户取名为admin,当然自己可以更换为其他的,并选择相应的权限,如图:2.新建画面,取名为login.dll并添加两个按钮,如图:只有当点击登录系统并输入正确密码后,才能进入画面.3.选择登录按钮-属性-事件-鼠标-按左键,加入C动作,内容如下: #pragma code ("UseAdmin.DLL")#include "pwrt_api.h"#pragma code ()PWRTLogin('e');如图:4.编辑进入画面按钮-属性—其他-授权-选择用户管理.如图:5.再次编辑进入画面按钮-事件-鼠标-按下左键-直接连接,如图:常数选择你要跳转的画面,当前窗口选择画面名称.[常数选择前需新建你的主画面]这样一个简单的用户登录画面就完成了.当然你可以优化一下,根据你的情况更改.浅析规则式植物造景和自然式植物造景苏旺指导老师:汪小飞(黄山学院生命与环境科学学院,安徽黄山245041)摘要:本文分析了规则式植物造景和自然式植物造景,和他们各自的造景特色和主要适用在什么场合。
探讨了规则式植物造景和自然式植物造景二者包括的造景形式以及他们在造园体系、表现手法上的不同点。
介绍了它们在各个国家、地域的各有特色。
最后我们应该适宜运用各种造景形式。
关键字:规则式植物造景,自然式植物造景Analysis of rule-plant landscaping andnature plant landscapeSu WangDirector:Wang Xiaofei(College of Life & Environmental Sciences, Huangshan University,Huangshan245041, China)Abstract:This article analyses the rules scene building with plants and nature plant landscape, and their landscape and mainly used on occasion.Discusses rules for scene building with plants and nature plant landscape landscape including the two forms as well as their gardening system, on the presentation of different points.Describes them in the various countries, geographical features.Finally we should be appropriate to use various landscape forms.Keyword:Rules-plant landscaping, nature plant landscape1.树木配置的形式按照树木的生态习性,运用美学原理,依其姿态、色彩、干形进行平面和立面的构图,使其具有不同形态的有机组合,构成千姿百态的美景,创造出各种引人入胜的树木景观。
wpficon的使用方法

wpficon的使用方法WPF(Windows Presentation Foundation)是一种用于创建Windows桌面应用程序的框架。
它提供了一种简单而强大的方式来添加图标到应用程序中,以增强用户界面的可视效果和交互性。
在WPF中,使用图标主要涉及两个方面:选择和使用图标。
首先,我们需要选择合适的图标,然后可以使用不同的方法将其添加到应用程序中。
选择图标:2. 使用系统图标:WPF提供了一些系统图标,例如应用程序的默认图标、文件夹图标等。
您可以通过导航到"Project > Add Reference"并选择"PresentationCore"程序集,然后使用System.Windows.Interop.IconHelper类来访问它们。
使用图标:一旦选择了图标,就可以将其添加到WPF应用程序中。
以下是几种常见的方法:1. 使用Image控件:可以将图标作为Image控件的源。
为此,需要将图标文件(通常是.ico文件)添加到项目资源中,并将其生成操作设置为"Resource"。
然后,可以通过以下方式在XAML中使用图标:```xml``````xml</TextBlock>```3. 使用Path控件:Path控件允许您以矢量格式显示图标。
对于自定义图标,您可以将它们转换为路径数据,并在XAML中使用Path控件来呈现它们。
以下是一个示例:```xml<Path Data="M20 10C20 7.24 17.76 5 15 5H9C6.24 5 4 7.24 410V18C4 20.76 6.24 23 9 23H15C17.76 23 20 20.76 20 18V10M1414H10V12H14V14Z" Fill="Black" />```4. 使用WPF图标库:WPF提供了一些内置的图标库,例如MahApps.Metro和Material Design。
wpfui界面设计(WPFUIinterfacedesign)
wpf ui 界面设计(WPF UI interface design)wpf ui 界面设计(WPF UI interface design)使用系统;彳吏用system・ collections・ generic;使用LI\Q系统;使用系统窗口;'(吏用sys tem. windows ・ automat io n. peers;'(吏用system ・ windows ・ automat io n. provider;'(吏用system・ windows・ controls;彳吏用system・ windows・ controls・ primitives: 彳吏用system・windows・ media;'(吏用system・ windows・ media・ imaging;'(吏用system・ windows・ shapes;'(吏用codingdfun. kinect・ wpf;'(吏用coding4fun. kinect・ wpf. controls;使用微软Kinect;命名空间kinecthubdemo公共部分类主要窗口:窗口kinectsensor Kinect;私有列表〈按钮 > 按钮;hoveredbutton 专用按钮;私人布尔iswindowsclosing 二假;«摘要〉III启动Kinect设备,默认初始化选项,并注册allframesready 同步事件//private void startkinect(){如果(kinectsensor. kinectsensors. count > 0){/ /选择第一个Kinect设备Kinect = kinectsensor kinectsensors [ 0 ];如果(Kinect = NULL)返回;Kinecto COLORSTREAM o enable ();VaR TSP 二新transformsmoothparameters{0. 5f平滑二,0. 5f校正二,预测二0. of,jitterradius = 0.05f,maxdeviationradius = 0. 04f};Kinecto skeletonstream 使(TSP);/ /启用骨骼跟踪,并在屏幕右下方显示彩色视频信息kinect. colorframeready + 二新Eve nt Handler < colorimageframereadyeventargs >(kinect_colorframeready); kinect.skeletonframeready + 二新Eve nt Handler <skeletonframereadyeventargs >(kinect_skeletonframeready); / /启动Kinect设备start () Kinect;}其他的{MessageBox显示("没有发现任何Kinect设备”);}}无效kinect_skeletonfrdmeready(object sender, skeletonframereadyeventargs E){使用(skeletonframe 框架二 E openskeletonframe ()){如果(帧二NULL)返回;(frame, skeletonarraylength = = 0)返回;骨架[]allskeletons 二新的骨架skeletonarraylength ][帧;CopySkeletonDataTo (allskeletons)框架;The //Linq syntax searches for the closest tracked skeleton from Kinect, using the head Z coordinates as a referenceSkeleton closestSkeleton = (from, s, in, allSkeletons)Where = SkeletonTrackingState・ Tracked && s. TrackingStateS. Joints[JointType.Head]・TrackingState ==JointTrackingState・ TrackedSelect s. 0rderBy (s) = > s. Joints[JointType.Head]・ Position. Z)・ FirstOrDefault ();If (closestSkeleton = null)Return;If (closestSkeleton. TrackingState ==SkeletonTrackingState・ Tracked)Return;Var joints = closestSkeleton. Joints;Joint rightHand = joints[JointType.HandRight];Joint leftHand = joints[JointType.HandLeft];The Y axis / / judgment is right or left-handed habits: one hand to lift the Y axis is largerVar hand = (rightHand .Position. Y > leftHand .Position. Y)RightHand?:leftHand;If (hand・ TrackingState = = JointTrackingState・ Tracked)Return;/ / get the screen width and heightInt screenWidth = (int) SystemParameters・PrimaryScreenWidth;Int screenHeight = (int)SystemParameters・ PrimaryScreenHeight;The position of "skeleton coordinate mapping / hand to screen coordinates; hand only need to move in a limited range can cover the entire screen area Float, posX = hand・ ScaleTo (screenWidth, screenHeight, 0. 2f,0.2f). Position. X;Float, posY = hand・ ScaleTo (screenWidth, screenHeight, 0・ 2f,0. 2f). Position. Y;/ / judge whether suspended in the picture button, then trigger the Click eventOnButtonLocationChanged (kinectButton, buttons, (int) posX, (int) posY);}}Void kinect_ColorFrameReady (object, sender,ColorImageFrameReadyEventArgs, e){Using (ColorImageFrame, colorFrame = e. 0penColorlmageFrame ()){If (colorFrame = null)Return;}The lower right corner of the screen display / color camera, using the CodingdFun. Kinect・Wpf extension methodVideoimage・ Source = colorFrame・ ToBitmapSource ();}}Public, Ma inWindow (){InitializeComponent ();KinectButton.click + = new routedeventhandler (kinectbutton _ clicked);}private void initializebuttons (){buttons = new list < s >{butto nl・button2・butto n3・button4・buttond・button6};}Ill (summary)///悬停选择按钮处理///->/ summary/ / / < param name = "hand" >〈 / > "1 前移动的悬浮手型光标param / / / < param name = "buttons" >< / > 图片按钮集合param/ / / < param name = >< / > skeletonhandx param/ / / < param name = "y" >< / > skeletonhandy paramprivate void onbuttonlocationchanged (hoverbutton hand, list < s > buttons, int x, int y){if (isbuttonoverobject (hand, buttons)hand, hovering () ; / / 触发mouse click 事件elsehand・ release ();/ /移动手型光标canvas・setleft (hand, x 一(hand・actualwidth / 2));canvas .settop (hand, y 一(hand・actualheight / 2));}private void kinectbutton _ clicked (object sender, routedeventargs and) {hoveredbutton. raiseevent (new routedeventargs (buttonbase・ clickevent, hoveredbutton));}public bool isbuttonoverobject (frameworke1ement hand, list < s > buttons) {if (iswindowsclosing !! window・getwindow (hand)・isactive)return false;/ /找到悬浮手型控件的中心点位置var handtopleft = new point (canvas・gettop (hand), canvas・getleft (hand);double handleft = handtopleft・ x + (hand・ actualwidth / 2);double handtop = handtopleft・ y + (hand・ actualheight / 2);//遍历图片按钮,判断hand图标是否悬浮在其中之一foreach (button target buttons){point targettopleft = target・pointtoscreen (new point ());if (handtop > targettopleft・ x&& handtop < x + target・ actualwidth targettopleft・&& handleft > targettopleft・ y&& handleft < targettopleft・ y + target・ actualheight){hoveredbutton = target;return true;}}return false;}private void promotebuttonclickevent (string info)1istboxhoverevent・ items・ add (string・ format C {0}: {1}"、info, datetime. now. tostring ("t")));}private void buttonl _ click (object sender, routedeventargs and){promotebuttone1ickevent ("button 1 clicked");}private void button2 _ click (object sender, routedeventargsand){promotebuttone1ickevent ("button 2 clicked");}private void button3_click(object sender, routedeventargs E){promotebuttonclickevent (n按钮 3 单击");}private void button4_click(object sender, routedeventargs E){promotebuttonclickevent (n按钮 4 单击“);}private void button5_click(object sender, routedeventargs E)promotebuttonclickevent (n按钮 5 单击");}private void button6_click(object sender, routedeventargs E){promotebut tone lickevent (n按钮 6 单击");}private void canvas_loaded(object sender, routedeventargs E){}private void stopkinect(){如果(Kinect)〜二null){如果(kinect. status = = kinectstatuso 连接){/ /关闭Kinect设备stop() Kinect;}}}private void window_loaded(object sender, routedeventargs E)initializebuttons();startkinect ();private void window_closing(object sender, systein. componentmode 1・canceleventargs E){iswindowsclosing 二真;stopkinect ();〈窗口X: class二u kinecthubdemoo 主窗口WindowState ="最大化”windowstyle = u singleborderwindow n xmlns 二"nxmlns:x = “;背景二“# lelc37”xmlns:控制二“CLR 命名空间:coding4fun o Kinecto WPF。
wpf ui界面设计(WPF UI interface design)

wpf ui界面设计(WPF UI interface design)wpf ui界面设计(WPF UI interface design)使用系统;使用system.collections.generic;使用LINQ系统;使用系统窗口;使用system.windows.automation.peers;使用system.windows.automation.provider;使用system.windows.controls;使用system.windows.controls.primitives;使用system.windows.media;使用system.windows.media.imaging;使用system.windows.shapes;使用coding4fun.kinect.wpf;使用coding4fun.kinect.wpf.controls;使用微软Kinect;命名空间kinecthubdemo{公共部分类主要窗口:窗口{kinectsensor Kinect;私有列表<按钮>按钮;hoveredbutton专用按钮;私人布尔iswindowsclosing =假;<<摘要>/ / /启动Kinect设备,默认初始化选项,并注册allframesready 同步事件//private void startkinect(){如果(kinectsensor.kinectsensors.count > 0){/ /选择第一个Kinect设备Kinect = kinectsensor kinectsensors [ 0 ];如果(Kinect = NULL)返回;Kinect。
COLORSTREAM。
enable();VaR TSP =新transformsmoothparameters{0.5f平滑=,0.5f校正=,预测= 0.5f,jitterradius = 0.05f,maxdeviationradius = 0.04f};Kinect。
2.1 WPF UI制作

二、知识准备:
2、认识WPF窗体
窗体是WPF中最重要的一个呈现控件,它能够容纳其他 的WPF控件,用户通常也是通过窗口来与WPF应用程序进 行数据交互的。简单的说,WPF窗体就是应用程序的载体, 承载了控件和用户数据展示。
WPF技术从传统Windows技术发展而来,WPF窗体也继 承了很多WinForm窗体特性,同时又具有很多自己的个性, 特别是在美观上能够请轻松制作出过去很难实现的炫酷效 果。
Title="frmLogin1" Height="219" Width="397" AllowsTransparency="True" WindowStyle="None" Background="Transparent" WindowStartupLocation="CenterScreen" Icon="Images/key.ico">
项目二 WPF布局设计—制作图书借阅系统UI
副教授 陈郑军
本章导读:
本章的主要内容是学习WPF的项目启动、窗体、布局 控件和常规功能控件。然后通过项目“设计制作图书借阅 系统UI”为导向,三个任务(登录窗体UI、注册窗体UI、 主窗体的制作)为驱动,学习有关WPF的布局控件、功能 控件和不规则窗体知识基础,本项目着力使学习者对WPF UI设计有个清晰的认识。
二、知识准备:
2、认识WPF窗体 (5)窗体的外观属性
WindowsStyle属性
二、知识准备:
2、认识WPF窗体
(5)窗体间的传值
WPF窗体之间要实现数据传递可以采用如下四种方式: (1)声明个全局变量,就是App.xaml里面声明;在所有窗体里面 都可以引用 Application.Current.Properties["ArgumentName"]。 (2)第二个就是在目标窗体上面公开个属性,直接赋值; (3)在Uri里面传参数 NavigationService.Navigate(window object,argument value); (4)定义一个静态类,所有窗体都可以访问静态类的静态数据成 员。
基于VFP的一个动态登录界面
用 VsaFxr 提供的表单设计器和表单控件来建立 i l oPo u
一
个动态登录界面的实例。
一
般来说 , 常见 的登 录界 面 应具 有 以 下功 能 : 户 用
从 组合 框 中选择 已注 册 的用 户 姓名 ,然 后 在 文本 框 中
输入相应的密码 ; 单击确定命令按扭 , 如果密码正确 , 打开指定的应用程序 , 否则 , 允许登录者再重新输入两 次密码 , 如果密码均不正确 , 提示登 录者密码错误 , 不
打开表单控件工具栏。在表单上添加五个标签 l e 、 a l b l
l e 、 bl、 bl a l l e3l e b2 a a 4和 l e5 a l,添 加 一 个 组 合 框 cm— b o
设置命令按钮属性 :
tiom. mm n c pi = 确定 ” hs r c f o ad . tn ” 1a o
Fxr 的 编程 设计 表 单 的方 法 。本 论 述介 绍 了一 个 利 oPo
3 设置对 象属性
每一个类 的对象都有很多不同的属性 ,在这里只 对应用程序有用 的屙 陛用命令进行设置表单属性。
设 置表 单属 性 :
ti om. pin ”登 录” hs r c t = f a o
原始状态 ; 单击退出命令按扭 , 闭登 录界面 , 复系 关 恢
统原始状态。 本论述以创建“ 普通高等学校学籍管理系 统登录” 这个动态表单为例来进行说明如何创建 Vsa il u
F xr opo的登 录界 面 。
ti m1 e . pi = 研 制 单 位 : 肃 交 通 职业 hs .bl c tn ”  ̄r a 3 a o 甘
& &如果组合框 cm o 中的操作员名称和文本 o bl
用WCF给Silverlight或WPF做用户登陆例子

用WCF给Silverlight或WPF做用户登陆例子
本人之前一直做的网站,最近想学习Silverlight的富客户端开发,发现有些内容还是不一样的,特别是数据库访问这块,这里写个最简单的用户登陆示例
先新建一个数据库,命名为test
再新建一个Users表,里面只有两列
这里插入一条测试数据,为了方便,密码我用了明文,实际项目中请加密码使用
程序里要使用的SQL
数据库的准备就好了打开VS2010,新建项目
选Silverlight应用程序
记得勾选最下面的”启用了WCF RIA服务”
第一步,我们在WEB.CONFIG文件里加上数据库连接字符串,因为我在程序里用到了SQL助手类
在WEB宿主程序里添加WCF服务
命名为:DBService.svc
双击进入DBService.svc.cs文件
改写DoWork()方法成下面的样子
到这里,我们的WCF就完成了.别忘了重启生成程序
现在我们在Silverlight程序里添加服务引用
点发现即可
把命名空间改为DBService,即添加完成!
在默认的MainPage.xaml里,创建如下内容
双击登陆,进入CS代码编辑器,键入以下内容
再纺编译程序,按F5运行!。
WPF登录界面及程序主界面设计
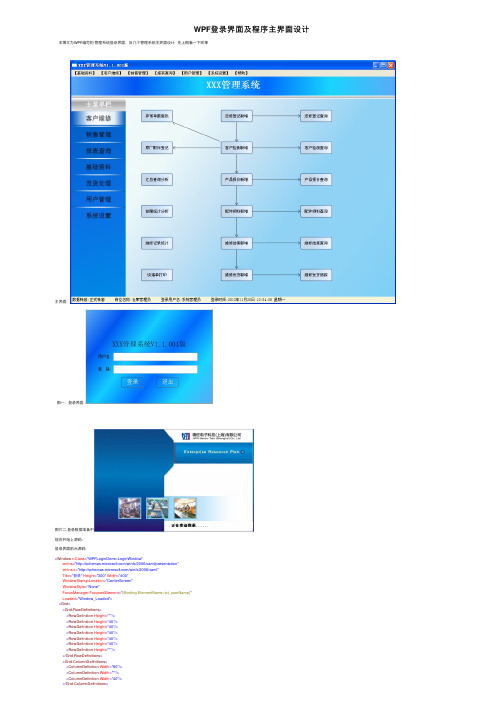
WPF登录界⾯及程序主界⾯设计本博⽂为WPF编写的管理系统登录界⾯,及⼏个管理系统主界⾯设计先上图看⼀下效果主界⾯:图⼀:登录界⾯图⽚⼆.登录数据准备中现在开始上源码:登录界⾯前台源码:<Window x:Class="WPFLoginDemo.LoginWindow"xmlns="/winfx/2006/xaml/presentation"xmlns:x="/winfx/2006/xaml"Title="登录" Height="300" Width="400"WindowStartupLocation="CenterScreen"WindowStyle="None"FocusManager.FocusedElement="{Binding ElementName=txt_userName}"Loaded="Window_Loaded"><Grid><Grid.RowDefinitions><RowDefinition Height="*"/><RowDefinition Height="40"/><RowDefinition Height="40"/><RowDefinition Height="40"/><RowDefinition Height="40"/><RowDefinition Height="40"/><RowDefinition Height="*"/></Grid.RowDefinitions><Grid.ColumnDefinitions><ColumnDefinition Width="80"/><ColumnDefinition Width="*"/><ColumnDefinition Width="40"/></Grid.ColumnDefinitions><LinearGradientBrush StartPoint="0,0" EndPoint="1,1"><GradientStop Color="#5aacf6" Offset="0.0"/><GradientStop Color="#0056f1" Offset="0.2"/><GradientStop Color="#13ceff" Offset="0.4"/><GradientStop Color="#006bff" Offset="0.6"/><GradientStop Color="#19d5ff" Offset="0.8"/><GradientStop Color="#5aacf6" Offset="1.0"/></LinearGradientBrush></Grid.Background><TextBlock Grid.Row="2" Grid.ColumnSpan="3"Text="XXX管理系统V1.1.001版" TextAlignment="Center"VerticalAlignment="Center" FontSize="22"></TextBlock><TextBlock Grid.Row="3" TextAlignment="Right" VerticalAlignment="Center"Text="⽤户名:"/><TextBox Grid.Row="3" Grid.Column="1" Height="27" Margin="5 0 5 0"Name="txt_userName"/><TextBlock Grid.Row="4" TextAlignment="Right" VerticalAlignment="Center"Text="密码:"/><PasswordBox Grid.Row="4" Grid.Column="1" Height="27" Margin="5 0 5 0"Name="txt_Pwd"/><StackPanel Grid.Row="5" Grid.Column="1" Orientation="Horizontal"><Button Content="登录" Width="70" Margin="30 0 0 0" Height="35"Name="btn_login" Click="btn_login_Click" Foreground="White" FontSize="18" Background="Transparent"/><Button Content="退出" Width="70" Margin="40 0 0 0" Height="35"Name="btn_exit" Click="btn_exit_Click" Background="Transparent" Foreground="White" FontSize="18"/></StackPanel></Grid></Window>后台源码private void btn_login_Click(object sender, RoutedEventArgs e){Splasher.Show(typeof(frmSplash));MainWindow mainWindow = new MainWindow();this.Close();mainWindow.Show();}private void btn_exit_Click(object sender, RoutedEventArgs e){this.Close();Environment.Exit(0);}这⾥顺便说⼀下。
物联网技术应用-wpf登陆界面

• (3)编写程序代码。在按钮控件【btnSubmit】上双击,进入单击事件代码窗 口,输入如下代码。
• (4)运Βιβλιοθήκη 效果如图5所示 图5 运行效果•
以上例子中,还使用了我们没有讲过的控件GroupBox,此控件用来把一些
控件作为一个特定区域显示,并且可以设置标题。
• 操作步骤 (1)新建一个“Csharp_2_例2.3”WPF应用程序项目。 (2)设置窗体的Title属性为“用户登录”,把Grid分为3行3列,从工具箱中找 到Label控件,拖入到窗体上,并设置Content属性值分别为“用户名:”和“密 码:”。 (3)向窗体中添加一个TextBox控件和一个PasswordChar控件,分别命名为“tx tName”和“txtPass”。 (4)向窗体中添加两个Label控件,命名为“LabUser”、“LabPass”, (5)向窗体中添加两个按钮,命名为“btnLogin”、“btnCancel”,并设置co ntent属性分别为“登录”、“取消”。 (6)选中用户名文本框,在“属性”窗口中选中TextChanged事件,双击进入事 件处理程序中,添加如下代码。
• (2)GroupName:设置同组单选按钮的名字。如果一个窗 体中有多组单选按钮,则同组的按钮设置相同的名字。
• RadioButton控件的常用事件为Checked事件,当IsChecked 属性值更改时发生。
1.5 CheckBox(多选框)
• CheckBox(复选框)控件与RadioButton控件相似, 不同的是CheckBox控件不会互相排斥,用户可以 在窗体上选择一个或几个复选框。
1.2 Label(标签)
• Label(标签)用来显示文本内容。可以为其它控件如文本 框等添加一些描述性的信息。常用属性Content,表示要显 示的文本。
一个简单WPF登陆界面,包含记住密码,自动登录等功能,简洁美观

⼀个简单WPF登陆界⾯,包含记住密码,⾃动登录等功能,简
洁美观
简介:这是⼀个⾃⼰以前⽤WPF设计的登陆界⾯,属于⼀个实验性的界⾯窗体,如果⽤于产品还很有不⾜。
但也是有⼀点学习价值。
后台代码略有复杂,但基本上都有注释分类,略有代码经验的⼀般都能看懂。
登陆界⾯外观:可以对登陆成功的信息,进⾏保存。
包括记住密码,⾃动登陆等信息,默认显⽰上⼀次登陆成功的⽤户信息。
登陆界⾯保存的登陆信息:可以删除不必要的登陆信息
登陆界⾯登陆Loading状态显⽰界⾯:登陆中显⽰遮罩层在1.5秒左右的时间内可以取消登录状态
源码下载:。
教你如何制作自己喜欢的登陆界面
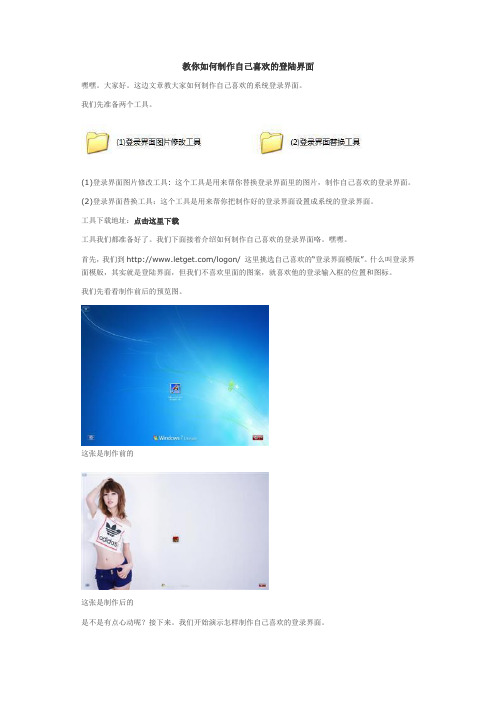
教你如何制作自己喜欢的登陆界面嘿嘿。
大家好。
这边文章教大家如何制作自己喜欢的系统登录界面。
我们先准备两个工具。
(1)登录界面图片修改工具: 这个工具是用来帮你替换登录界面里的图片,制作自己喜欢的登录界面。
(2)登录界面替换工具:这个工具是用来帮你把制作好的登录界面设置成系统的登录界面。
工具下载地址:点击这里下载工具我们都准备好了。
我们下面接着介绍如何制作自己喜欢的登录界面咯。
嘿嘿。
首先,我们到/logon/ 这里挑选自己喜欢的“登录界面模版”。
什么叫登录界面模版,其实就是登陆界面,但我们不喜欢里面的图案,就喜欢他的登录输入框的位置和图标。
我们先看看制作前后的预览图。
这张是制作前的这张是制作后的是不是有点心动呢?接下来。
我们开始演示怎样制作自己喜欢的登录界面。
我们先看看我们所需的工具先。
一个是(1)登录界面图片修改工具,一个是(2)登录界面替换工具,一个是喜欢的登录界面模版,一个是你喜欢的图片(注意:图片要转换成BMP格式,而且图片要适合您的屏幕尺寸,)图片可以到 桌酷壁纸站下载,那里还可以在线转换成适合你的屏幕尺寸的。
接下来。
我们打开登录界面图片修改工具,文件-打开-打开我们想修改的登录界面.exe然后我们在位图栏找到登陆界面本身的背景图片。
右击替换资源。
当软件弹出替换位图对话框,我们点击新位图,浏览到我们准备好的,自己喜欢的图片,注意,一定要先把图片转换成BMP格式。
而且尺寸要适合你当前屏幕的分辨率。
最后当我们选择好位图后,我们点击右下角的替换按钮。
工具就会自动完成登录界面图片替换制作。
到此,您喜欢的登录界面已经制作完成了。
要注意的是,(1)登录界面图片修改工具,在每当你修改一次的时候都会自动帮你备份一个副本,命名规则会在修改文件名字后加上_original。
我们接下来还要做什么?当然是马上设置为系统的登录界面啦。
哈哈。
具体登录界面教程请看看/FAQ/1/。
我们在这里也简单说下怎样替换成当前系统的登录界面。
登录窗体的制作
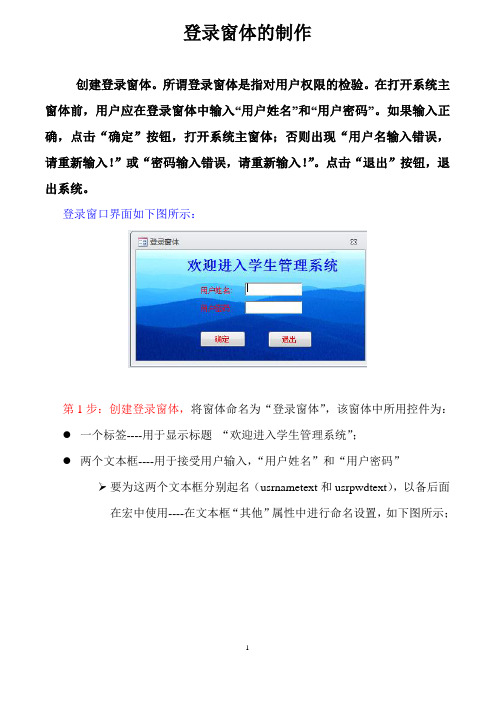
登录窗体的制作创建登录窗体。
所谓登录窗体是指对用户权限的检验。
在打开系统主窗体前,用户应在登录窗体中输入“用户姓名”和“用户密码”。
如果输入正确,点击“确定”按钮,打开系统主窗体;否则出现“用户名输入错误,请重新输入!”或“密码输入错误,请重新输入!”。
点击“退出”按钮,退出系统。
登录窗口界面如下图所示:第1步:创建登录窗体,将窗体命名为“登录窗体”,该窗体中所用控件为:●一个标签----用于显示标题“欢迎进入学生管理系统”;●两个文本框----用于接受用户输入,“用户姓名”和“用户密码”➢要为这两个文本框分别起名(usrnametext和usrpwdtext),以备后面在宏中使用----在文本框“其他”属性中进行命名设置,如下图所示;➢密码文本框需要使用星号形式(在密码文本框“数据”属性的“输入掩码”中进行设置),如下图所示:●两个命令按钮“确定”和“退出”(注意:做按钮时请关闭控件“工具箱”中的“控件向导”按钮(取消向导操作),在主体区画好按钮后,直接把“CommandXX”改名为“确定”或“退出”即可)第2步:创建登录宏此处应为自己的主界面窗体名称1、先拖拽“submacro ”到左边的“添加新操作”组合框中,形成“子宏”行,命名为“信息确定”2、再拖拽“if ”到左边的“子宏”下方的“添加新操作”组合框中3、点击“向导”按钮,在“表达式生成器”中通过选取“登录窗体”中的文本框构成表达式,见下面的绿框图用户名是老师的名字,请输入自己的用户名和密码,输入完表达式后,再参照左上图依次输入各个宏操作如果用户名和密码输入正确,则关闭当前的登录窗体,打开系统的主界面如果用户名输入有误,则使用Messagebox 函数出现错误提示,并使用Gotocontrol 函数把输入焦点锁定在用户名输入框上等待用户重新输入接下页图“信息确定”子宏 先做这个接上页图如果密码输入有误,则使用Messagebox函数出现错误提示,并使用Gotocontrol函数把输入焦点锁定在密码输入框上等待用户重新输入三层IF嵌套“退出”子宏第3步:为宏定义触发事件,将其关联到相应按钮的“单击”事件上。
WPF实现的UI设计
WPF实现的UI设计WPF(Windows Presentation Foundation)是一种用于开发Windows桌面应用程序的技术,它具有灵活性和强大的功能。
通过WPF,开发人员可以创建出色的用户界面设计,提供丰富的图形效果、动画和交互性。
在本文中,我们将讨论WPF实现的UI设计,并探讨如何利用WPF构建优雅、易于使用的用户界面。
在WPF中,UI设计是通过XAML(可扩展应用程序标记语言)来定义和布局的。
XAML是一种基于XML的标记语言,可以用于声明控件、属性和布局。
使用XAML,开发人员可以轻松地创建和设计界面,而无需编写大量的代码。
首先,在WPF中,界面设计的一个重要概念是布局管理器。
布局管理器是一种用于控制界面元素位置和大小的机制。
WPF提供了多种布局管理器,包括栈面板(StackPanel)、网格(Grid)和表格(Table)等。
开发人员可以根据需要选择适当的布局管理器来创建界面布局。
例如,我们可以使用网格布局来创建一个登录界面。
在网格布局中,界面被分为行和列,开发人员可以将控件放置在网格的不同单元格中。
通过指定行和列的大小、对齐方式和间距,可以实现灵活和精确的界面设计。
其次,WPF提供了丰富的图形效果和动画功能,可以增强用户体验。
例如,我们可以使用渐变、阴影和透明度等效果来制作出色的界面视觉效果。
此外,WPF还提供了动画功能,可以为控件添加平移、缩放和旋转等动画效果,使界面更加生动和吸引人。
除了布局、图形效果和控件,WPF还提供了许多其他功能,如数据绑定、命令处理和导航等。
数据绑定是一种将界面元素与数据模型进行关联的机制,可以实现数据的自动更新和反映。
命令处理是一种处理用户操作的机制,可以将用户操作(如按钮点击)与相关的功能代码进行关联。
导航是一种在不同界面之间切换的机制,可以实现复杂的应用程序导航和流程控制。
在设计WPF界面时,还应考虑一些用户体验原则。
首先,界面应设计简洁和直观,避免过多的复杂和混乱。
wpfui界面设计(WPFUIinterfacedesign)

wpf ui 界面设计(WPF UI interface design)wpf ui 界面设计(WPF UI interface design)使用系统;彳吏用system・ collections・ generic;使用LI\Q系统;使用系统窗口;'(吏用sys tem. windows ・ automat io n. peers;'(吏用system ・ windows ・ automat io n. provider;'(吏用system・ windows・ controls;彳吏用system・ windows・ controls・ primitives: 彳吏用system・windows・ media;'(吏用system・ windows・ media・ imaging;'(吏用system・ windows・ shapes;'(吏用codingdfun. kinect・ wpf;'(吏用coding4fun. kinect・ wpf. controls;使用微软Kinect;命名空间kinecthubdemo公共部分类主要窗口:窗口kinectsensor Kinect;私有列表〈按钮 > 按钮;hoveredbutton 专用按钮;私人布尔iswindowsclosing 二假;«摘要〉III启动Kinect设备,默认初始化选项,并注册allframesready 同步事件//private void startkinect(){如果(kinectsensor. kinectsensors. count > 0){/ /选择第一个Kinect设备Kinect = kinectsensor kinectsensors [ 0 ];如果(Kinect = NULL)返回;Kinecto COLORSTREAM o enable ();VaR TSP 二新transformsmoothparameters{0. 5f平滑二,0. 5f校正二,预测二0. of,jitterradius = 0.05f,maxdeviationradius = 0. 04f};Kinecto skeletonstream 使(TSP);/ /启用骨骼跟踪,并在屏幕右下方显示彩色视频信息kinect. colorframeready + 二新Eve nt Handler < colorimageframereadyeventargs >(kinect_colorframeready); kinect.skeletonframeready + 二新Eve nt Handler <skeletonframereadyeventargs >(kinect_skeletonframeready); / /启动Kinect设备start () Kinect;}其他的{MessageBox显示("没有发现任何Kinect设备”);}}无效kinect_skeletonfrdmeready(object sender, skeletonframereadyeventargs E){使用(skeletonframe 框架二 E openskeletonframe ()){如果(帧二NULL)返回;(frame, skeletonarraylength = = 0)返回;骨架[]allskeletons 二新的骨架skeletonarraylength ][帧;CopySkeletonDataTo (allskeletons)框架;The //Linq syntax searches for the closest tracked skeleton from Kinect, using the head Z coordinates as a referenceSkeleton closestSkeleton = (from, s, in, allSkeletons)Where = SkeletonTrackingState・ Tracked && s. TrackingStateS. Joints[JointType.Head]・TrackingState ==JointTrackingState・ TrackedSelect s. 0rderBy (s) = > s. Joints[JointType.Head]・ Position. Z)・ FirstOrDefault ();If (closestSkeleton = null)Return;If (closestSkeleton. TrackingState ==SkeletonTrackingState・ Tracked)Return;Var joints = closestSkeleton. Joints;Joint rightHand = joints[JointType.HandRight];Joint leftHand = joints[JointType.HandLeft];The Y axis / / judgment is right or left-handed habits: one hand to lift the Y axis is largerVar hand = (rightHand .Position. Y > leftHand .Position. Y)RightHand?:leftHand;If (hand・ TrackingState = = JointTrackingState・ Tracked)Return;/ / get the screen width and heightInt screenWidth = (int) SystemParameters・PrimaryScreenWidth;Int screenHeight = (int)SystemParameters・ PrimaryScreenHeight;The position of "skeleton coordinate mapping / hand to screen coordinates; hand only need to move in a limited range can cover the entire screen area Float, posX = hand・ ScaleTo (screenWidth, screenHeight, 0. 2f,0.2f). Position. X;Float, posY = hand・ ScaleTo (screenWidth, screenHeight, 0・ 2f,0. 2f). Position. Y;/ / judge whether suspended in the picture button, then trigger the Click eventOnButtonLocationChanged (kinectButton, buttons, (int) posX, (int) posY);}}Void kinect_ColorFrameReady (object, sender,ColorImageFrameReadyEventArgs, e){Using (ColorImageFrame, colorFrame = e. 0penColorlmageFrame ()){If (colorFrame = null)Return;}The lower right corner of the screen display / color camera, using the CodingdFun. Kinect・Wpf extension methodVideoimage・ Source = colorFrame・ ToBitmapSource ();}}Public, Ma inWindow (){InitializeComponent ();KinectButton.click + = new routedeventhandler (kinectbutton _ clicked);}private void initializebuttons (){buttons = new list < s >{butto nl・button2・butto n3・button4・buttond・button6};}Ill (summary)///悬停选择按钮处理///->/ summary/ / / < param name = "hand" >〈 / > "1 前移动的悬浮手型光标param / / / < param name = "buttons" >< / > 图片按钮集合param/ / / < param name = >< / > skeletonhandx param/ / / < param name = "y" >< / > skeletonhandy paramprivate void onbuttonlocationchanged (hoverbutton hand, list < s > buttons, int x, int y){if (isbuttonoverobject (hand, buttons)hand, hovering () ; / / 触发mouse click 事件elsehand・ release ();/ /移动手型光标canvas・setleft (hand, x 一(hand・actualwidth / 2));canvas .settop (hand, y 一(hand・actualheight / 2));}private void kinectbutton _ clicked (object sender, routedeventargs and) {hoveredbutton. raiseevent (new routedeventargs (buttonbase・ clickevent, hoveredbutton));}public bool isbuttonoverobject (frameworke1ement hand, list < s > buttons) {if (iswindowsclosing !! window・getwindow (hand)・isactive)return false;/ /找到悬浮手型控件的中心点位置var handtopleft = new point (canvas・gettop (hand), canvas・getleft (hand);double handleft = handtopleft・ x + (hand・ actualwidth / 2);double handtop = handtopleft・ y + (hand・ actualheight / 2);//遍历图片按钮,判断hand图标是否悬浮在其中之一foreach (button target buttons){point targettopleft = target・pointtoscreen (new point ());if (handtop > targettopleft・ x&& handtop < x + target・ actualwidth targettopleft・&& handleft > targettopleft・ y&& handleft < targettopleft・ y + target・ actualheight){hoveredbutton = target;return true;}}return false;}private void promotebuttonclickevent (string info)1istboxhoverevent・ items・ add (string・ format C {0}: {1}"、info, datetime. now. tostring ("t")));}private void buttonl _ click (object sender, routedeventargs and){promotebuttone1ickevent ("button 1 clicked");}private void button2 _ click (object sender, routedeventargsand){promotebuttone1ickevent ("button 2 clicked");}private void button3_click(object sender, routedeventargs E){promotebuttonclickevent (n按钮 3 单击");}private void button4_click(object sender, routedeventargs E){promotebuttonclickevent (n按钮 4 单击“);}private void button5_click(object sender, routedeventargs E)promotebuttonclickevent (n按钮 5 单击");}private void button6_click(object sender, routedeventargs E){promotebut tone lickevent (n按钮 6 单击");}private void canvas_loaded(object sender, routedeventargs E){}private void stopkinect(){如果(Kinect)〜二null){如果(kinect. status = = kinectstatuso 连接){/ /关闭Kinect设备stop() Kinect;}}}private void window_loaded(object sender, routedeventargs E)initializebuttons();startkinect ();private void window_closing(object sender, systein. componentmode 1・canceleventargs E){iswindowsclosing 二真;stopkinect ();〈窗口X: class二u kinecthubdemoo 主窗口WindowState ="最大化”windowstyle = u singleborderwindow n xmlns 二"nxmlns:x = “;背景二“# lelc37”xmlns:控制二“CLR 命名空间:coding4fun o Kinecto WPF。
wpf 常用控件和使用方法
wpf 常用控件和使用方法WPF(Windows Presentation Foundation)是一种用于创建用户界面的框架,它提供了丰富的控件库和强大的功能,使开发人员能够轻松构建现代化的应用程序。
本文将介绍WPF中常用的控件和它们的使用方法。
一、Button(按钮)Button是WPF中最基本的控件之一,用于触发操作或执行命令。
它可以显示文本、图像或两者的组合。
创建一个Button控件很简单,只需在XAML中添加<Button>标签,并设置相应的属性即可。
例如:```<Button Content="Click me!" Click="Button_Click" />```这里,Content属性设置按钮显示的文本,Click属性指定按钮被点击时触发的事件。
我们可以在代码中编写Button_Click方法来处理按钮点击事件。
二、TextBox(文本框)TextBox用于输入和显示文本。
它允许用户在界面中输入文本,并可以通过绑定来实时获取或设置文本的值。
创建一个TextBox控件同样很简单,只需在XAML中添加<TextBox>标签,并设置相应的属性。
例如:```<TextBox Text="{Binding UserName}" />```这里,Text属性用于绑定文本框的值到一个名为UserName的属性。
通过这种方式,我们可以方便地获取和修改文本框中的内容。
三、ComboBox(下拉框)ComboBox用于从预定义的选项中选择一个值。
它可以显示一个下拉列表,用户可以通过点击该列表选择一个选项。
创建一个ComboBox控件同样很简单,只需在XAML中添加<ComboBox>标签,并设置相应的属性和选项。
例如:```<ComboBox SelectedItem="{Binding SelectedItem}" ><ComboBoxItem Content="Option 1" /><ComboBoxItem Content="Option 2" /><ComboBoxItem Content="Option 3" /></ComboBox>```这里,SelectedItem属性用于绑定选中的选项到一个名为SelectedItem的属性。
C#WPF建立无边框(标题栏)的登录窗口
C#WPF 建⽴⽆边框(标题栏)的登录窗⼝前⾔:笔者最近⽤c#写WPF 做了⼀个项⽬,此前未曾做过完整的WPF 项⽬,算是⼀边学⼀边⽤,⽹上搜了不少资料了不少资料,效率,效率当然当然是不敢恭维的,是不敢恭维的,有时会在⼀些很简单的问题上纠结很长时间,⾎与泪有时会在⼀些很简单的问题上纠结很长时间,⾎与泪的教训可不少的教训可不少。
不过,正如电视剧某榜⾥的⼀句话:既然我活了下来,就不会⽩⽩活着!笔者怎么也算挣扎过了,有些经验与教训可以分享,趁着记忆深刻总结写下来。
希望后来者少⾛弯路,提⾼⼯作效率。
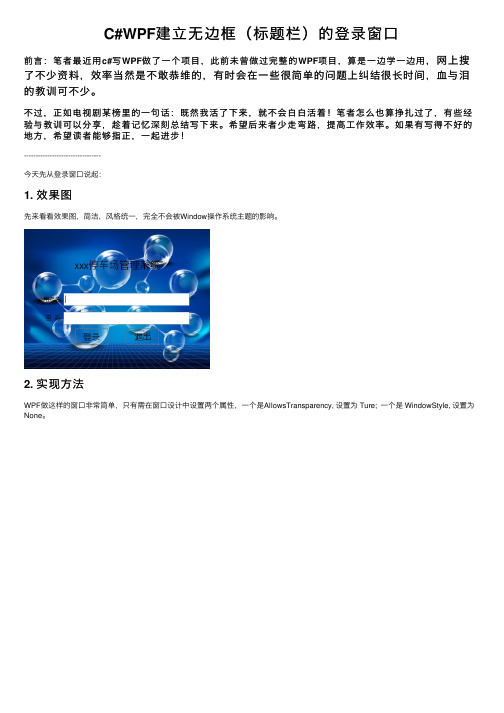
如果有写得不好的地⽅,希望读者能够指正,⼀起进步!---------------------------------今天先从登录窗⼝说起:1. 效果图先来看看效果图,简洁,风格统⼀,完全不会被Window 操作系统主题的影响。
2. 实现⽅法WPF 做这样的窗⼝⾮常简单,只有需在窗⼝设计中设置两个属性,⼀个是AllowsTransparency, 设置为 Ture; ⼀个是 WindowStyle, 设置为None 。
注:是Window的属性,不要选中其他的控件。
另外,如果AllowsTransparency="True",那么 WindowStyle只能为 None, VS2015 已经做到连动设置,只要勾选AllowsTransparency,后⼀个也跟着变了。
但 VS2008 还是需要⽤户分别设置,不然会报错。
还有⼀个问题不得不提,AllowsTransparency="True" 之后就⽆法使⽤ WindowsFormsHost控件了,因为就算⽤了,WFH⾥的任何控件也是透明⽆法显⽰出来的,⽐如ReportViewer!3.窗⼝任意空⽩地⽅实现⿏标拖拽标题栏上有最⼤化最⼩化和关闭的按钮,其中在登录窗⼝我们⼀般是不会使⽤最⼤化按钮的。
可是不得不说,标题栏还有⼀个很实⽤的作⽤,就是可以拖拽整个窗⼝,⽤户只要单击标题栏不放,就可以拖到桌⾯的任何地⽅。
- 1、下载文档前请自行甄别文档内容的完整性,平台不提供额外的编辑、内容补充、找答案等附加服务。
- 2、"仅部分预览"的文档,不可在线预览部分如存在完整性等问题,可反馈申请退款(可完整预览的文档不适用该条件!)。
- 3、如文档侵犯您的权益,请联系客服反馈,我们会尽快为您处理(人工客服工作时间:9:00-18:30)。
Create a LoginWindow in WPF Most business applications require some sort of security system. You can always use Windows Authentication to authenticate a user, but sometimes you might want your own authentication scheme. When you do, you will need to create a login screen for your user to enter her login id and password. This article will explore creating a login window in WPF.The UI for your login screen can contain any images and controls that you would like. In Figure 1 you can see a sample login screen that has an image of a key, a large title label across the top, two labels, a text box, a password box and twobutton controls. You can also make the border of the window rounded so that thereis no close, minimize or maximize button and no title bar.Figure 1: A Login Screen (WPFLogin.jpg)Of course this is just one version of a login screen but let’s take a look at how thisis put together.Create a Login Window in WPFCreating the WindowTo start, you need to create a window with no border and can be made into anyshape you want. To do this you will set a few different attributes. The WindowStyleattribute normally allows you to set a single border, three-D border, or a ToolWindow border. Setting this attribute to None will eliminate the border. TheShowInTaskbar attribute is optional, but if you are building a login screen youprobably won’t want this window to show up in the Task Bar as it is going to bemodal style form. The next two attributes, AllowsTransparency and Backgroundwork together. You must set AllowsTransparency to True to allow the Backgroundto be set to Transparent. If you do not set these two attributes, then your border willstill show up. Below is the xaml for this window.<Window ...WindowStartupLocation="CenterScreen"AllowsTransparency="True"ShowInTaskBar=FalseBackground="Transparent"WindowStyle="None"SizeToContent="WidthAndHeight"FocusManager.FocusedElement="{Binding ElementName=txtUserName}">......</Window>There are three additional attributes that are set on this window. TheWindowStartupLocation attribute is set to “CenterScreen” to ensure that the loginscreen is displayed in the middle of the screen when it is shown. You also set theSizeToContent attribute to WidthAndHeight to just take as much room for thiswindow as the controls need that are contained within this window. TheFocusManager.FocusedElement attribute is data-bound to the textbox control nextto the User Name label. This tells WPF to place the cursor in this textbox once thescreen is displayed.The BorderNow that you have the Window xaml defined you now can create the look for theoutside border of the window. A Border control is used to form the outside of thislogin screen. You will set the CornerRadius attribute to “10” to give the nicerounded corners. You can set the BorderBrush to “Gray” and the BorderThicknessto “3”. You also want to give this border a nice wide Margin to allow room for the2 Create a Login Window in WPFCopyright © 2009 by PDSA, Inc.All rights reserved. Reproduction is strictly prohibited.Using a Grid Layout DropShadowEffect that we add to the outside of this border. If you do not do this,then the drop shadow will be chopped off. To achieve the shadow effect on thiswindow, you will use the new Border.Effect and the DropShadowEffect that wasadded in WPF 3.5. This drop shadow effect is drawn using the GraphicalProcessing Unit (GPU) instead of being drawn using software. Thus drawing dropshadows is much more performant than in previous versions of WPF.<Border CornerRadius="10"BorderBrush="Gray"BorderThickness="3"Background="Beige"Margin="24"Padding="4"><Border.Effect><DropShadowEffect Color="Gray"Opacity=".50"ShadowDepth="16" /></Border.Effect>......</Border>Using a Grid LayoutTo place each of the login screen elements within the border, a Grid control is usedwith specific column and row definitions. There are three columns in this loginscreen. One for the image of the key, one for the labels and one for the TextBox,PasswordBox and Button controls.Create a Login Window in WPF 3 Copyright © 2009 by PDSA, Inc.All rights reserved. Reproduction is strictly prohibited.Create a Login Window in WPF<Grid><Grid.ColumnDefinitions><ColumnDefinition Width="60" /><ColumnDefinition Width="100" /><ColumnDefinition Width="*" /></Grid.ColumnDefinitions><Grid.RowDefinitions><RowDefinition /><RowDefinition /><RowDefinition /><RowDefinition /></Grid.RowDefinitions>......</Grid>Placing the Key ImageThe Key image that is in the upper left hand corner of this login screen is placedthere by using a StackPanel control and an Image control. The StackPanel givesus just a little more control over the placement within the Grid. Notice theGrid.Column, Grid.Row and Grid.RowSpan attributes that are set on theStackPanel. The Grid.Row and Grid.Column specify in which row and column ofthe grid you wish to display the StackPanel. The Grid.RowSpan allows the key tofloat down over the next three rows of the Grid control. If you were to use a smalleror larger key image, then you would probably need to adjust this attributeaccordingly. The Image control sets the source of its image to the Key.jpg filelocated in the /Images folder. A drop shadow effect is applied to this image controljust like you did with the Border control.4 Create a Login Window in WPFCopyright © 2009 by PDSA, Inc.All rights reserved. Reproduction is strictly prohibited.The Large Title Label <StackPanel Grid.Column="0"Grid.Row="0"Grid.RowSpan="3"><Image Name="imgKey"Margin="8"Source="/Images/Key.jpg"><Image.Effect><DropShadowEffect Color="Gray"Opacity=".50"ShadowDepth="8" /></Image.Effect></Image></StackPanel>The Large Title LabelThe large label across the top of the login screen is simply a Label control with theappropriate Grid.Row, Grid.Column and Grid.ColumnSpan attributes set forplacement. A FontSize of 18 is applied to make the text appear larger than theother labels on this screen. A Margin of 10 is used to give us some spacing fromthe border of the grid.<Label Grid.Column="1"Grid.Row="0"Grid.ColumnSpan="2"FontSize="18"Margin="10">Please Login To Access This Application</Label>The Login Data ControlsThe controls that gather the user name and password should be fairly familiar toyou if you have been doing any WPF at all. Each control is placed into a specificrow and column of the Grid control. Notice the use of the Tooltip attribute on theTextBox and the PasswordBox control. This gives the user an idea of what to putinto each control if they hover their mouse over that control.Create a Login Window in WPF 5 Copyright © 2009 by PDSA, Inc.All rights reserved. Reproduction is strictly prohibited.Create a Login Window in WPF<Label Grid.Column="1"Grid.Row="1">User Name</Label><TextBox Grid.Column="2"Grid.Row="1"ToolTip="Enter Your User Name"Name="txtUserName" /><Label Grid.Column="1"Grid.Row="2">Password</Label><PasswordBox Grid.Column="2"Grid.Row="2"ToolTip="Enter Your Password"Name="txtPassword" />The ButtonsThe two buttons at the bottom of the screen are placed into the last row of the Gridcontrol and into the second column of the grid by wrapping them into a StackPanel.The StackPanel has its HorizontalAlignment attribute set to Center and it’sOrientation attribute to Horizontal to allow the buttons to be centered within theStackPanel and to have the buttons appear side-by-side to each other.6 Create a Login Window in WPFCopyright © 2009 by PDSA, Inc.All rights reserved. Reproduction is strictly prohibited.Writing the Code for the Login Screen <StackPanel Grid.Column="2"Grid.Row="3"Margin="10"HorizontalAlignment="Center"Orientation="Horizontal"><Button Name="btnCancel"IsCancel="True"Content="Cancel"Click="btnCancel_Click"><Button.Effect><DropShadowEffect Color="Gray"Opacity=".50"ShadowDepth="8" /></Button.Effect></Button><Button Name="btnLogin"IsDefault="True"Content="Login"Click="btnLogin_Click"><Button.Effect><DropShadowEffect Color="Gray"Opacity=".50"ShadowDepth="8" /></Button.Effect></Button></StackPanel>There are two special attributes that are set on these buttons. The IsCancelattribute is set to true on the Cancel button. Setting this attribute to true will fire theclick event procedure on the Cancel button if the user presses the Escape key. TheIsDefault attribute is set to true on the on the Login button. Setting this attribute totrue will fire the click event procedure on the Login button if the user presses theEnter key.Writing the Code for the Login ScreenIn each of the click event procedures you will need to close the screen. In theCancel click event procedure you will set the DialogResult property of the screen toa false value. This will inform the calling procedure that the user clicked on theCancel button on this screen. In the Login click event procedure you will set theDialogResult property of the screen to a true value. This informs the callingprocedure that the user clicked on the Login button and was authenticated. I amleaving it up to you to write the code for authenticating the user. Here is the codefor the Cancel event procedure.Create a Login Window in WPF 7 Copyright © 2009 by PDSA, Inc.All rights reserved. Reproduction is strictly prohibited.Create a Login Window in WPFC#private void btnCancel_Click(object sender, RoutedEventArgs e){DialogResult = false;this.Close();}Visual BasicPrivate Sub btnCancel_Click(ByVal sender As System.Object, _ByVal e As System.Windows.RoutedEventArgs)DialogResult = FalseMe.Close()End SubAnd, here is the code for the Login event procedure.C#private void btnLogin_Click(object sender, RoutedEventArgs e){// Write code here to authenticate user// If authenticated, then set DialogResult=trueDialogResult = true;this.Close();}Visual BasicPrivate Sub btnLogin_Click(ByVal sender As System.Object, _ByVal e As System.Windows.RoutedEventArgs)DialogResult = TrueMe.Close()End SubDisplaying the Login ScreenAt some point when your application launches, you will need to display your loginscreen modally. Below is the code that you would call to display the login form(named frmLogin in my sample application). This code is called from the mainapplication form, and thus the owner of the login screen is set to “this”. You thencall the ShowDialog method on the login screen to have this form displayedmodally. After the user clicks on one of the two buttons you need to check to seewhat the DialogResult property was set to. The DialogResult property is a nullabletype and thus you first need to check to see if the value has been set.8 Create a Login Window in WPFCopyright © 2009 by PDSA, Inc.All rights reserved. Reproduction is strictly prohibited.Displaying the Login Screen C#private void DisplayLoginScreen(){frmLogin frm = new frmLogin();frm.Owner = this;frm.ShowDialog();if (frm.DialogResult.HasValue && frm.DialogResult.Value)MessageBox.Show("User Logged In");elsethis.Close();}Visual BasicPrivate Sub DisplayLoginScreen()Dim frm As New frmLogin()frm.Owner = Mefrm.ShowDialog()If frm.DialogResult.HasValue And frm.DialogResult.Value ThenMessageBox.Show("User Logged In")ElseMe.Close()End IfEnd SubCreate a Login Window in WPF 9 Copyright © 2009 by PDSA, Inc.All rights reserved. Reproduction is strictly prohibited.Create a Login Window in WPFSummaryCreating a nice looking login screen is fairly simple to do in WPF. Using theDropShadowEffect can add a nice finished look to not only your form, but imagesand buttons as well. Using a border-less window is a great way to give a customlook to a login screen or splash screen. The DialogResult property on WPFWindows allows you to communicate back to the calling routine what happened onthe modal screen. I hope this article gave you some ideas on how to create a loginscreen in WPF.10 Create a Login Window in WPFCopyright © 2009 by PDSA, Inc.All rights reserved. Reproduction is strictly prohibited.。
