EPSON机械手选件TP2中文手册
epson机械手程序讲解
epson机械手程序讲解Epson机械手是一种工业机器人,通常用于自动化生产线上的装配、搬运和加工等任务。
它们可以根据预先设定的程序执行各种复杂的动作,从而提高生产效率和质量。
下面我将从不同角度讲解Epson机械手的程序。
首先,Epson机械手的程序可以通过专门的机器人编程软件进行编写和编辑。
这些软件通常提供了图形化的用户界面,使操作人员可以直观地创建机器人动作序列,设置运动路径、速度、加减速度和姿态等参数。
此外,一些软件还支持基于模拟的程序验证,以确保程序的准确性和安全性。
其次,Epson机械手的程序通常包括了各种运动指令、逻辑控制和传感器反馈等元素。
例如,可以通过编程指定机械手的起始位置、目标位置和中间路径,还可以添加逻辑判断,使机械手根据不同的情况执行不同的动作,同时还可以集成传感器反馈,实现对工件位置、质量等信息的实时监测和响应。
此外,Epson机械手的程序还可以与其他设备进行接口和通讯,实现自动化生产线的协调作业。
通过编写程序,可以实现机械手与输送带、加工设备、检测设备等的联动操作,从而实现整个生产过程的自动化控制和优化。
最后,Epson机械手的程序还需要考虑安全性、稳定性和可维护性等方面。
在编写程序时,需要充分考虑机械手在工作过程中的安全保护措施,避免发生意外伤害。
同时,还需要考虑程序的稳定性和可维护性,确保程序的稳定运行和便于日常维护和升级。
总的来说,Epson机械手的程序编写涉及到多个方面,包括机器人编程软件的使用、运动控制、逻辑控制、传感器接口、设备通讯、安全性和稳定性等。
通过合理的程序设计和编写,可以充分发挥Epson机械手在自动化生产中的作用,提高生产效率和质量。
EPSON机械手选件TP2中文手册

iv
RC700/RC90 选件 TP2 Rev.2
东南亚 印度
Epson Singapore Pte Ltd. Factory Automation System 1 HarbourFrontPlace, #03-02 HarbourFront Tower one, Singapore 098633 TEL : +65-(0)-6586-5696 FAX : +65-(0)-6271-3182 EPSON Korea Co, Ltd. Marketing Team (Robot Business) 11F Milim Tower, 825-22 Yeoksam-dong, Gangnam-gu, Seoul, 135-934 Korea TEL : +82-(0)-2-3420-6692 FAX : +82-(0)-2-558-4271 EPSON SALES JAPAN CORPORATION
前言
感谢您购买本公司的机器人系统。 本手册记载了正确使用示教器所需的事项。 使用系统之前,请阅读本手册与相关手册,正确地进行使用。 阅读之后,请妥善保管,以便随时取阅。
保修
本机器人系统及其选装部件是经过本公司严格的质量控制、测试和检查,并在确认 性能满足本公司标准之后出厂交付的。 在交付产品的保修期内,本公司仅对正常使用时发生的故障进行免费修理。 (有关保 修期方面的信息,请咨询当地的销售办事处。 ) 但在以下情况下,将对客户收取修理费用(即使发生在保修期内): 1. 因不同于使用说明书内容的错误使用以及使用不当而导致的故障与损伤。 2. 客户擅自改造或拆卸造成的故障。 3. 因调整不当/擅自修理而导致的损坏。 4. 因地震、洪水等自然灾害导致的损坏。 警告、小心、使用: 1. 如果机器人系统相关设备的使用超出本手册所述的使用条件及产品规格,将导致 保修无效。 2. 本公司对因未遵守本手册记载的“警告”与“注意”而导致的任何故障或事故,甚至 是人身伤害或死亡均不承担任何责任,敬请谅解。 3. 本公司不可能完全预见危险与故障发生的所有状况,此可预见性存在局限性。因 此,本手册不能警告用户所有可能的危险。
西铁城 水平多关节型机器人 LS系列 机器人手册 (中文版)说明书
机器人手册 LS 系列 Rev.8水平多关节型机器人LS系列机器人手册Rev.8Copyright 2011-2015 SEIKO EPSON CORPORATION. All rights reserved. LS Rev.8i前言感谢您购买本公司的机器人系统。
本手册记载了正确使用机器人所需的事项。
安装该机器人系统前,请仔细阅读本手册与其他相关手册。
阅读之后,请妥善保管,以便随时取阅。
保修本机及其选装部件是经过本公司严格的质量控制、测试和检查,并在确认性能满足本公司标准之后出厂交付的。
在交付产品的保修期内,本公司仅对正常使用时发生的故障进行免费修理。
(有关保修期事项,请咨询您的区域销售办事处。
)但在以下情况下,将对客户收取修理费用(即使在保修期内):1. 因不同于手册内容的错误使用以及使用不当而导致的损坏或故障。
2. 客户未经授权进行拆卸导致的故障。
3. 因调整不当或未经授权进行修理而导致的损坏。
4. 因地震、洪水等自然灾害导致的损坏。
警告、小心、使用:1. 如果机器人或相关设备的使用超出本手册所述的使用条件及产品规格,将导致保修无效。
2. 本公司对因未遵守本手册记载的“警告”与“注意”而导致的任何故障或事故,甚至是人身伤害或死亡,均不承担任何责任,敬请谅解。
3. 本公司不可能预见所有可能的危险与后果。
因此,本手册不能警告用户所有可能的危险。
ii LS Rev.8商标Microsoft、Windows及Windows标识为美国Microsoft Corporation在美国和∕或其它国家的注册商标或商标。
其它品牌与产品名称均为各公司的注册商标或商标。
注意事项禁止擅自复印或转载本手册的部分或全部内容。
本手册记载的内容将来可能会随时变更,恕不事先通告。
如您发现本手册的内容有误或需要改进之处,请不吝斧正。
垂询方式有关机器人的修理∕检查∕调整等事项,请与服务中心联系。
未记载服务中心时,请与当地销售商联系。
爱普生培训资料:EPSON机械手软件操作指南
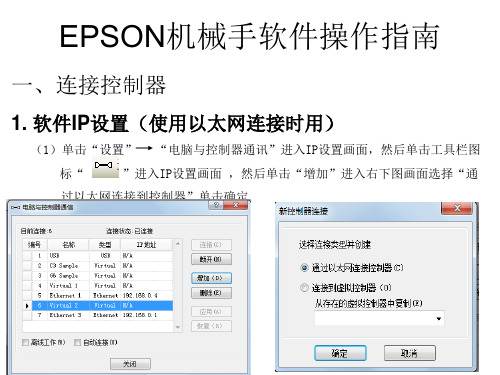
四、RC+5.4.3软件操作 (5)在“点数据”页面单击“保存”按钮,完成示教点。
四、RC+5.4.3软件操作
五、 马达重置及伺服OFF
工具 →机器人管理器→控制面板或单击工轴刹车释放后要按住 伺服指示灯旁边白色按
钮才能手动移动Z轴
运行功率设置
四、RC+5.4.3软件操作
1、 示教点步骤
(1)在“点数据”页面中“点文件”下拉菜单中选择需要教点的点文件
单击选择点文件
四、RC+5.4.3软件操作
(3)微动将机械手移动的需要示教点的位置。如果是SCARA机械手,Motor On情况下,可以在 Control Panel 页面Free All释放所有轴后,手动将机械手移动需要示教点的位置后,Lock ALL锁定所有轴。
EPSON机械手软件操作指南
一、连接控制器
1. 软件IP设置(使用以太网连接时用)
(1)单击“设置” “电脑与控制器通讯”进入IP设置画面,然后单击工具栏图
标“
”进入IP设置画面 ,然后单击“增加”进入右下图画面选择“通
过以太网连接到控制器”单击确定
四、RC+5.4.3软件操作
(2)设置新增以太网连接名称及IP地址 ,控制器出厂默认控制器IP设置如右下图所示 设置好IP后单击应用,如果控制器IP忘记了,可以先用USB线连接控制器然后在 “设置”|控制器|configuration里可以查看控制器IP,电脑IP的前三位要与控制 器的前三位相同,例如“192.168.0.10”
四、RC+5.4.3软件操作 2、选择“控制器”单击“下一个”进入如下画面
四、RC+5.4.3软件操作
3、修改程序名称(可不修改)设定存储磁盘后,单击“下一个” 进入如下画面,然后单击“导入”即可将控制器内的程序读取出 来。
EPSON ROBOT TP2 教导器使用说明
10
The End
Thank you very much!
11
5
Operation
•操作面板
6
Auto 模式
•F1:查詢異常履歷 顯7
TEACH模式:功能鍵
F1:點位資料 F2:I/O F3:運動模式 F4:解除/鎖定各軸 F5:煞車釋放 F6:ECP
•P.S.示教時需將”做動允許按鈕”壓下第一 段,若放開或壓下第二段,機器人無法做動。
TP2外型
TP2與控制器連接示意圖
TP2控制器連接頭規格
TP2標準規格
3
Specification
1. 顯示螢幕 2. 警停按鈕 3. 做動允許按鈕(ENBAL) 4. AUTO/TEACH切換開關 5. 操作面版 6. 連接器(控制器) 7. 連結電纜(5公尺)
4
Installation
1.安裝於控制器面版上TP連接埠。 2.可於控制器啟動時安裝、卸載(於Auto模式下)。 3.於TP連接埠安裝急停短路端子,則控制器可在沒有 TP2的 狀態下操作。
EPSON ROBOT TP2 使用說明
1
Outline
•TP2 (教導器)基本介紹 •1.Specification •2.Installation •3.Operation a. 操作面版 b. Auto 模式 c. TEACH模式 d. 教點流程
2
TP2 (教導器)基本介紹
• 功能:教導點位、執行指令、執行 程式(分兩種模式) • 不能做程式的編輯 • TP2搭配控制器:RC180、RC90 • TP2的控制器連接頭為D-sub頭 • 連接頭長度為5m
8
TEACH模式:教示功能鍵
Teach:教點 Save:儲存點位資料 Load:載出點位資料 Speed:切換速度(H/L) Mode:切換座標系(W/T/L/J) Dist:切換步進距離(C/L/M/S) Reset:還原初始設定 Motor:切換Motor ON/OFF Home:機器人回到起始點
手册_EPSON培训手册

12
五、SPEL+語言
4.變數的類型 變數有很多種類型,使用前先說明類型,格式為:數據類型變量名。例如: Integer i,定義變量i為整型數據。另外,代入的數據和變量的類型必須一致。在下 表中列出SPEL+ 語言中使用的數據類型。
13
六、動作指令
1. 動作指令分類
使機械手臂動作的指令叫作動作指令。 可分為:PTP動作指令,CP動作指令,Curves動作指令,Joint動作指令。
17
六、動作指令
5. 速度設定指令 5.1 PTP指令的速度設定
Speed 功能用於設定PTP動作速度的百分比 格式:Speed s,[a,b] 說明:s 速度設定值;a 第三軸上升速度設定值;b 第三軸下降速度設定值。 範例:1. Speed 80 2. Speed 80,40,30
圖2
NOTE:
1、Jump不能用於6軸機械手臂,6軸機械手臂只能使用Jump3和Jump3 CP指令 2、Jump3CP指令用法與Jump3類似,不同在於Jump3CP是3個CP動作的组合 3、SCARA機械手臂Z軸上升或下降動作時,使用Jump指令可以提高運动速度
3.4 BMove 、TMove、CVMove 指令
表1
7
二、硬體概要
系统組成圖示
8
三、EPSON RC+ 用戶界面
9
四、示教
1. 微調Jog &Teach介面
打開Jog&Teach介面: Tools →Robot Manager →Jog&Teach或點選工具檔
圖標後,選擇Jog&Teach介面。如下圖示
Mode說明:
World:在當前的局部坐標系、工具坐標系、機械手臂属性、ECP坐標系上,向X、Y、Z轴的方向微調動 作。如果是SCARA型機械手臂,也可以向U方向微動。如果是垂直6軸型機械手臂,則可以向U方向(傾 斜)、V方向(仰卧)、W方向(偏轉)微動。 Local: 向定義的局部坐標系的方向微動移動。 Tool : 向工具定義的坐標系的方向微動移動。 Joint : 各機械手臂的關節單獨微調移動。不是直角坐標型的機械手臂使用Joint模式時,顯示單獨的 微調按钮。 ECP : 在用當前的外部控制點定義的坐標系上,微調動作。
epson机械手培训课件

epson机械手培训课件汇报人:2023-11-16•机械手概述•epson机械手基本操作•机械手高级操作技巧•机械手编程实例目•epson机械手调试与维护•epson机械手应用案例分析录机械手概述机械手定义机械手特点机械手定义与特点机械手起源机械手发展机械手的历史与发展机械手的应用范围工业领域01医疗领域02其他领域03epson机械手基本操作机械手编程语言简介RAPID编程语言RAPID编程语言基本结构机械手操作流程1. 打开电源,启动机械手控制系统。
2. 连接机械手与计算机,进行系统初始化。
6. 运行程序,观察机械手实际运行情况。
7. 记录数据,分析结果。
机械手操作规范1. 在进行机械手操作前,务必确保机械手及其周边环境的安全性。
2. 请勿在机械手运行时进行维护和调试。
3. 在使用机械手进行生产作业时,请严格按照操作规程执行,避免因误操作导致的事故。
基本指令1. MOVE:移动机械手到指定位置。
2. Pose:设置机械手的姿态(位置、角度)。
4. If5. GOTO1. 运动控制:可以实现直线插补、圆弧插补、旋转等运机械手高级操作技巧运动学基础介绍机械手运动学的基本原理,包括正运动学和逆运动学,以及机械手位姿的描述方法。
动力学基础介绍机械手动力学的基本原理,包括力和运动的关系,以及机械手动力学模型的建立方法。
机械手运动学与动力学基础机械手轨迹规划方法基于几何的轨迹规划介绍基于几何的机械手轨迹规划方法,如直线插补和圆弧插补等。
基于运动的轨迹规划介绍基于运动的机械手轨迹规划方法,如加速度和速度规划等。
介绍机械手速度控制的基本原理,如PID 控制器和模糊控制器等,以及实现方法。
加速度控制介绍机械手加速度控制的基本原理,如加速度限制和冲击限制等,以及实现方法。
速度控制机械手速度与加速度控制VS机械手编程实例确定搬运任务选择合适的机械手编写搬运程序程序调试与优化简单搬运程序编写编写装配程序程序调试与优化分析分拣任务根据任务特点选择适合的传感器型号。
艾尔发注塑机械手说明书

5高级应用及编程5.1系统设定在任意操作画面的下方菜单栏点击“系统”按钮进入如下操作画面在该画面中可以设置:1、警报设置a)警报静音(关):有异常报警时,蜂鸣器会响;b)警报静音(开):即使有异常报警时,蜂鸣器不会响。
2、横出方式设置a)横出警示(关):机械手正常横出;b)横出警示(开):机械手每次横出时发出警示,蜂鸣器响一次。
3、机械手状态设置a)机械手使用(关):机械手不使用;b)机械手使用(开):机械手处于使用状态。
4、Mx可合模的安全位置:引拔退回到该位置后才送允许关模,此功能是为防止类似有送模机的机台,关模时撞到机械手臂而设计的。
5、检知方式设定a)全程检知:机械手从开始取产品一直到产品放掉整个过程中都检测产品是否脱落,如果脱落则警报,机械手暂停。
b)模内检知:机械手只在从开始取物到其横出过安全门这段过程中对产品进行检测,如果产品脱落则警报;在安全门之外,不对产品进行检测。
c)不检知:机械手不检查是否取到产品。
6、禁区功能设置a)开:禁区中设置的参数有效,机械手运行必须在禁区参数设定范围内,否则警报。
b)关:禁区中设置的参数无效,其设置不影响机械手运行。
点击屏幕下方菜单栏中的按键“进阶操作”,进入下面页面1)全自动下可修改的距离范围机械手全自动运行时,能修改轴位置最大距离。
超过时给出提示。
2)机械手本体的IO延迟时间:侧姿,回正信号在O点动作过设定时间后没检到I点发警报。
3)横出轴的原点反相:若选中该项,则机械手归原点时Y轴会往Y+方向找原点。
4)使用模内下行待机功能:若选中该项,则需设置待机点坐标,每次循环都会先回到待机点位置。
5)安全门打开的处理方式a)安全门打开后立即停止:全自动运行时安全门打开后立即停止,后续不在执行,要重新启动运行。
b)安全门关闭后继续加工:全自动运行时安全门打开立即暂停,关门后机械手继续执行后面动作。
6)副臂使用方式:当勾选时,机械手具有相应机型的功能5轴副臂使用伺服;3轴副臂不使用;3轴副臂加汽缸。
艾尔发注塑机机械手说明书

4.维护篇4.1系统相关参数设定按键返回到下面操作键。
4.1.1操作设定按“系统”键进入下画页。
4.1.2禁区设定按“禁区”键进入下画页。
在此画面设定各轴禁区位置。
4.1.3极限设定按“极限”键进入下画页。
在此画面设定各轴最大最小值。
4.1.4出厂设定按“出厂”键进入下画页。
在此面可以看机械出厂前相关信息。
4.1.5语言切换按“语系”键进入文字切换。
4.1.6系统参数备份按“备份”键进入系统参数备份。
在主机USB接口插入U盘,选汇出到USB,选要汇出内容点击“开始传输”键,把数据传到U盘。
如下图所示:若U盘内有改好的Ladder,可以由USB汇入。
更改PLC后由此传到控制器。
4.1.7系统升级按键返回,再按“>>”键切换下一功能键,点击“升级”键。
在主机USB接口插入U盘,盘内有要升级的程序,点“确定”开始程序升级。
4.2系统维护在操作切换栏按“维护”键进入下面画页。
在此画面可以观看系统变量内的值,程序执行时是否按要求变化。
发生故障时查找原因。
按“I/OMap”键进入下面画页。
在DIMap,DOMap内offset位看I/O点实际对应硬件接线位置。
按键返回,再按“切换用户”键进入下面画页。
在此画页内更改操作权限。
10~19为机械厂使用权限。
20~29为编辑权限。
99为一般用户权限。
改变使用者等级输入密码"****"点击OK键后出现如下画页在此等级下,进入编辑,修改。
按键返回,再按“操作权限”键进入下面画页。
此画页设定不同画页采用不同使用权限。
按键返回,再按“变更密码”键进入下面画页。
用户根据要求设定新密码。
按键返回,再按“阶梯图”键进入下面画页。
通过此画页看程序运行,以及PLC输入输出等状态。
4.3教好程序备份在教导画页内按“档案”键进入下面画页。
在此画页按“汇入汇出”键进入下面画面。
在主机USB接口插入U盘,选汇出到USB,选要汇出内容点击“开始传输”键,把数据传到U盘。
EPSON机器人产品说明书
EPSON RC+ 7.0 SPEL +语言参考Rev.4 C1M218S4861FVer.7.5EPSON RC+ 7.0 (Ver.7.5) SPEL+语言参考Rev.4EPSON RC+ 7.0 (Ver.7.5)SPEL+语言参考Rev.4Copyright 2012-2021 SEIKO EPSON CORPORATION. All rights reserved. EPSON RC+ 7.0 (Ver.7.5) SPEL+ 语言参考 Rev.4i前言感谢您购买本公司的机器人产品。
本手册记载了正确使用 EPSON RC+7.0 软件所需的事项。
请阅读本手册及相关手册后正确使用系统。
阅读之后,请妥善保管,以便随时取阅。
本公司的产品均通过严格的测试和检查,以确保机器人系统的性能符合本公司的标准。
但是如果在超出本手册所描述的环境中使用本产品,则可能会影响产品的基本性能。
本手册阐述了本公司可以预见的危险和问题。
请务必遵守本手册中的安全注意事项,安全正确地使用机器人系统。
商标Microsoft、Windows、Windows 标识、Visual Basic、Visual C++ 为美国MicrosoftCorporation 在美国及其它国家的注册商标或商标。
Pentium为美国英特尔公司的商标。
其它公司名称、商标名称、产品名称均为各公司的注册商标或商标。
关于标记Microsoft® Windows® 8 Operating systemMicrosoft® Windows® 10 Operating system在整个手册中,Windows 8以及Windows 10分别指上述相应的操作系统。
在某些情况下,Windows泛指Windows 8和Windows 10。
注意事项禁止擅自复印或转载本手册的部分或全部内容。
本手册记载的内容将来可能会随时变更,恕不事先通告。
EPSON机械手导入培训教材(PPT55页)

为什么使用要机器人
• 替代人工,解决近几年人工成本的增长和招工难的问题 • 人不愿意做的工作,恶劣环境下的工作,比如噪音大的环
境,污染的环境等等。 • 需要精度较高,人手难以实现的工作,比如中源的帖胶项
目很难用治具人工操作。 • 集成度高使用方便,减少设备开发周期。 • 稳定性 • 机器人可工作24小时 • 消费者对商品多样化的需求
2
什么是工业机器人
工业机器人(industrial robot,简称RI):
是集机械、电子、控制、计算机、传感器、人工智能等多个学科先进 技术于一体的现代制造业重要的自动化装备 ;广泛适用的能自主动作,且 多轴联动的机械设备 ;自从1962年美国研制出世界第一台工业机器人以来, 机器人技术及其产品发展很快,已经成为柔性制造系统(FMS),自动化 工厂(FA),计算机集成制造系统(CIMS)的自动化工具。
应用领域:
装货、卸货、焊接、包装、固定、 涂层、粘结、封装、特种搬运操作、装 配等。
8
工业机器人的的特点
6轴机器人特点:
有6个关节(六个自由度)X、Y、Z、U、 V、W,适合于几乎任何轨迹或角度的工作可 以自由编程,完成全自动化的工作 ,提高生 产效率。
应用领域:
应用领域有装货、卸货、喷漆、表面处 理、测试、测量、弧焊、点焊、包装、装配、 切屑机床、固定、特种装配操作、锻造、铸造 等。
second 7900 mm/s
RC180/ RC620
G10/20
10~20Kg
± 0.025 mm
650~1000 mm 0.38
second 11000 mm/s RC180/ RC620
RS3
3Kg
± 0.01 mm 350 mm 0.36
可普通模式的Epson项目器用户指南说明书

Quick SetupIMPORTANT: Before using the projector, make sure you read these instructions and the safety instructions in the online User’s Guide.Note: Product availability varies by country and region.Note: The illustrations show the EB-760W, but the steps are the same for all models, unless otherwise specified.Connect the projectorComputerChoose from the following connections. See the sections below or the online User’s Guide for details.VGA cableUSB cableHDMI cableHDMI® portConnect one end of an HDMI cable to one of the projector’s HDMIthe other end to an HDMI port on your computer.Computer portComputeraudio cable.Note: To use the projector’s Computer2 port, change the Monitor Out Portsetting in the Signal I/O menu. See the online User’s Guide for details.USB portConnect the square end of a USB cable to the projector’s USB-B (square) port.Connect the flat end of the cable to any USB port on your computer.Windows® 7 or later: After turning on the projector, follow the on-screeninstructions to install the Epson® USB Display software (EMP_UDSE.EXE;only on first connection). If the software screen does not displayautomatically, open My Computer, Computer, or This PC, then double-clickEPSON_PJ_UD.OS X 10.8.x or higher: After turning on the projector, the setup folder forUSB Display appears in the Finder. Double-click USB Display Installer andfollow the on-screen instructions to install the Epson USB Display software(only on first connection). If the software screen does not display automatically,double-click EPSON_PJ_UD, then double-click USB Display Installer.External monitor and speakersYou can connect an external monitor and external speakers to your projector toenhance your presentations. See the online User’s Guide for details.Wired networkConnect the projector to your network using an Ethernet cable. See “WiredVideo deviceConnect multiple video devices and use the Source Search button on theprojector or remote control to switch between them. For more information onplaying sound through the projector, see the online User’s Guide.Component videoto VGA cable3.5 mmaudio cableRCA video cable(composite video)HDMI cableNote: If you connected a streaming device to an HDMI port, you can alsoconnect it to the projector’s USB-A (flat) port for power.Camera, USB device, or document cameraConnect a digital camera, USB flash drive, USB storage device, or Epson DC-07document camera to the projector’s USB-A(flat) port.If you connect a digital camera, USB flash drive, or USB storage device, you canuse the projector’s PC Free feature. You can also connect other Epson documentcameras to the projector. See the online User’s Guide for details.Using the remote controlInstall the two AA batteries as shown.Choose which sourceto displayand offAccess projector menusdisplay and sound Access the HomescreenNavigate projectormenusControl projectorvolumeFor more information on using the remote control, see the online User’s Guide.Turn on your equipment1 T urn on your computer or video source.2 M ake sure the power cord is connected and plugged into anelectrical outlet.7 T he default language of the menu system is English. To select anotherlanguage, press the Menu button on the remote control. SelectManagement and press . Select Language and press . Select yourlanguage and press . Press the Menu button to exit the menu system.Network your projectorWireless network configurationF ollow these steps to set up the projector for a wireless network connection.1 P ress the Menu button on the remote control.2 S elect the Management menu and press .3 S elect On as the Wireless LAN Power setting.4 S elect the Network menu and press .5 S elect Network Settings and press .6 S elect Wireless LAN as the Priority Control Interface setting.7 S elect one of the following as the Simple AP setting:•O n for a direct connection to a computer, tablet, or smartphone.•O ff to connect your projector to a router or access point.N ote: If you connect to the projector directly, you can only projectlocally-stored content.IP Settings and press .f your network assigns addresses automatically, make sure thesetting is on. If not, make sure DHCP is off and enter the projector’sIP Address, Subnet Mask, and Gateway Address, as needed. Theno prevent the IP address from appearing on the network standby screen,IP Address Display setting to Off.hen you are finished, return to the Network Settings menu and selectto apply your settings. Then select Yes to save the settings.Menu button to exit the menu system.Install the optionalsoftwareYou can use Epson iProjection™ software to display wirelessly from a computerto your networked projector. Download the software and operation guide fromyour product’s support page (see “Where to get help”) and install the programon each computer that will project over the network.To monitor and control your projector over the network, download andinstall the Epson Projector Management software (Windows only) andoperation guide from your product’s support page (see “Where to get help”).Project over a networkIf you need to configure the projector for a wired network, see “Wired networkconfiguration.”1 P ress the LAN button on the remote control. You see a screen like this:2 S tart Epson iProjection on your computer.W indows11: Select > All Apps > EPSON Projector > EpsoniProjection Ver.X.XX.W indows10: Select > EPSON Projector > Epson iProjectionVer.X.XX.W indows 8.x: Navigate to the Apps screen and select EpsoniProjection Ver. X.XX.W indows7: Select or Start > Programs or All Programs > EPSON Projector > Epson iProjection > Epson iProjection Ver X.XX.m acOS 10.13.x or higher: Double-click the Epson iProjection icon in the Applications folder.3 S elect Advanced Connection Mode and click OK.4 S elect the projector you want to connect to, then click Join.I f you don’t see the projector you want, click the Automatic searchbutton to find the projector automatically, click the Manual searchbutton to enter the projector’s IP address, or click the Profile buttonto find the projector based on a previously saved profile.5 I f you see a message asking for a keyword, enter the four digits thatappear on the LAN standby screen and click OK.Your computer image is projected, with a floating toolbar:W hen you’re done presenting, click Leave on the toolbar. Using the Epson iProjection appYou can project wirelessly from a mobile device (iOS, Android™, or Chromebook™) using the Epson iProjection app and a QR code.1 S can the following QR code to download and install the EpsoniProjection app.2 I f you connected the projector to a network wirelessly, make sure toconnect your mobile device to the same network.3 P ress the LAN button on the remote control to display a QR code on theprojector screen.4 S tart Epson iProjection on your mobile device.5 Use the QR code reader feature to read the QR code displayed.6 F ollow the app instructions to connect your device to the projector.For more information on setting up and using this app, visit/projectorapp (U.S.), http://epson.ca/projectorapp (Canada), or /iprojection (Latin America).Using web remoteYou can use a standard web browser to control the projector through the network. A virtual remote control on your computer screen lets you perform many of the same functions as you can with the physical remote control.1 O pen your web browser and enter the IP address of the projector youwant to monitor in the browser’s address bar. The Epson Web Controlmenu opens.I f you’re not sure what the IP address of the projector is, turn theprojector on and select Wired LAN Info or Wireless LAN Info from the Network menu to display the IP address of the projector. (Do not enterthe leading zeroes.)2 S elect Basic Control or Remote. If you see a login screen, enterEPSONWEB as the user name and admin as the password.3 U se the on-screen buttons to operate the projector, as you would usingthe remote control. See the online User’s Guidefor details.Turn off pictureand soundSelect equipment connected toan HDMI portSelect wired or wireless networksignalSelect video signalSelect USB display signalPause videoManaging content(EB-770F/EB-775F)You can manage content from your computer using the Epson Projector Content Manager software, or over the network using a web browser (Epson Web Control) or the Epson iProjection app.Using the Content Manager softwareThe Epson Projector Content Manager software allows you to add images and movies to playlists and load them easily and directly to your projector via USB for playback.Note: Download and install the Epson Projector Content Manager software from your product’s support page (see “Where to get help”). For more information, see the online Epson Projector Content Manager Operation Guide or the online User’s Guide.Troubleshooting•If you see a blank screen, check the following:•M ake sure your computer or video device is properly connected.•M ake sure the Status light on the projector is blue and not flashing.•P ress the power button or the A/V Mute button on the remote control to wake the projector from standby or sleep mode, ifnecessary.•I f you see a blank screen when a computer is connected, check the following:•O n Windows, hold down the Windows key and press P at the same time, then click Duplicate.•I f you are using a Mac laptop with macOS 13, select System Settings > Displays. Press the + pop-up menu button, then choose a display tomirror.O n macOS 12, select System Preferences > Displays > DisplaySettings. Select the projector, then choose the mirror option for yourdisplay from the drop-down menu.O n macOS 11 and older, open System Preferences and selectDisplays. Click the Arrangement tab and select the MirrorDisplays checkbox.•I f the projector does not respond to remote control commands, make surethe batteries in the remote control are installed correctly. Replace thebatteries, if necessary.RegistrationRegister today to get product updates and exclusive offers. You can registeronline at /webreg.Where to get helpManualsFor more information about using the projector, you can view or download themanuals from the Epson website, as described below.Internet supportVisit /support (U.S.), http://epson.ca/support (Canada),or (Latin America) and search for your product todownload software and utilities, view manuals, get FAQs and troubleshootingadvice, or contact Epson.Telephone supportTo use the Epson PrivateLine® Support service, call (800) 637-7661 (U.S. andCanada). This service is available for the duration of your warranty period.You may also speak with a support specialist by calling (562) 276-4394 (U.S.) or(905)709-3839 (Canada).Support hours are 7 a.m. to 4 p.m., Pacific Time, Monday through Friday. Daysand hours of support are subject to change without notice. Toll or long distancecharges may apply.In Latin America, see the online User’s Guide for technical support information.Optional accessoriesFor a list of optional accessories, see the online User’s Guide.You can purchase screens or other accessories from an Epson authorized reseller.To find the nearest reseller in the U.S. or Canada, call 800-GO-EPSON(800-463-7766). Or you can purchase online at (U.S.sales) or http://epsonstore.ca (Canadian sales).To find the nearest reseller in Latin America, go to .EPSON is a registered trademark, Epson iProjection is a trademark, and EPSON Exceed Your Vision is a registeredlogomark of Seiko Epson Corporation.PrivateLine is a registered trademark of Epson America, Inc.Windows is a registered trademark of Microsoft Corporation in the United States and/or other countries.Mac, macOS, and OS X are trademarks of Apple Inc., registered in the U.S. and other countries.Android and Chromebook are trademarks of Google LLC.General Notice: Other product names used herein are for identification purposes only and may be trademarks oftheir respective owners. Epson disclaims any and all rights in those marks.This information is subject to change without notice.© 2022 Epson America, Inc., 11/22CPD-63093。
(中文)Epson机器人中文说明书
教育导入 RC90 / RC700EPSON RC+ 7.0 Rev.2RC90 / RC700 EPSON RC+ 7.0教育导入Rev.2Copyright © 2013-2014 SEIKO EPSON CORPORATION. All rights reserved.关于教材本教材的对象是控制器RC90/RC700的使用者,程序开发软件包EPSON RC+7.0的使用者,创建程序以及试校的人.注意本操作说明书不能擅自复制,转载一部分内容或者全部内容.本书所记载的内容,将来事先没有通知也有时会有变更.关于本书的内容,万一有错误,如果您有注意到的地方,麻烦联系我们.咨询本教材,以及机器人使用的相关咨询,请按以下信息联系.EPSON销售株式会社FA机器营业课〒160-8324东京都新宿区西新宿6-24-1西新宿三井大厦TEL : 03-5321-4161目录关于教材----------------------------------------------------------------------------- ii注意 ---------------------------------------------------------------------------------- ii咨询 ---------------------------------------------------------------------------------- ii第1章 1. 与机器人相关的基础知识 (1)1.1 接受机器人培训的意义 ----------------------------------------------------- 1劳动安全卫生法 ------------------------------------------------------------------------------ 1劳动安全卫生规则 --------------------------------------------------------------------------- 2安全卫生特别教育规定 --------------------------------------------------------------------- 31.2 工业机械手的定义 --------------------------------------------------------- 151.3 工业机械手的分类 --------------------------------------------------------- 15一般分类 ------------------------------------------------------------------------------------- 15从控制来分类 ------------------------------------------------------------------------------- 16从动作机构来分类 ------------------------------------------------------------------------- 161.4 关于坐标系 ------------------------------------------------------------------ 171.5 机械手坐标系 --------------------------------------------------------------- 17水平多关节型机械手 ---------------------------------------------------------------------- 17垂直多关节型机械手 ---------------------------------------------------------------------- 171.6 机械手的手臂姿势 --------------------------------------------------------- 18水平多关节型机械手 ---------------------------------------------------------------------- 18垂直多关节型机械手 ---------------------------------------------------------------------- 18特异姿势 ------------------------------------------------------------------------------------- 20特异姿势附近的PTP动作 ---------------------------------------------------------------- 20对于CP动作命令的LJM函数------------------------------------------------------------ 21特异姿势附近的CP动作(CP动作时的特异姿势通过机能) -------------------- 21第2章 2. 硬件的概要 (22)2.1 系统构成 --------------------------------------------------------------------- 222.2 控制器RC90 ----------------------------------------------------------------- 23各部分的名称和机能 ---------------------------------------------------------------------- 23LED -------------------------------------------------------------------------------------------- 25线缆的连接 ---------------------------------------------------------------------------------- 262.3 控制器RC700---------------------------------------------------------------- 28各部分的名称和机能 ---------------------------------------------------------------------- 28LED&7色LED的显示 ----------------------------------------------------- 31特殊状态的显示 ---------------------------------------------------------------------------- 32线缆的连接 ---------------------------------------------------------------------------------- 332.4 与安全相关的机能 --------------------------------------------------------- 352.5 电源的接入 ------------------------------------------------------------------ 372.6 EPSON RC+ 7.0的启动---------------------------------------------------- 37第3章 3. 软件概要 (38)3.1 EPSON RC+ 7.0的概要 ---------------------------------------------------- 383.2 设计资源管理器 ------------------------------------------------------------ 393.3 状态窗口 --------------------------------------------------------------------- 393.4 状态栏 ------------------------------------------------------------------------ 403.5 在线帮助 --------------------------------------------------------------------- 413.6 简单的程序作成和实行---------------------------------------------------- 423.7 机械手管理器 --------------------------------------------------------------- 43第4章 4. 试校 (44)4.1 控制面板 --------------------------------------------------------------------- 444.2 点动&试校-------------------------------------------------------------------- 46点动控制 ------------------------------------------------------------------------------------- 46 点动方法 ------------------------------------------------------------------------------------- 49 点动 ------------------------------------------------------------------------------------------- 50 TEACH 模式 ---------------------------------------------------------------------------------- 50 点的试校方法 ------------------------------------------------------------------------------- 50变更内容的保存/删除--------------------------------------------------------------------- 514.3 点的编集 --------------------------------------------------------------------- 52打开编辑用的点的文件 ------------------------------------------------------------------- 52 选择1行以上 ------------------------------------------------------------------------------- 53 选择所有行的话 ---------------------------------------------------------------------------- 53 定义新的点 ---------------------------------------------------------------------------------- 53 删除点 ---------------------------------------------------------------------------------------- 53点的[剪切]、[粘贴] ---------------------------------------------------------------------- 534.4程序的修正--------------------------------------------------------------------- 54第5章 5. SPEL+语言 (55)5.1 概要 --------------------------------------------------------------------------- 555.2 程序构造 --------------------------------------------------------------------- 555.3 函数名称 --------------------------------------------------------------------- 555.4 批注 --------------------------------------------------------------------------- 565.5 多陈述 ------------------------------------------------------------------------ 565.6 演算子 ------------------------------------------------------------------------ 565.7 进制 --------------------------------------------------------------------------- 575.8 变量 --------------------------------------------------------------------------- 57变量的数据型 ------------------------------------------------------------------------------- 57 变量的种类 ---------------------------------------------------------------------------------- 58 本地变量 ------------------------------------------------------------------------------------- 58 模块变量 ------------------------------------------------------------------------------------- 58 整体变量 ------------------------------------------------------------------------------------- 58 备份变量(Global Preserve) ------------------------------------------------------------ 58 变量的初期化 ------------------------------------------------------------------------------- 58 变量宣言 ------------------------------------------------------------------------------------- 59第6章 6. 动作命令 (60)6.1 动作命令 ----------------------------------------------------------------------60PTP动作命令---------------------------------------------------------------------------------60CP动作命令 ----------------------------------------------------------------------------------616轴机械手专用动作命令(PTP+CP)------------------------------------------------------626.2 速度设定命令 ----------------------------------------------------------------63PTP动作命令的速度设定------------------------------------------------------------------63CP动作命令的速度设定 -------------------------------------------------------------------64变更机械手速度的程序 --------------------------------------------------------------------656.3 Jump命令的修饰 ------------------------------------------------------------66拱形运动--------------------------------------------------------------------------------------66Z轴上限值的指定---------------------------------------------------------------------------676.4 指令窗口 ----------------------------------------------------------------------68第7章7. I/O (69)7.1 输入输出控制 ----------------------------------------------------------------697.2 输出 ----------------------------------------------------------------------------697.3 输入 ----------------------------------------------------------------------------727.4 Wait命令 ---------------------------------------------------------------------737.5 I/O 标签编辑器 -------------------------------------------------------------747.6 I/O 监视器 -------------------------------------------------------------------74第8章8. 程序的控制文 (75)For...Next-----------------------------------------------------------------------------------75If…Then…Else -----------------------------------------------------------------------------77Call--------------------------------------------------------------------------------------------79子程序-----------------------------------------------------------------------------------------79Do…Loop--------------------------------------------------------------------------------------81Print ------------------------------------------------------------------------------------------82Input ------------------------------------------------------------------------------------------82Print # ---------------------------------------------------------------------------------------83Input # ---------------------------------------------------------------------------------------83Cls ---------------------------------------------------------------------------------------------84第9章9. Pallet (85)9.1 Pallet的定义 ---------------------------------------------------------------859.2 Pallet内的位置确定 ------------------------------------------------------86 第10章10. 并列处理 (88)第11章11. 多重任务 (90)Xqt ------------------------------------------------------------------------------------ 90任务暂停,继续实行,结束 ----------------------------------------------------- 91Halt----------------------------------------------------------------------------------- 91Resume-------------------------------------------------------------------------------- 91Quit----------------------------------------------------------------------------------- 91任务管理器-------------------------------------------------------------------------- 94记忆卡I/O--------------------------------------------------------------------------- 96第12章12. 设计方案管理 (98)12.1 概要-------------------------------------------------------------------------- 98EPSON RC+ 7.0的设计方案 -------------------------------------------------------------- 98为什么需要设计方案 ---------------------------------------------------------------------- 98构成EPSON RC+ 7.0的设计方案的内容----------------------------------------------- 9812.2 新规设计方案的作成 ----------------------------------------------------- 9912.3 设计方案的设定 ----------------------------------------------------------- 9912.4 设计方案的建立 ---------------------------------------------------------- 10012.5 设计方案的复制的作成 ------------------------------------------------- 10112.6 设计方案的备份 ---------------------------------------------------------- 10112.7 设计方案的转换 ----------------------------------------------------------- 101第13章13. 远程控制 (102)13.1 概要------------------------------------------------------------------------- 10213.2 自动运转模式下的远程控制 ------------------------------------------- 10213.3 TEACH模式下的远程控制----------------------------------------------- 10313.4 遥控的程序调试 ---------------------------------------------------------- 10313.5 程序的选择---------------------------------------------------------------- 10313.6 远程输入------------------------------------------------------------------- 10413.7 远程输出------------------------------------------------------------------- 10713.8 设定远程控制软件设计 ------------------------------------------------- 110第14章14. 控制器的状态保存 (111)14.1 所谓的控制器状态保存机能 ------------------------------------------- 11114.2 在使用控制器状态保存机能之前 ------------------------------------- 111注意事项 ------------------------------------------------------------------------------------ 111可以使用的USB存储器 ------------------------------------------------------------------ 11114.3 控制器状态保存机能的使用 ------------------------------------------- 112用触发按钮保存控制器状态------------------------------------------------------------- 112控制器状态保存显示 --------------------------------------------------------------------- 112通过电子邮件的转送 --------------------------------------------------------------------- 11314.4 保存的数据的详细说明 ------------------------------------------------- 114第15章15. 模拟装置 (115)15.1 模拟装置机能------------------------------------------------------------- 115模拟装置上可执行的动作 --------------------------------------------------------------- 11515.2 模拟装置的使用方法---------------------------------------------------- 1161. 创建模拟控制器 --------------------------------------------------------------------- 1172. 设置使用的机器人 ------------------------------------------------------------------ 1183. 显示模拟画面 ------------------------------------------------------------------------ 1194. 创建程序 ------------------------------------------------------------------------------ 1195. 执行程序并操纵机器人 ------------------------------------------------------------ 12115.3 机能说明------------------------------------------------------------------- 122模拟装置画面的构成 --------------------------------------------------------------------- 122第16章Appendix ................................... A-1A-I 机器人管理器菜单 -------------------------------------------------------- A-1A-II 程序调试------------------------------------------------------------------A-34 断点的设定和解除 -----------------------------------------------------------------------A-34程序的STEP执行-------------------------------------------------------------------------A-35CALL STUCK的显示 ----------------------------------------------------------------------A-35变量的显示--------------------------------------------------------------------------------A-36 A-III 点 -------------------------------------------------------------------------A-38 点的定义-----------------------------------------------------------------------------------A-38根据点标签进行点的参照 --------------------------------------------------------------A-38根据变量进行点的参照 -----------------------------------------------------------------A-39在程序上的点 -----------------------------------------------------------------------------A-39点的保存和读入 --------------------------------------------------------------------------A-39点属性--------------------------------------------------------------------------------------A-39点坐标的取得和设定 --------------------------------------------------------------------A-41点的变更-----------------------------------------------------------------------------------A-41 A-IV 经常使用的指令---------------------------------------------------------A-42 P# (1. 定义点) --------------------------------------------------------------------------A-42P# (2. 指定点) --------------------------------------------------------------------------A-43优先工具姿势变化的加减速度的CP动作-------------------------------------------A-46SpeedR--------------------------------------------------------------------------------------A-47AccelR--------------------------------------------------------------------------------------A-47Till-----------------------------------------------------------------------------------------A-48Sense ---------------------------------------------------------------------------------------A-49CP--------------------------------------------------------------------------------------------A-50Fine-----------------------------------------------------------------------------------------A-51TmReset ------------------------------------------------------------------------------------A-52Tmr函数------------------------------------------------------------------------------------A-52Exit-----------------------------------------------------------------------------------------A-53TW函数 -------------------------------------------------------------------------------------A-53Trap(用户定义触发) --------------------------------------------------------------------A-54Trap(系统状态触发) --------------------------------------------------------------------A-57Select…Send -----------------------------------------------------------------------------A-59Inertia ------------------------------------------------------------------------------------A-60OLRate--------------------------------------------------------------------------------------A-61Align函数 -------------------------------------------------------------------------------- A-62 LJM函数 ----------------------------------------------------------------------------------- A-63 Here函数---------------------------------------------------------------------------------- A-65 RealPos函数 ----------------------------------------------------------------------------- A-65 InPos 函数 ------------------------------------------------------------------------------- A-66 Curve--------------------------------------------------------------------------------------- A-67 CVMove ------------------------------------------------------------------------------------- A-701.1.1 接受机械手培训的意义本次培训的开展是为了使客户掌握机械手的基本操作方法然而,目的不仅仅只是掌握操作手法,还在于了解机械手、排除不安全行为、能够积极地采取安全措施。
机械手操作说明书

操作说明机械手 操 作 说 明 书操作说明一, 简介:本设备主体部包括以下机构: 1, 上下伺服机械臂:1.5KW 三菱伺服;气动抓胎器;横走气缸; 2, 输送线:400W 三菱变频器及电机两台;检测用对射光电;定中气缸; 3,主要电气部件品牌及明细表:主要电气部件明细:序号 材料名称 1 PLC 2 触摸屏 3 4 5 6 7 8 9 10 11 12 13 14 15 16 17 18 伺服电机 伺服驱动器 输送电机用变频器 三相智能伺服变压器 开关电源 小型断路器 小型断路器 小型断路器 小型断路器 交流接触器 接近开关 电源滤波器 继电器 继电器端子座 超声波传感器 对射光电 材料规格 FX3U-48MT-001 DOP-B05S100 HF-SP152B MR-J3-200A FR-E740-0.4-CHT IST-C-045 NES-150-24 DZ47-60/3P/D16A DZ47-60/2P/D6A DZ47-60/2P/D10A DZ47-60/3P/D25A LC1-D1810M5C RN05-N(17*17) 3 米 PNF221-G-2A RJ2S-CL-D24 RJ2S-05B UB800-18GM40-E4-V1 PZ-G52N 用量 1 1 1 1 2 1 1 1 1 2 2 1 5 1 8 8 1 4 单位 台 个 品牌 三菱 台达 三菱 三菱 三菱 三诺科技 台湾明纬 正泰 正泰 正泰 正泰 施耐德 台湾 RIKO 埃德 idec idec 倍加福 基恩士台 台 台台 台 个 个 个 个 个 个 个 个 个 个 对二, 操作说明: 2.1 操作前注意事项:机械手运行范围内不要有人员站立. 确认抓手用输入气源是否打开且压力达到 0.5MPa 及以上。
2.2 操作说明:2.2.1,简要说明:操作说明1,本系统人机操作画面,支持中英文两种语言方式。
操作者可以在进入系统后的初 始开机画面,选择指定的操作语言。
新睿机械手说明书

前言非常感谢您购买xx机器人的机械手。
本机械手通过与注塑机的配合,以取出注塑机所加工的塑料产品,实现自动化生产作业。
此手册涉及机器的安全、安装、操作和维修保养等信息。
在操作之前请仔细阅读此说明书,相信如果能在熟读此操作说明书后进行正确操作,一定能够满足您的要求。
当您购买此机器后,请检查其型号、所有装箱单上所列零件,并检查运输过程中是否有任何部件受损。
如有任何部件遗漏或发现受损,请立即联系当地经销商或本公司。
我们再次感谢您的购买。
今后,本公司将继续努力进行技术开发、提高服务质量,制造出使您更满足的机械手。
免责事项●本手册的内容,将来可能更改,恕不预先通知。
●本手册内容的编写纰漏之处,在所难免,尚请不吝指正。
●本手册所载各种数据,系作本机的参考数据,并不负法律上的责任。
●由于顾客方面的改造、拆卸、误用、以及设备环境欠妥等本公司不能掌握的状况而造成损害时,本公司恕不负责。
目录五、控制器操作说明 (1)5.1手控器面板按键位置图 (1)5.2按键功能说明 (1)5.3操作说明 (2)5.3.1密码功能 (2)5.3.2中英文切换 (2)5.3.3手动操作说明 (3)5.3.4自动操作说明 (3)5.3.5错误报警 (4)5.3.6功能设置 (4)5.3.7教导说明 (7)5.3.8时间设置 (8)5.3.9 I/O监视说明 (8)5.4 标准动作程序 (9)5.5双臂动作程式 (11)六、故障说明 (13)6.1故障的编号及解释 (13)6.2故障说明及排除方法 (13)七、电气部分 (20)7.1电控系统安全规则 (20)7.2端口定义及接线说明 (21)7.2.1 36P线接线端口定义说明 (21)7.2.2中继板端口示意图 (22)7.2.3注塑机与机械手连接图 (23)7.2.4安装尺寸图 (24)7.2.5开关电源与中继板连接图 (25)五、控制器操作说明5.1手控器面板按键位置图5.2按键功能说明1数字键1/手臂上升/下降动作, 再按一次,则反相动作。
Epson项目器用户指南.pdf_1701926827.3378916说明书
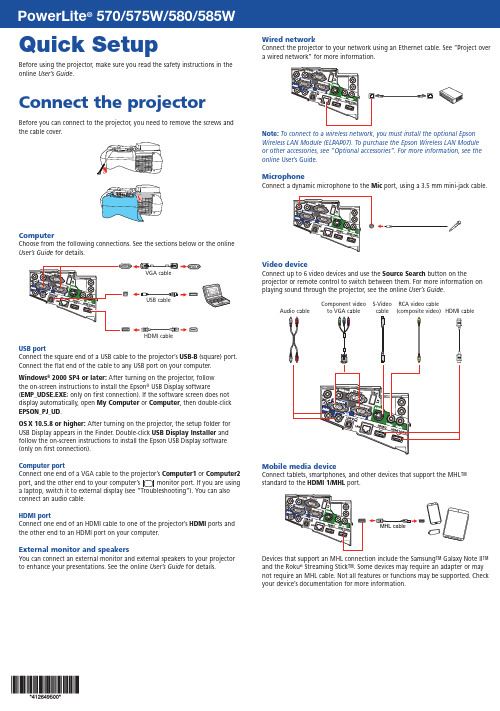
Quick SetupBefore using the projector, make sure you read the safety instructions in the online User’s Guide .Connect the projectorBefore you can connect to the projector, you need to remove the screws andthe cable cover.ComputerChoose from the following connections. See the sections below or the online User’s Guidefor details.USB portConnect the square end of a USB cable to the projector’s USB-B (square) port. Connect the flat end of the cable to any USB port on your computer.Windows ® 2000 SP4 or later: After turning on the projector, follow the on-screen instructions to install the Epson ® USB Display software(EMP_UDSE.EXE ; only on first connection). If the software screen does not display automatically, open My Computer or Computer , then double-click EPSON_PJ_UD .OS X 10.5.8 or higher: After turning on the projector, the setup folder for USB Display appears in the Finder. Double-click USB Display Installer and follow the on-screen instructions to install the Epson USB Display software (only on first connection).Computer portComputer1 or Computer2 port, and the other end to your computer’s monitor port. If you are using connect an audio cable.HDMI portConnect one end of an HDMI cable to one of the projector’s HDMI ports and the other end to an HDMI port on your computer.External monitor and speakersYou can connect an external monitor and external speakers to your projector to enhance your presentations. See the online User’s Guide for details.Wired networkConnect the projector to your network using an Ethernet cable. See “Project overa wired network” for more information.Note: To connect to a wireless network, you must install the optional Epson Wireless LAN Module (ELPAP07). To purchase the Epson Wireless LAN Module or other accessories, see “Optional accessories”. For more information, see the online User’s Guide .MicrophoneConnect a dynamic microphone to the Micport, using a 3.5 mm mini-jack cable.Video deviceConnect up to 6 video devices and use the Source Search button on theprojector or remote control to switch between them. For more information on playing sound through the projector, see the online User’s Guide.S-Video cable Component video to VGA cable Audio cableRCA video cable (composite video)HDMI cableMobile media deviceConnect tablets, smartphones, and other devices that support the MHL™ standard to the HDMI 1/MHLport.Devices that support an MHL connection include the Samsung™ Galaxy Note II™ and the Roku ® Streaming Stick™. Some devices may require an adapter or may not require an MHL cable. Not all features or functions may be supported. Checkyour device’s documentation for more information.Camera, USB device, or document cameraConnect a digital camera, USB flash drive, USB storage device, or Epson DC-06document camera to the projector’s USB-A(flat) port.Using the remote controlMake sure the batteries are installed as shown (two AA batteries).Choose whichsource to displayon and offmenusdisplay and sound Get solutions tocommon problemsNavigate projectormenusslides (USB only)Control projectorvolumeFor more information on using the remote control, see online User’s Guide.Turn on your equipment1Turn on your computer or video source.2M ake sure the power cord is connected and plugged into an3 Press the power button on the projector or remote control. Theprojector beeps, and the Status light flashes blue and then stays on.Note:To shut down the projector, press the power button twice.4I f you don’t see an image, press the Source Search button on theremote control to select the image source.N ote:If you still see a blank screen or have other display problems, seethe troubleshooting tips on the back of this sheet.5I f you need to focus the image, first slide the switch on the side of theprojector to open the air filter cover. Then raise or lower the focus lever6Tlanguage, press the Menu button on the remote control. SelectExtended and press . Select Language and press . Select yourlanguage and press . Press the Menu button to exit the menu system.Project over a wirednetworkIf you need to configure the projector for your network, see “NetworkConfiguration” on the back of this sheet.1 Press the LAN button on the remote control. You see this screen.2Start EasyMP® Network Projection on your computer.W indows 8: Navigate to the Apps screen and select EasyMP NetworkProjection.O ther versions of Windows: Select or Start > Programs or AllPrograms > EPSON Projector > EasyMP Network Projection.O SX: Double-click the EasyMP Network Projection icon in theApplications folder.3 Select Advanced Connection Mode and click OK.4Select the projector you want to connect to, then click Connect.I f you don’t see the projector you want, click the Automatic searchbutton.5I f you see a message asking for a keyword, enter the four digits thatappear on the LAN standby screen and click OK.Your computer image is projected, with a floating toolbar:When you’re done presenting, click Disconnect on the toolbar.N ote:To project wirelessly, you need the optional wireless LAN module.For more information about using the projector on a network, see theonline User’s Guide.Network configurationInstall the EasyMP Network Projection software on each computer that will project over the network. Use the CD labeled EPSON Projector Software to install the program.For instructions on installing and using your network software, click the icon on your desktop to access the online EasyMP Network Projection Operation Guide (requires an internet connection). If you don’t see the EasyMP Network Projection Guide icon, you can install it from the projector CD or go to the Epson support site (see “Where to get help”).To monitor and control your projector over the network, download and install the EasyMP Monitor software (Windows only) and manual from the Epson support site. You can install a link to the downloads page from the projector CD or go to the Epson support site (see “Where to get help”). Follow the steps here to configure your projector for your wired network using the projector’s menu system.1 P ress the Menu button on the remote control, select theNetwork menu, then press.2 ChooseNetwork Configuration and press .3 Select the Wired LAN menu and press .4ChooseIP Settings and press . You see a screen like the following:5 I f your network assigns addresses automatically, turn on the DHCP setting. If not, make sure DHCP is off and enter the projector’s IP Address , Subnet Mask , and Gateway Address , as needed. Then press Esc .6W hen you are finished, select Complete and press , then pressagain to save your settings.7Press the Menu button to exit the menu system.Mobile deviceTo project from an iOS or Android™ device,download and install the Epson iProjection™ app. Visit /projectorapp (U.S.) or www.epson.ca/projectorapp (Canada) for more information.Using web remoteYou can use a standard web browser to control the projector through thenetwork. A “virtual remote control” on your computer screen lets you perform many of the same functions as you can with the physical remote control.1O pen your web browser and enter the IP address of the projector you want to monitor in the browser window.If you’re not sure what the address of the projector is, turn the projector on and select Net. Info.-Wired LAN or Net. Info.-Wireless LAN from the Network menu to display the IP address of the projector. (Do not enter the leading zeroes.)2E nter EPSONWEB as the default user name and adminas the default password, then press .3F rom the Projector Control menu, select Web Remote . Use the on-screenbuttons to operate the projector, as you would using the remote control.Turn off pictureand soundSelect equipment connected to the USB portDisplay closed captionsSelect video signal Select computer signalPause videoSelect wired or wireless network signal TroubleshootingIf you see a blank screen or the No signal message after turning on your computer or video device, check the following:•M ake sure the Status light on the projector is blue and not flashing.• Press the Source Search button on the projector or the remote control to switch to the correct image source, if necessary.•If you’re using a Windows laptop, press the function key on your keyboard that lets you display on an external monitor. It may be labeled CRT/LCD or have an icon such as . You may have to hold down the Fn key while pressing it (such as Fn + F7). Wait a moment for the display to appear.•If you’re using a Mac laptop, open System Preferences and selectDisplays . Select the display or Color LCD option if necessary, then click the Arrange or Arrangement tab, and select the Mirror Displays checkbox.Where to get helpManualsFor more information about using the projector, click the icons on your desktopto access the online manuals (requires an Internet connection). If you don’thave icons to the manuals, you can install them from the projector CD or go tothe Epson website, as described below.Telephone support servicesTo use the Epson® PrivateLine® Support service, call (800) 637-7661. This serviceis available for the duration of your warranty period. You may also speak witha support specialist by calling (562) 276-4394 (U.S.) or (905) 709-3839 (Canada).Support hours are 6 am to 8 pm, Pacific Time, Monday through Friday, and7 am to 4 pm, Pacific Time, Saturday. Days and hours of support are subject tochange without notice. Toll or long distance charges may apply.Internet supportVisit /support (U.S.) or epson.ca/support (Canada) for solutions tocommon problems. You can download utilities and documentation, get FAQsand troubleshooting advice, or e-mail Epson.RegistrationRegister today to get product updates and exclusive offers. You can use the CDincluded with your projector, or register online at /webreg.Optional accessoriesFor a list of optional accessories, see the online User’s Guide.You can purchase screens or other accessories from an Epson authorized reseller.To find the nearest reseller, call 800-GO-EPSON (800-463-7766). Or you canpurchase online at (U.S. sales) or epson.ca (Canadian sales).EPSON, EasyMP, and PowerLite are registered trademarks, Epson iProjection is a trademark, andEPSON Exceed Your Vision is a registered logomark of Seiko Epson Corporation. PrivateLine is aregistered trademark of Epson America, Inc.Mac and OS X are trademarks of Apple Inc., registered in the U.S. and other countries.General Notice: Other product names used herein are for identification purposes only and may betrademarks of their respective owners. Epson disclaims any and all rights in those marks.This information is subject to change without notice.© 2014 Epson America, Inc., 1/14Printed in XXXXXX CPD-40431。
Epson项目机用户指南.pdf_1701925732.2603142说明书

RCA video cable (composite video)5U se the arrow buttons on the remote control to highlight any of the options on the Home screen that appears, then press to select it. You can display a QR code, switch between projection sources, and quickly access various adjustment options from this screen.6T he default language of the menu system is English . To select another language, press the Menu button on the projector or remote control. Select Extended and press . Select Language and press . Select your language and press . Press the Menu button to exit the menu system.•P ress the Source Search button on the projector or the remote control to switch to the correct image source, if necessary.•I f you’re using a Windows laptop, press the function key on your keyboard that lets you display on an external monitor. It may be labeled CRT/LCD or have an icon such as . You may have to hold down the Fn key while pressing it (such as Fn + F7). Wait a moment for the display to appear.•I f you’re using a Mac laptop, open System Preferences and select Displays. Click the Arrangement tab and select the Mirror Displayscheckbox.Where to get helpManualsFor more information about using the projector, click the icons on your desktop to access the online manuals (requires an Internet connection). If you don’t see icons to the manuals, you can install them from the projector CD orTelephone support servicesTo use the Epson® PrivateLine® Support service, call (800) 637-7661. This service is available for the duration of your warranty period. You may also speak with a support specialist by calling (562) 276-4394 (U.S.) or (905) 709-3839 (Canada). Support hours are 6 AM to 8 PM, Pacific Time, Monday through Friday, and7 AM to 4 PM, Pacific Time, Saturday. Days and hours of support are subject to change without notice. Toll or long distance charges may apply.Internet supportVisit /support (U.S.) or epson.ca/support (Canada) for solutions to common problems. You can download utilities and documentation, get FAQs and troubleshooting advice, or e-mail Epson.RegistrationRegister today to get product updates and exclusive offers. You can use the CD included with your projector or register online at /webreg. Optional accessoriesFor a list of optional accessories, see the online User’s Guide.You can purchase screens or other accessories from an Epson authorized reseller. To find the nearest reseller, call 800-GO-EPSON (800-463-7766). Or you can purchase online at (U.S. sales) or epson.ca (Canadian sales).NoticesDeclaration of ConformityAccording to 47CFR, Part 2 and 15, Class B Personal Computers and Peripherals; and/or CPU Boards and Power Supplies used with Class B Personal ComputersWe: Epson America, Inc.Located at: 3840 Kilroy Airport Way, MS: 3-13, Long Beach, CA 90806Telephone: (562) 981-3840Declare under sole responsibility that the product identified herein, complies with47CFR Part 2 and 15 of the FCC rules as a Class B digital device. Each product marketed, is identical to the representative unit tested and found to be compliant with the standards. Records maintained continue to reflect the equipment being produced can be expected to be within the variation accepted, due to quantity production and testing on a statistical basis as required by 47CFR §2.909. Operation is subject to the following two conditions: (1) this device may not cause harmful interference, and (2) this device must accept any interference received, including interference that may cause undesired operation.Trade Name: EpsonType of Product: ProjectorModel: H719A/H717A/H718AMarketing Name: VS240/VS340/VS345Epson America, Inc. Limited WarrantyOne-Year Projector Limited Warranty and 90-Day Lamp Limited WarrantyWhat Is Covered: Epson America, Inc. (“Epson”) warrants to the original retail purchaser of the Epson projector product enclosed with this limited warranty statement that the product, if purchased new and operated in the United States, Canada, or Puerto Rico will be free from defects in workmanship and materials for a period of one (1) year from the date of original purchase. This limited warranty applies only to the projector and not to the projector lamp, which carries a limited warranty period of ninety (90) days from the date of original purchase. For warranty service, you must provide proof of the date of original purchase.What Epson Will Do To Correct Problems: If your product requires service duringthe limited warranty period, please call Epson at the number on the bottom of this statement and be prepared to provide the model, serial number, and date of original purchase. Epson will, at its option, repair or replace the defective unit, without charge for parts or labor. If Epson authorizes an exchange for the defective unit, Epson will ship a replacement product to you, freight prepaid, so long as you use an address inthe United States, Canada, or Puerto Rico. You are responsible for securely packaging the defective unit and returning it to Epson within five (5) working days of receipt of the replacement. Epson requires a debit or a credit card number to secure the cost of the replacement product in the event that you fail to return the defective one. If Epson authorizes repair instead of exchange, Epson will direct you to send your product to Epson or its authorized service center, where the product will be repaired and sent back to you. You are responsible for packing the product and for all costs to and from the Epson authorized service center. When warranty service involves the exchange of the product or of a part, the item replaced becomes Epson property. The exchanged product or part may be new or refurbished to the Epson standard of quality, and at Epson’s option, the replacement may be another model of like kind and quality. Epson’s liability for replacement of the covered product will not exceed the original retail selling price of the covered product. Exchange or replacement products or parts assume the remaining warranty period of the product covered by this limited warranty. If Epson replaces the lamp as part of the warranty service, the replacement lamp carries the limited 90-day warranty stated above.What This Warranty Does Not Cover: This warranty covers only normal use in the United States, Canada or Puerto Rico. Excessive continual use is not considered normal use. This warranty does not cover consumables such as filters. This warranty is not transferable. Epson is not responsible for warranty service should the Epson label or logo or the rating label or serial number be removed. Epson is not responsible for warranty service should the product fail to be properly maintained or fail to function properly as a result of misuse, abuse, improper installation, neglect, improper shipping, damage causedby disasters such as fire, flood, and lightning, improper electrical current, software problems, the use of non-Epson lamps, add-in cards or cables, interaction with non-EPSON products, or service other than by Epson or an Epson-Authorized Servicer. Postage, insurance, or shipping costs incurred in presenting your Epson product for carry-in warranty service are your responsibility. If a claimed defect cannot be identified or reproduced in service, you will be held responsible for costs incurred. DISCLAIMER OF WARRANTIES: THE WARRANTY AND REMEDY PROVIDED ABOVEARE EXCLUSIVE AND IN LIEU OF ALL OTHER EXPRESSED OR IMPLIED WARRANTIES INCLUDING, BUT NOT LIMITED TO, THE IMPLIED WARRANTIES OF MERCHANTABILITY, FITNESS FOR A PARTICULAR PURPOSE AND NON-INFRINGEMENT. UNLESS STATED HEREIN, ANY STATEMENTS OR REPRESENTATION MADE BY ANY OTHER PERSON OR FIRM ARE VOID.Remedies: Your exclusive remedy and Epson’s entire liability for a material breach of this Agreement will be limited to a refund of the price paid for the Epson products covered by this Agreement. Any action for breach of warranty must be brought within 3 months of the expiration date of the warranty. Epson is not liable for performance delays or for nonperformance due to causes beyond its reasonable control. Except as provided in this written warranty, neither Epson nor its affiliates shall be liable for any loss, inconvenience, or damage, including direct, special, incidental or consequential damages, including lost profits, cost of substitute equipment, downtime, claims of third parties, including customers, or injury to property, resulting from the use or inability to use the Epson products, whether resulting from a breach of warranty or any other legal theory. Some jurisdictions do not allow limits on warranties or remedies for breach in certain transactions. In such jurisdictions, the limits in this paragraph and the preceding paragraph may not apply.In Canada, warranties include both warranties and conditions.Arbitration, Governing Laws: Any disputes arising out of this Agreement will be settled by arbitration, before a single arbitrator in Los Angeles, California, in accordancewith the commercial Arbitration Rules of the American Arbitration Association, and judgment upon the award rendered by the arbitrator may be entered in any court having jurisdiction thereof. This Agreement shall be construed in accordance with the laws of the State of California, except this arbitration clause which shall be construed in accordance with the Federal Arbitration Act.To find the Epson Authorized Reseller nearest you, please visit our website at: .To find the Epson Customer Care Center nearest you, please visit/support.To contact the Epson Connection SM , please call (800) 637-7661 or(562) 276-4394 in the U.S. and (905) 709-3839 in Canada or write toEpson America, Inc., P.O. Box 93012, Long Beach, CA 90809-3012.EPSON is a registered trademark and EPSON Exceed Your Vision is a registered logomark of Seiko Epson Corporation. PrivateLine is a registered trademark and Epson Connection is a service mark of Epson America, Inc.Mac and OS X are trademarks of Apple Inc., registered in the U.S. and other countries.。
富士机械手中文手册

富士机械手中文手册F U J I - A C E码垛机器人用户手册维护与操作EC(61/101/141/201) 系列(FA-01)日本不二输送机工业株式会社050119st用户手册目录维护篇--本手册的第一部分页I .注意事项I-1.一般注意事项I 1-1I-2. 操作前的注意事项I 1-1 II.机器人II-1. 动作范围 II 1-1 II-2. 机器人的主要构成 II 2-1 II-3. 各轴驱动系统图及系统表 II 3-1/2 II-4. 润滑位置 II 4-1/2 II-5. 电池更换方法 II 5-1操作篇 -- 本手册的第二部分III.基本操作IV.操作流程V.示教VI.错误表示与纠错方法VII.其他F U J I - A C E维护手册EC 系列 (FA-01)日本不二输送机工业株式会社050119st维护篇- 内容-页I .注意事项I-1.一般注意事项 I 1-1I-2.操作前的注意事项 I 1-1 II.机器人II-1. 动作范围 II 1-1 II-2. 机器人的主要构成 II 2-1 II-3. 各轴驱动系统图及系统表 II 3-1/2 II-4. 润滑位置 II 4-1/2 II-5. 电池更换方法 II 5-1I.项注意事I- 1. 一般注意事项(1) 本机器人必须由被授权的和接受培训过的人员来操作。
(2)一旦出现紧急情况,请立即按下紧急停止按钮。
在控制面板以及示教盒上面都设有紧急停止按钮。
(3) 如果要进入机器人的动作区域(安全防护栏内),请务必关闭控制电源,停止机器人运行,并将锁定钥匙取出。
(4) 在运行过程中请千万不要越过防护栏进入防护区域。
(5) 在机器人运行过程中,请不要用手触摸限位开关以及光电开关等传感器。
否则可能会引起机器人的误动作。
(6) 请定期检查空气过滤器,适时将冷凝水排出。
(7) 请不要使用不良的托盘:托盘的尺寸误差许可范围为±10mm (长度和宽度)和±5mm (高度).托盘如存在边框、底盘的破损,铁钉突出等现象,请务必将其修复后才能投入使用。
艾尔发注塑机械手说明书

5高级应用及编程5.1系统设定在任意操作画面的下方菜单栏点击“系统”按钮进入如下操作画面在该画面中可以设置:1、警报设置a)警报静音(关):有异常报警时,蜂鸣器会响;b)警报静音(开):即使有异常报警时,蜂鸣器不会响。
2、横出方式设置a)横出警示(关):机械手正常横出;b)横出警示(开):机械手每次横出时发出警示,蜂鸣器响一次。
3、机械手状态设置a)机械手使用(关):机械手不使用;b)机械手使用(开):机械手处于使用状态。
4、Mx可合模的安全位置:引拔退回到该位置后才送允许关模,此功能是为防止类似有送模机的机台,关模时撞到机械手臂而设计的。
5、检知方式设定a)全程检知:机械手从开始取产品一直到产品放掉整个过程中都检测产品是否脱落,如果脱落则警报,机械手暂停。
b)模内检知:机械手只在从开始取物到其横出过安全门这段过程中对产品进行检测,如果产品脱落则警报;在安全门之外,不对产品进行检测。
c)不检知:机械手不检查是否取到产品。
6、禁区功能设置a)开:禁区中设置的参数有效,机械手运行必须在禁区参数设定范围内,否则警报。
b)关:禁区中设置的参数无效,其设置不影响机械手运行。
点击屏幕下方菜单栏中的按键“进阶操作”,进入下面页面1)全自动下可修改的距离范围机械手全自动运行时,能修改轴位置最大距离。
超过时给出提示。
2)机械手本体的IO延迟时间:侧姿,回正信号在O点动作过设定时间后没检到I点发警报。
3)横出轴的原点反相:若选中该项,则机械手归原点时Y轴会往Y+方向找原点。
4)使用模内下行待机功能:若选中该项,则需设置待机点坐标,每次循环都会先回到待机点位置。
5)安全门打开的处理方式a)安全门打开后立即停止:全自动运行时安全门打开后立即停止,后续不在执行,要重新启动运行。
b)安全门关闭后继续加工:全自动运行时安全门打开立即暂停,关门后机械手继续执行后面动作。
6)副臂使用方式:当勾选时,机械手具有相应机型的功能5轴副臂使用伺服;3轴副臂不使用;3轴副臂加汽缸。
- 1、下载文档前请自行甄别文档内容的完整性,平台不提供额外的编辑、内容补充、找答案等附加服务。
- 2、"仅部分预览"的文档,不可在线预览部分如存在完整性等问题,可反馈申请退款(可完整预览的文档不适用该条件!)。
- 3、如文档侵犯您的权益,请联系客服反馈,我们会尽快为您处理(人工客服工作时间:9:00-18:30)。
ii
RC700/RC90 选件 TP2 Rev.2
商标
Microsoft、 Windows和Windows标识为美国Microsoft Corporation在美国与其他国家的 注册商标或商标。其他品牌与产品名称均为各公司的注册商标或商标。
本手册中的商标符号
Microsoft® Windows® XP Operating system Microsoft® Windows® Vista Operating system Microsoft® Windows® 7 Operating system 在本手册中,Windows XP、Windows Vista 和 Windows 7 指的是上述各操作系统。 在某些情况下,Windows 一般是指 Windows XP、Windows Vista 和 Windows 7。
4. 操作模式(TEACH/AUTO)............................. 14
4.1 概述 ............................................................. 14 4.2 切换操作模式 ..................................................... 15
iv
RC700/RC90 选件 TP2 Rev.2
东南亚 印度
Epson Singapore Pte Ltd. Factory Automation System 1 HarbourFrontPlace, #03-02 HarbourFront Tower one, Singapore 098633 TEL : +65-(0)-6586-5696 FAX : +65-(0)-6271-3182 EPSON Korea Co, Ltd. Marketing Team (Robot Business) 11F Milim Tower, 825-22 Yeoksam-dong, Gangnam-gu, Seoul, 135-934 Korea TEL : +82-(0)-2-3420-6692 FAX : +82-(0)-2-558-4271 EPSON SALES JAPAN CORPORATION
台湾
欧洲
中国
EPSON Taiwan Technology & Trading Ltd. Factory Automation Division 14F, No.7, Song Ren Road, Taipei 110 Taiwan, ROC TEL : +886-(0)-2-8786-6688 FAX : +886-(0)-2-8786-6677
Factory Automation Systems Department Nishi-Shinjuku Mitsui Bldg.6-24-1 Nishishinjuku.Shinjuku-ku.Tokyo.160-8324 JAPAN TEL : +81-(0)3-5321-4161
韩国
日本
RC700/RC90 选件 TP2 Rev.2
v
阅读本手册之前
本手册将以这些符号表示下述说明。
提示
注
“注”部分描述了操作机器人系统应遵循的重要信息。 “提示”部分描述了让操作变得更容易或进行替代时的提示。
注 注
注
请勿将TP2连接至以下机器人控制器。否则可能会因针脚分配不同而导致设备故障。 RC420/RC520/SRC5**/SRC-3**/SRC-2**
5. 操作面板(按键描述)............................... 16
供应商
北美与南美 EPSON AMERICA, INC. Factory Automation/Robotics 18300 Central Avenue Carson, CA 90746 USA TEL : +1-562-290-5900 FAX : +1-562-290-5999 E-MAIL : info@ EPSON DEUTSCHLAND GmbH Factory Automation Division Otto-Hahn-Str.4 D-40670 Meerbusch Germany TEL : +49-(0)-2159-538-1391 FAX : +49-(0)-2159-538-3170 E-MAIL : s@epson.de EPSON China Co., Ltd Factory Automation Division 7F, Jinbao Building No. 89 Jinbao Street Dongcheng District, Beijing, China, 100005 TEL : +86-(0)-10-8522-1199 FAX : +86-(0)-10-8522-1120
机器人控制器 RC700/RC90 选件 示教器
TP2
Rev.2 C1M13ZP2617R
机器人控制器RC700/RC90选件
示教器
TP2
Rev.2
ii
机器人控制器 RC700/RC90 选件 示教器
TP2
Rev.2
Copyright © 2012-2013 SEIKO EPSON CORPORATION. All rights reserved. RC700/RC90 选件 TP2 Rev.2 i
3. 安装............................................... 11
3.1 安装内容 ......................................................... 11 3.2 环境条件 ......................................................... 11 3.3 操作注意事项 ..................................................... 11 3.4 连接 ............................................................. 12 3.4.1 典型的电缆连接 ...........................................12 3.4.2 与控制器的连接 ...........................................13 3.5 电源 ............................................................. 13
OK:可兼容 !!!: 可兼容
注
可使用EPSON RC+ 7.0与控制器具备的所有功能。 可连接。我们推荐使用EPSON RC+ 7.0 Ver.7.0.2或以后版本。
注
使用无标签(EPSON RC+ 5.0)的机器人控制器 RC90 或 RC180 时,请参阅 RC90 / RC180 option Teach Pendant TP2 Manual。 其功能与本手册所述内容有所不同。
服务中心
RC700/RC90 选件 TP2 Rev.2
iii
制造商
Toyoshina Plant Factory Automation Systems Dept. 6925 Toyoshina Tazawa, Azumino-shi, Nagano, 399-8285 JAPAN TEL : +81-(0)263-72-1530 FAX : +81-(0)263-72-1495
TYPE B 的 PDF 手册适用于 EPSON RC+ 7.0 Ver.7.0.2。
RC700/RC90 选件 TP2 Rev.2
vii
viii
RC700/RC90 选件 TP2 Rev.2
目录
功能与安装
1. 安全................................................ 3
vi
RC700/RC90 选件 TP2 Rev.2
控制系统配置
本选件将与以下控制器和软件组合配套使用。
TYPE A:
控制器 RC700 软件 EPSON RC+ 7.0
TYPE B:附有以下标签的机器人控制器 RC90。
标签 控制器 软件
RC90
EPSON RC+ 7.0
RC90 控制器固件 Ver.7.0.2.0 EPSON RC+ 7.0 Ver.7.0.1 以前版本 Ver.7.0.2 以后版本 !!! OK
当 RC700/RC90(EPSON RC+7.0)选件 TP2 连接至机器人控制器 RC90(EPSON RC+5.0)或 RC180 时,其操作与本手册所述内容有所不同。 在这种情况下,请参阅以下手册。 RC90 / RC180 option Teach Pendan,数据称为“点数据”。
通知
禁止擅自复印或转载本手册的部分或全部内容。 本手册记载的内容将来可能会随时变更,恕不事先通告。 若您发现本手册的内容有误或需要改进之处,请不吝斧正。
垂询方式
有关机器人的修理/检查/调整等事项,请与服务中心联系。 未记载服务中心时,请与当地销售商联系。 联系时,请事先准备好下述各项。 - 控制器型号及其序列号 - 机器人型号及其序列号 - 机器人系统中的软件名称及其版本 - 问题描述
2. 规格................................................ 8
2.1 部件名称与功能 .................................................... 8 2.2 标准规格 .......................................................... 9 2.3 外形尺寸 ......................................................... 10
