中兴V880 WCDMA数字移动电话机售后维修手册(一级)
中国联通移动网诺基亚bsc设备维护操作手册
中国联通移动网诺西设备 诺西 C 操作维护手册
中国联通移动网诺西维护技术基地
1
中国联通移动网诺基亚 BSC 操作维护手册
目录
1 系统结构及重要硬件介绍 ...................................................................5
2
中国联通移动网诺基亚 BSC 操作维护手册
5.1.2 问题分析 ............................................................................85 5.1.3 问题处理 ............................................................................87 5.1.4 总结 ................................................................................87 5.2 2725 告警处理 .........................................................................87 5.2.1 问题及告警描述 ......................................................................87 5.2.2 问题分析 ............................................................................88 5.2.3 问题处理 .....................................
8M86维修资料
警告本手册仅供有经验的维修人员使用,不使用于一般消费者,手册中没有对非技术人员企图维修本产品而存在的潜在危害提出警告或者提醒。
电器产品应由有经验的专业技术人员进行维护和修理,任何其它人企图对本手册涉及的产品进行维护和修理将有可能受到严重伤害甚至生命危险。
1 产品标准1.1 机芯概述本机芯使用MSTAR的高集成芯片MSD389I,内置32bit RISC CPU,是单芯片数模一体化,内置DEMOdulation的DVB-C和一路串行或并行TS流,可支持DMB-T。
多媒体部分设有两路USB接口,一路网络接口可实现下载和在线收看功能,支持酷K和网络酷开功能。
功放采用的是STA335BW,支持2.1声道。
本机芯的软件架构用的是 Linux的操作系统,Kenel版本是2.6.8.9,用到的Uboot版本是1.1.6。
1.2 主要功能8M86机芯的接口功能配置如下:A.2路AV输入,1组分量,3路HDMI,1路VGA。
B.3路音频输入,其中1组AV,1组AV2和分量共用,1路VGA。
C.1组AV输出,1路重低音输出,1路数字音频输出。
D.2路 USB输入(其中1路可以用于软件升级),2路MIC麦克风输入,1路RJ45网络输入。
本机芯具有网络酷开功能,除具备酷K功能外,还具备本地酷开功能和网络酷开功能,本地酷开支持USB播放酷影、音乐相册(音乐、图片、文本),网络酷开功能支持“在线酷影”可以通过网络实时点播电影:“下载搜索”可以在网上搜索视频节目并下载到本地USB设备;“网上邻居”酷影播放局域网中电脑上共享的媒体文本。
本机芯为数模一体机,支持 DMB-T标准,可接收并解调DVB-C数字信号,通过插入CAM卡可以支持各个CA厂商的CA系统。
1.3 主要技术规格1、支持ISP(在系统可编程)功能,同时支持USB升级功能。
2、内置32-bit RISC CPU。
3、TS流既可从文件读取,也可从TS输入口输入,其最大速率为108M/S。
联通定制版中兴V880如何刷机
联通定制版中兴V880如何刷机?
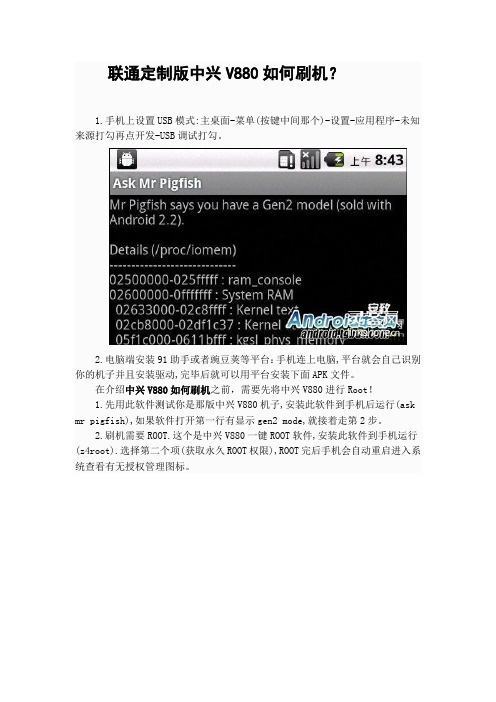
1.手机上设置USB模式:主桌面-菜单(按键中间那个)-设置-应用程序-未知来源打勾再点开发-USB调试打勾。
2.电脑端安装91助手或者豌豆荚等平台:手机连上电脑,平台就会自己识别你的机子并且安装驱动,完毕后就可以用平台安装下面APK文件。
在介绍中兴V880如何刷机之前,需要先将中兴V880进行Root!
1.先用此软件测试你是那版中兴V880机子,安装此软件到手机后运行(ask mr pigfish),如果软件打开第一行有显示gen2 mode,就接着走第2步。
2.刷机需要ROOT.这个是中兴V880一键ROOT软件,安装此软件到手机运行(z4root).选择第二个项(获取永久ROOT权限),ROOT完后手机会自动重启进入系统查看有无授权管理图标。
1.手机按HOME键(左下小房子按键)+声音下键+开机键同时按住到开机卡到Wo图标界面.在就连接上电脑。
2.直接在电脑端打开此文件(电脑V880驱动需要完整).按程序文本提示要求一直点进行就可以啦.结束后手机会自动重启就可以啦。
中兴V880刷机步骤
选择自己喜欢的ROM下载,放入手机内存卡里面。
第一步:将自己喜欢的刷机包放到SD卡的根目录(或者放到一个自己找到到的SD卡任意位置)
第二部:手机关机按HOME键(左下小房子按键)+声音上键+开机键,同时按着。
第三步:进行第二部成功之后手机会进入中文recovery界面,选择放入手机内存卡里的ROM就行了。
在这个页面的操作方法(音量上下键上下移动,小房子键确定)
以上就是联通定制版中兴V880如何刷机的详细步骤,其中需要特别注意的是,z4root如不能进行完美Root,请选择其他方法Root试试。
中兴V880完全拆解
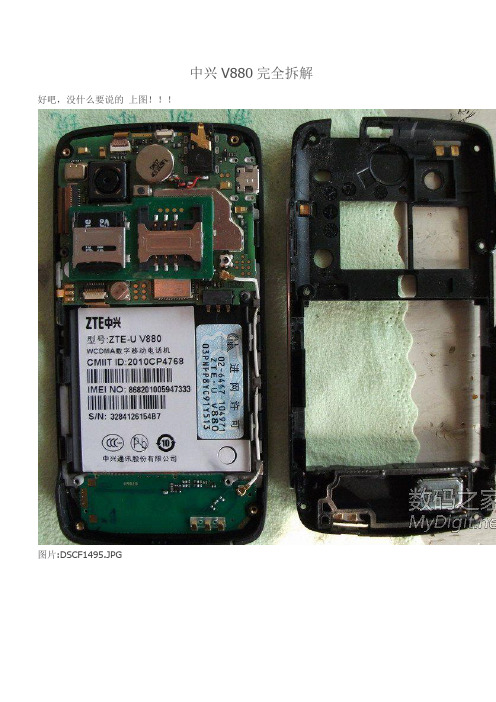
中兴V880完全拆解好吧,没什么要说的上图!!!图片:DSCF1495.JPG图片:DSCF1496.JPG图片:DSCF1498.JPG图片:DSCF1499.JPG图片:DSCF1501.JPG图片:DSCF1502.JPG图片:DSCF1503.JPG图片:DSCF1504.JPG通过拆解发现其实做工还不粗啦只不过存在一些小问题比如听筒用两三个月后会有很大的杂音这时候可以换个听筒淘宝有卖的换很简单还有一个办法就右手握住手机后盖把听筒位置往左手上适度的拍打,力度不能太小,也不必过大。
这样就有很大的可能性把听筒喇叭的振膜凹进去或凸出来的部分给用气流冲归位!再说一句废话不刷机真的不行刷机后真的可以9月机及以后的机子的摄像头及触屏问题早已解决。
还没刷机的同学们赶快行动吧本人刷机后刺客信条不朽的寓言都市赛车5等无压力!再有一个问题就是耳机插孔的问题相信用过880的同学都知道我指的是什么因为外壳在耳机的部分是斜面的,这就导致正常的耳机插进去后很容易弹出来,用了清水套后更甚。
建议用加长型接头的耳机!还要说的一点是v880的屏幕虽是玻璃的但并不像有些人想象的那样刀枪不入,我的就不小心被钥匙划出了好几道很深的刻痕。
其实不能只看配置的配置再高哪怕小米m2肯定也跟不上08年以后电脑的性能手机主要还是基本功能再就是玩些小游戏我刚买时也装了很多的游戏其中有不少gameloft的游戏大作运行都不错的(前提是刷机在这里还是继续建议已经购买了此款手机的朋友赶紧刷机获得整整双倍的性能还没买的同学不建议买了因为现在它已经不算性价比最高了其实刷机真的很简单赶快行动!)手机玩玩很多经典的小游戏就不错真的用来玩很大的游戏就算配置跟的上毕竟也是屏幕小哪怕4.3寸的还是不如笔记本台式机爽啊至于7 、8英寸往上就不能叫手机了吧v880刷机后基本功能的操作非常流畅玩水果高清变态非常流畅其他多数游戏非常流畅触摸屏还算灵敏挺不错就是最好贴膜虽然屏幕是玻璃的但是钥匙的硬度就能给它造成划痕!!建议贴膜!再次建议刷机!!感受极度流畅!!如果你拥有了一次刷机后的操作感受绝对不会想继续使用原版系统!!。
电子通讯设备维修手册
电子通讯设备维修手册第1章电子通讯设备概述 (3)1.1 设备分类与组成 (3)1.2 维修工具与仪器 (4)1.3 安全操作规程 (4)第2章维修基础知识 (4)2.1 电子元件识别与检测 (4)2.1.1 电阻器 (4)2.1.2 电容器 (5)2.1.3 电感器 (5)2.1.4 二极管、晶体管和场效应晶体管 (5)2.2 常用电子线路分析 (5)2.2.1 放大电路 (5)2.2.2 滤波电路 (5)2.2.3 信号发生电路 (5)2.2.4 电源电路 (5)2.3 维修思路与技巧 (5)2.3.1 故障诊断 (6)2.3.2 故障排查 (6)2.3.3 维修操作 (6)2.3.4 维修记录 (6)第3章信号传输线路维修 (6)3.1 同轴电缆故障排查与维修 (6)3.1.1 故障现象 (6)3.1.2 故障排查 (6)3.1.3 维修方法 (6)3.2 双绞线故障排查与维修 (6)3.2.1 故障现象 (6)3.2.2 故障排查 (6)3.2.3 维修方法 (7)3.3 光纤故障排查与维修 (7)3.3.1 故障现象 (7)3.3.2 故障排查 (7)3.3.3 维修方法 (7)第4章天馈系统维修 (7)4.1 天线故障排查与维修 (7)4.1.1 天线外观检查 (7)4.1.2 天线连接检查 (7)4.1.3 天线功能测试 (7)4.1.4 天线故障维修 (8)4.2 馈线故障排查与维修 (8)4.2.1 馈线外观检查 (8)4.2.2 馈线连接检查 (8)4.2.3 馈线功能测试 (8)4.2.4 馈线故障维修 (8)4.3 馈电系统故障排查与维修 (8)4.3.1 馈电系统部件检查 (8)4.3.2 馈电系统功能测试 (8)4.3.3 馈电系统故障维修 (8)4.3.4 系统调试 (8)第5章发射设备维修 (9)5.1 发射机故障排查与维修 (9)5.1.1 故障排查流程 (9)5.1.2 维修方法 (9)5.2 发射电源故障排查与维修 (9)5.2.1 故障排查流程 (9)5.2.2 维修方法 (9)5.3 发射控制系统故障排查与维修 (9)5.3.1 故障排查流程 (9)5.3.2 维修方法 (10)第6章接收设备维修 (10)6.1 接收机故障排查与维修 (10)6.1.1 故障现象识别 (10)6.1.2 故障排查步骤 (10)6.1.3 维修方法 (10)6.2 接收电源故障排查与维修 (10)6.2.1 故障现象识别 (10)6.2.2 故障排查步骤 (10)6.2.3 维修方法 (11)6.3 接收控制系统故障排查与维修 (11)6.3.1 故障现象识别 (11)6.3.2 故障排查步骤 (11)6.3.3 维修方法 (11)第7章通信设备维修 (11)7.1 交换设备故障排查与维修 (11)7.1.1 故障现象描述 (11)7.1.2 故障排查步骤 (11)7.1.3 维修方法 (12)7.2 调度设备故障排查与维修 (12)7.2.1 故障现象描述 (12)7.2.2 故障排查步骤 (12)7.2.3 维修方法 (12)7.3 通信电源故障排查与维修 (12)7.3.1 故障现象描述 (12)7.3.2 故障排查步骤 (12)7.3.3 维修方法 (13)第8章无线电设备维修 (13)8.1 无线电发射设备故障排查与维修 (13)8.1.1 故障排查流程 (13)8.1.2 维修方法 (13)8.2 无线电接收设备故障排查与维修 (13)8.2.1 故障排查流程 (13)8.2.2 维修方法 (14)8.3 无线电频率合成器故障排查与维修 (14)8.3.1 故障排查流程 (14)8.3.2 维修方法 (14)第9章卫星通信设备维修 (14)9.1 卫星天线故障排查与维修 (14)9.1.1 故障排查步骤 (14)9.1.2 维修方法 (15)9.2 卫星接收设备故障排查与维修 (15)9.2.1 故障排查步骤 (15)9.2.2 维修方法 (15)9.3 卫星通信系统调试与优化 (15)9.3.1 系统调试 (15)9.3.2 系统优化 (15)第10章维修案例分析 (16)10.1 发射设备维修案例 (16)10.1.1 案例一:某型号无线电发射设备功率下降 (16)10.1.2 案例二:某型号手机发射信号弱 (16)10.2 接收设备维修案例 (16)10.2.1 案例一:某型号无线电接收设备灵敏度低 (16)10.2.2 案例二:某型号手机接收信号差 (16)10.3 通信设备维修案例 (16)10.3.1 案例一:某型号路由器通信中断 (16)10.3.2 案例二:某型号交换机端口故障 (16)10.4 综合故障排查与维修案例 (16)10.4.1 案例一:某型号通信基站整体故障 (17)10.4.2 案例二:某型号网络设备集体故障 (17)第1章电子通讯设备概述1.1 设备分类与组成电子通讯设备作为现代社会信息交流的重要工具,其种类繁多,功能各异。
中国联通各地市营业厅V880刷机和软件安装指导

中国联通各地市营业厅V880刷机和软件安装指导软件, 文件夹, 中国联通, 文件下载, 客户经理本帖最后由 sharpone 于 2011-10-26 02:48 编辑经过本人无数次刷机经验,无数次更改各位论坛大大的ROM,测试结果分享如下,目的是为了推进中国联通营业厅更好更快的销售V880手机,更好更便捷的提供给客户软件安装服务。
论坛的高手可以忽视此贴,此贴只是针对新手,针对营业员或者集团客户经理,本人作为一个V880销售员,把我自己的经验分享给各位而已!不喜勿下!1,V8802.3.5中兴泄露版修改版(适合所有时间的机器)(image文件拷贝到SD卡上image文件夹下面即可,关机按住menu+音量向上键,点击一下开机电源键即可自动刷机完成。
)A,IMAGE影像文件下载/file/aq6gxdb3#image.binB,软件系统备份文件恢复(把压缩包直接解压缩拷贝到SD卡根目录,根目录第一个目录是clockworkmod请注意,完成A的前提下,关机,音量向下键+电源键同时开机进入recovery,找到备份恢复即可,时间大约5分钟)/file/cl7hyp2n#联通V880andriod2.3装机解决方案.zip2,V880 2.2原版系统精简修改版image影像(适合所有时间的机器)/file/aq6gx9uu#image.bin软件安装恢复包/file/bhq7k0zy#联通V880andriod2.2装机解决方案.zip方法同上。
3,MIUI美化2.3.7image影像包(不一定适合10月新机,看RP。
目前速度最流畅的一款ROM了,跑分1700+)/file/e6vk14xe#image.bin以上rom的共同特点是IMage自动分区了,可用ROm空间为304M,装完机大概在270-290M 左右,软件全部是装到机身的,不需SD卡安装,方法简单,最适合联通营业厅和客户经理。
高手勿拍砖,谢谢!自己做image包的工具:/file/dngyvl0j#zte-tcard-BIN-tool6102.7z方法自己论坛搜索,我就不说了!不是自己东西,转的别人的东西。
ZTEA300手机维修手册(一级)

3) LCD 无显示,缺线,花屏,蓝屏以及 SPEAKER 无声,受话器无声,马达不振
第6页
共 13 页
GSM 手机维修手册(一级)
①将故障手机的主板拆下, 检查故障手机主板与 LCD 模块是否连接良好, 有无短路现象. 装上良好的 LCD 组件,进行功能测试,如果正常,则可以将故障定位在 ZTEA300LCD 组件上. ②小屏升压电容以及 SPEAKER 的焊点上要贴一层绝缘胶带,防止与上翻前壳接触短路. ③检查 30Pin 连接器头上是否有不该有的焊锡,该焊锡容易造成连接器与主板的连接不 良,如跌落或其它操作时造成 LCD 无显示,受话器无声,大小全不亮或只有一个点亮等 等. 连接器的接地焊点有没有焊接良好, 否则在耦合测试的时候会引起相位峰值相位误差. ④检查受话器的焊盘处有没有较为明显的折痕,如果有折痕容易造成受话器无声. ⑤检查受话器有没有被烫伤的痕迹,如果被烫伤容易造成受话器损坏.
第5页
共 13 页 装配是否正常,如果是键盘装配的故障,请更换良好的键盘装配. ② 检查键盘板是否有污垢,如果有,请清洗. ③ 侧键是否焊接良好,侧键与键盘板焊盘处是否贴上绝缘胶带. ④ 检查 XJ1 是否焊接良好.如有问题,请补焊或更换. ⑤ 对于个别 LED 不能点亮的故障,请检查相应的 LED 和它旁边的限流电阻,是,否焊 接良好是否器件故障.如有问题,请补焊或更换. ⑥ 检查双色指示灯及其附属电路是否工作正常,如果双色灯损坏,则更换. ⑦ 检查 SH1 及其附属电路是否正常. ⑧ 检查 XJ1 处的过孔是否有裸露的,如果有则用绝缘胶带贴上.
ZXG10-MSCVLR(V3.0)例行维护指导手册
ZXG10-MSC/VLR(V3.0)例行维护指导手册中兴通讯移动事业部-用户服务部2004.81前言本手册用于指导操作维护人员进行ZXG10-MSC/VLR(V3.0)移动交换中心/拜访位置寄存器的例行维护检查,我们将其分为日、周、月三种周期的检查项目。
1目录第一章日维护指导 (3)1.1机房环境和电源检查 (3)1.1.1 机房环境检查 (3)1.1.2 机房直流电压检查 (3)1.1.3 机房交流电压检查 (4)1.2硬件检查 (4)1.2.1 单板工作状态检查 (4)1.2.2 告警箱检查 (4)1.3通讯检查 (5)1.3.1 操作维护服务器和前台之间通讯检查 (5)1.3.2 计费服务器和前台之间通讯检查 (6)1.4心跳线、资源状态及关系检查 (6)1.4.1 心跳线、资源状态检查 (6)1.5资源占用检查 (8)1.5.1 129、130服务器的内存占用率 (8)1.5.2 129、130服务器的CPU占用率 (9)11.5.3 前台各模块MP的内存占用率 (9)1.5.4 前台各模块MP的CPU占用率 (10)1.5.5 7号信令链路负荷 (10)1.6告警检查 (11)1.6.1 当前告警检查 (11)1.6.2 历史告警检查 (11)1.6.3 系统时钟检查 (12)1.7日志检查 (14)1.7.1 OMC129服务器c:\zxg10目录下的日志 (14)1.7.2 事件查看器中日志检查 (15)1.7.3 计费日志检查 (15)1.7.4 数据库日志检查 (16)1.8计费系统检查 (17)1.8.1 计费话单检查 (17)1.8.2 计费话单备份 (18)1.9业务检查 (18)1.9.1 呼叫业务检查 (18)21.10性能统计指标检查 (19)1.10.1 主要性能统计指标的检查 (19)1.11实时病毒监控告警检查 (19)1.11.1 实时病毒监控告警 (19)1.12数据备份检查 (20)1.12.1 基本配置数据备份 (20)1.12.2 129服务器数据库备份 (20)第2章周维护指导 (23)2.1 VLR用户数量 (23)2.1.1 VLR登记用户数检查 (23)2.2数据库检查 (23)2.2.1 数据库状态检查 (23)2.2.2 数据库空间检查 (24)2.3存储空间检查 (26)2.3.1 硬盘空间、各逻辑盘的可用空间检查 (26)2.4共享目录检查 (27)32.4.1 文件目录共享检查 (27)2.5硬盘病毒检查及病毒库更新 (28)2.5.1 本地硬盘病毒检查及病毒库更新 (28)第3章月维护指导 (29)3.1性能统计任务检查 (29)3.1.1 统计任务创建情况 (29)3.2双机倒换测试 (30)3.2.1 检查双机系统倒换情况 (30)3.3前台检查 (31)3.3.1 主备倒换检查 (31)3.3.2 负荷分担检查 (36)3.3.3 模块内诊断测试 (37)3.3.4 模块间诊断测试 (38)3.4远程维护 (38)3.4.1 Pcanywhere的安装情况和使用情况 (38)3.5 MP日志分析 (39)43.5.1 MP运行情况检查 (39)3.6 MP前台配置文件 (40)3.6.1 检查各模块MP中配置文件 (40)3.6.2 IRMX系统配置文件检查 (40)3.7业务观察 (42)3.7.1 业务观察 (42)3.8模块间通信 (42)3.8.1 模块间MP数据检查 (42)3.8.2 模块间通讯板记录数据 (43)3.8.3 各模块运行数据检查 (43)3.9操作系统日志 (44)3.9.1 操作系统日志检查 (44)3.10版本一致性检查 (45)3.10.1 前台MP版本一致性检查 (45)3.10.2 前台PP版本一致性检查 (45)3.11备份数据到其它介质 (46)3.11.1 检查数据备份是否再次备份到其它介质 (46)5附录A 前后台配置文件样本 (47)A.1 V ERSION.CFG (47)A.2 T CPIP.CFG (48)A.3 O MC.CFG (49)A.4 I PADDRS.CFG(302版本) (50)A.5 OMCCFG.INI (60)A.6 AUTOEXEC.BAT (67)A.7 CONFIG.SYS (67)6第一章 日维护指导1.1 机房环境和电源检查1.1.1 机房环境检查检查项目:机房湿度和温度检查检查目的:保证机房中设备在适宜的湿度和温度下运行检查步骤:查看机房空调设备,显示的机房湿度和温度,并记录检查标准:湿度要求:30%~70%,温度要求:15℃~25℃1.1.2 机房直流电压检查检查项目:直流电压检查检查目的:保证机房中设备的直流电源提供正常运行的电压环境。
中兴V880产品介绍与软件安装(PPT22张)

通过91手机助手安装
⑥ 根据自己想要安装的软件进行安装或搜索软件安装 ⑦ 确定下载,下载后自动安装
用91安装本地软件
⑧ 安装本地软件 ⑨ 跳出弹出窗口选择.APK结尾的软件进行安装
14
更改软件安装目录
1、软件默认安装路径为手机 2、将软件的安装改成SD卡
15
通过手机版91助手下载
① 事先将91助手安装到手机当中 ② 打开91手机助手 ③ 找到自己要安装的软件
中兴V880产品介绍与软件安装
(Android系统)
双峰分公司 聂琼芬
Blade V880效果图
Blade V880 为什么物有所值
比乐疯有速度 比苹果有优惠 比山寨机有档次 比塞班机符合潮流 比进口机更适合中国人 比国产机更有国际通用网络、国际范 她相当于一台小iPHONE
Blade V880产品参数
上市时间: 2011年2月
外观:直板
颜色:灰色
尺寸/体积:114*56*11.9mm 重量: 110g
屏幕参数:3.5” WVGA TFT 电容式触摸 480*800
网络频率:GSM 900/1800/1900M;UMTS 850/2100M
上行峰值:384kbps
下行峰值:HSDPA 7.2M
芯片型号及速率:高通7227-1 操作系统:Android 2.2
摄像头:3.2M AF
副摄像头:无
重力感应:有
WIFI/WIPI:有
电池容量:1250mA
程序、通话录音、3D硬件加速、GPS导
航、加速度传感器,渐近传感器,光传感器,WIFI\WAPI,指南针
联通业务:乐媒、手机上网、手机音乐、手机电视、116114、手机报、
中兴通讯 ZTE-T U802 TD-SCDMA GSM双模数字移动电话机 说明书

中兴通讯ZTE-T U802TD-SCDMA/GSM双模数字移动电话机使用手册法律声明本资料著作权属中兴通讯股份有限公司所有。
未经著作权人书面许可,任何单位或个人不得以任何方式摘录、复制或翻译。
侵权必究对本手册中的印刷错误及与最新资料不符之处我们会及时改进。
这些改动不再事先通知,但会编入新版手册中,中兴通讯保留最终解释权。
Copyright © 2011 ZTE CORPORATION版本号:R1.2物料代码:0795********发布日期:2011.09.21目录1.基本知识 (10)1.1简介 (10)2.安全事项 (11)2.1安全须知 (11)2.2安全警告和注意事项 (11)2.3驾驶车辆时使用手机注意事项 (12)2.4医用设备及公共医疗场所 (12)2.5您的手机 (13)2.6可能引起爆炸的地点及爆破区 (14)2.7电子设备 (14)2.8汽车安全 (14)2.9飞机上的注意事项 (15)2.10电池使用 (15)2.11SAR(电磁辐射比吸收率) (16)2.12使用充电器的注意事项 (17)2.13清洁和维护 (18)2.14免责声明 (18)3.手机概观 (20)3.1简述 (20)3.2按键说明 (22)3.3技术参数 (23)3.4指示图标说明 (24)4.开始使用 (25)4.1准备事项 (25)4.1.1电池 (25)4.1.2充电 (27)4.1.3存储卡 (28)4.1.4安装(U)SIM卡 (30)4.1.5开机和关机 (30)4.1.6解锁(U)SIM卡和手机 (31)4.1.7屏幕加锁与解锁 (32)4.1.8切换为睡眠模式 (32)4.1.9唤醒您的手机 (32)4.2屏幕控制 (33)4.3主屏 (34)4.3.1主屏的延伸界面 (36)4.3.2设定壁纸 (36)4.3.3添加主屏显示项 (36)4.3.4删除主屏显示项 (37)5.电话功能 (38)5.1拨打电话 (38)5.1.1拨打电话 (38)5.1.2快速拨号 (38)5.1.3使用联系人拨打电话 (39)5.1.4从通话记录拨打电话 (39)5.1.5从信息中拨打电话 (39)5.1.6拨打紧急电话 (40)5.1.7拨打国际长途电话 (41)5.2接听电话 (41)5.2.1接听来电 (41)5.2.2拒接来电 (42)5.2.3挂断电话 (42)5.3通话设置 (42)6.联系人 (45)6.1开始使用联系人 (45)6.1.1联系人界面介绍 (45)6.2管理联系人 (45)6.2.1新建联系人 (45)6.2.2添加联系人至收藏 (46)6.2.3搜索联系人 (46)6.2.4编辑联系人 (47)6.2.5删除联系人 (47)7.文本输入 (48)7.1屏幕虚拟键盘简介 (48)7.1.1搜狗输入法 (48)7.1.2谷歌拼音输入法键盘 (50)7.2文字设置 (50)8.信息 (52)8.1发送短信 (52)8.2发送彩信 (52)8.3管理信息和会话 (53)8.3.1回复信息 (53)8.3.2转发信息 (54)8.3.3删除信息 (54)8.4信息设置 (55)9.电子邮件 (57)9.1设置电子邮件账号 (57)9.2发送邮件 (57)9.3回复或转发邮件 (58)10.网络应用 (59)10.1网络连接 (59)10.1.1打开/关闭数据连接 (59)10.1.2GPRS/3G网络 (59)10.1.3WLAN网络 (60)10.2使用浏览器 (61)10.2.1打开浏览器 (62)10.2.2打开网页 (62)10.2.3浏览选项 (62)10.2.4使用书签 (63)10.2.5浏览器设置 (64)10.3蓝牙连接 (66)10.3.1启用/关闭蓝牙功能 (66)10.3.2设置蓝牙属性 (66)10.3.3使用蓝牙与其他设备配对 (67)10.4使用modem功能 (67)10.4.1启用modem功能 (67)10.4.2关闭modem功能 (68)10.5便携式WLAN热点 (69)10.5.1启用便携式WLAN热点 (69)10.5.2关闭便携式WLAN热点 (71)11.多媒体功能 (72)11.1相机 (72)11.1.1打开相机 (72)11.1.2拍照 (72)11.1.3相机设置 (73)11.2摄像机 (74)11.2.1打开摄像机 (74)11.2.2摄像 (74)11.2.3摄像机设置 (75)11.3音乐 (75)11.3.1打开音乐播放器 (75)11.3.2欣赏音乐 (75)11.3.3创建播放列表 (76)11.3.4管理播放列表 (76)11.3.5添加音乐至播放列表 (77)11.3.6设置音乐为来电铃声 (77)11.4图库 (78)11.5录音机 (78)11.5.1打开录音机 (78)11.5.2录制音频文件 (78)12.手机设置 (79)12.1基本设置 (79)12.1.1情景模式 (79)12.1.2设置日期和时间 (79)12.1.3显示设置 (80)12.1.4声音设置 (81)12.1.5语言设置 (83)12.1.6无线和网络设置 (83)12.2安全设置 (84)12.2.1屏幕解锁图案 (84)12.2.2使用PIN码 (86)12.2.3使用安全凭证 (87)12.3存储管理 (88)12.3.1SD卡存储管理 (88)12.3.2手机存储管理 (88)12.4应用程序设置 (89)12.4.1管理应用程序 (89)12.5恢复出厂设置 (89)12.6其他设置 (90)12.6.1搜索设置 (90)13.其他应用 (91)13.1闹钟时钟 (91)13.1.1设置闹钟 (91)13.2世界时 (91)13.3日历 (92)13.4记事本 (92)13.5计算器 (92)13.6任务管理器 (92)13.7文件管理器 (93)14.使用PC侧软件Join Me (93)15.简单故障排除 (94)16.用户满意度调查 (98)17.移动服务 (98)18.电子渠道e100 (98)19.中兴通讯产品有害物质含量状态说明表 (100)保修条例 (103)中兴通讯移动电话三包凭证 (104)保修条例 (105)中兴通讯移动电话三包凭证 (106)保修条例 (107)中兴通讯移动电话三包凭证 (108)1. 基本知识1.1 简介感谢您购买中兴通讯产品,为使该产品使用在最佳状态,请详细阅读本手册,阅读后请保留备用。
v800

2011-08-17 13:20回复
贴吧公益
m152628571119
薇名远扬8 4楼
4.删除联通定制的开机动画和声音
删除完软件后大家在重启手机时,相信大家看到联通logo时多少有点不爽,但是还能忍受;可是看到那个非常卡的动画场景以及听到那一声非常销魂的“欢迎进入wo的世界”,我相信大家会和我一样有种抓狂的感觉。多好的机子,被这么一声叫着显得低档了许多,那怎么补救?很简单,删掉它就行了。
ChsPack.apk 触宝输入法组件,可删
com.zte.sns.apk 中兴自带插件,可删
Contacts.apk 名片夹,不可删
ContactsProvider.apk 不可删
CustomerService.apk 打10010的程序,可删
DefaultContainerService.apk 不可删
AIMail_V880.apk 联通邮箱,删了吧
alarming.apk 自带闹钟,可删但是建议不要删,不然系统不稳定
AndroidQQ_V880.apk QQ软件,可删,我删了换个最新版本的。不过删除系统自带QQ后,会提示“出现错误,无法删除”,这时候重启就自带QQ没有,而且也不影响以后的使用。我就是这么干的,呵呵。如果大家不想出现这种情况,就重装新版的QQ直接覆盖掉也可以,不过那样QQ只能装在手机内存里。
贴吧公益
m152628571119
薇名远扬8 3楼
Phone.apk 不可删
PicoTts.apk 不可删
PinyinIME.apk 谷歌拼音输入法,可删
Protips.apk 这个没用,可删
Provision.apk 不可删
ZXG10 B8018故障快速定位手册
本文中的所有信息均为中兴通讯股份有限公司内部信息,不得向外传播iZXG10 B8018故障快速定位手册中兴通讯股份有限公司本文中的所有信息均为中兴通讯股份有限公司内部信息,不得向外传播iiZXG10 B8018故障快速定位手册策 划 ZTE 工程服务部 移动产品支持中心GSM 用服部* * * *中兴通讯股份有限公司地址:上海市张江高科技园区 碧波路889号邮编:201203技术支持网站:客户支持中心热线:(0755)26770800 800-830-1118传真:(0755)26770801* * * *本文中的所有信息均为中兴通讯股份有限公司内部信息,不得向外传播iii前 言《ZXG10 B8018故障快速定位手册》介绍ZXG10 B8018基站常见的十个故障解决方法,能够指导现场维护人员快速定位故障原因,从而快速解决故障。
本手册适用于中兴通讯GSM 用服部、中兴通讯办事处、外协所有技术支持人,具有普遍的指导意义。
本文中的所有信息均为中兴通讯股份有限公司内部信息,不得向外传播iv目 录1 AEM 不在位告警(告警码198087193),AEM 电源告警(告警码198087185),LNA0过流告警(告警码198087186) ............................................................................................................................. 1 2 AEM 合路器驻波比轻微告警(告警码198087190)和AEM 合路器驻波比严重告警(告警码198087191) ............................................................................................................................................. 1 3HW 链路长时间断链(告警码198087101) ................................................................................ 2 4PA 电源欠压告警(告警码198087289) ...................................................................................... 2 5SYNCLK 时钟异常(告警码198087289) ................................................................................... 2 660ms 同步时钟丢失告警(告警码198087282) .......................................................................... 3 7载频的TXRF 失锁告警(告警码198087279) ............................................................................ 3 8载频的前向功率3db 告警(告警码198087293) ......................................................................... 3 9载频与CMB 的HDLC 链路断(告警码198087247) ................................................................... 3 10 站点LAPD 断告警(告警码198087337) (4)1 AEM不在位告警(告警码198087193),AEM电源告警(告警码198087185),LNA0过流告警(告警码198087186)(1)检查CDU 前面板PWR指示灯。
国行小薇版中兴V880砖机恢复教程

国行小薇版中兴V880砖机恢复教程
中兴V880砖机恢复方法:
1、用读卡器或者可替代读卡器的东西把你的手机内存卡插上
2、把image.bin文件复制进内存卡的image文件夹中。
没有image文件夹的自己建一个
3、把内存卡取出,插到手机上。
(官方文档提示应将download文件夹内的东西备份,以防丢失。
)
4、按住手机上的menu键和音量+键,然后开机。
稍等片刻,会自动进入桌面。
即恢复完成。
中兴V880砖机恢复时要注意:
1、本方法仅用于国行机,其他机油请不要尝试,否则果断变砖。
2、升级时请保证手机电量充足
3、最好用最新版官方固件恢复你的手机,否则可能出现兼容性问题,如屏幕花屏。
4、请不要按错键,不要觉得可笑,也许按错键的就是你。
5、保证你的内存卡可以被手机在不开机时识别(据机油汇报,存在有swap或者ext分区的内存卡可能不能正常识别。
)
6、绝大多数恢复失败的朋友都是因为image.bin文件损坏引起的。
损坏它可能的地方是在它被下载时或者从电脑复制到内存卡中时。
解决方法,重新下载官方刷机包,解压后得到的image.bin文件复制进内存卡中。
多次尝试后仍无法恢复,可以换个内存卡试试。
感谢您选购了OT-S689C手机
OT-S689C感谢您选购了OT-S689C手机,为使您的手机使用在最佳状态,请详细阅读本手册。
执行标准1. YDC 015-2006 800MHz CDMA 1X 数字蜂窝移动通信网设备技术要求:移动台2. YDC 023-2006 800MHz CDMA 1X数字蜂窝移动通信网设备测试方法:移动台第1部分基本无线指标、功能和性能3. GB 4943-2001 信息技术设备的安全4. GB19484.1-2004 800MHz CDMA 数字蜂窝移动通信系统电磁兼容性要求和测量方法第1部分:移动台及其辅助设备5. GB/T18287-2000 蜂窝电话用锂离子电池总规范6. YD/T 965-1998电信终端设备的安全要求和试验方法7. YD/T998.2-1999 移动通信手持机用锂离子电源及充电器充电器8. YD/T 1591-2006 移动通信手持机充电器及接口技术要求和测试方法声明未经本公司事先书面许可的情况下,严禁以任何形式复制、传递、分发以及存储本使用手册中的任何内容。
如果本说明书所述的内容与您手机的实际使用情况不符,请以手机为准。
本着不断完善、持续发展的原则,本公司保留在不预先通知的情况下随时修订的权利。
本公司拥有对本说明书的最终解释权。
注意事项为了安全、正确地使用本产品,请您在使用手机前仔细阅读以下内容:1.驾驶时请不要使用手机,以免造成交通事故;2.在飞机上应关闭手机;3.在加油站、爆破地点以及化学燃料附近请不要使用手机;4.在医院里请关机或遵照有关规定使用手机;5.使用手机时请远离精密电子设备及医疗设备;6.为防止影响他人,公共场所请将手机设为振动;7.不要使用化学溶剂清洗或擦拭手机;8.不要在高温、低温、高湿度或灰尘较多的环境下放置或使用手机及其配件;9.请将手机和电池放在可靠的地方,避免其强烈震动或碰撞;10.如果是初次使用手机,请首先给电池完全充电,以保证电池使用寿命;11.不要随意拆卸手机及其附件,如有需要请到指定专业机构进行处理;12.请将手机及其配件放在小孩触摸不到的地方;13.废弃电池应放到电池回收箱内,请勿随意丢弃;14.请使用本型号产品的原装配件;15.请在网络覆盖范围内使用手机;16.在温度变化较为剧烈或长时间通话时LCD的显示效果会有所改变;友情提示:●当前市场上TF卡种类较多,请您在购买TF卡时,试用验证,选择与本手机相匹配的TF卡。
中兴V880详细教程

V880软件详细教程,本人亲测!!!---------堪称保姆级教程12月23日V880blade刚到手,就开始动手提取root权限,呵呵,走了很多弯路。
本人删除了联-通-定-制软件后,即安装UC,登陆并测试了网页速度,非常快,3M流量70元的预存话费告罄,被停机了。
建议若手机号码没有包月的,一定要先与联通签订包月协议。
原理:获取本机的root权限(相当于电脑里的管理员权限),只有获得root权限,才可以删除联通定制软件。
z4root 获得管理员权限。
RE即为文件管理器,可以在机器内存ROM和外部内存SD中查看文件。
1.下载文件:RE文件管理器v2.17.2/software/706.htmlz4root一键安全root工具1.3.0/download/apk/3216/com.z4mod.z4root/下载到个人PC(电脑,包含笔记本哦)。
2.拷贝到手机:按MENU键---跳出菜单“新建文件夹”---点击,重命名add.PC连接手机数据线,拖拽两个文件到SDcard(内存卡)的add文件夹中。
3.手机安装前准备电池电量满(其实不一定要满,为避免中途断电,建议半个电以上)按---显示---屏幕超时---30分钟,避免自动黑屏。
按---应用程序---开发---勾选USB调试。
后续需要设置,这里提前设置。
4.安装add文件夹中的两个软件按首页键手机界面下有3个图标,按中间的那个应用键进入SDcard中,手指单击add,进入add文件夹,手指单击进入安装:提示如下选择安装。
程序安装完成。
手指单击add,进入add文件夹,手指单击进入安装:提示如下选择安装。
程序安装完成。
5.提取root权限按手机首页键按应用键:进入界面可以看到新安装完两个程序:Z4图标即为:z4root一键安全root工具1.3.0RootExplorer即为RE文件管理器v2.17.2手指单击:进入如下界面:选择第一个temporary root调用临时权限,提示:“请等待直到root运行完成”等待2-5分钟后,提示“获得临时权限”,在重启手机之前。
中兴X100CDMA20001X数字移动电话用户手册V1.0说明书

1.0X100cdma2000 1X Digital Mobile PhoneUser ManualCopyright © 2005 by ZTE CorporationAll rights reserved.No part of this publication may be excerpted, reproduced, translated or utilized in any form or by any means, electronic or mechanical, including photocopying and microfilm, without the prior written permission of ZTE Corporation.Edition: 1st edition, Feb., 2005Contents1 General Information (6)1.1 Welcome (6)1.2 Security (6)1.3 Safety Warnings (6)2 Getting Started (7)2.1 Charging the battery (7)2.1.1 Recharging the battery (8)2.1.2 Caring for the battery (8)2.1.3 Common causes of battery drain (8)2.2 Powering on/off the Mobile Phone (8)2.3 Getting to know your phone (9)2.3.1 General introduction (9)2.3.2 Performing basic functions (9)2.3.3 Understanding screen icons (10)2.4 Using the menus (10)3 Making and Receiving Calls (12)3.1 Making Calls (12)3.1.1 Making a call (12)3.1.2 Dialing extension numbers (12)3.1.3 Making IDD (12)3.1.4 Redialing a number (12)3.1.5 Calling a saved number (12)3.2 Answering a call (12)3.2.1 Setting any key to answer calls (13)3.2.2 Muting an incoming call (13)3.2.3 Mute during a call (13)3.2.4 Adjusting the volume during a call (13)3.3 Dealing with missed calls (13)3.4 Setting speed dialing (13)3.5 Calling emergency numbers (13)4 Using Call Log List (14)4.1 Calling a number listed in the call log (14)4.2 Sending a message to the number listed in the call log (14)4.3 Viewing details of a call (14)4.4 Adding a number to the contacts list (14)4.5 Accessing the classified lists (14)4.6 Erasing a call record from the call log (14)4.7 Erasing all records (15)5 Entering Letters, Numbers, and Symbols (15)5.1 Understanding the text entry modes (15)5.2 Entering words letter by letter (Multitap mode) (16)5.3 Entering words quickly (16)5.4 Entering symbols (16)5.5 Entering numbers (16)5.6 Changing input modes (16)6 Sending and Receiving Text Messages (17)6.1 Sending text messages (17)6.1.1 Sending a new text message (17)6.1.2 Sending a message to more than one recipients (17)6.1.3 Sending a pre-written message (18)6.1.4 Sending a saved message (18)6.1.5 Failing to send a message (18)6.1.6 Receiving incoming calls while creating messages (18)6.1.7 Viewing the Sent box (18)6.1.8 Viewing the Inbox (18)6.1.9 Marking the priority (19)6.1.10 Using canned messages (19)6.2 Receiving text messages (19)6.3 Erasing messages (19)6.3.1 Erasing a single message (19)6.3.2 Auto Erase Inbox (19)6.4 Setting a different call back number (20)6.5 Setting the Delivery confirmation (20)6.6 Setting the Duplicate detection (20)7 Storage of Contacts (20)7.1 Saving a new contact (20)7.2 Adding pauses to a phone number (21)7.3 Viewing the information of the contacts (21)7.4 Editing a contact name (21)7.5 Editing a phone number (21)7.6 Setup a default number of the contact (21)7.7 Erasing a contact (22)7.8 Erasing a number (22)7.9 Assigning a Ring Tone (22)7.10 Setting speed dialing (22)8 Calculator (23)9 Customizing your Phone (24)9.1 Sound (24)9.1.1 Select a different ring tone (24)9.1.2 Setting sound effects (24)9.1.3 Setting the master volume (24)9.1.4 Adjusting other volume (25)9.2 Display (25)9.2.1 Changing the display contrast (25)9.2.2 Adjusting the backlighting (25)9.2.3 Setting the application time (25)9.2.4 Choosing a different language (26)9.2.5 Setting the name order (26)9.2.6 Choosing a different date format (26)9.2.7 Setting the separator of date (26)9.2.8 Choosing a different time format (26)9.2.9 Setting personal banner (26)9.3 Shortcuts (26)9.4 Roaming (27)9.5 Phone Features (27)9.5.1 Clear personalized dictionary (27)9.5.2 Changing the default text entry (27)9.5.3 Changing the default text language (27)9.5.4 Setting any key to answer calls (27)9.5.5 Setting keyguard (27)9.5.6 Displaying and resetting the call timer (28)9.5.7 Changing touchtone length (28)9.5.8 Setting service tone (28)9.6 Security (28)9.6.1 Setting voice privacy (28)9.6.2 Resetting the phone (28)9.7 About (28)10 Brew (29)11 Vmail (29)12 Clock (29)12.1 Setting an alarm (29)12.2 Using Timer (30)12.3 Setting a Countdown (30)13 Poker (31)14 Troubleshooting (32)15 FCC Statement (33)1 General Information1.1 WelcomeThank you for using ZTE X100 cdma2000 1X Digital Mobile Phone.To guarantee the mobile phone always in its best condition, please read this manual carefully and keep it for further use.The X100 enables you to freely communicate with people at any time and anywhere. It features intelligent personal information management, BREW functions, etc. which provides a vivid and dramatic mobile experience to you.X100 phone system has covered the cdma2000 1X technical specifications.ZTE Corporation reserves the right to modify the technical specifications in this manual at any time without notice.1.2 SecurityIf your mobile phone is lost or stolen, please report to your service provider or proxy agencies (You need to provide the phone’s ESN number labeled on the back of the mobile phone. You can see the ESN number after removing the battery. Please keep the ESN number for future use.)To protect your mobile phone from illegal use, please take the security measures as follows: Set handset lock.Take it with you as you can.1.3 Safety WarningsTo the ownerSome electronic devices are susceptible to electromagnetic interference sent by mobile phone if inadequately shielded, such as electronic system of vehicles. Please consult the device manufacturer before using the phone if necessary.The operation of mobile phones may interfere with medical devices like hearing aids and pacemakers. Please always keep the mobile phone more than 20 centimeters away from such medical devices when the phone is turned on. Do not carry the mobile phone in the breast pocket. Turn the mobile phone off if necessary. Consult a physician or the manufacturer of the medical device before using the phone.Be aware of the usage limitation when using a mobile phone at those places where there are explosive gases or explosive products being processed, such as oil warehouses or chemical factories, because even if your phone is in standby mode, it can still transmit radio frequency (RF) energy. Therefore, turn off your phone if required.Pay attention to the traffic safety. Do not use your mobile phone while driving. Park before making or answering a call.Store the phone out of the reach of small children. The phone may cause injury if used as a toy.Mobile phonePlease use the original accessories or those that are authenticated by ZTE. Using any unauthenticated accessories may affect your mobile phone’s performance, hurt your phone or even cause danger to your body and violate related national regulations about telecom terminals.If you want to clean your phone, please use clean fabric that is a bit wet or static-free. Do not use harsh chemical1.0cleaning solvents or strong detergents to clean it. Turn off your phone before you clean it.As your mobile phone can transmit electromagnetic waves, do not place it near magnetic items such as computer disks.Using the phone near electrical appliances, such as TV, telephone, radio and personal computer can cause interference, which affects the function of the phone.Do not expose your mobile phone to direct sunlight or store it in hot areas. High temperatures can shorten the life of electronic devices.Prevent liquid from leaking into your phone.Do not drop, knock or harshly treat it. Rough handling will break internal circuit boards.Do not connect the phone with other unauthorized peripheral equipments.Do not attempt to disassemble the mobile phone or battery by yourself. Non-expert handling of the devices may cause damages.Do not charge the mobile phone without battery.Battery useDo not short-circuit the battery, as this can cause excessive heat to bring about fire.Do not store the battery in hot areas or dispose of it in a fire.The battery can be recharged for hundreds of times, but it will eventually wear out. When the operating time (talk time and standby time) is noticeably shorter than normal, it is time to buy a new one.Never use any charger or battery damaged or worn out.Return the worn-out battery to the provider or put it in the appointed recycle place. Do not put it in familial rubbish.Warning: If the battery is broken, keep away from the content. If it taints your skin, wash your skin withabundance fresh water and ask for help from the doctor if necessary.Safety and general use in vehiclesBefore making or answering a call, you should pay attention to the local laws about the use of wireless mobile phones and take them into account for practical use.Safety airbag, brake, speed control system and oil eject system shouldn’t be affected by wireless transmitting. If you do meet problems above, please contact your automobile provider.Please turn off your mobile phone when refueling your automobile, and the same to the place where duplex wireless equipments are banned. Don’t put your phone together with flammable or explosive items; inner sparkmay cause fire.Aircraft safetyPlease turn off your mobile phone before the airplane takes off. In order to protect airplane’s communicationsystem from interference, it is never allowed to use mobile phone when it is in flight. Using mobile phone beforethe plane taking off should get aircrew’s permission according to safety regulations.2 Getting Started2.1 Charging the batteryFully charge the new battery for approximately 12 hours when using the phone for the first three times.To charge the battery, plug the charger into the socket located at the bottom left of the phone, then connect the adapter’s plug to a wall outlet.The battery icon at the top-right corner of the phone screen may tell you following possible status of the phone: • Charging (animated icon)• Partially charged• Full battery• Low battery while the icon blinks and the phone beeps. When the battery power is used up, the phone will automatically power off.During the charge, your phone and your charger may reasonably become hot, which is normal.• Finish charging when the battery is fully charged, the sound will be played. Please disconnect the charger from the phone and the outlet when charging finished.2.1.1 Recharging the batteryYou can safely recharge the battery at any time, The procedure is the same as the above.2.1.2 Caring for the batteryThis section gives you some important safety information and tips about how to improve the battery’s performance.General safety guidelines• This phone contains an integrated Li-Ion battery.• Do not attempt to disassemble, puncture, or short-circuit the battery.• If the battery has been put out of use for more than a month, recharge it before using your phone.• Avoid using the phone under extreme temperatures, direct sunlight, or high humidity.• Never dispose of used batteries in or near a fire. It could lead to explosion. Check with your local regulations for proper disposal instructions.2.1.3 Common causes of battery drainThe following operations drain the battery more quickly and thereby adversely affect its talk and standby times: • Playing games frequently.• Frequent use of the backlights.• Operating when no service is available, or service is available intermittently.• High earpiece and ringer volume settings.• Unacknowledged voicemail and text message alerts.2.2 Powering on/off the Mobile PhoneHold the key, until the power-on/power-off picture appears.This picture will be different according to different service provider.2.3 Getting to know your phone2.3.1 General introduction(1) Home screen .(2) Left soft key : Using as shortcut / corresponding to the function displayed at the left-bottom of the screen.(3) Right soft key : Using as shortcut / corresponding to the function displayed at the right-bottom of the screen.(4) Navigation key : (four directions) Scrolls through lists and moves the cursor during text entry. Also adjust the ringer volume.(5) OK key : Access menu or select an option from the list. Also switch between different modes during the text entry.(6) Send/Talk key : Dials a number or answers a call.(7) End/Power key : Turns the phone on or off, ends a call, or returns to the home screen.(8) Back key : Erases the last input in the text entry mode, returns to the previous menu, or erases all characters during text entry by holding the key.(9) “1” symbol key : Switches between symbol and other entry method during the text entry.(10) Keypad : For entering numbers, letters, or symbols.(11) Jack : For hands-free headset (sold separately).(12) * Text key : Switches between upper and lower case during the text entry.(13) # Space key : Inserts a space during the text entry.(14) Jack : For AC adapter (included).Warning: Inserting an accessory into the incorrect jack may damage the phone.2.3.2 Performing basic functionsTo...From the home screen... Turn on the phoneHold for approximately 3 seconds . Turn off the phoneHold for approximately 3 seconds . Make a call Enter the number by using the alphanumeric keypad and thenpress .End a call Press .Answer a call Press.1.0Set the master volume Hold for 3 second.Lock the keypad Hold for 1 second.Unlock the keypad Press then .Access the Contacts list Press left soft key (defined as Contacts shortcut).Access Messages Press right soft key (defined as Messages shortcut).Access recent Calls list Press send key (defined as Call Log shortcut).Access Menu Press OK key.2.3.3 Understanding screen iconsThese icons may appear on your phone’s screen.The alarm is set.Battery power indicator. More black bars indicates more battery power available.Service available. You can make and receive calls. More bars indicates stronger signal.No service available.Call in progress.Voice privacy set.A new text message received.One or more voicemails received.Roaming status indication.Vibration function on.Ringer off.2.4 Using the menusThe contents of the main menu are as follows:Call Log (options) Msging Contacts(options)Calc SettingsShow details Compose Add SoundSend message Inbox Edit DisplayDelete Sent Delete Shortcuts Show call type Draft RoamingClear list Pages Features Settings SecurityAbout Brew VmailClockPokerMobileShopAlarmClockSettingsTimerHelpCountdownTo operate in the menus:• Press OK key to access Menu.1.0• Press OK key to select a menu item.• Press left , right , up or down to view menu items.• Press to return to the previous menu page.• Press to return to the home screen.• In this guide, the arrow → guides you to the next step of an operation. For example, select Menu→ Settingsmeans to press OK key to access Menu, and then select the Settings option.1.03 Making and Receiving Calls3.1 Making Calls3.1.1 Making a call1. Make sure you are in an area where the network service is available. Note the icon on the home screen.More bars indicates stronger signal. If no bar appears, try to move the phone to where the signal can be detected.In some cases, it can be as simple as changing the direction you are facing.2. Enter the phone number.3. Press to dial the number.4. Press to end the call.3.1.2 Dialing extension numbersMethod1: Dial the exchange number and then the extension number.Method2: Add pauses (after entering the exchange number, press “Options” right soft key →Insert pause)between the exchange number and the extension numbers.3.1.3 Making IDDHold for about 3 seconds, release the key, and your screen will display the character “+” which replacesthe international access code, then enter the country code, the area code, and the phone number and then pressthe key to dial.3.1.4 Redialing a numberTo redial the last number called, press twice. If the send key is defined as shortcut key to other menus otherthan Call Log, you cannot do it.3.1.5 Calling a saved numberIf you have already saved a phone number in your phone, you can use the Contacts list to find it quickly.1. Press the left soft key (contacts shortcut key) on the home screen or press OK key → contacts. Thisbrings up a list of all saved contacts.2. Scroll in the list to search for the contact you want, and then select the number you want to dial, and pressto dial the number.3. If you have already assigned a speed dial number to a certain contact, press the corresponding speed dialnumber, and then press to dial. For more information, please refer to section “3.4 Setting speed dialing”.3.2 Answering a callWhen you receive a call, the phone will ring, vibrate, and /or light up, and an animated phone icon will appeartogether with the number of the caller . If the number is stored in your Contacts list, the contact’s name willappear.• Press to answer the call.• Press to end the call. The call duration will be displayed on the home screen for a short period of time.3.2.1 Setting any key to answer calls1. Select Menu → Settings→Features →Any Key Answer.2. Select On and press OK key to set.In this case, all incoming calls can be answered by pressing any key except , and .3.2.2 Muting an incoming callSelect the right soft key “silence” to mute the ringer or stop the vibration when call arrives.This action will only mute the current call. The phone will still ring when the following call arrives.3.2.3 Mute during a callYou can set voice mute for a moment during a call.Select right soft key “options” during the call.• Select Mute to block your voice.• Repeat last step and select Unmute to cancel the block.3.2.4 Adjusting the volume during a callTo adjust the earpiece volume during a call, press up or down.3.3 Dealing with missed callsIf you have missed a call, “Missed Call” indication will appear on your screen. You can get the caller’s number or name.• Press “Done” right soft key to clear the screen.• Press “Call Back” left soft key to call it.3.4 Setting speed dialingSpeed dialing allows you to quickly dial a stored phone number by entering a one- or two-digit speed dialing number.1. On the home screen, press shortcut key “contacts” to access your contacts list.2. Select the contact to which you want to assign a speed dialing number and press right soft key “options”.3. Select “edit” and press OK key.4. Scroll to Speed Dial and press OK key.5. Select an unassigned speed dial number (2-99) to assign to the phone number.6. Select one of the contact’s numbers.7. Press “save” soft key to confirm the speed dial assignment.When you want to dial a speed dialing number, please enter the one- or two digit speed dialing number and presskey to dial.3.5 Calling emergency numbersYou can call emergency numbers even if your account is restricted. However, while calling, your phone will be in Emergency mode, in which you cannot make normal calls.Note: Check with your service provider if the network supports this function.4 Using Call Log ListThe call log contains all calls sent or received by your phone, includes 4 type of log lists:All calls list, Missed calls list, Incoming calls list and Outgoing calls list.A sign is put ahead of every call number.Incoming calls.Outgoing calls.Missed calls.4.1 Calling a number listed in the call log1. Select Menu →Call log.2. Scroll down to select the number you want to call. Press OK key.3. Press Call soft key to make the call.4.2 Sending a message to the number listed in the call log1. Select Menu →Call log.2. Highlight the number you want to send a message. Press “options” soft key.3. Select Send message,press Next soft key,and then enter the text.4. Press Send soft key.4.3 Viewing details of a call1. Select Menu → Call log.2. Scroll down to select the number you want to view, Press OK key. You can get the caller’s name and his phone number, as well as the time and date of the call.4.4 Adding a number to the contacts list1. Select Menu →Call log.2. Highlight the number you want to save. Press “save” soft key.3. Select New contact.4. Select the number type you want to save as.5. Finish the following step of the contacts. For more details, please refer to section “ 7.1 saving a new contact”.4.5 Accessing the classified lists1. Select Menu → Call log.2. Press “options” soft key.3. Select Show call type. Press OK key.4. Select All Calls, Missed Calls, Incoming or Outgoing. Press OK key.4.6 Erasing a call record from the call logYou can erase a record listed in your Call log.1. Select Menu → Call log.2. Scroll down to select the record you want to delete. Press “options” soft key.1.03. Select Delete.A prompt window will pop up: “Delete xxxxxxxxx?”4. Select Yes to erase it. Select No to return to call log menu.4.7 Erasing all recordsYou can erase all records listed in your Call log menu.1. Select Menu → Call log.2. Press “option ”soft key.3. Select Clear list, Press OK key.A prompt window will appear: “Delete entire list?”4. Select Yes to erase all. Select No to return to call log menu.5 Entering Letters, Numbers, and SymbolsThis table is a guide of how to enter letters, numbers, and symbols in the text entry mode, such as Contacts andMessages. For more detailed information, please refer to section “ 5.1 Understanding text entry mode”.this...To... DoEnter a letter In Multitap mode(display abc), press the appropriate alphanumeric key forsome times until the letter you want appears on the display.Enter a number In Numbers mode(display123), press the number key once.Enter a symbol In Symbols mode, press left , right , up or down to select the symbolyou want.Enter a space Press .Erase a character Press .Erase all characters Hold .Move cursor right or left Press right or left.Change modes Press OK key to choose the current input mode.Capitalize the next letter In Multitap mode and eZiText mode, press key to choose the modeyou want to capitalize.5.1 Understanding the text entry modesThere are four input modes available to you when entering text, numbers, or symbols:• Multitap mode (displayed as abc)• Numbers mode (displayed as 123)• eZiText mode (displayed as ez)• Symbols modeNote:The default input mode you start in depends on the task you are doing. For example, when entering aphone number in the Contacts menu, the default text mode is Numbers, when entering text for a message, the default text mode is Multitap, and you can also choose eZiText mode or Numbers mode as default.5.2 Entering words letter by letter (Multitap mode) 1. Press the appropriate alphanumeric key once to display the first letter that appears on the keypad, twice for the second letter, and so on.2. Wait until the cursor move to the right before you enter the next letter.5.3 Entering words quicklyWhen you press a series of keys under eZiText mode, it checks the built-in dictionary for common words and predicts the word you are trying to spell.1. For each letter of the word you wish to spell, press the appropriate alphanumeric key once.For example, to enter the word “any”, press the alphanumeric keys →→.2. If the word suggested by eZiText does not match what you want, keep pressing until the word matches.3. When you get the word you want, press OK key to accept it.5.4 Entering symbolsWhile entering text, you can also enter symbols.1. Press in number mode or press in other mode to switch to the table of symbols.2. You will access the table of symbols.3. Press left, right, up or down to select a symbol.4. Press OK key to accept it.5.5 Entering numbers• In Numbers mode, press a number key once.• In Multitap mode, press the key several times until the number appears on the screen.• In eZiText mode, press and hold a number key until the number appears on the screen.5.6 Changing input modesTo enter characters that belong to other mode, you’ll need to switch between different modes. For example, to enter numbers in an email address while in Multitap mode:1. Press OK key to switch to Numbers.2. Enter the number, and then Press OK key to switch to Multitap mode to complete the address.6 Sending and Receiving Text Messages This chapter describes how to send, receive and erase text messages. The message consists of to 3 boxes: inbox, sent box and draft box. Inbox can save 30 messages. Sent box can save 50 messages. Draft box can save 10 messages.Important: The features and menus described in this chapter may vary from different services available in your area. Please contact the services provider about details of SMS charge.6.1 Sending text messagesFirst, make sure your service provider supports SMS. You can only send text messages to the phones that are capable of receiving them.6.1.1 Sending a new text messageYou can send messages to at most 5 recipients at one time.1. Select Menu →Msging → Compose.2. Enter the number of recipients you want to send.-Or-Press left soft key PhBook to access the contacts list, Select a contact name from the list and press OKkey, Select a number you want from the list and press OK key. Then press left soft key Done.Note: You can enter at most 5 recipients.3. Press next soft key to enter your text message. To learn how to enter letters, see section “ 5 Entering Letters, Numbers, and Symbols”.When you edit a message, the state bar will show the maximum number of characters that can fit in the text body, as well as the current count of current entries.4. When you finish editing your text, Press send soft key to send the message.6.1.2 Sending a message to more than one recipientsYou can add at most 5 recipients from your contacts list or the phone number manually entered at one time.1. Select Menu →Msging → Compose.2. Add at most 5 recipients, You can:1)Enter the first number. Press key, enter the second number, and so on.-Or-2)Press Options soft key to select PhBook.3)Select a contact name from the list and press OK key.4)Select a number you want from the list and press OK key.5) Press Done soft key to add the second number.6)Repeat step 2) to 5)to add the other numbers.3. Press Next soft key to edit the text.4. Press Send soft key to send the message.6.1.3 Sending a pre-written messageIf you don’t want to send the current message while editing, you can save the text to the draft box and edit them later.1. Select Menu → Msging → Draft.2. Scroll through the list of drafts and press OK key.3. Press Edit left soft key.4. Enter the recipient number and your text.5. Press Send left soft key, your message will be sent and saved to your Sent box.6.1.4 Sending a saved messageWhether a message was successfully sent or not, it would be automatically saved to the Sent box. You canre-use them.1. Select Menu →Msging → Sent.2. Scroll through the list of messages and press OK key to view the message.3. Press Options right soft key to select Forward.4. Enter the phone number manually or select one from the Contacts list.5. Press Next left soft key to view and edit the message.6. Press Send left soft key to send it.6.1.5 Failing to send a messageYou will fail to send or receive messages if your phone’s memory is full, or the messaging service is not available during that time. To free up the memory, please erase old messages. See section “ 6.3 Erasing messages”.6.1.6 Receiving incoming calls while creating messages• If you don’t wish to answer the call, press Reject left soft key to reject it, and then go on with your messages.• Press to answer the call. The message you were working on will be automatically saved to the draft box for you to treat it later.6.1.7 Viewing the Sent boxYou can check the status of the messages you have sent as long as they have been saved to the Sent Box.1. Select Menu → Msging→ Sent.2. Press up and down to scroll through the list of messages.3. Press OK key to read the message.4. Press options soft key, select an option from the list to execute the next step.-Forward: send this message to another recipient by entering his/her phone number.-Msg details: view the details of this message, including its call back number, date and time of call, etc.-Call:call back.-Add contact:Add this number to the contact list.6.1.8 Viewing the InboxYou can check the status of the messages you have received as long as they have been saved to the Inbox.1. Select Menu →Msging →Inbox.2. Press up and down to scroll through the list of messages.。
中兴机顶盒ITV终端维护

IPTV机顶盒维护手册---甘肃正宁电信设备维护:高涛一、机顶盒常见错误:A、机顶盒开机时,提示“非常抱歉,线路连接异常!请检查网线是否脱落或网络接入设备是否加电(1901)”a、请检查网线是否插在“WAN”端口上。
b、检查网线是否正常,如果机顶盒“连接”灯不亮,更换网线尝试。
如果网线没有问题,可能WAN口硬件故障,请拿到机顶盒维修地点检测。
B、机顶盒开机时,提示“设备异常,无法提供服务!(1306)”a、机顶盒没有进行初始化配置,没有配置信息,检查机顶盒接入方式、用户名、密码、业务账号、密码、服务器地址配置等。
b、检查方法见后面机顶盒手工设置说明。
C、机顶盒开机时,提示“非常抱歉,网络接入失败(1401,1402,1403,1404)”a、请检查机顶盒的接入方式设置,如果为PPPOE方式,重点检查“接入方式”中输入的用户名和密码是否正确,注意此处的账号和密码是宽带拨号的用户名和密码(一般为:p5xxxxxxxxxx@iptv),不是“业务设置”中的用户名和密码(一般为:p5xxxxxxxxxx)。
b、如果确认“接入方式”中PPPOE的用户名和密码正确,则请机房或10000号工作人员检查账号是否绑定,移机时尤为注意。
D、机顶盒开机时,提示“非常抱歉,网络接入失败!(1305)”a、此时接入方式一般为DHCP,请检查机顶盒设置是否和现场网络相符,检查现场DHCP网络,可以使用PC验证网络是否正常。
E、机顶盒开机时,提示“连接服务器失败,请稍后再试一次。
(1302)此问题经常遇到,主要检查以下几点:检查机顶盒的“业务设置”中“主用认证服务器地址”、“业务账号”和“业务密码”是否设置正确,其中“主认证服务器地址为“更新服务器地址为:如果发现主认证服务器地址为一定要修改为、到“统一视讯管理平台”检查用户状态是否正常,此时可能是账号没有开(有时账号会误送到UT平台),或者账号是注销状态,需要CRM重新开户激活后才能正常使用。
ZTEA80 GSM 双频数字移动电话机 说明书
ZTEA80GSM双频数字移动电话机使用手册本资料著作权属中兴通讯股份有限公司所有。
未经著作权人书面许可,任何单位或个人不得以任何方式摘录、复制或翻译。
侵权必究。
Copyright © 2004 by ZTE Corporation版次:2004年6月第1版10 9 8 7 6 5 4 3 2 1目录1基本知识 (6)1.1 简介 (6)1.2 安全须知 (6)1.3 安全警告和注意事项 (6)2开始使用 (11)2.1 按键说明 (11)2.2 界面图标说明 (13)2.3 技术参数 (13)2.4 电池 (14)2.4.1 电池的拆卸和安装 (14)2.4.2 电池的充电 (15)2.5 连接网络 (16)2.5.1 SIM卡 (16)2.5.2 SIM卡的插入和取出 (17)2.5.3 开关手机 (17)2.5.4 SIM卡和手机的去锁 (17)2.5.5 连接到网络 (18)3基本操作 (19)3.1 拨打电话 (19)3.2 接听电话 (20)3.3 呼叫菜单 (21)4功能菜单 (23)4.1 功能菜单结构和使用 (23)4.2 信息 (23)4.3 电话菜单 (27)4.3.1 电话记录 (27)4.3.2 来电转接 (28)4.3.3 电话防火墙 (29)4.3.4 通话设置 (31)4.4 工具箱 (32)4.4.1 闹钟 (32)4.4.2 计算器 (33)4.4.3 翻转棋 (33)4.4.4 输入法帮助 (34)4.5 情景模式 (34)4.6 设置 (35)4.6.1 手机设置 (35)4.6.2 时间设置 (36)4.6.3 显示设置 (36)4.6.4 铃音设置 (36)4.6.5 网络设置 (37)4.6.6 安全设置 (37)4.6.7 出厂设置 (39)4.7 STK(SIM卡应用工具包)服务 (39)4.8 名片夹 (39)4.8.1 添加名片 (41)4.8.2 修改名片 (41)4.8.3 查看名片 (42)4.8.4 查找名片 (42)4.8.5 删除整体记录 (42)4.8.6 发送短消息 (43)4.8.7 设置 (43)4.8.8 发送名片 (43)4.8.9 单键拨号 (44)4.9 全屏显示的日历 (44)5文字输入 (45)5.1 概述 (45)5.2 键盘定义 (45)5.3 输入法说明 (46)5.3.1 拼音输入法 (46)5.3.2 笔画输入法 (48)5.3.3 部件输入法 (49)5.3.4 英文和数字输入 (49)6故障分析 (51)1 基本知识1.1 简介感谢您选择ZTEA80手机。
华为、中兴话务台安装维护使用手册(完整版)

话务台安装维护使用手册目录华为CC08话务台1.话务台安装1.1 硬件安装1.2 软件安装1.2.1 话务台终端软件安装1.2.2 安装CTX卡驱动程序1.3 话务台设置1.3.1 用户登录设置1.3.2 用户授权设置1.3.3 设置计费数据1.4 安装注意项2.话务台扩展功能2.1 电脑话务员2.2 夜间服务2.3 浏览呼叫记录2.4 话单传送2.5 号码姓名对照表2.6 维护长短号3.常见故障处理08话务台常见故障处理流程中兴ZXJ10-B综合话务台一.综合话务台安装1.话务台简介2.话务台软件安装3.话务台硬件安装4.话务台运行设置二.中兴综合话务台故障处理华为篇1.话务台安装1.1 硬件安装CTX卡是Centrex话务台接口板,它插在PC机的PCI,通过双绞线与DSL板相连,通过插孔与耳机(包括话筒)相连,实现Centrex话务台的各项功能。
CTX卡有C802CTX、C803CTX两种,现在都是用的C803CTX。
(1). C803CTXC803CTX卡插在话务台(PC机)的PCI总线扩展槽中。
C803CTX单板没有跳线,也没有拨码开关。
C803CTX卡有三个接口:EARPHONE、RECEIVE、LINE,C803CTX卡接口如图2所示。
EARPHONE是四芯普通电话插座,为话务台耳机接口。
RECEIVE是四芯普通电话插座,为手柄接口。
LINE是六芯普通电话插座,为外线接口,中间两芯接双绞线与交换机侧的DSL板相连。
图21C803CTX卡接口示意图该板有一个线路状态指示灯,位于EARPHONE插孔上面。
慢闪(1秒亮1秒灭)表示单板运行正常,但是U口没有激活;快闪(1/4秒亮1/4秒灭)表示单板运行正常,并且U口已经激活。
C803CTX卡支持电脑话务员功能,电脑话务员的提示语音存在一片Flash内,可以通过话务台的耳机话筒反复录音,语音的长度最长可以达到60秒。
需要注意的是,电脑话务员功能只支持DTMF信号的识别,如果对方是脉冲拨号,CTX卡则不识别,这种情况可以通过终端软件设置,给用户回忙音或者把该电话转到值班分机。
张慧妹--中兴手机售后服务内容
客户服务与管理-------中兴手机售后服务内容姓名:张慧妹学号:4150103238中兴手机售后服务长期以来,中兴通讯手机售后体系非常重视售后渠道建设。
至今,在全国各省、直辖市共建立了700多家完全具备维修能力的CDMA终端售后维修中心,另有1000多家售后服务联络点遍布全国,设立在全国的27个客服中心对终端售后维修中心进行服务管理和业务培训工作,稳健快速地处理市场、客户反馈的售后问题,为各级用户提供快捷、方便的售后服务,立志打造售后服务第一品牌。
一、售后服务流程二、售后服务内容从上面的售后服务流程图上可以看到,中兴手机的售后主要有两个方面,一是用户通过呼叫热线向中兴手机客服咨询或投诉,而是用户所购买的手机出现硬件故障,向授权售后代理反映,予以解决。
1.咨询或投诉中兴通讯政企网客服中心服务热线为商务售前咨询提供7×8小时服务,为售后技术咨询提供7×24小时服务。
1)咨询一般分为三类:在线支持类、版本升级类、现场支持类在线支持类:为用户提供远程技术指导支持;版本升级类:用户申请设备软件版本对设备进行升级操作;现场支持类:对于一些特定用户或重大紧急故障,派调技术工程师去用户现场处理。
2)投诉如果是企业网用户,请拨打中兴通讯政企网客服中心服务热线8008309870(固话)、4008309870(手机固话);如果是运营商、供应商等,请拨打中兴通讯全球客户支持中心热线电话8008301118;若是一般用户课拨打热400-880-9999 400-636-3366给客服人员解决,解决不了,转于客服经理进行解决。
2.硬件故障中兴通讯为保证用户享受到满意的售后服务,着眼于建立全国范围的维修网络。
承诺⏹中兴手机主机和充电器(充电座)保修期为一年,电池保修期为六个月。
外接有线耳机保修三个月。
⏹用户所购手机及附件在保修期内出现质量问题,若非人为损坏,可持保修卡和购机发票到中兴授权客户检测中心检测,确定故障存在后,选择退货、换货或维修。
- 1、下载文档前请自行甄别文档内容的完整性,平台不提供额外的编辑、内容补充、找答案等附加服务。
- 2、"仅部分预览"的文档,不可在线预览部分如存在完整性等问题,可反馈申请退款(可完整预览的文档不适用该条件!)。
- 3、如文档侵犯您的权益,请联系客服反馈,我们会尽快为您处理(人工客服工作时间:9:00-18:30)。
6.12 按键故障 ............................................................................ 48 6.13 键盘灯不亮 .......................................................................... 48 6.14 显示故障 ............................................................................ 48 6.15 无信号 ............................................................................... 49 6.16 摄像故障 ............................................................................ 49 6.17 T-Flash 卡故障 ...................................................................... 50 6.18 触摸屏故障 .......................................................................... 50
4 拆 卸 演 示 . . . . . . . . . . . . . . . . . . . . . . . . . . . . . . . . . . . . . . . . . . . . . 17
4.1 拆机工具 .............................................................................. 17 4.2 爆炸图 ................................................................................. 17 4.3 拆机流程 .............................................................................. 18 4.4 拆机步骤 .............................................................................. 19 4.5 构成 ................................................................................... 37
3 下载软件 .............................................. 5
3.1 工装 .................................................................................... 5 3.1.1 计算机系统配置 ............................................................... 5 3.1.2 数据线 .......................................................................... 5 3.1.3 服务软件 ....................................................................... 5 3.1.4 注意事项 ....................................................................... 5 3.2 安装驱动 ............................................................................... 6 3.3 查询 COM 口 ........................................................................... 9 3.4 安装下载平台 ......................................................................... 9 3.5 下载软件 .............................................................................. 10 3.6 导出下载信息 ........................................................................ 13
V880 WCDMA 数 字 移 动 电 话 机 售后维修手册(一级)
版 本 1.0
dfdgfdsgs
法律声明
本资料著作权属中兴通讯股份有限公司所有。未经著作权人书面许可,任何单位或个人不 得以任何方式摘录、复制 或翻译。 侵权必究。 “ZTE”和“ZTE中兴”是中兴通讯股份有限公司的注册商标。中兴通讯产品的名称和标 志是中兴通讯的专有标志或 注册商标。在本手册中提及的其他产品或公司的名称可能是其 各自所有者的商标或商名。在未经中兴通讯或第三方 商标或商名所有者事先书面同意的情 况下,本手册不以任何方式授予阅读者任何使用本手册上出现的任何标记的许 可或权利。 本产品符合关于环境保护和人身安全方面的设计要求,产品的存放、使用和弃置应遵照产 品手册、相关 合同或相关国法律、法规的要求进行。 如果本产品进行改进或技术变更,恕不另行专门通知。 当出现产品改进或者技术变更时,您可以通过中兴通讯技术支持网站 查询有关信息。
Hale Waihona Puke 2 检测功能 .............................................. 3
2.1 NFF 检测 .............................................................................. 3 2.2 IMEI 检测 ............................................................................... 4 2.3 软件版本检测 ......................................................................... 4
7 附 录 . . . . . . . . . . . . . . . . . . . . . . . . . . . . . . . . . . . . . . . . . . . . . . . . . 51
7.1 售后技术开发部网站简介 .......................................................... 51
修订历史
版本信息 修订日期 修订原因
中兴通讯学院制作 发布日期 : 2011–01–15
目录
1 产品概述 .............................................. 1
1.1 产品外观 ............................................................................... 1.2 标准配置 ............................................................................... 1.3 产品规格 ............................................................................... 1.4 主要功能 ............................................................................... 1 1 1 1
6 常 见 故 障 维 修 流 程 图 ( 一 级 ) . . . . . . . . . . . . . . . . . . . . . . . . . . . . 43
6.1 结构件故障 ........................................................................... 43 6.2 电池故障 .............................................................................. 43 6.3 不开机 ................................................................................. 43 6.4 死机 ................................................................................... 44 6.5 自动关机 .............................................................................. 44 6.6 充电故障 .............................................................................. 45 6.7 不识卡 ................................................................................. 45 6.8 无送话 ................................................................................. 46 6.9 无受话 ................................................................................. 46 6.10 无铃声 ............................................................................... 47 6.11 无振动 ............................................................................... 47
