学习日语看日语电视台听日语广播KeyHoleTV 使用教程
电话用语

我怎样挂市问号台?番号案内は何番ですか。
ばんごうあんないはなんばんですか。
请拨114。
114にかけてください。
いちいちよんにかけてください。
这是长途台吗?ここは長距離交換台ですか。
ここはちょうきょりこうかんだいですか。
我想给北京挂电话。
ペキンヘ電話をかけたいですが。
ペキンヘでんわをかけたいですが。
3分钟多少钱?3分間でいくらですか。
さんぶんかんでいくらですか。
电话号码是多少?電話番号が何番ですか。
でんわばんごうがなんばんですか。
我的号码是0461-235789。
私の番号は0461-235789です。
わたしのばんごうはゼロよんろくいちのにさんごななはちきゅうです。
请给我接外线。
外線をお願いします。
がいせんをおねがいします。
我要挂的号码是0123-987654。
0123-987654をお願いします。
ゼロいちにさんのきゅうはちななろくごよんをおねがいします。
分机号是268。
内線番号は268です。
ないせんばんごうはにろくはちです。
电话占线。
お話し中です。
おはなしちゅうです。
電話の注文を取消したいんですが。
でんわのちゅうもんをとりけしたいんですが。
我用我房间的电话。
私は自分の部屋の電話を使います。
わたしはじぶんのへやのでんわをつかいます。
我们电话断线了。
話している途中で切れました。
はなしているとちゅうできれました。
对不起,我挂错了电话。
すみません。
電話番号を間違えました。
すみません。
でんわばんごうをまちがえました。
我可以与史密斯先生通话吗?スミスさんを電話口にお願いします。
スミスさんをでんわぐちにおねがいします。
请问,谁在讲话?すみません。
誰が話していますか。
すみません。
だれがはなしていますか。
请重复。
もう一度お願いします。
もういちどおねがいします。
请大声点。
どうぞ大きな声でお願いします。
どうぞおおきなこえでおねがいします。
我听不清楚。
はっきり聞こえないんですが。
はっきりきこえないんですが。
请挂上电话重拨。
Yamaha AV RECEIVER 使用手册说明书

目录 连接- 连接扬声器 播放 设置 故障排除附录 补充信息A V RECEIVER使用手册DRX-3.2≫≫≫≫≫≫≫≫包装箱中的物品 5零件名称 6前面板 6显示屏 8后面板 9遥控器 11连接连接扬声器 13扬声器安装 14扬声器连接“Speaker Setup”设置 32扬声器组合 45连接电视 46连接 ARC 电视 47连接非 ARC 电视 48连接播放设备 49连接装有 HDMI 接口的 AV 设备 49连接无 HDMI 接口的 AV 设备 50连接音频组件 51连接视频摄像机等 52连接单独房间中的 AV 设备(多区域连接) 53连接电视 (ZONE 2) 53连接前置主放大器 (ZONE 2) 54连接天线 55网络连接 56连接外部控制设备 57 IR IN/OUT 端口 57 12V TRIGGER OUT 接口 58连接电源线 59播放AV 设备播放 61基本操作 61 BLUETOOTH®播放 62基本操作 62网络电台 63播放 63 AirPlay® 65基本操作 65 DTS Play-Fi® 66播放 66 FlareConnect TM 67播放 67 USB 存储设备 68基本操作 68设备和支持的格式 70播放 PC 和 NAS(Music Server)上的文件 71 Windows Media® Player 设置 71播放 72支持的音频格式 74 Play Queue 75初始设置 75添加 Play Queue 信息 75排序和删除 76播放 76收听 AM/FM 电台 77调谐至一个无线电台 77预设无线电台 79使用 RDS(澳大利亚及亚洲产品类型) 81多区域功能 82切换遥控模式 (Zone 2) 83切换遥控模式 (Zone 3) 84播放 85便利功能 87调整音调 87聆听模式 88选择聆听模式 88聆听模式效果 90可选聆听模式 93设置Setup 菜单 102菜单列表 102菜单操作 1041. Input/Output Assign 1052. Speaker 1093. Audio Adjust 1134. Source 1145. Listening Mode Preset 1156. Hardware 1167. Multi Zone 1298. Miscellaneous 130 Quick Menu 131菜单操作 131 Web Setup 133菜单操作 133 Firmware Update 134本机中的更新功能 134通过网络更新固件 135通过 USB 更新 137使用自动启动向导进行 Initial Setup 139操作 139故障排除当本机错误运行 143故障排除 144附录关于 HDMI 152一般规格 1541. 主机 (1) Array2. 遥控器 (RC-912R) (1)3. 扬声器设置麦克风 (1)• 在 Initial Setup 过程中使用。
YAESU_FT-857D操作手册
第一节 简要说明........................................................................................................................................... 1 第二节 安全使用........................................................................................................................................... 2 第三节 组装和接线....................................................................................................................................... 3 第四节 接地系统........................................................................................................................................... 6 第五节 天线系统........................................................................................................................................... 6
YAMAHA AV功放 按键及其功能简介

按键及其功能前面板1STANDBY/ON按此开关可打开此设备的电源。
再次按下,将此设备设置为待机模式。
2Remote controls ensor这从遥控发射机接收信号。
3Display这显示了各种信息。
(有关详细信息,请参阅11页。
4MEMORY(MAN’L/AUTOFM)按此按钮可存储广播电台。
当此按钮按下并保持超过三秒时,自动预设调整开始。
5EDIT此按钮用于交换两个预设站之间的分配。
6TUNINGMODE(AUT O/MAN’LMONO)按此按钮可将调谐模式切换为自动或手动。
要选择自动调谐模式,请按此按钮,以便"自动调谐"指示器在显示器上亮起。
要选择手动调整模式,请按此按钮,以便"自动调谐"指示器熄灭。
7FM/AM按此按钮将接收音切换到FM或AM模式。
8TUNINGUP/DO WN此按钮用于调整。
按向上的一侧调谐到更高的频率,并按下侧以调低频率。
9TAPE/MD MON/EXT.DECODER若按下此按钮,您可以播放连接到外部解码器输入终端的信号。
10 INPUT打开这个选择器来选择程序源(VCR, VIDEO,AUX, TV/DBS, DVD/LD, CD, TUNER, PHONO)收听或观看。
所选程序源的名称出现在显示中。
11 INPUT MODE此按钮切换DVD/LD和电视/卫星输入信号模式(自动/模拟)。
12 VOLUME此控件用于提高或降低音量级别。
13 PHONES使用耳机时,请将耳机连接到话筒插口。
您可以通过耳机收听由主扬声器输出的声音。
仅使用耳机时,请将扬声器A和B设置为off位置,并关闭数字音频字段处理器(以便在显示器上不显示DSP程序名称)。
14 SPEAKERS将A或B(或A和B)设置为要使用的主扬声器系统(连接到此设备)的ON位置。
为不希望用于关闭位置的主扬声器系统设置按钮。
15 A/B/C/D/E按此按钮可选择预设站的组(A到E)之一。
字幕自动化播出系统客户端使用手册
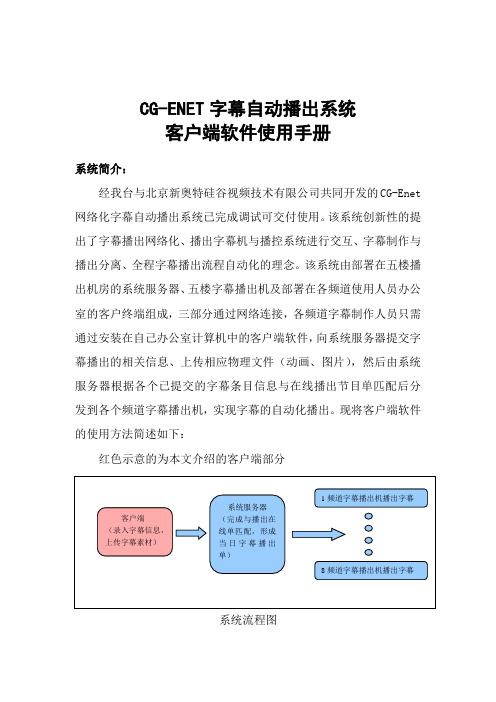
CG-ENET 字幕自动播出系统客户端软件使用手册系统简介:经我台与北京新奥特硅谷视频技术有限公司共同开发的CG-Enet 网络化字幕自动播出系统已完成调试可交付使用。
该系统创新性的提出了字幕播出网络化、播出字幕机与播控系统进行交互、字幕制作与播出分离、全程字幕播出流程自动化的理念。
该系统由部署在五楼播出机房的系统服务器、五楼字幕播出机及部署在各频道使用人员办公室的客户终端组成,三部分通过网络连接,各频道字幕制作人员只需通过安装在自己办公室计算机中的客户端软件,向系统服务器提交字幕播出的相关信息、上传相应物理文件(动画、图片),然后由系统服务器根据各个已提交的字幕条目信息与在线播出节目单匹配后分发到各个频道字幕播出机,实现字幕的自动化播出。
现将客户端软件的使用方法简述如下:红色示意的为本文介绍的客户端部分系统流程图 客户端(录入字幕信息,上传字幕素材) 系统服务器(完成与播出在线单匹配,形成当日字幕播出单)1频道字幕播出机播出字幕8频道字幕播出机播出字幕第一部分:客户端软件使用说明:一、客户端软件界面介绍:用户输入标识所属频道的用户名和密码后显示如下软件界面:客户端软件大致分三部分:A 区:基本功能区,包括对字幕条目的“新建”、“保存”、“删除”、“提交”等;B 区:信息查询区,用户可输入日期、类型等相关信息来查询记录在系统数据库中的已编辑字幕条目或在线节目播出单(此在线节目播出单与各频道播控程序当前在播节目单保持同步实时更新);A:基本功能按钮区 C:字幕条目具体属性录入区显示字幕条目/在线节目单信息 B:信息查询区 选择飞播时可显示在线单根据条目类型显示不同信息 在此选择查询已编辑字幕条目还是在线节目播出单当选择“时间表”标签时B区显示如右图:C区:字幕条目属性录入区,用户可在此区域定义字幕播出的时间、播出内容、播出方式、与字幕播出相匹配节目类型、字幕播出模板等相关信息,并可在此处完成字幕素材的上传。
US212C用户手册

US212C用户手册最新版本: 1.02013-10-17目录目录 ................................................................................................错误!未定义书签。
更新历史 ........................................................................................错误!未定义书签。
声明 ................................................................................................错误!未定义书签。
注意事项 ........................................................................................错误!未定义书签。
基本功能 ........................................................................................错误!未定义书签。
使用前准备 ....................................................................................错误!未定义书签。
外观图 ...........................................................................................................错误!未定义书签。
按键功能........................................................................................................错误!未定义书签。
智力快车数码播放器使用说明
智力快车数码播放器使用说明一、产品介绍智力快车数码播放器是一款高清晰度的数字媒体播放器,可以播放多种格式的音视频文件,并具备多种实用功能,如录音、FM收音等。
它不仅可以连接电视机或显示器进行高清画质输出,还可以通过蓝牙或USB接口与其他设备进行数据传输。
二、使用前准备1. 智力快车数码播放器本身:包括主机、遥控器等。
2. 电源适配器:智力快车数码播放器需要外接电源供电。
3. HDMI线或AV线:根据需要选择连接方式。
4. 存储设备:如U盘、移动硬盘等,存储需要播放的音视频文件。
三、基本操作1. 连接设备:将智力快车数码播放器通过HDMI线或AV线连接到电视机或显示器上,并将存储设备插入到USB接口中。
2. 开机:按下主机上的电源键,等待系统启动完成后即可使用。
3. 操作方式:(1)遥控器操作:使用遥控器进行操作,包括选择文件、调整音量、暂停/播放等功能。
(2)主机按钮操作:在没有遥控器时,也可以使用主机上的按键进行相关操作。
四、高级功能1. 蓝牙连接:智力快车数码播放器支持蓝牙连接,可以将手机、平板电脑等设备通过蓝牙与播放器连接,实现音频传输或遥控操作。
2. 录音功能:智力快车数码播放器具有录音功能,可以通过内置麦克风进行录音,并将录音文件保存到存储设备中。
3. FM收音功能:智力快车数码播放器可以接收调频广播信号,并进行收听。
五、常见问题解决1. 播放画面不清晰或者无法显示:检查HDMI线或AV线是否连接正确,检查电视机或显示器是否设置正确。
2. 播放声音不清晰或者无法发出声音:检查是否调整了正确的输出方式和音量大小。
3. 存储设备无法识别或者无法读取文件:检查存储设备是否格式化正确,文件类型是否支持。
六、注意事项1. 请避免在潮湿、高温、高压等环境下使用本产品。
2. 请勿在使用时强行拔插存储设备和电源适配器等外部接口。
3. 请勿在使用时将本产品摔打或受到其他外力冲击。
七、总结智力快车数码播放器是一款功能强大的数字媒体播放器,具备多种实用功能和高清晰度输出,可以满足用户对音视频娱乐的需求。
DIRECTV本地频道连接器快速入门指南说明书

DIRECTV Local Channel Connector Quick Start GuideA few simple steps, and you’re up and runningGive yourself about 30 minutes for setup,and be aware that your recordings will beinterupted during the process.Local Channel Connector using the coax cable.Connector’s USB pluginto your DIRECTVreceiver’s USB port.Note: Go to /lccfor a list of compatible receivers.(pig-tail) of the LocalChannel Connectorto the provided LocalChannel Connector.Adapter into an electricaloutlet (not controlled bya wall switch). The blueLED light on the USB plugshould come on.Antenna with Coax Cable and SplitterAntenna SplitterCoax Cable Local Channel ConnectorLCC Power AdapterLocal Channel Connector (LCC): On Demand features not available. Local channels are not available in the DIRECTV Everywhere app. You can watch and/or record up to 2 live local channels at the same time. Local channel availability is determined by location.TroubleshootingBefore you troubleshoot, if the weather is severe, wait for it to clear.If you try all the solutions listed here and nothing works, go to /lcc for more troubleshooting tips.I see the following screen telling me my signal is weak:This means the signal is weak or there is no signal. > Unplug Local Channel Connector power adapter. Wait 10 seconds and plug it back in.> Unplug USB from the receiver and plug it back in. > If not fixed, check antenna connections or position. > If you still have trouble, contact us.Settings in the Menu option showsSatellite instead of Sat & Antenna option.> Check all connections.> Make sure Local Channel Connector power adapter is plugged into an outlet (not controlled by a wall switch).> If it’s plugged in, unplug the Connector power adapter then plug it back in. > Unplug the Connector from the receiver and plug it back in. > If you still have trouble, restart the receiver and try again.Edit Over-the-Air Channels button is not selectable in the Over-the-Air Antenna Setup screen.> Check power cables and connections.> Check antenna location and move to a better location if possible.For tips on the best placement, download Winegard’s HDTV Tower Finder app available through your app store. > Run the Start Antenna Setup again:Go to Menu >Settings, then scroll to the right and click OK onSat & Antenna. In the Satellite Dish & Antenna Setup menu, selectOver-the-Air Antenna Setup >Start Setup.Many channels display “Red” in theSignal Strengthscreen.> Check antenna location and move to a better location if possible.For tips on the best placement, download Winegard’s HDTV Tower Finder app available through your app store.Many channels display no color in the Signal Strength screen and say Not Acquired.> Check Local Channel Connector power cable and connections to the receiver. Channels are missing in the Signal Strength screen.> Run the Start Antenna Setup again:Go to Menu >Settings, then scroll to the right and click OK onSat & Antenna. In the Satellite Dish & Antenna Setup menu, selectOver-the-Air Antenna Setup >Start Setup.©2018 AT&T Intellectual Property. All Rights Reserved. AT&T, Globe logo, DIRECTV and all other DIRECTV marks contained herein are trademarks of AT&T Intellectual Property and/or AT&T affiliated companies. All other marks are the property of their respective owners.。
LiTV線上影視 使用手冊说明书

使用手冊本手冊適用於LiTV3.0以上之軟體版本版權所有© 2014~15 替您錄科技股份有限公司TGC Taiwan Inc. All Rights Reserved目錄關於這本使用手冊 (ii)開始使用 (1)開始使用之前 (2)加入會員 (2)軟體更新 (2)遙控器說明 (3)遙控器功能介紹 (4)基本按鍵說明 (4)卡拉OK按鍵說明 (5)設定 (6)系統資訊 (7)會員 (8)家長監護 (12)版權與商標 (15)服務介紹 (16)LiTV主選單 (17)直播頻道 (18)隨選影片 (20)卡拉OK (24)空中幼兒園 (24)免費影音 (28)購買 (31)購買方案 (32)可使用服務 (34)購買記錄 (35)啟用兌換券 (35)FAQ問與答 (37)常見問題 (38)服務與內容 (38)技術支援 (39)訂購問題 (40)服務條款與隱私權政策 (44)LiTV服務條款 (45)隱私權政策 (48)i關於這本使用手冊謝謝您使用《LiTV線上影視》服務。
本使用手冊將為您介紹《LiTV線上影視》之各項服務設定方式和功能操作。
本服務需要連結至網際網路才能使用,您可選擇有線或無線網路來安裝。
使用《LiTV線上影視》服務前請先確認您的多媒體液晶顯示器已可連結至網際網路。
本手冊適用於LiTV3.0以上之軟體版本,您可在LiTV主選單選擇設定,或是按紅色鍵進入設定>系統資訊確認軟體版號。
以下所述之畫面及其操作方式可能隨系統的調整或功能的增加、改善而變動,本手冊內容僅供參考,請依LiTV實際顯示的畫面說明為準。
ii開始使用開始使用之前 (2)加入會員 (2)軟體更新 (2)開始使用之前LiTV以連網之多媒體液晶顯示器提供服務,因此使用《LiTV線上影視》服務前,請再次確認以下事項:1.已選購內建《LiTV線上影視》服務之連網多媒體液晶顯示器。
2.請依照該款多媒體液晶顯示器說明書,完成線路安裝及網路環境設定。
KeyHoleTV

(名称对照表) KeyHoleTV名称与我们平常所说的有一定出入,下面是部分参考的对照表。 绝大多数可以参照字母缩写和地方名称判断。 NHK(日本放送协会:包括综合电视、教育电视、第一广播、FM广播) NTV(日本テレビ;日本电视台,民放五大台之一) TV Asahi(テレビ朝日;朝日电视台,民放五大台之一) TBS(东京放送,民放五大台之一;广播、电视均有) Fuji TV(フジテレビ;富士电视台,民放五大台之一) TV Tokyo(テレビ东京;东京电视台,民放五大台之一) MX(Tokyo MX,东京都会电视台) 放送大学(housou univ)
打开下好的客户端,根据提示完成安装(一直点确定即可)。
使用指南
软件使用
节目清单Βιβλιοθήκη 1:软件打开后会自动进入节目列表,双击即打开。 2:当打开节目后,不能进行节目单的移动,要重新选节目请按Stop VIDEO键再进行选择。 3:KeyHoleTV搜索功能有一些问题,请自己手动浏览。 4:KeyHoleTV只支持同时收看一个节目,但是KeyholeTV可以多开(开多个程序)。
KeyHoleTV
日本政府发布的络媒体提供平台
01 基本信息
03 使用指南
目录
02 下载&安装
P2P络电视KeyHoleTV,是由日本政府(内务省)发布的,是合法的络媒体提供平台。
基本信息
用户客户端(Viewer Software) 操作系统:Windows 2000, Windows XP, Windows VISTA,Linux, MacOSX(10.4, 10.5) 建议带宽:2MB以上 提供服务:收看电视及广播服务。 广播客户端(Broadcaster Software) 操作系统:Windows XP,Windows VISTA,windows 7 建议带宽:2MB以上 提供服务: 1:广播你的视频节目到世界各地 你可以实时播放自己的视频节目到世界各地。你只需要一个摄像头和麦克风,就开始运作自己的广播电视台。 2:可视
HOLUX 導航軟體 使用手冊

12周年虎虎生風行動導航限量紀念機導航軟體使用手冊虎虎生風_導航軟體手冊地圖軟體更新與升級本主機已包含電子地圖之台灣版版權,無須再付任何費用,台灣地區請至研勤科技PaPaGo網站進入品牌專區「長天HOLUX下載專區」下載地圖軟體的更新與升級。
/download/download_hlx.htm特別警示:擴充記憶卡內之User檔案夾為自建地標(我的最愛)儲存位置,更新地圖時可先保留下來以免覆蓋原有資料,造成自建地標(我的最愛)遺失警告:請依據廠商建議置換相同或同型電池請依據製造商說明書處理用過之電池版本:1.01版2007年01月註冊資訊HOLUX與GPSmile為HOLUX Technology, Inc.的商標。
所有其他商標屬於各登記公司所有。
注意本手冊之內容,本公司享有隨時修改之權力,且不另行通知。
目錄簡介 (5)功能與特色 (5)使用衛星導航 (7)首次GPS定位 (7)拖曳地圖 (9)放大或縮小地圖 (9)浮動選單 (10)手寫輸入 (11)導航畫面點選區域 (13)PAPAGO! MAP操作說明 (14)基本導航功能 (14)ㄧ.目的地 (15)1.回家 (15)2.查詢紀錄 (17)3.我的地標 (18)4.住址/道路 (19)5.交岔路口 (23)6.景點 (25)7.加油站 (27)8.停車場 (28)9.交流道 (29)10.餐廳小吃 (30)11.住宿 (31)12.購物商場 (32)13.交通設施 (33)14.旅遊娛樂 (34)15.政府機關 (35)16.金融醫療 (36)17.教育文化 (37)18.其他 (38)二.路徑規畫 (39)1.結束導航 (39)2.取消經過點 (39)3.重新規劃路徑 (39)4.規劃結果 (40)5.繞道規劃 (40)6.規劃選項 (41)三.加值軟體 (42)四.瀏覽地圖 (42)五.導航模式 (43)六.系統設定 (44)1.日夜風格 (45)2.顯示設定 (45)3.導航畫面 (46)虎虎生風_導航軟體手冊4.導航語音 (47)5.輸入法選擇 (48)6.切換地圖 (48)7.安全模式 (49)8.GPS狀態 (50)關於衛星數訊強度表說明: (50)9.離開 (51)畫面說明 (52)1.未設定導航點時的畫面 (52)2.己設定導航點時的3D畫面 (52)3.己設定導航點時的2D畫面 (53)4.3D為主,路徑清單為輔 (54)5.2D為主、路徑清單為輔 (54)6.旅程電腦 (55)汽車導航使用技巧 (56)技術支援 (57)維護服務 (57)簡介‧帶您遠離塞車夢靨‧搶先搭載ITS導航技術核心‧以先進導航科技融合人性化操作訴求‧全球超過160萬使用者肯定與愛用‧不妥協的唯一選擇,體驗無以倫比的駕馭經驗功能與特色‧最新2006年第四季地圖資料‧車機等級全導航地圖資料庫(多車道低空照圖數化)‧全省主要道路門牌資料建置‧全省山區道路與產業道路普查‧全省國道設施、收費路段資料建置‧全省單行道資料建置‧全省禁轉交通規則建置‧即時路況道路定址技術(含車行方向)‧快慢車道切換行駛提示‧圓環、橋樑、隧道、高架橋、地下道、平面道路行駛提示‧收錄全省最新通車路段(含北宜高速公路全段、新竹市公道五路) ‧收錄最新全省測速照像機資訊‧收錄最新生活景點資訊,關聯式景點分類‧PAPAGO!R12高效能核心‧全新導航引擎, 畫面更新超順暢‧更寬更遠的全新視野‧路徑規劃智慧學習駕駛習慣-專利SmartLearning技術‧導航經過點支援‧行車電腦與行駛軌距紀錄顯示功能‧新一代的高速資料檢索引擎,快速全文檢索/道路編號檢索‧動態預測符合查詢資料筆數‧查詢資料方位與距離顯示‧友善的自動組態與自我癒合機制,安裝設定無障礙‧PAPAGO!R12先進操作界面‧更清晰易讀的資訊顯示配置‧手動路徑規劃迴避前方壅塞路段功能‧內建聲控語音指令導航功能‧內建數位語音擬真人道路名稱播報功能‧國台客英四語系預錄真人語音播報功能‧全功能資料搜尋器,智慧全文搜尋道路、景點、路口的資料‧自建地標排序與篩選功能‧依情境自動關聯,直覺的快捷點按式導航選單‧建置齊全的路徑規劃選項方案‧完整的全螢幕手寫/鍵盤輸入單元‧舒適閱讀的高速/快速公路行車資訊、交流道擬真看板最新最精確地圖資料‧勤崴科技最新2006年第四季地圖資料‧北宜高速公路全線資料/高鐵週邊路網更新‧最新車機等級地圖資料虎虎生風_導航軟體手冊‧多線化/雙線化/快慢車道分離數化‧全省單行道資料建置‧全省限制左右轉交通規則建置‧人性化路徑規劃選項‧收費道路迴避 / 即時路況迴避 / 路徑規畫智慧學習‧最佳路徑 / 一高優先/ 福高優先(二高優先) / 避走高速公路 / 機踏車模式 / 步行模式 / 最短路徑‧專利Smart Learning智慧型路徑規劃學習技術,有效學習使用者駕駛習慣‧全新導航選單‧簡單易懂的直覺式操作流程‧全螢幕輸入畫面‧手寫輸入法 / 注音輸入法 / 英數鍵盤‧TTS數位合成語音引擎‧內建蒙恬科技TTS引擎路名播報功能‧智慧景點搜尋功能‧景點方位 / 距離 / 行政區顯示‧可以篩選出發地及目的地附近資料‧全新直式導航畫面‧2D / 3D / 旅程電腦畫面‧全省住址查詢‧全新智慧查詢功能‧關鍵字查詢景點 / 道路 /交叉路口使用衛星導航本章節介紹GPS 定位與導航軟體的基本操作。
utalk使用手册

utalk使用手册
UTalk是一款团队语音通信工具,主要针对网络游戏用户和局域网游戏用户。
以下是UTalk的使用手册:
1. 下载和安装UTalk:首先,您需要在UTalk官方网站上下载并安装UTalk 软件。
请确保您的计算机或移动设备上已安装了UTalk客户端。
2. 注册和登录UTalk:打开UTalk客户端,您需要注册一个UTalk账号并
登录。
您可以使用邮箱地址或手机号码进行注册。
3. 创建或加入团队:在UTalk中,您可以创建自己的团队或加入其他人的
团队。
如果您想创建自己的团队,请选择“创建团队”,并输入团队的名称和其他信息。
如果您想加入其他人的团队,请选择“加入团队”,并搜索或浏览可用的团队。
4. 开始语音通话:一旦您加入了团队,您就可以开始语音通话了。
在UTalk 客户端中,您可以通过点击“开始通话”按钮来启动语音通话。
您还可以通过选择“静音”或“断开连接”按钮来控制语音通话的音量和连接状态。
5. 使用其他功能:UTalk还提供了其他有用的功能,如文本聊天、文件分享和屏幕共享等。
您可以在UTalk客户端中找到这些功能并使用它们。
6. 退出UTalk:当您完成使用UTalk时,请选择“退出”按钮来关闭UTalk 客户端。
请确保在退出前保存并关闭所有相关的文件和应用程序。
以上是UTalk的使用手册,希望对您有所帮助。
如果您在使用UTalk时遇
到任何问题,请参考UTalk的帮助文档或联系UTalk的客户服务支持团队。
V.Smile TV New Generation 使用手册说明书

V.Smile TV New Generation , la nueva Plug & Play ech: compacta, inalámbrica, fácil de usar y muy educativa. Deberá recorrer todas las áreas de juego para conseguir las llaves perdidas del castillo. Una aventura educativa especialmente diseñada para niños a Los materiales de este embalaje, tales como cintas, cuerdas, hojasde plástico, alambres, etiquetas, cierres de seguridad y tornillos de embalaje, no son parte de este juguete y deberían ser desechados Botón BBotón A Inicio AyudaCable micro USBANTES DE COMENZARPor la seguridad del menor, se recomienda que un adulto lleve a cabo la instalación del producto antes de entregar la unidad al pequeño y empezara jugar.1. Conecte el cable micro USB en el puerto USB delconector HDMI.2. Enchufe dicho conector Plug & Play en el puertoHDMI de la TV.3. Conecte el extremo grande del cable micro USBen un puerto USB libre del televisor.También puede conectar el cable USB a unadaptador de corriente DC 5V/500mA o unasalida DC 5V/1A.INSTALACIÓN Y CAMBIO DE PILAS1. Antes de insertar las pilas, asegúrese de que el juguete esté apagado.2. Encontrará el compartimento de las pilas en laparte posterior del mando inalámbrico.3. Si hay pilas instaladas en la unidad, extráigalastirando de uno de los extremos.4. Coloque 2 pilas AA (AM-3/Lmuestra el dibujo. Se recomienda el uso de pilasalcalinas para un mejor rendimiento del aparato.5. Coloque de nuevo la tapa y cierre elcompartimento, asegurándose de que el tornillo está suficientemente apretado.¡ADVERTENCIA!Las pilas deben ser colocadas por un adulto.Mantenga las pilas fuera del alcance de los menores.IMPORT ANTE: INFORMACIÓN SOBRE LAS PILAS • Instale las pilas correctamente respetando los signos de polaridad (+, -) para evitar cualquier tipo de fuga.• No mezcle pilas nuevas y viejas.• No utilice pilas de diferentes tipos.• Utilice únicamente el tipo de pilas recomendadas.• No se debe provocar cortocircuitos en los bornes de una pila.• Extraiga las pilas cuando no se vaya a utilizar el juguete durante un largo periodo de tiempo.• Retire las pilas usadas del juguete.• No acerque ni tire las pilas al fuego.PILAS RECARGABLES• Si las pilas recargables son extraíbles, retírelas del juguete para su carga.• Recargue las pilas recargables siempre bajo la vigilancia de un adulto.• No intente recargar pilas normales.NOTA:Si el dispositivo se apaga o las luces se hacen más tenues, por favor instale pilas nuevas y vuelva a intentarlo.Ayúdenos a cuidar nuestro entorno, es responsabilidad de todos.• Este símbolo indica que este producto y sus pilas no deben tirarse a la basura al final de su vida útil, sino quedeben ser depositados en contenedores especiales, parapoder reciclarlos adecuadamente y así evitar daños enel medio ambiente o efectos perjudiciales para la salud.Por favor, respete la normativa vigente y recurra a unPunto Limpio o a los servicios destinados para tal fin ensu localidad.• Los símbolos Hg, Cd, o Pb, indican que las pilas contienen un nivel de mercurio (Hg), cadmio (Cd) o plomo (Pb)mayor del permitido en la directiva europea (2006/66/CE).• La barra negra, indica que el producto está en el mercado después del 13 de agosto de 2005.Este juguete sólo se puede conectar con un equipo que contenga uno de los símbolos siguientes: o .No recomendado para niños menores de 3 años. Es unCARACTERÍSTICAS1. Botones direccionalesUse los botones direccionales para seleccionar opciones en la pantalla. Durante el juego, deberá usar derecha e izquierda para mover al personaje y abajo para que se agache y pueda pasar por determinados caminos.2. InicioPodrá salir del juego y volver al menú principal.3. AyudaPulse este botón para escuchar alguna pista de cómo seguir el juego o moverse por el menú principal.4. Botón AEste botón tiene diferentes funciones:• seleccionar zonas en el menú principal.• hace saltar al personaje.• pulse dos veces seguidas para dar un salto doble.• pulse varias veces para liberar al personaje de las burbujas.• seleccionar un cofre de la suerte.5. Botón B• Pulse B para acceder al menú anterior o cambiar de personaje en el menú del mapa.• Cuando aparezca una B en la pantalla, podrá interactuar con los personajes.• Podrá seleccionar un cofre de la suerte.6. Pantallas principalesLas siguientes pantallas aparecen durante el juego:Pantalla de selección de partida• Cree o elimine un perfil o partida enla pantalla de selección de partida.• Para recuperar una partida quehaya sido borrada accidentalmente,resalte una nueva partida y pulse lasiguiente combinación de botones enel mando inalámbrico: Inicio+ Inicio• Para desbloquear todas las áreas de juego, seleccione un perfil o partida guardada y pulse la siguiente combinación de botones en el mando inalámbrico: Inicio+ Inicio + Ayuda + Ayuda + B + B + Ayuda + Inicio + B.Pantalla del mapa• Acceda a las diferentes zonas deljuego en la pantalla del mapa.• El jugador tendrá que encontrar almenos una llave para poder accederal castillo.• Para cambiar de personaje, pulse elbotón B.• Para salir del juego, pulse el botón deinicio.• Podrá ver las recompensas del castilloen la pantalla del mapa después decada festival de las gemas.Centro del conocimiento• Acceda a todo el contenido educativoen el Centro del Conocimiento.Pantalla de selección de áreas de juego• Utilice los botones direccionalespara seleccionar un área que estédesbloqueada.• Pulse el botón A para entrar ycomenzar el juego.• Las áreas de juego no se desbloqueansi no se han completado las anteriores.7. Elementos del juegoLos siguientes objetos se encuentran a lo largo del juego.Gemas• El jugador puede recolectar gemas en cada pantalla.• T ambién se podrán encontrar gemas en los cofres dentro de cada partida.• Cuando se hayan completado las áreas de juego se premiará al jugador con estrellas en función del total de gemas que haya conseguido.• El juego se puede completar más de una vez con el mismo perfil o A continuación se muestran los distintos obstáculos que se9. Personajes del juegoEstos son los personajes con los que interactuarán los jugadores a lo largo del juego.Personajes educativos• Los personajes educativos enseñan datos curiosos sobre ellos.• Los personajes de letras se pueden encontrar en Letrilandia en la pantalla del mapa, o bien en el Centro del Conocimiento.• L os personajes de números se pueden encontrar en la Villa de los Números en la pantalla del mapa, o bien en el Centro del Conocimiento.• L os personajes de formas se pueden encontrar en el Pueblo de las Formas en la pantalla del mapa, o bien en el Centro del Conocimiento.• L os personajes de colores se pueden encontrar en la Aldea de los Colores en la pantalla del mapa, o bien en el Centro del Conocimiento.Pixies• Los pixies son muy traviesos, e intentan por todos los medios evitar que el jugador encuentre las llaves del Castillo del Aprendizaje.• Algunos Pixies le quitarán un corazón de vida al jugador si éste los toca.• Los Pixies pueden ser de varias formas y colores; algunos vuelan, otros nadan y otros salen del suelo.10. Desconexión automáticaPara preservar la duración de las pilas, el mando inalámbrico se apagara después de 1 minuto sin jugar. Pulse cualquier botón para activarlo de nuevo.11. Modo salvapantallasCada juego se grabará automáticamente y se iniciará el salvapantallasCUIDADO Y MANTENIMIENTO• Limpie la unidad con un paño suave ligeramente húmedo. No utilice disolventes ni abrasivos.• Mantenga el producto lejos de la luz directa del sol o de cualquier otra fuente de calor.• Extraiga las pilas cuando no vaya a ser utilizado durante un largo periodo de tiempo.• No deje caer la unidad sobre superficies duras, ni la exponga a la humedad o al agua.• No trate de reparar la unidad ni de desmontar el producto.• Examine el cable micro USB de corriente con frecuencia, así como sus conectores y otras piezas del producto para asegurarse de que no se hayan dañado con el uso. No utilice ninguna pieza dañada o deteriorada.SOLUCIÓN DE PROBLEMASSi el juego no funciona correctamente, le recomendamos seguir estas instrucciones:Televisor y conector HDMI:1. Corte la fuente de energía desconectando el cable de alimentaciónUSB del televisor o de la red eléctrica, en caso de que lo use con un adaptador DC 5V con salida mínima de 500mA.2. Desconecte el conector Plug & Play del puerto HDMI del televisor.3. Espere 10 segundos y luego vuelva a conectar el dispositivo al puertoHDMI de la televisión.4. Conecte el extremo grande del cable de alimentación a un puerto USBlibre del televisor (o a cualquier adaptador DC 5V y salida mínimo de 500mA.). El dispositivo debería estar operativo de nuevo y listo para jugar.Mando inalámbrico1. Retire las pilas para interrumpir el flujo de alimentación.2. Espere 10 segundos antes de colocarlas de nuevo.3. El controller inalámbrico debería estar listo para ser usadonuevamente.4. Si el equipo sigue sin funcionar, recomendamos sustituir las pilas porunas completamente nuevas.cumple la normativa 2014/53/EU. Puede consultar el texto completo en laLos términos HDMI, High-Definition Multimedia Interface y el logotipo HDMI son marcas registradas o marcas comerciales de HDMI Licensing, micro USB incluido a un puerto USB A del televisor o bien mediante un/1A.111111Para buscar más información acerca de nuestros productos y consultar las condiciones de garantía visite nuestra página web.www.vtech.esTM & © 20XX VT ech Holdings Limited.T odos los derechos reservados.Impreso en China.IM-613200-006Version:0。
学习日语看日语电视台听日语广播KeyHoleTV 使用教程
KeyHoleTV 使用教程
网上一款P2P播放软件,KeyHoleTV, 只要簡單的安裝, 可以收看日本的直播電視節目,网上转个
教程
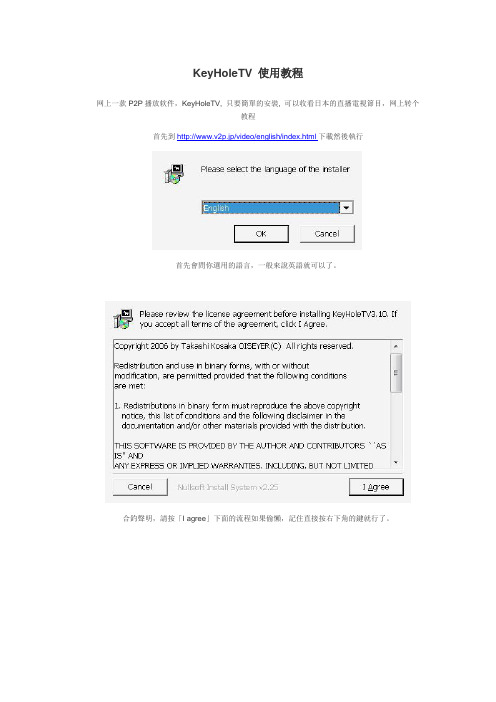
首先到http://www.v2p.jp/video/english/index.html下載然後執行
首先會問你選用的語言,一般來說英語就可以了。
合釣聲明,請按「I agree」下面的流程如果偷懶,記住直接按右下角的鍵就行了。
是否要安裝在開始功能表及設立桌面捷徑? 預設值是yes,按「Next」進行下一步。
安裝完成,讓我們按「確定」直接體驗KeyholeTV吧。
印入眼簾的就是KeyholeTV的主視窗,依次說明如下,ON LINE是啟動系統(預設值)。
TOP MOST 是KeyholeTV是否在視窗置頂. Stop VIDEO則是停止播放所看的節目。
與之前的說明不同,現在連上KeyholeTV,不用為了假名傷腦筋,可以直接看到電視台的「真名」,目前有「朝日電視」、「日本電視」、「富士電視」等地上波,並沒有NHK鐹WOWOW這些付費電視可
看。
東京電視台,選定想看的電視台之後,直接點擊就會開始播放了。
富士電視台的播放畫面。
Philips GoGear 音频视频播放器快速启动指南说明书

Philips GoGear audio video player Quick start guide1 2 3 4InstallConnect and ChargeT ransfer EnjoySA5225 SA5245 SA5247 SA5285SA5287Need help?Please visit/welcomewhere you can access to a full set of supporting materials such as user manual, the latest software upgrades and answers to frequently asked questions.Need help?Besoin d’aide ?Look up our Support Centre website/welcomeVisitez la page Web de notre centre d’assistance à l’adresse/welcome¿Necesita ayuda? Consulte nuestra página Web de Soporte técnico, /welcomeSupport?Besuchen Sie unser Support Center auf /welcome2 Is there a manual?2 Register your product2 Don’t forget about upgrades3 What’s in the box4 Overview of controls andconnections5 Install5 Connect and charge5 Connect to PC6 Read the battery level indicationof your player6 T ransfer6 T ransfer music and pictures withWindows Media Player 118 D ownload, convert and transfervideos with the Stream Ripperof the MediaConverter™10 Enjoy10 T urn on and play10 Main menu10 Navigate the menu11 Music mode12 Listen to audiobooks12 Add audiobooks to the SA52 12 Select audiobook by book title 12 Audiobook controls 13 Video13 Video play13 Fast forward / backward control 13 Radio13 Auto tune14 Play a preset radio station14 Recordings14 Make recordings14 Play recordings15 T roubleshooting15 How do I reset my player?15 Need help?16 Disposal of your old productand the integrated batteryIs there a manual?Y ou have a detailed user manual and FAQ on the CD by-packed with your player. Y ou can also download the same file from this website: /support Register your productSince it is possible for you to upgrade your product, we recommend that you register your product on /welcome so we can inform you as soon as new free upgrades become available.Don’t forget about upgradesWe know you will enjoy your product for a long time. For best performance, we recommend that you regularly check in to /support for free updates of the latest software and Firmware Manager for your product. These downloads will help you to optimize your product’s performance and to take advantage of our future support of new audio formats.Enjoy your new music experience.What’s in the boxA computer with:Windows XP (SP2 or above) or Vista Pentium III 800MHz processor or higher CD-ROM drive 128 MB RAM500MB Hard Disk space USB PortInternet connection (preferable)Microsoft Internet Explorer 6.0 or laterWhat else you'll need:USB cableCD-ROMQuick start guideComputerHeadphonesInstall1Insert the CD supplied with your product into the CD ROM drive of your PC.Follow the on-screen instructions to complete the installation of Windows Media Player , Philips device Manager and MediaConverter™ for Philips . TheMediaConverter™ for Philipsconverts video clips into suitable formats for the player.1 2 Connect and charge2Before you use the player for the first time, charge it for at least 5 hours.The battery has a 100% charge after 4 hours and an 80% charge after 2 hours.Connect the supplied USB cable to the mini USB port at the bottom of the player, the The player will start to charge as soon as it is connected to your PC.T ransfer3Read the battery level indication of your playerThe approximate power levels of your battery are indicated as follows:FullT wo-thirds fullHalf fullLowEmptyNote When the batteries are almost empty, the battery screen blinks. The player saves all settings and unfinished recordings and switches off in less than 60 seconds.Start Windows Media Player 11.Connect the player to your computer using the supplied USB cable.Once the player is connected, the sync tab changes as shown () and the device and its contents become visible in Windows Media Player 11(see figure above).Windows Media Player 11will automatically start synchronizing the contents of your music library to your player.1 2 3 4 For details on how to set synchronization options in Windows Media Player 11, pls refer to the user manual.d ownload, convert and transfer videos withthe Stream Ripper of the MediaConverter™importantDRM protected videos that you have downloaded (purchased) from the Internet must have a bit rate of e 800kbps so you can transfer them to the player. Y ou can obtain the licence for DRM protected videos when you play the videos on your PC that is connected to the Internet. Y ou can move DRM protected videos with downloaded licence to the VIDEO folder of your player by 'drag & drop' in Window Explorer.importantT o use the Stream Ripper feature and avoid download error messages, install the 'FLV codec' on your PC. (Tip: If you enter 'download FLV codec' in your Internet search engine, you can find websites that offer a download of the FLV codec.)Use the internet Explorer to open the website from where you want to download the video.The Stream Ripper software supports downloads from the following websites:While playing the video on the website, move your mouse cursor over the video until you see the Stream Ripper icon in the top left hand side corner, then click download.When the video is downloaded the MediaConverter™ opens and shows the downloaded video.1•••2>The progress of conversion and transfer is shown. All the converted files will be transferred to the player.Note If needed, the files will first be converted to a format that can be played on the player.Y ou can also select the files in Windows Explorer and then drag and drop them into the MediaConverter™ for Philips screen.4EnjoyMusicVPicturesRadioRecordingFoldersSettingsNLast playedMusic mode (also play mode for recordings)The player offers the following music mode options:Listen to audiobooksThe player supports books in audio format. The use of this feature requires that you download the AudibleManager from . With the AudibleManager you can manage the digital contents of your audiobooks.Visit and register. The onscreen instructions guide you through the AudibleManager software download process.Add audiobooks to the SA52On your computer, launch AudibleManager .Drag and drop your audiobooks to the SA52.Select audiobook by book titleFrom the main menu of the SA52, select to enter music mode.Press 3 or 4, then 2; to select Audiobooks .Press 3 or 4, then 2; to select option Book titles or Authors .Press 3 or 4, then 2; to make further selections.Press 3 or 4 to select title, then 2; to play. T o exit, press O .Audiobook controls1 2 1 2 3 4 5VideoVideo playY ou can play video clips that are stored on the player.From the main menu, select to enter Video mode.A list of video files stored on the player is displayed.Press 3 or 4 to select the file and press 2; to play.Short press to go back to the previous menu, and long press to return to the mainmenu.fast forward / backward controlThe player enables you to scan videos in fast forward / backward mode.fast forward / backwardLong press 2 to select 4x normal speed.Press 2; anytime to resume normal speed play.While in 4x normal speed mode, press 2 to cycle through the following speed options: 8x normal speed > 16x normal speed > 4x normal speed…RadioFrom the main menu, select to enter radio mode.Connect the headphonesThe supplied headphones serve as a radio antenna. Ensure you connect the headphones properly for an optimal reception.Auto tuneFrom the Radio menu , select Auto tune .The radio automatically tunes radio stations and saves the frequencies to presets. The radio can store up to 20 radio station to presets.1 >23 1 >2 1 >Play a preset radio stationFrom the Radio menu , select Presets .Press 3/4 to select preset, 2; to start playing.Press 1/2 to change to another preset.T o fine tune frequency, quick press 3/4.T o search for the next stronger signal, long press 3/4. T o exit radio, long press .RecordingsY ou can record audio with the player.Make recordingsFrom the main menu, select .Press 3 or4 to select the Start voice recording , then 2; to start.The player records and shows the recording display.Press 2; to pause.Press to stop and save the recording.Your recordings are saved in the Recordings library on the player.Y ou can find the voice recordings file under > Recordings Library > Voice recordings .1 2 3 4 5 1 2 >3 4 >5 Tip Y 2;.Play recordingsFrom the main menu, select > Recordings Library > Voice recordings .Press 3 or 4 to select the recording you want to hear.Press 2; to play.1 2 3T roubleshootinghow do i reset my player?Insert a small pin or other sharp object into the reset hole located at the bottom of the player. Hold until the player shuts down.if none of the above works, then you may have to use the device Manager to recover your player:Launch the Philips device Manager at Start > Programs > Philips digital Audio Player > SA52XX > Philips SA52XX device Manager on your PC.Press and hold the VOL+ button while your player is connecting to the PC.Keep holding the key until the Philips device Manager acknowledges your player and goes into recovery mode.Click the Repair button and follow the instructions given by the device Manager .After the player has been repaired, disconnect it from your PC and re-start.Need help?User Manual See the user manual on the CD-ROM that is supplied with this player.OnlineGo to /welcome1 2 3 4 5Disposal of your old product and the integrated batteryAll our products are designed and manufactured with high quality materials and components, which can be recycled and reused.The crossed-out wheel bin symbol on a product means that the product is subject to the European Directive 2002/96/ EC. This symbol can also be used in combination with a chemical symbol, which means that the product complies with the environmental directive for that chemical.Never dispose of your product with other household waste. Inform yourself or ask your dealer about localenvironmentally safe recycling regulations. The correct disposal of your old product helps prevent potentially negative consequences for the environment and human health.Y our product contains a built-in rechargeable battery covered by the European Directive 2006/66/EC, which cannot be disposed with normal household waste.T o safeguard the functionality and safety of your product, always bring your product to an official collection point or service centre where a professional can remove / replace the battery as shown in the user manual.Please inform yourself about the local rules on separate collection of batteries because the correct disposal will help prevent negative consequences for the environmental and human health.Printed in China wk8465Specifications are subject to change without notice. T rademarks are the property of Koninklijke Philips Electronics N.V . or their respective owners © 2008 Koninklijke Philips Electronics N.V . All rights 。
Philips GoGear 音频视频播放器快速启动指南说明书
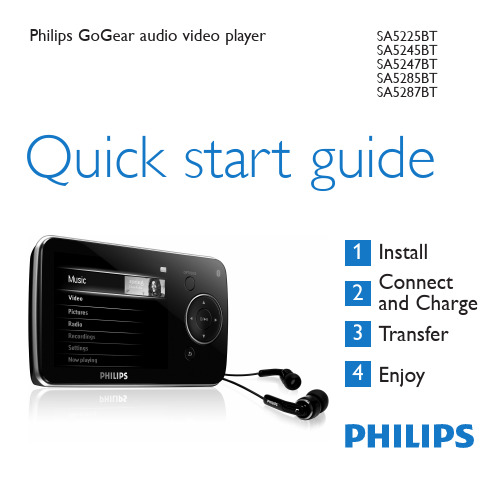
Philips GoGear audio video player Quick start guide1 2 3 4InstallConnect and ChargeT ransfer EnjoySA5225BTSA5245BTSA5247BTSA5285BTSA5287BTNeed help?Please visit/welcomewhere you can access to a full set of supporting materials such as user manual, the latest software upgrades and answers to frequently asked questions.Need help?Besoin d’aide ?Look up our Support Centre website/welcomeVisitez la page Web de notre centre d’assistance à l’adresse/welcome¿Necesita ayuda? Consulte nuestra página Web de Soporte técnico, /welcomeSupport?Besuchen Sie unser Support Center auf /welcome2 Is there a manual?2 Register your product2 Don’t forget about upgrades3 What’s in the box4 Overview of controls andconnections5 Install5 Connect and charge5 Connect to PC6 Read the battery level indicationof your player6 T ransfer6 T ransfer music with RhapsodyMedia Player12 D ownload, convert and transfervideos with the Stream Ripperof the MediaConverter™14 Enjoy14 T urn on and play14 Main menu14 Navigate the menu15 Connect Bluetooth®headphones15 Music mode16 Listen to audiobooks16 Add audiobooks to the SA52 16 Select audiobook by book title 16 Audiobook controls 17 Video17 Video play17 Fast forward / backward control 17 Radio17 Auto tune18 Play a preset radio station18 Recordings18 Make recordings18 Play recordings19 T roubleshooting19 How do I reset my player?19 Need help?20 Disposal of your old productand the integrated batteryIs there a manual?Y ou have a detailed user manual and FAQ on the CD by-packed with your player. Y ou can also download the same file from this website: /support Register your productSince it is possible for you to upgrade your product, we recommend that you register your product on /welcome so we can inform you as soon as new free upgrades become available.Don’t forget about upgradesWe know you will enjoy your product for a long time. For best performance, we recommend that you regularly check in to /support for free updates of the latest software and Firmware Manager for your product. These downloads will help you to optimize your product’s performance and to take advantage of our future support of new audio formats.Enjoy your new music experience.What’s in the boxA computer with:Windows XP (SP2 or above) or Vista Pentium III 800MHz processor or higher CD-ROM drive 128 MB RAM500MB Hard Disk space USB PortInternet connection (preferable)Microsoft Internet Explorer 6.0 or laterWhat else you'll need:USB cableCD-ROMQuick start guideComputerHeadphonesInstall1Insert the CD supplied with your product into the CD ROM drive of your PC.Follow the on-screen instructions to complete the installation of Rhapsody Media Player , Philips device Manager and MediaConverter™ for Philips . TheMediaConverter™ for Philipsconverts video clips into suitable formats for the player.1 2 Connect and charge2Before you use the player for the first time, charge it for at least 5 hours.The battery has a 100% charge after 4 hours and an 80% charge after 2 hours.Connect the supplied USB cable to the mini USB port at the bottom of the player, the The player will start to charge as soon as it is connected to your PC.T ransfer3Read the battery level indication of your playerThe approximate power levels of your battery are indicated as follows:Full T wo-thirds full Half full Low EmptyNote When the batteries are almost empty, the battery screen blinks. The player saves all settings and unfinished recordings and switches off in less than 60 seconds.Y ou can transfer music and picture files to your player using Rhapsody Media Player.See Organize and transfer pictures and music with Rhapsody Media Player section of the user manual for more details.T ransfer music with Rhapsody Media Playerinstall Rhapsody Media PlayerInstall the Rhapsody Media Player from the supplied software CD.By default,the pop-up window shows the music in the My Music folder on your computer.Click Browse... to find the folder with your music, if it is different from the pre-selected folder.Click import.All music in the selected folder is imported into My Library.o transfer the music files to your player, drag and drop the files from the main window to the player icon in the Sources window.476In the main window, select the tab Music guide.In the main window, select an album and song title.In the main window, click the + icon to add the title toIn the Sources window, select My Library.From the main window, drag and drop your music to the player in the* This feature is available only for music that you purchased through Rhapsody.476The player is shown in the Sources window on the left hand side of the screen.In the main window, select the tab Channel guide.In the main window, click on the + icon to add a channel toIn the Sources window, select My Channels.The main window shows a list of your channels.Drag and drop your channels to the player in the Sources* This feature is available only if you subscribe to Rhapsody Music Channels.546Sources window, select My Library.In the main window, click on a tab to select Photoso add pictures from a different folder on your computer, click on theAdd Media to My Library pop-up window, check the box next tophotos in this folder:.By default,the pop-up window shows the pictures in the My Pictures folder on your computer.Browse... to find the folder with your pictures, if it is different from the pre-selected folder.import, to import the selected folder to My Library.o transfer the picture files to your player, drag and drop the files from the main window to the player icon in the Sources window.d ownload, convert and transfer videos withthe Stream Ripper of the MediaConverter™importantDRM protected videos that you have downloaded (purchased) from the Internet must have a bit rate of e 800kbps so you can transfer them to the player. Y ou can obtain the licence for DRM protected videos when you play the videos on your PC that is connected to the Internet. Y ou can move DRM protected videos with downloaded licence to the VIDEO folder of your player by 'drag & drop' in Window Explorer.importantT o use the Stream Ripper feature and avoid download error messages, install the 'FLV codec' on your PC. (Tip: If you enter ‘download FLV codec’ in your Internet search engine, you can find websites that offer a download of the FLV codec.)Use the internet Explorer to open the website from where you want to download the video.The Stream Ripper software supports downloads from the following websites:While playing the video on the website, move your mouse cursor over the video until you see the Stream Ripper icon in the top left hand side corner, then click download.When the video is downloaded the MediaConverter™ opens and shows the downloaded video.1•••2>3The progress of conversion and transfer is shown. All the converted files will be transferred to the player.Note If needed, the files will first be converted to a format that can be played on the player.Y ou can also select the files in Windows Explorer and then drag and them into the MediaConverter™ for Philips screen.4EnjoyMusicRhapsody Channels* Listen to Rhapsody Music ChannelsVideoPicturesRadioRecordingFoldersSettingsNLast played* Rhapsody Music Channels are ‘virtual’Connect Bluetooth ® headphones (or other Bluetooth ® devices)Y ou can connect any kind of Bluetooth ® headphones as well as home or car audio systems. The following steps explain how to connect the player to a new device:On the Home menu, select Settings .Press 3 or 4 and 2; to select the option Bluetooth .Select T urn on Bluetooth to activate the Bluetooth ® feature of the player.Press 3 or 4 and 2; to select Connect to ....The list shows option New Device as well as already paired devices. Press 3 or 4 and 2; to select New device .The player searches and then displays the list of found devices. Select the device you want to connect to.Enter the passcode of the other device if necessary.A confirmation message appears upon successful connection.Music mode(also play mode for recordings)The player offers the following music mode options:1 2 3 4 >5 >6 7>Listen to audiobooksThe player supports books in audio format. The use of this feature requires that you download the AudibleManager from . With the AudibleManager you can manage the digital contents of your audiobooks.Visit and register. The onscreen instructions guide you through the AudibleManager software download process.Add audiobooks to the SA52On your computer, launch AudibleManager .Drag and drop your audiobooks to the SA52.Select audiobook by book titleFrom the main menu of the SA52, select to enter music mode.Press 3 or 4, then 2; to select Audiobooks .Press 3 or 4, then 2; to select option Book titles or Authors .Press 3 or 4, then 2; to make further selections.Press 3 or 4 to select title, then 2; to play. T o exit, press O .Audiobook controls1 2 1 2 3 4 5Video Video play Y ou can play video clips that are stored on the player.From the main menu, select to enter Video mode.A list of video files stored on the player is displayed.Press 3 or 4 to select the file and press 2; to play.Short press O to go back to the previous menu, and long press O to return to the main menu.fast forward / backward control The player enables you to scan videos in fast forward / backward mode.fast forward / backward Long press 2 to select 4x normal speed.Press 2; anytime to resume normal speed play.While in 4x normal speed mode, press 2 to cycle through the following speed options: 8x normal speed > 16x normal speed > 4x normal speed…RadioFrom the main menu, select to enter radio mode.Connect the headphones The supplied headphones serve as a radio antenna. Ensure you connect the headphones properly for an optimal reception.Auto tune From the Radio menu , select Auto tune .The radio automatically tunes radio stations and saves the frequencies to presets. The radio can store up to 20 radio station to presets.1 >23 1 >2 1 >Play a preset radio station From the Radio menu , select Presets .Press 3/4 to select preset, 2; to start playing.Press 1/2 to change to another preset.T o fine tune frequency, quick press 3/4.T o search for the next stronger signal, long press 3/4. T o exit radio, long press O .RecordingsY ou can record audio with the player.Make recordings From the main menu, select .Press 3 or4 to select the Start voice recording , then 2; to start. The player records and shows the recording display.Press 2; to pause.Press O to stop and save the recording.Your recordings are saved in the Recordings library on the player. Y ou can find the voice recordings file under > Recordings Library > Voice recordings .1 2 3 45 1 2 >3 4 >5 Tip Y 2;.Play recordings From the main menu, select > Recordings Library > Voice recordings .Press 3 or 4 to select the recording you want to hear.Press 2; to play.1 2 3T roubleshooting how do i reset my player?Insert a small pin or other sharp object into the reset hole located at the bottom of the player. Hold until the player shuts down.if none of the above works, then you may have to use the device Manager to recover your player:Launch the Philips device Manager at Start > Programs > Philips digital Audio Player > SA52XX > Philips SA52XX device Manager on your PC.Press and hold the VOL+ button while your player is connecting to the PC. Keep holding the key until the Philips device Manager acknowledges your player and goes into recovery mode.Click the Repair button and follow the instructions given by the device Manager .After the player has been repaired, disconnect it from your PC and re-start.Need help?User ManualSee the user manual on the CD-ROM that is supplied with this player.Online Go to /welcome1 2 3 4 5Disposal of your old product and the integrated batteryAll our products are designed and manufactured with high quality materials and components, which can be recycled and reused.The crossed-out wheel bin symbol on a product means that the product is subject to the European Directive 2002/96/ EC. This symbol can also be used in combination with a chemical symbol, which means that the product complies with the environmental directive for that chemical.Never dispose of your product with other household waste. Inform yourself or ask your dealer about localenvironmentally safe recycling regulations. The correct disposal of your old product helps prevent potentially negative consequences for the environment and human health.Y our product contains a built-in rechargeable battery covered by the European Directive 2006/66/EC, which cannot be disposed with normal household waste.T o safeguard the functionality and safety of your product, always bring your product to an official collection point or service centre where a professional can remove / replace the battery as shown in the user manual.Please inform yourself about the local rules on separate collection of batteries because the correct disposal will help prevent negative consequences for the environmental and human health.The Bluetooth® word mark and logos are registered trademarks owned by Bluetooth SIG, Inc. and any use of such marks by Philips is under license. Other trademarks and trade names are those of their respective owners.Printed in China wk8291Specifications are subject to change without notice. T rademarks are the property of Koninklijke Philips Electronics N.V . or their respective owners © 2008 Koninklijke Philips Electronics N.V . All rights 。
- 1、下载文档前请自行甄别文档内容的完整性,平台不提供额外的编辑、内容补充、找答案等附加服务。
- 2、"仅部分预览"的文档,不可在线预览部分如存在完整性等问题,可反馈申请退款(可完整预览的文档不适用该条件!)。
- 3、如文档侵犯您的权益,请联系客服反馈,我们会尽快为您处理(人工客服工作时间:9:00-18:30)。
KeyHoleTV 使用教程
网上一款P2P播放软件,KeyHoleTV, 只要簡單的安裝, 可以收看日本的直播電視節目,网上转个
教程
首先到http://www.v2p.jp/video/english/index.html下載然後執行
首先會問你選用的語言,一般來說英語就可以了。
合釣聲明,請按「I agree」下面的流程如果偷懶,記住直接按右下角的鍵就行了。
是否要安裝在開始功能表及設立桌面捷徑? 預設值是yes,按「Next」進行下一步。
安裝完成,讓我們按「確定」直接體驗KeyholeTV吧。
印入眼簾的就是KeyholeTV的主視窗,依次說明如下,ON LINE是啟動系統(預設值)。
TOP MOST 是KeyholeTV是否在視窗置頂. Stop VIDEO則是停止播放所看的節目。
與之前的說明不同,現在連上KeyholeTV,不用為了假名傷腦筋,可以直接看到電視台的「真名」,目前有「朝日電視」、「日本電視」、「富士電視」等地上波,並沒有NHK鐹WOWOW這些付費電視可
看。
東京電視台,選定想看的電視台之後,直接點擊就會開始播放了。
富士電視台的播放畫面。