艾酷3098n说明书
Kingbright DSAI7858 blue InGaN LED 产品说明书

DESCRIPTIONSThe Blue source color devices are made with InGaN Light Emitting DiodeElectrostatic discharge and power surge could damage the LEDsIt is recommended to use a wrist band oranti-electrostatic glove when handling the LEDs All devices, equipments and machineries must be electrically groundedFEATURES3.2 mm x 1.6 mm SMD LED, 1.1 mm thickness Low power consumptionIdeal for backlight and indicator Package: 2000 pcs / reel Moisture sensitivity level: 3 RoHS compliantAPPLICATIONSBacklightStatus indicatorHome and smart appliances Wearable and portable devicesHealthcare applicationsATTENTIONObserve precautions for handlingelectrostatic discharge sensitive devicesPACKAGE DIMENSIONSSELECTION GUIDEKPTL-3216QBC-D-013.2 x 1.6 mm SMD Chip LED LampRECOMMENDED SOLDERING PATTERN(units : mm; tolerance : ± 0.1)Part NumberEmitting Color (Material)Lens TypeIv (mcd) @ 20mA [2] Viewing Angle [1]Min.Typ.2θ1/2 KPTL-3216QBC-D-01■ Blue (InGaN)Water Clear 120 25080°Notes:1. All dimensions are in millimeters (inches).2. Tolerance is ±0.1(0.004") unless otherwise noted.3. The specifications, characteristics and technical data described in the datasheet are subject to change without prior notice.4. The device has a single mounting surface. The device must be mounted according to the specifications.Notes:1. θ1/2 is the angle from optical centerline where the luminous intensity is 1/2 of the optical peak value.2. Luminous intensity / luminous flux: +/-15%.3. Luminous intensity value is traceable to CIE127-2007 standards.ABSOLUTE MAXIMUM RATINGS at T A =25°CELECTRICAL / OPTICAL CHARACTERISTICS at T A =25°CParameterSymbolEmitting ColorValue UnitTyp. Max. Wavelength at Peak Emission I F = 20mA λpeak Blue 460 - nm Dominant Wavelength I F = 20mA λdom [1] Blue 465-nmSpectral Bandwidth at 50% Φ REL MAX I F = 20mA ΔλBlue25 - nmCapacitanceC Blue 100 - pFForward Voltage I F = 20mA V F [2]Blue 3.3 4.0 VReverse Current (V R = 5V) I R Blue - 50 µAParameterSymbolValueUnitPower Dissipation P D 120 mW Reverse Voltage V R 5 V Junction Temperature T j 115 °C Operating Temperature T op -40 to +85 °C Storage Temperature T stg -40 to +85°C DC Forward Current I F 30 mA Peak Forward CurrentI FM [1]150 mA Electrostatic Discharge Threshold (HBM)-250VNotes:1. The dominant wavelength (λd) above is the setup value of the sorting machine. (Tolerance λd : ±1nm. )2. Forward voltage: ±0.1V.3. Wavelength value is traceable to CIE127-2007 standards.4. Excess driving current and / or operating temperature higher than recommended conditions may result in severe light degradation or premature failure.Notes:1. 1/10 Duty Cycle, 0.1ms Pulse Width.2. Relative humidity levels maintained between 40% and 60% in production area are recommended to avoid the build-up of static electricity – Ref JEDEC/JESD625-A and JEDEC/J-STD-033.TECHNICAL DATABLUETAPE SPECIFICATIONS (units : mm)REEL DIMENSION (units : mm)REFLOW SOLDERING PROFILE for LEAD-FREE SMD PROCESSNotes:1. Don't cause stress to the LEDs while it is exposed to high temperature.2. The maximum number of reflow soldering passes is 2 times.3. Reflow soldering is recommended. Other soldering methods are not recommended as they mightcause damage to the product.PACKING & LABEL SPECIFICATIONSPRECAUTIONARY NOTES1. The information included in this document reflects representative usage scenarios and is intended for technical reference only.2. The part number, type, and specifications mentioned in this document are subject to future change and improvement without notice. Before production usage customer should refer tothe latest datasheet for the updated specifications.3. When using the products referenced in this document, please make sure the product is being operated within the environmental and electrical limits specified in the datasheet. Ifcustomer usage exceeds the specified limits, Kingbright will not be responsible for any subsequent issues.4. The information in this document applies to typical usage in consumer electronics applications. If customer's application has special reliability requirements or have life-threateningliabilities, such as automotive or medical usage, please consult with Kingbright representative for further assistance.5. The contents and information of this document may not be reproduced or re-transmitted without permission by Kingbright.6. All design applications should refer to Kingbright application notes available at https:///application_notes。
艾奎顿259820型号的艾奎顿摩尔系列NZM电流保护设备说明说明书
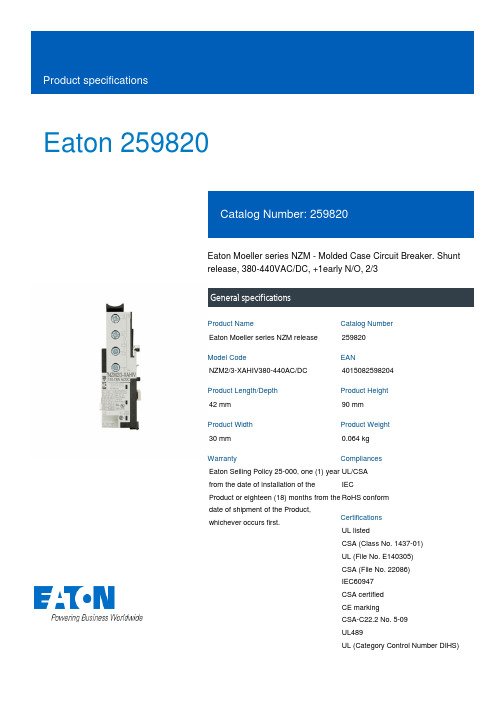
Eaton 259820Eaton Moeller series NZM - Molded Case Circuit Breaker. Shunt release, 380-440VAC/DC, +1early N/O, 2/3General specificationsEaton Moeller series NZM release 259820NZM2/3-XAHIV380-440AC/DC 401508259820442 mm 90 mm 30 mm 0.064 kg Eaton Selling Policy 25-000, one (1) year from the date of installation of the Product or eighteen (18) months from the date of shipment of the Product, whichever occurs first.UL/CSA IECRoHS conformUL listedCSA (Class No. 1437-01) UL (File No. E140305) CSA (File No. 22086) IEC60947 CSA certified CE marking CSA-C22.2 No. 5-09 UL489UL (Category Control Number DIHS)Product NameCatalog Number Model CodeEANProduct Length/Depth Product Height Product Width Product Weight WarrantyCompliancesCertificationsIs the panel builder's responsibility. The specifications for the switchgear must be observed.380 VMeets the product standard's requirements.10 msIs the panel builder's responsibility. The specifications for the switchgear must be observed.Does not apply, since the entire switchgear needs to be evaluated.Meets the product standard's requirements.380 VEarly-make auxiliary contact440 V50 Hz / 60 Hz / 200 Hz / 400 Hz, DC (shunt release)Is the panel builder's responsibility.15 ms eaton-feerum-the-whole-grain-solution-success-story-en-us.pdf eaton-digital-nzm-brochure-br013003en-en-us.pdfeaton-digital-nzm-catalog-ca013003en-en-us.pdfDA-DC-03_NZM2eaton-circuit-breaker-undervoltage-nzm-mccb-3d-drawing-002.epsM2_3-XAHIV380-440AC_DCIL012141ZUThe new digital NZM RangeIntroduction of the new digital circuit breaker NZMProduct Data Sheet - 259820eaton-nzm-technical-information-sheet10.11 Short-circuit ratingRated control supply voltage (Us) at AC, 50 Hz - min 10.4 Clearances and creepage distancesMinimum command time - min10.12 Electromagnetic compatibility10.2.5 Lifting10.2.3.1 Verification of thermal stability of enclosures Rated control supply voltage (Us) at DC - minFitted with:Rated control supply voltage (Us) at AC, 50 Hz - max Frequency rating10.8 Connections for external conductorsMinimum command time - maxSpecial features BrochuresCatalogsCertification reports DrawingseCAD modelInstallation instructions Installation videos Specifications and datasheets Technical data sheetsCannot be used in conjunction with NZM...-XR... remote operator.If the shunt trip is live, contact with the circuit breaker’s primary contacts is prevented when switchedon.Early make of auxiliarycontact on switching on andoff (manual operation):approx. 20 ms.Shunt releases cannot beinstalled simultaneously withNZM...-XHIV... early-makeauxiliary contact or NZM...-XU... undervoltage release.Voltage rating at AC (x Us) - min.7Rated control supply voltage (Us) at DC - max440 V10.9.3 Impulse withstand voltageIs the panel builder's responsibility.Rated control supply voltage380 - 440 V AC/DC10.6 Incorporation of switching devices and componentsDoes not apply, since the entire switchgear needs to be evaluated.10.5 Protection against electric shockDoes not apply, since the entire switchgear needs to be evaluated.Used withNZM2(-4), N(S)2(-4)NZM3(-4), N(S)3(-4)Electric connection typeScrew connectionVoltage rating at AC (x Us) - max1.110.13 Mechanical functionThe device meets the requirements, provided the information in the instruction leaflet (IL) is observed.10.2.6 Mechanical impactDoes not apply, since the entire switchgear needs to be evaluated.10.9.4 Testing of enclosures made of insulating materialIs the panel builder's responsibility.Number of contacts (normally closed contacts)10.3 Degree of protection of assembliesDoes not apply, since the entire switchgear needs to be evaluated.Voltage typeAC/DCFrameNZM2/3Reaction time20 msSuitable forOff-load switchPick-up power consumption (shunt release)2.5 VA/WRated control voltage (relay contacts)380 V DC380 V AC440 V AC440 V DC10.2.3.2 Verification of resistance of insulating materials to normal heatMeets the product standard's requirements.Time on duty - max∞10.2.3.3 Resist. of insul. mat. to abnormal heat/fire by internal elect. effectsMeets the product standard's requirements.Connection typeWith bolt connectionVoltage rating0.7 - 1.1 x Us10.9.2 Power-frequency electric strengthIs the panel builder's responsibility.Undelayed short-circuit release - min0 ARated control supply voltage (Us) at AC, 60 Hz - min380 V10.7 Internal electrical circuits and connectionsIs the panel builder's responsibility.Terminal capacity (solid/flexible conductor)18 - 14 AWG (1x) at shunt release0.75 mm² - 2.5 mm² (1x) for undervoltage releases, off-delayed with ferrule0.75 mm² - 2.5 mm² (1x) at shunt release with ferrule0.75 mm² - 2.5 mm² (2x) for undervoltage releases, off-delayed with ferrule18 - 14 AWG (1x) for undervoltage releases, off-delayed0.75 mm² - 2.5 mm² (2x) at shunt release with ferrule18 - 14 AWG (2x) at shunt release18 - 14 AWG (2x) for undervoltage releases, off-delayed10.10 Temperature riseThe panel builder is responsible for the temperature rise calculation. Eaton will provide heat dissipation data for the devices.TypeAccessoryShunt release10.2.2 Corrosion resistanceMeets the product standard's requirements.10.2.4 Resistance to ultra-violet (UV) radiationMeets the product standard's requirements.10.2.7 InscriptionsMeets the product standard's requirements.Rated control supply voltage (Us) at AC, 60 Hz - max440 VNumber of contacts (normally open contacts)1Undelayed short-circuit release - max0 ANumber of contacts (change-over contacts)Eaton Corporation plc Eaton House30 Pembroke Road Dublin 4, Ireland © 2023 Eaton. All Rights Reserved. Eaton is a registered trademark.All other trademarks areproperty of their respectiveowners./socialmedia。
高密度八线式接触器说明书

High-Speed Interconnect Solutions Rugged Electrical, Optical, and Hybrid Solutions for Mission-Critical Aerospace and Defense ApplicationsContacts and Insert Modules▪▪▪▪▪Our premier solution: Drop-in Size 8 octaxial contacts with outstanding high-speed signal integrity –now for both AWG#26 and AWG#24 wire! ▪▪▪▪▪▪▪Type I ▪▪▪Type II ▪▪▪Aerospace-grade wire for optimal protocol performance▪▪▪▪▪▪▪▪▪▪▪▪▪▪▪▪▪PlugReceptaclePlugReceptacleStraight Right Angle Straight Right AngleAdvanced-performance micro-miniature IAW D38999▪▪▪▪▪“Better than QPL” MIL -DTL-38999 high-speed solution ▪▪▪▪▪▪▪▪The next-generation mil-aero rectangular for high-speed datalink applicationsSingle-ended Point-to-point Ochito-to-COTSCircular and rectangular connector packagingThe faster ruggedized 4/8 pole interconnect system for Ethernet data applications▪▪▪▪▪Improved environmental sealing, grounding, and a broader range of wire termination options for RJ45 and USB —now for SuperSpeed 3.0▪▪▪▪DriveThru ▪▪▪▪▪▪▪Signature Twinax contact module optimized for high-bandwidth USB 3.1 gen 2, USB-C, SATA, PCIe, Display Port and HDMI▪▪▪▪▪▪▪▪▪Bypass high-loss board traces with low insertion loss / low latency jumpers▪▪▪Miniaturized Micro-D Connector / TwistPin contact solution with 10+ Gb/sec. performance per differential pair▪▪▪Smallest and lightest aerospace-grade high-speed connector solution▪▪▪Glenair mil-qualified 29504/4 and /5 termini ▪▪▪Nearly double the density of M28876 and D38999▪▪▪▪▪▪▪▪Unique terminus design for rapid integration ▪▪▪▪▪Ultra high-density, multiple termination (MT) commercial interconnect in a ruggedized mil-aero package ▪▪▪▪▪▪▪▪▪▪▪▪▪Heavy ion, proton, and gamma radiation tested devices (consult factory for exact tests and results)Absence of air in space requires cooling design changeFor high-speed signal/video applications such as Gigabit Ethernet, DVI, SMPTE 3G, HD-SDI etc.High-Speed Interconnect Solutions Rugged Electrical, Optical, and Hybrid Solutions for Mission-Critical Aerospace and Defense Applications。
美利坚电器Merrychef eikon系列炉子产品说明书
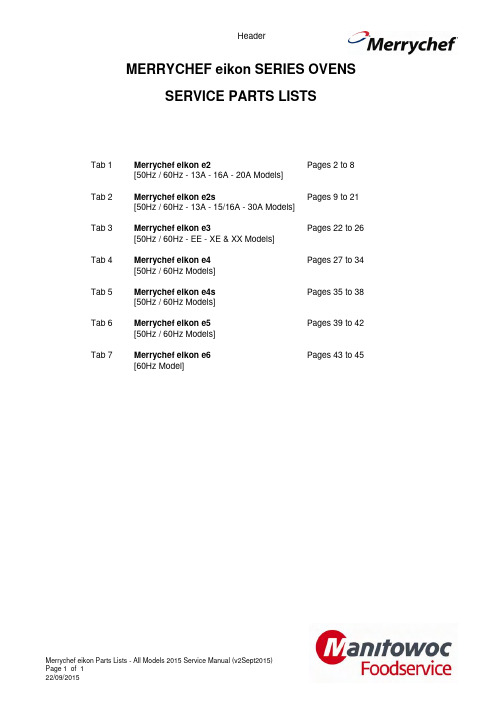
HeaderTab 1Pages 2 to 8Tab 2Pages 9 to 21Tab 3Pages 22 to 26Tab 4Pages 27 to 34Tab 5Pages 35 to 38[50Hz / 60Hz Models]Tab 6Pages 39 to 42Tab 7Pages 43 to 45[60Hz Model][50Hz / 60Hz Models]Merrychef eikon e6Merrychef eikon e3[50Hz / 60Hz - EE - XE & XX Models]Merrychef eikon e4[50Hz / 60Hz Models]MERRYCHEF eikon SERIES OVENSSERVICE PARTS LISTSMerrychef eikon e2[50Hz / 60Hz - 13A - 16A - 20A Models]Merrychef eikon e4s Merrychef eikon e5Merrychef eikon e2s[50Hz / 60Hz - 13A - 15/16A - 30A Models]Merrychef eikon Parts Lists - All Models 2015 Service Manual (v2Sept2015)Page 1 of 122/09/2015Merrychef eikon e2 Oven - Exploded View2/63621323/7834/39821611151722/36126765/667/855/577781/83/8418427444681/50/51/7345807975277620415646485271/6181/83/84707269324329/30/644947183319605865421/25/3759532635281438654ServiceManual Exploded View Part Number DescriptionQtyPerOvenUnit1-10Ovens11-50Ovens51-100OvensRecommendedService ListServiceManual Exploded View Part Number DescriptionQtyPerOvenUnit1-10Ovens11-50Ovens51-100OvensRecommendedService ListServiceManual Exploded View Part Number DescriptionQtyPerOvenUnit1-10Ovens11-50Ovens51-100OvensRecommendedService ListServiceManual Exploded View Part Number DescriptionQtyPerOvenUnit1-10Ovens11-50Ovens51-100OvensRecommendedService ListServiceManual Exploded View Part Number DescriptionQtyPerOvenUnit1-10Ovens11-50Ovens51-100OvensRecommendedService ListMerrychef eikon e2s OvenRecommended Min Stock Holding & Service ListRecommended Parts ListManual Exploded ViewPart NumberDescriptionPer OvenUnit1-10 Ovens 11-50 Ovens 51-100 Ovens RecommendedService Listeikon e2s 200/230Volts 50Hz 13A - UK - Black Trend - Unique Partseikon e2s 200/230Volts 50Hz 13A - UK - Red Trend - Unique PartsManual Exploded ViewPart NumberDescriptionPer OvenUnit1-10 Ovens 11-50 Ovens 51-100 Ovens RecommendedService Listeikon e2s 200/230Volts 50Hz 16A - 1P - EU - Black Trend - Unique Partseikon e2s 200/230Volts 50Hz 16A - 1P - EU - Red Trend - Unique PartsManual Exploded ViewPart NumberDescriptionPer OvenUnit1-10 Ovens 11-50 Ovens 51-100 Ovens RecommendedService Listeikon e2s 200/230Volts 50Hz 16A - 2P - EU - Black Trend - Unique Partseikon e2s 200/230Volts 50Hz 16A - 2P - EU - Red Trend - Unique PartsManual Exploded ViewPart NumberDescriptionPer OvenUnit1-10 Ovens 11-50 Ovens 51-100 Ovens RecommendedService Listeikon e2s 200/230Volts 50Hz 30A - 1P - EU - Black Trend - Unique Partseikon e2s 200/230Volts 50Hz 30A - 1P - EU - Red Trend - Unique PartsManual Exploded View Part Number Description PerOvenUnit1-10Ovens11-50Ovens51-100OvensRecommendedService Listeikon e2s 200/230Volts 50Hz 30A - AZ - Black Trend - Unique PartsManual Exploded View Part Number Description PerOvenUnit1-10Ovens11-50Ovens51-100OvensRecommendedService ListManual Exploded View Part Number Description PerOvenUnit1-10Ovens11-50Ovens51-100OvensRecommendedService Listeikon e2s 200/230Volts 50Hz 15A - CN - Black Trend - Unique PartsManual Exploded View Part Number Description PerOvenUnit1-10Ovens11-50Ovens51-100OvensRecommendedService ListManual Exploded ViewPart NumberDescriptionPer OvenUnit1-10 Ovens 11-50 Ovens 51-100 Ovens RecommendedService Listeikon e2s 208/240Volts 60Hz 15A - USA - Red Trend - Unique Partseikon e2s 208/240Volts 60Hz 15A - USA - Black Trend - Unique PartsManual Exploded ViewPart NumberDescriptionPer OvenUnit1-10 Ovens 11-50 Ovens 51-100 Ovens RecommendedService Listeikon e2s 208/240Volts 60Hz 20A - USA - Black Trend - Unique Partseikon e2s 208/240Volts 60Hz 20A - USA - Red Trend - Unique Partse2s All Mdl Service Manual PartService Manual Exploded ViewPart NumberDescriptionQtyPer OvenUnit1-10 Ovens 11-50 Ovens 51-100 Ovens RecommendedService ListRecommended Min Stock Holding & Service ListRecommended Parts Listeikon e2s 208/240Volts 60Hz 30A - USA - Black Trend - Unique Partseikon e2s 208/240Volts 60Hz 30A - USA - Red Trend - Unique PartsS P A R E S & R E P L A C E M E N TMerrychef eikon e3 Oven - Exploded ViewServiceManual Exploded View Part Number DescriptionQtyPerOvenUnit1-10Ovens11-50Ovens51-100OvensRecommendedService ListServiceManual Exploded View Part Number DescriptionQtyPerOvenUnit1-10Ovens11-50Ovens51-100OvensRecommendedService ListAll above oven variations can be fitted with or without Catalytic Converters (see Main List for part no.)Merrychef eikon e4 Oven - Exploded ViewServiceManual Exploded View Part Number DescriptionQtyPerOvenUnit1-10Ovens11-50Ovens51-100OvensRecommendedService ListService Manual Exploded ViewPart NumberDescriptionQtyPer OvenUnit1-10 Ovens 11-50 Ovens 51-100 Ovens RecommendedService ListServiceManual Exploded View Part Number DescriptionQtyPerOvenUnit1-10Ovens11-50Ovens51-100OvensRecommendedService ListServiceManual Exploded View Part Number DescriptionQtyPerOvenUnit1-10Ovens11-50Ovens51-100OvensRecommendedService ListServiceManual Exploded View Part Number DescriptionQtyPerOvenUnit1-10Ovens11-50Ovens51-100OvensRecommendedService ListMerrychef eikon e4s Oven - Exploded ViewService ManualExploded ViewPart NumberDescriptionQtyPer OvenUnit1-10 Ovens 11-50 Ovens 51-100 Ovens Service Centre Kit e4sUniquePartsover e4D E T A I L AS P A R E S & R E P L A C E M E N TMerrychef eikon e5 Oven - Exploded Viewe5 All Mdls Service Manual PartMerrychef eikon e5 OvenRecommended Min Stock Holding & Service List Recommended Parts ListServiceManual Exploded View Part Number DescriptionQtyPerOvenUnit1-10Ovens11-50Ovens51-100OvensRecommendedService Listeikon e6 208/240Volts 60Hz - USA (DH) - Unique PartsNot Shown DG0069e6 MAINS LEAD DH (30A)1EA136。
YG-309操控装置带无线测温使用说明书

版本号V3.01 免费升级三年质保快速交货现场报期开关柜智能操控装置产品说明书目录一、概述3二、功能简介3三、技术指标3四、操作简介41. 温湿度采集及控制 (4)2. 装置面板说明 (4)3. 语音防误功能 (6)4. SOE事件记录功能65. 人体感应功能66. 触头及电缆接头测温功能67. 操作菜单78. 传感器的安装89. 开孔尺寸及接线端子图 (8)10. 通讯功能 (9)五、运输和贮存15六、保修期限15一、概述该系列开关柜智能操控装置是一款新型多功能、模拟动态指示,带液晶显示的智能装置。
具有温度,凝露的测量及自动除湿降温,有动态一次模拟图,带电显示及闭锁、断路器分合状态指示、储能指示、接地开关状态指示、手车位置指示、分合闸回路完好指示、语音防止误操作提示、远方/就地操作、远程通信、柜内照明、SOE 事件记录、人体感应,还具有电气接点温度测量功能。
本产品采用单片机内核设计,中文操作菜单,与传统的指示仪相比,操作界面更友好,使用更简单,更性化。
适用于中置柜、手车柜、固定柜、环网柜等多种开关柜。
二、功能简介动态一次模拟图、温湿度测量及调节、带电显示及闭锁、报警输出接口、防误语音、RS485通讯、照明、储能、分合闸转换开关等功能。
本产品采用独特的抗干扰技术,抗干扰能力强。
三、技术指标• 供电电源:AC/DC85~265V• 工作环境:温度-30℃~+65℃相对湿度W90%RH 大气压强:W 2500pa • 功耗:W 5W• 抗电强度:外壳与端子间三AC2kV • 绝缘性能:外壳与端子间三100M Q • 动态模拟一次接线图• 模拟图(面膜)的制作:根据用户现场实际的一次接线方案、电压等级设计面膜。
•动态模拟对象:断路器,手车位置,接地开关、储能等,通过电路采样,动态地根据实际信息变化面膜上的一次接线图,从而实现动态模拟的目的。
模拟图显示如下:分闸(或回路)显示预分预合闸闪烁指示(选配) 储能显示 试验位置显示断路器、接地刀防误闪烁提示 • 温湿度测量及调节最多可测量及显示两路温湿度数据,且可实现对温湿度的自动调节。
IMail8中文使用手册.

Imail 服务器使用指南软件8版Ipswitch,公司1995-2003Ipswitch,公司版权所有.Imail服务器8.0WindowsNT/2000使用指南这本手册,和它描述的软件,在遵守许可证条件下可以被使用或拷贝除此之外或在没有经过Ipswitch公司书面同意的情况下,这本发布物的任何部份不可以以任何形式,电子的,机械的或其他任何记录形式复制、影印、存储或传输.这本手册的内容只做参考,如有任何改变将不另做通知,Ipswitch努力保证在此处信息的准确度,但这不作为Ipswitch的承诺,公司不承担错误或省略的责任.Ipswitch,公司也不承担由使用此文件信息建立的损害的责任.Imail,Imail图标,WhatsUp,WhatsUp图标,WS_FTP,WS_FTP图标,Ipswitch,和Ipswitch图标是Ipswitch的商标,其他的产品和他们的商标或公司名字,是各自公司的商标或注册的商标,属于公司的属性.下列各项是他们各自公司或组织的版权:该产品的拼写检查是WinterTree字典软件的版权.编码部分由RSA信息安全公司MD5信息-文摘运算法则编写,版权RSA信息安全公司所有;SSL部分由EricYoung(eay@cryptsoft.com)crypto/cryptlib.cCopyright1995-1998在SSLeay库基础上实施,部分由RSA信息安全公司实施.这种产品也包括由TimHudson(tjh@crytpsoft.com)编写的软件.历史记录1995年三月第一版1996年三月第二版1996年八月第三版1997年六月第四版1999年一月第五版1999年十二月第六版2000年一月第七版2001年六月第八版2003年二月第九版Ipswitch,公司81HartwellAve电话:781-676-5700Lexington,MA02421-3127传真:781-676-5710翻译:仲蔚menei@cemtek.com.cn;menei@21cn.com上海希柯科技发展有限公司http://www.cemtek.com.cn目录第一章:概观 (16)Imail 是什么.......................................................................................................... 16 介绍......................................................................................................................... 16 系统需求................................................................................................................. 16 在IMail 版本 8 中新的特征........................................................................ 16 服务......................................................................................................................... 16 用户界面................................................................................................................ 16 防垃圾邮件功能.................................................................................................. 16 Web 邮件管理...................................................................................................... 17 基本服务.. (18)SMTP (18)SMTP 安全 (18)POP3 (18)IMAP4..................................................................................................................... 18 Web 邮件................................................................................................................ 18 Web 日历................................................................................................................ 19 附加的服务............................................................................................................ 19 标准特征................................................................................................................. 20 用户注册和维护.................................................................................................. 20 邮件列表创造和维护......................................................................................... 20 邮件转寄................................................................................................................ 20 Finger “Plan” 支持.............................................................................................. 20 邮件递送规则....................................................................................................... 20 自动邮件帐户....................................................................................................... 20 多主机 (域支持................................................................................................. 21 增强隐私的邮局协议支持............................................................................... 21 对呼叫器的邮件转寄......................................................................................... 21 未知的本地用户处理......................................................................................... 21 防止垃圾邮件特征............................................................................................. 21 可选择的性能选项............................................................................................ 21 Windows 下的IMail 客户端 (21)第二章.安装................................................................................................... 21 在你开始之前....................................................................................................... 22 检查你的首要主机名字.................................................................................... 22 用户注册和验证.................................................................................................. 22 第一次安装 IMail 服务器............................................................................. 23 安装程序................................................................................................................ 23 Root 用户................................................................................................................. 24 执行最初的设定和测试................................................................................. 24 使用一个测试帐户发送并且接收邮件........................................................ 25 查看基本的 IMail 服务器配置................................................................... 25 General 属性.......................................................................................................... 25 邮件队列................................................................................................................ 25 IMail 服务器服务快速预览............................................................................. 26 验证服务................................................................................................................. 26 默认服务端口....................................................................................................... 26 IMail 服务器目录结构.................................................................................... 26 升级............................................................................................................................ 27 升级使用外部的数据库.................................................................................... 27 升级Web 邮件..................................................................................................... 28 重新安装 IMail 服务器到一个不同的位置................................................ 28 删除 IMail 服务器 (28)第三章:配置................................................................................................... 28 基本配置................................................................................................................. 28 高级配置................................................................................................................. 29 检查主要的邮件主机的配置....................................................................... 29 为主要的邮件主机建立 DNS..................................................................... 30 为邮件主机建立一个别名............................................................................ 30 增加附加的邮件主机....................................................................................... 30 有 IP 地址的虚拟主机....................................................................................... 31 没有 IP 地址的虚拟主机.................................................................................. 31 配置一个虚拟主机............................................................................................. 31 为多重邮件主机建立DNS (32)变更域的 IP 地址............................................................................................... 33 将IMail 服务器设置为邮件网关............................................................. 33 建立一个拨号方式连接................................................................................. 34 接收来自英特网服务提供者的邮件............................................................. 34 为拨号访问设立服务器.................................................................................... 34 建立 IMail 服务器作为备份处理............................................................. 36 建立“对等” IMail 服务器............................................................................. 37 如何对等工作....................................................................................................... 37 设定程序................................................................................................................ 37 建立对等服务器的例子.................................................................................... 37 使用 ETRN 取回邮件...................................................................................... 38 增加一个基于外部数据库的主机............................................................ 38 配置首要的主机.................................................................................................. 39 创造一个基于外部数据库的主机................................................................. 39 配置外部数据库接口.. (39)第四章:用户邮件报告........................................................................ 40 使用用户邮件帐号............................................................................................ 40 添加用户邮件帐号............................................................................................. 40 导入NT 用户........................................................................................................ 42 删除一个用户的邮件帐号............................................................................... 42 找寻孤儿邮件账户............................................................................................. 42 为新用户设置默认选项.................................................................................... 42 使用邮箱................................................................................................................. 43 直接邮箱名和用户ID ....................................................................................... 44 设置一个Finger 计划...................................................................................... 44 设置假期邮件....................................................................................................... 44 设置一封基本的假期邮件............................................................................... 44 清除发送者Email 地址列表........................................................................... 45 清除发送者Email 地址列表........................................................................... 45 发送一条回应每封邮件的信息...................................................................... 45 输入LDAP 目录信息(特性)................................................................. 45 转发邮件到另一个账号................................................................................. 45 将用户设置应用于其他用户.. (46)为现存用户进行通用设置............................................................................ 46 禁止整个域........................................................................................................... 46 添加,修改以及删除别名............................................................................ 46 你能够创建四类别名......................................................................................... 47 添加别名................................................................................................................ 47 处理发给不存在用户的邮件 (48)第五章:邮件处理技术........................................................................ 48 处理顺序................................................................................................................. 48 设置传递规则....................................................................................................... 49 例子......................................................................................................................... 49 试验传递规则....................................................................................................... 49 规则语法................................................................................................................ 50 创建一个参考外部文件的传递规则............................................................. 51 限制......................................................................................................................... 52 使用Info Manager............................................................................................. 52 当使用进行再分割的Info 管理人员说明的时候..................................... 53 次领域和信箱....................................................................................................... 53 再分割一个Info Manager邮件帐号............................................................. 54 关于转发的注意事项......................................................................................... 54 关闭Info Manager............................................................................................... 54 更多关于Info Manager的信息. (54)第六章:Imail 网络邮件.......................................................................... 55 什么是网络邮件?............................................................................................ 55 用户能如何处理网络邮件?....................................................................... 56 系统需求................................................................................................................. 56 升级............................................................................................................................ 56 网络邮件安全....................................................................................................... 57 设置网络邮件....................................................................................................... 57 网络邮件服务器的网络地址........................................................................... 58 如果你有多个邮件主机.................................................................................... 58 使用SSL ................................................................................................................ 58 SSL 查错................................................................................................................ 60 设置网络服务器.. (60)高级选项 (62)设置网络邮件功能的使用............................................................................... 63 使用远程管理功能............................................................................................. 64 用户管理................................................................................................................ 64 别名管理员........................................................................................................... 64 列表管理员........................................................................................................... 64 查看管理日志及SPOOL 目录........................................................................ 64 单击并显示spool 目录的信息.................................................................................... 65 管理虚拟主机....................................................................................................... 65 管理邮件列表....................................................................................................... 65 设置规则................................................................................................................ 65 编辑每日新闻及欢迎信息............................................................................... 65 拼写检查................................................................................................................. 65 为域安装字典....................................................................................................... 65 启动拼写检查....................................................................................................... 65 使用拼写检查程序............................................................................................. 66 禁止拼写检查....................................................................................................... 66 编辑字典................................................................................................................ 66 词典说明................................................................................................................ 66 展示在线广告....................................................................................................... 67 定制网络邮件. (67)第七章: IMail 网络日历........................................................................ 67 IMail 网络日历是什么? ................................................................................ 67 使用者能用 IMail 网络日历做什么? ...................................................... 68 系统需求................................................................................................................. 68 IMail 网页日历的安全.................................................................................... 68 设置 IMail 网页日历........................................................................................ 69 IMail 网页日历服务器的网络地址............................................................... 69 如果你有多个邮件主机.................................................................................... 69 使用安全插口层(SSL....................................................................................... 69 从浏览器中开始一个SSL 连接..................................................................... 70 配置web 日历服务器........................................................................................ 71 设置对网页日历服务的访问....................................................................... 72 邀请. (73)电子邮件邀请 (73)浏览邀请................................................................................................................ 73 接收邀请................................................................................................................ 73 拒绝邀请................................................................................................................ 73 显示在线广告....................................................................................................... 73 定制 IMail 的网页日历.. (74)第八章: SMTP 服务器............................................................................ 74 SMTP 对RFCs 的支持................................................................................... 74 基本信息................................................................................................................. 74 登录............................................................................................................................ 74 设置SMTP 服务................................................................................................. 75 SMTP 选项............................................................................................................ 75 Using a Remote Mail Gateway使用一个远端邮件网关..................... 76 SMTP Processes SMTP系统进程............................................................ 76 SMTP 安全. (76)第九章: 安全设置以及如何防止垃圾邮件...................... 76 SMTP 协议安全的技术背景........................................................................ 76 安全设置的准备工作....................................................................................... 77 邮件转发选项....................................................................................................... 77 认证接收的邮件.................................................................................................. 77 访问控制选项....................................................................................................... 77 改变 SMTP 欢迎消息........................................................................................ 78 SMTP 安全设置选项....................................................................................... 78 Setting Mail Relay Options 设置邮件转发选项......................................... 78 Setting Access to Local Mail Groups本地邮件组的访问设置.......... 80 Validating Incoming Mail验证接受的邮件............................................. 80 Setting Access to the SMTP Server设置对 SMTP 服务的访问........ 81 Copying Inbound and Outbound Mail产生所有邮件的副本.............81第十章: POP3 服务器.............................................................................. 82 Logging On 登入................................................................................................. 82 Configuring the POP3 Server 配置 POP3 服务器............................ 82 Logging Options 日志选项. (83)Other Options 其他选项.................................................................................... 83 设置对 POP3 服务的访问................................................................................ 83 改变 POP3 服务器的欢迎消息....................................................................... 83 第十一章: IMAP4 Server..................................................................... 84 服务器关于 IMAP4 的实现......................................................................... 84 IMAP4 服务的支持............................................................................................ 84 完整的 IMAP4 客户端的支持........................................................................ 84 邮箱的管理........................................................................................................... 84 公共的邮箱........................................................................................................... 85 登入............................................................................................................................ 85 配置IMAP4 服务............................................................................................... 85 日志选项................................................................................................................ 85 Changing the IMAP Welcome Message 改变 IMAP 欢迎消息............. 86 第十二章: LDAP Server................................................................ 86 Imail 的 LDAP 的实现.................................................................................... 86 对 LDAP 目录服务的完整的支持........................................................... 87 为没有登记的用户提供 LDAP 信息............................................................ 87 从 Microsoft 的邮件客户端访问 LDAP 信息............................................ 87 Populating the LDAP Database........................................................................ 87 登入............................................................................................................................ 87 配置LDAP 服务器........................................................................................... 88 日志选项................................................................................................................ 88 第十三章: Whois Server........................................................................ 89 登入............................................................................................................................ 89 配置Whois 服务器........................................................................................... 89 日志选项................................................................................................................ 89 第十四章: Finger Server........................................................................ 90 登入............................................................................................................................ 90 配置Finger 服务器........................................................................................... 90 日志选项................................................................................................................ 90 第十五章: Password Server 密码服务器.. (91)配置 Password 服务器..................................................................................... 91 日志选项................................................................................................................ 91 登入............................................................................................................................ 91 第十六章: 监视服务器........................................................................... 92 配置 Monitor 服务器........................................................................................ 92 登入 (93)注意 (93)在控制面板中更改 Monitor 服务的设定.................................................... 93 如何使用警告....................................................................................................... 93 定制警告................................................................................................................ 93 定制蜂鸣器警告.................................................................................................. 94 使用外部蜂鸣器程序......................................................................................... 94 定义传呼机警告.................................................................................................. 94 定义邮件警告....................................................................................................... 95 把定义好的警告设置放入警告标签............................................................. 95 激活警告信息....................................................................................................... 96 关闭警告信息....................................................................................................... 96 设置网页管理方式............................................................................................ 96 设置网页管理方式的访问............................................................................... 97 使用网页管理方式............................................................................................ 97 个人帐号选项....................................................................................................... 98 系统管理员........................................................................................................... 98 主机管理................................................................................................................ 99 第十七章:邮件列表服务器的邮件列表.............................. 99 性能............................................................................................................................ 99 邮件列表服务器的邮件列表的类型....................................................... 99 使用密码和投递列表......................................................................................... 99 Open Lists (Anyone Can Post 开放式邮件列表..................................... 100 Subscriber Lists 订阅邮件列表..................................................................... 100 Moderated Lists 受管理的邮件列表............................................................ 100 投递邮件到邮件列表..................................................................................... 100 使用密码.............................................................................................................. 101 查询信息和订阅.. (101)查询信息的格式................................................................................................ 101 查询信息的有关命令....................................................................................... 101 订阅者使用的命令........................................................................................... 102 邮件列表拥有者或管理员使用的命令...................................................... 102 邮件列表服务器是如何工作的.................................................................... 102 Creating a List-Server Mailing List 创建一个列表.................................. 103 设置高级选项..................................................................................................... 104 安全设置............................................................................................................... 105 设置文摘模式..................................................................................................... 106 为邮件列表服务器中的邮件列表设置文摘模式:.................................. 106 Digest Scheduling.............................................................................................. 107 添加和删除订阅用户和未知用户.......................................................... 107 设置一个别名删除未知的用户.................................................................... 107 第十八章: 发送电子邮件到蜂鸣器或者传呼机...... 108 增加一个蜂鸣器或者传呼机的别名..................................................... 108 定义传呼机的别名........................................................................................... 108 定义蜂鸣器的别名........................................................................................... 108 发送信息到传呼机/蜂鸣器........................................................................ 109 转发信息到传呼机........................................................................................... 109 当邮件到达时候发送信息到指定的蜂鸣器............................................. 109 Imail Administrator 远程连接................................................................... 109 第十九章如何发送邮件到传真............................................. 110 安装Imail 传真支持....................................................................................... 110 设置调制解调器端口..................................................................................... 111 添加一个“邮件至传真”别名............................................................... 111 创建和修改传真............................................................................................... 111 设置和使用动态拨号别名.......................................................................... 112 为所有的动态别名设置全局属性............................................................... 113 设置访问和拨号限。
猫(Cat)309CR小型轨道液压机械挖掘机特色说明书

4,134 psi
Digging Force – Stick (Standard)
42.3 kN
9,500 lbf
Digging Force – Stick (Long)
35.7 kN
8,023 lbf
Digging Force – Bucket
62.0 kN
13,943 lbf
Swing System
UNMATCHED DEALER SUPPORT Your Cat dealer is here to help you reach your business goals.
From providing equipment solutions to operator training to service needs and beyond, your Cat dealer is ready to help.
BIG PERFORMANCE IN A MINI DESIGN Increased lifting, swinging, travel and multi-functioning performance
helps you get the job done more efficiently, and dig-to-blade allows for easy clean up.
233 L/min 62 gal/min
Operating Pressure – Equipment
285 bar
4,134 psi
Operating Pressure – Travel
285 bar
4,134 psi
Operating Pressure – Swing
250 bar
NU-TECH_9按键触摸芯片TC309_中文手册_V1.3

TC Serial touch sensor
Page 6 of 8
TC309_中文手册_V1.3
额定值 *
工作温度 存储温度 电源电压 管脚最大电流 管脚电压 * 注意 超出额定值可能会导致芯片永久损坏
电气特性
TA = 25℃ 特性 工作电压 电流消耗
符号 Vcc Idd
上电稳定时间 Tini
条件
3KΩ RX3
VCC
RU1 RU2 RU3
SDA 15 SCL 14 INT 13
10KΩ 10KΩ 10KΩ
SEN 3
20pf CSEN
CX8 12
RX8 3KΩ
CX7 11
RX7 3KΩ
CX6 10
RX6 3KΩ
CX5 9
RX5 3KΩ
CX4 8
RX4 3KΩ
MCU
PAD8 PAD7 PAD6 PAD5 PAD4
0.224
0.236
0.248
0.018
0.026
0.033
0°
--
8°
TC Serial touch sensor
Page 8 of 8
6.30
0.45
0.65
0.85
0°
--
8°
Dimensions In Inches
Min
Nom
Max
0.051
0.059
0.067
0.002
0.006
0.010
0.012
0.016
0.022
0.006
0.010
0.014
0.382
0.394
0.406
.0148
0.156
Akko 3098B多模机械键盘用户手册说明书

用户手册User ManualMulti-modesB 三模3098B规格参数1目录3098B Technical Specifications3098B HotKeys3098B System Commands (Windows)3098B System Commands (Mac)3098B Backlight Settings3098B Bluetooth Feature Overview3098B Bluetooth Setup Instruction 13098B Bluetooth Setup Instruction 2Key/Lighting Effects Customization Instruction Akko Warranty and Service Statement 11 12 13 14 15 16 17 18 19 20Menu3098B规格参数1约382*134*40mm约1.1kg中国机械键盘PBT材质蓝牙 / 无线 / 有线Type-C To USB3000mAh键盘需在有线模式下配合驱动进行自定义支持支持23098B组合键功能33098B系统功能(Windows)Fn + 左Win 锁Win键长按 Fn + ~恢复出厂设置长按Fn + 右Ctrl将Ctrl变成Menu (App)键43098B系统功能(Mac)F1F2F3F4降低显示屏亮度增加显示屏亮度开放任务控制呼出SiriF5F6F7F8无功能无功能向后跳(音频)暂停/播放(音频)F9F10F11F12向前跳过(音频)静音调低音量调高音量左Win 左Alt左Alt左Win3098B背光调节53098B蓝牙使用指南61.切换到蓝牙模式① 键盘不插USB线未连接电脑使用的状态下,底部电源拨动开关或往左进入Windows系统/或往右进入Mac系统,长按Fn + E / R / T可进行蓝牙匹配,E / R / T按键上蓝灯快闪,即可进入蓝牙匹配模式。
PLEXIGLAS Edgelight 8N LD96 说明书

PRODUCT INFORMATIONPLEXIGLAS® Edgelight 8N LD96Product Profile:PLEXIGLAS® Edgelight 8N LD96 is a highly transparent light guide material based on PLEXIGLAS® 8N.In addition to the typical properties of PLEXIGLAS®,such as• Excellent weather resistance • UV-stability• Good flow, high mechanical strengthPLEXIGLAS® Edgelight 8N LD96 is developed for edge lit Edgelight applications. The light scattering properties convert the light guide to a full illuminated panel.Furthermore, the material allows for a competely transparent view through the light guide when it is not illuminated. This opens a new degree of freedom for designers. PLEXIGLAS® Edgelight 8N LD96 is recommended for panels with a distance of 48 cm to 96cm between two light injecting Edgelight strips.Application:Preferably, for injection molding, but can also be used for special extrusion.Examples:BLU (Back lighting) for LCD-Displays, illuminated freeform panels, ambient lighting, illuminated handle bars and switches. Illuminated outline contours fordevices.Processing:PLEXIGLAS® Edgelight 8N LD96 can be processed on injection molding machines with 3-zone general purpose screws for engineering thermoplastics.Physical Form / Packaging:PLEXIGLAS® Edgelight 8N LD96 is supplied as pellets of uniform size, packaged in 25kg polyethylene bags; other packaging on request.Properties:Parameter Unit Standard PLEXIGLAS®Edgelight 8NLD96Mechanical PropertiesTensile Modulus 1 mm/min MPa ISO 5273300 Stress @ Break 5 mm/min MPa ISO 52777 Strain @ Break 5 mm/min%ISO 5275,5 Charpy Impact Strength23°C kJ/m²ISO 179/1eU20 Thermal PropertiesVicat Softening Temperature B / 50°C ISO 306108 Glass Transition Temperature°C ISO 11357117 Temp. of Deflection under Load0.45 MPa°C ISO 75103 Temp. of Deflection under Load 1.8 MPa°C ISO 7598 Coeff. of Linear Therm. Expansion0 - 50°C E-5 /°K ISO 113598 Classes of construction product DIN EN 13501-1E Flammability UL 94 1.5 mm Class IEC 60695-11-10HB Rheological PropertiesMelt Volume Rate, MVR230°C / 3,8kg cm³/10min ISO 11333 Optical Properties d=3 mmLuminous transmittance D65%ISO 13468-292 Haze%ASTM D1003< 1 Refractive Index589nm/23°C ISO 4891,49 Other PropertiesDensity g/cm³ISO 1183 1.19 Recommended ProcessingConditionsPredrying Temperature°C max. 98 Predrying Time in Desiccant-TypeDrier h 2 - 3Melt Temperature°C220 - 260 Mold Temperature (InjectionMolding)°C60 - 90All listed technical data are typical values intended for your guidance. They are given without obligation and do not constitute a materials specification.Certified to ISO 9001:2015, ISO 14001:2015 and IATF 16949:2016.This information and all further technical advice is based on our present knowledge and experience. However, it implies no liability or other legal responsibility on our part, including with regard to existing third party intellectual property rights, especially patent rights. In particular, no warranty, whether express or implied, or guarantee of product properties in the legal sense is intended or implied. We reserve the right to make any changes according to technological progress or further developments. The customer is not released from the obligation to conduct careful inspection and testing of incoming goods. Performance of the product described herein should be verified by testing, which should be carried out only by qualified experts in the sole responsibility of a customer. Reference to trade names used by other companies is neither a recommendation, nor does it imply that similar products could not be used.Röhm is a worldwide manufacturer of PMMA products sold under the PLEXIGLAS® trademark on the European, Asian, African and Australian continents and under the ACRYLITE® trademark in the Americas.® = registered trademarkPLEXIGLAS and PLEXIMID are registered trademarks of Röhm GmbH.Röhm GmbH • Darmstadt • Germany****************************Ref. No.: MC518 A1142。
inwin+309+gaming+edition+使用者手冊说明书

使用者手冊产品影片信息目 錄1. 产品故事 (04)2. 规格 (05)3. 包装内容 (07)4. 机体结构 (08)5. 安装步骤 (10)6. 内建游戏操作说明 (15)7. 游戏手把使用说明 (16)8. 灯光及风扇控制按钮说明 (17)9. GLOW X软件使用说明 (18)产品故事GAME TIME!如果你认为InWin 309的144颗LED面板设计是个疯狂的想法,那么309 Gaming Edition将再次突破你对机箱的想象!内建三款经典小游戏及专属的手把,让机箱瞬间化身游戏屏幕,随时随地、想玩就玩!搭配全新升级的GLOW X软件,除了增加多种有趣的互动灯效,还提供高达40张可自定义的图面,以及多样的创作工具和色彩校正功能,为每一个创作灵感找到出口,即使要制作面板动画也不是问题!机种309 Gaming Edition 产品型号IW-CS-309GE-BLK 颜色Black 机箱型式Mid Tower材质SECC 镀锌钢板, 钢化玻璃, ABS 主板兼容12" x 11" ATX, Micro-ATX, Mini-ITX 显卡扩充槽7 x PCI-E高兼容性支持高规格显卡长度:350 mm 支持CPU 散热器高度:160 mm 输出/入埠1 x USB 3.1 Gen2 Type-C 2 x USB 3.0 HD AudioLED & 风扇模式切换按钮LED & 风扇控制按钮隐藏式硬盘位2 x 3.5" / 2.5"2 x 2.5"(2 x 2.5"标配,至多支援3个)散热系统兼容风扇支持上:3 x 120 mm 后:1 x 120 mm 下:3 x 120 mm(标配4颗InWin Saturn ASN120风扇)水冷排支持上:1 x 360 mm 后:1 x 120 mm下:1 x 360 mm (薄排)* 本产品风扇预装数量视各销售区域略有不同电源兼容PSII: ATX12V- 可安装长度达200 mm 产品尺寸 (长 x 宽 x 高)553 x 238 x 500 mm 包装尺寸 (长 x 宽 x 高)706 x 618 x 335 mm 净重13.7 kg 毛重16.6 kg* 本产品符合欧盟有害物质使用限制指引 (RoHS)309 Gaming Edition 机箱产品名称Saturn ASN120尺寸120 x 120 x 25 mm材质PC, PBT额定电压DC 12V额定功率 4.32W额定电流0.36AARGB 额定电压DC 5VARGB 额定功率 1.5WARGB额定电流0.30A风扇转速PWM 500 - 1800 +/- 10% RPM风量77.17 CFM风压 3.12 mm / H2OLED ARGB风扇串接接头6-Pin模组化接头主板接头4-Pin (12V, PWM), 3-Pin (5V, ARGB)噪音值35 dB(A) (Max.)轴承形式长效油封轴承InWin Saturn ASN120 风扇* 本产品符合欧盟有害物质使用限制指引 (RoHS)* 产品规格视各销售区域略有不同包装内容309 Gaming Edition 机箱专属游戏手把e. 2.5" 硬盘螺丝f. 3.5" 硬盘螺丝g. 水冷排垫片h. 显卡支撑架及垫片a. 主板固定铜柱b. 主板铜柱套筒c. 六角头螺丝d. 束线带电源开关LED & 风扇模式切换按钮USB 3.1 Gen 2 Type-C 插槽LED & 风扇控制按钮音源插孔(耳机和麦克风)重开机键USB 3.0插槽电源指示灯123456789电源供应器安装区10 3.5" / 2.5"硬盘槽11 2.5"硬盘槽12上置风扇/水冷排安装区(已预装3颗InWin Saturn ASN120风扇)13后方风扇/水冷排安装区(已预装1颗InWin Saturn ASN120风扇)14下置风扇/水冷排安装区15主板安装区16PCI-E(显卡)扩展槽17显卡支撑架安装孔18防震脚垫19风扇滤网101214131516111891917安装步骤* 请依据以下步骤进行安装。
Altopro Audio PS 4L 4LA смер具 使用人手册说明书

User's Manual Version 1.3 Aug. 2008EnglishACTIVE/PASSIVE MODELSSPEAKER ENCLOSUREPS 4L/4LAIMPORT ANT SAFETY INSTRUCTIONWARNINGTo reduce the risk of electric shockand fire, do not expose this equipmentto moisture or rain.1.2.3.4.5.6.7.8.9.10.Dispose of this product shouldnot be placed in municipal wasteand should be separate collection.11.12.Move this Equipment only with a cart,specified by themanufacturer, orsold with theEquipment. Whena cart is used, usecaution whenmoving the cart /equipmentcombination toavoid possiblePermanent hearing loss may be caused byexposure to \ extremely high noise levels.The US. Government's Occupational Safetyand Health Administration (OSHA) hasspecified the permissible exposure to noiselevel.These are shown in the following chart:HOURS X DAY EXAMPLEAccording to OSHA, an exposure to high SPL inexcess of these limits may result in the loss ofheat. To avoid the potential damage of heat, it isrecommended that Personnel exposed toequipment capable of generating high SPL usehearing protection while such equipment isunder operation.864321,510,50,25 or lessSPL90929597100102105110115Small gigtrainSubway trainHigh level desktop monitorsClassic music concertRock concert may be sufficient to constitute the risk of electricProtective Ground T erminalAC mains (Alternating Current)Hazardous Live T erminalON: Denotes the product is turned on.OFF: Denotes the product is turned off.The apparatus shall be connected to a mainssocket outlet with a protective earthingconnection.The mains plug or an appliance coupler is usedas the disconnect device, the disconnect deviceshall remain readily operable.CAUTIONDescribes precautions that should be observed toprevent damage to the product.Keep this Manual in a safe place.Be aware of all warnings reportedwith this symbol.moisture.Clean it only with dry cloth. Do not usesolvent or other chemicals.Do not damp or cover any cooling opening.Install the equipment only in accordance withthe Manufacturer's instructions.Power Cords are designed for your safety. Donot remove Ground connections! If the plugdoes not fit your AC outlet, seek advice froma qualified electrician. Protect the powercord and plug from any physical stress toavoid risk of electric shock. Do not placeheavy objects on the power cord. This couldcause electric shock or fire.Unplug this equipment when unused for longperiods of time or during a storm.Refer all service to qualified service personnelonly. Do not perform any servicing other thanthose instructions contained within theUser's Manual.To preven t fire and damage to the product,use only the recommended fuse type asindicated in this manual. Do not short-circuitthe fuse holder. Before replacing the fuse,make sure that the product is OFF anddisconnected from the AC outlet.IN THIS MANUAL:1. INTRODUCTION (1)2. QUICK START - PS 4L (2)3. QUICK START - PS 4LA (3)4. HOOK-UP DIAGRAMS (4)5. RIGGING (5)6. PANEL DESCRIPTION-PS 4LA (6)7. PANEL DESCRIPTION-PS 4L (7)8. TECHNICAL SPECIFICATION (8)9. WARRANTY (9)1. INTRODUCTIONThank you for your purchasing of the PS4L/4LA, 2-way active sound reinforcement speaker enclosures. It is just one of the many Alto products that a talented, multinational T eam of Audio Engineers and Musicians have developed with their great passion for music. Y our PS4L/4LA is capable of enormous sound pressure level and it has been created to give you a performance that is better than any loudspeaker in this range. Thanks to the quality of its transducers, built-in amplifier and digital processor. We design all our transducers and cabinets in Emilia-Romagna of Italy, a lowland famous for music and fast cars. In fact, Lamborghini, Maserati and Ferrari are made just a few miles away from our design centres. The same area has a long tradition in designing and manufacturing some of the world's best professional transducer and plastic moldings. Enjoy your PS4L/4LA and make sure to read this Manual carefully before operation!122. QUICK START - PS 4L1. PS 4L PASSIVE SPEAKER CABINETMake all initial connections with all the equipment powered off, and ensurethat all the main volume controls are turned completely down.1). Connect one side of the speaker cable to the output CHA/CHB or Binding of your speaker cabinet.2). Complete other connections as illustrated.3). T urn on your mixer first, then the stereo power amplifier.4). T urn up the volume controls of your amplifier to about 70%.5). Use PFL function to get the proper input level for the mixer, and adjust the main mix level control to manipulate the output level.6). After using, turn off your stereo power amplifier first, then the mixer.Post of your stereo power amplifier and the other side to the input socket2. PS 4LA ACTIVE SPEAKER CABINETMake all initial connections with all the equipment powered off, and ensure that all the main volume controls are turned completely down.1). Connect one side of the signal cable at your audio mixer into output left /right (with Stereo-Jack or XLR) and the other side of the cable into the line input (Stereo-Jack) of your active speaker cabinet. 2). Connect the power cord to mains.3). T urn on your mixer first, then the active speaker cabinets.4). T urn up the volume control of the active speaker cabinets.5). Use PFL function to get the proper input level for the mixer , and adjust the main mix level control to manipulate the output level.6). After using, turn off your active speaker cabinets first, then the mixer .3. QUICK START - PS 4LA44.3 Two subwoofers and two satellite speakers56-. CONNECTION PLA TE(1) BI-POLAR MAIN POWER SWITCH (2) AC POWER SOCKET WITH MAIN FUSE (3) GROUND SWITCH (4) CLIP INDICATOR RED LED (5) LINK OUT ON XLR CONNECTOR (6) a. STEREO JACK INPUT(7) MAIN VOLUME CONTROLb. LINE INPUT ON XLR CONNECTOR (3)(b)(a)-. CONNECTION PLA TE(1) INPUTReceive the power coming from an external poweramplifier. (SPK +1/-1 connected; +2/-2 not connected)(2) THRUDirect LINK for connect in parallel a second speakercabinet. (SPK +1/-1 connected; +2/-2 not connected)Besides, the passive crossover included theelectronic protection on the driver.(1)(2)788. TECHNICAL SPECIFICA TIONModel ItemSystem type Continuos Power Peak Power Rating Sensitivity at 1W, 1mt Max SPL at 1mt Frequency Response ImpedanceCrossover Frequency Lower - Frequency High - FrequencyHigh Frequency Protection Dimensions H W D Net Weight /kg lbs Gross Weight lbs/kg Shipping VolumeModel ItemPowered System type LOW Output Power HIGH Output Power Max SPL at 1mFrequency Response Impedance Low - High Crossover Frequency Protection Low - High Low - Frequency High - Frequency Input Sensitivity Input ImpedanceConnectorsPlastic Reinforced Cabinet Hardware Suspension Amplifier Protections External Control Power SupplyDimensions H W D Net Weight /kg lbs Gross Weight lbs/kg Shipping VolumePS 4LPS 4LA2 - way vented box180 Watt AES Standard 360 Watt Peak 96dB SPL 119dB SPL60Hz / 20kHz +/- 10dB 8 Ohm Nominal 2450Hz 12dB/Oct12" / 318mm - 2" Voice Coil 1" Compression Driver - 1" Voice CoilElectronic Dynamic Protection (26" 15.6" 15.1")660mm 396mm 384mm 17.1kg / 37.7lbs 19.82kg / 43.69lbs 4.83CFTBi-Amp. With analog processor 108W (RMS) / 141W (EIAJ) 45W (RMS) / 56.3W(EIAJ)119dB SPL55Hz / 20kHz +/- 10dB Low 8 Ohm - High 8 Ohm Complex EQ processorLimiter / Compressor plus PTC 12" / 318mm - 2" voice coil 1"Compression Driver - Line + 4dB / 1.23V 30k Ohms Balanced - 15k Ohms UnbalancedInput with Jack / Link with XLR Trapezoidal & Monitor shape SIX suspension pointsSoft Start - Short Circuit - DC voltage - Thermal Protection Volume - Clip - Ground Switch 230Volt / 115Volt 50 /60Hz 660mm 396mm 384mm (26" 15.6" 15.1")22.05kg / 48.61lbs 4.83CFT19.40kg / 42.81lbs9. WARRANTY1. WARRANTY REGISTRATION CARDT o obtain Warranty Service, the buyer should first fill out and return the enclosed Warranty Registration Card within 10 days of the Purchase Date.All the information presented in this Warranty Registration Card gives the manufacturer a better understanding of the sales status, so as to provide a more effective and efficient after-sales warranty service. Please fill out all the information carefully and genuinely, miswriting or absence of this card will void your warranty service.2. RETURN NOTICE2.1 In case of return for any warranty service, please make sure that theproduct is well packed in its original shipping carton, and it can protect your unit from any other extra damage.2.2 Please provide a copy of your sales receipt or other proof of purchase with the returned machine, and give detail information about your return address and contact telephone number.2.3 A brief description of the defect will be appreciated.2.4 Please prepay all the costs involved in the return shipping, handling and insurance.3. TERMS AND CONDITIONS3.1 warrants that this product will be free from any defects in materials and/or workmanship for a period of 1 year from the purchase date if you have completed the Warranty Registration Card in time.3.2 The warranty service is only available to the original consumer, who purchased this product directly from the retail dealer, and it can not be transferred.3.3 During the warranty service, may repair or replace this product at its own option at no charge to you for parts or for labor in accordance with the right side of this limited warranty. 3.4 This warranty does not apply to the damages to this product that occurred as the following conditions:Instead of operating in accordance with the user's manual thoroughly, any abuse or misuse of this product.Normal tear and wear.The product has been altered or modified in any way.Damage which may have been caused either directly or indirectly by another product / force / etc.Abnormal service or repairing by anyone other than the qualified personnel or technician.And in such cases, all the expenses will be charged to the buyer .3.5 In no event shall be liable for any incidental or consequential damages. Some states do not allow the exclusion or limitation of incidental orconsequential damages, so the above exclusion or limitation may not apply to you.3.6 This warranty gives you the specific rights, and these rights are compatible with the state laws, you may also have other statutory rights that may vary from state to state.L TO L TO L TO 9c All rights reserved to ALTO. All features and content might be changed without prior notice. Any photocopy, translation, or reproduction of part of thismanual without written permission is forbidden. Copyright 2008 Seikaku Group SEIKAKU TECHNICAL GROUP LIMITEDNO. 1, Lane 17, Sec. 2, Han Shi West Road, Taichung 40151, Taiwan T el: 886-4-22313737email:************************:886-4-22346757。
程序可调电源3091LD商品说明书

858.458.0223sales@ 2693091LD : Specifications© 2009 AMETEK Programmable Power All rights reserved. AMETEK Programmable Power is the trademark of AMETEK Inc., registered in the U.S. and other countries. Elgar, Sorensen, California Instruments, and Power Ten are trademarks of AMETEK Inc., registered in the U.S.RatingsPower 3000 W @ 0-37° C; 2400 W @ 38-50° C Current 30 ARMS Voltage 50 to 350 VRMS Frequency 45 to 440 HzMax. Peak Power 13 kW (up to 20% duty cycle)Max. Peak/Surge Current 90 APEAK Surge: 300 APEAK for 50 ms Max. Peak Voltage500 VPEAKOperating ModesConstant Current Range: 0 to 30 ARMS; Accuracy: 0.2 % of full scale; Resolution: 0.05 % of full scale; Min. Set Current: Voltage / Maximum Set Resistance Constant Voltage Range: 50 to 350 VRMS; Accuracy: 0.2 % of full scale; Resolution: 0.05 % of full scaleConstant Resistance Range: 2.5 to 100 Ohms, 100 to 1000 Ohms; Accuracy: 1% FS, 5% FS; Resolution: 0.05 % FS; Max. Set Resistance: 1 / (Freq.*1.3e-5)Constant Power Range: 3000 W @ 0-37° C,2400 W @ 38-50° C; Accuracy: 0.5% of full scale; Resolution: 0.1% of full scale Crest Factor Range: 1.4142 to 4.0, limited to 90 Apeak; Accuracy: 1 % of full scale; Resolution: 0.1 % of full scalePower Factor Range: 0 to 1 lead or lag limited by Crest factor settings; Accuracy: 1 % of full scale; Resolution: 0.1 % of full scale Shourt Circuit ModeMax. Surge current: 300 APEAK, up to 50 msec; Max. Cont. current: 30 ARMS; Max. Voltage drop: 2.5 VRMSMeasurementsFrequency Range: 45 to 440 Hz; Accuracy: 0.1% FS; Resolution: 0.05% FS Voltage Range: 50 to 350 VRMS; Accuracy: 0.1% FS; Resolution: 0.05% FS Peak Voltage Range: 50 to 500 V; Accuracy: 0.5% FS; Resolution: 0.1% FS Current Range: 0 to 30 ARMS; Accuracy: 0.2% FS; Resolution: 0.1% FS Peak Current Range: 0 to 90A; Accuracy: 0.5% FS; Resolution: 0.1% FS Crest Factor Range: 1,4142 to 4.0; Accuracy: 0.5% FS; Resolution: 0.1% FS Apparent Power Range: 0 to 3000 VA; Accuracy: 0.5% FS; Resolution: 0.1% FS True Power Range:0 to 3000 W; Accuracy: 0.5% FS; Resolution: 0.1% FS Peak Power Range: 0 to 45,000 W; Accuracy: 1% FS; Resolution: 0.1% FS Reactive Power Range: 0 to 3000 VA; Accuracy: 0.5% FS; Resolution: 0.1% FS Power Factor Range: 0 to 1; Accuracy: 0.5% FS; Resolution: 0.1% FSResistanceRange: 2.5 to 100 Ohms,100 to 1000 Ohms; Accuracy: 1% FS, 5% FS; Resolution: 0.05% FSProtectionOver Current Limited by input - Circuit Breaker and Set Maximum Current Limit in software.Over Voltage Output protected for voltage transients over 500 V in hardware.Over Power Power limited at maximum average and peak rated power in hardware. Limited to Set Maximum Power Limit in software.Over TemperatureMonitors heat sink temperature.Mechanical SpecificationsDimensions H: 8.75” (222 mm), W: 16.88” (429 mm), D: 25“ (635 mm)Weight 74 lbs / 34 Kg.Remote Sensing Max. 2V drop between sense and load lines Isolation1000 V between input and chassis groundAudible Noise (@1meter)Audible Noise (@ 1meter): Low power: 49.0 dBA; Full power: 69.5 dBA Control Power Input 115 Vac or 230 Vac (model -230) ± 10%, 47 to 63Hz Operating Temperature3000 W @ 0-37° C, 2400 W @ 39-50° CInterfacesGPIBStandardNote: Specifications are subject to change without notice. Specifications are warranted over an ambient temperature range of 25°± 5° C. Unless otherwise noted, specifications are per phase for a sinewave with a resistive load and apply after a 30 minute warm-up period. For three phase configurations, all specifications are for L-N. Phase angle specifications are valid under balanced load conditions only.3000–12000 VA。
OMEGAPHONE八路报警拨号器说明书

OMEGAPHONE ® Eight Channel Alarm DialersModel OMA-VM606 monitors up to eight switch closures (dry contacts) which allows you to connect a wide variety of sensors such as magnetic door or window switches, thermostats, fluid level switches and motion sensors. The OMA-VM606 allows you to program a “normal” state and a time delay for each dry contact input. A five-second message can be recorded to define each input. An additional local identification message can be recorded to identify the OMA-VM606 dialer. When an input is different from the programmed “normal” state for longer than the time delay, or the power is out for longer than five minutes (default is 5 minutes however this is user selectable) the unit will dial up to eight phone or pager numbers. If contact has not been made after dialing all phone numbers, the OMA-VM606 will wait 20 minutes and begin calling again. This sequence is repeated until contact is made. The integrated voice tells you which input is in alarm and the current status. Y ou can call the unit at any time to hear a status report including power status. All programming is accomplished over the phone following simple voice instructions.When the OMA-VM606 goes into an emergency state it will energize the alarm relay, activate the alarm buzzer and begin making emergency calls. When the unit dials a voice number it will first play the local identification message and the current status of any inputs which caused the emergency state. The unit ceases to be in the emergency state once contact is made with the unit. Contact is made by the user entering a personal identification number (PIN) after receiving a call from the unit, by entering the PIN number when calling in to the unit or by pressing the pushbutton located on the top of the dialer. If the input(s) return to theprogrammed “normal” states, the unit will also cease to be in the emergency state. If the OMA-VM606 calls an answering machine or voice mail, the warning message will be left and the unit will continue to call. When the OMA-VM606 calls a pager number, it will transmit the local identification number, any inputs which have caused an alarm and the power status.U M onitors Power Statusand Up to Eight Switch Closures (Dry Contacts)U P rogram Up to Eight 20-Digit Phone Numbers U W orks with Telephone Pagers U E asy-to-Follow Menu Driven Programming Done Over the Phone U W all Mount Enclosure U 4-Line LCD DisplayOMA-VM606OMA-VM606E shown smaller than actual size.2Range of Incoming Rings Before Answer: 1 to 20up to a 5-second identification message for each input Operation: Operates with answering machine on the same phone lineAlarm Notification:relay closes if any input(s) go into an alert condition Alarm Cancellation:silences the alarm and cancels emergency telephone callsAlarm Relay Output:Alarm Relay Operation:automatically energized during an emergency state (turn off from top button) or to be remotely controlled (turn on or off) via touch tone phone Alarm Buzzer:Display:Power:transformer power supplyBattery Backup:Operating Ambient:Electrical Connections:terminal blocksDimensions: 127 H x 191 W x 45 mm D (5.0 x 7.5 x 1.75")Material:Weight: 1.4 kg (3 lb)Ethernet Data Collection (OMA-VM606E Only)LAN: Ethernet 10Base-T or 100Base-TX (auto-sensing)Transport Protocol: TCP/IP , UDP Connector: RJ45LED Indicators: 10Base-T connection, 100Base-TX connectionfor free from ) you can view real time SM a total of 2 years.DescriptionEight channel alarm dialerOMA-VM606EEight channel alarm dialer with ethernetBottom view of OMA-VM606E showing ports.OMEGACARE SM extended warranty program is available for models shown on this page. Ask your sales representative for full details when placing an order. OMEGACARE SM labor and equivalent loaners.Extended Warranty。
KitchenAid 6吋多功能混合饮料机型号对应部件说明书

W10170081 Rear
17 9703445 Bearing, Thrust
18 9709231 Gear, Worm
19
Control Assembly
9706648 Control with Black Knob
20 9708191 Shaft, Agitator 21 3400200 Screw
6 QT. STAND MIXER
MODELS:
KP26M9PCBM5 (Black Matte) KP26M9PCCU5 (Contour Silver) KP26M9PCER5 (Empire Red)
03/18/2019
Part No. W11337405 Rev. B
COLOR VARIATION PARTS
11 W10598835 Rod, Bowl Lift
12
9237 Spring, Lift Rod
13 9703439 Washer
14 8533907 Nut
15
Column Assembly
(Refer to Color Variation Parts Page)
16 W11215949 Beater, Flat (Coated)
6
Column & Pins
W11123140 Black Matte
W10328003 Contour Silver
9705324 Empire Red
7
Base & Foot Assembly
W11123131 Black Matte W10328017 Contour Silver
9705348 Empire Red
6 9709511 Gasket, Transmission
Malekko Heavy Industry AD LFO说明书

AD/LFO MANUAL V.1TABLE OF CONTENTS SPECIFICATIONS 12 INSTALLATION3 DESCRIPTIONOVERVIEW 4 QUICKOUTPUTS 5 INPUTSANDWARRANTY 6SPECIFICATIONSFORMAT:EURORACKDIMENSIONS:12HP, 12mm deepINTERNAL AND EXTERNAL SIGNALS (3.5mm jacks): 0-5V Logic I/OMAX CURRENT:+12V: 90mA-12V: 20mA+5V: n/aINSTALLATIONRemove module from packaging.Power down your modular synthesizer and disconnect the power cable from the wall outlet.Attach the included power cable to the module’s power connector and connect the other end to the power distribution bus in your EuroRack synthesizer case. If you have a bi-colored ribbon cable the red stripe should be on a same side with a bold white line on a pcb. In case if you have a rainbow-colored ribbon cable the key is brown. Connector also has a key which should match sikscreen on a pcb. Position the module on the mounting rails in your EuroRack case and screw down mounting screws. Power up! If your case does not turn on properly then you have installed the module incorrectly. Simply power down and make sure to follow the diagram when reconnecting the module.DESCRIPTIONThe AD/LFO is a digital powerhouse of envelopes and low frequency oscillators, totaling 6 independent function generators plus 2 SUM outputs. Each bank of three can be 10 times longer with a touch of the /10 button. This module was designed with live performance in mind!FEATURES:- 6 total generators with independent outputs- Control over Attack/Decay on each row- Attack/Decay LOOP on/off button- SUM outs for 2 banks of 3 generators- /10 button makes all 3 generators in a bank 10 times longerINPUTS AND OUTPUTSWARRANTYThis product is covered by the Malekko Heavy Industry warranty, for one yearfollowing the date of purchase. This warranty covers any defect in the manufacturing of this product. This warranty does not cover any damage or malfunction caused by incorrect use – such as, but not limited to, power cables connected backwards, excessive voltage levels, or exposure to extreme temperature or moisture levels. The warranty covers replacement or repair, asdecided by Malekko Heavy Industry. Please visit our website to obtain full warranty information and to registeryour product for coverage.。
Aimline ALX系列产品手册说明书

ALX ManualAimline ALX SeriesManualDownload the PDF version by scanningthe QR codeALX ManualManual for Aimline ALX seriesMountingPrepare the cabling for the ALX. All connectors are located at the back side behind a plate at the bottom of the enclosure.Mount the speaker to the wall using the L-brackets or the two pieces wallmount for space less mounting.Recommended mounting height should be minimum 1,80 bottom to the ground.Correct orientation is having the input panel at the bottom side.Dimensions ALX 8Dimensions cover plate Dimensions bracketDimensions connecting plateALX connection1: Ground2. GPI: Input: Contact can switch between Dante and analogue input3. GPIO: Output: Gives status report (failure indication) about the system(for surveillance).4: AES-EBU-Digital Input Ground5: AES-EBU Digital-Input minus6: AES-EBU Digital Input plusConnecting the ALX to PANC softwareConnect your computer to the Ethernet port “DATA-IN” of the ALX using a standard CAT-5 cable.Connections to more ALX speaker are made using “DATA-THRU” going to the next ALX speaker.For having more than two devices in a network and using DANTE as audio transmission the use of the IP switch is strongly recommended. Factory default setting of ALX is set to a fixed IP-address 192.168.10.10Set your network-adapter at your PC to a fixed IP-address in the range:192.168.10 XX (without using 10)Open “PANC CONTROL.exe”RIGHT-click on “INTERFACES” (top left on the screen)Have a look at IP-RANGE (top-right), be sure the IP-range is set to the correct value (192.168.10.1 – 192.168.10.100)In “UDP MENUE” NETWORK VIEW you can have a look to all devices that are in your networkIn “UDP MENUE”NETWORK VIEWyou can have alook to all devicesthat are in yournetworkClick “START SCANNING”The software now scans the IP-RANGE and will show all Aimline speaker within the network.Click “ADD ALL”. The scan window will be closed and the main-window shows up.Online-devices appear with a green dot.Maybe a popup appears that offers you to do a firmware-update: Please click “CANCEL”.You can change the IP address of any Aimline speaker in the network using “NETWORK-view” in the TOOLS Menue:Double-click the unit and change the IP address. Notice: Effect appears after restarting the unit. A new network-scan is necessary.Notice that every device has to be set to an individual IP address.Be sure to choose the right audio input source: Analogue, AES or Dante for your audio-input.Factory default setting for ALX is DANTE INPUTYou can name each device individually: Double-click on thedevice in the Interface-window and name your device.Please notice not to use the same name twice.DANTE:Please notice:Factory default setting for the DANTE card is “DHCP”, DANTE does not have a fixed IP-address.You can change thenetwork settings forthe DANTE-cards usingthe software “DANTEcontroller”, that isavailable fromAudinate-website.With the DANTE-controller you canassign the DANTE-signals to the DANTEreceivers. Each AimlineALX offers two DANTE-inputs.In DANTE controlleryou can also changethe network settingsfor the DANTE cards from DHCP to a fixed IP address. Notice that this range has to be separated from the range of the PANC range.To download DANTE controller for Windows orMacOS scan the QR codeIf the connection between PANC software and one ore more devices is lost (caused by mains disconnected or network disconnected) the green bottom top left will turn to RED.RIGHT-click on the speaker and choose RECONNECTNotice:The MUTE-ALL- bottom mutes ALL devices in your network; the UNMUTE-bottom unmutes ALL devices in your network.DEVICE-MANAGERIn “DEVICE-MANAGER” you have a TAB for each ALX speaker found in the network. Below the TAB you see TABs for editing each speaker:MAIN – GAIN/DELAY – IRR – FIR – BEAM - PRESETS – SYSTEMS SETTINGSThe tab MAIN offers an overview and gives direct access to MUTE – GAIN – DELAY – IIR- and the presetsThe tab GAIN/DELAY gives access to the level and the delay for each input. The delay can be switched from ms to meter to feetThe IIR tab gives access to a full parametric equalizer for each of the two inputs. Note: The inputs can be linked in the main-view, with linked inputs the PEQ-settings will be linked as well.Beam settings:The tab BEAM offers you the complete setup for the beam steering ability of the ALX series.Choose between one or two beams by choosing how many speaker are used for each beam.For each beam the angle (up and down) can be set.For each beam the beam spreading can be set.For each beam the acoustic center can be set.For each beam the gain can be set.Speakers per Beam:Used for multibeam-applications, splits the beam into two beams. Decide, how many driver-units physically are used to build up one beam. Minimum 4 drivers are necessary to build one beam.Possible configurations:ALX4: No multibeamALX8: 4:4 is the only choiceALX16: 8:8, 12:4, 4:12ALX24: 12:12, 20:4, 4:20, 12:8, 8:12ALX32: 16:16, 28:4, 4:28, 20:12, 12:20ALX40: 20:20, 36:4, 4:36, 32:8, 8:32, 28:12, 12:28, 24:16, 16:24ALX48: 24:24, 40:4, 4:40, 36:4, 4:36, 32:8, 8:32, 28:12, 12:28, 24:16, 16:24Angle:Specifies the angle of one or two beams. Using the “Down” arrow the acoustical beam moves down, using the “Up” arrow the acoustical beams moves up.If only one beam is activated use the lower button line.BEAM-Spreading:Specifies the opening-angle for each beam.If only one beam is activated use the lower button line.Acoustic MidSpecifies the acoustical center. This can be moved up and down using the up and down arrows.If only one beam is activated use the lower button line.Gain:Specifies the Gain (volume) for each beamIf only one beam is activated use the lower button line.Testfrequency:Specifies the frequency for the beam graphic.Standard-setting is 1500Hz.Room length:Enter the room dimensions (length)Room height:Enter the room dimensions (height)Install-Pos X:Enter the install position of the ALX-speaker in x-dimension (distance from the wall)Install-Pos Y:Enter the install position of the ALX-speaker in y-dimension (height from the floor, bottom of enclosure)Install Angle:Enter the install-angle of the ALX-speaker if the speaker is mounted in anangle down- or upwards.Working with presetsPresets are to be created in the PANC control software. They will be stored in the hardware-device. Use the Load and Store- button in the MAIN-tab of the device.The current active preset is shown in the left area.using the tab PRESETSAfter you created one or more presets press the button “Store Device Param-eters”. The device will load the last preset after each start.Working with UDP commands to switch presetsThe presets can be recalled using UDP commands coming from a mediacontrol system integrated in the same network.UDP Port for all Aimline devices is: 3022Command has to be send to the fixed IP address of the selected device.#LOAD_PRESET=preset_numberUsing PANC offline:To use PANC in offline-mode without any speaker in a network:RIGHT-click on the symbol ROOT in the GROUP-LIST and select the virtual device from the pull-down menueThe virtual device appears in the DEVICE-Manager as DEVICE0 and can be named and handled as an online-device.With right click on the offline-device the settings can be stored local in a file (Export device settings)Cascading ALX modulesALX8 modules can be cascaded to ALX16 (two modules), ALX 24 (three mod-ules), ALX32 (four modules), ALX40 (five modules), ALX 48 (six modules) to build extended columns.Instruction:Decide which module should be Master (the lower one) and which module should be slaves (the upper ones).Start to open all connection port coverplates.Put he modules straight on the floor, face down. Remove the caps (except the lowest and the upper)Put in the connection plate into the rail (one per two modules)Connect the enclosures by latching them with the two short screws.Slide the connection plate in the centre between the two modules.Cabling:The lower Master module gets power with the mains-connector and network using the ETHERNET DATA in port.Remove the two cables behind the UPPER plate and move them to the next slave-module. Connect the mains clamp to the main input, connect the net-work cable to the ETHERNET DATA THRU-port.Having more than two modules go on in the same way. Notice that all slaves have to be connected to the DATA THRU port.Close the connector port plates and mount the new built column.After starting the ALX (connected with mains) the software in network scan will recognize the new built column as ALX16/24/32/40/48.Notice: Every change of the configuration forces a new start (power off, pow-er on).Networking with cascaded modules:Having modules cascaded the Master module (the lowest one) reassigns the IP-addresses to the slaves (e.g. master 192.168.10.10, first slave:192.168.10.11, next slave: 192.168.10.12 a.s.o.)Audio-signal with cascaded modules:The Master module gets audio, using analogue, AES or Dante.The slaves will automatically be switched to Input AES, signal will be trans-ported via AES from master to slaves internally.Using DANTE: The DANTE-input in the Master module has to get the DANTE input.Notice: If it necessary to rebuilt a cascaded column and use the modules as single ALX the input has been switched to AES, the IP-adress will be the onethat was assigned from the master.Aimline Company contact:Beckumer Str. 348231 WarendorfGermany Phone: 02581 9490 600********************** 。
- 1、下载文档前请自行甄别文档内容的完整性,平台不提供额外的编辑、内容补充、找答案等附加服务。
- 2、"仅部分预览"的文档,不可在线预览部分如存在完整性等问题,可反馈申请退款(可完整预览的文档不适用该条件!)。
- 3、如文档侵犯您的权益,请联系客服反馈,我们会尽快为您处理(人工客服工作时间:9:00-18:30)。
艾酷3098n说明书
艾酷(AKKO)此款3098B机械键盘,采用全新的98键位布局,黑金配色,采用ASA高度高含量PBT二色键帽,干燥舒适,不易打油,并提供20颗增补按键。
采用轴座式热插拔,支持五脚轴热插拔,能够根据自己的喜好进行DIY。
蓝牙5.0、2.4G/有线三模连接,全键无冲。
支持RGB灯效,提供18种灯光模式。
俄罗斯方块键帽,无线三模,热插拔,RGB背光。
全键无冲,全键同时响应无冲突,支持键线分离,ASA键帽,PBT 材质更耐用,高品质按键机械轴体,三模连接(有线/2.4G无线/蓝牙),轴座热插拔,支持三脚、五脚轴。
独立的RGB背光,多种背光模式,软件和硬件皆可调节。
1、快银轴手感真的很不错,我用来打字和玩游戏感觉很舒服,和腹灵980的ROSA感觉各有千秋。
2、无线接收器的使用很不方便,说明书上面是要FN+5键激活,而且首先要在背面把原来默认设置的USB线模式切换到Win下面再用FN+5,感觉不是很方便。
3、大键并不像哔站上面akko官网说的那么好用,至少我的这一把空格键钢丝音还是比较重的,需要手动调一下,不如腹灵980那种拿来就可以用那么舒爽。