VOLVO发动机维修手册
沃尔沃柴油发动机操作跟维修维护保养

沃尔沃柴油发动机操作跟维修维护保养一、操作方法1.启动前的准备工作在启动发动机之前,需要进行以下准备工作:-检查油量、水温和油压指示器是否正常;-检查电池的电量是否充足;-检查传动装置是否处于空档状态;-开启油门;-开启点火开关;-启动发动机。
2.启动发动机启动发动机时,应按照以下步骤进行:-踩下离合器,并将换挡杆放到空挡位置;-踩下刹车,并将钥匙转动到启动位置;-启动发动机后,松开刹车,并慢慢松开离合器。
3.选择适当的挡位在行驶中选择适当的挡位非常重要,在不同的路况和行驶速度下,需要选择合适的挡位,以确保发动机的正常运行和车辆的安全性。
4.行驶中的注意事项在行驶中,需要注意以下事项:-调整发动机的转速,以维持适当的行驶速度;-即使行驶速度较慢,也要保持适当的转速,以确保发动机的正常运行;-避免急刹车和急加速,以免对发动机造成不必要的损坏;-定期检查发动机的运行状况,如水温、油量等。
二、维修维护保养方法1.换油和保养油是发动机正常运行的重要润滑剂,因此要定期更换发动机油,并确保使用适当的油品。
同时,还要定期保养发动机,包括更换机油滤清器、空气滤清器和燃油滤清器。
2.发动机冷却系统维护发动机冷却系统的维护非常重要,可以通过以下几个方面来保持其正常运行:-定期检查冷却液的水平和浓度;-定期清洗冷却系统中的沉淀物和堵塞物。
3.燃油系统维护燃油系统的维护也是非常重要的,可以通过以下几个方面来保持其正常运行:-定期检查燃油滤清器和供油系统的压力;-定期清洗燃油喷射器和燃油喷油泵。
4.电气系统维护电气系统的维护对发动机的正常运行也有很大影响,可以通过以下几个方面来保持其正常运行:-定期检查电池的电量和线路连接;-定期检查点火系统和起动机的工作状况。
5.排气系统维护排气系统的维护可以通过以下几个方面来保持其正常运行:-定期清洗排气管和消音器;-定期检查排气系统的连接和密封情况。
2010 VOLVO SUPPLEMENT线路图S80L维修手册

Group 35 Lighting
Interior lighting 1:2 ....................................................... 33
Group 36 Additional electrical equipment
Keyless vehicle 1:2 ...................................................... 35
Control ቤተ መጻሕፍቲ ባይዱodules
Overview locations....................................................... 29 Overview designations................................................. 30 Data communication, LIN 1:2 ...................................... 31
Fuses
Distribution box in engine compartment F1-F5............... 7 Distribution box in engine compartment F9-F25............. 8 Distribution box in engine compartment F26-F35........... 9 Distribution box in engine compartment F36-F38......... 10 Distribution box in engine compartment F39-F43......... 11 Central Electronic Module (CEM) F1 - F11................... 12 Central Electronic Module (CEM) F13 - F19................. 13 Central Electronic Module (CEM) F21 - F28................. 14 Distribution box in cargo compartment FA1-FA11........ 15 Distribution box in cargo compartment FB1-FB12........ 16 Distribution box in cargo compartment FD1-FD7 ......... 17 Battery PF1-PF2 ........................................................... 18
volvo 维修手册PPT

欢迎参加VP柴油机技术交流 欢迎参加 柴油机技术交流 柴油机
欢迎参与!
汽车检测诊断仪器 /
2012-5-3
VOLVO TRAINING
信息共享
——我们身边的发动机故障 我们身边的发动机故障
2012-5-3
VOLVO TRAINING
2012-5-3
VOLVO TRAINING
•
• • • • • • •
Hale Waihona Puke 1、发电机不发电,没有电压(电压未建立)
日钻一50522。李文忠。更换二极管。( 2008年5月27日) (1)西电,TAD1641GE 2008年2月24日钻一 )西电, 年 月 日钻一 。李文忠。更换二极管。( 年 月 日 (2)TAD1230G 2008年2月25日 钻一 ) 年 月 日 钻一50532。靳宏卫。更换电压自动调节器。 。靳宏卫。更换电压自动调节器。 日钻一50648。钱考胜。更换二极管、浪涌抑制器。( 。(2008年8月8日) (3)西电,TAD1241GE 2008年6月12日钻一 )西电, 年 月 日钻一 。钱考胜。更换二极管、浪涌抑制器。( 年 月 日 日钻一50505,孙振宇。更换二极管。 (4)浪涌抑制器西电,TAD1641GE 2008年2月24日钻一 )浪涌抑制器西电, 年 月 日钻一 ,孙振宇。更换二极管。 (5)西电,TAD1232GE 2008年7月21日 钻一 )西电, 年 月 日 钻一40576。将克喜。更换二极管。 。将克喜。更换二极管。 (6)西电,TAD1641GE 2008年9月24日,钻一 西电, 西电 年 月 日 钻一70591。米永强。更换二极管。( 2008年5月27日) 。米永强。更换二极管。( 年 月 日 (7)西电,TAD1642GE 2009年6月16日,海南 )西电, 年 月 日 海南50611,张景亮。励磁线圈故障。 ,张景亮。励磁线圈故障。
volvo重型卡车维修手册

volvo重型卡车维修手册一、概述本手册旨在为VOLVO重型卡车维修人员提供一本详尽的维修指南,涵盖了VOLVO重型卡车的结构、工作原理、常见故障诊断与排除等方面的知识。
本手册旨在帮助维修人员更好地了解和掌握VOLVO重型卡车的维修技能,提高维修效率和质量。
二、车辆结构与工作原理1. 车辆总体构造:VOLVO重型卡车由多个部分组成,包括发动机、底盘、电气系统等。
本章节将详细介绍各组成部分的名称、功能及相互关系。
同时,也会介绍车辆的总体布局,方便维修人员快速了解车辆的整体结构。
2. 发动机:详细介绍VOLVO重型卡车的发动机结构、工作原理及常见故障。
维修人员需要了解发动机的类型(柴油或汽油)、气缸数量和排量等关键信息。
3. 底盘:阐述底盘各组成部分的结构、工作原理及调整方法,包括悬挂、制动系统、传动系统等。
同时,也会介绍底盘的维护和保养方法,确保车辆的正常运行。
4. 电气系统:介绍电气系统的组成、工作原理及常见故障诊断与排除方法。
维修人员需要了解电气系统的基本组成,如蓄电池、发电机、保险丝等,并熟悉其工作原理。
三、维修工具与设备本章节将介绍维修VOLVO重型卡车所需的常用工具和专用设备,包括工具的用途、使用方法及注意事项。
同时,也介绍了工具的摆放和安全操作规范。
此外,还会列出一些必备的测试仪器和软件,以供维修人员参考。
四、故障诊断与排除本手册将提供一系列常见故障的诊断与排除方法。
对于每个故障,维修人员将获得故障描述、可能的原因、诊断步骤以及相应的解决方法。
以下是一些常见的故障示例:1. 启动困难:针对启动困难的问题,我们将提供原因分析和诊断方法,并提供相应的解决方法,如检查电池状态、清洁启动马达触点等。
2. 燃油消耗异常:对于燃油消耗异常的情况,我们将介绍可能的原因,如空气流量传感器故障、发动机磨损等,并提供相应的诊断与排除方法。
3. 制动系统故障:我们将介绍制动系统常见故障及诊断与排除方法,如制动踏板不回位、制动效能降低等。
柴油发动机维修手册说明书
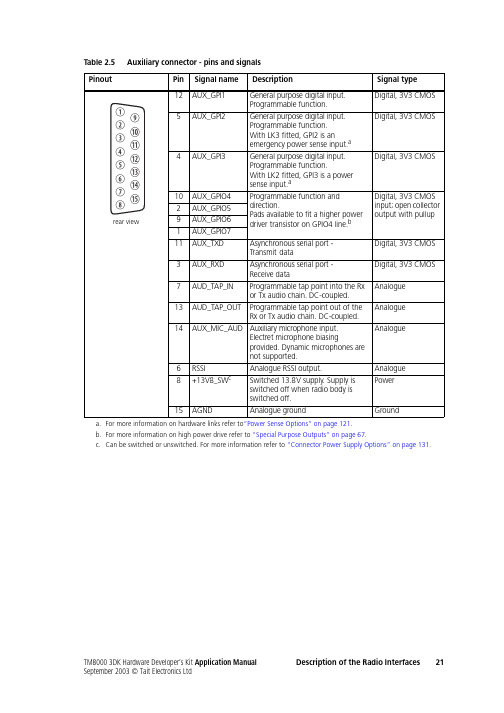
Table 2.5Auxiliary connector - pins and signalsa.For more information on hardware links refer to“Power Sense Options” on page121.b.For more information on high power drive refer to “Special Purpose Outputs” on page67.c.Can be switched or unswitched. For more information refer to “Connector Power Supply Options” on page131.Table 2.6Auxiliary connector - DC characteristicsParameterStandardTest method and conditions Comments min.typ.max.unitsDigital signals Input low level:All inputs AUX_GPI20.7V s–4VVNo hardware links fitted a.LK3 fitted.Includes AUX_GPI3 with LK1/2 fitted.Configured as emergency power senseinput.Input high level:All inputs AUX_GPI2 AUX_GPI31.7V s–1.52.6VVVNo hardware links fitted a.LK3 fitted.LK1 and/or 2 fitted.Configured as emergency power senseinput.Configured as power sense input.Input low current:All other inputs AUX_GPI2 AUX_GPI3 AUX_RXD –100–120–13b–500–1µAmAµAmANo links fitted a. Default pullups c.LK3 fitted. V s=13.8VLK1 and 2 fitted.–8V input.Default pullup resistance is 33kΩ.Configured as emerg. power sense input.Configured as power sense input.Input high current:AUX_RXDAll other inputs 110100mAµAµANo links fitted a. Default pullups c.+8V input.3.3V input.5V input.Default pullup resistance is 33kΩ.Output low level:AUX_GPIO4-7 AUX_TXD 50600200mVmVmV100µA sink current.10mA sink current.100µA sink current.Current limit occurs at 20mA typ.Output high level:AUX_GPIO4-7 AUX_TXD 3.12.4VVNo load. Default pullups c.3kΩ load.Safe DC input limits:AUX_GPI1-3 AUX_GPIO4-7 AUX_RXD AUX_TXD d –0.5–0.5–25V–10V s+0.5V s+0.5V s+0.5V s+0.5VVVVInput current must not exceed ±50mA.This is the rating of the clampingdiodes.Analogue signals DC output range:RSSI13V8_SW 09.7317.2VVSee Table2.9 on page24.Follows V s.Output switches off outside this range.DC bias:AUD_TAP_IN AUD_TAP_OUT AUX_MIC_AUD 1.42.12.91.52.33.01.62.53.1VVVNo load. Zero Rx frequency error.Via 2.2kΩ.Bias for electret microphone.Input impedance:AUD_TAP_IN AUX_MIC_AUD 502.11002.21502.3kΩkΩDC to 10kHzOutput impedance:AUD_TAP_OUT RSSI 59095060010006501050ΩΩDC to 10kHzSafe DC input limits:AUD_TAP_IN AUD_TAP_OUT d AUX_MIC_AUD RSSI d –17–0.5–17–17+17+17+17+17VVVVShort circuit-safe. Input current <±20mAa.For more information on hardware links refer to “Power Sense Options” on page121.b.It is recommended that this input is driven by a mechanical switch or an open collector/drain output.c.For more information on pullups refer to “Digital Input Lines” on page39.d.These outputs are protected against accidental input to the limits specified.22Description of the Radio Interfaces TM8000 3DK Hardware Developer’s Kit Application ManualNotes:1.Optional processing blocks are bypassed in the above specification.2.For AUD_TAP_IN and AUD_TAP_OUT specifications the following signal paths apply:Table 2.7Auxiliary connector - AC characteristicsParameterStandardTest method and conditionsCommentsmin.typ.max.unitsAUD_TAP_IN (refer to note 4)Nominal input level:T ap T3, T4, T5, T8, T12T ap T13T ap R7, R100.620.780.620.690.870.690.760.960.76V p-p V p-p V p-p Level for 60% RSD@1kHz.Level for 3kHz dev.@1kHz.Refer to note 3.Equivalent to –10dBm into 600Ω.Full scale input level 2.0V p-pFrequency response:All tap-pointsRefer to the plots inTable 2.10 and Table 2.11.Group delay - absolute:T ap T13T ap T12T ap T8T ap T5T ap T4T ap T31.81.89.611.611.711.7ms ms ms ms ms msAt 1kHz. Refer to note 2.Refer to note 1.Refer to note 1.Group delay - distortion:T ap T12 and Tap T13Refer to the plots in Table 2.12.AUD_TAP_OUTNominal output level:All Rx tap-points except R1T ap R1T ap T30.620.540.620.690.600.690.760.660.76V p-p V p-p V p-p Rload=600Ω.Level at 60% RSD@1kHz.Level at 3kHz dev.@1kHz Refer to “Microphonesensitivity ”of AUX_MIC_AUD.Equivalent to –10dBm into 600Ω.Full scale output level 2.0V p-pRload=600Ω.Frequency response:All tap-pointsRefer to the plots inTable 2.10 and Table 2.11.Group delay - absolute:T ap R1T ap R2T ap R4T ap R5T ap R7T ap R101.81.86.66.78.58.7ms ms ms ms ms msAt 1kHz. Refer to note 2.Refer to note 1.Group delay - distortion:T ap R1 and Tap R2Refer to the plots in Table 2.12.AUX_MIC_AUD Rated System Deviation NB MB WB–2.5–4.0–5.0+2.5+4.0+5.0kHz kHz kHzEIA-603BUnits are peak frequency deviation from nominal carrier frequency in kHz.Modulation frequency responseRefer to the plot in Table 2.13.EIA-603BMicrophone sensitivity 6.07.59.0mV rmsEIA-603BCaseInput Output Tap into Rx chain AUD_TAP_INRX_AUD Tap out of Rx chain Modulation at antenna AUD_TAP_OUT Tap into Tx chain AUD_TAP_IN Modulation at antenna Tap out of Tx chainAUX_MIC_AUDAUD_TAP_OUT3.For tap into the Rx path, nominal level refers to the level required to give output at RX_AUD that is same as the60% dev level from the receiver. The level specified applies at 1kHz only.4.AUD_TAP_IN uses a DC-coupled analog-to-digital converter and the bias voltage specified in Table2.6 should beused to maximise dynamic range. The DC bias is removed internally by a digital high-pass filter so the Tx carrier frequency will not be affected by any bias error. it is recommended to use external AC-coupling for applications which do not require modulation to very low frequencies.Table 2.8Auxiliary connector - data characteristicsParameterStandardTest method and conditions Comments min.typ.max.unitsSerial portBaud rate:1200, 2400, 4800,9600, 14400, 19200bit/s All UART parameters are fixedand common to all UARTsexcept for the baud ratewhich is configurable anddifferent for different modes/applicationsData bits: 8Start bit:1Stop bit:1 Parity:None Protocol:CCDI2 Flow control:Software XON/XOFF GPIODelays:I/O mirror to IOP UI key delay 50050µsmsTable 2.9RSSI voltage vs. signal strength24Description of the Radio Interfaces TM8000 3DK Hardware Developer’s Kit Application Manual。
2007款沃尔沃xc90维修手册

2007款沃尔沃XC90维修手册目录1.介绍2.维护和保养3.故障排除4.常见问题解答5.推荐配件和替换零件6.注意事项7.维修记录1. 介绍本手册提供了2007款沃尔沃XC90的详细维修信息,旨在帮助车主进行日常维护和故障排除。
XC90是一款豪华SUV车型,被广泛用作家庭和商务用途。
2. 维护和保养2.1 日常维护在汽车的日常维护过程中,我们建议车主完成以下任务:•定期更换机油和机油滤清器•定期检查和更换空气滤清器•定期检查和更换燃油滤清器•检查并更换火花塞•保持轮胎正常气压并定期旋转轮胎•检查并更换刹车片和刹车盘•定期检查并更换传动系统油•定期检查并更换冷却系统冷却液•定期检查并更换转向油•定期检查并更换电池2.2 保养时间表以下是推荐的保养时间表,根据里程数和时间来指导车主进行维护:•每5000公里或每三个月:更换机油和机油滤清器•每1万公里或每六个月:更换空气滤清器,检查和更换火花塞•每2万公里或每年:更换燃油滤清器,检查和更换刹车片和刹车盘•每4万公里或每两年:检查和更换传动系统油,检查和更换冷却系统冷却液•每6万公里或每三年:检查和更换转向油•每8万公里或每四年:更换火花塞请注意,这些保养时间表仅供参考,具体的保养间隔可能会因行驶条件和车辆状况而有所不同。
3. 故障排除在遇到故障时,车主可以根据以下步骤进行排除:1.确定故障现象和表现2.查找可能的原因并进行初步排除3.使用故障诊断工具和电子设备进行详细故障诊断4.根据故障代码和诊断结果进行修复或更换零件5.进行测试和验证修复效果如果故障无法在家庭条件下排除,请联系专业的汽车维修店或沃尔沃授权服务中心进行进一步的维修。
4. 常见问题解答以下是一些常见问题的解答,以帮助车主更好地了解和解决问题:问题1:汽车电池无法正常启动车辆。
可能原因: - 电池老化或损坏 - 充电系统故障 - 发电机故障解决方法: 1. 检查电池电压并确保正常 2. 检查充电系统和发电机 3. 如有必要,更换电池或修复充电系统故障问题2:汽车发动机无法启动。
潍柴汽车维修手册说明书

6. 维修过程中避免制动块和制动盘沾染油污,若沾染油污则使用纱布打磨干净。 7. 切勿重复使用排出的制动液,排出的制动液应储存在专用的回收容器内。 8. 排气过程中要观察制动液壶的制动液液位,低于最低刻度线时,应及时补充。 9. 加注制动液且排气结束后,检查制动系统是否有泄漏;若有应及时给予排除,确保行
前蒸发器 ...........................................71B-39
更换..................................................... 71B-39
空调风道 ...........................................71B-40
更换..................................................... 71B-35
暖风机芯体........................................71B-38
更换..................................................... 71B-38
鼓风机 ...............................................71B-30
更换..................................................... 71B-30
调速模块 ...........................................71B-31
更换..................................................... 71B-31
volvo重型卡车维修手册
volvo重型卡车维修手册引言:本手册旨在为Volvo重型卡车的维修提供详细且全面的指南。
通过本手册,您将能够有效地进行卡车的维护和修理工作,确保其长期的稳定运行和卓越性能。
第一章:卡车简介1.1 Volvo重型卡车的特点和优势本节将介绍Volvo重型卡车的优势,包括卓越的性能、可靠性和节能环保的特点。
此外,还将介绍其创新的技术和安全功能。
1.2 卡车部件和系统概述在本节中,将详细介绍卡车的各个重要部件和系统,包括发动机、传动系统、转向系统等。
您将了解到各个部件的功能以及它们之间的相互关系。
第二章:维护保养2.1 基本维护知识本节将介绍卡车的基本维护知识,包括定期保养、润滑油更换和滤清器更换等。
您将了解到维护保养对保持卡车正常运行的重要性,并掌握正确的维护方法。
2.2 维护时间表在本节中,将提供Volvo重型卡车维护时间表的范例。
这将帮助您制定合理的维护计划,确保按时进行必要的检查和维护,降低故障的风险。
第三章:故障排除和修理3.1 故障排除流程本节将指导您如何进行故障排除和诊断,包括使用故障码读取设备和执行车辆自检程序。
通过本节的指导,您将能够准确识别故障原因并采取正确的修复措施。
3.2 常见故障及解决方法在本节中,将列举Volvo重型卡车常见的故障,并提供相应的解决方法。
这将帮助您更好地应对各种常见问题,提高修理效率。
第四章:安全注意事项4.1 工作环境和安全设施本节将介绍维修工作的安全环境,包括工作场所的要求和各类安全设施的使用。
此外,还将提供应急情况处理的指导,确保维修过程中的安全。
4.2 个人保护措施在本节中,将详细介绍维修工作中个人保护的必要措施,包括使用个人防护装备和遵守相关规定。
通过遵循这些措施,您将最大程度地降低维修过程中的伤害风险。
第五章:维修工具和设备5.1 基本工具和设备本节将介绍维修过程中常用的工具和设备,包括手工工具、电动工具、测量设备等。
您将了解到正确使用这些工具和设备的方法,以提高维修效率和质量。
VOLVO发动机说明书16L
VOLVO发动机说明书16L VOLVO发动机说明书16L1、简介1.1 产品概述1.2 技术规格1.3 适用范围2、发动机结构2.1 发动机组成2.2 主要部件介绍2.2.1 缸体2.2.2 活塞组件2.2.3 链传动系统2.2.4 曲轴2.2.5 进气与排气系统2.2.6 燃油系统2.2.7 冷却系统2.2.8润滑系统2.2.9电气系统2.3 工作原理3、使用注意事项3.1 发动机启动与停止3.2 发动机运行参数监控3.3 发动机保养维护3.3.1 换油与滤清器更换 3.3.2 火花塞更换3.3.3 燃油喷嘴清洗3.3.4 故障灯处理方法3.3.5 发动机故障诊断4、故障排除与维修4.1 常见故障与排查方法4.2 维修流程4.2.1 维修工具准备4.2.2 维修操作步骤4.2.3 维修记录与报告填写5、安全操作指南5.1 安全警示5.2 出现故障时的应急措施5.3 灭火器的使用5.4 废弃物处理6、原厂授权与保修政策6.1 原厂授权维修点6.2 保修政策说明6.3 维修费用与收费标准7、附件7.1 配件列表7.2 维修手册及图纸7.3 保养记录表法律名词及注释:1、著作权法:指对知识产品及表现形式给予法律保护的法律规定。
2、商标法:指对商品、服务商标与商业名称等的使用和管理所做的法律规定。
3、合同法:指调整各种合同的签订、履行和效力等问题的法律规定。
4、侵权责任法:指对侵害他人合法权益所做的法律规定。
5、消费者权益保护法:指保护消费者合法权益的法律规范。
本文档涉及附件:1、发动机配件列表2、维修手册及图纸3、保养记录表。
沃尔沃d16mg柴油机维修资料
沃尔沃d16mg柴油机维修资料沃尔沃D16MG柴油机是一款高性能的发动机,广泛应用于船舶、发电机组和重型卡车等领域。
为了确保该发动机的正常运行和延长使用寿命,正确的维修和保养是至关重要的。
本文将为您介绍沃尔沃D16MG柴油机的维修资料。
要了解沃尔沃D16MG柴油机的维修资料,我们可以从以下几个方面入手。
1. 柴油机的结构和工作原理:了解柴油机的结构和工作原理是进行维修工作的基础。
沃尔沃D16MG柴油机采用直列6缸、涡轮增压和中冷技术,具有高效节能和低排放的特点。
在维修过程中,需要掌握柴油机各个部件的位置、功能和相互关系,以便能够准确地定位和解决故障。
2. 维修手册和技术资料:沃尔沃为D16MG柴油机提供了详细的维修手册和技术资料,其中包含了各个部件的拆装和调整方法、故障诊断和排除步骤、维护保养的要点等内容。
在进行维修工作时,可以根据维修手册的指导进行操作,确保操作正确和安全。
3. 维修工具和设备:进行柴油机维修时,需要使用一些特殊的维修工具和设备,例如扳手、榔头、压力表、测量仪器等。
这些工具和设备能够帮助我们更方便地进行维修工作,提高工作效率和质量。
4. 维修经验和技巧:除了掌握理论知识和技术资料,维修人员还需要积累丰富的实际经验和技巧。
在长期的维修实践中,可以遇到各种各样的故障和问题,需要不断学习和总结,提高解决问题的能力和水平。
在进行沃尔沃D16MG柴油机的维修工作时,需要注意以下几点:1. 定期检查和维护:定期检查和维护柴油机是确保其正常运行的基础。
包括更换机油和滤清器、清洁空气滤清器、检查和调整喷油嘴、检查和清洗散热器等。
定期维护可以及时发现和解决潜在问题,避免故障的发生。
2. 注意安全操作:在进行柴油机维修工作时,一定要注意安全操作。
首先,要确保柴油机停止运行并断开电源,避免意外伤害。
其次,要正确使用维修工具和设备,遵守操作规程,防止操作错误导致损坏或事故发生。
3. 故障诊断和排除:当柴油机出现故障时,需要进行准确的诊断和排除。
沃尔沃d12系列发动机飞轮维修手册说明书
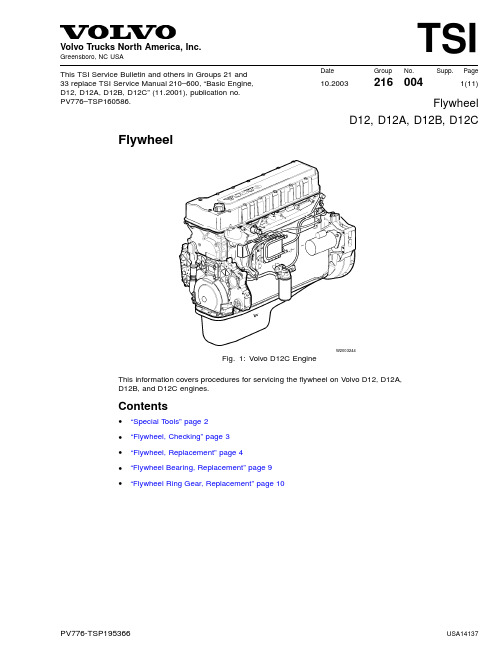
Volvo Trucks North America,Inc.Date Group No.Page TSI10.20032160042(11)ToolsSpecial ToolsThe following special tools are used to replace or repair components.The tools can beordered from Volvo;please use the specified part number when ordering.Volvo Trucks North America,Inc.Date Group No.Page TSI10.20032160043(11)Service Procedures2166-06-03-01Flywheel,Checking(Runout:Circumference and Surface)Y ou must read and understandthe precautions andguidelines in Service Information,Group21,"General Safety Practices,Engine"before performing this procedure.If you are not properly trained and certified in this procedure,ask your supervisor for training before you perform it.Special tools:9996956,9999696,9989876 1T2008997 Checking the flywheel for warp Use dial indicator9989876with magnetic base9999696 for this procedure.Position the probe against the flywheel and set the dial indicator at zero(0).2Remove the flywheel inspection cover and install flywheel turning tool9996956.Rotate the flywheel and read off the highest reading on the dial indicator.99969563The reading must not exceed0.20mm(0.008in.)ona measuring radius of150mm(6in.).In the case of excessive warp,remove the flywheel and check for dirt or unevenness between the flywheel and the crankshaft flange.0.20mm(0.008in.)150mm(6in.)Volvo Trucks North America,Inc.Date Group No.Page TSI10.20032160044(11)2166-03-02-02Flywheel,Replacement(In vehicle—Transmission and clutch removed.)Not Included:•“Flywheel,Overhaul”(rebush bearing bore,flywheelremoved)•“Flywheel,Checking”page3•“Rear Crankshaft Seal,Replacement”(flywheelremoved)•“Flywheel Ring Gear,Replacement”page10Prerequisites:•T ransmission removed.•Clutch assembly removed.Special tools:9996950Removal1T2006665Fig.2:Engine Speed Sensor location on flywheelhousing,D12A/BD12A/B:Remove sensor from the flywheel housing.Volvo Trucks North America,Inc.Date Group No.Page TSI10.20032160045(11)2W2003426Fig.3:Speed sensor location on flywheel casing,D12CD12C:Remove the speed sensor from the flywheelhousing.3T2006667Fig.4:Removing the flywheelAttach two bolts(M12x100)to the flywheel.Remove theflywheel bolts and lift off flywheel with the help of the bolts.Inspection4Minor scores or cracks in the friction face can be removedby grinding.However,do not remove more than0.5mm(0.02in.).In cases of more severe damage,replacethe flywheel.The flywheel depth(the distance from theclutch plate face to the clutch retaining plate face)mustremain unchanged.Therefore,the clutch retainingplate face must be ground down the same amountas the clutch plate face.0.5mm(0.02in.)5Install new flywheel pilot bearing.Volvo Trucks North America,Inc.Date Group No.Page TSI10.20032160046(11)Installation6Install new crankshaft rear seal.See“Rear Crankshaft,”216–003.7T2006668Contact surfaceCarefully clean the flywheel contact surface on thecrankshaft and the flywheel bolt holes in the crankshaft.8Carefully clean the contact surface on the flywheel.9Make sure that the flywheel alignment stud is in positionand undamaged.10T2007091Installing the flywheelLift the new flywheel into position with the help of twobolts(M12x100).Install the retaining bolts.Volvo Trucks North America,Inc.Date Group No.Page TSI10.20032160047(11)11T2006666Fig.5:Blocking tool installed,D12A/BT2008983Fig.6:Blocking tool installed,D12CRemove the inspection cover from beneath the flywheelhousing and install blocking tool9996950.999695012T orque-tighten the flywheel bolts,using the following2–step procedure:D12,D12A,D12B85±5Nm(63±4ft-lb)T urn the bolts another30±3±5Volvo Trucks North America,Inc.Date Group No.Page TSI10.20032160048(11)14T2006665Fig.7:Speed sensor location on flywheel housing,D12A/BW2003426Fig.8:Speed sensor location on flywheel casing,D12CClean and install the speed sensor.Check and adjustsensor distance as needed.See Service Specifications,Group20.Volvo Trucks North America,Inc.Date Group No.Page TSI10.20032160049(11)2169-03-03-01Flywheel Bearing,ReplacementClutch RemovedNot included:•Flywheel,Overhaul(rebush bearing bore,flywheelremoved)•“Flywheel,Checking”page3•Rear Crankshaft Seal,Replacement(flywheelremoved)Special tools:9991821,9992564,99918011T2006733Fig.9:Removing the flywheel bearingRemove the old flywheel bearing with tool9991821.99918212Clean the flywheel and check it for damage.3C2000452Fig.10:Installing the new flywheel bearingInstall the new flywheel bearing,using drift tool9992564and handle9991801.9992564,9991801Volvo Trucks North America,Inc.Date Group No.Page TSI10.200321600410(11)2166-03-05-01Flywheel Ring Gear,Replacement(Flywheel removed)Not Included:•Flywheel,Overhaul(rebush bearing bore,flywheelremoved)•Rear Crankshaft Seal,Replacement(flywheelremoved)•“Flywheel,Checking”page3C(360–400C(360–400Volvo Trucks North America,Inc.Date Group No.Page TSI10.200321600411(11)4T2006661Fig.13:Installing new ring gearInstall the heated ring gear onto the flywheel and tap itinto place using a soft drift and a hammer.5Allow the ring gear to air dry until cool.。
VOLVO维修手册
Contents
Safety information ...................................................................... 2 General information ................................................................... 5
Avoid opening the filler cap for the coolant when the engine is hot. Steam or hot coolant can spray out, and the built up pressure will be lost. If necessary open the filler cap slowly and release the overpressure in the cooling system. Use extreme caution if cocks, plugs or coolant pipes must be dismantled when the engine is hot. Steam or hot coolant can flow out in an unpredicted direction.
1
Safety information
Introduction
The Workshop Manual contains technical data, descriptions and repair instructions for specified products or product versions from Volvo Penta. Make sure that the correct workshop literature is used. Read the following safety information, including “General information” and “Repair instructions” carefully before beginning service work.
沃尔沃TAD1641GE大修手册
Read the available safety information, “General information” and “Repair instructions” in the workshop manual before you start to do any service work.
Avoid opening the coolant filler cap when the engine is hot. Steam or hot coolant can spray out and the system pressure will be lost. When needed, open the filler cap slowly and release the pressure in the system. Be extremely careful if a tap, plug or coolant hose has to be removed from a hot engine. It is difficult to anticipate in which direction steam or hot coolant can spray out.
Avoid getting oil on the skin! Repeated exposure to oil or exposure over a long period can result in the skin becoming dry. Irritation, dryness, eczema and other skin problems can then occur. Used oil is more dangerous than fresh oil from a health aspect. Use protective gloves and avoid oil soaked clothes and shop rags. Wash regularly, especially before eating. There are special skin creams which counteract drying out of the skin and make it easier to clean off dirt after work is completed.
沃尔沃VOLVO富豪发电机组维修保养_沃尔沃柴油发电机组

沃尔沃VOLVO富豪柴油发电机组维修保养VOLVO柴油机的保养安全注意事项1:每日检查项目:养成在起动发动机之前和停机后直观检查发动机的习惯。
这有助于你及时发现燃油、润滑油或冷却液的泄漏和其它一些已经发生或将要发生的异常情况。
2:加注燃油:加注燃油时有起火和爆炸的危险。
禁止吸烟,并必须关停发动机。
切勿将油箱加得过满。
确保拧紧油箱加油口盖。
应只使用本说明书推荐的燃油。
使用品质不当的燃油会导致发动机运行异常或停机。
柴油发动机使用劣质燃油会导致喷油泵卡滞和发动机飞车,有造成发动机损坏和人身伤害的危险。
3:应知常识:本说明书包括有关如何安全而正确地进行一般保养和维修的指导。
在开始工作前,应仔细阅读本说明书。
可以从你的经销商那里得到有关这方面的更为广泛的资料。
对于发动机上那些你尚无把握如何进行的工作,切勿贸然尝试去作。
此时可与经销商联系,请他们提供帮助。
4:关停发动机:在打开或拆下发动机盖/罩之前,应先关停发动机。
除非另有说明,所有的保养和维修工作必须在发动机停机的情况下进行。
为防止意外起动,开始工作前应取下起动钥匙,用主开关切断发动机的电源,并将其锁定在OFF断开位置上。
同时要在该操作工位上放置警告标志以示正在进行维修工作。
靠近正在运行的发动机或在其上工作是有危险的。
松散的衣服和头发、手指或坠落的工具,都可能会被卷入发动机的旋转零件而造成严重的人身伤害。
建议所有要在发动机运行时进行的维修工作,可由经过授权的富豪进行。
5:起吊发动机:要用装在发动机上的吊耳起吊发动机。
一定要检查起吊设备是否处于良好状态和有足够的能力起吊发动机及其所有的附加设备。
为了安全起见,应使用可调节的梁式吊具。
所有的吊链和钢缆应彼此平行并尽可能与发动机顶部垂直。
切记安装在发动机上的外加设备可能会改变发动机的重心。
为了保持平衡和确保安全搬运发动机,可能会需要专门的起吊设备。
切勿在悬挂于起重设备上且无任何支撑的发动机上进行工作。
6:使用非富豪原产零部件:富豪发动机上的燃油和电气系统所使用的零部件,都是为将起火和爆炸风险降至最低的要求来设计和制造的。
沃尔沃船用发动机维修手册说明书

Tor que i s gi ven i n Nm ( newt on met r e) ear l i er uni t k pm ( ki l opond met r e) ear l i er uni t l bf f t ( poundf oot ) ear l i er uni t I mp. gal
AB VOLVO PENTA Techni cal Publ i cat i ons Depar t ment
SI UNI T SYSTEM
Uni t s accor di ng t o t he i nt er nat i onal SI syst em have been used i n t hi s book . The ear l i er uni t s ar e gi ven af t er t he SI uni t s .
Publ . n r 7730974- 8 4- 1990
WORKSHOP MANUAL
VPOELNVTOA
FOREWORD
Thi s wor kshop manual cont ai ns r epai r i nst r uct i ons f or t he 2001, 2002 and 2003 engi nes . The i nst r uct i ons concer ni ng over haul i ng descr i be t he most sui t abl e wor ki ng met hod usi ng t he speci al t ool s l i st ed under t he headi ng " Speci al t ool s" . Bot h t he engi ne desi gnat i on and i t s ser i al number must be cl ear l y st at ed i n al l cor r espondence concer ni ng t he engi ne and when or der i ng par t s . We r eser ve t he r i ght t o car r y out desi gn modi f i cat i ons and, f or t hi s r eason, t he cont ent s of t hi s manual cannot be r egar ded as bi ndi ng.
潍道汽车修理手册说明书

IndexAccessory (Ignition KeyPosition) ...................................... 40AccessoriesElectronic .................................... 40Installation ................................ 100AddingAutomatic TransmissionFluid........................................ 138Brake Fluid................................ 140Clutch Fluid .............................. 141Engine Coolant.......................... 131Engine Oil.................................. 127Manual Transmission Fluid .... 139Windshield Washer fluid.......... 137Additives, Engine Oil .................. 128AdjustmentsMirrors ........................................ 47Seats ............................................ 44Steering Wheel............................ 35Adult Safety Belt Usage .................. 6Air Bag (SRS).................................. 12Air Cleaner.................................... 142Air Conditioning ............................ 54Maintenance (152)Usage............................................ 54Air Outlets (Vents) ........................ 59Air Pressure, Tires........................ 154Air Pump........................................ 177Alarm, Anti-theft.............................. 86Alcohol and Drugs.......................... 15Alcohol in Gasoline ........................ 91Aluminum Wheels, Cleaning ...... 169Antifreeze ...................................... 131Anti-lock BrakesDescription ................................ 210Operation.................................... 113Warning Light............................ 113Anti-theft Steering Column Lock .. 40Anti-theft System ............................ 86Appearance Care .......................... 167Ashtray ............................................ 50Audio System .................................. 64Automatic Car Washes ................ 187Automatic Climate ControlSystem.......................................... 54Automatic Speed Control .............. 36Automatic Transmission.............. 111Capacity, Fluid .......................... 208Checking Fluid Level................ 138Shifting .. (108)Automatic TransmissionShift Lock Release .................... 111Shift Position Indicator (108)Baby, Holding A.............................. 10Backup Lamp Replacement ........ 162BatteryCharging System WarningLight.......................................... 23Jump Starting ............................ 190Maintenance .............................. 147Specifications ............................ 209Before Driving ................................ 89Belts, Seat.......................................... 6Body Repair .................................. 173Brakes............................................ 112Anti-lock System........................ 113Break-in, New Linings ................ 91Fluid............................................ 140Light, Burned-out...................... 162Parking ........................................ 49System Light................................ 23Wear Indicators, Disc .. (112)CONTINUEDIndexBrakes, Anti-lockDescription ................................ 210Operation .................................. 113Indicator Light .......................... 113Braking System ............................ 112Break-in, New Car .......................... 91Brightness Control, Instruments ..31Brights, Headlights ........................ 30Bulb Replacement........................ 158Back-up Lights .......................... 162Brake Lights .............................. 162Courtesy Lights ........................ 164Headlights.................................. 158License Plate Lights.................. 163Parking Lights .......................... 160Side Marker Lights .................. 161Specifications ............................ 209Turn Signal Lights .................... 160Bulbs, Halogen (158)Cables, Jump Starting With ........ 189Capacities Chart............................ 208Carbon Monoxide in Exhaust .... 213Cargo, Loading.............................. 101Car Seats For Children .................... 9Cassette PlayerCare .............................................. 77Operation...................................... 69Catalytic Converter ...................... 215CAUTION, Explanation of .............. ii Certification Label........................ 206Chains............................................ 157Change OilHow To ...................................... 129When To .................................... 121Changing A Flat Tire.................... 176Changing Engine Coolant............ 132Charging System Light.................. 23Check Engine Light........................ 24CheckingAutomatic Transmission Fluid. 138Battery Condition...................... 147Brake Fluid ................................ 140Clutch Fluid (141)CheckingEngine Belts .............................. 153Engine Coolant.......................... 131Engine Oil.................................. 127Fuses .......................................... 197Manual Transmission Fluid .... 139Checklist, Before Driving ............ 104Child Restraints ................................ 9Cigarette Lighter ............................ 50CLEAN Light .................................. 77Cleaner, Air.................................... 142Cleaning ........................................ 167Aluminum Wheels .................... 169Exterior ...................................... 168Interior........................................ 171Seat Belts........................................ 8Vinyl............................................ 171Climate Control System ................ 54Clock, Setting The .......................... 48Clutch Fluid .................................. 141CO In The Exhaust ...................... 213Cold Weather, Starting In............ 106Compact (Folding) Spare ............ 186Consumer Information ................ 219Controls, Instruments And ............19IndexCoolantAdding........................................ 131Checking.................................... 131Proper solution.......................... 131Temperature Gauge.................... 27Courtesy Lights .............................. 51Crankcase Emission ControlSystem........................................ 213Cruise Control Operation .............. 36Customer Relations Office . (219)DANGER, Explanation of ................ ii Dashboard ...................................... 21Dead Battery, What To Do .......... 189Defects, Reporting Safety .............. 17Defogger, Rear Window ................ 34Defrosting The Windows .............. 61Dexron II Automatic Transmission Fluid............................................ 138Dimensions.................................... 208Dimming The Headlights .............. 30DipstickAutomatic Transmission .......... 138Engine Oil. (127)Directional Signals.......................... 32Disabled, Towing Your Car If...... 202Disc Brake Wear Indicators ........ 112Disposal Of Used Oil.................... 130Do Not Tow A Trailer .................. 117DoorsLocking and Unlocking .............. 41Lockout Prevention .................... 42Monitor Light.............................. 24Power Door Locks ...................... 41DOT Tire Quality Grading .......... 156Downshifting, 5-speedTransmission ............................ 107Driving .......................................... 103Economy ...................................... 99In A Foreign Country.................. 92In Bad Weather.. (116)Economy, Fuel................................ 99Emergencies On The Road.......... 175Battery, Jump Starting .............. 189Changing A Flat Tire ................ 176Charging System Light ............ 195Checking The Fuses ................ 197Manually Opening TheHeadlights.............................. 196LOW Oil Pressure Light .......... 194Overheated Engine .................. 192Emergency Brake .......................... 49Emergency Flashers ...................... 34Emission Controls ........................ 213EngineCheck Light.................................. 24Compartment, CheckingIn The........................................ 93Coolant Temperature Gauge...... 27Oil Pressure Gauge .................... 27Oil Pressure Light ...................... 23Oil, What Kind To Use.............. 128Overheating (192)CONTINUEDIndexEngineSpecifications ............................ 209Engine Cover, Opening The.......... 93Ethanol In Gasoline........................ 91Evaporative Emission Controls ..213Exhaust Fumes .............................. 16Exhaust Gas Recirculation .......... 214Expectant Mothers, Use of SeatBelts By........................................ 11Exterior, Cleaning The . (168)Fabric, Cleaning............................ 171Fan, Interior .................................... 62Fan, Radiator ................................ 177Features, Comfort AndConveniences .............................. 53Filling The Gas Tank...................... 92FiltersAir................................................ 142Fuel ............................................ 144Oil................................................ 129First Gear, Shifting ...................... 1075-Speed TransmissionChecking Fluid Level (139)5-Speed TransmissionShifting The................................ 107Flashers, Hazard Warning ............ 34Flat Tire, Changing A .................. 176FluidsAutomatic Transmission .......... 138Brake .......................................... 140Clutch ........................................ 141Manual Transmission .............. 139Windshield Washer .................. 137FM Stereo Radio Reception .......... 68Folding Spare Tire ........................ 186Foreign Countries, Driving In ...... 92Four-way Flashers .......................... 34Front End, Towing By Emergency Wrecker...................................... 202Fuel .................................................. 91Filler Door And Cap.................... 93Filter .......................................... 144Gauge............................................ 28Octane Requirement .................. 91Reserve Indicator........................ 26Tank, Filling The ........................ 92Fuses, Checking The (197)Gas Mileage, Improving ................ 99Gas Station Procedures.................. 92Gasohol............................................ 91Gasoline .......................................... 91Containing Alcohol...................... 91Filter............................................ 144Fuel Reserve Indicator................ 26Gauge............................................ 28Octane Requirement .................. 91Tank, Filling The ........................ 92Gauges ............................................ 27Engine Coolant Temperature .... 27Engine Oil Pressure.................... 27Fuel .............................................. 28Voltmeter...................................... 28Gearshift Lever PositionsAutomatic Transmission .......... 1085-speed Transmission .............. 107Glass Cleaning .............................. 171Glove Box........................................43IndexHalogen Headlight Bulbs ............ 158Hazard Warning Flashers.............. 34HeadlightsEmergency Operation,Manual.................................... 196High Beam Indicator .................. 26High Beams, Turning On .......... 30Low Beams, Turning On ............ 30Monitor, Bulb .............................. 24Reminder Chime ........................ 30Replacing Halogen Bulbs ........ 158Turning On .................................. 30Heating And Air ConditioningSystem.......................................... 54High Altitude, Starting At............ 106High-Low Beam Switch.................. 30High Speed, Shifting At................ 108Holding A Baby .............................. 10Hood, Opening The ........................ 97Horn ................................................ 39Hot Coolant, Warning About ...... 131Hydraulic Clutch .......................... 141Hydroplaning .. (117)Identification Number, Vehicle .. 206If Your Car Has To Be Towed .... 202IgnitionKeys.............................................. 39Switch .......................................... 40Timing Control System ............ 214Indicator Lights, InstrumentPanel ............................................ 22Infant Restraint.................................. 9Inflation, Proper Tire.................... 153Inside Mirror .................................. 46Inspection, Tire ............................ 154Instrument Panel............................ 21Instrument Panel Brightness ........ 31Interior Cleaning .......................... 171Interior Lights ................................ 51Introduction .. (i)Jack, Tire........................................ 177Jacking Up The Car...................... 179Jump Starting .. (190)Keys (39)Label, Certification........................ 206Lane Change, Signaling ................ 32Lap/Shoulder Belts.......................... 6Leaking Of Exhaust Into Car ........ 16Lighter, Cigarette............................ 50LightsBulb Replacement .................... 158Courtesy ...................................... 51Indicator ...................................... 22Parking ........................................ 30Turn Signal .................................. 32Loading Cargo .............................. 101Lock (Ignition Key Position) ........ 40Locks................................................ 41Anti-theft Steering Column ........ 40Fuel Filler Door .......................... 92Glove Box .................................... 43Power Door. (41)CONTINUED。
潍柴wp10h发动机维修手册

潍柴wp10h发动机维修手册潍柴WP10H发动机维修手册第一章:引言1.1 介绍潍柴WP10H发动机是一款高性能、高可靠性的柴油发动机,广泛应用于工程机械、重型卡车和船舶等领域。
本手册将为您提供该发动机的维修指南。
1.2 维修手册的目的本手册的目的是为维修人员提供详细的维修指导,使其能够快速、准确地诊断和修复发动机故障。
通过正确的维修方法和技巧,确保发动机的正常运行和长期可靠性。
第二章:发动机的基本结构2.1 发动机的组成部分潍柴WP10H发动机由缸体、缸盖、曲轴箱、活塞、连杆、气门机构、燃油系统、冷却系统等组成。
本章将详细介绍各个部件的结构和功能。
2.2 发动机的工作原理本节将解释发动机的工作原理,包括吸气、压缩、爆燃和排气等过程。
了解发动机的工作原理对于故障诊断和维修至关重要。
第三章:维修前的准备工作3.1 安全注意事项在进行维修工作之前,必须遵守一些安全规定,包括穿戴个人防护装备、确保工作区域安全、使用正确的工具等。
3.2 维修工具和设备本节将列出进行发动机维修所需的工具和设备清单,包括常见的手工工具、测量仪器、维修设备等。
3.3 维修文档和资料在进行维修工作之前,需要准备相关的维修文档和资料,包括发动机的技术手册、维修手册、零件目录等。
第四章:故障诊断与排除4.1 故障诊断流程本节将提供一套系统的故障诊断流程,帮助维修人员准确地找出故障的原因。
从听、看、闻、摸等多个角度进行故障诊断。
4.2 常见故障与排除方法本节将列举常见的发动机故障和相应的排除方法,如发动机无法启动、动力不足、冒黑烟等。
第五章:维修操作指南5.1 发动机的拆装本节将详细介绍发动机的拆装步骤和注意事项,包括拆卸缸盖、曲轴箱、活塞等部件的方法。
5.2 发动机零件的更换本节将介绍常见发动机零件的更换方法,如活塞环、气门、油封等,包括拆装步骤和注意事项。
5.3 发动机的调试和调整本节将介绍发动机的调试和调整方法,包括喷油器的校正、气门间隙的调整等。
VOLVO船用发动机传动轴维修包说明书

REC22075
AQ 311 A,B
290A, SP-A
REC22075
430
SP-A, DP-A
REC22075
430A
SP-A1, SP-A2, SP-C, DP-A, DP-A1, DP-A2, DP-C REC22075
430B
SP-C, DP-C
REC22075
431A
SP-A, SP-A1, SP-A2, SP-C, DP-A, DP-A1, DP-A2, DP-C
GUIA KITS RODAMIENTOS Y RETENES TRANSOM FLYWHEEL CASING REPAIR KITS GUIDE
GUIDA KIT CUSCINETTI E PAROLI TRANSOM
V O VL O
440
MODELO MOTOR ENGINE MODEL MODELLO MOTORE
REC22075
AQ 205A
SP-A, DP-A
REC22075
AQ 211A
290A,DP, SP-A, DP-A
REC22075
AQ 225A, B, C, D, E, F 275, 280, PT, 280L, 290, A, DP
REC22075
230
275, SP-A, SP-A1
REC22074
REC22074
AQ 170
270
REC22060
REC22057
REC22161
REC22074
REC22060
REC22059
REC22163
REC22055
REC22075
REC22074
AQ 140A
- 1、下载文档前请自行甄别文档内容的完整性,平台不提供额外的编辑、内容补充、找答案等附加服务。
- 2、"仅部分预览"的文档,不可在线预览部分如存在完整性等问题,可反馈申请退款(可完整预览的文档不适用该条件!)。
- 3、如文档侵犯您的权益,请联系客服反馈,我们会尽快为您处理(人工客服工作时间:9:00-18:30)。
维护保养计划表 ........................................ 18 维护保养计划表 .............................................. 18
简介..................................................................... 6 环保有责............................................................ 6 磨合 ................................................................... 6 燃油和润滑油..................................................... 6 维护保养和备件 ....................................................6 经认证的发动机 ................................................. 7
发动机使用说明书
发电机组和工业用发动机
4-7升(EDC 4)
前言
Volvo Penta 工业发动机的用户遍布世界各地,无论是移动的还是固定应 用,在可以想象得到的各种严酷工作环境中,您都可以找到它们。
经历了 90 余年的发动机制造历史,Volvo Penta 这个品牌已经成为运行 可靠、技术创新、性能一流和使用寿命长的代名词。我们坚信这些特点也 正是您对新 Volvo Penta 工业发动机的期盼和要求。
故障跟踪 ................................................. 37 征兆和可能原因....................................... 37
维护保养.................................................. 20 发动机一般保养 .............................................. 20 润滑系统 ......................................................... 22 冷却系统 ......................................................... 25 燃油系统 ......................................................... 30 电气系统............................................................. 32
为了切实满足您对 Volvo Penta 发动机的期望,我们要求您在开始使用发 动机之前,认真阅读本使用说明书。
AB VOLVO PENTA
发动机数据 发动机型号 .........................................
产品代号 .................................................
产品介绍 ................................................... 8 技术说明............................................................ 8 发动机编号........................................................................... 10 EDC 4.............................................................. 11
© 2007 AB VOLVO PENTA Volvo reserves the right to make changes
Printed on environmentally friendly paper
目录
安全注意事项 ..................................................... 2 操作和维护保养中的安全注意事项 ................... 3
仪表 ........................................................12
封存 ....................................................... 36 封存的准备工作.....................................................................36 重新启用 ......................................................... 36
最近的 Volvo Penta 维修服务点
姓名 ...................................
电话 .................................
地址 ...................................................................................................................................
发动机编号......................................................................................................................
离合器,型号/编号 .......................................................................................................
