conference手册说明
视频会议系统使用手册

EConference视频会议系统使用手册V1.01. EConference视频会议系 (3)2. 软件安装 (3)3. 界面功能介绍 (4)3.1 菜单栏 (5)3.2 用户列表 (6)3.3 视频区 (6)3.4 功能控制 (7)3.5 数据会议 (7)3.5.1 电子白板 (7)3.5.2 文档共享 (7)3.5.3 协同浏览 (8)3.5.4 文字交谈 (9)4会议流程 (10)4.1 进入会议 (10)4.2 举手发言 (10)4.3 数据操作 (10)4.4 退出会议 (11)5附录 (11)1. EConference视频会议系ES视频会议系统使用户可以利用普通的PC机、标准的视频采集设备(USB摄像头或者视频头+视频采集卡)、耳机和麦克风,实现基于Internet、广域网、局域网的虚拟会议。
与传统的基于硬件的H.323解决方案相比,Ensue是纯软件解决方案。
用户无需投入高昂的成本,就能够实现高质量、高可靠性的音视频通讯的会议功能,有效地节约时间和经费,提高企业的工作效率。
Ensue提供与网站结合的接口,可与网站完整结合。
a)服务器端要求b)客户端要求2. 软件安装从网上下载客户端程序:EConf_Setup.exe ,直接运行便可安装好。
注意:安装客户端之前,请关闭登陆页面。
安装完成后再打开登陆页面进入会议。
3. 界面功能介绍Es Conference 3 的工作区为用户提供了简便、实用的操作环境,各区域的合理布局,保证了视频会议中各种功能的有效利用。
Es Conference的工作区主要有:菜单栏、用户列表区、功能控制区、数据共享区、视频区。
下图是Es Confernce的界面和各区域的布局。
3.1菜单栏菜单栏包括了视频会议中的主要功能:1、视频源:设置视频采集设备,如果没有视频采集设备或只有一个视频采集设备的话,就不必设置视频源;若有两个以上的视频采集设备,可以点击该菜单来选择使用哪个视频设备。
V2 conference Admin Manual管理员手册
Admin ManualV 5.6Ownership ClaimsV2 Technology, Inc. reserves the right to interpret this manual. V2 Technology, Inc. reserves the right to alter, modify, or otherwise change in any manner the content hereof without obligation of V2 Technology, Inc. to notify any person of such revision or changes.No part of this manual may be added, deleted, modified, abstracted, translated, reproduced, or adopted in any form or by any means without the prior written permission of V2 Technology, Inc. Due care has been taken to make the Admin Manual as accurate as possible. V2 Technology, Inc. makes no representation or warranties with respect to the contents hereof and shall not be responsible for any loss or damage caused to the User by the direct or indirect use of the Admin Manual.V2 Technology, Inc. may own the patents, patent-pending rights, trademarks, copyright or other intellectual properties mentioned in this manual. Except otherwise stated in written form by V2 Technology, Inc. the ownership of this manual doesn’t mean that you are entitled to use any of these rights, trademarks, copyrights or other intellectual properties.All marks and trademarks are properties of the respective companies with which they are associated.The GIPS technologies and their respective trademarks used by this software are owned by Global IP Sound AB. The copyright claims are as follows.Portions Copyright © 1999-2009 Global IP Sound Inc. All rights reserved.Global IP Sound,GIPS,SoundWare,NetEQ,iPCM,iLBC,GIPS V oiceEngine,and associated design marks and logos are trademarks owned or used under license by Global IP Sound AB,and may be registered in the United States and other countries.Patents and Patents Pending, Global IP Sound Inc.Copyright © 1999-2009 V2 Technology, Inc. All rights reserved.ContentsOwnership Claims (1)Contents (I)About this manual (1)1. System Introduction (2)2. Server Installation (3)2.1. System Requirements (3)2.2. MyODBC Program Installation (3)2.3. SDK Program Installation (3)2.4. Conference Server Installation Procedure (3)2.5. IM Server Installation (16)3. Server Configuration (21)3.1. Configure the Master Server (21)3.1.1. Database Configuration (21)3.1.2. Conference Server Management (24)3.1.3. IM Server Management (29)3.2. Configure the Slave Server (38)3.3. Upgrade the Slave Server Automatically (39)4. Log in to the Management System (43)4.1. Log in to the Management System of Maser Server (43)4.1.1. Personal Details (44)4.1.2. Department Management (45)4.1.3. User Management (47)4.1.4. Conference Scheduling (50)4.1.5. Conference Management (58)4.1.6. System Configuration (60)4.1.7. Monitor equipment (64)4.1.8. Database (67)4.1.9. Address Book (68)4.1.10. Resource Statistics (69)4.1.11. Change Server Type (71)4.1.12. Exit System (71)4.2. Log in to the Management System of the Slave Server (71)4.2.1. Change Server Type (72)4.2.2. Authorization Password Configuration (72)4.2.3. Resource Statistics (73)4.2.4. Modify Password (73)4.2.5. Exit System (73)Annex A PSTN Server Installation Instructions (74)1. System Requirements (74)2. Installation Procedure (75)2.1. Install the Board (75)2.2. Wiring (75)2.3. Parameter Setup (75)Annex B Connection to SIP Terminals (77)1. Permissible Rights (77)2. Operating Procedure (77)3. Relations (78)4. Handling Conflicts (78)Annex C Server Port Information (80)Annex D H.323 Routing User (83)About this manualThe audience of this manual is system admin of V2 Conference This manual involves implementation details of V2 Conference system as well as other work performed by the system admin.This manual offers the following information:z System IntroductionIntroduction to the V2 Conference Systemz Server InstallationSystem requirements and server installing procedurez Server ConfigurationHow to configure and start Master Server and Slave Serverz Log in to the Management SystemThe actions that may be performed by the system admin in the management system of the Master Server and Slave Server1.System IntroductionV2 Conference is composed of the video conferencing server, conferencing management server and endpoint. Of which, the video conferencing server and endpoint are designed to perform the collection, compression, transmission, exchanging and routing of the multi-media information for conferencing. Whereas the conferencing management server provides users with a tool to perform system management and maintenance. By accessing the conferencing management server through such web browsers as IE, remote system management and maintenance such as database configuration, server startup and monitoring, conferencing management, user management, and resources inquiry may be performed. All the conferencing applications (installation, download and upgrade of the endpoint programs) and management applications are WEB enabled. Conference system can combine the monitor system. During the conference, moderator call the monitor user, and then display its video in the conference.Conference system can combine the monitor system, administrator can configure the monitor functions when the server supports monitor commutate service.The V2 Conference system supports the multi-server cascading deployment, allowing the CPU and network processing bottleneck to be distributed to multi servers. In such way, several thousand users may videoconference at the same time. By configuring and managing the master server, the operation of each functional module on the slave server may be dynamically monitored and managed.2.Server Installation2.1.System RequirementsOne or more servers may be deployed to take care endpoint applications depending on system size and requirements. System requirements of the video conferencing serve are shown in the following table.Minimum configuration Recommended configurationCPU PentiumIV Pentium IV 3.0G or above Dual XEON CPURAM 512M and above 2G and aboveSupported RecommendedOperating system Windows 2000Windows 2003Windows XPWindows VistaWindows 7Windows 2003 Server2.2.MyODBC Program InstallationIf the conference server is not installed MyODBC procedures, it needs to install the program first. If the Active/Active mode is using, secondary server also needs to install this program. The installation process will not repeat here.2.3.SDK Program InstallationIf the conference server is not installed SDK procedures, it needs to install the program first. If the Active/Active mode is using, secondary server also needs to install this program. The installation process will not repeat here.2.4.Conference Server Installation ProcedureInsert the CD-ROM into the CD drive. The installation program will start automatically, with the following welcome interface displayed.Figure 2-1Accept the agreement by checking the “I have read and accept it”. Click the “Next” button and follow the onscreen prompts to select the installation directory.Figure 2-2Click “Next” button to display the License Agreement as shown in the following figure.Figure 2-3You may select the default path or click “Browse” button to select other installation directory. After that, click “Next” button.Figure 2-4The system will prompt you to choose the installation version. “Formal Edition” is the official version while “Trial Edition” is a trial version (the four participants and two conference rooms version). Select the “Formal Edition” and then click “Next” as shown in the following figure.Figure 2-5Onscreen prompt will ask you to choose the Master Server or Slave Server. After that, click “Next” button to open the Port Configuration window as shown in the following figure.Figure 2-6Management Port is the port of the management system, which is defaulted as 18080. Web server port is 8080. Conference Mysql Port is the port of Mysql, which is defaulted as 3307. After setting, click the “Next” button to open the following window, showing the need to support dual-hot information.Figure 2-7The default is “No”, means does not need dual-hot feature, pass this step. If select "Yes", means choice the dual-hot feature, administrators should prepare the software similars to the “Life Keeper” to configure Dual Hot-backup, and add the three services of conference, when the failure of the main server, the system will activate the slave host through the consultation measurement software (generally through the heart diagnosis) to ensure that application in a short time to return fully to normal use. Main host and slave host need only one Aladdin encryption device, and the host should install the Aladdin encryption driver. The setup programme shown as below. Click the arrow in front of the “Hasp HL Net License Manager”, select the first option, install the service.Figure 2-8In the Figure 2-7 click “Next”, show the dual-hot standby IP setting information, shown as follow;Figure 2-9Input the master host, slave host and drift IP address. Click “Next”, show the window as below.Figure 2-10To start installation, click “Next”. For the Slave Server, the installation completion window will be displayed after the installation is completed.For the Master Server, the encryption driver installation window will be popped up as shown in the following figure.Figure 2-11Ensure that you meet the requirements. Then, click “Next” to display the Installing Parameters window as follows:Figure 2-12Two options are available, the Install SenseIV Driver and the Uninstall SenseIV Driver. If you have never installed the encryption driver before, select the Install SenseIV Driver option. Then, click “Next” to continue to open the following window.Figure 2-13Click “Finish” button to finish the driver installation. The server installation completion window is displayed as follows.Figure 2-14Check “Go to conference’s homepage” and click “Finish” to finish the server installation. The server configuration window will be opened.Notes:z To protect customer’s legal rights, highly secured hardware encryption is used toprevent against pirating at the maximum extent. Ensure to find this device in thepackaging as shown in the following figure.Figure 2-15z The server installation package contains updated versions of Tomcat(5.0.0.28),MySQL(4.1.13), and JDK(1.4.2).After the server installation is completed, ConfMachineLoader and ConfTomcat services will be started by system automatically.To manually start or stop these services, Windows management tools should be used.z Only the installation of the encryption driver is completed could the encryption device be plugged into the USB port. Installation of the encryption driver is notnecessary for the users who have installed the encryption driver or are using the trialversion.2.5.IM Server InstallationInsert the CD-ROM into the CD drive. The installation program will start automatically, with the following welcome interface displayed.Figure 2-16Click “Next” to display the License Agreement as shown in the following figure. Accept the agreement by checking the “I have read and accept it”.Figure 2-17Display the webservice password setting page, as shown below. Input the webservice password. When the administrator adds IM server in the conference management system, it will prompt this password. If the password is wrong, it will not boot the server, and indicating that the wrong password. Then click “Next”.Figure 2-18Click “Next” button and follow the onscreen prompts to select the installation directory. You may select the default path or click “Browse” button to select other installation directory.Figure 2-19Click “Next” to open the following window. To start installation, click “Next”.Figure 2-20The server installation completion window is displayed as follows. Click “Finish” button to finish the server installation.Figure 2-213.Server ConfigurationBoth the Master Server and Slave Server need to be installed and configured. For trial use, you may only install the Master Server. All the servers need to be assigned a public or intranet IP address. The server uses the intranet IP address to transfer information over the intranet or uses the public IP address to transfer information to or from the external network. It is recommended that a well equipped computer be used as the master server.3.1. Configure the Master ServerUpon installation of the Master Server, the management system login window will be opened (or enter IP address and port number in the address line of the IE browser).Enter user name and password of the system administrator and click “Login”, the initial username and password are all admin, the system will prompt you to configure the database.Our conferencing system is compatible with a wide range of databases, including MySQL, MS SQLSERVER, Oracle and DB2.3.1.1.Database Configuration3.1.1.1.MySQL DatabaseTogether with installation of the server program, MySQL is also installed by the system by default. Click the “Database Configuration” icon to display the following page.Figure 3-1Select MySQL as the database and odbc driver name, select its address (local or remote) and port3307. Enter root’s password, then click the “Connection Test” button to display the page. Click the “Create Database” button to complete database configuration.3.1.1.2.MS SQLSERVER DatabaseIf the MS SQLSERVER database is available on the server, you can also select MS SQLSERVER as the database to be connected. Click the “Database Configuration” icon to open the following page.Figure 3-2Select MS SQLSERVER as the database and odbc driver name, select its address (local or remote) and port 1433. Enter root’s password, then click the “Connection Test” button to display the page. Click the “Create Database” button to complete database configuration.3.1.1.3.Oracle DatabaseIf the Oracle database is available on the server, you can also select Oracle as the database to be connected. Click the “Database Configuration” icon to open the following page.Figure 3-3Select Oracle as the database, Oracle global SID and odbc driver name, select its address (local or remote). Enter the user system’s password, and then click the “Test Connection” button to perform database configuration. The system will then displays the prompt “The database doesn’t exist, please use the Database Configuration Assistant of Oracle9i to create the database.” Open the “Database Configuration Assistant” window and select “Create Database”, set the template to General Purpose, database to CONFDB, and database character set to UTF8. Finally enter password of the new database SYS and SYSTEM.Having done that, click “Connection Test” and the system will than prompt that the database doesn’t exist. Click the “Create Database” button to complete the configuration.3.1.1.4.DB2 DatabaseIf the DB2 database is available on the server, you can also select DB2 as the database to be connected. Click the “Database Configuration” icon to open the following page.Figure 3-4Select DB2 as the database and odbc driver name, select its address (local or remote) and port 50000. Enter root’s password, then click the “Connection Test” button to display the page. Click the “Create Database” button to complete database configuration.3.1.2.Conference Server ManagementFollowing the database configuration step, the step adding server may be performed. Click the “Conference Server Management” icon to display the server management page.3.1.2.1.Add a serverClick the “Add server” button to display the following page.Figure 3-5z Server NameIt is preferred that the server name should carry information about the server in an easily recognizable way, such as address, functions, etc. The name should be unique, with the length not exceeding 30 characters. The first server to be created is the master server by default, with the name “master”. Only one master server is needed.z Server IP addressServer local IP addressz Management system port18080 by defaultz Web server port8080 by defaultz Startup passwordIdentical with the “validation password” in the system configuration option.z Service optionsAvailable functions and requirements are shown in the following table. Ensure sufficient encryption resources for all available services.Service options Available functions RequirementsConferencing service Allowing users to log in to the conference room via this serverH.323 service Two-way conferencing with H.323devicesCannot be used together withV oIP serviceService options Available functionsRequirementsPSTN voice card service Two-way conferencing with telephone devices The voice card hardware isneeded, please see PSTN Server InstallationInstructions -{}-SIP service Allowing two-way conferencing with SIP endpointsV oIP service Connecting telephones to the conference Public IP address must beused by the server, and an IPtelephone card is needed.Cannot be used together withH.323 serviceH.323 routing service Using the conferencing server as the router, allowing one H.323 to be connected with another H.323Can only be configured and started on the Master Server Guest serviceGuest users can login to the server that has this serivceIf the maximum number ofguest users in the encryptingresources is 0, this service isnot supported and displayed by the Server. And the Master and SlaveServer also support thisservice.Monitor commutate service Conference server which has this service is responsible for connecting monitoring equipment, obtains the video of the monitor point and transmits to the conference users. If the maximum number ofmonitor users in the encrypting resources is 0, this service is not supported anddisplayed by the Server.After entering all the service options, click the “OK” button. The available server list will be displayed as follows.Figure 3-6For the servers that are not started, you may also view or modify their service information. Thechange of the Slave Server configuration information is similar to the Master Server. Configurations that possibly need to be changed are listed in the following table. Normally the defaulted configurations will be selected. For port information, please see the Annex.Service name Parameter name Parametermasterfs mcuspace Space of the conference room. If set to 0, the space size will not be limited.slavefs uploadmaxnumberThe maximum processes that simultaneouslyperform file uploading between the master fileserver and the slave file server. downloadmaxnumberThe maximum processes that simultaneouslyperform file downloading between the master fileserver and the slave file server.mastermcu conftimeDefaulted that 300 seconds prior to the end of theconference, a prompt will be displayedconflog Defaulted as 1. If 0, log files will not be savedslavemcu Maxusernum The maximum number of participants who log in to the clients of the Slave Server is defaulted as 300slavemcuforpstn MaxV oIPChannelNumber Maximum PSTN channel number is defaulted as 2slavemcuforsip _PasswordThe password that is used to register on the thirdparty’s server._UserIDThe user account that is used to register on thethird party’s server._externalGKIP The registering server address of the third party_prefixRemove the unnecessary prefix in the externaldevice access codeslavemcuforh323 or slavemcuforvoip _PasswordThe password that is needed to register on GK ofthe third party_UserIDThe user account that is needed to register on GKof the third party_externalGKIP GK address of the third party_prefixRemove the unnecessary prefix in the externaldevice access codeNotes: Only the client moderator user has the right to check if V oIP registration is made, by which to decide if proper V oIP service is configured3.1.2.2.Start your serverEnsure that proper server configuration is made. After that, click the “Start” button to start the server. Start of the Master Server depends on its available encryption resources whereas start of the Slave Server depends on the total amount of encryption resources used by the servers that hasbeen successfully started as well as the its own available encryption resources. You should first start the master server then start the slave server. If succeed, the server state will become green from red. Please see the following figure.Figure 3-7For the servers that have been started, one can only view their information and service information and cannot delete them. The user amount and conference room amount of the system resources depend on the amount supported by the system’s encryption resources. Clicking the “Stop” button may turn off the server. If the Master Server is turned off, all its slave masters will be turned off accordingly.The list of all the servers that have been started is displayed on the opened management system page of the Master Server.Notes:z Sometimes for system expansion needs, the existing encryption needs to be changed. To do that, first delete all the servers in the server list. Then plug in newencrypting hardware. After that, use the Windows service management tool to first turnoff the ConfMachineLoader and ConfTomcat services and then turn on them. Next, addand start servers again. Now the videoconferencing may continue to be performed.z The slave server may be automatically stopped or started in its own managementsystem. In such case, the start mode may be changed accordingly when trying to log into the management system of the master server.z To modify the configuration of a server that has been started, you must first stopthen start it again.3.1.2.3.Separate server from the cascading systemIf Slave Server has encryption resources, it can be separated from the cascading system and works as a Master Server. The operation steps are as follows:step 1:The admin log in to the management system of Slave Server and stop all services.step 2:Change the Slave Server to the Master Server by “Change Server Type” function.After completed the settings above, user can operate the server as Master Server.Notes: If the slave server has no encryption resources, it cannot be converted into the master server.3.1.2.4.Server combinationThe system supports server combination function; user can integrate sub-systems into a larger cascading system to meet the resources requirements of holding a large meeting.step 1:The admin log in to the management system of Master Server and stop all services.step 2:Change the Master Server to the Slave Server by “Change Server Type” function.step 3:Add the Slave Server to the Central Server.step 4:Restart the Slave Server.After completed the settings above, system will integrate the Slave Server’s encryption resources into the Central Server’s automatically, such as Maximum no. of concurrent conference, Maximum no. of attendees etc. The admin can examine the information in the resource statistics page.Notes:z If the security dongle does not support server combination, the Master Servercannot be converted into the Slave Server.z You should first start the Central Server and then start the Slave Server.z After changing the server type, meanwhile, all conference and user information inMaster Server may also be deleted, the admin should backup it before use the function. 3.1.3.IM Server Management3.1.3.1. MySQL-FrontIf IM server and Master server are installed on the same host, you can skip this section; If IM server and Master server are not installed on the same host, you need to modify the database parameters by MySQL-Front program.First, you need to install MySQL-Front program on the host which has been installed the Master server. The installation process will not be repeated here. Details on how to modify the database parameters are as follows.Step 1 Open the MySQL-Front, Click the “File” icon, and choose “Connection”, it will pop up the “open session” dialog box, as shown below:Figure 3-8Step 2 Click the “New …” icon and it will pop up the “add session” dialog box. It includes four tabs: General, Connection, Login and Data Browser, as shown below:Figure 3-9Step 3 Click the “General” tab to enter your login information. The login name is same as the database user name. For more details of the database, please refer to “Database Configuration”. Then choose the “Connection” tab, as shown below:Figure 3-10Step 4 Connection setting. Enter Master server IP address, Mysql port 3307, and then choose the “Login” tab, as shown below:Figure 3-11Step 5 Login setting. Enter the user name and password of the database. Click “” icon and it will pup up the “Select Databases” dialog box, as shown below:Figure 3-12Step 6 Select the Database “mysql” and then click "OK" button to return to the “open session” dialog box. Select one database which you want to log in, click "OK" button to open the “Database Login” dialog box, as shown below:Figure 3-13Step 7 Enter the password of the database. Click “OK” icon to open the “Database User’s Object Browser” page, as shown below:Figure 3-14Step 8 Click the “+”icon in the left folder panel to expand Mysql folder, select “user” in the pull-down menus and then Click the "data browser" button on the menu bar to open “Data Browser” page, as shown below:Figure 3-15Step 9 Select the string “localhost” under the Host column and change it to percent symbol "%", then click the “” icon on the tool bar to save your settings, as shown below:Figure 3-16Step 10 Click “user” item under “mysql” in the left folder panel, you can see the parameters of Host have been modified, as shown below. Now the IM server is available for you.Figure 3-173.1.3.2.IM Server ManagementClick “IM Server Management” icon to display the IM server management page as below.Figure 3-18First click "Add server" button that shown as Figure 3-19. Creation of the first created IM server contains data access service by default, the other two services optional. IM users log in to the IM system through this master server after activated the IM. The first IM server in the server list is marked as "Master".IP Address/Domain Name: user can enter multiple IP addresses of IM server, compart with semicolon.Validate Password is the password for the communication of management system and servers, bydefault is empty, 0-6 characters in length.When IM server is deployed in internet, user needs to install STUN server. The initial value of the default address is: 59.151.40.134. User can also modify it, configure two public network addresses, running “server.exe” by command format in the two servers as follows: "server.exe-h local_ip-a remote_server_ip" (which local_ip is local server IP, remote_server_ip is another server IP). Use any one network address as STUN server IP address.Figure 3-19The second and subsequent creation of IM server, the page is shown as Figure 3-20. Service Pack does not contain data access services, the other two services optional, and must choose one of them. In the server list is marked as "Slave".Figure 3-20In all the IM servers should contain at least data access service and directory service, if used in the LAN, can not choose transfer service.The methods of starting the server and interface parameters are the same to the conference server. Not repeat them here.After running the server, download IM software, then activates IM, user can use it. The operation。
atlassian conference操作手册
Atlassian Conference 操作手册一、会议注册与登录1.访问Atlassian Conference 官方网站。
2.点击"注册" 按钮,填写相关信息并完成注册。
3.在收到确认邮件后,点击邮件中的链接进行账号激活。
4.登录Atlassian Conference,进入个人中心,完善个人信息。
二、会议日程查看1.登录Atlassian Conference 后,进入"会议日程" 页面。
2.可以按照日期、时间、议题等筛选会议,并查看具体的议程安排。
3.点击每个议程项,可查看该议程的详细信息,包括演讲者、议题等。
三、演讲者与议题管理1.在"会议日程" 页面,可查看所有演讲者和议题信息。
2.若需管理演讲者或议题,可点击页面右上角的"管理" 按钮。
3.在管理页面,可对演讲者或议题进行编辑、删除等操作。
四、用户组与讨论区设置1.在个人中心,可创建或管理用户组,为用户组分配角色和权限。
2.在"讨论区" 页面,可创建不同主题的讨论区,并对每个讨论区进行管理。
3.用户可在相应的讨论区中发表观点,与其他用户互动交流。
五、会议资料上传与分享1.在"会议资料" 页面,可上传相关资料供参会者下载或在线查看。
2.可设置资料的下载权限和有效期,确保资料的安全性。
3.在上传资料时,可选择将其分享到特定的用户组或所有用户。
六、实时聊天与问答1.在会议进行期间,可在"实时聊天" 区域与其他参会者进行交流。
2.可通过聊天窗口向演讲者提问,提问时请注意文明用语。
3.演讲者或组织者将根据问题进行回答或进一步讨论。
七、会议投票与反馈1.在某些议程结束后,可进行投票以表达对该议程的意见和建议。
2.可根据需求设置不同的投票选项,并选择匿名或实名投票。
3.组织者将根据投票结果进行统计和分析,以改进会议的安排和内容。
Conference-template-A4(IEEE)(中文版)
Paper Title* (use style: paper title) *Note: Sub-titles are not captured in Xplore and should not be used第一行:第一个给定姓氏第2行:部门。
机构名称(隶属关系)第3行:组织的名称(隶属关系)第4行:城市,国家第5行:电子邮件地址line 1: 4th 第一行:第二个给定姓氏第2行:部门。
机构名称(隶属关系)第3行:组织的名称(隶属关系)第4行:城市,国家第5行:电子邮件地址第1行:第3个名字姓第2行:部门。
机构名称(隶属关系)第3行:组织的名称(隶属关系)第4行:城市,国家第5行:电子邮件地址Abstract—这个电子文档是一个“实时”模板,并且已经在其样式表中定义了您的论文的组成部分[标题,文本,标题等]。
*关键:不要在论文标题或摘要中使用符号,特殊字符,脚注或数学。
. (Abstract)Keywords—component, formatting, style, styling, insert (key words)I.I NTRODUCTION (H EADING 1)该模板在MS Word 2007中进行了修改,并保存为PC的“Word 97-2003文档”,为作者提供了准备电子版论文所需的大部分格式规范。
所有标准纸张组件的规定有三个原因:(1)格式化单张纸时的易用性,(2)自动遵守促进电子产品的同时或稍后生产的电子要求,以及(3)整个样式的一致性会议记录。
内置边距,列宽,行间距和类型样式; 本文档中提供了类型样式的示例,并且在示例后面的括号内以斜体标识。
虽然提供了各种表格文本样式,但是没有规定一些组件,例如多级方程式,图形和表格。
格式化程序需要创建这些组件,并包含以下适用的标准.II.E ASE OF U SEA.Selecting a Template (Heading 2)首先,确认您的纸张尺寸有正确的模板。
会议接待手册 英语范文
会议接待手册英语范文English:In crafting a conference reception manual, it's crucial to prioritize seamless coordination and impeccable hospitality. Start by outlining the roles and responsibilities of the reception team, including greeting attendees, providing registration assistance, and offering information about the event schedule and facilities. Emphasize the importance of professionalism, friendliness, and efficiency in all interactions. Detail procedures for handling various scenarios, such as VIP arrivals, latecomers, or unexpected issues. Provide clear instructions for utilizing any technology or software involved in registration or check-in processes. Address security protocols, including badge distribution and access control. Additionally, incorporate contingency plans for emergencies like medical incidents or facility disruptions. Ensure thorough training for all staff involved in reception duties, covering both routine procedures and emergency protocols. Regularly update the manual to reflect any changes in procedures or technology. Finally, encourage feedback from both attendees and staff to continuously improve the reception experience.中文翻译:制定会议接待手册时,重要的是优先考虑无缝协调和完美的款待。
atlassian conference操作手册
atlassian conference操作手册摘要:1.会议概要2.会议注册3.会议议程4.演讲嘉宾5.会议地点与住宿6.交通指南7.会议费用与支付8.会议赞助9.会议联系方式正文:【1.会议概要】Atlassian Conference 是一场专注于Atlassian 产品与技术的盛会,旨在为我国广大Atlassian 用户、合作伙伴和开发者提供一个交流与分享的平台。
会议将邀请业界专家进行主题演讲,分享Atlassian 产品在团队协作、项目管理、软件开发等方面的最佳实践。
【2.会议注册】要参加Atlassian Conference,请访问会议官网进行在线注册。
注册时需填写个人信息、选择参会类型(标准票/VIP 票等)和支付方式(支付宝/微信支付等)。
注册成功后,您将收到确认邮件,邮件内包含参会二维码,请妥善保管。
【3.会议议程】会议议程包括主题演讲、工作坊、圆桌讨论等多种形式。
您可以根据个人需求选择参加不同场次的议程。
会议议程将在会议前一个月在官网上公布,敬请关注。
【4.演讲嘉宾】Atlassian Conference 将邀请来自全球的知名专家、行业领袖和创新者担任演讲嘉宾。
嘉宾们将分享他们在Atlassian 产品领域的丰富经验和独到见解,为参会者带来极具价值的内容。
【5.会议地点与住宿】会议将在我国某知名城市的国际会议中心举行。
参会者可以根据会议提供的住宿建议预订周边酒店,也可以选择自行安排住宿。
【6.交通指南】会议中心附近有公交、地铁等多种交通方式。
建议参会者提前查看会议提供的交通指南,规划合适的出行路线。
【7.会议费用与支付】会议费用根据参会类型不同而有所区别。
参会者需在注册时选择支付方式并完成支付。
支付成功后,将无法退款。
如有特殊情况,请与会议主办方联系。
【8.会议赞助】Atlassian Conference 欢迎各类企业进行赞助合作。
赞助商将享有品牌宣传、展位展示、演讲机会等权益。
英文会议手册
DIRECTORYWelcome Letter Page 2 Part 1 The Schedule of SDUWMUN Page 3 Part 2 The Committee Introduction Page 51.The Committee History2.The Structure of the Committee3.Country MatrixPart 3 The Topics & Background Page 6 Part 4 The Advice of theDais & Relevant WebsitesPage 7 Part 5 Conference Procedure & Rules Page 81. General Conference Information2. Rules on Formal Debate3. Rules Governing Resolutions4. Rules Governing Voting5. Precedence of MotionsPart 6 Award Page22 Part 7 Meeting Etiquette Page23 Appendix I Page24Welcome LetterDear Delegates and Faculty Advisors,It’s my distinct pleasure to welcome you to the fourth session of Model United Nations of Shandong University at Weihai. This conference will be held from 30th October to 31st October, 2010, hosted by the International Cooperation and Communication Department, organized by Students’ International Communication Association. We also have invited some universities in Shandong Province to participate in the conference.This is really an amazing conference, which not just develops your expertise in research, writing, public speaking but also the art of negotiation as you fight for the interests of the countries you will represent on every conceivable topic relevant in today’s global community. I sincerely hope that your experience at SDUWMUN will empower you to further your passion for international diplomacy.This April, the third session of SDUWMUN was held successfully. This October, SDUWMUN will continue the mission to present an exciting conference. Recently, the most heated discussed topics are financial crisis and human rights, so this time, our topic is that ‘the Background of the Impact of Global Financial Crisis on the Universal Realization and Effective Enjoyment of Human Rights’, we will provide a comprehensive study guide to help you become well-versed with the topic of debate. Furthermore, we hope that you can be able to benefit through taking part in the preparation.All of us are very excited to welcome you to Model United Nations in Shandong University at Weihai. SDUWMUN can be considered as a competition, a forum, and also a big brilliant party. We thank you for all of your hard work in preparing for this conference and are looking forward to an incredible party. Let’s enjoy it! And never hesitate to contact us with any questions you may have.Yours sincerely,石玉丹(Secretary-General)Shandong University at Weihai Model United NationsPART 1:The Schedule of SDUWMUN 2010 •PROCESS:Date&Time Event Place Note10.10 (19.00-21.00)ConferenceTraining(one)Training of theprocedure10.17 (19.00-21.00)ConferenceTraining(two)Training of the topics10.22 (19.00-21.00) ConferenceTraining(three)WenhuaHotelRehearsal10.24Hand in thePositionPaper Send the electronic version of Position Paper tosicawh_mun2009@hotmail.c om before 12 o’clock10.29The Invited Members Arrive, Welcome Dinner Accommodation:Wenhua Hotel at SDUW10.30(Sat)8.00-9.00Opening Ceremony10.30 (Sat) 9.00-9.30Group Photograph10.30 (Sat) 9.30-12.00Formal Conference (One)10.30 (Sat) 14.00-17.30FormalConference(Two)Submit the electronicversion of DraftResolutions tosicawh_mun2009@hotmail.com before 18.3010.30 (Sat) 19.00-20.30Young diplomat dance10.31(Sun)8.00-12.00FormalConference(Third)After discussing thedraft resolution adjourn40 minutes,before theend of the time, submitthe electronic version ofthe amendments to thesecretariat10.31(Sun)14.00-15.00News Conference10.31 (Sun) 14.00-15.00AwardCeremonyClosingCeremonyTheReportingHall atInternetBuildingPART 2:Committee IntroductionCommittee HistoryThe Human Rights Council is an inter-governmental body within the UN system made up of 47 States responsible for strengthening the promotion and protection of human rights around the globe. The Council was created by the UN General Assembly on 15 March 2006 with the main purpose of addressing situations of human rights violations and make recommendations on them. One year after holding its first meeting, on 18 June 2007, the Council adopted its “Institution-building package” [Word file] providing elements to guide it in its future work. Among the elements is the new Universal Periodic Review mechanism which will assess the human rights situations in all 192 UN Member States. Other features include a new Advisory Committee which serves as the Council’s “think tank” providing it with expertise and advice on thematic human rights issues and the revised Complaints Procedure mechanism which allows individuals and organizations to bring complaints about human rights violations to the attention of the Council. The Human Rights Council also continues to work closely with the UN Special Procedures established by the former Commission on Human Rights and assumed by the Council.The Structure of the CommitteeThe Dais:A ChairTwo RapporteursThe secretariat:One SecretaryOne Deputy Secretary GeneralThree Secretary AssistantsCountry MatrixAngola IranArgentina IsraelBahrain JapanBrazil KoreaChina NigeriaCuba PhilippinesEcuador RussiaFrance United KingdomGermany United States of AmericaIndia ZambiaPart 3:The Topics & BackgroundThe Topics:The Background of The Impact of Global Financial Crisis on the Universal Realization and Effective Enjoyment of Human RightsThe Background:In August 2007, the international financial crisis erupted, causing the decrease of trade, increase of unemployment and the deduction of investment. In the situation of the poor economy, our first concern is the recovery of the economy, but as the crisis spread, the other impacts of the crisis have been shown, and its influence to the human rights has been noticed.On Feb. 20th 2009, UN Human Rights Council held a special conference on the influence on the global economic and financial crisis. This meeting was supported by most countries of the UN Human Rights Council, and was the brainchild of Egypt with the support of the African Union and Brazil. The president of the Human Rights Council said during meeting that the crisis posed a grave threat for human rights. He further emphasized that ensuring the basic human rights was the fundamental way to respond to the global crisis.In June 2009, United Nations held the Conference on the World Financial and Economic Crisis and its Impact on Development in New York City. The United Nations convened a three-day summit of world leaders from June 24th to June 26th at its headquarters inNew York City to assess the damage from the global economic crisis. The conference concluded that people in developing countries were suffering disproportionately due to the crisis and it is the responsibility of the developed countries that caused the crisis to help. They recommended that developed countries follow the Monterrey Consensus' recommendation by giving 0.7% of their GDP as aid to poor countries.NGOs also closely followed this issue. After the global financial crisis began, six major NGOs made a joint statement that the crisis not only hurt business but also infringed upon human rights. Presently, basic social rights such as the right to shelter, healthcare and education are bearing the brunt of pressure. As the economic crisis worsened, governments also increased censorship to stifle potential unrest. NGOs are putting more pressure on governments to respect human rights by various ways.PART 4:The Advice of the DaisI.Which kind of country is influenced most by the financial crisisand the reasons;II.What challenges of human rights protection are we faced with under the pressure of the financial crisis;III. How do we do with these challenges.Relevant WebsitesUnited Nations UNA-China / Muners /web/The Database of UN Human Rights Treaty The UN Division for the Advancement of Women/womenwatch/dawPART 5:Conference Procedure & Rules1. General Conference InformationI. THE PROCESS: COMMITTEE SESSIONSFormal DebateThe formal debate will begin with an open Speakers’ List, during which time representatives have the opportunity to share their views with the entire committee. The time limit for each delegate is 2 minutes. In formal debate, representatives may make speeches, answer questions, and introduce and debate draft resolutions and amendments. Points and motions are in order during formal debate.Unmoderated ConsultationWhile in formal debate, representatives may move for an unmoderated consultation for a fixed period of time, 5 minutes in average. The consultation serves as a temporary suspension of formal debate. During this time, representatives can meet informally with each other and the committee staff to discuss working papers, draft resolutions, amendments, and other relevant issues. A great deal of draft resolution writing and compromise is usually accomplished during this period of time, and representatives are encouraged to use consultation time to the best of their advantage.Moderated ConsultationRepresentatives can also make motions for moderated consultations on specific topics to focus the debate of the committee on issues that are of particular relevance. When a motion for moderated consultation is passed, the Chairperson shall call upon representatives to address committee members for a predetermined amount of time which should be decided by the delegate who make this motion. No motions are in order during a moderated discussion.Submission and Debate of ProposalsBefore we can discuss the specifics of the debate structure, it is important to note that the purpose of the debate is to produce a comprehensive and pragmatic solution to the issue, embodied in a document called a resolution. The process for producing a resolution in a CNMUN committee consists of two written stages: the workingpaper and the draft resolution. By writing, submitting, introducing and debating on proposals, the committee will be propelled towards a pragmatic and holistic solution to the issue. The path towards a resolution will be depicted in details below.VotingThe final act in the discussion of a topic area is voting on the draft resolution(s) on the floor (as amended throughout the course of debate). A draft resolution is passed when two-thirds majority of the committee votes in its favor and only one resolution may be passed for a topic area. Consideration of the topic area is normally over when one comprehensive resolution has been passed. And then the meeting will be adjourned if a simple majority members present and voting.II. THE PATH TOWARDS A RESOLUTIONIf we are to understand the nuances of the debate, we must first grasp the path towards the resolution.1). Working PaperWorking papers mainly serve as a point of reference for discussion in committee by putting abstract ideas into a concrete, written form (please see the sample provided later in this guide). Working papers are usually short proposals on one or more aspects of the problem under discussion and serve as a way of breaking down an issue into manageable units. With the approval of the Chairperson, working papers are copied and distributed so that the committee’s representatives can learn about the positions and interests of other representatives. As the committee’s work progresses, new points and ideas should be compiled into new working papers. Amendments cannot be made to working papers. Subsequent working papers must contain ideas that do not appear on any previous or concurrent working papers. Working papers should help advance the committee’s work, not duplicate it. This means that once a variety of proposals and viewpoints are introduced, the committee should begin to formulate the working papers into comprehensive draft resolutions. Representatives should be aware that working papers are not “mini-resolutions” in that they do not need to be in any specific format and do not need to cover all the issues raised in the Questions a Resolution Must Answer portion of the study guide. Additionally, ideas do not have to appear in working papers before they can become draft resolutions. In another word, working papers do provide a very useful tool for getting the entire committee’s feedback on specific ideas before presenting them as formal draft resolutions.2).Position PaperPosition papers are single-spaced, one-page documents that explain your country’s position on a particular topic. They should be instructive, clear, and concise, so as to leave no doubt on your country’s stance. Include your name, the name of your university, and the country delegation you are representing at the top of the document. Each delegation of a committee must turn in one position paper before the conference. Please adhere to the following three-paragraph format, setting the topic of Children’s Education Rights as an example:The first paragraph must state your country’s position on this topic. What is your country’s education status of children? What are the obstacles of your nation to achieve the goal of “Universal primary education” and “Gender equality in education”?The second paragraph will present what kinds of efforts your country has paid on attempt to settle down this issue. In addition, what is the relationship between your country and the international community in cooperation? What specific policy steps at the international, regional, national and community levels does your country desire to undertake in order to promote the domestic educations situation for children?The final paragraph must present a plan to ensure and expand the availability of primary education enrollment in impoverished nations and regions, especially in SAS and SSA. Considering the proposed solutions presented in the topic booklet, these plans must be viable and involve specific roles for United Nations agencies, national governments, regional organizations, international bodies, and NGOs in their implementation. A strong plan will address most of the QARMAs. Ingenuity (i.e. not simply copying the suggestions already presented) and novel syntheses of existing proposals are strongly encouraged. Requirement on Position PaperCountry:Committee:Topic:Delegates:3). Draft ResolutionsAs in the real United Nations, the main vehicle of action at CNMUN is the resolution, a formal document in which a committee spells out the action to be taken in order to solve a particular problem. Each draft resolution should deal specifically with the topic area currently under discussion by the committee. The following criteria mustbe met before a draft resolution can be introduced to the committee:* It must completely address the points set out in the “Questions a Resolution Must Answer” section of the study guide as well as any other points that have been raised in the course of debate.* It must be well-written, concise, comprehensive, and free of grammatical and typographical errors.* It must have the minimum number of signatories as stipulated in the Rules of Procedure.* It must receive the approval and signature of the Chairperson.* It must be completely original work done at the conference; no prewritten draft resolutions will be allowed, and plagiarism will not be tolerated. Because the committee can pass only one resolution on each topic, representatives should expect to be asked to revise draft resolutions several times before they meet the Chairperson’s standards. While the Chairperson will not advocate a particular solution, it is his or her responsibility to ensure that the committee has fulfilled its responsibilities and adequately addressed the entire topic before it can be introduced as a draft resolution. The Chairpersons are trained to be very discriminating in accepting draft resolutions, and representatives should not be surprised or offended if the dais staff sends a proposal for a draft resolution back to the committee for revision before approving it. It is the committee’s responsibility to construct an effective resolution to handle the situation at hand. When a draft resolution is introduced, it is usually not ready for an immediate vote. Much debate, compromise, and revision are involved in the formulation of a resolution that can be agreed upon by the committee. Listed below are some (not comprehensive) guidelines for good resolutions:* A good resolution should represent a technical solution to the issue. It is not enough to merely create an additional committee to discuss the problem or to condemn or approve of this or that country. The resolution should present specific, concrete proposals to deal with the issue at hand.* The resolution should be the product of a workable compromise among the nations party to a dispute (in an antagonistic political situation) or among the competing viewpoints on how an issue should be resolved (in a cooperative problem-solving situation). This means all involved parties should agree. Any resolution dealing the situation in Israel/Palestine, for example, is meaningless if it does not meet with the approval of both Israel and the Arab community. * The compromise reached must take into account the relative power of the parties to the dispute. In the United Nations, each nation has one equal vote. But in the international community, it is a fact that some nations have more power than others. When drafting a resolution, keep in mind that a realistic world view is essential to a solution that can be effectively implemented in the global arena.Requirement on Draft ResolutionCommittee:Topic:Sponsors:Signatories:THE CONTENT SHOULD BE WRITTEN IN VERDANA NO.54). AmendmentsThe amendment process is used to perfect and improve draft resolutions as the course of debate evolves to reflect concerns that may not have been addressed in the original document. A clear understanding of the rules of procedure is very important to the process of proposing, debating, and voting on an amendment. Chairperson will clarify this process at conference, time permitting, but a review of the amendment process as described in the Rules of Procedure is highly recommended to optimize a committee’s efficiency and productivity. At CNMUN, all amendments must be put to procedural vote of the entire committee. Only at the Chairperson’s discretion can amendments be made without vote (on non-substantive matters such as typos). There are no friendly amendments, and all amendments are treated in the same way regardless of the effect they have on the draft resolution in question. If an amendment is passed by the body, it is immediately incorporated into the text of the draft resolution for the purposes of debate and voting.Requirement on The AmendmentAmendmentCommittee::Topic::Sponsors:Signatories:THE CONTINENT SHOULD BE WRITTEN IN VERDANA NO.4 with DOUBLE SPACING2. Rules on Formal DebateDuring the formal debate, all delegates are required to follow the rule of procedures and maintain decorum. Formal debate can be divided into the following segments:Roll CallIn this phase, the Rapporteur would announce the name of each member state and observer in alphabetical order. Upon announcement, the aforementioned country’s delegate would raise his/her placard and announce “present”.Setting of AgendaEstablishment of Speakers ListThe Committee will have an open Speakers List for the topic area being discussed. The Director would initially call for countries willing to speak to be added to the list and will set the speaking time beforehand.Making of SpeechesTime LimitAll speakers on any speaker list would be given 120 seconds to speak unless a delegate moves otherwise, and such a motion requires a second and a simple majority to pass.YieldsAfter a delegate has finished his/her speech within the allocated time, any remaining time can be yielded. There are four different types of yields:Yield Time to Another DelegateThis situation usually appears when country A which yields his/her time and country B to whom the time is yielded to have reached a consensus after discussion. The delegate from country B would utilize the time remaining from A’s speech to speak. If there is still time remaining after B’s speech, there would be no further yielding of time.Yield Time to QuestionsOnce a delegate that has spoken chooses to yield his/her time to questions, the Director would ask for delegates willing to ask questions to raise their placards and would randomly pick any of such delegates to pose their inquiries. The time for asking questions would not be included in the remaining time of the previous speech. The delegate speaking can use the remaining time to answer all questions posed.Yield Time to CommentsOnce a delegate chooses to yield his/her remaining speaking time to comments, the Director would ask for delegates willing to comment to raise their placards andrandomly pick any of such delegates to speak. Delegates appointed to comment can use the remaining time to make relevant comments; however, the delegate who has yielded his/her time would not be allowed to express his/her opinions again or rebut the comments in this same time frame. The Director will rule out any comments that do not pertain to the previous speech. Yield Time to the ChairUpon yielding time to the chair, a delegate chooses to forego his/her remaining time and the Director would proceed on with the rest of the proceedings.Points and MotionsAfter a delegate has spoken/fully utilized the allocated speaking time, the Director would ask for points or motions from the Committee. At this point in time, a delegate can raise points or motions according to his/her needs. MotionsMotion to set speaking time Simple Majority (50%+1)Motion for a Moderated Consultation Simple Majority (50%+1)Motion for a Unmoderated Consultation Simple Majority (50%+1)Motion to Suspend the Meeting Simple Majority (50%+1)Motion to Close Debate Two-thirds MajorityPointsPoint of Order When a delegate feels that the Director or another delegate has made an error in the rules of procedures,he/she can raise a Point of Order to correct the mistake.This can be done even in the middle of a speech, but theright should be exercised with caution.NovotePoint of Inquiry When a delegate has questions about the rules of procedures, he/she can raise a Point of Parliamentary Inquiry to the Director.NovotePoint of Personal Privilege When a delegate feels any personal discomfort that will hinder his/her participation of the meeting,he/she can raise a Point of Personal Privilegeto obtain the assistance of the Dais. This can be doneeven in the middle of a speech, but the right should be exercised whit caution.Novote3. Rules Governing ResolutionsDraft ResolutionsOne member could sponsor only one draft resolution and the co-sponsors of the draft resolutions need to sign on to it which indicates their support. One member may sign more than one draft resolution. Signing a draft resolution does not explicitly indicate the support for the draft resolution but only indicate a desire for the draft resolution to be discussed in committee. As such, the signatory has no obligations towards the draft resolution.Consideration of Draft ResolutionsA draft resolution may be proposed only when it has been signed by a quarter of the members present at the session. A representative may motion to introduce a draft resolution as long as it has been approved by the Chairperson and then distributed to all members. At the Chairperson’s discretion, he/she shall recognize the main sponsors to introduce the draft resolution and permit a clarification session with a time limit. Any substantive points will be ruled out of order during this period. More than one draft resolution may be on the floor at any one time, but at most one draft resolution may be passed. Debate on draft resolutions proceeds according to the general Speakers’ List and representatives may then refer to the draft resolutions by its designated number.A draft resolution requires two thirds majority of members to adopt it. The draft resolution adopted by each committee will be debated and put to vote at the Plenary. The draft resolution supported by more than two-thirds member states will be adopted as the final decision. If the draft resolutions are not adopted, a Chairperson’s statement will be issued.Consideration of AmendmentsRepresentatives may amend any draft resolution on the floor. The amendment must be substantively different from the resolution it seeks to amend. Only one amendment may be introduced at any given time.4. Rules Governing VotingProcedural VotingAll voting is considered procedural with the exception of voting on draft resolutions and their amendments. Representatives must vote on all procedural motions, and no abstentions are allowed. All procedural matters shall be voted upon using name plates. A motion that requires a simple majority needs more than half of the Committee members present and voting.A motion that requires two-thirds to pass requires exactly two-thirds of the Committee memberspresent and voting. After closure of debate, the Committee shall move into voting procedure. At that point, only the following points and motions shall be allowed: Motion for a Roll Call Vote, Motion for Reordering the Draft Resolution, and Point of Order. If there are no such motions, the Committee shall vote on all draft resolutions.Substantive VotingThe only substantive voting shall be voted on draft resolutions and amendments. All other votes shall be procedural voting. For substantive voting, each member shall have one vote and, it requires two-thirds majority for the Committee to adopt a resolution or an amendment. The Council shall normally vote by show of name plates, except that any member state requests a roll-call, which shall be taken in the English alphabetical order of the names of the member states of the Council. The name of each member state shall be called in all roll-calls, and its representative shall replay “yes”, “no” or “abstention”. Decisions on substantive matters of the Council or Committees shall be made by two-thirds of the members present and voting. Members who abstain from voting are considered as not voting. The Chairperson shall then announce the outcome of the vote. Brief statements by member states consisting solely of explanations of their votes may be permitted by the Chairperson before the voting has commenced or after the voting has been completed.Order of Voting On Draft ResolutionIf there is more than one draft resolution, they shall, unless the Committee decides otherwise, be voted on in the order in which they were submitted. The Committee may, after each vote on a draft resolution, decide whether to vote on the next draft resolution.Reordering Draft ResolutionsA Motion to Reorder Draft Resolutions shall only be in order immediately after entering voting procedure, and before voting has started on any draft resolutions. If the motion receives the simple majority required to pass, the Chairperson shall take all motions to reorder draft resolutions and then vote on them in the order in which they came. Voting shall continue until either a motion passes, receiving a simple majority, or all of the motions fail, in which case the Committee shall move into voting procedure, voting on the draft resolutions in their original order. Only one motion to reorder draft resolutions is in order in each round of voting procedures.Order of Voting On AmendmentsBefore an amendment is included into a draft resolution, the amendment shall be voted on first. When two or more amendments are proposed to a draft resolution, the amendment furthest removed in substance from the original draft resolution shall be voted on first and then the amendment next furthest removed there, and so on。
conference手册说明
conference⼿册说明1 简介Confluence为团队提供⼀个协作空间。
在这⾥,团队成员齐⼼协⼒,协同地编写同⼀个⽂档和管理项⽬。
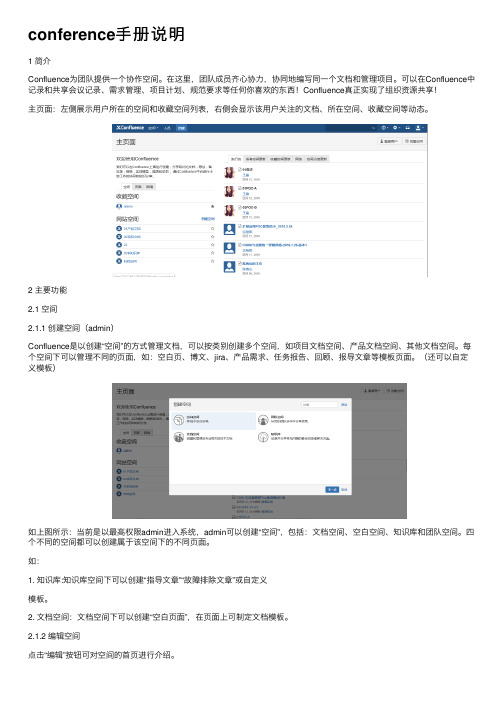
可以在Confluence中记录和共享会议记录、需求管理、项⽬计划、规范要求等任何你喜欢的东西!Confluence真正实现了组织资源共享!主页⾯:左侧展⽰⽤户所在的空间和收藏空间列表,右侧会显⽰该⽤户关注的⽂档、所在空间、收藏空间等动态。
2 主要功能2.1 空间2.1.1 创建空间(admin)Confluence是以创建“空间”的⽅式管理⽂档,可以按类别创建多个空间,如项⽬⽂档空间、产品⽂档空间、其他⽂档空间。
每个空间下可以管理不同的页⾯,如:空⽩页、博⽂、jira、产品需求、任务报告、回顾、报导⽂章等模板页⾯。
(还可以⾃定义模板)如上图所⽰:当前是以最⾼权限admin进⼊系统,admin可以创建“空间”,包括:⽂档空间、空⽩空间、知识库和团队空间。
四个不同的空间都可以创建属于该空间下的不同页⾯。
如:1. 知识库:知识库空间下可以创建“指导⽂章”“故障排除⽂章”或⾃定义模板。
2. ⽂档空间:⽂档空间下可以创建“空⽩页⾯”,在页⾯上可制定⽂档模板。
2.1.2 编辑空间点击“编辑”按钮可对空间的⾸页进⾏介绍。
⽂档⾥嵌⼊了OFFICE部分控件,可直使⽤上⾯的功能,还可以插⼊⽂件、图⽚、链接等更多内容。
2.1.3 关注点击“关注”按钮,在弹出的页⾯可管理关注该页⾯的⼈员,如果该页⾯发⽣变化,各个⼈员登陆后可看见发⽣变化的信息。
2.1.4 更多功能点击右侧更多功能可列出更多的功能为⽤户使⽤。
2.2 ⼦空间(admin以下⽤户)点击“创建”按钮,可为空间创建⼦空间,选择已有的分类模板或⾃定义模板。
⼦空间所具有的功能继承了空间的功能。
⼦空间下可继续创建⼦空间,并为⼦空间选择已有的分类模板或⾃定义模板2.3 个⼈空间(个⼈⽤户)每个⽤户都可创建⾃⼰的个⼈空间,个⼈空间拥有空间是全部功能,个⼈⽤户可在⾃⼰的个⼈空间上创建博⽂、空⽩页、JIRA 报告、任务报告、指导⽂章、产品需求、回顾或⾃定义模板,在创建的各类⽂件上写作。
第十八届全国胶体与界面化学学术会议会议手册说明书
会议接待手册 英语范文
会议接待手册英语范文Welcome to our conference reception handbook. In this handbook, we will provide you with all the necessary information and guidelines for hosting a successful conference reception.Firstly, let's talk about the importance of conference receptions. Conference receptions are an essential part of any successful event. They provide a great opportunity for networking, socializing, and building relationships. It's a chance for attendees to relax, unwind, and discuss theday's events in a more informal setting.Now, let's discuss the key elements of a successful conference reception. The first and most crucial element is planning. It's essential to plan every aspect of the reception, from the venue selection to the catering, entertainment, and seating arrangements. Attention todetail is key to ensuring a successful event.Another important aspect is the reception staff. It's essential to have a team of professional and well-trained staff to welcome and assist the attendees. They should befriendly, approachable, and knowledgeable about the event and its schedule.The next key element is the catering. Providingdelicious food and drinks is crucial for a successful reception. It's important to consider the dietary requirements and preferences of the attendees and to ensure that there is a good variety of options available.Entertainment is also an essential element of a successful conference reception. Whether it's live music, a DJ, or some other form of entertainment, it's important to provide something that will enhance the atmosphere and keep the attendees engaged and entertained.Now, let's talk about some essential dos and don'ts for hosting a conference reception. Firstly, do ensure that the reception area is well-decorated and welcoming. It's important to create a pleasant and inviting atmosphere for the attendees. On the other hand, don't overlook the importance of a good sound system and lighting. It's essential to have the right equipment to ensure that the entertainment and speeches are heard and enjoyed by all.In terms of the catering, do provide a good variety of food and drink options to cater to all dietary requirements and preferences. On the other hand, don't forget toconsider the logistics of serving and replenishing the food and drinks throughout the reception. It's important to ensure that there are enough staff and resources to keep everything running smoothly.In terms of the reception staff, do ensure that they are well-prepared and briefed on their roles and responsibilities. It's important for them to be knowledgeable about the event and to be able to assist the attendees with any questions or requests. On the other hand, don't overlook the importance of having a backup plan in case of any unforeseen issues or emergencies. It'sessential to be prepared for any eventuality.Lastly, let's discuss some tips for ensuring that the conference reception runs smoothly. Firstly, it's important to communicate with the attendees and keep them informed about the schedule and any changes or updates. It's also essential to be flexible and adaptable and to be able to handle any unexpected issues that may arise.In conclusion, hosting a successful conference reception requires careful planning, attention to detail, and a dedicated team of staff. By following the guidelines and tips provided in this handbook, you can ensure that your conference reception is a memorable and enjoyable event for all the attendees.欢迎阅读我们的会议接待手册。
conference手册说明
1 简介Confluence为团队提供一个协作空间。
在这里,团队成员齐心协力,协同地编写同一个文档与管理项目。
可以在Confluence中记录与共享会议记录、需求管理、项目计划、规范要求等任何您喜欢的东西!Confluence真正实现了组织资源共享!主页面:左侧展示用户所在的空间与收藏空间列表,右侧会显示该用户关注的文档、所在空间、收藏空间等动态。
2 主要功能2.1 空间2.1.1 创建空间(admin)Confluence就是以创建“空间”的方式管理文档,可以按类别创建多个空间,如项目文档空间、产品文档空间、其她文档空间。
每个空间下可以管理不同的页面,如:空白页、博文、jira、产品需求、任务报告、回顾、报导文章等模板页面。
(还可以自定义模板)如上图所示:当前就是以最高权限admin进入系统,admin可以创建“空间”,包括:文档空间、空白空间、知识库与团队空间。
四个不同的空间都可以创建属于该空间下的不同页面。
如:1. 知识库:知识库空间下可以创建“指导文章”“故障排除文章”或自定义模板。
2. 文档空间:文档空间下可以创建“空白页面”,在页面上可制定文档模板。
2.1.2 编辑空间点击“编辑”按钮可对空间的首页进行介绍。
文档里嵌入了OFFICE部分控件,可直使用上面的功能,还可以插入文件、图片、链接等更多内容。
2.1.3 关注点击“关注”按钮,在弹出的页面可管理关注该页面的人员,如果该页面发生变化,各个人员登陆后可瞧见发生变化的信息。
2.1.4 更多功能点击右侧更多功能可列出更多的功能为用户使用。
2.2 子空间(admin以下用户)点击“创建”按钮,可为空间创建子空间,选择已有的分类模板或自定义模板。
子空间所具有的功能继承了空间的功能。
子空间下可继续创建子空间,并为子空间选择已有的分类模板或自定义模板2.3 个人空间(个人用户)每个用户都可创建自己的个人空间,个人空间拥有空间就是全部功能,个人用户可在自己的个人空间上创建博文、空白页、JIRA报告、任务报告、指导文章、产品需求、回顾或自定义模板,在创建的各类文件上写作。
V2_Conference操作手册
V2视频会议初级操作手册北京威速科技技术支持中心目录1 登陆方式 (2)2 会议界面 (3)2.1 显示视频 (3)2.2 申请发言 (4)2.3 更换桌面布局 (4)2.4 文字交流区 (5)2.5 申请控制权 (6)3 数据协作 (6)3.1 创建新白板 (7)3.2 创建新WEB共享 (8)3.3 创建新文档共享 (9)3.3.1 AutoCAD文档的共享方法 ..............................................错误!未定义书签。
3.4 共享我的程序 (9)3.4.1 一对多程序共享 (10)3.4.2 一对一程序共享 (10)3.5 屏幕截图 (10)4 文件传输 (11)5 投票 (11)6 会议议程 (12)7 主席权限 (12)7.1 同步视频 (13)7.2 同步桌面布局 (13)7.3 会议分组 (14)7.4 综合录制权限 (14)7.5 主席置换/申请 (14)7.6 电子举手 (15)1登陆方式1、打开IE(浏览器),在地址栏里输入IP地址,例如“http://61.138.179.189:18080”,进入V2 Conference系统主界面。
2、若无法登陆请尝试http:// 61.138.179.189:443或“http:// 61.138.179.189:80”。
3、点击会议室名称,例如“北京测试”会议。
4、输入“昵称”、“密码”,点击“进入会议”。
5、初次登陆,系统将自动提示“智能升级客户端”。
2会议界面界面:简洁大方、友好直观,普通用户无需特殊培训即可快速掌握、熟练使用。
主要包括“用户列表区”、“数据操作区”、“视频区”和“文字交流区”。
左侧“参会者”列表:体现参会用户的不同状态。
如“申请发言”名字后出现“喇叭”,“申请操作”名字后出现“小笔”,安装摄像头的用户出现“摄像头图标”。
2.1 显示视频进入会议界面,系统默认不显示视频。
会务手册英语
会务手册英语Conference ManualTable of Contents1. Introduction2. Conference Theme and Objectives3. Schedule of Events4. Conference Venue5. Accommodation6. Registration Process7. Keynote Speakers8. Presentation Guidelines9. Exhibition Area10. Networking Opportunities11. Meals and Refreshments12. Conference Materials13. Social Events14. Transportation15. Emergency Information16. Contact Information1. IntroductionWelcome to the Conference Manual! This handbook is designed to provide all necessary information about the upcoming conference. It contains details about the conference theme, schedule, venue, registration process, and other vital aspects of the event.2. Conference Theme and ObjectivesThis section explains the main theme and objectives of the conference. It highlights the key topics that will be covered and the goals to be achieved during the event.3. Schedule of EventsThe schedule of events provides a detailed overview of the conference program. It includes the date, time, and location of each session, presentation, and panel discussion. Participants can refer to this section to plan their attendance accordingly.4. Conference VenueThis section provides information about the conference venue, including the address, directions, and facilities available. It also mentions any additional services provided by the venue, such as Wi-Fi access or parking facilities.5. AccommodationParticipants can find details about recommended hotels and accommodations in this section. It includes information about nearby hotels, their facilities, and contact information for making reservations.6. Registration ProcessThis section outlines the registration process for the conference. It includes details about the registration fees, deadlines, and required documents. Participants can find instructions on how to register online or through other designated channels.7. Keynote SpeakersHere, participants can find information about the distinguishedkeynote speakers who will be addressing the conference. It includes their biographies, areas of expertise, and the topics they will be discussing.8. Presentation GuidelinesThis section provides guidelines and requirements for participants who will be delivering presentations or posters during the conference. It explains the time limits, presentation formats, audio-visual equipment available, and other relevant information.9. Exhibition AreaInformation about the exhibition area, including booth assignments, exhibition layout, and guidelines for exhibitors, can be found in this section.10. Networking OpportunitiesThis section highlights the various networking opportunities available during the conference, such as coffee breaks, luncheons, and networking sessions. It emphasizes the importance of networking and encourages participants to make the most of these opportunities.11. Meals and RefreshmentsDetails about meals and refreshments provided during the conference, such as breakfast, lunch, and coffee breaks, are mentioned here. Any dietary restrictions or special requests can be communicated prior to the event.12. Conference MaterialsParticipants can find information regarding conference materials,such as handouts, program booklets, and name tags, in this section. Instructions for collecting these materials will also be provided. 13. Social EventsThis section outlines any planned social events, such as a welcome reception or gala dinner, during the conference. It includes details about the venue, date, time, and dress code.14. TransportationParticipants can find information about transportation options, such as shuttles or public transport, to and from the conference venue. It also includes details about parking facilities and any special arrangements.15. Emergency InformationThis section provides emergency contact numbers and information about emergency procedures. Participants are encouraged to familiarize themselves with this information to ensure their safety during the event.16. Contact InformationIf participants have any queries or require additional information, they can refer to the contact information provided in this section. Conference organizers can be contacted via email or phone for any assistance needed.With this comprehensive conference manual, participants should have all the necessary information to make the most of their conference experience. We hope you have a memorable and rewarding event!。
iecon2020会议手册
iecon2020会议手册IECON 2020 Conference GuideIntroduction:Welcome to the IECON 2020 Conference Guide! This comprehensive handbook aims to provide all the necessary information for participants attending the upcoming IECON 2020 conference. In this guide, you will find details about the conference program, keynote speakers, workshops, social events, and important logistical information. Let's explore the exciting opportunities awaiting you at IECON 2020!Conference Overview:IECON 2020 is an internationally renowned conference dedicated to the latest advancements in industrial electronics, control, and automation. With a broad scope covering various fields, including power electronics, robotics, renewable energy systems, and more, the conference brings together researchers, practitioners, and industry experts to share their knowledge and collaborate.Conference Program:The conference program spans over several days and includes a diverse range of activities. It encompasses plenary sessions, keynote addresses, technical paper presentations, workshops, tutorials, panel discussions, and poster sessions. The program is designed to accommodate the diverse interests and needs of conference participants, allowing for ample networking opportunities and exchange of ideas.Keynote Speakers:IECON 2020 features a lineup of renowned keynote speakers who are experts in their respective fields. These speakers will deliver insightful talks, sharing their expertise and highlighting the latest trends and breakthroughs in industrial electronics and automation. Their presentations will provide valuable insights and inspire new perspectives among the conference attendees.Technical Paper Presentations:One of the highlights of IECON 2020 is the technical paper presentations. Researchers from around the globe submit their original work, which undergoes a rigorous peer-review process. Accepted papers will be presented in dedicated sessions, where authors will showcase their findings and engage in discussions. This platform encourages knowledge sharing, collaboration, and the exploration of emerging research areas.Workshops and Tutorials:IECON 2020 offers workshops and tutorials led by prominent experts in specific fields related to industrial electronics and automation. These sessions aim to provide in-depth knowledge and practical guidance on various topics, ranging from control systems to intelligent manufacturing. Attending these workshops and tutorials will enrich participants' understanding of cutting-edge technologies and their applications.Social Events and Networking:IECON 2020 acknowledges the importance of social interactions and networking opportunities for conference attendees. Throughout theconference, participants will have the chance to engage in various social events, including gala dinners, networking luncheons, and receptions. These events provide a relaxed and informal environment for participants to connect, exchange ideas, and build professional relationships.Logistical Information:To ensure a smooth and enjoyable experience, the conference guide provides essential logistical information. It includes details about the conference venue, accommodation options, transportation, and city attractions. Additionally, participants will find information about registration procedures, visa requirements (if applicable), and other practicalities thatwill facilitate their attendance at IECON 2020.Conclusion:In conclusion, the IECON 2020 Conference Guide serves as a comprehensive resource for conference participants, offering valuable information about the program, keynote speakers, technical paper presentations, workshops, tutorials, social events, and logistical details. It is designed to enhance attendees' experience and ensure their active participation in this premier industrial electronics and automation conference. We look forward to welcoming you to IECON 2020 and witnessing the exchange of knowledge, collaboration, and innovation that lies ahead.。
conference手册说明
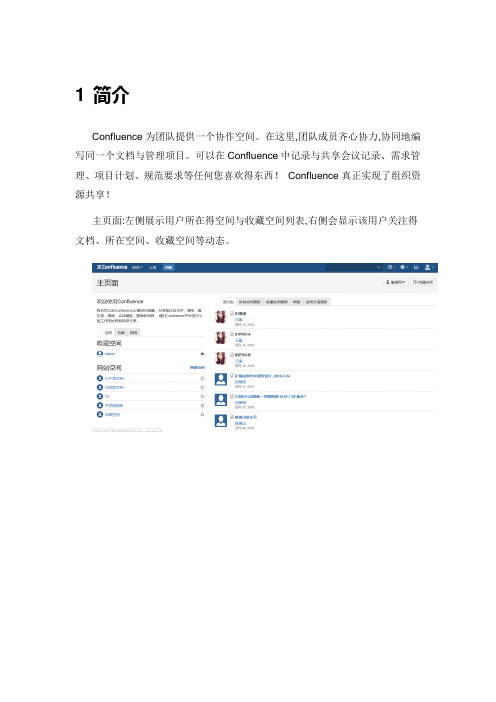
1 简介Confluence为团队提供一个协作空间。
在这里,团队成员齐心协力,协同地编写同一个文档与管理项目。
可以在Confluence中记录与共享会议记录、需求管理、项目计划、规范要求等任何您喜欢得东西!Confluence真正实现了组织资源共享!主页面:左侧展示用户所在得空间与收藏空间列表,右侧会显示该用户关注得文档、所在空间、收藏空间等动态。
2 主要功能2.1 空间2.1.1 创建空间(admin)Confluence就是以创建“空间”得方式管理文档,可以按类别创建多个空间,如项目文档空间、产品文档空间、其她文档空间。
每个空间下可以管理不同得页面,如:空白页、博文、jira、产品需求、任务报告、回顾、报导文章等模板页面。
(还可以自定义模板)如上图所示:当前就是以最高权限admin进入系统,admin可以创建“空间”,包括:文档空间、空白空间、知识库与团队空间。
四个不同得空间都可以创建属于该空间下得不同页面。
如:1. 知识库:知识库空间下可以创建“指导文章”“故障排除文章”或自定义模板。
2. 文档空间:文档空间下可以创建“空白页面”,在页面上可制定文档模板。
2.1.2 编辑空间点击“编辑”按钮可对空间得首页进行介绍。
文档里嵌入了OFFICE部分控件,可直使用上面得功能,还可以插入文件、图片、链接等更多内容。
2.1.3 关注点击“关注”按钮,在弹出得页面可管理关注该页面得人员,如果该页面发生变化,各个人员登陆后可瞧见发生变化得信息。
2.1.4 更多功能点击右侧更多功能可列出更多得功能为用户使用。
2.2 子空间(admin以下用户)点击“创建”按钮,可为空间创建子空间,选择已有得分类模板或自定义模板。
子空间所具有得功能继承了空间得功能。
子空间下可继续创建子空间,并为子空间选择已有得分类模板或自定义模板2.3 个人空间(个人用户)每个用户都可创建自己得个人空间,个人空间拥有空间就是全部功能,个人用户可在自己得个人空间上创建博文、空白页、JIRA报告、任务报告、指导文章、产品需求、回顾或自定义模板,在创建得各类文件上写作。
2021国际能源化学与工程大会手册
2021国际能源化学与工程大会手册1.这次大会的主题是“能源化学与工程的未来发展方向”。
The theme of this conference is "Future Development of Energy Chemistry and Engineering".2.大会将邀请国内外知名专家学者进行主题报告。
The conference will invite well-known experts and scholars at home and abroad to give keynote speeches.3.会议期间将举办多个分论坛,涵盖能源材料、能源转化、能源存储等研究领域。
During the conference, multiple sub-forums will be held, covering research areas such as energy materials, energy conversion, and energy storage.4.与会者可以在会场内外交流学术观点,扩大学术交流。
Participants can exchange academic views inside and outside the venue to promote academic communication.5.大会将举办展览,展示最新的能源化学与工程领域的科研成果。
The conference will host an exhibition to showcase the latest research achievements in the field of energy chemistry and engineering.6.会议期间安排了专门的座谈会,让参会人员就行业热点问题展开深入讨论。
Special forums are arranged during the conference toallow participants to have in-depth discussions on industryhot topics.7.本次大会旨在促进能源领域的学术交流与合作,促进科技创新与成果转化。
BenQ DVY32 Video Conference Camera 用户手册说明书

DVY32Video Conference CameraUser ManualDisclaimerBenQ Corporation makes no representations or warranties, either expressed orimplied, with respect to the contents of this document. BenQ Corporation reserves the right to revise this publication and to make changes from time to time in the contentsthereof without obligation to notify any person of such revision or changes. CopyrightCopyright 2021 BenQ Corporation. All rights reserved. No part of this publication may be reproduced, transmitted, transcribed, stored in a retrieval system or translated into any language or computer language, in any form or by any means, electronic, mechanical, magnetic, optical, chemical, manual or otherwise, without the prior written permission of BenQ Corporation.T able of ContentsImportant notices (4)Application instructions (4)Electric safety (4)Transport caution (4)Careful installation (4)Magnetic Interference (4)Do not disassemble discretionarily (4)Package contents (5)Features (6)Installation instructions (7)Product interface (7)Camera operation (8)Interface instruction (8)Using the privacy cover (9)Application instructions (10)Remote control (10)Menu settings (11)Appendix A: The Optional Wall Mount (19)Installing the wall mount (20)Appendix B: The Optional Display Mount (22)Installing the display mount on a display (23)Installing the display mount on a display with a VESA mount (25)Product information (27)Specifications (27)Dimensions (29)Maintenance and troubleshooting (30)Maintenance (30)Troubleshooting (30)12/9/21Important notices4Important noticesThis manual briefly introduces the camera functions, installation, and operations. Please read carefully before application.Application instructionsT o prevent damages to this camera or any products connected to it, this product canonly be used within the specified range:1.Do not expose the camera to rain or moisture.2.This product contains no parts which can be maintained by users themselves. Anydamage caused by dismantling the product by user without permission is notcovered by warranty.3.T o prevent an electric shock, do not disassemble the camera; only qualifiedtechnicians can perform installation and maintenance.4.Do not use under conditions that exceed the limited temperature, humidity orpower supply specifications.5.When cleaning the camera lens, please wipe it with a dry soft cloth. When theproduct is heavily soiled, please wipe it gently with a neutral detergent. Do not usestrong or corrosive cleaning agents to avoid scratching the lens and affecting theimage quality.Electric safetyThis product must be installed in strict compliance with local electrical safety standards.T ransport cautionAvoid heavy pressure, severe vibration, soaking damage to the product in transportation, storage, and installation.Careful installation1.The camera body is made of organic material, please do keep away from corrosiveliquid, gas, or solid material.2.Do not rotate the camera head violently, otherwise it may cause mechanical failure;3.This product should be placed on a stable desktop or other horizontal surface. Donot install the product obliquely, otherwise it may display inclined image.4.Ensure there are no obstacles within rotation range of the holder.5.Do not power on before completing installation.Magnetic InterferenceElectromagnetic fields at specific frequencies may affect the video image. This product is Class A. It may cause radio interference in household application. Appropriate measure is required.Do not disassemble discretionarilyWe are not responsible for any damage caused by unauthorized disassembling.Package contents5 Package contentsOpen the sales package and check the contents. If any item is missing or damaged, please contact your dealer immediately.CameraUSB cablePrivacy CoverQuick start guide• Before discarding the package, check that you haven't left any accessories inside the box.• Dispose of packaging materials wisely. Y ou can recycle the cardboard carton. Consider storingthe package (if possible) for future transport of the display.• Do not leave plastic bags within reach of young children or babies.Features6FeaturesThis product is a new 4K ePTZ video conference camera. It is built with AI functions,which can automatically frame all people in the meeting and center them in the scene. It also has ideal functions and superior performance, adopting advanced ISP processingalgorithms so as to provide vivid images with evenly clear brightness, strong colorlayering, high resolution, and fantastic color rendition. The camera is easy and convenient to install and maintain, as well as being stable and reliable.• Ultra HD 4K Resolution: It employs a 1/2.8 inch high-quality CMOS sensor; supports4K; provides 4K@ 30fps (MJPG or H.264) video resolution at most; and provides clear video and vivid expressions and movements. At the same time, it is compatible with1080p and 720p resolution.• EPTZ: EPTZ and 5X digital Zoom• Auto framing: With an excellent facial detection algorithm, automatically adjust thezoom level according to the number of people in the meeting as well as centering them within the frame thereby allowing all the people in the meeting to be shown in thescreen.• Optimized imaging: Clear images even in dim lighting.• Built-in omnidirectional microphone: Includes 2 built-in omnidirectional microphones,(all-round omnidirectional microphones). Features a noise suppression algorithm thatensures your voice will be perfect. The effective omnidirectional microphone range isup to 8 meters.• Multiple video encoding formats: Support H.264, H.265, MJPEG, YUV video encodingwhich enables the video to play more fluidly.• Easy to use: No need to download drivers; just plug and play via USB 3.0.• Multiple installations: Standard equipped with mold clamp. Easy to install on any devices.• Dual stream output: The USB 3.0 port support main stream and sub-stream output atthe same time.• Wide variety of applications: Can be used for personal video conferencing, enterprisevideo conferencing, unified collaboration and more.Installation instructions 7Installation instructionsProduct interfaceNo.Name Omni-Directional microphones for audio input LED for indicating when the camera is activated Lens (fixed focus)IR sensor for remote control Screw hole for tripod Mounting and locating hole Flexible clip/base USB 3.0 output interface12345678Installation instructions 8Camera operation1.Fix the product on top of the display, place it directly on a desktop, or install it on a tripod or mount.2.The tilt angle of the camera mount should be less than 85 degrees.3.Connect the camera via the USB cable to the display, video conference terminal, or other USB input device, log in the video conference software, and select a video device to have image output.Interface instructionThe interface illustration is as shown below.If you want to adjust the camera parameters in a third-party software, go to SETUP > Image Style and select Custom mode to enable image adjustments in the third-party software. Refer to Setup on page 13 for more information.85°Installation instructions 9Using the privacy cover1.Flip up the cap of the privacy cover.2.Lean the privacy cover slightly forward on the front of the camera and make sure that the cap is lined up with the camera lens.3.Push the privacy cover onto the top side of the camera to make sure that the indent on the cover fits properly on the camera.4.To use, flip the cap down to cover the lens.Once the privacy cover is installed on the camera, do not attempt to shift it to the right or left.This may scratch the surface of the camera. T o move the cover’s position, remove it from thecamera and re-install it in the correct position.Application instructions10Application instructionsRemote controlRemote Control Indicator LEDLights up anytime a button is pressed.Disable Camera KeyDisables/Enables video from the camera.Arrow Keys• Allows you to navigate and select items in the OSD settings menu.• Pans and/or tilts the view of the camera when zoomed in on a scene.Preset Camera View Keys 1 / 2 / 3• Press a key to have the camera switch to the view that has been preset for the respective key.• Press and hold any of the keys for 2 seconds to set that the current camera view as the preset view for that key.Zoom In/Out KeyPress to zoom in or out on a specific scene Mute KeyMutes/Unmutes the microphone on the camera.Menu KeyOpens or closes the camera’s OSD settings menu.OK KeyConfirms any selection made in the camera’s OSD settings menu.12345678Application instructions11 Menu settingsMain MenuPress the menu key on the remote control to display the camera’s OSD settings menu, and then use the arrow and OK keys to navigate and select submenus or items.The sections below will detail the available settings in each submenu.Application instructions12PresetDescriptionsSet Sets the current zoom in/out position as preset setup. Select a value from 1 -10.Call Recalls the preset position. Select a value from 1 -10.Application instructions13 SetupDescriptionsAuto Framing • Enables the facial detection algorithm automatically adjust the zoom level according to the number of people in the meeting as well as centering them within the frame.The options include: ON / OFF• When set to ON you can also set the level of sensitivityof the algorithm.Image Style Changes the look of the image to preset styles.The options include: BenQ Color (Default) / Low Light Source / Zoom Optimized / Custom.OSD Flip-H Flips the OSD menu if the image is not presented in a mirrored orientation.The options include: ON / OFFDual Stream Enables/Disables a second image stream for a second application.The options include: ON / OFFUSB Mode Sets the mode for the camera’s USB interface. The options include: ISOC / BULKApplication instructions14Exposure:DescriptionsMode Configures the exposure to preset modes based on the settings listed below.The options include: Auto / Manual / SAE / Bright.EV Enables/Disables the exposure value for the image (only available in Auto mode).The options include: ON / OFFBLC Activates a backlight for the image (only available in Auto mode).The options include: ON / OFFFlicker Selects the amount of flicker for the image (only available in Auto, SAE, or Bright mode).The options include: ON / OFF / 50Hz / 60HzGain Limit Adjusts the gain limit for the image (only available in Auto or Bright mode).Select a value from 1 to 15 (by intervals of 1)DRC (Dynamic Range Correction)Adjusts the amount of correction for the ratio between the darkest and brightest parts of an image (only available in Auto mode).The options include: Close or a value from 1 - 8 (by intervals of 1).Shutter Adjusts the shutter speed for the camera (only available in Manual or SAE mode).Select a value from 1/30 to 1/10000Gain Adjusts the gain value for the camera (only available in Manual or SAE mode).Select a value from 1 to 15 (by intervals of 1).Application instructions15 Color:DescriptionsWB Mode Configures the white balance setting to preset modes based on the settings listed below.The options include: Auto / Manual / One Push / VARRG T uning Adjusts the amount of red in the image (only available in Auto or Manual mode).Select a value from -10 to 10 (by intervals of 1).BG T uning Adjusts the amount of blue in the image (only available in Auto or Manual mode).Select a value from -10 to 10 (by intervals of 1).Saturation Adjusts the amount of color saturation in the image. Select a value from 0 to 50 (by intervals of 1).Hue Adjusts the hue level in the image.Select a value from 0 to 8 (by intervals of 1).AWB Sensitivity Selects the level of sensitivity for the auto white balance feature (only available in Auto mode).The options include: High / Middle / LowColor T emp Adjusts the color temperature value for the image (only available in VAR mode).Select a value from 2400K to 7100K (by intervals of 100).Application instructions 16Image:Descriptions Brightness Adjusts the brightness level for the image.Select a value from 0 - 100 (by intervals of 1).Contrast Adjusts the contrast level (the difference between dark and light colors) for the image.Select a value from 0 - 100 (by intervals of 1).Sharpness Adjusts the sharpness level (the distinctness between different tones or colors) for the image.Select a value from 0 - 15 (by intervals of 1).Flip-HFlips the image horizontally.The options include: ON / OFF Flip-VFlips the image vertically.The options include: ON / OFF B&W ModeT oggles the image between color or black and white.The options include: Color / Black/White GammaAdjusts the tone luminance.The options include: Default / 0.34 / 0.39 / 0.47 / 0.50Low-Light Mode Enables/Disables low-light mode.The options include: Close / OpenApplication instructions 17Noise Reduction:DescriptionsNR-2DDisables or adjusts the level of 2D noise reduction.The options include: OFF or a value from 1 to 7 (by intervals of 1).NR-3D Disables or adjusts the level of 3D noise reduction.The options include: OFF or a value from 1 to 8 (by intervals of 1).Application instructions18VersionThis menu displays the version number for the camera.Restore DefaultSelect YES for this option and press OK to restore the camera’s settings to their default values.Appendix A: The Optional Wall Mount19 Appendix A: The Optional Wall MountIf you purchase an optional wall mount, first open the package and check the contents. If any item is missing or damaged, please contact your dealer immediately.Mount1/4-20 screw (for Camera)Bracket stopperM6 screw anchor x 4Nut and washer x 4• Before discarding the package, check that you haven't left any accessories inside the box.• Dispose of packaging materials wisely. Y ou can recycle the cardboard carton. Consider storingthe package (if possible) for future transport of the display.• Do not leave plastic bags within reach of young children or babies.20Appendix A: The Optional Wall MountInstalling the wall mountT o install the wall mount:1.Choose the location on the wall for the mount and then mark the four screw anchorinstallation points on the wall.The screw holes on the mount for the measure 100mm x 50mm.2.Install the four screw anchors into the wall at the marked points.3.Install the mount onto the screw anchors.4.Install the bracket stopper onto the top side of the wall mount.Appendix A: The Optional Wall Mount 215.Secure the wall mount onto the wall with the four sets of nuts and washers.6.Install the camera onto the wall mount so that the bracket stopper on the mountfits into the tripod screw hole on the camera, and then secure the camera byscrewing the 1/4-20 screw into the camera’s mounting hole.22Appendix B: The Optional Display MountAppendix B: The Optional Display MountIf you purchase an optional display mount, first open the package and check the contents.If any item is missing or damaged, please contact your dealer immediately.MountBracket stopperRubber washer x 4Cape screw x 2Anti-skid nut x 2Metal washer x 21/4 screw (for camera)• Before discarding the package, check that you haven't left any accessories inside the box.• Dispose of packaging materials wisely. Y ou can recycle the cardboard carton. Consider storingthe package (if possible) for future transport of the display.• Do not leave plastic bags within reach of young children or babies.Appendix B: The Optional Display Mount23 Installing the display mount on a displayT o install the display mount directly on a display:1.Flip open the neck of the mount.2.Rotate the legs of the mount outward.3.Install the bracket stopper onto the mount.4.Align the mount to the location you want it to be on the display and then lower itonto the display.5.If necessary further rotate the legs of the mount so that the openings on the legsalign with the screw holes on the rear of the display.6.Secure the mount to the display by installing, from the outside-in, a washer and acape screw through the openings on both legs of the mount and into the screwholes on the display.Appendix B: The Optional Display Mount247.Install the camera onto the wall mount so that the bracket stopper on the mountfits into the tripod screw hole on the camera, and then secure the camera byscrewing the 1/4-20 screw into the camera’s mounting hole.Appendix B: The Optional Display Mount25 Installing the display mount on a display with a VESA mountT o install the display mount a display with a VESA mount:1.Flip open the neck of the mount.2.Rotate the legs of the mount outward.3.Install the bracket stopper onto the mount.4.Align the mount to the location you want it to be on the display and then lower itonto the display so that the legs are in between the rear of the display and the VESA mount.5.If necessary further rotate the legs of the mount so that the openings on the legsalign with the openings on brackets of the VESA mount.6.Align, from the inside-out, a washer and anti-skid nut through the openings on bothlegs of the mount and the openings on the bracket of the VESA mount, and then secure the mount to the VESA mount by installing a cape screw to each of the anti-skid nuts.Appendix B: The Optional Display Mount267.Install the camera onto the wall mount so that the bracket stopper on the mountfits into the tripod screw hole on the camera, and then secure the camera byscrewing the 1/4-20 screw into the camera’s mounting hole.Product information27 Product informationSpecificationsCamera Sensor4K UHDEffective Pixels8.28MP,16:9Field of View120°(D) / 110°(H)/ 72°(V) ResolutionMain Stream: 4K@30fps, 1080p@30fps,720p@30 fpsSub Stream:720P@fps, 480P@30fps Zoom Digital: 5xPan / Tilt DigitalFocus Auto and ManualLens Type GlassLow Light Performance0.1 LuxAuto Framing YesPreset position OSD: 10, Remote Control: 3 Backlight contrast On/OffExposure Auto/ManualVideo adjustmentsBrightness, Definition, Saturation,Contrast, White Balance, Gain, Anti-Flicker, Low Brightness Compensation,BLCDNR2D and 3D DNRSNR>50dBAudio Microphone Omni-Directional mics Pickup Range Up to 8mEcho Cancellation YesVideo Output USB3.0 Compression Format MJPEG, YUY2, H.264, H.265Power Input Voltage DC5V Input Current1A (max) Power Consumption5W (max)Compatibility Operating SystemsWindows 7, 8.1, or 10, Linux, Chrome TMOS*, macOS TM 10.10 and higher*Contact BenQ service for available ChromebookmodelsUSB Plug and PlayDimensions Dimensions (HxWxD)180.1mm x 47.4mm × 44.0mm Weight0.4 kgProduct information 28PackageContents Included • 4K UHD conference cam • Remote control • USB 3.0 Type-B cable• Privacy coverProduct information29 DimensionsUnit: mmMaintenance and troubleshooting30Maintenance and troubleshootingMaintenance1.Please disconnect the camera if it is not used for a long time.e soft cloth or tissue to clean the camera cover.3.Wipe it with a soft, dry cloth when cleaning the camera lens. Wipe it gently with amild detergent if needed. Do not use strong or corrosive detergents to avoidscratching the lens and affecting the image.T roubleshooting1.No video output- Check whether the USB cable is well connected and the power indicator light isON.- Check whether the machine could do self-check after being restarted.- Restart the display.- Check whether the camera is well recognized by display.2. No image: Check the USB cable quality and whether it is well connected.3.Image dithering when zoom-in or zoom-out- Check whether the camera installation position is solid.- Check whether there is a shaking machine or object around the camera.。
logitech conference connect 快速入门指南说明书
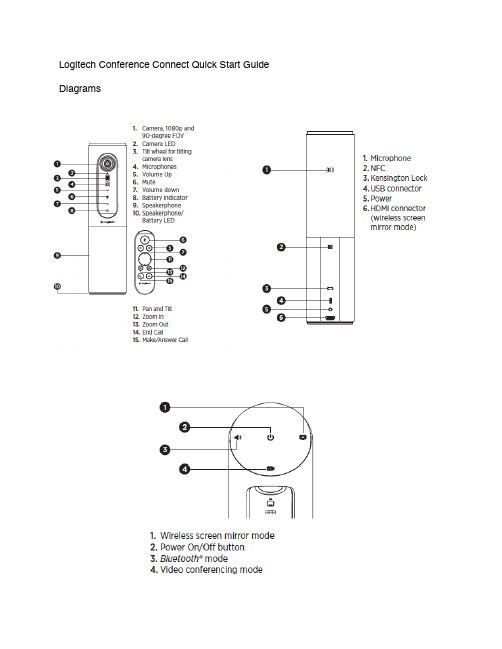
Logitech Conference Connect Quick Start Guide DiagramsNote: If you are the organizer of a video conference call using Skype for Business, Teams or any other video conferencing software, please ensure participants have been sent a meeting link to access the call. Participants should also be asked to test the meeting link prior to the meeting to ensure that their system is working correctly. For details on how to create video meetings links in Skype for Business or MS Teams please see the videos and PFD’s on the ISS Web page.Connecting the Camera to your Computer1.Connect the provided USB cable to the USB connector on the rear of the device,and then insert the USB into your computer2.Connect the provided power cable into the rear of the device and plug the powercable into an outlet (Note the power cable is optional as the device has aninternal battery, however we recommend you keep it plugged in to prevent thebattery dying during a call)3.Power on the device by pressing the Power On/Off button on the top4.Press the Video conferencing mode button to turn on the camera andmicrophone5.Remove the lens cover, the cover also serves as a remote control for the camera6.Once the conference connect camera is connected to your computer andpowered on it will be available to be used by your system in your videoconference call.7.By default your system may choose to use its built-in web camera or microphone,to select the conference connect log into your meeting. To resolve this accessthe settings with in the call and select Device Settings, then select the LogitechConference Camera options. A video of how to resolve this issue is available at: https://www.unb.ca/saintjohn/iss/services-facstaff/video_conference.htmlAt the End of Your Call1.Exit the meeting room2.Power off the conference connect camera3.Disconnect the power cable form the outlet and the device4.Disconnect the USB cable from your computer and the device5.Place the two cables, camera with lens cover remote, and user guide back in thecase and return it to the Hans W. Klohn Commons。
(完整版)会议手册
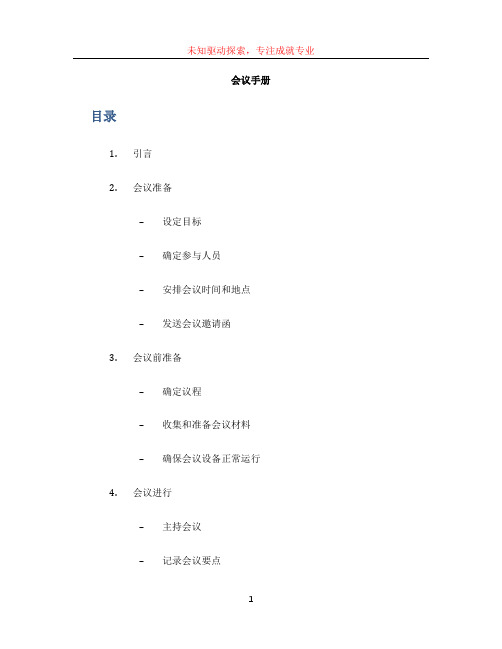
未知驱动探索,专注成就专业会议手册目录1.引言2.会议准备–设定目标–确定参与人员–安排会议时间和地点–发送会议邀请函3.会议前准备–确定议程–收集和准备会议材料–确保会议设备正常运行4.会议进行–主持会议–记录会议要点未知驱动探索,专注成就专业–管理会议时间–促进参与5.会议后处理–撰写会议纪要–分配任务和行动计划–跟进会议进展–收集反馈1. 引言本文档是一份关于如何组织和进行会议的完整版手册,旨在帮助委员会成员、项目团队或其他组织机构的相关人员顺利地进行会议。
会议是组织内外沟通和决策的重要方式之一,如何高效地组织会议对于提高工作效率、推进项目进展至关重要。
该手册将介绍会议前、会议中和会议后的相关准备工作和处理事项,以帮助您更好地规划和管理会议流程。
2. 会议准备在召开会议之前,需要进行一些准备工作,以确保会议的顺利进行。
设定目标明确会议的目标和目的非常重要。
确定会议的目标将有助于确定议程和确定参与人员,确保会议的成果对组织或项目具有实际意义。
确定参与人员根据会议的目标和议程,确定应邀请的参与人员。
确保邀请函清晰地说明与会者的身份和责任,以便他们知道自己是否需要做些准备。
安排会议时间和地点根据参与人员的日程安排,选择一个适合大多数人的时间和地点。
在安排时间时,请尽量避免与其他重要事项冲突,以确保所有关键人员都能参加。
发送会议邀请函准备会议邀请函,并通过电子邮件或其他适当的通信方式发送给参与人员。
邀请函中应包含会议的目标、时间、地点、议程等信息,以便与会者提前做好准备。
3. 会议前准备在会议开始之前,需要进行一些准备工作,以确保会议的顺利进行。
确定议程制定会议议程是确保会议高效进行的关键步骤。
将会议目标和参与人员的需求纳入考虑,确定会议的议程,包括讨论的主题和时间安排。
收集和准备会议材料根据议程,收集并准备相关的会议材料,如报告、数据分析等。
确保这些材料在会前分发给与会者,以便他们有足够的时间来熟悉和准备。
- 1、下载文档前请自行甄别文档内容的完整性,平台不提供额外的编辑、内容补充、找答案等附加服务。
- 2、"仅部分预览"的文档,不可在线预览部分如存在完整性等问题,可反馈申请退款(可完整预览的文档不适用该条件!)。
- 3、如文档侵犯您的权益,请联系客服反馈,我们会尽快为您处理(人工客服工作时间:9:00-18:30)。
1 简介
Confluence为团队提供一个协作空间。
在这里,团队成员齐心协力,协同地编写同一个文档和管理项目。
可以在Confluence中记录和共享会议记录、需求管理、项目计划、规范要求等任何你喜欢的东西!Confluence真正实现了组织资源共享!
主页面:左侧展示用户所在的空间和收藏空间列表,右侧会显示该用户关注的文档、所在空间、收藏空间等动态。
2 主要功能
2.1 空间
2.1.1 创建空间(admin)
Confluence是以创建“空间”的方式管理文档,可以按类别创建多个空间,如项目文档空间、产品文档空间、其他文档空间。
每个空间下可以管理不同的页面,如:空白页、博文、jira、产品需求、任务报告、回顾、报导文章等模板页面。
(还可以自定义模板)
如上图所示:当前是以最高权限admin进入系统,admin可以创建“空间”,包括:文档空间、空白空间、知识库和团队空间。
四个不同的空间都可以创建属于该空间下的不同页面。
如:
1. 知识库:知识库空间下可以创建“指导文章”“故障排除文章”或自定义
模板。
2. 文档空间:文档空间下可以创建“空白页面”,在页面上可制定文档模板。
2.1.2 编辑空间
点击“编辑”按钮可对空间的首页进行介绍。
文档里嵌入了OFFICE部分控件,可直使用上面的功能,还可以插入文件、图片、链接等更多内容。
2.1.3 关注
点击“关注”按钮,在弹出的页面可管理关注该页面的人员,如果该页面发生变化,各个人员登陆后可看见发生变化的信息。
2.1.4 更多功能
点击右侧更多功能可列出更多的功能为用户使用。
2.2 子空间(admin以下用户)
点击“创建”按钮,可为空间创建子空间,选择已有的分类模板或自定义模板。
子空间所具有的功能继承了空间的功能。
子空间下可继续创建子空间,并为子空间选择已有的分类模板或自定义模板
2.3 个人空间(个人用户)
每个用户都可创建自己的个人空间,个人空间拥有空间是全部功能,个人用户可在自己的个人空间上创建博文、空白页、JIRA报告、任务报告、指导文章、产品需求、回顾或自定义模板,在创建的各类文件上写作。
以创建博文为例,为博文命名,系统会按月份进行分类,发布的博文可在左
侧列表中显示。
在博文中,通过@用户的方式来通知某一个用户。
点击“编辑”按钮,即可在已经创建的博文下发布相关信息,可设置权限、设置关注人最后发布博文。
2.4 空间管理
以“文档空间”为例
2.4.1 概览
概览是对空间细节的编辑和空间的删除。
2.4.2 权限
1. 权限配置
通过用户组、用户还有匿名用户对该“空间”页面、博文、评论、附件、权限、邮件的操作配置权限。
2. 受限页面
受限页面显示了被指定的组或用户对页面访问的权限。
2.4.3 内容工具
1. 模板:为空间创建模板,规范文档,使团队成员按照特定模板写作。
蓝图:以模板的形式体现,分为任务报告蓝图、产品需求蓝图、回顾蓝
图等,创建蓝图后confluence会自生成目标蓝图供参考使用。
全局页面模板:创建全局页面模板,应用于所有页面
2. 重排页面:通过拖拽方式重排页面
3. 独立页面:该报告显示所有未与其他页面链接的独立页面
4. 未定义页面:指曾在Confluence中被链接,但现已不存在的页面
5. 附件:列出详细附件信息
6. 回收站:保存着所有被删除的页面、博客和附件。
你可以从这里恢复或
者清除这些项目
7. 导入:从Confluence服务器的某个文件夹中导入文本文件
8. 导出:可以通过HTML、PDF、XML文档格式导出空间
9. RSS源:通过订阅RSS源,你可以在Confluence发生更新时及时获得通知。
为
了能够显示RSS源,你需要一个RSS客户端或者支持RSS的Web浏览器。
2.4.4 外观
主要是对conference页面主题、色彩方案、版式等进行设置
2.4.5 集成
与第三方环境实现集成。
3 特点
3.1 权限控制
对于创建的页面,设置单独成员或分组成员,设置页面查看或编辑权限。
3.2 设置页面位置移动
可将页面挪动到其他空间或本空间的其他位置。
3.3 关注任务
为当前页面配置关注人,页面发生变化可在关注人的空间显示。
3.4 Wiki关联
已经上传过的文档可以通过链接的形式,链接到新建页面中。
如:已经上传过V1.0.0的软件版本文件或页面。
选中V1.0.0点击超链接按钮。
在弹出的页面中,选中目标文件,点击“插入”按钮可完成超链文件,页面如下图所示:
3.5 页面布局
在工具栏页面,可以选择不同的列布局。
4 需注意问题
4.1 空间命名唯一
创建的空白页、博文、jira、产品需求、任务报告、回顾、报导文章等模板的名字必须保证唯一性,因为CONFLUENCE最大的特点是可以以链接的方式找到相关文件。
所以必须保证空间命名唯一。
4.2 删除页面权限
个人用户只有创建页面的权限,没有删除页面的权限。
删除页面权限需联系管理员。
—。
