原创 pix525 6.3(5) 升级到8.04 过程
PIX525透明模式详细配置过程
PIX525透明模式详细配置过程编者按:为了让网络管理员对技术知识有个全面的认识,IT168网络通信频道将与ChinaUnix联手,选登来自ChinaUnix上优秀的帖子和博客文章,供大家学习、阅读。
这是一篇关于如何配置PIX525防火墙为透明模式的帖子,作者从实际操作入手,逐步阐述。
文章简单易懂,非常适合正在学习中的网管朋友们。
如何连接电脑我就不多说了,网上到处都是。
但好像要注意一点,先吧超级终端打开再给防火墙加电,不然超级终端上什么都看不到。
下面就是正是配置了:由于一般的PIX系列的防火墙出场时候预装的IOS是6.X的版本而只有7.0以上才支持透明模式.所以第一步是升级IOS准备工作:找一台和防火墙在一个交换机机上的计算机安装ciscotftp软件.去上面就有.很简单汉化版.然后去cisco网站上下载一个7.0的bin文件(我下载的是pix701.bin)放到tftp服务器的根目录下正式开始:防火墙通电,按ESC进入monitor> 状态下。
monitor> address 192.1.1.1 --设置防火墙IPaddress 192.1.1.1monitor> server 192.1.1.2 --设置tftp服务器的IPserver 192.1.1.2monitor> ping 192.1.1.2 --检测一下是否能ping通Sending 5, 100-byte 0x7970 ICMP Echoes to 10.32.2.78, timeout is 4 seconds:!!!!!Success rate is 100 percent (5/5)monitor> file pix701.bin --声明你下载的那个bin文件的全称file pix704.binmonitor> tftp --开始灌入tftp pix704.bin@192.168.1.80...........................耐心等待.一直到出现非特权模式的那个">"符号.下面要吧bin文件考到flash里面去,以后启动的时候才能正常使用pixfirewall> enPassword:pixfirewall# con tpixfirewall(config)# interfaceethernet1 --进入端口模式pixfirewall(config-if)# ip address 192.1.11255.255.255.0 --配置e1口的IPpixfirewall(config-if)# nameifinside --配置e1口为防火墙的inside口INFO: Security level for "inside" set to 100 by default.pixfirewall(config-if)# noshutdown --激活inside口pixfirewall(config-if)# ping192.1.1.2 --测试一下Sending 5, 100-byte ICMP Echos to 192.1.1.2, timeout is 2 seconds:!!!!!Success rate is 100 percent (5/5), round-trip min/avg/max = 1/1/1 mspixfirewall(config-if)#exit --退出端口模式pixfirewall(config)# copy tftpflash: --copybin 文件Address or name of remote host []?192.1.1.2 --tftp服务器IPSource filename []?pix701.bin --文件名Destination filename [pix701.bin]?pix701.bin --确认Accessingtftp://192.1.1.2/pix701.bin...!! --开始copy 耐心等待Writing file flash:pix701.bin...!!!!!!!!!!!!!5124096 bytes copied in 82.80 secs (62488 bytes/sec)pixfirewall(config)#reload --升级完成.重启!!!!!!!ps.第一次启动时间会稍长不要着急下面才是配置.也很简单了,和刚才配置差不多配置outside口和inside口并激活,只是注意不要配置IP.这可是透明模式.谁见过一根网线两端还有IP的?pixfirewall> enPassword:pixfirewall# con tpixfirewall(config)# interface ethernet0pixfirewall(config-if)# nameif outsideINFO: Security level for "outside" set to 0 by default.pixfirewall(config-if)# no shutdownpixfirewall(config-if)# exitpixfirewall(config)# interface ethernet1pixfirewall(config-if)# nameif insideINFO: Security level for "inside" set to 100 by default.pixfirewall(config-if)# no shutdownpixfirewall(config-if)# exit记住哦~~~~~~~~这里可是最重要的了,即下面的五句话:pixfirewall(config)# firewalltransparent --设置防火墙为透明模式pixfirewall(config)# access-list out-list extended permit icmp any any --设置允许通过所有的协议pixfirewall(config)# access-list out-list extended permit ip any any --设置允许通过所有的IPpixfirewall(config)# access-group out-list in interfaceoutside --把刚才的访问列表绑在outside口pixfirewall(config)# access-group out-list out interfaceoutside --把刚才的访问列表绑在outside口pixfirewall(config)# ip address 192.1.1.1255.255.255.0 --设置一个以后配置防火墙的IP。
完整的pix525配置
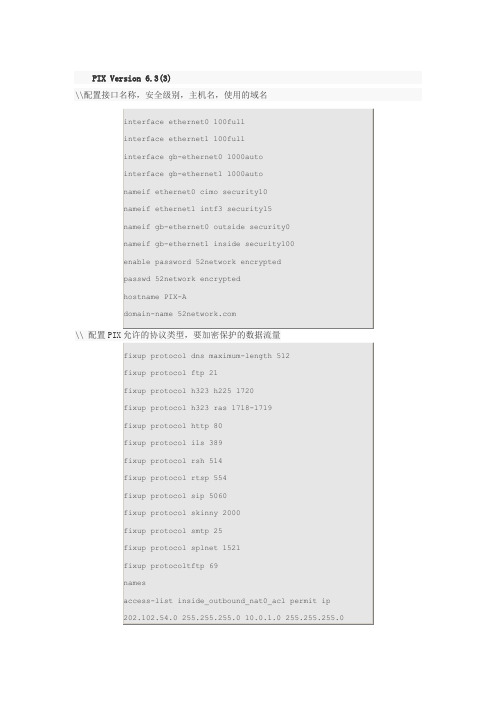
PIX Version 6.3(3)\\配置接口名称,安全级别,主机名,使用的域名interface ethernet0 100fullinterface ethernet1 100fullinterface gb-ethernet0 1000autointerface gb-ethernet1 1000autonameif ethernet0 cimo security10nameif ethernet1 intf3 security15nameif gb-ethernet0 outside security0nameif gb-ethernet1 inside security100enable password 52network encryptedpasswd 52network encryptedhostname PIX-Adomain-name \\ 配置PIX允许的协议类型,要加密保护的数据流量fixup protocol dns maximum-length 512fixup protocol ftp 21fixup protocol h323 h225 1720fixup protocol h323 ras 1718-1719fixup protocol http 80fixup protocol ils 389fixup protocol rsh 514fixup protocol rtsp 554fixup protocol sip 5060fixup protocol skinny 2000fixup protocol smtp 25fixup protocol splnet 1521fixup protocoltftp 69namesaccess-list inside_outbound_nat0_acl permit ip202.102.54.0 255.255.255.0 10.0.1.0 255.255.255.0access-list outside_cryptomap_20 permit ip 202.102.54.0255.255.255.0 10.0.1.0 255.255.255.0\\设置日志服务器,PIX各接口的IP地址,PIX设备的故障切换功能pager lines 24logging timestamplogging standbylogging trap informationallogging facility 22logging host inside 202.102.54.5mtu cimo 1500mtu intf3 1500mtu outside 1500mtu inside 1500ip address cimo 192.168.0.1 255.255.255.252ip address intf3 127.0.0.1 255.255.255.255ip address outside 202.102.53.6 255.255.255.0ip address inside 202.102.54.1 255.255.255.248ip audit info action alarmip audit attack action alarmfailoverfailover timeout 0:00:00failover poll 15failover replication httpfailover ip address shaying 192.168.0.2failover ip address intf3 127.0.0.2failover ip address outside 202.102.53.69failover ip address inside 202.102.54.3failover link shaying\\配置能通过WEB界面管理PIX设备的工作站。
Pixhawk(PX4)在线刷固件教程及注意事项
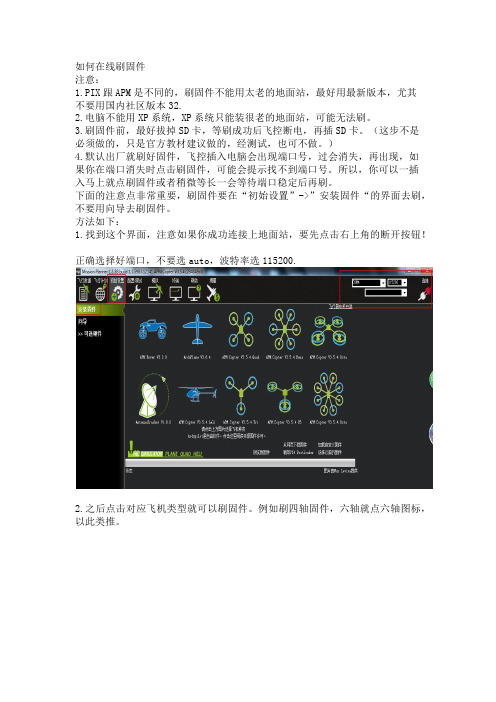
如何在线刷固件注意:1.PIX跟APM是不同的,刷固件不能用太老的地面站,最好用最新版本,尤其不要用国内社区版本32.2.电脑不能用XP系统,XP系统只能装很老的地面站,可能无法刷。
3.刷固件前,最好拔掉SD卡,等刷成功后飞控断电,再插SD卡。
(这步不是必须做的,只是官方教材建议做的,经测试,也可不做。
)4.默认出厂就刷好固件,飞控插入电脑会出现端口号,过会消失,再出现,如果你在端口消失时点击刷固件,可能会提示找不到端口号。
所以,你可以一插入马上就点刷固件或者稍微等长一会等待端口稳定后再刷。
下面的注意点非常重要,刷固件要在“初始设置”->”安装固件“的界面去刷,不要用向导去刷固件。
方法如下:1.找到这个界面,注意如果你成功连接上地面站,要先点击右上角的断开按钮!正确选择好端口,不要选auto,波特率选115200.2.之后点击对应飞机类型就可以刷固件。
例如刷四轴固件,六轴就点六轴图标,以此类推。
如果用地面站66以上版本(如果不是该版本就无此提示),之后会提示“Is this a CubeBlack“,一定要点击No,不可以点击yes,因为pixhawk不属于CubeBlack,务必注意。
如果不小心点击yes,解决办法:重新点击刷老版本固件,刷成功后再回头刷最新版本,这回一定要记得提示Is this a CubeBlack?时,点击NO。
之后会跳出一个界面问你是否下载chibiOS,选择“NO”,不要选择“YES”,务必注意。
NUTTX和Chibios 功能是一样的,不存在优劣差别。
注意:如果你坚持要点击yes去刷固件,前提你的电脑要是win10正版系统,否则你会遇到驱动问题,目前官方没有chibios驱动提供。
如果你的电脑是win7,刷完之后,可能会遇到驱动无法识别的问题。
慎重!!!nuttx 支持win10及以下的系统,而chibios 目前只支持部分win7 pro正版系统,win10正版系统,要求比较高。
戴妃525刷4.0.1系统使用教程(本人亲测)

me525戴妃defy 小米刷4.0系统教程1.本教程刷机过程需要在Windows操作系统环境下进行。
2刷机有风险,务必要小心4.本教程内容摘自互联网资源并经官方整理,如有版权问题可联系管理员。
更多内容详见免责声明。
3本教程只针对DEFY, 国行MOTO ME525暂不推荐刷机,如果已经升级MOTO 官方2.3.4请参考DEFY+教程。
下载MIUI ROM for Defy 最新安装包工具包下载地址:4.0.1系统包:/file/clowu7qy刷机工具包:/file/e6r03rqi准备一张剩余空间大于256MB的MicroSD/TF卡。
将刷机工具包defy_new_tools.zip解压至电脑,具体哪个盘自己决定,但是一定要空间足够。
不要解压MIUI ROM 4.0.1安装包将MIUI最新ROM包直接拷贝到SD卡根目录下。
如已经安装过USB驱动:可略过本步骤,前往下一步在手电脑操作打开刷机工具包目录中MotoHelper_2051_Driver_520.exe.2、将手机关机,然后同时按住电源键和音量“-”键,出现“M”标志之后即可松手,然后同时按住音量上和音量下键,进入recovery模式。
双wipe之后(双wipe 即:选择wipe data/factory reset,然后选择Yes——delete all user date;完成之后再选择wipe cache partition)。
选择reboot system now重启手机。
双wipe手机3、恢复官方系统恢复至MOTO官方系统保证有充足的电量,进行本步骤操作之后手机将会失去所有用户资料并会失去保修。
在手机上操作执行本步骤前请先关闭手机,同时按住电源键和音量上键,此时进入了Bootloader界面。
在电脑上操作将手机使用USB连接线连接至电脑。
打开defy_tools中RSD Lite文件夹下,选择SDL.exe。
在此期间禁止关闭电脑上的刷机程序,禁止断开数据线或拔出电池。
富士 FINEPIX Z200fd 数码相机 说明书

相机连接
连接电视机 ....................................................... 111 将相机直接连接至打印机 — PictBridge 功能.... 112
软件安装
在 Windows 计算机中的安装 ............................ 在 Mac OS X 中的安装 ..................................... 连接计算机 ....................................................... FinePixViewer 的使用方法 ....................... 116 118 121 124
2
高级功能 — 回放
[ 红外线通讯菜单 ] ............................................... 77 发送和接收图像 ([ 红外线通信 ])......... 77 处理、传送并保存博客图像 ([ 适合博客用的尺寸 ]) ....................... 80 使用 [ 回放菜单 ].................................................. 83 设置 [ 回放菜单 ].......................................... 83 设置自动回放 ([ 幻灯片式播放 ])............................. 84 选择图像过渡的类型 ([ 过渡效果 ])..................................... 84 旋转图像 ([ 图像旋转 ])....................... 85 保护图像 ([ 保护 ]) ............................... 86 为图像增加语音注释 ([ 语音注释 ])..................................... 87 DPOF 设置画面 ([ 打印预约 (DPOF) ])................... 90 裁剪图像 ([ 裁剪 ]).............................. 94
FEFLOW6.0中文用户手册
我们建议在使用feflow软件前或在图形显示出问题时到显卡或芯片制造商的网站上下载最新的驱动程23界面定制界面是完全可定制的也就是说除主菜单之外用户可以任意选择所有组件的位置和可现性
DHI-WASY 软件
FEFLOW 6
有限元地下水和溶质迁移模拟系统
用户手册
DHI WASY
目录
1介绍 ............................................................................ 1 1.1 欢迎使用 FEFLOW....................................................................................................................... 1 1.2 FEFLOW 软件包............................................................................................................................ 1 1.3 FEFLOW 用户文档....................................................................................................................... 2 1.4 应用范围和结构............................................................................................................................ 2 1.5 注释................................................................................................................................................ 3
索尼nex-3n(4453048911)操作说明

具有不同亮度的相同场景 (47)
45
防止相机抖动 (45)
55
拍摄黄昏的美丽晚霞 (55)
64
光痕 (64)
33
虚化背景 (33)
菜单
索引
10CS
续r
目录
拍摄快速移动的被摄体
68
跟随移动的被摄体 (68)
65
拍摄正在接近相机的被摄体 (65)
61
表现充满刺激的活动 (61)
44
捕捉最佳时刻 (44)
索引
3CS
续r
目录
样张
菜单
通过 W/T (变焦)杆使用功能
变焦 ...................................... 49 (影像索引)............................. 51
使用菜单中的功能
照相模式 .................................. 22 相机 ...................................... 23 影像尺寸 .................................. 23 亮度 / 色彩 ................................ 24 播放 ...................................... 24 设置 ...................................... 24
• 自拍肖像时,将液晶屏向上倾斜约 180 度 (第 113 页)。
• 根据使用三脚架的不同,您可能无法调节液 晶屏的角度。在这种情况下,暂时拧松三脚 架的螺丝,然后调节液晶屏的角度。
13CS
续r
Image-Pro+Plus+6.0+官方简体中文参考指南
Media Cybernetics, 公司 8484 Georgia Avenue Silver Spring, MD 20910 (301) 495-3305, 传真 (301)495-5964 MAN 41N60000 20060130
更换的程序介质不符合Media的有限担保,且该程序介质是与一份发票的副本一并交还Media的;或
2. 如果Media不能交送在制作方面无瑕疵的程序介质以供更换,您可以通过向购买处或Media退还本产品及一份发票副本的方式终止
本协议,并得到退款。
如果Media不是厂商,则Media将无更换或退款的责任,并且,您必须同意自行寻找厂商来获得上述义务。
若本许可证的任何部分被一司法管辖区的法庭宣告无效或不可执行,协议中其它条款则继续保有其全部效力。
4.
若Media未履行本许可证中任何权利,并不能被视为对其权利的自动放弃,包括对随后违约行为反应的权利。
5.
您还需接受本许可证为您与Media
Cybernetics有限公司间达成的完全和唯一的声明,并取代任何口头或书面的建议或先前的协议,以及您与Media
打印输出程序介质中的产品文档。如果您打印输出本程序介质中的文档的任何部分,则您必须在任何本产品文档的副本中复制和包括本版权声明 。
您不可以:
全部或者部分地使用或复制本产品,但除本许可证协议明确允许的外。
在一台以上的工作站上同时使用本产品。
除上述规定外,向第三方全部或部分复制、出租、分销、销售、许可或分许可,或其它转让本产品或本许可证。
在无Media许可的情况下,将本产品或本产品的任何部分并入到其它软件中,或使用本产品或本产品的任何部分进行开发,或对产品进行其它修 改或其它派生行为。
viewme-um004_-zh-e说明书

松下触摸屏GT_系列技术手册

All Rights Reseved
Copyright Panasonic Electric Works, Ltd.
目录
使用前的注意事项 关于使用手册 关于 GT 主体版本及可使用的功能
第 1 章 特点与功能 ........................................................................................................................ 1-1
可编程智能操作面板
GT系列
技术手册
[适用机型] ・GT01 ・GT05 ・GT11 ・GT21 ・GT32 使用前请务必仔细通读本手册,确保产品的正确使用。
可编程智能操作面板 GT系列 ARCT1F432C-1 ’08年4月
All Rights Reseved
Copyright Panasonic Electric Works, Ltd.
第 2 章 各部位的名称和功能 .......................................................................................................... 2-1
2.1 各部位的名称 ........................................................................................................................................ 2-2 2.1.1 GT01·GT11·GT21 .................................................................................................................... 2-2 2.1.2 GT05·GT32 ................................................................................................................................. 2-4 2.2 COM 端口的端子排列图 ....................................................................................................................... 2-6 2.2.1 GT01.............................................................................................................................................. 2-6 2.2.2 GT11.............................................................................................................................................. 2-7 2.2.3 GT21.............................................................................................................................................. 2-8 2.2.4 GT05·GT32 ................................................................................................................................. 2-9 2.3 与画面编制工具 GTWIN 的连接 ......................................................................................................... 2-10 2.3.1 TOOL 端口(GT01·GT11·GT21) ......................................................................................... 2-10 2.3.2 USB 端口(GT05·GT32) ........................................................................................................ 2-10 2.3.3 Ethernet 端口(GT32T1) .......................................................................................................... 2-13
得实DS-600针式打印机操作手册
4.1 如何进行参数设置 ................................ 4-2 4.2 系统设置 ........................................ 4-3 4.3 纸张设置 ........................................ 4-7 4.4 接口设置 ....................................... 4-12 4.5 ESC/P和LQ仿真参数设置 .......................... 4-13 4.6 OKI仿真参数设置 ................................ 4-16 4.7 双向测试及纵向校正 ............................. 4-17 4.8 打印针自动调整设置 ............................. 4-21 4.9 打印针补偿设置 ................................. 4-22
安装打印机 1-5
4、用手小心将打印头移至中间位置处。 5、更换色带盒之前,请先拿开旧色带盒。(当第一次安装新色带盒时,
应跳的旋钮,确保色带芯已被拉紧。
7、如下图所示,将色带盒从机架两边的凹槽插入,使色带盒两边的卡 扣卡在机架两侧板的凹槽内,将色带芯夹在打印头和色带保护片中 间,并转动色带盒上的旋钮,拉紧色带芯:
在安装打印机之前,首先要确定一个合适的地方放置打印机。 这里“合适的地方”是指:
请将打印机平放在工作台上。 避免将打印机置于过热、过度潮湿和灰尘过多的地方。 接上稳定电源,避免与电冰箱之类大功率或有干扰的电器同 一电源。 关闭打印机电源开关后,才能拔插电源线,打印机应尽可能 放置在接近插座的地方,便于使用。 打印机必须放置在走纸空间足够的地方。 如果用打印机并行接口连接,必须确保电缆长度在 2 米范围 内。用 RS-232C 连接,可选 SPC-32K 转换器,连接距离可在 15 米以内。
Fiery XF 7 说明书

Fiery XF 7© 2018 Electronics For Imaging, Inc. 此产品的《法律声明》适用于本出版物中的所有信息。
2018 年 12 月 19 日目录Fiery Command WorkStation 概述 (11)Job Center (11)用于管理队列中作业的命令 (12)工具栏图标 (12)作业搜索 (13)Job Editor (14)Server Manager (14)系统维护 (14)配置 Command WorkStation (16)登录到多个 Fiery 服务器 (16)移除 Fiery server (16)添加更多打印机 (16)配置网络打印机 (17)配置通过 USB 连接的打印机 (17)配置打印到文件输出 (18)承印材料和工作流程 (18)配置承印材料 (19)配置工作流程 (19)配置用户帐户 (23)登录到 Command WorkStation (24)注销 Command WorkStation (24)导入作业 (25)直接导入作业到 Job Center (25)在导入时自动处理作业 (26)热文件夹和虚拟打印机 (26)配置热文件夹 (27)配置虚拟打印机 (27)Fiery XF Universal Driver (28)安装 Universal Driver (28)登录到 Universal Driver 并打印 (28)Universal Driver 设定 (29)配置打印机设定 (30)开始打印 (30)取消作业处理 (31)PostScript 和 PDF 作业 (32)切换到不同的 PDF 打印引擎 (32)EPS 作业检测 (33)为 EPS 作业检测设置时间推移或更改输入分辨率 (33)采用 RIP 自动分色 (33)设置 Command WorkStation 如何处理 in-RIP 信息 (34)页面框定义 (34)指定页面框 (35)工作色彩空间 (35)应用工作色彩空间 (35)在合成作业中套印 (36)在合成作业中模拟套印 (36)管理 PDF 作业中的非嵌入字体 (36)将多页 PDF 作业作为单页加载 (36)编辑作业 (38)旋转作业 (38)翻转作业 (38)缩放作业 (38)对齐印张上的作业 (39)裁切作业 (39)撤销作业编辑 (40)将作业设定另存为工作流程 (40)可视辅助工具 (40)更改测量单位 (41)放大 (41)打开对齐 (42)设置标尺坐标 (42)使用参考线 (42)显示可视辅助工具 (42)作业标签 (43)创建或编辑作业标签 (43)打印作业标签 (43)调整作业标签的大小 (44)控制栏 (45)选择控制栏 (45)创建动态楔入 (45)跨两行打印作业标签 (46)嵌入 (47)嵌入所有作业 (47)强制嵌入以打印 (48)嵌入所选作业 (48)添加、移除或删除套叠式作业 (48)克隆套叠式作业 (49)重命名嵌入 (49)排列套叠式作业 (49)在印张上将所有套叠式作业对齐 (49)编辑套叠式作业 (50)缩放套叠式作业 (50)在印张的固定位置锁定套叠式作业 (50)添加套叠式作业周围的边距 (51)打印多页 PDF 的所选页面 (51)平铺 (52)创建平铺 (52)创建具有重叠效果的图素 (53)打印具有粘合区域的图素 (53)调整图素大小 (54)将图素边缘锁定到固定位置 (54)合并或拆分图素 (54)显示和保存平铺预览 (55)拆分图素以进行打印 (55)对平铺作业进行后期编辑 (56)步骤和重复 (57)创建步骤和重复 (57)修改步骤和重复 (58)作业合并 (59)设置自动作业合并的工作流程 (59)手动合并作业 (60)校准和生成特性档工具 (61)启动 Color Tools (61)校准打印机 (61)非 EFI 宽幅打印机的校准过程 (62)EFI 宽幅打印机的校准过程 (68)打印机优化 (75)为承印材料特性档优化进行设定 (76)选择一个 L*a*b* 优化文件。
墨刀用户手册说明书

墨刀用户手册(原型制作)目录Axure导入 (10)1、导出Axure文件 (10)2、压缩Axure文件 (10)3、导入到墨刀内 (12)Axure导入常见问题小贴士 (12)编辑页面 (13)添加页面及页面文件夹 (13)页面标识 (15)设置页面文件夹标识 (15)设置页面标识 (16)设置页面/组件外观 (20)页面列表/元素组件列表多选 (21)删除页面 (23)删除页面找回 (24)调整页面顺序 (25)上传图片创建页面 (25)设置页面横屏 (25)设置页面高度(长页面) (26)修改页面/页面文件夹名称 (27)展开、折叠页面 (28)批量导入图片生成页面 (29)合并项目 (29)项目设置 (30)修改原型尺寸和机型 (30)隐藏网格线 (30)设置项目图标/启动页/封面图 (31)星标项目 (32)锁定项目 (33)编辑组件 (33)添加组件 (33)组合/打散组件 (35)锁定/解锁组件 (35)使用智能间距整理组件 (36)使用属性复制编辑组件 (38)快捷键 (39)重命名组件 (39)修改组件颜色 (40)等比例缩放组件 (40)选中被盖住的组件 (41)添加跳转 (41)添加交互链接 (41)设置返回上一页 (42)显示、隐藏交互链接 (43)添加批注 (44)打点和卡片批注 (44)其他操作 (45)查找/替换 (45)使用、隐藏一屏线(蓝色虚线) (45)一屏线的作用 (46)隐藏一屏线 (46)测距/显示测距标注 (47)辅助线(红线) (47)添加/删除辅助线 (47)隐藏辅助线 (49)撤销/重做 (49)调整图层顺序 (50)怎么拖动画布 (51)缩小、放大画布 (51)刷新界面 (51)更多帮助 (52)切换深色主题模式 (52)帮助中心 (55)更多菜单 (55)右下角帮助 (56)素材面板 (56)组件素材 (57)内置组件 (57)我的组件 (58)发现组件 (61)图标素材 (61)图片素材 (63)页面素材 (64)全局搜索 (65)素材库 (66)最近使用 (67)常用组件 (67)矩形设置圆角 (68)使用数值设置圆角 (68)快速圆角 (69)修改批注颜色 (71)修改文字外观 (71)批量修改/替换文字 (72)插入、分割、裁切、下载图片 (72)插入图片 (72)图片分割 (73)图片裁切 (74)下载图片 (75)添加链接区域(热区) (77)占位符 (78)箭头组件 (79)多边形 (79)星形 (80)表单组件 (85)单行/多行输入 (85)下拉选择器 (86)选择文件 (87)单选/复选 (87)开关组件 (89)滑动条 (90)数字步进器 (91)导航组件 (91)下拉菜单 (93)弹出菜单 (94)导航菜单(垂直、水平菜单) (95)移动端导航 (98)分段器 (100)折叠面板 (102)标签页 (103)分页器 (104)图表组件 (105)如何编辑图表数据? (106)图表设置 (107)数据标签 (108)前/后缀单位 (108)柱状图/条形图 (109)属性设置 (109)折线图/面积图 (110)属性设置 (110)饼状图/环形图 (111)属性设置 (112)进度圆环 (112)雷达图 (112)多媒体组件 (113)添加轮播图 (113)轮播图设置 (114)为轮播图图片添加交互事件 (115)网页组件 (115)视频组件 (118)使用腾讯视频怎样嵌入链接呢? (119)音频组件 (120)二维码 (120)地图组件 (120)使用“腾讯地图”来添加地图 (121)聊天气泡 (122)图标组件 (122)选择图标 (123)墨刀内置图标svg格式下载 (124)我的组件 (125)我的组件/图片是什么? (125)2种方式创建“我的组件” (126)让组件动起来 (127)管理我的组件/图片 (127)素材库 (128)管理素材库 (128)组件 (129)图片 (129)添加文件夹、添加标签 (130)批量管理 (130)高效搜索 (130)替换图片 (130)企业素材 (131)删除素材库的素材 (131)企业素材库 (132)如何添加企业组件/图片 (132)母版 (138)使用母版批量修改组件 (138)新建母版 (138)编辑母版 (139)模板资源 (141)项目模板 (141)使用模板内的组件 (141)商用说明 (142)字体商用常见问题说明 (142)页面交互 (142)页面状态 (142)页面状态设置与添加 (142)页面状态的作用 (143)页面状态切换和页面切换的区别 (144)如何实现页面状态切换 (145)网页跳转/插入外部链接 (145)定时跳转 (147)动态组件 (148)动态组件的作用 (148)动态组件和页面状态比较 (149)动态组件连接其它页面 (151)固定组件 (151)按钮 (151)固定顶栏/固定底部导航 (152)分享与协作 (152)把项目分享给别人 (153)在客户端打开别人的分享链接 (154)是否允许切换到画板外内容 (154)分享设置 (155)分享链接给别人默认显示某个页面 (155)分享链接仅限某些特定人员查看 (156)重置分享链接 (158)添加评论 (158)预览模式下评论 (158)版本管理 (159)新建项目版本 (160)删除项目版本 (160)查看、还原项目版本 (161)项目演示 (162)电脑端直接打开演示 (162)手机微信扫码打开演示 (162)使用墨刀手机APP打开 (162)安装到手机桌面(Android) (163)安装到手机桌面(iOS) (165)电脑端离线演示 (167)手机端离线演示 (168)运行时关闭高亮链接区域 (169)运行快捷键 (170)运行时隐藏页面列表 (170)显示、隐藏手机边框 (171)预览模式 (172)「PRD」模式 (172)关于「PRD」模式 (172)如何使用「PRD」模式 (172)如何导出「PRD」模式的内容 (174)「长页面」模式 (174)「真机」模式 (175)演示常见问题 (175)运行时某些页面出现「设备框」消失的原因说明 (175)下载交付 (176)下载原型 (176)下载/打开HTML (177)下载/安装APK (178)页面编辑区下载组件 (179)标注模式下载图片 (180)标注模式 (180)生成/查看css样式代码 (180)复制原型中的文字 (181)sketch插件介绍 (182)墨刀Sketch 插件是什么? (183)谁可以使用墨刀Sketch 插件? (183)关于下载 (183)安装Sketch插件 (183)导入sketch设计稿 (184)如何导入sketch设计稿 (185)导入切图 (187)为Sketch设计稿做交互 (187)sketch切图下载 (188)Mac/Macbook M1芯片电脑导入sketch说明 (188)导入异常 (191)sketch导入问题 (191)墨刀是一款在线一体化产品设计协作平台,包括原型、设计、流程图、思维导图几款工具。
PHOTOSHOP中级考证题目与解答

第1单元点阵绘图1.1 第1题【操作要求】建立一个新文件,l6cm×l2cm,72pixels/inch,RGB模式,最终效果如下图所示。
1.将背景填充为一个合适的紫色。
通过绘制三个侧面的选区,再分别填充上不同的颜色来制作出第一个立体形状。
2.用选择工具画一正圆,并填充一个白、蓝的渐变色填充。
3.用选择工具分别画出两正圆,用白、黑的渐变色填充。
制作出几种基本立体与按钮形状。
4.将最终结果以“某某某.tif”为文件名保存在考生文件夹下。
【试题解答】1.建立文件第1步:建立一个新文件,l6cm×l2cm,72pixels/inch,RGB模式,设置背景色为紫色,然后按Ctrl+Delete组合键填充背景色为紫色。
第2步:新建图层命名为图层1,建立矩形选区,填充颜色为深蓝色。
2.修改变换第3步:在图层面板,复制图层l,重命名为图层2,再执行“编辑”>“变换”>“缩放”命令,缩小左右距离,执行“编辑”>“变换”>“斜切”命令,调整斜度以符合透视规律.然后填充颜色为浅蓝色。
第4步:在图层面板复制图层l,重新命名为图层3,执行“编辑”>“变换”>“缩放”命令缩小上下的距离,再执行“编辑”>“变换”>“斜切”命令,调整斜度以符合透视规律。
然后填充颜色为蓝色。
第5步:在图层面板建立图层4,建立正圆形选区。
3.编辑调整第6步:选择径向渐变工具,渐变色设置为白-蓝。
第7步:在圆的高光部位斜向下方拖拉渐变。
第8步:新建图层5,建立正圆形选区,填充黑白渐变色。
第9步:复制图层5,命名为图层6,执行“编辑”>“变换”>“缩放”命令,再执行“编辑”>“变换”>“水平翻转”命令,接下来将图层6的小圆精确地移到大圆中心;也可链接图层5和图层6,选择移动工具,后在选项栏中单击“垂直中齐”和“水平中齐”按钮。
4.保存文件第10步:将最终效果以“某某某.tif”为文件名保存在考生文件夹下。
北京苍穹CIS系统操作手册(KqGIS)

北京苍穹CIS系统操作手册(KqGIS)北京苍穹数码测绘有限公司用户手册KqGIS北京苍穹数码测绘有限公司北京苍穹数码测绘有限公司用户手册目录第一章概述 ..................................................................... ........................................................................ (6)1.1引言 ..................................................................... ........................................................................ . (6)1.2系统设计思想 ..................................................................... ........................................................................71.2.1集土利用管理和权属管理为一体...................................................................... (7)1.2.2统一的数据组织管理模式...................................................................... (7)1.2.3统一的数据结构 ..................................................................... . (8)1.2.4统一的分类体系 ..................................................................... . (9)1.2.5面向基层土地管理人员,操作简单 ..................................................................... (9)1.2.6多元化的国土业务处理 ..................................................................... . (9)1.2.7可与电子政务系统集成,成为电子政务系统中重要的一部分 (11)1.2.8采用关联技术对各种国土资源进行统一管理 ..................................................................... (12)1.2.9保障地籍调查成果的延续性和现势性 ..................................................................... (12)1.2.10与三维虚拟档案馆管理系统集成...................................................................... ....................... 13 1.3参考文档 ..................................................................... ........................................................................ (13)第二章系统初始运行 ..................................................................... ......................................................................152.1系统运行环境 ..................................................................... ......................................................................152.2系统运行准备 ..................................................................... ......................................................................152.2.1系统安装 ..................................................................... .. (15)2.2.2 SQL Server 2000数据库安装...................................................................... .. (20)2.2.2.1 SQL Server 2000安装 ..................................................................... (20)2.2.2.2 SQL Server 2000服务器的注册 ..................................................................... .. (23)2.2.3数据库备份及还原 ..................................................................... ................................................. 24 2.3数据库建立与维护 ..................................................................... .. (27)2.4系统登录运行 ..................................................................... ......................................................................282.5系统框架说明 ..................................................................... ......................................................................29第三章文件 ..................................................................... ........................................................................ .. (30)3.1清空工程 ..................................................................... ........................................................................ (30)3.2加载工程 ..................................................................... ........................................................................ (30)3.3保存工程 ..................................................................... ........................................................................ (30)3.4导出注记 ..................................................................... ........................................................................ (31)5导入注记 ..................................................................... ........................................................................ ...... 31 3.3.6图件打印定位 ..................................................................... ......................................................................313.7图件打印预览 ..................................................................... ......................................................................313.8加载数据 ..................................................................... ........................................................................ (31)3.9图件打印 ..................................................................... ........................................................................ (32)3.10退出 ..................................................................... ........................................................................ (32)第四章视图 ..................................................................... ........................................................................ .. (33)4.1工具条 ..................................................................... ........................................................................ . (33)4.2工具条功能及说明 ..................................................................... .. (33)4.2.1地图工具 ..................................................................... .. (33)4.2.1.1放大 ..................................................................... . (33)4.2.1.2缩小 ..................................................................... . (33)4.2.1.3中心放大 ..................................................................... .. (34)- 1 -北京苍穹数码测绘有限公司用户手册4.2.1.4中心缩小 ..................................................................... .. (34)4.2.1.5平移 ..................................................................... . (34)4.2.1.6全屏 ..................................................................... . (34)4.2.1.7输入比例 ..................................................................... .. (34)4.2.1.8设置显示 ..................................................................... .. (34)4.2.1.9选择要素 ..................................................................... .. (35)4.2.1.10拉框选取 ..................................................................... (35)4.2.1.11属性查询工具...................................................................... . (35)4.2.1.12实体查询 ..................................................................... (36)4.2.1.13量测距离 ..................................................................... (36)4.2.1.14注记编辑 ..................................................................... (37)38 4.2.2页面工具 ..................................................................... .................................................................4.3缩放到全图 ..................................................................... ........................................................................ .. 39 4.4清除选择集 ..................................................................... ........................................................................ .. 39 4.5视图刷新 ..................................................................... ........................................................................ ...... 39 4.6绘制设置 ..................................................................... ........................................................................ (39)第五章图形的查询与显示 ..................................................................... .............................................................. 41 5.1图形查询 ............................................................................................................................................. (41)5.1.1基本图查询 ..................................................................... . (41)5.1.2区域图查询 ..................................................................... . (42)5.1.3自定义范围查询 ..................................................................... .. (43)5.1.4组合查询 ..................................................................... .. (44)5.1.5宗地图查询 ..................................................................... . (46)5.1.6专题图查询 ..................................................................... . (48)5.1.7分幅图查询 ..................................................................... . (48).................................................................... (49)5.1.8三维查询5.2属性查询 ..................................................................... ........................................................................ (49)5.2.1宗地属性查询 ..................................................................... (49)5.2.2图斑属性查询 ..................................................................... (49)5.2.3房屋属性查询 ..................................................................... (49)5.3图形定位 ..................................................................... ........................................................................ (50)5.3.1宗地定位 ..................................................................... .. (50)5.3.2图斑定位 ..................................................................... .. (50)5.3.3预约出让地块定位 ..................................................................... . (50)5.4图形裁剪 ..................................................................... ........................................................................ (51)5.4.1自定义范围裁剪 ..................................................................... .. (51)5.4.2取消自定义范围裁剪 ..................................................................... (51)5.5图件管理 ..................................................................... ........................................................................ (51)5.5.1展开所有图层 ..................................................................... (52)5.5.2收拢所有图层 ..................................................................... (52)5.5.3清除选择集 ..................................................................... . (52)5.5.4地图选择集转换为版面元素...................................................................... (52)5.5.5缩放到全图 ..................................................................... . (52)5.5.6设置引用比例尺 ..................................................................... .. (52)- 2 -北京苍穹数码测绘有限公司用户手册5.5.7清除引用比例尺 ..................................................................... ..................................................... 53 5.6图层管理 ..................................................................... ........................................................................ (53)5.6.1删除图层 ..................................................................... .. (53)5.6.2缩放到图层 ..................................................................... . (53)5.6.3上移图层 ..................................................................... .. (53)5.6.4下移图层 ..................................................................... .. (54)5.6.5清除选择集 ..................................................................... . (54)5.6.6全部选择 ..................................................................... .. (54)5.6.7按选择集缩放 ..................................................................... (54)5.6.8图层选择集转换为版面元索...................................................................... (54)5.6.9自定义查询 ..................................................................... . (54)5.6.10属性浏览 ..................................................................... (54)5.7历史查询 ..................................................................... ........................................................................ (55)5.7.1历史切片图查询 ..................................................................... .. (55)5.7.2历史区段分析图 ..................................................................... .. (55)5.7.3宗地历史查询 ..................................................................... (56)5.7.4图斑历史查询 ..................................................................... (58)5.8量测 ............................................................................................................................................. .. (58)5.8.1长度量算 ..................................................................... .. (58)5.8.1面积量算 ..................................................................... .. (58)第六章统计分析 ..................................................................... ........................................................................ (59)6.1统计报表 ..................................................................... ........................................................................ (59)6.1.1界址点成果表 ..................................................................... (59)6.1.2宗地面积计算表 ..................................................................... .. (60)6.1.3宗地面积汇总表 ..................................................................... .. (60)6.1.4分类面积统计表 ..................................................................... .. (61)6.1.5权属性质统计表 ..................................................................... .. (61)6.1.6土地来源性质统计表 ..................................................................... (61)6.1.7土地使用者性质统计表 ..................................................................... .. (62)6.1.8土地利用强度分析 ..................................................................... . (62)6.1.8.1建筑占地面积 ..................................................................... (62)6.1.8.2楼层占地面积 ..................................................................... (63)6.1.8.3建筑密度容积率 ..................................................................... ............................................ 63 6.2缓冲分析 ..................................................................... ........................................................................ (63)6.3综合分析 ..................................................................... ........................................................................ (64)第七章设置 ..................................................................... ........................................................................ .. (66)7.1出图设置 ..................................................................... ........................................................................ (66)7.1.1分幅图设置 ..................................................................... . (66)7.1.2区域图设置 ..................................................................... . (67)7.1.3宗地图设置 ..................................................................... . (67)7.1.4图件分层设置 ..................................................................... (68)7.1.5接合图设置 ..................................................................... . (71)7.2系统设置 ..................................................................... ........................................................................ (71)7.2.1启动时装载基本图 ..................................................................... . (71)- 3 -北京苍穹数码测绘有限公司用户手册7.2.2使用国标地类编码体系 ..................................................................... .. (71)7.2.3用户权限设置 ..................................................................... (72)7.2.3.1动态工作流设置 ..................................................................... .. (72)7.2.3.2用户权限、字典设置 ..................................................................... (73)7.2.4启动优化方式 ..................................................................... (74)第八章土地登记 ..................................................................... ........................................................................ (74)8.1初始登记 ..................................................................... ........................................................................ (75)8.1.1收件 ..................................................................... .........................................................................758.1.2申请书 ..................................................................... (76)8.1.3调查表 ..................................................................... (77)8.1.4经办、初审、审核、审批...................................................................... . (78)8.1.5登记 ..................................................................... .........................................................................7980 8.1.6土地证书 ..................................................................... .................................................................8.2变更登记 ..................................................................... ........................................................................ (80)8.3他项权利登记 ..................................................................... ......................................................................818.4查封冻结登记 ..................................................................... ......................................................................818.5土地出让 ..................................................................... ........................................................................ (83)8.6注销登记 ..................................................................... ........................................................................ (84)8.7预约出让 ..................................................................... ........................................................................ (84)8.7.1预约出让合同登记 ..................................................................... . (84)8.7.2年度、产业、区块统计及报表输出 ..................................................................... . (84)85 8.7.3自定义查询 ..................................................................... .............................................................8.8土地出让 ..................................................................... ........................................................................ (85)8.8.1土地使用权出让合同登记...................................................................... . (85)8.8.2年度、产业、区块、竣工、土地供应量统计及报表输出 (85)8.8.4催缴、到期提醒 ..................................................................... .. (85)8.8.5开工、征收闲置费、超期未动工收回提醒 ..................................................................... . (85)8.8.6竣工、超期未竣工、超期未竣工收回提醒 ..................................................................... .......... 86 8.9土地租赁 ..................................................................... ........................................................................ (86)8.9.1待办、自定义查询 ..................................................................... . (86)8.9.2年度、产业、区块、竣工、土地供应统计及报表输出 (86)8.9.3应催缴租金提醒 ..................................................................... .. (86)8.9.4开工、征收闲置费、超期未动工收回提醒 ..................................................................... . (86)8.9.5竣工、超期未竣工、超期未竣工收回提醒 ..................................................................... . (86)第九章报表 ..................................................................... ........................................................................ .. (87)9.1图幅面积平差 ..................................................................... ......................................................................879.2图斑面积平差 ...........................................................................................................................................889.3统计簿计算及浏览 ..................................................................... .. (88)9.3.1台帐计算与浏览 ..................................................................... .. (88)9.3.2统计簿浏览 ..................................................................... . (89)9.4二调土地利用一级分类面积汇总表 ..................................................................... .................................. 91 9.5二调土地利用二级分类面积汇总表 ..................................................................... .................................. 91 9.6二调土地利用一级分类面积按权属性质汇总表 ..................................................................... ............... 92 9.7二调农村土地利用现状一级分类面积汇总表...................................................................... (93)- 4 -北京苍穹数码测绘有限公司用户手册9.8二调农村土地利用现状二级分类面积汇总表...................................................................... .................. 94 9.9二调农村土地利用一级分类面积按权属性质汇总表 ..................................................................... . (95)9.10二调飞入地土地利用现状一级分类面积汇总表 ..................................................................... ............. 96 9.11二调飞入地土地利用现状二级分类面积汇总表 ..................................................................... ............. 97 9.12二调耕地坡度分级面积汇总表 ..................................................................... ........................................ 97 9.13其它报表 ..................................................................... ........................................................................ . (98)9.13.1外单位面积汇总表 ..................................................................... .. (98)9.13.2辖区权属面积汇总表 ..................................................................... . (99)9.13.3辖区坐落面积汇总表 ..................................................................... . (99)9.13.4单位面积汇总表 ..................................................................... ................................................. 100 9.14报表格式和模板的修改 ..................................................................... .. (101)第十章影像库管理 ..................................................................... (105)105 10.1影像库的创建 ..................................................................... ..................................................................10.2影像文件的导入 ..................................................................... .. (105)10.3影像文件的加载、导出 ..................................................................... .. (106)- 5 -北京苍穹数码测绘有限公司用户手册第一章概述1.1引言随着近年来经济的快速发展,城市化建设迅速推进,土地的流转速度加快,用地情况不断发生变化,为满足国民经济宏观调控和国土资源管理工作的需要,迫切需要建立国土资源综合业务管理系统,以适应土地资源管理科学化、规范化的需要。
PIX恢复密码
PIX的密码恢复和AAA配置恢复程序内容前言前提条件需求使用的组件惯例逐步程序带软驱的 PIX不带软驱的 PIX示例输出下载软件相关信息前言本文档介绍如何通过 7.0 恢复 PIX 软件版本的 PIX 口令。
请注意,对 PIX 执行口令恢复只会清除口令,而不会清除配置。
如果版本 6.2 和更高版本中提供了 Telnet 或控制台 aaa authentication 命令,系统还会提示删除这些命令。
注意: 如果已对 PIX 配置了 AAA,并且 AAA 服务器已关闭,则可以通过首先输入 Telnet 口令,然后输入 pix 作为用户名和口令的启用口令(启用口令的口令),以此来访问 PIX。
如果 PIX 配置中没有启用口令,请对用户名输入 pix 并按 Enter。
如果已设置启用口令和 Telnet 口令,但不知道该口令,请继续口令恢复过程。
PIX 口令锁定实用程序基于您运行的 PIX 软件版本。
请使用 show version 了解 PIX/ASA 安全设备上运行的软件版本。
注意: 有关 ASA 5500 系列自适应安全设备的口令恢复,请参阅对 ASA 5500 系列自适应安全设备执行口令恢复。
前提条件需求本文档没有任何特定的要求。
使用的组件本文档中的信息需要以下硬件设备:一台 PC工作串行终端或终端仿真器使 PIX 和网络停机约 10 分钟注意: 您必须使 PIX 和网络停机约 10 分钟才能执行此过程。
您需要 PIX 口令锁定实用程序才能使用口令恢复过程,该程序包含以下文件:相应的二进制文件(根据您运行的 PIX 软件版本):np70.bin(7.x 和 8.0 版本)np63.bin(6.3 版本)np62.bin(6.2 版本)np61.bin(6.1 版本)np60.bin(6.0 版本)np53.bin(5.3 版本)np52.bin(5.2 版本)np51.bin(5.1 版本)np50.bin(5.0 版本)np44.bin(4.4 版本)nppix.bin(4.3 和更早版本)注意: 您需要确定要使用的 .bin 文件,这取决于 PIX 当前运行的 PIX 代码(而不考虑 BIOS 版本)。
TerraExplorer Pro v7.0用户操作手册-2019v1.0

4.1
启动界面 ......................................................................................................................... 13
4.2
界面布局 ......................................................................................................................... 13
3.1
TerraExplorer 7.0.1 版本新特性 .......................................................................................8
3.1.1 栅格图层改进 ............................................................................................................ 8
3.2.6 分析工具..................................................................................................................10
3.2.7 使用 SkylineGlobe Server– 发布工具 .....................................................................10
1.1
关于本手册 ....................................................................................................................... 1
SIGMA Photo Pro 说明书

警告 !!
請不要將本產品內附之光碟放在音頻光碟播放器內。如使用本產品內附之光碟放在 音樂光碟播放器內,並利用耳筒聆聽,可能令聽力受損。而使用本產品內附之光碟放在音 樂光碟播放器內,亦可能令喇叭損壞。
請閣下嚴謹地使用本數碼相機拍攝照片,請勿使用任何方式以觸犯國際及本地版權法例及 規條。另外,本產品純供個人拍攝用途。在攝影陳列、論証示範、商業性展覽時,必需遵 守其版權及法定權上的守則。
在 SIGMA Photo Pro 以外重新命名 ..............................................................19
5.5 選取圖像
19
選擇單一圖像 ................................................................................................19
iii
目錄
在主視窗內用幻燈片展示觀看圖像。 ........................................................21
6
圖像檢視
22
6.1 檢視視窗
23
開啟檢視視窗 ................................................................................................23
從充電池轉換至 AC 交流電 (SD9/SD10) .....................................................11
當軟件在運行中連接相機 (SD9/SD10).........................................................11
星河6001使用手册

目录第1章如何安装设备及软件 (1)1.1 使用环境 (1)1.2 如何安装设备 (1)1.3 设备安全注意事项 (6)1.4 技术指标 (7)第2章新手入门 (9)2.1 测试原理及测试过程概述 (9)2.2 名词解释 (10)2.3 软件模块 (11)第3章开机自检程序 (13)3.1 开机自检界面 (13)3.2 图标说明 (13)3.3 各检测项目的内容说明 (13)3.4 显示报告 (14)第4章编辑 (15)4.1 元件 (15)4.2 “组块区”说明 (25)4.3 开短路 (25)4.4 元件打印 (27)第5章如何进行编辑调试 (28)5.1 调试数据步骤 (28)5.2 其他注意事项 (30)5.3 元器件类型及方法对应表 (31)第6章测试 (32)6.1 测试程序运行界面 (32)6.2 菜单说明 (35)6.3 工具栏说明 (36)6.4 快捷键说明 (37)6.5 多工位测试 (37)第7章统计 (39)7.1 统计菜单 (39)7.2 工具栏的说明 (43)第8章功能测试 (44)8.1 基本功能测 (44)8.2 信号调理板(Signal Conditioning Board)(硬件选配) (50)8.3 多路程控电源(Muti-PC-Power)(硬件选配) (55)8.4 GPIB测试(GPIB Test)(硬件选配) (58)8.5 Camera测试LED(硬件选配) (59)第9章调试与校准 (65)9.1 信号板控制 (65)9.2 信号板测试 (65)9.3 气动头测试 (65)9.4 开关板测试 (65)9.5 开关板绝缘测试 (66)9.6 恒流及交流源 (66)第10章SRC数据转换 (67)10.1 启动方法 (67)10.2 使用方法 (67)第11章图形格式转换程序 (68)111.1 图形格式转换程序的启动 (68)11.2 源文件的指定 (68)11.3 目标图形文件的生成 (69)第12章PCB图形显示功能 (71)12.1 系统要求 (71)12.2 图形显示平台文件操作说明 (71)12.3 图形显示的图层设置(Alt+SL) (71)12.4 图形的控制(Alt+C) (72)12.5 显示与隐藏列表(Alt+CG) (73)12.6 查看(Alt+V) (74)12.7 帮助(Alt+H) (74)12.8 平台相关的一些快捷方式定义 (74)12.9 程序与图形显示平台相关联的操作 (74)第13章常见故障处理 (76)13.1 电源方面 (76)13.2 系统自检方面 (76)13.3 非正常测试与死机 (76)13.4 硬件电路的损坏与维修 (76)13.5 关于气动头故障的检修流程与说明 (76)13.6 气缸缓冲调节方法 (77)13.7 常见故障列表 (78)第14章测试原理 (79)14.1 电阻测量 (79)14.2 电容测量 (79)14.3 电感测量 (80)14.4 跳线测量法(通断测量) (81)14.5 晶体管测量 (81)14.6 光电耦合器测量(OP0) (81)14.7 IC测量 (82)14.8 PN结测量 (82)14.9 稳压管测量方式(Z0) (83)14.10 电位器测量方式(W0) (83)14.11 继电器测量 (83)14.12 可控硅测量 (84)14.13 .放电步(Z4) (84)14.14 绝缘测试的使用说明 (85)第15章设备保养 (89)15.1 主机的保养: (89)15.2 气动及夹具保养 (89)第16章针床布针规则与PCB板布线建议 (91)16.1 针床布针规则 (91)16.2 PCB板布线建议 (91)附录:特制功能测试 (92)SHARK功能测试 (92)B6TVSP1功能测试 (92)FIN668功能测试 (92)Georgia功能测试 (92)IIC通讯 (92)Lumiere 功能测试模块使用说明 (92)Merlin功能测使用说明 (92)配置清单(标配) (93)SRC6000系列产品功能对照表 (94)2第1章如何安装设备及软件1.1 使用环境适宜的工作环境可确保SRC ICT超长的使用寿命、超高的工作效率,使其在测试环节发挥最佳的作用。
- 1、下载文档前请自行甄别文档内容的完整性,平台不提供额外的编辑、内容补充、找答案等附加服务。
- 2、"仅部分预览"的文档,不可在线预览部分如存在完整性等问题,可反馈申请退款(可完整预览的文档不适用该条件!)。
- 3、如文档侵犯您的权益,请联系客服反馈,我们会尽快为您处理(人工客服工作时间:9:00-18:30)。
INFO: converting 'fixup protocol ftp 21' to MPF commands
INFO: converting 'fixup protocol h323_h225 1720' to MPF commands
9、配上接口地址,TFTP服务器地址等等,开始TFTP下载新版PIXOS。
monitor> address 192.168.1.1
address 192.168.1.1
monitor> server 192.168.1.2
server 192.168.1.2
monitor> ping 192.168.1.2
Sending 5, 100-byte 0x7970 ICMP Echoes to 10.32.2.78, timeout is 4 seconds:
!!!!!
Success rate is 100 percent (5/5)
monitor> file pix804.bin
file pix701.bin
flashfs[7]: erasing block 125...done.
flashfs[7]: 0 files, 1 directories
flashfs[7]: 0 orphaned files, 0 orphaned directories
flashfs[7]: Total bytes: 16128000
pixfirewall(config)# exit
pixfirewall# ping 192.168.1.2
6、好了,重启PIX,准备升级。
这是启动的画面,比较多字符。
按esc中断FLASH引导,进入monitor模式下。
Wait.....
monitor>
Invalid or incorrect command. Use 'help' for help.
UR版本防火墙上直接可以PING通192.168.1.2
但FO版本防火墙就是要清除配置文件才可以PING通。
pixfirewall# conf t
pixfirewall(config)#clear config all
PIX525UR与FO版本的8.04版本是一样的。
pixfirewall#copy tftp flash
1.查看当前版本
pixfirewall# sh ver
Cisco PIX Firewall Version 6.3(4)
2、检查一下flash能不能访问:
pixfirewall# sh flash
3、检查原来的配置,保存之
pixfirewall# sh ru
pixfirewall# wr
INFO: converting 'fixup protocol skinny 2000' to MPF commands
INFO: converting 'fixup protocol smtp 25' to MPF commands
Cisco PIX Security Appliance Software Version 8.0(4)
xfirewall# wr
18、最后重启大功告成
pixfirewall# reload
14、启动完成,看看有没有什么新变化
pixfirewall> en
Password:
pixfirewall# sh run
: Saved
PIX Version 8.0(4)
15、查看新版本
pixfirewall# sh ver
pixfirewall# sh flash
16、记得重新安装一次COPY一次到FLASH
flashfs[7]: Bytes used: 1024
flashfs[7]: Bytes available: 16126976
flashfs[7]: flashfs fsck took 161 seconds.
flashfs[7]: Initialization complete.
12、继续引导:
monitor> tftp
tftp pix804.bin@192.168.1.2
…………
Received 7124096 bytes
Cisco PIX Security Appliance admin loader (3.0) #0: Thu sep 31 21:03:05 PST 2008
INFO: converting 'fixup protocol rsh 514' to MPF commands
INFO: converting 'fixup protocol rtsp 554' to MPF commands
INFO: converting 'fixup protocol sip 5060' to MPF commands
####################################################
……
512MB RAM
10、下载完之后,PIX直接用新版PIXOS启动了
11、这里是检查整理一遍FLASH,并把原来的PIXOS映像存成image_old.bin
Initializing flashfs...
Encryption hardware device : VAC+ (Crypto5823 revision 0x1)
--------------------------------------------------------------------------
13、自动转换一些配置
Cryptochecksum(unchanged): a24fcf17 7e777a56 ca8e0420 377bb244
monitor> interface 0
0: i8255X @ PCI(bus:0 dev:2 irq:255)
1: i8255X @ PCI(bus:0 dev:1 irq:255)
Using 0: i82559 @ PCI(bus:0 dev:2 irq:255), MAC: 000e.0c5f.a3f0
4、检查一下PIX上的interface,查看其工作状态:
pixfirewall# sh int
5、我在这里先配了一个FE口测试与终端的连通性,以便确保等一阵可以用TFTP(这个可以不配置)
pixfirewall(config)# ip address inf0 192.168.1.1 255.255.255.0
flashfs[7]: Checking block 0...block number was (-10627)
…………
flashfs[7]: erasing block 0...done.
flashfs[7]: Checking block 125...block number was (-1)
17、修改启动的版本
pixfirewall# conf t
pixfirewall(config)# boot system flash:pix804.bin
INFO: Converting flash:pix804.bin to flash:/pix804.bin
pixfirewall(config)# end
INFO: converting 'fixup protocol h323_ras 1718-1719' to MPF commands
INFO: converting 'fixup protocol http 80' to MPF commands
INFO: converting 'fixup protocol netbios 137-138' to MPF commands
7、查看在monitor下可用的interface,肯定就是那两个FE口了。
monitor> interface
0: i8255X @ PCI(bus:0 dev:2 irq:255)
1: i8255X @ PCI(bus:0 dev:1 irq:255)
8、这里我选用第一个fe口,就是刚才测试过的那个口
