OpenMeeting SOAP
OpenMeetings源码编译手册

O PENMEETINGS源码编译手册2010-12-1B Y:邵贤军O PENMEETINGS源码编译及运行环境搭建 (2)一、下载eclipse for javaEE (2)二、Subclipse插件安装 (2)三、用Subclipse从Google SVN Check out项目文件 (7)四、消除项目红叉 (9)五、配置文件的修改 (13)六、启动openmeetings项目 (14)Openmeetings源码编译及运行环境搭建一、下载eclipse for javaEEEclipse是IBM捐献的一套开发java的IDE,由于它采用了OSGI协议,因此现在可以开发的语言已经有很多种了,这里我们下载eclipse for javaEE,因为openmeetings是基于web开发的,至于下载的过程这里就不提了,一般从/downloads/下载,我下载的是eclipse-jee-galileo-win32.zip,解压就可以使用,我的eclipse是版本3.6,下面的说明和截图都是基于此版本的。
二、Subclipse插件安装Subclipse是eclipse的一个SVN插件,使得你可以从Google code上“Check out”openmeetings的代码。
打开eclipse,依次Help->Install New Software在弹出的对话框中点击add,在新弹出的对话框中填入Name和Location,图中Name:subclipse, Location:/update_1.6.x,但是我在做的时候用1.6找不到,所以实际上我填写的是Name:subclipse1.4,Location:/update_1.4.x点击OK;安装的,至于它们是干什么的,你可以上网查,这里不做赘述;点击Next,出现如下界面:这个界面是程序检测依赖性的界面,检测完毕之后,会出现以下界面:直接点击Next即可,进入下面界面:下界面:依次windows->preferences->show View->other,见图:在弹出的对话框中找到SVN,选中SVN资源库,如图:这时eclipse将出现以下界面:三、用Subclipse从Google SVN Check out项目文件点击图中“1“位置,将弹出下图:在URL中填入/svn/trunk/singlewebapp,点击Finish,即可看到如下图:这个图显示了openmeetings项目的源码目录,在图中位置点击右键,点击“检出为“,英文为”check out“,进入下一个界面:按照如图填写,点击Finish,等待很久….check之后会看到Project Explorer 多出一个项目Root,见图:至此,Openmeetings的源码已经下载完毕了可以看到里面还有很多小红叉,下面我们就把其中的小红叉去掉,这个比较麻烦,具体的步骤我也记得不太清了,但是主要的几个烦扰我的问题我还是记得的。
openMeetings二次开发高手的七篇文章
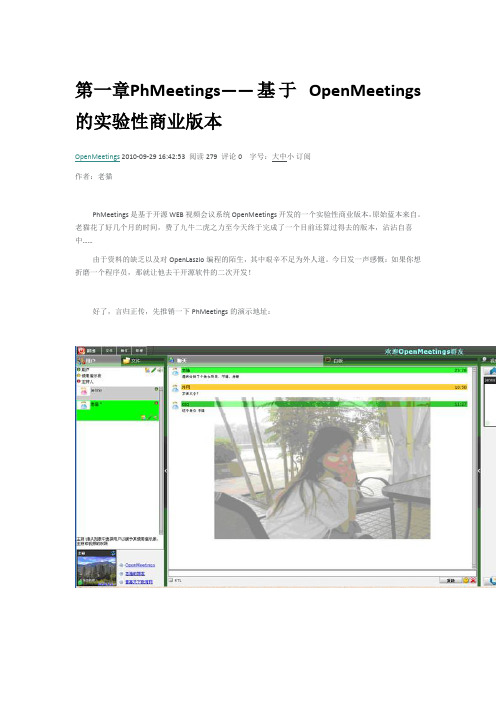
第一章PhMeetings——基于OpenMeetings 的实验性商业版本OpenMeetings 2010-09-29 16:42:53 阅读279 评论0 字号:大中小订阅作者:老猫PhMeetings是基于开源WEB视频会议系统OpenMeetings开发的一个实验性商业版本,原始蓝本来自。
老猫花了好几个月的时间,费了九牛二虎之力至今天终于完成了一个目前还算过得去的版本,沾沾自喜中……由于资料的缺乏以及对OpenLaszlo编程的陌生,其中艰辛不足为外人道。
今日发一声感慨:如果你想折磨一个程序员,那就让他去干开源软件的二次开发!好了,言归正传,先推销一下PhMeetings的演示地址:参考国内流行的一些C/S架构下的网络视频会议系统,老猫的PhMeetings在OpenMeetings基础上增加了一些适合独立进行商业运营的概念和功能,同时也删减了一些不符合国内网络环境或者形同鸡肋的功能。
删除的功能有:SIP接入网关(IP phone在国内基本用不上)预约会议功能(这个在商业运营商很难掌控)屏幕共享功能(除非部署在局域网环境,否则会把人急死)取消了其它类型房间的录制功能,只保留interview类型房间内的录制功能新增的概念或功能:房间目录树概念:用于对房间采用树状目录管理新增用户类型:房主。
使得房间的租用概念得以商业化推广。
房间计费管理及租用到期提醒功能新增房间管理后台功能:房主可以管理房间超级主持人、LOGO、背景、黑名单、白名单、链接及广告等。
房间收藏和房间搜索功能:方便在众多的房间中找到你想要去的。
房间锁功能:可对房间设置进入密码。
踢出房间功能:超级管理员或者房主有权在房间里将捣乱的用户踢出系统。
黑名单功能:将用户ID或者IP加入房间黑名单,该用户将被该房间拒之门外。
白名单功能:列入房间白名单的用户在房间设置密码锁时可以不必输入密码验证。
游客直接通过链接进入房间功能:房间租用者可以对游客开展产品推介或其它客服服务。
openmeetings二次开发详解(本人都已实践成功)
openmeetings十万个如何(不断更新)事先声明,我用的是最新的openmeetings源码(包括客户端与服务端),最新版本openmeeting是有多种风格默认为蓝色一.如何绕过登陆找到base\auth\checkLoginData.lzx,在第一个oninit加上this.login()<handler name="oninit">this.pressEnter = new LzDelegate(this, "login");lz.Keys.callOnKeyCombo(this.pressEnter, ["enter"]);lz.Focus.setFocus(ername,true);this.login();</handler>这样,一进入登陆界面就会自动登陆.二.如何传参数给openmeetings如http://localhost:5080/openmeetings/index.jps?userName=土匪&pwd=123可以修改index.jsp,在openmeetings for java的源码找到它var so = new SWFObject("main.lzx.swf8.swf", "lzapp", "100%", "100%", "8", "#ffffff");so.addParam("quality", "high");so.addParam("id", "lzapp");so.addParam("allowScriptAccess", "always");so.addParam("scale", "noscale");so.addVariable("yxUserName",'<%=request.getParameter("userName")% >');so.addVariable("yxUserPass",'<%=request.getParameter("pwd")%>');so.write("flashcontent");以上so.addVariable是我加的,就是把传过来的用户名与密码加入到openlaze 中,这里的yxUserName与yxUserPass在openLaze中是全局变量三.如何把传过来的参数,即用户名与密码直接录入到输入框中,来达到真正意义的跳转找到base\auth\checkLoginData.lzx,<method name="login" args="item">if (this.b2.visible) {ername.setAttribute("text",yxUserName);erpass.setAttribute("text",yxUserPass);this.b2.onclick.sendEvent();} else {this.b3.onclick.sendEvent();}</method>在里面加上ername.setAttribute("text",yxUserName);erpass.setAttribute("text",yxUserPass);四,如何在登陆后直接跳入到演讲界面找到base\navi\mainNavi.lzx在最下面<handler name="oninit"><![CDATA[var value = this.naviObject;for (var i=0;i<value.length;i++){var t1 = newlz.mainMenuMeetingsItem(this.itemlist,{textvalue:value[i].name,list :value[i].mainnavi,isleaf:value[i].isleaf,text:value[i].label.value,textToolTip:value[i].t ooltip.value,action:value[i].action});// if (i==0) t1.onclick.sendEvent();if (i==2) t1.onclick.sendEvent();//Debug.write("t1: ",t1);}//Debug.write("this: ",this);]]></handler>我现在已经把i=0改为了i=2,这样就直接进入到演讲之前的一个界面,接着我们就是触发进入按钮就OK了注意,还可以把i改成i=1,i=3找到modules\conference\conference\roomListItem.lzx<simpleLabelButton name="enter_name" labelid="131" x="300" width="160" height="30" y="17"onclick="parent.checkConditionsWhenButtonClicked(this)"><view resource="go_jump_rsc" x="$once{ parent.width-24 }" y="6" /></simpleLabelButton>加入了一个name="enter_name",原来是没有再把最前面<handler name="oninit">方法的最后加入一句enter_name.onclick.sendEvent();ok,现在就可直接进入到演讲界面openmeeting 安装另一篇Red5 , 视频会议GgNET 08月 20th. 2008, 1:43am(一)好了,开始吧。
OpenMeetings使用说明书

OpenMeetings 使用说明书
1、在地址栏中输入http://210.43.220.174:5080/openmeetings/即弹出用户登录窗口
2、在用户登录窗口输入用户名、密码,单击登录,进入会议首页。
用户名为stu01,密码:stu01
3、在如下的系统窗口中,单击“开始”按钮。
4、进入公共会议室窗口,在公共会议室窗口任选一种类型的room,单击“进入”按钮。
5、在弹出的测试音频视频配置窗口单击“开始进入会议室”按钮。
6、进入会议室主界面。
默认的是用户选项卡和白板选项卡处于选定状态。
OpenMeetings会议主界面
7、单击左上角的主持人或者用户头像,头像将出现如下变化,这时可对该用户进行权限设置。
例如:在视音频设备安装完好的前提下,单击将出现如下所示的视音频设备选择窗口:
单击确定,则显示视频窗口。
如下图:
视频窗口
可以对该视频窗口进行随意拖动、放大、缩小、最小化。
若点击左下角的绿色圆点,可进行用户发言。
8、在主界面的白板区上方有如图所示的工具条,
把鼠标放在任一工具上,会有文字提示。
主讲人可根据提示,选择自己所需的操作。
9、白板下方的属性窗口,可对诸如字体颜色,字号,对象位置,线型粗细等进行设置。
10、展开最下方的聊天窗口,在输入框输入文字,进行在线的文字聊天。
OpenMeetings用户手册

OpenMeetings tutorial for new users Contents1. Logging in / Creating an user account (2)1.1 Home view (4)1.2 Edit Profile (5)1.3 Upload avatar / image (6)2. Conference rooms (Meeting) (7)2.1 Entering a Conference room (8)2.2 Inside a conference room (9)3. Auditorium rooms (10)4. The Whiteboard (12)4.1 The toolbar (13)4.2 Upload a file to the whiteboard (15)4.3 Saving the whiteboard as an image / Files menu (16)5. Configuring microphone and webcam (17)6. Actions menu (18)1. Logging in / Creating an user accountThis is a tutorial where I will be showing you how to use OpenMeetings as a normal user (for admins and moderators there is a completely different guide). I will start off by showing you what the login screen looks like.Picture 1 – Here you can see the login screen for OpenMeetings, you can change both language and color-style. If you aren’t a member you can sign up here (note: The sign up option might not be activated, the admin has the authority to enable or disable new members to sign up).If you have a slower connection than DSL connection you might want to use medium quality, which can be chosen from the Quality menu.In case the “Not a member” feature is enabled (if this feature is not enabled you will have to ask an admin to create an account for you) I will show you how to sign up for OpenMeetings, click onthis will then give you a new window which looks like this:Picture 2 – This is the sign up window where you are to write the username, password you want. Your firstname, lastname, email and what country you come from.(Note: The sign up window will be empty.) Once you have filled it in you clickIf successful you should be able to login, so fill in your username and password (if it isn’t filled in already) and click .1.1 Home viewAfter logging in you will enter the Homepage. You can also reach this page by clicking on theicon located in the upper left corner of the page.Picture 3 – Here you can see what the home page looks like. This is the default view, where you can navigate through the whole site.The chat can be read by anyone able to log in, if you want to clear the chat history you press the button.We have several different menus that all have their own sub-menus, I will go through them all one by one.Under quick links you will find the and , I will explain the difference between a Conference room and an Auditorium room later on.1.2 Edit ProfileNow I will show you what you can do in the edit profile menu, everything here is all straight forward. If you start with the profile so that everyone you will talk to know a little bit more about you.First off start by clicking or (found on the main page) this will take you to the edit profile page.Picture 4 – This is the view of the edit profile page. Here both Country and Birthday must be filled in or you cannot save your information.If you want to change the password you should just type the new password in the field next to Password, and then retype the exact same password in the box below the password box. Organizations can only be changed or added by an admin.When you have typed all the information you find useful then press the save button in the upper left corner.1.3 Upload avatar / imageIf you want to upload an image you can do it from here or from the Main page, by clicking on, which will prompt you a popup window that asks you to choose a file, here you:1.Press Select File2.Locate the picture on your hard drive that you want to use as your avatar3.Once you have located the picture you want to use click Open4.Then click Start UploadNow it might take a while until the picture is uploaded, when it is done the picture will automatically be used as an avatar for you.2. Conference rooms (Meeting)Conference rooms are where you have your meetings. Here everyone can talk / chat, upload files to the whiteboard. To get to the Conference rooms you should click on (located on the mainpage) or the tab that can be found in the main menu. Both will take you to the same place (seen in picture 5 below).Picture 5 – Here you can see the different Conference rooms, public Conference Room with with 0/8 maximum users, public Video Only Room and the public Video And Whiteboard Room with 0/16 maximum users.2.1 Entering a Conference roomStart with entering a room by clicking next to one of the rooms, this will take you to that conference room.Once you have entered the room you will be prompted with a question to choose published devices, your choices are:1.Audio and Video (For this you will need a webcam and a microphone)2.Audio only (For this you will need a microphone only)3.Video only (For this you will need only a webcam)4.no Audio/Video (static Image) (This requires neither webcam nor a microphone)Picture 6 - When joining a room for the first time you will be prompted by this screen, asking you to choose published devices including what webcam you want to use, and what microphone. Clicking in the “Do not ask again” will save the information so it will automatically be used the next time you log in. Once you have filled all those in and clicked ok, a new window will appear:Picture 7 – this window asks if you want to allow OpenMeetings to use your web camera and microphone. Here you should click “Allow” if you click “Deny” you will not be heard nor seen in OpenMeetings.Once you have done that you will be able to talk to / see the ones in the room2.2 Inside a conference roomThis is what a conference room looks like.Picture 8 – This is the view of a conference room, with a whiteboard, chat, current users and where all the files are stored, that users of this room have uploaded to OpenMeetings.3. Auditorium roomsAuditorium rooms are different from Conference rooms, in the auditorium rooms only the moderator is able to talk or allow users to talk/ be viewed on webcam. Other than that the room is just the same as the Conference rooms. It has a Whiteboard for the moderator to share documents on.Auditorium rooms can be reached from the main menu or by clicking on thelocated on the main page.The page itself will look similar to the Conference Room page, but it will only include Auditorium rooms. As seen in P icture 9 below.Picture 9 – This is what the Public Audience meeting room looks like, if the admin creates more rooms you will find more rooms in the meeting-rooms.This is what an auditorium room looks likePicture 10 – This is the default view of an auditorium room.4. The WhiteboardThe whiteboard is a very handy tool, it is capable of showing files that you upload, may it be .pdf files, jpg files or impress presentations, you can upload many other things as well, these are just examples.Picture 11 – Here is the view of a Conference room, the Whiteboard (located in the upper-right part of the screen).Once more and more members join in you will be able to see everyone using a webcam, and be able to hear what they are saying. The size of the webcam windows can be increased or decreased as well.4.1 The toolbarThe toolbar located in the upper middle area is used to draw or point out things that are on the whiteboard.Clear draw area Save and export UndoRedo Select an object PointerInsert a text Paint Draw a lineDraw underline Rectangle EllipseArrowThe properties tab is when you select an object, you can move it to a certain X, Y coordinate, define its’ width and height.change linecolor. disable / enable linecolor or fillcolor.change fillcolor the upper one means change line width and the lower one changes transparency.You can also save the current whiteboard to a pdf file, and download the saved file, sort of like a printscreen but directly to .pdf, .jpg, .svg or .tif formatPicture 12 – Here you can see an impress presentation, marked with red you can see that it is currently displaying page 1 of 2. And it is very easy to navigate with.Currently these file types are viewable on the whiteboard:.tga, .xcf, .wpg, .txt, .ico, .ttf, .pcd, .pcds, .ps, .psd, .tiff, .bmp, .svg, .dpx, .exr, .jpg, .jpeg, .gif, .png, .ppt, .odp, .odt, .sxw, .wpd, .doc, .rtf, .txt, .ods, .sxc, .xls, .sxi, .pdfAll documents will be converted to a .pdf file and a bunch of .png's which can be used in the conference (drag n drop to the whiteboard) The original file and the .pdf file can be downloaded.4.2 Upload a file to the whiteboardIf you want to upload a file to the whiteboard you click File Upload, and a new window will appear that says - Choose a file, here you:1.Click Select File2.Locate the file on your hard drive that you want to upload to the whiteboard3.Once you have located the picture you want to use click Open4.Then click Start Upload5.It might take a while but once the file is uploaded but once the file is uploaded you will see a newentry in the Files (Seen in picture 13 below high lighted with red)Picture 13 – A view of a conference room where a file has been uploaded, the file has been marked with Red.Now we want the file we uploaded to be shown in the whiteboard (Note: you have to be a moderator):1.Clicking on the new item (marked with red in picture 13)2.Clicking anywhere within the field that says “Load Presentation to whiteboard”3.Now the file you have chosen will be uploaded onto the whiteboard.4.3 Saving the whiteboard as an image / Files menuYou can also save the current whiteboard to .png, .jpg, .pdf, .svg, .tif format as seen in picture 14 belowPicture 14 – here you can see the Files menu located in the upper left corner of a conference / auditorium room.Back to rooms - This takes you back to where you can browse all the rooms.5. Configuring microphone and webcamIf you need to change the volume on your microphone or need to change webcam you can easily do this by following these simple directions:1.Right clicking somewhere in a room2.Click Settings3.Click on the microphone icon4.Drag the volume slider up or down to increase or decrease the volume from your microphone5.Click on the webcam icon6.Here you can choose what webcam you want to use, if you have several that is.6. Actions menuThe actions menu is found on any room, in the upper left corner and looks like this:Picture 15 – This is the Actions menu tab, here you can find various options.Apply for Moderation means you can apply for moderation in the channel, this will start a poll where all users have to vote for you to become a moderator in that room.Send invitation will bring up this window as seen in picture 16 belowPicture 16 – When sending invitation by mail this window pops up for you to fill.Recipient – Here you fill in the persons e-mail address.Subject – Subject of the mail.Message – The message you want the recipient to receive.Password protected – The person you have invited will be asked to verify the password beforebeing able to log into OpenMeetings.Validity period – Here you can choose from 3 different types1.Endless The invitation is valid forever, no ending date.2.Period The invitation is valid for a certain time.3.One-Time The invitation is valid only once.Cam and Mic Settings - Here you can choose what webcam or what microphone you want to use. Whiteboard settingsPicture 17 – Here you can see what options you can set for the whiteboard.Create a poll - If you by any chance want to create a poll, asking a question and wanteveryone to answer, you can do so with this option, you can have themanswer with a number 1-10 or simply yes or no.Poll results - Check the results of a previous poll.Vote! - If a poll is under way you can vote on it by clicking this option.。
openmeeting二次开发
使用SOAP网关实现OpenMeetings 与其它系统的整合OpenMeetings 2010-09-27 10:28:49 阅读158 评论2字号:大中小订阅作者:老猫一、概述非常遗憾的是,OpenMeetings没有提供基于第三方SSO(单点登录,例如CAS)系统的集成方法。
但它提供了一个Web Service,官网将其命名为SOAP-Gateway,亦即一个基于SOAP的网关。
这个Gateway集成了一系列的方法,可以实现从OpenMeetings的Flash客户端(前台)之外完成登录、进入房间、以及部分后台管理(如添加房间、注册新用户等)功能。
调用SOAP-Gateway的前提是你必须知道一个OpenMeetings管理员的登录名和密码。
对于调用该Web Service来进行平台管理的应用,这看起来是合理的;但对于那些只是需要让一个游客直接进入某个房间的应用来说,这似乎有点不合理,从安全性角度,管理员的帐户和密码似乎不应该在外部应用中出现。
因此,对于那些只需要集成以游客身份直接进入房间的应用,建议将调用SOAP-Gateway的程序与OpenMeeting部署在一起,仅向外部应用提供一个输入游客姓名的页面url。
要了解OpenMeetings提供的SOAP-Gateway的接口信息,最简单的方法是把OpenMeetings运行起来,然后在浏览器中输入:http://localhost:5080/openmeetings/axis2-web/浏览器的现实如下图:以上信息告诉我们,SOAP-Gateway实际上是一个采用AXIS2框架实现的Web Service。
单击Services,我们可以查到它是由UserService、RoomService 和FileService三个Service组成。
再单击某个Service,如UserService或直接键入链接(http://localhost:5080/phmeetings/services/UserService?wsdl),则以wsdl 方式显示出它的全部方法和接口。
openmeeting用户操作手册
Openmeeting操作手册(用户部分)
一、准备工作:
1、确认您的听筒是否正常,若会上需要发言,请确认麦克风是否正常。
2、注意事项:若在公司,请网管确认80,8089,1709,1707网络端口是否开启。
二、使用部分:
登录会议系统,地址:http://221.6.15.182:1080/openmeetings/,请用事先发给您的帐户/密码登录。
登录后,点击“开始”
选择会议室点“进入”
点“开始进入会议室“
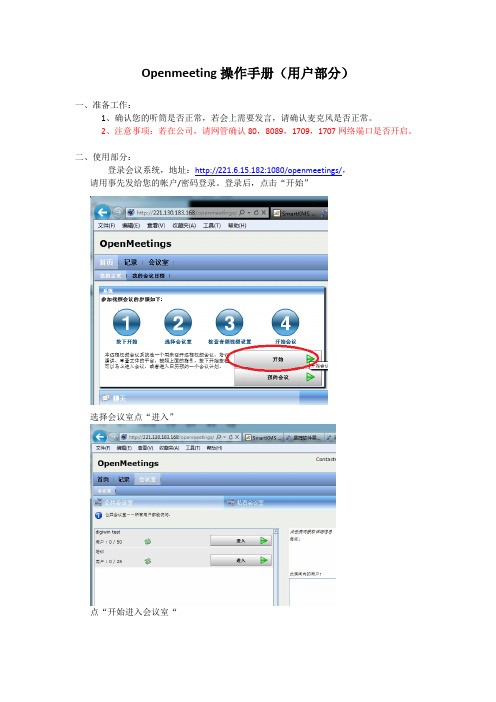
进入会议室后看到如下画面,
左侧为参加会议的人员列表,右侧上方为主持人共享ppt及共享桌面的平台,右侧下方为参加会议人员反馈信息的窗口
若会上需要发言,请点击下面的图标,主持人授权后方可发言。
30分钟搞定开源视频会议系统OPENMEETINGS

30分钟搞定开源视频会议系统OPENMEETINGS30分钟搞定开源视频会议系统OPENMEETINGS一、安装JDK将jdk-6u16-linux-i586.bin复制到系统中执行chmod +x jdk-6u16-linux-i586.bin./jdk-6u16-linux-i586.binmv jdk1.6.0_16 /usr/local/编辑/etc/profile在末尾添加# JAVA environment#JAVA_HOME=/usr/local/jdk1.6.0_16PATH=$PATH:$JAVA_HOME/binCLASSPATH=:$JAVA_HOME/lib/dt.jar:$JAVA_HOME/lib/tools .jarexport JAVA_HOME CLASSPATH PATH执行source /etc/profilejava -version二、安装OpenOffice将OOo_3.1.0_LinuxIntel_install_wJRE_zh-cn.tar.gz复制到系统中执行tar zxvf OOo_3.1.0_LinuxIntel_install_wJRE_zh-cn.tar.gzcd OOO310_m11_native_packed-3_zh-CN.9399/RPMSrm -rf jre-6u13-linux-i586.rpmrpm -ivh *.rpm将openoffice.init复制到系统中执行cp openoffice.init /etc/init.d/openofficechmod 755 /etc/init.d/openofficechkconfig --level 235 openoffice onservice openoffice start三、安装 ghostscript ImageMagick执行yum install ghostscript ImageMagick四、安装lame将lame-398-2.tar.gz复制到系统中执行tar -zxvf lame-398-2.tar.gzcd lame-398-2./configure --prefix=/usrmakemake install五、安装SWFTools将swftools-0.9.0.tar.gz复制到系统中安装zlib依赖包执行yum install zlib-devel giflib giflib-devel libjpeg-devel freetype-devel执行tar -zxvf swftools-0.9.0.tar.gzcd swftools-0.9.0./configure --prefix=/usr/makemake install六、安装ffmpeg将ffmpeg-0.5.1.tar.bz2复制到系统中执行tar -jxvf ffmpeg-0.5.1.tar.bz2cd ffmpeg-0.5.1./configure --prefix=/usr/ --enable-libmp3lame makemake install六、安装sox将sox-14.3.1-rc3.tar.gz复制到系统中执行tar -zxvf sox-14.3.1-rc3.tar.gzcd sox-14.3.1./configure --prefix=/usr七、安装字体将fonts.tar.gz复制到系统中执行tar -zxvf fonts.tar.gz -C /八、安装openmeetings将openmeetings_1_1_r3087.zip复制到系统中执行unzip openmeetings_1_1_r3087.zipmv red5 /usr/local/cd /usr/local/red5vi red5.sh修改export RED5_HOME=`pwd`;为export RED5_HOME=“/usr/local/red5”九、配置系统服务1、修改red5启动脚本执行vi /etc/rc.local在末尾添加sh /usr/local/red5/red5.sh2、设置mysql开机启动执行chkconfig --level 235 mysqld on3、配置防火墙开放1935 (RTMP)8088 (RTMP-Over HTTP)5080 (HTTP)4445 (Desktop Sharing)8443 (RTMP over SSL)开源视频会议OPENMEETINGS在CentOS 5上一键安装脚本#!/bin/bash# Name: openmeetings.sh# Author: Andowson Chang (andowson [at] gmail [dot] com) # Version: 1.1# Last Modified: 2010-01-09## install openoffice-service running on port 8100 in headless mode#yum -y install -base -headless -writer -impress -calc -langpack-zh_CN## generate openoffice startup script#echo '#!/bin/bash# headless server script## chkconfig: 2345 80 30# description: headless openoffice server script# processname: openoffice## Author: Vic Vijayakumar# Modified by Federico Ch. T omasczik#OOo_HOME=/usr/lib//programSOFFICE_PATH=$OOo_HOME/soffice.binPIDFILE=/var/run/openoffice-server.pidset -ecase "$1" instart)if [ -f $PIDFILE ]; thenecho "OpenOffice headless server has already started."sleep 5exitfiecho "Starting OpenOffice headless server"$SOFFICE_PATH -headless -nologo -nofirststartwizard -accept="socket,host=127.0.0.1,port=8100;urp" & > /dev/null 2>&1touch $PIDFILE;;stop)if [ -f $PIDFILE ]; thenecho "Stopping OpenOffice headless server."killall -9 soffice.binrm -f $PIDFILEexitfiecho "Openoffice headless server is not running."exit;;*)echo "Usage: $0 {start|stop}"exit 1esacexit 0' > /etc/init.d/openofficechmod 755 /etc/init.d/openofficechkconfig --level 235 openoffice on/etc/init.d/openoffice start## install ImageMagick(=>GhostScript will be installed as dependency)#yum -y install ghostscript ImageMagick## install SWFT ools#yum -y install giflib-devel libjpeg-devel freetype-develif [ ! -r swftools-0.9.0.tar.gz ]; thenwget /swftools-0.9.0.tar.gzfitar zxvf swftools-0.9.0.tar.gzcd swftools-*./configuremakemake installcd ..## install FFmpeg#if [ ! -r ffmpeg-0.5.tar.bz2 ]; thenwget /releases/ffmpeg-0.5.tar.bz2fitar jxvf ffmpeg-0.5.tar.bz2cd ffmpeg-*./configuremakemake installcd ..## install Flash player 10#if [ ! -r flash-plugin-10.0.42.34-release.i386.rpm ]; thenwget/get/flashplayer/current/fla sh-plugin-10.0.42.34-release.i386.rpmfirpm -Uvh flash-plugin-10.0.42.34-release.i386.rpm## install OpenMeetings with Red5#if [ ! -r openmeetings_1_0_r2688.zip ]; thenwget /files/openmeetings_1_0_r2688.zipfiunzip openmeetings_1_0_r2688.zipmv openmeetings_1_0_r2688 /var/red5# modify hibernate.cfg.xmlcd /var/red5/webapps/openmeetings/confcp -fp postgres_hibernate.cfg.xml hibernate.cfg.xmlsed -i -e '7c\ <session-factory>' hibernate.cfg.xmlsed -i -e '9c\ <property name="ername">openmeetings</property>'hibernate.cfg.xmlsed -i -e '10c\ <property name="connection.password">openmeetings</property>' hibernate.cfg.xml## create user and database openmeetings#sudo -u postgres psql -c "create user openmeetings with encrypted password 'openmeetings' createdb;" template1 sudo -u postgres psql -c "create database openmeetings with encoding 'unicode';" -U openmeetings template1 sudo -u postgres psql -c "alter user openmeetings nocreatedb;" template1## start up red5#chmod 755 /var/red5/red5*.shcd /var/red5nohup ./red5.sh &OpenMeetings是一个开源的视频会议软件。
部署Openmeetings开源视频会议系统
中 下 载 ffmpeg-0.6.5-1. rf.src.rpm 中, 来 下 载 ffmpeg 套件至 /tmp 路径中, 然后,在命令行中执行“rpm -ivh ffmpeg-0.6.5-1. rf.src.rpm”完 成 安 装。 接 着 执 行“yum install rpmbuild gcc make”来完成创 建 RPM 套件的程序安装。
尚未安装 MySQL 套件,请执行 发。您可以在命令行中执行
“yum install mysql mysql- “/usr/bin/java –version”
server”。如果执行后出现了 来查看目前的 Java 版本,必
同范例中的信息,即表示目前 须使用 1.6 以上的版本。需
已经安装了最新版本。
无论您的企业打算选 择软件式还是硬件式来部 署 视 频 会 议 系 统,这 两 类 型 的解决方案都有许多的厂
商 在提供,例如硬件式的 Polycom、Cisco 与 软 件 式 的 Microsoft Skpe Server、IBM Lotus Sametime。此外值得 注 意 的 是,如 今 也 已 有 许 多 厂商纷纷提出了云端服务的 产品,让企业 IT 无需自行部 署 与 管 理 视 频 会 议 系 统,而 是直接使用 7×24 小时的在 线视频会议云端服务。
8tadmin@ 系统维护与管理 System Management
中。 请 执 行“yum install ImageMagick”,如 果 系 统 检 测 到 您 已 经 安 装,将 会 显 示 目前的版本信息。
openmeetings二次开发详解(本人都已实践成功)

openmeetings十万个如何(不断更新)事先声明,我用的是最新的openmeetings源码(包括客户端与服务端),最新版本openmeeting是有多种风格默认为蓝色一.如何绕过登陆找到base\auth\checkLoginData.lzx,在第一个oninit加上this.login()<handler name="oninit">this.pressEnter = new LzDelegate(this, "login");lz.Keys.callOnKeyCombo(this.pressEnter, ["enter"]);lz.Focus.setFocus(ername,true);this.login();</handler>这样,一进入登陆界面就会自动登陆.二.如何传参数给openmeetings如http://localhost:5080/openmeetings/index.jps?userName=土匪&pwd=123可以修改index.jsp,在openmeetings for java的源码找到它var so = new SWFObject("main.lzx.swf8.swf", "lzapp", "100%", "100%", "8", "#ffffff");so.addParam("quality", "high");so.addParam("id", "lzapp");so.addParam("allowScriptAccess", "always");so.addParam("scale", "noscale");so.addVariable("yxUserName",'<%=request.getParameter("userName")% >');so.addVariable("yxUserPass",'<%=request.getParameter("pwd")%>');so.write("flashcontent");以上so.addVariable是我加的,就是把传过来的用户名与密码加入到openlaze 中,这里的yxUserName与yxUserPass在openLaze中是全局变量三.如何把传过来的参数,即用户名与密码直接录入到输入框中,来达到真正意义的跳转找到base\auth\checkLoginData.lzx,<method name="login" args="item">if (this.b2.visible) {ername.setAttribute("text",yxUserName);erpass.setAttribute("text",yxUserPass);this.b2.onclick.sendEvent();} else {this.b3.onclick.sendEvent();}</method>在里面加上ername.setAttribute("text",yxUserName);erpass.setAttribute("text",yxUserPass);四,如何在登陆后直接跳入到演讲界面找到base\navi\mainNavi.lzx在最下面<handler name="oninit"><![CDATA[var value = this.naviObject;for (var i=0;i<value.length;i++){var t1 = newlz.mainMenuMeetingsItem(this.itemlist,{textvalue:value[i].name,list :value[i].mainnavi,isleaf:value[i].isleaf,text:value[i].label.value,textToolTip:value[i].t ooltip.value,action:value[i].action});// if (i==0) t1.onclick.sendEvent();if (i==2) t1.onclick.sendEvent();//Debug.write("t1: ",t1);}//Debug.write("this: ",this);]]></handler>我现在已经把i=0改为了i=2,这样就直接进入到演讲之前的一个界面,接着我们就是触发进入按钮就OK了注意,还可以把i改成i=1,i=3找到modules\conference\conference\roomListItem.lzx<simpleLabelButton name="enter_name" labelid="131" x="300" width="160" height="30" y="17"onclick="parent.checkConditionsWhenButtonClicked(this)"><view resource="go_jump_rsc" x="$once{ parent.width-24 }" y="6" /></simpleLabelButton>加入了一个name="enter_name",原来是没有再把最前面<handler name="oninit">方法的最后加入一句enter_name.onclick.sendEvent();ok,现在就可直接进入到演讲界面openmeeting 安装另一篇Red5 , 视频会议GgNET 08月 20th. 2008, 1:43am(一)好了,开始吧。
(完整版)OpenMeetings音视频参数设置及优化
OpenMeetins音视频参数设置及优化作者:老猫日期:2010-9-17一、前言OpenMeetings是一个基于Flash视频的视频会议系统,它的后台是基于开源的流媒体服务器RED5做的二次开发,而前台实质上是一个采用OpenLaszlo开发的Flash。
也就是说,OpenMeetings的客户端必须运行在Flash环境下。
因此,我们不妨把PC机上的Flash Player 看作是一个OS(操作系统),而把OpenMeetings的前台(swf文件)当作该操作系统下的一个可执行程序。
这样的思路下,我们就可以理解,就如我们在Windows下开发依赖于硬件的应用程序时必须要借助WINDOWS API的支持一样,OpenMeetings的客户端也极度依赖Flash环境所能提供的功能和性能,尤其是和音频视频相关的地方。
二、OpenMeetings流媒体采集和编码Flash视频的客户端采集视频和音频信号后由Flash插件完成音视频编码,编码算法是封闭的,据说采用的编码协议是H.323(视频编码为H.263),应用开发者无法优化这一块。
OpenMeetings调用摄像头时并创建一个广播流时,我们来看看Flash做了哪些动作:●捕获摄像头信号●进行视频压缩编码●创建一个基于RTMP协议的流与RED5建立连接●将经过视频压缩编码后的数据按照RTMP协议进行信道编码●将信道编码后的数据放入流中我们可以发现,Flash自动帮我们完成了大部分的工作,所以开发基于Flash的流媒体应用是一件相当轻松愉快的事情。
然而,事物总是具备两面性的,Flash的封闭性使我们无从着手改进音视频的压缩编码算法,更谈不上改进RTMP协议传输协议。
能改善性能的地方都被牢牢地封闭在黑箱子里,就好比我们要参加汽车节油比赛时,却发现手里只有一辆纯自动档的汽车,让你空有一身车技却无用武之地时,郁闷更是无与伦比。
三、OpenMeetings公网上应用的带宽瓶颈在国内,大多数家庭用户和中小型企业接入都采用ADSL线路。
openwms 操作手册
OpenWMS是一个开源的、功能强大的仓库管理系统,广泛应用于物流、制造业等行业。
以下是OpenWMS操作手册的简要概述:
1.系统安装与配置:按照指导完成OpenWMS系统的安装,并根据实际需求进行
必要的配置。
确保系统正常运行,具备仓库管理的基本功能。
2.用户管理:创建和管理用户账户,设置不同的权限级别以满足不同岗位的需
求。
确保系统的安全性,控制对敏感操作的访问。
3.货物管理:通过系统管理货物的基本信息,如货物名称、规格、数量等。
维
护货物的准确数据,确保仓库运营的顺利进行。
4.入库操作:根据入库货物的信息,进行入库流程的管理。
包括货物的验收、
上架、库存更新等操作。
确保货物的准确性和及时性。
5.出库操作:根据出库货物的信息,进行出库流程的管理。
包括拣货、打包、
装车等操作。
确保货物的准确性和及时性,满足客户的需求。
6.库存管理:实时监控仓库的库存情况,进行库存调整和优化。
通过系统提供
的报表和分析工具,了解库存状况和趋势,提高库存周转率。
7.系统维护与更新:定期对系统进行维护和更新,保持系统的稳定性和安全
性。
及时处理系统故障和问题,确保仓库运营的连续性。
以上仅为OpenWMS操作手册的部分内容摘要,实际操作中还需遵循手册中的详细规定和安全规范。
为确保安全和最佳性能,务必遵循制造商提供的操作指南和安全规范。
如有任何疑问或问题,请及时联系制造商或专业技术人员进行咨询和支持。
soap格式使用指南

soap格式使用指南SOAP(Simple Object Access Protocol)是一种基于XML的通信协议,用于在分布式环境中进行应用程序间的通信。
它使用标准的HTTP协议进行消息传递,可以在不同的操作系统和编程语言之间进行交互。
本文将为您介绍SOAP协议的使用指南。
1.SOAP协议的结构SOAP消息由SOAP Envelope、Header和Body组成。
SOAP Envelope 是SOAP消息的根元素,定义了消息的命名空间和结构。
SOAP Header是可选的,可以包含与消息相关的扩展信息。
SOAP Body包含了具体的消息内容。
2.SOAP的发送和接收在使用SOAP协议发送消息时,首先需要构建SOAP消息体。
可以使用XML编程库或SOAP工具来构建SOAP消息。
然后将SOAP消息体作为HTTPPOST请求的内容发送到目标地址。
接收方会解析SOAP消息,并根据消息的结构和内容来执行相应的操作。
3.SOAP消息体的构建SOAP消息体使用XML格式编写,按照SOAP规范定义的结构来组织数据。
可以使用XML编程库(如DOM或SAX)来构建SOAP消息体,也可以使用SOAP工具来快速生成SOAP消息。
以下是一个简单的SOAP消息体示例:```<soap:Header><!--可选的头部信息--></soap:Header><soap:Body><!--消息内容--></soap:Body></soap:Envelope>```4.SOAP消息的传输SOAP消息可以通过各种协议进行传输,最常见的是使用HTTP协议。
在进行SOAP消息传输时,需要将SOAP消息体作为HTTP请求的内容发送到目标地址。
可以使用工具或编程库来发送HTTP请求,并将SOAP消息体作为请求内容发送。
5.SOAP消息的安全性SOAP消息在传输过程中可能会受到各种安全威胁,因此需要采取相应的安全措施来保护SOAP消息的机密性和完整性。
openMeetings二次开发高手的七篇文章
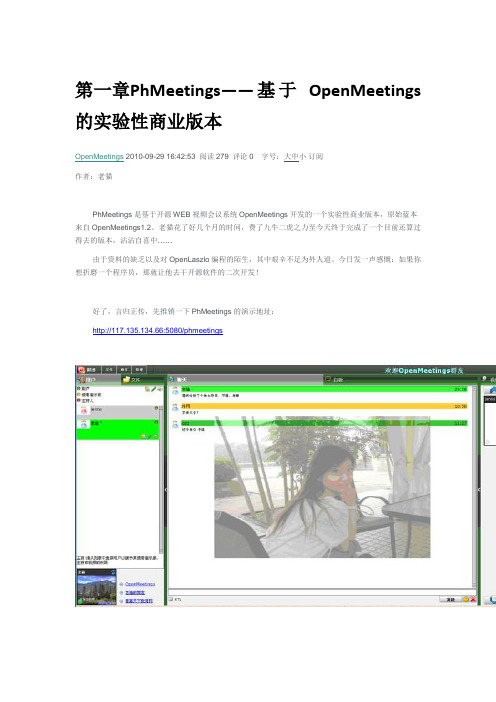
第一章PhMeetings——基于OpenMeetings 的实验性商业版本OpenMeetings 2010-09-29 16:42:53 阅读279 评论0 字号:大中小订阅作者:老猫PhMeetings是基于开源WEB视频会议系统OpenMeetings开发的一个实验性商业版本,原始蓝本来自OpenMeetings1.2。
老猫花了好几个月的时间,费了九牛二虎之力至今天终于完成了一个目前还算过得去的版本,沾沾自喜中……由于资料的缺乏以及对OpenLaszlo编程的陌生,其中艰辛不足为外人道。
今日发一声感慨:如果你想折磨一个程序员,那就让他去干开源软件的二次开发!好了,言归正传,先推销一下PhMeetings的演示地址:http://117.135.134.66:5080/phmeetings参考国内流行的一些C/S架构下的网络视频会议系统,老猫的PhMeetings在OpenMeetings基础上增加了一些适合独立进行商业运营的概念和功能,同时也删减了一些不符合国内网络环境或者形同鸡肋的功能。
删除的功能有:●SIP接入网关(IP phone在国内基本用不上)●预约会议功能(这个在商业运营商很难掌控)●屏幕共享功能(除非部署在局域网环境,否则会把人急死)●取消了其它类型房间的录制功能,只保留interview类型房间内的录制功能新增的概念或功能:●房间目录树概念:用于对房间采用树状目录管理●新增用户类型:房主。
使得房间的租用概念得以商业化推广。
●房间计费管理及租用到期提醒功能●新增房间管理后台功能:房主可以管理房间超级主持人、LOGO、背景、黑名单、白名单、链接及广告等。
●房间收藏和房间搜索功能:方便在众多的房间中找到你想要去的。
●房间锁功能:可对房间设置进入密码。
●踢出房间功能:超级管理员或者房主有权在房间里将捣乱的用户踢出系统。
●黑名单功能:将用户ID或者IP加入房间黑名单,该用户将被该房间拒之门外。
Openmeetings 搭建总结

Openmeetings 搭建总结代码包括两部分,一个为客户端,这个其实是一个lzx写的Flash客服端,在整个项目中只要生成后的Flash程序就可以了,但是如果需要修改界面,就需要客户端代码。
运行lzx的程序需要使用服务器OpenLaszlo(这个东东编译出来的Flash好丑的说)直接下载下来的打包好的服务器端文件部署(这个已经包含red5,解压后按下面的步骤修改就可以了):需要创建数据库openmeetings需要配置文件hibernate.cfg.xml(直接从源码中找,修改用户名密码),将配置文件放置webapps\openmeetings\conf还是webapps\openmeetings\WEB-INF\classes?(不确定,两个都放了)启动red5.bat//源码操作:房间信息修改:modules/conference/conference/roomList...服务器端连接使用的是NetConnectionLaszlo 使用的是xml语法和javascript作为脚本(actionscript2.0采用和javascript相同的ECMAScript标准),有些JS类在laszlo中直接使用,列入NetConnection,Camera等Laszlo文件的扩展名为.lzx,每个文件使用canvas作为根文件(?),所有的可视化组件都继承自view元素(?)为元素定义一个属性:<attribute name="_nsPlay" value="null" />为元素定义一个方法:<method name="connectRtmpConnection">this._nc = new NetConnection();_root.Debug.write("connectRtmpConnection URL:",url.getText());this._nc.connect(url.getText());this._nc.onStatus = function(info){_root.Debug.write(info.code,info);}</method>属性和方法定义之后可以通过this引用<slider id="sliderItem" y="20" x="10" minvalue="50" maxvalue="300"value="50"/><view y="$once{sliderItem.y + sliderItem.height + 5}"x="$once{sliderItem.x}" bgcolor="0xff0000"width="${sliderItem.value}" height="${width}"><view bgcolor="0x0000ff"width="${parent.width / 5}" height="${width}"x="${(parent.width / 2) - (width / 2)}"y="${(parent.height / 2) - (height / 2)}"/></view>Slider 为自带控件,可以在标签中使用行内脚本,行内脚本使用”${}”绑定,只进行一次执行的使用$once{},在元素中可以使用parent来访问父元素。
openmeetings安装手册2014

Windows server 2008 R2下搭建openmeetings2.2.0视频会议系统一、安装准备:OpenMeetings是Apache的一个项目,是一个多语言可定制的视频会议和协作系统。
它支持音频、视频,支持共享桌面,文件协作处理,它还包含一个白板,通过白板可以导入各种格式的图片,DOC,DOCX,PPT,PPTX,pdf,jpg等文档。
其最大特点是视频会议客户端不需要下载安装,openmeetings 系统将客户端做成 swf 形式,通过网页浏览的方式自动加载,免去用户下载安装的步骤,所有支持flash 的ie浏览器都可以使用openmeetings进行视频会议。
它基于OpenLaszlo的新流媒体格式和开源的Flash服务器Red5。
最重要的,它基于LGPL开源协议,所以,搭建这样一个平台是完全自由免费的。
Red5是基于java的开源流媒体服务器,所以在安装前必须先安装java环境即JDK。
二、openmeetings搭建所需要的组件Openmeetings 2.2.0做视频会议系统,需要以下组件:JDK8(Java)、microsoft .net framework 4.0 & python & Microsoft Visual C++ 2013运行库 & Visual Studio 2010 Tools for Office Runtime 4.0(安装mysql之前需要安装的软件)、mysql(提供数据库服务支持)、openmeetings(开源视频会议系统)、SWFtool(将 PDF 文档转化成FLASH 文档)、ImageMagick(图片格式转换)、Ghostscript(PDF 文件转换打印)、openoffice (文档共享)、flash_player(客户端电脑需要安装flash播放器,可选,因为99%电脑都已安装)、ffmpeg(视频处理,录制、转换和流化音频和视频)、sox(音频处理,用于录制功用)、jodconverter(doc等文档转换为pdf)、mysql-connector-java(java连接mysql的驱动)其对应的名称及下载地址如下:1.下载jdk-8u25-windows-x64.exe,官网下载地址:/technetwork/java/javase/downloads/index.html。
openmeeting学习笔记
OpenMeeting学习笔记一、下载安装1、下载openmeetings地址:/p/openmeetings/downloads/list2.、安装mysql数据库,安装后创建一个空的数据库,名为xmlcrm。
3.、安装Open-Office-Service,我安装的是OpenOffice_3.4.0地址:/softdown/2311_2.htm#downA、安装完毕后,打开“开始”---“程序”---“ 3.4.0” Base(若是第一次运行,需要注册并配置,填写注册信息,不要进行数据库配置)B、软件运行后,点“开始”---“运行”---cmd,进入“命令提示符”C、进入openoffice的安装目录下的program目录,如:C:\Program Files\ \programD、输入以下命令使openoffice在手动模式下运行在8100端口上:soffice.exe -headless -nologo -norestore -accept=socket,host=localhost,port=8100;urp;StarOffice.ServiceManagerE、输入以下命令检查服务是否正常运行:netstat -anp tcp点“回车”后会出现一个列表,当发现列表中有如下一行,说明配置成功:TCP 127.0.0.1:8100 0.0.0.0:0 LISTENING4.、安装“ImageMagick”,我安装的是ImageMagick-6.3.6-6-Q16-windows-dll地址:/download/dinuoluoke/33685665.、安装Ghostscript,我装的是Ghostscript 9.06地址:/softdown/169598_2.htm6.、安装SWFTools,我装的是swftools-0.8.1地址:/detail/yeachy3747/32941097.、安装jre,我装的是jre1.6.08. 、安装Red5 Server,我装的是red5-0.6.3地址:/red5/0.6.3/win/setup -red5-0.6.3.exe二、配置1、将openmeetings的压缩包解压,得到的xmlcrm文件夹放到$RED5-HOME/webapps/目录下。
openmeetings简介

openmeetings简介
OpenMeetings是一个开源的多功能在线会议和协作工具。
它提供了视频会议、语音通话、实时聊天、屏幕共享、白板、文件共享等功能,使用户可以在远程环境下进行实时交流和合作。
OpenMeetings支持多种操作系统和平台,并且具有跨浏览器兼容性。
它使用了WebRTC技术来实现高质量的音视频通信,同时支持与其他会议工具(如Adobe Connect、BigBlueButton 等)的互操作性。
此外,OpenMeetings还提供了一系列协作工具,如白板、投票、文档共享和共同编辑,使用户可以方便地进行团队协作和项目管理。
OpenMeetings的安装和管理相对简单,可以通过自托管或托管服务来部署。
它是一个灵活且功能强大的工具,适用于各种场景,如企业会议、在线培训、远程支持等。
总之,OpenMeetings是一个开源的多功能在线会议和协作工具,提供了丰富的功能和灵活的部署方式,适用于各种远程协作和沟通需求。
- 1、下载文档前请自行甄别文档内容的完整性,平台不提供额外的编辑、内容补充、找答案等附加服务。
- 2、"仅部分预览"的文档,不可在线预览部分如存在完整性等问题,可反馈申请退款(可完整预览的文档不适用该条件!)。
- 3、如文档侵犯您的权益,请联系客服反馈,我们会尽快为您处理(人工客服工作时间:9:00-18:30)。
使用SOAP网关实现OpenMeetings
与其它系统的整合
作者:老猫
日期:2010-9-17
一、概述
非常遗憾的是,OpenMeetings没有提供基于第三方SSO(单点登录,例如CAS)系统的集成方法。
但它提供了一个Web Service,官网将其命名为SOAP-Gateway,亦即一个基于SOAP的网关。
这个Gateway集成了一系列的方法,可以实现从OpenMeetings的Flash客户端(前台)之外完成登录、进入房间、以及部分后台管理(如添加房间、注册新用户等)功能。
调用SOAP-Gateway的前提是你必须知道一个OpenMeetings管理员的登录名和密码。
对于调用该Web Service来进行平台管理的应用,这看起来是合理的;但对于那些只是需要让一个游客直接进入某个房间的应用来说,这似乎有点不合理,从安全性角度,管理员的帐户和密码似乎不应该在外部应用中出现。
因此,对于那些只需要集成以游客身份直接进入房间的应用,建议将调用SOAP-Gateway的程序与OpenMeeting部署在一起,仅向外部应用提供一个输入游客姓名的页面url。
要了解OpenMeetings提供的SOAP-Gateway的接口信息,最简单的方法是把OpenMeetings运行起来,然后在浏览器中输入:
http://localhost:5080/openmeetings/axis2-web/
浏览器的现实如下图:
以上信息告诉我们,SOAP-Gateway实际上是一个采用AXIS2框架实现的Web
Service。
单击Services,我们可以查到它是由UserService、RoomService和FileService三个Service组成。
再单击某个Service,如UserService或直接键入链接(http://localhost:5080/phmeetings/services/UserService?wsdl),则以wsdl方式显示出它的全部方法和接口。
这些方法的说明,可以直接参考OpenMeetings的官网,链接如下:/p/openmeetings/wiki/SoapMethods
查看wsdl文件,我们发现,SOAP-Gateway实际实现了三种协议的调用接口(port):SOAP1.1协议、SOAP1.2协议、以及HTTP Get。
这给我们的实现和调试带来了很大的方便。
二、SOAP-Gateway的SSO原理
SOAP-Gateway提供了几个WebService,其中的UserService是关于用户操作的,集中了getSession(获取SessionID)、AddNewUser(注册新用户)、loginUser(注册用户)、setUserObjectAndGenerateRoomHash(设置用户对象并获取房间Hash)等方法。
SOAP-Gateway实现SSO的步骤有三步:
●第一步:向系统申请一个SessionID
●第二步:以管理员身份登录系统(与第一步申请的SessionID绑定)
●第三步:提交用户名、房间号等信息获得进入某个房间的secureHash(类似加密的
票据)
获得Hash码之后就可以凭此组装一个直接到某个房间的url了,在浏览器中输入该url 就可以直接打开房间界面了。
SOAP-Gateway在第三步时会检查用户提交的帐户是否在系统数据库中已存在,若没有,会在用户记录中插入一条新的记录。
从SOAP-Gateway的实现原理看,它并不是采用CAS那样的认证中心认证并颁发Ticket 的方式,看起来倒非常象是采用管理员帐户来担保。
这种方式比较适合那种封闭的应用,OpenMeetings只是作为一个平台的某个组件的应用,例如,某个教学系统,需要视频教室,于是集成了一个OpenMeetings。
如果把OpenMeetings作为一个独立的应用,需要与一些其它的应用整合,这种方式就需要比较深入的改进了。
三、SOAP-Gateway三步走测试
下面我们启动OpenMeetings的后台服务,来测试一下不同过正常的登录,如何直接进入房间:
第一步:调用getSession方法
http://localhost:5080/openmeetings/MethodGateway?service=userserv ice&method=getSession
返回SessionID:6a875b01f7eaeaa334e84458d29793e0
第二步:调用loginUser方法
http://localhost:5080/openmeetings/MethodGateway?service=userserv ice&method=loginUser&SID=6a875b01f7eaeaa334e84458d29793e0&username=ad ministrator&userpass=yalinwu0829
其中:SID是第一步时返回的SessionID,username/userpass是管理员的登录名/密码(注意,必须是管理员的)。
返回值为1表示登录成功。
第三步:调用setUserObjectAndGenerateRoomHash方法
http://localhost:5080/openmeetings/MethodGateway?service=userservice& method=setUserObjectAndGenerateRoomHash&SID=6a875b01f7eaeaa334e84458d 29793e0&username=jglee&firstname=JG&lastname=LEE&profilePictureUrl=&e mail=jglee@.tw&externalUserId=&externalUserType=&room_id=9&be comeModeratorAsInt=1&showAudioVideoTestAsInt=1
第三步的参数比较多,具体的含义参见官网上的说明。
第三步返回的是一个secureHash字符串,其形式如:6c280410c96e91ea05d25e0b28b10a87。
如果不是,则说明调用失败。
有了这个Hash,你就可以组装起一个直接进入房间的url地址。
该Hash是与第一步中的SessionID绑定的,一旦Session实效,该Hash也失效了。
第四步组装Url
http://localhost:5080/openmeetings/main.swf8.swf?secureHash=6c280410c 96e91ea05d25e0b28b10a87&lzproxied=solo
在浏览器中输入后,试试你看到了什么?
注意:
上述测试实际上并非直接调用的SOAP接口,而是通过OpenMeetings的Servlet页面调用的,该servlet只是一个演示,并未完全实现SOAP-Gateway,很多SOAP中的方法并没有实现,在OpenMeetins的某些版本中,甚至并未实现第三步的setUserObjectAndGenerateRoomHash方法,如果我们坚持想采用servlet测试,可以将SOAP实现类中的setUserObjectAndGenerateRoomHash方法照搬到Servlet中将其补全。
建议正式应用中采用SOAP客户端的方式来实现,以保证其安全性。
