ofbiz各配置文件作用以及工作流程
ofbiz 中文文档解读
技术文档第一部分、ofbiz表现一、理解MVC模式当涉及大量商业逻辑项目的时候,我们需要考虑什么?如何分离用户界面和后台操作?如何避免将商业逻辑混淆于一般的流程控制中?作为企业信息系统,就需要考虑很多类似的问题。
源源不断的客户新需求, 要进行功能修改和扩充, 但是因为程序的高耦合,改动将变得非常困难,导致项目成本何风险增加。
而且,往往维护人员与开发人员不是同一个人,即使有详尽的文档,也很难理清程序里纵横交错的联系。
所以贯彻Model-View-Controller(MVC)模式的设计,在设计阶段首先杜绝此类问题, 是一个非常好的方法。
1、MVC理论描述所谓MVC模式,指的是一种划分系统功能的方法,它将一个系统划分为三个部分:l 模型(Model):封装的是数据源和所有基于对这些数据的操作。
在一个组件中,Model往往表示组件的状态和操作状态的方法。
l 视图(View):封装的是对数据源Model的一种显示。
一个模型可以由多个视图,而一个视图理论上也可以同不同的模型关联起来。
l 控制器(Control):封装的是外界作用于模型的操作。
通常,这些操作会转发到模型上,并调用模型中相应的一个或者多个方法。
一般Controller在Model和View之间起到了沟通的作用,处理用户在View上的输入,并转发给Model。
这样Model和View两者之间可以做到松散耦合,甚至可以彼此不知道对方,而由Controller连接起这两个部分。
模型,即相关的数据,它是对象的内在属性;视图是模型的外在表现形式,一个模型可以对应一个或者多个视图,视图还具有与外界交互的功能;控制器是模型与视图的联系纽带,控制器提取通过视图传输进来的外部信息转化成相应事件,然后由对应的控制器对模型进行更新;相应的,模型的更新与修改将通过控制器通知视图,保持视图与模型的一致性。
下图(图1.1)描述了这三者之间的关系:2、系统设计系统属于浏览器/服务器模型(Browser/Server)。
ofbiz 中文文档解读

技术文档第一部分、ofbiz表现一、理解MVC模式当涉及大量商业逻辑项目的时候,我们需要考虑什么?如何分离用户界面和后台操作?如何避免将商业逻辑混淆于一般的流程控制中?作为企业信息系统,就需要考虑很多类似的问题。
源源不断的客户新需求, 要进行功能修改和扩充, 但是因为程序的高耦合,改动将变得非常困难,导致项目成本何风险增加。
而且,往往维护人员与开发人员不是同一个人,即使有详尽的文档,也很难理清程序里纵横交错的联系。
所以贯彻Model-View-Controller(MVC)模式的设计,在设计阶段首先杜绝此类问题, 是一个非常好的方法。
1、MVC理论描述所谓MVC模式,指的是一种划分系统功能的方法,它将一个系统划分为三个部分:l 模型(Model):封装的是数据源和所有基于对这些数据的操作。
在一个组件中,Model往往表示组件的状态和操作状态的方法。
l 视图(View):封装的是对数据源Model的一种显示。
一个模型可以由多个视图,而一个视图理论上也可以同不同的模型关联起来。
l 控制器(Control):封装的是外界作用于模型的操作。
通常,这些操作会转发到模型上,并调用模型中相应的一个或者多个方法。
一般Controller在Model和View之间起到了沟通的作用,处理用户在View上的输入,并转发给Model。
这样Model和View两者之间可以做到松散耦合,甚至可以彼此不知道对方,而由Controller连接起这两个部分。
模型,即相关的数据,它是对象的内在属性;视图是模型的外在表现形式,一个模型可以对应一个或者多个视图,视图还具有与外界交互的功能;控制器是模型与视图的联系纽带,控制器提取通过视图传输进来的外部信息转化成相应事件,然后由对应的控制器对模型进行更新;相应的,模型的更新与修改将通过控制器通知视图,保持视图与模型的一致性。
下图(图1.1)描述了这三者之间的关系:2、系统设计系统属于浏览器/服务器模型(Browser/Server)。
ofbiz菜鸟笔记
OFBIZ学习一、ofbiz之Hello World⏹下载OFBIZ并配置到当地⏹下载地址:解压(安装)OFBIZ:配置到当地:运行命令行: (cmd)进入到安装目录(即解压旳目录):在安装目录下运行命令: ant load-demo注: 版本较低旳命令也许是 ant run-install⏹安装成功后运行命令: java -jar ofbiz.jar导入到IDE(Eclipse)中:直接import安装目录, 将整个ofbiz导入到eclipse中1.新建练习项目:2.在hot-deploy目录下新建practice目录(apache-ofbiz-12.04.02\hot-deploy\practice)在practice目录下新建webapp、widget目录, 然后新建ofbiz-component.xml文献(apache-ofbiz-12.04.02\hot-deploy\practice\webapp)(apache-ofbiz-12.04.02\hot-deploy\practice\wid)(apache-ofbiz-12.04.02\hot-deploy\practice\ofbiz-component.xml)注: ofbiz-component.xml可直接从(apache-ofbiz-12.04.02\specialpurpose\example)下拷贝后来所有需要新建旳文献都直接从示例中拷贝, 然后进行修改。
代码如下:3.在webapp下新建practice目录(hot-deploy/practice/webapp/practice)4.在第二个practice下新建WEB-INF目录(hot-deploy/practice/webapp/practice/WEB-INF)注: 第一种practice是我们旳组件名, 第二个practice是我们旳应用名5.在下面我们不再使用第一种第二个这种说法, 会直接说组件(component)或应用(webapp)6.在WEB-INF下新建web.xml与controller.xml文献(去拷贝过来)先修改web.xml文献, 在ofbiz 中web.xml配置文献遵守j2ee旳规范, 与j2ee旳配置文献类似。
ofbiz基本流程

ofbiz各配置文件作用以及工作流程1.当客户端发出请求时,调用第一个配置文件WEB-INF/controller.xml,根据请求的地址处理方法1:直接调用java类的方法<request-map uri="login"><security https="true" auth="false"/><event type="java" path="org.ofbiz.webapp.control.LoginWorker" invoke="login"/><response name="success" type="view" value="main"/><response name="error" type="view" value="login"/></request-map>如果为login,会查找path="org.ofbiz.webapp.control.LoginWorker"这个类的invoke="login"这个方法进行处理处理方式2:通过service配置文件取查找对应的service(常用)<request-map uri="createForum"><security https="true" auth="true"/><event type="service" path="" invoke="createForum"/><response name="success" type="view" value="FindForum"/><response name="error" type="view" value="FindForum"/></request-map>表示调用的类型为type="service"调用的方法为invoke="createForum"2.进入servicedef/services.xml,这是service的配置文件从里面找到上面对应的配置信息<service name="createForum" default-entity-name="GroupForum" engine="simple"location="org/ofbiz/group/GroupServices.xml" invoke="createForum" auth="true"> <description>Create a GroupForum</description><permission-service service-name="exampleGenericPermission" main-action="CREATE"/><auto-attributes include="pk" mode="OUT" optional="false"/><auto-attributes include="nonpk" mode="IN" optional="true"/><override name="forumName" optional="false"/></service>文件配置的createForum这个文件实现的相关信息location="org/ofbiz/group/GroupServices.xml"表示实现是通过minilanguage配置文件3.进入script下面的org/ofbiz/group/GroupServices.xml文件通过minilanguage配置文件<simple-method method-name="createForum" short-description="create a GroupForum"> <make-value entity-name="GroupForum" value-name="newEntity"/><sequenced-id-to-env sequence-name="GroupForum" env-name="newEntity.forumId"/> <!-- get the next sequenced ID --><field-to-result field-name="newEntity.forumId" result-name="forumId"/><set-nonpk-fields map-name="parameters" value-name="newEntity"/><create-value value-name="newEntity"/></simple-method>配置了对entity-name="GroupForum"实体的创建的相关信息和操作,该步骤可以用java代码实现.4.进入实体配置文件部分entitymodel.xml<entity entity-name="GroupForum" package-name="org.ofbiz.group" title="GroupForum Entity"> <field name="forumId" type="id-ne"><!-- primary sequenced ID --></field><field name="forumName" type="name"></field><field name="description" type="description"></field><field name="authorID" type="id"></field><field name="created" type="date-time"></field><prim-key field="forumId"/></entity>配置了entity-name="GroupForum" 的实体与数据库映射文件entitygroup.xml<entitygroup xmlns:xsi="/2001/XMLSchema-instance"xsi:noNamespaceSchemaLocation="/dtds/entitygroup.xsd"> <entity-group group="org.ofbiz" entity="GroupForum"/><entity-group group="org.ofbiz" entity="GroupCategory"/><entity-group group="org.ofbiz" entity="GroupThread"/><entity-group group="org.ofbiz" entity="GroupPost"/></entitygroup>配置了实体名称的组5.service执行成功后会返回到展现逻辑配置部分,也就是WEB-INF/controller.xml中<request-map uri="login"><security https="true" auth="false"/><event type="java" path="org.ofbiz.webapp.control.LoginWorker" invoke="login"/><response name="success" type="view" value="main"/><response name="error" type="view" value="login"/></request-map>现在会请求到main中,<view-map name="main" type="screen"page="component://group/widget/group/CommonScreens.xml#main"/>在WEB-INF/controller.xml中找到main的配置信息该显示用screen配置显示component://group/widget/group/CommonScreens.xml#main6.现在根据地址找到配置文件component://group/widget/group/CommonScreens.xml#main表示该文件中name为main的screen<screen name="main"><section><actions><set field="titleProperty" value="OrderOrderTaskList"/><set field="headerItem" value="tasklist"/><scriptlocation="component://order/webapp/ordermgr/WEB-INF/actions/task/ordertasklist.bsh"/> </actions><widgets><decorator-screen name="main-decorator"><decorator-section name="body"><container style="screenlet"><container style="screenlet-header"><label style="boxhead" text="Main Page"/></container><container style="screenlet-body"><section><condition><if-empty field-name="userLogin"/></condition><widgets><container><label text="${uiLabelMap.ExampleMessage}"/></container></widgets></section><container><label text="${uiLabelMap.Welcome}"/></container></container></container></decorator-section></decorator-screen></widgets></section></screen><screen name="login"><section><widgets><decorator-screen name="main-decorator"><decorator-section name="body"><platform-specific><html><html-template location="component://common/webcommon/login.ftl"/></html> </platform-specific></decorator-section></decorator-screen></widgets></section></screen></screens>该配置文件配置了显示的数据以及显示的格式其中数据是通过.bsh文件和service提供的,而显示的格式为ftl文件提供的7.进入group\webapp\group\WEB-INF\actions\forum在bsh为beansheel配置文件,语法与java类似,在这儿是为了提供显示数据import java.util.*;import java.io.*;import org.ofbiz.entity.*;import org.ofbiz.base.util.*;security = request.getAttribute("security");delegator = request.getAttribute("delegator");userLogin = session.getAttribute("userLogin");person = null;if (userLogin != null ) {person = userLogin.getRelatedOne("Person");}forumId = request.getParameter("forumId");categoryId = request.getParameter("categoryId");if ( categroyId == null ||UtilValidate.isEmpty(categoryId) ){categoryId = delegator.getNextSeqId("GroupCategory");}groupCategory = delegator.findByPrimaryKey("GroupCategory", UtilMisc.toMap("categoryId", categoryId));context.put("forumId", forumId);context.put("categoryId", categoryId);context.put("groupCategory", groupCategory);context.put("person", person);该文件把需要的数据放到返回的上下文中8.进入到group\webapp\group\forum\listForum.ftl该文件为Freemarker的文件,作用是代替jsp作显示层<#if forums?has_content>Some of the famous celebrities who have visited our site:<table><ul><#list forums as forum><tr><li><td><a href="EditForum?forumId=${forum.forumId?if_exists}">${forum.forumId?if_exists}</a></td> <td>12 ${forum.forumName?if_exists}</td><td> ${forum.description?if_exists}</td><li><td><a href="deleteForum?forumId=${forum.forumId?if_exists}">${forum.forumId?if_exists}</a></td> </tr><tr><li><td><a href="FindCategory?forumId=${forum.forumId?if_exists}">${forum.forumId?if_exists}</a></td> <td><a href="EditCategory?forumId=${forum.forumId?if_exists}">${forum.forumId?if_exists}</a></td> <td> </td><li><td></td></tr></#list></ul></table></#if>通过一些表达式和判断把数据显示出来,这样整个请求完毕其他配置文件的作用:data目录下的配置文件:<entity-engine-xml><UserLogin userLoginId="DemoBuyer"currentPassword="47ca69ebb4bdc9ae0adec130880165d2cc05db1a" passwordHint=""/> <UserLogin userLoginId="DemoRepAll"currentPassword="47ca69ebb4bdc9ae0adec130880165d2cc05db1a" passwordHint=""/> <UserLogin userLoginId="DemoRepStore"currentPassword="47ca69ebb4bdc9ae0adec130880165d2cc05db1a" passwordHint=""/> <UserLogin userLoginId="DemoCustCompany"currentPassword="47ca69ebb4bdc9ae0adec130880165d2cc05db1a" passwordHint=""/> <UserLogin userLoginId="DemoCustAgent"currentPassword="47ca69ebb4bdc9ae0adec130880165d2cc05db1a" passwordHint=""/> <UserLogin userLoginId="DemoCustomer"currentPassword="47ca69ebb4bdc9ae0adec130880165d2cc05db1a" passwordHint=""/> <UserLogin userLoginId="supplier" partyId="externaluser"currentPassword="47ca69ebb4bdc9ae0adec130880165d2cc05db1a" passwordHint=""/> <UserLoginSecurityGroup groupId="ORDERSUPPLIER_LTD" userLoginId="supplier" fromDate="2001-01-01 12:00:00.0"/></entity-engine-xml>配置了系统启动时后需要添加的一些数据config目录下的配置文件:为国际化配置信息<property key="OrderCaughtExceptionOnCartUpdate"><value xml:lang="en">Caught exception on cart update. </value><value xml:lang="es">Excepción capturada en la actualización del carro.</value><value xml:lang="fr">%Exception attrapée dans la mise à jour du chariot. %</value><value xml:lang="it">Eccezione sull'aggiornamento carrello. </value><value xml:lang="ro">Exceptie la actualizarea cosului. </value><value xml:lang="zh">更新购物车时发生意外情况</value></property>widget里面的form配置文件:<form name="OrderPurchaseProductOptions" type="single"target="OrderPurchaseReportProduct.pdf" title="" extends="OrderPurchaseReportOptions"> <field name="fromOrderDate" title="${uiLabelMap.OrderReportFromDate}"><date-timetype="timestamp"/></field><field name="thruOrderDate" title="${uiLabelMap.OrderReportThruDate}"><date-timetype="timestamp"/></field><field name="submitButton" title="${monRun}"widget-style="smallSubmit"><submit button-type="button"/></field></form>配置了一些表单信息,和screen一样,但是他可以直接显示数据不需要使用Freemaerker的文ftl文件作页面布局,根据配置信息可以直接生成ofbiz-componet.xml文件配置了项目要加载的配置文件的信息,它可以告诉OFBIZ应用程序组件的相关信息:数据模型,商业逻辑,用户接口,种子数据,以及其他程序需要的资源。
Ofbiz 自我总结,入门文档

Ofbiz(Open for business), 开源的电子商务系统,基于JAVA开发,功能强大,可扩展性强。
1.为什么使用Ofbiz呢?首先Ofbiz 是开源的,集成了很多优秀的开源技术:Ant , Freemarker , Jboss 等等。
其次功能强大,拥有已经开发好的,并且稳定的工作流引擎,用户权限系统,前台电子商务系统,后台订单处理,库存管理系统,客户管理等等。
最后Ofbiz提供了一套基于JAVA的功能扩展方案,可以在目前最基本的功能上添加新的功能。
并且基于Component组件开发,对于不需要的功能可以将相应Component去除掉。
2.为什么不用Ofbiz呢?虽然说Ofbiz提供了一整套功能扩展方案,但是其过程十分繁琐。
实现一个最简单的功能(比如读取一张用户表的信息),需要进行配置的文件就有十几个。
对于数据库的操作进行了非常强大的封装,拥有Ofbiz引以为傲的Entity Engine(有点像Hibernate,不过比Hibernate还要猛,一句SQL语句都不用)。
只需要在相应Component的entityengine.xml对要操作的实体(对应表)进行定义,并且定义在特定服务中的增删改查方法即可。
这样说好像很好用的样子,但是实际上,需要付出非常多的时间和精力去学习这套东西,并且学习曲线会很大。
Ofbiz本身自带的功能如果不符合我们自己的需求,基本上很难进行修改,而是应该重新开发对应的功能。
比如它的Order Processing跟目前我们公司的订单管理存在很大的差距。
所以我们必须重构。
而这都需要付出很大的代价。
我们考虑使用Ofbiz的原因主要是想要在其强大功能的基础进行快速的扩展,但是如果很多功能都需要重构的话,那么就得不偿失了。
ofbiz使用注意项:在配置ofbiz路径时不要有空格。
3.如何在ofbiz上扩展一个功能呢?我们以读取显示一个简单的User List来做说明:修改ofbiz使用的数据库:(采用热部署:应用程序目录对应hot-deploy之下)第一步,建立一张User表,将Oracle的JDBC数据驱动Jar包放到这个目录:ofbiz\framework\entity\lib\jdbc第二步,修改相应的数据源配置:将jdbc部分改成对应的参数。
ofbiz配置加增删改查
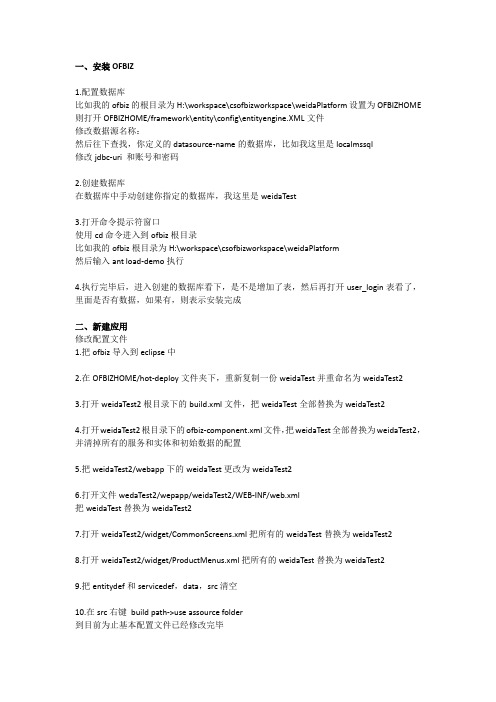
一、安装OFBIZ1.配置数据库比如我的ofbiz的根目录为H:\workspace\csofbizworkspace\weidaPlatform设置为OFBIZHOME 则打开OFBIZHOME/framework\entity\config\entityengine.XML文件修改数据源名称:然后往下查找,你定义的datasource-name的数据库,比如我这里是localmssql修改jdbc-uri 和账号和密码2.创建数据库在数据库中手动创建你指定的数据库,我这里是weidaTest3.打开命令提示符窗口使用cd命令进入到ofbiz根目录比如我的ofbiz根目录为H:\workspace\csofbizworkspace\weidaPlatform然后输入ant load-demo执行4.执行完毕后,进入创建的数据库看下,是不是增加了表,然后再打开user_login表看了,里面是否有数据,如果有,则表示安装完成二、新建应用修改配置文件1.把ofbiz导入到eclipse中2.在OFBIZHOME/hot-deploy文件夹下,重新复制一份weidaTest并重命名为weidaTest23.打开weidaTest2根目录下的build.xml文件,把weidaTest全部替换为weidaTest24.打开weidaTest2根目录下的ofbiz-component.xml文件,把weidaTest全部替换为weidaTest2,并清掉所有的服务和实体和初始数据的配置5.把weidaTest2/webapp下的weidaTest更改为weidaTest26.打开文件wedaTest2/wepapp/weidaTest2/WEB-INF/web.xml把weidaTest替换为weidaTest27.打开weidaTest2/widget/CommonScreens.xml把所有的weidaTest替换为weidaTest28.打开weidaTest2/widget/ProductMenus.xml把所有的weidaTest替换为weidaTest29.把entitydef和servicedef,data,src清空10.在src右键build path->use assource folder到目前为止基本配置文件已经修改完毕现在开始ofbiz的流程学习1.打开weidaTest2/webapp/weidaTest2/WEB-INF/controller.xml使其内容如下图:Request-map 表示一个rul配置,其中属性说明如下:rui:该rul的具体值比如我写的是main,则其完整的url值为http://localhost:8180/weidaTest2/mainSecurity 安全配置属性,https是否使用https连接,auth是否必须登陆Response默认的name值有success,和error其作用跟struts2中的相试,就是根据事件返回的值不同,跳转到不同的视图去,这里没有配置事件,则默认都是跳转到success那里设置为request-map后,设置view-mapname值对应response里的value值Page指示视图的配置文件路径和其name值,#后面的就是name值这里指定视图的配置文件路径为weidaTest2/widget/weidaScreens.xml。
ofbiz 简介

FBiz简介,什么是OFBizOFBiz is an Apache Software Foundation top level project.Apache OFBiz全称是The ApacheOpen For Business Project。
是开放的电子商务平台,是一个非常著名的开源项目,提供了创建基于最新的J2EE/XML规范和技术标准,构建大中型企业级、快平台、跨数据库、跨应用服务器的多层、分布式电子商务类WEB应用系统的框架。
OFBiz几乎实现了所有的J2EE核心设计模式,各个模块之间的耦合比较松散,用户能够比较容易的根据自己的需要进行拆卸,非常灵活。
下面介绍一下它的目录结构以及文件说明。
2、目录结构整个项目目录结构applications:`各个应用的目录,包含了OFBiz核心的应用程序组件,如订单管理,电子商务存储等。
framework:框架目录,包含OFBiz框架的组件,例如实体引擎和服务引擎。
这是OFBiz框架的核心,其他应用程序都是基于它来构建的。
hot-deploy:热部署目录specialpurpose:专门目录,包含一些其他的应用程序,不是OFBiz的核心部分。
themes:主题目录tools:工具目录如果我们要写一个模块,那么建的目录如下,把此模块热部署到hot-deploy中即可。
Ofbiz-component.xml:每个组件都有这样一个文件。
他们用于定位该组件的entity,service,web配臵文件以及jar包等。
build.xml是ant文件,用于测试和构建这个应用程序。
build目录是放本模块生成的jar包和已编译的Java代码。
Config 目录包含配臵文件,例如国际化的UI标签的XML文件。
data目录包含种籽和演示数据。
entitydef目录包含实体配臵的xml,即数据模型定义。
script脚本目录包含业务逻辑的脚本文件。
servicedef包含services服务,是细粒度的业务逻辑(DAO方法)。
ofbiz实现oracle平台小例子详解步骤及注意的问题

一, 在配置的过程中需要注意一下几点:(请先完成下面的小例子,再进行构建)1,一般项目都是创建在hot-deploy目录下2,数据源的配置在D:/ofbiz/framework/entity/configf下的entityengine.xml文件其中在配置oracle数据源时需要把schema-name="OFBIZ"属性删除,避免数据库实例不是ofbiz的情况,具体的文件内容会复制在文件最后3 , D:/ofbiz/framework/entity/lib/jdbc需要在该目录下加入ojdbc.jar4,在D:/ofbiz/framework/base/config目录下有ofbiz-containers.xml,里面定义了ofbiz项目启动时服务的端口,初始为8080建议在初期开发是不要更改该端口,如果出现oracle端口和8080冲突时,建议更改oracle的http服务的端口,因为在ofbiz提供的一些application中很多地方是把端口写死为8080,如果更改不方便访问一些应用程序5 , 更改完数据源配置时需要重构ofbiz目录,具体做法如下在ofbiz根目录下,运行指令ant clean-all ,接着运行指令ant run-install执行完这两个ant的时候就已经完成了对数据库的映射注:如果是郭刚提供的ofbiz框架,在ant前,需要把D:/ofbiz/specialpurpose目录下的build.xml文件中的meetingroom/build.xml删除6 , 框架重构完成以后,在用java -Xmx512m -jar ofbiz.jar进行启动时,可能会出现job_sandbox表出现异常,这时需要把该表中的RUN_BY_INSTANCE_ID字段全部手动填上值,并commit, 注:我全是负值为1二, 简单增删改查实例实现详细步骤:step1 : 首先在hot-deploy创建一个新的项目目录:hellosix在该目录下新建ofbiz-component.xml该xml文件内容如下:<?xml version="1.0" encoding="UTF-8"?><ofbiz-component name="hellosix"xmlns:xsi="/2001/XMLSchema-instance"xsi:noNamespaceSchemaLocation="/dtds/ofbiz-component.xsd"> <!-- define resource loaders; most common is to use the component resource loader --><resource-loader name="main" type="component"/><!-- place the config directory on the classpath to access configuration files --><classpath type="dir" location="config"/><classpath type="dir" location="dtd"/><classpath type="dir" location="script"/><!-- load single or multiple external libraries --><classpath type="jar" location="build/lib/*"/><!-- entity resources: model(s), eca(s), group, and data definitions --><entity-resource type="model" reader-name="main" loader="main" location="entitydef/entitymodel.xml"/> <entity-resource type="group" reader-name="main" loader="main" location="entitydef/entitygroup.xml"/><!-- web applications; will be mounted when using the embedded Jetty container --><webapp name="hellosix"title="UserExample"server="default-server"location="webapp/hellosix"base-permission="OFBTOOLS"mount-point="/hellosix"/></ofbiz-component>step2 : 在hellosix目录下创建一个entitydef目录在该目录下创建entitygroup.xml , entitymodel.xml两个文件entitygroup.xml文件内容为:<?xml version="1.0" encoding="UTF-8"?><entitygroup xmlns:xsi="/2001/XMLSchema-instance"xsi:noNamespaceSchemaLocation="/dtds/entitygroup.xsd"><entity-group group="org.ofbiz" entity="UserExample"/></entitygroup>entitymodel.xml文件内容为:<?xml version="1.0" encoding="UTF-8"?><entitymodel xmlns:xsi="/2001/XMLSchema-instance"xsi:noNamespaceSchemaLocation="/dtds/entitymodel.xsd"><!-- ========================================================= --><!-- ======================== Defaults ======================= --><!-- ========================================================= --><title>Entity of an Open For Business Project Component</title><description>None</description><copyright>Copyright 2001-2006 The Apache Software Foundation</copyright><author>None</author><version>1.0</version><entity entity-name="UserExample" package-name="org.ofbiz.hellosix" title="UserExample Entity"> <field name="userexampleId" type="id-ne"><!-- primary sequenced ID --></field><field name="userexampleName" type="name"></field><field name="description" type="description"></field><field name="longDescription" type="very-long"></field><field name="comments" type="comment"></field><field name="userexampleSize" type="numeric"></field><field name="userexampleDate" type="date-time"></field><prim-key field="userexampleId"/></entitymodel>到此为止我们就定义好了Schema,注意:在ofbiz-component.xml,里面有对entitymodel.xml和entitygroup.xml的引用step3 : 启动ofbiz 访问url:http://localhost:8080/webtools/constrol/main,点击右上方的"Login"用admin/ofibz 登陆,登陆进入后选择链接"Check/Update DataBase" ,这是会出现Check 的Form 该表单验证Schema是否改变,默认的GroupName为org.ofbiz.点击"Check/Update DataBase"按钮,Ofbiz会检验变动情况,显示出一个详细列表,你可以检查一下我们刚才建的"UserExample",如果没有,那可能就是我们前面定义的xml文件有问题了,按照之前的不步骤重新再做一遍到现在为止,我们就成功的完成了,UserExample Schema的创建.step 4 : 下面我们创建数据操作层在d:/ofbiz/hot-deploy/hellosix/ 下创建servicedef目录在该文件下创建services.xml文件该文件内容如下:<?xml version="1.0" encoding="UTF-8"?><services xmlns:xsi="/2001/XMLSchema-instance"xsi:noNamespaceSchemaLocation="/dtds/services.xsd"><description>UserExample Services</description><vendor>OFBiz</vendor><version>1.0</version><!-- Example & Related Services --><service name="createUserExample" default-entity-name="UserExample" engine="simple"location="org/ofbiz/hellosix/UserExampleServices.xml" invoke="createUserExample" auth="false"><description>Create a UserExample</description><auto-attributes include="pk" mode="OUT" optional="false"/><auto-attributes include="nonpk" mode="IN" optional="true"/><override name="userexampleName" optional="false"/></service><service name="updateUserExample" default-entity-name="UserExample" engine="simple"location="org/ofbiz/hellosix/UserExampleServices.xml" invoke="updateUserExample" auth="false"><description>Update a UserExample</description><auto-attributes include="pk" mode="IN" optional="false"/><auto-attributes include="nonpk" mode="IN" optional="true"/></service><service name="deleteUserExample" default-entity-name="UserExample" engine="simple"location="org/ofbiz/hellosix/UserExampleServices.xml" invoke="deleteUserExample" auth="false"><description>Delete a Example</description></services>step 5 : 在D:/ofbiz/hot-deploy/hellosix/下创建目录/script/org/ofbiz/hellosix在该目录下创建UserExampleServices.xml该文件内容如下:<?xml version="1.0" encoding="UTF-8"?><simple-methods xmlns:xsi="/2001/XMLSchema-instance"xsi:noNamespaceSchemaLocation="/dtds/simple-methods.xsd"><!-- Example methods --><simple-method method-name="createUserExample" short-description="create a UserExample"login-required="false"><make-value entity-name="UserExample" value-name="newEntity"/><sequenced-id-to-envsequence-name="UserExample" env-name="erexampleId"/><!-- get the next sequenced ID --><field-to-result field-name="erexampleId" result-name="userexampleId"/><set-nonpk-fields map-name="parameters" value-name="newEntity"/><create-value value-name="newEntity"/></simple-method><simple-method method-name="updateUserExample" short-description="update a UserExample"login-required="false"><entity-one entity-name="UserExample" value-name="lookedUpValue"/><!-- handle statusId change stuff; first put the current statusId in the oldStatusId result --><set-nonpk-fields map-name="parameters" value-name="lookedUpValue"/><store-value value-name="lookedUpValue"/></simple-method><simple-method method-name="deleteUserExample" short-description="delete a Example"login-required="false"><entity-one entity-name="UserExample" value-name="lookedUpValue"/><remove-value value-name="lookedUpValue"/></simple-method></simple-methods>上面定义了:增,删,改的数据操作方法的定义这几个方法在services.xml中提供了用户权限的检查step6 : 创建显示层在D:/ofbiz/hot-deploy/hellosix/widget/hellosix下创建目录widget/hellosix在该目录下创建CommonScreen.xml,UserExampleForms.xml,UserExampleMenus.xml,UserExampleScreens.xml 其中CommonScreen.xml内容如下:<?xml version="1.0" encoding="UTF-8"?><screens xmlns:xsi="/2001/XMLSchema-instance"xsi:noNamespaceSchemaLocation="/dtds/widget-screen.xsd"><screen name="main-decorator"><section><actions><!-- base/top/specific map first, then more common map added for shared labels --><property-map resource="ExampleUiLabels" map-name="uiLabelMap" global="true"/><property-map resource="CommonUiLabels" map-name="uiLabelMap" global="true"/><set field="panyName" from-field="uiLabelMap.ExampleCompanyName" global="true"/><set field="panySubtitle" from-field="uiLabelMap.ExampleCompanySubtitle" global="true"/> <set field="layoutSettings.headerImageUrl" value="/images/ofbiz_logo.jpg" global="true"/><!-- <set field="layoutSettings.headerMiddleBackgroundUrl" value="" global="true"/> --><!-- <set field="layoutSettings.headerRightBackgroundUrl" value="" global="true"/> --><set field="activeApp" value="userexample" global="true"/><set field="appheaderTemplate" value="component://hellosix/webapp/hellosix/includes/appheader.ftl"global="true"/></actions><widgets><include-screen name="GlobalDecorator" location="component://common/widget/CommonScreens.xml"/> </widgets></section></screen><screen name="main"><section><widgets><decorator-screen name="main-decorator"><decorator-section name="body"><container style="screenlet"><container style="screenlet-header"><label style="boxhead" text="Example Main Page"/></container><container style="screenlet-body"><condition><if-empty field-name="userLogin"/></condition><widgets><container><label text="${uiLabelMap.ExampleMessage}"/></container></widgets></section><container><label text="${uiLabelMap.ExampleWelcome}"/></container></container></container></decorator-section></decorator-screen></widgets></section></screen><screen name="login"><section><widgets><decorator-screen name="main-decorator"><decorator-section name="body"><platform-specific><html><html-template location="component://common/webcommon/login.ftl"/></html></platform-specific></decorator-section></decorator-screen></widgets></section></screen></screens>UserExampleForms.xml内容如下:<?xml version="1.0" encoding="UTF-8"?><forms xmlns:xsi="/2001/XMLSchema-instance"xsi:noNamespaceSchemaLocation="/dtds/widget-form.xsd"><form name="ListUserExamples" type="list" list-name="examples"paginate-target="FindUserExample"><actions><entity-condition entity-name="UserExample"><order-by field-name="description"/></entity-condition><field name="userexampleId" title="${uiLabelMap.ExampleExampleId}" widget-style="buttontext"><hyperlink also-hidden="false"description="${userexampleId}"target="EditUserExample?userexampleId=${userexampleId}"/></field><field name="userexampleName" title="${monName}"><display/></field><field name="description" title="${monDescription}"><display/></field><field name="deleteexampleId" title="${uiLabelMap.ExampleExampleId}" widget-style="buttontext"><hyperlink also-hidden="true"description="${userexampleId}"target="deleteUserExample?userexampleId=${userexampleId}"/></field></form><form name="EditUserExample" type="single" target="updateUserExample" title=""default-map-name="userexample"><alt-target use-when="userexample==null" target="createUserExample"/><auto-fields-service service-name="updateUserExample"/><field use-when="userexample!=null"name="userexampleId"title="${uiLabelMap.ExampleExampleId}"tooltip="${monNotModifRecreat}">< display/></field><fielduse-when="userexample==null&&userexampleId==null"name="userexampleId"title="${uiLabelMap. ExampleExampleId}"><ignored/></field><fielduse-when="userexample==null&&userexampleId!=null"name="userexampleId"title="${uiLabelMap. ExampleExampleId}"><displaydescription="${monCannotBeFound}: [${userexampleId}]"also-hidden="false"/></field><field name="description" title="${monDescription}"/><fieldname="submitButton"use-when="example==null"title="${monCreate}"><submitbutton-type="button"/></field><fieldname="submitButton"use-when="example!=null"title="${monUpdate}"><submitbutton-type="button"/></field> </form></forms>UserExampleMenus.xml内容如下:<?xml version="1.0" encoding="UTF-8"?><menus xmlns:xsi="/2001/XMLSchema-instance"xsi:noNamespaceSchemaLocation="/dtds/widget-menu.xsd"><menu name="EditUserExample" default-selected-style="selected"menu-container-style="button-bar button-style-1"type="simple"><menu-item name="EditUserExample" title="${uiLabelMap.ExampleExample}"><link target="EditUserExample?userexampleId=${userexampleId}"/></menu-item></menu></menus>UserExampleScreens.xml内容如下:<?xml version="1.0" encoding="UTF-8"?><screens xmlns:xsi="/2001/XMLSchema-instance"xsi:noNamespaceSchemaLocation="/dtds/widget-screen.xsd"><screen name="FindUserExample"><section><actions><set field="headerItem" value="UserExample"/><set field="titleProperty" value="PageTitleFindExample"/></actions><widgets><decorator-screen name="main-decorator" location="component://hellosix/widget/hellosix/CommonScreens.xml"> <decorator-section name="body"><section><widgets><container><label style="head1">${uiLabelMap.${titleProperty}}</label></container><containerstyle="button-bar"><linktarget="EditUserExample"text="${uiLabelMap.ExampleNewExample}"style="buttontext"/></container><include-form name="ListUserExamples"location="component://hellosix/widget/hellosix/UserExampleForms.xml"/></widgets><fail-widgets><label style="head3">${uiLabelMap.ExampleViewPermissionError}</label></fail-widgets></section></decorator-section></decorator-screen></widgets></section></screen><screen name="CommonExampleDecorator"><actions><set field="headerItem" value="UserExample"/><set field="userexampleId" from-field="erexampleId"/><entity-one entity-name="UserExample" value-name="userexample"/></actions><widgets><decorator-screen name="main-decorator" location="component://hellosix/widget/hellosix/CommonScreens.xml"> <decorator-section name="body"><section><widgets><section><condition><not><if-empty field-name="userexample"/></not></condition><widgets><include-menu name="EditUserExample"location="component://hellosix/widget/hellosix/UserExampleMenus.xml"/><containerstyle="button-bar"><linktarget="EditUserExample"text="${uiLabelMap.ExampleNewExample}"style="buttontext"/></container><containerstyle="button-bar"><labelstyle="head1">${uiLabelMap.${titleProperty}}</label><labelstyle="head2"> ${monFor}"${erexampleName}"[${userexampleId}]</label></container> </widgets></section><decorator-section-include name="body"/></widgets><fail-widgets><label style="head3">${uiLabelMap.ExampleViewPermissionError}</label></fail-widgets></section></decorator-section></decorator-screen></widgets></section></screen><screen name="EditUserExample"><section><actions><set field="titleProperty" value="PageTitleEditExample"/><set field="userexampleId" from-field="erexampleId"/><entity-one entity-name="UserExample" value-name="userexample"/> </actions><widgets><decorator-screen name="CommonExampleDecorator"><decorator-section name="body"><include-form name="EditUserExample"location="component://hellosix/widget/hellosix/UserExampleForms.xml"/> </decorator-section></decorator-screen></widgets></section></screen></screens>step 7 : 下面需要在controller.xml进行mapping的设置在D:/ofbiz/hot-deploy/hellosix/下创建目录webapp/hellosix在D:/ofbiz/hot-deploy/hellosix/webapp/hellosix下创建一个文件index.jsp,创建三个目录error,includes, WEB-INFindex.jsp内容如下:<%response.sendRedirect("control/main");%>在D:/ofbiz/hot-deploy/hellosix/webapp/hellosix/error创建error.jsperror.jsp内容如下:<%@ page import="org.ofbiz.base.util.*" %><html><head><title>Open For Business Message</title><meta http-equiv="Content-Type" content="text/html; charset=iso-8859-1"></head><% String errorMsg = (String) request.getAttribute("_ERROR_MESSAGE_"); %> <body bgcolor="#FFFFFF"><div align="center"><br/><table width="100%" border="1" height="200"><tr><td><table width="100%" border="0" height="200"><tr bgcolor="#CC6666"><div align="center"><font face="Verdana, Arial, Helvetica,sans-serif" size="4"color="#FFFFFF"><b>:ERRORMESSAGE:</b></font></div></td></tr><tr><td><div align="left"><font face="Verdana, Arial, Helvetica,sans-serif"size="2"><%=UtilFormatOut.replaceString(errorMsg,"/n", "<br/>")%></font></div></td></tr></table></td></tr></table></div><div align="center"></div></body></html>在D:/ofbiz/hot-deploy/hellosix/webapp/hellosix/includes下创建文件appheader.ftl该文件内容如下:<#assign selected = headerItem?default("void")><div id="app-navigation"><h2>${uiLabelMap.ExampleApplication}</h2><ul><li<#if selected = "main"> class="selected"</#if>><ahref="<@ofbizUrl>main</@ofbizUrl>">${monMain}</a></li><li<#if selected = "Example"> class="selected"</#if>><ahref="<@ofbizUrl>FindUserExample</@ofbizUrl>">${uiLabelMap.ExampleExample}</a></li><#if userLogin?has_content><li class="opposed"><a href="<@ofbizUrl>logout</@ofbizUrl>">${monLogout}</a></li> <#else><li class="opposed"><ahref="<@ofbizUrl>${checkLoginUrl?if_exists}</@ofbizUrl>">${monLogin}</a></li> </#if></ul><br class="clear" /></div>在D:/ofbiz/hot-deploy/hellosix/webapp/hellosix/WEB-INF下创建二个文件controller.xml,web.xml其中controller.xml内容如下:<?xml version="1.0" encoding="UTF-8"?><site-conf xmlns:xsi="/2001/XMLSchema-instance"xsi:noNamespaceSchemaLocation="/dtds/site-conf.xsd"><description>Example Component Site Configuration File</description><owner>Copyright 2001-2006 The Apache Software Foundation</owner><errorpage>/error/error.jsp</errorpage><!-- event handlers --><handler name="java" type="request" class="org.ofbiz.webapp.event.JavaEventHandler"/><handler name="soap" type="request" class="org.ofbiz.webapp.event.SOAPEventHandler"/><handler name="service" type="request" class="org.ofbiz.webapp.event.ServiceEventHandler"/><handler name="simple" type="request" class="org.ofbiz.webapp.event.SimpleEventHandler"/><!-- view handlers --><handler name="screen" type="view" class="org.ofbiz.widget.screen.ScreenWidgetViewHandler"/><handler name="screenfop" type="view" class="org.ofbiz.widget.screen.ScreenFopViewHandler"/><handler name="jsp" type="view" class="org.ofbiz.webapp.view.JspViewHandler"/><handler name="http" type="view" class="org.ofbiz.webapp.view.HttpViewHandler"/><!--These can be used to return the reports as views; make sure the classes are compiled and available<handler name="datavision" type="view" class="org.ofbiz.webapp.view.DataVisionViewHandler"/><handler name="jasperreportspdf" type="view" class="org.ofbiz.webapp.view.JasperReportsPdfViewHandler"/> <handler name="jasperreportsxml" type="view" class="org.ofbiz.webapp.view.JasperReportsXmlViewHandler"/> --><postprocessor><!-- Events to run on every request after all other processing (chains exempt) --><!-- <event type="java" path="org.ofbiz.webapp.event.TestEvent" invoke="test"/> --></postprocessor><!-- Security Mappings --><request-map uri="checkLogin" edit="false"><description>Verify a user is logged in.</description><security https="true" auth="false"/><event type="java" path="org.ofbiz.webapp.control.LoginWorker" invoke="checkLogin" /><response name="success" type="view" value="main"/><response name="error" type="view" value="login"/></request-map><request-map uri="login"><security https="true" auth="false"/><event type="java" path="org.ofbiz.webapp.control.LoginWorker" invoke="login"/><response name="success" type="view" value="main"/><response name="error" type="view" value="login"/></request-map><request-map uri="logout"><security https="true" auth="true"/><event type="java" path="org.ofbiz.webapp.control.LoginWorker" invoke="logout"/><response name="success" type="request" value="checkLogin"/><response name="error" type="view" value="main"/></request-map><!-- End of Security Mappings --><!-- Request Mappings --><request-mapuri="main"><security https="true" auth="false"/><responsename="success" type="view" value="main"/></request-map><request-map uri="authview"><security https="true"auth="false"/><response name="success"type="view"value="main"/></request-map><request-map uri="setSessionLocale"><security https="true" auth="false"/><event type="java" path="monEvents" invoke="setSessionLocale"/><response name="success" type="view" value="main"/><response name="error" type="view" value="main"/></request-map><!-- Example Requests --><request-mapuri="FindUserExample"><response name="success"type="view"value="FindUserExample"/></request-map><request-map uri="EditUserExample"><response name="success"type="view"value="EditUserExample"/></request-map><request-map uri="createUserExample"><security https="true" auth="false"/><event type="service" path="" invoke="createUserExample"/><response name="success" type="view" value="EditUserExample"/><response name="error" type="view" value="EditUserExample"/></request-map><request-map uri="updateUserExample">。
OFBiz教程

2.3创建主修饰器来修饰这个应用
• Step - 1 : 在CommonScreens.xml 文件中创建screen, 名称为"main-decorator"。(参考Example 组件中的 CommonScreens.xml) • Step - 2 : 现在在已有的CommonPracticeDecorator screen包含这个修饰器。 • web.xml
• • • • • • • •
Step - 4 创建一个"web.xml"(web.xml遵守 j2ee web应用规范) Step - 5 创建一个"controller.xml" (被ofbiz webapp控制器使用)的文件 Step – 6创建出错处理文件/webapp/practice/error/error.jsp Step - 7 : 在你的组件目录practice中创建一个"widget"(hot-deploy/practice/widget). Step - 8 : 在"widget"中创建文件"PracticeScreens.xml“l中的request-map、view-map Step - 10 : 现在该运行你的第一个练习应用 Step - 11 : 在webapp目录“practice”创建一个index.jsp文件,这个文件负责重定向响应至主 页control/main
1.3创建web应用
• • • Step - 1创建一个"webapp"目录(hot-deploy/practice/webapp). Step - 2在webapp目录下创建一个子目录命名为"practice"(hot-deploy/practice/webapp/practice) Step - 3在你webapp下创建WEB-INF目录(hot-deploy/practice/webapp/practice/WEB-INF)
OfBiz安装和配置

必备软件Jdk7文件名:java_ee_sdk-6u4-jdk7-windows.exeeclipseMySQL Installer 5.6 for WindowsMySql Connectors文件名:mysql-connector-java-gpl-5.1.35.msi.Net Framework 4.0文件名:dotNetFx40_Full_x86.exeOfBiz13.07.01apache-ofbiz-13.07.01.zip安装安装和设置JAVA环境新建系统变量JAVA_HOME:C:\Program Files (x86)\Java\jdk7系统变量Path的值加入内容:%JAVA_HOME%\bin;安装MySql数据库依赖于:Microsoft .NET Framework 4 Client ProfiledotNetFx40_Client_setup.exeMicrosoft Visual C++ 2013 Redistributable Package (x86 or x64)vcredist_x86.exe安装MySql建立一个数据库ofbiz。
新建一个用户ofbiz和密码ofbiz,并且赋予ofbiz全部权限。
集成开发工具eclipse(java环境要加进来)解压apache-ofbiz-13.07.01.zip到eclipse工作目录下,打开eclipse载入apache-ofbiz-13.07.01数据库安装和配置将MySql的jdbc驱动拷贝到${Ofbiz_Home}/framework/entity/lib/jdbc 目录下。
不安装,会报如下错误:[java] Exception: ng.ClassNotFoundException[java] Message: Cached loader got a known bad class name:com.mysql.jdbc.Driver[java] ---- stack trace ------设置实体引擎(Entity Engine)的默认数据库配置文件:${Ofbiz_Home}/framework/entity/config/entityengine.xml●默认的数据库为derby,把localderby改成MySql<delegator name="default" entity-model-reader="main" entity-group-reader="main" entity-eca-reader="main" distributed-cache-clear-enabled="false"><group-map group-name="org.ofbiz" datasource-name="localmysql"/><group-map group-name="org.ofbiz.olap" datasource-name="localmysql"/><group-map group-name="org.ofbiz.tenant" datasource-name="localmysql"/> </delegator><delegator name="default-no-eca" entity-model-reader="main" entity-group-reader="main" entity-eca-reader="main" entity-eca-enabled="false" distributed-cache-clear-enabled="false"> <group-map group-name="org.ofbiz" datasource-name="localmysql"/><group-map group-name="org.ofbiz.olap" datasource-name="localmysql"/><group-map group-name="org.ofbiz.tenant" datasource-name="localmysql"/> </delegator><!-- be sure that your default delegator (or the one you use) uses the same datasource for test. You must run "ant run-install" before running "ant run-tests" --><delegator name="test" entity-model-reader="main" entity-group-reader="main" entity-eca-reader="main"><group-map group-name="org.ofbiz" datasource-name=" localmysql "/><group-map group-name="org.ofbiz.olap" datasource-name=" localmysql "/><group-map group-name="org.ofbiz.tenant" datasource-name=" localmysql "/></delegator>●修改实体引擎的默认数据库的配置信息<datasource name="localmysql"helper-class="org.ofbiz.entity.datasource.GenericHelperDAO"field-type-name="mysql"check-on-start="true"add-missing-on-start="true"check-pks-on-start="false"use-foreign-keys="true"join-style="ansi-no-parenthesis"alias-view-columns="false"drop-fk-use-foreign-key-keyword="true"engine="InnoDB" <!-- 现在mysql一般的引擎都是InnoDB,早在4.0时代就不推荐使用type,现在改成engine ,-->character-set="utf8" <!--字符集>collate="utf8_general_ci"><!--排序方式><read-data reader-name="seed"/><read-data reader-name="seed-initial"/><read-data reader-name="demo"/><read-data reader-name="ext"/><inline-jdbcjdbc-driver="com.mysql.jdbc.Driver"jdbc-uri="jdbc:mysql://127.0.0.1/ofbiz?autoReconnect=true"jdbc-username="ofbiz"<!-- 这里都是数据库的基本配置信息,改成自己对应的-->jdbc-password="ofbiz"isolation-level="ReadCommitted"pool-minsize="2"pool-maxsize="250" 连接池没必要搞这么多,50够了time-between-eviction-runs-millis="600000"/></datasource>运行OfBiz (CTRL+R)输入cmd进入命令模式,cd到你eclipse的工作目录workspace下项目ofbiz12.0.4的根目录(如:D:\workspace\ofbiz),安装OFBIZ演示数据:$ ant load-demo$ ant start安装过程出现的错误解决方案:1.错误:Exception: com.mysql.jdbc.exceptions.MySQLSyntaxErrorExceptionMessage: Table 'ofbiz.status_type' doesn't exist在5.1以及之前版本的MySQL中新建一个Table,可以这样执行:CREATE TABLE t (i INT) TYPE = MYISAM;或者CREATE TABLE t (i INT) ENGINE = MYISAM;在MySQL5.5版本中,用TYPE来指定存储引擎已经行不通,标准用法是ENGINE。
ofbiz工作流
一、工作流引擎指南1、简介OFBiz工作流引擎基于WfMC和OMG规范(看相关文档可以了解这些规范的信息)。
它是服务框架的成员之一,与EntityEngine紧密集成。
工作流引擎把entitymodel_workflow.XML文件找到的实体用作定义信息,而把entitymode_workeffort文件找到的实体用作运行时刻存储。
一个流程或任务(activity)都是实时的。
因此,工作流引擎不是运行在一个线程上,而只是简单的一组API和通用对象在处理流程。
当工作流发生改变时,引擎马上就处理这个变化,处理结束后,引擎返回结果。
因此,当一个应用垮了(或系统重启),重启时工作流接着从停下的位置继续执行。
工作流引擎不是为一个web站点的处理流程而设计的。
这是一个普遍的错误概念。
web站点的流转由控制Servlet处理。
工作流是为了达到一个目标而进行的手动和自动任务(activitie)处理。
OFBiz工作流引擎把XPDL作为自己的流程定义语言。
这是一个开放的标准,十分灵活。
在XPDL规范没有明确或留给厂商实现的地方,我们在XPDL扩展节说明。
2、XPDL扩展工作流使用XPDL进行设计。
本文档不讨论XPDL细节,这些内容在WfMC有详细解释,请看相关文档。
在WfMC规范里,留了很多属性(attribute)给厂商使用。
下面是我们在使用的XPDL扩展:任务(ACTIVITY)扩充属性acceptAllAssignments-这个扩展属性告诉工作流引擎在一个任务开始之前的所有委派都必须接受。
当一个任务有多个参与者,并且要求在任务开始前每个参与者必须接受自己收到的委派时,本属性将会很有用。
(缺省值:NO)completeAllAssignments-类似于acceptAllAssignments属性,告诉工作流引擎在一个任务完成之前的必须完成所有的委派。
例如,在某个薪资任务中,要求所有的员工必须提交自己的时间表后才能进行下一步动作。
Ofbiz架构讲解与讨论

Ofbiz架构讲解与讨论Ofbiz的MVC架构。
Model模型,在ofbiz中称为实体,通过实体引擎来操纵。
View 视图,ofbiz使用screen widget组装视图,视图的展现形式可以使用jsp,freemark,velocity。
Controller ofbiz使用控制器+script(groovy,bsh)作为控制器。
典型的请求处理过程如下。
请求(url)控制器处理请求安全检查响应请求返回视图名称找视图映射找到模板。
controller.xml<request-map uri="createAdmin"><description>Create admin.</description><security https="false"auth="false"/><event type="java"path="com.ufinity.web.HubStarServices"i nvoke="createAdmin"/><response name="success"type="view"value="createAdmin"/></request-map><view-map name="createAdmin" type="screen"page="component://trustSG/widget/CommonScreens.xml#createAdmin"/> CommonScreens.xml<screen name="createAdmin"><section><actions/><widgets><decorator-screen name="main-decorator"location="${parameters.mainDecoratorLocation}"><decorator-section name="body"><container style="screenlet"><container style="screenlet-header"></container><platform-specific><html><html-templatelocation="component://trustSG/webapp/trustSG/createAdmin.ftl"/></html></platform-specific></container></decorator-section></decorator-screen></widgets></section></screen>1.View(视图)Ofbiz采用Screen Widget的模板拼配作为视图。
Ofbiz

Ofbiz(Open for business), 开源的电子商务系统,基于JAVA开发,功能强大,可扩展性强。
1.为什么使用Ofbiz呢?首先Ofbiz 是开源的,集成了很多优秀的开源技术:Ant , Freemarker , Jboss 等等。
其次功能强大,拥有已经开发好的,并且稳定的工作流引擎,用户权限系统,前台电子商务系统,后台订单处理,库存管理系统,客户管理等等。
最后Ofbiz提供了一套基于JAVA的功能扩展方案,可以在目前最基本的功能上添加新的功能。
并且基于Component组件开发,对于不需要的功能可以将相应Component去除掉。
2.为什么不用Ofbiz呢?虽然说Ofbiz提供了一整套功能扩展方案,但是其过程十分繁琐。
实现一个最简单的功能(比如读取一张用户表的信息),需要进行配置的文件就有十几个。
对于数据库的操作进行了非常强大的封装,拥有Ofbiz引以为傲的Entity Engine(有点像Hibernate,不过比Hibernate还要猛,一句SQL语句都不用)。
只需要在相应Component的entityengine.xml对要操作的实体(对应表)进行定义,并且定义在特定服务中的增删改查方法即可。
这样说好像很好用的样子,但是实际上,需要付出非常多的时间和精力去学习这套东西,并且学习曲线会很大。
Ofbiz本身自带的功能如果不符合我们自己的需求,基本上很难进行修改,而是应该重新开发对应的功能。
比如它的Order Processing跟目前我们公司的订单管理存在很大的差距。
所以我们必须重构。
而这都需要付出很大的代价。
我们考虑使用Ofbiz的原因主要是想要在其强大功能的基础进行快速的扩展,但是如果很多功能都需要重构的话,那么就得不偿失了。
ofbiz使用注意项:在配置ofbiz路径时不要有空格。
3.如何在ofbiz上扩展一个功能呢?我们以读取显示一个简单的User List来做说明:修改ofbiz使用的数据库:(采用热部署:应用程序目录对应hot-deploy之下)第一步,建立一张User表,将Oracle的JDBC数据驱动Jar包放到这个目录:ofbiz\framework\entity\lib\jdbc第二步,修改相应的数据源配置:将jdbc部分改成对应的参数。
OFBIZ功能大全
OFBIZ功能大全(上)1、通用功能∙免费开源软件o没有版权费或版权维护费o没有对厂商、服务提供商或应用的倚赖o活跃并能提供有力支持的社区o你能获得全部开源代码▪你能看到每个功能是怎么实现的▪你能快速跟踪到问题▪你能修改任何东西o Apache 2.0开源版权协议▪你不需要开源你修改的代码▪你能重新打包、分发甚至销售衍生的软件▪你能说它是基于OFBiz的∙基于各种标准o很容易使用从类似的软件中获得的技能o很容易在同样的标准基础上重用已有的软件o很容易与其它内部或合作伙伴的系统整合o OFBiz基于: Sun Java, J2EE; W3C XML, HTML, SOAP; WfMC XPDL; OMG GL, Party, Product, Workflow∙全部应用都基于同样的框架、工具和组件o不需要学习和使用很多不同的技术o不需要整合各种应用o不会因分立技术间的糟糕整合而在功能上受到限止o因为一致的和易于维护的组件而节省大量金钱∙基于灵活而通用的数据模型标准o覆盖了所有主要的业务中使用的实体o提供了一个简单获得定制数据的结构o对实体名称使用通用术语,易于理解和使用∙灵活而高效地使用数据层o不倚赖数据库系统;支持许多不同的数据库o不需要写繁琐的存储代码和设置o易于使用XML数据定义o强大的API提供了因数据定义不同而不同的通用操作o大部分操作能够用一行简单的代码实现,不需要写支持代码∙松耦合多层组件结构o易于定制和重用组件o易于通过已有组件的组合实现新的应用o易于找到基于同一样式的代码和其它组件o由于很好地定义和管理了依赖关系,所以能够在不破坏其它组件的情况下替换组件∙分布式架构o易于扩展到多台服务器或服务器池o易于与其它系统无缝整合和通讯∙基于服务的逻辑层o所有逻辑都作为服务建模o易于重用逻辑o服务能自动作为Web服务暴露出来o易于添加定制用户界面,甚至一次很多个o易于把系统分布到多个服务器上o易于与其它系统通讯∙高级Web应用框架o分立的输入过程逻辑、浏览数据准备逻辑和浏览呈现的模板o支持许多不同类型的逻辑,包括脚本语言和服务o支持许多不同类型的浏览模板,包括XML/XSLT、FreeMarker、Velocity、JSP 等o基于安全和市场考虑,记录所有访问和页面点击o从服务器运行开始按时段保存流量和性能数据∙完美的B2C和B2B电子商务∙易于配置安全或公开的目录浏览∙支持根据具体页面保护方法从HTTP(非安全)自动切换到HTTPS(安全)并返回HTTP∙产品查找o产品搜索▪支持包括关键字、分类、特征和其它限制条件的组合条件搜索▪为产品关键字建立索引▪能够搜索全部关键字或任何指定的关键字▪能够配置忽略字,在建立索引和搜索时会忽略这些字▪能够配置后缀(如-y、-ies等),在建立索引时会忽略这些后缀的差异,从而不会影响搜索结果▪不同的产品域在索引时能够具有不同的权重▪分类限制条件▪能够把对产品的搜索限制在指定分类中;这令仅对有效分类中的产品进行关键字等的搜索成为可能▪能够在分类及所有子分类中进行搜索▪能够在搜索中包含多个分类从而实现获得分类中产品的交集,如产品必须在全部分类中▪能够用指定的特征来限制对产品的搜索▪搜索结果缺省基于索引中的关键字权重排序,当然也支持其它排序方法▪当显示搜索结果时,会列出用到的全部限制条件,你可以去掉其中任何一个o浏览产品分类▪在相关页面上左侧可展开的树会显示当前分类(缺省)▪能够为不同的分类指定不同的模板,为不同的产品指定不同的子模板▪缺省会一次显示10个产品,你能够转到上一页和下一页(这些设置可以很容易更改)▪产品能够属于多个分类▪子分类能够属于多个上级分类▪根浏览分类会根据相关联的有效目录的设置自动改变▪全部产品、分类和目录在设置的时间段内有效▪对产品、分类和目录没有数量限制o产品详细浏览▪显示大的产品图片(如果指定了的话),会有一个到详细图片的链接(如果指定了的话)▪显示全部相关产品信息包括名称、简要描述和详细描述、价格、是否有货等▪显示全部配套产品、较高端产品、比这个产品评价低的产品、比这个产品评价高的产品以及通过简单地修改模板显示任何其它想要的关联产品▪对于带有变量的产品(又称为“虚拟”产品),把每个特征类型作为可选特征用下拉框显示;为了处理有效的特征组合,会在第一个下拉框中显示全部选项,其它的下拉框会在前一个选择了之后才会出现选项▪对于带有变量的产品,能够为第一个可选的特征类型的每一个特征显示小图片;这个功能的一个很有用的应用是先让用户选择颜色,为每种不同的颜色提供一个小图片;当把大图片与带有变量的产品关联时,大图片会随着下拉框中的选项改变而改变▪在当前分类中显示上一个和下一个产品的链接,以便浏览指定分类的详细内容▪通过灵活的产品属性和特征,能够很容易地添加和显示你要的附加信息o指定分类▪在指定页面如首页上显示▪分类的范例有前10个最具人气产品、促销产品、新产品等▪这些分类与有效的目录关联o配套产品和较高端产品▪按产品关联的指定类型建模▪能够包括产品的负面评论、市场包等▪为每个产品显示在产品详细信息页面上o购物车随机显示配套产品▪从当前购物车中的全部物品中随机选择它们的配套产品▪一次显示3个;当不同产品多于3个时,会在每个新页面上选择一组不同的来显示▪向购物车添加一个产品时,它就不再作为配套产品显示了▪在购物车详细页面上显示▪在相关页面右侧的小购物车下面的一个小方框中显示(缺省)o快速再定货▪再定货列表从以前的定单产生▪列表把订购数量和订购频率作为权重▪对指定产品的缺省再定货数量是以前订购数量的平均数▪在任何给定时间只显示前五个▪当产品添加到购物车后就不再显示了▪在相关网页的右侧底部的一个小方框中显示(缺省) ∙促销o支持的促销条件▪购物车部分购物合计▪产品总数▪X 产品总量▪X 产品数量▪自创建以来的财物日▪会员▪角色类型o支持的促销行为▪购买时的礼品▪免费送货▪X Y%产品折扣▪X Y产品折扣▪X Y产品价格▪定单百分比折扣▪定单总额取整o对每个定单、客户、促销限制使用o促销代码▪能够对促销应用▪对每个客户、代码限制使用▪能够仅让用户用指定电子邮件地址或会员ID使用o能够把产品和/或分类与整个促销或一个指定条件或行为关联起来,支持包括、不包括和一直三种关联形式o通过条件和行为能够支持购买X免费获得Y(或Z%的折扣)以及许多其它选项∙基于规则的定价∙客户档案资料∙购物车和结帐流程∙定单历史记录∙分支机构和市场活动数据注意:会员可以是一个人或一组会员。
ofbiz服务流程
ofbiz服务流程Ofbiz服务调用流程如何定义以及调用自己的service?一.定义一个服务1.在目录${component:learning}中,新建一个名为servicedef 的目录。
在那个目录中,新建一个叫做services.xml。
2.在文件${component:learning}\ofbiz-component.xml中,在最后一个元素后添加下面内容:<="" bdsfid="73" loader="main" p="" type="model">location="servicedef/services.xml"/>它告诉learning组件在文件${component:learning}\servicedef\services.xml 中查找服务定义。
二.创建服务的java类。
在包org.ofbiz.learning.learning中,新建一个LearningServices的类。
备注:服务必须返回一个map。
该map必须包含至少一个entry。
这个entry必须有一个键responseMessage(见org.ofbiz.service.ModelService.RESPONSE_MESSAGE),可拥有的值如下:success 或ModelService.RESPOND_SUCCerror 或ModelService.RESPOND_ERRORfail 或ModelService.RESPOND_FAIL使用ServiceUtil.returnSuccess()来构建最小的返回map,我们不需要关心添加responseMessage键值对。
另一个常用的entry是键为successMessage(ModelService.SUCCESS_MESSAGE)。
ofbiz初级--安装与配置

1:ofbiz下载1.1 svn方式下载trunk : $ svn co /repos/asf/ofbiz/trunk release10.04 : $ svn co/repos/asf/ofbiz/branches/release10.041.2 http方式下载/apache//ofbiz/apache-ofbiz-10.04.z ip (下载之后,解压,import进eclise)1.3 备注网络不好或硬件配置不高的同学建议使用http方式下载。
登陆/ 获取ofbiz 其他下载方式或者版本.2:ofbiz编译2.1 命令行原始方式编译进入ofbiz 根目录之后,执行java -jarframework/base/lib/ant-launcher-1.7.1.jar -libframework/base/lib/ant (需要设置path环境变量)2.2 命令行批处理方式编译进入ofbiz 根目录之后,window环境执行ant 或者 ant.bat , linux环境执行./ant 。
(需要设置JAVA_HOME环境变量)2.3 eclipse build.xml方式编译两种方法:方法一:右键根目录下的build.xml,弹出窗口执行run as,然后ant build (需要设置JA VA_HOME环境变量)方法二:eclipse 中调出ant view.将ofbiz 根目录下的bulid.xml 拖到ant view,在ant view 中展开OFBiz Main Build 这个tree。
双击build [default]这个节点,即可完成编译. (需要设置JA VA_HOME环境变量)编译成功标志:BUILD SUCCESSFULTotal time: XX seconds一般情况当出现上述两行字样时代表编译成功。
当然并不全是出现这两行就代表成功了,你得留意日志。
3:ofbiz启动3.1 命令行启动进入ofbiz-home 执行 Java -Xms128M -Xmx512M -XX:MaxPermSize=128m-jar ofbiz.jar 。
ofbiz中的几个重要文件总结
controller.xml
位置:(以accounting为例)accounting\webapp\accounting\WEB-INF
作用:负责控制接收到的请求request。任何到来的请求,无论是屏幕请求,还是服务请求或事件请
求,都要经过controller.xml的处理,然后转交给相应的相应的部分处理。
<load-on-startup>1</load-on-startup>
</servlet>
<servlet-mapping>
<servlet-name>ControlServlet</servlet-name>
<url-pattern>/control/*</url-pattern>
<display-name>ControlServlet</display-name>
<description>Main Control Servlet</description>
<servlet-class>org.ofbiz.webapp.control.ControlServlet</servlet-class>
/s/blog_4a4820f9_0008hi.html
分享到:
(当请求"main"到来时,在controller.xml中,先找到<request-map uri="main">,根据其value="main",继续向下找到view-map name="main",最后得到该请求该返回的页面位置page="component://accounting/widget/CommonScreens.xml#main" )
ofbiz简述
OFBIz之旅[结构]注意:1,持久层,在OFBIZ中的定义,就是Model。
DAO被划分到业务层中。
OFBIz已经改名为OpenTaps项目发展了。
其自身的工作流引擎也已经停止发展。
现在改用内嵌式的shark工作流引擎作为自己的工作流引擎。
而且,实际上并没有使用shark制作任何工作流。
Opentaps的宗旨,还是使用一系列自创的开源技术,开发大规模的企业级应用程序。
它的目标,不是工作流,也不是appfuse这样一个整合其他开源技术的演示性的网站,而是一个综合的、企业级的电子商务网站。
First, go into your OFBiz directory and take a look inside:首先,进入Ofbiz目录:[sichen@localhost ofbiz_5010]$ ls -ltotal 88drwxrwxr-x 15 sichen sichen 4096 May 20 07:54 applicationsdrwxrwxr-x 8 sichen sichen 4096 May 20 07:59 base-rw-rw-r-- 1 sichen sichen 10173 May 20 07:58 build.XMLdrwxrwxr-x 4 sichen sichen 4096 May 20 07:59 datadrwxrwxr-x 24 sichen sichen 4096 May 20 07:58 Frameworkdrwxrwxr-x 3 sichen sichen 4096 May 20 07:52 hot-deploy-rwxrwxr-x 1 sichen sichen 309 May 20 07:58 ij.ofbizdrwxrwxr-x 2 sichen sichen 4096 May 20 08:08 logs-rw-rw-r-- 1 sichen sichen 21167 May 20 08:07 ofbiz.jar-rw-rw-r-- 1 sichen sichen 2869 May 20 07:58 rc.ofbizdrwxrwxr-x 6 sichen sichen 4096 May 20 07:55 specialized-rw-rw-r-- 1 sichen sichen 265 May 20 07:58 startofbiz.bat-rwxrw-r-- 1 sichen sichen 790 May 20 07:58 startofbiz.sh-rwxrw-r-- 1 sichen sichen 325 May 20 07:58 stopofbiz.shdrwxrwxr-x 12 sichen sichen 4096 May 20 07:52 Web siteThings to note here:1,ofbiz-component.xml 每个组件都有这样一个文件。
OFBIZ ERP功能列表

1产品分类
2产品单位设置
3产品
二仓库管理
1联系方式
2库存
3库存明细
4采购入库
5调拨
6实务盘存
7销售出货
8销售退货
三订单管理
1报价
1.1报价查询
1.2新建报价单
1.3添加报价项
1.4修改报价项
1.5设计报价项分类
1.6设置调整类型
1.7报价单打印
2采购订单
2.1订单查询
2.2创建供货单
2.3订单创建
2.4编辑订单(编辑项目)
2.5设置订单调整项
2.6订单审批
2.7新建送货信息记录(准备入库)
3销售订单
3.1订单查询
3.2创建客户
3.3订单创建
4退货订单
4.1
4.2退货给供应商
4.3客户退货
四应收管理
1发票
1.1发票查询
1.2新加发票
1.3发票明细
1.4金额调整
1.6发票状态调整
2收款
2.1收款查询
2.2创建收款
五应付管理
六会员管理
1人员
1.1查询人员
1.2创建人员
2权限管理
2.1安全组
2.2新建安全组
2.3为账号付权限
七生产管理
1创建生产产品任务
2新加规程
3新建规程任务
4新建物理清单
5运行生成资源计划八人事薪资
1人事管理
1.1新建员工
1.2查询员工
1.3查询员工详情
2公共通讯录管理
2.1新增电话
2.2查询通讯录
2.3删除电话
3部门管理
3.1新建部门
3.2查询部门。
- 1、下载文档前请自行甄别文档内容的完整性,平台不提供额外的编辑、内容补充、找答案等附加服务。
- 2、"仅部分预览"的文档,不可在线预览部分如存在完整性等问题,可反馈申请退款(可完整预览的文档不适用该条件!)。
- 3、如文档侵犯您的权益,请联系客服反馈,我们会尽快为您处理(人工客服工作时间:9:00-18:30)。
ofbiz各配置文件作用以及工作流程2008-04-18 14:351.当客户端发出请求时,调用第一个配置文件WEB-INF/controller.xml,根据请求的地址处理方法1:直接调用java类的方法<request-map uri="login"><security https="true" auth="false"/><event type="java" path="org.ofbiz.webapp.control.LoginWorker" invoke="login"/><response name="success" type="view" value="main"/><response name="error" type="view" value="login"/></request-map>如果为login,会查找path="org.ofbiz.webapp.control.LoginWorker"这个类的invoke="login"这个方法进行处理处理方式2:通过service配置文件取查找对应的service(常用)<request-map uri="createForum"><security https="true" auth="true"/><event type="service" path="" invoke="createForum"/><response name="success" type="view" value="FindForum"/><response name="error" type="view" value="FindForum"/></request-map>表示调用的类型为type="service"调用的方法为invoke="createForum"2.进入servicedef/services.xml,这是service的配置文件从里面找到上面对应的配置信息<service name="createForum" default-entity-name="GroupForum"engine="simple"location="org/ofbiz/group/GroupServices.xml"invoke="createForum" auth="true"><description>Create a GroupForum</description><permission-service service-name="exampleGenericPermission" main-action="CREATE"/><auto-attributes include="pk" mode="OUT" optional="false"/> <auto-attributes include="nonpk" mode="IN" optional="true"/> <override name="forumName" optional="false"/></service>文件配置的createForum这个文件实现的相关信息location="org/ofbiz/group/GroupServices.xml"表示实现是通过minilanguage配置文件3.进入script下面的org/ofbiz/group/GroupServices.xml文件通过minilanguage配置文件<simple-method method-name="createForum" short-description="create a GroupForum"><make-value entity-name="GroupForum" value-name="newEntity"/> <sequenced-id-to-env sequence-name="GroupForum"env-name="newEntity.forumId"/> <!-- get the next sequenced ID --><field-to-result field-name="newEntity.forumId"result-name="forumId"/><set-nonpk-fields map-name="parameters"value-name="newEntity"/><create-value value-name="newEntity"/></simple-method>配置了对entity-name="GroupForum"实体的创建的相关信息和操作,该步骤可以用java代码实现.4.进入实体配置文件部分entitymodel.xml<entity entity-name="GroupForum" package-name="org.ofbiz.group"title="GroupForum Entity"><field name="forumId" type="id-ne"><!-- primary sequenced ID --></field><field name="forumName" type="name"></field><field name="description" type="description"></field><field name="authorID" type="id"></field><field name="created" type="date-time"></field><prim-key field="forumId"/></entity>配置了entity-name="GroupForum" 的实体与数据库映射文件entitygroup.xml<entitygroup xmlns:xsi="/2001/XMLSchema-instance" xsi:noNamespaceSchemaLocation="/dtds/enti tygroup.xsd"><entity-group group="org.ofbiz" entity="GroupForum"/><entity-group group="org.ofbiz" entity="GroupCategory"/><entity-group group="org.ofbiz" entity="GroupThread"/><entity-group group="org.ofbiz" entity="GroupPost"/></entitygroup>配置了实体名称的组5.service执行成功后会返回到展现逻辑配置部分,也就是WEB-INF/controller.xml中<request-map uri="login"><security https="true" auth="false"/><event type="java" path="org.ofbiz.webapp.control.LoginWorker" invoke="login"/><response name="success" type="view" value="main"/><response name="error" type="view" value="login"/></request-map>现在会请求到main中,<view-map name="main" type="screen"page="component://group/widget/group/CommonScreens.xml#main"/>在WEB-INF/controller.xml中找到main的配置信息该显示用screen配置显示component://group/widget/group/CommonScreens.xml#main6.现在根据地址找到配置文件component://group/widget/group/CommonScreens.xml#main表示该文件中name为main的screen<screen name="main"><section><actions><set field="titleProperty"value="OrderOrderTaskList"/><set field="headerItem" value="tasklist"/><scriptlocation="component://order/webapp/ordermgr/WEB-INF/actions/task/orde rtasklist.bsh"/></actions><widgets><decorator-screen name="main-decorator"><decorator-section name="body"><container style="screenlet"><container style="screenlet-header"><label style="boxhead" text="Main Page"/></container><container style="screenlet-body"><section><condition><if-emptyfield-name="userLogin"/></condition><widgets><container><labeltext="${uiLabelMap.ExampleMessage}"/></container></widgets></section><container><labeltext="${uiLabelMap.Welcome}"/></container></container></container></decorator-section></decorator-screen></widgets></section></screen><screen name="login"><section><widgets><decorator-screen name="main-decorator"><decorator-section name="body"><platform-specific><html><html-templatelocation="component://common/webcommon/login.ftl"/></html></platform-specific></decorator-section></decorator-screen></widgets></section></screen></screens>该配置文件配置了显示的数据以及显示的格式其中数据是通过.bsh文件和service提供的,而显示的格式为ftl文件提供的7.进入group\webapp\group\WEB-INF\actions\forum在bsh为beansheel配置文件,语法与java类似,在这儿是为了提供显示数据import java.util.*;import java.io.*;import org.ofbiz.entity.*;import org.ofbiz.base.util.*;security = request.getAttribute("security");delegator = request.getAttribute("delegator");userLogin = session.getAttribute("userLogin");person = null;if (userLogin != null ) {person = userLogin.getRelatedOne("Person");}forumId = request.getParameter("forumId");categoryId = request.getParameter("categoryId");if ( categroyId == null ||UtilValidate.isEmpty(categoryId) ){ categoryId = delegator.getNextSeqId("GroupCategory");}groupCategory = delegator.findByPrimaryKey("GroupCategory",UtilMisc.toMap("categoryId", categoryId));context.put("forumId", forumId);context.put("categoryId", categoryId);context.put("groupCategory", groupCategory);context.put("person", person);该文件把需要的数据放到返回的上下文中8.进入到group\webapp\group\forum\listForum.ftl该文件为Freemarker的文件,作用是代替jsp作显示层<#if forums?has_content>Some of the famous celebrities who have visited our site:<table><ul><#list forums as forum><tr><li><td><a href="EditForum?forumId=${forum.forumId?if_exists}">${forum.forumId?if_ex ists}</a></td><td>12 ${forum.forumName?if_exists}</td><td> ${forum.description?if_exists}</td><li><td><a href="deleteForum?forumId=${forum.forumId?if_exists}">${forum.forumId?if_ exists}</a></td></tr><tr><li><td><a href="FindCategory?forumId=${forum.forumId?if_exists}">${forum.forumId?if _exists}</a></td><td><a href="EditCategory?forumId=${forum.forumId?if_exists}">${forum.forumId?if _exists}</a></td><td> </td><li><td></td></tr></#list></ul></table>通过一些表达式和判断把数据显示出来,这样整个请求完毕其他配置文件的作用:data目录下的配置文件:<entity-engine-xml><UserLogin userLoginId="DemoBuyer"currentPassword="47ca69ebb4bdc9ae0adec130880165d2cc05db1a" passwordHint=""/><UserLogin userLoginId="DemoRepAll"currentPassword="47ca69ebb4bdc9ae0adec130880165d2cc05db1a" passwordHint=""/><UserLogin userLoginId="DemoRepStore"currentPassword="47ca69ebb4bdc9ae0adec130880165d2cc05db1a" passwordHint=""/><UserLogin userLoginId="DemoCustCompany"currentPassword="47ca69ebb4bdc9ae0adec130880165d2cc05db1a" passwordHint=""/><UserLogin userLoginId="DemoCustAgent"currentPassword="47ca69ebb4bdc9ae0adec130880165d2cc05db1a" passwordHint=""/><UserLogin userLoginId="DemoCustomer"currentPassword="47ca69ebb4bdc9ae0adec130880165d2cc05db1a" passwordHint=""/><UserLogin userLoginId="supplier" partyId="externaluser" currentPassword="47ca69ebb4bdc9ae0adec130880165d2cc05db1a" passwordHint=""/><UserLoginSecurityGroup groupId="ORDERSUPPLIER_LTD"userLoginId="supplier" fromDate="2001-01-01 12:00:00.0"/></entity-engine-xml>配置了系统启动时后需要添加的一些数据config目录下的配置文件:为国际化配置信息<property key="OrderCaughtExceptionOnCartUpdate"><value xml:lang="en">Caught exception on cart update. </value> <value xml:lang="es">Excepción capturada en la actualización del carro.</value><value xml:lang="fr">%Exception attrapée dans la mise à jour du chariot. %</value><value xml:lang="it">Eccezione sull'aggiornamento carrello.<value xml:lang="ro">Exceptie la actualizarea cosului. </value> <value xml:lang="zh">更新购物车时发生意外情况 </value></property>widget里面的form配置文件:<form name="OrderPurchaseProductOptions" type="single"target="OrderPurchaseReportProduct.pdf" title=""extends="OrderPurchaseReportOptions"><field name="fromOrderDate"title="${uiLabelMap.OrderReportFromDate}"><date-timetype="timestamp"/></field><field name="thruOrderDate"title="${uiLabelMap.OrderReportThruDate}"><date-timetype="timestamp"/></field><field name="submitButton" title="${monRun}" widget-style="smallSubmit"><submit button-type="button"/></field></form>配置了一些表单信息,和screen一样,但是他可以直接显示数据不需要使用Freemaerker的文ftl文件作页面布局,根据配置信息可以直接生成ofbiz-componet.xml文件配置了项目要加载的配置文件的信息,它可以告诉OFBIZ应用程序组件的相关信息:数据模型,商业逻辑,用户接口,种子数据,以及其他程序需要的资源。
