卓豪ITSM管理员指南
Lenovo XClarity 管理员产品指南说明书
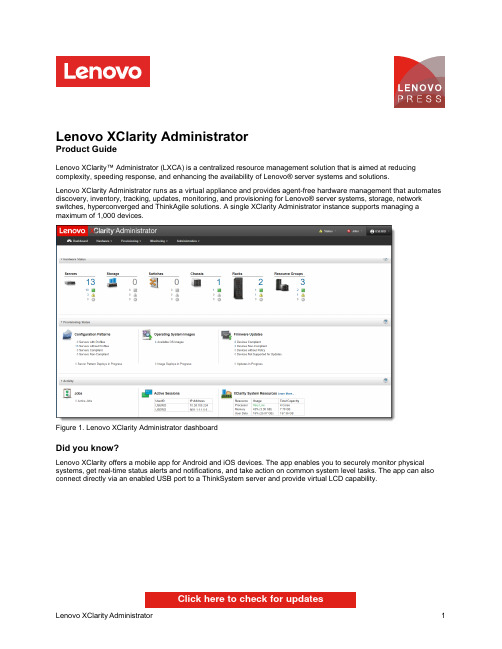
Lenovo XClarity AdministratorProduct GuideLenovo XClarity™ Administrator (LXCA) is a centralized resource management solution that is aimed at reducing complexity, speeding response, and enhancing the availability of Lenovo® server systems and solutions.Lenovo XClarity Administrator runs as a virtual appliance and provides agent-free hardware management that automates discovery, inventory, tracking, updates, monitoring, and provisioning for Lenovo® server systems, storage, network switches, hyperconverged and ThinkAgile solutions. A single XClarity Administrator instance supports managing a maximum of 1,000 devices.Figure 1. Lenovo XClarity Administrator dashboardDid you know?Lenovo XClarity offers a mobile app for Android and iOS devices. The app enables you to securely monitor physical systems, get real-time status alerts and notifications, and take action on common system level tasks. The app can also connect directly via an enabled USB port to a ThinkSystem server and provide virtual LCD capability.Click here to check for updatesFigure 2. Lenovo XClarity mobile appFigure 3. User management interfaceHardware monitoringLenovo XClarity Administrator provides a centralized view of events and alerts that are generated from managedendpoints, such as chassis components, servers, storage devices and network switches. When an issue is detected an event is passed to the Lenovo XClarity Administrator. That event is displayed in the alerts list that is available within the user interface. A status bar also is available that provides overall status information on the main XClarity Administrator interface. An example list of alerts is shown in the following figure. This view can be filtered to show specific alert severity.Additionally, the view can also be filtered by dates and alert sources or via the search filter.Figure 4. Alerts and actionsHardware managementThere are various management tasks for each supported endpoint, including viewing status and properties, configuring system information and network settings, starting the CMM/BMC/IMM/XCC web interfaces, and remote control for the severs and Flex nodes. Note, the Feature on Demand (FoD) key for remote presence is required on ThinkSystem,ThinkAgile Solutions, NeXtScale, and System x servers if not included as standard. The options available for PowerActions on a selected ThinkSystem server is shown in the following figure.Figure 5. Hardware ManagementConfiguration managementConfiguration patterns provide a way to ensure that you have consistent configurations applied to managed servers.Server patterns are used to provision or pre-provision a managed server by configuring local storage, I/O adapters, boot setting, firmware, ports, IMM, and UEFI settings. Server patterns also integrate support for virtualizing I/O addresses so you can virtualize Flex System fabric connections or re-purpose servers without disruption to the fabric.You can also determine whether the settings on a server are in compliance with the server profile assigned. The settings on a server can become out of compliance with its server profile if settings are changed without using Configuration Patterns or if an issue occurred during deployment, such a firmware issue or an invalid setting.Operating system deploymentFigure 6. Firmware updatesTask automation using scriptsLenovo XClarity Administrator provides REST APIs and a PowerShell Toolkit, Python Toolkit and Ruby toolkit, which can be used to generate scripts to automate management functions.Lenovo XClarity Administrator set of easy-to-use APIs can be used to access XClarity Administrator data and services from applications running outside of the XClarity Administrator framework. This allows for integration of XClarity Administrator capabilities into other software. These APIs are based on the REST architecture and are accessed via the HTTPS protocol. More information on the XClarity Administrator REST API is available at the following link:https:///help/topic/com.lenovo.lxca_restapis.doc/rest_apis.htmlLenovo XClarity Administrator PowerShell (LXCAPSTool) toolkit provides a library of cmdlets to automate provisioning and resource management from a Microsoft PowerShell session. The cmdlets use Lenovo XClarity REST APIs and can automate the following functions:Logging in to XClarity AdministratorManaging and unmanaging chassis, servers, storage devices, and top-of-rack switches (devices)Collecting inventory data for devices and componentsDeploying an operating-system image to one or more serversConfiguring servers through the use of Configuration PatternsApplying firmware updates to devicesManaging user accountsMonitoring eventsXClarity Administrator offers a PyLXCA toolkit which provides a Python-based library of commands and APIs to automate provisioning and resource management from an OpenStack environment, such as Ansible or Puppet.The PyLXCA toolkit provides an interface to Lenovo XClarity Administrator REST APIs to automate functions such as: Logging in to Lenovo XClarity AdministratorLenovo XClarity Pro editions are available with a 1-year, 3-year, or 5-year software subscription and support. Lenovo XClarity Pro is available on a per-managed-endpoint basis or per-managed-chassis basis. The per-chassis licenses offer a more cost-effective way of purchasing licenses for the Flex System environment.The part numbers are listed in the following tables.Table 2. Lenovo XClarity Pro part numbers: Per managed endpointDescription Part numberLenovo XClarity Pro, per Managed Endpoint w/1 Yr SW S&S00MT201Lenovo XClarity Pro, per Managed Endpoint w/3 Yr SW S&S00MT202Lenovo XClarity Pro, per Managed Endpoint w/5 Yr SW S&S00MT203Table 3. Lenovo XClarity Pro part numbers: Per managed chassisDescription Part numberLenovo XClarity Pro, per Managed Chassis w/1 Yr SW S&S00MT198Lenovo XClarity Pro, per Managed Chassis w/3 Yr SW S&S00MT199Lenovo XClarity Pro, per Managed Chassis w/5 Yr SW S&S00MT200When you purchase XClarity Pro, the order is fulfilled via electronic software delivery (ESD) using the Lenovo Key Management System (LKMS). The order is placed onto LKMS using an email address for the end user who has ordered the code. This email address is where the Activation Code is sent in PDF format (the email will come from******************).TherecipientemailaddressisthelogintotheLKMSsystemforadministrationandtomanagethe LKMS inventory.The Activation code is redeemed via LKMS and the information about the end customer should be entered during the redemption process.For more information on how to redeem the Authorization Code, downloading the XClarity Administrator License key, and importing the license key into the XClarity Administrator appliance, refer to Installing the full-function enablement license in the online help.Licenses are installed using a license activation key file, in .KEY format or as a .zip file (which consists of multiple .key files). After you redeem licenses, you can create an activation key for all or a subset of your available licenses (Note this can only be done at the time of redemption), and then download and install the activation key in XClarity Administrator per instructions as described in Installing the full-function enablement license in the online help.Note: The number of managed devices must not exceed the total number of licenses in all active license keys. If XClarity Administrator is not in compliance with the installed licenses (for example, if licenses expire or if managing additional devices exceeds the total number of active licenses), you have a grace period of 90 days to install appropriate licenses. Each time XClarity Administrator becomes non-compliant, the grace period resets to 90 days. If the grace period (including the free trial) ends before licenses are compliant, advanced functions are disabled for all devices.For example, if you manage an additional 100 ThinkSystem servers and 20 rack switches in an existing XClarity Administrator instance, you have 90 days to purchase and install 100 additional licenses before advanced functions are disabled in the user interface (for all devices). Licenses for the 20 rack switches are not needed to use the advanced functions; however, they are needed if you want service and support. If advanced functions are disabled, the advanced functions are re-enabled after you install enough licenses to be back in compliance. If you are using a free trial license or you have a grace period to become compliant, and you upgrade to a later version of XClarity Administrator, the trial license or grace period resets to 90 days.The following table shows details on what happens to each of the premium functions on different versions of XClarity Administrator after the 90 day grace/evaluation period has expired. For more information, see the Installing the full-function enablement license in the online help.4. Lenovo XClarity Integrator for Windows Admin Center - HCI Disk Management2022-11-25 | 15 minutes | Employees and PartnersThis course introduces the Lenovo XClarity Integrator (LXCI) for Windows Admin Center (WAC) HCI diskmanagement functions. After completing this course, you will be able to describe the available HCI diskmanagement functions, and list the steps to add, replace or remove a disk drive in a storage pool.Published: 2022-11-25Length: 15 minutesEmployee link: Grow@LenovoPartner link: Lenovo Partner LearningCourse code: DLXCIO2065. Lenovo XClarity Integrator for Windows Admin Center - Systems Update Overview2022-10-21 | 20 minutes | Employees and PartnersThis course will provide an overview of the Lenovo XClarity Integrator for Windows Admin Center - Systems Update.After attending this overview course, you will be able to:1. Describe the available update package types2. Explain the difference between the two update methods3. List the recommended steps to update a server or cluster.Published: 2022-10-21Length: 20 minutesEmployee link: Grow@LenovoPartner link: Lenovo Partner LearningCourse code: DLXCIO2056. Lenovo XClarity Integrator for Windows Admin Center - Cluster Management Basics2022-08-30 | 15 minutes | Employees and PartnersThis course introduces how to manage Lenovo clusters in Lenovo XClarity Integrator for Windows Admin Center.After completing this course, you will be able to manage Lenovo clusters in Lenovo XClarity Integrator for WAC via Lenovo XClarity Administrator, or via Native OS. You will be able to describe the cluster management functions provided by LXCI.Published: 2022-08-30Length: 15 minutesEmployee link: Grow@LenovoPartner link: Lenovo Partner LearningCourse code: DLXCIO2047. Lenovo XClarity Integrator for Windows Admin Center - Server Management Basics2022-08-29 | 15 minutes | Employees and PartnersThis course introduces how to manage Lenovo servers in Lenovo XClarity Integrator for Windows Admin Center.After completing this course, you will be able to:• Manage Lenovo servers in Lenovo XClarity Integrator for WAC via Lenovo XClarity Administrator, or via Native OS.• Describe the server management functions provided by LXCI.Published: 2022-08-29Length: 15 minutesEmployee link: Grow@LenovoPartner link: Lenovo Partner LearningCourse code: DLXCIO2038. Partner Technical Webinar - XClarity Workshop Lite2022-08-10 | 60 minutes | Partners OnlyIn this 60-minute replay, Marilee Smith, NA Technical Trainer and XClarity SME showed an abridged version of the XClarity Workshop for Partners. She gave an overview of the XClarity family and then gave a bit more depth and short demo of XClarity Controller, Essentials, Provisioning Manager, Administrator, Orchestrator and Integrator.Published: 2022-08-10Length: 60 minutesPartner link: Lenovo Partner LearningCourse code: 0805229. Lenovo XClarity Integrator for Windows Admin Center - Install and Configure2022-07-13 | 25 minutes | Employees and PartnersThis course will guide you to install and configure the Lenovo XClarity Integrator for Windows Admin Center. After attending the Lenovo XClarity Integrator for Windows Admin Center: Install and Configure course you will be able to: explain the steps to install Lenovo XClarity Integrator for WAC, describe the available settings that can be configured in LXCI for WAC, and demonstrate how to use the system updates repository.Published: 2022-07-13Length: 25 minutesEmployee link: Grow@LenovoPartner link: Lenovo Partner LearningCourse code: DLXCIO20210. Lenovo XClarity Integrator for Windows Admin Center - Overview2022-06-23 | 15 minutes | Employees and PartnersThis course will provide an overview of the Lenovo XClarity Integrator for Windows Admin Center. After attending this overview course, you will be able to: describe Lenovo XClarity Integrator for Windows Admin Center, discuss when to use Lenovo XClarity Integrator for Windows Admin Center, and explain the key features and functions of Lenovo XClarity Integrator for Windows Admin Center.Published: 2022-06-23Length: 15 minutesEmployee link: Grow@LenovoPartner link: Lenovo Partner LearningCourse code: DLXCIO20111. Understanding Lenovo XClarity2021-11-05 | 8 minutes | Employees and PartnersThis course is designed to give Lenovo sales and partner representatives an understanding of Lenovo XClarity.Learning Objectives:- Identify the different components of XClarity- Describe the primary benefits to customers- Define its core featuresPublished: 2021-11-05Length: 8 minutesEmployee link: Grow@LenovoPartner link: Lenovo Partner LearningCourse code: SXXW2118TrademarksLenovo and the Lenovo logo are trademarks or registered trademarks of Lenovo in the United States, other countries, or both. A current list of Lenovo trademarks is available on the Web at https:///us/en/legal/copytrade/. The following terms are trademarks of Lenovo in the United States, other countries, or both:Lenovo®Flex SystemNeXtScaleRackSwitchSystem x®ThinkAgile®ThinkEdge®ThinkServer®ThinkSystem®UpdateXpress System PacksXClarity®The following terms are trademarks of other companies:Intel® and Xeon® are trademarks of Intel Corporation or its subsidiaries.Linux® is the trademark of Linus Torvalds in the U.S. and other countries.Microsoft®, Azure®, Hyper-V®, PowerShell, Windows Server®, and Windows® are trademarks of Microsoft Corporation in the United States, other countries, or both.Other company, product, or service names may be trademarks or service marks of others.。
系统管理员版本6.3 Manager(Windows版)复制设置指南(ExpressCluster
SystemManager Version 6.3 Manager (Windows Version) Duplication Setup Guide (ExpressCluster X Edition)June 2016CONTENTSChapter 1Preface (3)Chapter 2Configuration Procedure (4)2.1Setting up ExpressCluster X (4)2.2Setting up MasterScope SystemManager (10)2.3Set up the start setting of MasterScope SystemManager (12)Chapter 3Uninstalling SystemManager (16)3.1Uninstalling SystemManager (16)3.2Deleting Files (16)Chapter 4Other Notes (16)4.1Registering Licenses (16)DisclaimerThe contents of this document are subject to change without notice.NEC Corporation takes no responsibility for any technical or editorial errors, or omissions, in this document.In addition, you are responsible for installing and using the software in accordance with the descriptions in this document in order to obtain the expected results.NEC Corporation owns the copyright to the contents of this document. You are not permitted to reproduce, modify, or translate this document in whole or in part without the permission of NEC Corporation.Trademark informationCLUSTERPRO® X is a registered trademark of NEC Corporation.Microsoft and Windows are registered trademarks of Microsoft Corporation in the United States and other countries.Other product names and slogans in this document are trademarks or registered trademarks of their respective companies.Other system names, company names, and product names are trademarks or registered trademarks of their respective companies.Chapter 1 PrefaceThis document provides an example procedure for using ExpressCluster X to set up a cluster configuration that has two nodes (for duplication). ExpressCluster X is an NEC product that can be used to switch running processes between nodes in a duplicated system.In this document, a host system included in a cluster is referred to as a node.Supplemental informationUpgrading an OSIf the incorrect procedure is used to upgrade the OS on a cluster server, failovers might occur at unexpected times. In the worst case, this might damage the system.Only upgrade the OS in accordance with the procedure on the setup card.This also applies when applying a service pack.Application rangeThis document describes ExpressCluster X 1.0 for Windows.ExpressCluster X® is a registered trademark of NEC Corporation.Microsoft® and Windows®are either registered trademarks or trademarks of Microsoft Corporation in the United States and/or other countries.Other system names, company names, and product names are trademarks or registered trademarks of their respective companies.Chapter 2 Configuration ProcedureThis chapter provides a procedure for configuring a MasterScope SystemManager cluster environment.2.1 Setting up ExpressCluster XThis document assumes that ExpressCluster X is installed and that a cluster environment has been set up. For details about how to configure a cluster environment, also see the ExpressCluster X documents.* These documents can be downloaded from the following website: /en/global/prod/expresscluster/en/support/manuals.html?Creating failover groupsFor ExpressCluster X, nodes connected to the cluster are managed using units called failover groups (referred to as groups below).For details about how to create groups, see the relevant ExpressCluster X document (chapter 5 in the Installation and Creation Guide).Figure 2-1 WebManagerSetting up shared resourcesThe following describes how to set up shared resources for a failover group.Here, the following shared resources are assumed:⏹Floating IP address: 192.168.1.10⏹Shared (mirror) disk: Y drive⏹Service:Manager: MasterScope UMF Operations Manager_n (The italicized n representsa number.)Start Builder, and then select a failover group. (Here, select [MasterScope].)Figure 2-2 Group PropertiesRight click the group, and then select [Add Resource] from the displayed pop-up menu. The [Definition of a resouce] dialog box is displayed.First, set up the shared disk. For [Type], select [disk resource] or [mirror disk resource], and then enter the group name of the shared disk in the [Name] text box. Set up the disk in accordance with the instructions in the dialog box.Figure 2-3 Definition of a resouce (Shared Disk)Next, set up the floating IP address. Right click the group, select [Add Resource] from the displayed pop-up menu, select [floating ip resource] for [Type], and then enter the group name in the [Name] text box.Figure 2-4 Definition of a resouce (Floating IP Address)Specify the floating IP address in the [IP Address] text box.Figure 2-5 Floating IP Address AdditionSwitching between connected nodesTo switch between the active and standby nodes, use the following method.Open a command prompt, and then enter the following command:* A direct command can be entered because the environment variable PATH isregistered when ExpressCluster X is installed.The nodes can also be switched by right clicking the icon next to a group namedisplayed in the left WebManager pane and then selecting [Move] from the displayedpop-up menu.Figure 2-6 Switching Between Connected Nodes2.2 Setting up MasterScope SystemManagerInstall the MasterScope SystemManager manager on the Windows computers to be used as active and standby servers.For details about how to do so, see the Release Notes supplied with the product.As described in 2.1 Setting up ExpressCluster X, the following shared resources are assumed:∙Virtual host name: vhost1∙Shared disk: Y driveNotes* Install MasterScope SystemManager on the active server first, and then on the standby server.* It must be possible to reference the shared disk when installing the active server manager.* Use the same drive and folder as the installation destination for MasterScope SystemManager on the active and standby servers.* vhost1 is a host name that can be resolved to a floating IP address (192.168.1.10).The following describes the procedure for installing the MasterScope SystemManager manager.First, start up the cluster from the active node, and then install MasterScope SystemManager on the active node.In the installation settings window, specify the following settings:\Manager\sg is automatically added to the data area folder, and settings that must be shared are stored here.After installation finishes, confirm that \Manager\sg has been created in the data area folder.Next, set up the MasterScope SystemManager manager on the standby node.In the installation settings window, specify the following settings:After installation finishes, change the service startup attributes on both the active and standby nodes.In the [Start] menu, click [Administrative Tools] and then [Services]. Next, stop the [MasterScope UMF Operations Manager_1] service, and then change the [Startup type] in the properties from [Automatic] to [Manual].Figure 2-7 Service Properties* If using the bundled DB, change the [Startup type] for the bundled DB service to [Manual] in the same way.2.3 Set up the start setting of MasterScope SystemManagerSet up the service. Right click the group, select [Add Resource] from the displayed pop-up menu, select [execute resource] for [Type], and then enter the group name in the [Name] text box.Figure 2-8 Definition of a resouce (Service)Specify the Windows service name for the product in the [Service Name] text box.Figure 2-9 Service Name SpecificationThe service name varies depending on the node, so enter the following service name.* serial-number represents a number. Check the actual value in the Windows [Administrative Tools].To set up the dependencies, clear the [Follow the default dependence] check box, and then add resources that depend on the floating IP address and shared disk.Figure 2-10 Dependency SpecificationAfter specifying the settings, return to the failover group properties, and then confirm that the settings have been applied (by confirming that the window is like the one shown in Figure 2-2).* If using the bundled DB, add the resource for the bundled DB service in the same way. Set up the resource dependencies so that the bundled DB is dependent on SystemManager.Service name is [fdb_wfdbn].n indicates a service number of 1 or higher.(The value is set during installation of MasterScope products.)This manual describes startup settings for failover groups.Separately set up service monitoring in accordance with the relevant ExpressCluster X document.This concludes the ExpressCluster X setup.Chapter 3 Uninstalling SystemManager3.1 Uninstalling SystemManagerTo uninstall SystemManager, perform the procedure described in the SystemManager Release Memo (relememo.pdf).3.2 Deleting FilesAfter uninstalling SystemManager, files and directories remain on the shared disk.Manually delete directories on the shared disk specified during installation.Chapter 4 Other Notes4.1 Registering LicensesRegister licenses for a cluster environment on both the active and standby nodes.。
ITSM-QM-3-002 IT服务管理角色与职责说明
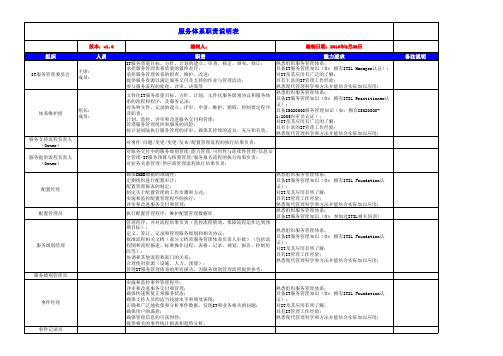
版本:v1.0 编制人: 编制日期:2010年2月28日
组织
主席: 成员:
人员
职责
IT服务质量目标、方针、计划的建立、审查、核定、颁布、修订; 承担服务管理体系质量的最终责任; 承担服务管理体系的检查、维护、改进; 提供服务资源以满足服务交付及支持的作业与管理活动; 参与服务流程的处理、评审、决策等
问题经理
问题提交人
问题分析员
熟悉服务管理体系; 具备IT服务管理知识(如:参加过ITIL相关培训)
知识管理员
变更经理
熟悉组织服务管理体系; 具备IT服务管理知识(如:拥有ITIL Foundation认 证); 对IT及其应用有所了解; 具有IT管理工作经验; 熟悉现代管理科学和方法并能结合实际加以应用;
熟悉组织服务管理体系; 具备IT服务管理知识(如:参加过ITIL相关培训)
发布经理
熟悉组织服务管理体系; 具备IT服务管理知识(如:拥有ITIL Foundation认 证); 对IT及其应用有所了解; 具有IT管理工作经验; 熟悉现代管理科学和方法并能结合实际加以应用; 熟悉组织服务管理体系; 具备IT服务管理知识(如:参加过ITIL相关培训) 熟悉组织服务管理体系; 具备IT服务管理知识(如:参加过ITIL相关培训) 熟悉组织服务管理体系; 具备IT服务管理知识(如:拥有ITIL Foundation认 证); 对IT及其应用有所了解; 具有IT管理工作经验; 熟悉现代管理科学和方法并能结合实际加以应用; 熟悉组织服务管理体系; 具备IT服务管理知识(如:拥有ITIL Foundation认 证); 对IT及其应用有所了解; 具有IT管理工作经验; 熟悉现代管理科学和方法并能结合实际加以应用; 熟悉组织服务管理体系; 具备IT服务管理知识(如:拥有ITIL Foundation认 证); 对IT及其应用有所了解; 具有IT管理工作经验; 熟悉组织服务管理体系; 具备IT服务管理知识(如:参加过ITIL相关培训) 熟悉组织服务管理体系; 具备IT服务管理知识(如:拥有ITIL Foundation认 证); 对IT及其应用有所了解; 具有IT管理工作经验; 熟悉现代管理科学和方法并能结合实际加以应用; 熟悉组织服务管理体系; 具备IT服务管理知识(如:参加过ITIL相关培训)
Storage Center 更新实用程序管理员指南说明书
Storage Center Update Utility Administrator’s GuideAbout This GuideThis guide describes how to update your storage system using the Storage Center Update Utility.The Storage Center Update Utility is used to update Storage Center series storage systems that cannot connect to the SupportAssist server. The Update Utility updates the Storage Center Operating System and firmware on any storage system running software version 6.6.5 or later.Revision HistoryDocument Number: 680-118-002Table 1. Document Revision HistoryRevision Date DescriptionA May 2016Initial release in support of Storage Center OS Version 7B April 2017Feature release to address distribution typesC March 2018Add Unisphere 2018 R1 informationD August 2019General updateAudienceThe information provided in this guide is intended for users who cannot use the SupportAssist functionality to perform Storage Center updates.Recovery of Storage Center software or system state is not possible without support assistance. Dell EMCContacting DellDell provides several online and telephone-based support and service options. Availability varies by country and product, and some services might not be available in your area.To contact Dell for sales, technical support, or customer service issues, go to /support.•For customized support, type your system service tag on the support page and click Submit.•For general support, browse the product list on the support page and select your product.Notes, Cautions, and WarningsA NOTE indicates important information that helps you make better use of your product.A CAUTION indicates either potential damage to hardware or loss of data and tells you how to avoid theA WARNING indicates a potential for property damage, personal injury, or death.© 2018 - 2019 Dell Inc. or its subsidiaries. All rights reserved. Dell, EMC, and other trademarks are trademarks of Dell Inc. or its subsidiaries. Other trademarks may be trademarks of their respective owners.2019 - 08Rev. D1 Storage Center Update Utility (5)Application Overview (5)Download the Storage Center Update Utility and Software Distro (5)Install the Storage Center Update Utility (5)Configure SupportAssist Settings (6)Configure SupportAssist Settings with Dell EMC Storage Manager (6)Configure SupportAssist Settings with Unisphere (7)Update Storage Center Software Using a Distro Directory (7)Update Storage Center Software Using a Distro File (8)Manage the Update Utility Information (9)4ContentsStorage Center Update UtilityApplication OverviewReview the following guidelines before downloading and installing the Storage Center Update Utility.Storage Center version 7 and later is managed using either the Dell EMC Storage Manager or Unisphere user Storage Manager Administrator’s Guide or the Unisphere and Unisphere .System RequirementsThe Storage Center Update Utility requires the following software versions.•Storage Center version 6.6.5 or later.•Windows 7, 8, and 8.1; Windows Server 2008 R2, and Windows Server 2012 R2.•.NET Framework version 4.5 or later.System PreparationThe inbound TCP port needs to be open to allow the Update Utility to serve updates. Use either of the following methods to open the inbound TCP port:•Open the inbound TCP port in the Windows firewall. The default port is 9005.•Open the inbound TCP port during the Storage Center Update Utility installation procedure by selecting the Automatically configure Windows Firewall to allow port traffic checkbox in the Preferences dialog box. See Install the Storage Center Update Utility .Download the Storage Center Update Utility and Software DistroYou will need both the Storage Center Update Utility and the software update distro to perform the software update.Steps1.Download the Storage Center Update Utility software from the Drivers and Downloads page of your product on /storagemanuals .2.Download the update distro.•For SCv2000 series, SCv3000 series, SC5020 series, and SC7020 series Storage Centers, download the update distro either from the Dell Digital Locker or using an FTP link provided by technical support •For CT-SC040, SC4020, SC8000, and SC9000, download the update distro using an FTP link provided by technical support.Install the Storage Center Update Utility Use this procedure to install the Storage Center Update Utility.PrerequisitesInstall the Update Utility on a computer that is on the same network as the Storage Center that you want to 1Storage Center Update Utility 5Steps1.To start the installation, double-click the ScuuSetup-1.xx.xx.xx.exe file.2.If prompted, allow the installation program to install the Update Utility.The Update Utility is installed in the C:\Program Files (x86)\Dell\Storage Center Update Utility\ directory and the Update Utility window opens when the installation is complete.The Preferences dialog box opens for new Update Utility installations.Figure 1. Storage Center Update Utility Preferences Dialog BoxSpecify the following information in the Preferences dialog box:•IP address on which the Update Utility listens for update requests. You can specify a specific address, or listen on all IP addresses.•Port through which the Update Utility communicates.Next stepsThe firewall must be disabled on the inbound TCP port to allow the Update Utility to provide updates to theConfigure SupportAssist SettingsTo allow the Storage Center Update Utility to communicate with the Storage Center and provide updates, connect to the Storage Center using either the Dell EMC Storage Manager or Unisphere and configure the SupportAssist settings.Configure SupportAssist Settings with Dell EMC Storage ManagerUse the Dell EMC Storage Manager to connect to the Storage Center and configure the SupportAssist settings.About this taskFor more information about using Storage Manager, refer to the Dell EMC Storage Manager Administrator’s.Steps1.If the Storage Manager Client is connected to a Data Collector, select a Storage Center from the Storage view.2.In the Summary tab, click Edit Settings.The Edit Storage Center Settings dialog box opens.6Storage Center Update Utility3.Click the SupportAssist tab.4.Disable SupportAssist. Click Turn Off SupportAssist.5.Under Configure Update Utility, select the Enabled checkbox.6.In the Update Utility Host or IP Address field, type the host name or IP address of the Storage Center Update Utility.7.In the Update Utility Port field, type the port of the Storage Center Update Utility. The default port is 9005.8.Click OK.Configure SupportAssist Settings with UnisphereUse Unisphere to connect to the Storage Center and configure the SupportAssist settings.About this taskFor more information about using Unisphere, refer to the Unisphere and Unisphere Central for SC Series.Steps1.If you are using Unisphere Central, select a Storage Center from the drop-down list in the left navigation pane.2.Click Summary.The Summary view is displayed.3.Click (Settings).The Storage Center Settings dialog box opens.4.Click the SupportAssist tab.5.Disable SupportAssist. Click Turn Off.6.Under Use Update Utility, select the Enabled checkbox.7.In the Update Utility Host or IP Address field, type the IP address of the Storage Center Update Utility.8.In the Update Utility Port field, type the port of the Storage Center Update Utility.9.Click OK.Update Storage Center Software Using a Distro DirectoryUse these instructions to update Storage Center software using a distro directory.PrerequisitesRecovery of Storage Center software or system state is not possible without assistance from technical About this taskFor more information about using Storage Manager or Unisphere, refer to the Dell EMC Storage Manageror the Unisphere and Unisphere Central for SC Series Version Administrator’s Guide,Steps1.Start the Update Utility.Storage Center Update Utility7Figure 2. Storage Center Update Utility2.Unzip the distro file to a folder on the computer, then click Distro Directory.The Browse For Folder dialog box opens.3.Select the folder that contains the distro files, then click OK.If Validate upgrade distro after selection is selected in the Preferences dialog box, the Update Utility displays a progress message on the main window while the distro is validated. If the distro is valid, the Start button turns green and the message Distro successfully validated displays in the Info pane.4.If Start serving distro for upgrade immediately after selection is selected in the Preferences dialog box, the hosting service isstarted automatically. If not, click Start.The Update Utility hosts the update to the Storage Center, that allows the Storage Center to download the update.5.(Optional) To stop the update service, click Stop.If any update sessions are in progress, a warning displays before the Update Utility stops the update service.6.After starting the Update Utility, connect to the Storage Center to be updated using Storage Manager or Unisphere.•Storage Manager – From the Storage view, select a Storage Center. (Data Collector connected Storage Manager only.)•Unisphere Central only – From the drop-down list in the left navigation pane, select a Storage Center.7.Check for updates.•Storage Manager – In the right pane, select Actions > System > Check for Update.•Unisphere/Unisphere Central – In the right pane, click (More Actions) and select Check for Update.The Update Storage Center dialog box opens and checks for an update.Update Storage Center Software Using a Distro FileUse these instructions to update Storage Center software using a distro ZIP file.PrerequisitesRecovery of Storage Center software or system state is not possible without assistance from technical About this taskFor more information about using Storage Manager or Unisphere, refer to the Dell EMC Storage Manageror the Unisphere and Unisphere Central for SC Series Version Administrator’s Guide,8Storage Center Update UtilitySteps1.Start the Update Utility.Figure 3. Storage Center Update Utility2.Click Distro File.3.Locate and select the distro ZIP file, then click Open.The Update Utility performs the following actions:•Update Utility extracts the ZIP file to the directory specified in the Preferences dialog box.•Update Utility opens the distro.•If Validate upgrade distro after selection is selected in the Preferences dialog box, the Update Utility displays a progress message on the main window while the distro is validated. If the distro is valid, the Start button turns green and the message Distro successfully validated displays in the Info pane.4.If Start serving distro for upgrade immediately after selection is selected in the Preferences dialog box, the hosting service isstarted automatically. If not, click Start.Update Utility now responds to update requests from Storage Centers.5.(Optional) To stop the update service, click Stop.If any update sessions are in progress, a warning displays before the Update Utility stops the update service.6.After starting the Update Utility, connect to the Storage Center to be updated using Storage Manager or Unisphere.•Storage Manager – From the Storage view, select a Storage Center. (Data Collector connected Storage Manager only.)•Unisphere Central only – From the drop-down list in the left navigation pane, select a Storage Center.7.Check for updates.•Storage Manager – In the right pane, select Actions > System > Check for Update.•Unisphere/Unisphere Central – In the right pane, click (More Actions) and select Check for Update.The Update Storage Center dialog box opens and checks for an update.Manage the Update Utility InformationConfigure the Update Utility to use with a different Storage Center and remove the data in the Info and Errors log panes.Steps1.Start the Update Utility.2.Update the options and settings in the Preferences dialog box.a)Select Tools > PreferencesThe Preferences dialog box opens.b)Specify new information in the IP address, port and directories fields.c)Clear or select different Update Utility instruction checkboxes.Storage Center Update Utility93.To delete the data in the Info log pane, select Tools > Clear Info Log Pane.The data is immediately deleted.4.To delete the data in the Errors log pane, select Tools > Clear Error Log Pane.The data is immediately deleted.10Storage Center Update Utility。
卓豪ITSM管理员指南1
ManageEngine SeviceDesk Plus管理员指南一、简介ManageEngine SeviceDesk Plus是一个全面的帮助台和资产管理软件,它为IT 管理者和桌面代理提供了一个集成的控制台,用来管理和维持来自组织中IT资源用户的服务请求,和对应的IT资产。
IT帮助台在IT服务提供中起着重要的作用。
当IT服务出现问题的时候,利用它可以第一时间联系用户。
同时IT帮助台也是需要帮助的终端用户的唯一联系点。
没有它,一个组织就会丧失应有的效率。
ManageEngine SeviceDesk Plus的两个主要焦点是IT请求跟踪和资产管理。
使用SeviceDesk提供的帮助台功能模块,技术人员和系统管理员能够不用花费多长时间就解决复杂的问题,从而减少了终端用户的挫折感,提高解决问题的效率。
同时借助于本产品的资产管理,可以有效地跟踪组织的需求,恰当地将资源分配给适当的用户/部门,从而显著地提升组织的生产效率。
SeviceDesk提供了如下的功能模块:➢请求➢问题管理➢变更管理➢项目管理➢解决方案➢资产管理➢定购单➢合同➢配置管理数据库请求模块其作用就是一个综合帮助台,在那里可以获取/提交请求,分配给技术员以便提供必要的解决方案来解决问题。
当登录到ManageEngine SeviceDesk Plus,应用程序显示主页,其内容包括待处理的请求,逾期的请求,指派给登录用户的请求,个人的任务列表等。
根据登录用户的情况,可能还会显示其他的信息,如合同和订购单等。
请求:点击标题面板的请求标签,你就进入了请求模块。
这个服务作为IT帮助台模块,可以获取、跟踪来自单个用户的IT请求,并指派技术人员,从而提供一个解决方案。
问题问题管理的目标就是尽量最小化事故和问题对业务的影响,预防相同事故的重复发生。
因此,需要在问题管理中找寻事故的根本原因,并采取改进措施或者变更动作以便消除影响。
变更变更管理的目标是确保所有的变更处理都可管控,并采取标准化的方法与步骤来实施变更。
MX行业领先云管理系统说明书

INDUSTRY-LEADING CLOUD MANAGEMENT• Unified firewall, switching, wireless LAN, and mobile device man-agement through an intuitive web-based dashboard• Template based settings scale easily from small deployments to tens of thousands of devices• Role-based administration, configurable email alerts for a variety of BRANCH GATEWAY SERVICES• Built-in DHCP, NAT, QoS, and VLAN management services • Web caching: accelerates frequently accessed content• Load balancing: combines multiple WAN links into a single high-speed interface, with policies for QoS, traffic shaping, and failover FEATURE-RICH UNIFIED THREAT MANAGEMENT (UTM) CAPABILITIES• Application-aware traffic control: bandwidth policies for Layer 7 application types (e.g., block Y ouTube, prioritize Skype, throttle BitTorrent)• Content filtering: CIPA-compliant content filter, safe-seach enforcement (Google/Bing), and Y ouTube for Schools• Intrusion prevention: PCI-compliant IPS sensor using industry-leading SNORT® signature database from Cisco• Advanced Malware Protection: file reputation-based protection engine powered by Cisco AMP• Identity-based security policies and application managementINTELLIGENT SITE-TO-SITE VPN WITH MERAKI SD-WAN• Auto VPN: automatic VPN route generation using IKE/IPsec setup. Runs on physical MX appliances and as a virtual instance within the Amazon AWS or Microsoft Azure cloud services• SD-WAN with active / active VPN, policy-based-routing, dynamic VPN path selection and support for application-layer performance profiles to ensure prioritization of the applications types that matter • Interoperates with all IPsec VPN devices and services• Automated MPLS to VPN failover within seconds of a connection failure• Client VPN: L2TP IPsec support for native Windows, Mac OS X, iPad and Android clients with no per-user licensing feesOverviewCisco Meraki MX Security & SD-WAN Appliances are ideal for organizations considering a Unified Threat Managment (UTM) solution fordistributed sites, campuses or datacenter VPN concentration. Since the MX is 100% cloud managed, installation and remote management are simple. The MX has a comprehensive suite of network services, eliminating the need for multiple appliances. These services includeSD-WAN capabilities, application-based firewalling, content filtering, web search filtering, SNORT® based intrusion detection and prevention, Cisco Advanced Malware Protection (AMP), web caching, 4G cellular failover and more. Auto VPN and SD-WAN features are available on our hardware and virtual appliances, configurable in Amazon Web Services or Microsoft Azure.Meraki MXCLOUD MANAGED SECURITY & SD-WANRedundant PowerReliable, energy efficient design with field replaceable power suppliesWeb Caching 128G SSD diskDual 10G WAN Interfaces Load balancing and SD-WAN3G/4G Modem Support Automatic cellular failover1G/10G Ethernet/SFP+ Interfaces 10G SFP+ interfaces for high-speed LAN connectivityEnhanced CPU Layer 3-7 firewall and traffic shapingAdditional MemoryFor high-performance content filteringINSIDE THE CISCO MERAKI MXMX450 shown, features vary by modelModular FansHigh-performance front-to-back cooling with field replaceable fansManagement Interface Local device accessMulticolor Status LED Monitor device statusFRONT OF THE CISCO MERAKI MXMX450 shown, features vary by modelCryptographic AccelerationReduced load with hardware crypto assistCisco Threat Grid Cloud for Malicious File SandboxingIdentity Based Policy ManagementIronclad SecurityThe MX platform has an extensive suite of security features including IDS/IPS, content filtering, web search filtering, anti-malware, geo-IP based firewalling, IPsec VPN connectivity and Cisco Advanced Malware Protection, while providing the performance required for modern, bandwidth-intensive yer 7 fingerprinting technology lets administrators identifyunwanted content and applications and prevent recreational apps like BitT orrent from wasting precious bandwidth.The integrated Cisco SNORT® engine delivers superior intrusion prevention coverage, a key requirement for PCI 3.2 compliance. The MX also uses the Webroot BrightCloud® URL categorization database for CIPA / IWF compliant content-filtering, Cisco Advanced Malware Protection (AMP) engine for anti-malware, AMP Threat Grid Cloud, and MaxMind for geo-IP based security rules.Best of all, these industry-leading Layer 7 security engines and signatures are always kept up-to-date via the cloud, simplifying network security management and providing peace of mind to IT administrators.Organization Level Threat Assessment with Meraki Security CenterSD-WAN Made SimpleTransport independenceApply bandwidth, routing, and security policies across a vari-ety of mediums (MPLS, Internet, or 3G/4G LTE) with a single consistent, intuitive workflowSoftware-defined WAN is a new approach to network connectivity that lowers operational costs and improves resource us-age for multisite deployments to use bandwidth more efficiently. This allows service providers to offer their customers the highest possible level of performance for critical applications without sacrificing security or data privacy.Application optimizationLayer 7 traffic shaping and appli-cation prioritization optimize the traffic for mission-critical applica-tions and user experienceIntelligent path controlDynamic policy and perfor-mance based path selection with automatic load balancing for maximum network reliability and performanceSecure connectivityIntegrated Cisco Security threat defense technologies for direct Internet access combined with IPsec VPN to ensure secure communication with cloud applications, remote offices, or datacentersCloud Managed ArchitectureBuilt on Cisco Meraki’s award-winning cloud architecture, the MX is the industry’s only 100% cloud-managed solution for Unified Threat Management (UTM) and SD-WAN in a single appliance. MX appliances self-provision, automatically pulling policies and configuration settings from the cloud. Powerful remote management tools provide network-wide visibility and control, and enable administration without the need for on-site networking expertise.Cloud services deliver seamless firmware and security signature updates, automatically establish site-to-site VPN tunnels, and provide 24x7 network monitoring. Moreover, the MX’s intuitive browser-based management interface removes the need for expensive and time-consuming training.For customers moving IT services to a public cloud service, Meraki offers a virtual MX for use in Amazon Web Services and Microsoft Azure, enabling Auto VPN peering and SD-WAN for dynamic path selection.The MX67W, MX68W, and MX68CW integrate Cisco Meraki’s award-winning wireless technology with the powerful MX network security features in a compact form factor ideal for branch offices or small enterprises.• Dual-band 802.11n/ac Wave 2, 2x2 MU-MIMO with 2 spatial streams • Unified management of network security and wireless • Integrated enterprise security and guest accessIntegrated 802.11ac Wave 2 WirelessPower over EthernetThe MX65, MX65W, MX68, MX68W, and MX68CW include two ports with 802.3at (PoE+). This built-in power capability removes the need for additional hardware to power critical branch devices.• 2 x 802.3at (PoE+) ports capable of providing a total of 60W • APs, phones, cameras, and other PoE enabled devices can be powered without the need for AC adapters, PoE converters, or unmanaged PoE switches.MX68 Port ConfigurationVirtual MX is a virtual instance of a Meraki security appliance, dedicated specifically to providing the simple configuration benefits of site-to-site Auto VPN for customers running or migrating IT services to the public cloud. A virtual MX is added via the Amazon Web Services or Azure marketplace and then configured in the Meraki dashboard, just like any other MX. It functions like a VPN concentrator, and features SD-WAN functionality like other MX devices.• An Auto VPN to a virtual MX is like having a direct Ethernetconnection to a private datacenter. The virtual MX can support up to 500 Mbps of VPN throughput, providing ample bandwidth for mission critical IT services hosted in the public cloud, like Active Directory, logging, or file and print services.• Support for Amazon Web Services (AWS) and AzureMeraki vMX100MX68CW Security ApplianceLTE AdvancedWhile all MX models feature a USB port for 3G/4G failover, the MX67C and MX68CW include a SIM slot and internal LTE modem. This integrated functionality removes the need for external hardware and allows for cellular visibility and configuration within the Meraki dashboard.• 1 x CAT 6, 300 Mbps LTE modem • 1 x Nano SIM slot (4ff form factor)• Global coverage with individual orderable SKUs for North America and WorldwideMX67C SIM slotSmall branch Small branch Small branch Small branch50250 Mbps250 Mbps250 Mbps200 Mbps1Requires separate cellular modemMX67MX67C MX68MX68CW 1Requires separate cellular modemMedium branch Large branch Campus orVPN concentrator Campus orVPN concentratorRack Mount Models 1Requires separate cellular modemVirtual AppliancesExtend Auto-VPN and SD-WAN to public cloud servicesAmazon Web Services (AWS) and Microsoft Azure1 + VirtualIncluded in the BoxPackage Contents Platform(s)Mounting kit AllCat 5 Ethernet cable (2)AllAC Power Adapter MX64, MX64W, MX65, MX65W, MX67, MX67W, MX67C, MX68, MX68W, MX68CWWireless external omni antenna (2)MX64W, MX65W, MX67W, MX68W250W Power Supply (2)MX250, MX450System Fan (2)MX250, MX450SIM card ejector tool MX67C, MX68CWFixed external wireless and LTE paddle antennas MX68CWRemovable external LTE paddle antennas MX67CLifetime Warranty with Next-day Advanced ReplacementCisco Meraki MX appliances include a limited lifetime hardware warranty that provides next-day advance hardware replacement. Cisco Meraki’s simplified software and support licensing model also combines all software upgrades, centralized systems management, and phone support under a single, easy-to-understand model. For complete details, please visit /support.ACCESSORIES / SFP TRANSCEIVERSSupported Cisco Meraki accessory modulesNote: Please refer to for additional single-mode and multi-mode fiber transceiver modulesPOWER CABLES1x power cable required for each MX, 2x power cables required for MX250 and MX450. For US customers, all required power cables will beautomatically included. Customers outside the US are required to order power cords separately.SKUMA-PWR-CORD-AUThe Cisco Meraki MX84, MX100, MX250, MX450 models support pluggable optics for high-speed backbone connections between wir-ing closets or to aggregation switches. Cisco Meraki offers several standards-based Gigabit and 10 Gigabit pluggable modules. Each appliance has also been tested for compatibility with several third-party modules.Pluggable (SFP) Optics for MX84, MX100, MX250, MX450AccessoriesManagementManaged via the web using the Cisco Meraki dashboardSingle pane-of-glass into managing wired and wireless networksZero-touch remote deployment (no staging needed)Automatic firmware upgrades and security patchesTemplates based multi-network managementOrg-level two-factor authentication and single sign-onRole based administration with change logging and alertsMonitoring and ReportingThroughput, connectivity monitoring and email alertsDetailed historical per-port and per-client usage statisticsApplication usage statisticsOrg-level change logs for compliance and change managementVPN tunnel and latency monitoringNetwork asset discovery and user identificationPeriodic emails with key utilization metricsDevice performance and utilization reportingNetflow supportSyslog integrationRemote DiagnosticsLive remote packet captureReal-time diagnostic and troubleshooting toolsAggregated event logs with instant searchNetwork and Firewall ServicesStateful firewall, 1:1 NAT, DMZIdentity-based policiesAuto VPN: Automated site-to-site (IPsec) VPN, for hub-and-spoke or mesh topologies Client (IPsec L2TP) VPNMultiple WAN IP, PPPoE, NATVLAN support and DHCP servicesStatic routingUser and device quarantineWAN Performance ManagementWeb caching (available on the MX84, MX100, MX250, MX450)WAN link aggregationAutomatic Layer 3 failover (including VPN connections)3G / 4G USB modem failover or single-uplinkApplication level (Layer 7) traffic analysis and shapingAbility to choose WAN uplink based on traffic typeSD-WAN: Dual active VPN with policy based routing and dynamic path selection CAT 6 LTE modem for failover or single-uplink1MX67C and MX68CW only Advanced Security Services1Content filtering (Webroot BrightCloud CIPA compliant URL database)Web search filtering (including Google / Bing SafeSearch)Y ouTube for SchoolsIntrusion-prevention sensor (Cisco SNORT® based)Advanced Malware Protection (AMP)AMP Threat Grid2Geography based firewall rules (MaxMind Geo-IP database)1 Advanced security services require Advanced Security license2 Threat Grid services require additional sample pack licensingIntegrated Wireless (MX64W, MX65W, MX67W, MX68W, MX68CW)1 x 802.11a/n/ac (5 GHz) radio1 x 802.11b/g/n (2.4 GHz) radioMax data rate 1.2 Gbps aggregate (MX64W, MX65W), 1.3Gbps aggregate (MX67W,MX68W, MX68CW)2 x 2 MU-MIMO with two spatial streams (MX67W, MX68W, MX68CW)2 external dual-band dipole antennas (connector type: RP-SMA)Antennagain:*************,3.5dBi@5GHzWEP, WPA, WPA2-PSK, WPA2-Enterprise with 802.1X authenticationFCC (US): 2.412-2.462 GHz, 5.150-5.250 GHz (UNII-1), 5.250-5.350 GHZ (UNII-2), 5.470-5.725 GHz (UNII-2e), 5.725 -5.825 GHz (UNII-3)CE (Europe): 2.412-2.484 GHz, 5.150-5.250 GHz (UNII-1), 5.250-5.350 GHZ (UNII-2)5.470-5.600 GHz, 5.660-5.725 GHz (UNII-2e)Additional regulatory information: IC (Canada), C-Tick (Australia/New Zealand), RoHSIntegrated Cellular (MX67C and MX68CW only)LTE bands: 2, 4, 5, 12, 13, 17, and 19 (North America). 1, 3, 5, 7, 8, 20, 26, 28A, 28B, 34, 38, 39, 40, and 41 (Worldwide)300 Mbps CAT 6 LTEAdditional regulatory information: PTCRB (North America), RCM (ANZ, APAC), GCF (EU)Power over Ethernet (MX65, MX65W, MX68, MX68W, MX68CW)2 x PoE+ (802.3at) LAN ports30W maximum per portRegulatoryFCC (US)CB (IEC)CISPR (Australia/New Zealand)PTCRB (North America)RCM (Australia/New Zealand, Asia Pacific)GCF (EU)WarrantyFull lifetime hardware warranty with next-day advanced replacement included.Specificationsand support). For example, to order an MX64 with 3 years of Advanced Security license, order an MX64-HW with LIC-MX64-SEC-3YR. Lifetime warranty with advanced replacement is included on all hardware at no additional cost.*Note: For each MX product, additional 7 or 10 year Enterprise or Advanced Security licensing options are also available (ex: LIC-MX100-SEC-7YR).and support). For example, to order an MX64 with 3 years of Advanced Security license, order an MX64-HW with LIC-MX64-SEC-3YR. Lifetime warranty with advanced replacement is included on all hardware at no additional cost.*Note: For each MX product, additional 7 or 10 year Enterprise or Advanced Security licensing options are also available (ex: LIC-MX100-SEC-7YR).and support). For example, to order an MX64 with 3 years of Advanced Security license, order an MX64-HW with LIC-MX64-SEC-3YR. Lifetime warranty with advanced replacement is included on all hardware at no additional cost.*Note: For each MX product, additional 7 or 10 year Enterprise or Advanced Security licensing options are also available (ex: LIC-MX100-SEC-7YR).。
ITSM-1-QM-01 IT服务管理手册 -模板
编号:版本号:受控状态:受控密级:内部公开xxx公司ISO20000体系文件IT服务管理手册文档信息版本记录服务手册发布书册保障信息化工作有效运行和促进业务长足发展是xxx公司IT服务团队实现卓越的IT服务管理的基石。
为了实现这一目标,我们不仅需要服务质量的不断改进,更需要服务过程的有效管理和改进,以满足用户对IT服务的期望和业务发展对IT服务的要求。
服务管理手册依据《ISO/IEC 200001:2011-1:2011 信息技术-服务管理规范》国际标准制定,它是服务团队IT服务管理体系的核心文件,也是指导服务团队建立并实施IT服务管理体系的纲领和行动准则,是服务团队对用户的承诺。
此文件现予以批准颁布实施。
自实施之日起,服务团队全体员工必须遵照执行。
最高管理层:xxx日期:xx日IT服务管理者代表任命书为保持xxx公司IT服务管理体系适用性、充分性和有效性,加强对IT 服务管理体系运作的领导,特任命xx为xxx的IT服务管理者代表。
管理者代表的职责和权限:1.确保按照ISO/IEC 200001:2011-1:2011 标准的要求建立、实施和保持IT服务管理体系;2.向IT服务管理委员会报告IT服务管理体系的运行业绩及改进需求,以供评审和作为IT服务管理体系改进的基础;3.在xxx认证范围内使全体员工理解专业,高效,可靠的服务方针,提升服务意识;4.就IT服务管理体系的推进、执行和持续改进等有关事宜与内外部各方进行沟通和联络。
签名:日期:目录服务手册发布书 (III)1.手册序论 (6)1.1编制目的 (6)1.2适用范围 (6)1.3术语定义 (6)2.总则 (7)2.1认证范围 (7)2.2认证地点 (7)2.3引用标准 (7)2.4服务口号 (7)2.5服务方针 (7)2.6服务目标 (8)3.管理体系及要求 (8)3.1服务管理组织及职责 (29)3.2文件要求 (29)3.2.1文件的分级管理 (29)3.2.2文件编码 (29)3.2.3文件管制要求 (29)4.服务管理体系的PDCA (29)4.1服务管理体系的规划(P LAN) (29)4.1.1服务管理的目标和范围 (29)4.1.2服务管理组织及其职责 (29)4.1.3将要执行的流程 (29)4.1.4各流程之间的接口 (29)4.2服务管理体系的建立(D O) (29)4.2.1服务管理体系实施 (29)4.2.2人员培训 (29)4.3服务管理体系的检查(C HECK) (29)4.3.1内审 (29)4.3.2管理评审 (29)4.3.3日常检查 (29)4.4服务管理体系的改进(A CT) (29)5.规划和实施新的或变更的服务 (29)服务管理手册1. 手册序论服务管理手册规定了xxx公司IT服务团队(以下简称“xxx”)的服务方针、目标、IT服务管理体系组织、职责,以及各流程文件的控制范围和控制目标。
ManageEngine IT运维管理平台(IT360)
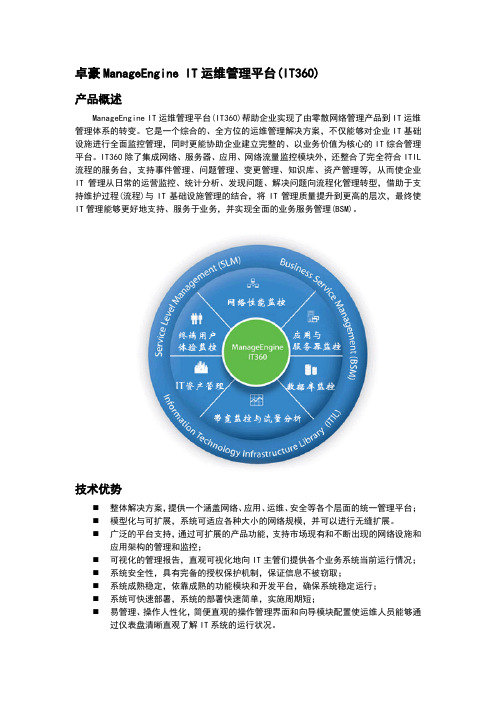
卓豪ManageEngine IT运维管理平台(IT360)产品概述ManageEngine IT运维管理平台(IT360)帮助企业实现了由零散网络管理产品到IT运维管理体系的转变。
它是一个综合的、全方位的运维管理解决方案,不仅能够对企业IT基础设施进行全面监控管理,同时更能协助企业建立完整的、以业务价值为核心的IT综合管理平台。
IT360除了集成网络、服务器、应用、网络流量监控模块外,还整合了完全符合ITIL 流程的服务台,支持事件管理、问题管理、变更管理、知识库、资产管理等,从而使企业IT管理从日常的运营监控、统计分析、发现问题、解决问题向流程化管理转型,借助于支持维护过程(流程)与IT基础设施管理的结合,将IT管理质量提升到更高的层次,最终使IT管理能够更好地支持、服务于业务,并实现全面的业务服务管理(BSM)。
技术优势⏹整体解决方案,提供一个涵盖网络、应用、运维、安全等各个层面的统一管理平台;⏹模型化与可扩展,系统可适应各种大小的网络规模,并可以进行无缝扩展。
⏹广泛的平台支持,通过可扩展的产品功能,支持市场现有和不断出现的网络设施和应用架构的管理和监控;⏹可视化的管理报告,直观可视化地向IT主管们提供各个业务系统当前运行情况;⏹系统安全性,具有完备的授权保护机制,保证信息不被窃取;⏹系统成熟稳定,依靠成熟的功能模块和开发平台,确保系统稳定运行;⏹系统可快速部署,系统的部署快速简单,实施周期短;⏹易管理、操作人性化,简便直观的操作管理界面和向导模块配置使运维人员能够通过仪表盘清晰直观了解IT系统的运行状况。
功能特色⏹网络及机房监控●全面性:端到端的网络设施平台,高级故障和性能管理功能,管理LAN网络、WAN、VoIP电话网络设备以及诸如机房设备、打印机、UPS等IT基础设施;●点到面:实现由“设备点”全面监控到“网络面”深入分析;●可视化:可视化地直观呈现所有IT基础架构的运行状况;●可控性:问题及时预警、故障根源精确定位、快速恢复措施;●平台级:平台级的网管系统提供了全面的扩展性,如设备配置模板;⏹服务器监控●采用无代理方式监控服务器,不会对原有业务造成任何影响;●监控服务器负载、磁盘利用率、进程、内存利用率、磁盘I/O、服务器CPU利用率等;●帮助IT管理员准确识别问题的根源在于操作系统、应用还是服务器;●支持Linux, Windows、Solaris、AIX、HP UX等业界主流操作系统。
Intel 主动管理技术(主动式管理技术) v4.0 管理员指南说明书

Intel® Active Management Technology(主动式管理技术)v4.0管理员指南概览产品概览操作模式设置和配置概览预配置方法菜单及默认设置MEBx 设置概览ME 配置菜单AMT 配置菜单MEBx 默认设置设置和配置方法概览配置服务MEBx 界面(企业模式)MEBx 界面(中小企业模式)系统部署操作系统驱动程序管理Intel AMT Web GUIAMT 重定向 (SOL/IDE-R) AMT 重定向概览故障排除故障排除如果您购买的是 Dell™ n 系列计算机,则本文中关于 Microsoft® Windows®操作系统的任意参考内容均不适用。
本说明文件中的信息如有更改,恕不另行通知。
(c) 2008 Dell Inc.。
版权所有,翻印必究。
未经 Dell Inc. 书面许可,严禁以任何形式复制这些材料。
本文中使用的商标:Dell、Latitude和DELL徽标是 Dell Inc. 的商标;Intel 是 Intel Corporation 在美国及其他国家和地区的商标或注册商标;Microsoft和Windows是 Microsoft Corporation 在美国及/或其他国家和地区的商标或注册商标。
本说明文件中述及的其它商标和商品名称是指拥有相应标记和名称的公司或其制造的产品。
Dell Inc. 对其它公司的商标和产品名称不拥有任何所有权。
2008 年 8 月修订版 A00概览Intel® 主动管理技术 (Intel AMT) 使公司可通过以下方法轻松实现对其联网计算机的管理:搜索网络上的计算机资产(无论计算机处于打开或关闭状态)– Intel AMT 使用存储在非易失性系统内存中的信息来访问计算机。
即使计算机处于关闭状态,也能对其进行访问(也称为带外访问或 OOB 访问)。
假如操作系统发生故障,也可远程修复系统 — 在软件或操作系统发生故障的情况下,可使用 Intel AMT 远程访问计算机以完成修复。
ITMS客户端操作手册
I TMS客户端操作手册终端综合治理系统(Integrated Terminal Management System,以下简称ITMS)是我的E家终端治理系统,可对我的E家终端进行远程治理,并远程下发参数及故障处置。
一. ITMS客户端安装目前ITMS客户端安装,除安装客户端软件外,需要安装客户端修补工具,安装客户端修补工具后,ITMS客户端将自动识别最新版本并自动升级。
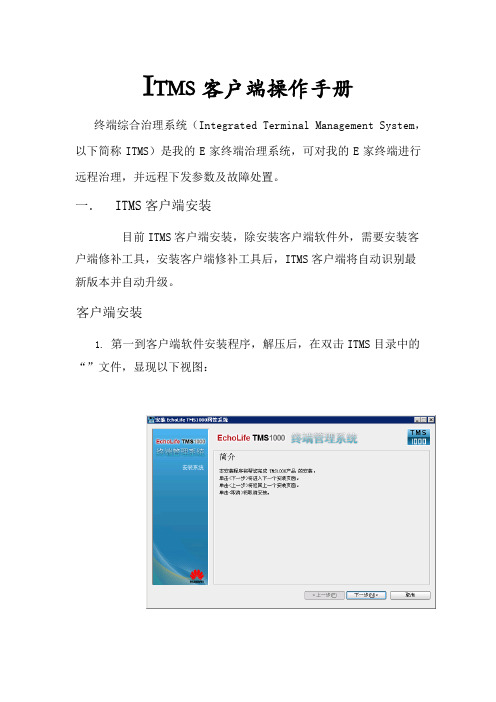
客户端安装1.第一到客户端软件安装程序,解压后,在双击ITMS目录中的“”文件,显现以下视图:2. 单击“下一步”,显现“软件许可协议”窗口,如下所示。
软件许可协议请认真阅读,而且确认已经同意软件许可协议后,选择“我同意上述条款”,单击“下一步”,显现“选择安装途径”窗口。
3. 手工输入安装目录或单击“阅读”选择安装目录,推荐安装途径为“D:\TMS1000”,如错误!未找到引用源。
如下所示。
4.采纳缺省设置,单击“下一步”,直到显现“安装完毕”的窗口,单击“确信”。
显现提示从头启动操作系统的对话框,单击“是”。
2.客户端修补工具安装1. 双击客户端修补工具目录中“”文件,显现修补操作框如下所示:此框3秒后自动关闭。
2. 双击TMS1000客户端进行登岸,设置完登录界面后,点击“登录”按钮,显现升级进度框如下所示:3. 升级进程中会显现以下操作框:4. 升级完成后,从头进入登岸界面,即可进行设置登录了。
二. ITMS客户端登录用户通过客户端来访问TMS。
在安装客户端应用软件的运算机上单击“开始 > 所有程序 > 网络治理系统 > TMS1000 客户端”,运行客户端,如下图。
1. TMS客户端应用软件2. 设置效劳器参数第一次利用TMS客户端应用软件前,需要设置客户端所连接的效劳器参数。
设置效劳器参数的操作步骤如下:在以下图所示的“用户登录”窗口上,单击效劳器下拉列表框旁的“...”,弹出效劳器“设置”窗口。
1. 用户登录窗口2. 效劳器设置窗口3. 单击“增加”,弹出如错误!未找到引用源。
TE管理者指南说明书

Tom Lynch 目錄鼓勵道德文化落實我們的價值觀 (6)以身作則 (8)• 成為榜樣• 公平公正• 尊重他人• 值得信賴遵守我們的《道德行為指南》 (10)以道德激勵員工 (10)遵守法律 (10)承擔責任 (11)支援您的團隊營造積極的環境 (14)• 培育英才• 鼓勵創新• 表示讚賞促進溝通 (16)• 致力奉行開放政策• 成為善於傾聽者如果? (20)回應問題運用良好的判斷 (26)參考我們的指南和政策 (27)報告違規行為 (27)絕不容忍打擊報復 (27)資源 (28)落實我們的價值觀不要只是宣傳道德原則 – 要切實落實。
成功的主管會在每一天的工作中落實他們的價值觀。
我們對 TE 經理抱持相同的期望。
我們的價值觀是我們的道德行為聲譽的基石。
它們反映了我們公司的理念– 我們希望您在與員工、客戶、供應商、股東和其他 TE 利益相關者交流時能體現出這些價值觀。
貫徹我們的價值觀即代表您落實著我們的《指南》並積極影響他人的活動。
這是激勵他人做到最好的一種有力方式。
• 把我們的價值觀融入您的領導風格。
• 在言行中體現我們的價值觀。
• 依據員工在貫徹我們的價值觀方面的表現來評估其成功程度。
在 TE ,道德領導力代表強調我們的核心價值觀如何引導我們每 天的工作行為。
我們追求以最高的個人和企業誠信標準要求自身和彼此。
我們捍衛公司的資產。
我們遵守所有法律和公司政策。
我們堅持多元化、公平對待、相互尊重和相互信任。
我們營造一個鼓勵創新、創意、卓越和透過團隊合作完成任務的環境。
我們實施引導、激勵、 促進員工全力參與和職涯的領導理念。
我們提倡進行開誠佈公的有效溝通和互動。
我們落實自己的承諾,為自己的所有行為和結果承擔個人責任。
我們創造一種能與公司的企業文化融為一體,且持續改善的經營原則。
我們體認到,創新是企業發展的基礎。
在各項工作中,我們都迎難而上,力圖創造更新、 更好的工作方法。
我們鼓勵、期望和重視創造精神、對變革的開放態度和創新的工作方式。
卓豪 Applications Manager 快速用户手册说明书

目录简介 (3)系统安装 (3)硬件要求 (3)软件要求 (3)安装部署 (4)启动Applications Manager (10)访问Applications Manager (11)添加监视器 (12)示例:添加Windows监视器: (13)告警管理 (16)1:配置阈值告警 (16)配置邮件服务器 (21)创建邮件动作 (23)3:将动作与监视器关联 (24)使用6:报表 (29)产品文档 (30)是针对企业各种业务监控管理需求推出的应用性能监控管理解决方案。
它采用了无监控代理(Agentless)的最新技术,易于架构,可以对不同的业务系统、应用和网络服务(如服务器、操服务、中间件、邮件系统、其他关键应用等)进行多角use / Ubuntu / Mandri v a /和MS SQL作为后台数据库2.请阅读Manage E ngine Applications Manager的许可协议,然后点击“YES”进入下一步操作;3.这是语言选择界面,请您在下列语言中选择“S implified Chinese”代表简体中文,点击“N ext”进入下一步;4.Applications Manager有免费版,专业版和企业版三个版本,都提供30天的免费试用,请您选择“Professional E dition”专业版,点击“N ext”;5.选择Applications Manager安装路径,您可以通过点击“B rowse”自行更改其安装路径(注:路径中请不要出现中文和特殊字符),点击“N ext”;6.默认程序目录为“Manage E ngine Applications Manager 13如有需要可以更改名称。
点击“N ext”进入下一步;7.Applications Manager默认的Web服务端口为9090,SS L端口为8443,根据您的情况可自行更改,点击“N ext”进入下一步;8.请您根据提示注册技术支持信息,点击“N ext”或“Sk ip”进入下一步;9.请检查安装信息文件,确认无误后点击“N ext”进入下一步;10.请您选择“30 da y trial”选项,安装30天免费试用版,点击“N ext”进入下一步。
卓豪ITSM用户指南
简介ManageEngine ServiceDesk Plus集成了帮助台和资产管理软件。
它提供了帮助台代理、IT管理器和管理控制台,用来管理资产以及由用户提交的所有IT请求。
IT帮助台在IT服务管理中起着非常重要的作用,是联系终端用户的唯一途径,当用户出现问题时都要借助于帮助台来提交问题。
为了更加容易地向IT帮助台提交问题,ManageEngine ServiceDesk Plus 为您提供了自助服务门户,您可以在登录它之后,在线提交您的问题与投诉。
一旦提交完成,它将列出您所提交的所有问题,您可以随时追踪问题的处理状态。
同时也可以通过自助平台更新个人信息。
在个人自助服务门户,您可以访问:请求: 可以创建新的请求,也可以查看已有请求的状态。
您所提交的所有请求都将保存在服务器中供将来参考。
解决方案: 从IT帮助台的解决方案知识库中,您可以查找您所面临的问题的解决方案。
如果没有,您可以提交新的请求。
我的明细: 查看/编辑您的账户明细,包括更改密码等。
请求利用ManageEngine ServiceDesk Plus提供的自助门户的请求模块,可以创建新的请求,将您所面临的问题提交到帮助台。
您也可以查看和追踪您已经提交的请求的状态。
一旦请求被处理完毕,您可以在已关闭的请求中查看您的请求。
创建新的请求当需要从IT帮助台获得帮助,可以向他们发送请求。
有多种方式可以提交请求:基于Web表单、Email、电话等。
ServiceDesk Plus 将在接收到请求后按照不同方式记录、处理请求的明细。
使用Web表单创建请求的步骤:1.用正确的用户名和密码登录ServiceDesk。
2.点击首页画面中的新建请求链接。
请求人明细在请求人信息块中,将显示您的名称以及关联的工作站。
名称不可编辑,可以从工作站下拉框中选择您提交问题的所相关的工作站。
根据管理员的配置,工作站列表中可能会列出您所在组织的所有工作站或者与您关联的工作站。
重塑it角色——卓豪manageengine让it管理更简单
企业上云在为业务增进 效率的同时,也往往会带来管 理复杂性的增加。IT 运维管 理与业务的结合始终是企业 管理者特别重视的环节。
ITIL 已经在企业管理中 非常常见,也许很多人疑惑, 如今已经有了很多比较完善 的各种相关制度,为什么还要 实施 ITIL 的流程?
卓豪公司资深技术顾问 袁聪解释,其实流程和制度是 有区别的,IT 服务管理在实 施的过程中可能会面临一系 列的绊脚石,一是内部人员组 织没有形成共识 ;二是没有 获得业务部门支持 ;三是致 命的繁琐流程。
流程管理是为了让工作 更简单,但随着业务的复杂而 往往事与愿违,因此有必要利 用 IT 服务管理以确保简单明 了流程的管控。
卓豪公司在为用户解决 以上 IT 服务管理时有着独特 的方法和技术积累,通过提供 给用户的服务台作为统一 IT 服务入口,跟踪整个事件生命 周期,以用户特性划分,管理 理用户满意度,将 IT 资源及 多数据中心统一管理,构筑统 一管理的平台,通过一站式解 决方案在世界范围内超过 15 万家企业中得到广泛应用。
这一系列原因使得企业 在 IT 服务管理过程中变得异 常复杂,致使 IT 服务无法为 企业业务带来正向的带动作 用。这并不是企业 IT 管理的 初衷,造成这些问题的原因值 得企业管理者们深入思考。
因 此,针 对 这 些 问 题,卓 豪公司进行了针对性的解惑。
卓豪公司资深技术顾问 袁聪
首先,针对内部人员组织的共 识 问 题,卓 豪 能 够 为 用 户 引 入 IT 服务管理,帮助企业人 员进行能力意识的培训,通过 一致的流程走向,将内部人员 特定的处理事故达成共同的 处理流程,同时选择合适的流 程,以得到整体部门人员的认 可,帮助用户进行统一的流程 走向。
在实际工作中,很多业务 部门人员不愿改变工作习惯, 使得 IT 服务与业务的融合缓 慢。这种现象又该如何破局? 其实,IT 服务管理可以帮助 业务部门得到正确的定位,同 时通过深刻理解组织业务,可 以帮助业务部门了解企业内 部流程,在同一个 IT 服务管
系统管理员手册
系统管理员手册1.办事端治理 (2)1.1电子仓库设置 (2)1.2日记治理 (3)1.3数据库备份与还原 (4)2.人员权限治理 (5)2.1用户治理 (5)2.2角色治理 (5)2.3权限治理 (6)2.4录用人员角色 (7)2.5人员产品相干 (8)1.办事端治理CAXA图文档是办事端的重要供给电子仓库设置,日记治理和数据库备份的功能。
1.1电子仓库设置电子仓库是办事端专门用来存放由客户端上传到办事器的各类文档。
电子仓库设置主假如为了让用户依照本身办事端地点设备的情形选择一个实际的物理地址来存放文档。
在办事端的主界面下,如图1所示.图1 电子仓库设置用户单击设置菜单栏,然后在弹出的菜单项中选择电子仓库设置,就可进入下面图2所示的电子仓库设置窗口。
用户能够依照本身的情形在路径后的文本框中输入检入库的实际磁盘路径,比如我们输入d:\vault\checkedin,同时那个目次是实际存在的,单击下面切实事实上定按钮,办事端就会主动把该路径储存到数据库之中。
单击标签页的宣布库或者归档库,用同样的方法能够设置文档的宣布库和归档库。
图2电子仓库路径设置1.2日记治理办事端的日记治理用户登录名、登录时刻、对对象履行的操作(事宜)、操尴尬刁难象等信息,这些信息会显示在办事端的日记治理窗口中。
如图3所示。
为了便于用户快速得在浩渺日记记录中找到本身欲望的信息,办事端供给了在日记中查找的功能。
如图4中所示单击在日记视图中查找对象按钮,体系会弹出图5所示的查找窗口。
图3 体系日记记录图4 在日记中查找记录图5 日记记录查找前提设置用户能够在查找内容下面的文本框中输入从用户列开端往后任何一列中的随便率性符号,体系会找到与之匹配的内容同时逗留在该行上。
用户在查找时能够依照实际情形选择完全匹配,部分匹配以及查找的偏向。
当用户单击“标识所有”按钮时体系会主动使所有与之匹配的行被选中。
1.3数据库备份与还原数据库体系是图文档治理体系的核心对象。
豪生酒店管家部标准运作程序手册手册
STANDARD OPERATING PROCEDURESPOLICY NO.SUBJECT项目HSKP – 001 Standard Of Cleanliness 清洁标准HSKP –002 Lost and Found 失物招领HSKP –003 Entering Guest Rooms 进入客房HSKP – 004 Floor Attendant Services 客房服务HSKP – 005 Shoe Shine Service 擦鞋服务HSKP – 006 Guest Request Items 客人需求项目HSKP – 007 Babysitting 托婴服务HSKP – 008 Guest Belongings 客人财产HSKP – 009 Room Wait Requests 等候要求HSKP – 010 Shift Briefing 班会HSKP – 011 Work Orders 客房维护HSKP – 012 Allowing Access To Guest Rooms 允许进入客人房间HSKP – 013 Gratuities / Tips 赠物、小费HSKP – 014 Attending To Guests In Public Restrooms 做好客用休息区卫生HSKP – 015 Chain Of Command 行政管理HSKP – 016 Holding Open And Securing Guest Room Door 客房安全HSKP – 017 Reasonable Job Requests 合理的工作分配HSKP – 018 Key Control Procedure 钥匙控制程序HSKP – 019 Leaving Work Area Without Authorization 未经批准擅离工作区域HSKP – 020 Telephone Skill 电话技巧HSKP – 021 Cleaning The Public Telephone 公用电话清洁HSKP – 022 Cleaning Furniture 家具清洁HSKP – 023 Cleaning The Guest Corridors 楼层过道清洁HSKP – 024 Providing Turndown Service 夜床服务HSKP – 025 Cleaning Service Areas And Emergency Stairway 服务区和应急区的清洁HSKP – 026 Sweep Log 清洁记录HSKP – 027 Handling Guest Laundry 处理宾客洗衣HSKP – 028 Uniform Room Procedures 制服程序HSKP – 029 Handling Guestroom Trash 客房垃圾处理HSKP – 030 Empty the Wastebasket 清除垃圾HSKP – 031 Vacuuming of Public Areas 公共区域吸尘HSKP – 032 AM/PM Discrepant Rooms Report 早中班房态差异报告HSKP – 033 Definition of a Guest 宾客诠释HSKP – 034 Handle Guest Complaints 处理客人投诉HSKP – 035 Job Safety 岗位安全HSKP – 036 Personal Safety 个人安全HSKP – 037 Priority Cleaning 优先清洁HSKP – 038 Do Not Disturb 请勿打扰HSKP – 039 Guest Room Security 房间安全STANDARD OPERATING PROCEDURE POLICY NO.SUBJECT项目HSKP – 041 Housekeeping Department Hygiene and GroomingStandard房间清洁和卫生标准HSKP – 042 Guest Room Cleaning 房间清洁HSKP – 043 Make A bed 做床HSKP – 044 Bathroom Cleaning 卫生间清洁HSKP – 045 Proper Behaviour for Housekeeping Staffs 客房员工正确行为举止HSKP – 046 Use A Vacuum Cleaner 吸尘器的使用HSKP – 047 Handling baby Crib / Cot 处理婴儿床HSKP – 048 Regular Turndown Service 夜床服务规范HSKP – 049 Executive Floor Lounge Cleaning Hours 行政楼层工作时间HSKP – 050 Flower Ordering /Arrangements 鲜花订购、安排HSKP – 051 Executive Floor Guests / VIP Flower Ordering/Arrangements 行政楼层客人/VIP 鲜花订购安排HSKP – 052 Executive Floor Guests / VIP Turndown Service 行政楼层/VIP开夜床服务HSKP – 053 Cleanliness & Hygiene 清洁及卫生HSKP – 054 Daily Check List 每日检查表HSKP – 055 Equipment Usage 设备使用HSKP – 056 Newspaper & Magazines 报纸和杂志HSKP – 057 Reception Service 迎宾服务HSKP – 058 Towels 毛巾HSKP – 059 Administration 管理HSKP – 060 Quality Control 质量控制HSKP – 061 Normal, Express and Pressing Service 一般,特殊和熨烫服务HSKP – 062 Guest Laundry Pick Up & Distribution 收送洗衣服务HSKP – 063 Handling Clean Linen 干净布草的处理HSKP – 064 Soiled Linen Handling 脏布草的处理HSKP – 065 Room Linen Discard Procedures 布草报损程序HSKP – 066 Receiving of Uniform & Linen from Supplier 更换制服,补充布草HSKP – 067 Storage of Chemicals 药水储存HSKP – 068 Machinery 机器HSKP – 069 Linen Room attendant & Its Function 布草服务员及其职能HSKP – 070 Floor Linen Control 楼层布草控制HSKP – 071 Linen & Uniform Inventory 布草制服盘存HSKP – 072 Uniform Control 制服控制HSKP – 073 Receiving of Uniform 换制服HSKP – 074 Issue Uniform to Banquet 发放宴会制服HSKP – 075 Issue F & B Linen 发放餐饮布草HSKP – 076 Processing Linen 布草处理STANDARD OPERATING PROCEDURESSubject 项目STANDARDS OF CLEANLINESS清洁标准Effective Date有效日期16、JULY 2004Policy No 序号HSKP-001 Issued by发出者RDMPage 页码 1 of 4 Approved by批准人HOTEL MANAGER酒店经理Distribution 描述 All Associates全体员工部门经理Objective: 目标To ensure consistent quality standard of cleanliness at Hotel are meet at all times.随时保证酒店的清洁质量标准。
卓豪ITSM用户指南1
简介ManageEngineServiceDesk Plus集成了帮助台和资产管理软件。
它提供了帮助台代理、IT管理器和管理控制台,用来管理资产以及由用户提交的所有IT请求。
IT帮助台在IT服务管理中起着非常重要的作用,是联系终端用户的唯一途径,当用户出现问题时都要借助于帮助台来提交问题。
为了更加容易地向IT帮助台提交问题,ManageEngineServiceDesk Plus 为您提供了自助服务门户,您可以在登录它之后,在线提交您的问题与投诉。
一旦提交完成,它将列出您所提交的所有问题,您可以随时追踪问题的处理状态。
同时也可以通过自助平台更新个人信息。
在个人自助服务门户,您可以访问:请求: 可以创建新的请求,也可以查看已有请求的状态。
您所提交的所有请求都将保存在服务器中供将来参考。
解决方案: 从IT帮助台的解决方案知识库中,您可以查找您所面临的问题的解决方案。
如果没有,您可以提交新的请求。
我的明细: 查看/编辑您的账户明细,包括更改密码等。
请求利用ManageEngineServiceDesk Plus提供的自助门户的请求模块,可以创建新的请求,将您所面临的问题提交到帮助台。
您也可以查看和追踪您已经提交的请求的状态。
一旦请求被处理完毕,您可以在已关闭的请求中查看您的请求。
创建新的请求当需要从IT帮助台获得帮助,可以向他们发送请求。
有多种方式可以提交请求:基于Web表单、Email、电话等。
ServiceDesk Plus 将在接收到请求后按照不同方式记录、处理请求的明细。
使用Web表单创建请求的步骤:1.用正确的用户名和密码登录ServiceDesk。
2.点击首页画面中的新建请求链接。
请求人明细在请求人信息块中,将显示您的名称以及关联的工作站。
名称不可编辑,可以从工作站下拉框中选择您提交问题的所相关的工作站。
根据管理员的配置,工作站列表中可能会列出您所在组织的所有工作站或者与您关联的工作站。
工作站的选择不是必需的。
Aloha TableService 6.2 管理员指南 PDF文档说明书

PC Software Aloha TS Manager Guide v6.2 ManualT ableService v6.2Manager GuideTable of ContentsIntroductionAbout Aloha TableService?..............................................................I-viiFront-of-House Interface...............................................................I-viiiBack-of-House Interface...............................................................I-viii Reports..........................................................................................I-ixIs This Guide for You?.......................................................................I-xScreen Components.........................................................................I-xiiFunction Tabs...............................................................................I-xiiiFunction Tab Title Bar..................................................................I-xiiiAdditional Tabs.............................................................................I-xivStandard Button Functions...........................................................I-xivNavigation in Aloha Manager...........................................................I-xviNavigating with the Mouse............................................................I-xviNavigating with the Keyboard.......................................................I-xviHow This Guide is Organized........................................................I-xviiiPerforming Daily Functions.................................................1-1About Your Restaurant.....................................................................1-5Opening Your Restaurant.................................................................1-5Performing a System Check..........................................................1-6Clocking Yourself In.......................................................................1-7Setting Up the Cash Drawer..........................................................1-7Running the Aloha Delivery-Frequent Buyer Interface..................1-8Running Your Restaurant...............................................................1-10v6.2 Performing Security Procedures..................................................1-11Performing Guest Check Procedures..........................................1-13Performing Table and Tab Procedures.......................................1-18Performing Cash Drawer Procedures.........................................1-23Performing System Procedures..................................................1-25Viewing FOH Reports..................................................................1-28Performing Video Display System Procedures...........................1-37Closing Your Restaurant................................................................1-39Performing Employee Break Procedures....................................1-39Performing Employee Checkout Procedures..............................1-41Performing Employee Clockout Procedures...............................1-42Performing Credit Card Procedures............................................1-44Performing PMS Guest Account Procedures..............................1-50Clocking Yourself Out..................................................................1-54Summary........................................................................................1-55Managing Your Data..............................................................2-1About Your Data...............................................................................2-3Logging In......................................................................................2-4Logging Out...................................................................................2-4Changing a BOH Password..........................................................2-5Managing Your Labor.......................................................................2-6Employee Maintenance.................................................................2-6Weekly Labor Schedules.............................................................2-11Shift Maintenance........................................................................2-15Break Maintenance.....................................................................2-17Edit Punch Reasons Maintenance..............................................2-19Managing Your Product..................................................................2-20Item Maintenance........................................................................2-20Category Maintenance................................................................2-24Modifier Maintenance..................................................................2-27Submenu Maintenance...............................................................2-33Menu Maintenance......................................................................2-36Managing Your Pricing...................................................................2-42Item Pricing.................................................................................2-42Price Levels Pricing.....................................................................2-42Price Changes Pricing.................................................................2-45Button Pricing..............................................................................2-47Fixed Item Pricing........................................................................2-48Quantity Item Pricing...................................................................2-50 iv Table of Contents Aloha TableService Manager Guide v6.2Managing Your Payments..............................................................2-52Promotion Maintenance...............................................................2-52Comp Maintenance......................................................................2-58Managing Your Bonus Plans.......................................................2-62Managing Your Coupons.............................................................2-69Managing Your Messages..............................................................2-72Main Screen Message Maintenance...........................................2-72Guest Check Message Maintenance...........................................2-75Clock In Message Maintenance...................................................2-78Server Message Maintenance.....................................................2-79Managing Your Members...............................................................2-80Member Maintenance..................................................................2-80Credit Hold Reason Maintenance................................................2-82Managing Your System Data..........................................................2-84Verifying Your Data......................................................................2-84Refreshing Your Data..................................................................2-85Managing Your Delivery-Frequent Buyer Database....................2-85 Summary........................................................................................2-90Running Your Reports..........................................................3-1About Your Reports..........................................................................3-4Performing Common Report Functions.........................................3-6Working with Custom Report Settings...........................................3-8Analyzing Your Sales Report..........................................................3-10Working with Deposits.................................................................3-11Running Your Sales Report.........................................................3-14Editing the Sales Report Settings................................................3-14Analyzing Your Labor Report..........................................................3-23Running Your Labor Report.........................................................3-24Editing the Labor Report Settings................................................3-25Analyzing Your Product Mix Report................................................3-30Running Your Product Mix Report...............................................3-33Editing the Product Mix Report Settings......................................3-33Working with Delivery-Frequent Buyer Lists and Reports..............3-38Printing Mailing Labels.................................................................3-39Generating Coupon Batches.......................................................3-42 Summary........................................................................................3-44IndexAloha TableService Manager Guide v6.2Table of Contents vThis is a “Table of Contents preview” for quality assuranceThe full manual can be found at /estore/catalog/ We also offer free downloads, a free keyboard layout designer, cable diagrams, free help andsupport. : the biggest supplier of cash register and scale manuals on the net。
- 1、下载文档前请自行甄别文档内容的完整性,平台不提供额外的编辑、内容补充、找答案等附加服务。
- 2、"仅部分预览"的文档,不可在线预览部分如存在完整性等问题,可反馈申请退款(可完整预览的文档不适用该条件!)。
- 3、如文档侵犯您的权益,请联系客服反馈,我们会尽快为您处理(人工客服工作时间:9:00-18:30)。
ManageEngine SeviceDesk Plus管理员指南一、简介ManageEngine SeviceDesk Plus是一个全面的帮助台和资产管理软件,它为IT管理者和桌面代理提供了一个集成的控制台,用来管理和维持来自组织中IT资源用户的服务请求,和对应的IT资产。
IT帮助台在IT服务提供中起着重要的作用。
当IT服务出现问题的时候,利用它可以第一时间联系用户。
同时IT帮助台也是需要帮助的终端用户的唯一联系点。
没有它,一个组织就会丧失应有的效率。
ManageEngine SeviceDesk Plus的两个主要焦点是IT请求跟踪和资产管理。
使用SeviceDesk提供的帮助台功能模块,技术人员和系统管理员能够不用花费多长时间就解决复杂的问题,从而减少了终端用户的挫折感,提高解决问题的效率。
同时借助于本产品的资产管理,可以有效地跟踪组织的需求,恰当地将资源分配给适当的用户/部门,从而显著地提升组织的生产效率。
SeviceDesk提供了如下的功能模块:➢请求➢问题管理➢变更管理➢项目管理➢解决案➢资产管理➢定购单➢合同➢配置管理数据库请求模块其作用就是一个综合帮助台,在那里可以获取/提交请求,分配给技术员以便提供必要的解决案来解决问题。
当登录到ManageEngine SeviceDesk Plus,应用程序显示主页,其容包括待处理的请求,逾期的请求,指派给登录用户的请求,个人的任务列表等。
根据登录用户的情况,可能还会显示其他的信息,如合同和订购单等。
请求:点击标题面板的请求标签,你就进入了请求模块。
这个服务作为IT帮助台模块,可以获取、跟踪来自单个用户的IT请求,并指派技术人员,从而提供一个解决案。
问题问题管理的目标就是尽量最小化事故和问题对业务的影响,预防相同事故的重复发生。
因此,需要在问题管理中找寻事故的根本原因,并采取改进措施或者变更动作以便消除影响。
变更变更管理的目标是确保所有的变更处理都可管控,并采取标准化的法与步骤来实施变更。
从而最小化由变更引发相关的事故数,改进组织的日常操作。
解决案这个模块服务作为知识库,可以为IT帮助台团队和你的所有用户提供帮助。
用户可以搜索问题的解决案并自行解决他们。
同时,当技术人员解决了某个问题之后,他们可以直接把这些解决案转化为知识库文档,以便将来查询。
为了浏览解决案,点击标题面板的解决案页签。
资产资产管理有助于您有效地跟踪与管理资产。
它可以跟踪所有新添的资产,并维护组织的所有资产的记录。
它将资产分为IT、非IT和资产组件,更好地加以管理。
它涵盖了工作站、打印机、路由器、交换机、软件可、扫描仪、投影仪等等。
甚至像空调机这些资产也可以加以管理。
资产清单点击标题面板的资产清单页签可以打开资产清单模块。
这能帮户你跟踪和维持IT资产清单,例如计算机,鼠标,键盘,打印机等等。
你可以查看某些资产是否和特定的工作站或者用户相关联,或者它们是否可以分配给新用户或者工作站。
而且你也可以跟踪各个工作站所关联的软件资源,从而制定计划来购买或者丢弃软件可。
定购单你可以创建新的定购单并跟踪它们直到该定购单的货物全部收齐。
同时它的详细信息将被保存以便将来做参考。
点击定购单页签可以进入定购单模块。
合同这个模块用来掌控你的组织和供应商之间的合同的详细信息,你的组织从供应商那里购买相关的资产。
点击合同页签可以进入合同模块。
配置管理数据库配置管理数据库(简称:CMDB),可以帮助您追踪管理所有配置项,尽管资产数据库也属于配置项的一种,但是,这里所提到的CMDB,可以更好地支持所有IT结构,全面支持各个配置项之间的关系,以便更好地进行根本原因分析,影响分析,决策制定。
项目管理提供全面的项目管理功能,从而使变更管理更加有效。
除此之外,SeviceDesk Plus还为请求和资产管理模块提供了丰富的报表。
这些预定义的报表,可以用来帮助你评估你的IT帮助台团队的效率和生产率、团队处理的请求的工作量、资产的分布等等。
SeviceDesk管理员可以配置不同种类的帮助台,资产和企业相关的设置,例如组织的工作时间,服务级别协定,用户职能权限等。
基于SeviceDesk Plus管理员提供的每一个用户的权限。
你也能够访问上面的模块。
如果你没有访问权限,请和你的SeviceDesk Plus管理员联系。
ServiceDesk Plus的版本ServiceDesk Plus目前提供以下三种版本:•标准版(免费)- 提供事故/请求管理,知识库及报表等。
•专业版- 具有事故/请求管理、资产管理、定购单管理、合同管理、知识库及报表等。
•企业版- 提供事故/请求管理、问题管理、变更管理、项目管理、资产管理、定购单管理、合同管理、知识库及报表等,是功能齐全的基于ITIL的IT管理解决案。
下表详细列出了各个版本的可用功能。
二、安装指南本安装指南旨在帮助您快速安装ServiceDesk Plus,从而顺利地使用本产品为您的IT管理提供有益的帮助。
1.系统要求硬件请根据技术员数和资产节点数来选择硬件。
说明:推荐安装我们的64位版本程序。
操作系统Windows•Windows Server 2012.•Windows Server 2008.•Windows 8.•Windows 7.Linux•RHEL 7.2及以上•Ubuntu 10.0及以上支持的数据库•Postgre SQL 9.2.4,置数据库,不用安装。
推荐使用。
•MySQL 4.1.18[InnoDB]•MySQL 5.1.50 [InnoDB]•MS SQL 2005, 2008, 2012 或其express版本支持的浏览器•Internet Explorer:11.•Firefox: v45.0及以上•Google Chrome: 49.0及以上安装ServiceDesk Plus安装文件根据您要安装机器的操作系统,请选择正确的ServiceDesk Plus的安装文件。
目前安装文件有以下两种:•ManageEngine_ServiceDesk_Plus.exe (用于Windows OS)•ManageEngine_ServiceDesk_Plus.bin (用于Linux OS)升级服务包•ManageEngine_ServiceDesk_Plus_<latest_version>_SP-<build_number>.ppm请从我们的下载合适的安装文件。
在Windows系统下安装请按照以下步骤在Windows机器上安装ServiceDesk Plus:1.下载安装文件ManageEngine_ServiceDesk_Plus.exe。
2.点击下载的文件开始安装,出现ServiceDesk Plus安装进程。
3.点击下一步(Next) 开始安装过程。
如下图所示:4.显示可协议画面,请仔细阅读该可协议。
您必须接受该可协议能继续安装。
5.点击接受(Yes)接受可协议,继续安装。
6.选择要安装的ServiceDesk Plus版本。
o标准版- 提供帮助台、自助门户、知识库、SLA管理、报表等功能。
o专业版- 除了标准版的功能之外,还提供软件关联,产品目录,资产管理、定购单和合同管理等功能。
o企业版- 它是本产品的完全版本,为您实现ITIL全流程管理提供有力帮助。
除了专业版的功能外,支持事故管理、问题管理、变更管理、CMDB、项目管理等等。
各版本直接的区别,请参见ServiceDesk Plus版本对照,您可以根据需要选择要安装的版本。
7.如果选择标准版或企业版,接下来可以选择是安装免费版还是试用版。
o试用版允2个技术员,200资产节点,可以试用30天,期满后需要应用正式的可才能继续使用。
o免费版永不过期,但是不享受技术支持。
若要技术支持,请购买相应的年技术支持和维护费用。
8.如果选择企业版,将具有30天的试用期,支持5技术员和200节点。
过期后需要正式可能继续使用。
9.接下来,选择安装目录,默认情况下,安装目录为:C:\ManageEngine\ServiceDesk。
您可以点击浏览(Browse...)按钮,选择别的安装路径,然后继续安装。
注意:请确保在安装路径中,不要包含空格。
10.点击下一步(Next)。
11.提供显示在程序文件夹下的名称,可以直接采用默认值ManageEngine ServiceDesk Plus,点击下一步(Next)。
12.选择Web服务器的端口,默认值为8080,如果已经有其他应用占用了该端口,请指定一个有效的没有被占用的端口号。
13.点击下一步(Next)。
14.选择产品所使用的后台数据库,支持:PostgreSQL,MSSQL 和MYSQL ,默认情况下使用Postgre SQL 数据库,要切换到MSSQL /MYSQL,需要提供对应的数据库的配置信息,以便正确建立连接。
需要输入的数据库信息如下:•主机名:运行相应数据库的IP地址/主机名。
默认值为'localhost'•端口:相应数据的端口,默认值为65432.•数据库名称:默认的数据库名称为Servicedesk,(可根据需要修改)•用户名:登录该数据库用的用户名。
•密码:登录该数据库用的密码。
注意:要切换至MSSQL数据库,您必须启用SQL认证,而不能使用默认的Windows认证。
15.点击下一步(Next)。
16.如果需要,提供注册技术支持的信息,以便更好地为您提供技术支持。
17.点击下一步(Next)。
18.接下来,将显示到目前为止您所做的选择,以便确认。
Installation Directory:C:\ManageEngine\ServiceDeskFolder Name:ManageEngine ServiceDesk PlusWeb Server Port:8080如果所有信息正确。
点击下一步开始安装,如果不正确,可返回做必要的修改。
19.确认信息后,就开始安装,此过程不可终止,直到安装文件复制完毕。
20.安装过程结束后,将出现完成向导页面,默认将选中启动ServiceDesk的选项,您可以禁用它。
21.点击完成(Finish)按钮,完成安装。
将会向您展示产品的自述文件。
您可以全部按照默认值,进行安装,也可以根据自己的需要加以调整。
安装完成后,就可以从服务或开始菜单操作ServiceDesk Plus了。
在Linux下安装有安装图形界面下的安装1.下载Linux系统用的安装文件:ManageEngine_ServiceDesk_Plus.bin2.要使下载的.bin文件能够执行,您需要修改它的权限,赋予它可执行权限。
请导航到存放有下载文件的目录下,使用用户终端,输入以下命令:#chmod +xManageEngine_ServiceDesk_Plus_x_Linux.bin3.执行修改了权限的.bin 文件。
