SC高压气控阀使用说明和注意事项说明
燃气管道自闭阀正确使用方法

燃气管道自闭阀正确使用方法
燃气管道自闭阀是一种用于关闭燃气管道的阀门,通常用于紧急情况或进行维修
和检修时。
以下是燃气管道自闭阀的正确使用方法:
1. 确保你对燃气管道自闭阀的位置和工作原理有所了解。
燃气管道自闭阀通常安
装在燃气管道上,有一个手动操作杆。
2. 在需要关闭燃气供应的情况下,找到燃气管道自闭阀。
根据阀门的位置,可能
需要进入燃气表下的地下室或其他接入点。
3. 将手动操作杆调整到“关闭”位置,通常是将杆从水平位置转到垂直位置。
你可
能需要用力将杆移动,因为阀门可能已经长时间未使用。
4. 确保燃气管道自闭阀已经完全关闭。
可以通过观察燃气表上的压力指示器来判断。
若压力指示器的针指向0,则表示阀门已经关闭。
5. 如果需要打开燃气管道自闭阀,将手动操作杆调整到“开启”位置,通常是将杆
从垂直位置转到水平位置。
同样,你可能需要用力将杆移动。
6. 确保燃气管道自闭阀已经完全开启。
可以通过观察燃气表上的压力指示器来判断。
若压力指示器的针指向正常范围内的数值,则表示阀门已经开启。
注意事项:
- 在关闭燃气管道自闭阀之前,确保所有燃气器具已经关闭,并且没有明火或其
他可能引起火灾的情况。
- 燃气管道自闭阀通常由专业人士操作,如燃气公司的工作人员或维修技师。
如
果你不确定如何正确使用燃气管道自闭阀,请联系相关专业人士进行操作或维修。
- 为了确保安全,定期检查燃气管道自闭阀的工作状态,并进行必要的维护和保养。
如果发现任何问题或异常,应尽快联系专业人士进行修复。
燃气调压设备操作制度

燃气调压设备操作规程1、燃气调压装置的日常维护、维修人员必须经过专业技术培训。
2、熟悉调压装置主要设备的工作原理及维修方法。
3、维修人员必须穿戴防护用品,使用防爆工具。
4、调压器启动前必须确认气流箭头方向是否与安装的气流方向一致。
5、检查输配管线压力是否与调压器上的标签所印的适合压力范围相符。
调压器入口压力不能超过标准名片上规定的最大入口压力,调节压力必须在出口压力范围。
6、调压器启动前必须确认上下游截止阀关闭,放空阀关闭,调整螺栓至弹簧安全放松。
7、当出口管线为空管时,应先开调节阀下游切断阀,再开管路出口控制阀并配合调压控制,防止流速过大对调压器阀芯和膜片的损坏。
燃气调压设备安全注意事项及维护维护保养安全注意事项1、进行定期维护时,必须由经培训上岗的熟练操作工进行操作,严格按照维护操作规程进行操作。
2、进行放散过程中,应仔细检查调压设备周围有无明火,应严格按照“先通风、再检测、后操作”流程进行操作。
3、维护保养工作完成后,维护人员应将本次维护保养记录记录到《调压箱/柜》维护档案。
日常维护根据用气量情况,定期进行检查维护1、用手持式可燃气体检测仪和泡沫水检查调压器阀门、法兰连接处有无泄漏。
2、检查调压器的出口压力是否在规定范围内。
3、带切断的调压器应检查切断器脱钩机构能否正常工作,检查切断后完毕是否严密。
4、检查过滤器压差表,如压差过大则需清洗过滤器。
5、对燃气调压器外部进行清洁。
定期检查维护根据气质情况,每3-6个月定期对调压器进行检查:1、对调压器的关闭压力进行一次检查;2、对切断器进行启动压力值检查;3、对调压器、指挥器内部零件进行清洁维护,对其易损件如:阀口密封件、平衡膜、O型圈进行检查,及时更换已溶胀、老化、压痕不均的密封件;及时更换磨损、变形的零件;4、对切断机构、放散机构内部进行清洁维护,对其易损件如:阀口密封件、平衡膜、O型圈进行检查、及时更换已溶胀、老化、压痕不均的密封件;及时更换磨损、变形的零件;5、清洗过滤器,更具用气量更换滤芯;检查管道及各部件外观油漆涂层,若剥落严重及时进行除锈补漆。
SC威索燃烧器说明书

不同的控制结构 威索WM燃烧器有以下几种控制结 构:
6
燃油: 三级式(T)(或两级式带低 冲击启动和过载释放) 比例调节式(R)
燃气: 滑动两级式或比例调节式 (ZM)(依据负荷控制:在调 节范围内,可以根据热量需求 随意调节功率。)
最重要的优点 • 切换燃料十分便捷(燃油/燃
气) • 整个功率范围内采用电子联动
的数字化燃烧管理 • 结构紧凑 • 标准配置的进风消音罩使运行
更安静 • 借助特别研发的结构和控制系
统使内置风机的功能尤为强大 • 所有WM 20燃烧器的混合头
在出厂前都预调到了相应功率 • 防护等级IP54作为标准配置 • 所有的部件清晰可及,如:混
数字式燃烧管理系统一览表
单燃料运行 双燃料运行 燃烧管理器符合间歇性运行 燃烧管理器符合不间断运行 火焰监测符合间歇性运行 火焰监测符合不间断运行 电子联动伺服机构数 (最多) 伺服机构采用步进电机 变频控制 氧量调节 燃气阀组检漏 输入信号4-20 mA 集成有自动调整的温度 或压力 PID 控制器 操作模块可取下 (最大距离) 燃料耗量计 显示燃烧效率 eBUS / MOD BUS接口 PC支持调试 其他额外功能连接,如燃气阀组,油关断装置请洽询。 1) 不能与变频控制同时实现
product 燃油、燃气及双燃料燃烧器信息
WM20燃油、燃气和双燃料
威索monarch®WM 20(150 - 2600kW)• 紧凑强劲
1
源于传统的进步: 新monarch®
50多年来,monarch®这一标志在燃烧器制造中都是性能和质量的代名词。
50多年来,威索monarch®系列燃烧器被广泛运用于各种供暖 及工业设备上,成就了威索的杰出声望。 新的monarch®产品将续写该系列产品的成功篇章。最先进的 技术和紧凑的结构形式使该强力机型得以普遍应用。
调压阀安全操作及保养规程

调压阀安全操作及保养规程前言为了确保调压阀的使用安全和工作稳定,本文将介绍一些调压阀的安全操作和保养规程。
调压阀是一种比较重要的装置,掌握好这些规程,对我们的工作及使用都有很重要的意义。
安全操作1.调压阀的安装位置应尽量避免在高温、高压、震动、脏污、潮湿等环境下,以免影响调压阀的正常使用。
2.调压阀的选型和安装应符合设计要求和技术要求,确保调压阀的液体通道、连接管路和附件的正确安装和布置。
3.调压阀在正常工作时应平稳,实现自动调节,不允许有震动或声响。
4.调压阀安装后,应严格按照要求进行试运行和调试,确保调压阀运行稳定,灵敏可靠,且达到正常的调压、流量等工作标准。
5.调压阀的操作人员应熟悉操作规程,严格按照操作流程操作,忌讳将它开大或开小,并且应时刻注意调压阀是否正常工作,如有异常应及时处理。
保养规程1.定期检查和维护调压阀的运转状况,观察并记录调压阀的压力、流量等工作数据。
2.检查和清洁调压阀及其附件的各个部位,清除附件及连接管道中的积水、积灰、油脂等,确保液体通道的畅通。
3.检查调压阀的各个螺栓和紧固件是否完好,如有松动或损坏应及时加以处理。
4.定期对调压阀进行维护保养,清除和更换附件及其内部弹簧、膜片等,确保其正常工作。
注意事项1.调压阀的保养和维护工作应由具有调压阀安装、调试和维护经验的专业人员进行,以免造成设备的损坏或其他不必要的损失。
2.如调压阀长期处于不使用状态下,应进行定期检查和保养,以免不能正常工作。
3.在对调压阀进行保养和维护时,应先切断供电,松开连接管道和附件,等液体完全停止流动后再拆卸、更换操作。
4.在对调压阀进行保养和维护时,应选择正规、合法的厂家维修点,使用符合国家标准的备品,以确保调压阀的正常工作,维护设备的完整性和稳定性。
结语调压阀的使用和维护规程对工业制造和生产非常重要,正确了解和掌握其中的安全操作和保养规程对我们的工作和生产都有着很重要的作用。
希望大家在使用和维护调压阀的过程中,能够做好以上几点工作,从而保证调压阀的正常使用和工作稳定。
调压器燃气调压器安全操作及保养规程
调压器燃气调压器安全操作及保养规程引言燃气调压器是燃气供应系统不可缺少的部分,它能够将高压的天然气或液化气降压成合适的压力用于燃气设备的供应。
但是,在使用调压器的过程中,如果不注意安全操作和保养,就有可能造成安全事故和设备故障。
因此,在正常使用调压器的同时,必须了解其安全操作规程和保养方法。
调压器燃气调压器的安全操作规程1.安装时必须遵守以下规定1.安装位置应远离易燃易爆物品,不得设置在通风不良的地方。
2.安装时应注意防水并固定好管道和调压器。
3.在调压器入口处安装截止阀门,以便随时切断气源。
2.使用时必须遵守以下规定1.在使用调压器前,应先检查各个接口和阀门是否密实。
2.在使用调压器过程中,禁止使用明火或靠近明火,以免引发燃爆事故。
3.出现气味异常时,应立即关闭气源,并通知专业工作人员进行检查处理。
4.在室内安装燃气调压器时,尤其要保持良好通风,以免燃气中毒。
3.关闭时必须遵守以下规定1.在停止使用调压器后,应先关闭调压器出口处截止阀门。
2.然后再关闭调压器入口处的截止阀门,切断气源。
3.关闭气源后,应将室内的门窗打开进行通风。
调压器燃气调压器的保养方法1.日常维护1.定期检查调压器各个接口和阀门是否存在松动或者老化,必要时及时更换。
2.每隔三个月左右进行一次除尘保洁工作,将调压器表面的灰尘和杂物清洗干净。
3.定期检查调压器压力表是否正常,如出现错误,应及时更换。
2.定期检查保养1.每年定期进行一次全面的检查保养工作,对调压器内部进行清理并更换润滑油。
2.对调压器管道进行清洗和防腐处理,防止管道老化和腐蚀。
3.每年检查调压器的阀门和管道是否存在漏气的现象,如有问题应及时更换或修理。
结论在安装和使用调压器燃气调压器时,应始终注重安全,遵守规程,避免出现安全事故。
在维护和保养方面,要加强日常维护,定期检查和清洗调压器,防止设备故障和影响使用效果。
高压阀门开关说明说明书
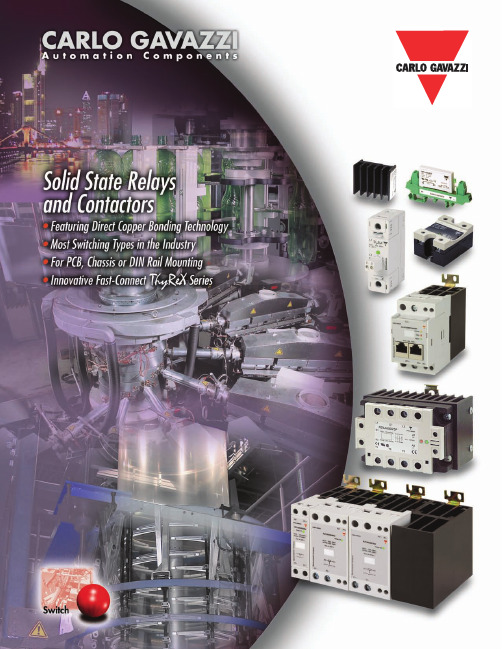
Zero Switching For resistive, inductive and capacitive loadsUpon application of the control volt-age, the SSR’s output is activated at the first zero crossing of the line voltage. The response time is less than a half period, i.e. typically less than 8.33 ms. Also offered with an optional system monitoring function and current sensing function, as shown in the lower right. Due to the high surge current and blocking voltage capabilities, SSRs of this switching type will also perform successfully with most inductive and capacitive loads. They are the most commonly used SSRs in plastics mold-ing machinery, packaging machines, soldering equipment and machinery for the food processing industry.Instant-onSwitchingFor inductive loadsThe SSR output is activated imme-diately after applying control voltage. Consequently, this relay can turn on anywhere along the AC sinusoidal volt-age curve. Response times can typically be as low as 1 ms.The SSR is particularly suitable in applications where a fast response time is desired, such as solenoids or coils.Analog SwitchingFor resistive loads Since the 4-20mA or 0-10VDC controlinput of the analog relay can be varied, the output operates in accordance with the phase control principle. The relay is equipped with a built-in synchronization circuit in order to achieve phase angle control. The output is proportional to the input signal. The transfer functionis linearized and reproducible. These SSRs are highly advantageous in closed loop applications or where soft starting can limit high inrush currents. Ideal for use in switching quartz heaters or in applications which demand precise temperature control.Analog Full CycleSwitchingFor resistive loadsWith this particular switching prin-ciple, the SSR provides a number of fullcycles, evenly distributed over a fixedtime period, depending on the controlinput (either 4-20mA or 0-10VDC)— with the low value of the input cor-responding to zero and the high value ofthe input to a full output with a period of1.28 seconds.Typical applications include: Analogcontrol of heating elements with manualor automatic controllers with 4-20mAor 0-10VDC control signal. Control ofheating zones, controlled individuallyby a number of temperature controllerswith analog output. Analog control offragile heating elements which are usedfor cutting, welding etc., which canhave their lifetime extended due to thereduced thermal load stress.Zero Switching withSystem MonitoringFor resistive andinductive loadsThe system monitoring (sense) SSRprovides an alarm output in the eventof a circuit failure. Internal circuitrymonitors:• Line Voltage• Load Current• Correct Functioning of the SSR• SSR Input StatusThe relay is designed for applica-tions where immediate fault detectionis required. An alarm output signal isavailable to determine fault status.Zero Switching withCurrent SensingFor resistive andinductive loadsThe Solitron MIDI current sensing SSR isa zero switching type which also providesan alarm output when it senses variationsin the load. Typical conditions that canbe detected include: heater break, opencircuit, partial heater short circuit, blownfuse, semiconductor short circuit andfaulty power connection. Integral currentsensing eliminates the need for additionalexternal equipment. “TEACH-IN” set pointis achieved by pushbutton or remotelywhere an HMI is preferred.As shown above, the PNP alarmoutput provides a series of pulses whichidentify the specific type of fault detected.Interfacing to a PLC can provide a clearindication of fault. An NPN alarm outputis also available.Peak SwitchingFor heavyinductive loadsThe peak switching SSR isdesigned in a way that the poweroutput is activated at the first peakof the line voltage upon applicationof the control voltage. After thefirst half period, the Peak SwitchingSSR operates as an ordinary ZeroSwitching SSR. The peak of theinrush current could hereafter bereduced during the first half periodfor inductive loads. Ideally suited forinductive loads with a remnant ironcore (i.e. transformers).DC SwitchingFor resistive andinductive loadsThe power semiconductor inthe DC switching relay operates inaccordance with the control input.The response time is less than 100ms. DC Switching SSRs are used withresistive and inductive loads for thecontrol of DC motors and valves.When switching inductive loads itwill be necessary to interconnect afree wheeling diode surplus voltageparallel to the load as protection.Switching Principles Designedfor Y our Application RequirementsLine Voltage Control InputLoad CurrentLine VoltageControl InputLoad CurrentLine VoltageControl InputLoad CurrentBurst Full CycleAnalog Full CyclePeriodLine VoltageControl InputLoad CurrentLine VoltageControl InputLoad CurrentLine VoltageLoad CurrentControlGreen LEDDC SupplyRed LEDAlarm Ouput = Half LED light intensityLine voltage loss or thyristor open circuitLED Visual IndicationHeater BreakLED Visual indicationOver-temperature / current over-rangeLED Visual IndicationThyristor short-circuitLED Visual IndicationAlarm Output LED IndicationThe RJ1P Modbus combines the functionality of Zero Switching, Analog Switching, Analog Full Cycle Switching, System Monitoring and Current Sensing, with the addition of voltage, current, power and frequency measurements.conductance is a guarantee!The DCB SubstrateWith the DCB substrate, the copperis bonded directly to the ceramicsubstrate. In the production process,copper conductors with a thicknessof 0.3 to 0.5 mm are bonded toceramic, at temperatures in excessof 1900°F . The temperature is cho-sen such that a joint layer is generat-ed between the ceramic surface andthe copper, the expansion coefficientof which is slightly higher than thatof the ceramic substrate. This alsoassures the material expansioncoefficient against silicon (the outputchip) is negligible. Hence, thermalstress or fatigue will not causepremature failure of power outputsemiconductors.Specifications subject to change. View complete datasheets at www.Gavazzi Online .comRM1E Series Analog Switching SSRs • Analog switching thyristor, up to 100A @ 660VAC• 4-20mA or 0-10VDC control signal• Up to 1400Vp non-repetitive peak voltage• Green LED status indicator• 58.2 x 44.8 x 28.8mm (H x W x D) chassis mount housingRD Series DC Switching SSRs• DC switching transistor, up to 5A @ 60VDC or 1A @ 350VDC• 3-32VDC control voltage• 58.2 x 45.5 x 30mm (H x W x D) chassis mount housingRA2A Series Dual Output SSRs• Dual output, zero switching alternistor, up to 40A @ 660VAC• Dual input, 4.5-32VDC control voltage• Up to 1200Vp non-repetitive peak voltage• Fast-on spade terminals• T wo green LED status indicators• 57.8 x 44.5 x 31.7mm (H x W x D) chassis mount housingRA...S Series System Monitoring (Sense) SSRs• Provides a transistor alarm output upon failure of supply, function or load• Zero switching alternistor, up to 110A @ 530VAC• 20-32VDC supply voltage with a 4.5-32VDC control voltage• Up to 1200Vp non-repetitive peak voltage• Diagnostic green and red LED status indicators• 57.8 x 44.5 x 31.7mm (H x W x D) chassis mount housingRZ3A 3-Phase Zero Switching SSRs• Three zero switching alternistors, up to 75A @ 660VAC• 5VDC, 4-32VDC or 24-50VDC / 24-275VAC control voltage• Up to 1200Vp non-repetitive peak voltage• Green LED status indicator, built-in snubber networks, IP20 pro-tective cover, captive wire clamps and• Optional over-temperature protection, transistor alarm output and red LED alarm status indicator• 73.5 x 103 x 41mm (H x W x D) chassis mount housingRSCAA 3-Phase Analog Switching SSR• Phase angle controller for inductive/resistive loads (pumps, fans, heaters, lights, etc.)• Three zero switching alternistors, up to 110A @ 625VAC• 10-32VDC supply voltage with a 0 or 4 to 20mA control signal• Up to 1600Vp non-repetitive peak voltage•Red LED status indicators for line and load energization, built-in MOV protection• Optional over-temperature protection• 66 x 103 x 73.5mm (H x W x D) chassis mount housingPCB Mount SSRs RP1A Series: Zero switching, up to 10A @ 480VAC RP1B Series: Instant-on switching, up to 10A @ 480VAC RP1D Series: DC switching, up to 8A @ 60VDC or 1A @ 350VDC RMD1 Series Hybrid Relays • Thyristors initially switch the current, and then after a short delay, they transfer to an internal electromechanical relay• Zero switching, up to 20A @ 253VAC • Over 5 million operations • 4-32VDC or 24-275VAC control voltage • Green LED status indicator • 81 x 17.5 x 67.2mm (H x W x D) DIN rail mount housingRX1A Series Fast-Connect Thyrex SSRs • Quick efficient wiring via fast-connect terminals: » Screw terminals or » Spring terminals or » Fast-on (power) terminals • Two 22.5mm wide Thyrex-specific heat sinks • M4 mounting holes are interchangeable with standard‘hockey puck’ SSRs, but half the width • Zero switching thyristor, up to 50A @ 552VAC • 4-32VDC or 36-265VAC control voltage• Up to 1200Vp non-repetitive peak voltage • Green LED status indicator and built-in snubber protection • 76 x 22.5 x 56mm (H x W x D) chassis mount housing RS1A Series Zero Switching SSRs • Economically priced triac (10A) or alternistor (25 and 40A)• Zero switching, up to 40A @ 530VAC • 3-32VDC, 18-35VAC/DC, 110, 230 or 400VAC control voltage • Up to 1200Vp non-repetitive peak voltage • Green LED status indicator • 58.2 x 44.8 x 28.8mm (H x W x D) chassis mount housing RM1A Series Zero Switching SSRs • Zero switching thyristor, up to 100A @ 660VAC • 3-32VDC, 5-24VAC/DC or 22-48VDC / 20-280VAC control voltage • Instant on switching (RM1B), 3-32VDC control voltage only• Up to 1400Vp non-repetitive peak voltage • Green LED status indicator and built-in MOV protection • 58.2 x 44.8 x 28.8mm (H x W x D) chassis mount housing RM1C Series Peak Switching SSRs • Peak switching thyristor, for inductive loads up to 30A @660VAC • 4.25-32VDC control voltage • Up to 1400Vp non-repetitive peak voltage• Green LED status indicator• 58.2 x 44.8 x 28.8mm (H x W x D) chassis mount housingPCB, Chassis and DIN Rail Mount SSRsPCB SSRs RMD1 Series RS1A and RM1. SeriesRD SeriesRA2A SeriesRA.S SeriesRZ3A SeriesRSCAAM60 SeriesRX1A SeriesPCB & Chassis Mount Solid State RelaysInnovative Fast-ConnectSeries Three Options in One DeviceVarious Solutions to Fit All Y our Needs Clip-on protection cover isremovable with a screwdriver T erminals with support surface for connection of cables with wire clamps, cable shoes or ring terminalsIP protected connection of cables with ring terminalsup to 5 AWG (16 mm 2)Quick, safe installation which can easily be tested through the protective cover’s holes Carlo Gavazzi offers an extensive range of RHS Series heat sinks and other various accessories including:fork terminals (lug connectors for larger size load wires), thermal paste, MOVs, protective covers, PCB SSR sockets, etc.Fast-on (Power) TerminalsScrew Terminals Spring Terminals For Looping For Ring Terminals Quick Troubleshooting RM1x Series Chassis Mount Solid State Relays A Wide Variety of Heat Sinks for Efficient Heat DissipationFaster, More Efficient Panel Building: The revolutionary THYREX fast-connect system allows technical staffs to pre-wire the cable harness outside of the panel. Base modules can be separately pre-mounted onto their heatsink – an operation requiring much less expertise. Result: Leaner panel building. Fast assembly: Both power and control terminals plug-on.SOLITRON Solid State Relays and Contactors CARLO GAVAZZI’s SOLITRON Series is the result of over two decades experience in designing, manufacturing and marketing solid state relays. With the SOLITRON family, customers get a product with exceptional features, which provide unparalleled benefits, resulting in a prolonged application life. It is offered in several switching types, including dual input/output types, which is unmatched in the industry. They provide a fast switching, long lasting alternative to noisy electromechanical contactors and environmentally hazardous mercury contactors.FeaturesSurface mount technologyprovides reliabilitySelf-liftingterminal clamps(Mini only)Cage-clamp terminals from 45 to 90A guaranteeing secureconnection of cables up to25mm2 — AWG 3(Midi & Power only)Direct copper bondingtechnology used throughoutSecure looping of cables up to2.5mm2 — AWG 12(Mini only)Choice of two terminallayouts making it easier to fitinto existing panel designsDIN-rail or panelmounting supportsRemoveableIP20 cover(Mini only)Identification window and LEDindication of input status andoptional over-temperaturealarm statusMounting holes forforced air cooling(Midi & Power only)Use of ring terminals for cablesup to 4mm2 — AWG 10(Mini only)Optional over-temperaturealarm signal output(Midi & Power only)Larger amperage SOLITRONS areprovided with an integral fanSpecifications subject to change. View complete datasheets at www.Gavazzi Online .comRJ3A Series 3-Phase SOLITRON (3 Pole)*• Three phase, zero switching thyristors, up to 32A @ 660VAC• Three pole switching provides switching of three phase resistive loads, i.e. heating elements, bands, etc.• Over-temperature protection on 32A version (optional on 20 and25A) versions• 5-32VDC or 24-275VAC/24-190VDC control voltage• 20A: 81.7 x 45 x 103mm (H x W x D) DIN rail mount housing• 25A: 81.7 x 90 x 103mm (H x W x D) DIN rail mount housing• 32A: 122 x 45 x 103mm (H x W x D) DIN rail mount housingwhich features an integral fan and over-temperature protectionRJCS Series Current Sensing SOLITRON*• Provides a transistor alarm output upon detecting a voltage orcurrent load or line failure• Relay ‘teaching’ can be done manually or remotely from PLC• Adjustable 2-40 second time delay for current sensing alarm output • Over-temperature protection• Zero switching thyristor, up to 50A @ 660VAC• Diagnostic green and red LED status indicators• 81.7 x 45 x 103mm (H x W x D) DIN rail mount housingRJ1P Analog Switching SOLITRON*• Single pole analog switching of resistive loads up to 50A @660VAC• Five selectable mode of operation: Phase Angle, Distributed Full Cycle, Burst Control (1, 3 or 10 seconds)• 0-10VDC or 4-20mA control input• Load and control status indication• 81.7 x 45 x 107mm(H x W x D) DIN rail mount housingRJ1P Modbus SOLITRON*• Four software selectable modes: On/Off, Phase Angle, Distributedand Burst Firing• Single phase switching of resistive loads up to 50A @ 265VAC• SSR control is done in Modbus protocol over RS485 interface• 81.7 x 45 x 122mm (H x W x D) DIN rail mount housing• Monitoring of over-temperature, SSR fault and line and load lossare standard features• Measurement of voltage, current, power and frequency is anoptional featureRJ1A Series SOLITRON MINI*• Zero switching thyristor, up to 30A @ 660VAC • 4-32VDC or 24-275VAC control voltage • 80 x 22.5 x 103mm (H x W x D) DIN rail mount housing RJ2A Series SOLITRON MINI (2 Pole)*• Two pole, zero switching thyristors, up to 18A @ 530VAC• Common control input for two single pole switching or 2-pole3-phase economy switching (leaving one pole live)• 4-32VDC control voltage • 103 x 22.5 x 125mm (H x W x D) DIN rail mount housing RJ1A Series SOLITRON MIDI*• Zero switching thyristor, up to 75A @ 660VAC• 4-32VDC or 24-275VAC control voltage• 45A/50A: 81.7 x 45 x 103mm (H x W x D) DIN rail mount housing• 75A: 122 x 45 x 103mm (H x W x D) DIN rail mount housing RJ1A Series SOLITRON POWER*• Zero switching thyristor, up to 90A @ 660VAC • 4-32VDC or 24-275VAC control voltage • 70A: 81.7 x 90 x 103mm (H x W x D) DIN rail mount housing • 90A: 122 x 90 x 103mm (H x W x D) DIN rail mount housingRJD2A Series Two Pole SOLITRON*• Two pole, zero switching thyristors, up to 45A @ 660VAC • Individually controlled by two inputs, 4-32VDC control voltage • 30A: 81.7 x 45 x 103mm (H x W x D) DIN rail mount housing • 45A: 81.7 x 90 x 103mm (H x W x D) DIN rail mount housing RJ2A Series 3-Phase SOLITRON (2-Pole)*• Three phase, zero switching thyristors, up to 32A @ 660VAC• Two pole switching (with one live pole) provides economicalswitching of three phase resistive loads, i.e. heating elements • Optional over-temperature protection • 5-32VDC or 24-275VAC/24-190VDC control voltage • 25A: 81.7 x 45 x 103mm (H x W x D) DIN rail mount housing • 32A: 122 x 90 x 103mm (H x W x D) DIN rail mount housingDIN Rail Mount Solid State Relays/ContactorsRJ2A SOLITRON MINI RJ1A SOLITRON MINI RJ1A SOLITRON MIDI RJD2A Two Pole SOLITRON RJ2A/RJ3A Three Phase SOLITRON RJ1A SOLITRON POWER RJD2A Two Pole SOLITRON RJ2A/RJ3A Three Phase SOLITRON RJ1PModbusSOLITRONRJCS Current Sensing SOLITRON RJ1PAnalog SwitchingSOLITRON*All SOLITRONS feature one or more green LED status indicator(s), a built-in protective snubber network and up to 1200Vp non-repetitive peak voltage ratings.CARLO GAVAZZI A u t o m a t i o n C o m p o n e n t s Sol idStateRela ysandCo ntactorsBrochur e1/8Argentina • Australia • Austria • Bahrain • Belgium • Bolivia • Bosnia • Brazil • Brunei • Bulgaria • Canada Chile • China • Columbia • Croatia • Cyprus • Czech • Denmark • Dominican Republic • Egypt • Estonia Finland • France • Germany • Greece • Hong Kong • Hungary • Iceland • India • Indonesia • Iran • Ireland • Italy • Japan Jordan • Kenya • Korea • Kuwait • Lebanon • Malaysia • Malta • Maroc • Mauritius • Mexico • Netherlands New Zealand • Norway • Pakistan • Papua New Guinea • Paraguay • Peru • Philippines • Poland Portugal • Qatar • Romania • Russia • Saudi Arabia • Serbia • Singapore • Slovakia • Slovenia • South Africa Spain • Sultanate of Oman • Sweden • Switzerland • Syria • Taiwan • Thailand • Tunisie • Turkey Ukraine • United Arab Emirates • United Kingdom • Uruguay • United States of America • Venezuela • Vietnam USA CARLO GAVAZZI INC.750 Hastings Lane Buffalo Grove, IL 60089Tel 847.465.6100Fax 847.465.7373**********************CANADACARLO GAVAZZI (CANADA) INC2660 Meadowvale BoulevardMississauga, Ontario L5N 6M6Tel 905.542.0979, Fax 905.542.2248CARLO GAVAZZI (CANADA) LTÉE3777 Boulevard du TricentenaireMontréal, Quebec H1B 5W3Tel 514.644.2544, Fax 514.644.2808************************Regional / Area Sales OfficeDistrict Sales OfficeCARLO GAV AZZI has a multitude of sales offices spanning North America (not to mention our hundreds of distributors). Therefore, we can be viewed as “your local automation resource” - assisting you every step of the way in finding the proper solution for your various application requirements. Naturally, our job is greatly simplified as we have such a vast range of solutions to offer you via our comprehensive product package.Our worldwide sales offices make us an ideal business partner, especially for manufacturers of exported machinery , as our products are available locally and they are CE marked.Inductive Proximity Sensors Tripleshield™ Capacitive Sensors Photoelectric Sensors Ultrasonic Sensors Level Sensors Limit Switches Magnetic Switches Solid State Relays Contactors and Overloads Manual Motor Starters Motor Controllers Electromechanical Relays Pilot Devices Cam Switches Rotary Disconnects Energy ManagementDigital Panel Meters PID Controllers Time Delay Relays Current Monitoring Relays Voltage Monitoring Relays Three Phase Monitoring Relays Signal Conditioners Current Transformers EnclosuresSafety Light Curtains Safety Control ModulesSafety Interlock Switches Safety Mat Systems Safety Magnetic SensorsDupline Field & Installation Bus Building Automation Systems Elevator Systems The Complete Product PackageA Global Force in Industrial AutomationYour Authorized Distributor:USA Phone: 847.465.6100 Fax: 800.222.2659Canada Ontario: 905.542.0979 Quebec: 514.644.2544Website www.Gavazzi Online .comEmail **********************Visit our website for downloadable data sheets, brochures & pricing: www.Gavazzi Online .com。
高压阀门的使用及维护
高压阀门的使用及维护作者:郭忠刘涛来源:《科学与财富》2013年第02期摘要:简述了发电厂高压阀门的形式及特点,介绍了高压阀门的原理、优点和种类以及在发电厂中的使用及维护。
在汽、水等单相介质输送系统中,管路阀门已经形成了一整套安全可靠的使用方式与方法。
但是,作为火力发电厂汽水系统的疏放水系统,其阀门却长期没有得到应有的重视,特别是广泛使用的定期排污系统,基本是沿用单介质阀门的设计标准与使用方法,忽视了汽、液两相流介质运行时存在的冲刷磨损和排放污垢的使用特点。
常常使关断、切换、调整等过程无法实施,甚至出现阀门越多,安全可靠性越差的现象,严重影响了疏放水系统的安全运行。
随着机组容量的不断增大,汽水系统对全厂安全文明生产的影响也愈加明显,汽水系统的高压阀门的重要性也就更加突出了。
我认为,在加强对新型高压阀门研制的同时,应该重视高压阀门的现场合理使用,本文结合生产现场的运行情况,浅谈对高压阀门使用的认识。
关键词:高压阀门使用维护一、高压阀门的现场使用情况汽水系统管路上的各种高压阀门,长期处在高温高压介质的冲刷磨损、和排放污垢的工况下运行,普遍存在着磨损快、使用寿命短、开启不动、关闭不严、切换困难、操作不便、检修频繁等问题。
具体来说,汽水系统的高压阀门主要是指安装在蒸汽系统、给水系统、疏放水系统等管路中的关断阀、切换阀等,以下是各类阀的实际使用情况。
1、关断阀关断阀是安装减温水主管,用以实现减温水与此同时系统的关断与隔离。
通常采用阻力较小的铸钢阀门。
阀门接触介质的压力较高,水流对阀门的冲刷也特别严重,常常在几个月的时间内就会磨损得关闭不严。
在疏放水系统中,部分电厂也存在磨损问题,但大部分是排污垢问题。
阀门经排污垢卡住后,开启阀门需要很大的力矩,因此常常拧断阀杆。
关闭阀门时阀杆和阀口上的污垢会导致阀门不能关严或卡死。
因而检修更换工作量很大,维护费用也很高。
近几年来,国内研制了一种带阀笼式的截止阀。
使用情况表明:这种阀门虽然带有多孔阀笼、更换容易,但铸造的阀体结构大大削弱了阀体强度,阀体极易发生操作断裂故障,使用情况也不乐观。
SMC 电子控制气体阀门用户手册说明书
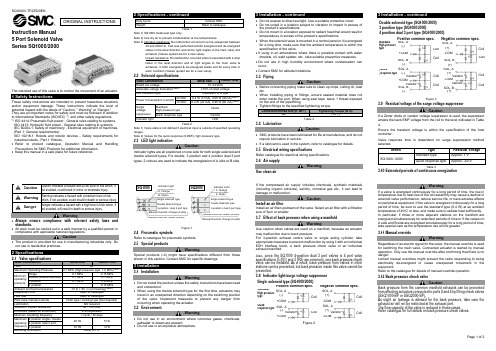
Minimum operating pressure
Single Double (double solenoid) 3 position 4 position
Ambient and fluid temperature
0.1 MPa
0.15 MPa
0.1 MPa
0.1 MPa
0.1 MPa
0.2 MPa
Danger
Danger indicates a hazard with a high level of risk which, if not avoided, will result in death or serious injury.
Warning
• Always ensure compliance with relevant safety laws and standards.
天然气集输系统——常用阀门手册

天然气集输系统是天然气从采出地点到加工厂或终端用户的输运系统,是天然气资源利用和输送的关键组成部分。
在天然气集输系统中,阀门是非常重要的设备,它们用于控制和调节天然气的流动,保证系统的安全稳定运行。
本手册旨在介绍天然气集输系统中常用的阀门类型、结构、特点、安装及维护方法,帮助相关工程技术人员正确选择、使用和维护阀门,提高天然气集输系统的安全和效率。
一、常用的天然气集输系统阀门类型1. 节流阀:用于控制流体的质量流量,通过改变局部流道横截面积来调节,主要包括节流阀、节流孔板和节流套管等类型。
2. 截断阀:用于切断流体的传输,包括球阀、闸阀、刀闸阀、旋塞阀等类型。
3. 定位阀:用于调整流体的压力或流量,包括调节阀、减压阀、节流阀等类型。
4. 安全阀:用于在系统压力超过设定值时自动减压,保护管道和设备的安全运行。
5. 排污阀:用于排除管道和设备中的杂质和污物,保证系统清洁。
6. 切断阀:用于在紧急情况下切断天然气供应,防止事故的发生。
二、天然气集输系统阀门特点及选择原则1. 耐高压:天然气集输系统中的阀门需要具备较高的耐压能力,能够在高压条件下安全运行,因此在选择阀门时需要考虑其耐压等级。
2. 耐腐蚀:天然气中可能含有一定的硫化物、硫醇等有机成分,对阀门材质有一定的腐蚀性,因此需要选择耐腐蚀性能好的阀门材质。
3. 密封性能:天然气是易燃易爆的气体,在输送过程中需要保持管道系统的密闭性,防止泄漏和安全事故的发生,因此阀门的密封性能非常重要。
4. 耐温性能:天然气集输系统中的阀门需要能够在较宽的温度范围内安全运行,因此需要选择耐高温、耐低温的阀门。
5. 流量特性:根据天然气的流动特性和管道系统的设计要求,选择具有合适流量特性的阀门,保证系统流体的正常流动和控制。
三、天然气集输系统阀门安装及维护方法1. 安装要求:天然气集输系统中的阀门安装需要符合相关的规范和标准,保证阀门可以正常工作。
在安装过程中需要注意阀门的密封、对中、固定等方面的要求。
氧气调节阀使用方法
氧气调节阀使用方法
氧气调节阀的使用方法如下:
1. 检查调节阀的外观有无损坏或者泄漏的情况,如果有需要及时更换或修理。
2. 确认氧气的压力、流量及温度要求,选择合适的调节阀进行安装。
3. 将调节阀安装到氧气管道系统中,固定好阀门和压力表,并连接好气源及气管。
4. 打开气源控制开关,逐步调节压力,观察压力表上的压力,确保压力稳定在所需的范围内。
5. 如果需要调节氧气的流量,在调节阀上逐步调节阀门开度,观察流量计上的氧气流量是否符合要求。
6. 在使用过程中,定期检查调节阀和氧气管道的密封性能,避免漏气和泄露的情况。
7. 停止使用氧气后,先关闭气源控制开关,再关闭调节阀的阀门,防止氧气残留及泄漏。
注意事项:
1. 氧气是易燃易爆的气体,必须遵循安全操作规范,避免火源及静电产生。
2. 氧气的压力和流量需符合实际需要,不可过高或过低,以免对人员和设备造成损害。
3. 定期检修调节阀和气管等管道设备,确保其密封性能和运行稳定性。
4. 使用氧气时需对整个操作过程进行严格控制和监管,防止出现意外情况的发生。
燃气调压器操作规范与注意事项

燃气调压器操作规范与注意事项一、检查与准备1操作人员要明确所操作燃气系统的压力等工艺参数设置要求。
2检查所用工具、物品是否齐全,穿戴好工作服及劳保用品。
3设定操作压力应遵循由高到低的原则,按步骤逐项进行。
一般设置压力顺序为:放散压力、切断压力、工作压力。
各用气场所可根据其用气特点要求和侧重保护方式的不同,调整各压力的设定值并结合工作实际调整压力设置。
二、操作程序1调压器的投用(1)确认调压器的进出口阀门已关闭。
(2)测试切断阀的复位操作,确认切断阀设置压力正确并处于正常工作状态。
测试中切断阀或附加在调压器上的切断阀在执行了切断动作后须人工进行复位。
(3)测试放散阀,确认放散阀设置压力正确并处于正常工作状态。
打开放散阀前边的控制阀门,使放散管路通畅,放散阀连接的放散管要符合安全要求。
(4)缓慢开启进口阀门,并观察上游压力表是否在允许的压力范围,为避免出口压力表在送气时超量程损坏,可先关闭压力表下阀门,待压力稳定后再开启。
(5)当进口压力正常后,缓慢开启调压器出口阀门,并精确调节调压器的出口压力。
(6)缓慢开启调压器进口阀门,观察低压端压力,压力平稳后逐步全部开启调压器的进出口阀门,实现对系统供气。
(7)低温天气投用调压器要进行排污和保温防冻等措施。
(8)调压器初次投用要加强巡检次数并做好记录。
2调压器的压力设定2.1运行压力的设定(1)开启进气阀门前,应仔细检查调压器的所有阀门是否处于关闭状态。
(2)缓慢打开主路调压器上燃气入口阀门,并打开进气总管上压力表的控制阀门,观察压力情况。
(3)在入口压力稳定状态下,打开调压器前的阀门,缓慢打开监控调压器的调节螺栓,直至达到监控调压器的出口设定压力,锁定监控调压器调节螺栓(若无监控调压器则无此操作步骤)。
(4)打开调压器后管路上的排气嘴,排净管路中的气体。
(5)缓慢旋进或者旋出工作调压器调节螺栓,直至达到要设定的出口压力。
(6)重复调试三遍,确认压力表示值与设定值相符,锁紧调节螺栓,运行压力设置完毕。
昆明高压调压阀使用说明

昆明高压调压阀使用说明
昆明高压调压阀,包括手动调压阀和电动调压阀,是一种用来降低管
道压力的控制仪表设备。
适用于石油、化工、天然气、热力、电力、制药、冶金等行业。
使用方法:
1、高压调压阀的安装应当垂直或者水平安装,且不宜有振动。
2、高压调压阀的控制在手动控制下,拧螺母,调节旋钮转动,调节
仪表可以实现动态压力控制。
3、电动调压阀可实现远距离控制,可以结合压力控制指令信号来实
现电动执行器的调节,从而实现远距离压力控制。
注意事项:
1、使用前应预先检查调压阀的通径是否正常,压力是否正常。
2、在操作时需要确保手柄正向旋转,反向旋转可能造成严重的损坏。
3、定期检查阀的控制机构是否正常使用,以确保安全可靠的操作。
4、如果长时间不使用,应当进行清洁和保养,以确保系统的正常运行。
高压气瓶使用方法(2篇)
高压气瓶使用方法1、氧气瓶及其专用工具严禁与油类接触,氧气瓶附近也不得有油类存在,操作者必须将手洗干净,绝对不能穿用沾有油脂或油污的工作服、手套及油手操作,以防万一氧气冲出后发生燃烧甚至爆炸。
2、高压气瓶上选用的减压阀要专用,安装时螺扣要上紧。
3、使用装有易燃、易爆、有毒气体的气瓶工作地点,应保证良好的通风换气。
4、开关高压气瓶瓶阀时,应用手或专门扳手,不得随便使用凿子、钳子等工具硬扳,以防损坏瓶阀。
5、禁止敲击、碰撞;气瓶应可靠地固定在支架上,以防滑倒。
6、开启高压气瓶时,操作者须站在气瓶出气口的侧面,气瓶应直立,然后缓缓旋开瓶阀。
气体必须经减压阀减压,不得直接放气。
7、氧气瓶、可燃性气瓶与明火距离应不小于10m;有困难时,应有可靠的隔热防护措施,但不得小于5m。
8、高压气瓶应避免曝晒及强烈振动,远离火源。
9、气瓶内气体不得全部用尽,剩余残压。
即余压一般应为2kgcm-2左右,至少不得低于0.5kgcm-2。
10、各种气瓶必须定期进行技术检验。
充装一般气体的气瓶,每3年检验1次;充装腐蚀性气体的气瓶每两年检验1次。
气瓶在使用过程中,如发现有严重腐蚀或其他严重损伤应提前进行检验。
盛装剧毒或高毒介质的气瓶,在定期技术检验同时,还应进行气密性试验。
高压气瓶使用方法(2)高压气瓶是一种用来贮存高压气体的设备,在各个行业和领域中广泛应用。
它具有体积小、重量轻、贮存气体多等优点,因此被广泛使用。
然而,由于高压气体的特殊性,高压气瓶的使用需要特别注意安全问题。
下面我们将介绍高压气瓶的使用方法,以确保安全使用。
一、选择合适的高压气瓶在使用高压气瓶之前,首先要确保所选择的气瓶符合使用要求。
根据实际需求选择合适的规格和类型,以确保能够承载所需的气体压力和体积。
同时还要检查气瓶的外观是否完好,阀门是否紧固,无渗漏等异常情况。
二、正确安装气瓶在安装气瓶时,首先要将气瓶放置在平稳的地面上,并用托盘或者固定支架固定住。
根据气瓶和工作环境的实际情况,选择合适的固定方式,确保气瓶不会发生滚动或者倾斜。
高压度L型空气阀说明书

Doc. no.XL*****-OMJ0005-CHigh Vacuum L Type ValveXLH SeriesSafety Instructions - - - - - - - - - - - - - - - - - - - - - - - - - - - - 2 1. Product Specific Precautions 1 - - - - - - - - - - - - - - - - - - - - - - - - - - - - 4(Precautions on Design, Selection, Mounting, Piping, Wiring, Maintenance)2. Product Specific Precautions 2 - - - - - - - - - - - - - - - - - - - - - - - - - - - - 6 (Maintenance parts)3. Specifications - - - - - - - - - - - - - - - - - - - - - - - - - - - - 74. Construction and Outer dimensions - - - - - - - - - - - - -- - - -- - - - - - - - - - - - 95. Period and scope of warranty - - - - - - - - - - - - - - - - - - - - - - - - - - - - 106. Parts replacement procedure - - - - - - - - - - - - - - - - - - - - - - - - - - - - 11Safety InstructionsThese safety instructions are intended to prevent hazardous situations and/or equipment damage. These instructions indicate the level of potential hazard with the labels of “Caution,” “Warning” or “Danger.”They are all important notes for safety and must be followed in addition to International Standards (ISO/IEC)*1), and other safety regulations.*1) ISO 4414: Pneumatic fluid power -- General rules relating to systems ISO 4413: Hydraulic fluid power -- General rules relating to systemsIEC 60204-1: Safety of machinery -- Electrical equipment of machines (Part 1: General requirements) ISO 10218-1992: Manipulating industrial robots -- SafetyCaution Caution indicates a hazard with a low level of risk which, if not avoided, could resultin minor or moderate injury.Warning Warnig indicates a hazard with a medium level of risk which, if not avoided, could result in death or serious injury. DangerDanger indicates a hazard with a high level of risk which, if not avoided, will resultin death or serious injury .Warning 1. The compatibility of the product is the responsibility of the person who designs theequipment or decides its specifications.Since the product specified here is used under various operating conditions, its compatibility with specific equipment must be decided by the person who designs the equipment or decides its specifications based on necessary analysis and test results.The expected performance and safety assurance of the equipment will be the responsibility of the person who has determined its compatibility with the product.This person should also continuously review all specifications of the product referring to its latest catalog information, with a view to giving due consideration to any possibility of equipment failure when configuring the equipment.2. Only personnel with appropriate training should operate machinery and equipment.The product specified here may become unsafe if handled incorrectly.The assembly, operation and maintenance of machines or equipment including our products must be performed by an operator who is appropriately trained and experienced.3. Do not service or attempt to remove product and machinery/equipment until safety is confirmed.1.The inspection and maintenance of machinery/equipment should only be performed after measures to prevent falling or runaway of the driven objects have been confirmed.2.When the product is to be removed, confirm that the safety measures as mentioned above are implemented and the power from any appropriate source is cut, and read and understand the specific product precautions of all relevant products carefully.3.Before machinery/equipment is restarted, take measures to prevent unexpected operation and malfunction.4. Contact SMC beforehand and take special consideration of safety measures if the product is to be used in any of the following conditions.1. Conditions and environments outside of the given specifications, or use outdoors or in a place exposed to direct sunlight.2. Installation on equipment in conjunction with atomic energy, railways, air navigation, space, shipping, vehicles, military, medical treatment, combustion and recreation, or equipment in contact with food and beverages, emergency stop circuits, clutch and brake circuits in press applications, safety equipment or other applications unsuitable for the standard specifications described in the product catalog.3. An application which could have negative effects on people, property, or animals requiring special safety analysis.4. Use in an interlock circuit, which requires the provision of double interlock for possible failure by using a mechanical protective function, and periodical checks to confirm proper operation.Safety InstructionsCaution1.The product is provided for use in manufacturing industries.The product herein described is basically provided for peaceful use in manufacturing industries.If considering using the product in other industries, consult SMC beforehand and exchange specifications or a contract if necessary.If anything is unclear, contact your nearest sales branch.Limited warranty and Disclaimer/Compliance RequirementsThe product used is subject to the following “Limited warranty and Disclaimer” and “Compliance Requirements”.Read and accept them before using the product.Limited warranty and Disclaimer1. The warranty period of the product is 1 year in service or 1.5 years after the product isdelivered,whichever is first.*2)Also, the product may have specified durability, running distance or replacement parts. Please consult your nearest sales branch.2.For any failure or damage reported within the warranty period which is clearly our responsibility, a replacement product or necessary parts will be provided.This limited warranty applies only to our product independently, and not to any other damage incurred due to the failure of the product.3.Prior to using SMC products, please read and understand the warranty terms and disclaimers noted in the specified catalog for the particular products.*2) Vacuum pads are excluded from this 1 year warranty.A vacuum pad is a consumable part, so it is warranted for a year after it is delivered.Also, even within the warranty period, the wear of a product due to the use of the vacuum pad orfailure due to the deterioration of rubber material are not covered by the limited warranty.Compliance Requirements1.The use of SMC products with production equipment for the manufacture of weapons of mass destruction(WMD) or any other weapon is strictly prohibited.2.The exports of SMC products or technology from one country to another are govemed by the relevant security laws and regulation of the countries involved in the transaction. Prior to the shipment of a SMC product to another country, assure that all local rules goveming that export are known and followed.Common Precautions 1Be sure to read before handling.DesignWarning●All models1.The body material is A6063,the bellows is SUS316L, and other metal seal material is SUS304. The sealing material of the vacuum part is FKM as standard, but this can be changed to other materials (refer to “How to Order”). Confirm whether the fluid to be used is compatible with the materials before use. ●With heater (thermister)1.When using a model with a heater, a mechanism to prevent overheating should be installed.Selection●High temperature type1. If using gases that cause a large amount of deposits, heat the valve body to prevent deposits in the valve.Mounting● All models1. In high humidity environments, keep the valve packed until the time of installation.2. Perform piping so that excessive force is not applied to the flange sections. When there is vibration from heavy objects or attachments, etc., fix piping so that vibration will not apply torque directly to the flange section.3. Vibration resistance allows for normal operation of up to 30m/s 2 (45 to 250Hz). Be advised that continuous vibration may cause a decline in durability. Arrange piping to avoid excessive vibration or impacts.●High temperature type (temperature specification /H4 H5)1. In models with a heater (thermistor), take care not to damage the insulation components of the lead wires and connector section.2. The set temperature for models with a heater should be established without any drafts or heat insulation. It will change depending on conditions such as heat insulation measures and the heating of other piping. Fine adjustment is not possible.3. When installing heater accessories or mounting a heater, check insulation resistance at the actual operating temperature. A current leakage breaker or fuse should be installed.4. When a valve is to be heated, only the body section should be heated, excluding the handle section.5. In models with a heater, when the heater is in operation, the entire valve becomes hot. Be careful not to touch it with bare hands, as burns will result.6. The heater temperature will initially decrease several % after the heating starts and then gradually becomes stable. (The heater temperature may decrease approximately 5 to 10% due to individual differences.)CautionCaution1. Before mounting, clean the surface of the flange seal and the O-ring with ethanol, etc.2. There is an indentation of 0.1 to 0.2mm in order to protect the flange seal surface, and it should be handled so that the seal surface is not damaged in any way.If the fluid or reaction product (deposit) may cause the valve to become unsafe, the valve should be disassembled, cleaned and re-assembled by an operator who has sufficient knowledge and experience (e.g. a specialist).1. When removing deposits from the valve, take care not to damage any part of it.2. Replace the handle assembly when the valve is approaching the end of its service life. *For the endurance cycles, refer to Chapter 5, “Period and Scope of Warranty” (P . 9).3. If damage is suspected prior to the end of the service life, perform early maintenance.4. SMC specified parts should be used for service. Refer to the Construction / Maintenance parts table.5. When removing the valve seal and external seal, take care not to damage the sealing surfaces. When installing the valve seal and external seal, be sure that the O-ring is not twisted. (Refer to Chapter 6, “Parts Replacement Procedure” (P. 10 to 11) for details.)CautionWarningCautionCommon Precautions 2 Be sure to read before handling Maintenance PartsSMC specified parts should be used for service.Refer to Chapter 5, “Construction and Dimensions" (P. 9) for the part indication numbers.1.Replace the handle assembly when changing the sealant material. Due to the different materialsused, changing only the seal may prove inadequate.Handle assembly/construction part number (1)Temperature specificationsValve size16 25 40 50Standard(5~150 o C) XLH16-30-1 XLH25-30-1 XLH40-30-1 XLH50-30-1 Note1) List the optional seal material symbol after the model number, except for the standard seal material (FKM: compound No. 1349-80). e.g.) XLH16-30-1-XN1Exterior seal, valve sealDescription Constructions No. MaterialValve size16 25 40 50Exterior seal (3) Standard AS568-025V AS568-030V AS568-035V AS568-039V Specific AS568-025 ** AS568-030 ** AS568-035 ** AS568-039 **Valve seal (2) Standard B2401-V15V B2401-V24V B2401-P42V AS568-227V Specific B2401-V15 ** B2401-V24 ** B2401-P42 ** AS568-227 **Note1) List the optional seal material symbol after the model number, except for the standard sealant material (FKM: compound no. 1349-80). e.g.) AS568-025-XN1Note2) Refer to the Construction of each series for the construction numbers.Note3) Due to the different materials used, changing only the seal may prove inadequate.Note1) Due to the different materials used, changing only the seal may prove inadequate.Barrel Perfluoro R is a registered trademark of Matsumura Oil Co.,Ltd.Kalrez R is a registered trademark of E.I. du Pont de Nemours and Company orits affiliates.Chemraz R is a registered trademark of Greene, Tweed Technologies,Inc.ULTIC ARMOR R is a registered trademark of Nippon Valqia Industries, Ltd. Caution3-1. Valve specifications3-2. Heater specificationsItemXLH-25XLH-40 XLH-50Rated voltage of the heater90 to 240 ACV S y m b ol H4 Heater assembly number - XLA25-60S-1XLA25-60S-1No. of heater assemblies- 1 pc. 1 pc. Initial power /Powerconsumption (W)100 VAC - 200/40 200/50 200 VAC- 800/40 800/50 H5Heater assembly number XLA25-60S-1XLA25-60S-2XLA25-60S-2No. of heater assemblies 1 pc. 1 pc. 1 pc. Initial power /Powerconsumption (W)100 VAC 200/40 400/70 400/80 200 VAC800/40 1600/801600/80 Note 1) Initial power and power consumption are nominal values. Note 2) Heaters are not available for size 16.The heaters are PTC thermistor type design. These thermistors self regulate their temperature by switching the resistance at certain critical temperatures, so a separate temperature controller is unnecessary.If the temperature of the PTC heaters fitted exceeds 200o C, then it may fail. The maximum operating temperature for the valve is 150o C. If the heater temperature is over 200o C or valve temperature is over 150o C, please use thermostat to control theModel XLH-16 XLH-25 XLH-40 XLH-50 Flange (valve) size 16 25 40 50 Valve type Manual type Fluid Vacuum of inert gasOperating temperature oC 5 to 150 Operating pressure Pa Atmospheric pressure to 1 x 10⁻⁶ Conductance l/s Note 1) 5 14 45 80 Leakage Pa ・m 3/s Internal 1.3 x 10⁻¹⁰for the standard material (FKM) at ambient temperatures , excluding gas permeation External 1.3 x 10⁻¹¹ for the standard material (FKM)at ambient temperatures , excluding gas permeationFlange type KF (NW) Main material Body: aluminum alloy, Bellows: SUS316L, Main part: SUS304 and FKM (standard sealing material) Surface treatment forbody Outside: hard anodized Inside: basis materialPilot torque N ・m 0.1 < 0.15 < 0.35 < 0.5 < Handle revolutions 5 7 10 13 Weight kg 0.23 0.41 1.05 1.62 Note1) The conductance is “molecular flow” measured with an elbow pipe which has the samedimension with each flange.heaters to prevent overheating.With PTC type heaters, there is an initial surge of current (inrush current) after the power is supplied. These inrush current will reduce overtime. If multiple heater assemblies are used, the inrush current to the heaters will be magnified and care should be taken. When multiple heater assemblies or valves are used, do not apply power to the heater assemblies simultaneously. Keep approximately 30 seconds between applications of power to each heater assembly. This will allow for incremental spacing to prevent harmful large initial surge.4.holderSUS304)BellowsSUS316L)SUS304)BodyA6063)Handle (Including ②,Exterior seal(Maintenance part)Valve seal(Maintenance part)A ABφGφH C CD E EφFModel A B C D E F G H XLH-16 40 100.5 38 1 - 30 17 35 XLH-25 50 114 48 1 12 40 26 41 XLH-40 65 162.5 66 2 11 55 41 57 XLH-5070 179.5 79211755270Unit: mmThe warrantyd period covers the period which finishes the earliest among 0.1 million operating cycles [with our durability test conditions], 18 months after shipping from us, and 12 months after starting the use of the product at your place or your customer’s place.If the valve has been used outside of the specifications, or if a failure occurs as a result of mounting onto a machine or replacement of an assembly, O-ring etc. by the user, the warranty cannot be applied.Notes )The endurance will depend on the operating conditions (such as if the flow rate is large).For any failure reported within the warranty period which is clearly our responsibility, the whole valve will be replaced. This warranty does not apply to any damage incurred due to the failure of the valve.Result of endurance test (Using the circuit shown on the right) The valve was opened and closed in an internal vacuum state at nominal (room) temperature andoperation.We confirmed that the product satisfies theproduct specifications of 0.1 million cycles.sealant material.<Reference>The pumping direction is not limited, but if the pumping creates a flow stream, the durability of the product could be impaired.Therefore, the pumping direction shown on the right figure (bellows side pumping) is recommended. Also, the operating conditions should be checked prior to use, as this affects the life of the product.Vacuum pumpBellows side Valve sideChamberRecommended direction of exhaust6-1. PrecautionsBe sure to follow [1. Precautions 1] when disassembling the product for maintenance. Along with the precautions above, comply with the following precautions too.Warning•If it is expected that product materials may get stuck to the product, ensure safety isassured before handling. It is recommended to wear gloves and a mask.•Pay attention to the handling of components according to the procedure in the next itemonwards. Do not apply excessive force or impact. This will not only damage the productbut also decrease its performance and life expectancy.•It is not possible to disassemble the handle assembly of this product. If the componentsand assembly are damaged, or damage is expected, exchange the handle assemblyitself.•Do not disassemble the parts that are not explained in this operation manual. Theperformance and life may decrease. Also, it may cause danger.The heater is removed by loosening Bolt a. Bolt a is behind the Cover. Remove the Cover using a watchmaker's screwdriver.Loosen the Bolt b gradually with the valve opened a little in numerical order.Remove the outer seal O-ring from the Body(Take care to prevent the mounting surface of O-ring from being damaged )Handle assemblyBolt bBolt aHeaterCover1234EthanolAssemble parts eliminating any dust or debris. Wipe off dust with a Clean cloth soaked with Ethanol. Blow parts with clean air if necessary. (Ensure there is no fibers or dust. )Step 3314C Renewal 2018.9 4-14-1, Sotokanda, Chiyoda-ku, Tokyo 101-0021 JAPANTel: + 81 3 5207 8249 Fax: +81 3 5298 5362URL Note: Specifications are subject to change without prior notice and any obligation on the part of the manufacturer.© 2011 SMC Corporation All Rights Reserved。
蒸汽压力开关安全操作及保养规程

蒸汽压力开关安全操作及保养规程蒸汽压力开关是一种专门用于控制蒸汽压力的开关,广泛应用于各种行业。
合理操作和保养能够保证设备的正常运行,提高设备效率,延长设备使用寿命。
本文将从安全操作和保养两个方面进行详细介绍。
安全操作安装安装前先确认电源开关处于关闭状态,保证电源处于断开状态。
其次,将电源线连接到相应的插座中。
然后进行开关的安装,安装前需确认开关与管路连接处无异物并且保持清洁,然后将开关与管路相连接,同时注意连接的方向和位置(有些开关会有箭头标注)。
最后,确认所有连接已经固定牢固,无松动现象,以避免运行时摇晃。
开机及关闭首先将开关的控制调节旋钮旋转至最小,然后打开电源开关,调节旋钮至设定值。
开机后需等待一段时间,直到压力达到设定值,然后才可以进行操作。
关闭时需逐步关闭各个系统,待压力降至接近于零(一般低于0.3MPa),然后再关闭电源开关。
注意,不能直接切断电源,以避免损坏器件。
运行过程中注意事项运行过程中需建立健康安全意识,及时发现有异常情况及时处理。
如果出现异常响声、异味等异常情况,立即关闭设备,停止使用,并且联系专业人员进行检查维修。
严禁擅自拆卸设备,以免发生危险。
可能出现的问题•开关失灵开关失灵导致蒸汽压力变化不稳定,需要及时更换开关或进行维修。
•压力设定值与实际值不符检查设备是否正常,如果设备正常,将开关的调节旋钮进行调整即可。
保养规程定期检查按照规定时间,对设备进行定期检查,及时发现设备可能存在的问题。
检查内容包括设备的电气部分、机械部分、结构部分等。
1.机械部分检查开关本身及其附件有无松动、破损、磨损等情况,如果发现问题及时替换。
2.电气部分检查电路连接是否松动,电缆是否破损,设备中各部件的绝缘性是否存在漏电现象。
3.结构部分检查设备的结构有无畸形、缺口或者裂纹等情况。
如果发现问题及时送修或者替换。
清洗保养机械设备在长时间运行后,对部件的磨损也越来越大,因此应定期对设备进行清洗、保养,确保机械设备的精度和性能。
液化气罐高压阀的使用方法
液化气罐高压阀的使用方法随着液化气罐爆炸事故的频繁发生,越来越多的人关注液化气罐的安全问题。
接下来因液化气罐内液化气的压力很大,无法直接使用,所以要用减压阀,减压阀直接用丝口旋在液化气罐上,减压阀的出口用管子接到煤气灶上,开大开小液化气罐的角阀,对燃烧没影响。
高压阀输出压力高流量大(输出压力可调,顶针旋进压力高,反之则低),常常是用猛火时调节。
液化气罐容易漏气的地方角阀、减压阀;胶管、接口、炉具、瓶底或锈蚀严重的地方。
②简单查漏方法当怀疑有液化气泄漏时,可用以下方法简单查漏;1)肥皂液查漏任选肥皂、洗衣粉、洗涤精三者之一,加水制成肥皂液(起泡),涂抹到钢瓶、角阀(手轮开关处)、减压阀(角阀与减压阀接口处)、胶管、燃具上,尤其是接口处,有气泡鼓起的部位就是漏点。
2)眼看、耳听、手摸、鼻闻配合查漏。
保持严禁用明火查漏。
液化气泄漏应急措施:1) 切断气源。
立即关闭钢瓶角阀、燃具开关。
2) 严禁打开或关闭任何电器开关。
打开和关闭任何电器开关,如电灯、电扇、排气扇、抽油烟机、空调、电闸、有线与无线电话、门铃、冰箱等,都可能产生微小火花引致爆炸。
3) 打开门窗。
让空气流通,以便液化气散发。
4) 疏散人员。
迅速疏散家人、邻居,阻止无关人员靠近。
5) 电话报警。
在没有液化气泄漏的地方,打电话119报警。
液化气泄漏起火怎么办:①切断气源。
切记“断气即断火”。
应立即关闭角阀。
如果角阀附近有火焰,可用湿毛巾、湿衣物包手关闭。
②疏散人员。
迅速疏散家人、邻居,阻止无关人员靠近。
③电话报警。
在没有液化气泄漏的地方,拨打电话119报警。
④尽量灭火。
用灭火器、湿棉被等扑打火焰根部灭火。
这就是那么如何安全使用液化气罐呢?欢迎登陆的农贸市场安全小知识库吧!。
燃气自闭阀使用说明、技术参数、产品功能、使用方法和使用注意事项
燃气自闭阀使用说明、技术参数、产品功能、使用方法和使用注意事项概述燃气自闭阀安装于低压燃气系统管道上,当管道供气压力出现欠压、超压时,不用电或其它外部动力,能自动关闭并须手动开启的装置技术参数执行标准:CJ/T447-2014工作温度:-10C<T<40C超压自动关闭压力:8KPa士2KPa欠压自动关闭压力:08KPa02KPa连接尺寸:进口螺纹为G1/2,出口为G1/2或直径9.5产品功能3.1、超流切断功能:当燃气胶管松动脱落、烧断。
鼠咬、破裂超过设定流量时,阀门自动切断气源。
气压突然升高超过安全压力时造成流量超值,阀门自动切断起源。
3.2、超压保护功能:当调压器失灵值,阀门自动切断气源。
3.3、超低压功能:当燃气管道供气气压不足,阀门自动关闭气源3.4、停气关闭功能:燃气管道因类发事件、故障检修等原因停止供气时、阀门自动关闭气源3.5、微漏检测功能:关闭燃具开关,拉开自闭阀旋钮,再关闭进气闷、观察10-20分钟后自闭阀保持开启状态,说明胶管及接口和燃县开关均为正常。
使用方法4.1、在管道正常通气状态下,拉起红色提即可用气。
4.2、如提钮自动吸回时,应注意检在以下情况a 、软管是否有破裂现象。
B、接口是否脱落c、是否停气使用注意事项5.1、自闭阀应由有资质专业人员安装。
5.2、必须使用符合国家标准的熄火保护燃气灶具5.3、自闭严禁浸水5.4、自闭阀具有微漏检测功能,用户应定期自行自检5.5、需经常检查燃气胶管及接头处,若出现老化裂痕、鼠等小微破损,泄潜量并未超过规定的过流关闭值,此时自闭阀不会自闭,应及时更换燃气胶管5.6禁止私自拆卸自闭阀5.7、如果发现室内有燃气异味,应立即打开门窗通风、禁止在现场打电话、开灯或用火,禁止使用灶具。
SCBA简介及穿戴

2.如果供气部分或完全停止,或者呼吸器不能自动打开。迅速打开强制通气调节阀( 红色旋钮)并立即离开受污染区域。 3.如果非吸气情况下,气体仍不停的进入面罩。迅速打开强制通气调节阀(红色旋钮 )并根据个人需求部分关闭钢瓶阀门,之后立即撤离受污染现场。 C:低温操作 1.SCBA应保存在冰点温度以上的环境中。 2.如果SCBA不可避免的要在冰点以下的环境中存放,必须确保保存前所有的部件都必 须清洁并完全干燥。 3.如果SCBA不可避免的被保存在冰点以下且使用前不可能将其置于室温环境中,在面 罩完全戴好且鼻罩完全适合脸型前,不要向面罩内通气。 4.在冰点或以下的温度中使用完SCBA后,摘下的面罩和调剂器应一起置于外套下保暖 ,以便再次使用。 5.冰点或以下温度环境中保存SCBA,面罩和调节器一定要注意防水了。
目录
-:使用范围及目的. 二:器材介绍 . 三:使用说明 . 四:注意事项 .
-:使用范围及目的.
使用范围:主要应用于火灾、毒气泄漏、挥 发性液体泄漏、密闭空间等产生有害气体或 氧气含量低的区域。目的:提供正常呼吸所 需要的空气。
二:器材介绍 .
面罩
头套调整带
肩带
通气调节阀
压力表
腰带
调整带肩带
腰带调整带
减压器
固定扣带
气瓶
头套
腰带
压力表
背架 气瓶压力表
三:使用说明
3.1:检查气瓶压力表查看指针是否在绿色范围內,我公司目前用的是最大压力为 4500psig的气瓶,充满气能用30分钟左右(1MPa =145 psig磅/平方英寸)。
3.2 抓住背板架高举过头 (两臂于肩带內)双手抓住肩带呼吸器自然落于背部。 3.3 双手抓住肩部调整带身体稍微往前倾同时将调整带往下拉。
