ZSG-18型排爆机器人使用说明书
18工业机器人培训课件焊接机器人基本操作及应用

高频点火器
割炬
教材(图18-3)机器人切割系统
第18章 焊ቤተ መጻሕፍቲ ባይዱ机器人应用(5)
教材(图18-5)装载机驱动桥体的机器人焊接系统
第18章 焊接机器人应用(6)
(后桥总成图片)
教材(图18-7)帕萨特后桥总成双机器人焊接工作站
第18章 焊接机器人应用(7)
控制柜 机器人1
外部轴1
工位1
机器人2
外部轴 变位器
第18章 焊接机器人应用(3)
机器人 控制柜
安全围栏
第一工位
外部轴变 位装置
第二工位 (装卸工位)
教材(图18-2)三轴垂直翻转双工位机器人工作站
第18章 焊接机器人应用(4)
配气装置 控制装置
切割机器人系 统主要由由以下
四部分组成: 1.机器人部分
2.控制部分 3.配气部分 4.割炬部分
机器人本体
遮光栅
观察窗
触摸屏
数量 1 1 1 1 1 1 2 2 1
1
1
1
型号
350GR3
BRS-CC TA1400 500KG 高2100mm
焊接机器人基本操作及应用
2019年7月
焊接机器人基本操作及应用
2019年7月
第18章 焊接机器人应用(1)
教材(图18-9)自行车 三角架工装(焊前示教)
教材(图18-10)自行车 三角架鱼鳞纹焊接效果
第18章 焊接机器人应用(2)
维修入口门 第二工位
第一工位 回转台
教材(图18-1)水平回转台式双工位机器人系统图
外部轴2 工位2
工件装 卸位置
操作盒
教材(图18-8)三轴垂直翻转双机器人平面布置图
排爆机器人
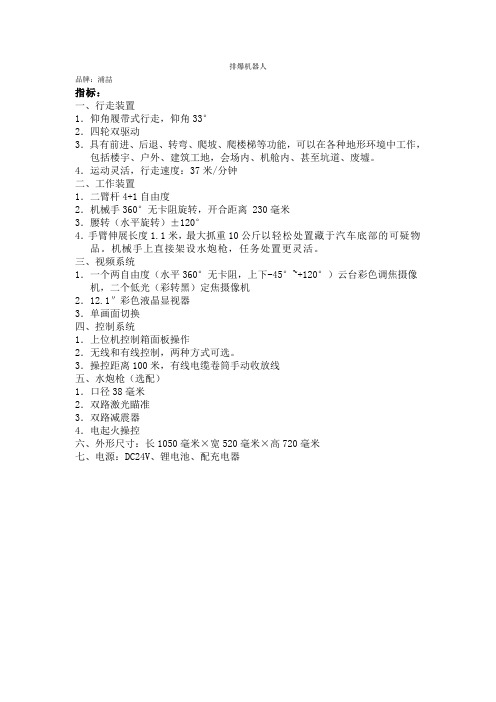
排爆机器人
品牌:浦喆
指标:
一、行走装置
1.仰角履带式行走,仰角33°
2.四轮双驱动
3.具有前进、后退、转弯、爬坡、爬楼梯等功能,可以在各种地形环境中工作,包括楼宇、户外、建筑工地,会场内、机舱内、甚至坑道、废墟。
4.运动灵活,行走速度:37米/分钟
二、工作装置
1.二臂杆4+1自由度
2.机械手360°无卡阻旋转,开合距离 230毫米
3.腰转(水平旋转)±120°
4.手臂伸展长度1.1米,最大抓重10公斤以轻松处置藏于汽车底部的可疑物品。
机械手上直接架设水炮枪,任务处置更灵活。
三、视频系统
1.一个两自由度(水平360°无卡阻,上下-45°~+120°)云台彩色调焦摄像机,二个低光(彩转黑)定焦摄像机
2.12.1″彩色液晶显视器
3.单画面切换
四、控制系统
1.上位机控制箱面板操作
2.无线和有线控制,两种方式可选。
3.操控距离100米,有线电缆卷筒手动收放线
五、水炮枪(选配)
1.口径38毫米
2.双路激光瞄准
3.双路减震器
4.电起火操控
六、外形尺寸:长1050毫米×宽520毫米×高720毫米
七、电源:DC24V、锂电池、配充电器。
灭火机器人使用说明
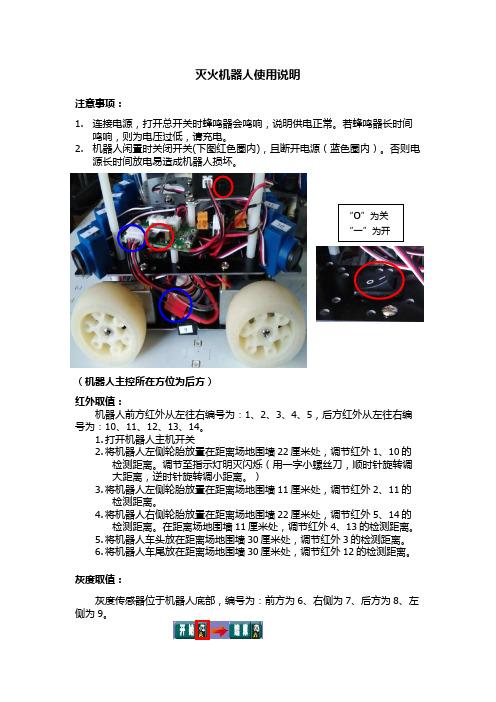
灭火机器人使用说明注意事项:1. 连接电源,打开总开关时蜂鸣器会鸣响,说明供电正常。
若蜂鸣器长时间鸣响,则为电压过低,请充电。
2. 机器人闲置时关闭开关(下图红色圈内),且断开电源(蓝色圈内)。
否则电源长时间放电易造成机器人损坏。
(机器人主控所在方位为后方)红外取值:机器人前方红外从左往右编号为:1、2、3、4、5,后方红外从左往右编号为:10、11、12、13、14。
1. 打开机器人主机开关2. 将机器人左侧轮胎放置在距离场地围墙22厘米处,调节红外1、10的检测距离。
调节至指示灯明灭闪烁(用一字小螺丝刀,顺时针旋转调大距离,逆时针旋转调小距离。
)3. 将机器人左侧轮胎放置在距离场地围墙11厘米处,调节红外2、11的检测距离。
4. 将机器人右侧轮胎放置在距离场地围墙22厘米处,调节红外5、14的检测距离。
在距离场地围墙11厘米处,调节红外4、13的检测距离。
5. 将机器人车头放在距离场地围墙30厘米处,调节红外3的检测距离。
6. 将机器人车尾放在距离场地围墙30厘米处,调节红外12的检测距离。
灰度取值:灰度传感器位于机器人底部,编号为:前方为6、右侧为7、后方为8、左侧为9。
新建文件,鼠标双击上图中开始图标右半部分方框区域,弹出编辑框:根据机器人自身的测试值进行修改上图中方框内的B1,B2的值。
灰度黑色分界值B1为机器人底部灰度在场地黑色部分的值,取4个灰度的最大值再加200;灰度白色分界值B2为机器人底部灰度在场地白色部分的值,取4个灰度的最小值再减200。
点击“保存模板”,再保存。
灰度取值方法为:1.打开机器人主机开关;2.按主控左下方按钮进行选择,选定“TEST”选项,按右上方按钮确定;3.选择“Analog”选项,查看通道口6、7、8、9的数值。
如:黑色值,1309、1200、1102、1211,则将B1的数值改为1500 白色值,2601、2722、2655、2695,则将B2的数值改为2400函数说明:新建文件,点击左下方“任务”按键,跳转至任务功能模块。
救生消防设备操作规程汇总

9L手提式泡沫灭火器操作说明PROCEDURE FOR PORTABLE FOAM EXTINGUISH 1.拔下安全销Pull out safety--pin2.把控制杆压到底Press the control lever all the way down3.对着火根部进行灭火Direct at the base of flame and squeeze the trigger抛绳枪操作规程PROCEDURE FOR LINE-THROWING APPLIANCE 1.将抛射绳后端系固在船上,将抛射体细钢索与抛射绳连接在一起,注意抛射绳不要扭缠或打结。
Tie the end of line to the steady parts of the ship , connect the line and the steel line on the throwing part, ensure the line no twist, tangle and overlapping.2.将底火装入发射筒底部拧紧。
Fit cartridge into firing tube on the bottom side using screw driver until the end of cartridge come to the rear surface of firing tube and stop .3.将保险栓后拉至“f”位置时再扳向右侧,到“s”位置,上好保险。
Pull the handle of firing gun to "F" Position ,then turn right to the position marked with " S"4.将发射筒和发射器组装在一起。
Fix together the prepared firing gun and firing tube5.将抛射体放入抛射筒内。
全部整合排爆机器人使用说明

全部整合排爆机器人使用说明关键信息:1、排爆机器人型号:____________________________2、操作权限:____________________________3、适用场景:____________________________4、维护周期:____________________________5、故障处理流程:____________________________11 引言本协议旨在为用户提供关于全部整合排爆机器人的详细使用说明,以确保其安全、有效地执行排爆任务。
111 排爆机器人概述排爆机器人是一种专门设计用于处理危险爆炸物的高科技设备,具备先进的传感器、机械臂和控制系统。
112 主要功能包括但不限于探测爆炸物、抓取和转移爆炸物、远程操控等。
12 操作前准备121 操作人员培训操作人员必须经过专业培训,熟悉机器人的操作流程和应急处理方法。
122 环境评估在使用前,对操作环境进行全面评估,确保无干扰因素影响机器人工作。
13 启动与连接131 电源接入按照正确的方式接入电源,并检查电源指示灯是否正常。
132 通信连接建立稳定的通信连接,确保操作人员与机器人之间的数据传输流畅。
14 操作界面介绍141 主控制界面详细说明各个控制按钮、参数显示区域的功能和含义。
142 监控画面解释监控画面中不同图像和数据的代表意义。
15 移动控制151 前进、后退、转弯操作明确操作指令对应的移动动作和速度控制方法。
152 越障能力及应对策略介绍机器人在遇到不同障碍物时的处理方式。
16 探测功能使用161 传感器类型及工作原理阐述机器人所配备的各类传感器,如红外、化学等传感器的工作原理。
162 探测模式选择根据不同的任务场景,选择合适的探测模式。
17 机械臂操作171 抓取动作控制精准控制机械臂的抓取力度和角度。
172 精细操作技巧如何进行微小物品的抓取和操作。
18 排爆流程181 发现爆炸物如何确认爆炸物的位置和类型。
排爆机器人操作手册
目录第一章上位机遥控箱介绍 (3)1.1 面板介绍 (3)1.2 界面介绍 (4)第二章排爆机器人操作说明 (6)2.1 监视及显示查看 (6)2.1.1 指示灯显示 (6)2.1.2 视频显示 (6)2.1.3 报警错误消息提示 (7)2.1.4 设置的速度显示 (7)2.1.5 各轴位置及使能情况显示 (8)2.1.6 机械臂末端速度显示 (10)2.2 初始化与清错操作 (10)2.3 上下使能操作 (11)2.4 模式切换操作 (12)2.5 暂停、急停及复位操作 (13)2.6 机器人运动全局速度设置 (13)2.7 车体运动操作 (14)2.7.1 单轴运动操作 (14)2.7.2 车体行进转向操作 (14)2.8 摆臂运动操作 (15)2.8.1 单轴运动操作 (15)2.8.2 分组控制操作 (15)2.8.3 耦合控制操作 (16)2.9 机械臂运动操作 (16)2.9.1 机械臂点动操作 (16)2.9.2 末端平动控制 (17)第三章日常故障及处理 (18)3.1 网络通讯故障 (18)3.2 电压不足 (18)第四章技术参数 (18)4.1主要技术指标 (18)第一章上位机遥控箱介绍1.1面板介绍总电源开关:通过该开关控制排爆箱总电源的开和关。
电脑启动按钮:通过该按钮来启动和关闭排爆箱电脑。
有线无线开关:通过该开关来切换排爆机器人为有线或无线控制方式。
紧停旋钮:通过选择紧停按钮来停止和恢复下位机运行。
手控制摇杆:控制机械臂手末端运动。
车控制摇杆:控制车体行进转向。
1.2界面介绍清错、配置及模式切换区域:进行异常处理、机器人上下使能、机器人暂停、急停及复位和模式切换。
视频切换区域:进行视频显示控制。
云台控制区域:进行云台运动控制。
报警错误及消息提示区域:实时显示下位机当前错误信息。
指示灯区域:显示网络通讯、使能、错误和抱闸状态信息。
机器人模型显示区域:通过机器人模型实时显示机器人摆臂及机械臂位置。
FC18-操作手册

FC18-操作手册JB-TGZL-FC18R 型火灾报警控制器(联动型)操作说明书目录第一章 系统简介···········································································································································3 1. 特点 ·····················································································································································3 2. 性能参数················································································································································4 3. 外形尺寸················································································································································5 4. 兼容设备目录··········································································································································5 5. 系统结构················································································································································6第二章 安 装··············································································································································8 1. 安装过程················································································································································8 2. 接线图···················································································································································9 3. 拨码开关设置········································································································································13第三章 操 作·············································································································································14 1. 界面显示··············································································································································14 2. 液晶窗口显示········································································································································16 3. 用户级别··············································································································································18 3.1 登录 ··············································································································································19 3.2 退出 ··············································································································································19 4. 状态类型··············································································································································20 5. 火警事件处理········································································································································22 6. 故障事件处理········································································································································23 7. 监管事件处理········································································································································24 8. 启动/反馈事件处理·································································································································25 9. 实时事件查询········································································································································26 10. 设备属性查询········································································································································27 11. 历史记录查询········································································································································28 12. 如何进行屏蔽/开放·································································································································29 13. 如何进行启动/停止·································································································································30 14. 如何进行测试/移动测试···························································································································31 15. 如何进行定位测试/定位恢复·····················································································································32 16. 如何设置蜂鸣器音量·······························································································································33 17. 如何设置登录时间··································································································································34 18. 如何设置移动测试时间····························································································································35 19. 如何设置 LCD 关闭时间 ··························································································································36 20. 如何设置时间········································································································································37 21. 如何进行系统检测··································································································································38 22. 如何保存配置········································································································································39 23. 如何修改参数········································································································································40 24. 如何新建/查看联动关系···························································································································41 25. 如何编辑/删除联动关系···························································································································42 26. 如何进行组分配/FRT 分配 ·······················································································································44 27. 如何查看帮助信息··································································································································45 28. 如何操作联动盘·····································································································································45 29. 如何打开/关闭打印机······························································································································46 30. 如何替换设备········································································································································48页码:1/60。
如果你是消防大队指导员请编写消防机器人操作手册

如果你是消防大队指导员请编写消防机器人操作手册
1、红外摄像头:观察机器人本体周围的环境,实现路画面(车体前、后、水炮喷射口、车体云台)无线图像传输功能。
2、消防水炮:80L每秒流量水炮,水、泡沫两用,射程75m。
3、气体采集(选配):机器人本体周围五种气体的采集(O2、CO、H2S、C12、CH4)。
4、照明:LED大功率强光照明灯。
5、声光报警:机器人本体运行状态下发出声光报警。
6、自动避障:在行进时时时检测前方障碍物,避免碰撞。
7、喷淋降温:双重水幕喷淋降温。
8、可实时的显示机器人本体电池内部的各种信息;实时显示机器人状态、机器人内外温度、有毒有害气体浓度报警信息等;控制机器人前进、后退、转向等运动;控制水炮做上、下、左、右、直流、雾化、自摆动等动作。
排爆机器人

排爆机器人品牌:浦喆排爆机器人主要是用来处理爆炸物相关工作的排爆式机器人,也可用于侦察人难以达到的地形的一种机器人。
6自由度排爆机械手能实现任意角度旋转,可以抓举30KG的重物,机械臂装载爆炸物销毁器,可现场摧毁爆炸物,底盘采用履带结构,能适应各种地形快速作战部署。
排爆机器人可与多种配件一同使用,包括销毁器,X射线,爆炸物的远程引爆控制系统等。
机器人主体参数:1、摄像头像素:1080P2、抓举力:最大≦30Kg。
展开抓取≤10kg3、排爆弹外径:29mm4、轮胎直径:320mm5、爬坡能力:≤30°6、爬楼梯能力:≤30°7、越障高度:300mm8、最大速度:≥1.4m/s9、转弯半径:原地旋转10、有线控制:100m11、无线控制:500m12、尺寸:1200*1030*1000mm(包含云台)13、重量:220KG14、电压:48V15、工作时间:≥12h机械臂参数1、主臂旋转:0-90°2、主臂伸缩:0-450mm3、小臂:-90°-120°4、底座:左90°右60°5、爪转:360°(连续)6、爪张合尺寸:0-245mm爆炸物销毁器(选配):1、重量:3.2KG2、发射器外径:53mm3、发射器口径:22mm4、击穿能力:木板70mm;钢板3mmX光机参数(选配)1、成像板外形尺寸:383mmx480mmx15mm2、成像板厚度小于:15mm3、成像板重量小于:3.2kg4、像素尺寸小于:160μm5、射线源尺寸:310mmx50mm6、X 射线穿透力:可穿透50mm 铝板。
7、光源:光源有线和无线控制8、同步方式:手动控制(13)有线通信:兼容百兆、千兆以太网. 系统组成:MK6排爆机器人 1台遥控箱 1台车体充电器(54.6.2V) 1个遥控充电器(12.6V) 1个有线通讯电缆 1卷。
多功能模块化排爆机器人设计使用说明
第一届xxx机械创新设计大赛作品说明书多功能模块化排爆机器人参赛学校xxxx参赛学员 xxxx指导教员 xxxx摘要:地面无人作战平台在现代战争中已经开始扮演着重要的角色,国内外都在对此进行研究。
本文依据自主设计并制作的多功能模块化排爆机器人(样机)和相关的战场适应性能试验,主要研究了模块化设计理念在我军未来无人作战装备中的具体实现方案和采用模块化理念设计的无人作战平台对战场、战争环境的适应性。
为未来我军无人化装备的设计和生产提供了有益的借鉴。
关键词:模块化、多功能、排爆、机器人、无人化一、设计背景目前国内外恐怖主义猖獗,活动类型多样,在很多地区还存在着大量恐怖分子遗留的爆炸物。
由于人工排爆存在巨大危险性,排爆机器人已成为反恐作战的重要装备之一。
在国外,美军提出并实施了“联合机器人计划”(JRP),国防高级研究计划局提出了“战术移动机器人”(TMR)、“未来战斗系统”(FCS)、无人地面战车等项目,目前有100多项战斗任务可由机器人承担,如机器人弹药装填手、机器人排雷车、火力支援机器人等。
美、英、德、法及日本等国均已经研制出多种型号的地面无人作战平台,有的已在波黑战争和伊拉克战争中使用。
除上述国家外,其他国家也在开展地面无人作战平台的研制工作,如加拿大的“改进型地雷探测计划”,意大利、法国和西班牙联合开展的“先进移动机器人”项目,瑞士的Pemex轮式地面无人平台项目,比利时的HUDEM项目,西班牙的“罗德”轮式地面无人平台以及俄罗斯的“越野车”-M3超轻型移动式机器人等。
排爆机器人是目前较具研究价值的机器人产品,在反恐怖斗争领域可用来执行诸如反恐排爆的任务,战场上排爆机器人则用以执行诸如排除爆炸物,战场信息收集的任务;稍加改造,即可加装单兵武器用于武装巡逻、战斗值勤等高危险任务。
基于军用机器人产品系列化、通用化的需要,在小型移动平台基础上,提出并制作了多功能模块化排爆机器人,其包括履带式底盘、机械手臂、控制系统、侦察系统等,集模块化、多功能、自动控制于一体,可用于各种复杂、危险情况下的可疑危险物品的清理作业,以及代替现场安检人员实地勘察,实时传输现场图像。
ZSG系列矿用振动筛使用说明书

ZSG系列矿用振动筛使用说明书(一)ZSG高效振动筛产品概述及特点:ZSG系列高效振动筛是我公司自行研制的一种新型、高效的筛分设备,主要用于冶金、矿山、煤炭、建材、电力、化工等大块状物料及中小颗粒物料的筛分行业,尤以冶金行业用途最为广泛,是高炉槽下、焦化厂、选矿厂常用的筛分机械。
该产品具有体积小、重量轻,能耗低、便于安装及工艺布置等特点,采用节能振动电机作振动源,橡胶弹簧支撑并隔振,处理量大,筛分效率高,筛网有较大的安装倾角,拼块组装筛板,更换方便,使用寿命长。
ZSG高效振动筛主要特点:1.体积小,筛分能力大.2.重量轻,便于安装及工艺布置.3.能耗少,可节约大量能源.4.价格低,备件量极少.5.结构简单,造型美观.6.筛网由小块拼装,且更换极为简便.(二)ZSG高效振动筛工作原理和结构:ZSG系列矿用重型振动筛是利用振动电机或普通电机外拖动或自振源驱动,使筛体沿激振力方向作周期性往复振动,物料在筛面上沿直线方向作抛物线运动,从而达到筛分目的。
ZSG系列高效重型筛由激振装置、筛箱、防尘罩、落料斗、减振装置、底座等部分组成。
ZSG系列高效重型筛工作时,由激振器产生的激振力通过筛箱传递给筛箱内的筛面上,因激振器产生的激振力为纵向力,迫使筛箱带动筛网面作纵向前后位移,在一定条件下,筛网面上的物料因受激振力作用而被向前抛起,落下时小于筛孔的物料则透筛而落到下层,物料在筛网面上的运动轨迹为抛物运动,由于这样周而复始的物料运动,物料从入料端落入筛箱后,迅速前进、松散、透筛,完成筛分作业。
ZSG系列矿用重型振动筛有筛箱、振动电机、减振系统及底架等组成。
筛箱由筛框、筛板、衬板等组成。
筛机侧板采用优质钢板制作而成,侧板与横梁、激振器底座采用高强度螺栓或环槽铆钉连接,结构合理,坚固耐用。
SG系列矿用重型振动筛采用振动电机做为激振源,调节振动电机激振力的大小,可以改变筛机的振幅。
减振系统有橡胶弹簧、支承座等组成。
本系列振动筛振动电机安装方式可分为上振式和侧振式,减振装置安装方式可分为座式或吊挂式。
灵动18氪使用说明书

灵动18氪使用说明书
1,在使用过程中,当机身前端模拟燃烧烟头明显变绿时,应用随机附带专用充电器对电池充电。
充电3-4小时后,充电器指示灯由红色变成绿色时,既代表电池已充满电,请取出电池,并断开充电器电源。
2,每个烟弹可以抽300口左右(按型号不同有差别),普通香烟一支基本上可以抽15口,为了防止使用者次性过量摄取烟油而感到口腔不适,同时也防止电池过量放电而损坏,建议抽吸电子烟14-16口烟后停吸半小时,然后再吸。
3,长期不使用电池时,要将电池从烟体和充电器中取出,充电后单独保存在低温干燥的环境中。
4,烟弹开封后建议在半年内使用,以免造成烟油流失。
5,本产品含微电子元器件与感应器,应避免磕碰。
6,本产品暂无防水功能,如不慎掉入水中,请将其它完全晾干后再使用。
7,请勿尝试用该充电器为其它类型的电池充电。
福乐斯Z使用手册

1.概述多回转阀门电动装置,简称为Z型电装,是阀门实现开启、关闭或调节控制的驱动设备。
Z型电装适用于闸阀、截止阀、隔膜阀、柱塞阀、节流阀、水闸门等。
可用于明杆阀,也可用于暗杆阀。
本系列电装具有功能全、性能可靠、控制系统先进、体积小、重量轻、使用维护方便等特点。
可对阀门实行远控、集控和自动控制。
广泛用于电力、冶金、石油、化工、造纸、污水处理等行业。
本产品的性能符合JB/T8528-1997《普通型阀门电动装置技术条件》的规定。
隔爆型的性能符合GB3836.1-2000《爆炸性气体环境用电气设备第1部分:通用要求》,GB3836.2-2000《爆炸性气体环境用电气设备第2部分:隔爆型“d”》及JB/T8529-1997《隔爆型阀门电动装置技术条件》的规定。
多回转电动电动装置按防类型分:有普通型、户外型和隔爆型按控制方式分:有常规型、整体型和整体调节型按连接型式分:有转矩型、电站型和推力型。
2.型号表示方法A:带现场按钮;F:带4-20mA信号输出;S:带手动减速箱Z:整体型;T:整体调节型输出轴最大转圈数:阿拉伯数字表示,无数字见表1防护类型:W表示户外型;B表示隔爆型;无代号为普通型输出转速:阿拉伯数字表示,单位r/min(转/分)连接型式:T表示推力型,I表示电站型,无代号为常规转矩型额定输出转矩:阿拉伯数字表示,单位kgf·m产品型式:多回转电动装置型号示例:1.Z30I-18W:多回转电动装置,输出转矩300N·m(30kgf·m),电站型接口,输出转速18r/min,最大转圈数60,常规户外型。
2.Z45T-24B/S:多回转电动装置,输出转矩450N·m(45kgf·m),推力型接口,输出转速24 r/min,最大转圈数120,隔爆型,带手动减速箱。
3.Z120-24W/240T:多回转电动装置,输出转矩1200N·m (120kgf·m),转矩型接口,输出转速24 r/min,最大转圈数240圈,整体调节型。
雪橇18英寸5位高度切割机操作手册说明书

© 2017 by Snow Joe ®, LLCA Division of Snow Joe ®, LLCForm No. SJ-MJ1800M-880E-MMANUAL REEL MOWERIMPORTANT!Safety InstructionsAll Operators Must Read These Instructions Before Use Always follow these safety guidelines. Failure to do so may result in serious bodily injury or death.General Safety WARNINGS!When using this reel mower, basic safety precautions should always be followed to reduce the risk of personal injury. These precautions include:m WARNING! This unit can be dangerous! Careless orimproper use can cause serious injury.m WARNING! Risk of dismemberment: keep hands andfeet away from the rotating blades and the cutting area.Before using the reel mower, familiarize yourself with the controls, especially how to stop the mower in an emergency. The only individuals who should use the mower are those who thoroughly understand these instructions and know how to properly operate the unit. Children should never be allowed access to the mower.Retain this manual for future reference and reread it at the start of each mowing season.Safety Information1. Never place hands, fingers, or feet inside the reel.Although this mower is not powered by a motor, the reel spins when the wheels turn, and it is sharp enough to cause serious injury.2. Never mow when the grass is wet as it can be slippery.3. Do not use the reel mower while barefoot or while wearing sandals.4. Walk behind, never run, while using the reel mower.Always keep proper footing and balance when using this reel mower.5. Do not intentionally strike or hit trees, fences, or other objects. Doing so can cause severe injuries or permanently damage the reel mower's mechanisms.6. Make sure that the reel mower is in proper working order prior to use. Do not attempt to operate this reel mower if it is damaged. Contact your authorized Snow Joe ® + Sun Joe ® dealer or call the Snow Joe ® + Sun Joe ® customer service center at 1-866- SNOWJOE (1-866-766-9563).IMPORTANT!Safety Instructions for Walk-Behind Reel MowersGeneral Operation• Read, understand, and follow all instructions on the machine and in the manual(s) before starting.• Do not put hands or feet near or under the machine. Always stay clear of the discharge opening.• Only responsible adults who are familiar with theinstructions should be allowed to operate this machine.• Clear the mowing area of foreign objects such as rocks, wire, toys, and other miscellaneous articles, which could be picked up and thrown by the rotating blades. • Make sure that the mowing area is clear of bystanders before starting the mower. Stop the mower if anyone enters the area. • Always look down and behind before starting and while moving backward with the mower.• Do not operate the machine without safety protective devices in place and in proper working order.• Never operate the mower on wet grass. Always be sure of your footing; walk, never run, with the mower.• Keep blades sharp.• Keep hands and feet away from the cutting area.• Always wear eye protection when operating the machine.• Objects struck by the reel mower blades can cause severe injuries. The mowing area should always be carefullyexamined and cleared of all objects prior to each mowing.• Only use identical replacement blades.Slope OperationSlopes are major factors involved in slip and fall accidents. Such accidents can cause severe personal injury. Operating this mower on any inclined surface requires extra caution. If you feel uneasy on a slope, do not mow it.• Mow across the face of a sloped surface; never mowup and down a slope. Exercise extreme caution whenchanging direction on a slope.• Watch for holes, ruts, bumps, rocks, or other hiddenobjects. These may cause an unexpected slip or fall.• Do not mow on wet grass or excessively steep slopes.Poor footing could cause a slip and fall accident.• Do not mow near drop-offs, ditches, or embankments.You could lose your footing or balance. ChildrenTragic accidents can occur if the operator is not alert to the presence of children. Children are often attracted to the mower and the mowing activity. Never assume that children will remain where you last saw them.• Keep children out of the mowing area and under thewatchful care of a responsible adult other than theoperator.• Stay alert and stop the reel mower if a child enters thearea.• Never allow children access to the machine.• Use extra care when approaching blind corners, shrubs,trees, or other objects that may block your view of a child. Service• Keep all nuts and bolts tight.• Never tamper with safety devices. Regularly check toensure these devices are in place and in proper workingorder.• Keep the reel mower free from grass, leaves, or otherdebris buildup.• If you strike a foreign object, stop and inspect the reelmower. Repair, if necessary, before restarting.• The mower blades are sharp. Wrap the blades or weargloves when handling.• Maintain or replace safety and instruction labels asneeded.Safety SymbolsThe following table depicts and describes safety symbols that may appear on this product. Read, understand, and follow all instructions on the machine before attempting to assemble and operate.Know Your Manual Reel MowerRead the owner’s manual and safety instructions carefully before operating the reel mower. Compare the illustration below to the reel mower in order to become familiar with the location of the various controls and adjustments. Save this manual for future reference.Technical DataRotor 5 steel blades Cutting Width 18 in (45.8 cm)Cutting Heights 1.1 in. – 3.2 in.(2.7 cm – 8.2 cm)Wheel Size Front: 10 in. (25 cm)Rear: 6 in. (15 cm)Height Control 5-position manual height adjustment Weight34.6 lbs (15.7 kg)FRONTBACK1234567810911121. Foam grip2. Upper handle frame3. Handle shield knobs (4)4. Handle shield5. Lower handle bar (2)6. Front wheel (2)7. Mower housing8. Rear wheel (2)9. Height adjustment lever (2)10. Lifting handle 11. Steel blades 12. Middle handle frame 13. Allen wrench13UnpackingCarton Contents:• Reel mower body with front wheels• Rear wheels (2)• Rear wheel bolt + washer (2)• Allen wrench• Upper handle frame• Middle handle frame• Lower handle bar (2)• Handle shield• Handle shield knobs (4)• Handle shield bolts (4)• Manuals with registration card1.Carefully remove the manual reel mower and check to seethat all of the above items are supplied.2.Inspect the product carefully to make sure no breakage ordamage occurred during shipping. If you find damaged or missing parts, DO NOT return the unit to the store. Please call the Snow Joe® + Sun Joe® customer service center at 1-866-SNOWJOE (1-866-766-9563).NOTE: Do not discard the shipping carton and packaging material until you are ready to use your new manual reelmower. The packaging is made of recyclable materials.Properly dispose of these materials in accordance withlocal regulations.IMPORTANT! The equipment and packaging material are not toys. Do not let children play with plastic bags, foils,or small parts. These items can be swallowed and pose a suffocation risk!AssemblyRear Wheel Assembly1. Align one rear wheel with the hole on the end of themower body, and connect with one set of rear wheelwasher + bolt, as shown (Fig. 1).3. Repeat the above instructions for the other wheel. Handle Assembly1. Lay out the handle parts upside down as shown for easierassembly. Make sure the arch of the upper handle frame is pointing down. Enter the end of the upper handle frame into the middle handle frame, and enter the end of themiddle handle frame into the lower handle bar. Roughlyalign the holes (Fig. 3).OperationCutting Height Adjustment1. The cutting height of the 18 in. (45.8 cm) reel mowercan be adjusted from 1.1 in. to 3.2 in. (2.7 to 8.2 cm) by moving the 5-position height adjustment levers to thedesired setting. The height adjustment levers are located next to the rear wheels.2. In order to set the mower to its lowest cutting position,hold the mower by its lifting handle, and pull theadjustment levers on both sides, one at a time, and setthem to position A (Fig. 10).3.In order to set the mower to its highest cutting position,hold the mower by its lifting handle, and move theadjustment levers on both sides to position B (Fig. 10).avoid injury, wear gloves while making adjustments. Keep fingers away from the interface between the cutting reel blades and stationary blade.NOTE: Although the blades are pre-adjusted prior to leaving the factory, it is recommended that the adjustment be verified prior to first use.NOTE: Vibrations during shipping can cause blade misalignment, which often causes the blades to become too loose or too tight. This will result in a rough, uneven cut, or make the mower difficult to push (Fig. 11).3. Follow the instructions to adjust the mower blade.4. To check if the mower cuts properly, turn the mower on its side.5.Starting with the end close to the ground, feed a strip of paper between a cutting reel blade and the stationary blade, keeping the paper flush against the side of the stationary blade. About half an inch of the strip should be visible beyond the stationary blade.6. Slowly rotate the cutting reel toward the stationary blade, and observe whether the paper is cut as the first cutting reel blade passes (Fig. 13).is set correctly. If all or most of the blades do not cut on one or both ends, the cutting system needs to be adjusted. Follow the instructions for adjusting the blade below.m WARNING!Do not overtighten the adjustment screws as this could damage the cutting bar. Both screws must be tight on final adjustment.3. To loosen the blades, use the Allen wrench provided andturn both adjustment screws by an equal amountcounterclockwise.4. To tighten the blades, tighten both screws by an equalamount by turning them clockwise.NOTE: If you have any questions, please call the Snow Joe® + Sun Joe® customer service department at 1-866-SNOWJOE (1-866-766-9563) for assistance.5. Once the mower blades have been properly adjusted andtheir alignment has been verified, you can now proceedto use your reel mower. Align the cutting path indicationarrow with the previously cut path. Mowing TipsFollow the 1/3 RuleThe 1/3 rule is key to an enjoyable mowing experience and a healthy lawn.1. You should mow your lawn regularly, at least once a week,during the growing season.2.Be guided by observing the lawn and taking care not toremove more than 1/3 of the total height of the turf at any mowing session and never more than 1 inch at a time(Fig. 16).3. Following this rule will stimulate the turf’s root growth,maintain its health, and encourage its natural ability tocrowd out unwanted weeds.Tall Grass Requires Incremental Cutting 1. For extremely tall grass, set the cutting height at themower's maximum setting for the first pass, and thenreset it to the desired height and mow a second or thirdtime (Fig. 17).2. Removing too much of the turf’s height, especially in theheat of summer, can cause root shock and weaken thelawn; bringing down the height by successive mowingover two or more days can avoid this damage andmaintain the health of the turf.3. If the lawn is overgrown (to higher than 4 inches) it may benecessary to use a brush cutter to remove the excess turf mass before resuming mowing at normal heights. NOTE: Do not cover the grass surface with a heavy layerof clippings. Consider using a grass collection system and starting a compost pile.Transporting the MowerDuring normal operation, the blade reel will turn anytime the mower's front wheels are turning. To safely move the mower from one location to another without the blade reel turning, simply pivot the handle over the reel and push the mower from the opposite side. Pushing the mower in this manner (transport mode) prohibits the blade reel from turning (Fig. 18).Care + Maintenance1. Minimum care is required to ensure smooth operation ofyour mower.2. To avoid damage to the mower or cutting blades, keep thearea to be mowed free from debris.3. For best results, regularly apply lubricant to the mower’scutting surfaces, cutting reel axle shaft, and wheels. Sharpening the Cutting Blades1. Spread a thin layer of lapping compound on the front edgeof the reel blades.2. Adjust the cutting bar so that the blade has light but firmcontact across the full width of the bar.m CAUTION! Do not overtighten the adjusting screws, as this could damage the cutting bar. Tighten both screws during final adjustment.3. Turn the reel blades until the front edge of the cutting barblade is polished.m WARNING! Clean any grinding compound or debris from the cutting bar blade, reel blade, pinions, and pawls. NOTE: Use industrial or valve lapping compound between 100NOTE: Lubricate the axle and pinion with a light film of wheel bearing grease.Cleaning and Storage1. Clean the exterior of the machine thoroughly using asoft brush and cloth before storing. Do not use water,solvents, or polishes.2. Turn the mower on its side to clean the blade area.m WARNING!Do not place your hands inside or near the cutting area. If grass cuttings are compacted in the blade area, remove them using a wood or plastic cleaning tool appropriate for blade cleaning.3. Store the mower in a dry place. Do not place otherobjects on top of the mower during storage. Maintenance TipsReel mowers are relatively low maintenance. For consistent cutting, follow the below instructions:• Always keep the cutting bar properly adjusted. Refer to the instruction manual for further directions.• Regularly clean and lubricate cutting edges with light spray oil.IMPORTANT! Reel mowers have difficulty cutting tall weeds, such as dandelions, and will often bend, rather than cut, such weeds. Cut often to prevent this.Service and SupportIf your Sun Joe® MJ1800M manual reel mower requires service or maintenance, please call the Snow Joe® + Sun Joe®customer service center at 1-866-SNOWJOE (1-866-766-9563).Model and Serial NumbersWhen contacting the company or reordering parts, youwill need to provide the model and serial numbers of your product. These are found on the decal affixed to the housing of your reel mower. Copy these numbers into the space provided below.Record the following numbers from the housing or handle of yournew product:M J 1 8 0 0 M Model #: Serial #:PRODUCT REGISTRATION:Snow Joe®, LLC (“Snow Joe® + Sun Joe®”) strongly encourages you to register your purchase. You can register online at /ProductRegistration, or by printing and mailing in a registration card available online from our website, or calling our Customer Service Department at 1-866-SNOWJOE (1-866-766-9563), or by e-mailing us at ****************. Failure to register your product purchase will not diminish your warranty rights. However, registering your purchase will allow Snow Joe® + Sun Joe® to better serve you with any of your customer service needs.WHO CAN SEEK WARRANTY COVERAGE?This Warranty is extended by Snow Joe® + Sun Joe® to the owner of this new product for residential and personal household use only. This Warranty does not apply to products used for commercial, rental or re-sale purposes. Should ownership of this product change during the 2-year period, please update the product’s owner information at /ProductRegistration.WHAT IS COVERED?Snow Joe® + Sun Joe® warrants to the owner that if this product fails within 2 years from the date of purchase due to a defect in material or workmanship or as a result of normal wear and tear from ordinary household use, Snow Joe® + Sun Joe® will send a replacement part or product, as needed, free of charge and with free shipping to the original purchaser.If, in Snow Joe® + Sun Joe®’s sole discretion, the failed product cannot be repaired with a part, Snow Joe® + Sun Joe® will elect to either (A) send a new product at no charge and with free shipping or (B) refund the full purchase price to the owner.WHAT IS NOT COVERED?This Warranty does not apply to products that have been used commercially or in non-household applications. This Warranty does not cover cosmetic changes that do not affect performance.This Warranty is only valid if the product is used and maintained in accordance with the instructions, warnings and safeguards contained in the owner’s manual. Snow Joe® + Sun Joe® will not be responsible for the cost of any unauthorized warranty repairs. This warranty does not cover any cost or expense incurred by the purchaser in providing substitute equipment or service during reasonable periods of malfunction or non-use of this product while waiting for a replacement part or unit under this warranty. Wearing parts like belts, augers, chains and tines are not covered under this warranty, and can be purchased at or by calling 1-866-SNOWJOE (1-866-766-9563). Batteries are covered in full for 90-days from the date of purchase. Repair, replacement or refund of the purchase price are the exclusive remedies of purchaser and the sole liability of Snow Joe® + Sun Joe® under this warranty. No employee or representative of Snow Joe® + Sun Joe® is authorized to make any additional warranty or any modification to this warranty which may be binding upon Snow Joe® + Sun Joe®. Accordingly, purchaser should not rely upon any additional statements made by any employee or representative of Snow Joe® + Sun Joe®. In no event, whether based on contract, indemnity, warranty, tort (including negligence), strict liability or otherwise, shall Snow Joe® + Sun Joe® be liable for any special, indirect, incidental, or consequential damages, including, without limitation, loss of profit or revenue.Some states do not allow limits on warranties. In such states, the above limitations may not apply to you.Outside the USA, other warranties may apply.ABOVE ALL ELSE, Snow Joe® + Sun Joe® are dedicated to you, our customer. We strive to make your experience as pleasant as possible. Unfortunately, there are times when a product does not work or breaks under normal operating conditions. We think it’s important that you know what you can expect from us. That’s why we created the Snow Joe® + Sun Joe® promise.OUR PROMISE: Snow Joe® + Sun Joe® warrant new products for two years from the date of purchase. If your product does not work, or there’s an issue with a specific part, we will fix this by either sending you a free replacement part or by sending you a new or comparable product at no charge. How cool is that! Before you know it, you’ll be back in action cutting, sawing, mowing, washing and…?11m WARNING! Some dust created by power sanding, sawing, grinding, drilling, and other construction activities contains chemicals known [to the State of California] to cause cancer, birth defects, or other reproductive harm. Some examples of these chemicals are:• lead from lead-based paints,• crystalline silica from bricks and cement and other masonry products, and• arsenic and chromium from chemically-treated lumber.Your risk from these exposures varies, depending on how often you do this type of work. To reduce your exposure to these chemicals: work in a well ventilated area, and work with approved safety equipment, such as those dust masks that are specifically designed to filter out microscopic particles. For more information go to www. .。
排爆机器人介绍

CONTENTS
01
防爆机器人产品简介:
02
防爆机器人产品特点:
03
防爆机器人应用环境:
防爆机器人产品简介:
防爆机器人是一款小型模块化排爆机器人,主要可用于危险物品抓取、转移、销毁等作业,同时 机器人手臂具有七个自由度,活动灵活,亦可用于狭小空间侦察作业。机器人行走模块采用"鳍臂 式"履带结构,使机器人具备了强的越障能力,可适应沙地、瓦砾、草地等多种复杂地形。机器人 结构坚固、轻巧,防尘、防水、防震、防腐蚀,各项性能指标均达到标准要求。
防爆机器人产品特点:
1. 越障能力强,鳍臂式履带结构,使机器人翻越楼梯、沟 壑等障碍。 2. 运动速度快,相当于人小跑速度,无级变速,低速状态 下同样具备较大扭矩。 3. 体积小、重量轻,可单人背负,可放入轿车后备箱内, 运输方便。 4. 一体化机械臂云台,5+2自由度设计,抓取、观察灵活。 5. 模块化设计,电池模块、云台模块、机械臂模块可快拆 卸、更换,方便维护。
10.机器人运动灵活、地形适应能力强;可装备水炮枪进行 销毁作业。
防爆机器人应用环境:
1. 公共场所(地铁、机场、火车站、商场、会议场所等)可疑物品转移、销毁。 2. 哑弹排除、路边排除、地雷排除等应用环境。 3. 危险生化及有害环境内物品抓取、转移。 4. 灾后废墟环境内侦察、探测,物品抓取、转移。 5.核辐射环境内物品抓取、转移,简单探测、维修作业。
THANKS
山东卡特智能机器人有限公司
防爆机器人主要参数:
防爆机器人主要参数: 结构形式:摆臂+轮式+履带三合一结构,适合多种地形, 大臂:采用双电动撑杆升降,角度:0-90度 可伸缩臂:采用悬浮丝杠结构,伸缩范围:0-45cm往复运动。 小臂:采用涡轮自锁结构,0-180度转动。 机械爪:三轴,360度连续旋转。 腰转系统:腰盘直径150毫米,转动角度左60度,右90度。 轮子:带快释放的气动轮胎(轮胎尺寸10.0”/25.0cm)。据需要可与驱动系统脱离。 照明:前后各采用一组发光二极管灯照明(一组肆个)。 电源:24V快换直流电池组(两组12V,14A/h安时电池)。 充电器:110或220交流变24V直流。
排爆机器人技术参数
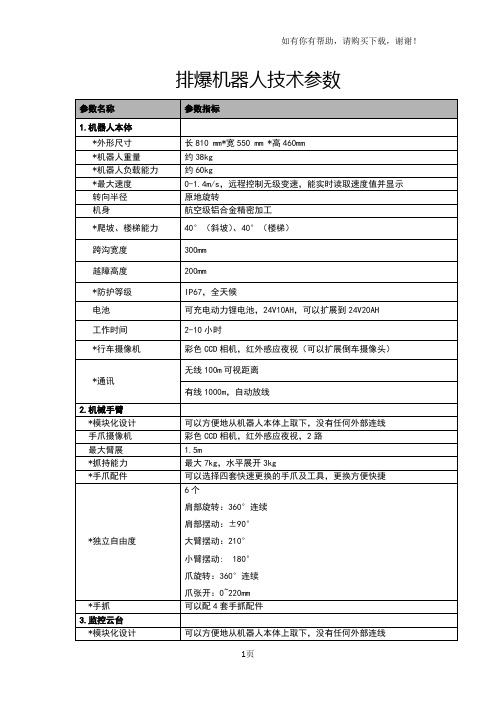
排爆机器人技术参数参数名称参数指标1.机器人本体*外形尺寸长810 mm*宽550 mm *高460mm*机器人重量约38kg*机器人负载能力约60kg*最大速度0-1.4m/s,远程控制无级变速,能实时读取速度值并显示转向半径原地旋转机身航空级铝合金精密加工*爬坡、楼梯能力40°(斜坡)、40°(楼梯)跨沟宽度300mm越障高度200mm*防护等级IP67,全天候电池可充电动力锂电池,24V10AH,可以扩展到24V20AH工作时间2-10小时*行车摄像机彩色CCD相机,红外感应夜视(可以扩展倒车摄像头)*通讯无线100m可视距离有线1000m,自动放线2.机械手臂*模块化设计可以方便地从机器人本体上取下,没有任何外部连线手爪摄像机彩色CCD相机,红外感应夜视,2路最大臂展 1.5m*抓持能力最大7kg,水平展开3kg*手爪配件可以选择四套快速更换的手爪及工具,更换方便快捷*独立自由度6个肩部旋转:360°连续肩部摆动:±90°大臂摆动:210°小臂摆动: 180°爪旋转:360°连续爪张开:0~220mm*手抓可以配4套手抓配件3.监控云台*模块化设计可以方便地从机器人本体上取下,没有任何外部连线*监控摄像机1/4" Sony CCD ,520TVL以上 , 低照度:0.02Lux,防爆镜头*云台运动自由度3个独立自由度,旋转速度可调云台升降:30cm云台旋转:360度连续,旋转速度最大120°/秒云台俯仰:-45°~ 190°,旋转速度最大50°/秒4.操控终端控制箱便携式、防水、防尘、高强度控制箱*控制箱尺寸410×300×190mm控制箱重量10kg*显示屏尺寸12英寸高亮度液晶屏,宽视角,户外清晰*快捷键功能多自由度联动一键控制:手臂伸展、手臂抓取、手臂收回功能*操控高质量摇杆手柄,软件界面人性化设计,观察图像和操控方便显示图像同时监控4路视频信号或单独放大其中1路*武器开关带有武器钥匙、保险、开火等开关,方便配备水炮枪等部件*信息显示实时仿真显示机器人的速度、电压、姿态等信息电池可充电24V锂电池,充满电工作时间不小于3-5小时参数名称参数指标1.机器人本体*外形尺寸长810 mm*宽550 mm *高460mm*机器人重量约38kg*机器人负载能力约60kg*最大速度0-1.4m/s,远程控制无级变速,能实时读取速度值并显示转向半径原地旋转机身航空级铝合金精密加工*爬坡、楼梯能力40°(斜坡)、40°(楼梯)跨沟宽度300mm越障高度200mm*防护等级IP67,全天候电池可充电动力锂电池,24V10AH,可以扩展到24V20AH工作时间2-10小时*行车摄像机彩色CCD相机,红外感应夜视(可以扩展倒车摄像头)*通讯无线100m可视距离有线1000m,自动放线2.机械手臂*模块化设计可以方便地从机器人本体上取下,没有任何外部连线手爪摄像机彩色CCD相机,红外感应夜视,2路最大臂展 1.5m*抓持能力最大7kg,水平展开3kg*手爪配件可以选择四套快速更换的手爪及工具,更换方便快捷*独立自由度6个肩部旋转:360°连续肩部摆动:±90°大臂摆动:210°小臂摆动: 180°爪旋转:360°连续爪张开:0~220mm*手抓可以配4套手抓配件3.监控云台*模块化设计可以方便地从机器人本体上取下,没有任何外部连线*监控摄像机1/4" Sony CCD ,520TVL以上 , 低照度:0.02Lux,防爆镜头*云台运动自由度3个独立自由度,旋转速度可调云台升降:30cm云台旋转:360度连续,旋转速度最大120°/秒云台俯仰:-45°~ 190°,旋转速度最大50°/秒4.操控终端控制箱便携式、防水、防尘、高强度控制箱*控制箱尺寸410×300×190mm控制箱重量10kg*显示屏尺寸12英寸高亮度液晶屏,宽视角,户外清晰*快捷键功能多自由度联动一键控制:手臂伸展、手臂抓取、手臂收回功能*操控高质量摇杆手柄,软件界面人性化设计,观察图像和操控方便显示图像同时监控4路视频信号或单独放大其中1路*武器开关带有武器钥匙、保险、开火等开关,方便配备水炮枪等部件*信息显示实时仿真显示机器人的速度、电压、姿态等信息电池可充电24V锂电池,充满电工作时间不小于3-5小时带*项目为参数必须满足项具有:1、水中作业视频2、质检报告3、科技查新报告,查新结果为国际先进4、专利5、原始机器人生产厂家。
排爆机器人的应用

排爆机器人的应用姓名:学号:指导教师:日期:目录1……………………………………………………..序言2……………………………………….排爆机器人介绍3…………………………………….排爆机器人的分类4……………………………….排爆机器人的实际用途5……………………………….排爆机器人国内外现状6……………………………………………雪豹-10介绍7…………………………………………………….小结1.序言为期一个学期的机器人基础课程即将结束,经过了近一个学期的学习,我们已经对机器人技术有了一定的认识和理解。
机器人技术是一门先进而又前沿的学科,包含了多个学术分支,所以知识掌握起来也必须运用各种所学知识,才能融会贯通。
机器人技术在飞速的发展我们必须坚持理论学习,高标准要求自己才能让自己的知识与时俱进,不断进步。
在一学期的课程即将结束之际,撰写本论文,简述一种机器人的应用。
本论文包括七个部分,包括序言,排爆机器人介绍,排爆机器人的分类,排爆机器人的实际用途,排爆机器人国内外现状,在最后着重介绍一款我国自主研发的排爆机器人雪豹-10,以及最后的小结。
在此感谢苏丽颖老师在这一学期的授课,使得我们受益匪浅。
2.排爆机器人介绍排爆机器人是排爆人员用于处置或销毁爆炸可疑物的专用器材,避免不必要的人员伤亡。
它可用于多种复杂地形进行排爆。
主要用于代替排爆人员搬运、转移爆炸可疑物品及其它有害危险品;代替排爆人员使用爆炸物销毁器销毁炸弹;代替现场安检人员实地勘察,实时传输现场图像;可配备散弹枪对犯罪分子进行攻击;可配备探测器材检查危险场所及危险物品。
由于科技含量较高,排爆机器人往往身价不菲。
3.排爆机器人的分类按操控方式分类:按照操作方法,排爆机器人分为两种:一种是远程操控型机器人,在可视条件下进行人为排爆,也就是人是司令,排爆机器人是命令执行官;另一种是自动型排爆机器人,先把程序编入磁盘,再将磁盘插入机器人身体里,让机器人能分辨出什么是危险物品,以便排除险情。
- 1、下载文档前请自行甄别文档内容的完整性,平台不提供额外的编辑、内容补充、找答案等附加服务。
- 2、"仅部分预览"的文档,不可在线预览部分如存在完整性等问题,可反馈申请退款(可完整预览的文档不适用该条件!)。
- 3、如文档侵犯您的权益,请联系客服反馈,我们会尽快为您处理(人工客服工作时间:9:00-18:30)。
SDHT-18型排爆机器人
使
用
说
明
书
北京斯达恒通科技有限公司----------------------------------------------
中国*北京
名称:18型排爆机器人
品牌:斯达恒通
一、产品概述:
ZSG-18型排爆机器人结构由行走机器人主体及控制系统组成。
行走机器人主体由箱体、电机、驱动系统、机械臂、云台支架、监视系统、照明灯、爆炸物销毁器底座、充电电池、牵引环等组成。
机械臂由大臂、伸缩臂、小臂、机械手抓组成,机械臂安装在腰盘上,腰盘直径220mm,大臂上安装有双电动撑杆和双气动撑杆;云台支架可折叠,其上安装有气动撑杆、摄像机、天线;监视系统由摄像机、监视器、天线等组成;在主体前、后部各安装有1组LED照明灯;系统使用DC24V 铅酸充电电池供电;控制系统由中央控制系统、控制箱等组成。
排爆机器人可选装配件:爆炸物销毁器、尾翼、无线发射天线、五金工具(含刀具、钩子、耙子、钻头、剪子)。
排爆机器人折叠后外形尺寸:宽650mm*长910mm(不含尾翼)*高500mm。
排爆机器人质量为:90kg(不含附件、包装、控制箱)。
二、应用环境
公共场所(地铁、机场、火车站、商场、会议中心等)可疑物品转移、销毁。
哑弹排除、路边炸弹排除、地雷排除等应用环境。
危险生化及有毒环境内物品抓取、转移。
灾后废墟环境内侦察、探测,物品抓取、转移。
核辐射环境内物品抓取、转移,简单探测、维修作业。
三、技术参数
1 移动速
度检验
排爆机器人最高移动速度≥1.5m/s
2 爬坡能
力检验
在与水平面夹角为45°的斜坡上,
操纵排爆机器人爬至坡顶;将爬坡
行走中的排爆机器人在中间任意位
置停机1次,机器人能稳定在坡面
上。
3 爬楼梯
能力检
验
排爆机器人无需外力辅助爬上、爬
下角度为45°楼梯。
4 平地越
过障碍
检验
在水平面上横向放置截面
320mm*320mm、长度>800mm木方或
水泥方,操控排爆机器人能越过
5 通行宽
度检验
排爆机器人可通过宽度≤700mm的
路面
6 回转性
能检验
在水平水泥或沥青上,操纵机器人
可原地左右回转各360°
7 负载能
力检验
机器人负载能力≥140kg
8 拖拽能
力检验
排爆机器人拖拽能力不小于500N
9 手抓张
开尺寸
机械手手爪最大张开尺寸不小于
250mm
检验
1 0 举重能
力检验
操纵机械手夹紧质量≥40kg的试
样,然后启动机械手各关节的驱动
装置,手爪可达空间任意位置试样
不松动
1 1 机械手
自由度
检验
机械手自由度数量≥6
1 2 垂直高
度检验
机械臂垂直展开后至地面距离≥
1950mm
1 3 机械臂
旋转角
度及伸
缩长度
检验
排爆机器人机械臂手爪能顺时针、
逆时针旋转360°、小臂应可顺时针
旋转150°、逆时针旋转110°,中
臂伸缩应长度不小于450mm,大臂应
可顺时针、逆时针旋转90°,腰盘
应能逆时针旋转45°、顺时针旋转
180°
1 4 摄像机
检验
排爆机器人上安装有不同位置的监
视摄像机,摄像机图像应能实时传
输至监视器,图像无延时
1 5 照明灯
检验
排爆机器人机体上有工作照明灯
1 6 控制距
离检验
排爆机器人在无遮挡的空旷地区工
作时,无线控制距离不小于150米;
排爆机器人的有线控制距离不小于100m
1 7 控制箱
检验
操纵控制箱的按键和手柄能便捷、
准确的控制视频切换/变焦、行走、
云台旋转、灯光、中臂伸缩、手爪
开合、小臂旋转动作、大臂起落、
腰盘旋转、手腕旋转等功能,且控
制系统配备触摸屏,适合初学者使
用。
《北京斯达恒通科技有限公司》
主营产品:环境安全检测仪器、消防救护破拆装备、应急救援器材、食品安全检测仪器、通风测绘仪表、粉尘测量及效验仪器、堵漏器材、安防安检防护器材等,已广泛应用于煤矿、救护队、石油化工、学校、实验室、建筑、交通、民航、物流、政府机构,以及各种厂矿企业。
