超声波破碎仪使用说明书
超声波粉碎机说明(原创版)
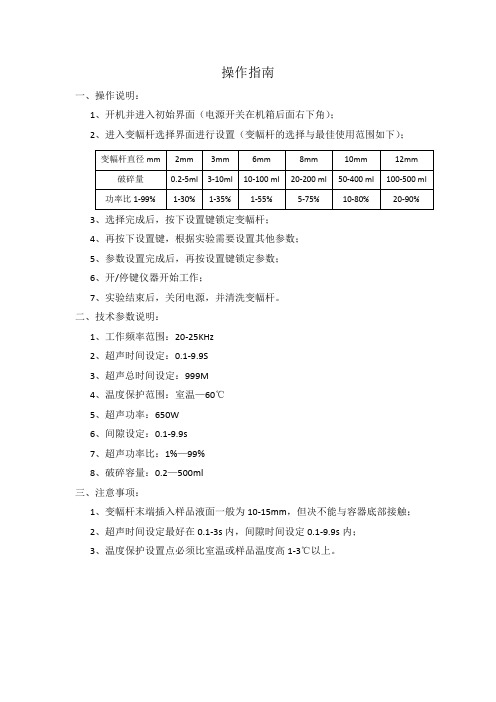
操作指南
一、操作说明:
1、开机并进入初始界面(电源开关在机箱后面右下角);
2、进入变幅杆选择界面进行设置(变幅杆的选择与最佳使用范围如下);
3、选择完成后,按下设置键锁定变幅杆;
4、再按下设置键,根据实验需要设置其他参数;
5、参数设置完成后,再按设置键锁定参数;
6、开/停键仪器开始工作;
7、实验结束后,关闭电源,并清洗变幅杆。
二、技术参数说明:
1、工作频率范围:20-25KHz
2、超声时间设定:0.1-9.9S
3、超声总时间设定:999M
4、温度保护范围:室温—60℃
5、超声功率:650W
6、间隙设定:0.1-9.9s
7、超声功率比:1%—99%
8、破碎容量:0.2—500ml
三、注意事项:
1、变幅杆末端插入样品液面一般为10-15mm,但决不能与容器底部接触;
2、超声时间设定最好在0.1-3s内,间隙时间设定0.1-9.9s内;
3、温度保护设置点必须比室温或样品温度高1-3℃以上。
bioruptor pico使用手册
bioruptor pico使用手册Bioruptor Pico使用手册第一章:产品概述1.1 产品介绍Bioruptor Pico是一种高性能的超声波细胞破碎仪,用于破碎生物样品,提取DNA、RNA和蛋白质等目标分子。
它采用超声波震荡原理,能够快速、高效地破碎生物细胞,同时保持目标分子的完整性和活性。
1.2 主要特点- 高效破碎:Bioruptor Pico能够以超声波频率震动细胞,使得细胞壁破碎,释放内部的目标分子。
- 稳定性:仪器设计紧凑、结构稳定,可长时间连续运行,保证了实验的稳定性。
- 可控性:Bioruptor Pico提供多种工作模式和参数设置,以满足不同实验需求。
- 易于操作:仪器采用触摸屏和用户友好的操作界面,操作简便。
1.3 技术参数- 最大功率输出:500 W- 频率范围:10 kHz - 1 MHz- 破碎时间范围:1 s - 10 min- 体积:300 mm × 200 mm × 200 mm- 重量:5 kg第二章:安装与启动2.1 安装- 将Bioruptor Pico放置在水平平整的台面上,保证其稳定。
- 连接电源线,接通电源。
- 根据实验需要,选择合适的破碎器皿,将样品放入破碎器皿中。
2.2 启动- 使用手指点击仪器触摸屏上的电源按钮,启动仪器。
- 在仪器启动完成后,进入主界面。
- 在界面上选择所需的工作模式和工作参数,点击确认按钮即可开始实验。
第三章:使用方法3.1 操作界面- 在主界面上,显示当前的操作模式和参数设置。
- 点击“模式设置”按钮,可以选择不同的工作模式,如常规模式、高能模式等。
- 点击“参数设置”按钮,可以调整破碎时间、功率等参数。
3.2 样品处理- 将待处理样品放入破碎器皿中,确保样品的浓度和体积适宜。
- 盖上破碎器皿的盖子,确保样品不会溅出。
- 将装有样品的破碎器皿放入试样架中。
3.3 实验操作- 在主界面上选择工作模式和参数设置。
Bioruptor_UCD-200超声波破碎仪说明书

Bioruptor UCD-200非接触式全自动超声波破碎仪
操作规程
1.恒温箱预冷:
(1)依次打开恒温箱“电源”“制冷”“循环”按钮
(2)待水浴冷却至4度,即“测量值”显示:004.0,即可使用
2.蠕动泵循环:
(1)打开“电源”(蠕动泵右后方)
(2)待蠕动泵运转1min,左边管路比右边管路转速快,并且右边管路有空气排出,即可使用
注意:此时超声破碎仪中水位应在蓝色线位(如有异常,请与工作人员联系)
3.放置样品:
(1)选择合适的adaptor:
0.5ml离心管:样品体积10ul—100ul(必须使用0.5ml进口离心管)
1.5ml离心管:样品体积100ul--300ul(必须使用1.5ml进口离心管)
(如需更大体积的adaptor,请与工作人员联系)
(2)对称放置离心管(如有单管,用空管配平),将adaptor拧紧,放置破碎仪上,关上隔音箱
4. 超声破碎:
(1)超声频率:超声30’s,暂停30’s
(如有特殊需要,请与工作人员联系)
(2)选择超声功率:
L: Low 160W
M: Medium 200W
H: High 320W
(3) 设定超声时间:
最大预设时间为15min,如使用持续时间“PERMANENT”,必须有人员看管!
5.关闭:重要!!!
(1)用完仪器后,关闭超声破碎仪,取出样品,将adaptor放回指定抽屉(2)关闭蠕动泵、恒温箱
(3)清理桌面,将房间恢复到最初状态!
仪器负责人:戴钰敏 Tel:54921257,Email:daiym@。
sonics超声破碎仪使用说明
Autotune 系列高强度超声波细胞破碎仪使用说明及注意事项800瓦特机型一、安全注意事项:-确保超声波细胞破碎仪经过三芯插头座妥善接地。
-电源部分存在高电压,非合格技术人员不得打开机壳。
-打开机壳进行维修前拔下电源线以防止触电。
-电源部分未连接变换器时不得接通电源开关。
-探头上不得安装异物。
-除样品外不得让任何物品接触振动的探头-不得让微端头或者说延长头在空气中振动超过10秒钟以上。
-使用微端头时,一定保持幅度在40以下(目前所装为微端头),超过40会使微端头和延长杆断裂。
-不要在螺纹端没有安装端头、延长头或者微端头的情况下开动探头。
-超过100°C的温度工作时用风冷冷却变换器。
-操作超声波细胞破碎仪时建议使用隔音罩(已配备)。
-不得随意拆卸探头、端头等机械部件,以免影响其连接造成电源控制部分失效,此外,机械部件连接不牢有可能造成共振频率的变化,影响破碎效果。
-固体易于被超声波排开,应当放在大得足以容下探头,却小得足以限制样品移动的容器中。
-在每次使用前,把探头端头放在水或者酒精中并且通电源数秒以去除残余物按键、控制件、指示件和连接件的功能使用步骤:1.确认ON/OFF 电源开关置于OFF 。
2.把电源线插进电源插座。
3.检查变换器和探头或者直微端头配合表面的清洁度,以及螺杆螺孔的清洁度。
检查螺杆是否拧紧。
4.用通/断开关接通电源。
开关会发光并且液晶显示屏显示超声波细胞破碎仪的功率,注意事项及以下控制参数。
5. 把探头浸入到样品中约2英寸(5厘米)。
如果使用微端头,则把探头浸入到样品中约1/2英寸(1厘米)。
(注意:应当把探头浸入得足够深以防止空气注入样品中,并且防止气溶现象和泡沫现象。
)6. AMPL.幅度是操作该超声波细胞破碎仪时必须设定的唯一参照。
对于连续工作,其它两个控制参数TIME 和PULSE 不需要设定。
AMPL.显示由AMPLITUDE 控制钮设定的,意为最大幅度的百分比,例如75%,按需要设定幅度。
美国sonics超声波细胞破碎仪小功率使用说明

Prime SCIENTIFIC*************************超声波细胞破碎仪使用说明书100瓦特、130瓦特、150瓦特一、安全注意事项1.注意本系列超声波细胞破碎仪设计为最大程度上保证操作人员的安全。
但是设计不能防止不正确使用造成的人身伤害或者财产损坏。
为了保证操作人员的人身安全和设备完好使用,必须时刻遵守以下所述的注意事项,在操作设备之前请仔细地阅读本使用说明,把本使用说明收存好以备随时参阅⑴电源部分存在高电压,除非合格技术人员不得打开机壳。
⑵确保超声波细胞破碎仪用三芯插头正确地接地。
插电源线之前,请检测电源插座地线是否接地良好。
⑶电源部分未连接变频器时不得接通电源开关。
⑷没有装好端头前不得开动可更换端头的探头。
⑸不得触摸振动的探头⑹操作超声波细胞破碎仪时建议使用耳朵防护罩。
本说明书所述的超声波细胞破碎仪选料精良,做工上乘,出厂前经过充分彻底的检验,按本使用说明书所规定的操作规矩行事可以为用户提供长年的安全可靠的服务。
2.低表面张力液体、有机溶剂所有的探头,包括可以带可更换端头的探头都调谐至特定的共振频率。
如果把端头从探头上拆下或者说与探头的其余部分隔开,探头就不再共振于该频率了,电源部分就会失效。
低表面张力液体会渗入探头和可更换的端头之间的界面,并且把微粒带进螺纹部中,把振子与探头隔开。
当使用13毫米探头处理低表面张力液体时,请一定使用实心探头。
二、安装1.初步检查在安装超声波细胞破碎仪之前,进行肉眼检查,是否在运输过程中发生了破损,丢弃包装材料之前仔细检查其中是否带有小物件。
*************************该超声波细胞破碎仪在出厂前经过仔细包装和彻底的检查。
装货前承运公司承担了安全发货的责任。
运输过程中出现的丢失和损坏应向承运公司理陪。
如果出现损坏,当于收货日期24小时内与承运公司联系。
不要运行损坏的设备。
保留所有的包装材料以备今后装运。
2.电气要求该超声波细胞破碎仪要求单相的三端带接地型插座,视选取的电压而定供电电源可为50/60赫芝,100伏特、110伏特、220伏特或者240伏特电压的交流电。
超声波细胞破碎仪使用说明

超声波细胞破碎仪使用说明
超声波细胞破碎仪是一种常用的实验室设备,可以用于细胞、组织等生物样品的破碎和分散。
以下是超声波细胞破碎仪的使用说明: 1. 准备工作:将所需细胞、组织等样品放入破碎管中,并加入适量缓冲液或生理盐水,注意不要过多,以免影响破碎效果。
2. 超声波参数设置:根据不同的样品和试验需要,设置合适的超声波参数,包括功率、时间、循环间隔等。
在设置时应当参考相关的文献、经验和实验结果,避免超声波过度破坏样品。
3. 破碎操作:将破碎管插入超声波探头,调整超声波位置,按下启动按钮开始破碎。
在破碎过程中应当定期检查破碎样品状态,避免过度破坏或样品污染。
4. 清洗和消毒:破碎结束后,将超声波探头取出并清洗,以避免残留样品污染下一次破碎。
同时还要对破碎管和其他部件进行清洗和消毒,以保证实验的准确性和可靠性。
5. 维护保养:定期检查超声波设备的电源线、探头等部件是否正常,如发现异常应及时维修或更换,以延长设备使用寿命和保证实验效果。
总之,使用超声波细胞破碎仪需要严格遵守相关操作规程和注意事项,注意样品处理和超声波参数设置,以保证实验结果的准确性和稳定性。
美国SONICS超声波破碎仪

美国SONICS (VCX500&VCX750型)超声波破碎仪操作规程一、仪器的使用注意:在将电源连接到转换器之前,请勿开启电源。
按I 键,屏幕将显示超声波处理器的额定功率和频率,及如下控制参数:振幅:振幅是超声波处理器运行时唯一必须设置的参数。
其他控制参数,如时间和脉冲等,不是持续运行中所必须设置的。
AMPL参数显示已选定的振幅,如40%。
在超声波关闭状态下输入振幅,若需40%振幅,按AMPL键和和键,屏幕显示Ampl 40%后,按ENTER/REVIEW 键。
屏幕将显示:超声波处理器已做好持续运行的准备。
按START键或足开关,超声波电路接通;按STOP键或释放足开关,则电路断开。
如需使用“时间”或“脉冲”参数,请参阅下文相关章节。
在超声波开启时若需小幅增减振幅,可按AMPL键,显示振幅百分比,通过键来调节注意:可以任意顺序选择任意功能组合,按CLEAR键可清除错误输入。
注:如果按START键,且未设置时间限制,则在按STOP键之前,处理过程不会停止。
如果按START键,且已设置时间限制,处理过程将持续到时限届满或在届满前按STOP键为止。
如果使用足开关,且未设置时间限制,处理过程将持续到按下足开关为止。
如果使用足开关,且已设置时间限制,处理过程将持续到时限届满或在届满前释放足开关为止。
START键与足开关互相独立的,如果处理过程是由START键开启的,则关闭时足开关不起作用;如果处理过程是由足开关开启的,则关闭时STOP键不起作用1.通过转换器的顶部配件,通入循环的压缩空气,冷却转换器2.探头插入到液面以下足够深,避免液体起沫,会降低效率。
注:探针是在特定频率下振动的。
如果探针因气蚀或碎裂而导致共振频率改变,则无法达到最小读数。
如果存在超负荷现象,或将探针取出样品后无法达到最小读数(低于20%),请在不带探针情况下检查设备,以确定出现故障的元件。
如果使用不带探针的转换器可达到最小读数,则为探针故障,需要更换新探针。
超声波破碎仪
超声波破碎仪
(1)为避免超声波对样品产生热损伤,恒温箱中加冰水至水位指示线
(2)放置样品:①取100-300µl样品装入离心管中,选择与离心管相配套的适配器(本机配置1.5 ml、2 ml适配器);②适配器上对称放置离心管,将适配器拧紧,放置在破碎仪上并关上隔音箱的门
(3)样品超声破碎:①人工设置超声时间和停止时间,红色指示键指示超声时间,绿色指示键指示暂停时间;②超声功率,有低(160w)、中(200w)、高(320w)3个等级可供选择;③设定超声时间,最大预设时间为15分钟
(4)关闭仪器:①先关闭仪器电源,再断开总电源;②取出样品,适配器放回原先位置;③清空腔体内的冰水;④关闭隔音箱的门,清理台面。
细胞超声破碎仪 操作
台式超声细胞破碎仪
型号:Soniprep 150
主要用途
用于各种细胞、细菌及组织的破碎,也可用于各类无机物质的破碎重组,同时可用来乳化、分离、匀化、消泡清洗、提取及加速化学反应等。
操作者可根据需要设置超声波输出功率。
操作流程
1.使用前根据所破碎的对象选择合适的超声破碎头。
2.插电源,打开超声破碎仪电源开关,电源指示灯(绿灯)亮。
3.按下override键,时间指示灯(黄灯)亮。
4.超声时间可通过定时器定时,也可不定时,手动控制强度旋钮来控制。
5.最上方旋钮为超声强度旋钮,控制超声波强度大小。
6.放样品时,通过立杆旋钮来调节底盘位置与高度,破碎头应当伸进液面以下。
7.确保门关闭后再进行超声操作。
8.用完后,清洗超声破碎头:超纯水超3遍。
清洁底盘、台面。
9. 依次关闭时间指示灯(黄灯),电源指示灯(绿灯)。
10.拔下电源离开。
注意事项
1.超声过程产热量大,样品应在冰浴中超声,一次不超过3秒,不建议超声次数过多,根据样品需要重复3-8次即可。
2.一般情况下,细胞样品电流设置在10A,组织样品电流设置在15A。
3.超声过程中,会产生泡沫,属正常现象,若没有泡沫产生或声音较大,则应调整破碎头,确保其再液面以下,不要贴近试管壁。
超声波破碎仪器对生物细胞破碎的使用方法

超声波破碎仪器可以用来破碎细胞壁和细胞膜,释放细胞内部的分子和物质。
其使用方法如下:1. 准备样本:取出需要破碎的细胞样本,如细菌、酵母或哺乳动物细胞等。
2. 将细胞样本加入破碎管中:将细胞样本加入到破碎管中,可以选择使用不同的缓冲液来保护样本中的蛋白质和核酸等。
3. 将破碎管置于破碎仪器中:将破碎管放入超声波破碎仪器中,注意管口要紧密封闭,以避免样本泄露。
4. 调整超声波破碎仪器参数:超声波破碎仪器具有不同的参数可以调整,如功率、振幅和时间等,不同细胞类型可能需要不同的参数设置。
5. 开始破碎:按下超声波破碎仪器的启动按钮,开始进行样本的破碎,根据需要可以进行多次破碎,直到获取所需的细胞内部分子。
6. 处理样本:经过破碎后,可以将样本放入离心管中进行离心,以分离出各种细胞内部成分,如蛋白质、核酸和酶等。
需要注意的是,超声波破碎仪器可以对细胞样本造成一定的热损伤,因此要注意控制破碎时间和功率等参数,避免对样本造成不良影响。
同时,为了保证实验的准确性和可重复性,要按照标准化方法进行超声波破碎操作。
超声破碎仪使用说明
使用说明:1.旋转功率调节旋钮以调节输出功率大小;间隙时间和超声时间由超声时间设定旋钮来调节,总工作时间由总时间设定置数码开关来设置。
设置好后,按工作复位键进入超声工作;2.按样品量的多少选择适当的容器(试管或各种烧杯及离心管),固定或安放好后,调节振动系统位置,使变幅杆末端插入样品液面10-15mm并使其在容器的中心位置,不得让变幅杆与容器相接触。
变幅杆末端离容器一般应大于30mm。
量少时,功率开得较小的情况下可小于30mm;3.将功率调节旋钮向逆时针方向转至最小位置,工作时间、超声时间和间隙时间调至所需的合适时间(一般工作时间不宜开的过长,且间隙时间应大于工作时间)。
上述准备就绪即可按电源开关开机,再按一次保护复位按钮及工作复位按钮,待设定的间隙时间过后即可进入振荡状态,显示屏开始显示工作时间,将功率调节旋钮慢慢向顺时针方向转动,调至所需的功率位置上,以达到理想的工作效果,待设定的工作时间过后,时间显示窗所设定的总时间。
仪器处于停振状态,如需重复上述实验,可按工作复位键,如不需要重复,应关机并切断电源。
4.如在工作是保护指示灯亮(在保护复位键上),说明仪器的功率开得过大而进入保护状态。
减少功率,按一次保护复位键及工作复位键,即开始工作;5.调换探头时,按探头的规格,相应调节变幅杆选择开关(机箱背面);注意事项1.严禁在变幅杆未插入液体内(空载)时开机,否则会损坏换能器或超声波发生器;2.换能器在支架上要固定牢靠,防止从立柱上突然下滑,变幅杆末端切勿碰撞,防止变形或损伤;3.对各种细胞量的多少、时间长短和功率大小,有待用户根据各种不同介质摸索确定,选取最佳值;4.用一定时间后变幅杆末端会被空化腐蚀而发毛,可用油石或细什景锉刀锉平,否则会影响工作效果;5.功率表显示的数值与电压、变幅杆插入页面深度及负载(被破碎样品的浓度、稠度)有关,电源电压低于220V,变幅杆插入液面深,负载浓度太浓,显示数值可能要稍小;反之稍高。
超声波细胞破碎仪操作规程
1、目的规范实验室超声波细胞破碎仪的操作维护方法,保证实验检测的有效性。
2、适用范围:适用于实验室超声波细胞破碎仪的使用和维护。
3、职责分子生物学实验室PCR检测岗位人员必须熟练掌握超声波细胞破碎仪的使用方法,并定期做好维护保养和状态检查工作。
4、作业程序4.1操作规程4.1.1确认ON/OFF电源开关置于ON。
4.1.2把电源线插进电源插座。
4.1.3如果使用选配的脚踏开关,把插头插入后面板上的插座中。
确认插头插牢和插到位。
4.1.4检查变换器和探头或者直微端头配合表面的清洁度,以及螺杆螺孔的清洁度。
检查螺杆是否拧紧。
4.1.5用手把探头或者直微端头组件(由连接器和直端头组成)组装到变换器上,用随机附送的搬手拧牢靠4.1.6向探头上固定可更换端头、延长器或者锥形的微端头使用活搬子或者花搬子.4.1.7把变换器电缆连接到电源单元上。
4.1.8把变换器、探头组件安装在实验室支架上。
只把夹具固定到1/2英寸(63毫米)直径的变换器壳上。
不要把夹具固定到变换器/探头组件的其它部分上4.2 维护保养规程4.2.1如果探头必须与固体样品接触,请使用切成70毫米长的20毫米直径不锈钢管。
不要用玻璃管.4.2.2微端头只能与液接触,不得与其它物体接触4.2.3在每次使用前,把探头端头放在水或者酒精中并且通电源数秒以去除残余物4.2.4探头可以用高压蒸锅消毒,也可以浸入开水中消毒,也可以用消毒灭菌剂消毒.4.2.5不得把锥形微端头用在连接器上。
没有连接器不要用直端头。
在处理低表面张力液体时不得使用带螺纹端和可更换的端头的探头.。
超声波细胞粉碎机使用

超声波细胞粉碎机使用
⒈使用前,用清水清洗超声波探头,并用纸将探头擦干净。
⒉将烧杯装的待破碎溶液与盒装冰水混合物放入探头下,抬升底座,使探头深入溶液内,与烧杯的底部有1CM的间距,并将探头放置烧杯中央。
随手关上门。
⒊打开仪器开关,连续按两次设置键,设置总时间,超声时间,超声间隔时间,并按下确定键。
⒋点击“开”,通过玻璃观察超声情况,如有异常,立即点“停”。
重新摆放,确认无误后,开始超声。
⒌超声结束后,拿出破碎溶液,用20%乙醇清洗超声波探头。
注意事项:⑴严禁在超声波探头未插入溶液中时开机,否则会损坏仪器。
⑵根据细胞破碎的量的多少,选择时间长短。
⑶盒装冰水混合物中的水不能超过烧杯中待破摔液的高度,否则在超声破碎时,烧杯会不停的旋转,使探头不在超声的最佳位置。
⑷烧杯底部与探头的间距不能太接近,否则超声时,烧杯底部会破裂。
超声波细胞粉碎机使用说明书

超声波细胞粉碎机使用说明书一、引言超声波细胞粉碎机是一种高效、安全的实验室设备,广泛应用于生物医学研究领域。
本文将详细介绍超声波细胞粉碎机的使用方法和注意事项。
二、设备介绍超声波细胞粉碎机是一种利用超声波振荡原理将生物样本细胞破碎的实验设备。
它由以下几个主要部分组成: 1. 超声波发生器:产生高频超声波信号; 2. 超声波探头:将超声波信号传递给样本; 3. 操作面板:用于设置超声波的参数和控制设备。
三、使用方法1. 准备工作在使用超声波细胞粉碎机之前,需要进行以下准备工作: - 确保设备已连接电源并处于正常工作状态; - 清洁超声波探头,确保其表面干净; - 准备待处理的生物样本。
2. 设置参数在操作面板上设置超声波的参数,包括: - 超声波功率:根据样本的特性和所需破碎程度进行调整; - 超声波时间:设置超声波处理的时间; - 工作模式:选择连续工作模式或脉冲工作模式。
3. 进行样本处理将待处理的生物样本放置在超声波探头下方的样本槽中,确保样本与超声波探头接触良好。
然后按下启动按钮,超声波细胞粉碎机开始工作。
4. 注意事项•在操作过程中,避免将手指或其他物体接触到超声波探头;•根据样本的特性和所需破碎程度,适时调整超声波的参数;•定期清洁超声波探头,避免污染样本;•在处理高浓度样本时,可以适当降低超声波功率,以防止样本过热。
四、常见问题解答1. 超声波细胞粉碎机可以处理哪些样本?超声波细胞粉碎机可以处理多种生物样本,包括细胞、组织等。
2. 如何选择超声波的功率和时间?选择超声波的功率和时间需要根据样本的特性和所需破碎程度来决定。
一般来说,样本越难破碎,需要使用更高的功率和更长的时间。
3. 超声波细胞粉碎机是否需要定期维护?是的,超声波细胞粉碎机需要定期清洁超声波探头,避免污染样本。
同时,也需要定期检查设备的工作状态,确保其正常运行。
4. 超声波细胞粉碎机是否适用于敏感样本?超声波细胞粉碎机在处理敏感样本时需要谨慎操作,可以降低超声波的功率,以避免样本受损或过热。
超声波破碎仪使用操作步骤

超声波破碎仪使用操作步骤1.插上电源线。
2.打开仪器后下方的电源开关,指示灯亮。
3.通过“▲▼”键来设定“超声时间、间隙时间、工作次数”。
一般超声时间不宜开的过长,控制在1-5秒为宜,工作时最好选用间隙时间大于工作时间进行实验。
4.通过仪器底下的旋钮“●”来调整功率,功率不要超过200W。
5.根据样品量选用适配容器(试管、烧杯及离心管),固定好后,调节隔音箱内的升降台来确定高低位置,使变幅杆末端插入样品液面一定深度,并使其在容器的中心位置,不得让变幅杆与容器壁及容器底相接触。
6.关上隔音箱门,按“启动/暂停”键启动超声破碎,超声结束后按“复位“键。
超声过程中可按“启动/暂停”键停止超声,若要恢复超声则再按“启动/暂停”键。
7.样品超声结束后,关掉仪器后下方的电源开关。
注:超声前后请用水冲洗变幅杆,并擦干甩片机使用操作步骤1.插上电源线。
2.打开仪器前方的电源开关,指示灯亮。
3.程序设置:重复按“设置”键,显示屏上的“转速”“时间”“离心力”“转头”等设置项目依次闪动,这时可通过“▲▼”上下键对闪动的项目进行设置。
设置完所有项目后,按“确定”键保存。
4.向外抽仪器右上侧的拉动杆,打开盖子,把准备好的甩片装置放到架子上。
5. 将细胞悬液加入甩片装置中,盖上盖子,按“启动”键开始运行。
仪器运行过程中可按“停止”键暂停。
6. 运行结束后,打开盖子,取出甩片装置。
盖上盖子,关掉电源开关。
低速台式离心机使用操作步骤1.插上电源线。
2.打开仪器左下方的电源开关,指示灯亮。
3.程序设置:重复按“SET”键,显示屏上的“Roter””Speed/Rcf”等设置项目的数值依次闪动,这时可通过“▲▼”上下键对闪动的项目进行设置。
设置完所有项目后,按“ENTER”键保存。
4.按“STOP”键打开离心机的盖子,将配平好的离心管放入离心机。
用力盖紧盖子后,按”START”键启动运行。
5.离心结束后,按“STOP”键打开离心机的盖子,取出离心管。
超声波破碎仪操作流程
超声波破碎仪操作流程超声波破碎仪是一种常用的实验室设备,用于将样品破碎成微小颗粒或分子。
本文将介绍超声波破碎仪的操作流程,以帮助使用者正确使用该设备并获得高质量的样品破碎结果。
一、设备准备1. 确保超声波破碎仪处于稳定的工作台面上,并接通电源。
2. 检查超声波探头是否正确安装在破碎仪的振荡杆上,并确保其与样品接触的部分干净且无污染。
3. 准备好所需的样品,并将其放入适合的破碎仪容器中。
确保容器干净,并在破碎前根据需要添加适量的溶液或缓冲液。
二、设定操作参数1. 打开破碎仪的控制面板,选择所需的工作模式(如连续模式或脉冲模式)和破碎时间。
2. 根据样品的特性和需要,调整超声波功率和振幅。
一般来说,较硬或较难破碎的样品需要较高的功率和振幅。
三、进行破碎操作1. 将装有样品的容器放入超声波破碎仪的固定夹具中,并确保夹具牢固地固定容器,避免破碎过程中的晃动或跌落。
2. 关闭破碎仪的密封盖或安全盖,并确保其紧密密封。
3. 启动破碎仪,开始进行样品破碎。
在破碎过程中,可以通过控制面板监控功率、振幅和破碎时间等参数,并根据需要进行调整。
4. 监视破碎过程中的溶液温度,并确保其在可接受范围内,以避免样品的过度加热或损坏。
5. 根据所需的破碎程度和时间,适时关闭破碎仪并取出破碎后的样品。
注意在取出样品之前关闭超声波发生器以避免伤害。
四、清洁和维护1. 使用清洁剂和干净的布或纸巾清洁超声波探头和容器,将残留的样品和杂质完全清除。
2. 检查超声波探头是否有损坏或磨损,如有需要及时更换。
3. 定期检查和清洁破碎仪的工作台面、控制面板和电缆等部分,保持设备整洁并延长其使用寿命。
总结:超声波破碎仪操作流程包括设备准备、设定操作参数、进行破碎操作以及清洁和维护。
正确使用超声波破碎仪可以获得高质量的样品破碎结果,并保证设备的正常运行和寿命。
在操作过程中请务必注意安全,遵循设备的使用说明和操作规范。
超声破碎简要操作说明(Thermo Scientific, FB120型)

Fisher超声波破碎仪简要操作说明基本操作:1.按下“ON”键,打开电源。
屏幕显示如下图:2.根据需要设定振幅比例。
按下“AMPL”键,屏幕显示默认功率为40%。
同时按下“AMPL”键和数字键可以设定所需的功率百分比(该比例的最小可设值是20%,最大值取决于探头,具体请参见英文原版说明书)。
最后按“ENTER/REVIEW”键确认。
如设定错误可以按“CLEAR”键撤销。
3.将超声波探头浸入样品溶液中。
确保浸没深度超过探头末端直径的1.5倍。
4.按下“START”按钮或脚踏开关开始超声。
如需停止请按“STOP”键或松开脚踏开关。
5.如需在超声过程中微调功率,可以参照第2步按下“AMPL”键然后按或键可以调节功率大小。
6.使用过程中确保换能器散热良好,如果过热,请暂停使用。
计时器:脉冲模式下,超声时间仅仅是每个脉冲周期中探头真正在工作的时间,而比机器工作时间要短。
计时器功能可以显示并控制真正的超声时间。
1.按下“TIMER”键,屏幕显示:2.使用数字键设定需要的超声时间。
3.按“ENTER/REVIEW”键确认。
脉冲模式:该模式让超声能量短时间反复地释放,可以有效防止样品的热量累积,从而让温度敏感样品更加安全。
每个脉冲周期的放能期和间歇期可独立设定,范围是1秒到59秒。
1.按下“PULSE”键,进入脉冲模式。
屏幕显示:2.使用数字键设定工作期(Pulse on)的时间,按“ENTER/REVIEW”键确认。
随后用同样的方式设定间歇期(Pulse off)时间,并按“ENTER/REVIEW”键确认。
3.再次按下“ENTER/REVIEW”键,屏幕显示:Review:多次按下“ENTER/REVIEW”键可以让屏幕显示不同的设定参数而不影响机器工作。
超声破碎仪使用说明

使用说明:旋转功率调节旋钮以调节输出功率大小;间隙时间和超声时间由超声时间设定旋钮来调节,总工作时间由总时间设定置数码开关来设置。
设置好后,按工作复位键进入超声工作;按样品量的多少选择适当的容器(试管或各种烧杯及离心管),固定或安放好后,调节振动系统位置,使变幅杆末端插入样品液面10-15mm并使其在容器的中心位置,不得让变幅杆与容器相接触。
变幅杆末端离容器一般应大于30mm。
量少时,功率开得较小的情况下可小于30mm;将功率调节旋钮向逆时针方向转至最小位置,工作时间、超声时间和间隙时间调至所需的合适时间(一般工作时间不宜开的过长,且间隙时间应大于工作时间)。
上述准备就绪即可按电源开关开机,再按一次保护复位按钮及工作复位按钮,待设定的间隙时间过后即可进入振荡状态,显示屏开始显示工作时间,将功率调节旋钮慢慢向顺时针方向转动,调至所需的功率位置上,以达到理想的工作效果,待设定的工作时间过后,时间显示窗所设定的总时间。
仪器处于停振状态,如需重复上述实验,可按工作复位键,如不需要重复,应关机并切断电源。
如在工作是保护指示灯亮(在保护复位键上),说明仪器的功率开得过大而进入保护状态。
减少功率,按一次保护复位键及工作复位键,即开始工作;调换探头时,按探头的规格,相应调节变幅杆选择开关(机箱背面);注意事项严禁在变幅杆未插入液体内(空载)时开机,否则会损坏换能器或超声波发生器;换能器在支架上要固定牢靠,防止从立柱上突然下滑,变幅杆末端切勿碰撞,防止变形或损伤;对各种细胞量的多少、时间长短和功率大小,有待用户根据各种不同介质摸索确定,选取最佳值;用一定时间后变幅杆末端会被空化腐蚀而发毛,可用油石或细什景锉刀锉平,否则会影响工作效果;功率表显示的数值与电压、变幅杆插入页面深度及负载(被破碎样品的浓度、稠度)有关,电源电压低于220V,变幅杆插入液面深,负载浓度太浓,显示数值可能要稍小;反之稍高。
此数据为模拟参数,它的大小不影响超声波发射的实际功率;本机不需预热,使用应有良好的接地;在超声破碎时,由于超声波在液体中起空化效应,使液体温度会很快升高,用户对各种细胞的温度要多加注意,建议采用短时间(每次不超过5秒)的多次破碎,同时可外加冰浴冷却;本机采用无工频变压器的开关电源,在打开发生器机壳切勿乱摸,以防触电;本机安放在干燥处,不可放置于潮湿、高温、灰尘较多及有腐蚀性气体等地方;。
- 1、下载文档前请自行甄别文档内容的完整性,平台不提供额外的编辑、内容补充、找答案等附加服务。
- 2、"仅部分预览"的文档,不可在线预览部分如存在完整性等问题,可反馈申请退款(可完整预览的文档不适用该条件!)。
- 3、如文档侵犯您的权益,请联系客服反馈,我们会尽快为您处理(人工客服工作时间:9:00-18:30)。
USER’S GUIDEAUTOTUNE SERIESHIGH INTENSITY ULTRASONIC PROCESSORMICROPROCESSOR CONTROLLED100 Watt Model • 130 Watt ModelTABLE OF CONTENTSWarrantyImportant SafeguardsLow Surface Tension Liquids - Organic SolventsSECTION 1 – INSTALLATIONInspectionElectrical RequirementsInstalling the Ultrasonic ProcessorSECTION II – OPERATIONPrinciples of Ultrasonic DisruptionFunctions of Controls, Indicators, and ConnectorsPreparations for UseUsing the Ultrasonic ProcessorSECTION III – SERVICE INFORMATIONOverload ConditionReturn of EquipmentSECTION IV – OPERATING SUGGESTIONS AND TECHNIQUESThe Ultrasonic Processor supplied with this instruction manual is constructed of the finest material and the workmanship meets the highest standards. It has been thoroughly tested and inspected before leaving the factory and when used in accordance with the procedures outlined in this manual, will provide you with many years of safe and dependable service.Rev. April 2004IMPORTANT SAFEGUARDSREAD BEFORE INSTALLING ORUSING THE EQUIPMENTYour Ultrasonic Processor has been designed with safety in mind. However, no design can completely protect against improper usage, which may result in bodily injury and/or property damage. For your protection and equipment safeguard, observe the following warnings at all times, read the operating instructions carefully before operating the equipment, and retain this instruction manual for future reference. If the ultrasonic Processor is used in a manner contrary to that specified in this instruction manual, the protection features designed into the unit may be impaired.• When mounting the probe, always clamp the converter housing. Never clamp the probe.• Make sure the Ultrasonic Processor is properly grounded via a 3-prong outlet.• High voltage is present in the power supply. Do not remove the cover. Refer all servicing to qualified service personnel.• To avoid electric shock, disconnect the electrical power cord before removing the cover prior to servicing.• Never operate the power supply unless it is connected to the converter.• Never secure anything to the probe, except at the nodal point (point of no activity).• Never touch a vibrating probe.• Never allow a microtip to vibrate in air for more than 10 seconds.• Never operate a threaded probe without a replaceable tip.• Air-cool the converter when sample temperature exceeds 100° C, and when working at high intensity for more than 30 minutes.• It is recommended that a sound abating enclosure or ear protection be used when operating the Ultrasonic Processor.CAUTIONLOW SURFACE TENSION LIQUIDS – ORGANIC SOLVENTS The probes (solid or with a replaceable tip) are tuned elements that resonate at a specific frequency. When using a ½” (13 mm) probe with a replaceable tip, if the replaceable tip is removed or isolated from the rest of the probe, the probe will no longer resonate at that frequency, and the power supply will fail.Unlike aqueous (water based) solutions, which rarely cause problems, samples containing solvents or low surface tension liquids are problematic. These liquids penetrate the probe/replaceable tip interface, and force the particulates into the threaded section isolating the tip from the probe.When processing samples containing solvents or low surface tension liquids ALWAYS use a solid probeSECTION 1 – INSTALLATIONINSPECTIONPrior to installing the Ultrasonic Processor, perform a visual inspection to detect any evidence of damage, which might have occurred during shipment. Before disposing of any packaging material, check it carefully for small items.The Ultrasonic Processor was carefully packed and thoroughly inspected before leaving our factory. The carrier, upon acceptance of the shipment, assumed responsibility for its safe delivery. Claims for loss or damage sustained in transit must be submitted to the carrier.If damage has occurred, contact your carrier within 48 hours of the delivery date. DO NOT OPERATE DAMAGED EQUIPMENT. Retain all packing materials for future shipment.ELECTRICAL REQUIREMENTSThe Ultrasonic Processor requires a fused, single phrase 3-terminal grounding type electrical outlet capable of supplying 50/60 Hz at 100 volts, 115 volts, 220 volts, or 240 volts, depending on the voltage option selected. For power requirements, check the label on the back of the unit.Should it become necessary to convert the unit for different voltage operation, proceed as follows.1. Ensure that the power cord is not connected to the electrical outlet.2. Open the fuse holder cover using a small screwdriver.3. Pull out the red fuse holder from its housing.4. To convert from 100/115V to 220/240V replace the two 3 Amp slow blow fuses,with 1.6 Amp fuses.5. To convert from 220/240V to 100/115V reverse the procedure above.6. Rotate the fuse holder 180º from its original position, and reinsert it into itshousing. For 100/115V operation the voltage displayed should be 115. For220/240V operation the voltage display should be 220.7. Change the electrical power cord as required.The Ultrasonic Processor should be installed in an area that is free from excessive dust,dirt, explosive and corrosive fumes, and extremes of temperature and humidity.SECTION II – OPERATIONPRINCIPLES OF ULTRASONIC DISRUPTIONThe ultrasonic power supply converts 50/60 Hz line voltage to high frequency electrical energy. This high frequency electrical energy is transmitted to the piezoelectric transducer within the converter, where it is changed to mechanical vibrations. The vibrations from the converter are intensified by the probe, creating pressure waves in the liquid. This action forms millions of microscopic bubbles (cavities), which expand during the negative pressure excursion, and implode violently during the positive excursion. As the bubbles implode, they cause millions of shock waves and eddies to radiate outwardly from the site of collapse, as well as generate extremes in pressures and temperatures at the implosion sites. Although this phenomenon, known as cavitation, lasts but a few microseconds, and the amount of energy released by each individual bubble is minimal, the cumulative amount of energy generated is extremely high. The larger the probe tip, the larger the volume that can be processed but at a lesser intensity. For information regarding the processing capability of each probe, consult the tables below.FUNCTIONS OF KEYS, CONTROLS, INDICATORS, AND CONNECTORS (cont.)REAR PANEL9 pin D-sub connector Connects to external actuation device, and enable power and frequency monitoring.Footswitch jack Connects to the footswitch cable.Coax connector Connects to the converter.Power module Connects to the electrical line cord and encases the fuse(s).9-PIN D-SUB CONNECTORPin No. Description1 Notconnected2 Notconnected3 Notconnected4 Enables connection to a frequency counter.5 Enables connection to an external power monitor (5 mv = 1 watt)6 Ground7 Energizestheultrasonicswhen connected to ground.8 and 9 Enables the intensity to be remotely adjusted using an external 10k potentiometer. See belowPREPARATION FOR USE1. Plug the electrical line cord into the electrical outlet, if the unit is already on; depress2. If the optional footswitch is used, insert the plug into the jack located on the rearpanel. Make sure that the plug is inserted forcefully all the way in.3. If the converter / probe assembly is not already assembled; screw the probe into theconverter and secure with wrenches provided.4. Mount the converter / probe assembly in a laboratory stand, secure the clamp to theupper section of the converter housing only. Do not secure the clamp to the probe.5. Connect the converter cable to the power supply.USING THE ULTRASONIC PROCESSORand the following control parameters.AMPLITUDE: The amplitude is the only parameter that must be set in order for the Ultrasonic Processor to be operational. The other control parameters – Timeand Pulse, do not have to be set for continuous operation. AMPL. displays theamplitude selected e.g. 40%. To set the amplitude when the ultrasonics is off,press the AMPL key and the numeric keys for a 40% reading on the screen –Ampl 40%, and the ENTER/REVIEW key.The screen will display:The Ultrasonic Processor is now ready for continuous operation. To energize the ultrasonics, press the START key or the footswitch. To de-energize the ultrasonics, press the key or release the footswitch. If the Time or Pulse functions must be used, refer to the appropriate paragraph(s) below.To increase or decrease the amplitude in small increments when the ultrasonics is on, depress the AMPL key to display Amplitude Setting on the screen, then depress the ▲or ▼key, as required.Immerse the microtip half way into the sample. If the probe is immersed to an insufficient depth, air will be injected into the sample, causing the sample to foam.Since the amplitude required is application dependent and subject to the volume and composition of the sample, it is recommended that the amplitude be selected empirically, by increasing or decreasing the level of intensity as required as the sample is being processed.TIMER:In the pulsed mode the processing time will be different from theelapsed time because the processing time function monitors and controls only the ON portion of the duty cycle. For example, for 1 hour processing time, theelapsed time will be 2 hours if the ON and OFF cycle are set for 1 second. To set the processing time, press the TIMER key.The screen will display:Using the numeric keys, set the processing time as required:Press the ENTER/REVIEW key. The screen will display:PULSER:By inhibiting heat build-up in the sample, the pulse function enablessafe treatment of temperature sensitive samples at high intensity. In addition,pulsing enhances processing by allowing the material to settle back under theprobe after each burst. The ON and OFF pulse duration can be set independently from 01 second to 59 seconds. During the OFF portion of the cycle, the redindicator on the key will illuminate. If the OFF portion of the cycleexceeds three seconds, a cautionary message - Sonics in OFF Cycle - will warnthe operator against touching the ultrasonic probe. To set the pulser, press PULSE key.The screen will display:Using the numeric keys, set the ON portion of the cycle, and press the ENTER/REVIEW key.The screen will display:Using the numeric keys set the OFF portion of the cycle.The screen will display:Press the ENTER/REVIEW key.The screen will display:REVIEW: The REVIEW function provides a “window” on the process by displaying various operating parameters without process interruption. Pressing theENTER/REVIEW key repeatedly during processing will consecutively display the following information.a) Selected amplitude:e.g. Amplitude 40%b) Selected processing time and elapsed processing time:e.g. Set 0:30:00 Time 0:22:10c) Selected pulsing cycle, and actual pulsing cycle:e.g. Pulse 01 01 / 01 00d) Amount of power in watts, and accumulated amount of energy in JOULESdelivered to the probe:e.g. 20 watts 0000000 Joulese) Elapsed time since processing was initiated:e.g. Elapsed time 0:44:20SECTION III – SERVICE INFORMATIONYour Ultrasonic Processor was designed to provide you with years of safe anddependable service. Nevertheless, because of component failure or improper usage, the possibility does exist that it might not perform as it should, shut down due to an overload condition or that it will stop working all together. The most probable causes formalfunction are listed below and should be investigated.The unit was plugged into an electrical outlet that provides a different voltage fromthat required. See Electrical Requirements.The probe and/or microtip is not secured properly.If the probe has a replaceable tip, the tip is not secured properly, or the probe hasbeen used with samples containing solvents or low surface tension liquids.1. the electrical outlet.2. holder from its housing.3.Replace the fuse(s).4.disconnect the probe from the converter.5. reads above 10 watts, either the converter or power supply has failed and thecomplete Ultrasonic Processor should be returned for repair.OVERLOAD CONDITIONIf the Ultrasonic Processor stops working, and an OVERLOAD indication is displayed onRETURN OF EQUIPMENTIt is suggested that an Ultrasonic Processor in need of repair be sent back to the factory.In order to receive prompt service; always contact the factory before returning anyinstrument. Include date of purchase, model number and serial number. For instruments not covered by the 3-year warranty, a purchase order should be forwarded to avoidunnecessary delay. Care should be exercised to provide adequate packing to insureagainst possible damage in shipment. The Ultrasonic Processor should be sent to the “Service Department” with all transportation charges prepaid and return of shipment indicated.Please obtain a Return Authorization Number prior to returning the instrument.SECTION IV - OPERATING SUGGESTIONS AND TECHNIQUES DISRUPTING CELLSThe disruption of cells is an important stage in the isolation and preparation of intracellular products. From research levels through to production, many areas of biotechnology, particularly recombinant technology, necessitate the use of ultrasonics for cell disruption. Although some biological products are secreted from the cell or released during autolysis, many others require sonication to release intracellular material. Cell disruption focuses on obtaining the desired product from within the cell, and it is the cell wall that must be disrupted to allow cell contents extraction.Single-cell organisms (micro-organisms) consist of a semipermeable, tough, rigid outer cell wall surrounding the protoplasmic membrane and cytoplasm. The cytoplasm is made up of nucleic acid, protein, carbohydrates, lipids, enzymes, inorganic ions, vitamins, pigments, inclusion bodies, and about 80% water. In order to isolate and extract any of these substances from inside the cell, it is necessary to break the cell wall and protoplasmic membrane. In some cases the cell may excrete the desired substance without assistance, but in most cases, the cells must be lysed and sonicated in order for these substances to be released. Breaking cell membranes and releasing the contents present significant challenges. The process must be fast and thorough to maximize the protein yield. Because the energy applied must be great enough to break the cell membranes or walls, yet gentle enough to avoid physically or chemically damaging cell contents, the Vibra-Cell with its variable intensity capability is ideally suited for this application.The level of intensity that should be used is application dependent. For example high intensity might be recommended for the break up of cells, but should never be used when the release of intracellular components might be objectionable e.g. Organelle isolation. The ability to control the amplitude at the probe tip is a prerequisite for process optimization. And because each application requires its own set of processing parameters, due to variation in volume and composition, the optimum amplitude can only be determined empirically. When processing a new sample, it is recommended that the amplitude be set first at 50% (30% with a microtip) and then increased of decreased as required.Yeast, gram-positive bacteria, and to a lesser extent, gram-negative bacteria have considerably harder cell walls in comparison to animal cells, and require relatively high power for cell disruption.Gram negative bacteria typically require 10 to 15 minutes of processing, while staphylococcus requires 20 to 30 minutes.Microorganisms differ greatly in their sensitivity to ultrasonic disintegration. For example, the most readily disintegrated are the rod-like forms (bacilli), while the spherical organisms (cocci) are much more resistant. The group Mycobacteria, to which the tuberculosis organism belongs, is particularly difficult to disrupt. Generally, animal cells are more easily disintegrated that plant cells, and red blood cells are more readily disintegrated than muscle cells because they lack a protective cell wall.Cellular disruption is the first step in RNA isolation and one of the most critical steps affecting yield and quality of the isolated RNA. Typically, cell disruption needs to be fast and thorough. Slow disruption, for example placing cells or tissue in guanidinium isothiocyanate (GITC) lysis solution for a long time prior to sonication, may result in RNA degradation by endogenous RNases released internally. This is especially a concern when working with tissues high in endogenous RNase such as spleen and pancreas. Disrupting frozen tissue is more time consuming and cumbersome that processing fresh tissue, but freezing samples is sometimes necessary. Samples are usually frozen when, 1) they are collected over a period of time and thus, cannot be processed simultaneously; 2) there are many samples, 3) samples are collected in the field, or 4) mechanical processing of fresh samples is insufficient for thorough disruption. A mortar and pestle or bag and hammer are typically used when the starting material is frozen. RNA will remain intact in tissues for a day at 37ºC, a week at 25ºC a month at 4ºC and indefinitely at subzero temperatures.Ultrasonic processing will typically cause the temperature of the sample to increase especially with small volumes. Since high temperatures inhibit cavitation, the sample temperature should be kept as low as possible - preferably just above its freezing point. This can be accomplished by immersing the sample vessel in an ice-salt-water bath. Temperature elevation can also be minimized by using the pulser.Increasing hydrostatic pressure (typically 15-60 psi) and viscosity can enhance cell disruption. For microorganisms, the addition of glass beads in the 0.5 to 1mm size range promotes cell disruption. Beads are almost a prerequisite when working with spores and yeast. A good ratio is one volume of beads to two volumes of liquid. Glass beads are available from Cataphote, Inc. P.O. Box 2369, Jackson, Mississippi 39225-2369 USA, phone (800) 221-2574 or (601) 939-4612, FAX (601) 932-5339, Jayco Inc. 675 Rahway Ave., Union NJ 07083 USA, phone (908) 688-3600, FAX (908) 688-6060 or Sigmund Lindner GmbH. P.O. Box 29. D-95483 Warmensteinach, Germany. Phone (49) 0 92 77 9 94 10, FAX (49) 0 92 77 9 94 99.When processing difficult cells such as yeast, pretreatment with an enzyme is beneficial. Lysozyme, byaluronidase, glycosidase, glucalase, lyticase, zymolase and lysostaphin digestion are among the enzymatic methods frequently used with yeast and Lysozyme with bacteria. Enzymatic treatment is usually followed by sonication in a GITC lysis buffer. Collogenase may be used with collogen, lysostaphin with staphylococcus, and trypsin hyaluronidase with liver and kidney.If enzymes cannot be used, the following procedures should be considered: Freezing the sample at -70°C overnight, then thawing it in water immediately prior to ultrasonic processing.Most animal tissues can be processed fresh (unfrozen). It is important to keep fresh tissue cold and to process it quickly (within 30 minutes) after dissection. When working with fresh tissue, the cells must be sonicated immediately at the time the GITC lysis solution is added. This can be done by dispensing the lysing solution in the tube, adding the tissue and immediately sonicating. Samples should never be left sitting in lysis solution, undisrupted. Large samples of hard tissues should be first treated in a blender or a mechanical homogenizer.Animal tissues that have been frozen after collection should be disrupted by grinding in liquid nitrogen with a mortar and pestle. During this process, it is important that the equipment and tissue remain at cryogenic temperatures. The tissue should be dry and powdery after grinding. Grinding should be followed by thorough sonication in a GITC lysis buffer. Processing frozen tissue in this way is cumbersome and time consuming, but effective.Cultured cells are normally easy to disrupt. Cells grown in suspension are collected by centrifugation, rinsed with PBS to remove culture medium, and then lysed by sonicating in a GITC lysis buffer. Placement of the vessel on ice while washing and lysing the cells will further protect the RNA from endogenous RNases released during the disruption process.Soft, fresh plant tissue can often be disrupted by sonicating in a lysis buffer. Other plant tissues, like pine needles, need to be ground dry, without liquid nitrogen. Some hard, woody plant materials require freezing and grinding in liquid nitrogen prior to being ultrasonically processed. Plant cell suspension cultures and calluses can typically be sonicated in a lysis buffer within 2 minutes. The diversity of plants and plant tissue make it impossible to give a single recommendation for all. However, most plant tissues typically contain polysaccharides and polyphenols that can coprecipitate with RNA and inhibit downstream assays. Treating a plant tissue lysate with polyvinylpyrrolidone (PVP) will precipitate such problematic components from the lysate before the actual RNA isolation is carried out.Whenever possible, the tissues should be diced very small to permit movement within the liquid. Tough tissues such as skin and muscle should be macerated first in a blender or the like for about 10 seconds, and confined to a small vessel during ultrasonic treatment. If sub-cellular particles are desired intact, the amplitude should be kept low, and the processing time increased.Yeast can be extremely difficult to disrupt because their cell walls may form capsules or nearly indestructible spores. To process yeast, sonicate in a tube containing the sample, guanidinium-based lysis buffer and small glass beads (0.5 – 1 mm). Pretreatment withzymolase, glucalase and / or lyticase to produce spheroplasts that are readily lysed may also be useful.To disrupt filamentous fungi, scrape the mycelial mat into a cold mortar, add liquid nitrogen and grind to a fine powder with a pestle. The powder can then be thoroughly sonicated in lysis buffer to solubilize completely. As fungi may also be rich in polysaccharides, pretreatment with polyvinylpyrrolidone (PVP) may be beneficial. Bacteria, like plants, are extremely diverse; therefore, it is difficult to make one recommendation for all bacteria. Ultrasonic processing will lyse most Gram positive and Gram negative bacteria, including mycobacteria. Although it is recommended that glass beads and lysis solution be used; it is possible to lyse some Gram negative bacteria by sonicating in lysis solution without beads. Bacteria cell walls can be digested with lysozyme to form spheroplasts. Gram positive bacteria usually require more rigorous digestion and longer processing time. The spheroplasts are then lysed with sonication in GITC lysis buffer.Disruption of cells found in soil and sediments is accomplished one of two ways. One technique isolates the bacterial cells from the material prior to the RNA isolation procedure. This is accomplished by homogenization of wet soil in a mechanical blender followed by a slow speed centrifugation to remove fungal biomass and soil debris. The supernatant is centrifuged again at a higher speed to pellet the bacteria cells. Cells can then be lysed as described above for bacteria. Other techniques describe RNA isolation from the soil or sediment directly. For example, one method requires soil to be added to a diatomaceous earth and lysis buffer, and then sonicated. The sample is then centrifuged to remove solid debris.Always immerse the probe deep enough below the surface of the sample to inhibit aerosoling or foaming, foaming substantially reduces cavitation. Processing at a lower power setting without foam is much more effective than processing at a higher power setting with foam. Decreasing the power, increasing processing time and lowering the temperature of the sample will usually prevent aerosoling and foaming. Do not use any antifoaming agents or surfactants.During cavitation, free radicals are formed which, if they are allowed to accumulate, can greatly affect the biological integrity of the sample by reacting with proteins, polysaccharides, or nucleic acids. Although during short periods of processing their formation is not normally considered a problem; for longer durations, the addition of free radical scavengers such as, carbon dioxide, N2O, cysteine, reduced glutahione, dithiothreitol or other SH compounds, might be beneficial. Saturating the sample with a protective atmosphere of helium or nitrogen gas, or dropping a small pellet of dry ice in the sample, will also inhibit free radical formation. Whereas it is true that gas is required for effective cellular disruption, it is not necessary that the vapor phase be oxygen or air since any gas except carbon dioxide will work just as well.21Various methods can be used to measure the efficiency of the disruption. For example, a visual count can be made using a microscope.For greater accuracy, a protein assay could be used. This procedure is widely recognized as a good method for measuring cell disruption by taking into account the amount of protein released after disruption. The disrupted cells are then tested and checked against this number for percentage breakage.There are several types of protein assays. One commonly used is the Folin Reaction (Lowry Assay) method, as it is comparatively simple and provides consistent results. This colorimetric method has a sensitivity to protein of around 8 µg / mL in the assay solution.The assay turns blue in the presence of proteins due to the reaction of copper ions in the alkaline solution with protein and the reduction of phosphomolybdate- phosphotungstic acid in the Folin reagent by aromatic amino acids in the treated protein.Fractional protein release, Rp, is calculated using the following equation and multiplying the result by 100:Rp = Cf – CbCt – CbCf = Free proteinCt = total proteinCb = Background proteinThis gives the actual disruption percentage, taking into account the background levels of protein before disruption.Since the greatest concentration of energy is beneath the probe, it is imperative that the sample be kept as close to the tip as possible, liquids are easily processed because the free moving cells circulate repeatedly below the probe. Solid materials however have a tendency to be repelled by the ultrasonic, and should be processed in a vessel large enough to accommodate the probe, yet small enough to restrict sample movement. For small samples, conical shaped test tubes are recommended.Allowing the probe to contact the vessel will decrease the power output, and cause minute grey glass particles to migrate into the sample. Although these glass particles will not adversely affect the chemical composition of the sample, they will form a thin grey layer on centrifuging. If the probe has to come in contact with a solid sample, use a standard 20mm (3/4”) diameter stainless steel centrifuge tube cut to 70mm (3”) length. Do not use a glass tube. Microtips must never allowed to come in contact with anything but the liquid, because the stress resulting at the point of contact with a hard surface will cause the microtip to fracture. Although larger probes will not fracture if they come in contact with a glass vessel, they may cause the vessel to fracture.Before each application, place the tip in water or alcohol and energize the power supply for a few seconds to remove any residual substances. If concerned about contamination from previous use, clean the probe with a 20% Virkon solution and rinse with distilled water. Because Virkon®, Dupont's broad spectrum cleaner / disinfectant is effective against a wide range of virus, bacteria and fungi, it is ideally suited for that purpose. For further information regarding Virkon® contact BiosafetyUSA, Inc. 10220 NW 50thStreet, Sunrise Florida 33351, 954-578-6580 *124 or e-mail info@For critical application, probes may be autoclaved.22。
