WAVES Renaissance Reverb 中文说明书
Waves Abbey Road Reverb Plates用户指南说明书

WAVESAbbey Road Reverb PlatesUSER GUIDETable of ContentsChapter 1 – Introduction (3)1.1 Welcome (3)1.2 The Original Reverb Plates at Abbey Road Studios (3)1.3 Product Overview (5)1.4 Concepts and Terminology (5)1.5 Components (6)Chapter 2 – Quick Start Guide (7)Chapter 3 – Interface and Controls (8)3.1 Interface (8)3.2 Controls (9)3.3 WaveSystem Toolbar (12)Chapter 1 – Introduction1.1 WelcomeThank you for choosing Waves! In order to get the most out of your new Waves plugin, please take a moment to read this user guide.To install software and manage your licenses, you need to have a free Waves account. Sign up at . With a Waves account you can keep track of your products, renew your Waves Update Plan, participate in bonus programs, and keep up to date with important information.We suggest that you become familiar with the Waves Support pages: / support. There are technical articles about installation, troubleshooting, specifications, and more. Plus, you’ll find company contact information and Waves Support news.1.2 The Original Reverb Plates at Abbey Road StudiosOne of the unique tools available to artists recording at Abbey Road Studios in the mid-twentieth century was access to the studios’ three echo chambers for the creation of unique reverb effects. The sound created by the chambers was very natural, but not easily adjustable, allowing only a single fixed reverb and decay time per chamber. With just three chambers existing to facilitate reverb for all of Abbey Road’s recording, remix and transfer rooms, availability would often also be an issue. To combat this, in 1957, Abbey Road Studios purchased four brand new state-of-the-art plate reverb units to complement the existing chambers.Designed in Germany by EMT, these were the first professional electro-mechanical artificial reverb units made available to studios worldwide. At 8 feet long, 4 feet tall and 1 foot wide, these plates were considerably more compact than the chamber rooms. Each plate contained a large sheet (or “plate”) of steel suspended vertically by a set of springs to allow it to resonate, and was fixed to a stable steel frame. A small transducer speaker was fixed to the plate’s center point, and when a signal was played through the speaker, the plate would begin to vibrate, sustaining the tone for several seconds. Two pickups were attached to each plate, on both sides of the speaker, a quarter of the distance fromUnlike the reverb chambers, these plates had a damper system that allowed adjustment of the reverb decay time. The damper system consisted of a fiberglass panel suspended parallel to the plate, which could move towards or away from the plate sheet. The damper could control variable distances, ranging from 1/8” away from the plate for a one-second reverberation time, to 2” away from the plate for a five-second decay. This system let the user tune the decay time with whatever precision was required to meet the needs of the particular recording or mixing session.To this day, Abbey Road Studios house the four reverb plates – labeled A, B, C and D. Plate D has all-valve amplifiers on both the input and output stages, consisting of E81L, E80CC and EF804ES valves. Plates A, B and C also have an all-valve amplifier on the input, but on the output stage EMI Central Research Laboratories custom-built hybrid solid-state/valve amplifiers, in an attempt to keep the noise floor to a minimum. The sound of the plates is generally considered smoother than that of an echo chamber, if not entirely natural. Most Abbey Road engineers initially preferred the more organic-sounding chambers, but this became less of an issue when bands started to experiment with psychedelic sounds and ‘natural’ sounding recording techniques were becom ing less in vogue for pop music. Due to the nature of analog valve equipment and manufacturing techniques (plus the EMI custom-built amps), no two plates sound the same: each has its own distinctive sonic characteristics. From the mid-1960s onward, ever since the Sgt. Pepper’s Lonely Hearts Club Band era, these four plates have seen significant use on nearly every pop recording done at Abbey Road Studios – from the Beatles and Pink Floyd, to Radiohead, Adele, James Blake, Florence + the Machine and Frank Ocean. The plates even started being favored by some of the classical engineers, and before long were being used on a wealth of films scores – so much so that the plates would often have to be booked well in advance of sessions to guarantee their availability.1.3 Product OverviewThe Waves Abbey Road Reverb Plates plugin faithfully models the above-mentioned plates A, B, C and D. The Plate Selector control allows you to switch between the four modeled plates, letting you find the exact reverb ambience that you need. You can also choose from 11 different damper positions, giving you different reverb decay times –anywhere from 1 to 5.4 seconds, depending on the selected plate. The bass cut circuit at the start of the driver amplifier chain has also been modeled, so you can decrease the overall low-frequency area to avoid rumbles.The Treble control is a high-shelf filter that adds brightness and air to the overall reverb sound. It can also decrease the top of the high-frequency range, resulting in a darker sound. The Drive and Analog controls model the original amplifiers’ THD behavior and the plates’ hum and noise: switch them on or off, and select the exact amount added. The PreDelay control sets the amount of delay between the direct dry signal and the processed wet sound, while the Wet/Dry control sets the balance between the two.1.4 Concepts and TerminologySince the original hardware plates at Abbey Road Studios are not located inside the control room, engineers need to use a remote control in order to set the damper position. The Damper control of the Waves Abbey Road Reverb Plates plugin is inspired by that remote control. The bass cut control is modeled on the original bass cut circuit located at the original plates’ input amplifier. The Treble control has been added as an extra feature: it is modeled on Abbey Road’s EMI mixing desks, which were often used to brighten up the signal.1.5 ComponentsWaveShell technology enables us to split Waves processors into smaller plugins, which we call components. Having a choice of components for a particular processor gives you the flexibility to choose the configuration best suited to your material.The Waves Abbey Road Reverb Plates plugin includes three components:Mono – One plate process engine:Mono to Stereo– One input into two plate process engines (L, R):Stereo – Two inputs into two plate process engines (L, R), with the inputs summed:Chapter 2 – Quick Start Guide∙Launch the Waves Abbey Road Reverb Plates plugin on your reverb aux buss or track insert.∙Send a signal to the reverb aux and listen to it through the default preset.∙Set the Damper value that fits your overall sound image.∙Change the Plate Selector to find the precise plate reverb sound you want. Each plate reverb sounds different, depending on the spring, the type of amplifierengine, and the plate sheet itself.∙If the overall sound has more low frequencies than you need, use the Bass Cut control to decrease them.∙Use the PreDelay control to get a delay between the dry signal and the wet reverb sound. We suggest using 15 ms for instruments and 40 ms for vocals.This is only a suggestion, however; use whichever delay time best serves the mix in your view.∙Use the Treble control to brighten up the overall reverb sound.∙The Drive and Analog controls allow you to add, or to turn off, the modeled THD behavior and noise-and-hum levels.Chapter 3 – Interface and Controls 3.1 Interface3.2 ControlsInputControls the input gain level before any processing takes place. In the Stereo component, the left and right faders can be moved independently. You can also move them together by clicking and dragging up or down in the small area between the two faders.Range: -inf to +18 dBDefault: 0 dBInput LinkLinks the left and right Input faders (Stereo component only). When the Link control is activated, moving one fader will also move the other, and any offset between left and right input will be kept.Options: On, OffDefault: OnPlate SelectorSelects between plates A, B, C and D.Please note: Switching plates does not change the values of any of the other plugin parameters (Damper, PreDelay, Drive, Analog, etc.).Options: Plate A, B, C, DDefault: Plate ADamperControls the reverb decay time, letting you choose from 11 different damper positions (0 to 10). Select the damper position by clicking the + and - buttons (both of which respond to extended mouse clicks), or by clicking and dragging inside the damper meter itself.Please note: The numbers on the meter represent different damper positions; they do not represent the number of seconds of decay time. Each of the four plates has its own damper behavior. The same damper position will therefore correspond to different reverberation decay times, depending on the plate you are using. For example, damper position 3 in Plate C will give you a much shorter reverberation time than damper position 3 in Plate A.Range: 0 to 10 (approximately 1 to 5.4 seconds, depending on the plate)Default: 2Bass CutThere are four high-pass filter modes on the plate input amplifier that cut frequencies at the range between 10 Hz to 1000 Hz.Options: 0, 1, 2, 3Default: 0 (no bass cut)DriveControls the amount of drive added to the signal by modeling the THD behavior of the driver amplifier and the plate itself.Range: 0–100Default: 0Controls the amount of modeled hum & noise added to the signal. To add the precise amount of hum & noise delivered by the original plates, set the value to 100.Range: Off to 100Default: OffTreble4000-Hz High-shelf filter to control the reverb’s brightness.Range: -20 dB to +20 dBDefault: 0 dBPreDelayControls the amount of the delay between the dry and wet signal.Range: 0 ms–500 msDefault: 0 msWet/DryControls the balance between the dry and wet signal and thus the amount of reverb added.Range: 0% (dry) to 100% (wet)Default: 100% (wet)Crosstalk (Only in Stereo to Stereo component)Controls the summing between the Left and Right inputs to get a stereo effect.Range: 0%–100%Default: 0%Waves Abbey Road Reverb PlatesUser GuideControls the output gain level after processing. In the Stereo component, the left and right faders can be moved independently. You can also move them together by clicking and dragging up or down in the small area between the two faders.Range: -inf to +18 dBDefault: 0 dBOutput LinkLinks the left and right Output faders (Stereo component only). When the Link control is activated, moving one fader will also move the other, and any offset between left and right output will be kept.Options: On, OffDefault: On3.3 WaveSystem ToolbarUse the bar at the top of the plugin to save and load presets, compare settings, undo and redo steps, and resize the plugin. To learn more, click the icon at the upper-right corner of the window and open the WaveSystem Guide.Waves Abbey Road Reverb PlatesUser Guide。
waves-效果器全套中英文说对照表
waves 效果器全套中英文说对照表99个英文中文01.Prologue 12:42 加载方法02.API-2500 09:06 压缩处理03.API-550A 09:04 均衡处理04.API-550B 05:29 均衡处理05.API-560 03:20 均衡处理06.AudioTrack 09:50 多重效果07.C1 Comp 04:16 压缩处理08.C1 Comp-Gate 12:33 压缩+门限09.C1 Comp-Sc 18:00 侧链压缩10.C1 Gate 07:14 门限处理11.C4 13:14 多段动态12.DeEsser 03:44 齿音消除13.Doppler 04:48 声场调整14.Doubler 12:32 合唱效果15.Enigma 09:36 迷幻效果16.IDR 01:45 抖动处理17.L1-Ultramaximizer 02:54 母带处理18.L1-Ultramaximizer+ 03:49 母带处理19.L2 02:52 母带处理20.L3-MultiMaximizer 11:56 母带处理21.L3-UltraMaximizer 03:38 母带处理22.LinEq Broadband 05:40 均衡处理23.LinMB 08:57 多段动态24.MaxxBass 03:59 泛音处理25.MetaFlanger 06:40 镶边效果26.MondoMod 09:15 调制效果27.Morphoder 07:18 声码效果28.PAZ Analyzer 11:36 综合分析仪29.PAZ Frequency 15:31 频谱仪30.PAZ Meters 12:10 电平表31.PAZ Position 11:16 声场仪32.Qx-Paragraphic EQ 21:07 均衡处理33.RBass 05:22 泛音处理34.RChannel 09:23 多重效果35.RComp 18:11 压缩处理36.RDeEsser 04:32 齿音消除37.REQ bands 04:43 均衡处理38.RVerb 26:39 卷积混响39.RVox 04:00 压缩处理40.S1-Imager 07:23 立体声扩展41.S1-Shuffler 07:32 立体声扩展42.SoundShifter G Offline 08:11 变速变调43.SoundShifter P 03:26 变调处理44.SoundShifter P Offline 07:11 变速变调45.SSLChannel 36:49 通道条46.SSLComp 06:24 压缩处理47.SSLEQ 07:19 均衡处理48.SuperTap 24:43 延迟处理49.TransX 08:09 瞬间电平控制50.TrueVerb 19:11 模拟混响51.UltraPitch 07:55 自动和声52.X-Click 03:36 去咔哒声53.X-Crackle 03:40 去噼啪声54.X-Hum 06:13 滤波降噪55.X-Noise 10:45 采样降噪56.Z-Noise 12:24 采样降噪57.DeBreath 06:09 去呼吸声58.Tune 01 22:22 音高修正(上)59.Tune 02 16:11 音高修正(中)60.Tune 03 18:07 音高修正(下)AudioTrack是waves的通道条效果器,是一款均衡器/压缩器/门限器的组合C1包括四个,C1comp是单纯的压缩器,C1compgate是压缩/门限的组合,C1SC是旁链压缩器(应用于广播等场合),C1gate是单纯的门限C4是waves的著名多段动态处理器Desser是消除齿音效果器Doppler是掠过音效器,多普勒效应嘛Doubler是声音加倍效果器,做合唱合奏用的Engima是迷幻音效效果器,它利用相位调制原理来产生各种稀奇古怪的效果XIDR是waves自己开发的噪声整型/抖动算法,转换采样深度时用来减小数字背景随机噪声L1/L2/L3都是限制器,区别一个比一个猛,L1可以放在分轨作限制,L2、L3是母带用的。
Reverb模拟混响效果器

下图是Ultrafunk R3 Reverb模拟混响效果器的界面:1、输入音量(input):用于控制输入音量大小,单位是dB(分贝)。
旁边的Mute按钮,可以对输入到混响器的原始声进行静音。
2、低频滤切/高频滤切(Lou Cut/High Cut):它们是用来对混响的低频与高频进行滤切处理的。
3、预延迟时间(Predelay):可以控制直达声和早期反射声“之间的”时间长度。
Predelay 是最能决定空间大小的。
Predelay值越大,表示产生混响的空间就越大。
4、空间大小(Room size):用于控制产生混响“房间/空间”的大小。
所以,可以使用Predelay (预延迟时间)和Room size(空间大小)这两个参数来控制空间大小。
5、散射度(diffusion):用来设置在混响中,“早期反射声”的接近程度。
也就是所谓的扩散度!6、低频衰减时间(Bass Multiplier):可以控制混响中,低频的衰减时间。
7、分频点(Crossover):用于控制“混响低频衰减时间”与“混响高频衰减时间”的分频位置。
8、残响时间(Decay time):它可以控制混响的整体长度。
Decay time越长,会带来较长的混响尾巴。
9、高频阻尼(High Damping):用来控制混响中的“高频衰减时间”的频率位置,单位是khz。
10、原始干声(Dry):可以设置“原始干声”的输出音量大小。
点击Dry旁边的Mute按钮,可以对“原始干声”进行静音。
11、早反射声(E.R):用来调整“早期反射声”的输出音量大小。
旁边的Mute按钮,可以对“早期反射声”进行静音。
12.混响音量(Rerverb):也叫Wet Out,可以控制“混响声”的输出音量大小。
同样,旁边的Mute按钮可以对“混响声”进行静音。
13.声场宽度(Width):可以用来调整混响的立体声宽度。
当数值为0%时,得到的就是一个单声道的混响效果。
14.输入输出电平表(In/Out):右边的显示仪中- In用于显示输入电平,L表示左声道的输入音量,R表示右声道的输入音量。
音乐制作中常用的混响插件

音乐制作中常用的混响插件音乐制作是一门融合技术与艺术的创作过程,其中一个重要的环节就是混音。
在混音过程中,混响插件被广泛应用。
混响能够为音频信号增加环境感和深度感,使得音乐作品更加生动和真实。
本文将介绍几种在音乐制作中常用的混响插件。
一、Valhalla RoomValhalla Room是一款广受欢迎的混响插件,它能够模拟出各种房间大小和形状的混响效果,从而为音频信号赋予不同的空间感。
Valhalla Room具有低延迟、高品质和直观的界面等特点,使得用户能够轻松地调整混响参数,从而实现理想的音效效果。
二、Lexicon PCM Native Reverb BundleLexicon PCM Native Reverb Bundle是一款由经典混响设备Lexicon 系列混响效果器模拟而成的插件。
它拥有丰富的混响算法,能够模拟出各种经典混响效果,包括大厅、房间、板式混响等。
Lexicon PCM Native Reverb Bundle具有多种预设和灵活的参数控制,能够满足音乐制作中各种不同的需求。
三、AltiverbAltiverb是一款基于采样的混响插件,它通过录制真实场景中的混响响应,再将其应用于音频信号中,实现高度真实的混响效果。
Altiverb拥有大量的采样库,内置了数以千计的不同环境和建筑物的混响响应,包括教堂、剧院、录音棚等。
使用Altiverb,音乐制作人可以获得非常逼真的混响效果,提高作品的质量。
四、Waves Renaissance ReverbWaves Renaissance Reverb是一款简单易用但功能强大的混响插件。
它提供了直观的控制界面,用户可以通过调整预设和参数来定制混响效果。
Waves Renaissance Reverb不仅提供了高质量的混响音色,还具有卓越的稳定性和低延迟,适合在音乐制作过程中实时应用。
五、Soundtoys Little PlateSoundtoys Little Plate是一款模拟经典混响设备的插件,它主打简单和直观的操作方式。
waves教学:Waves Renaissance Reverb 复兴的混响效果插件使用(二)
waves教学:Waves Renaissance Reverb 复兴的混响效果插件使用(二)Waves Renaissance Reverb 复兴的混响效果插件使用6均衡控制 EQ Controls低频 Low Frequency参数值范围时从16 到 1600 Hz控制混响均衡的低频点,这个参数可以影响早期反射及混响。
低频增益 Low Gain参数范围是–24.0 到 + 12.0。
对低频点以下的部分进行增强或衰减。
当参数值达到–24.0时,均衡器就变成了一个低切滤波器。
高频 High Frequency参数范围从1000 到 2100 Hz。
控制混响均衡的高频点。
这个参数可以影响早期反射及混响。
高频增益 High Gain参数范围是从–24.0 到 + 12.0。
对高频点以上的部分进行增强或衰减。
当参数值为–24.0时,均衡器则变成一个高切滤波器。
Waves Renaissance Reverb 复兴的混响效果插件使用7图形显示混响阻尼混响均衡以上两个图形分别显示混响阻尼及混响均衡的情况。
在使用时,用户也可以直接拖动接点,同时改变频率及比率(或增益)这两个参数。
时间响应以上图形以橘黄色的竖线表示早期反射声及其间隔。
红色三角则表示后期混响。
早期反射声的间距则依赖当前所选的混响类型,可以使用不同的方式进行控制。
在大多数情况下它们反映了声音的空间大小。
这些竖线是不可以被拖动的。
Waves Renaissance Reverb 复兴的混响效果插件使用8第5章—混响类型RVerb 所提供的混响类型有以下几种。
不同的混响类型是改变声音质地的核心。
大厅混响一般都作为混响类型的优选,用于模拟音乐厅或演奏厅的声场环境。
这种大的房间的效果听起来可以使声音悦耳动听。
平直的后期混响及频率响应,加上均匀的早期反射,大厅混响使声音听起来富有个性并使人感到舒服。
Hall 1 –大厅1。
用于模仿大的空间如音乐厅、排练厅等。
混响(reverb)效果器上常见的参数详解

www. 58yhk .com
• 1: levels 输入输出音量用来控制混响器的 输入音量和输出音量的
• 2:MIX (Wet out)是湿声输出 也就是混响器的 混响效果的大小调节 这个湿声指的是在混响的整 体声音中 除了直达声之外的所有反射的声音 在 TC3里面没有dry out 和 Wet out 的推子 而是通过 一个mix的推子来控制dry out 和 Wet out的比例 向左拖拽这个推子 就是增大干声的比例 向右拖拽 就是增大湿声的比例 在混响效果器的使用过程中 是一定要采用全部湿声输出的(在sma中的AUX (辅助发送)插件中可以100%湿声输出,而在独 轨中则30%~40%湿声输出足矣,个人感觉。。)
www. 58yhk .com
• 混响器看似简单 实则比较复杂 在调节人声 在声场中的位置和调节人声与伴奏的融合 度时 混响也起到了至关重要的作用 建议在 人声上添加混响效果器的时候 有个不成文 的规定那就是宁缺勿滥 我们宁可把人声做 的很干混响效果做的很小 也不要把混响效 果开的非常大 因为一旦混响效果大了 人声 的清晰度就会急剧降低 同时 人声的位置也 会变得非常靠后 人声的清晰度过低和人声 的位置过于靠后都是我们需要避免的
www. 58yhk .com
• 3: 直达声与早反射声之间的时间差 也就是早反 射声相对直达声的延迟时间这个相对的延迟时间 就叫做“早反射时间”也就是混响效果器中的 predelay 这个早反射时间是最能体现房间大小的 因为造成早反射声的反射面通常是一个房间中面 积最大的面 最容易造成反射的面 所以 当我们增 大混响效果器中的predelay参数值的时候 空间感 就会立刻增大 我们可以通过横向拖拽这个点 来改 变predelay的长度 上下拖拽则是更改早反射声音 的声音强度
Waves 插件Renaissance Reverb混响器
Waves 插件Renaissance Reverb 混响器
雪帝数字音频
具有丰富尾混响、12种混响类型和先进的早期反射系统的经典混响插件,是无数制作人和音频工程师的首选。
Renaissance Reverb将丰富的功能与易用的界面相结合,提供无与伦比的声音以及非凡的混响密度和质感。
Renaissance Reverb可让你从12种混响类型中进行选择,包括大厅、房间、室内、教堂、板式、反向、门限、非线性、回声混响(EchoVerb)和共鸣混响(ResoVerb)。
借助双频段均衡器、阻尼控制和更新的直观界面,Renaissance Reverb可为你提供混响效果所需的灵活性。
在世界一流制作人、音乐家和音频工程师之间名声大噪的混响插件,也是你的声音所需。
特点:
•声音温暖的混响器,旨在模仿经典声音效果
•12种混响类型可供选择
•先进的早期反射系统、双频段均衡器和阻尼控制
•去相关控制,以实现细微的早期反射变化和微调
•新增:来自行业顶尖制作人和混音师Michael Brauer、Eddie Kramer等人的预设•新增:更新的界面有浅色版、深色版、经典版三种皮肤可选。
WAVE说明书TrueVerb效果插件中文说明书

WAVE说明书TrueVerb效果插件中文说明书第一章快速入门假如你不想仔细阅读操作手册马上就用TrueVerb插件,那就看看这章快速入门吧。
快速入门介绍了TrueVerb的两种操作模式――通过(Thru)模式和发送(Send)模式。
如果你想了解更多TrueVerb的情况,我们建议你阅读第四章,它提供了有关各种控制方式的细节。
TrueVerb与其它的混响处理软件有较大差异。
它有两种主要模式:“通过”模式,适用于“真实距离处理”。
这种模式就是我们常说的“插入式效果”。
传统的“发送”模式你也许知道“发送”模式的工作方式,所以我们先描述一下“通过”模式:让所有的声音通过效果器。
你不用对经过TrueVerb的声音进行干湿对比度的混音,让原始的声音穿过效果器,因此你要将TrueVerb 放到一个音轨、辅助总线输出或主输出上的插入点上。
例一:你有一段音乐会的实况录音,它需要一种“房间”的感觉。
将TrueVerb放置在主推子的立体声插入点上。
确定房间有多大,有多明亮或多阴暗,还要确定听众与舞台的距离(这种工作方式也适合需要良好房间效果的古典或爵士音乐录制任务)。
例二:如果在你的混音中有对鼓进行的副混音,而且要把鼓放在一个“合适的房间”里。
这需要将TrueVerb插到副混音的辅助输出或主输出上(根据需要而定),调入TrueVerb 预置方案中的“鼓房间(Drum Room)”,然后用鼠标调整屏幕上的参数。
这种迅速生成的模拟房间也适合于其它副混音,比如人声、吉它等。
TrueVerb让你可以围绕声源创建一个真实的、声音自然的房间,并可控制房间尺寸、频率特性和距离。
你可以像使用其它发送-返回的混响效果器一样使用它,还可以将早期反射和混响一起使用或分别使用。
预置数据库由“通过”和“发送”两部分构成。
将TrueVerb放在你需要的位置,挑选你需要的预置混响,然后进行调整。
如果你不熟悉这个装载/保存系统,可以先阅读WaveSystem手册中的有关信息,从中可以了解许多非常有用的有关所有Waves插件通用的技巧。
Waves超实用插件推荐(二)

Waves超实用插件推荐(二)压缩类CLA-76建模自最著名的模拟压缩器,录音棚中的传奇设备。
处理主唱、吉他、贝斯、鼓等等,可谓是无所不能。
这一个插件更包含Blacky和Bluey两个版本。
CLA-2ACLA-2A重现了传奇硬件原型的频率响应和平滑的声音特性,能增添平滑的谐波染色,作用于人声、吉他、贝斯都恰如其分。
以上两款压缩插件都包含于CLA Classic Compressors套装中。
API 2500API 2500是功能全面的压缩器,尤其在鼓声上的力度表现出众,通透塑形能力超强。
它本为总线压缩设计,但绝对可以为任何轨道增添质感。
混响与延迟类H-Reverb功能多样的混响插件,如果你只能选一个混响,那必须就是H-Reverb!基于开创性的有限脉冲响应混响技术,它内置均衡、压缩、调制处理、BPM同步,可以轻松制作创新的尾混响。
H-Delay老式模拟延迟的声音,以简单易用的形态呈现,即插即用,受全世界音乐人和音频工程师青睐。
它的调制和低保真功能更能带来个性音色。
Abbey Road Reverb Plates板式混响是流行乐人声等等需要闪亮质感声音的必备。
建模自Abbey Road录音棚的经典设备,无论是细微应用还是戏剧化效果,它的音色辨识度都极高。
Abbey Road Chambers这款混响的声音世界上绝无仅有,建模自Abbey Road录音棚的混响室,完全重现了Abbey Road录音棚原汁原味的S.T.E.E.D.设置,开启了回归经典声学效果的大门。
以上两款Abbey Road混响插件包含于Abbey Road Collection 套装中。
通道条类SSL E-Channel这款通道条建模自Solid State Logic 4000系列调音台,拥有极富音乐性的均衡声音和紧致有力的压缩和门限,能从容处理大多数混音工程。
包含于SSL 4000 Collection套装中。
Scheps Omni Channel多功能合一的通道条,由格莱美奖得主混音大师Andrew Scheps 钦定打造。
Waves Greg Wells VoiceCentric 用户指南说明书

WAVESGreg Wells VoiceCentricUser GuideTABLE OF CONTENTSChapter 1 – Introduction (3)1.1 Welcome (3)1.2 Product Overview (3)1.3 Components (4)Chapter 2 – Quick Start Guide (5)Chapter 3 – Interface and Controls (6)3.1 Interface (6)3.2 Controls (6)3.3 Greg Wells VoiceCentric Signal Flow (9)Chapter 1 – Introduction1.1 WelcomeThank you for choosing Waves. In order to get the most out of your Waves processor, please take the time to read through this manual.In conjunction, we also suggest you become familiar with /support. There you will find an extensive answer base, the latest tech specs, detailed installation guides, new software updates, and current information on licensing and activation.By signing up at , you will receive personalized information on your registered products, reminders when updates are available, and information on your licensing status.1.2 Product OverviewThe Greg Wells VoiceCentric plugin is the first in a line of Greg Wells Signature Series plugins, created in collaboration with multiple GRAMMY®-nominated producer, songwriter, musician and mixing engineer Greg Wells (Katy Perry, Adele, OneRepublic, Mika, Twenty One Pilots), who has songs on over 85 million units sold. Greg Wells VoiceCentric is a user-friendly plugin featuring one main control and three additional controls for Wells’ customized Delay, Doubler and Reverb settings. Designed for those looking for an A-level mixed vocal sound, this plugin gives you quick access to Greg Wells’ signature sound.A Word from Greg Wells:The most important instrument in the mix of a song is the vocal. I am always asked if there is a simple plugin that can make a vocal sound like a modern mixed vocal on a hit record. When the vocal sounds right, it makes everything else sound great.This is specifically where the VoiceCentric plugin takes you. It is the result of all my studio experience, from working with the best mixing engineers in the business, to mixing hit records myself.The ingredients of the VoiceCentric plugin are all the elements of my favorite Waves plugins, reacting how and when I want them to. The main Intensity knob is deceptively simple to use; there is a lot going on behind the curtain, however, and certain elements don't turn on until 60% or even 80%. This means it's not a 0–100 control, although that's how it's designed to be used.The VoiceCentric plugin delivers a world-class mixed vocal sound, designed for everyone from newbies to seasoned pros.– Greg Wells, October 20151.3 ComponentsWaveShell technology enables us to split Waves processors into smaller plugins, which we call components. Having a choice of components for a particular processor gives you the flexibility to choose the configuration best suited to your material.The Greg Wells VoiceCentric plugin has three components:∙VoiceCentric Mono – mono in to mono out∙VoiceCentric Mono-to-Stereo – mono in to stereo out∙VoiceCentric Stereo – stereo in to stereo outChapter 2 – Quick Start Guide1. Insert the Greg Wells VoiceCentric plugin on the track you wish to process.2. Adjust the input so that on the loudest part of the program, the sensitivity LED is solidyellow. Adjust the output by the same inverted amount to keep equal loudness between input and output.3. Adjust the Intensity control to receive the right amount of processing on the track. A goodsetting to experiment with would be when gain reduction reaches 3 to 4 dB in the loudest part of the track.4. Turn on any of the parallel effects (Delay, Doubler, Reverb) if you wish to use them, andadjust their respective levels to achieve a good blend of these effects in your mix.5. If needed, adjust the output to make up for any gain change as a result of the processing.The presets included in Greg Wells VoiceCentric are a good starting point: find a preset you like, then tweak it as desired.Chapter 3 – Interface and Controls 3.1 Interface3.2 ControlsInputAdjusts the plugin’s input level.Your input level will not change when you load a preset. Range: -24 to 24 dB in 0.1 dB incrementsDefault: 0Sensitivity LEDThe Sensitivity LED’s three colors indicate when appropriate levels are reached: o LED Off (too low)o Green (good)o Yellow (optimal)o Red (very hot)Turn the Input control until the LED lights up to the desired color. For best results, use the loudest section of your track with the highest peaks.IntensityDetermines how much processing is applied to the vocal signal.Range: 0 (Min) to 100 (Max) in 0.1 increments.Default: 50Delay On/OffTurns the return of a parallel delay process on or off.Default: OffDelay LevelDetermines how much of the Delay is added to the signal.Range: -30 to 0 dB in 0.1 dB increments.Default: -30 dBPlease Note: Greg Wells VoiceCentric has been designed with stereo behavior in mind. Due to differences between the mono and stereo characteristics of delay, this effect will sound different depending on whether you use the plugin’s mono and stereo components.Doubler On/OffTurns the return of a parallel doubler process on or off.Default: OnDoubler LevelDetermines how much of the Doubler is added to the signal.Range: -30 to 0 dB in 0.1 dB increments.Default: -11.3 dBPlease Note: Greg Wells VoiceCentric has been designed with stereo behavior in mind. Due to differences between the mono and stereo characteristics of doubling, this effect will sound different depending on whether you use the plugin’s mono and stereo components.Reverb On/OffTurns the return of a parallel reverb process on or off.Default: OnReverb LevelDetermines how much of the Reverb is added to the signal.Range: -30 to 0 dB in 0.1 dB increments.Default: -11.3 dBPlease Note: Greg Wells VoiceCentric has been designed with stereo behavior in mind. Due to differences between the mono and stereo characteristics of reverb, this effect will sound different depending on whether you use the plugin’s mono and stereo components.Gain Reduction MeterIndicates the amount of gain reduction applied by the Intensity control.Range: 0 to -12 dB in 0.5 dB increments.OutputAdjusts the plugin’s output level.Your output level will not change when you load a preset.Range: -24 to 24 dB in 0.1 dB incrementsDefault: 03.3 Greg Wells VoiceCentric Signal Flow。
Waves插件的使用技巧和诀窍二 混响
Waves插件的使用技巧和诀窍二
作者:涂云
将早期反射声和混响尾声混合起来——TrueVerb(真实的混响)和Renaissance Rever b(文艺复兴混响)
既喜欢真实的混响所模拟出的空间的声音,但是同时又想得到文艺复兴混响所产生出来的平滑的混响尾声吗?想要两全其美吗?使用一个单独的插入通道,首先将真实的混响放到这个通道中,紧接着放入文艺复兴混响。
首先我们来设置真实的混响,所以现在先要将文艺复兴混响旁路。
加载一个你喜欢的预置或者创建一个你自己的设置。
点击位于底部右下角(Reverb字样的下方)的蓝色方块来关闭混响信号部分。
通过这种方法你可以不使用真实的混响的混响尾声部分而只使用直通信号和早反射信号。
现在,将文艺复兴混响退出旁路状态。
加载一个你喜欢的预置或者创建一个你自己的设置并将“Early ref.(早反射)”滑块向下拉至“Off(关闭)”状态。
现在,通过调整文艺复兴混响的Wet(湿)/dry(干)滑块,你就可以将真实的混响的早期反射声和文艺复兴混响的混响尾声混合起来使用。
WAVES部分中文说明
WAVES部分中文说明WA VES部分中文说明一说到声音特效,你一定会想到美国大片中各种奇异、震撼的音响效果吧。
其实除了电影制作外,声音特效技术还广泛运用于多媒体制作的各个领域,从FLASH中的循环音效到AUTHORW ARE各种按钮、动画片段配音再到PREMIERE中视频同步配乐等等都离不开音效处理这个环节,但市面上流行的各种音效制作软件都不能满足追求新刺激视听感受玩家的要求,不能给人以听觉上的强烈冲击,W A VES 就是这样一款顶级声音特效制作插件。
目前最高版本是5.0。
WA VES公司一直以出品专业级的音频效果器而闻名于世,其产品为全世界很多专业音频工作站首选。
从最早的NA TIVE POWER PACK 2.5到随后的2.8再到3.0、5.0,每一款效果器都给用户留下了深刻的印象,品质自然没得说,当然软件价格也高得惊人。
尽管W A VES 的效果包没有其他同类软件种类那么丰富,但其音质却让所有专业人士都瞠目结舌,一言以蔽之-酷毙了!1.空间回旋效果首先登场的是一个叫MONDO MOD的空间回旋效果插件,使用它可以轻松搞定各种回旋立体声方案,并可以制作出频度宽广的变化声场效果。
在SOUND FORGE中选择一段音频事件,然后在DIRECTX 中选择W A VES MONDO MOD启动它的参数设置窗口。
在PRESET 中WA VES为我们预置了大量常用的空间回旋效果,CIRCULAR圆形区域可以制作出动态环绕立体声效果、DIFFUSER扩散性区域制作由近至远的声场扩散特效、FLUTTER摆动区域制作摇摆的飘动效果、FULL ROTOR全方位转动制作空间运动声场特效、45RPM OFFCENTER 45度偏移中心制作在规定区域内的距离变化效果等等。
选择一个并用PREVIEW预听,你会看到中心圆形仪器里呈现了声场扩散的运动状态,非常直观!当然对预设置不满意的话,也可以自己进行参数调整,TEMPO表示声音运动速度、W A VEFORM表示声波产生方式、MIX表示原声和效果声的大小比例、GAIN表示总输出的增益值等等。
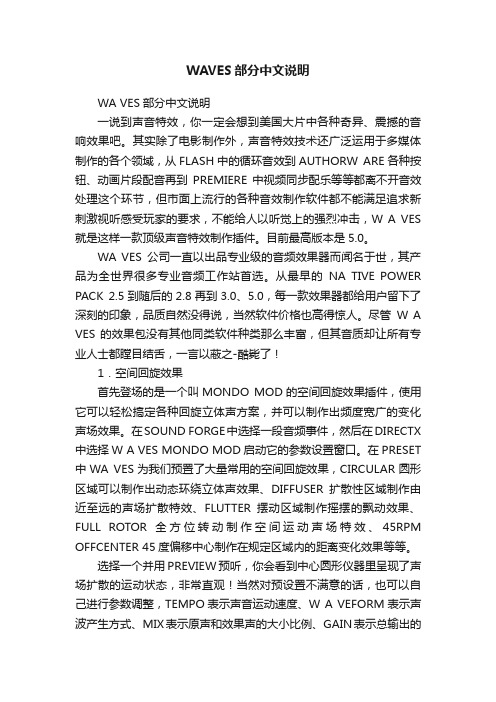
Waves CLA Vocals用户指南说明书
WAVES CLA VOCALS USER GUIDETable of ContentsChapter 1 – Introduction (3)1.1 Welcome (3)1.2 Product Overview (3)1.3 Concepts and Terminology (4)1.4 A Few Words from Chris (4)1.5 Components (5)Chapter 2 – Quickstart Guide (6)Chapter 3 – Interface and Controls (7)3.1 Interface (7)3.2 Controls (8)Chapter 4 – The WaveSystem (14)4.1 The WaveSystem Toolbar (14)4.2 Preset Handling (14)4.3 Interface Controls (16)4.4 Waves Preferences (Pro Tools only) (18)Waves CLA VocalsUser Guide- 2 -Chapter 1 – Introduction1.1 WelcomeThank you for choosing Waves! In order to get the most out of your Waves processor, please take the time to read through this manual.In conjunction, we also suggest that you become familiar with . There you will find an extensive Answer Base, the latest Tech Specs, detailed Installation guides, new Software Updates, and current information on Authorization and Registration.By signing up at , you will receive personalized information on your registered products, reminders when updates are available, and information on your authorization status.1.2 Product OverviewThe Waves Artist Signature Series is our exclusive line of application-specific audio processors, created in collaboration with the world’s top producers, engineers, and mixing engineers. Every Signature Series plug-in has been precision-crafted to capture the artist’s distinct sound and production style. For experienced and aspiring audio professionals alike, the Waves Signature Series allows you to dial up the sound you’re looking for quickly, without interrupting the creative flow.The CLA Artist Collection consists of 6 plug-ins, each designed to handle a specific mixing task.• CLA Vocals•CLA Drums• CLA Bass• CLA Guitars• CLA Unplugged• CLA EffectsWaves CLA VocalsUser Guide- 3 -1.3 Concepts and TerminologySensitivity Control/Sensitivity LEDThe Sensitivity LED’s 3 colors indicate when appropriate levels are reached: LED Off (too low)Green (good)Yellow (optimal)Red (very hot)Push the Sensitivity Control upwards until the LED lights up. We recommend adjusting the Sensitivity Control as soon as you open the plug-in, using the section of your song with the highest peaks for best results.In most cases, the Sensitivity LED indicates that your levels hit the processor in a way that will give you the intended output result. However, it’s important to keep in mind that optimal results for your source material may be achieved even when the Sensitivity LED does not display “optimal” levels (yellow). As always, trust your ears.ColorEach fader on CLA Artist Signature Collection plug-ins controls a specific function, such as compression or reverb. Each function has a color-coded selector which controls the internal characteristics of that function, resulting in a different sound character or “Color.” You can mix and match different colors across the different faders.1.4 A Few Words from Chris"The most important part of any song is the vocals. The CLA Vocals plug-in makes this part of mixing an absolute joy. I have taken the very best settings which I use in my everyday mixes and crafted them into this chain. It works great on all styles of singers and, best of all, they will want that sound every time! You also get three flavors of the top six effects you need: the right amount of bass, treble, compression, reverb, delay, and chorusing/doubling."Waves CLA VocalsUser Guide- 4 -1.5 ComponentsWaveShell technology enables us to split Waves processors into smaller plug-ins, which we call components. Having a choice of components for a particular processor gives you the flexibility to choose the configuration best suited to your material.The Waves CLA Vocals has two components:•CLA Vocals Mono-to-Stereo – Mono in to Stereo out component•CLA Vocals Stereo – Stereo in to Stereo out componentWaves CLA VocalsUser Guide- 5 -Chapter 2 – Quickstart Guide•Insert the CLA Vocals plug-in on a vocal track.•Adjust the Sensitivity control until you achieve proper levels, as indicated by the Sensitivity LED and the input meter.•The current plug-in settings now represent Chris's default setup.Tweak the following controls to fit your mix:•Adjust the Bass and Treble faders. Toggle through the Colors to find the EQ that works best for the song.•Use Compress for dynamic range control. Toggle through the Colors to find that which works best for the song.•Adjust Reverb, Delay and Pitch effect levels. Toggle through the Colors to find that which works best for the songPlease note:•When all colors are set to clear (Bypass/Mute), some fixed processing as designed by Chris is still active.•EQ adjustment will take effect once the EQ faders are moved. At zero, cycling through the EQ Colors will have no effect.•All other faders are active and set to Chris's default setup when at zero.> If the Output meter goes into the red, use the Ouput fader to lower the Output level.Chapter 3 – Interface and Controls 3.1 Interface3.2 ControlsInput Sensitivity is used to achieve optimal plug-in input level.Range: +/- 10 (in 0.1 steps)Default: 0Input Meter displays input signal peak level.Range: -26 to 0 dBFSClip LED lights up when levels exceed 0 dBFS. Click inside the meter area to reset.Balance adjusts the offset between left and right signals. (Stereo component only) Range: +/- 6 dB (in 0.1 steps)Default: 0Sensitivity LED indicates the presence of proper levels.Range: LED off (too low), Green (good), Yellow (optimal), Red (very hot)Bass controls low frequency gain.Range: +/- 10 (in 0.1 steps)Default: 0Bass Color toggles between low frequency filters.Range: Clear (Bypass), Green (Sub), Blue (Lower), Red (Upper) Default: Green (Sub)Treble controls high frequency gain.Range: +/- 10 (in 0.1 steps)Default: 0Treble Color toggles between high frequency filters.Range: Clear (Bypass), Green (Bite), Blue (Top), Red (Roof)Default: Green (Bite)Compress controls the dynamic range.Range: +/- 10 (in 0.1 steps)Default: 0Compress Color toggles between compression characters.Range: Clear (Bypass), Green (Push), Blue (Spank), Red (Wall) Default: Green (Push)Reverb controls the reverb wet mixRange: +/- 10 (in 0.1 steps)Default: 0Reverb Color toggles between reverb environments.Range: Clear (Mute), Green (Tight), Blue (Large), Red (Chamber)Default: Green (Tight)Delay controls the delay wet mix.Range: +/- 10 (in 0.1 steps)Default: 0Delay Color toggles between delay times and characters. Please note: Delay time syncs to the session BPM.Range: Clear (Mute), Green (Slap – 1/16 note), Blue (Eight - 1/8 note), Red (Quarter – 1/4 note)Default: Green (Slap)Pitch controls the pitch modulation wet mix.Range: +/- 10 (in 0.1 steps)Default: 0Pitch Color toggles between pitch modulation types.Range: Clear (Mute), Green (Stereo), Blue (Wide), Red (Spreader) Default: Green (Stereo)Output controls the output level.Range: +/- 10 (in 0.1 steps)Default: 0Output Meter displays output signal peak level.Range: -26 to 0 dBFSClip LED lights up when levels exceed 0 dBFS. Click inside the meter area to reset.Chapter 4 – The WaveSystem4.1 The WaveSystem ToolbarAll Waves processors feature the WaveSystem toolbar which takes care of most administrative functions you will encounter while working with your Waves software. The features of the WaveSystem toolbar are the same on practically all Waves processors, so familiarity with its features will be helpful whichever processor you are using. Toolbar FunctionsUndo Undoes the last 32 actions.Redo Redoes the last 32 undone actions.Setup A/B Toggles between two presets. This is useful for close comparison of different parameter settingsCopy A->B Copies the current settings to the second preset registerLoad Recalls presets from fileSave Saves presets in the Waves file formatsOpens the manual for the processor you are using4.2 Preset HandlingPreset TypesFactory Presets are permanent presets in the Load menu. Factory presets cannot be over-written or deleted. When applicable, different component plug-ins may have different factory presets.User Presets are your favorite settings of the plug-in saved as a preset in the Load menu, under ‘User Presets’. User Presets can be over-written and deleted.Setup Files may contain more than one preset. For example, a single file can contain all the presets for a session. When you open a Setup File, all its setups become part of your Load pop-up menu for fast access. This can be particularly useful with multiple instances of a plug-in in a single session. By saving all the settings you create into a single Setup File, they can all be quickly available for every instance of that plug-in.Loading Presets and SetupsClick on the Load button to see the Load pop-up menu. The menu is divided into four sections. If a section is not currently available it will not appear in the Load pop-up menu. Open Preset File…Select to open any setup or preset file, whether from the Library oryour own creations.‘Filename.xps’: Displays any currently loaded Setup File and its presets.Factory Presets:Displays the default Factory Presets.User Presets:Displays any loaded User Presets.Saving Presets and SetupsClick on the Save button to see the Save pop-up menu. Four options are available. If an option is not currently available it will be grayed out and inaccessible.Save to New File…Select this to start a new Setup file. There are twoprompts - first for the setup filename, then for thepreset name. You must provide a name for both thesetup file and the preset. Click OK (ENTER) tocomplete the save. It is a good idea to create afolder in which to save several setup files for aproject.Save ‘File Name’ – “Preset Name” Overwrites the settings of the loaded preset(whether a User Preset or a preset from a SetupFile) with the current settings. If a Setup File iscurrently loaded, the name of the Setup File isdisplayed followed by the name of the preset itself.If a User Preset is loaded, its name is displayed. Save to ‘File Name’ As…Saves the current settings as a new preset into theSetup file that is open (if one is not open, the optionis grayed out). You will be prompted to give thepreset a name.Put into Preset Menu As…Save the current settings into a User Preset thatwill always be in your Load menu (until deleted).You will be prompted to give this preset a name.User Presets are stored in the plug-in’s preferencefile.Deleting PresetsYou may delete User Presets and presets within a Setup File. Factory Presets and Setup Library files cannot be deleted or overwritten.1. Hold the Command (Mac)/Control (PC) key down.2. Click-and-hold the Load button to see the pop-up menu.3. While still holding the Command/Control key, select the preset or setup to delete.4. A confirmation box will appear, allowing you to cancel or ‘OK’ the deletion.A/B Comparison and CopyingThe Setup A/Setup B button may be clicked to compare two settings. If you load a preset in the Setup B position, this will not affect the preset loaded into the Setup A position, and vice-versa.If you want to slightly modify the settings in Setup A, you can copy them to Setup B by clicking on the Copy to B button, then alter Setup A and compare with the original Setup B.The name of the current setup will be shown in the title bar (on platforms which support it), and will switch as you change from Setup A to Setup B.Note: an asterisk will be added to the preset name when a change is made to the preset.4.3 Interface ControlsControls can be in one of three states:•Not Selected where the control is not the target of any user entry•Selected where the control is the target of mouse control entry only•Selected and Active where the control is the target for both mouse and keyboard entryToggle ButtonsToggle buttons display the state of a control, and allow switching between two or more states. Single-click to change the control’s state. Some toggle buttons have a text display which updates with the current setting, and others (bypass, solo, or monitoring toggles) illuminate when the control is active.Some processors have link buttons between a pair of toggle buttons, allowing click-and-drag adjustment while retaining the offset between the controls.Value Window ButtonsValue windows display the value of a control and allow click-and-drag adjustment, or direct control via the keyboard.•Using the mouse, click-and-drag on the value window to adjust. Some value windows support left/right, some up/down (as you hover over a button, arrowswill appear to let you know which direction of movement that button supports).•Using the arrow keys, click once with mouse to select the button, and then use up/down – left/right (depending on the direction supported by that button) tomove in the smallest incremental steps across the button’s range (holding down the arrow keys will move faster through the range).•Using key entry, double click on the button to open the value window, and directly enter the value from your keyboard. If you enter an out of range number, the button stays selected but remains at the current setting (system beeps? Ifsystem sounds are on?)Some processors have link buttons between a pair of value windows, allowing click-and-drag adjustment while retaining the offset between the controls.SlidersClick on the slider itself or anywhere within the sliders track. The numerical value of the slider settings is displayed in a hover window above/below the slider path.Hover BoxHovering boxes will appear and display the control value when hovering with the mouse over the control.TAB FunctionsTAB moves the ‘selected’ status to the next control, with shift-TAB moving in the reverse direction.Additionally, the Mac has an option-TAB function for ‘down’ movement and shift-option-TAB for ‘up’ movement where applicable.If you have several Value Window Buttons selected, TAB functions will take you through the selected controls only.Hitting Esc or Return will return the 'focus' to the DAW application.4.4 Waves Preferences (Pro Tools only)When launching Pro Tools, hold Shift to view the Waves plug-in Preferences window. The following options are available:•Don't use AudioSuite plug-ins•Dont use RTAS plug-ins•Don't use TDM plug-ins•Rescan all plug-ins•HUI control surfaces support (low res)•Enable single-click text entry。
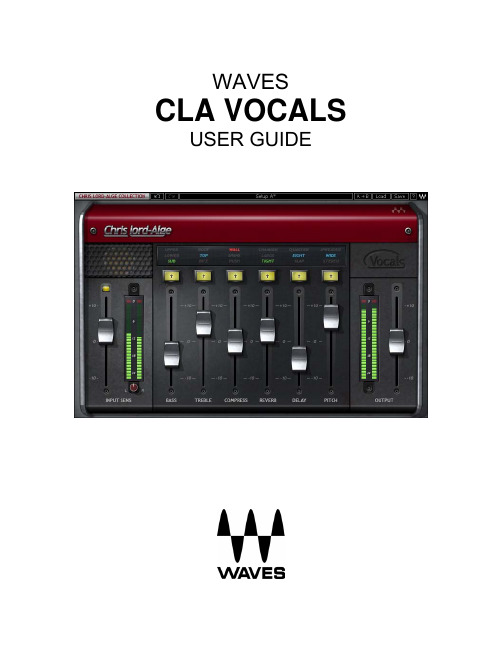
Waves 插件Renaissance Bass低频增强插件
Waves 插件Renaissance Bass低频增强插件
雪帝数字音频
业界最受喜欢的插件,可提供更丰满、下潜更深的低频,即使在小型扩声系统上也可以精准回放。
这是无数格莱美获奖工程师信赖的工具。
当需要在笔记本电脑或移动设备上也能听到低频时,Renaissance Bass就是你最好的帮手。
利用Waves专利的MaxxBass®心理声学技术,R-Bass可以在无法通过物理方式处理低频信号的播放系统上准确地再现出低频内容。
这通过为基波创建谐波得以实现,使大脑感知到实际并不存在的低音频率。
R-Bass拥有简单友好的用户界面(仅3个控制:频率定位、谐波强度和输出增益),使你可以快速轻松地得到有力的低频声音,在各种尺寸的音响系统上都听感绝佳。
特点:
•格莱美奖获奖工程师们最喜欢的低频增强插件
•更宏大更紧实的低频适用于任何播放系统,不论是移动设备还是大型音响系统•将可感知的低频响应扩展至1.5个倍频程
•基于Waves专利的MaxxBass®心理声学技术
•无需担心削波
•新增:来自行业顶尖制作人和混音师Lu Diaz、Michael Brauer等人的预设
•新增:更新的界面有浅色版、深色版、经典版三种皮肤可选。
Waves插件用户指南说明书

WelcomeThank you for choosing Waves! In order to get the most out of your new Waves plugin, please take a moment to read this user guide.To install software and manage your licenses, you need to have a free Waves account. Sign up at . With a Waves account you can keep track of your products, renew your Waves Update Plan, participate in bonus programs, and keep up to date with important information.We suggest that you become familiar with the Waves Support pages: /support. There are technical articles about installation, troubleshooting, specifications, and more. Plus, you’ll find company contact information and Waves Support news. About Waves eMo GeneratorWaves eMo Generator lets you generate common signals quickly and easily, with several simple and useful options. Use Pink Noise to test and tune your live sound system. Use White Noise for SPL measurements. Use Sine Wave to sweep through entire frequency ranges or even tune your instruments to middle A. In addition, you can quickly test the L-R wiring in your studio or liveloudspeakers.eMo Generator includes two components:•eMo Generator Mono•eMo Generator StereoFeaturesIn both components:•Signal types: Pink, White, Sine•Sine frequency is fully sweepable, with most-used frequency shortcuts •Gain is fully sweepable, with gain shortcuts•Touch-compatibleStereo component only:•Routing: Play the generated signal through left, right or both outputs•Phase: Flips phase between left and right outputs1 2 3 4 5 6 7On/OffSignal Type Frequency*GainRouting**Phase** WaveSystem Toolbar1 23 54 67INTERFACE*Frequency available whenSINE type is selected.** Routing and Phase available inStereo component only.ControlseMo Generator ON button: Turns eMo Generator on and off.Options: On, OffDefault: OffSIGNAL TYPE: Selects the type of signal generated.PINK: Generates pink noise at 20 Hz to 21 kHz; equal energy in all octavesWHITE: Generates white noise at 20 Hz to 21 kHz; equal energy per hertzSINE: Generates pure sine wave toneOptions: Sine, White, PinkDefault: PinkFREQUENCY: Sweep through frequencies manually using the Frequency knob, type in the desired frequency, or use the shortcutbuttons to quickly jump to a predetermined frequency.Frequency range: 20 to 21000 HzDefault: 1000 HzShortcut buttons: 100 Hz, 1 kHz, 10 kHzDefault: 1 kHzGAIN: Adjust the output gain manually using the Gain knob, type in the desired value, or use the shortcut buttons to quickly jumpto a predetermined value.Gain range: -120 to 0 dBDefault: -20 dBShortcut buttons: -6 dB, -12 dB, -20 dBDefault: -20 dBROUTING: Quickly routes the generated signal to the left output, the right output, or both. Available only in the Stereo component.Options: L, L+R, RDefault: L+RPHASE: Flips phase by 180 degrees between the left and right outputs. Available only in the Stereo component.WaveSystem ToolbarUse the bar at the top of the plugin to save and load presets, compare settings, undo and redo steps, and resize the plugin. To learnmore, click the icon at the upper-right corner of the window and open the WaveSystem Guide.。
waves7种效果器jiesh

BBE Sonic Maximizer电脑音频的软效果器里,最有名的人声激励器插件效果器就是传说中的BBE了,它的确能够很好的对人声进行高音激励,使声音更有穿透力,对于初学者来说,这是一款不可多得的经典人声激励器!BBE SonicMaximizer较果器一直以来被音乐爱好者们亲切的称为“穷人的劳斯来斯”。
无论是处理单独的音轨还是合成最终较果,无论是在多么低档的电脑配置环境下,BBE SonicMaximizer总是能以最简单的操作步骤和最高较的运算速度得到与它自身容量,硬件运行环境所不相适宜的惊人好较果具有极强的实用价值。
简单说来,BBE SonicMaximizer是利用激励器的作用原理,通过3个旋扭的组合调节得到非常清晰,透亮的声音较果。
它仍然是以插件形式作用于音频文件。
其中BBE PROCSS FUNCTION相当于一个BBE SonicMaximizer的开关。
当按下它为N时,表示BBE SonicMaximizer开始工作,图中以绿色小灯显示:当按起它为OUT时,表示BBE SonicMaximizer没有作用,以小灯显示。
有了这个按扭就可以很方便地对比BBE SonicMaximizer作用前后的较果了,更方便我们对照地进行调节。
LO CONTOUR表示低频的定向校正:PROCESS表示高频的定向校正:而OUTPUT LEVEL表示输出电平的大小,也就是处理后的湿声比例大小。
在调节OUTPUT LEVEL时要特别注意右边的电平大小,不要出现过载失真的现象。
整个BBE SonicMaximizer就是通过上面3个旋扭进调节的,它们也有下面3种不同的操作方法,分别如下:一,在旋扭上指定的参数位置点击鼠标:二,按住鼠标左键并上下拖动:三,在旋扭上右击并输入具体数值:如果手动的调整还不是很熟悉的话,可以选择BBE SonicMaximizer提供的预置参数:这里有Bass(贝斯),Drums(鼓),Guitsr(吉它),Piano(钢琴),几种乐器的预置参数,也有Mastering(最终处理),Vocal(人声)的预置参数,使用时直接调用就可以了,非常方便。
Waves Renaissance Bass软件音频处理器用户手册说明书

RenaissanceBasssoftware audio processor User’s GuideTable of ContentsChapter 1Quickstar tChapter 2ControlsChapter 3Basic adjustment p r oced ureRenaissance Bass Software Manual12Renaissance Bass Software ManualChapter 1 - QuickstartWaves created the Renaissance Bass to answer the demands of the market:an easy-to-adjust processor that delivered a great sound,quickly.Renaissance Bass uses patented technology that Waves developed for the original MaxxBass processor.Over the years we’ve been able to refine the algorithm for many licensing agreements,and felt it was time to bring the fruits of our labor back to the pro audio world,where it all started.Therefore,we created theRenaissance Bass processor,with significant improvement in the psychoacoustic bass performance,easier adjustment,and clip-free performance.What is the secret?Of course we can’t tell you everything we’re doing,but in general,the process is very simple.The brain can reconstruct a “missing fundamental”from just the harmonics the ear is hearing.For example, if you have a radio with a small speaker,the bass guitar in a rock song,or the double bass in a concerto,can not be reproduced by that very small speaker,that is,the fundamental pitch is too low for that speaker to produce.However,the harmonics are coming out of the speaker (they are higher than the fundamental of course, check your physics of sound book gathering dust on your shelf for a lot more information).Your ear can hear these harmonics,and the “hearing mechanism”,more like“hearing software”of the brain recognises that these harmonics are related to each other (i.e.,correlated),and reconstructs the missing fundamental.Therefore,you hear the low bass note,even though it is not coming out of that speaker.This phenomenon has been well known for centuries (pipe organ builders use exactly this technique to emulate very long pipes that might have been too expensive for the owner).Waves created the MaxxBass algorithm to do exactly this,taking the very low bass (user controllable) and creating harmonics that can be added into the signal (variable by user).Waves has patented this technology, refined it,and has put it into the Renaissance Bass processor.Renaissance Bass Software Manual3Renaissance Bass Software Manual4Chapter 2 - Controls Signal flow in the Renaissance Bass is from the left to right,so it’s easy to see how the original bass signal and the new harmonics are contributing to the total output.On the left side is the meter for the Original Bass level.In the middle is the level meter for the Harmonics that are created.Renaissance Bass Software Manual 5On the right side is the output meter,with infinite peak hold numbers at the bottom of the meters.Here’s a screenshot of a sine wave input to Renaissance Bass,without any Harmonics being added.When adding the Harmonics,the same signal produces this output:Renaissance Bass Software Manual 6In/Out (Original Bass)Switches the original bass (frequencies below the Freq value) in or out of the final out-put signal ofthe processor.Intensity This control is simply a level control ofthe Harmonics that are generated.It rangesfrom -24dB to +24dB.The zero reference level (0.0) is just a rough approximation formost systems to achieve a perceived equal bass level.For example,if you completelyremove the Original Bass (the In/Out button is set to Out),an Intensity setting of 0.0will very roughly give you equal perceived bass by using only Harmonics.Of course thiswill change a great amount depending on the source material,your speakers,the roomyou are in,and so forth.It’s not a recommended starting point,it’s just the middle ofthe control range.The higher the Intensity value,the more Harmonics are added to the output signal.FreqThis simply controls where the process begins (much as in a crossover).Therefore,with the setting shown above (65Hz),all frequencies below 65Hz will have harmonics generated by the system and added by the Intensity control.GainThe output gain control,which is reflected in the output meters immediately beside thegain control.Output metersThese meters show the output level of the processor.Just below each of the meters areinfinite peak hold numeric indicators,showing the highest peak (sample accurate) sincethe last reset.T o reset,just click the meters anywhere.There’s lots more information inthe WaveSystem manual,which explains common controls and amazing shortcuts thatare found in every Waves software processor.At the top of the meters is a clip light.Click it to reset.Renaissance Bass Software Manual7Renaissance Bass Software Manual 8Chapter 3 - Basic Adjustment ProcedureAdjusting Renaissance Bass is basically the same,no matter the application.What you want to do is enhance the perception of bass frequencies in a “proper”mix.It doesn’t depend on the speakers you have (we are assuming that you are using widerange speakers for monitoring).It depends only on your ability to use this tool as in any other (such as EQ,compression,etc.) and to use it in a reasonable way to get a balanced sound.Mixing or masteringLet’s suppose the bass guitar of a mix is a little low.Instead of adding EQ,which would boost the bass and surrounding harmonics,and boost other instru-ments in the same range as the harmonics,use Renaissance Bass.By taking all the frequencies below,say 100Hz,and creating new harmonics that are laid on top of any other sounds,the bass guitar will be heard more clearly,without becoming muddy from boosting other instruments at the same time.Here are the steps for adjusting the previous scenario:In a multitrack mix,you can insert Renaissance Bass on just the track (recommended in this example),or you can insert it on the 2-mix (master output),as you would do in a mastering application.•Set Freq to 100Hz.•Adjust Intensity to a low level (say,-10 or so)•Use the Bypass control to compare between the harmonically-enhanced signal,and no processing.•Adjust Freq and Intensity for desired effect.In this case,a low level of Intensity is probably enough,but of course it depends on the problem you are trying to fix.Fixed installation adjustmentA very different situation would be for a playback system that has a specific speaker system that does not have good bass,such as a kiosk,a commercial installation,an art installation,or any situation where you know exactly what speakers will be used,and have one with you to do the mixes with.For example,you are doing sound for a theme park such as Disneyland,and the speakers are 5”drivers that have a cutoff frequency of about 110Hz.You want to extend the bass response from these speakers,and you know that only these speakers will be used.Now you can do a more severe adjustment to the sound,knowing that the playback will be on this particu-lar system by completely replacing the low bass with harmonics.This keeps the small speaker from trying to reproduce the low frequencies,saves amplifier usage,all while sounding better than the speaker can actually sound!•Set Freq to the cutoff frequency of the playback speaker (in this example,110Hz)•Set Intensity to 0.0,then move upward until the bass is heard in a balanced way.•Fine tune the Freq and Intensity for the smoothest bass response.Frequency sweeps can be used, as well as the source material you are mixing.Renaissance Bass Software Manual9。
WAVES公司的 Renaissance Reverb中文书

WAVES的混响WAVES Renaissance Reverb目录第一章—简介 (3)第二章—快速入门 (4)基本操作方法 (4)第三章—软件的构成 (5)第四章—控制 (5)混响类型Reverb type (5)混响变体Decorrelation (5)混响特性的控制 (5)预延时Predelay (5)时间Time (6)大小Size (7)漫射Diffusion (7)衰减Decay (7)混响电平控制Rverb Levels C ontrols (7)早期反射Early Ref (7)混响Reverb (8)湿/干对比Wet/Dry (8)增益Gain (8)阻尼控制Damping Controls (8)低频Low Frequency (8)低频比率Low Frequency Ratio (8)高频High Frequency (8)高频比率High Frequency Ratio (9)均衡控制EQ Controls (9)低频Low Frequency (9)低频增益Low Gain (9)高频High Frequency (9)高频增益High Gain (9)图形显示 (10)第5章—混响类型 (11)第一章—简介感谢使用Waves Renaissance Reverberator软件。
这个软件是为使用支持DIRECT X专业音频软件的用户设计的。
Renaissance Rever b 软件可以对传统的声音进行极好的控制。
现在市场上有很多处理器用于直接模仿老式乐器的声音。
但是Renaissance Rever b 软件则为用户提供了一个可以创新及灵活应用的、用于模仿老式合成器声音的工具。
我们采用了TrueVer b软件中早期反射声系统作为开始,然后以多种方式对其进行改造,建立一个新的后期混响。
我们同时还建立了一个可视性很强的界面,用于监视反馈信号及调整各项参数。
第二章—快速入门基本操作方法对于干湿对比度基本的使用手法是:•在使用断点插入为一个音轨提供效果时,在调入一个预置方案后,应将湿/干对比度设置成100%。
- 1、下载文档前请自行甄别文档内容的完整性,平台不提供额外的编辑、内容补充、找答案等附加服务。
- 2、"仅部分预览"的文档,不可在线预览部分如存在完整性等问题,可反馈申请退款(可完整预览的文档不适用该条件!)。
- 3、如文档侵犯您的权益,请联系客服反馈,我们会尽快为您处理(人工客服工作时间:9:00-18:30)。
复兴的混响 WAVES Renaissance Reverb 中文说明书第一章—简介感谢使用Waves Renaissance Reverberator软件。
这个软件是为使用支持DIRECT X专业音频软件的用户设计的。
Renaissance Reverb 软件可以对传统的声音进行极好的控制。
现在市场上有很多处理器用于直接模仿老式乐器的声音。
但是Renaissance Reverb 软件则为用户提供了一个可以创新及灵活应用的、用于模仿老式合成器声音的工具。
我们采用了TrueVerb软件中早期反射声系统作为开始,然后以多种方式对其进行改造,建立一个新的后期混响。
我们同时还建立了一个可视性很强的界面,用于监视反馈信号及调整各项参数。
第二章—快速入门基本操作方法对于干湿对比度基本的使用手法是:. 在使用断点插入为一个音轨提供效果时,在调入一个预置方案后,应将湿/干对比度设置成100%。
. 在使用辅助总线为一个音轨提供效果时,在调入一个预置方案后,应将湿/干对比度设置成50%。
使用这个软件的大体过程如下:. 调用一个预置方案。
. 调整用于修饰声音色彩的混响特性。
. 调整混响电平(同早期反射声的比例也随之变化)。
. 调整各均衡参数,对某一频段进行提升或衰减。
. 对各项参数做细微的调整。
在操作界面的最上端,是Waves系列标准的控制模式。
详见“WaveSystem”一章。
该章所涉及的内容在使用所有Waves系列的软件时都会遇到,了解这些控制按钮会为你的操作带来很多方便。
Waves系列软件性能非常出色,它们可以使用户同时控制多个参数。
界面上方的三块图形显示了时间和频率反应特性。
在混响阻尼(Reverb Damping)和混响均衡(Reverb EQ)图形上,只需要简单地拖动图形上的节点,就可以改变混响的阻尼和均衡参数。
在界面的下方有9个推子,这9个推子可分为两类:控制声音的特性和控制音量。
第三章—软件的构成使用软件时,用户可以在音频软件的有关编辑菜单中找到plug-in (插件)菜单,然后就可以找到Waves 系列的插件程序。
其中Rverb即为本手册介绍的“复兴的混响”。
第四章—控制混响类型 Reverb type[Hall 1 大厅1 . Hall 2 大厅2 . Room 房间 . Chamber 会议室 . Church 教堂 . Plate 1 板式1 . Plate 2 板式2 . Reverse 反转 . Gated 门限 . Non-Linear 非线性 . EchoVerb 回声混响. ResoVerb 共鸣混响]在显示界面上面中间部分可以找到混响类型的控制(Reverb type),这个参数可以控制总体的混响类型及早期反射声。
每一种类型如Hall, Room, Plate等都能使声音听起来有很大的变化。
你也可以理解成每换一种混响类型,就相当于更换了混响的核心发动机。
在使用过程中,可以随时更换混响类型。
混响变体 Decorrelation每一个混响类型都有7种变化:Vari 0至Vari 6。
不同的变体使声音在早期反射声内,其左右声道有着不同程度的联系。
尽管效果的变化是极细微的,但是它们对细微地调整声音的音色有着非常重要的作用。
简单地用鼠标点击Decorrelation下的按钮即可在不同的变体间进行切换。
混响特性的控制预延时 Predelay参数范围是:–160.0 至 +160.0ms (毫秒)。
这是一个典型的预延时控制,它可以通过对发送给后期混响发生器的信号进行延时来对后期混响进行补偿。
我们还提供了一个特殊的功能就是允许预延时为负数,这时延时的实际是直达(干)信号。
如下图所示:当预延时参数为负数时,延时参数变红,提醒你这时所延时的信号为干信号(由Wet/dry控制的干信号)。
注意Wet/dry控制推干的参数值必须小于100,这时在负数区域内调整预延时参数时才能在图形窗中看到一根垂直的红线移动,同时可以听到被延时的直达声。
从红线的高度和位置可以很直观地看到直达声和效果声的比例以及直达声被延时量,如下图所示:在以上图例中,采用的是反转类型混响,早期反射声为100微秒,在其后的较高的红线为直达信号,这时的湿/干对比度(wet/dry)为50。
时间 Time参数值范围是:0.1 至 20.0s (seconds)设置混响后期的标准延时时间。
大小Size参数值的范围是:1.0 至 100.0。
可以控制各种不同的参数,和混响类型的选择有关。
这些参数包括早期反射声的空间大小,后期混响的尺度等。
漫射Diffusion参数值范围是 0.0 到 100.0。
控制反馈给后期混响的直达声和早期反射声之间的比例。
当这个参数值为0时,漫射为最小,反馈给后期混响的声音将全部是直达声。
当这个参数值为100时,漫射为最大,反馈给后期混响的声音全部是早期反射声。
衰减 Decay参数值范围是从0.0 到“Linear”(“线性”)。
这个参数可以使后期混响以非线性的方式存在。
这个参数在最顶端的时候是线性的,当向下拖动这个参数推杆,就会逐渐变成非线性,直到底部的完全非线性(最小)。
假设混响时间足够长,可以进行门限处理(当大于1秒时,建议使用3作为开始),则只要向下拖动这个推杆,就可以使所有的预置效果变为非线性(例如“门限混响”)。
混响电平控制Rverb Levels Controls早期反射Early Ref.参数范围从0.0 到 Off(关)可以控制早期反射的电平。
混响Reverb参数范围是从 0.0 到 Off(关)。
控制后期混响的输出电平。
湿/干对比 Wet/Dry参数范围是从0到100。
控制“干”信号和“湿”信号(早期反射+后期混响)之间的对比度。
增益 Gain参数范围是从–24.0 到 0.0。
用于控制输入信号的增益,以dB为单位。
阻尼控制 Damping Controls低频 Low Frequency参数范围是从16 到 1600 Hz定义阻尼的低频点。
低频比率Low Frequency Ratio参数范围是从0.10 到 2.00 (系数)控制混响在低频点以下被阻尼的程度。
高频 High Frequency参数范围是从1000 到 2100 Hz定义阻尼的高频点。
高频比率 High Frequency Ratio参数范围是从0.10 到 2.00 (系数)控制在高频点以上信号被阻尼的程度。
均衡控制 EQ Controls低频 Low Frequency参数值范围时从16 到 1600 Hz控制混响均衡的低频点,这个参数可以影响早期反射及混响。
低频增益 Low Gain参数范围是–24.0 到 + 12.0。
对低频点以下的部分进行增强或衰减。
当参数值达到–24.0时,均衡器就变成了一个低切滤波器。
高频 High Frequency参数范围从1000 到 2100 Hz。
控制混响均衡的高频点。
这个参数可以影响早期反射及混响。
高频增益 High Gain参数范围是从–24.0 到 + 12.0。
对高频点以上的部分进行增强或衰减。
当参数值为–24.0时,均衡器则变成一个高切滤波器。
图形显示混响阻尼混响均衡以上两个图形分别显示混响阻尼及混响均衡的情况。
在使用时,用户也可以直接拖动接点,同时改变频率及比率(或增益)这两个参数。
时间响应以上图形以橘黄色的竖线表示早期反射声及其间隔。
红色三角则表示后期混响。
早期反射声的间距则依赖当前所选的混响类型,可以使用不同的方式进行控制。
在大多数情况下它们反映了声音的空间大小。
这些竖线是不可以被拖动的。
第5章—混响类型RVerb 所提供的混响类型有以下几种。
不同的混响类型是改变声音质地的核心。
大厅混响一般都作为混响类型的首选,用于模拟音乐厅或演奏厅的声场环境。
这种大的房间的效果听起来可以使声音悦耳动听。
平直的后期混响及频率响应,加上均匀的早期反射,大厅混响使声音听起来富有个性并使人感到舒服。
Hall 1 –大厅1。
用于模仿大的空间如音乐厅、排练厅等。
Hall 2 –大厅2。
上述效果的一个变化。
在中上段具有较长延音时间。
这种声音效果具有较强的穿透力,使声音听起来不浑浊。
Room –房间。
这是一个泛称,房间大小从小的密室到大的会议中心不等。
但总体来说房间要比演奏厅小一些,其早期反射声较强且密。
Chamber –混响室。
在电子混响器应用之前,人们通常是在工作室中建造一个称为“echo chambers”(回声的房间)的建筑以人工的方式建立混响,实现方法是在具有不规则反射的房间中安放不同的话筒及音箱(至少是一个话筒,一个音箱)。
混响室的声音同房间的声音不同,它们缺少强的早期反射及声音染色。
Church –教堂。
通常,几乎所有的老式大教堂在建造时都没有考虑到声音的传送问题,人们只考虑到建筑美学方面的因素尽量把教堂建造得雄伟、神秘。
这种教堂的构造非常适合管风琴及唱师班的声音,但却不适合人声。
现代的教堂设计则更加注重声学因素。
在本书复兴的混响中所使用的教堂混响,是模仿过去欧式大教堂的声场环境,这种混响具备更长的混响时间,以及较强的后期反射声。
Plate 1 –板式1。
最初的板式混响器是用一个很薄的金属板悬浮在一个盒子中,再配备一个传感器和拾音器。
声音在金属中的传送是非常快的,因此早期反射声非常快并且混响密度非常高。
板式混响的声音特点是明亮且浓厚。
Plate 2 –板式2。
其声音味道和板式1不同,主要体现在早期反射声上。
Reverse –反转。
早期反射声随着时间的推移逐渐变强,和正常情况早期反射声逐渐变弱正好相反。
最好使用断点插入模式来使用这种效果,将湿/干对比度设置成大约50%左右,将tPredelay(预延时)参数设置成负数,并设置Size(大小)参数,使后期反射声在直达声之前。
当然,为了保持同使乐段的其它声部同步,还需要其它轨的PreDelay 参数设置成同样的数值。
Gated –门限。
前面已经提到衰减的概念,衰减控制将使任何类型的效果具有门限声音。
但这种控制还会改变早期反射的特性。
当改变衰减参数时,后期混响将变为非线性,早期反射变得较短并且相对电平也会起变化,即加入了门限特性。
Non-linear –非线性。
大多数情况下,非线性混响是针对门限声音而言的。
此处所提到的非线性则是指早期反射有较长的偏移且出现得较晚。
当Size参数较大时,早期反射在后期表现较为紧凑;当Size参数较小时,早期反射则在前期表现得非常紧凑。
EchoVerb –回声混响。
这种音响效果富有活力,声音不是很平滑,有很多小的早期反射和回声。
当Size参数很小时,声音尖锐而干脆;当Size参数为中等时,声音较强且具有很多跳跃感的混响。
当Size参数很大时,声音听起来散布广泛且有拍掌式的回声效果。