ge洗碗机说明书
科勒洗碗机K-24257T-NA K-26594T-NA 使用说明书
1430480-T01-A© Copyright Kohler China Investment Co., Ltd. 2020© 版权为科勒(中国)投资有限公司所有 2020使用说明书洗碗机(家用嵌入式型 - 450系列)K-24257T-NA K-26592T-NA K-26593T-NA K-26594T-NA科勒(中国)投资有限公司 上海市静安区江场三路158号 邮编:2004361. 安全注意事项 (1)2. 使用注意事项 (2)3. 使用前的确认及准备 (3)4. 各部位名称 (4)5. 快速使用指南 (7)6. 餐具摆放 (8)7. 关于洗剂 (13)8. 功能说明 (15)9. 变更设置 (17)9. 保养 (18)10. 预防冻结 . 长期不使用时 (20)11. 常见问题 (21)12. 故障判断 (22)13. 故障代码 (24)14. 规格 (26)尊敬的用户:科勒客户服务中心热线号码:800 820 2628 /400 820 2628衷心感谢您购买科勒产品。
本产品只限于家庭使用。
使用产品前请仔细阅读本使用说明书,并请妥善保管。
使用前请务必仔细阅读“安全注意事项”(第 1 页)。
本说明书的插图形状、颜色可能与实物有所不同,请以实物为准。
特别声明:本资料上所有内容均经过认真核对,如有印刷错误或内容上的误解,本公司保留解释权。
另:产品如有技术改进,会编进新版手册或说明书中,恕不另行通知。
产品外观如有改动,请以实物为准。
请勿擅自自行拆机,请依照保养事项步骤进行维护。
※另附安装说明书和保修证(保留备用)1430480-T01-A-1-为了防止人身伤害及财产损失,请务必遵守以下内容。
警告!本产品不能由儿童或有体力、感官或精神缺陷的人或缺乏经验知识的人使用,除非有负责他们安全的人对其进行监督和指导。
应照看好儿童,确保他们不玩耍本产品。
请勿对机体等泼水、洒水。
(可能导致火灾、触电)请勿靠近火源、热源。
洗碗机使用指南

洗碗机使用指南洗碗机是现代厨房中的一项重要工具,它能够简化我们的洗碗工作并提高效率。
然而,为了最大程度地发挥洗碗机的作用,我们需要正确地使用它。
本文将为您提供一份洗碗机使用指南,以确保您能够正确操作洗碗机并获得最佳的洗碗效果。
1. 准备工作在使用洗碗机之前,首先确保您已将餐具、餐盘和餐具筐中的残留食物清除干净。
这可以通过在水槽中预洗餐具来完成。
确保没有大块的残留食物堵塞洗碗机的过滤器。
2. 操作方式根据您的洗碗机型号,选择适当的洗涤程序和设置。
通常,洗碗机上会有清洗、快速洗和节能洗等不同的模式可供选择。
根据您的需求选择最合适的模式。
3. 摆放餐具将餐具和餐盘摆放在洗碗机的餐具筐中。
确保餐具之间有足够的间隔,以确保水流可以顺利通过并达到最佳的清洁效果。
餐具的柄应朝下以避免倒立的时候积水。
4. 加入洗碗剂将适量的洗碗剂加入洗碗机的洗涤剂盒中。
请务必使用洗碗机专用的洗碗剂,以避免对洗碗机造成损坏。
根据洗碗机型号和使用说明书上的建议,选择正确的洗涤剂用量。
5. 清洗过程关闭洗碗机门并启动洗涤程序。
在洗碗机的运行过程中,确保没有其他物品堵塞洗碗机的喷嘴或旋转臂。
同时,注意避免触碰洗碗机内部的加热元件。
6. 清洗结束清洗程序完成后,等待洗碗机自动关闭或手动关闭洗碗机的电源。
打开洗碗机门时要小心,因为里面可能有残渣的热气。
7. 餐具护理当洗碗机完成任务后,及时取出餐具,并将其隔离放置以免交叉污染。
您可以将餐具用柔软的毛巾擦干,以确保它们完全干燥和储存。
8. 清洗和维护定期清洁洗碗机,以保持其正常运行和延长使用寿命。
清洗洗碗机的过滤器、喷嘴和旋转臂,并定期查看水管和水箱是否有任何问题。
如果发现故障或异常现象,应及时联系专业技术人员进行检修和维护。
总结:正确地使用洗碗机可以大大减轻我们的家务负担,并确保餐具清洁卫生。
在使用洗碗机之前,准备工作的准确和细致是至关重要的。
正确选择洗涤程序和设置,并妥善摆放餐具,加入适量的洗碗剂,并注意洗碗机的清洗和维护。
洗碗机使用指南说明书
The filters in the water connection of the supply or AquaStop hose are blocked. 1. Switch off the appliance. 2. Pull out the mains plug. 3. Turn off the water tap. 4. Unscrew the water connection. 5. Remove the filter from the sup-
and remove. 2. On initial start-up: Fill the dispenser right up with
water.
Adding rinse aid
1. Press the catch on the lid
of the dispenser for rinse
2
aid and lift .
Setting the water softening sys-
H02
tem
H03
1. Press .
H04
2. To open the basic settings, press
H05
for 3 seconds.
H06
a The display shows Hxx.
H07
a The display shows .
6. Re-assemble the filter system.
7. Insert the filter system into the appliance and turn the coarse filter clockwise. Make sure that the arrow markings match up.
洗碗机作业指导书
洗碗机安全操作指导书一、洗碗机开机前准备:1.该设备必须专人负责,操作,维修及保养;2.操作人员需学习洗碗机《使用说明书》,了解该设备的基本结构和性能,熟练掌握操作规程,并严格按照操作规程进行操作;3.洗碗机用电量大,为防止导线超负荷,须采用单独线路供电,同时安装合适的熔断器和使用耐高温的绝缘材料并加装漏电保护器;4.开机前加满洗缸水,点检机台外壳是否完整有无破损,安全防护罩是否牢固齐全;机械部件传动、润滑是否良好有无异音,各部零件有无松动;5.点检电气装置是否完好,各按钮是否灵敏,仪表指针是否正常,接地是否正常;6.检查水箱内是否有异物,各管路是否畅通,加热,喷淋,密封功能是否正常,一切正常方可投入使用;二、操作程序:1.严格按照检查标准进行点检;2.检查完毕后,打开注水阀,注入冷水,水注满后即关闭进阀门;3.开机前40分钟准备预热工作;4.开启蒸汽总阀门,打开汽门将各水箱的水升温到不低于85℃,然后关闭小汽门继续加热,保证水箱内水的温度不致降低;5.到电器柜合闸,接通洗碗机电源,启动输送带和水泵开关,空车运转几分钟,并检查机械部件传动平稳,润滑良好、无异音,各部零件无松动;6.正常后开始洗碗,打开消毒汽门,运转过程中手不要放在输送带上;7.在清洗过程中,餐具放置均匀、不重叠并倾斜放在输送带上,小件餐具要放在洗涤筐内。
餐具在放进水箱前应先粗洗,对已干了的淀粉等污垢需先浸泡,以减少过滤网以及洗涤喷嘴的堵塞,保证洗涤效果;8.运转中发现异常现象和不正常的声音要立即停车,及时清除餐具的碎片;如有紧急情况可在尾端侧边按OFF钮,即停止运转;9.机器运行中,专职人员不得擅离职守,一定要做到人离停机;三、操作完毕后:1.断开洗碗机电源总开关;2.打开清扫阀门,用刷子或抹布清理洗碗机的出入口,把污物冲入滤网;3.打开排水阀,排掉各水箱的水。
用水管冲洗洗碗机内部;4.取出滤网,清理污物,待水排尽后方可取出吸入滤网,吸入滤网必须每次取出清理;5.将取出滤网放回原处,开启窗门使洗碗机内部干燥;阜阳市棋胜后勤管理服务有限公司。
海尔 EYBW142286GGU1 14套独嵌两用全自动洗碗机 使用说明书
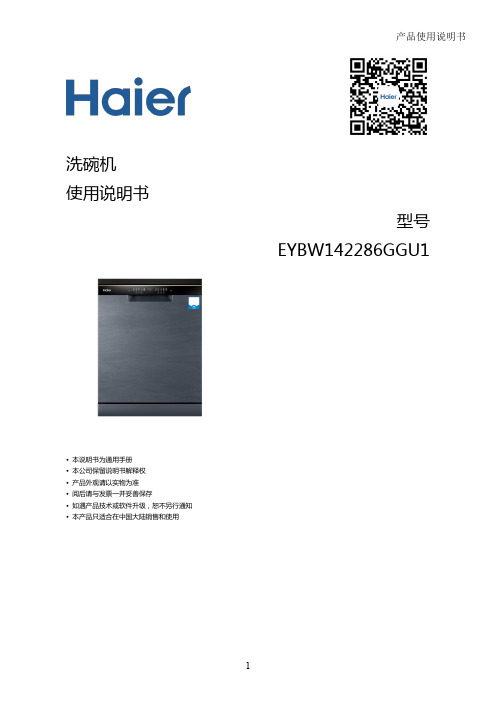
洗碗机使用说明书型号EYBW142286GGU1•本说明书为通用手册•本公司保留说明书解释权•产品外观请以实物为准•阅后请与发票一并妥善保存•如遇产品技术或软件升级,恕不另行通知•本产品只适合在中国大陆销售和使用一、产品介绍1.1.部件介绍1.1.1.各部件名称本图片为示意图,由于产品迭代升级,产品外观、颜色及功能部件可能与该图片不一致,请以实际产品为准。
1.1.2.附件清单1.2.控制面板本机控制面板为触摸屏。
为了您的安全操作和使用体验,操作前请务必确保手是干的,否则将会影响触控灵敏度。
二、使用说明2.1.注意事项2.1.1.标志符号说明本产品属于I类电器,请您使用时注意用电安全。
为了您能更好的使用本产品,防止人身伤害及物品损坏事故,请重点关注安全注意事项内容,并运用生活常识谨慎操作。
对因使用不当造成的损失,本公司不承担相关责任。
请务必仔细阅读并遵守本说明书中有以下标志符号的内容。
2.1.2.电源及安放场景电源•本产品使用交流220V/50Hz电源,用电环境应有规格适宜的保险丝等过载保护装置,电表、电线、插座应能承受10A以上的电流。
•电源必须使用三孔独立插座,插座中的零线、火线、地线应接线正确且可靠。
电源的地线应正确接地并远离地下水管及电线,如果用电环境不能达到安全要求,如无接地线等,必须由专业人员处理到位。
•请使用原装电源线,不要擅自更换或改装电源线;保持电源线向下延展,确保电源线被固定在特定位置,过度弯曲、拉扯、缠绕、捆扎电源线或在电源线上放置重物可能导致电源线破损,均可引起触电或火灾。
•如果电源线损坏,为了避免危险,必须由制造商、其维修部或类似部门的专业人员更换。
•洗碗机电源插座不能安装在机器后面,必须能随手触及,便于断开电源。
•禁止用潮湿的手接触、插拔电源插头,以防触电。
不要通过拽拉电源线来拔下电源插头。
•任何情况下禁止拆除或改装电源插头的接地插脚。
安放场景•洗碗机安放位置应远离热源、避免太阳直射,以免外壳涂层褪色或脱落。
2017年洗碗机系统使用说明书(word版本)

洗碗机系统使用说明书目录一.养成安全第一的好习惯二.控制板视图三.洗碗机内部视图四.技术参数五.盐、洗涤剂和助清剂六.将餐具装入洗碗机七.运行洗碗机八.洗涤循环调整按钮九.洗涤循环表十.节能密诀十一.如何保存洗碗机十二.清洗及专门维护十三.故障排除十四.安装一.养成安全第一的好习惯注意:请仔细阅读本手册的安项内容, 它向你提供了有关洗碗机安全、正确安装以及使用和维护的重要内容。
该洗碗机符合EEC下列标准:-73/23EEC19/02/73(低压)规定以及其后的修定本;-89/336/EEC03/05/89(电磁兼容性)标准以及其后的修定本。
1.小心处置包装材料。
2.除去包装后,请检查确认机器是否有损,如有疑惑,请与Ariston 授权的技术人员联系。
3.该洗碗机仅供成年人用于洗涤家用碗碟和烹饪用具。
4.使用洗碗机时,请遵守以下基本规则:――光脚或手脚潮湿时,严禁触摸洗碗机;――严禁使用接线板和多孔插座;――安装时,禁止将电源线过度拉拽或弯曲;――如果机器不能正常运转或有必要维修,切断电源。
5.将洗涤剂存放在小孩接触不到的地方,机器工作时,让小孩远离洗碗机。
6.洗碗机不能安装在室外,即使有顶蓬的地方也不行,将其暴露在雨中或外界环境下是十分危险的。
7.洗涤过程中或洗完之后,不要触摸发热元件。
8.机门打开时,禁止斜靠或坐在门上,因为这样可使机器翻倒。
9.如果机器不能正常工作,关掉进水,切断电源(拨下电源插头)。
如果您自已不能解决问题,请与维修中心联系。
10.只有被授权的技术人员方可进行维修。
11.不再使用机器时,通过切断电源线和拆下门锁,使机器不能运行。
二.控制板视图A开关钮 E 按钮B开关灯 F 按钮C开门把手H 低盐指示灯D选择钮三.洗碗机内部视图E上栅架F顶部喷洒臂G栅架高度调节器H 下部栅架I 底部喷洒臂J 盐容器盖K 洗涤过滤器L 洗涤剂和助清剂分配器四.技术参数五.盐、洗涤剂和助清剂盐:水的硬度随地域不同而变化。
餐饮设备清洁和卫生操作规范:洗碗机说明书
本规程由麻州大学(阿姆斯特)爱森伯格管理学院酒店及旅游管理系、麻州大学扩展部营养教育项目、麻州中小学教育部和营养、健康、安全办公室制定。
麻州大学扩展部与美国农业部合作是社会平等机会的提供者和雇用单位。
请向你当地的扩展办公室咨询有关残疾人住房的信息。
如果你有任何关于歧视的投诉,请致电麻州大学扩展部主任:413-545-4800。
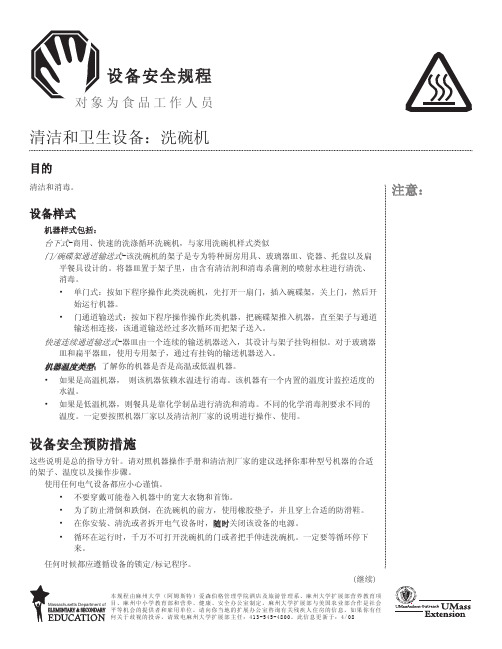
此信息更新于:4/08设备安全规程为食品工作人员注意:目的清洁和消毒。
设备样式机器样式包括:台下式-商用、快速的洗涤循环洗碗机,与家用洗碗机样式类似门/碗碟架通道输送式-该洗碗机的架子是专为特种厨房用具、玻璃器皿、瓷器、托盘以及扁平餐具设计的。
将器皿置于架子里,由含有清洁剂和消毒杀菌剂的喷射水柱进行清洗、消毒。
• 单门式:按如下程序操作此类洗碗机,先打开一扇门,插入碗碟架,关上门,然后开始运行机器。
• 门通道输送式:按如下程序操作操作此类机器,把碗碟架推入机器,直至架子与通道输送相连接,该通道输送经过多次循环而把架子送入。
快速连续通道输送式-器皿由一个连续的输送机器送入,其设计与架子挂钩相似。
对于玻璃器皿和扁平器皿,使用专用架子,通过有挂钩的输送机器送入。
机器温度类型:了解你的机器是否是高温或低温机器。
• 如果是高温机器, 则该机器依赖水温进行消毒。
该机器有一个内置的温度计监控适度的水温。
• 如果是低温机器,则餐具是靠化学制品进行清洗和消毒。
不同的化学消毒剂要求不同的温度。
一定要按照机器厂家以及清洁剂厂家的说明进行操作、使用。
设备安全预防措施这些说明是总的指导方针。
请对照机器操作手册和清洁剂厂家的建议选择你那种型号机器的合适的架子、温度以及操作步骤。
使用任何电气设备都应小心谨慎。
• 不要穿戴可能卷入机器中的宽大衣物和首饰。
• 为了防止滑倒和跌倒,在洗碗机的前方,使用橡胶垫子,并且穿上合适的防滑鞋。
• 在你安装、清洗或者拆开电气设备时,随时关闭该设备的电源。
• 循环在运行时,千万不可打开洗碗机的门或者把手伸进洗碗机。
洗碗机说明书节能洗碗机说明书
洗碗机说明书大家肯定都有过这样的经历:油腻腻的碗筷,冬天冰冷的洗碗水…看着就难过发愁!真是不想洗,但是总让老婆或者爸妈洗也心疼啊!可是市场上的洗碗机不说价格多贵,动不动就上万元,而且体积也大,不是新装修的房子都没办法嵌在橱柜里,而且洗一次要一个多小时,时间太久!最关键的是洗不干净,不说洗杯子了,连碗底都洗不干净!还费电费水容易坏。
由于自己也深受其害,经常为洗碗郁闷不已,所以和很多朋友大量查找国内外的洗碗机,终于找到也最适合中国习惯的洗碗机,既可洗碗,又能洗碟、洗盘、洗餐盒、洗杯、还能给宝宝洗奶瓶!还有干净快速,节能环保,方便移动,寿命超长等特点,家用商用都适合,价格大家都想象不到的低,多少?才一百多!这么好的产品都动心了吧?!那咱们赶紧来详细了解一下吧洗碗机性能、产品参数、安装方法、使用方法、用后清洁等大家关心的问题吧。
节能洗碗机-新时代的宠儿多功能节能环保洗碗机属国内首创,不需要接电源,真正实现零电耗,创造性地诠释了最具清洁功能的刷洗功能,适用于各种大小,各种材质的碗、碟、餐盒、餐盘、杯子、奶瓶、刀叉、筷子等的清洗!外形采用国际流行的流线型设计,设计新颖,操作简单,方便实用!独特的洗碗双毛刷配合设计和洗杯毛刷设计可异常干净地清除各种死角,彻底解决一般洗碗机洗不到碗底杯底的烦恼!还具有去污能力强,占地小,价格实惠,快捷,方便,省水,省电,安全可靠,经久耐用,能洗各种形状碗、碟、盘、杯、奶瓶等,不需培训即可操作等优点。
晟宇伟业公司节能洗碗机速度极快,熟练的话可达到600~1000个/小时,不仅适用于家用,也适合商用!而且拥有最好的性价比,每台都经过严格的测试和检验,设备的各项性能均达到或超过国内外同类产品水平,产品远销到美国,德国,日这,澳大利亚,英国,加拿大,奥地利,匈牙利等十几个国家,获得一致好评!比于昂贵的,体积庞大,又耗电又耗水,时间长,餐具易破,容易损坏,不易维修,需要专业培训的大型洗碗机来说,这款洗碗机能完美解决上述大型洗碗机易出现的烦心问题。
智能洗碗机产品说明书
智能洗碗机产品说明书尊敬的用户,欢迎选购我们的智能洗碗机。
本产品是一款具有先进科技的家用电器,能够为您提供高效、方便的洗碗体验。
为了让您更好地了解和使用本产品,我们将在以下几个方面对其进行详细说明。
在阅读本说明书前,请您仔细阅读产品使用手册并按照手册的指引正确使用本产品。
一、产品概述智能洗碗机是一款具有多项智能功能的家电设备。
它采用先进的洗涤技术和高效的洗涤剂,能够快速、彻底地清洁各类餐具、酒杯、餐盘等。
本产品不仅能够节省您的时间和精力,更能保证洗涤效果的质量。
二、产品特点1. 高效洗涤:本产品采用先进的洗涤系统,能够高效而彻底地清洗各类餐具。
独特的喷淋设计和强力喷嘴水流,可以确保每个角落都得到充分的清洁。
2. 多功能洗涤模式:智能洗碗机提供多种洗涤模式的选择,包括普通洗涤、强力清洗、节能模式等。
您可以根据自己的需求选择最适合的洗涤模式,以达到理想的洗涤效果。
3. 智能控制系统:本产品配备先进的智能控制系统,能够根据不同的洗涤需求,自动调节洗涤时间、温度和水流等参数,以实现最佳的洗涤效果和节能环保的使用体验。
4. 安全可靠:本产品通过严格的质量控制和安全认证,具备稳定可靠的性能。
内置的安全保护装置能够在出现异常情况时及时停机,保证用户的使用安全。
5. 静音设计:智能洗碗机采用静音技术,运行过程中噪音小,不会对您的正常生活产生干扰。
三、使用说明1. 准备工作:在使用洗碗机前,请确保电源连接正常,并检查水源和排水口是否畅通。
同时,需要将餐具、酒杯等放入洗碗机的合适位置,并根据洗涤不同类型的餐具选择相应的洗涤模式。
2. 操作方法:本产品提供直观简单的操作界面,您只需要按照界面上的指示按键即可选择洗涤模式和启动洗涤程序。
在洗涤过程中,请勿打开洗碗机的门,以免热蒸汽对身体产生伤害。
3. 清洁和维护:使用一段时间后,请按照产品手册的要求对洗碗机进行清洁和维护。
及时清理滤网和水箱,保持洗涤系统的良好状态。
同时,请定期检查电源线和排水管道,确保无异常。
电子洗碗机说明书.pdf_1702006057.514806
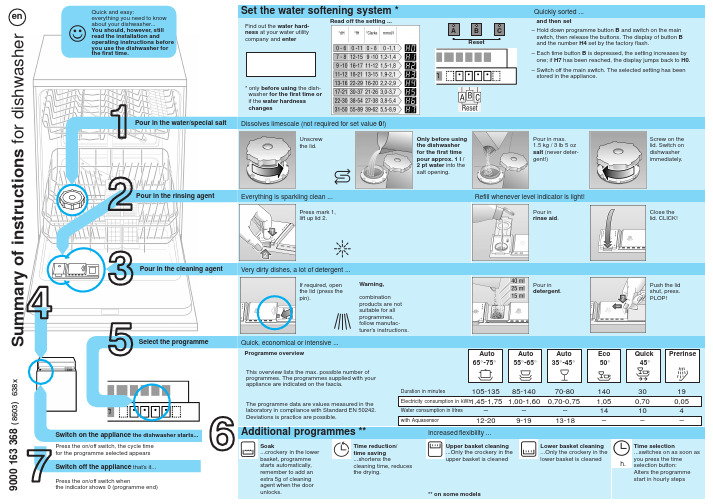
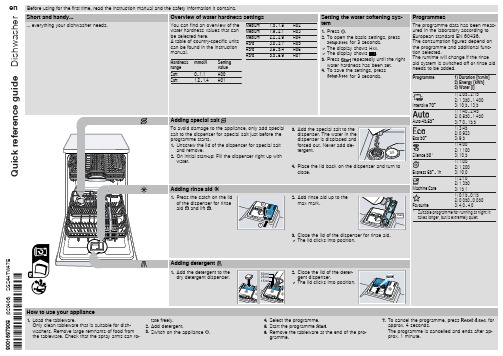
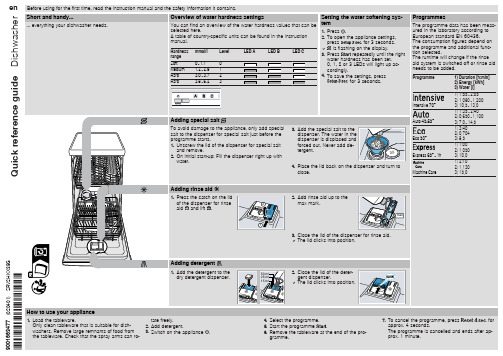
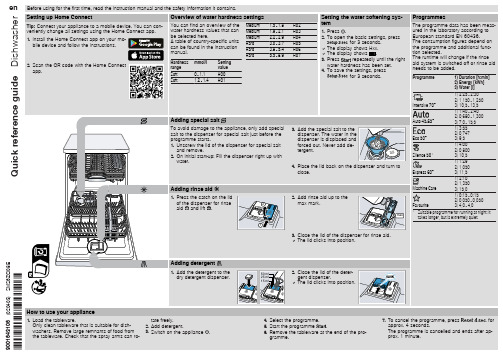
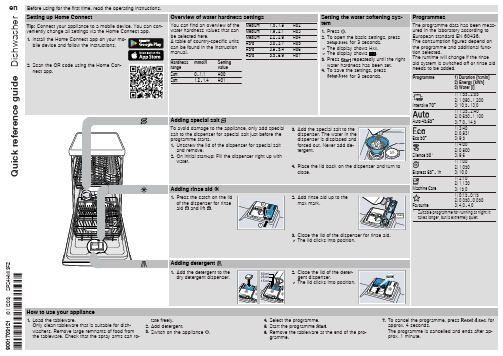
Quick and easy:everything you need to knowabout your dishwasher...You should, however, stillread the installation andoperating instructions beforeyou use the dishwasher for the first time.Switch on the appliance the dishwasher starts...Switch off the appliance that’s it...Press the on/off switch, the cycle time for the programme selected appearsPress the on/off switch whenthe indicator shows 0 (programme end)Pour in the water/special saltPour in the rinsing agentPour in the cleaning agentSelect the programme S u m m a r y o f i n s t r u c t i o n s f o r d i s h w a s h e r9000 163 368(8603) 638xenSet the water softening system *Quickly sorted ...Find out the water hard-ness at your water utility company and enter* only before using the dish-washer for the first time or if the water hardness changesRead off the setting ...and then set– Hold down programme button B and switch on the main switch, then release the buttons. The display of button B and the number H4 set by the factory flash.– Each time button B is depressed, the setting increases by one; if H7 has been reached, the display jumps back to H0.– Switch off the main switch. The selected setting has been stored in the appliance.ResetA BCDissolves limescale (not required for set value 0!)Unscrew the lid.Only before using the dishwasher for the first time pour approx. 1 l /2 pt water into the salt opening.Pour in max.1.5kg / 3 lb 5 oz salt (never deter-gent!)Screw on the lid. Switch on dishwasher immediately .Everything is sparkling clean ...Refill whenever level indicator is light!Press mark 1,lift up lid 2.Pour in rinse aid .Close the lid. CLICK!Very dirty dishes, a lot of detergent ...If required, open the lid (press the pin).Warning,combination products are not suitable for all programmes, follow manufac-turer’s instructions.Pour in detergent .Push the lid shut, press.PLOP!Quick, economical or intensive ...Programme overviewThis overview lists the max. possible number of programmes. The programmes supplied with your appliance are indicated on the fascia.The programme data are values measured in the laboratory in compliance with Standard EN 50242.Deviations is practice are possible.Cleaning the waste-water pump ** With some models–Ladle out water and remove filters–Unscrew cover (Torx T20)–Check area of fan impeller for foreign objects–Screw in cover and insert filtersInsert lower arm ...Screw in upper armEliminating minor faults yourself ...... Self–help pays!Possible CauseDevice does not work/stops Check water supply Supply fitting not openSupply hose kinkedSupply fitting jammed or calcifiedOpen supply fitting.Lay supply hose without kinks.1. Unscrew water connection.2. Clean filter in the water connection.3. Flow rate must be min. 9 l/min whenthe water inlet is open.If the flow rate is less, replace thesupply fitting.RemedyPlastic parts / parts of Too little cleaning productDiscoloration caused by food colourings(tomato sauce)Follow manufacturer’s specifications(detergent).Discoloration is quite safe; fades aftersubsequent rinse cycles.Residual water in the device Waste-water pump blockedProgramme not yet ended Clean waste-water pump (see above). Switch on appliance and close or terminate programme (see Terminating the programme).Cutlery not rust-proofHard knife blades are more susceptible Extraneous rust Use dishwasher-proof cutlery.Never wash rusting parts in theappliance.Fault Possible CauseStains and streaksMilky residues on dishes(can be removed)Rinse aid dosage too high / too lowMilky film, glasses cloudy /dull (cannot be removed)Water softening system incorrectly set;no special saltDishes not cleanSand or grainy residueson dishesUtensils are situated too close to eachother or on top of each otherToo little cleaning productUnsuitable programme selectedSpray nozzles blockedFilters dirty, not installed securelySpray arms blockedStopping the programme ...。
洗碗机操作说明
70℃长时间洗涤。
洗
用冷水漂洗,用热
水漂洗,干燥。
标
用冷水预热。在
准
55℃长时间洗涤。
洗
用冷水漂洗,用热 水漂洗,干燥。
轻
用冷水预热。在
柔
50℃长时间洗涤。
洗
用冷水漂洗,用热 水漂洗,干燥。
玻
在 45℃下洗涤。
璃
用冷水漂洗,用热
洗
水漂洗,干燥。
快
在 40℃下短时间
速
洗涤。用冷水漂
洗
洗。
冲
短时间冷水洗涤,
文件编号
洗碗机操作说明
文件版本
A/0
生效日期
文件页码
目 的:
规范仪器的操作步骤,提高测试的准确度。
适用范围:
适用于家用和类似用途洗涤测试。
责任部门:
测试中心
操作说明:
1、 将进水管和出水管接通。 2、 打开洗碗机门依据“程序使用方法”打开对应试剂添加口盖分别加入洗
涤剂、漂洗剂及食盐,并盖好试剂添加口盖。 3、 放入测试物品并摆放合理,打开水龙头,接通电源,关闭洗碗机门。 4、 按下电源开关,然后选择所需的程序按键按下(程序自行运行至结束)。 5、 如果需要预约延时启动功能或 1/2 洗涤时,应先按下预约延时启动按钮
编制 日期
审核 日期
批准 日期
者异味。 3、 在到入漂洗剂时,注意不要使漂洗剂溢出。 4、 测试人员应严格按操作说明进行操作,并随时注意观察是否有异现象,
以及及时处理 5、 非实验室人员,不得使用本仪器。
洗碗机操作说明
文件编号
文件版本
A/0
生效日期
文件页码
程序使用方法:
表示有效 - 表示无效
洗碗机说明书
E n g l i s hDISHWASHERINSTRUCTION MANUALModel:DW-14F1(SS)-NZRead these instructions carefully before using your DISHWASHER, and keep it carefully.SAFETY INSTRUCIONSAll instructions described should be carefully read and followed.These instructions are precautions to prevent the risks of serious injury or death of the user, and any damages to property.(*1) Serious injury - injury which requires hospitalization, lengthy treatment, or blindness, hot and cold skin burn, electric shock, broken bones or poisoning.(*2) Injury - injury, skin burn or electric shock which does not require hospitalization or lengthy treatment.(*3) Property loss - extended loss of houses, furniture, domestic animals or pets.02E n g l i s h03040506Handle the package of the dishwasher with extreme care.All packages are recyclables.Plastic parts are marked with abbreviation of international standard;TreatmentsPE Polyethylene, e.g., tableted package material Polystyrene, e.g., packing material Polymethyl, e.g., plastic clip Polymer, e.g., control panel Polypropylene, e.g., inner wallPS POM ABS PPE n g l i s hSuch warning sign is used to prevent dangers to you and others.Please follow it strictly.After reading, please store it properly for use just in case.07Recognize the dishwasher Dishwasher features Control panel 101101Please carefully read the instruction manual before using the dishwasher,and this is helpful for the use and maintenance of the product.Contents08Start upCleaning and care Filter cleaning Spray arms cleaning Care and maintenanceUse the dishwasher Adding rinse aid to the dispenser 13020304Rinse aid and detergent 162425261714Program Setting Washing program Changing the program mid-cycle Put additional dishes in Basket used tipsInstall dishwasher bowl basket 1819Adding rinse aid to the dispenser 221415End of washing program1509TroubleshootingBefore connecting customer service center Error code Installation Product dimension Power connection 052728303233Specification 06Water connection Connection of drain hoses282934Product ficheRecognize the dishwasherDishwasher featuresImportant:Before using the dishwasher for the first time, read following instructions to ensure the best results.10FilterLower spray armDispenserCutlery basketLower basketUpper spray arm Upper basket Cutlery rackCup rackControl panelE n g l i s h1112The table below shows which programs are best for the levels of food residue on Washing programProgram SettingE n g l i s h13them and how much dishwashing powder is needed. It also show various information about the programs. Dishwashing powder (g)Highest Water Temperature65℃Time (min)Power (kWh)Water(L)ProgramAUTO120-1900.9-1.311-1550℃1750.8GLASS(*AS/NZS 2007.1)60℃1250.914.565℃90 1.211.5RAPIDNOTE: Select Hygiene cycle for better drying performance.45℃300.6HYGIENE75℃200 1.9718.55/27.5Or all in 15/27.5Or all in 15/27.5Or all in 15/27.5Or all in 125Or all in 12512.511.5Start upChanging the program mid-cycle1. The plug shall be firstly plugged into the socket. Power supply shall be of 220-240V AC 50Hz type, with socket of 10 A 220-240V AC.2. Make sure that the water supply is turned on to full pressure.3. Close the door, press "ON/OFF" button turn on the dishwasher.4. Press the button of desired program, the corresponding indicator will light up.5. Then, pass”Start/Pause”button to start.A wash cycle can only be changed if it has been running for a short time otherwise, the detergent may have already been released and the dishwasher may have already drained the wash water. If this is the case, the dishwasher needs to be reset and the detergent dispenser must be refilled. To reset the dishwasher, follow the instructions below:1. Press the Start/Pause button to pause the washing.2. Press the Program button for more than 3 seconds, the dishwasher will enter standby mode.3. Press the Program button to select the desired program.4.Press the Start/Pause button, the dishwasher will run after 10 seconds.3 seconds14Put dishes inadditional Additional dishes can be placed in at any time before dishwasher program start. If you want to reload dishes in the process of washing, please follow instructions below:1. Press “Start/Pause” button to pause washing program;2. Wait for 5 seconds to open the door;3. Put the additional dishes in;4. Close the door;5. Press “Start/Pause” button and after 10 seconds, the dishwasher will start again.E n g l i s h15End of washing programAfter the program finishes, the machine show "End" after the buzzer beeps for 8 seconds. Turn off the machinePress ON/OFF button to turn off the dishwasher.Hot dishes are more likely to be damaged. The dishes shall be cool for about 15 minutes and then taken out from the dishwasher.Open the door carefullyClear the dishwasherIt is normal that the dishwasher still remains wet inside.Use the dishwasherFunction of the rinse aid and detergentThe rinse aid is released during the final rinse to prevent water from forming droplets on your dishes, which can leave spots and streaks. It also improves drying by allowing water to roll off the dishes. Your dishwasher is designed to use liquid rinse aids.When to refill the rinse aidThe regularity of the dispenser needing to be refilled depends on how often dishes are washed and the rinse aid setting used.The Low Rinse Aid indicator ( ) will appear in the display when more rinse aid is needed.Do not overfill the rinse aid dispenser.Function of detergentThe chemical ingredients that compose the detergent are necessary to remove, crush and dispense all dirt out of the dishwasher. Most of the commercial quality detergents aresuitable for this purpose.16To achieve a better drying performance with limited rinse aid, the dishwasher is designed to adjust the consumption by user. Follow the below steps.1. .Close the door and s witch on the appliance 2. Within 60 seconds after step 1, press the Program button more than 5 seconds to enter the set model, the rinse aid indication blinks as 1 Hz frequency.3. Press the Program button to select the proper set according to your using habits , the sets will change in the following sequence: D3->D4->D5->D1->D2->D3. The higher the number, the more rinse aid the dishwasher uses.4. Without operation in 5 seconds or press the Power button to exit the set model, the set success.Adjusting the rinse aid reservoirAdding rinse aid to the dispenserE n g l i s h17Adding detergent to the dispenserA. Open the cap by sliding the release latch.B. Open the cap by pressing down the release latch.C. Open the cap by pressing in the release latch.For better cleaning result, especially if you have very dirt items, pour a small amount of detergent onto the door.The additional detergent will activate during the pre-wash phase.18Dishes and knives should not be placed in other utensils, and they can’t overlaid each other.Do not place glass close to each other to avoid damage.For long knives, placing upright is very dangerous.Precautions before and after the bowl basket is placedInstall dishwasher bowl basketSuggestionUse the dishwashing machine rationallyPurchase dishes suitable for dishwasher.Use a suitable mild dishwashing powder. If necessary, consult the manufacturer for more information.For special appliances, try to select a washing program that with a lower temperature.Do not take out the glass dishes immediately after the program ends to prevent damage.Limited use:Not for:Wooden, ivory, porcelain or pearl shank tool Non heat-resistant plastic products Cohesive knives or dishes Tin or copper vessels Crystal glass Rusty steel products Wooden utensils Synthetic fiber productsStale non heat-resistant cutters with glue adhesive partAfter several cleanings, some glassware will become dullColor of smooth dishes may fade out if often washedSilver or aluminum products tend to change color during cleaning(For the best use of dishwasher, follow the instructions below. For different models, the characteristics and appearance of the basket will be different) Clear larger food residues.Soften the residue of burnt food left on the pan. It is not necessary to rinse dishes with water first. Place the dishes in the dishwasher as follows:Cups, glasses, pots and so on are placed face down.For curved or concave and convex vessels, place them diagonally so that the water flows out. All utensils should be placed safely and must not be overturned.All utensils should be placed that the arms can rotate freely during washing.The open of hollow tablewares (such as cups, glasses, pots, etc.) should face downward so that water does not easily remain in the container or grooves.Long or sharp knives (eg. meat cleavers) should be placed horizontally in the basket.Do not use the dishwasher overloaded so that you can get better cleaning performance.E l i 1920There are two ways to load the cutlery basket as followings:14744987Loading the cutlery rack and basketThe cutlery rack is best suited for washing flatware and most cooking or serving utensils. The separators on the cutlery racks help keep flatware separated to avoid damage and improve cleaning.3241111111111111222333444444444444555555555555543251E n g l i s h21Adjusting the upper basketBasket used tips22E n g l i s h23Cleaning and careThe filtering system in the base of the wash cabinet retains coarse debris from the washing cycle. The collected coarse debris may cause the filters to clog. Check the condition of the filters regularly and clean them if necessary under running water.Follow the steps below to clean the filters in the wash cabinet.Filter cleaningLift the filter upwards and out of the dishwasher.The coarse filter can be detached from the main filter by gently squeezing thetabs at the top and pulling it away.For a more thorough clean, use a softcleaning brush.filter insert, and rotate clockwise tothe close arrow.24the jets. Replace them after rinsing them thoroughly.It is necessary to clean the spray arms regularly for hard water chemicals will clog the spray arm jets and bearings.To clean the spray arms, follow the instructions below:rotate the spray arm counterclockwise to remove it.Spray arms cleaningE n g l i s h25Care and maintenanceThe door and the door sealClean the door seals regularly with a soft damp cloth to remove food deposits.When the dishwasher is being loaded, food and drink residues may drip onto the sides of the dishwasher door. These surfaces are outside the wash cabinet and are not accessed by water from the spray arms. Any deposits should be wiped off before the door is closed. The control panelControl panel can be wiped with a slightly wet cloth. After cleaning, make sure it iscompletely dry.Do not use Sharp tools, Scratch sponge, or Rough detergent anywhere in the machine.26InstallationProduct dimensionHeight (H)Width (W)Depth (D1)Depth (D2)845mm 598mm600mm (with the door closed)1175mm (with the door opened 90°)E n g l i s h27Power connectionPower requirementsPlease check the label of rated value of power supply system for knowing rated voltage and connect the machine to appropriate power supply. 10A fuse is required and time-delay fuse or circuit breaker is recommended. Only separate circuit is suitable for this machine. Machine connectionMake sure that supplied voltage and frequency correspond to those on rating plate. Plug can only be connected to a properly grounded socket. If the socket that the machine must be connected to is not suitable for the plug, replace the socket, and do not use a power adapter that may cause overheating and burning.Water connectionConnect the cold water supply hose to a threaded 3/4(inch) connector and make sure that it is fastened tightly in place.If the water pipes are new or have not been used for an extended period of time, let the water run to make sure that the water is clear. This precaution is needed to avoid the risk of the water inlet to be blocked and damage the appliance.28Please securely fix the drain hose in either position A or position BInsert the drain hose into a drain pipe with a minimum diameter of 4 cm, or let it run into the sink, making sure to avoid bending or crimping it. The height of drain pipe must be less than 1000mm. The free end of the hose must not be immersed in water to avoid the back flow of it.Extension hoseWater outletHow to drain excess water from hosesSyphon connectionIf the sink is 1000 higher from the floor, the excess water in hoses cannot be drained directly into the sink. It will be necessary to drain excess water from hoses into a bowl or suitable container that is held outside and lower than the sink.Connect the water drain hose. The drain hose must be correctly fitted to avoid water leaks. Ensure that the water drain hose is not kinked or squashed.The waste connection must be at a height less than 100 cm (maximum) from the bottom of the dish. The water drain hose should be fixed .If you need a drain hose extension, make sure to use a similar drain hose.It must be no longer than 4 meters; otherwise the cleaning effect of the dishwasher could be reduced.Connection of drain hosesE n g l i s h29TroubleshootingBefore connecting customer service centerPlease check the chart below before connecting customer service center30E n g l i s hError codeWhen failure occurs, error code will appear to remind you:SpecificationE n g l i s hProduct fiche。
ge洗碗机说明书

ge洗碗机说明书篇一:洗碗机说明书节能洗碗机说明书洗碗机说明书大家肯定都有过这样的经历:油腻腻的碗筷,冬天冰冷的洗碗水…看着就难过发愁!真是不想洗,但是总让老婆或者爸妈洗也心疼啊!可是市场上的洗碗机不说价格多贵,动不动就上万元,而且体积也大,不是新装修的房子都没办法嵌在橱柜里,而且洗一次要一个多小时,时间太久!最关键的是洗不干净,不说洗杯子了,连碗底都洗不干净!还费电费水容易坏。
由于自己也深受其害,经常为洗碗郁闷不已,所以和很多朋友大量查找国内外的洗碗机,终于找到也最适合中国习惯的洗碗机,既可洗碗,又能洗碟、洗盘、洗餐盒、洗杯、还能给宝宝洗奶瓶!还有干净快速,节能环保,方便移动,寿命超长等特点,家用商用都适合,价格大家都想象不到的低,多少?才一百多!这么好的产品都动心了吧?!那咱们赶紧来详细了解一下吧洗碗机性能、产品参数、安装方法、使用方法、用后清洁等大家关心的问题吧。
节能洗碗机-新时代的宠儿多功能节能环保洗碗机属国内首创,不需要接电源,真正实现零电耗,创造性地诠释了最具清洁功能的刷洗功能,适用于各种大小,各种材质的碗、碟、餐盒、餐盘、杯子、奶瓶、刀叉、筷子等的清洗!外形采用国际流行的流线型设计,设计新颖,操作简单,方便实用!独特的洗碗双毛刷配合设计和洗杯毛刷设计可异常干净地清除各种死角,彻底解决一般洗碗机洗不到碗底杯底的烦恼!还具有去污能力强,占地小,价格实惠,快捷,方便,省水,省电,安全可靠,经久耐用,能洗各种形状碗、碟、盘、杯、奶瓶等,不需培训即可操作等优点。
晟宇伟业公司节能洗碗机速度极快,熟练的话可达到600~1000个/小时,不仅适用于家用,也适合商用!而且拥有最好的性价比,每台都经过严格的测试和检验,设备的各项性能均达到或超过国内外同类产品水平,产品远销到美国,德国,日这,澳大利亚,英国,加拿大,奥地利,匈牙利等十几个国家,获得一致好评!比于昂贵的,体积庞大,又耗电又耗水,时间长,餐具易破,容易损坏,不易维修,需要专业培训的大型洗碗机来说,这款洗碗机能完美解决上述大型洗碗机易出现的烦心问题。
一键净水的智能洗碗机使用说明书
一键净水的智能洗碗机使用说明书1. 准备工作在使用一键净水的智能洗碗机之前,请确保以下准备工作已完成。
1.1 水源接口:将智能洗碗机的进水管接到水源接口上。
确保水源接口的密封良好,避免漏水。
1.2 电源插座:将智能洗碗机的电源插头插入合适的电源插座中。
确保电源供应稳定,以免影响洗碗机的正常运行。
2. 操作步骤按照以下步骤正确操作一键净水的智能洗碗机。
2.1 打开洗碗机轻轻拉开洗碗机的门,并确保洗碗机内部没有遗留的物品。
2.2 放置餐具将需要清洗的餐具放置于洗碗机的餐具篮中。
请注意,刀具和叉子的刃部应朝下,以免划伤其他餐具。
2.3 加入洗涤剂打开洗涤剂仓,根据洗涤剂的种类和洗碗机的要求,加入适量的洗涤剂。
2.4 设置洗碗模式在洗碗机的控制面板上选择合适的洗碗模式。
根据不同的污渍程度和餐具材质,选择适当的模式可以达到最佳的清洗效果。
2.5 设置洗碗时间根据实际需要,设置洗碗机的洗碗时间。
一般情况下,智能洗碗机会自动根据所选模式自动计算时间,但用户也可以手动设置洗碗时间。
2.6 启动洗碗机关闭洗碗机的门,并按下启动按钮。
洗碗机将开始自动运行,并根据选择的模式和时间进行清洗。
2.7 完成清洗清洗完成后,洗碗机将发出提示音。
此时,您可以打开洗碗机门,取出干净的餐具。
3. 注意事项在使用一键净水的智能洗碗机时,请注意以下事项,以确保使用安全和清洗效果。
3.1 餐具预处理洗碗机可以将餐具的大部分污渍清除,但某些顽固污渍可能需要事先处理。
在放入洗碗机之前,刮去饭渣和残留的食物。
3.2 安全操作在打开洗碗机门时,小心烫伤。
由于洗碗机内部的温度可能很高,请避免直接接触洗碗机内部。
3.3 清洗剂选择请使用合适的洗碗机专用洗涤剂,以获得最佳的清洗效果。
使用其他洗涤剂可能会导致清洗效果不佳或损坏洗碗机。
3.4 定期清洁为确保洗碗机的长期使用和清洁效果,建议定期进行洗碗机的清洁和维护。
请参考洗碗机的使用手册或联系售后服务了解更多细节。
洗碗机 说明书
5. Lift the pump cover inwards at an angle and remove.
residue.
2. Turn the coarse filter anticlock-
2
wise and re-
move the filter
system .
1
3. Pull down the micro filter to remove.
4. Press the locking
catches to-
and remove. 2. On initial start-up: Fill the dispenser right up with
water.
3. Add the special salt to the dispenser. The water in the dispenser is displaced and forced out. Never add detergent.
Programme
Intensive 70° Auto 45-65° Eco 50° Express 65° - 1h Machine Care
1) Duration [h:min] 2) Energy [kWh] 3) Water [l]
1) 1:55 - 2:05 2) 1,090 - 1,200 3) 10,5 - 13,0
50 ml
2. Close the lid of the deter-
洗碗机指南说明书
Clean wastewater pump
1. Disconnect the appliance from the power supply. 2. Remove the filter system. 3. Scoop out any water. 4. Prise off the pump cover using a
Tip: Connect your appliance to a mobile device. You can conveniently change all settings using the Home Connect app. 1. Install the Home Connect app on your mo-
2. Pull up the lower spray arm to remove.
3. Check the outlet nozzles on the spray arms for blockages under running water and remove any foreign bodies.
spoon and grip it by the crosspiece.
5. Lift the pump cover inwards at an angle and remove.
6. Remove any remnants of food and foreign bodies in the area
智能洗碗机 操作指南说明书

Hardness mmol/l range
Setting value
Medium Medium Medium Hard Hard Hard
Soft
0 - 1.1
H00
Soft
1.2 - 1.4 H01
1.5 - 1.8 1.9 - 2.1 2.2 - 2.9 3.0 - 3.7 3.8 - 5.4 5.5 - 8.9
2. Pull up the lower spray arm to remove.
3. Check the outlet nozzles on the spray arms for blockages under running water and remove any foreign bodies.
washers. Remove large remnants of food from 3. Switch on the appliance .
the tableware. Check that the spray arms can ro-
4. Select the programme. 5. Start the programme . 6. Remove the tableware at the end of the pro-
of the impeller.
7. Insert the pump cover and press
down .
2
a The pump cover clicks into position.
1
8. Install the filter system.
Troubleshooting
Fault
E:32-00 will light up alternately or indicator for water supply lights up.
智能洗碗机用户指南说明书
gether and lift
1
the coarse filter
out .
Cleaning spray arms
1. Unscrew the upper spray arms and
2
pull down to remove .
1 2
Clean wastewater pump
1. Disconnect the appliance from the power supply. 2. Remove the filter system. 3. Scoop out any water. 4. Prise off the pump cover using a
4. Insert the lower spray arm. a The spray arm clicks into position. 5. Insert the upper spray arms and screw firmly in place.
5. Lift the pump cover inwards at an angle and remove.
ply hose
6. Clean the filter. 7. Re-insert the filter in the supply hose. 8. Screw the water connection back on. 9. Check the water connection for leaks. 10.Restore the power supply. 11.Switch the appliance on.
Water tap is turned off. ▶ Turn on the water tap.
- 1、下载文档前请自行甄别文档内容的完整性,平台不提供额外的编辑、内容补充、找答案等附加服务。
- 2、"仅部分预览"的文档,不可在线预览部分如存在完整性等问题,可反馈申请退款(可完整预览的文档不适用该条件!)。
- 3、如文档侵犯您的权益,请联系客服反馈,我们会尽快为您处理(人工客服工作时间:9:00-18:30)。
ge洗碗机说明书篇一:洗碗机说明书节能洗碗机说明书洗碗机说明书大家肯定都有过这样的经历:油腻腻的碗筷,冬天冰冷的洗碗水…看着就难过发愁!真是不想洗,但是总让老婆或者爸妈洗也心疼啊!可是市场上的洗碗机不说价格多贵,动不动就上万元,而且体积也大,不是新装修的房子都没办法嵌在橱柜里,而且洗一次要一个多小时,时间太久!最关键的是洗不干净,不说洗杯子了,连碗底都洗不干净!还费电费水容易坏。
由于自己也深受其害,经常为洗碗郁闷不已,所以和很多朋友大量查找国内外的洗碗机,终于找到也最适合中国习惯的洗碗机,既可洗碗,又能洗碟、洗盘、洗餐盒、洗杯、还能给宝宝洗奶瓶!还有干净快速,节能环保,方便移动,寿命超长等特点,家用商用都适合,价格大家都想象不到的低,多少?才一百多!这么好的产品都动心了吧?!那咱们赶紧来详细了解一下吧洗碗机性能、产品参数、安装方法、使用方法、用后清洁等大家关心的问题吧。
节能洗碗机-新时代的宠儿多功能节能环保洗碗机属国内首创,不需要接电源,真正实现零电耗,创造性地诠释了最具清洁功能的刷洗功能,适用于各种大小,各种材质的碗、碟、餐盒、餐盘、杯子、奶瓶、刀叉、筷子等的清洗!外形采用国际流行的流线型设计,设计新颖,操作简单,方便实用!独特的洗碗双毛刷配合设计和洗杯毛刷设计可异常干净地清除各种死角,彻底解决一般洗碗机洗不到碗底杯底的烦恼!还具有去污能力强,占地小,价格实惠,快捷,方便,省水,省电,安全可靠,经久耐用,能洗各种形状碗、碟、盘、杯、奶瓶等,不需培训即可操作等优点。
晟宇伟业公司节能洗碗机速度极快,熟练的话可达到600~1000个/小时,不仅适用于家用,也适合商用!而且拥有最好的性价比,每台都经过严格的测试和检验,设备的各项性能均达到或超过国内外同类产品水平,产品远销到美国,德国,日这,澳大利亚,英国,加拿大,奥地利,匈牙利等十几个国家,获得一致好评!比于昂贵的,体积庞大,又耗电又耗水,时间长,餐具易破,容易损坏,不易维修,需要专业培训的大型洗碗机来说,这款洗碗机能完美解决上述大型洗碗机易出现的烦心问题。
产品参数主体材质:优质PP;毛刷才智:优质弹性PET;尺寸(长宽高):41*24*23厘米;重量:2.3kg;电压:0V;频率:0Hz;功率:0W,节能零电耗;适用对象:家用、食堂、商用等;洗杯速度:高效快捷,600~1000个碗碟杯瓶/小时;操作:简单方便,老幼皆可,安全可靠,移动方便;使用寿命:理论上无限期(毛刷可轻松更换);功能:各种大小、各种材质的碗、碟、酒杯、茶杯、奶瓶等:节能洗碗机安装方法1、将晟宇伟业科技发展有限公司生产的节能洗碗机从包装礼盒中取出,打开盖子取出里面的洗碗毛刷、洗杯毛刷和排水阀塞;2、将洗杯毛刷插入洗碗机侧面的方形孔中,特殊设计的圆柱型毛刷和竖直毛刷紧密配合,保证将各种酒杯、茶杯、奶瓶的杯口、内外壁和底部都刷洗干净;洗碗机内壁上卡有2排洗碗毛刷,排毛刷紧密配合,保证将再深再大的碗、碟、餐盘都里外都洗干净!毛刷可轻松拆下冲洗,洗后装入洗碗机内壁的卡槽中即可!多年使用磨损后方便轻松更换,大大节约重新购买洗碗机的费用;节能洗碗机安装图3、将排水阀塞的六角螺母和排水塞拧下,装入洗碗机侧面底部的排水孔中,再拧上六角螺母,并装上环形把的堵头即可;至此安装结束,然后将洗碗机放入水槽中或者洗碗台平面上准备使用。
节能洗碗机使用方法节能洗碗机主体结构1、向洗碗机中加水(冷水或温热水均可)至与毛刷顶部平齐,放入洗涤液或固体洗涤块;2、将碗、碟、盘、餐盒等侧插入毛刷中轻轻旋转一圈,紧密配合的两排毛刷即可刷轻松洗干净碗口、碗底与内外壁;刀叉、筷子只需握着底部插入毛刷中再取出即可(请稍微轻柔地将碗碟放入/取出毛刷,以免溅水哦~);紧密配合的两种毛刷即可刷轻松洗干净碗口、碗底与内外壁;3、将酒杯、茶杯、奶瓶等杯口朝下插入洗杯毛刷中,上下刷动或顺时针旋转,4、将洗好的餐具用清水洗净收好即可。
用后清洁1、将洗碗机侧面底部的排水塞取下,废水自动排出;2、用清水冲洗干净洗毛刷。
注意事项1、不用时,请将毛刷取出晒干;2、不用时,请勿将杯子放在洗杯毛刷上;3、若毛刷长久磨损,可购买毛刷轻松更换:4、如有漏水现象,请检查排水阀塞是否塞紧。
再也不用为洗碗头痛了~再也不用为谁来洗碗吵架了~篇二:洗碗机分配器使用说明书洗碗机分配器分配器的安装1、机身安装将机身固定在架子或垂直的墙面上,保证机身远离洗碗机的通风口及蒸汽通道上,否则会造成设备过热,从而影响运行状况。
机身后壳上的预留孔是用于安装于墙面时上螺丝之用,安装时需加密封垫片。
2、分配器安装1)探头的安装:当分配器选择探头控制加料模式时,必须安装探头。
探头必须安装在水箱液面以下,并尽可能的在靠近水箱底部的洗碗机缸臂上钻一个22.0MM的孔,用橡胶圈从内、外部固定探头。
探头应与热源、洗涤剂入口、排水管、进水管等保持一定距离。
2)洗涤剂注入器的安装注入器应安装在水箱液面以上,在洗涤缸臂适当位置钻一个22.0MM的孔安装注入器,作为洗涤剂的入口。
用橡胶垫圈从内部固定注入器。
3)催干剂单向阀的安装将单向阀安装在洗碗机的过水管或者加热包上。
一般洗碗机上有预留接口;若没有,在管壁厚度足够的情况下,自钻一个11/32(8.7MM)的孔或用三通来替代。
4)输液管连接将ф6MM的白色输液管插入洗涤泵的黑色蠕动胶管末端,并用拉带扎紧。
再将输液管截成适当长度的两段,长度以达到洗涤剂料桶与重锤注入器连接。
进料输液管末端与注入器用白色螺帽紧密连接。
同样,将ф6MM的输液管截成适当长度的两段,长度以达到催干剂料桶与重锤连接。
进料输液管一端与催干泵的黑色蠕动胶管末端相连,另一端与白色PVC吸液管用白色螺帽相连,然后一并放入催干剂料桶。
出料输液管末端与单向阀相连。
电路安装1、分配器工作电压(常电源)220V、110V,如果有24V 电压则不需要安装变压器电源,电源单独设置电源开关。
2、连接主电源前检查洗碗机输出端电压后再进行连接,以免烧坏变压器以及电路板。
3、一般洗碗机都在电控箱内,留有洗涤剂催干剂的电源信号接口,比较方便的就可以接在分配器的触发信号连接柱上,电压范围在24V—230V都可以。
4、如果洗碗机没有预留洗涤剂催干剂的电源信号,可以将触发电源信号连接在主洗接触器和过水接触器的电源上。
5、分配器选择在时间速度控制模式时,则将首次加药的电源信号,连接进水电磁阀的电源上。
设置与调试1、具体见电路板图标和屏幕显示及设置。
2、此机有清洁剂泵、催干剂泵手动按钮,在显示面板上,可以在初次使用时将清洁剂、催干剂直接打入泵体内,可以测试泵是否能正常运转,压力如何。
3、在不用探头模式下,(时间模式P0)具有首次加药功能,只需要将进水电磁阀的电源信号接入DET.SIG接线柱,再设置C2、C3,可以设置延时定时功能,也可以设置与电源信号同步调节速度,进行首次加入清洁剂的运行功能。
4、在不用探头的模式下,补充加药量的控制。
将信号电源接到RINSE.SIG接线柱,此时可以调节C4、C5,即可与电源信号同步运行(将延时调到0,定时调到0),也可运用速度C1调节加药量。
也可以用延时功能和定时功能循环加药,在通道式洗碗机内特别适用。
再可以调节b2、b3,与电源信号同步运行(将延时调到0,定时调到0)。
用速度调节加催干剂的量(通道式),也可以定时加催干剂的量(门式)。
5、在探头模式下,将A1设置为最高转速。
数字越大转速越快,最高为99,A2为浓度设置,数字越大浓度越高,应运用化学滴定法来设置您所需要的清洁剂浓度范围,A3为报警延时时间,最长时间为(99*2)S,如果在设定的时间内,没有将加药浓度达到所设定的范围内,报警器会蜂鸣,蜂鸣时间等于A4所设定的时间,分配器会立即启动时间模式。
查找原因后可重新调回探头模式。
6、在探头模式下,催干剂泵的设置可以用速度调节加药量(将延时调到0,定时调到0),也可以用延时时间,定时时间来调节加药量(一般在门式上)。
7、在时间模式时,在信号线始终有电的情况下,如果要求两个泵只运转一次,只需要把B2、C4调为0,B3、C5调为需泵运转的相应时间,其它不管即可。
8、在使用探头模式时,当对数值进行设置后,需要从探头模式退出,所设置的新数值才能生效。
9、注意事项:在使用探头模式时,请务必把时间模式也调节到适量位置。
临安日化厂编篇三:揭盖式洗碗机使用说明书XYXWZ1型揭盖式洗碗机使用说明书目录结构与安装操作简要介绍1. 型号与名称????????????????????12. 用途与特点????????????????????13. 技术参数?????????????????????24. 主要结构及工作原理????????????????25. 安装与调整????????????????????26. 操作面板?????????????????????37. 机器操作?????????????????????38. 机器清洗?????????????????????49. 洗涤物品的摆放??????????????????4 操作使用说明1. 总则?????????????????????52. 安全注意事项?????????????????53. 安装指南???????????????????64. 机器运行???????????????????85. 洗涤及漂洗准备????????????????86. 洗涤及漂洗操作????????????????107. 关机?????????????????????118. 操作面板说明?????????????????129. 维护与保养??????????????????1310. 简易故障诊断?????????????????13附图:平面总图、电路图XYXWZ1型揭盖式洗碗机结构与安装操作简要介绍注意:本机必须由受过专业培训的合格技术人员安装,由受过专业培训的合格操作人员操作。
安装及操作前请详细阅读本说明书。
1. 型号与名称型号:XYXWZ1名称:揭盖式洗碗碟机2. 用途与特点本机采用了目前最流行的旋转式洗涤臂和漂洗臂的设计,确保了一流的洗涤效果。
电器上采用了电脑芯片程序控制系统和新颖的操作面板获得最舒适的操作过程,可以满足各类盘、碟、碗以及玻璃杯的高标准洗涤要求。
特别适用于宾馆、饭店、餐厅和食堂等卫生洗涤餐具的场所。
本产品还具有以下特点:2.1不锈钢结构的双层上揭盖盖,前置式操作杆,操作舒适并节约能源。
后敞开式的揭盖壳,打开机揭盖使蒸汽从后面溢出,从而增强了操作的舒适度。
420mm的净通高度,洗涤大碗碟更为方便。
2.2圆弧角过渡的不锈钢洗涤水槽美观,无腐蚀,易操作,易清洗。
本机具有自清洗功能,清洗极为方便,最大程度保持机器的清洁与卫生。