润普专业电话录音系统、电话录音卡使用说明书和开发手册
三润远程语音求助系统使用说明V7.0.0.0
系统使用手册系统使用手册 (1)一、运行环境 (2)1、硬件环境 (2)2、软件运行环境 (3)3、设备应用网络环境 (3)4、交叉网线做法 (3)二、设备 (3)1、规格标准 (3)2、设备安装(施工及线材要求) (4)3、保养维护 (4)4、注意事项 (4)三、安装方法 (4)四、卸载软件 (8)五、登录与退出 (8)1、登录 (8)2、修改密码 (9)3、软件退出 (10)4、软件的注销 (10)六、配置软件 (10)1、设备管理 (10)2、事件管理 (14)3、地图管理 (14)4、分组管理 (15)5、语音管理(为设备定制相应的提示音) (15)七、软件视图 (15)1、设备窗口 (15)2、设备列表 (16)3、事件列表 (16)4、工具栏 (16)5、状态栏 (16)八、软件帮助 (16)1、帮助文档 (16)2、系统配置要求 (16)3、关于 (16)九、软件操作 (16)1、主动监控 (16)2、主动接听 (17)3、远程主动控制开关(此功能仅限于5S系列产品) (17)4、地图操作 (17)5、设备点定位 (17)6、事件查看 (17)十、附录 (17)1、快捷键 (17)2、设备点颜色 (18)3、自定义分组图标颜色 (18)4、常见问题处理 (18)5、设备复位 (20)6、终端与PC服务器之间有路由器时IP的设置方法 (20)7、解决对讲啸叫或有回音的方法 (22)8、常用的网络命令使用 (22)一、运行环境1、硬件环境最低配置:CPU:Intel Pentium4 处理器 2.4GHz或以上机器内存:1G以上硬盘空间:160G或以上显示驱动:64MB DDR显存网卡:10/100M以太网卡内置声卡:需符合HD Audio规范。
(可用板载realtek瑞昱芯片系列的声卡,带Realtek高清晰音频置。
)(非常重要)基本配置:CPU:Intel Core处理器 2.4GHz或以上机器内存:2G以上硬盘空间:320G或以上显示驱动:256MB DDR显存网卡:10/100M以太网卡内置声卡:需符合HD Audio规范。
润普RH脱机电话录音盒系统方案
中国网通北京分公司电话录音系统及电话录音仪项目;
天津地铁热线呼叫中心系统; 贵州省凯里市长热线项目; 内蒙古赤峰公安局三警合一呼叫中心项目; 北京崇文区职介中心电话语音查询系统项目; 诺基亚通信有限公司厂房设施服务中心电话系统项目; 北京七区电话局数字自动外呼系统项目;
典型客户
平安集团产险、信保、银行电话录音系统全国项目; 民信集团全国嵌入式网络版电话录音系统项目; 双胞胎集团全国嵌入式网络版电话录音系统项目; 北京第一车网电话业务呼叫中心项目; 青海西宁三警合一呼叫中心工程; 秦皇岛城管大队呼叫中心项目; 洛阳12319服务热线项目;
中国长江三峡工程开发总公司电话录音设备采购项目;
国家电网公司电话录音设备采购项目; 中华慈善总会高端数码录音电话采购项目; 北京奥组委电话录音设备采购项目; 中国工商银行陕西省分行录音电话采购项目; 中信银行总行润普高端数码录音电话采购项目; 中国国际航空公司超长数码录音电话采购项目;
典型客户
广州出入境边防检查总站数码录音电话采购项目; 中国农业发展银行高端数码录音电话采购项目; 上海机场(集团)有限公司数码录音电话采购项目; 四川长虹南北两地大型电话录音系统项目; 北大青鸟所有网点电话录音系统项目 民生银行北京42网点营业厅大客户电话录音系统项目; 山西省电力公司电话录音系统项目;
帐号密码为:admin
脱机电话录音盒系统-通道状态
脱机电话录音盒系统-系统管理
脱机电话录音盒系统-录音查询
脱机电话录音盒系统-录音查询
脱机电话录音盒系统-录音设置
脱机电话录音盒系统-用户管理
脱机电话录音盒系统-集中备份
脱机电话录音盒系统-集中备份
脱机电话录音盒系统-集中备份状态
脱机电话录音盒系统-集中备份统计
润普专业电话录音系统、电话录音卡使用说明书和开发手册

电话录音软件使用说明和开发手册2003年5月1日目录系统简介 (3)一、基本功能 (3)二、技术参数 (5)三、典型行业客户列表 (5)系统安装 (6)一、硬件安装 (6)1.1微机 (6)1.2应用环境 (6)1.3硬件结构、安装 (7)二、软件安装 (7)软件操作 (9)一、系统启动 (9)二、基本操作 (10)2.1主窗口说明 (10)2.2模块功能 (11)编程接口 (23)函数说明 (24)VC环境 (28)C++Builder环境 (28)VB环境 (30)DELPHI环境 (32)PB环境 (33)VFP环境 (35)其他编程语言 (36)系统简介RL系列系列电话录音系统,是本公司凭借多年来在语音技术方面的专业经验,使用最新数字电子技术,辅以现今为止最先进的电脑及Windows软件所设计完成的一套整合性系统,它可以同时对多路电话通话进行录音、监听和查询。
系统可选读写光盘作为备份,容量大,可靠性高。
RL系列系列电话录音系统可广泛的应用于商业电话录音,电力调度录音,热线服务电话录音,投诉电话录音,关键岗位电话录音,传呼台录音,金融证券录音,公安报警录音,安全部门的监听电话,航空、铁路、交通运输调度录音及各行业的生产调度录音。
一、基本功能1.流行的Windows 98/ME/2000/XP操作环境。
B接口,符合USB 1.1标准,系统为外置式设备,不占用主机资源,即插即用。
3.从USB端口供电,不需外接电源。
4.可热插拔。
5.容量(线数)随意调整。
用户可根据需要接入多个USB电话录音设备。
可通过USB接口卡随意扩展。
6.支持中文、繁体、英文等各种字体的操作系统。
7.录音对通话双方没有任何影响。
8.可以根据任意给定的条件对录音、备份资料进行快速、简洁的回放查听。
9.多个用户可以在多台电脑使用声卡对录音资料根据任意给定条件进行回放查听与备份。
10.系统具有自动同步双备份功能。
也可以通过系统手工备份到您想要保存的目录或磁带转录。
TUBE PREAMP 530 现代汽车音频系统用户手册说明书

professional quality tube sounds in a modern, exceptionally compact 19" rack-mountable package (1 rack space). The two main channels Clean and Lead feature dedicated voicing sections, gain pots and volume controls for precision sound shaping and fine-tuning. The Gain Lo/Hi switch converts the Clean channel to a Crunch channel and, in the Lead channel, the sound spectrum encompasses everything from Heavy Crunch to Ultra Gain. With a 4-band voicing section featuring two midrange bandwidths and ahandy feature is the Defeat function, which bypasses the preamp and routes the guitar signal directly to the output. This feature enables you to connect two preamps in series and this option enlarges the tonal spectrum. The variable Stereo Line Out and a frequency compensated Line O ut give you a wide range of application options, for instance you can patch the preamp signal directly to a mixing console or recording devicewhich is equipped with an impressive array of high-tech features that deliver a wide range of devastating sounds, come highly recommended. The integrated 2 x 1, 5 Watt stereo poweramp is suitable for three different applications:1, practicing with stereo headphones,2. practising with hi-fi stereo speakers, and3, practicing with a conventional guitar speaker cabinet.This preamp is defined by the effort and materials that went into it: intelligent design features, superior craftsmanship, impeccable finishing and quality components. However keep in mind, that a few precautions will radically extend tube life (see handling and care guidness).The entire-Team would like to thank you for your faith in ourproduct; we hope you derive a great deal of joy and satisfaction fromPLEASE NOTE: Read the O perator's Manual carefully and thoroughly, especially the Handling and Care section as well as the guidelines in bold-face type. Avoid operating errors and potential damage to the preamp by heeding the guidelines and cautionary remarks in this manual. The footnotes also cover a few convenient pointers and interesting tips on several functions. These are listed on side 3 of the manual.Gain settings depend on what type of pickups are installed in your guitar. The recommended setting for humbuckers or active pickups lies between the 10 and 1 o ’clock positions and 12 to 3 o ’clock for single coils for a pure clean response.For a crisp glassy tone, set the Bright switch to the On position. This setting boosts the treble response of muddy pickups.To get an idea of this preamp's capabilities in the Clean-Mode, we suggest you set thetone control pots Bass (5), Middle (6) and Treble (7) to the 12 o'clock position.To get Crunch or heavy Rhythm sounds, set this control between the 10 and 1 o ´clock ´s position (depending on the type of pick-up) and leave the Gain Boost (15) pusbuttonin the Off-position. All functions that can be accessed via footswitch can also be switched via the ENGL MIDI Switcher Z- 11. Simply connect the two 1/4" stereo jacks (22) and (23) to the stereo inputs of the Switcher via two cables equipped with 1/4" stereo plugs. You can control switching functions via the buttons on the Switcher. The respective functions (e, g. Lead, Hi -Gain,Contour active, Defeat off) are saved to the desired MIDI program locations. The ENGL MIDI Footswitch Z-12 is ideal for activating MIDI programs. When used in conjunction with the ENGL MIDI Switcher Z-11, this durable footswitch does not require a separateAC power pack. The requisite power is routed via the MIDI cable.To get an idea of this preamp's Lead sounds, we suggest you set the tone control pots Bass (9), Lo Mid (10), Hi Mid (11) and Treble (12) to the 12 o'clock position. The Treble control is important when operating the preamp in combination with a poweramp that does not feature a Presence control: Set the Treble pot between the 7 and 12 o ´clocksposition it suppresses the gritty upper frequencies. The integrated miniature stereo poweramp delivers maximum output of 2 x 1. 5 Watts at 4 ohms. However, you can connect diverse systems with impedances of 4, 8 and 16 ohms as well as headphones with 200 ohms. To the achieve the desired audio result, it is essential that the Selector switch (24) located on the rear panel is set to the proper position. The volume level of the poweramp is determined by the volume level settings for the two channels and the setting of the LINE LEVEL control (29). If the LINE LEVEL pot is turned up fairly high, then the setting for the two volume controls (7) and (14) must be reduced substantially so that the poweramp is not saturated!PLEASE ENSURE YOU HEED THE FOLLOWING: If you are using the amp to drive just one speaker cabinet, connect only one stereo channel via a 1/4" stereo plug. A mono 1/4" plug will short-circuit the poweramp's second channel. If you operate the amp under these conditions at high volumes for a longer period of time, this may destroythe amp or other components!The LINE outputs (25) and (26) provide signals that emulate the response of a 412 guitar cabinet, The signal level is nominally identical to the level at the LINE outputs (27) and (28).However in practice, the level deviates slightly due to frequency compensation. When the preamp is active, the output level of the LINE outputs depends on the following factors:the input level (Gain), the Volume control settings for the respective channels, and in some measure, the voicing section control settings. This is why we recommend that you dial in the desired sound via the front panel control features, set a desired FX level (if you have connected a processor) and then use the LINE LEVEL pot (29) to dial in a suitable level.The following is another conceivable practical application: Patch the outputs (27) and (28) to a stereo poweramp (e.g. ENGL 830/50) to drive two cabinets (e.g. ENGL 412G or S)and the two frequency compensated LINE outputs to the PA mixing console. The emulated 412 signal can be used for the FOH sytem so you do not have to mic your guitar cabinets.The filter stages, integrated LINE amp and the headphones amp can also be used for external application, depending on how you route the signals. Use the two FX LOOP RETURN jacks (30) and (31) as signal inputs. The preamp signal is interrupted when a1/4" jack is inserted. (refer to the Signal Routing Plan).BASSBottom end voicing control for theLead Channel.LO MIDLo Mid-range voicing control (at 500 Hz)for the Lead Channel.LEAD GAINGain control for the Lead channel, controls theamount of distortion in the Lead mode.CAUTION: Extremely high gain and volumelevels in the Lead mode can produce strongfeedback. Avoid feedback squeals, they leadto hearing loss and damaged speakers!TREBLEUpper range voicing control for theClean Channel.7CLEAN VOLUMEVolume control for the Clean channel.BASSBottom end voicing control for theClean Channel.MIDDLEMid-range voicing control for theClean Channel.BRIGHTAlters the EQ by boosting the upper treblerange; (above 2 kHz).Front1INPUTUnbalanced 1/4" (main) input jack.CLEAN GAINHI MIDHi Mid-range voicing control (above 1 kHz)for the Lead Channel.TREBLEUpper range voicing control for theLead Channel.CONTOURPress this button to alter the mid-EQ. When thebutton is pressed, mids between 300 & 500 Hzand mids between 1 & 2 kHz are boostedslightly; the red LED indicates Contour active.This function can also be activated via afootswitch connected to jack (23). Once afootpedal is connected, the channel selectorpushbutton is deactivated.LEAD VOLUMEVolume control for the Lead channel.14GAIN LO / HIThis button increases the gain levels for bothchannels. When you activate it, the Cleanchannel responds more like a Crunch channel,and the Lead channel delivers a hi-gain leadsound. You can also activate this function viafootswitch (Jack 22), the Gain Boost pushbuttonis then no longer functional. The LEDilluminates to indicate Hi-Gain mode is active.CLEAN / LEADChannel selector pushbutton for Clean andLead modes, red LED indicate Lead mode;This function can also be activated via afootswitch connected to jack 22. Once a foot-pedal is connected, the channel selector push-button is deactivated.PREAMP DEFEATThis feature bypasses the preamp when thebutton is depressed. In this case the guitarsignal is routed to the Instrument Outputjack (32) .You can also activate this function viafootswitch (at Jack 23), the Preamp Defeatpushbutton is then no longer functional.The LED above the button illuminates toindicate the preamp is bypassed.POWERAC power on/off.19STEREO HEAD PHONES1/4" stereo output designed for stereoheadphones. you can also connecthi-fi speakers or guitar cabinets. When youconnect a conventional guitar cabinet set theselector switch (24) to ,,Routed to GuitarCabinet."CAUTION! Ensure You Heed The Following:Always use a 1/4 stereo plug. If you use amono plug, it may short-circuit and destroythe poweramp!Rear Planel20AC SocketConnect AC cord here.CAUTION: Ensure you use an intact ACcord with an insulated plug only! Beforeyou power the amp up, ensure the voltagevalue printed beside the AC socketcorresponds to the available current.21AC Fuse BoxContains mains fuse (rear chamber) andspare fuse (front chamber).NOTE: Ensure replacement fuses bearidentical ratings (refer to the table)!22FOOTSWITCH:CLEAN/LEAD; GAIN LO/HI1/4" stereo jack for connecting a dualfootswitch (e.g. ENGL Z-11) or a MIDI-switching system (e.g. ENGL Z-11).The following functions can be executed:1.Channel switching Clean - Lead(mono terminal)2.Gain Lo - Hi (stereo terminal).23FOOTSWITCH:PREAMP DEFEAT; CONTOUR1/4" stereo jack for connecting a dualfootswitch (e.g. ENGL Z-11) or a MIDI-switching system (e.g. ENGL Z-11).The following functions can be executed:1.Preamp Defeat / Bypass(mono terminal).2.Contour switching (stereo terminal).24HEADPHONES OUTPUT:A) Routed To Headphones Or HiFi Cab.B) Routed To Guitar Cab.Rear panel selector switch for front panelheadphones jack. Set the switch to the leftposition A) when you connect stereoheadphones or hi-fi speakers and to theright position B) when you connect aguitar cabinet to ensure proper frequencycompensation for the respective systems.FREQUENCY COMPENSATED LINEOUTPUT: RIGHTLine Out for the preamp's right frequencycompensated signal (1/4" unbalanced jack).This signal can be patched directly to amixing console or a recording device.FREQUENCY COMPENSATED LINEOUTPUT: LEFTLine Out for the preamp's left frequencycompensated signal (1/4" unbalanced jack).This signal can be patched directly to amixing console or a recording device.LINE OUTPUT: RIGHTLine Out for the preamp's right channel(1/4" unbalanced jack).This signal can be routed to a powerampor a FX device via a shielded cable.LINE OUTPUT: LEFTLine Out for the preamp's left channel(1/4" unbalanced jack).This signal can be routed to a powerampor a FX device via a shielded cable.LINE LEVELThis control feature determines the level ofthe LINE outputs 25, 26, 27 and 28. Theinstrument output (32) signal can also beamplified to 15 dB if required.29FX LOOP RETURN: RIGHTSignal input right stereo channel for theFX Loop. Connect this input to a signalprocessor’s right output/send jack via ashielded cable with 1/4" plugs.30FX LOOP RETURN: LEFTSignal input left stereo channel for theFX Loop. Connect this input to a signalprocessor’s left output/send jack via ashielded cable with 1/4" plugs.31INSTRUMENT OUTPUTFX LOOP SENDOutput for patching the preamp signal to apoweramp input or the input of a anotherpreamp or signal processor/FX device.Ensure you use a short shielded cable forthis signal circuit.AUXILIARY INPUTSupplentary preamp input. This circuit is routedin series with the input located on the frontpanel and is used for patching the setup to a19" rack. The front panel input has priority. Inother words, when you insert a plug into thefront panel jack (1), the signal routed in via theAux. Input (33) is interrupted.33The INSTRUMENT OUTPUT (32) delivers a signal similar to the one generated by a guitar'spickups when the preamp is active (PREAMP DEFEAT switch Off), i.e. a high-ohm signal at about the same level as a guitar signal. This feature is relevant when you want to establish the same conditions via a bypass circuit (guitar signal to the INSTRUMENT OUTPUT) for further signal processing, for instance by an FX device, another Preamp connected in series or a poweramp.You can connect a signal processor between the INSTRUMENT OUTPUT (32) and the FX LOOP RETURN jacks (30) and (31) or directly between the LINE OUTPUTS (27) and (28) and a stereo poweramp's inputs. There is a substantial difference between these two applications:When you connect the Processor to the FX LOOP, the send signal is identical to the guitar signal when the preamp is in defeat mode and the preamp signal when the defeat mode is off. The send level only is influenced by the settings of the volume controls in this case.The level of the master output signal routed to the LINE outputs can be increased via the LINE LEVEL (29) pot.However, when you connect the Processor between the LINE outputs and the poweramp,the input (Send) signal to the FX device can be increased via the LINE LEVEL (29) pot and you have two Send signals (left, right) available. This option is recommended for low impedance (0 dB)FX devices that are not equipped with a variable input.Technical DataCaution: Replace fuses only with others of the same rating!INSTRUMENT: -10 dB max. 0 dB LINE OUT: -10 dB max.15 dB Output level (0 dB => 1Veff)Tubes:approx.4 kgV1 => ECC83/12AX7 FirstQuality V2 => ECC83/12AX7 selected Dimensions:Weight:19", 1 rack spaces, depth: 260 mm INPUT: -20 dB max. -3 dB Input level(0 dB => 1Veff) 2 x 1,5 Watts at 4 OhmsHeadphones poweramp:Power Consumption: approx. 16 Watts max.Fuses100 & 120 Volts 400 mAM 500 mATAC Mains: external:internal:230 Volts 200 mAM 250 mATM => medium, T => slowchanged!Internal Signal-path:INSTRUMENTHandling and CareProtect the preamp from mechanical knocks (tubes!).Let the preamp cool down before you transport it (approx. 10 minutes).Tubes need about 20 seconds to warm up after you switch the power on.Avoid storing the preamp in damp or dusty rooms, they are hard on jacks, switches and potentiometers.criteria) to avoid microfonic properties, undesireable noise and feedback.W e r e s e r v e t h e r i g h t t o m a k e u n a n n o u n c e d t e c h n i c a l u p g r a d e s !ENGL Ger ätebau GmbH, Germany; Internet: Text, design, grafics and layout by Horst Langer。
PPR80 数字录音机使用手册说明书
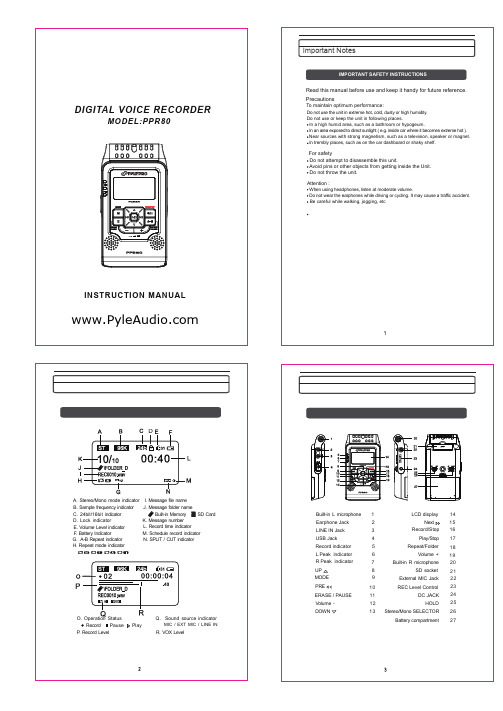
Open the SD card door,push the card fully until it clicks. Being careful about the direction you insert it.
Close the Card door . * If the card door cannot be completely closed, remove the card ,check its direction and then insert it again.
Do not use the unit in extreme hot, cold, dusty or high humidity. Do not use or keep the unit in following places.
In a high humid area, such as a bathroom or hypogeum. In an area exposed to direct sunlight ( e.g. inside car where it becomes extreme hot ). Near sources with strong magnetism, such as a television, speaker or magnet. In trembly places, such as on the car dashboard or shaky shelf.
HOLD 25
13 Stereo/Mono SELECTOR 26
Battery compartment 27
Battery Installation
It will never affect files stored in the unit to replace batteries . If you shut down the unit with normal operation , it will keep the date and time by previous setting .
世纪网通IPPBX-X6(2.1)产品手册(V2.0)

在本手册中提及的其他产品或公司的名称可能是其各自所有者的商标或商名。在未经世 纪网通或第三方商标或商名所有者事先书面同意的情况下,本手册不以任何方式授予阅读者 任何使用本手册上出现的任何标记的许可或权利。
公司名称:广东世纪网通信设备有限公司 联系电话:(0755)26589288 公司传真:(0755)26589516 技术支持中心:(0755)26589288-200 邮 编:518052 公司网址:
CDX8000-RD4(P) 电话录音仪说明书

电话录音仪说明书版本:Version2.1型号:CDX8000-RD4(P)佛山市容讯科技有限公司目录目录 (2)1 前言 (4)1.1 浏览器兼容性说明 (4)1.2 文档内容 (4)1.3 文档变更 (5)2 产品介绍 (6)2.1 产品概述 (6)2.1.1 4路模拟录音盒外观 (6)2.2 主要特性 (7)2.3 主要功能 (7)2.4 主要参数 (8)3 硬件安装 (9)3.1 组网应用 (9)3.2 硬件接口 (10)3.3 产品安装 (10)4 系统管理 (13)4.1 登录 (13)4.2 导航树 (14)4.3 运行信息 (15)4.3.1 实时告警 (15)4.3.2 历史告警 (15)4.3.3 工作状态 (16)4.3.4 录音统计 (18)4.4 录音管理 (18)4.4.1 通道设置 (18)4.4.2 通道设置 (20)4.4.3 免录名单 (21)4.4.4 实时监听 (21)4.4.5 录音查询 (22)4.4.6 备份录音查询 (24)4.5 系统管理 (26)4.5.1 设备信息 (26)4.5.2 网络参数 (26)4.5.3 IP配置 (28)4.5.4 FTP配置 (28)4.5.5 WIFI配置 (29)4.5.6 时间设置 (29)4.5.7 导入/导出配置 (29)4.5.8 设备管理 (30)4.5.9 PING 测试 (31)4.5.10 帐号管理 (31)4.5.11 邮件告警 (32)4.5.12 web访问权限 (33)4.5.13 Web操作日志 (33)4.5.14 系统升级 (33)1 前言1.1浏览器兼容性说明可通过任何浏览器登陆到录音仪的web端,当进行播放,下载录音等操作时,由于要安装插件,部分浏览器兼容性不是很好,导致操作失败。
请使用下列浏览器来操作。
1.2文档内容1.3文档变更2 产品介绍2.1产品概述CDX8000-RD系列嵌入式电话录音仪是新一代录音设备,设备自带Linux系统,无需另外电脑,就可实现电话录音,不受计算机病毒的影响。
MDR电话录音系统操作手册

M D R电话录音系统操作手册This manuscript was revised by the office on December 10, 2020.二、基本操作2.1主窗口说明主界面一说明:1.两个图都是录音系统的主界面,他们之间可以自由切换。
主界面一为大图标显示,主界面二为列表方式显示,可以即时显示每个通道的状态。
2.主界面的最上方是菜单条,紧接着是快捷按钮。
菜单条与快捷按钮可以实现相同的功能,不过快捷按钮更方便些。
屏幕中间的大区域为每个通道的状态显示。
屏幕的右方与下方为用户与系统的状态显示。
3.当系统主界面启动后,录音系统即处于工作状态。
4.监听:本系统提供即时监听功能,用户用鼠标双击某一线路的图标,即可监听此线路,再次双击此线路则取消监听。
同一时刻只能监听一个通道。
5.通道状态图标说明:断线录音空闲监听录音摘机不可用留言空闲主界面二2.2模块功能主画面上方有录音系统的功能菜单,通过本菜单可以对录音系统进行全部操作。
包括:日常操作查询统计录音设置参数设置帮助1.日常操作1)登录:用户输入用户名与密码后,可以实现登录,不同的用户可以有不同的权限。
2)注销:用户完成操作后,可以注销此用户,这样其他用户要操作本系统时必须登录。
3)界面切换:切换主界面中各线路状态的显示方式,详细见主界面一与主界面二。
4)退出:关闭录音系统。
2.查询统计1)录音查询本功能是录音系统最常用的功能,在这里,用户可以完成录音文件的查听、备份、除、注释、打印等功能。
说明:查询:用户必须先查询出录音文件,然后才可以对文件进行放音,注释,备份、删除等操作。
1. 查询条件时间:可以设置查询的开始与结束时间,默认为当天。
电话号码:此号码为用户拨入或拨出的电话号码,*代表全部,5039*表示以5039开始的所有的电话号码。
*5039*表示包含5039的所有的电话号码。
备注:根据用户设置的备注信息进行查询。
电话分类:根据电话分类(可在电话本中设置分类)进行查询。
WTR050 使用说明书
广州唯创电子有限公司MP3录音模块WTR050使用说明书V1.012016-09-22Note:WAYTRONIC ELECTRONIC CO.,LTD.reserves the right to change this document without prior rmation provided by WAYTRONIC is believed to be accurate and reliable.However,WAYTRONIC makes no warranty for any errors which may appear in this document.Contact WAYTRONIC to obtain the latest version of device specifications before placing your orders.No responsibility is assumed by WAYTRONIC for any infringement of patent or other rights of third parties which may result from its use.In addition,WAYTRONIC products are not authorized for use as critical components in life support devices/systems or aviation devices/systems,where a malfunction or failure of the product may reasonably be expected to result in significant injury to the user,WTR050使用说明书V1.01芯片简介WTR050是一款高性能录音芯片,录音距离远,音质好,可直接推动8ohm/0.5W喇叭输出,播放音质清晰、音量大,使用方便,通过按键控制,可实现长按录音功能、除此之外,还具有循环播放、电平保持可循环播放、短按播放等功能。
新版北京市电话录音工商企业公司商家名录名单联系方式大全182家

北京北京市北京海淀 无绳电话机,录音电话机,多功
北京市 区三义庙8号东北房 能电话机,复印机,传真机,固
4
定电话
中国 北京 北京市海 北京市 淀区 苏州街西屋国
际E座1101室
纽曼,投影机,纽曼投影机,手 机,纽曼手机
北京市
中国 北京 京海淀
北京市
北
电话录音设备
北京市
中国 北京 北京市 北 京市海淀区农科大厦 418室
北京市 淀区 上地信息路甲 话,电话录音系统,公司即时通
28号
讯软件
北京金创时代科技 开发中心销售部
北京
北京市
北京 北京市北京市 朝阳区亚运村慧忠北 里312号天创世缘B2 栋1001
来电显示软件,企业crm,中小 企业crm,电话录音,电话录音 系统,录音电话,录音电话机, 办公精灵企业版,scr9900,录 音通
北京市
北京市海淀区万寿路 南口古庙
程控交换机,无绳电话,普通电 话机,录音电话,计费器
北京爵士特科技有 限责任公司网上宣 北京 传部
POS机,收款机,无线点菜系
北京市
北京 北京市北京西 城区百万庄南街1号
统,餐饮管理软件,收银机,美 食城一卡通,会员管理一卡通, 无线呼叫系统,电话录音系统,
电话录音设备
医用呼叫器,有线呼叫器,医用 集中供氧,电话录音卡,国威电 话交换机,威谱程控交换机,医 院中心供氧,医院呼叫器
北京方大智讯科技 有限公司
北京
北京市
北京 北京市海淀区 海淀桥北硅谷电脑城 南401室
国产集团电话,进口电话交换 机,录音系统,电话机,IP业务
北京纽曼伟业公司 北京
北京市华阳佳讯科 技有限公司
电话商务录音系统使用说明书
第一章简介本公司将先进语音技术同大容量磁盘存储技术相结合推出性能优异的新一代多路电话商务录音管理系统是对电话双方通话过程进行实行自动录音和实时监听功能的软硬件集成系统。
能对多路电话同时进行超长时间录音显示记录主叫号码、被叫号码及通话时长等通话信息并保存于电脑系统管理人员可以对任意正在通话的通道进行实时监听而通话不受任何影响。
录音采用国际通用语音处理及压缩技术符合CCITT标准将话音信号经取样数字化压缩后存储在计算机磁盘中。
放音则是通过对磁盘上的语音数据进行解压后通过外接音箱(耳机)播放。
是生产调度、服务热、110、火警、防讯报警、银行委托、证卷行业等领域不可缺少的工具。
产品已布及国家和地区:美国、港澳台地区新加坡马来西亚印度尼西亚等东南亚国家南美诸国中东地区以及西亚地区出口品质值得信赖。
产品通过CE/FCC认证.系统基本功能:●支持Windows 98/NT/2000/XP/2003操作环境。
●提供USB接口2路PCI接口单卡4路8路16路数字30B+D(30路)。
●可实时监听每一条线路的通话内容。
●支持三种录音模式自动录音(压控)声控可手动录音(键控)。
●可以对所有的拨入、拨出未接电话进行清单列表、打印、支持条件查询及添加通话备注。
●支持直线交换机的内线分机接入同时录音。
●系统支持自动备份可将语音文件自动备刻录到DVD支持自动循环录音。
●系统附带来电客户信息管理系统可识别来电身份及自定义来电座席弹屏。
●录音起始时间可以灵活设置可以是一段时间内录音也可以是每天24小时录音。
●用户可在特殊号码表里自定义不录音的电话号码如拨打95555,163上网录音系统不启动录音)。
●系统具有完整的操作日志可以记录对系统的所有操作。
●支持每个用户对某些线路拥有操作的权限可设定不同等级的密码保护除了系统管理员使用最高级的密码外还有用户密码、录音文档查询密码等多种保护措施。
●线路适用于普通电话外线、分机内线、ISDN引出的模拟线、无线对讲机的音频输出线等。
RA-2000多通道数字电话录音系统说明书
RA-2000多通道数字多通道数字录音录音录音系统系统一、 系统概述RA-2000多通道数字录音系统采用最新的数字语音处理技术,结合先进的计算机硬件,实现了大容量、高品质且安全、稳定的多路电话录音。
与传统的磁带录音系统相比,RA-2000具有语音不失真、易保存、查询快及便于操作等优点,而且还具有许多磁带录音系统所没有的功能,其性能价格比远超出磁带录音系统。
二、 应用范围RA-2000多通道数字录音系统应用非常广泛,如电力、铁路、石油、企业等行业的指挥调度部门,机场、港口、公安、安全、军事等要害部门的录音和监听,金融行业授权指令的实时录音,无线寻呼台、电信局、服务行业的服务、售票窗口、应急电话受理的录音和监听,并且还应用在各种客户服务中心、投诉中心等,为了解及时查询和发现事故原因以及提供准确可靠的原始录音记录,发挥了巨大作用。
三、 主要功能* 录音功能- 摘机自动录音。
挂机或断线时自动停止录音。
- 录音资料保存为标准的PCM 格式或ADPCM 格式(压缩格式)文件。
可转换为Windows 下的WA V 格式文件。
* 放音功能- 可选择任一条录音记录由扬声器播放。
- 可对放音进行控制,如快进、快退、暂停、重放等。
- 经转换的WA V 文件可在任何带声霸卡的计算机上播放。
* 网络查询- 可通过网络,查听系统内所有的录音记录。
- 即时播放录音内容。
* 远程查询- 可通过电话拨通系统的查询通道,查听系统内所有的录音记录。
- 查询时,系统提供提示语音帮助用户操作。
* 系统管理- 系统本身以及查询通道均设密码保护。
用户只能在其权限内操作。
-提供完整的通话记录方便用户查看。
-自动监视硬盘剩余容量。
当剩余容量小于指定的最小保留容量值时,系统提示用户进行转存或删除。
四、技术特点分层结构:基于C/S模式的分布结构,层次清晰,易于维护。
可将服务器和客户端运行在不同的计算机上通过网络连接,也可运行在同一台机器上;并行操作:录音和通话记录检索或记录放音可同时进行;数据快速检索:系统语音用数据库方式来管理,快速而高效,并能实现复杂的通话记录快速检索。
Possum HC2006电话产品说明书

The HC2006 T elephone is classified as a Class 1 medical device as an accessory , intended for use by the physically disabled.Possum Limited products are not authorised for use as critical components in life support devices or systems which sustain life and whose failure to perform, when properly used in accord-ance with the instructions for use provided, can reasonably be expected to result in significant injury or death. A criticalcomponent is any component of a life support device or system whose failure to perform can reasonably be expected to cause the failure of the life support device or system or to affect its safety or effectiveness.SCOPE OF USEAPPROVALSThe Possum HC2006 T elephone is CE marked under theR&TTE directives and has been tested toHC2006This equipment does generate, use and can radiate radio frequency energy and if not installed correctly, may causeinterference with radio and television receivers or other sensitive equipment. This equipment may be susceptible to radiofrequency energy or mains conducted interference generated by other nearby equipment. Interference is unlikely to be a problem in a typical domestic environment, but if you have any queries please contact Possum Limited for advice.POSSUM LIMITED8, FARMBROUGH CLOSESTOCKLAKE PARK INDUSTRIAL ESTAYLESBURYBUCKS HP20 1DQPossum Limited reserves the right to makeimprovements to this guide or the products it describes at any time and without further notice. This guide is copyright in the U.K. and all rights are reserved. No part of this guide may be reproduced by any means or in any form without the prior consent in writing from Possum Limited.NoticeHC2006 User Guide - part no: 034-751-GB Issue: 03 Possum Limited, October 2009There are no user-serviceable parts within theHC2006. Refer all faults to Possum Limited or their authorised service agents.Note that under the Medical Devices Directive, only service personnel trained and approved by Possum Limited are permitted to install, maintain and repair this product.WARNING! Hazardous voltages and exposed liveparts exist within the HC2006 power supply unit when in use. Never attempt to open the unit or remove the case cover.SPECIFICATIONSPOWER REQUIREMENTSThe Possum HC2006 Telephone is designed to operate only with the supplied power supply - type HCP2006.(Never use a HC501 or any other power supply)OPERATING/STORAGE ENVIRONMENTStorage Temperature Range:0°C to 40°C (32°F to 104°F)Storage Humidity Range:30% to 75%(non-condensing)Storage Altitude Range:0m to 2,000mPHYSICAL CHARACTERISTICSWidth: 165mm Height (without mtg bracket) : 95mm Height (with mtg bracket) : 105mm Length : 200mm Weight (without mtg bracket): 1065grammes Weight (with mtg bracket): 1130grammesEN60950 - 1:2006 (Safety)EN55022:2006 (EMC)EN55024:1998, Amd. 1 & Amd. 2:2003 (EMC)I f the HC2006 fails to operate, check :1. That there is a clear line of sight from the controller to the HC2006 IR window.2. That the HC2006 IR window is not in direct sunlight.3. That HC2006 is connected to UK phone socket If you are still unable to solve the problem, please contact Possum Limited at the address stated for assistance.IF YOU HAVE A PROBLEMSERVICINGPRODUCT CARE1) Disconnect the mains power supply & telephone line to the HC2006 unit before attempting to clean the product.2) The Possum HC2006 should be cleaned only with a soft,lint-free cloth, slightly moistened with clean water.3) Do not use abrasive or solvent-based cleaning products.4) Do not allow moisture to enter the HC2006 unit. Ensure that the product is dry before re-connecting to the mains power supply & telephone line.5) The Possum HC2006 is intended for indoor use only and is not drip proof, splash proof or waterproof.6) The Possum HC2006 is not anaesthetic proof and cannot be sterilised.[1] [2] [3]The mains power socket for connecting the mains adaptorand phone line point should be easily accessible[4] [5] [6]PHONE SETUPAdding Contacts to the phone bookA phone contact has many parameters all of which need to be set in turn.Using the phone bookchoose contact, press Using the calls list (incoming calls)Press Call LockThe phone can be set to provide certain levels of restrictions when .keypad to choose a particular numerical memory location.T hears on the phone line cannot be adjusted.T duration. The caller is alerted of the recording by means of an audible tone.01296461000#12Recording personal Answerphone Out Going1.or4.Adding PhrasesPhrase Description1.Press the digit key which corresponds to the requiredletter of the name repeatedly until the correct character is 2.3.4.Record Phrase5.6.7.8.Adjusting Announcement VolumeThe announcement of keys and names is a setting accessible only by a Possum approved engineer,If enabled, the volume level can be adjusted as follows:Setting the clock (continued)Display SymbolsSetting the clockThe clock is used to give date and time of each entry inthe call or redial list and date and time of messages in Answerphone message list. The date and time will beset by the engineer at installation but will need settingagain for clock changes at GMT and BST. The clock willalso need to be set following a prolonged period of mains failureafter the internal phone batteries have become exhausted.Setting the clock for the first time[10] [11] [12]Telephone ringing Displayed information has a recording assignedSpeakerphone on Speakerphone offSet microphone levels Microphone mute Headset modeCall restriction active(pin number maybe required) Caller marked as VIP WarningDo not disturb onContact number - Work Contact number - Home Contact number - Mobile Contact number - SOS (Flashes when dialling) Battery chargingOn hook Off hookNo phone line Answerphone onAnswerphone messageCaller leaving message on Answerphone MEANINGSYMBOL。
润普 RP-BOX10D 数码录音电话使用说明书电子版..
RP-BOX系列录音电话RP Digital Recorder数码录音电话使用说明书润普音讯(北京)科技发展有限公司RIPE Audio-Communication (Beijing) Technology Development Co., Ltd.欢迎使用RP-BOX系列数码录音电话,本产品采用数码录音,能够实时、清晰地录制通话语音、来电留言和本地录音,掉电语音数据不丢失,录音时长可达10小时,特设置两级密码保护,确保语音数据的安全性和保密性。
提供USB接口与PC机相连,通过专用的PC机管理软件可以播放、保存录制的语音信息,语音文件可转换为WA V文件,也可以作为普通文件进行COPY、E-MAIL等。
本产品还具有来电显示等多种电话功能。
包装盒内所含附件:录音电话机、电源适配器、USB连接线、录音电话说明书、软件安装光盘。
润普音讯(北京)科技发展有限公司目录一、产品安装 (1)1、安装步骤 (1)2、按键图 (1)3、液晶图 (1)二、电话功能 (2)1、末码重拨 (2)2、静音 (2)3、闪断 (2)4、忙音/静音检测挂机 (2)5、时钟及日期设置 (2)6、来电显示 (2)7、新来电号码提示 (2)8、振铃次数设置 (2)9、和弦铃声设置 (3)10、闪断时间设置 (3)三、录音功能 (4)1、通话录音 (4)2、应答留言 (4)3、现场录音 (4)4、主人留言 (4)5、录音播放 (4)6、录音查询 (5)7、录音删除 (5)四、密码功能 (6)1、密码设置 (6)2、密码修改 (6)3、密码取消 (6)五、系统设置 (7)六、电池备份及馈电电话功能 (7)七、USB接口 (7)八、产品类比 (8)九、产品保修卡 (9)一、产品安装1、安装步骤本机的安装非常简单,用户只要将手柄线、电话线、外接电源线(9V DC)插好,本机就可正常工作了。
本机备有充电电路,用户只需装入四节5号充电电池,这样即使外接电源停电,本机可正常工作。
Grandstream Wave 电话客户端 用户手册说明书

潮流网络技术有限公司技术支持潮流网络技术有限公司为客户提供全方位的技术支持。
您可以与本地代理商或服务提供商联系,也可以与公司总部直接联系。
地址:深圳市南山区科技园北区新西路16号彩虹科技大厦4楼邮编:518057网址:客服电话:*************客服传真:*************技术支持论坛:/forums网上问题提交系统:/support/submit-a-ticket商标声明和其他潮流网络商标均为潮流网络技术有限公司的商标。
本文档提及的其他所有商标或注册商标,由各自的所有人拥有。
注意由于产品版本升级或其他原因,本文档内容会不定期进行更新。
除非另有约定,本文档仅作为使用指导,本文档中的所有陈述、信息和建议不构成任何明示或暗示的担保。
目录更新日志 (1)软件版本1.0.1.9(Android TM)/1.1.9(iOS TM) (1)软件版本1.0.0.17(Android TM)/1.0.15(iOS TM) (1)软件版本1.0.0.6 (1)欢迎使用 (2)概述 (2)软件特性 (2)基本操作 (4)设备要求 (4)下载及安装 (4)基本手势 (5)使用Wave (6)登录帐号 (6)忘记密码 (6)拨打电话 (7)重拨 (7)使用通话记录 (8)使用联系人 (8)接听电话 (9)通话 (9)通话保持与恢复 (11)静音 (11)声音通道切换 (12)未接来电 (12)呼叫转移 (13)盲转 (13)指定转 (14)会议室 (14)即时会议 (15)预约会议 (16)音频会议 (17)视频会议 (17)视频会议成员 (18)结束会议 (19)链接入会 (20)语音邮件 (20)联系人 (21)搜索联系人 (21)查看联系人 (22)常用联系人 (22)通话记录 (24)设置 (25)帐号信息 (25)关于 (26)常见问题解答 (27)图表目录图表1手势说明图 (5)图表2登录界面 (6)图表2忘记密码界面 (6)图表3拨号盘界面 (7)图表4使用通话记录拨号 (8)图表5使用联系人拨号 (8)图表6来电振铃界面 (9)图表7单路通话 (10)图表8语音通话保持界面 (11)图表9通话静音界面 (11)图表10通话时切换声音通道界面 (12)图表11未接来电提醒界面 (12)图表12呼叫转移-盲转界面 (13)图表13呼叫转移-指定转界面 (14)图表14会议室界面 (15)图表15即时会议设置界面 (15)图表16预约会议设置界面 (16)图表17音频会议界面 (17)图表18视频会议界面 (18)图表19会议参会者界面 (19)图表20主持人退出会议界面 (19)图表21链接入会界面 (20)图表22语音邮件收听界面 (21)图表23联系人主界面 (21)图表24联系人搜索界面 (22)图表25联系人详情界面 (22)图表26联系人详情中设置常用联系人界面 (23)图表27联系人详情中设置常用联系人界面 (23)图表28通话记录 (24)图表29通话记录详情 (24)图表30设置界面 (25)图表31帐号信息界面 (25)用户手册图表32关于界面 (26)用户手册更新日志更新日志本节主要介绍Wave App最新的版本更改及新功能的增加。
TMPRO 880专业音频会议系统产品说明书

THE CLEAR CHOICE FOR PROFESSIONAL AUDIO CONFERENCING CONVERGE TM PRO 880APPLICATIONSConference RoomsBoardroomsCourtroomsDistance Learning FacilitiesConvention Centers and HotelsTraining RoomsTelemedicine FacilitiesHouses of WorshipCONVERGE TM PRO 880 ADVANTAGESAdvanced Conferencing Feature Set+Next-generation Acoustical Echo Cancellation> Full bandwidth (20Hz to 22Khz) echo cancellation> Improved duplex performance> Push-to-talk microphone compatibility+Next-generation Noise Cancellation> Adaptive modeling to room ambient noise condition+Increased resolution on Microphone Preamp stage> 0-56 dB in 7 dB increments+Pre-AEC routing for Sound Reinforcement Applications> Maximum of 4 millisecond processing delay+Management Improvements> Integrated Ethernet and USB connections> SNMP and HTML remote management agents> Event scheduler> Diagnostic console+Simplified Configuration Software> Drag & drop A/V and channel objects> Selectable views—unit, matrix, channel+Expanded Serial Command ListSuperior Audio Performance+Next-generation Distributed Echo Cancellation®on every mic input+First-mic priority delivers clear audio to the far end+20 Hz-22 kHz bandwidth for full-range audio response+ALC & AGC keep participants’ audio balanced and consistentConfiguration Flexibility+Scalable – link multiple Converge Pro units (880, 840T, 8I, TH20) for extensive microphonecoverage and up to 16 phone lines+Enhanced expansion bus, featuring 12 mix-minus audio buses for routing between units+Eight mic gating groups (four internal & four global) allow separation of mics intoindividual mixer gating groups for greater configuration flexibility+32 presets can be executed on-the-fly without disturbing other ongoing preset operations+255 Macros for customized audio control/configuration with single command execution Professional Conferencing SystemPROFESSIONAL CONFERENCINGDATA SHEET < CONVERGE TM PRO|880>SPECIFICATIONSCONVERGE PRO 880DATA SHEET <>CLEARONE LOCATIONS>CONVERGE PRO 880 BACK PANELAudio PerformanceConditions: Unless otherwise specified, allmeasurements are performed with a 20 Hz to 22 kHz BW limit (no weighting)Frequency Response: 20 Hz to 22 kHz ±1dB Noise (EIN): -126 dBu, 20 kHz BW, max gain,Rs=150 ΩTHD+N: <0.02%Dynamic Range: 100 dB (non A-weighted)Crosstalk <-91 dB re 20 dBu @ 20 kHz channelto channel Auto Mixer ParametersNumber of Open Microphones (NOM)PA Adaptive Mode First Mic Priority Mode Last Mic ModeMaximum # of Mics Mode Ambient LevelGate Threshold Adjust Off Attenuation Adjust Hold Time Decay RateMatrix Mixing Parameters 36x36 matrix 12 analog in/out12 expansion bus in/out8 assignable processing blocks in/out 4 assignable fader blocks in/out Assignable Processing Blocks Filters:All pass Low pass High pass Low shelving High shelving Parametric EQ Notch CD Horn Crossovers:BesselButterworth Linkwitz-Riley CompressorDelay; adjustable up to 250 msAssignable Fader Blocks Gain/MuteMicrophone Input Configuration Input Gain Adjust Mic or Line LevelPhantom Power on/off Echo Cancellation on/off Noise Cancellation on/off Filters:All Pass Low Pass High Pass Notch PEQMute on/offChairman Override on/off AGC on/offAutomatic Level Control on/off Auto Gate/Manual gate Adaptive Ambient on/off Pre AEC channelMic/Line Inputs 1-8Push-on mini-terminal block, balanced,bridgingImpedance: < 5 KΩNominal Level: adjustable -56 dBu to 0 dBu (7dB step coarse gain adjustment)Maximum Level: -65 dBu to +20 dBuEcho Cancellation: 130 ms tail time (works with 12 dB of room gain)Noise Cancellation: 6–15 dB attenuation Phantom Power: 24 V , selectable Line Inputs 9-12Push-on mini-terminal block, balanced,bridgingImpedance: < 5 KΩNominal Level: 0 dBu Maximum Level: 20 dBuOutputs 1-12Push-on mini-terminal block, balanced Impedance: < 50 ΩNominal Level: 0 dBu Maximum Level: 20 dBuExpansion Bus In/Out Proprietary Network RJ-45 (2), 1.9 MbpsCategory 5 twisted-pair cable, 200’ maximum cable length between any two Converge Pro devicesEthernetAutoswitching with Quality of Connection (QoC)10/100 Mbps Ethernet Network Port 10/100 Mbps Ethernet PC Port RJ-45 ConnectorsRS-232Serial Command Protocol Only (Console software not supported on RS- 232 port)DB-9 female9,600/19,200/38,400/57,600/115,200 baud rate; 8 bits,1 stop bit, no parityHardware flow control on (default)/off USBVersion 2.0 Compatible T ype: B-connectorControl/Status Ports DB-25 female A/B (2)Inputs A/B: active low (pull to ground)Outputs A/B: open collector, 40 VDC max, 40mA each+3.3 VDC pins (2) (300 mA over-current protected)Configuration & Administration Software Converge™ Console Power Input Range Auto-Adjusting100–240 VAC; 50/60 Hz Power Consumption 30 W T ypicalDimensions (L x D x H)17.25” x 10.25” x 1.75”43.8 x 26 x 4.5 cmWeight7.5 lbs/3.3375 kg unit weight 12 lbs/5.4kg shipping weightOperating T emperature14° F/-10 °C to 122° F/50° C ambient unit temperature Approvals & ComplianceAES48-2005: AES standard oninterconnections — Grounding and EMC practices — Shields of connectors in audio equipment containing active circuitry (self certified)U.S.A. & Canada CSA safety listed EU CountriesRoHS compliant WEEE compliantSee product manual for additional details Optional AccessoriesConverge Pro 880Converge Pro 880T Converge Pro 840T Converge Pro 8i Converge Pro TH20Converge SR 1212T abletop ControllerButton Microphone – Omni-Directional Button Microphone – Uni-Directional Delta MicrophoneT abletop Microphone – Uni-Directional JBL Wall-Mount SpeakersPart Number910-151-880 Converge Pro 880 – 8-channel AEC Microphone Mixer Headquarters:Salt Lake City, UT USA 5225 Wiley Post Way Suite 500Salt Lake City, UT 84116 Tel:801-975-7200T oll Free: 800-945-7730 Fax:801-977-0087******************Latin America Tel:801-974-3621*******************EMEATel: 44 (0) 1189 036 053*******************APACTel:801-303-3388 *******************Other product names may be registered trademarks of their respective owners who do not necessarily endorse ClearOne or ClearOne’s products. All rights reserved. Information in this document subject to change without notice . © 2007 ClearOne Communications Inc. 802-151-880 Revision 1.7 January 2008.。
PJP-50R_T_setup
多个 ProjectPhone 的阶层连接 (级联) .... 27 何谓级联? ............................. 27 级联的设置 ............................. 28 使用级联通信 ........................... 29 级联的显示 ............................. 29
14 当准备长时间 (例如休假)不使用本机时,请将 AC 电源线 从墙上插座断开。
15 对通常的操作错误,在断定本机出故障之前,请务必先阅读 “故障排除”一节。
16 在搬动本机之前,请按住 (断开)设置本机到待机模 式,然后将 AC 电源插头从墙上的插座断开。
17 如果环境温度变化剧烈,可能形成结露。此时,请将电源插 头拔离插座,并将本机存放在干燥处。
设置日期和时间 ......................... 23 手动设置日期和时间 .................... 23 使用 SNTP 服务器设置日期和时间 ......... 23
编辑地址簿 ............................. 24 登记新地址 ............................ 24 编辑已有地址 .......................... 24
11 请勿使用化学溶剂清洁本机;这可能损坏机壳涂层。 请使 用洁净的干布。
Grandstream GXP2200企业应用电话快速启动指南说明书
Grandstream Networks, Inc. 1297 Beacon Street, 2nd FloorBrookline, MA 02446. USATel : +1 (617) 566 – 9300Fax: +1 (617) 249 – 1987For Warranty and RMA information, please visit GXP2200 Enterprise Application PhoneQuick Start GuideContent English (1)简体中文 (9)Español (17)Français (25)Deutsch (33)Italiano (41)The GXP2200 isnot pre-configured to support or carry emergency calls to any type of hospital, law enforcement agency, medical care unit (“Emergency Service(s)”) or any other kind of Emergency Service. You must make additional arrangements to access Emergency Services. It is Your responsibility to pur -chase SIP-compliant Internet telephone service, prop-erly configure the GXP2200 to use that service, and periodically test your configuration to confirm that it works as You expect. If You do not do so, it is Your re -sponsibility to purchase traditional wireless or landline telephone services to access Emergency Services.GRANDSTREAM DOES NOT PROVIDE CON -NECTIONS TO EMERGENCY SERVICES VIA THE GXP2200. NEITHER GRANDSTREAM NOR ITS OFFICERS, EMPLOYEES OR AFFILIATES MAY BE HELD LIABLE FOR ANY CLAIM, DAMAGE, OR LOSS, AND YOU HEREBY WAIVE ANY AND ALL SUCH CLAIMS OR CAUSES OF ACTION ARISING FROM OR RELATING TO YOUR INABILITY TO USE THE GXP2200 TO CONTACT EMERGENCY SER -VICES, AND YOUR FAILURE TO MAKE ADDITIONAL ARRANGEMENTS TO ACCESS EMERGENCY SER -VICES IN ACCORDANCE WITH THE IMMEDIATELY PRECEDING PARAGRAPH .PACKAGE CONTENTS:PRECAUTIONS:WARNING: Please DO NOT power cycle the GXP2200 during system bootup or firmware upgrade. You may corrupt firmware images and cause the unit to malfunction.WARNING: Use only the power adapter included in the GXP2200 package.Using an alternative non-qualified power adapter may possibly damage the unit.1 X GXP2200 Main Case 1 X Handset 1 X Phone Cord1 X Ethernet Cable 1 X 12V Power Adapter1 X Phone Stand1 X Quick Start GuideCONNECTING THE PHONE:OVERVIEW:EXT PortPC Port LAN Port Handset PortTab with extension upSlots for the phone standHandset RestTab with extension downPHONE SETUP:GXP2200 represents the future of enterprise business telephones in modern In -ternet age. Featuring Android 2.3 and its vast number of 3rd party applications, a 480x272 capacitive touch screen TFT LCD, dual Gigabit network ports, integrated PoE and Bluetooth, this unique product is distinguished in a special class of its own. The GXP2200 delivers superior HD audio quality, leading edge telephony features, integration of rich Web content with access to the rapidly growing An -droid applications base, automated provisioning, advanced security protection for privacy, and broad interoperability with most 3rd party SIP based devices, IP PBX and major IMS platforms. The GXP2200 is an innovative smart desk phone loaded with tremendous value for Web-integrated business communications as well as unprecedented power for advanced custom business applications devel -opment and personalization.Push phone stand upwardsPower Headset PortSD Card SlotUSB Port1. Attach the phone stand to the back of the phone where there is a slot for the phone stand. Upper part and bottom part are available for two angels;2. When using the bottom part for phone stand, you may also adjust the tab from the handset cradle. Pull out the tab from the handset cradle (see Figure in next page);3. Rotate the tab and plug it back into the slot with the extension up to hold the handset.Installing The Phone Stand:1. Connect the handset and main phone case with the phone cord;2. Connect the LAN port of the phone to the RJ-45 socket of a hub/switch or a router (LAN side of the router) using the Ethernet cable;3. Connect the 12V DC output plug to the power jack on the phone; plug the power adapter into an electrical outlet. If PoE switch is used in step 2, this step could be skipped;4. The LCD will display booting up or firmware upgrading information. Before con -tinuing, please wait for the main screen display to show up;5. Using the web configuration interface or from the menu of the touch screen, you can further configure network connection using either static IP , DHCP and etc.Tips For Using the Keypad:Configure the GXP2200 using the Touch Screen:KeypadPHONE CONFIGURATION:Configure the GXP2200 using Web Browser:1. Ensure your phone is properly powered up and connected to the Internet;2. The IP address of the phone will show in the main screen when pressing the Home button;3. Type the phone’s IP address in your PC’s browser (See Figure in next page);4. The default username and password for administrator is “admin” and “admin“. The default username and password for user is “user“ and “123”;5. In the web GUI, select Account 1/2/3/4/5/6 page to configure Account name, SIP Server, Outbound Proxy, SIP User ID, Authenticate ID and Authenticate Password to register the account on GXP2200.1. Make sure the phone is properly powered up and in idle screen;2. Tap on the screen Menu icon to access GXP2200’s applications and settings;3. Select Settings->Advanced Settings->Account. Tap on one of the Account to configure Account name, SIP Server, Outbound Proxy, SIP User ID, SIP Auth ID, SIP Auth Password to register the account on GXP2200. After successfully regis -tered, the main screen will be shown as the figure below;4. Follow the screen Menu icon options to configure other settings on the phone.For example: To use Static IP on GXP2200, set up IP address via Settings->Networks->Ethernet Settings;5. Please contact your ITSP (Internet Telephony Service Provider) for additional settings that may be necessary to configure the phone.The GXP2200 extension module is an ideal solution for the busy enterprise envi -ronment looking to add the ability to receive and dispatch calls efficiently. Each ex -tension module has 20 programmable buttons, Left and Right buttons, supporting 40 Multiple Purpose Keys to be configured. GXP2200 supports up to 4 extension modules, adding 160 fully programmable phone extensions to the phone.Note: The extension module is an additional accessory for the GXP2200 and is not included in the GXP2200 box.Note: For the detailed user manual, please download from:/supportGXP2200 Extension Module Package Content:Configuring GXP2200 Extension Module:1. Login GXP2200’s web GUI and configure Multiple Purpose Keys for Extension board 1/2/3/4 following the GXP2200 web GUI tabs;2. On the GXP2200 extension board, press Left or Right button to browse all the MPKs’ status in different pages;3. For more information, please refer to the GXP2200 user manual.3. Connect the extension board to GXP2200 via the EXT port using the RJ11-RJ11 cable provided;4. Install the phone stand on GXP2200 and extension board;5. Power up the GXP2200. The GXP2200 extension board will show the booting up screen with version information and connecting status;6. After successfully booting up, the extension board will stay in idle. Press and hold the Left button for 3 seconds to check the version information and status.Installing GXP2200 Extension Module:1 X GXP2200 Extension Board 1 X GXP2200 Extension Board Stand1 X RJ11-RJ11 Cable1 X Extension Board Connector Plate4 X Screws1. On the back of GXP2200 and the extension board, there are slots for connector plate. Attach the connector plate between the slots for GXP2200 and the exten -sion board;2. Apply the screws provided and securely tighten them in (see Figure in the next page);GXP2200 EXTENSION MODULE:GXP2200不预设对医院,执法机构,医疗中心(急救服务)以及各种紧急服务的紧急通话服务。
快速参考指南音频系统(P 253)操作指南说明书
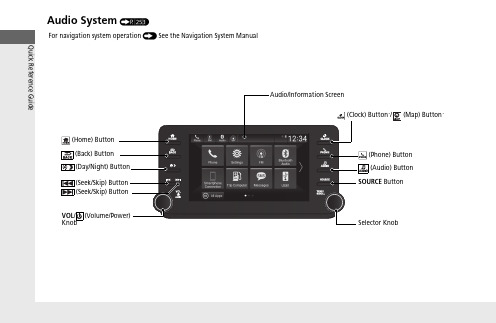
Audio System (P 253)FeaturesPress to go to the home 2Switching the Display P.254(Back) Button: Press to go back to the previous display when it is displayed./ (Seek/Skip) Buttons: Press to change songs.(Clock) Button *: Press to display the clock*: Press to display the map (Phone) Button: Press to display the phone screen.(Audio) Button: Press to display the current audio information.SOURCE Button:Press to display the source select screen.Selector Knob: Rotate left or right to scroll through the available choices.Press to changethe audio/information screen brightness.Press once and select or to make an adjustment.u Each time you press , the mode switches among the daytime mode, nighttime mode, and off mode.1Audio System Basic OperationThese indications are used to show how to operate the Selector Knob.Rotate to select.Press to enter.Selector KnobWhen the list is not displayed, songs, frequency, etc. can be changed.While connected to Apple CarPlay, it changes as follows:•Pressing the Phone Button, display the Apple CarPlay phone screen.•Pressing the Audio Button, display the Apple CarPlay audio screen.*Not available on all modelsuu Audio System Basic Operation u Audio/Information ScreenFeatures Audio/Information ScreenDisplays the audio status and wallpaper. From this display, you can go to various setup options.■Using the audio/information screenPress the button to go to the home screen.Select the following icons on the home screen or after selecting All Apps.■PhoneDisplays the HFL information.2Bluetooth® HandsFreeLink® P.374■Switching the Display1Audio/Information ScreenTouchscreen Operation•Use simple gestures - including touching, swiping,and scrolling - to operate certain audio functions.•Some items may be grayed out during driving toreduce the potential for distraction.•You can select them when the vehicle is stopped oruse voice commands.•Wearing gloves may limit or prevent touchscreenresponse.You can change the touchscreen sensitivity setting.2Customized Features P.351All Appsuu Audio System Basic Operation u Audio/Information ScreenFeatures■Trip ComputerDisplays the trip computer information.•Current Drive tab: Displays the current trip information.•Trip A /Trip B tab: Displays information for the current and three previous drives. The information is stored every time you reset Trip A/B.To reset the Trip A/B, select Settings , then select Delete Trip History .To change the setting of how to reset Trip A/B, select Settings , then select “Trip A” Reset Timing or “Trip B” Reset Timing .■ClockDisplays the clock.■System Updates *Updates the software version of the audio system.2System Updates * P.266■FM/AM/SiriusXM */USB1 (USB)/USB2*/Bluetooth Audio/SmartphoneConnectionDisplays information for each audio format.■SettingsEnters the customizing menu screen.2Customized Features P.351■Navigation *Displays the navigation screen.2Refer to the Navigation System Manualuu Audio System Basic Operation u Audio/Information ScreenFeatures ■HondaLinkDisplays the HondaLink screen.2HondaLink® P.301■Apple CarPlay/Android AutoDisplays the Apple CarPlay or Android Auto screen.2Apple CarPlay P.3132Android Auto P.320■MessagesDisplays the text message screen.2Bluetooth® HandsFreeLink® P.374■AT&T Hotspot*Displays the AT&T Hotspot screen.2AT&T Hotspot* P.311■Compass*Displays the compass screen.uu Audio System Basic Operation u Audio/Information ScreenFeaturesYou can change, store, and delete the wallpaper on the audio/information screen.■Import wallpaper1.Connect the USB flash drive to the USB port in the center pocket.2USB Ports P.2472.Select Clock .3.Select Settings .4.Select Clock Faces .5.Select Add New Wallpaper .u The Searching... screen is displayed.6.Import a desired picture.u Multiple pictures can be imported at the same time.7.Select Start Import .u The display will return to the Clock Faces screen.■Wallpaper Setup1Wallpaper SetupThe wallpaper you set up on Clock Faces cannot be displayed on the driver information interface.•When importing wallpaper files, the image must be in the USB flash drive’s root directory. Images in a folder cannot be imported.•The file name must be fewer than 64 characters (64 bytes).•The file format of the image that can be imported is BMP (bmp) or JPEG (jpg).•If the USB flash drive does not have any pictures,the No files detected message appears.•Up to five pictures can be imported.•The individual file size limit is 2 MB.•The maximum image size is 1,920 × 936 pixels. If the image size is less the image is displayed in the middle of the screen with the extra area appearingin black.uu Audio System Basic Operation u Audio/Information ScreenFeatures ■Select wallpaper1.Select Clock.2.Select Settings.3.Select Clock Faces.4.Select a desired wallpaper.5.Select Set.u The display will return to the Clock Faces screen.■To view wallpaper once it is set1.Press the button.2.Select Clock.■Delete wallpaper1.Select Clock.2.Select Settings.3.Select Clock Faces.4.Select a desired wallpaper.5.Select Delete.6.Select Yes.u The display will return to the Clock Faces screen.1Wallpaper SetupYou cannot delete the initial imported wallpapers.When the file size is large, it takes a while to bepreviewed.uu Audio System Basic Operation u Audio/Information ScreenFeatures■To move to the next screenSelecting or , or swiping the screen left or right changes to the next screen.■Home Screen1Home ScreenThe home screen has 2 pages. You can add up to 7 pages.Press the button to go directly back to the firstSwipeIcon > Icon<Current page position<>uu Audio System Basic Operation u Audio/Information ScreenFeatures ■To add app icons on the home screenApp icons can be added on the home screen.1.Press the button.2.Select and hold the home screen.3.Select Add.4.Drag and drop the icon to where you wantit to be.5.SelectDone.u The screen will return to the homescreen.1To add app icons on the home screenYou can add app icons by the following procedure.1.Press the button.2.Select All Apps.3.Select Customize.4.Select Add.5.Drag and drop the icon to where you want it tobe.6.Select Done.u The screen will return to the home screen.Pre-installed apps may not start up normally. If thisoccurs, you need to reset the system.2Defaulting All the Settings P.370If you perform Factory Data Reset, it may reset allthe settings to their factory default.2Defaulting All the Settings P.370In case those apps still do not startup normally evenafter Factory Data Reset, contact your dealer.If a browser shuts down mid-use, the screen willreturn to the screen viewed prior to the browserstartup.uu Audio System Basic Operation u Audio/Information ScreenFeatures■To move icons on the home screenYou can change location on the home screen.1.Select and hold an icon.u The screen switches to the customization screen.2.Drag and drop the icon to where you want it to be.3.Select Done .u The screen will return to the home screen.1To move icons on the home screenSelect Tips to show tips. To hide them, select it again.Select and hold.Drag and drop.uu Audio System Basic Operation u Audio/Information ScreenFeatures ■To remove icons on the home screenYou can delete the icons on the home screen.1.Select and hold an icon.u The screen switches to the customizationscreen.2.Drag and drop the icon you want to removeto the Hide icon.u The icon is removed from the homescreen.3.Select Done.u The screen will return to the homescreen.1To remove icons on the home screenApps will not be deleted by deleting the icon on thehome screen.Select Tips to show tips. To hide them, select it again.Select and hold.Drag and drop toHideicon.uu Audio System Basic Operation u Audio/Information ScreenFeatures■To shortcut icons on the home screenYou can store up to three icons on the upper left of the home screen.1.Select and hold an icon.u The screen switches to the customization screen.2.Drag and drop the icon you want to store to the upper left of the home screen.u The icon is a shortcut.3.Select Done .u The screen will return to the homescreen.1To shortcut icons on the home screenSelect Tipsto show tips. To hide them, select it again.Select and hold.Drag anddrop to preset icon.ShortcutIconsuu Audio System Basic Operation u Audio/Information ScreenFeatures1.Select the system status icon.u The status area appears.2.Select an item to see the details.3.Press the button or select the systemstatus icon to close the area.■Status AreaSystemStatus Icon Status Areauu Audio System Basic Operation u Audio/Information ScreenFeaturesYou can edit, show, or hide the meter contents on the driver information interface.1.Press the button.2.Select Settings .3.Select System .4.Select Config. of Instrument Panel .5.Select the content you wish to show or hide.u The checked items are displayed on the driver information interface.6.Select Done .■Editing orderYou can change the order of the contents on the driver information interface.1.Press the button.2.SelectSettings .3.Select System .4.Select Config. of Instrument Panel .5.Select Reorder .6.Select and hold the contents you want to move.7.Drag and drop the contents to where you want them to be.8.Select Done .■Customizing the Meter1Customizing the MeterYou can store up to three customized configurations.To select or customize a configuration, select Select configuration .uu Audio System Basic Operation u System Updates*Features System Updates*The audio system’s firmware can be updated with a Wi-Fi connection or with a USB device.■Wireless connection mode setup1.Press the button.2.Select System Updates.3.Select Settings.4.Select Connection Setup.5.Select Wi-Fi.6.Select Change Mode.7.SelectNetwork, thenConfirm.u The display returns to the network list.8.Select an access point from the network list,then Save.u If the audio system requires a password,enter a password.■How to Update Wirelessly1Wireless connection mode setupIf your vehicle has a telematics control unit (TCU), youdo not need the wireless connection mode setup.*Not available on all modelsuu Audio System Basic Operation u System Updates *Features■How to updateWhen the audio system update is available, the notification is shown on the audio/information screen. Use the following procedure to update the system.1.Press the button.2.Select System Updates .3.Select via Wireless .u If a notification is displayed on the screen, the screen of step 5 will be displayed.4.Select Download Now .uA notification appears on the screen.1How to updateYou can update the system via Wi-Fi, but cannot use the captive portal that require login or agreement the terms of use on the browser.Your download will be canceled if:•Your Wi-Fi connection is severed.•You turn off the ignition when the battery is low on power.Your download will recommence the next time a Wi-Fi connection is established.uu Audio System Basic Operation u System Updates*Features 5.Select Install Now or Install whileVehicle OFF.u A notification appears on the screen ifthe update is successful.1How to updateFor battery protection, Install while Vehicle OFFcannot be selected when the battery is low on power.If you want to install the updated data, recharge thebattery or select Install Now.uu Audio System Basic Operation u System Updates *Features■Automatic download settingsUse the following procedure to change to the automatic download setting.1.Press the button.2.Select System Updates .3.Select Settings .4.Select Auto Download .5.Select the access point, then Yes .■View a version and update statusUse the following procedure to confirm the version and update status.1.Press thebutton.2.Select System Updates .3.Select Settings .4.Select Version Status .uu Audio System Basic Operation u System Updates*Features ■Download the update files from the server1.Press the button.2.SelectSystem Updates.3.Select via USB.u A notification appears on the screen.4.Connect a USB device into the USB port inthe center pocket.u The inventory data is copied into the USBdevice.2USB Ports P.2475.Remove the USB device from the USB port.6.Connect the USB device into yourcomputer, and then download the updatefiles.u Follow the link to download the requiredsoftware update files. Refer tohttps:// for instructions.■How to Update with a USB Device1How to Update with a USB DeviceA USB device with a minimum of 8 GB of free spaceor more is recommended.Be sure to delete any previous inventory or updatefiles from the USB before starting the USB updateprocess.uu Audio System Basic Operation u System Updates *Features■Update the audio system1.Press the button.2.Select System Updates .3.Select via USB .u A notification appears on the screen.4.Connect the USB device with the update files into the USB port.u A notification appears on the screen.2USB Ports P.2475.SelectInstall Now .u A notification appears on the screen if the update is successful.uu Audio System Basic Operation u Adjusting the SoundFeatures Adjusting the Sound1.Press the button.2.Select an audio source icon.3.Select Sound.4.Select the setting you want.5.Select Save.Select an item from the following choices:•Bass / Treble: Treble, Midrange, Bass,Subwoofer*•Balance / Fader: Balance, Fader•DTS Neural Surround*: DTS NeuralSurround TM•Speed Volume Compensation: SpeedVolume Compensation (SVC)1Adjusting the SoundThe SVC adjusts the volume level based on thevehicle speed. As you go faster, audio volumeincreases. As you slow down, audio volumedecreases.You can also adjust the sound by the followingprocedure.1.Press the button.2.Select Settings.3.Select Sound.To reset each setting for Bass / Treble, Balance /Fader, DTS Neural Surround* and Speed VolumeCompensation select Default.*Not available on all models。
- 1、下载文档前请自行甄别文档内容的完整性,平台不提供额外的编辑、内容补充、找答案等附加服务。
- 2、"仅部分预览"的文档,不可在线预览部分如存在完整性等问题,可反馈申请退款(可完整预览的文档不适用该条件!)。
- 3、如文档侵犯您的权益,请联系客服反馈,我们会尽快为您处理(人工客服工作时间:9:00-18:30)。
电话录音软件使用说明和开发手册2003年5月1日目录系统简介 (2)一、基本功能 (2)二、技术参数 (4)三、典型行业客户列表 (4)系统安装 (6)一、硬件安装 (6)1.1微机 (6)1.2应用环境 (6)1.3硬件结构、安装 (7)二、软件安装 (7)软件操作 (9)一、系统启动 (9)二、基本操作 (10)2.1主窗口说明 (10)2.2模块功能 (12)编程接口 (24)函数说明 (25)VC环境 (29)C++Builder环境 (30)VB环境 (31)DELPHI环境 (33)PB环境 (35)VFP环境 (37)其他编程语言 (38)第 1 页共39 页 1系统简介RL系列系列电话录音系统,是本公司凭借多年来在语音技术方面的专业经验,使用最新数字电子技术,辅以现今为止最先进的电脑及Windows软件所设计完成的一套整合性系统,它可以同时对多路电话通话进行录音、监听和查询。
系统可选读写光盘作为备份,容量大,可靠性高。
RL系列系列电话录音系统可广泛的应用于商业电话录音,电力调度录音,热线服务电话录音,投诉电话录音,关键岗位电话录音,传呼台录音,金融证券录音,公安报警录音,安全部门的监听电话,航空、铁路、交通运输调度录音及各行业的生产调度录音。
一、基本功能1.流行的Windows 98/ME/2000/XP操作环境。
B接口,符合USB 1.1标准,系统为外置式设备,不占用主机资源,即插即用。
3.从USB端口供电,不需外接电源。
4.可热插拔。
5.容量(线数)随意调整。
用户可根据需要接入多个USB电话录音设备。
第 2 页共39 页 2可通过USB接口卡随意扩展。
6.支持中文、繁体、英文等各种字体的操作系统。
7.录音对通话双方没有任何影响。
8.可以根据任意给定的条件对录音、备份资料进行快速、简洁的回放查听。
9.多个用户可以在多台电脑使用声卡对录音资料根据任意给定条件进行回放查听与备份。
10.系统具有自动同步双备份功能。
也可以通过系统手工备份到您想要保存的目录或磁带转录。
11.可以完整的检测并记录所有外拨电话号码与来电显示号码。
12.强大的电话管理功能,可以对所有的拨入、拨出电话进行清单列表、打印、汇总、分组等。
13.系统具有自动增益功能,可以自动调节通话双方的音量,而不至于声音太小。
14.所有谈话内容录为WINDOWS W A V格式,可以在任意WINDOWS电脑中播放。
15.可以设置多达6个盘(可以是硬盘、分区或网络映射盘)自动循环录音。
16.录音启动方式灵活,具有压控、键控三种启动方式。
17.录音起始时间可以灵活设置,可以是一段时间内录音,也可以是每天第 3 页共39 页 324小时录音。
18.线路适用于电话外线、分机内线、ISDN引出的模拟线、无线对讲机的音频输出线等。
19.当系统的硬盘将满时,系统将自动清除最先录音的资料,以保证系统可以常年不间断运行。
20.方向判别。
可以判别出呼叫方向,如呼入还是拨出。
21.系统具有18种权限,可以满足不同行业的需要。
22.系统具有完整的操作日志,可以记录对系统的所有操作。
二、技术参数USB接口:USB1.1标准输入阻抗:>50 K欧信噪比:典型50 dB频率响应:300-3400 Hz调制方式:PCM ,64KBPS,每秒8K字节通道电流:<50mA功耗:<250mW三、典型行业客户列表上海海监局上海港引航站金鹏期货华中期货第 4 页共39 页 4使用说明美而雅期货苏州公安局兰州军区司令部新疆叶合电力江苏滨海电力四川达竹煤电梅山集团第 5 页共39 页 5系统安装一、硬件安装本录音系统硬件由微机(工控机)、电话录音盒组成。
1.1微机奔腾以上电脑配置即可。
1.2应用环境电脑系统要求带USB接口的IBM PC或与之兼容的台式电脑、笔记本电脑或超小型笔记本电脑、操作系统要求Windows 98Windows MeWindows 2000Windows XPUSB主控制器要求UHCI 通用主控制器接口OHCI 开放主控制器接口第 6 页共39 页 6第 7 页 共 39 页7注意:对于SIS 7001 USB HOST Cotroller 的主机,录音盒不支持。
1.3硬件结构、安装1.总体连接示意图如上,最简单的连接方式通过随机提供的USB 连接线连接电脑,然后将电话线接入任一电话插孔即可。
2.单路RL1/RL2录音盒的两个电话插孔为并联结构,用户使用任一接口均可,通常方式是:一个连接电话线,一个在连接话机,这样即可录音,也可拨打电话。
3.RL4/RL8/RL12/RL16采用RJ45网络插头,每个连接4部电话。
并且来要连接外接电源。
二、软件安装1.Windows 98/2000/XP 下驱动程序的安装方法录音盒采用USB 接口,支持即插即用。
支持热插拔,当您通过USB连接线将第 8 页 共 39 页8录音盒同电脑连接起来后,按照以下步骤安装驱动程序: 1) 连接设备或重新启动计算机后系统会提示“找到新硬件”,出现“添加新硬件”向导,按向导提示完成硬件添加.2) 在对话框中点击“下一步”按钮,出现一带有选择按钮的窗口,选择第一项:“搜索设备的最新驱动程序(推荐)。
”3) 点击“下一步”按钮,在接下来弹出的窗口中,点击“从磁盘安装”按钮。
4)插入驱动光盘,点击“确定”按钮5)在接下来的对话框中,点击“下一步”。
6)系统拷贝文件完成后,点击“完成”。
至此,USB电话录音盒驱动安装完毕。
系统安装正确后,对于RL1/RL2录音盒,USB灯会亮,若不亮,则系统启动没有成功对于RL4/RL8/RL16/RL12录音盒,安装成功后,在屏幕右下角会有一个箭头提示。
RL1/RL2录音盒上2个LED灯的含义USB灯: 红色,灯亮:成功连接到电脑上;灯闪烁:正在读写数据软件操作一、系统启动进入WINDOWS操作系统后,选中录音系统的图标,鼠标双击图标进入录音系统,将出现录音系统主画面,显示录音通道的当前状态。
第9 页共39 页92.1主窗口说明第10 页共39 页10第 11 页 共 39 页11主界面二说明:1. 两个图都是录音系统的主界面,他们之间可以自由切换。
主界面一为大图标显示,主界面二为列表方式显示,可以即时显示每个通道的状态。
2. 主界面的最上方是菜单条,紧接着是快捷按钮。
菜单条与快捷按钮可以实现相同的功能,不过快捷按钮更方便些。
屏幕中间的大区域为每个通道的状态显示。
屏幕的右方与下方为用户与系统的状态显示。
3. 当系统主菜单出现后,录音系统将在后台录音。
4. 线路状态图标说明:断线 空闲 提机 录音5. 音量:屏幕右边的音量调节可以调节放音音量。
2.2模块功能主画面上方有录音系统的功能菜单,通过本菜单可以对录音系统进行全部操作。
包括:⏹日常操作⏹参数设置⏹系统⏹帮助1.日常操作1)登录:用户输入用户名与密码后,可以实现登录,不同的用户可以有不同的权限。
默认用户:admin 密码:admin2)注销:用户完成操作后,可以注销此用户,这样其他用户要操作本系统时必须登录。
3)查听:本功能是录音系统的主要功能,在这里,用户可以完成录音文件的查听、备份、删除、注释、打印等功能。
第12 页共39 页12说明:查询:用户必须先查询出录音文件,然后才可以对文件进行放音,注释,备份、删除等操作。
第13 页共39 页13☐路径:缺省情况下,用户从录音盘中查询录音文件的,若用户点击查询备份盘,则系统可以从其他盘中查询录音文件。
查询备份盘的界面如下:☐时间:可以设置查询的开始与结束时间。
缺省为当天。
☐线路:可以设置需查询的线路,缺省为全部线路。
☐电话号码:此号码为用户拨入或拨出的电话号码,*代表全部,3303*表示以3303开始的所有的电话号码。
*3303*表示包含3303的所有的电话号码。
☐方向:拨入还是拨出。
☐出局:市话还是长途。
☐全选:当用户需要编辑某一录音文件时,需要选中某一、某些录音文件。
方法为鼠标双击某一行,再次双击则取消选中。
当某一行被选中后,该行第一列将包含符号“+”。
用户点击全选按钮后,所有语音文件将被选中。
☐取消:用户点击全选按钮后,所有语音文件将被取消选中。
☐标志:所有被选中的栏目第一列包含符号“+”,已经被放音过的栏目第一列将包含符号“$”。
☐注释:将选中的语音文件加注释。
第14 页共39 页14☐删除:删除所有选中的语音文件。
☐备份:将所有选中的语音文件备份到指定的目录中。
若用户要备份到网络目录中,请先将此网络目录映射为驱动盘,对此映射盘进行操作。
☐打印:根据查询出来的语音文件打印通话清单。
☐自动连续播放:系统播放文件时将从蓝条行开始自动连续播放到最后一行。
☐放音增益:当选择自动增益复选框后,放音时通话双方的音量可以达到平衡,不至于使一方的声音太小而无法听到。
☐音量:调节放音的音量。
☐放音:在第一块卡的放音通道放音,放音文件为蓝条行对应的语音文件。
4)界面切换切换主界面中各线路状态的显示方式,详细见主界面一与主界面二。
2.参数设置设置系统的核心参数。
一般用户不应该有此权限。
本部分包括:⏹目录设置⏹清除策略第15 页共39 页15⏹线路设置⏹用户设置⏹报警设置⏹系统设置1)目录设置☐最多设置6个目录,每个目录的驱动盘必须不同。
☐当某一工作目录所在磁盘的剩余空间少于单个磁盘最少剩余录音空间时,系统会自动寻找大于单个磁盘最少剩余录音空间的目录进行录音。
2)清除策略第16 页共39 页16☐自动删除:当系统所有工作目录所在磁盘的剩余空间少于单个磁盘最少剩余录音空间时,系统会寻找系统工作目录中最早的录音文件予以删除。
☐当系统开始删除时,会一次性删除设定大小的录音空间。
3)线路设置设置系统各个线路的信息与录音条件、启动方式等。
a)线路信息☐电话号码:选中线路对应的电话号码。
☐使用者:选中线路对应的使用者。
☐备注:线路说明。
☐出局号码:长途电话的出局判别号码。
b)录音参数☐允许该线路录音:设置本线路是否录音。
☐最短时间:当录音长度少于某个值时,并不保存此录音文件。
☐最长时间:暂时未用。
第17 页共39 页17☐录音时段:可以设置24小时录音,也可以设置在某一时段才录音。
c)启动方式☐压控:根据电话线上的电压变化启动录音。
也就是提机就录音,挂机就停止录音。
大多数采用此种方式来录音。
☐基电压:一般在20左右。
☐键控:根据用户的按键来启动与停止录音☐声控:根据线上的声音来启动录音。
有声音开始录音,无声音时停止录音。
第18 页共39 页18d)主叫号识别☐是否支持主叫号识别功能。
☐识别方式:两种方式,一般模拟线路采用FSK方式。
4)用户设置☐用户与密码的最大长度为20位。
☐共有15种权限可以设置☐点击左侧的用户列表,右侧屏幕即可显示出该用户的相应权限。
