WPF控件开发之自定义控件
简单易学 图文并茂 VB制作WPF自定义控件 范例1
简单易学图文并茂创作控件自己创作控件,分三种主要的形式:复合控件,扩展控件,和自定义控件。
复合控件,顾名思义就是把现有的进行组合,让它们协作形成功能强大的新控件;扩展控件,是以某一现有控件为基础,让它具有新的功能;自定义控件,则是由作者完全操刀,建立一个全新的控件。
可以用一个比喻来理解这三种形式的区别:复合控件,就是你买好各个电脑配件,组装成一台电脑;扩展控件,就是把显卡上的零件更换几个,让它能力比标准产品更强大;自定义控件,就是自己制作一个名为“生人勿近”的硬件,他可以通过PCI插槽,安装到电脑上,一旦生人走近,它能识别并发出狗叫……综上,三种形式中,复合控件相对来说是最简单的;扩展控件在其次;自定义控件最难。
通常,我们使用前两种技术,就能创作出很复杂的控件了。
范例1:Excel的单元格Cell,当它没有焦点的时候,就是一个TextBlock,当它获得焦点,可以编辑的时候,就是一个TextBox框。
这样一个控件,将是我们今后制作表格控件的基础。
范例1中,我们会用到两种技术,复合控件和扩展控件。
在VS中,要进行如下的工作(推荐使用VS2010)1.新建一个Solution,名为Cell;2.添加一个名为“TestAPP”的WFP项目。
我们用他来测试成果;3.添加一个名为“Ctrl_Cell”的WFP用户控件项目。
然后,我们需要一个TextBlock,和一个TextBox控件,这是我们的演员。
考虑一下它们应该怎样演出,才能达到我们需要的效果:●平时这个控件,应该表现出TextBlock的外观;●当我们点击这个Label时,隐藏的TextBox控件跑到TextBlock的前面,并且它显示的值和TextBlock一样。
同时,这个值是可以编辑的;●编辑完TextBox的内容,按下Enter,或者点击屏幕上的其他控件,让TextBox失去焦点,TextBox消失。
TextBlock跑到前面来,并且显示编辑后的内容。
WPF自定义ItemsControl控件
该控件叫 Sum m ar y, 主要是一些汇总信息的显示,有几个地方用,之前都是分散到各个XA ML 文件里,不统一。
本人WPF新手,对XAML了解不多,做这个软件基本上都是用CM,界面布局用Avalon Dock。
由于缺乏相关经验,又没有一个能问得上的人指导,写这个控件费了我很长时间(啥时有空啥时动动)。
之前主要做一些功能方面的,没有心思美化界面,现在虽然还有很多功能没写,但是基本上够自己用了,放下心思来做一些界面上的东西,要不然何苦选择WPF?先看一下图:该Custo m Cont rol 由4部分组成:大标题,小标题,值及Detail。
虽然细分这么多,但实质上还是一个列表类的控件,所以选择继承自 Item sC ontro l.做这个控件的时候,遇到了一些详细的问题不知道怎么解决,Google/Bing 都没有找到我要了解的,Baidu更不用提了,漫天的转载,Copy.1, 类似 Com boB ox 的 Displa yMemb erPat h 如何弄?既然都自定控件了,当然是想让它适用不同场景,不能局限于某一个实体类,最好是能像Displa yMemb erPat h ValueM em ber Path这样的属性。
这里,我定义了:Item Ti tlePa thPro perty及 Item Va luePa thPro perty来处理。
2,有了上面两个依赖属性,但是还不足以处理更多的场景,最好是能有不同的 Tem pla te 。
这里我定义了:TitleT em pla te / ValueT em pla te及De tailT em pla te.第一个问题,只需定义一个简单的 DataTe m plat e ,然后用 Tem pla teBin ding即可做到。
WPF自定义TabControl控件样式
WPF⾃定义TabControl控件样式⼀、前⾔程序中经常会⽤到TabControl控件,默认的控件样式很普通。
⽽且样式或功能不⼀定符合我们的要求。
⽐如:我们需要TabControl的标题能够居中、或平均分布;或者我们希望TabControl的标题能够进⾏关闭。
要实现这些功能我们需要对TabControl的样式进⾏定义。
⼆、实现TabControl的标题平均分布默认的TabControl标题是使⽤TabPanel容器包含的。
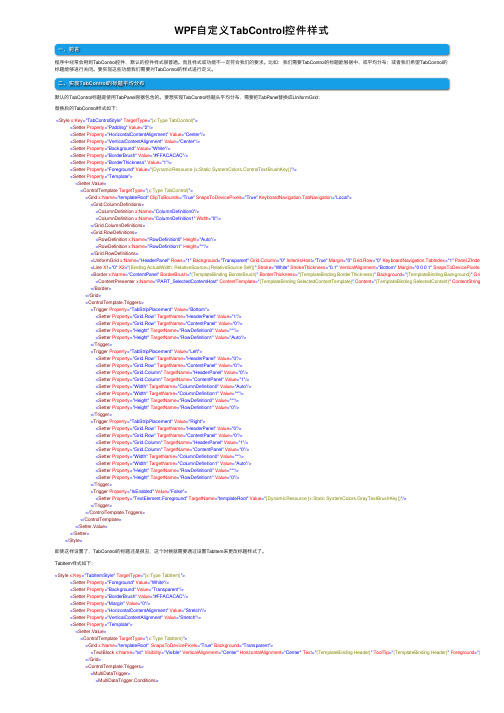
要想实现TabControl标题头平均分布,需要把TabPanel替换成UniformGrid;替换后的TabControl样式如下:<Style x:Key="TabControlStyle" TargetType="{x:Type TabControl}"><Setter Property="Padding" Value="2"/><Setter Property="HorizontalContentAlignment" Value="Center"/><Setter Property="VerticalContentAlignment" Value="Center"/><Setter Property="Background" Value="White"/><Setter Property="BorderBrush" Value="#FFACACAC"/><Setter Property="BorderThickness" Value="1"/><Setter Property="Foreground" Value="{DynamicResource {x:Static SystemColors.ControlTextBrushKey}}"/><Setter Property="Template"><Setter.Value><ControlTemplate TargetType="{x:Type TabControl}"><Grid x:Name="templateRoot" ClipToBounds="True" SnapsToDevicePixels="True" KeyboardNavigation.TabNavigation="Local"><Grid.ColumnDefinitions><ColumnDefinition x:Name="ColumnDefinition0"/><ColumnDefinition x:Name="ColumnDefinition1" Width="0"/></Grid.ColumnDefinitions><Grid.RowDefinitions><RowDefinition x:Name="RowDefinition0" Height="Auto"/><RowDefinition x:Name="RowDefinition1" Height="*"/></Grid.RowDefinitions><UniformGrid x:Name="HeaderPanel" Rows="1" Background="Transparent" Grid.Column="0" IsItemsHost="True" Margin="0" Grid.Row="0" KeyboardNavigation.TabIndex="1" Panel.ZIndex<Line X1="0" X2="{Binding ActualWidth, RelativeSource={RelativeSource Self}}" Stroke="White" StrokeThickness="0.1" VerticalAlignment="Bottom" Margin="0 0 0 1" SnapsToDevicePixels="True"<Border x:Name="ContentPanel" BorderBrush="{TemplateBinding BorderBrush}" BorderThickness="{TemplateBinding BorderThickness}" Background="{TemplateBinding Background}" Grid.Column<ContentPresenter x:Name="PART_SelectedContentHost" ContentTemplate="{TemplateBinding SelectedContentTemplate}" Content="{TemplateBinding SelectedContent}" ContentStringFormat</Border></Grid><ControlTemplate.Triggers><Trigger Property="TabStripPlacement" Value="Bottom"><Setter Property="Grid.Row" TargetName="HeaderPanel" Value="1"/><Setter Property="Grid.Row" TargetName="ContentPanel" Value="0"/><Setter Property="Height" TargetName="RowDefinition0" Value="*"/><Setter Property="Height" TargetName="RowDefinition1" Value="Auto"/></Trigger><Trigger Property="TabStripPlacement" Value="Left"><Setter Property="Grid.Row" TargetName="HeaderPanel" Value="0"/><Setter Property="Grid.Row" TargetName="ContentPanel" Value="0"/><Setter Property="Grid.Column" TargetName="HeaderPanel" Value="0"/><Setter Property="Grid.Column" TargetName="ContentPanel" Value="1"/><Setter Property="Width" TargetName="ColumnDefinition0" Value="Auto"/><Setter Property="Width" TargetName="ColumnDefinition1" Value="*"/><Setter Property="Height" TargetName="RowDefinition0" Value="*"/><Setter Property="Height" TargetName="RowDefinition1" Value="0"/></Trigger><Trigger Property="TabStripPlacement" Value="Right"><Setter Property="Grid.Row" TargetName="HeaderPanel" Value="0"/><Setter Property="Grid.Row" TargetName="ContentPanel" Value="0"/><Setter Property="Grid.Column" TargetName="HeaderPanel" Value="1"/><Setter Property="Grid.Column" TargetName="ContentPanel" Value="0"/><Setter Property="Width" TargetName="ColumnDefinition0" Value="*"/><Setter Property="Width" TargetName="ColumnDefinition1" Value="Auto"/><Setter Property="Height" TargetName="RowDefinition0" Value="*"/><Setter Property="Height" TargetName="RowDefinition1" Value="0"/></Trigger><Trigger Property="IsEnabled" Value="False"><Setter Property="TextElement.Foreground" TargetName="templateRoot" Value="{DynamicResource {x:Static SystemColors.GrayTextBrushKey}}"/></Trigger></ControlTemplate.Triggers></ControlTemplate></Setter.Value></Setter></Style>即使这样设置了,TabControl的标题还是很丑,这个时候就需要通过设置TabItem来更改标题样式了。
简单易学 图文并茂 VB制作WPF自定义控件 范例1

简单易学图文并茂创作控件自己创作控件,分三种主要的形式:复合控件,扩展控件,和自定义控件。
复合控件,顾名思义就是把现有的进行组合,让它们协作形成功能强大的新控件;扩展控件,是以某一现有控件为基础,让它具有新的功能;自定义控件,则是由作者完全操刀,建立一个全新的控件。
可以用一个比喻来理解这三种形式的区别:复合控件,就是你买好各个电脑配件,组装成一台电脑;扩展控件,就是把显卡上的零件更换几个,让它能力比标准产品更强大;自定义控件,就是自己制作一个名为“生人勿近”的硬件,他可以通过PCI插槽,安装到电脑上,一旦生人走近,它能识别并发出狗叫……综上,三种形式中,复合控件相对来说是最简单的;扩展控件在其次;自定义控件最难。
通常,我们使用前两种技术,就能创作出很复杂的控件了。
范例1:Excel的单元格Cell,当它没有焦点的时候,就是一个TextBlock,当它获得焦点,可以编辑的时候,就是一个TextBox框。
这样一个控件,将是我们今后制作表格控件的基础。
范例1中,我们会用到两种技术,复合控件和扩展控件。
在VS中,要进行如下的工作(推荐使用VS2010)1.新建一个Solution,名为Cell;2.添加一个名为“TestAPP”的WFP项目。
我们用他来测试成果;3.添加一个名为“Ctrl_Cell”的WFP用户控件项目。
然后,我们需要一个TextBlock,和一个TextBox控件,这是我们的演员。
考虑一下它们应该怎样演出,才能达到我们需要的效果:●平时这个控件,应该表现出TextBlock的外观;●当我们点击这个Label时,隐藏的TextBox控件跑到TextBlock的前面,并且它显示的值和TextBlock一样。
同时,这个值是可以编辑的;●编辑完TextBox的内容,按下Enter,或者点击屏幕上的其他控件,让TextBox失去焦点,TextBox消失。
TextBlock跑到前面来,并且显示编辑后的内容。
WPF控件开发之自定义控件

WPF控件开发之自定义控件Windows Presentation Foundation(WPF)控件模型的扩展性极大减少了创建新控件的需要。
但在某些情况下,仍可能需要创建自定义控件。
本主题讨论可最大限度减少在Windows Presentation Foundation(WPF)中创建自定义控件以及其他控件创作模型的需要的功能。
本主题还演示如何创建新控件。
AD:Windows Presentation Foundation(WPF)控件模型的扩展性极大减少了创建新控件的需要。
但在某些情况下,仍可能需要创建自定义控件。
本主题讨论可最大限度减少在Windows Presentation Foundation(WPF)中创建自定义控件以及其他控件创作模型的需要的功能。
本主题还演示如何创建新控件。
编写新控件的替代方法以前,如果要通过现有控件获取自定义体验,您只能更改控件的标准属性,例如背景色、边框宽度和字号。
如果希望在这些预定义参数的基础之上扩展控件的外观或行为,则需要创建新的控件,通常的方法是继承现有控件并重写负责绘制该控件的方法。
虽然这仍是一种可选方法,但也可以利用WPF丰富内容模型、样式、模板和触发器来自定义现有的控件。
下面的列表提供了一些示例,演示如何在不创建新控件的情况下使用这些功能来实现统一的自定义体验。
丰富内容。
很多标准WPF控件支持丰富内容。
例如,Button的内容属性为Object类型,因此从理论上讲,任何内容都可以显示在Button上。
若要让按钮显示图像和文本,可以将图像和TextBlock添加到StackPanel中,然后将StackPanel分配给Content属性。
由于这些控件可以显示WPF可视化元素和任意数据,因此,减少了创建新控件或修改现有控件来支持复杂可视化效果的需要。
样式。
Style是表示控件属性的值的集合。
使用样式可创建所需控件外观和行为的可重用表示形式,而无需编写新控件。
wpf自定义控件(包含依赖属性以及事件)

wpf⾃定义控件(包含依赖属性以及事件)创建了这个依赖属性,就可以直接在对应的控件中使⽤了,就像是button中⼀开始就内置的width等属性⼀样,这个在设计⾃定义控件的时候⽤的尤其多下⾯讲的是⾃定义分页控件代码:<UserControl x:Class="WPFDataGridPaging.Pager"xmlns="/winfx/2006/xaml/presentation"xmlns:x="/winfx/2006/xaml"xmlns:mc="/markup-compatibility/2006"xmlns:d="/expression/blend/2008"xmlns:local="clr-namespace:WPFDataGridPaging"mc:Ignorable="d"d:DesignHeight="30" d:DesignWidth="220"><UserControl.Resources><Style TargetType="{x:Type Button}"><Setter Property="Width" Value="22"/><Setter Property="Height" Value="22"/></Style></UserControl.Resources><Grid><StackPanel Orientation="Horizontal"><Button x:Name="FirstPageButton" Margin="5,0" Click="FirstPageButton_Click"><Path Width="7" Height="10" Data="M0,0L0,10 M0,5L6,2 6,8 0,5" Stroke="Black" StrokeThickness="1"Fill="Black" VerticalAlignment="Center" HorizontalAlignment="Center"/></Button><Button x:Name="PreviousPageButton" Margin="0,0,5,0" Click="PreviousPageButton_Click"><Path Width="8" Height="8" Data="M0,4L8,0 8,8z" Stroke="Black" Fill="Black" VerticalAlignment="Center" HorizontalAlignment="Center"/></Button><TextBlock VerticalAlignment="Center"><Run Text="第"/><Run x:Name="rCurrent" Text="0"/><Run Text="页"/></TextBlock><Button Margin="5,0" x:Name="NextPageButton" Click="NextPageButton_Click"><Path Width="8" Height="8" Data="M0,4L8,0 8,8z" Stroke="Black" Fill="Black" VerticalAlignment="Center" HorizontalAlignment="Center"><Path.RenderTransform><RotateTransform Angle="180" CenterX="4" CenterY="4"/></Path.RenderTransform></Path></Button><Button Margin="0,0,5,0" x:Name="LastPageButton" Click="LastPageButton_Click"><Path x:Name="MainPath" Width="7" Height="10" Data="M0,0L0,10 M0,5 L6,2 6,8 0,5"Stroke="Black" StrokeThickness="1" Fill="Black" VerticalAlignment="Center" HorizontalAlignment="Center"><Path.RenderTransform><RotateTransform Angle="180" CenterX="3" CenterY="5"/></Path.RenderTransform></Path></Button><TextBlock VerticalAlignment="Center"><Run Text="共"/><Run x:Name="rTotal" Text="0"/><Run Text="页"/></TextBlock></StackPanel></Grid></UserControl>界⾯:后台代码:public partial class Pager : UserControl{#region声明事件和依赖属性public static RoutedEvent FirstPageEvent;public static RoutedEvent PreviousPageEvent;public static RoutedEvent NextPageEvent;public static RoutedEvent LastPageEvent;public static readonly DependencyProperty CurrentPageProperty;public static readonly DependencyProperty TotalPageProperty;#endregionpublic string CurrentPage{get { return (string)GetValue(CurrentPageProperty); }set { SetValue(CurrentPageProperty, value); }}public string TotalPage{get { return (string)GetValue(TotalPageProperty); }set { SetValue(TotalPageProperty, value); }}public Pager(){InitializeComponent();}static Pager(){#region注册事件以及依赖属性//注册FirstPageEvent事件,事件的拥有者是Pager,路由事件的名称是FirstPage,这是唯⼀的FirstPageEvent = EventManager.RegisterRoutedEvent("FirstPage", RoutingStrategy.Direct,typeof(RoutedEventHandler), typeof(Pager));PreviousPageEvent = EventManager.RegisterRoutedEvent("PreviousPage", RoutingStrategy.Direct,typeof(RoutedEventHandler), typeof(Pager));NextPageEvent = EventManager.RegisterRoutedEvent("NextPage", RoutingStrategy.Direct,typeof(RoutedEventHandler), typeof(Pager));LastPageEvent = EventManager.RegisterRoutedEvent("LastPage", RoutingStrategy.Direct,typeof(RoutedEventHandler), typeof(Pager));//注册⾃定义的依赖属性CurrentPageProperty = DependencyProperty.Register("CurrentPage",typeof(string), typeof(Pager), new PropertyMetadata(string.Empty, new PropertyChangedCallback(OnCurrentPageChanged))); TotalPageProperty = DependencyProperty.Register("TotalPage",typeof(string), typeof(Pager), new PropertyMetadata(string.Empty, new PropertyChangedCallback(OnTotalPageChanged)));#endregion}public event RoutedEventHandler FirstPage{add { AddHandler(FirstPageEvent, value); }remove { RemoveHandler(FirstPageEvent, value); }}public event RoutedEventHandler PreviousPage{add { AddHandler(PreviousPageEvent, value); }remove { RemoveHandler(PreviousPageEvent, value); }}public event RoutedEventHandler NextPage{add { AddHandler(NextPageEvent, value); }remove { RemoveHandler(NextPageEvent, value); }}public event RoutedEventHandler LastPage{add { AddHandler(LastPageEvent, value); }remove { RemoveHandler(LastPageEvent, value); }}///<summary>///依赖属性回调⽅法///</summary>///<param name="d"></param>///<param name="e"></param>public static void OnTotalPageChanged(DependencyObject d, DependencyPropertyChangedEventArgs e){Pager p = d as Pager;if (p != null){Run rTotal = (Run)p.FindName("rTotal");rTotal.Text = (string)e.NewValue;}}private static void OnCurrentPageChanged(DependencyObject d, DependencyPropertyChangedEventArgs e){Pager p = d as Pager;if (p != null){Run rCurrrent = (Run)p.FindName("rCurrent");rCurrrent.Text = (string)e.NewValue;}}private void FirstPageButton_Click(object sender, RoutedEventArgs e){RaiseEvent(new RoutedEventArgs(FirstPageEvent, this));}private void PreviousPageButton_Click(object sender, RoutedEventArgs e){RaiseEvent(new RoutedEventArgs(PreviousPageEvent, this));}private void NextPageButton_Click(object sender, RoutedEventArgs e){RaiseEvent(new RoutedEventArgs(NextPageEvent, this));}private void LastPageButton_Click(object sender, RoutedEventArgs e){RaiseEvent(new RoutedEventArgs(LastPageEvent, this));}}上⾯就是⾃定义的⼀个分页控件,如果我们想要使⽤这个控件,如下:<Window x:Class="WPFDataGridPaging.MainWindow"xmlns="/winfx/2006/xaml/presentation"xmlns:x="/winfx/2006/xaml"xmlns:d="/expression/blend/2008"xmlns:mc="/markup-compatibility/2006"xmlns:i="/expression/2010/interactivity"xmlns:local="clr-namespace:WPFDataGridPaging"mc:Ignorable="d"Title="MainWindow" Height="350" Width="525"><Grid><Grid.RowDefinitions><RowDefinition Height="*"/><RowDefinition Height="Auto"/></Grid.RowDefinitions><DataGrid Grid.Row="0" ItemsSource="{Binding FakeSource}" AutoGenerateColumns="False" CanUserAddRows="False"> <DataGrid.Columns><DataGridTextColumn Header="Item Id" Binding="{Binding Id}" Width="80"/><DataGridTextColumn Header="Item Name" Binding="{Binding ItemName}" Width="180"/></DataGrid.Columns></DataGrid><!-- TotalPage 和CurrentPage就是在Pager中⾃定义的依赖属性,可以在这⾥直接来⽤--><local:Pager TotalPage="{Binding TotalPage}"CurrentPage="{Binding CurrentPage, Mode=TwoWay}"HorizontalAlignment="Center"Grid.Row="1"><i:Interaction.Triggers><!--EventName="FirstPage" 这⾥FirstPage就是前⾯注册事件的时候默认的事件名称,必须要唯⼀ --><i:EventTrigger EventName="FirstPage"><i:InvokeCommandAction Command="{Binding FirstPageCommand}"/></i:EventTrigger><i:EventTrigger EventName="PreviousPage"><i:InvokeCommandAction Command="{Binding PreviousPageCommand}"/></i:EventTrigger><i:EventTrigger EventName="NextPage"><i:InvokeCommandAction Command="{Binding NextPageCommand}"/></i:EventTrigger><i:EventTrigger EventName="LastPage"><i:InvokeCommandAction Command="{Binding LastPageCommand}"/></i:EventTrigger></i:Interaction.Triggers></local:Pager></Grid></Window>界⾯:后台代码:///<summary>/// Interaction logic for MainWindow.xaml///</summary>public partial class MainWindow : Window{public MainWindow(){InitializeComponent();//这⾥⼀定要注意,⼀定要将模型加到上下⽂中,要不然依赖属性和事件都不会触发,在实际开发中是不可能⼀打开 //界⾯就开始加载出来数据的,所以可以通过ObservableCollection形式绑定表格数据,//⽽需要绑定事件和依赖属性的需要将其绑定到上下⽂中DataContext = new MainViewModel();}}MainViewModel:public class MainViewModel : ViewModel{private ICommand _firstPageCommand;public ICommand FirstPageCommand{get{return _firstPageCommand;}set{_firstPageCommand = value;}}private ICommand _previousPageCommand;public ICommand PreviousPageCommand{get{return _previousPageCommand;}set{_previousPageCommand = value;}}private ICommand _nextPageCommand;public ICommand NextPageCommand{get{return _nextPageCommand;}set{_nextPageCommand = value;}}private ICommand _lastPageCommand;public ICommand LastPageCommand{get{return _lastPageCommand;}set{_lastPageCommand = value;}}private int _pageSize;public int PageSize{get{return _pageSize;}set{if(_pageSize != value){_pageSize = value;OnPropertyChanged("PageSize"); }}}private int _currentPage;public int CurrentPage{get{return _currentPage;}set{if(_currentPage != value){_currentPage = value;OnPropertyChanged("CurrentPage"); }}}private int _totalPage;public int TotalPage{get{return _totalPage;}set{if(_totalPage != value){_totalPage = value;OnPropertyChanged("TotalPage"); }}}///<summary>/// ObservableCollection表⽰⼀个动态数据集合,它可在添加、删除项⽬或刷新整个列表时提供通知。
WPF自定义控件和样式之自定义按钮(Button)

WPF⾃定义控件和样式之⾃定义按钮(Button)⼀、前⾔程序界⾯上的按钮多种多样,常⽤的就这⼏种:普通按钮、图标按钮、⽂字按钮、图⽚⽂字混合按钮。
本⽂章记录了不同样式类型的按钮实现⽅法。
下⾯话不多说了,来⼀起看看详细的介绍吧。
⼆、固定样式的按钮固定样式的按钮⼀般在临时使⽤时或程序的样式⽐较固定时才会使⽤,按钮整体样式不需要做⼤的改动。
2.1 普通按钮-扁平化风格先看效果:定义Button的样式,详见代码:<Style x:Key="BtnInfoStyle" TargetType="Button"><Setter Property="Width" Value="70"/><Setter Property="Height" Value="25"/><Setter Property="Foreground" Value="White"/><Setter Property="BorderThickness" Value="0"/><Setter Property="Background" Value="#43a9c7"/><Setter Property="Template"><Setter.Value><ControlTemplate TargetType="Button"><Border x:Name="border" Background="{TemplateBinding Background}" BorderBrush="{TemplateBinding BorderBrush}" BorderThickness="{TemplateBinding BorderThickness}" SnapsToDevicePixels="True"><TextBlock Text="{TemplateBinding Content}" Foreground="{TemplateBinding Foreground}" VerticalAlignment="Center" HorizontalAlignment="Center"/></Border><ControlTemplate.Triggers><Trigger Property="IsMouseOver" Value="True"><Setter TargetName="border" Property="Background" Value="#2f96b4"/></Trigger><Trigger Property="IsPressed" Value="True"><Setter TargetName="border" Property="Background" Value="#2a89a4"/></Trigger></ControlTemplate.Triggers></ControlTemplate></Setter.Value></Setter></Style>引⽤⽅法:<Grid Background="White"><StackPanel Orientation="Horizontal" Margin="10" VerticalAlignment="Top"><Button Style="{StaticResource BtnInfoStyle}" Content="信息" Margin="5 0"/></Grid>上述代码实现了Button按钮的扁平化样式,如果你想调整颜⾊风格,通过修改Background的值可实现默认颜⾊,⿏标经过颜⾊以及⿏标按下颜⾊。
在WPF中自定义控件
承,打造 CustomControl 时其会为从 System.Windows.Controls.Control 继承.但实际情况下,也许我们从他们的衍生类别开始继承会得到更多的好处(更好的重 用已 有的逻辑),比如你的控件拥有更多的类似于 Button 的某些特性,那么从 Button 开始继承就比从 Control 继承少写很多代码.
二,UserControl 还是 CustomControl? 要在 WPF 中自定义一个控件,使用 UserControl 与 CustomControl 都是 不错的选择(除此之外,还有更多选择,比如打造一个自定义的面板,但这不在本文
的讨论范围),他们的区别在于: UserControl,其更像 WinForm 中自定义控件的开发风格,在开发上更简单快速,几乎可以简单地理解为:利用设计器来将多个已有控件作为子元素来拼凑
在 VS 中右键单击你的项目,点击"添加新项目",在出现的选择列表中选择"UserControl",VS 会自动为你生成一个*.xaml 文件以及其对应 的后台代码文件
2
(*.cs 或其它). 值得注意的是,自动生成的代码中,你的控件是继承于 erControl 类的,这对应你的控件而 言并不一定是最恰当的基 类,你可以修改它,但注意你应该同时修改*.cs 文件和*.xaml 文件中的基类,而不只是修改*.cs 文件,否则当生成项目时会 报错"不是继承于同一基类".修改 *.xaml 文件的方法是:将该文件的第一行和最后一行的"UserControl" 改成与你认为恰当的基类名称.
[WPF自定义控件]简单的表单布局控件
![[WPF自定义控件]简单的表单布局控件](https://img.taocdn.com/s3/m/93300ad977a20029bd64783e0912a21614797fed.png)
[WPF ⾃定义控件]简单的表单布局控件1. WPF布局⼀个表单在WPF 中布局表单⼀直都很传统,例如使⽤上⾯的XAML ,它通过Grid 布局⼀个表单。
这样出来的结果整整齐齐,看上去没什么问题,但当系统⾥有⼏⼗个表单页以后需要统⼀将标签改为上对齐,或者标签和控件中加⼀个:号等需求都会难倒开发⼈员。
⼀个好的做法是使⽤某些控件库提供的表单控件;如果不想引⼊⼀个这么“重”的东西,可以⾃⼰定义⼀个简单的表单控件。
这篇⽂章介绍⼀个简单的⽤于布局表单的Form 控件,虽然是⼀个很⽼的⽅案,但我很喜欢这个控件,不仅因为它简单实⽤,⽽且是⼀个很好的结合了ItemsControl 、ContentControl 、附加属性的教学例⼦。
Form 是⼀个⾃定义的ItemsControl ,部分代码可以参考这篇⽂章。
2. ⼀个古⽼的⽅法即使抛开验证信息、确认取消这些更⾼级的需求(表单的其它功能真的很多很多,但这篇⽂章只谈论布局),表单布局仍是个⼗分复杂的⼯作。
幸好⼗年前ScottGu 分享过⼀个,很有参考价值:Karl Shifflett has another great WPF blog post that covers a cool way to perform flexible form layout for LOB scenarios.<Grid Width="400" HorizontalAlignment="Center" VerticalAlignment="Center"><Grid.RowDefinitions><RowDefinition Height="Auto" /><RowDefinition Height="Auto" /><RowDefinition Height="Auto" /></Grid.RowDefinitions><Grid.ColumnDefinitions><ColumnDefinition Width="Auto" /><ColumnDefinition Width="*" /></Grid.ColumnDefinitions><TextBlock Text="⽤户名" HorizontalAlignment="Right" VerticalAlignment="Center" Margin="4" /><TextBox Grid.Column="1" Margin="4" /><TextBlock Text="密码" HorizontalAlignment="Right" VerticalAlignment="Center" Margin="4" Grid.Row="1" /><PasswordBox Grid.Row="1" Grid.Column="1" Margin="4" /><TextBlock Grid.Row="2" Text="确认密码" HorizontalAlignment="Right" VerticalAlignment="Center" Margin="4" /><PasswordBox Grid.Column="1" Grid.Row="2" Margin="4" /></Grid>使⽤代码和截图如上所⽰。
wpf propertygridcontrol 用法
wpf propertygridcontrol 用法WPF PropertyGridControl 用法WPF(Windows Presentation Foundation)是由微软推出的一种用于创建用户界面的框架。
在WPF中,PropertyGridControl 是一种常用的控件,用于显示对象属性和允许用户编辑属性值。
本文将详细介绍PropertyGridControl 的用法,以帮助读者更好地了解和使用该控件。
一、PropertyGridControl 的基本介绍PropertyGridControl 是一种自定义控件,用于显示对象的属性和允许用户编辑属性值。
它是由控件库中的GridControl 和PropertyGridEditor 组合而成的,因此,其外观和行为与传统的表格视图非常相似。
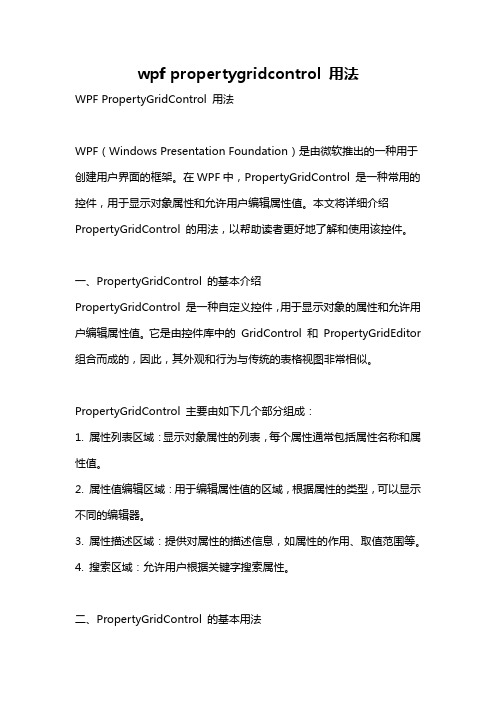
PropertyGridControl 主要由如下几个部分组成:1. 属性列表区域:显示对象属性的列表,每个属性通常包括属性名称和属性值。
2. 属性值编辑区域:用于编辑属性值的区域,根据属性的类型,可以显示不同的编辑器。
3. 属性描述区域:提供对属性的描述信息,如属性的作用、取值范围等。
4. 搜索区域:允许用户根据关键字搜索属性。
二、PropertyGridControl 的基本用法1. 引用控件库要使用PropertyGridControl,首先需要将控件库引用到项目中。
可以通过NuGet 包管理器或手动添加引用的方式,将控件库添加到项目中。
2. 添加PropertyGridControl 控件在XAML 页面中的合适位置添加PropertyGridControl 控件。
可以使用如下代码示例:<dxprg:PropertyGridControl x:Name="propertyGridControl" />其中,dxprg 是控件库的命名空间。
3. 设置属性数据源将需要显示和编辑的对象赋值给PropertyGridControl 的SelectedObject 属性。
WPF自定义控件与样式(9)-树控件TreeView与菜单Menu-ContextMenu
WPF⾃定义控件与样式(9)-树控件TreeView与菜单Menu-ContextMenu⼀.前⾔ 申明:WPF⾃定义控件与样式是⼀个系列⽂章,前后是有些关联的,但⼤多是按照由简到繁的顺序逐步发布的等,若有不明⽩的地⽅可以参考本系列前⾯的⽂章,⽂末附有部分⽂章链接。
本⽂主要内容:菜单Menu的⾃定义样式;右键菜单ContextMenu的⾃定义样式;树控件TreeView的⾃定义样式,及右键菜单实现。
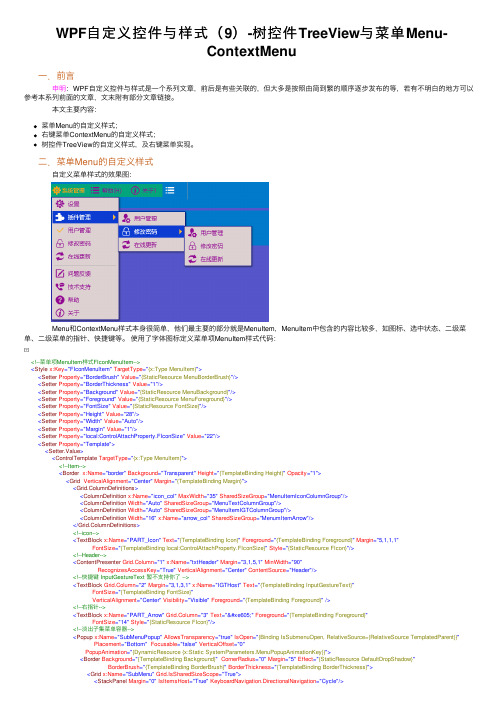
⼆.菜单Menu的⾃定义样式 ⾃定义菜单样式的效果图: Menu和ContextMenu样式本⾝很简单,他们最主要的部分就是MenuItem,MenuItem中包含的内容⽐较多,如图标、选中状态、⼆级菜单、⼆级菜单的指针、快捷键等。
使⽤了字体图标定义菜单项MenuItem样式代码:<!--菜单项MenuItem样式FIconMenuItem--><Style x:Key="FIconMenuItem" TargetType="{x:Type MenuItem}"><Setter Property="BorderBrush" Value="{StaticResource MenuBorderBrush}"/><Setter Property="BorderThickness" Value="1"/><Setter Property="Background" Value="{StaticResource MenuBackground}"/><Setter Property="Foreground" Value="{StaticResource MenuForeground}"/><Setter Property="FontSize" Value="{StaticResource FontSize}"/><Setter Property="Height" Value="28"/><Setter Property="Width" Value="Auto"/><Setter Property="Margin" Value="1"/><Setter Property="local:ControlAttachProperty.FIconSize" Value="22"/><Setter Property="Template"><Setter.Value><ControlTemplate TargetType="{x:Type MenuItem}"><!--Item--><Border x:Name="border" Background="Transparent" Height="{TemplateBinding Height}" Opacity="1"><Grid VerticalAlignment="Center" Margin="{TemplateBinding Margin}"><Grid.ColumnDefinitions><ColumnDefinition x:Name="icon_col" MaxWidth="35" SharedSizeGroup="MenuItemIconColumnGroup"/><ColumnDefinition Width="Auto" SharedSizeGroup="MenuTextColumnGroup"/><ColumnDefinition Width="Auto" SharedSizeGroup="MenuItemIGTColumnGroup"/><ColumnDefinition Width="16" x:Name="arrow_col" SharedSizeGroup="MenumItemArrow"/></Grid.ColumnDefinitions><!--icon--><TextBlock x:Name="PART_Icon" Text="{TemplateBinding Icon}" Foreground="{TemplateBinding Foreground}" Margin="5,1,1,1"FontSize="{TemplateBinding local:ControlAttachProperty.FIconSize}" Style="{StaticResource FIcon}"/><!--Header--><ContentPresenter Grid.Column="1" x:Name="txtHeader" Margin="3,1,5,1" MinWidth="90"RecognizesAccessKey="True" VerticalAlignment="Center" ContentSource="Header"/><!--快捷键 InputGestureText 暂不⽀持你了 --><TextBlock Grid.Column="2" Margin="3,1,3,1" x:Name="IGTHost" Text="{TemplateBinding InputGestureText}"FontSize="{TemplateBinding FontSize}"VerticalAlignment="Center" Visibility="Visible" Foreground="{TemplateBinding Foreground}"/><!--右指针--><TextBlock x:Name="PART_Arrow" Grid.Column="3" Text="" Foreground="{TemplateBinding Foreground}"FontSize="14" Style="{StaticResource FIcon}"/><!--淡出⼦集菜单容器--><Popup x:Name="SubMenuPopup" AllowsTransparency="true" IsOpen="{Binding IsSubmenuOpen, RelativeSource={RelativeSource TemplatedParent}}"Placement="Bottom" Focusable="false" VerticalOffset="0"PopupAnimation="{DynamicResource {x:Static SystemParameters.MenuPopupAnimationKey}}"><Border Background="{TemplateBinding Background}" CornerRadius="0" Margin="5" Effect="{StaticResource DefaultDropShadow}"BorderBrush="{TemplateBinding BorderBrush}" BorderThickness="{TemplateBinding BorderThickness}"><Grid x:Name="SubMenu" Grid.IsSharedSizeScope="True"><StackPanel Margin="0" IsItemsHost="True" KeyboardNavigation.DirectionalNavigation="Cycle"/></Grid></Border></Popup></Grid></Border><!--触发器--><ControlTemplate.Triggers><!--TopLevelHeader:第⼀级菜单(有⼦菜单)--><Trigger Property="Role" Value="TopLevelHeader"><Setter Property="Visibility" Value="Collapsed" TargetName="PART_Arrow"/><Setter Property="Visibility" Value="Collapsed" TargetName="IGTHost"/><Setter Property="Margin" Value="5,1,1,1" TargetName="PART_Icon"/><Setter Property="Margin" Value="1,1,6,1" TargetName="txtHeader"/><Setter Property="MinWidth" Value="10" TargetName="txtHeader"/><Setter Property="Width" Value="0" TargetName="arrow_col"/></Trigger><!--TopLevelItem 第⼀级菜单(⽆⼦级)--><Trigger Property="Role" Value="TopLevelItem"><Setter Property="Visibility" Value="Collapsed" TargetName="PART_Arrow"/><Setter Property="Visibility" Value="Collapsed" TargetName="IGTHost"/><Setter Property="Margin" Value="5,1,1,1" TargetName="PART_Icon"/><Setter Property="Margin" Value="1,1,6,1" TargetName="txtHeader"/><Setter Property="MinWidth" Value="10" TargetName="txtHeader"/><Setter Property="Width" Value="0" TargetName="arrow_col"/></Trigger><!--SubmenuHeader:⼦菜单,有⼦菜单--><Trigger Property="Role" Value="SubmenuHeader"><Setter Property="Visibility" Value="Visible" TargetName="PART_Arrow"/><Setter Property="Placement" Value="Right" TargetName="SubMenuPopup"/></Trigger><!--SubMenuItem:⼦菜单,⽆⼦级--><Trigger Property="Role" Value="SubMenuItem"><Setter Property="Visibility" Value="Collapsed" TargetName="PART_Arrow"/></Trigger><!--选中状态,优先级将⾼于Icon--><Trigger Property="IsChecked" Value="True"><Setter TargetName="PART_Icon" Value="" Property="Text"></Setter><Setter TargetName="PART_Icon" Value="18" Property="FontSize"></Setter><Setter TargetName="PART_Icon" Value="{StaticResource CheckedForeground}" Property="Foreground"></Setter></Trigger><Trigger Property="IsEnabled" Value="False"><Setter TargetName="border" Value="{StaticResource DisableOpacity}" Property="Opacity"></Setter></Trigger><!--⾼亮状态--><Trigger Property="IsHighlighted" Value="true"><Setter Property="Background" TargetName="border" Value="{StaticResource MenuMouseOverBackground}"></Setter><Setter Property="Foreground" Value="{StaticResource MenuMouseOverForeground}"></Setter></Trigger><Trigger Property="IsPressed" Value="true"><Setter Property="Background" TargetName="border" Value="{StaticResource MenuPressedBackground}"></Setter><Setter Property="Foreground" Value="{StaticResource MenuPressedForeground}"></Setter></Trigger><!--⼦菜单打开状态--><Trigger Property="IsSubmenuOpen" Value="true"><Setter TargetName="PART_Arrow" Value="{StaticResource CheckedForeground}" Property="Foreground"></Setter></Trigger></ControlTemplate.Triggers></ControlTemplate></Setter.Value></Setter></Style><!--基于FIconMenuItem的默认样式,提供Header模板--><Style x:Key="DefaultMenuItem" TargetType="{x:Type MenuItem}" BasedOn="{StaticResource FIconMenuItem}"><Setter Property="HeaderTemplate"><Setter.Value><DataTemplate><TextBlock x:Name="txtHeader" FontSize="{Binding FontSize,RelativeSource={RelativeSource AncestorType={x:Type MenuItem},Mode=FindAncestor}}" HorizontalAlignment="Stretch" Margin="3,1,5,1"Text="{Binding Header,RelativeSource={RelativeSource AncestorType={x:Type MenuItem},Mode=FindAncestor}}" VerticalAlignment="Center"Foreground="{Binding Foreground,RelativeSource={RelativeSource AncestorType={x:Type MenuItem},Mode=FindAncestor}}"/> </DataTemplate></Setter.Value></Setter></Style>View CodeMenu样式:<!--默认Menu样式--><Style x:Key="DefaultMenu" TargetType="{x:Type Menu}"><Setter Property="SnapsToDevicePixels" Value="True"/><Setter Property="RenderOptions.ClearTypeHint" Value="Enabled"/><Setter Property="TextOptions.TextFormattingMode" Value="Ideal"/><Setter Property="Background" Value="Transparent"/><Setter Property="ItemContainerStyle" Value="{StaticResource DefaultMenuItem}"/><Setter Property="Template"><Setter.Value><ControlTemplate TargetType="{x:Type Menu}"><Border BorderBrush="{TemplateBinding BorderBrush}" BorderThickness="{TemplateBinding BorderThickness}"Background="{TemplateBinding Background}" Padding="{TemplateBinding Padding}"SnapsToDevicePixels="{TemplateBinding SnapsToDevicePixels}"><ItemsPresenter Margin="0" SnapsToDevicePixels="{TemplateBinding SnapsToDevicePixels}"/></Border></ControlTemplate></Setter.Value></Setter></Style>⽰例代码:<MenuItem Header="帮助(H)" InputGestureText="Ctrl+H" Icon=""><MenuItem Header="设置" Icon=""/><MenuItem Icon="" Header="插件管理"/><MenuItem Icon="" Header="⽤户管理"/><MenuItem Icon="" Header="修改密码"/><MenuItem Icon="" Header="在线更新"/><Separator Style="{StaticResource HorizontalSeparatorStyle}"/><MenuItem Icon="" Header="问题反馈"/><MenuItem Icon="" Header="技术⽀持"/><MenuItem Icon="" Header="帮助"/><MenuItem Icon="" Header="关于"/></MenuItem>三.右键菜单ContextMenu的⾃定义样式有了第⼆节的MenuItem样式,ContextMenu的样式很简单:<!--默认右键菜单ContextMenu样式--><Style x:Key="DefaultContextMenu" TargetType="{x:Type ContextMenu}"><Setter Property="SnapsToDevicePixels" Value="True"/><Setter Property="RenderOptions.ClearTypeHint" Value="Enabled"/><Setter Property="TextOptions.TextFormattingMode" Value="Ideal"/><Setter Property="BorderBrush" Value="{StaticResource MenuBorderBrush}"/><Setter Property="Background" Value="{StaticResource MenuBackground}"/><Setter Property="BorderThickness" Value="1"/><Setter Property="Foreground" Value="{StaticResource MenuForeground}"/><Setter Property="OverridesDefaultStyle" Value="True"/><Setter Property="Grid.IsSharedSizeScope" Value="True"/><Setter Property="HasDropShadow" Value="True"/><Setter Property="ItemContainerStyle" Value="{StaticResource DefaultMenuItem}"/><Setter Property="Template"><Setter.Value><ControlTemplate TargetType="{x:Type ContextMenu}"><Grid><Border x:Name="Border" BorderBrush="{TemplateBinding BorderBrush}" Margin="5"BorderThickness="{TemplateBinding BorderThickness}" Background="{TemplateBinding Background}"Padding="{TemplateBinding Padding}" SnapsToDevicePixels="{TemplateBinding SnapsToDevicePixels}"> <ItemsPresenter x:Name="ItemsPresenter" KeyboardNavigation.DirectionalNavigation="Cycle"Grid.IsSharedSizeScope="True" Margin="0" SnapsToDevicePixels="{TemplateBinding SnapsToDevicePixels}" KeyboardNavigation.TabNavigation="Cycle"/></Border></Grid><ControlTemplate.Triggers><Trigger Property="HasDropShadow" Value="True"><Setter TargetName="Border" Property="Effect" Value="{StaticResource DefaultDropShadow}"></Setter></Trigger></ControlTemplate.Triggers></ControlTemplate></Setter.Value></Setter></Style>实现⼀个⽂本操作(剪切、复制、粘贴)的样式:<!--⽂本操作右键菜单--><ContextMenu x:Key="TextBoxContextMenu" Style="{StaticResource DefaultContextMenu}"><MenuItem Command="ApplicationCommands.Cut" Icon="" Style="{DynamicResource DefaultMenuItem}"/><MenuItem Command="ApplicationCommands.Copy" Icon="" Style="{DynamicResource DefaultMenuItem}"/><MenuItem Command="ApplicationCommands.Paste" Icon="" Style="{DynamicResource DefaultMenuItem}"/></ContextMenu>效果图:四.树控件TreeView的⾃定义样式4.1TreeView基本样式TreeView的样式⽐较简单,相⽐ListBox,主要多了层级关系,节点的展开、收缩。
WPF自定义控件创建

WPF⾃定义控件创建本⽂简单的介绍⼀下WPF⾃定义控件的开发。
⾸先,我们打开VisualStudio创建⼀个WPF⾃定义控件库,如下图:然后,我们可以看到创建的解决⽅案如下:在解决⽅案中,我们看到了⼀个Themes⽂件夹和⼀个CS⽂件。
其中CS⽂件,就是我们需要编写的⾃定义控件,⾥⾯的类继承了Control类;⽽Themes则存放该控件的样式。
即,WPF⾃定义控件,是通过样式给我们的编辑的控件类披上外⾐⽽形成的。
下⾯,我们来编写⼀个简单的时间控件。
我们先将CustomControl1⽂件改名为KibaDateTime,然后打开KibaDateTime.cs⽂件,看到了⼀些控件应⽤提⽰,这些提⽰写的是⾃定义控件的应⽤⽅式,我们先不看这些提⽰,因为他写的不是很好理解。
接下来我们开始编写时间控件,修改KibaDateTime类如下:public class KibaDateTime : TextBox{private static Regex regex = new Regex("[0-9]+");#region ⼩时public static readonly DependencyProperty HourProperty = DependencyProperty.Register("Hour", typeof(int), typeof(KibaDateTime), new FrameworkPropertyMetadata(00));public int Hour{get{return (int)GetValue(HourProperty);}set{SetValue(HourProperty, value);}}#endregion#region 分钟public static readonly DependencyProperty MinuteProperty = DependencyProperty.Register("Minute", typeof(int), typeof(KibaDateTime), new FrameworkPropertyMetadata(00));public int Minute{get{return (int)GetValue(MinuteProperty);}set{SetValue(MinuteProperty, value);}}#endregion#region 秒public static readonly DependencyProperty SecondProperty = DependencyProperty.Register("Second", typeof(int), typeof(KibaDateTime), new FrameworkPropertyMetadata(00));public int Second{get{return (int)GetValue(SecondProperty);}set{SetValue(SecondProperty, value);}}#endregionstatic KibaDateTime(){//当此依赖项属性位于指定类型的实例上时为其指定替换元数据,以在该依赖项属性继承⾃基类型时重写该属性已存在的元数据。
WPF自定义控件与样式(3)-TextBoxRichTextBoxPasswordBox样。。。

WPF⾃定义控件与样式(3)-TextBoxRichTextBoxPasswordBox样。
⼀.前⾔.预览 申明:WPF⾃定义控件与样式是⼀个系列⽂章,前后是有些关联的,但⼤多是按照由简到繁的顺序逐步发布的等,若有不明⽩的地⽅可以参考本系列前⾯的⽂章,⽂末附有部分⽂章链接。
本⽂主要是对⽂本输⼊控件进⾏样式开发,及相关扩展功能开发,主要内容包括:基本⽂本框TextBox控件样式及扩展功能,实现了样式、⽔印、Label标签、功能扩展;富⽂本框RichTextBox控件样式;密码输⼊框PasswordBox控件样式及扩展功能;效果图:⼆.基本⽂本框TextBox控件样式及扩展功能2.1 TextBox基本样式样式代码如下:<!--TextBox默认样式--><Style TargetType="{x:Type TextBox}" x:Key="DefaultTextBox"><Setter Property="ContextMenu" Value="{DynamicResource TextBoxContextMenu}"/><Setter Property="SelectionBrush" Value="{StaticResource TextSelectionBrush}"/><Setter Property="FontFamily" Value="{StaticResource FontFamily}"/><Setter Property="FontSize" Value="{StaticResource FontSize}"/><Setter Property="BorderThickness" Value="1"/><Setter Property="MinHeight" Value="26"/><Setter Property="Width" Value="100"/><Setter Property="Background" Value="{StaticResource TextBackground}"/><Setter Property="Foreground" Value="{StaticResource TextForeground}"/><Setter Property="Padding" Value="0"/><Setter Property="BorderBrush" Value="{StaticResource ControlBorderBrush}"/><Setter Property="local:ControlAttachProperty.FocusBorderBrush" Value="{StaticResource FocusBorderBrush}"/><Setter Property="local:ControlAttachProperty.MouseOverBorderBrush" Value="{StaticResource MouseOverBorderBrush}"/><Setter Property="VerticalContentAlignment" Value="Center"/><!-- change SnapsToDevicePixels to True to view a better border and validation error --><Setter Property="SnapsToDevicePixels" Value="True"/><!--英 ['kærət] 美 ['kærət] 插⼊符号--><Setter Property="CaretBrush" Value="{StaticResource TextForeground}"/><Setter Property="Template"><Setter.Value><ControlTemplate TargetType="{x:Type TextBox}"><Grid x:Name="PART_Root"><Border x:Name="Bg" SnapsToDevicePixels="{TemplateBinding SnapsToDevicePixels}"CornerRadius="{TemplateBinding local:ControlAttachProperty.CornerRadius}"BorderBrush="{TemplateBinding BorderBrush}" BorderThickness="{TemplateBinding BorderThickness}" Background="{TemplateBinding Background}"/> <Grid x:Name="PART_InnerGrid"><Grid.ColumnDefinitions><ColumnDefinition Width="Auto"/><ColumnDefinition Width="*"/><ColumnDefinition Width="Auto"/></Grid.ColumnDefinitions><!--Label区域--><ContentControl x:Name="Label" Margin="1" Template="{TemplateBinding local:belTemplate}"Content="{TemplateBinding local:bel}"/><!--内容区域--><ScrollViewer x:Name="PART_ContentHost" BorderThickness="0" Grid.Column="1" IsTabStop="False" Margin="2"VerticalAlignment="Stretch" Background="{x:Null}"/><!--⽔印--><TextBlock x:Name="Message" Padding="{TemplateBinding Padding}" Visibility="Collapsed"Text="{TemplateBinding local:ControlAttachProperty.Watermark}" Grid.Column="1"Foreground="{TemplateBinding Foreground}" IsHitTestVisible="False" Opacity="{StaticResource WatermarkOpacity}"HorizontalAlignment="{TemplateBinding HorizontalContentAlignment}"VerticalAlignment="{TemplateBinding VerticalContentAlignment}" Margin="5,2,5,2"/><!--附加内容区域--><Border x:Name="PART_AttachContent" Grid.Column="2" Margin="2" VerticalAlignment="Center" HorizontalAlignment="Center"><ContentControl VerticalAlignment="Center" VerticalContentAlignment="Center" Template="{TemplateBinding local:ControlAttachProperty.AttachContent}"/></Border></Grid></Grid><ControlTemplate.Triggers><!--显⽰⽔印--><DataTrigger Binding="{Binding RelativeSource={RelativeSource Self}, Path=Text}" Value=""><Setter TargetName="Message" Property="Visibility" Value="Visible"/></DataTrigger><Trigger Property="IsMouseOver" Value="True"><Setter Property="BorderBrush" Value="{Binding Path=(local:ControlAttachProperty.MouseOverBorderBrush),RelativeSource={RelativeSource Self}}"/></Trigger><Trigger Property="IsFocused" Value="True"><Setter Property="BorderBrush" Value="{Binding Path=(local:ControlAttachProperty.FocusBorderBrush),RelativeSource={RelativeSource Self}}"/></Trigger><!--不可⽤--><Trigger Property="IsEnabled" Value="False"><Setter TargetName="PART_Root" Property="Opacity" Value="{StaticResource DisableOpacity}"/></Trigger><!--只读时,禁⽤PART_AttachContent--><Trigger Property="IsReadOnly" Value="True"><Setter TargetName="PART_AttachContent" Property="IsEnabled" Value="False"/><Setter TargetName="Bg" Property="Opacity" Value="{StaticResource ReadonlyOpacity}"/><Setter TargetName="PART_ContentHost" Property="Opacity" Value="{StaticResource ReadonlyOpacity}"/><Setter TargetName="Label" Property="Opacity" Value="{StaticResource ReadonlyOpacity}"/></Trigger></ControlTemplate.Triggers></ControlTemplate></Setter.Value></Setter></Style> 模板内容主要包含四部分:⽤于实现Label标签的预留区域;TextBox本⾝的⽂本输⼊显⽰部分;⽔印显⽰部分;功能扩展的预留区域; 其中Label标签、功能扩展,还有输⼊框的不同状态显⽰效果都是通过附加属性来实现的,其实从本质上附加属性和控件上定义的依赖属性是同⼀个概念,有些时候附加属性会更加⽅便,对于⼀些可共⽤的属性,就⽐较⽅便,这⼀点怎本⽂是有体现的。
WPF自定义控件与样式(7)-列表控件DataGrid与ListView自定义样式
WPF⾃定义控件与样式(7)-列表控件DataGrid与ListView⾃定义样式⼀.前⾔ 申明:WPF⾃定义控件与样式是⼀个系列⽂章,前后是有些关联的,但⼤多是按照由简到繁的顺序逐步发布的等,若有不明⽩的地⽅可以参考本系列前⾯的⽂章,⽂末附有部分⽂章链接。
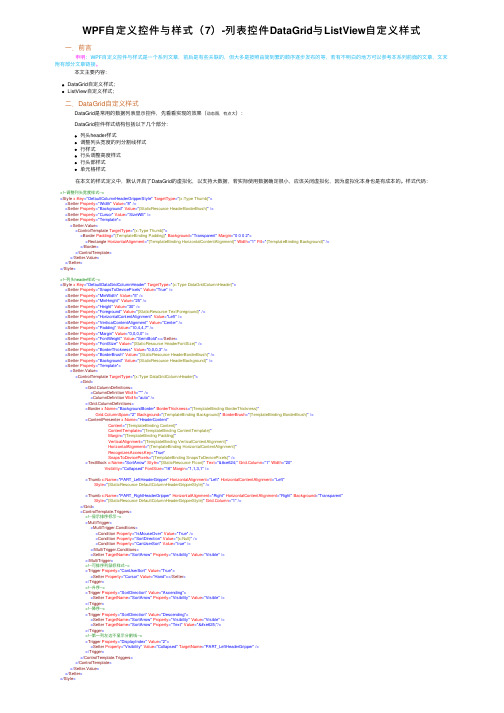
本⽂主要内容:DataGrid⾃定义样式;ListView⾃定义样式;⼆.DataGrid⾃定义样式DataGrid是常⽤的数据列表显⽰控件,先看看实现的效果(动态图,有点⼤):DataGrid控件样式结构包括以下⼏个部分:列头header样式调整列头宽度的列分割线样式⾏样式⾏头调整⾼度样式⾏头部样式单元格样式 在本⽂的样式定义中,默认开启了DataGrid的虚拟化,以⽀持⼤数据,若实际使⽤数据确定很⼩,应该关闭虚拟化,因为虚拟化本⾝也是有成本的。
样式代码:<!--调整列头宽度样式--><Style x:Key="DefaultColumnHeaderGripperStyle" TargetType="{x:Type Thumb}"><Setter Property="Width" Value="8"/><Setter Property="Background" Value="{StaticResource HeaderBorderBrush}"/><Setter Property="Cursor" Value="SizeWE"/><Setter Property="Template"><Setter.Value><ControlTemplate TargetType="{x:Type Thumb}"><Border Padding="{TemplateBinding Padding}" Background="Transparent" Margin="0 0 0 2"><Rectangle HorizontalAlignment="{TemplateBinding HorizontalContentAlignment}" Width="1" Fill="{TemplateBinding Background}"/></Border></ControlTemplate></Setter.Value></Setter></Style><!--列头header样式--><Style x:Key="DefaultDataGridColumnHeader" TargetType="{x:Type DataGridColumnHeader}"><Setter Property="SnapsToDevicePixels" Value="True"/><Setter Property="MinWidth" Value="5"/><Setter Property="MinHeight" Value="25"/><Setter Property="Height" Value="30"/><Setter Property="Foreground" Value="{StaticResource TextForeground}"/><Setter Property="HorizontalContentAlignment" Value="Left"/><Setter Property="VerticalContentAlignment" Value="Center"/><Setter Property="Padding" Value="10,4,4,7"/><Setter Property="Margin" Value="0,0,0,0"/><Setter Property="FontWeight" Value="SemiBold"></Setter><Setter Property="FontSize" Value="{StaticResource HeaderFontSize}"/><Setter Property="BorderThickness" Value="0,0,0,3"/><Setter Property="BorderBrush" Value="{StaticResource HeaderBorderBrush}"/><Setter Property="Background" Value="{StaticResource HeaderBackground}"/><Setter Property="Template"><Setter.Value><ControlTemplate TargetType="{x:Type DataGridColumnHeader}"><Grid><Grid.ColumnDefinitions><ColumnDefinition Width="*"/><ColumnDefinition Width="auto"/></Grid.ColumnDefinitions><Border x:Name="BackgroundBorder" BorderThickness="{TemplateBinding BorderThickness}"Grid.ColumnSpan="2" Background="{TemplateBinding Background}" BorderBrush="{TemplateBinding BorderBrush}"/><ContentPresenter x:Name="HeaderContent"Content="{TemplateBinding Content}"ContentTemplate="{TemplateBinding ContentTemplate}"Margin="{TemplateBinding Padding}"VerticalAlignment="{TemplateBinding VerticalContentAlignment}"HorizontalAlignment="{TemplateBinding HorizontalContentAlignment}"RecognizesAccessKey="True"SnapsToDevicePixels="{TemplateBinding SnapsToDevicePixels}"/><TextBlock x:Name="SortArrow" Style="{StaticResource FIcon}" Text="" Grid.Column="1" Width="20"Visibility="Collapsed" FontSize="16" Margin="1,1,3,1"/><Thumb x:Name="PART_LeftHeaderGripper" HorizontalAlignment="Left" HorizontalContentAlignment="Left"Style="{StaticResource DefaultColumnHeaderGripperStyle}"/><Thumb x:Name="PART_RightHeaderGripper" HorizontalAlignment="Right" HorizontalContentAlignment="Right" Background="Transparent"Style="{StaticResource DefaultColumnHeaderGripperStyle}" Grid.Column="1"/></Grid><ControlTemplate.Triggers><!--显⽰排序标⽰--><MultiTrigger><MultiTrigger.Conditions><Condition Property="IsMouseOver" Value="True"/><Condition Property="SortDirection" Value="{x:Null}"/><Condition Property="CanUserSort" Value="true"/></MultiTrigger.Conditions><Setter TargetName="SortArrow" Property="Visibility" Value="Visible"/></MultiTrigger><!--可排序列⿏标样式--><Trigger Property="CanUserSort" Value="True"><Setter Property="Cursor" Value="Hand"></Setter></Trigger><!--升序--><Trigger Property="SortDirection" Value="Ascending"><Setter TargetName="SortArrow" Property="Visibility" Value="Visible"/></Trigger><!--降序--><Trigger Property="SortDirection" Value="Descending"><Setter TargetName="SortArrow" Property="Visibility" Value="Visible"/><Setter TargetName="SortArrow" Property="Text" Value=""/></Trigger><!--第⼀列左边不显⽰分割线--><Trigger Property="DisplayIndex" Value="2"><Setter Property="Visibility" Value="Collapsed" TargetName="PART_LeftHeaderGripper"/></Trigger></ControlTemplate.Triggers></ControlTemplate></Setter.Value></Setter></Style><!--⾏样式--><Style x:Key="DefaultDataGridRow" TargetType="{x:Type DataGridRow}"><Setter Property="Foreground" Value="{StaticResource TextForeground}"/><Setter Property="Background" Value="Transparent"/><Setter Property="Margin" Value="0,0,0,0"/><Style.Triggers><Trigger Property="ItemsControl.AlternationIndex" Value="1"><Setter Property="Background" Value="{StaticResource ItemsAlternationContentBackground}"/></Trigger><Trigger Property="IsSelected" Value="True"><Setter Property="Background" Value="{StaticResource ItemSelectedBackground}"/><Setter Property="Foreground" Value="{StaticResource ItemSelectedForeground}"/></Trigger><MultiTrigger><MultiTrigger.Conditions><Condition Property="IsSelected" Value="True"/><Condition Property="Selector.IsSelectionActive" Value="True"/></MultiTrigger.Conditions><Setter Property="Background" Value="{StaticResource ItemSelectedBackground}"/><Setter Property="Foreground" Value="{StaticResource ItemSelectedForeground}"/></MultiTrigger><MultiDataTrigger><MultiDataTrigger.Conditions><Condition Binding="{Binding Path=IsMouseOver, RelativeSource={RelativeSource Self}}" Value="True"/></MultiDataTrigger.Conditions><Setter Property="Background" Value="{StaticResource ItemMouseOverBackground}"/><Setter Property="Foreground" Value="{StaticResource ItemMouseOverForeground}"/></MultiDataTrigger></Style.Triggers></Style><!--⾏头调整⾼度样式 --><Style x:Key="DefaultRowHeaderGripperStyle" TargetType="{x:Type Thumb}"><Setter Property="Height" Value="6"/><Setter Property="Background" Value="Transparent"/><Setter Property="Cursor" Value="SizeNS"/><Setter Property="Template"><Setter.Value><ControlTemplate TargetType="{x:Type Thumb}"><Border Padding="{TemplateBinding Padding}" Background="Transparent"/></ControlTemplate></Setter.Value></Setter></Style><!--⾏头部样式--><Style x:Key="DefaultDataGridRowHeader" TargetType="{x:Type DataGridRowHeader}"><Setter Property="HorizontalContentAlignment" Value="Stretch"/><Setter Property="VerticalContentAlignment" Value="Center"/><Setter Property="Background" Value="Transparent"/><Setter Property="BorderBrush" Value="Transparent"/><Setter Property="BorderThickness" Value="0,0,1,0"/><Setter Property="Margin" Value="0,0,0,0"/><Setter Property="Template"><Setter.Value><ControlTemplate TargetType="{x:Type DataGridRowHeader}"><Grid><Border BorderBrush="{TemplateBinding BorderBrush}"Background="{TemplateBinding Background}"BorderThickness="{TemplateBinding BorderThickness}"Padding="{TemplateBinding Padding}"Margin="{TemplateBinding Margin}"SnapsToDevicePixels="True"><ContentPresenter SnapsToDevicePixels="{TemplateBinding SnapsToDevicePixels}"VerticalAlignment="{TemplateBinding VerticalContentAlignment}"HorizontalAlignment="{TemplateBinding HorizontalContentAlignment}"/></Border><Thumb x:Name="PART_TopHeaderGripper" VerticalContentAlignment="Top"VerticalAlignment="Top" Background="Transparent" Style="{StaticResource DefaultRowHeaderGripperStyle}"/> <Thumb x:Name="PART_BottomHeaderGripper" VerticalContentAlignment="Bottom"VerticalAlignment="Bottom" Style="{StaticResource DefaultRowHeaderGripperStyle}"/></Grid></ControlTemplate></Setter.Value></Setter></Style><!--单元格样式--><Style x:Key="DefaultDataGridCell"TargetType="{x:Type DataGridCell}"><Setter Property="Background" Value="Transparent"/><Setter Property="BorderBrush" Value="Transparent"/><Setter Property="HorizontalContentAlignment" Value="Stretch"/><Setter Property="VerticalContentAlignment" Value="Center"/><Setter Property="SnapsToDevicePixels" Value="True"/><Setter Property="Padding" Value="0"/><Setter Property="Template"><Setter.Value><ControlTemplate TargetType="{x:Type DataGridCell}"><Border BorderBrush="{TemplateBinding BorderBrush}"BorderThickness="{TemplateBinding BorderThickness}"Background="{TemplateBinding Background}"SnapsToDevicePixels="{TemplateBinding SnapsToDevicePixels}"><ContentPresenter ContentTemplate="{TemplateBinding ContentTemplate}"Content="{TemplateBinding Content}" ContentStringFormat="{TemplateBinding ContentStringFormat}" Margin="{TemplateBinding Padding}" SnapsToDevicePixels="{TemplateBinding SnapsToDevicePixels}" VerticalAlignment="{TemplateBinding VerticalContentAlignment}"HorizontalAlignment="{TemplateBinding HorizontalContentAlignment}"></ContentPresenter></Border><ControlTemplate.Triggers><Trigger Property="IsSelected" Value="True"><Setter Property="Foreground" Value="{StaticResource ItemSelectedForeground}"/></Trigger></ControlTemplate.Triggers></ControlTemplate></Setter.Value></Setter></Style><!--表格DataGrid样式--><Style x:Key="DefaultDataGrid" TargetType="{x:Type DataGrid}"><Setter Property="MinRowHeight" Value="25"/><Setter Property="Background" Value="{StaticResource ItemsContentBackground}"/><Setter Property="BorderBrush" Value="{StaticResource ControlBorderBrush}"/><Setter Property="BorderThickness" Value="1"/><Setter Property="HorizontalGridLinesBrush" Value="{StaticResource GridLinesBrush}"/><Setter Property="VerticalGridLinesBrush" Value="{StaticResource GridLinesBrush}"/><Setter Property="ColumnHeaderStyle" Value="{StaticResource DefaultDataGridColumnHeader}"/><Setter Property="RowHeaderStyle" Value="{StaticResource DefaultDataGridRowHeader}"/><Setter Property="CellStyle" Value="{StaticResource DefaultDataGridCell}"/><Setter Property="RowStyle" Value="{StaticResource DefaultDataGridRow}"/><Setter Property="HeadersVisibility" Value="All"/><Setter Property="EnableRowVirtualization" Value="True"/><Setter Property="EnableColumnVirtualization" Value="False"/><Setter Property="AutoGenerateColumns" Value="False"/><Setter Property="IsReadOnly" Value="True"/><Setter Property="SelectionMode" Value="Single"/><Setter Property="SelectionUnit" Value="FullRow"/><Setter Property="GridLinesVisibility" Value="All"/><Setter Property="AlternationCount" Value="2"></Setter><Setter Property="ScrollViewer.CanContentScroll" Value="True"/><Setter Property="VirtualizingStackPanel.IsVirtualizing" Value="True"></Setter><Setter Property="VirtualizingStackPanel.VirtualizationMode" Value="Recycling"/><Setter Property="ScrollViewer.IsDeferredScrollingEnabled" Value="False"/><!--列头移动列时候分割线样式--><Setter Property="DropLocationIndicatorStyle"><Setter.Value><Style TargetType="Separator"><Setter Property="Background" Value="{StaticResource HeaderBorderBrush}"/><Setter Property="Width" Value="2.5"/><Setter Property="Template"><Setter.Value><ControlTemplate TargetType="Separator"><Rectangle Fill="{TemplateBinding Background}" Height="{TemplateBinding Height}" Width="{TemplateBinding Width}"/></ControlTemplate></Setter.Value></Setter></Style></Setter.Value></Setter><!--DataGrid控件模板--><Setter Property="Template"><Setter.Value><ControlTemplate TargetType="{x:Type DataGrid}"><Border BorderBrush="{TemplateBinding BorderBrush}" BorderThickness="{TemplateBinding BorderThickness}" x:Name="border"Background="{TemplateBinding Background}" Padding="{TemplateBinding Padding}" SnapsToDevicePixels="True"><ScrollViewer x:Name="DG_ScrollViewer" Focusable="false"><ScrollViewer.Template><ControlTemplate TargetType="{x:Type ScrollViewer}"><Grid><Grid.ColumnDefinitions><ColumnDefinition x:Name="col_rowheader" Width="1"/><ColumnDefinition Width="*"/><ColumnDefinition Width="Auto"/></Grid.ColumnDefinitions><Grid.RowDefinitions><RowDefinition Height="Auto"/><RowDefinition Height="*"/><RowDefinition Height="Auto"/></Grid.RowDefinitions><!--表格头部--><DataGridColumnHeadersPresenter x:Name="PART_ColumnHeadersPresenter" Grid.Column="1" Grid.ColumnSpan="2"Visibility="{Binding HeadersVisibility, ConverterParameter={x:Static DataGridHeadersVisibility.Column}, Converter={x:Static DataGrid.HeadersVisibilityConverter}, RelativeSource={RelativeSource AncestorTyp <!--主数据区--><Grid Grid.Row="1" Grid.ColumnSpan="2"><ScrollContentPresenter x:Name="PART_ScrollContentPresenter" CanContentScroll="{TemplateBinding CanContentScroll}" Grid.ColumnSpan="2"/></Grid><!--垂直滑动条--><ScrollBar x:Name="PART_VerticalScrollBar" Grid.Column="2" Maximum="{TemplateBinding ScrollableHeight}"Orientation="Vertical" Grid.Row="0" Grid.RowSpan="3" Visibility="{TemplateBinding ComputedVerticalScrollBarVisibility}"Value="{Binding VerticalOffset, Mode=OneWay, RelativeSource={RelativeSource TemplatedParent}}"ViewportSize="{TemplateBinding ViewportHeight}"/><!--横向滑动条--><ScrollBar x:Name="PART_HorizontalScrollBar" Grid.Column="0" Grid.ColumnSpan="2" Grid.Row="2"Maximum="{TemplateBinding ScrollableWidth}" Orientation="Horizontal"Visibility="{TemplateBinding ComputedHorizontalScrollBarVisibility}"Value="{Binding HorizontalOffset, Mode=OneWay, RelativeSource={RelativeSource TemplatedParent}}"ViewportSize="{TemplateBinding ViewportWidth}"/></Grid></ControlTemplate></ScrollViewer.Template><ItemsPresenter SnapsToDevicePixels="{TemplateBinding SnapsToDevicePixels}"/></ScrollViewer></Border><ControlTemplate.Triggers><Trigger Property="IsEnabled" Value="false"><Setter Property="Opacity" Value="{StaticResource DisableOpacity}" TargetName="border"/></Trigger></ControlTemplate.Triggers></ControlTemplate></Setter.Value></Setter><Style.Triggers><Trigger Property="IsGrouping" Value="true"><Setter Property="ScrollViewer.CanContentScroll" Value="false"/></Trigger></Style.Triggers></Style>View Code 最后⼀个就是DataGrid的样式了,主要是重写定义了滑动条的布局,使得整体效果更加协调,属性AlternationCount可⽤来设置⾏交替⾊,⽽具体实现交替⾊是在上⾯⾏(DataGridRow)样式中通过触发器实现的。
[WPF自定义控件]从ContentControl开始入门自定义控件
![[WPF自定义控件]从ContentControl开始入门自定义控件](https://img.taocdn.com/s3/m/1f4e90c0a0c7aa00b52acfc789eb172ded639910.png)
[WPF ⾃定义控件]从ContentControl 开始⼊门⾃定义控件1. 前⾔我去年写过⼀个在UWP ⾃定义控件的,⼤部分的经验都可以⽤在WPF 中(只有⼀点⼩区别)。
这篇⽂章的⽬的是快速⼊门⾃定义控件的开发,所以尽量精简了篇幅,更深⼊的概念在以后介绍各控件的⽂章中实际运⽤到才介绍。
是WPF 中最基础的⼀种控件,Window 、Button 、ScrollViewer 、Label 、ListBoxItem 等都继承⾃ContentControl 。
⽽且ContentControl 的结构⼗分简单,很适合⽤来⼊门⾃定义控件。
这篇⽂章通过⾃定义⼀个ContentControl 来介绍⾃定义控件的⼀些基础概念,包括⾃定义控件的基本步骤及其组成。
2. 什么是⾃定义控件在开始之前⾸先要了解什么是⾃定义控件以及为什么要⽤⾃定义控件。
在WPF 要创建⾃⼰的控件(Control ),通常可以使⽤⾃定义控件(CustomControl )或⽤户控件(UserControl ),两者最⼤的区别是前者可以通过对控件的外观灵活地进⾏定制。
如在下⾯的例⼦中,通过ControlTemplate 将Button改成⼀个圆形按钮:控件库中通常使⽤⾃定义控件⽽不是⽤户控件。
3. 创建⾃定义控件ContentControl 最简单的派⽣类应该是HeaderedContentControl 了吧,这篇⽂章会创建⼀个模仿HeaderedContentControl 的MyHeaderedContentControl ,它继承⾃ContentControl 并添加了⼀些细节。
在“添加新项”对话框选择“⾃定义控件(WPF )”,名称改为"MyHeaderedContentControl.cs"(⽤My-做前缀是⼗分差劲的命名⽅式,但只要⼀看到这种命名就明⽩这是个测试⽤的东西,不会和正规代码搞错,所以我习惯了测试⽤代码就这样命名。
WPF自定义控件与样式(6)-ScrollViewer与ListBox自定义样式
WPF⾃定义控件与样式(6)-ScrollViewer与ListBox⾃定义样式⼀.前⾔ 申明:WPF⾃定义控件与样式是⼀个系列⽂章,前后是有些关联的,但⼤多是按照由简到繁的顺序逐步发布的等,若有不明⽩的地⽅可以参考本系列前⾯的⽂章,⽂末附有部分⽂章链接。
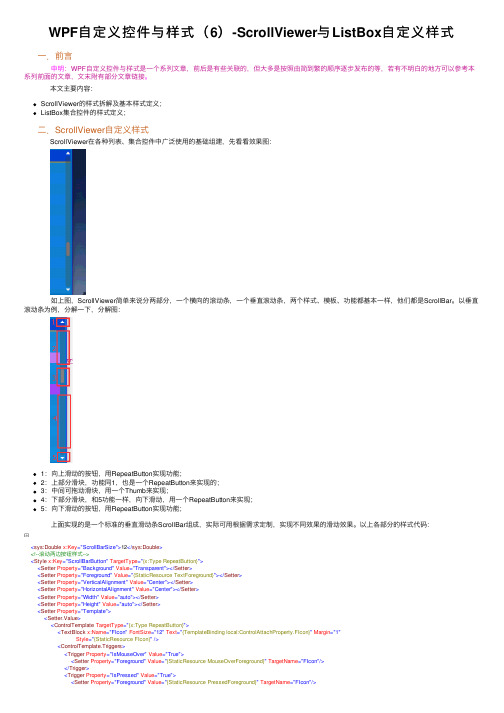
本⽂主要内容:ScrollViewer的样式拆解及基本样式定义;ListBox集合控件的样式定义;⼆.ScrollViewer⾃定义样式ScrollViewer在各种列表、集合控件中⼴泛使⽤的基础组建,先看看效果图: 如上图,ScrollViewer简单来说分两部分,⼀个横向的滚动条,⼀个垂直滚动条,两个样式、模板、功能都基本⼀样,他们都是ScrollBar。
以垂直滚动条为例,分解⼀下,分解图:1:向上滑动的按钮,⽤RepeatButton实现功能;2:上部分滑块,功能同1,也是⼀个RepeatButton来实现的;3:中间可拖动滑块,⽤⼀个Thumb来实现;4:下部分滑块,和5功能⼀样,向下滑动,⽤⼀个RepeatButton来实现;5:向下滑动的按钮,⽤RepeatButton实现功能; 上⾯实现的是⼀个标准的垂直滑动条ScrollBar组成,实际可⽤根据需求定制,实现不同效果的滑动效果。
以上各部分的样式代码:<sys:Double x:Key="ScrollBarSize">12</sys:Double><!--滚动两边按钮样式--><Style x:Key="ScrollBarButton" TargetType="{x:Type RepeatButton}"><Setter Property="Background" Value="Transparent"></Setter><Setter Property="Foreground" Value="{StaticResource TextForeground}"></Setter><Setter Property="VerticalAlignment" Value="Center"></Setter><Setter Property="HorizontalAlignment" Value="Center"></Setter><Setter Property="Width" Value="auto"></Setter><Setter Property="Height" Value="auto"></Setter><Setter Property="Template"><Setter.Value><ControlTemplate TargetType="{x:Type RepeatButton}"><TextBlock x:Name="FIcon" FontSize="12" Text="{TemplateBinding local:ControlAttachProperty.FIcon}" Margin="1"Style="{StaticResource FIcon}"/><ControlTemplate.Triggers><Trigger Property="IsMouseOver" Value="True"><Setter Property="Foreground" Value="{StaticResource MouseOverForeground}" TargetName="FIcon"/></Trigger><Trigger Property="IsPressed" Value="True"><Setter Property="Foreground" Value="{StaticResource PressedForeground}" TargetName="FIcon"/></Trigger><Trigger Property="IsEnabled" Value="false"><Setter Property="Opacity" Value="0.5" TargetName="FIcon"/></Trigger></ControlTemplate.Triggers></ControlTemplate></Setter.Value></Setter></Style><!--滚动条滑块两边按钮样式--><Style x:Key="ScrollBarTrackButton" TargetType="{x:Type RepeatButton}"><Setter Property="Background" Value="Transparent"></Setter><Setter Property="Template"><Setter.Value><ControlTemplate TargetType="{x:Type RepeatButton}"><Border Background="Transparent"></Border></ControlTemplate></Setter.Value></Setter></Style><!--滚动条滑块样式--><ControlTemplate x:Key="ThumbTemplate" TargetType="Thumb"><Grid><Border x:Name="Bg" CornerRadius="4" Margin="2" SnapsToDevicePixels="True" Background="{StaticResource ScrollBarForeround}"><!--<Border.Background><LinearGradientBrush StartPoint="0.5,0" EndPoint="0.5,1"><GradientStop Color="#C7C0C0" Offset="0.15"/><GradientStop Color="#AFA9A9" Offset=".5"/><GradientStop Color="#989494" Offset=".5"/><GradientStop Color="#858585" Offset="1"/></LinearGradientBrush></Border.Background>--></Border></Grid><ControlTemplate.Triggers><Trigger Property="IsMouseOver" Value="True"><Setter Property="Background" Value="{StaticResource MouseOverForeground}" TargetName="Bg"></Setter></Trigger><Trigger Property="IsEnabled" Value="False"><Setter Property="Opacity" Value="0.5" TargetName="Bg"></Setter></Trigger></ControlTemplate.Triggers></ControlTemplate><!--⽔平滚滚动条模板--><ControlTemplate x:Key="HorizontalScrollBar" TargetType="{x:Type ScrollBar}"><Grid x:Name="HorizontalRoot" Height="{TemplateBinding Height}"><Grid.ColumnDefinitions><ColumnDefinition Width="Auto"/><ColumnDefinition Width="*"/><ColumnDefinition Width="Auto"/></Grid.ColumnDefinitions><!--外部背景,好像不⽤更好看--><!--<Border x:Name="Bg" Grid.Column="0" Grid.ColumnSpan="3" CornerRadius="0" Opacity="0" Background="#858585"/>--><!--内部背景--><Border x:Name="BgInner" Grid.Column="1" Margin="0" SnapsToDevicePixels="True" Opacity="0.3" CornerRadius="6" Background="{StaticResource ScrollBarBackground}"/> <!--左按钮--><Border Grid.Column="0" VerticalAlignment="Center" HorizontalAlignment="Center"><RepeatButton local:ControlAttachProperty.FIcon="" Style="{StaticResource ScrollBarButton}" x:Name="HorizontalSmallDecrease"IsTabStop="False" Interval="50" Margin="0,1,0,0" Command="ScrollBar.LineLeftCommand"/></Border><!--中间滑动区域--><Track x:Name="PART_Track" IsDirectionReversed="False" Grid.Column="1"><!--左滑块--><Track.DecreaseRepeatButton><RepeatButton x:Name="HorizontalLargeDecrease" Command="ScrollBar.PageLeftCommand"IsTabStop="False" Interval="50" Style="{DynamicResource ScrollBarTrackButton}"/></Track.DecreaseRepeatButton><!--中间滑块 Margin="1" VerticalAlignment="Center" VerticalContentAlignment="Center" --><Track.Thumb><Thumb Template="{StaticResource ThumbTemplate}"/></Track.Thumb><!--右滑块--><Track.IncreaseRepeatButton><RepeatButton x:Name="HorizontalLargeIncrease" Command="ScrollBar.PageRightCommand"IsTabStop="False" Interval="50" Style="{DynamicResource ScrollBarTrackButton}"/></Track.IncreaseRepeatButton></Track><!--右按钮--><Border Grid.Column="2" VerticalAlignment="Center" HorizontalAlignment="Center"><RepeatButton local:ControlAttachProperty.FIcon="" Style="{StaticResource ScrollBarButton}"IsTabStop="False" Interval="50" Margin="0,1,0,0" Command="ScrollBar.LineRightCommand"/></Border></Grid><ControlTemplate.Triggers><Trigger Property="IsMouseOver" Value="true"><Setter TargetName="BgInner" Property="Opacity" Value="0.5"/></Trigger></ControlTemplate.Triggers></ControlTemplate><!--垂直滚滚动条模板--><ControlTemplate x:Key="VerticalScrollBar" TargetType="{x:Type ScrollBar}"><Grid x:Name="VerticalRoot" Height="{TemplateBinding Height}"><Grid.RowDefinitions><RowDefinition Height="Auto"/><RowDefinition Height="*"/><RowDefinition Height="Auto"/></Grid.RowDefinitions><!--外部背景,好像不⽤更好看--><!--<Border x:Name="Bg" Grid.Row="0" Grid.RowSpan="3" CornerRadius="0" Opacity="0" Background="#858585"/>--><!--内部背景--><Border x:Name="BgInner" Grid.Row="1" Margin="0" CornerRadius="6" SnapsToDevicePixels ="True" Opacity="0.3" Background="{StaticResource ScrollBarBackground}"/> <!--上按钮--><Border Grid.Row="0" VerticalAlignment="Center" HorizontalAlignment="Center" x:Name="VerticalSmallDecrease"><RepeatButton local:ControlAttachProperty.FIcon="" Style="{StaticResource ScrollBarButton}"IsTabStop="False" Interval="50" Margin="0" Command="ScrollBar.LineUpCommand"/></Border><!--中间滑动区域--><Track x:Name="PART_Track" IsDirectionReversed="true" Grid.Row="1"><!--上滑块--><Track.DecreaseRepeatButton><RepeatButton x:Name="HorizontalLargeDecrease" Command="ScrollBar.PageUpCommand"IsTabStop="False" Interval="50" Style="{DynamicResource ScrollBarTrackButton}"/></Track.DecreaseRepeatButton><!--中间滑块--><Track.Thumb><Thumb Template="{StaticResource ThumbTemplate}" MinHeight="10"/></Track.Thumb><!--下滑块--><Track.IncreaseRepeatButton><RepeatButton x:Name="HorizontalLargeIncrease" Command="ScrollBar.PageDownCommand"IsTabStop="False" Interval="50" Style="{DynamicResource ScrollBarTrackButton}"/></Track.IncreaseRepeatButton></Track><!--下按钮--><Border Grid.Row="2" VerticalAlignment="Center" HorizontalAlignment="Center" x:Name="VerticalSmallIncrease"><RepeatButton local:ControlAttachProperty.FIcon="" Style="{StaticResource ScrollBarButton}"IsTabStop="False" Interval="50" Margin="0" Command="ScrollBar.LineDownCommand"/></Border></Grid><ControlTemplate.Triggers><Trigger Property="IsMouseOver" Value="true"><Setter TargetName="BgInner" Property="Opacity" Value="0.5"/></Trigger></ControlTemplate.Triggers></ControlTemplate><!--ScrollBar样式--><Style x:Key="DefaultScrollBar" TargetType="{x:Type ScrollBar}"><Setter Property="SnapsToDevicePixels" Value="True"/><Setter Property="OverridesDefaultStyle" Value="true"/><Style.Triggers><Trigger Property="Orientation" Value="Horizontal"><Setter Property="Template" Value="{StaticResource HorizontalScrollBar}"/><Setter Property="Height" Value="{StaticResource ScrollBarSize}"/></Trigger><Trigger Property="Orientation" Value="Vertical"><Setter Property="Template" Value="{StaticResource VerticalScrollBar}"/><Setter Property="Width" Value="{StaticResource ScrollBarSize}"/></Trigger></Style.Triggers></Style>View Code 最后ScrollViewer的样式如下,其实就是两个 ScrollBar组成:<!--ScrollViewer样式--><Style x:Key="DefaultScrollViewer" TargetType="{x:Type ScrollViewer}"><Setter Property="Template"><Setter.Value><ControlTemplate TargetType="{x:Type ScrollViewer}"><Grid x:Name="Grid" Background="{TemplateBinding Background}"><Grid.ColumnDefinitions><ColumnDefinition Width="*" x:Name="leftColumn"/><ColumnDefinition Width="Auto" x:Name="rightColumn"/></Grid.ColumnDefinitions><Grid.RowDefinitions><RowDefinition Height="*"/><RowDefinition Height="Auto"/></Grid.RowDefinitions><ScrollContentPresenter x:Name="PART_ScrollContentPresenter" CanContentScroll="{TemplateBinding CanContentScroll}"CanHorizontallyScroll="False" CanVerticallyScroll="False" ContentTemplate="{TemplateBinding ContentTemplate}"Content="{TemplateBinding Content}" Margin="{TemplateBinding Padding}"Grid.Row="0" Grid.Column="0"/><!--垂直滚动条 --><ScrollBar x:Name="PART_VerticalScrollBar" AutomationProperties.AutomationId="VerticalScrollBar"ViewportSize="{TemplateBinding ViewportHeight}"Cursor="Arrow" Grid.Column="1" Maximum="{TemplateBinding ScrollableHeight}"Minimum="0" Grid.Row="0" Visibility="{TemplateBinding ComputedVerticalScrollBarVisibility}"Value="{Binding VerticalOffset, Mode=OneWay, RelativeSource={RelativeSource TemplatedParent}}"/><!--⽔平底部滚动条--><ScrollBar x:Name="PART_HorizontalScrollBar" AutomationProperties.AutomationId="HorizontalScrollBar"Cursor="Arrow" Grid.Column="0" Maximum="{TemplateBinding ScrollableWidth}"Minimum="0" Orientation="Horizontal" Grid.Row="1"Visibility="{TemplateBinding ComputedHorizontalScrollBarVisibility}"Value="{Binding HorizontalOffset, Mode=OneWay, RelativeSource={RelativeSource TemplatedParent}}"ViewportSize="{TemplateBinding ViewportWidth}"/></Grid></ControlTemplate></Setter.Value></Setter></Style>使⽤很简单,如果想通⽤,把上⾯定义的ScrollViewer设置为默认样式即可:<Style TargetType="{x:Type ScrollBar}" BasedOn="{StaticResource DefaultScrollBar}"></Style><Style TargetType="{x:Type ScrollViewer}" BasedOn="{StaticResource DefaultScrollViewer}"></Style>三.ListBox样式定义ListBox是最基础、常⽤的集合控件,效果:ListBox的样式⽐较简单,包括两部分:ListBoxItem项的样式;ListBox的样式;完整代码:<Style x:Key="DefaultListBoxItem" TargetType="{x:Type ListBoxItem}"><Setter Property="Foreground" Value="{StaticResource TextForeground}"/><Setter Property="HorizontalContentAlignment" Value="Stretch"/><!--<Setter Property="VerticalContentAlignment" Value="Center" />--><Setter Property="MinHeight" Value="25"/><Setter Property="Margin" Value="0"/><Setter Property="Background" Value="Transparent"/><Setter Property="Padding" Value="3,0,0,0"/><Setter Property="SnapsToDevicePixels" Value="True"/><Setter Property="Template"><Setter.Value><ControlTemplate TargetType="{x:Type ListBoxItem}"><Border x:Name="Border" Background="{TemplateBinding Background}" SnapsToDevicePixels="{TemplateBinding SnapsToDevicePixels}"><ContentPresenter Margin="{TemplateBinding Padding}" SnapsToDevicePixels="{TemplateBinding SnapsToDevicePixels}"HorizontalAlignment="{TemplateBinding HorizontalContentAlignment}" VerticalAlignment="{TemplateBinding VerticalContentAlignment}"/> </Border><ControlTemplate.Triggers><Trigger Property="IsSelected" Value="True"><Setter TargetName="Border" Property="Background" Value="{StaticResource ItemSelectedBackground}"/><Setter Property="Foreground" Value="{StaticResource ItemSelectedForeground}"/></Trigger><Trigger Property="IsMouseOver" Value="True"><Setter TargetName="Border" Property="Background" Value="{StaticResource ItemMouseOverBackground}"/><Setter Property="Foreground" Value="{StaticResource ItemMouseOverForeground}"/></Trigger><Trigger Property="IsEnabled" Value="False"><Setter TargetName="Border" Property="Opacity" Value="{StaticResource DisableOpacity}"/></Trigger></ControlTemplate.Triggers></ControlTemplate></Setter.Value></Setter></Style><Style x:Key="DefaultListBox" TargetType="{x:Type ListBox}"><Setter Property="BorderBrush" Value="{StaticResource ControlBorderBrush}"/><Setter Property="Background" Value="{StaticResource ItemsContentBackground}"/><Setter Property="BorderThickness" Value="1"/><Setter Property="ItemContainerStyle" Value="{StaticResource DefaultListBoxItem}"></Setter><Setter Property="SnapsToDevicePixels" Value="True"/><Setter Property="VirtualizingStackPanel.IsVirtualizing" Value="False"></Setter><Setter Property="Template"><Setter.Value><ControlTemplate TargetType="{x:Type ListBox}"><Border Name="Border" Background="{TemplateBinding Background}"BorderBrush="{TemplateBinding BorderBrush}" BorderThickness="{TemplateBinding BorderThickness}"><ScrollViewer><ItemsPresenter /></ScrollViewer></Border><ControlTemplate.Triggers><Trigger Property="IsEnabled" Value="False"><Setter TargetName="Border" Property="Opacity" Value="{StaticResource DisableOpacity}"/></Trigger></ControlTemplate.Triggers></ControlTemplate></Setter.Value></Setter></Style>ListBox默认是⽀持虚拟化的,当加载⼤数据时需要开启虚拟化,或者定义⼀个虚拟化的样式:<!--⽀持虚拟化的ListBox--><Style x:Key="VirtualListBox" TargetType="{x:Type ListBox}" BasedOn="{StaticResource DefaultListBox}"><Setter Property="ScrollViewer.CanContentScroll" Value="True"/><Setter Property="VirtualizingStackPanel.IsVirtualizing" Value="True"></Setter><Setter Property="VirtualizingStackPanel.VirtualizationMode" Value="Recycling"/><Setter Property="ScrollViewer.IsDeferredScrollingEnabled" Value="False"/></Style>上⾯演⽰效果的代码⽰例:<ListBox Margin="5" SelectionMode="Multiple"><ListBoxItem Style="{StaticResource RadioButtonListBoxItem}">男</ListBoxItem><ListBoxItem Style="{StaticResource RadioButtonListBoxItem}">⼥</ListBoxItem><ListBoxItem Style="{StaticResource RadioButtonListBoxItem}">其他</ListBoxItem><CheckBox>2222333333333333333</CheckBox><CheckBox>2222333333333333333</CheckBox><CheckBox>2222333333333333333</CheckBox><CheckBox>2222333333333333333</CheckBox><CheckBox>2222333333333333333</CheckBox><CheckBox>2222333333333333333</CheckBox><CheckBox>2222333333333333333</CheckBox><CheckBox>2222333333333333333</CheckBox><TextBox Width="200"></TextBox><ListBoxItem IsSelected="True">111</ListBoxItem></ListBox><ListBox Margin="5" Grid.Column="1"><ListBoxItem Style="{StaticResource RadioButtonListBoxItem}">男</ListBoxItem><ListBoxItem Style="{StaticResource RadioButtonListBoxItem}">⼥</ListBoxItem><ListBoxItem Style="{StaticResource RadioButtonListBoxItem}">其他</ListBoxItem></ListBox>另外提供⼀个⽐较常⽤的需求,ListBox单选RadioButton效果样式,如上图右边的那个ListBox效果:<Style x:Key="RadioButtonListBoxItem" TargetType="{x:Type ListBoxItem}" BasedOn="{StaticResource DefaultListBoxItem}"><Setter Property="Template"><Setter.Value><ControlTemplate TargetType="{x:Type ListBoxItem}"><Border x:Name="Border" Background="{TemplateBinding Background}" SnapsToDevicePixels="{TemplateBinding SnapsToDevicePixels}"><RadioButton IsChecked="{Binding IsSelected,RelativeSource={RelativeSource TemplatedParent},Mode=TwoWay}"><RadioButton.Content><ContentPresenter Margin="{TemplateBinding Padding}" SnapsToDevicePixels="{TemplateBinding SnapsToDevicePixels}"HorizontalAlignment="{TemplateBinding HorizontalContentAlignment}" VerticalAlignment="{TemplateBinding VerticalContentAlignment}"/> </RadioButton.Content></RadioButton></Border><ControlTemplate.Triggers><Trigger Property="IsSelected" Value="True"><Setter TargetName="Border" Property="Background" Value="{StaticResource ItemSelectedBackground}"/><Setter Property="Foreground" Value="{StaticResource ItemSelectedForeground}"/></Trigger><Trigger Property="IsMouseOver" Value="True"><Setter TargetName="Border" Property="Background" Value="{StaticResource ItemMouseOverBackground}"/><Setter Property="Foreground" Value="{StaticResource ItemMouseOverForeground}"/></Trigger><Trigger Property="IsEnabled" Value="False"><Setter TargetName="Border" Property="Opacity" Value="{StaticResource DisableOpacity}"/></Trigger></ControlTemplate.Triggers></ControlTemplate></Setter.Value></Setter></Style>附录:参考引⽤个⼈能⼒有限,本⽂内容仅供学习、探讨,欢迎指正、交流。
WPF自定义控件第一

WPF⾃定义控件第⼀本⽂主要针对WPF新⼿,⾼⼿可以直接忽略,更希望⾼⼿们能给出⼀些更好的实现思路。
前期⼀个⼩任务需要实现⼀个类似含步骤进度条的控件。
虽然对于XAML的了解还不是⾜够深⼊,还是摸索着做了⼀个。
这篇⽂章介绍下实现这个控件的步骤,最后会放出代码。
还请⾼⼿们给出更好的思路。
同时也希望这⾥的思路能给同道中⼈⼀些帮助。
话不多说,开始正题。
实现中的⼀些代码采⽤了⽹上现有的⽅案,代码中通过注释标记了来源,再次对代码作者⼀并表⽰感谢。
⾸先放⼀张最终效果图。
节点可以被点击控件会根据绑定的集合数据⽣成⼀系列节点,根据集合中的数据还可以按⽐例放置节点的位置。
节点的实体代码如下:1234 5 6 7 8 9 10 11 12 13 14 15 16 17 18 19public class FlowItem{public FlowItem(){}public FlowItem(int id, string title,double offsetRate) {Id = id;Title = title;OffsetRate = offsetRate;}public int Id { get; set; }public string Title { get; set; }public double OffsetRate { get; set; }}其中三个属性分别代表了节点的编号,标题和偏移量(⽤来确定节点在整个条中的位置)。
控件的实现忘了很久以前在哪看到过⼀句话,说设计WPF控件时不⼀定按照MVVM模式来设计,但⼀定要确保设计的控件可以按照MVVM模式来使⽤。
本控件也是本着这么⽬标来完成。
控件实现为TemplatedControl,个⼈认为这种⽅式更为灵活,做出来的控件可复⽤度更⾼。
反之UserControl那种组合控件的⽅式更适⽤于⼀个项⽬内复⽤的需要。
遵循⼀般的原则,我们将控件单独放于⼀个项⽬中。
在TemplatedControl项⽬中,“模板”即XAML内容⼀般都放置在⼀个名为Generic.xaml⽂件中,这个⽂件应该放置在解决⽅案Themes⽂件夹下。
【转】WPF自定义控件与样式(13)-自定义窗体Window自适应内容大小消息框Messa。。。
【转】WPF⾃定义控件与样式(13)-⾃定义窗体Window⾃适应内容⼤⼩消息框Messa。
⼀.前⾔ 申明:WPF⾃定义控件与样式是⼀个系列⽂章,前后是有些关联的,但⼤多是按照由简到繁的顺序逐步发布的等。
本⽂主要内容:⾃定义Window窗体样式;基于⾃定义窗体实现⾃定义MessageBox消息提⽰框;⼆.⾃定义Window窗体样式 ⾃定义的Window窗体效果: 因为WPF默认的窗体⽐较简陋,⼤都需要⾃⼰实现Window窗体样式效果,基本思路很简单:第⼀步:⼲掉默认样式:WindowStyle = WindowStyle.None;第⼆步:设置窗体透明:AllowsTransparency = true;第三步:设置⾃⼰的窗体样式; 这样从外观样式上可以满⾜,但做为窗体该具备的基本功能还没有,需要另外来实现了:窗体Icon、标题栏(可以通过样式实现);窗体的基本按钮:最⼩化、最⼤化、关闭按钮;窗体的⿏标拖动;好像Win8、Win10的功能吧,窗体拖动到桌⾯边缘⾃动最⼤化、还原;⿏标调整窗⼝⼤⼩;双击标题栏最⼤化、还原; 上⾯的功能在本⽂中,⼀部分是⾃定义实现的,还有⼀部分是⽤了⼀个开源库(Microsoft.Windows.Shell)⽤于实现窗体⼤⼩、拖放等窗体基本功能,Microsoft.Windows.Shell⽂件下载:。
进⼊正题,⾃定义窗体WindowBase的后台C#代码:///<summary>/// WindowBase.xaml 的交互逻辑///</summary>public class WindowBase : Window{#region默认Header:窗体字体图标FIconpublic static readonly DependencyProperty FIconProperty =DependencyProperty.Register("FIcon", typeof(string), typeof(WindowBase), new PropertyMetadata("\ue62e"));///<summary>///按钮字体图标编码///</summary>public string FIcon{get { return (string)GetValue(FIconProperty); }set { SetValue(FIconProperty, value); }}#endregion#region默认Header:窗体字体图标⼤⼩public static readonly DependencyProperty FIconSizeProperty =DependencyProperty.Register("FIconSize", typeof(double), typeof(WindowBase), new PropertyMetadata(20D));///<summary>///按钮字体图标⼤⼩///</summary>public double FIconSize{get { return (double)GetValue(FIconSizeProperty); }set { SetValue(FIconSizeProperty, value); }}#endregion#region CaptionHeight 标题栏⾼度public static readonly DependencyProperty CaptionHeightProperty =DependencyProperty.Register("CaptionHeight", typeof(double), typeof(WindowBase), new PropertyMetadata(26D));///<summary>///标题⾼度///</summary>public double CaptionHeight{get { return (double)GetValue(CaptionHeightProperty); }set{SetValue(CaptionHeightProperty, value);//this._WC.CaptionHeight = value;}}#endregion#region CaptionBackground 标题栏背景⾊public static readonly DependencyProperty CaptionBackgroundProperty = DependencyProperty.Register("CaptionBackground", typeof(Brush), typeof(WindowBase), new PropertyMetadata(null));public Brush CaptionBackground{get { return (Brush)GetValue(CaptionBackgroundProperty); }set { SetValue(CaptionBackgroundProperty, value); }}#endregion#region CaptionForeground 标题栏前景景⾊public static readonly DependencyProperty CaptionForegroundProperty = DependencyProperty.Register("CaptionForeground", typeof(Brush), typeof(WindowBase), new PropertyMetadata(null));public Brush CaptionForeground{get { return (Brush)GetValue(CaptionForegroundProperty); }set { SetValue(CaptionForegroundProperty, value); }}#endregion#region Header 标题栏内容模板,以提⾼默认模板,可⾃定义public static readonly DependencyProperty HeaderProperty = DependencyProperty.Register("Header", typeof(ControlTemplate), typeof(WindowBase), new PropertyMetadata(null));public ControlTemplate Header{get { return (ControlTemplate)GetValue(HeaderProperty); }set { SetValue(HeaderProperty, value); }}#endregion#region MaxboxEnable 是否显⽰最⼤化按钮public static readonly DependencyProperty MaxboxEnableProperty = DependencyProperty.Register("MaxboxEnable", typeof(bool), typeof(WindowBase), new PropertyMetadata(true));public bool MaxboxEnable{get { return (bool)GetValue(MaxboxEnableProperty); }set { SetValue(MaxboxEnableProperty, value); }}#endregion#region MinboxEnable 是否显⽰最⼩化按钮public static readonly DependencyProperty MinboxEnableProperty = DependencyProperty.Register("MinboxEnable", typeof(bool), typeof(WindowBase), new PropertyMetadata(true));public bool MinboxEnable{get { return (bool)GetValue(MinboxEnableProperty); }set { SetValue(MinboxEnableProperty, value); }}#endregionpublic WindowBase(){this.WindowStyle = WindowStyle.None;this.AllowsTransparency = true;this.WindowStartupLocation = WindowStartupLocation.CenterScreen;this.Style = this.FindResource("DefaultWindowStyle") as Style;this.Icon = Images.CreateImageSourceFromImage(Properties.Resources.logo);//12=6+6//Margin=6,Border.Effect.BlueRadius=6this.MaxHeight = SystemParameters.WorkArea.Height + 12 + 2;//bind commandthis.BindCommand(SystemCommands.CloseWindowCommand, this.CloseCommand_Execute);this.BindCommand(ApplicationCommands.Close, this.CloseCommand_Execute);this.BindCommand(SystemCommands.MaximizeWindowCommand, this.MaxCommand_Execute);this.BindCommand(SystemCommands.MinimizeWindowCommand, this.MinCommand_Execute);}private void CloseCommand_Execute(object sender, ExecutedRoutedEventArgs e){SystemCommands.CloseWindow(this);}private void MaxCommand_Execute(object sender, ExecutedRoutedEventArgs e){this.WindowState = this.WindowState == WindowState.Maximized ? WindowState.Normal : WindowState.Maximized;e.Handled = true;}private void MinCommand_Execute(object sender, ExecutedRoutedEventArgs e){this.WindowState = WindowState.Minimized;e.Handled = true;}protected override void OnMouseLeftButtonDown(MouseButtonEventArgs e){base.OnMouseLeftButtonDown(e);if (e.ButtonState == MouseButtonState.Pressed){this.DragMove();}}}绑定命令的扩展⽅法:///<summary>///绑定命令和命令事件到宿主UI///</summary>public static void BindCommand(this UIElement @ui, ICommand com, Action<object, ExecutedRoutedEventArgs> call){var bind = new CommandBinding(com);bind.Executed += new ExecutedRoutedEventHandler(call);@mandBindings.Add(bind);}WindowBase的样式有两个,⼀个是基础样式BaseWindowStyle,可以⾃定义头部标题栏,提供更多定制需求。
- 1、下载文档前请自行甄别文档内容的完整性,平台不提供额外的编辑、内容补充、找答案等附加服务。
- 2、"仅部分预览"的文档,不可在线预览部分如存在完整性等问题,可反馈申请退款(可完整预览的文档不适用该条件!)。
- 3、如文档侵犯您的权益,请联系客服反馈,我们会尽快为您处理(人工客服工作时间:9:00-18:30)。
WPF控件开发之自定义控件Windows Presentation Foundation (WPF) 控件模型的扩展性极大减少了创建新控件的需要。
但在某些情况下,仍可能需要创建自定义控件。
本主题讨论可最大限度减少在 Windows Presentation Foundation (WPF) 中创建自定义控件以及其他控件创作模型的需要的功能。
本主题还演示如何创建新控件。
AD:Windows Presentation Foundation (WPF) 控件模型的扩展性极大减少了创建新控件的需要。
但在某些情况下,仍可能需要创建自定义控件。
本主题讨论可最大限度减少在 Windows Presentation Foundation (WPF) 中创建自定义控件以及其他控件创作模型的需要的功能。
本主题还演示如何创建新控件。
编写新控件的替代方法以前,如果要通过现有控件获取自定义体验,您只能更改控件的标准属性,例如背景色、边框宽度和字号。
如果希望在这些预定义参数的基础之上扩展控件的外观或行为,则需要创建新的控件,通常的方法是继承现有控件并重写负责绘制该控件的方法。
虽然这仍是一种可选方法,但也可以利用 WPF 丰富内容模型、样式、模板和触发器来自定义现有的控件。
下面的列表提供了一些示例,演示如何在不创建新控件的情况下使用这些功能来实现统一的自定义体验。
丰富内容。
很多标准 WPF 控件支持丰富内容。
例如,Button 的内容属性为 Object 类型,因此从理论上讲,任何内容都可以显示在 Button 上。
若要让按钮显示图像和文本,可以将图像和 TextBlock 添加到 StackPanel 中,然后将 StackPanel 分配给 Content 属性。
由于这些控件可以显示 WPF 可视化元素和任意数据,因此,减少了创建新控件或修改现有控件来支持复杂可视化效果的需要。
样式。
Style 是表示控件属性的值的集合。
使用样式可创建所需控件外观和行为的可重用表示形式,而无需编写新控件。
例如,假设希望所有 TextBlock 控件都呈现字号为 14 的红色 Airal 字体。
您可以创建一个样式作为资源,然后相应地设置适当的属性。
这样,添加到应用程序中的每个 TextBlock 都将具有相同的外观。
数据模板。
DataTemplate 可用于自定义数据在控件上的显示方式。
例如,DataTemplate 可用于指定数据在 ListBox 中的显示方式。
有关这种情况的示例,请参见数据模板概述。
除了自定义数据外观之外,DataTemplate 还可以包含 UI 元素,这样大大增加了自定义 UI 的灵活性。
例如,使用 DataTemplate 可以创建一个 ComboBox,其中每一项都包含一个复选框。
控件模板 WPF 中的很多控件都使用 ControlTemplate 来定义控件的结构和外观,这样可将控件外观和控件功能分离开。
通过重新定义控件的 ControlTemplate,可以彻底更改控件的外观。
例如,假设您希望控件看起来像一个交通信号灯。
此控件具有简单的用户界面和功能。
该控件有三个圆形,一次只能点亮其中的一个。
经过考虑之后,您可能意识到RadioButton 提供了一次只选中一项的功能,但是 RadioButton 的默认外观完全不像交通信号灯上的灯。
由于 RadioButton 使用控件模板来定义其外观,因此很容易重新定义ControlTemplate 以符合该控件的要求,从而使用单选按钮来制作交通信号灯。
说明:尽管 RadioButton 可以使用 DataTemplate,但在本例中,只使用 DataTemplate 还不够。
DataTemplate 定义控件内容的外观。
对于 RadioButton,指示 RadioButton 是否选中的那个圆形右侧显示出来的全部都是该控件的内容。
在交通信号灯的示例中,单选按钮只需要成为可“点亮”的圆形。
由于交通信号灯的外观要求与 RadioButton 的默认外观存在很大差异,因此,有必要重新定义 ControlTemplate。
一般而言,DataTemplate 用于定义控件的内容(或数据),ControlTemplate 用于定义控件的构成方式。
触发器。
Trigger 用于在不创建新控件的情况下动态更改控件的外观和行为。
例如,假设应用程序中有多个 ListBox 控件,而您希望每个 ListBox 中的项在选中时都显示为红色粗体。
您首先想到的可能是创建一个从 ListBox 继承的类,然后重写OnSelectionChanged 方法,以更改选中项的外观,不过,更好的方法是向 ListBoxItem 的样式添加一个更改选中项外观的触发器。
触发器用于更改属性值或根据属性值执行操作。
EventTrigger 用于在发生事件时执行操作。
一般而言,如果控件完全复制现有控件的功能,但您希望该控件具有不同的外观,则应先考虑是否可以使用本节中讨论的某些方法来更改现有控件的外观。
控件创作模型通过丰富内容模型、样式、模板和触发器,最大程度地减少了创建新控件的需要。
但是,如果确实需要创建新控件,那么理解 WPF 中的不同控件创作模型就显得非常重要。
WPF 提供三个用于创建控件的一般模型,每个模型都提供不同的功能集和灵活度。
这三个模型的基类分别为 UserControl、Control 和 FrameworkElement。
从 UserControl 派生在 WPF 中创建控件的最简单方法是从 UserControl 派生。
如果生成继承自 UserControl 的控件,需要将现有组件添加到 UserControl,命名这些组件,然后在可扩展应用程序标记语言 (XAML) 中引用事件处理程序。
执行这些操作之后,即可在代码中引用这些命名元素和定义事件处理程序。
此开发模型非常类似于用于 WPF 应用程序开发的模型。
如果生成正确,UserControl 可以利用丰富内容、样式和触发器的优点。
但是,如果控件继承自 UserControl,则使用该控件的用户将无法使用 DataTemplate 或ControlTemplate 来自定义其外观。
因此,有必要从 Control 类或其派生类(UserControl 除外)进行派生,以便创建支持模板的自定义控件。
从 UserControl 派生的优点如果符合以下所有情况,请考虑从 UserControl 派生:希望以类似于生成应用程序的方式生成控件。
控件仅由现有组件组成。
不需要支持复杂自定义项。
从 Control 派生从 Control 类派生是大多数现有 WPF 控件使用的模型。
在创建继承自 Control 类的控件时,可使用模板定义其外观。
通过这种方式,可以将运算逻辑从可视化表示形式中分离出来。
通过命令和绑定(而不是事件),也可确保分离 UI 和逻辑,尽可能避免引用ControlTemplate 中的元素。
如果控件的 UI 和逻辑正确分离,该控件的用户即可重新定义其 ControlTemplate,从而自定义其外观。
尽管生成自定义 Control 不像生成 UserControl 那样简单,自定义 Control 还是提供了最大的灵活性。
从 Control 派生的优点如果符合以下任一情况,请考虑从 Control 派生,而不要使用 UserControl 类:希望控件外观能通过 ControlTemplate 进行自定义。
希望控件支持不同的主题。
从 FrameworkElement 派生从 UserControl 或 Control 派生的控件依赖于组合现有元素。
很多情况下,这是一种可接受的解决方案,因为从 FrameworkElement 继承的任何对象都可以位于 ControlTemplate 中。
但是,某些时候,简单的元素组合不能满足控件的外观需要。
对于这些情况,使组件基于 FrameworkElement 才是正确的选择。
生成基于 FrameworkElement 的组件有两种标准方法:直接呈现和自定义元素组合。
直接呈现涉及的操作包括:重写 FrameworkElement 的 OnRender 方法,并提供显式定义组件视觉效果的 DrawingContext 操作。
此方法由 Image 和 Border 使用。
自定义元素组合涉及的操作包括使用 Visual 类型的对象组合组件的外观。
有关示例,请参见使用DrawingVisual 对象。
Track 是 WPF 中使用自定义元素组合的控件示例。
在同一控件中,也可以混合使用直接呈现和自定义元素组合。
从 FrameworkElement 派生的优点如果符合以下任一情况,请考虑从 FrameworkElement 派生:希望对控件的外观进行精确控制,而不仅仅是简单的元素组合提供的效果。
想要通过定义自己的呈现逻辑来定义控件的外观。
想要以一种 UserControl 和 Control 之外的新颖方式组合现有元素。
控件创作基础知识如前所述,WPF 最强大的功能之一是,无需创建自定义控件即可实现远比设置控件的基本属性来更改其外观和行为更强的功能。
WPF 属性系统和 WPF 事件系统使样式、数据绑定和触发器功能成为可能。
如果在控件中实现依赖项属性和路由事件,则无论使用什么模型创建自定义控件,自定义控件的用户都可以像对 WPF 随附的控件那样使用这些功能。
使用依赖项属性当属性为依赖项属性时,可以进行下面的操作:在样式中设置该属性。
将该属性绑定到数据源。
使用动态资源作为该属性的值。
动画处理该属性。
如果希望控件的属性支持以上任一功能,则应将该属性实现为依赖项属性。
下面的示例定义一个依赖项属性。
这段代码执行下面的操作:将一个名为 ValueProperty 的 DependencyProperty 标识符定义为publicstaticreadonly 字段。
通过调用 DependencyProperty..::.Register 向属性系统注册该属性名,以指定以下内容:属性的名称。
属性的类型。
拥有该属性的类型。
属性的元数据。
元数据包含该属性的默认值、CoerceValueCallback 和PropertyChangedCallback。
通过实现该属性的 get 和 set 访问器,定义一个名为 Value 的 CLR“包装”属性,这个名称也就是用来注册该依赖项属性的名称。
请注意,get 和 set 访问器只是分别调用GetValue 和 SetValue。
建议依赖项属性的访问器不要包含其他逻辑,这是因为客户端和WPF 可绕过这两个访问器直接调用 GetValue 和 SetValue。
