Kernel Configuration_hpux
HP-UX 11.0内核参数篇
P-UX 11.0内核参数篇1.1 内核配置的概念抽象地讲,内核配置是管理员所有选项和设置的集合,这些选项和设置用于确定HP-UX 内核行为和功能。
1.1.1 内核配置包括:1. 一组内核可调参数值分配2. 一组内核模块,每个均具有所需的状态1.1.2 内核配置的名称和选项说明:从物理上讲,内核配置是一个位于/stand下的目录,其中包括实现特定行为所需的文件。
此目录包括:1. HP-UX 内核可执行程序2. 一组HP-UX 内核模块文件3. 内核注册表数据库,包含以上所有设置4. 系统文件,以用户可读的形式说明上述设置5. 特定于实现的各种其他文件6. 除运行中的内核的配置之外,还可保存任意数目的HP-UX 系统内核配置,这只受/stand 目录中磁盘空间的限制。
1.2 HP的核心参数存放在哪些文件中这两个文件中的信息比较的全:/usr/conf/master.d/core-hpux ./var/sam/boot.config ./stand/vmunix是内核文件,参数当然包含在里面,但是它并不是一个文本文件,只能间接看到系统内核参数(如sysdef/sam)。
/stand/system是修改内核参数的一个文本文件,按要求编辑好这个文件以后,再运行kmtune 重新按system的值编译内核,以达到修改内核参数的目的。
这是通过命令行方式修改内核参数的一个方法,如果用sam修改,则方便许多。
不信你可以修改/stand/system的pty值试试,不kmtune就打开sam看pty的值,根本就没改变。
1.3 HP-UX的内核参数的修改/usr/conf/master.d/core-hpux设定HP-UX的核心环境,对核心环境进行管理。
但修改后不能立即对核心参数进行管理。
因为系统会向boot.config读出参数,所以只有移走boot.config,然后再用getkinfo重建boot.config文件。
开机自启动-AIX-Linux_HP-UX原理及配置

AIX/etc/inittab init守护进程运行,init会打开/etc/inittab,并且执行里面的内容。
(文件部分内容)/etc/rc.d 是inittab里的一组脚本指向开机自动运行方法:1)直接修改inittab文件,使系统在开机重启时运行我们的命令。
2)通过rc.local启动rc.local是inittab里的一个脚本指向,果inittab文件里没有关于rc.local的信息,可以通过此命令创建脚本mkitab -i rcnfs "rc.local:2:once:/etc/rc.local > /dev/console 2>&1"touch /etc/rc.local #新建rc.local文件chmod 700 /etc/rc.local #设置执行权限执行脚本放到/etc/rc.local里之后,AIX系统在重新启动时,就会运行/etc/rc.local里的脚本了。
3)通过/etc/rc.d脚本启动(需要编写start\stop脚本)Linux/etc/inittab 这个文件设定了init进程怎样把系统引导成某种运行级别(不含服务启动脚本内容)(文件部分内容)Xinetd extended internet daemon 新一代网络守护进程服务,又叫超级internet服务器增强了一些网络访问控制功能。
/etc/init.d –> /etc/rc.d/init.d (软连接) 目录下为系统各服务启动脚本包括xinetd/etc/rc.d/rcn.d (n就是运行级0-6) /etc/rc.d/init.d下脚本用ln 命令连接到/etc/rc.d/rcn.d 目录redhat的启动方式和执行次序:1)加载内核2)执行init程序3)/etc/rc.d/rc.sysinit # 由init执行的第一个脚本4)/etc/rc.d/rc $RUNLEVEL # $RUNLEVEL为缺省的运行模式5)/etc/rc.d/rc.local #相应级别服务启动之后、在执行该文件6)/sbin/mingetty # 等待用户登录开机自动运行方法:1)在上面第4步中创建服务,在/etc/rc.d/init.d目录创建服务启动脚本。
hpux双机oracle配置步骤3-共享空间划分与oracle10g安装

安装过程前的准备工作硬件安装架构图组建好;操作系统安装统一的;多通道冗余配置;阵列的划分等等;oracle安装过程检查物理内存#/usr/sbin/dmesg | grep "Physical:" 最好大于1G处理器(CPU): 64-bit 处理器#getconf KERNEL_BITS查看交换空间#/usr/sbin/swapinfo –a对于小于2g物理内存的系统,设置为物理内存的2倍。
对应大于2g内存的系统,设置为跟物理内存同样大小。
检查临时空间bdf /tmp保证至少400m,推荐1g如果没有400M可以设置oracle用户的环境变量,增加临时空间$ oracle用户执行 vi ~/.profile,增加export TEMP=/directoryexport TMPDIR=/directory检查磁盘空间bdf文档上说至少4g空间,但是实际安装完成后发现crs和database大概占用了的空间,所以推荐至少6G的空间,如果空间允许给出更多更好,便于存储trace文件,跟踪问题。
个人意见:此外建议再额外划分6g的空间备用,主要用于存储安装软件、升级数据库前的备份crs和database,以防止升级过程出现意外。
查看是否开启RAW设备的异步I/O默认是开启的.ll /dev/async# crw-rw-rw- 1 bin bin 101 0x000000 Jun 9 09:38 /dev/async#如果没有开启,可以通过如下方法开启:1.创建 /dev/async 特征设备# /sbin/mknod /dev/async c 101 0x0# chown oracle:dba /dev/async# chmod 660 /dev/async2.使用SAM在内核中配置异步驱动=> Kernel Configuration=> Drivers=>找到名为'asyncdsk' 的驱动(先remove掉asyncdsk后新建kel)生成一个新内核重启(选择新内核自动重启)#重新启动reboot#或者 shutdown -r -y 0检查符合的连接是否存在cd /usr/libls libX*.sl# 如果不存在需要创建cd /usr/libln -sln -sln -sln -sln -sln -sln -sln -sln -sls -al libX*.sl查看hp-ux的具体patch和pack/usr/sbin/swlist -l bundle | grep xxxName/usr/sbin/swlist -l patch/usr/sbin/swlist -l patch <patch_number>注:Hp-ux 的默认安装过程,能够满足oracle 的安装需求。
HP ux-常用命令

HP ux三、网络故障1. 如需修改网络地址、主机名等,一定要用set_parms 命令# set_parms hostname# set_parms ip_address2. 查看网卡状态:lanscanHardware Station Crd Hardware Net-InterfacePath Address In# state nameunit state8/20/5/1 0x0800097843FB 0 up lan0 up3. 确认网络地址:# ifconfig lan04. 启动网卡:# ifconfig lan0 up5. 网络不通的诊断过程:lanscan 查看网卡是否启动(up)ping 自己网卡地址(ip 地址)ping其它机器地址,如不通,在其机器上用lanscan 命令得知station address,然后linkloop station_address来确认网线及集成器是否有问题。
在同一网中,subnetmask 应一致。
6. 配置网关手动加网关:/usr/sbin/route add default 20.08.28.98 1把网关自动加入系统中vi /etc/rc.config.d / netconf:ROUTE_DESTINATION [0]=defaultROUTE_GATEWAY [0]=20.08.28.98ROUTE_COUNT [0]=1:/sbin/init.d/net 将执行:/usr/sbin/route add default 20.08.28.98 1命令netstat -rn 查看路由表另外也可用set_parms addl_netwrk 来设缺省路由。
一、关于HP-UX的硬盘资源的逻辑卷管理HP-UX管理硬盘存储资源是采用逻辑卷方式来进行管理的,要说清整个机制,先要介绍几个概念:物理卷Physical Volume,称为PV:指物理上硬盘,一个硬盘就是一个PV逻辑卷组Logical Volume Group,称为VG:一个VG包含整数个PV,可理解为一个大硬盘。
HP-UX上ORACLE8.1.6 Cluster安装手册

HP-UX上Oracle 8.1.6 Cluster安装1.HP-UX 11.0系统安装(两台主机均需进行)假定:两台主机名分别为scdbsrv1和scdbsrv2术语:物理盘physical driver逻辑盘logical driver物理卷physical volume卷组volume group逻辑卷logical volume文件系统file system1.1.HP-UX操作系统初始安装1.1.1.将HP-UX安装光盘(标记为:HP-UX 11.0 install/update/recovery)插入DVD驱动器,重新启动服务器,当其显示“T o discontinue, press any key within 10 seconds”时,按任意键中断缺省的启动,出现命令提示符。
在命令提示下键入:co1.1.2.接着键入fastboot命令使快速启动开启。
1.1.3.键入sea命令查找设备,记下光驱对应的设备路径(如P2)。
1.1.4.键入bo p2命令使机器从光盘引导,这里p2是用sea命令查看到的DVD驱动器对应的设备。
1.1.5.出现Interact with IPL时,键入n。
从光盘启动后,当出现安装画面时,选择InstallHP-UX,回车进入安装过程。
1.1.6.在随后的屏幕中选择Media only installation和Advanced Installation两项。
1.1.7.当出现系统配置时,主要设置System页和File System页的内容。
设置System中的Hostname、IP、Time以及Time Zone。
其中Time Zone时,在Locations中选择Asia,然后在Time Zone中选择China(EAT-8)。
注意:此时只配置一块网卡(lan0)即可,最好不要对其他的网卡进行配置。
设置File System页时,各文件系统按如下大小规划:(其中size项都选Fixed MB)/ 140M/stand 150M/tmp 200M/home 200M/opt 1024M/usr 1024M/var 1500M/oracle 5000M(其中Vsage项选取VxFS格式。
HPUX修改内核参数
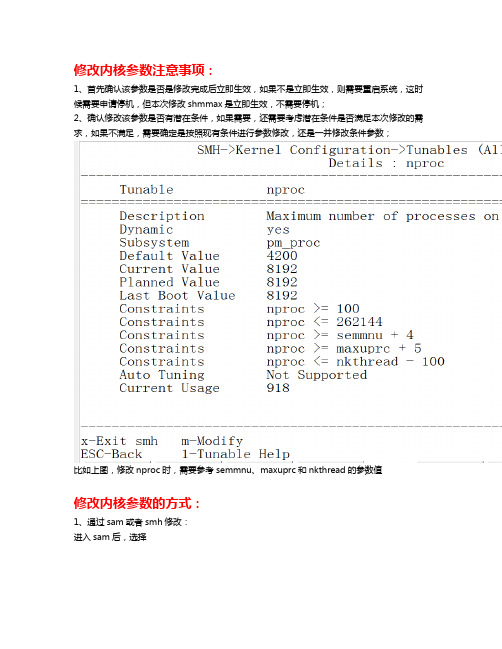
修改内核参数注意事项:
1、首先确认该参数是否是修改完成后立即生效,如果不是立即生效,则需要重启系统,这时候需要申请停机,但本次修改shmmax是立即生效,不需要停机;
2、确认修改该参数是否有潜在条件,如果需要,还需要考虑潜在条件是否满足本次修改的需求,如果不满足,需要确定是按照现有条件进行参数修改,还是一并修改条件参数;
比如上图,修改nproc时,需要参考semmnu、maxuprc和nkthread的参数值
修改内核参数的方式:
1、通过sam或者smh修改:
进入sam后,选择
进入后选择
然后
然后“m“然后进行修改。
2,命令修改:
kctune:
kctune -s semmni=4096。
HPUX启动过程

HPUX系统启动过程:
1.PDC(Processor Dependent Code):处理器相关代码
2.ISL(Initial System Loader):初始化系统
3.Loading the Kernel
4.Starting Subsystem
5.Console Login
IPL将启动盘上的ISL装载到内存中并执行。
Kernel Initialization:
用hpux装载系统读取/stand/ioconfig和/stand/rootconf,初始化所有内存。
如果系统I/O有问题,比如SCSI链路没有终结或是SCSI ID冲突,在Load Kernel时往往造成system panic,若出现这样的现象,将系统中不需要的设备暂时隔离开。
启动子系统:
1.etc/init:根据/etc/inittab中的内容初始化相关进程
2./sbin/bcheckrc:激活卷组信息,进行文件系统检查fsck
3./etc/rc.config:检查并运行/etc/rc.config.d/下的所有配置文件
4./sbin/rc:根据系统运行级别一次执行相应的启动脚本
Init:Command Is Respawning Too Rapidly:
出现这个错误的原因通常是因为/etc/rc.config.d/下的某一个配置文件(或/etc/inittab)中有一些无效的字符,造成脚本运行不正常。
HPUX操作系统安装说明详解
HP-UX操作系统安装说明1 设置显示输出新出厂的hp rx2660机器输出默认定义到串行口,需要修改为正确的显卡,设置完保存以后不用再次设置。
1.1连接计算机所有电缆,加电,显示引导管理界面,选择‘Boot Configuration’选项。
1.2选择‘Console Configuration’选项。
1.2选择正确的显示卡输出,在其前设置“P”,其它的输出设备设置为“NC”。
一般情况主板上集成的显卡设备是“VGA Acpi(HWP0002,PNP0A03,0)/PCI(3|0)”,外加的显卡设备是“VGA Acpi(HWP0002,PNP0A03,300)/PCI(1|0)”。
设置完成后保存设置。
2 做SAS卡磁盘镜像(此步可选)如果不做镜像此步可以略高。
如果HP rx2660小机配置多块硬盘,并且没有配置raid卡,两块硬盘做镜像可以通过主板上的SAS卡进行配置。
2.1从引导菜单中选择EFI Shell (Built In)2.2回车进入shell界面,键入drvcfg –s命令。
2.3选择做镜像的SAS卡2.4选择“RAID Properties”2.4选择“RAID Properties”2.5默认“RAID DISK”为“NO”,用空格键将其改为“Yes”,键入“c”创建镜像盘,保存配置。
3做RAID卡磁盘镜像(此步可选)如果机器配置了RAID卡,用RAID卡做磁盘RAID 1或RAID 5。
3.1 在机器启动期间看屏幕提示按“F8”键,进入设置界面,根据屏幕提示操作。
3 操作系统安装3.1 准备HP-UX操作系统光盘(两张DVD),版本2007年12月份以后(HP-UX 11i V2B.11.23)。
3.2 连接计算机所有电缆,加电,把可引导的第一张DVD光盘放入光驱3.3 系统开始引导,(如果系统没有自动引导)它会转到引导菜单。
这是一个限时菜单,按任意键可以使计时器停止运行。
3.4 可以按下列步骤从EFI shell 手动进行安装。
Hp-ux安全配置规范

HP-UX 安全配置规范
2011年3月
第1章概述
1.1适用范围
适用于中国电信使用HP-UX操作系统的设备。
本规范明确了安全配置的基本要求,适用于所有的安全等级,可作为编制设备入网测试、安全验收、安全检查规范等文档的参考。
由于版本不同,配置操作有所不同,本规范以HP-UX11v2\11v3为例,给出参考配置操作。
第2章安全配置要求
2.1账号
编号:1
2.2口令编号:1
编号: 2
编号: 3
编号:4
2.3文件与目录权限编号: 1
编号:2
编号:3
2.4远程维护编号:1
编号:2
2.5补丁安全编号: 1
2.6日志安全编号: 1
编号:2
编号:3(可选)
2.7不必要的服务、端口编号: 1
2.8修改Banner信息
2.9登录超时时间设置
2.10调整内核设置(可选)
2.11删除潜在危险文件
2.12 FTP设置
附表:端口及服务。
HPUX操作系统介绍

HPUX操作系统介绍HPUX是惠普公司(Hewlett-Packard)为自家生产的计算机所开发的一种类Unix操作系统。
它是基于UNIX System V发展而来的,因此在其核心设计和功能上与其他UNIX操作系统有许多相似之处。
HPUX最初于1984年发布,并已成为惠普的主要操作系统之一HPUX的设计目标是提供一个可靠、安全、高性能的操作系统,适用于从小型服务器到大型机集群的各种计算机系统。
它具有许多先进的功能,包括分布式计算、高可用性、存储管理和云计算支持。
HPUX还支持多种硬件架构,包括IA-64和x86-64HPUX的核心设计是为了实现高可靠性和可扩展性,以确保系统能够持续运行和适应不断增长的业务需求。
它采用了诸如进程管理、内存管理、文件系统和网络堆栈等传统UNIX功能,同时增加了一些独有的功能,如集群管理和透明分布式计算。
HPUX提供了丰富的开发工具和应用程序支持,使开发人员能够轻松创建和管理各种应用程序。
它包括编译器、调试器、性能分析工具和源代码管理系统,使开发者能够更加高效地开发和调试应用程序。
此外,HPUX还支持多种编程语言,包括C、C++、Java和Python。
HPUX的安全性也是其设计的一个重要方面。
它提供了许多安全功能,包括用户身份验证、访问控制、加密通信和审计日志记录。
这些功能帮助管理员保护系统免受未经授权的访问和恶意软件的威胁。
HPUX还具有强大的系统管理和监控功能,帮助管理员轻松管理和监控整个系统。
它提供了一组命令行工具和图形用户界面,使管理员能够从中央位置管理系统配置、用户帐户、安全设置和存储资源。
管理员还可以通过集成的性能监视器和日志分析工具跟踪系统性能和故障。
HPUX还支持集群技术,使多台服务器能够合作工作以实现高可用性和可伸缩性。
它提供了一套用于配置、管理和监控集群的工具和技术。
HPUX的集群技术能够实现自动故障转移、负载平衡和资源共享,从而提供更高的可用性和响应能力。
【系统】hp小型机hpux操作系统安装配置手册v10

目录第1章RP8420/RP4440硬件结构1.1RP8420服务器简介及结构HP 9000 rp8420-32服务器基于标准化、模块化的技术、强大的PA-8900双处理器和惠普虚拟服务器环境,能够降低平台成本、提升性能,提供更大的可扩展性和灵活性,以及更高的投资回报,帮助您成功迈向动成长企业。
HP 9000 rp8420-32服务器的特性:●强大的PA-8900处理器和HP Super-Scalable Chipset(超级可扩展芯片组)sx1000●UNIX®卓越的高可用性、安全性和品质●基于单元板的架构,提供业界领先的高可用性特性和解决方案●机箱内升级至英特尔安腾处理器通过HP-UX 11i虚拟服务器环境—它包括虚拟分区(vPars)、硬分区(nPars)以及HP Workload Manager (WLM)功能,该服务器在应用和服务器整合方面的灵活性得到了提升,从而使您可以通过自动分配资源和充分利用系统资源来保持服务级别。
rp8420-32服务器是大型企业技术与商业计算的理想选择,可以运行各种计算与数据密集型业务应用,如企业资源规划(ERP)、供应链管理和业务智能等,同时提供一流性能,并能有效降低成本和复杂性。
rp8420-32服务器具有领先的64 位处理能力,无论何种配置都能提供出众的性价比。
具体特性如下:1.1.1Rp8420服务器配置HP 9000 rp8420可单独作为数据库服务器,或两台rp8420分别安装HP高可用集群软件MC/ServiceGuard 集群软件,互为备份,通过全光纤通道连接共享磁盘阵列,实现双机高可用群集。
•每台rp8420配置: 8颗双核PA-RISC 1.1GHz CPU、32GB内存,两个分区(或6颗双核PA-RISC1.1GHz CPU、24GB内存)。
•每台rp8420安装MirrorDisk/UX,实现内置磁盘镜像、支持磁盘热插拔,保证系统数据的可用性。
HPUX操作系统介绍

创建VG
# vgcreate vgnew /dev/dsk/c0t5d0 /dev/dsk/c0t6d0
给现有VG扩容的操作
初始化硬盘
# pvcreate [-f] /dev/rdsk/c0t5d0
将硬盘加入到VG中
# vgextend vgXX /dev/dsk/ c0t5d0
该命令可以用来缩小VG的空间,前提是PV上面的空间没有被分配,可以用命令pvdisplay查看。
创建VG
vgcreate vg_name /dev/dsk/cXtXdX /dev/dsk/c…..
查看VG
vgdisplay–v vg_name
删除VG
VG删除的方法有两种,vgremove和vgexport
Class IH/W Path Driver S/W State H/W Type Description
=======================================================
disk 1 0/0/2/sdisk CLAIMED DEVICE SEAGATE ST39204LC
如果机器的网卡数量和实际查看到的结果不一致,要查看系统的网卡的驱动是否正确安装。
一.2.5.2
配置IP地址的方法
用ifconfig命令可以对某个网卡进行IP地址的设置,典型的用法是:
ifconfig lan0 ip_address [newmask mask] up
可以用命令netstat–in查看网卡上的IP地址的配置情况
-eReinstall the special files for pseudo-drivers andexisting devices. This is useful for restoringspecial files if one or more have been removed.
HP-UX命令和配置文件

命令描述accept, reject 允许/阻止LP打印机队列请求arp 地址解析和控制arp 地址解析协议at 立即执行命令或在一段时间以后执行banner 用大的字母做标题bdf 报告空闲磁盘块的数量(berkeley版本)cal 打印日历cat 连接拷贝和打印文件catman 为手册页创建cat文件cd 改变工作目录chfn 改变由finger命令使用的用户信息,该命令更新/etc/passwd文件Chmod 改变文件模式访问的权限chown,chgrp 改变文件属主和组chsh 改变一个用户的却声登陆shell.该命令更新/etc/passwd文件clear 清理终端屏幕cmp 比较两个文件comm 选择或拒绝两个已排序文件中的共同行compress, uncompress 压缩和扩展数据.这是用于文件压缩和解压的标准命令cp 拷贝文件和目录cpio 拷入和拷出文件档案;复制目录树.这个命令在很多UNIX系统中被用于备份和恢复cron 定时执行作业的守护进程crontab 用户作业调度器csh 类似C语言的用户SHELLcut 剪取(提取)一个文件或stdin中被选择的域.date 显示或设置日期和时间dd 转换\重新分块\翻译和拷贝一个文件(磁带).这个命令转储原数据到一个设备(不是文件)df 报告文件系统可用磁盘块的数量diff 不同的文件和目录比较器diskinfo 描述一个磁盘设备的特征dmesg 从错误日志中收集系统统计信息或送到错误日志domainname 设置或显示网络信息服务(NIS)域的名字du 磁盘使用的汇总dump, rdump 本地或跨网络的增量文件系统备份echo 回显(打印)参数enable, disable 启用/禁用LP打印机ex, edit 扩展的面向行的文本编辑器exportfs 向NFS客户导出和回收目录expr 评估作为一个表达式的参数extendfs 拓展一个系统的大小fbackup 有选择的备份文件file 决定文件类型find 查找文件finger 用户信息查询程序frecover 有选择地恢复文件freedisk 通过查询在一个特定时期内没有使用的文件集来恢复磁盘空间fsadm 一个文件系统管理命令fsck 文件系统一致性检查和交互式修复fstype 决定文件系统类型ftp 文件传输程序.用于网络传输文件ftpd 文件传输协议服务器fuser 列出使用一个文件和文件结构的进程getty 设置终端类型模式速率和规律线grep, egrep, fgrep 在文件中搜索一个模式groupadd 添加一个新的组到系统groupdel 从系统删除一个组groupmod 在系统中修改一个组groups 显示组成员关系head 打印输入的前几行hostname 设置和显示当前的主机名hpux HP-UX引导程序id 打印用户和组ID和名字ifconfig 配置网络借口参数inetd Internet服务守护进程init 控制初始化的进程insf 安装特殊(设备)文件ioinit 测试和维护在内核I/O数据结构和/etc/ioconfig之间的一致性ioscan 扫描I/O系统iostat 报告I/O统计状态isI 初始化系统装载器kill 向一个进程发送信号,终止一个进程killall 杀死所有的进程ksh rksh shell,标准/受限制的命令编程语音lanadmin 本地网络管理程序lanscan 显示局域网设备的配置和状态last, lastb 显示用户和tty的上一次登录lifcp 拷贝到(或从)LIF文件lifls 列出一个LIF目标的内容lifrm 删除一个LIF文件linkloop 确认LAN在链路曾的回显连通性ln 连接文件或目录login 登录;开始一个终端会话logname 取得登录名lp, lpalt cancel 打印变更或撤消一个LP打印机或绘图仪上的请求vlpadmin 配置LP缓冲系统lpsched,lpshut,lpmove,lpfence 启动或停止LP请求的调度器移动请求并定义打印优先级的最小值lpstat 报告打印机的状态信息ls, lc, l, ll, lsf, lsr, lsx 列出目录的内容lsacl 列出文件的访问控制列表(ACL)lsdev 列出系统中的设备驱动程序lssf 列出一个特殊文件lvchange 改变LVM逻辑卷特性lvcreate 在LVM卷组中创建一个逻辑卷lvdisplay 显示有关LVM逻辑卷的信息lvextend 增加LVM逻辑卷的空间和镜象lvlnboot 增加一个LVM逻辑卷作为根引导主交换和转储lvmerge 合并两个LVM逻辑卷为一个逻辑卷lvreduce 减少逻辑卷的分配空间和镜象拷贝的数量lvremove 在LVM卷组中删除一个或多个逻辑卷lvrmboot 删除连接到根主交换或转储设备的逻辑卷mail. rmail 发送邮件给客户或读邮件man 通过关键字查找手册页信息;打印一个手册页mediainit 初始化磁盘和磁带介质;分区化DDS磁带mesg 允许或禁止到一个终端的信息mkboot rmboot 从一个磁盘安装更新或删除引导程序mkdir 生成一个目录mkfifo 生成FIFO(命名管道)特殊文件mkfs 创建一个文件系统mknod 创建特殊文件mksf 生成一个特殊(设备)文件model 打印详细的硬件模块信息more page CRT显示的文件阅读过滤器mount umount 挂起和卸载文件系统mountall umountall 挂起和卸载多个文件系统mountd NFS挂起请求服务器mt 磁带操作程序mv 移动或重新命名文件和目录named Internet域名服务器ndd 网络调试netstat 显示网络状态newfs 创建一个新的文件系统newgrp 装换到一个新的组nfsd biod NFS守护进程nfsstat 网络文件系统统计信息nice 在非却声的优先级运行一个命令nohup 不受挂起影响地运行命令nslookup 交换的查询名字服务器ntpdate 依靠NTP来设置日期和时间ntpq 标准的网络时间协议查询程序passwd 改变一个登录口令的相关选项pax 解压写并列出归档文件;拷贝文件和目录层次.可以用于备份和恢复pcnfsd PC-NFS审核和打印请求pdc 处理器相关代码(固件)ping 发送ICMP回显请求包到一个网络主机ps 报告进程状态pvchang 改变一个在LVM卷组中的物理卷的信息pvck 口令和组文件检查pvcreate 创建一个用在LVM卷组中的物理卷的信息pvdisplay 显示有关LVM卷组中的物理卷的信息pwck, grpck 口令和组文件检查pwd 正在工作的目录名rarpd 反向地址解吸协议守护进程rc 输入的一个新的运行级时被调用的通用定序器rcp 通过一个网络的远程拷贝文件read 从stdin读取一行.通常用在shell脚本中reboot 重新引导系统remsh rexec 从一个远程的shelll执行remshd 远程shell服务器renice 改变正在运行的程序的优先级rlogin 远程登录rlogind 远程登录服务器rlpdaemon 远程缓冲的行打印机守护进程;信息写入守护进程rm 删除文件或目录rmdir 删除目录rmnl 从一个文件中删除额外的新行字符.用于去除空白行rmsf 删除一个特殊(设备)文件route 手工地调整路由表rpcbind 通用地址到RPC程序号的映射器rpcinfo 报告RPC信息ruptime 显示一个网络上的本地机器状态rusers 判断谁登陆了本地网络的机器上rwho 显示谁登陆到了本地机器rwhod 系统状态服务器san 系统管理器samlog_viewer 一个查看和保存SAM日志文件的工具sar 系统行为报告sed 流式文本编辑器sh, rsh 标准和首限制的POSIX.2兼容的命令shellshar 制作一个shell归档包showmount 显示所有远程的挂起shutdown 终止所有进程sleep 挂起执行一段时间sort 排序和合并文件strings 在一个对象或其他二进制文件中找到可打印字符串stty 设置一个终端端口的选项su 转换用户swacl 查看和修改保护软件产品的访问控制列表swagentd swagent 服务于本地或远程SD软件管理任务swapinfo 系统分页空间信息,swapon 为分页启用设备或文件系统swconfig 配置清除配置或重新配置已安装的软件swinstall swcopy 安装和配置软件产品;为以后的安装或发布而拷贝软件产品swlist 显示有关软件产品的信息swmodify 在一个目标根或一个软件仓库中修改软件产品swpackage 把软件产品打包到一个跟或磁带中swreg 注册或取消一个跟或软件仓库的注册swremove 取消配置并删除软件产品swverify 确认软件产品sysdef 显示系统定义syslogd 记录系统信息tail 显示文件的最后部分talk 通过网络和其他用户交谈tar 磁带问归档器.用于备份和恢复tee 管道装置telnet telnet协议的用户接口telnetd telnet协议服务器test 条件评估命令tftp 通用的文件传输程序time 时间命令timex 计时一个命令;报告进程数据和系统行为top 显示和更新在系统上最高的进程的信息touch 更新文件的访问修改并/或改变文件的时间.也可以创建一个0字节的文件true, false 返回一个为零或为1的退出状态test, reset 终端相关的初始化tty, pty 获得终端的名字ttytype 终端标识程序umask 设置或显示文件创建模式的掩码uname 显示有关一个计算机系统的信息;设置一个节点名(系统名)uniq 报告在一个文件中重复的行uptime, w 显示一个系统已经启动了多长时间,并/或谁登陆了系统以及他们在做什么useradd 添加一个新登录到系统的用户userdel 从系统删除一个用户登录usermod 修改一个在系统上用户登录users 系统上的用户的紧凑列表vgcfgbackup 创建或更新LVM卷组配置备份文件vgcfgrestore 从一个备份文件中显示或恢复LVM卷组配置文件vgchange 设置LVM卷组可用性vgcreate 创建一个LVM卷组可用性vgdisplay 显示有关LVM卷组的信息vgexport 导出一个L VM卷组和它相关的逻辑卷vgextend 通过添加物理卷拓展一个LVM卷组vgimport 导入一个LVM卷组到系统vgreduce 从一个LVM卷组删除物理卷vgremove 从系统中删除LVM卷组的定义vgscan 为LVM卷组检测物理组vi, view, vedit 面向屏幕(可视的)的文本编辑器vipw 编辑口令文件vmstat 包虚拟内存的统计信息wait 等待进程完成wall 给所有用户写一个信息wc 统计一个文件中的单词行字节或字符个数whereis 为程序定位源文件二进制文件或手册页which 定位一个包括别名和路金程序whoami 打印有效的当前用户IDwhodo 列出哪个用户在做什么xntpd 网络时间协议守护进程ypcat 打印所有在网络信息服务中值的映射ypinit 构建和安装网络信息服务数据库ypmake 创建或重新构建网络信息服务数据库ypmatch 打印在网络信息服务映射中所选择的键的值yppasswd 改变网络信息系统(NIS)中的一个登陆口令yppasswdd 用户修改网络信息服务口令数据库的守护进程yppoll 想NIS服务器查询有关NIS影射的信息yppush 强制传播网络信息服务数据库ypserv, ypbind, ypxfrd 网络信息服务(NIS)服务器绑定和传输进程ypset 绑定到一个特定的网络信息服务服务器ypupdated rpc ypupdated 改变NIS信息的服务器ypwhich 列出哪个主机是网络信息服务服务器或主映射ypxfr 从服务器传诵一个NIS数据库到本地节点配置文件/etc/pxorts 描述可以导出给NFS客户的目录/etc/xtab 包含当前被导出的目录的条目/etc/fstab 包含一个可以被挂起的文件系统条目的列表/etc/ftpuser ftpd守护进程拒绝远程登录到在/etc/ftpusers中命名的本地用户/etc/group 用于提供每一个组的名字/etc/hosts 把Internet(IP)地址联系到正式的主机名或别名/etc/hosts.equiv, $home/.rhosts 声明远程主机和与本地主机或用户等值的用户/etc/inetd.conf inetd守护进程可选的配置文件/var/adm/inetd.sec inetd守护进程可选的安全文件/etc/inittab 提供init引导守护进程的脚本/etc/issue 包含作为额一个登陆提示符打印的问题或项目标识/etc/mnttab 包含一个有mount命令挂起的设备的列表/etc/networks 把internet(IP)地址联系到正式的网络名和别名/etc/nsswitch.conf 服务转换配置文件/etc/passwd 包含用户名口令和其他用户信息/etc/profile 用户shell的系统启动文件$HOME/.profile shell的用户启动文件$HOME/.exrc VI编辑器的启动配置文件/etc/ntp.conf NTP xntpd守护进程的配置文件/etc/rpc 包含用于替换RPC程序号的用户可读的名字/etc/services 把正规服务名与别名与端口号和使用的协议服务联系起来/etc/shells 一个包含系统中合法shell的列表。
HP_UX双机原理、安装与配置手册

操作系统参数检查
修改参数的方法如下: #SAM->Kernel Configuration ->Configurable Parameters 按如下的值调整参数:
max_thread_proc maxdsiz maxfiles maxusers nflocks nproc npty semmns semmni semmsl semvmx shmmax shmseg shmmni msgseg=20480 msgtql=10240 msgmnb=163840 msgmax=56383 ( 256 0x40000000 1024 128 200 1044(这个是自动计算的,不手工改) 240 2048 512 2048 65534 0x40000000 10 100
双机配置的规划(4)
对于两台机器跑两个应用,三类地址遵循以下原则: • • • • • 所有的引导IP(boot ip)必须在同一个网段中。 服务浮动IP地址和引导IP地址需要在同一个网段。 心跳IP必须在同一个网段中。心跳IP与引导IP、浮 动IP在不同的网段中。 备用网卡不配置地址 双机浮动地址采用别名的工作方式 ,原来的地址继 续保留 心跳IP、引导IP、服务浮动IP的子网掩码一般要一 致。一般都是255.255.255.0。
名称
地址
说明
xjsc21a
xjsc21a
lan0
100.100.5.40
心跳网卡
lan1
222.248.5.40
222.248.5.100
lan2
无
备用
xjsc21b
xjsc21b
lan0
100.100.5.50
心跳网卡
lan1
222.248.5.50
HP-UX内核管理及配置

HP-UX内核管理目录第1章内核管理 (3)1.1 调整HP-UX内核参数意义 (3)1.2 HP-UX内核参数的解释 (4)1.2.1 记账子系统(Accounting Subsystem) (4)1.2.2 异步IO子系统(Asynchronous I/O Subsystem) (5)1.2.3 光纤通道子系统(FibreChannel Subsystem) (5)1.2.4 文件子系统(File System Subsystem) (6)1.2.5 进程间通信子系统(Interprocess Communication (IPC) Subsystem) (10)1.2.6 内核转储子系统(Kernel Panic Dump Subsystem) (14)1.2.7 内存分页子系统(Memory Paging Subsystem) (14)1.2.8 . 进程管理子系统(Process Management Subsystem) (16)1.2.9 旋转锁子系统(Spinlock Pool Subsystem) (18)1.2.10 流子系统(Streams Subsystem) (19)1.2.11 其他参数(Miscellaneous Parameters) (20)1.3 调整HP-UX内核参数值和驱动方法 (23)第1章内核管理1.1 调整HP-UX内核参数意义依据不同的生产情况,惠普公司提供了不同的HP-UX的安装介质。
操作环境 (OE) 是经过测试并集成的应用程序软件包,用于与操作系统配合使用,并提供系统所需的功能。
HP-UX 11i v1 (B.11.11) DVD 提供了下列操作环境:a)HP-UX 11i v1 Foundation OE (FOE) — 用于满足 Web 服务器、目录服务器和前端服务器的需求,此 OE 包括多种应用程序,如 HP-UX Web 服务器套件、Java2 Standard Edition 技术和 Mozilla 应用程序套件。
HPUX系统安装-清晰完整的步骤
HP-UNIX系统安装完整步骤(rx6600)HP主机重新安装系统时。
主机加电,放入光盘---》用串口线连接主机串口---》查看看MP端口的ip地址----》网线连接到主机MP 口----》进入[a] MP:CM> ----》输入co 进入控制窗口---》选择internal bootable dvd 启动[a] MP:CM>MP MAIN MENU:CO: ConsoleVFP: Virtual Front PanelCM: Command MenuSMCLP: Server Management Command Line ProtocolCL: Console LogSL: Show Event LogsHE: Main Help MenuX: Exit Connection[a] MP> co[Use Ctrl-B or ESC-( to return to MP main menu.]- - - - - - - - - - Prior Console Output - - - - - - - - - -HPUX>HPUX>HPUX> 开始安装,(此时会输出主机的硬件信息)- - - - - - - - - - - - Live Console - - - - - - - - - - - -************************************************************ ROM Version : 04.03* ROM Date : 04/08/2008* BMC Version : 05.23***********************************************************0 0 0x0015B2 0x0000000023232801 boot time event1 0 0x0000A4 0x0000000000000000 start memory configuration提示输入语言Enter the number of the language you want: 26[a] MP:CM> help --- 进入帮助HE==== MP Help: Main Menu ======================================================= Hardware Revision S0 Firmware Revision F.02.17 Oct 5 2007,16:53:04Integrated Lights-Out for HP Integrity - Management Processor (MP)MP Help SystemUse Ctrl-B to exit MP command interface and return to the main MP menu.Enter a command at the help prompt:OVerview : Launch the help overviewLIst : Show the list of MP Command Menu commands<COMMAND> : Enter the command name for help on individual commandTOPics : Show all MP Help topics and commandsHElp : Display this screenQ : Quit help====MP:HE>MP MAIN MENU:CO: ConsoleVFP: Virtual Front PanelCM: Command MenuSMCLP: Server Management Command Line ProtocolCL: Console LogSL: Show Event LogsHE: Main Help MenuX: Exit Connection[a] MP> cm(Use Ctrl-B to return to MP main menu.)[a] MP:CM> pe关闭/开启电源[a] MP:CM> pePCCurrent System Power State: OnPower Control Menu:C - Power CycleON - Power OnOFF - Power OffG - Graceful ShutdownEnter menu item or [Q] to Quit: offoffSystem will be powered off.You must shut down the OS manually before this command is executed.Failure to do this can cause problems when the OS is restarted.Confirm? (Y/[N]): yy-> System is being powered off.[a] MP:CM> pePCCurrent System Power State: OffPower Control Menu:C - Power CycleON - Power OnOFF - Power OffG - Graceful ShutdownEnter menu item or [Q] to Quit: ononSystem will be powered on.Confirm? (Y/[N]): yy-> System is being powered on.改MP的ip地址[a] MP:CM> helpHE==== MP Help: Main Menu ======================================================= Hardware Revision S0 Firmware Revision F.02.17 Oct 5 2007,16:53:04Integrated Lights-Out for HP Integrity - Management Processor (MP)MP Help SystemUse Ctrl-B to exit MP command interface and return to the main MP menu.Enter a command at the help prompt:OVerview : Launch the help overviewLIst : Show the list of MP Command Menu commands<COMMAND> : Enter the command name for help on individual commandTOPics : Show all MP Help topics and commandsHElp : Display this screenQ : Quit help====MP:HE> listlist==== MP Help: Command Menu List =============================================BP : Reset BMC Passwords PC : Remote Power ControlCA : Configure asynch/serial ports PM : Remote Power Mode ControlDA TE: Display Date PR : Power Restore Policy Config.DC : Default Configuration PS : Power management module StatusDF : Display FRU Information RB : Reset BMCDI : DIsconnect users RS : Reset System through RST signalDNS : Configure DHCP and DNS SA : Set MP AccessFW : Upgrade MP firmware SNMP: Configure SNMP parametersHE : Display Help SO : Security OptionsID : System Information SS : System processors StatusIT : Modify MP inactivity timeouts SYSREV: Display System firmware Revs.LC : Configure LAN, SSH and Web ports TC : Reset system via INITLDAP: Configure Directory parameters TE : TEll- send a msg. to other usersLM : License Management UC : User ConfigurationLOC : Locator LED display WHO : Display connected MP usersLS : LAN Status XD : Diagnostics and reset of MP====MP:HE> LC ---》先将dhcp设为disable----》重启----》设置MP ip地址============================================1、系统安装前的准备准备HPUX的系统安装介质<系统安装盘>,以及配有光驱的性能稳定的目标主机<小型机或工作站>。
HP-UX常用命令
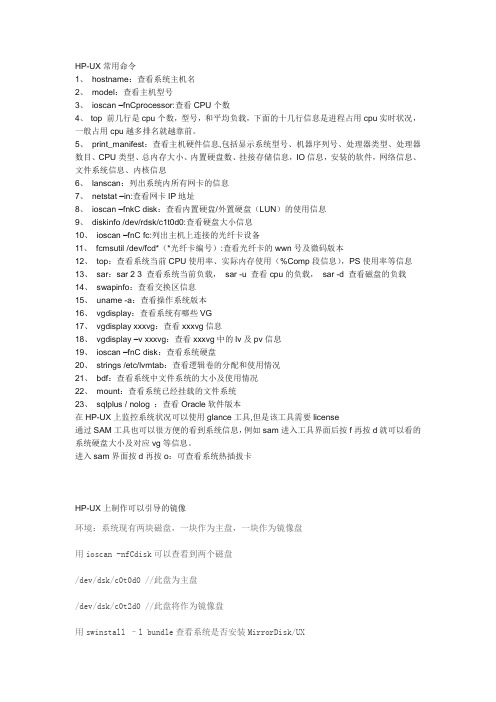
HP-UX常用命令1、hostname:查看系统主机名2、model:查看主机型号3、ioscan –fnCprocessor:查看CPU个数4、top 前几行是cpu个数,型号,和平均负载,下面的十几行信息是进程占用cpu实时状况,一般占用cpu越多排名就越靠前。
5、print_manifest:查看主机硬件信息,包括显示系统型号、机器序列号、处理器类型、处理器数目、CPU类型、总内存大小、内置硬盘数、挂接存储信息,IO信息,安装的软件,网络信息、文件系统信息、内核信息6、lanscan:列出系统内所有网卡的信息7、netstat –in:查看网卡IP地址8、ioscan –fnkC disk:查看内置硬盘/外置硬盘(LUN)的使用信息9、diskinfo /dev/rdsk/c1t0d0:查看硬盘大小信息10、ioscan –fnC fc:列出主机上连接的光纤卡设备11、fcmsutil /dev/fcd*(*光纤卡编号):查看光纤卡的wwn号及微码版本12、top:查看系统当前CPU使用率、实际内存使用(%Comp段信息),PS使用率等信息13、sar:sar 2 3 查看系统当前负载,sar -u 查看cpu的负载,sar -d 查看磁盘的负载14、swapinfo:查看交换区信息15、uname -a:查看操作系统版本16、vgdisplay:查看系统有哪些VG17、vgdisplay xxxvg:查看xxxvg信息18、vgdisplay –v xxxvg:查看xxxvg中的lv及pv信息19、ioscan –fnC disk:查看系统硬盘20、strings /etc/lvmtab:查看逻辑卷的分配和使用情况21、bdf:查看系统中文件系统的大小及使用情况22、mount:查看系统已经挂载的文件系统23、sqlplus / nolog :查看Oracle软件版本在HP-UX上监控系统状况可以使用glance工具,但是该工具需要license通过SAM工具也可以很方便的看到系统信息,例如sam进入工具界面后按f再按d就可以看的系统硬盘大小及对应vg等信息。
HP-UX系统安装和配置

HP-UX系统安装和配置1 HP-UX系统安装HP-UX操作系统是预装的,由HP工程师进行配置。
配置包括如下参数:主机名: CRCT1(上)CRCT2(下)此主机名可通过hostname或uname –a 命令查看。
2 创建用户帐号使用sam创建用户帐号halt、test、jzx、train和informix。
并分别用passwd 命令给各用户设置口令。
3配置磁盘3.1 配置镜像磁盘Mirror Disk是HP-UX的一套软件包,当系统中安装有两个系统盘时,可以利用该软件的功能来做操作系统的镜像备份,以下是做镜像磁盘的步骤。
1、执行lvlnboot -v命令检查系统中的启动设备#lvlnboot -vBootBootSwapDump2、创建第二块系统盘#pvcreate -B /dev/rdsk/c2t6d03、扩展vg00,添加第二块硬盘#vgextend /dev/vg00 /dev/dsk/c2t6d04、为第二块磁盘创建boot引导信息#mkboot /dev/dsk/c2t6d05、扩展vg00中各逻辑卷,添加镜像磁盘lvextend -m /dev/vg00/lvol2 /dev/dsk/c2t6d0lvextend -m /dev/vg00/lvol3 /dev/dsk/c2t6d0lvextend -m /dev/vg00/lvol4 /dev/dsk/c2t6d0lvextend -m /dev/vg00/lvol5 /dev/dsk/c2t6d0lvextend -m /dev/vg00/lvol6 /dev/dsk/c2t6d0lvextend -m /dev/vg00/lvol7 /dev/dsk/c2t6d0lvextend -m /dev/vg00/lvol8 /dev/dsk/c2t6d0lvextend -m /dev/vg00/lvol9 /dev/dsk/c2t6d0lvextend -m /dev/vg00/lvol10 /dev/dsk/c2t6d06、为第二块磁盘创建boot引导信息#mkboot -a "hpux(;0)/stand/vmunix" /dev/dsk/c2t6d07、执行如下操作后重新启动系统#lvlnboot -b /dev/vg00/lvol1#lvlnboot -b /dev/vg00/lvol2#lvlnboot -b /dev/vg00/lvol3#lvlnboot -d /dev/vg00 /dev/dsk/c2t6d0#lvlnboot -R#shutdown -h -y 08、在启动Main Menu出现时,从第二块磁盘启动Main Menu:>seaP0 0/0/2/0.6 intscsia.6 Random access mediasP1 0/0/2/6 intscsia.6 Random access mediasP0 0/4/0/0.0 Random access mediasP3 0/10/0/0.1 Random access mediasP4 1/10/0/0.5 Sequene access mediasMain Menu:>bo p19、系统启动以后执行如下操作#lvlnboot -v3.2添加磁盘阵列柜使用sam命令添加物理磁盘:sam ?;Disks and File Systems(CRCT1)选定某个磁盘,在该磁盘上执行:?;Disk Devices?;Actions ?;Disk Array Maitainece?;bind出现的菜单可对选定的物理磁盘添加一个新的PV,共添加四个PV,其中两个64G,两个1GB。
Oracle 9.2.0.1在hpux下的安装过程

Oracle 9.2.0.1在hpux下的安装过程一.作为root用户的工作1.配置内核参数用root用户登陆#sam 进入system administrator manager在其中选择kernel configuration,进入以后在选择configurable parameters修改以下参数MAXDSIZ 1073741824MAXDSIZ_64 2147483648MAXSSIZ 134217728MAXSSIZ_64 1073741824MAXUSERS 1000NPROC 20+8*MAXUSERSSEMMNI 500SEMMNS 1000SEMMSL 2048SEMVMX 32767SEMMNU 500SHMMAX 1073741824 (我配的那台机器最大允许就是这个值,应该是配最大的物理内存)SHMMNI 512SHMSEG 200VPS_CEILING 642.安装oracle9201所需要的磁盘空间创建2个文件系统,一个用来安装oracle,不小于4G,可以取名为/oracle,另一个用来存放oracle的安装文件,也不小于4G,取名为/oradata,同时保证/tmp目录有多于55M的空闲空间3.创建dba组和oracle用户用root用户登陆#sam进入system administrator manager在其中选择accounts for users and groups选择groups,选择menu中的actions选项中的add输入group name为dba,然后确定回到accounts for users and groups选择users,选择menu中的actions选项中的add输入login name为oracle,home directory为/home/oracle,primary group name为dba,确定,输入密码oracle并确认二.设置oracle的环境变量#su – oracle 用oracle用户登陆$vi .profile 修改参数文件在文件的最后加入以下参数ORACLE_BASE=/oracleORACLE_HOME=/oracle/product/9.2.0.1ORACLE_SID=testORACLE_TERM=xtermexport ORACLE_BASE ORACLE_HOME ORACLE_SID ORACLE_TERMNLS_LANG=american_america.ZHS16GBKexport NLS_LANGORA_NLS33=$ORACLE_HOME/ocommon/nls/admin/dataexport ORA_NLS33LD_LIBRARY_PATH=$ORACLE_HOME/lib:$ORACLE_HOME/ctx/lib:/lib:/usr/lib:$ \ ORACLE_HOME/RDBMS/lib:$ORACLE_HOME/lib32SHLIB_PATH=$ORACLE_HOME/lib32:$ORACLE_HOME/rdbms/lib32ORACLE_DOC=$ORACLE_BASE/product/9.2.0.1export SHLIB_PATH LD_LIBRARY_PATH ORACLE_DOCPATH=/bin:/usr/bin:/usr/sbin:/opt/bin:/usr/local/bin:$ORA CLE_HOME/bin:/usr/contrib/ \ bin:$PATHexport PATHCLASSPATH=$ORACLE_HOME/JRE:$ORACLE_HOME/jlib:$ORACLE_HOME / \ rdbms/jlibCLASSPATH=$CLASSPATH:$ORACLE_HOME/network/jlibexport CLASSPATHEDITOR=viexport EDITOR注:行末尾的“\”符号表示下一行接着上一行继续。
HP-UX系统维护常用配置文件

HP-UX系统维护常用配置文件
1./etc/hosts
主机名字解析文件,提供主机名和IP地址的对应。
2./etc/passwd
口令文件,内容为
登录用户名:加密口令:用户ID:组ID:保留:初始工作目录:shell路径
3. /etc/group
内容为
组名:加密密码:组ID:所有属于该组的用户。
4. /etc/profile
如果该文件存在,则每个用户登录时将执行该文件。
该文件一般用于设置一些通用环境变量,如果用户的home目录中存在.profile文件,则在执行/etc/profile之后,再执行用户的.profile文件。
5. /etc/inittab
内部初始化之后,系统将启动/etc/init这个deamon进程,使/etc/init进程取得引导序列的控制权。
而init进程从文件/etc/inittab(init table,初始化表)取得指示,该文件的内容控制所有init状态,同时也控制那些已消亡进程的再生。
6. /etc/fstab
系统中可以mount的文件系统的信息。
7. /etc/lvmtab
使用命令:
# strings /etc/lvmtab;查看系统VG和磁盘信息。
8. /etc/rc.config.d/netconf
包含系统名称和网络配置信息,如IP地址、子网掩码和路由信息等。
9. /stand/system
包含系统的驱动程序和子系统信息,内核设备信息和一些系统可调参数信息。
- 1、下载文档前请自行甄别文档内容的完整性,平台不提供额外的编辑、内容补充、找答案等附加服务。
- 2、"仅部分预览"的文档,不可在线预览部分如存在完整性等问题,可反馈申请退款(可完整预览的文档不适用该条件!)。
- 3、如文档侵犯您的权益,请联系客服反馈,我们会尽快为您处理(人工客服工作时间:9:00-18:30)。
Last Update: June 2008Oracle release: Oracle 11gR1Oracle 10gR1/R2Oracle 9i R1/9i R2Operating System: HP-UX 11iv3 (also called 11.31)HP-UX 11i v2 (also called 11.23 and 11.23PI)HP-UX 11i v1 (also called 11.11PA-Risc)Author: Bernd Menth/HP Oracle CTC1.Oracle release information2.HP-UX release information3.additional SW/patch information and links4.HP-UX Kernel Parameter5.Helpful Tools6.Appendix 1: db_block_size7.Appendix 2: Raw Devices + Asynchronous IO8.Appendix 3: Parallel Query Option9.Appendix 4: shmmax10.Appendix 5: Swapping/Paging11.Appendix 6: Privileges for SCHED_NOAGE and MLOCK12.Appendix 7:cell local memory vs. interleaved memoryOracle 11g recommendations:- Check process during installation:Temp 415 MBSwap 250 MB/opt/oracle 4.7 GBChecking operating system requirements ...Expected result: One of 11.23,11.31Actual Result: 11.31Check complete. The overall result of this check is: Passed========================================================Checking recommended operating system patches -> could be already replaced by a new version Checking for PHKL_35936;Checking for PHKL_35900;Checking for PHKL_36248;Checking for PHKL_36249;========================================================Checking kernel parametersChecking for ksi_alloc_max=32768;Checking for max_thread_proc=1024;Checking for maxdsiz=1073741824;Checking for maxdsiz_64bit=2147483648;Checking for maxssiz=134217728;Checking for maxssiz_64bit=1073741824;Checking for maxuprc=3687;Checking for msgmni=4096;Checking for msgtql=4096;Checking for ncsize=35840;Checking for nflocks=4096;Checking for ninode=34816;Checking for nkthread=7184;Checking for nproc=4096;Checking for semmni=4096;Checking for semmns=8192;Checking for semmnu=4092;Checking for semvmx=32767;Checking for shmmax=1073741824;Checking for shmmni=4096;Checking for shmseg=512;Checking for vps_ceiling=64;======================================================== Checking physical memory requirements ...Expected result: 1024MBChecking available swap space requirements ...Validating ORACLE_BASE location (if set) ...Oracle 10g recommendations:-Minimum RAM = 1024 MB-HP-UX 11i-Swap Space: Minimumo Between 1GB and 2GB RAM use 1.5 times the size of RAM for swapo Between 2GB and 8 GB RAM use equal to the size of RAMo More than 8 GB RAM 0.75 to equal size of RAMplease check Appendix 5 for large systems-available Disk Space: up to 4 GB (sw only up to 3 GB)this includes 1 GB from companion CD- Temporary Disk Space: 400 MB of space in the /tmp directoryIf there is not 400MB available space in the /tmp directory,then you can set the TMPDIR or TMP (used by Oracle) environmentvariable to point to a directory that has at least 400 MB of available space.This directory must be writable by the user account performing the installation.) Disk space for DB files: 1 .2 GB-Create OS UNIX groups for Oracle system:o OSDBA group : Requiredo OSOPER group: Optionalo ORAINVENTORY group: Optionalo APACHE group: Recommended-Please check appendix 6 for SCHED_NOAGE usage and MLOCKOracle 9i recommendations:-Minimum RAM = 256 MB (HP-UX 11.0/11.i v1)-Minimum RAM = 512 MB (HP-UX 11.i v2 and v1.6)-HP-UX 11.0 or HP-UX 11i v1 or HP-UX 110 v2.0-Swap Space: Minimum 2 x RAM or min 400MB, whichever is greater, please check Appendix 5 for large systems-available Disk Space: 3 GB (HP-UX 11.0/11.i v1)-available Disk Space: 3.5 GB (HP-UX 11.i v2 and v1.6)-an additional 1 GB for a seed database- Temporary Disk Space: up to 2GB of space in the /tmp directory (If there is not 2 GB of available space in the /tmp directory,then you can set the TMPDIR or TMP (used by Oracle) environmentvariable to point to a directory that has at least 400 MB of available space.This directory must be writable by the user account performing the installation.) -Create OS UNIX groups for Oracle system:o OSDBA group : Requiredo OSOPER group: Optionalo ORAINVENTORY group: Optionalo APACHE group: Recommended-Please check appendix 6 for SCHED_NOAGE usage and MLOCKOracle® Database on Unix® Operating Systems Installation and Configuration Requirements Quick Reference Doc ID: Note:169706.1 on Oracle requires some patches on the specific Operating SystemThese patches might be superseded.HP-UX 11iv3 (11.31)∙The following kernel parameters are obsolete on HP-UX 11iV3.o maxswapchunkso msgmapo ncallouto semmapo vx_ncsizeo dbc_max_pct replaced by filecache_max (50% default)o dbc_min_pct replaced by filecache_min (5% default)▪the file caching with 11i v3 is different from v2/en/oshpux11iv3.html∙You need to install the following patches on top of HP-UX 11.31 for Oracle DB o PHKL_37185 (replaces PHKL_35936)▪PHKL_36054 (needed by PHKL_37185)▪PHKL_36261 (needed by PHKL_37185)∙For RAC we installed also the Oracle patcheso Patch 6000740o CRS PATCH> Patch 5556081> Patch 5557962∙We recommend to install the latest patch bundle,f.e. the September 2007 version 11.31.0709∙For Oracle releases 11, 10 and 9, you need to use the additiona flag –ignoreSysPreReqs for the runInstaller, otherwise the installationwill not continueo runInstaller –ignoreSysPreReqsHP-UX 11iv2 (11.23) (Itanium2 / PA-RISC):∙HP-UX B.11.23.0412 or later∙Quality Pack Bundle:o Latest patch bundle: Quality Pack Patches for HP-UX 11i v2 ∙HP-UX 11.23 Patches:o PHSS_31849: linker + fdp cumulative patcho PHSS_31852: aC++ Runtime (PA A.03.61)o PHSS_32511: HP aC++ Compiler (A.03.63)o PHSS_32512: ANSI C compiler B.11.11.12 cumulative patcho PHSS_32513: +O4/PBO Compiler B.11.11.12 cumulative matcho PHCO_35524(LVM patch date April 2007 necessary for 10203 with ASM) ∙ Serviceguard and OS Patches (optional, only if you want to use Serviceguard): o PHSS_32740: Serviceguard A.11.16.00 (replaces PHSS_31076)o PHSS_32659: Serviceguard Extension for RAC 11.16.00 (optional, only if you want to use SGeRAC) (replaces PHSS_31080)o PHSS_32741: COM B.03.00.00/COM B.03.00.01 (replaces PHSS_31078)o PHCO_31244: VxVM 3.5-IA.004 Command Patch 02 (only required for clusters using VxVM; required to support 8 node clusters with CVM)HP-UX 11.11 (PA-RISC):∙Quality Pack Bundle:HP-UX 11i Quality Pack (GOLDQPK11i)∙HP-UX 11.11 Patches:o PHNE_31097: ONC/NFS general release/performance patcho PHSS_31221: HP aC++ -AA runtime libraries (aCC A.03.60)o PHSS_32508: HP aC++ Compiler (A.03.63)o PHSS_32509: ANSI C compiler B.11.11.12 cumulative patcho PHSS_32510: +O4/PBO Compiler B.11.11.12 cumulative patch ∙ Serviceguard and OS Patches (optional, only if you want to use Serviceguard): o PHSS_32731: Serviceguard A.11.16.00 (replaces PHSS_31075)o PHSS_32658: Serviceguard Extension for RAC A.11.16.00 (replacesPHSS_31079)o PHSS_32732: COM B.03.00.00 (replaces PHSS_31077)o PHCO_30850: VxVM 3.5m Command Cumulative Patch 07 (only required if VxVM 3.5 is used, required to support 8 node clusters with CVM) ∙Patches for JDK on HP-UX 11.11:o PHSS_30970: ld(1) and linker tools cumulative patcho Note: Refer to the following Web site for information about additional patches that may be required by JDK 1.4.2:/products1/unix/java/patches/index.htmlCreating Required Symbolic LinksTo enable you to successfully relink Oracle products after installing this software,enter the following commands to create required X library symbolic links in the/usr/lib directory:Note: This task is required only if the Motif 2.1 Development Environment package(X11MotifDevKit.MOTIF21-PRG) is not installed.# cd /usr/lib# ln -s libX11.3 libX11.sl# ln -s libXIE.2 libXIE.sl# ln -s libXext.3 libXext.sl# ln -s libXhp11.3 libXhp11.sl# ln -s libXi.3 libXi.sl# ln -s libXm.4 libXm.sl# ln -s libXp.2 libXp.sl# ln -s libXt.3 libXt.sl# ln -s libXtst.2 libXtst.slTo ensure that the system meets these requirements, follow these steps:∙HP provides patch bundles at /SUPPORT_PLUS∙To determine whether the HP-UX 11i Quality Pack is installed:# /usr/sbin/swlist -l bundle | grep GOLD∙Individual patches can be downloaded from /∙To determine which operating system patches are installed, enter the following command:# /usr/sbin/swlist -l patch∙To determine if a specific operating system patch has been installed, enter the following command:# /usr/sbin/swlist -l patch <patch_number>∙To determine which operating system bundles are installed, enter the following command:# /usr/sbin/swlist -l bundleRequired ExecutablesThe make, ar, ld, and nm executables must be present in the /usr/ccs/bin directoryAdditional SW:To support Oracle Real Application Clusters 9i, the following operating system package and patch are required:MC/ServiceGuardMC/ServiceGuard extension for RACWith Oracle 10g/11g RAC, you do have the choice between different cluster ware.Note: These are minimum kernel requirements for Oracle database. If you have previously tuned your kernel parameters to levels equal to or higher than these values, continue to use the higher values, except for file system cache parameters (tunable filecache_max , tunable filecache_min, dbc_max_pct, dbc_min_pct). The default parameter for files system cache is for an Oracle database most of the time to high (tunable filecache_max, dbc_max_pct = 50, means 50% of your memory is given to file system cache), it is better to give Oracle the memory to cache data in the SGA instead to have a large files system cache. A system restart is necessary for kernel changes to take effect.Kernel Parameter Setting PurposeHelpful Tools:To find out which server you have-model -> provide you a short information about the server-machinfo –v –> provide you a detailed information about the server, cpu clock speed and cache, memory,To list all kernel parameters on the system-HP-UX11iv1/v2:-use SAM or-/usr/sbim/kmtune –l | more-HP-UX 11iv3:-System Management Homepage (/usr/sbin/smh) or-/usr/sbin/kctuneTo update a kernel parameter-HP-UX11iv1/v2:-SAM (/usr/sbin/sam) or-/usr/sbin/kmtune –s <kernel parameter> {=|+}-HP-UX 11iv3:-System Management Homepage (/usr/sbin/smh) or-/usr/sbin/kctuneTo find out 32 or 64 bit HP-UX 11.x- /bin/getconf KERNEL_BITSLimitations on processes-ulimit –aThe command sysdef analyzes the currently running system and reports on its tunable configuration parameters.-sysdef | moreTo find out 32 or 64 bit Oracle software version$ cd $ORACLE_HOME/bin$ file oracle# if this is the answer, you have 32-bit Oracleoracle: PA-RISC1.1 shared executable dynamically linked -not stripped# if this is the answer, you have 64 bit Oracleoracle: ELF-64 executable object file - PA-RISC 2.0 (LP64) # for PA-Risc systemsoracle: ELF-64 executable object file - IA64 # for Itanium systemsAppendix 1: db_block_sizeThe default db_block_size on HP-UX is 2048. But we recommend to use the following values:-db_block_size = 4096 to 8192 for OLTP Applications-db_block_size = 8192 to 16384 for DSS/DW ApplicationsFor RAC/OPS it makes still sense to use small db_block_size to reduce the amount of data to transfer between the nodes for cache fusion.Appendix 2: Raw Devices + Asynchronous IOWe recommend to use raw devices instead of file system files for Oracledatafiles and to use asynchronous IO, both resulting in much betterperformance.Use stripping with a large number of disks to spread IO over multiple disks (high number is good). Define the number of disks in your stripe set also dependent of your future growth of your storage, otherwise you will get probably hot spots in the future. For the stripping are 2 possibility exists. For a high number of disks we did not figured out big difference in performance.Use the HP-UX Logical Volume Manager to stripe logical volumes across multiple disks. Recommended stripe size: Quite often is 64KB still usedoruse HP-UX Extend-based-striping with 1 MB or even larger extends.To implement asynchronous IO on HP-UX systems (raw devices are required) - add the asyncdsk Driver (Asynchronous Disk Pseudo Driver)to the HP-UX Kernel (using SAM) and regenerate new kernel-create the device file:- /sbin/mknod /dev/async c 101 0x100- chown oracle:dba /dev/async-chmod 660 /dev/async-depending on the HP-UX version you have to provide privilege to group dba- HP-UX 11.0 (dependend on the patch level)Patch PHKL_22380 and all newer patches which supersede it (likePHKL_22440) use a special "feature" which has to be set to really useasyncio. As root:/usr/sbin/setprivgrp dba MLOCK- HP-UX 11i (>=11.11)To use asyncio: As root:/usr/sbin/setprivgrp dba MLOCK-set oracle init.ora parameters:-use_async_io=true (Oracle 7.3)-disk_async_io = true (>= Oracle 8i)-db_writers=1 ( < Oracle 7.3)To test the async IO- check with fuser /dev/async- or look with glance/gpm at the ora_dbwr.- look for open files:- /dev/async must be shown as opened file- if /dev/async is not seen and you want to use asyncio:To check the priviliges to use async IO on HP-UX 11 (with Patch PHKL_22380 and all newer patches which supersede it like PHKL_22440) and HP-UX 11i- To check the privilege capabilities for a group, issue thecommand: /usr/bin/getprivgrp- If the output of getprivgrp(1) does not indicate that the group has the MLOCK privilege, it can be set by issuing the following command as root:/usr/bin/setprivgrp dba MLOCKWhen not using asynchronous IO-set db_writers to number of disk (for Oracle 7)-set db_writer_processes = 1 – 10 (>= Oracle 8i)-set dbwr_io_slaves = 0 – 999 (>= Oracle 8i)(Please test with your application, if the behaviour using multipledb_writer_processes is better than use multiple dbwr_io_slaves)Please check also appendix 6 for Oracle (SCHED_NOAGE)Using file system please have a look at least at these 3 parameters which might have an impact for Oracle DB performance from the HP-UX 11iv2, v3 vxtunefs parameter max_diskq=1Gwrite_nstream=64read_nstream=64We have used theses parameters with an EVA8000 with 112 disks. For other storage subsystems the parameter may be different.To give you information about the VxFS 3.5 Defaultsread_pref_io = 65536read_nstream = 1read_unit_io = 65536write_pref_io = 65536write_nstream = 1write_unit_io = 65536pref_strength = 10buf_breakup_size = 131072discovered_direct_iosz = 262144max_direct_iosz = 1048576default_indir_size = 8192qio_cache_enable = 0write_throttle = 0max_diskq = 1048576initial_extent_size = 1max_seqio_extent_size = 2048max_buf_data_size = 8192hsm_write_prealloc = 0read_ahead = 1Read Ahead• JFS detects sequential pattern, prefetches datainto buffer cache• Read ahead size is calculated using read_pref_io *read_nstream• Maintains 4 ranges of read ahead size• Sequential read ahead affected by oth erprocesses or threadsFlush Behind• Flush behind amount is calculated usingwrite_pref_io * write_nstream• When the number of dirty buffers for a fileexceeds the flush behind amount, JFS willstart to issue asynchronous writes to flushthe dirty buffers.Appendix 3: Parallel Query OptionWhen using Oracle Parallel Query Option, there are up to parallel_max_servers more Oracle Processes running on the system. It's necessary to increase the related HP-UX Parameters (maxusers, maxuprc, nfile, nproc)Appendix 4: shmmaxIf you got an Oracle error saying ORA-3113: end-of-file on communication channelthan you have to adapt your shmmax to a usable value which means,-for Oracle 32-bit max 1GB-for Oracle 64-bit shmmax can be raised above 1 GBPlease remind, that you have normally more than one shared memory segments (shmmni (max number of shared memory segments allowed to exist simultaneously), shmseg (perprocess) are the related kernel parameters), which can be used by Oracle. If you have multiple Oracle instances on one system, it is normally better to decrease the size of shared memory and use multiple shared memory segments instead (which is done automatically). Limitations:-Oracle7-the buffer cache part can be composed of more than one segment,but the variable portion of the SGA (mainly the shared_pool) must fit in one shared memory segment-Oracle8 / Oracle 9i / Oracle 10g / Oracle 11g-the buffer cache part can be composed of more than one segment,the variable portion of the SGA (mainly the shared_pool) can be composed of more than one shared memory segment, assuming that the shared memory segments are contiguousAppendix 5: Swapping/Paging-How much memory does the maschine have?-dmesg | grep Physical-or grep Physical /var/adm/syslog/syslog.log-What is the page size?-dmesg | grep physical-or grep physical /var/adm/syslog/syslog.log-Is the maschine swapping in the moment?-vmstat 5 5-page.pi indicated the number of pages moving from disk to memory-page.po indicated the number of pages moving from memory to disk-memory free indicates the amount of free memory in pages-How much swap space is configured / used?-swapinfo –a- A swap area of TYPE=dev gives the NAME of the area of disk used for paging. /etc/fstab will show NAME as a swap device.- A swap area of TYPE=reserve indicates the amount of swap spacethat would be required if HP-UX needed to page out all in-memorypages for all processes that are currently running.- A swap area of TYPE=memory only appears if 'memory paging' is enabled, by setting the configurable kernel parameter swapmem_on to 1 (on).This default value for this parameter is 1.'memory paging' is also known as 'pseudo-swap'.If present, the AVAIL figure is (total memory - memory used after bootup).This swap area is not actually used by HP-UX for paging (since it does notmake sense to page from memory, and then back into memory).--How much swap should I configure?-Oracle 9i-Recommendation is to have 2 x RAM size for swap at least 400 MB on a system running Oracle,but on large systems 2*RAM size is not used anymore. You need at least the swap space that Oracle SGA fits in plus some additional swap space, even swapping out the SGA is not a good solution for a system.(related kernel parameters for the swap are swchunk and maxswapchunks)-Oracle >= 10g-Recommendation is to have at least 1GB or 2 x size of RAM size for swap on a system running Oracle,but on large systems with 2 GB or more 2* size of RAM size is not used anymore.You need at least the swap space that Oracle SGA fits in plus some additionalswap space, even swapping out the SGA is not a good solution for a system.(related kernel parameters for the swap are swchunk and maxswapchunks)Appendix 6: Privileges for SCHED_NOAGE (>= Oracle 9i DB) and MLOCKThe SCHED_NOAGE policy gives processes holding a latch a fixed priority and makes them nonpreemptable during this time. This causes less latch waits and latch sleeps, hence higher throughput.To enable the SCHED_NOAGE policy for Oracle, the following init.ora parameter needs to be added:hpux_sched_noage=154 (for HP/UX 11.0)hpux_sched_noage=178 (for >= HP/UX 11i)In addition, the system privileges RTPRIO and RTSCHED need to be added to the DBA group as root in/etc/privgroup:dba RTPRIO RTSCHEDComplete root user set-up tasks:The MLOCK privilege grants Oracle the ability to execute asynch I/Os through the HP asynch driver. Without this privilege, Oracle DB generates trace files with the following error message: IoctlASYNCH_CONFIG error, errno = 1As root, do the following:_ If it does not already exist, create the /etc/privgroup file. Add the following line to the file: dba MLOCK RTSCHED RTPRIO_ Use the following command syntax to assign these privileges:#setprivgrp groupname privilegesIn the preceding command, groupname is the name of the group that receives the privileges, and privileges are the privileges that are granted to the group.For example, to set the privileges for the OSDBA group, which is typically named dba, enter the following command:#setprivgrp dba MLOCK RTSCHED RTPRIOAppendix 7: ccNUMA Architecture: cell local memory vs. interleaved memory ccNUMA (cache coherent Non-Uniform Memory Architecture) systems offer programmers and users the simplicity and flexibility of symmetric multiprocessing (SMP) with the memory scalability of clusters. In a ccNUMA system, processors, memory, and I/O are grouped together into cells. The latency and bandwidth characteristics of communication within a cell are faster, while going outside a cell is slower. Since the memory in ccNUMA systems is physically distributed but logically shared, these systems offer better performance to applications that are optimized to use their features. For non-optimized applications, they still offer better performance since the default behavior is designed to be benign—if not beneficial—and they still have access to much larger shared resources of memory, CPUs, and disk space. It's the basic technology that's used to build large machines like rx7640, rx8640 or Superdome.Interleaved memoryInterleaved memory is memory for shared objects or data structures. A portion of memory is taken from cells of the system—typically all of the cells—and is mixed together in a round robin fashion of cache-line-size chunks. It has the characteristic that memory accesses take a uniform amount of time. In other words, it has uniform latency no matter which processor accesses it.Using interleaved memory and not having cell local memory the following Oracle init.ora parameter needs to be set to switch off and cell based systems._enable_numa_optimization=FALSE_db_block_numa=1For more information have a look at /en/4913/ccNUMA_White_Paper.pdf For additional information about Oracle on HP Itanium Server have a look at the following white paper /ERC/downloads/4AA2-0547ENW.pdfThe white paper talks about Oracle on ccNUMA architecture and resource management with Oracle on HP-UX.。
