VR-物理相机常规设置参数
Vray物理相机介绍主要参数
VRay物理相机主要参数1. 功能VRayPhysicalCamera(VRay物理相机)可以模拟真实相机的结构原理,包括镜头、光圈、快门和景深等。
因为相机的结构比较复杂,所以先要了解一下相机的基本原理,这样学习VRay物理相机就轻松多了,如图1所示。
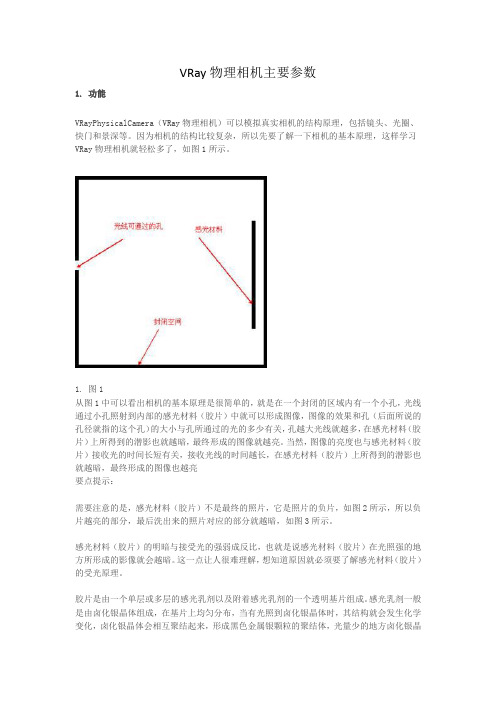
1. 图1从图1中可以看出相机的基本原理是很简单的,就是在一个封闭的区域内有一个小孔,光线通过小孔照射到内部的感光材料(胶片)中就可以形成图像,图像的效果和孔(后面所说的孔径就指的这个孔)的大小与孔所通过的光的多少有关,孔越大光线就越多,在感光材料(胶片)上所得到的潜影也就越暗,最终形成的图像就越亮。
当然,图像的亮度也与感光材料(胶片)接收光的时间长短有关,接收光线的时间越长,在感光材料(胶片)上所得到的潜影也就越暗,最终形成的图像也越亮要点提示:需要注意的是,感光材料(胶片)不是最终的照片,它是照片的负片,如图2所示,所以负片越亮的部分,最后洗出来的照片对应的部分就越暗,如图3所示。
感光材料(胶片)的明暗与接受光的强弱成反比,也就是说感光材料(胶片)在光照强的地方所形成的影像就会越暗。
这一点让人很难理解,想知道原因就必须要了解感光材料(胶片)的受光原理。
胶片是由一个单层或多层的感光乳剂以及附着感光乳剂的一个透明基片组成。
感光乳剂一般是由卤化银晶体组成,在基片上均匀分布,当有光照到卤化银晶体时,其结构就会发生化学变化,卤化银晶体会相互聚结起来,形成黑色金属银颗粒的聚结体,光量少的地方卤化银晶体会相互聚结也少,这样就形成了影像(负像)。
负像上黑暗(厚的)部分就是曝光较多部分;明亮(薄的)部分就是曝光较少的部分;全透明部分就是没有受到光照射的部分。
上面的理论有些复杂,其实这些理论的最终解释就是相机上的孔径大小以及光通过孔的时间与最后洗出来的照片的明暗区是成正比的。
2. 图23. 图3真实相机的结构要比图1中复杂,如图4所示,最主要的就是增加了镜头、光圈、快门和焦距控制等装置。
VR物理相机详解

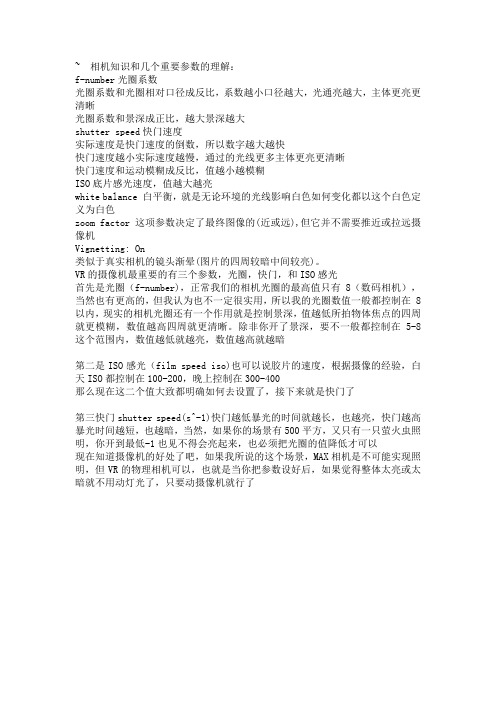
一般常用35mm相机 焦距:值越大,景深区域越模糊 光圈: 值越大渲的图越暗,值越小图越亮 值越大所拍物体焦点的四周就更清晰,值越小四周就更模糊 当确定相机位置后,点击该按钮,可以帮 助校正相机视图。 快门:注意,一般是1/4或1/8这样的分数 来表示,我们填写的其实是分母。 此值越大快门时间越短,进光量越小,画 面越暗。此值越小画面越亮。 值越高,胶片越容易被感光,画面越亮 白天ISO都控制在100-200,晚上控制在300-400
v-ray物理相机
主ቤተ መጻሕፍቲ ባይዱ:梁静
Vray物理相机
• VR物理相机与3D的相机有什么区别?
– MAX相机是不可能实现照明,但VR的物理相机可以。也就 是当你把参数设好后,如果觉得整体太亮或太暗就不用动灯 光了,通过调节相机的快门等参数改变场景的亮度; – 焦距的调节也更灵活和方便;
– 还可以调节景深。
Vray物理相机
Vray物理相机
•
焦距比数:(光圈)
– – – – – 图象的曝光程度可以通过调整光圈来满足。 光圈的作用和瞳孔相似,光强的时候,光圈应小些。 光线强时,设置教大的光圈值以减少进入相机的光线数量; 光线暗时,设置较小的光圈值,使更多的光线进入相机。 控制场景亮度,和景深有一定关系
•
快门:
– 快门速度决定了曝光时间。速度,分母越小,曝光时间越长,图象越亮。 – 该值大小影响到运动模糊效果。
Vray物理相机
景深
• Depth of Field (景深DOF) – 即在调焦使影像清晰时,在 焦点的前后一段距离内的区 域,图像能清晰的呈现,而 这一段范围我们称之为景深, 景深越长,那么能清晰呈现 的范围越大;反之,景深越 小,则前景或背景会变得模 糊,模糊是因为聚焦松散所 形成的一种朦胧现象。从光 学理论角度来看,在镜头的 焦距下,能够清楚的成像的 只有在一物距上的平面,在 此平面外的景物都会模糊。
VRay物理相机全参数详解,胶片感光变焦光圈值白平衡
VRay物理相机全参数详解,胶片感光变焦光圈值白平衡VR物理相机采用的是现实世界里的相机的设置,有f-stop, 焦距, 快门速度等,用它配合真实世界的灯光类型,比如VR太阳,VR灯和VR天空等,可以快速得到良好的效果。
基本参数type –相机的类别,这个参数在动态模糊上会产生不同的效果。
Still cam –模拟普通相机在常规快门速度下的效果。
Cinematic camera –模拟带有圆形快门的影视摄影机效果。
Video camera –模拟带有CCD矩阵的摄影机效果。
targeted –决定在场景里是否看到相机的目标点film gate (mm) –以毫米为单位,定义片门的水平数值。
垂直数值则由渲染图的比例进行相应的缩放(垂直胶片尺寸 = 水平胶片尺寸 / 宽高比).focal length (mm) 焦距–决定了相机的焦距。
fov –当勾选时,这个参数的数值会取代之前的film gate和focal length两项参数。
zoom factor (变焦)–模拟相机的变焦效果。
数值高于1,相当于放大效果,小于1,相当于缩小效果。
horizontal shift –调整相机的水平视界,比如0.5的数值,会让相机向左侧移动当前画面水平宽度的一半。
vertical shift –调整相机的垂直视界,比如0.5的数值,会让相机向上方移动当前画面垂直高度的一半。
f-number(光圈值)–决定了相机的光圈。
如果Exposure(曝光)选项被勾选的话,更改这个参数还会对画面的亮度产生影响。
target distance –定义了相机与目标点之间的距离。
vertical tilt和horizontal tilt –模拟偏斜镜头的效果。
点击Guess vert tilt和Guess horiz tilt按钮对画面进行两点透视的修正(保持透视的垂直和水平)。
auto guess vert. –当勾选时,相机在动画时也会自动修正偏斜。
VR物理相机功能全解析培训资料
~ 相机知识和几个重要参数的理解:f-number光圈系数光圈系数和光圈相对口径成反比,系数越小口径越大,光通亮越大,主体更亮更清晰光圈系数和景深成正比,越大景深越大shutter speed快门速度实际速度是快门速度的倒数,所以数字越大越快快门速度越小实际速度越慢,通过的光线更多主体更亮更清晰快门速度和运动模糊成反比,值越小越模糊ISO底片感光速度,值越大越亮white balance 白平衡,就是无论环境的光线影响白色如何变化都以这个白色定义为白色zoom factor这项参数决定了最终图像的(近或远),但它并不需要推近或拉远摄像机Vignetting: On类似于真实相机的镜头渐晕(图片的四周较暗中间较亮)。
VR的摄像机最重要的有三个参数,光圈,快门,和ISO感光首先是光圈(f-number),正常我们的相机光圈的最高值只有8(数码相机),当然也有更高的,但我认为也不一定很实用,所以我的光圈数值一般都控制在 8以内,现实的相机光圈还有一个作用就是控制景深,值越低所拍物体焦点的四周就更模糊,数值越高四周就更清晰。
除非你开了景深,要不一般都控制在5-8这个范围内,数值越低就越亮,数值越高就越暗第二是ISO感光(film speed iso)也可以说胶片的速度,根据摄像的经验,白天ISO都控制在100-200,晚上控制在300-400那么现在这二个值大致都明确如何去设置了,接下来就是快门了第三快门shutter speed(s^-1)快门越低暴光的时间就越长,也越亮,快门越高暴光时间越短,也越暗,当然,如果你的场景有500平方,又只有一只萤火虫照明,你开到最低-1也见不得会亮起来,也必须把光圈的值降低才可以现在知道摄像机的好处了吧,如果我所说的这个场景,MAX相机是不可能实现照明,但VR的物理相机可以,也就是当你把参数设好后,如果觉得整体太亮或太暗就不用动灯光了,只要动摄像机就行了VR物理相机3Ds max 2009-08-18 18:25 阅读367 评论0字号:大中小vray 物理相机(2009-07-25 07:29:39)标签:杂谈VRay物理相机基本原理详解2009/03/15 18:411. 功能VRayPhysicalCamera(VRay物理相机)可以模拟真实相机的结构原理,包括镜头、光圈、快门和景深等。
[V-ray]教你如何使用V-ray物理相机渲染夜晚场景
![[V-ray]教你如何使用V-ray物理相机渲染夜晚场景](https://img.taocdn.com/s3/m/7e73276bf5335a8102d2206c.png)
[V-ray]教你如何使用V-ray物理相机渲染夜晚场景以下是一个主要使用物理相机渲染夜景教程的具体作图步骤:一、焦距、光圈等参数设置1、焦距,相机的镜头焦距是衡量镜头所拍摄范围的一个重要参量。
2、光圈,控制进入镜头光的强弱,数值越大,光圈越小,进光量越少。
3、佑算垂直移动,在你移动相机位置时,点这个按扭,它可以校正视图。
4、镜头渐晕,照片的四周较暗中间较亮。
5、白平衡,相机对白色物体的还原。
6、快门,控制镜头进光时间的长短。
7、感光度就是描述胶片对光强的敏感程度,感光度越高的胶片就越容易被感光,但感光度值越大,噪点就越多。
二、正确的曝先是拍摄一张照片基本的要素,而曝光量主要由光圈、快门、感光度决定。
三、在场景打出VR相机,然后根据你想表现的重点来调整相机的角度和高度,适当调节焦距,来获得合适的画面。
特别值得提醒的是,当你确定相机位里以后,别忘记了点一下“估算垂直移动”这个按扭,它可以帮你校正相机视图。
四、根据场景表现的时段,适当调节相机暴光参数。
主要注意光圈、快门和感光度三个地方,这个场景我要表现的是夜景,这三个数的设置如图。
记住它们的参数也不是一成不变的,可在一定的范围内灵活调节。
对于这三个参数,我一般是固定光圈和感光度的值,然后根据场景亮度,在一定范围内适当调节快门值。
五、这是布光图:这个场景一共只有四个灯。
1、是模拟电视的面光;2、是床头台灯;3、是落地灯。
A顶面图B侧面图六、1、灯光1的面版设置,它主要是模拟电视屏幕,注意看画红线的地方。
2、去掉:“忽略灯光法向”的勾选让灯光的物理属性更准确。
3、为了加快渲染速度,可保存灯光直接光照,夜景可以这样做,但白天的话应该取消它可以得到更多阴影细节。
七、灯光2的面版设置。
注意看画红线的地方。
勾选Area shadow(面积阴影),并适当更改U向尺寸,让灯光阴影更柔和,数字可以根据测试的结果灵活调节。
八、灯光3的面版设置。
其他地方和灯光2是差不多的,不同的是颜色和强度,并要消高光反射,让地板反射不到这个灯。
物理相机参数设置

物理相机参数设置
在1.5RCx版本的VRay里面,新增了一个物理相机的功能,其参数与真实相机是十分相似的,所以使用它就要有一定的摄影知识,这样就很方便的调节出自己想要的效果.
景深
这个新增的物理相机对与景深的调节是非常直观的,如下图,三个平面已经显示出景深的范围,那么我们需要做的就是将需要拍摄的物理放在景深范围里及焦平面上.
影响景深的因素
影响景深的因素有三个,分别是光圈口径,镜头焦矩和摄影距离.它们与景深的关系是:
-光圈越大,景深越小;光圈越小,景深越大
-焦距越长,景深越小;焦距越短,景深越大
-摄距越近,景深越小;摄距越远,景深越大
那么在VRay里我们就需要调节这三者的参数来使景深范围和焦平面落在被拍摄物体上.
打开景深
如下图,在基本参数里面,勾取手动调焦(specify focus),然后调节焦点距离(focus distance)这个参数,配合光圈(f-number)和相机的位置,使景深范围及焦平面落在被拍摄物体上.最后,就要勾选Sampling卷展栏下的depth-of-field选项,下面的细分(subdivs)是控制DOF和运动模糊的质量,值越大,质量越好,渲染时间就越长.
VRAY物理相机模仿单反相机的,具体参数与单反参数无太大出入,输出时参数设置也比较灵活。
VRay如何设置并使用物理相机
VRay如何设置并使用物理相机+VRaySun+VRaySky对于MAX来说,日光系统是模拟现实的物理光源,可真实再现太阳在真实时间里出现的位置,而VRay内设的太阳光VRaySun正是为了更真实的表现日光来开发的,并且已经从1.5版本开始整合在MAX辅助工具的日光系统中,更方便的调整正确位置。
作为辅助的VRaySky 贴图系统则是模拟天空环境颜色,它将依照日光位置、强度、大气……等等产生颜色亮度变化。
那么要保证日光亮度更真实,就要采用VRay的物理相机,通过它的真实参数设置来调整整个画面曝光和色彩对比。
这篇教程就是针对这三个物理模块来进行解析,只介绍常用参数,因为其他参数不会对图像产生过多影响。
所有演示图片所采用的渲染设置:对于MAX来说,日光系统是模拟现实的物理光源,可真实再现太阳在真实时间里出现的位置,而VRay内设的太阳光VRaySun正是为了更真实的表现日光来开发的,并且已经从1.5版本开始整合在MAX辅助工具的日光系统中,更方便的调整正确位置。
作为辅助的VRaySky 贴图系统则是模拟天空环境颜色,它将依照日光位置、强度、大气……等等产生颜色亮度变化。
那么要保证日光亮度更真实,就要采用VRay的物理相机,通过它的真实参数设置来调整整个画面曝光和色彩对比。
这篇教程就是针对这三个物理模块来进行解析,只介绍常用参数,因为其他参数不会对图像产生过多影响。
所有演示图片所采用的渲染设置:要注意:日光系统是依照上北下南左西右东的坐标方向来定位太阳,所以不论室外建筑还是室内场景,记得要先确定图纸上窗口南北朝向,在建立模型时保证方位一致,这样明暗关系才正确。
进入工具栏的辅助工具,建立日光辅助系统。
将默认设置的MAX自身日光转化为VRaySun模式。
由于VRay对MAX的天光不兼容,所以记得关掉下面的天光。
日光系统的定位模式有三种:手动、日期时间和区域地点、气象数据文件。
手动模式比较自由,可以随意调整位置,但不准确。
vr物理相机的参数详解(Thep...

vr物理相机的参数详解(The parameters of vr physical camera aredetailed)VR physics camera parameter translation (2009-07-28 19:54:04) reprint label: photography, VR, aperture, shutter, check, Vray, physics, camera homeCompared to cameras with Max itself, the VR physics camera simulates true imaging and allows easier adjustment of perspective. Cameras alone can control exposure, and there are many other very good features and effects.Since I know very little about photography, I read a few articles online to find out its parameters.Basic parameters: basic parametersType: typeStill cam cameraMovie cam cameraVideo cameraTargeted target pointFilm gate (mm) gate sizeFocal, length (mm) focal lengthZoom factor amplification factorF-number aperture factorTarget distance destination distance (valid when targeted is not checked)Distortion twistDistortion type twist typeQuadratic squareCubic cubeVertical shift vertical correctionGuess vertical shift automatic vertical correctionSpecify focus manual focusFocus distance focal length (valid when specify focus is checked)Exposure exposureVignetting vignettingWhite balance white balanceShutter speed (1/x) shutter (camera)Shutter angle (DEG) shutter angle (camera)Shutter offset (DEG) shutter offset (camera)Latency (s) delay (camera)Film speed (ISO) film speedBokeh effiects: special effectsBlades aperture blade countRotation (DEG) rotationCenter bias center offsetAnisotropy anisotropySampling samplingDepth-of-field depth of fieldMotion blur motion blurSubdivs subdivisionCamera knowledge and understanding of several important parameters:F-number aperture factorThe aperture coefficient is inversely proportional to the aperture relative to the aperture. The smaller the coefficient, the greater the aperture, and the greater the luminous intensity, the brighter and clearer the bodyThe aperture coefficient is proportional to the depth of field, and the greater the depth of fieldShutter speed shutter speedThe actual speed is the reciprocal of the shutter speed, so the larger the number the more quicklyThe smaller the shutter speed, the slower the actual speed. The more light passed through, the brighter and clearer the subjectThe shutter speed is inversely proportional to the motion blur, and the smaller the value, the more blurred the motionISO film speed, the greater the value of lightThe white balance white balance is defined as white, regardless of how light affects the white color of the environmentZoom factor this parameter determines the final image (near or far), but it does not need to push near or pull the camera awayVignetting: OnSimilar to the actual camera lens vignetting (pictures aroundthe dark, the middle of the bright).VR cameras are the most important of three parameters, aperture, shutter, and ISO sensitiveThe first is the aperture (f-number), the highest value of our normal camera aperture is only 8 (digital camera), there are more, but I think is not very practical, so the numerical aperture is generally controlled within 8, the reality of the camera aperture and a function is to control the depth of field value around the lower shoot objects focus more fuzzy, with higher values around more clearly. Unless you open the depth of field, or generally controlled in the range 5-8, the lower the number the higher the more dark light, numericalSecond is ISO (film speed ISO), also can say film speed, according to the experience of photography, daytime ISO control in 100-200, at night control inWell, now the two values are roughly defined, how to set, and then the shutterShutter speed (s^-1) third shutter shutter of the lower exposure time longer, more bright, more high shutter exposure time is shorter, more dark, of course, if your scene is 500 square, and only a firefly lighting, you also can not see to the lowest -1 will light up, must also the aperture value can be reducedNow I know the benefits of the camera, if I say this scene,MAX cameras are impossible to achieve lighting, but the VR physical camera can, that is, when you set the parameters, if you feel the whole is too bright or too dark, do not have to move the lights, just move the camera on itVR physical cameraPublished at 11:17 2007-01-14, author: Zhou ZhengpingCommon sense in photography (VRAY basic knowledge of camera Physics)1. Film speed (ISO) film sensitivityISO (abbreviated as International Standards Organization).ISO photographic value is the sensitivity of traditional camera negative to light response. The measured value is usually expressed in ISO digitalThe more sensitive, the commonly used methods of expression are ISO 100, 400, 1000 and so on. Generally speaking, the higher the sensitivity, the negative of the filmThe thicker the particle, the less effective the magnification is, and the digital camera also applies this ISO value to mark the exposure used by the metering system, the benchmarkThe lower the ISO, the higher the amount of exposure required.2. aperture (aperture)There is a set of overlapping metal plating in the camera lens. When the exposure time is constant, the aperture will be larger, then the exposure of the film will be enoughThe greater. Represented by the f/ value (f-number). The general camera's diaphragm values are f/1.4, f/2, f/2.8, f/4, f/5.6F/8, f/11, f/16, f/22, the aperture value jumps up and down a grid, and the exposure will be doubled or halved.3. shutter (Shutter)Of course, mainly refers to the shutter speed (Shutter speed). As mentioned above, the opening time of metal leaves is determined.The shutter speed of many cameras is now controlled by the camera's own computer. In the traditional camera or some semi professional, to the higher level cameraThe shutter speed of the camera still needs to be manually operated, mainly including the following, from slow and fast, 1, 1/2, 1/4, 1/8, 1/15, 1/30,1/60, 1/125, 1/250, 1/500, 1/1000 seconds, and in some of the more professional cameras, there are longer or shorter than theseGate speed setting. In the same way, the shutter speed jumpsup and down at one or more times, and the amount of exposure is doubled or halved.4. the relationship between the aperture and the shutterThe larger the aperture, the shorter the relative exposure time (under special conditions), and there are many different shutter speedsYou can get the same exposure with the aperture and the aperture, but the exposure may not be the same, because it involves the depth of fieldLater on. The lens with the largest aperture is called a fast lens because it matches the shutter speed at a relatively fast pace.5. depth of field (Depth-of-field)Sometimes you can see some pictures of the subject and background are very clear, but also seen only the main clear, and around the focus of the photos Lost focus.To produce these effects involves the problem of depth of field. When selecting the faster exposure rate, we usually need to use the ratioThe larger the aperture, then the depth of field will be relatively short, the clear range of the picture will be relatively small, some scenes may be more obscure; andIf the shutter speed is slow, so the aperture can be small, then there may make the picture dictation messy you don't part ofCome out now. Therefore, how to control the depth of field is an initial and important technique in photography.conceptSimply put, depth of field is the clear range of the scene of the photograph. Theoretically, only objects in the focus plane are clear, but due toThe discrimination of the naked eye, so in general, some objects around the focal plane will behave very clearly.Factors related to depth of fieldThe focal length of the 1. lensThe focal length of the lens is different, and the depth of field will vary. A long lens produces a shorter depth of field, and a short shot produces a ratioLonger depth of field effect.2. irisIn general, the larger the aperture, the shorter the depth of field, and the smaller the aperture, the longer the depth of field.The distance between the 3. shots from the main bodyThe closer the body is, the shorter the depth of field is. Vice versa。
- 1、下载文档前请自行甄别文档内容的完整性,平台不提供额外的编辑、内容补充、找答案等附加服务。
- 2、"仅部分预览"的文档,不可在线预览部分如存在完整性等问题,可反馈申请退款(可完整预览的文档不适用该条件!)。
- 3、如文档侵犯您的权益,请联系客服反馈,我们会尽快为您处理(人工客服工作时间:9:00-18:30)。
1)运行3ds max 2011,打开素材文件“巧克力豆.max”,该文件已经对材质、光源进行了设置,并创建了VR-物理相机,在本训练中,将为大家讲解VR-物理相机的基本编辑参数。
(2)渲染“VR-物理相机001”视图,观察当前场景效果。
(3)选择“VR-物理相机001”,进入“修改”面板。
(4)由于本实例为静态场景,所以在“类型”下拉式选项栏选择“照相机”选项。
提示:“类型”下拉式选项栏内的“摄影机”主要模拟电影相机效果;“摄像机”主要模拟录像机的镜头。
(5)设置“片门大小”参数为60,观察镜头效果。
(6)35mm的胶片是最流行的胶片尺寸,设置“片门大小”参数为35,观察镜头效果。
(7)设置“焦距”参数为100,渲染“VR-物理相机001”视图,观察当前场景效果。
(8)设置“焦距”参数为35,渲染“VR-物理相机001”视图,观察当前场景效果。
(9)设置“缩放因数”参数为3,观察镜头效果。
(10)设置“缩放因数”参数为1,观察镜头效果。
(11)设置“水平偏移”参数为0.4,观察镜头效果。
(12)设置“水平偏移”参数为0,观察镜头效果。
(13)设置“垂直偏移”参数为0.3,观察镜头效果。
(14)设置“垂直偏移”参数为0,观察镜头效果。
(15)设置“光圈系数”参数为1,渲染“VR-物理相机001”视图,观察当前场景效果。
(16)设置“光圈系数”参数为7,渲染“VR-物理相机001”视图,观察当前场景效果。
(17)设置“垂直纠正”参数为1,观察镜头效果。
(18)设置“垂直纠正”参数为0,观察镜头效果。
(19)设置“水平纠正”参数为1,观察镜头效果。
(20)设置“水平纠正”参数为0,观察镜头效果。
(21)设置“渐晕”参数为5,渲染“VR-物理相机001”视图,观察当前场景效果。
提示:选择“渐晕”复选框后,可以模拟真实相机的虚光效果,也就是画面中心部分比边缘部分的光线亮。
(22)设置“渐晕”参数为1,渲染“VR-物理相机001”视图,观察当前场景效果。
(23)将“自定义平衡”设置为黄色。
提示:“白平衡”针对不同色温条件下,通过调整摄像机内部的色彩电路使拍摄出来的影像抵消偏色,更接近人眼的视觉习惯。
白平衡可以简单地理解为在任意色温条件下,摄像机镜头所拍摄的标准白色经过电路的调整,且使之成像后仍然为白色,可以由右边的预设选项来定义白平衡,也可以由下面的“自定义平衡”选项来调节。
(24)渲染“VR-物理相机001”视图,观察当前场景效果。
(25)将“自定义平衡”设置为蓝色。
(26)渲染“VR-物理相机001”视图,观察当前场景效果。
(27)设置“快门速度”参数为100,渲染“VR-物理相机001”视图,观察当前场景效果。
提示:“快门速度”参数值是实际速度的倒数,控制光通过镜头到达感光材料(胶片)的时间,其时间长短会影响到最后图像的亮度,如果将快门速度设为80,那么最后的实际快门速度为1/80秒。
因此,数值小的快门慢(快门打开的时间长,通过的光就会多,感光材料(胶片)所得到的光就会越多,最后的图像就会越亮),数值大的快门快(所得到的图像就会越暗)。
这样就得到一个结果,数值越大图像就会越暗,反之就会越亮。
(28)设置“快门速度”参数为200,渲染“VR-物理相机001”视图,观察当前场景效果。
(29)设置“感光速度”参数为300,渲染“VR-物理相机001”视图,观察当前场景效果。
(30)设置“感光速度”参数为150,渲染“VR-物理相机001”视图,观察当前场景效果。
(31)现在本实例就完成了。