Linux IPSec操作手册
集成于Linux操作系统的IPSec实现

集成于Linux操作系统的IPSec实现
郭井龙;高翔
【期刊名称】《电子设计应用》
【年(卷),期】2003(000)012
【摘要】本文分析了Linux内核2.5.74中IPSec协议对数据的处理过程,包括数据被IPSec接管、处理的过程,以及IPSec对报文的发送、接收和转发过程,并通过对该过程的分析给出了其实现的总体思想和框架.
【总页数】3页(P57-59)
【作者】郭井龙;高翔
【作者单位】信息工程大学信息工程学院;信息工程大学信息工程学院
【正文语种】中文
【中图分类】TN91
【相关文献】
1.浅析GRE over IPSEC与IPSEC over GRE实现方法 [J], 过林吉
2.IPSec和L2TP集成的多安全连接技术研究及实现 [J], 李慧;李涛
3.基于IPv6嵌入式Linux操作系统IPSec协议的研究与设计 [J], 陈晓丹;苏利敏;薛永毅
4.在Windows 7、Windows Server 2008和Windows Vista中和用IPsec实现服务器隔离——连接安全规则首次集成到IPsec和防火墙功能中 [J], 肖欣(译)
5.吏用IPsec实现域隔离通过推送IPsec策略实现网络的安全划分 [J], Russell Smith; 黄思维(译者)
因版权原因,仅展示原文概要,查看原文内容请购买。
linux命令操作手册

linux命令操作手册一、文件操作1.1 创建文件:使用touch命令可以创建一个空文件,语法为“touch 文件名”。
1.2 编辑文件:使用文本编辑器(如vi、nano等)可以编辑文件,语法为“编辑器文件名”。
1.3 复制文件:使用cp命令可以复制文件,语法为“cp 源文件目标文件”。
1.4 移动文件:使用mv命令可以移动文件,语法为“mv 源文件目标目录”。
1.5 删除文件:使用rm命令可以删除文件,语法为“rm 文件名”。
二、目录操作2.1 创建目录:使用mkdir命令可以创建目录,语法为“mkdir 目录名”。
2.2 删除目录:使用rmdir命令可以删除目录,语法为“rmdir 目录名”。
2.3 移动目录:使用mv命令可以移动目录,语法为“mv 目录名目标目录”。
2.4 复制目录:使用cp命令可以复制目录,语法为“cp -r 源目录目标目录”。
三、文本操作3.1 查看文件内容:使用cat命令可以查看文件内容,语法为“cat 文件名”。
3.2 编辑文件内容:使用文本编辑器(如vi、nano等)可以编辑文件内容。
3.3 查找文本:使用grep命令可以查找文本,语法为“grep '查找内容' 文件名”。
3.4 替换文本:使用sed命令可以替换文本,语法为“sed 's/查找内容/替换内容/g' 文件名”。
四、压缩与解压4.1 压缩文件:使用tar命令可以压缩文件,语法为“tar -czvf 压缩文件名.tar.gz 源文件或目录名”。
4.2 解压文件:使用tar命令可以解压文件,语法为“tar -xzf 压缩文件名.tar.gz”。
五、文件查找5.1 查找文件:使用find命令可以查找文件,语法为“find 查找路径-name '文件名'”。
5.2 查找目录:使用find命令可以查找目录,语法为“find 查找路径-type d -name '目录名'”。
TransPort主模式IPsec IKEv1 VPN使用手册说明书

Quick Note 061Main Mode IPsec IKEv1 VPN from TransPort to StrongSwan using Preshared key22 August 20171Introduction (3)1.1Introduction (3)1.2Network Diagram (3)1.3Outline (4)1.4Assumptions (4)1.5Corrections (4)1.6Version (4)2TransPort Configuration (5)2.1Local Ethernet Interface Configuration (5)2.1WAN interface configuration (6)2.1Tunnel Configuration (7)2.1.1Phase 1 Settings (7)2.1.2Phase 2 settings (8)2.2Configure users (10)3StrongSwan Configuration (11)3.1Configure Ethernet Interfaces (11)3.1.1WAN Interface (11)3.1.2Local Interface (11)3.2Install StrongSwan (11)3.3Configure StrongSwan (13)3.3.1IPsec VPN Configuration (13)3.4Start/Restart the StrongSwan IPsec daemon (16)4Check Tunnel Status (17)4.1Digi TransPort (17)4.2StrongSwan (18)5Testing (19)5.1TransPort side (19)5.2StrongSwan side (19)6TransPort Configuration (20)1.1IntroductionThis document describes how to configure a VPN IPsec tunnel between a Digi TransPort WR to and a StrongSwan server using Main Mode, IKEv1 and pre-shared key authentication.1.2Network DiagramTransPort WR RouterStrongSwan1.3OutlineThis guide details the steps involved in configuring a Digi TransPort router to act as an IPsec VPN client to a StrongSwan appliance configured as an IPsec VPN server using Main Mode, IKEv1 and pre-shared key authentication. This example as sumes that both equipment’s are not behind a NAT box.1.4AssumptionsThis guide has been written for use by technically competent personnel with a good understanding of the communications technologies used in the product and of the requirements for their specific application. It also assumes a basic ability to access and navigate a Digi TransPort router and configure it with basic routing functionsThis application note applies to:Model: Digi TransPort WR11/21/31/41/44Firmware versions:WR21: 5.2.17.10 and laterConfiguration: This document assumes that the devices are set to their factory default configurations. Most configuration commands are shown only if they differ from the factory default. Please note: This application note has been specifically rewritten for the specified firmware versions and later but will work on earlier versions of firmware. Please contact ********************* if your require assistance in upgrading the firmware of the TransPort WR routers.1.5CorrectionsRequests for corrections or amendments to this application note are welcome and should be addressed to: ********************* Requests for new application notes can be sent to the same address.1.6Version2.1Local Ethernet Interface ConfigurationNavigate to Configuration – Network > Interfaces > Ethernet > Ethernet 02.1WAN interface configurationIn this example, the mobile interface will be used as the WAN interface on which the IPsec tunnel will be established.Navigate to:Configuration – Network > Interfaces > MobilePlease note: If required, enter a SIM PIN and Username/Password for this SIM card and APN.2.1Tunnel ConfigurationOpen a web browser to the IP address of the TransPort WR21 router. 2.1.1Phase 1 SettingsNavigate to:Configuration – Network > Virtual Private Network (VPN) >IKE > IKE 02.1.2Phase 2 settingsNavigate to:Configuration – Network > Virtual Private Network (VPN) > IPsec > IPsec 0 – 9 > IPsec 0Click Apply2.2Configure usersNavigate to Configuration - Security > Users > User 0-9 > User 9Here the pre-shared key is configured using the WAN IP address of the StrongSwan. The username value should therefore match the Peer ID set in the IPsec configuration above:3.1Configure Ethernet Interfaces3.1.1WAN InterfaceConfigure the WAN interface for the StrongSwan Server. In this example, the Ethernet interface used for WAN is called ens33root@ubuntu:/home/digi# ifconfig ens33 192.168.1.118root@ubuntu:/home/digi# ifconfig ens33 netmask 255.255.255.0root@ubuntu:/home/digi# route add default gw 192.168.1.254 ens333.1.2Local InterfaceConfigure the Local interface for the StrongSwan Server. In this example, the Ethernet interface used for LAN is called enx00249b09ef56root@ubuntu:/home/digi# ifconfig enx00249b09ef56 100.10.10.2root@ubuntu:/home/digi# ifconfig enx00249b09ef56 netmask 255.255.255.03.2Install StrongSwanDepending on the Linux distribution, the installation of StrongSwan might defer. In this document, Ubuntu is used. Please refer to for further installation instructions. The easiest way t o install StrongSwan is via the “apt-get install strongswan” CLI command:digi@ubuntu:~$ sudo apt-get install strongswanReading package lists... DoneBuilding dependency treeReading state information... DoneThe following additional packages will be installed:libstrongswan libstrongswan-standard-plugins strongswan-charonstrongswan-libcharon strongswan-starterSuggested packages:libstrongswan-extra-plugins libcharon-extra-pluginsThe following NEW packages will be installed:libstrongswan libstrongswan-standard-plugins strongswan strongswan-charon strongswan-libcharon strongswan-starter0 upgraded, 6 newly installed, 0 to remove and 59 not upgraded.Need to get 3,731 kB of archives.After this operation, 16.1 MB of additional disk space will be used.Do you want to continue? [Y/n] yGet:1 /ubuntu xenial-updates/main amd64 libstrongswan amd64 5.3.5-1ubuntu3.4 [1,398 kB]Get:2 /ubuntu xenial-updates/main amd64 strongswan-libcharon amd64 5.3.5-1ubuntu3.4 [1,241 kB]Get:3 /ubuntu xenial-updates/main amd64 strongswan-starter amd64 5.3.5-1ubuntu3.4 [742 kB]Get:4 /ubuntu xenial-updates/main amd64 strongswan-charon amd64 5.3.5-1ubuntu3.4 [55.6 kB]Get:5 /ubuntu xenial-updates/main amd64libstrongswan-standard-plugins amd64 5.3.5-1ubuntu3.4 [267 kB]Get:6 /ubuntu xenial-updates/main amd64strongswan all 5.3.5-1ubuntu3.4 [27.1 kB]Fetched 3,731 kB in 12s (307 kB/s) Preconfiguring packages ...Selecting previously unselected package libstrongswan.(Reading database ... 175214 files and directories currently installed.) Preparing to unpack .../libstrongswan_5.3.5-1ubuntu3.4_amd64.deb ...Unpacking libstrongswan (5.3.5-1ubuntu3.4) ...Selecting previously unselected package strongswan-libcharon.Preparing to unpack .../strongswan-libcharon_5.3.5-1ubuntu3.4_amd64.deb ... Unpacking strongswan-libcharon (5.3.5-1ubuntu3.4) ...Selecting previously unselected package strongswan-starter.Preparing to unpack .../strongswan-starter_5.3.5-1ubuntu3.4_amd64.deb ... Unpacking strongswan-starter (5.3.5-1ubuntu3.4) ...Selecting previously unselected package strongswan-charon.Preparing to unpack .../strongswan-charon_5.3.5-1ubuntu3.4_amd64.deb ... Unpacking strongswan-charon (5.3.5-1ubuntu3.4) ...Selecting previously unselected package libstrongswan-standard-plugins. Preparing to unpack .../libstrongswan-standard-plugins_5.3.5-1ubuntu3.4_amd64.deb ...Unpacking libstrongswan-standard-plugins (5.3.5-1ubuntu3.4) ...Selecting previously unselected package strongswan.Preparing to unpack .../strongswan_5.3.5-1ubuntu3.4_all.deb ...Unpacking strongswan (5.3.5-1ubuntu3.4) ...Processing triggers for man-db (2.7.5-1) ...Setting up libstrongswan (5.3.5-1ubuntu3.4) ...Setting up strongswan-libcharon (5.3.5-1ubuntu3.4) ...Setting up strongswan-starter (5.3.5-1ubuntu3.4) ...Setting up strongswan-charon (5.3.5-1ubuntu3.4) ...Setting up libstrongswan-standard-plugins (5.3.5-1ubuntu3.4) ...Setting up strongswan (5.3.5-1ubuntu3.4) ...Please note: All commands have to be used in elevated or super user mode. For ease of configuration, this document will use the root user (not recommended). In most case, using “sudo” in front of each commands will provide the expected result.3.3Configure StrongSwan3.3.1IPsec VPN ConfigurationThe IPsec configuration of StrongsWan is done via 2 main files (when using pre-shared keys as in this example):-ipsec.conf : Used for Phase 1 (IKE) and Phase 2 IPsec configuration-ipsec.secrets : Used for pre-shared keysIn this example, the following Phase 1 settings will be used:-AES (128 bit)-SHA 1-MODP Group 2-Main ModeIn this example, the following Phase 2 settings will be used:-AES (128 bit)-SHA 1-No PFS-ID Types : IPv4-Preshared Keys3.3.1.1ipsec.confEdit the ipsec.conf file using a text editor such as vi: config setupconn %defaultikelifetime=60mkeylife=20mrekeymargin=3mkeyingtries=%foreverkeyexchange=ikev1authby=secretconn peer1-peer2left=192.168.1.118leftsubnet=100.10.10.0/24leftfirewall=yesright=%anyrightallowany=yesrightsubnet=10.0.0.0/24auto=startcloseaction=restartike=aes128-sha1-modp1024esp=aes128-sha1type=tunnelkeyingtries=%forevertype :wq to save and close3.3.1.2ipsec.secretsEdit the ipsec.secrets file using a text editor such as vi:192.168.1.118 : PSK "digidigi"192.168.1.23 : PSK "digidigi"type :wq to save and close3.4Start/Restart the StrongSwan IPsec daemonOnce the files are modified, the changes will only take effect after reloading the StrongSwan daemon. To do so, issue the following command:root@ubuntu:/home/digi# ipsec restartStopping strongSwan IPsec...Starting strongSwan 5.3.5 IPsec [starter]...4.1Digi TransPortNavigate to Management – Connections > Virtual Private Networking (VPN) > IPsec > IPsec Tunnels > IPsec Tunnels 0 – 9 > IPsec Tunnels 0-9Via CLI:sastatCommand: sastatCommand resultIPsec SAs (total:1). Eroute 0 -> 49Outbound V1 SAsSPI Eroute Peer IP Rem. subnet Loc. subnet TTL KBytes Left VIPc3b444ae 0 192.168.1.118 100.10.10.0/24 10.0.0.0/24 28648 0 N/AInbound V1 SAsSPI Eroute Peer IP Rem. subnet Loc. subnet TTL KBytes Left VIP6eb46719 0 192.168.1.118 100.10.10.0/24 10.0.0.0/24 28648 0 N/AOutbound V2 SAsList EmptyInbound V2 SAsList EmptyOK4.2StrongSwanroot@ubuntu:/home/digi# ipsec statusallStatus of IKE charon daemon (strongSwan 5.3.5, Linux 4.10.0-28-generic,x86_64):uptime: 29 seconds, since Aug 22 06:25:17 2017malloc: sbrk 1486848, mmap 0, used 344640, free 1142208worker threads: 11 of 16 idle, 5/0/0/0 working, job queue: 0/0/0/0, scheduled: 3loaded plugins: charon test-vectors aes rc2 sha1 sha2 md4 md5 random nonce x509 revocation constraints pubkey pkcs1 pkcs7 pkcs8 pkcs12 pgp dnskey sshkey pem openssl fips-prf gmp agent xcbc hmac gcm attr kernel-netlink resolve socket-default connmark stroke updownListening IP addresses:192.168.1.118100.10.10.2Connections:peer1-peer2: 192.168.1.118...%any,0.0.0.0/0,::/0 IKEv1peer1-peer2: local: [192.168.1.118] uses pre-shared key authenticationpeer1-peer2: remote: uses pre-shared key authenticationpeer1-peer2: child: 100.10.10.0/24 === 10.0.0.0/24 TUNNELSecurity Associations (1 up, 0 connecting):peer1-peer2[1]: ESTABLISHED 22 seconds ago,192.168.1.118[192.168.1.118]...192.168.1.23[192.168.1.23]peer1-peer2[1]: IKEv1 SPIs: 6eb06982e84e8679_i 208d286522e19369_r*, pre-shared key reauthentication in 54 minutespeer1-peer2[1]: IKE proposal:AES_CBC_128/HMAC_SHA1_96/PRF_HMAC_SHA1/MODP_1024peer1-peer2{1}: INSTALLED, TUNNEL, reqid 1, ESP SPIs: cc5e3c54_i 6eb4671a_o peer1-peer2{1}: AES_CBC_128/HMAC_SHA1_96, 0 bytes_i, 0 bytes_o, rekeying in 15 minutespeer1-peer2{1}: 100.10.10.0/24 === 10.0.0.0/24To simply test the tunnel, generate a ping from each side of the tunnel and ping the remote end’s ethernet interface.5.1TransPort sideCommand: ping 100.10.10.2 –e0Command resultPinging Addr [100.10.10.2]sent PING # 1PING receipt # 1 : response time 0.00 secondsIface: PPP 1Ping StatisticsSent : 1Received : 1Success : 100 %Average RTT : 0.00 secondsOK5.2StrongSwan sideroot@ubuntu:/home/digi# ping 10.0.0.1PING 10.0.0.1 (10.0.0.1) 56(84) bytes of data.64 bytes from 10.0.0.1: icmp_seq=1 ttl=250 time=2.30 ms64 bytes from 10.0.0.1: icmp_seq=2 ttl=250 time=1.30 ms64 bytes from 10.0.0.1: icmp_seq=3 ttl=250 time=1.56 ms64 bytes from 10.0.0.1: icmp_seq=4 ttl=250 time=1.28 ms64 bytes from 10.0.0.1: icmp_seq=5 ttl=250 time=1.35 ms64 bytes from 10.0.0.1: icmp_seq=6 ttl=250 time=1.38 ms^C--- 10.0.0.1 ping statistics ---6 packets transmitted, 6 received, 0% packet loss, time 5010msrtt min/avg/max/mdev = 1.287/1.532/2.304/0.358 mseth 0 IPaddr "10.0.0.1"addp 0 enable ONlapb 0 ans OFFlapb 0 tinact 120lapb 1 tinact 120lapb 3 dtemode 0lapb 4 dtemode 0lapb 5 dtemode 0lapb 6 dtemode 0ip 0 cidr ONdef_route 0 ll_ent "ppp"def_route 0 ll_add 1eroute 0 descr "StrongSwan"eroute 0 peerip "192.168.1.118" eroute 0 peerid "192.168.1.118" eroute 0 ourid "192.168.1.23" eroute 0 ouridtype 3eroute 0 locip "10.0.0.0"eroute 0 locmsk "255.255.255.0" eroute 0 locipifadd 1eroute 0 remip "100.10.10.0" eroute 0 remmsk "255.255.255.0" eroute 0 ESPauth "SHA1"eroute 0 ESPenc "AES"eroute 0 authmeth "PRESHARED" eroute 0 nosa "TRY"eroute 0 autosa 2eroute 0 enckeybits 128dhcp 0 respdelms 500dhcp 0 mask "255.255.255.0"dhcp 0 gateway "192.168.1.1"dhcp 0 DNS "192.168.1.1"sntp 0 server "" ppp 0 timeout 300ppp 1 name "W-WAN"ppp 1 phonenum "*98*1#"ppp 1 username "username"ppp 1 epassword "KD5lSVJDVVg=" ppp 1 IPaddr "0.0.0.0"ppp 1 timeout 0ppp 1 do_nat 2ppp 1 ipsec 1ppp 1 use_modem 1ppp 1 aodion 1ppp 1 autoassert 1ppp 1 r_chap OFFppp 3 defpak 16ppp 4 defpak 16web 0 prelogin_info ONike 0 encalg "AES"ike 0 keybits 128ike 0 authalg "SHA1"ike 0 ikegroup 2ike 0 noresp ONike 0 deblevel 4ike 0 debug ONana 0 anon ONana 0 l2on OFFana 0 l3on OFFana 0 xoton OFFana 0 lapdon 0ana 0 lapbon 0ana 0 ikeon ONana 0 logsize 45cmd 0 unitid "ss%s>"cmd 0 cmdnua "99"cmd 0 hostname "digi.router"cmd 0 asyled_mode 2cmd 0 tremto 1200cmd 0 rcihttp ONuser 0 access 0user 1 name "username"user 1 epassword "KD5lSVJDVVg="user 1 access 0user 2 access 0user 3 access 0user 4 access 0user 5 access 0user 6 access 0user 7 access 0user 8 access 0user 9 name "192.168.1.118"user 9 epassword "PDZxU0FFQFU="user 9 access 4local 0 transaccess 2sslsvr 0 certfile "cert01.pem"sslsvr 0 keyfile "privrsa.pem"ssh 0 hostkey1 "privSSH.pem"ssh 0 nb_listen 5ssh 0 v1 OFFcloud 0 clientconn ONcloud 0 ssl ONOKPage | 21。
Linux IPSec操作手册

Linux IPSec操作手册IPSec操作手册第一部分: OpenSSL生成证书首先需要一个根证书,然后用这个根证书来下发“子证书”。
1,找一台Linux PC, 首先切换目录,到 /etc/pki/tls/misc,openssl的脚本在这里。
2,生成根证书: ./CA -newca输入pass phrase,后面签发的时候会用到,类似一个密码 CA证书的路径在/etc/pki/CA/cacert.pem3,生成server私有密钥:openssl genrsa -out server.key 20484,生成服务器证书请求:openssl req -new -key server.key -out server.csr5,把server.crt文件改名成newreq.pem,然后用CA来签证就可以了 mv server.csr newreq.pem ./CA �Csign6,把newcert.pem改名成server.pem mv newcert.pem server.pem 这就是server的证书。
7,重复3-6步,生成client的证书和私钥。
8,将 server.key 和 server.pem 和 cacert.pem复制到FC1080,其中server.key 和server.pem import到Local Certificates中,cacert.pem import到Trusted CA 中(只需导入证书部分,描述部分不用导入)在Linux PC上,新建/var/cert 目录,将client.pem, client.key, cacert.pem复制到 /var/cert/目录下。
9,在Linux PC的 /var/cert/目录下执行下列命令:ln -s cacert.pem $(openssl x509 -noout -hash -in cacert.pem).0这个命令是生成一个hash link,如果没有此hash link,后面将无法建立IPSec通道至此两台主机的证书分发工作已经完成。
Centos7 搭建IPSEC上的L2TP服务器
2
ipsec
l2tp
[root@]#cd /etc/ipsec.d/ [root@]#vi l2tp_psk.conf conn L2TP-PSK-NAT rightsubnet=vhost:%priv also=L2TP-PSK-noNAT conn L2TP-PSK-noNAT authby=secret pfs=no auto=add keyingtries=3 dpddelay=30 dpdtimeout=120 dpdaction=clear rekey=no ikelifetime=8h
[OK]
[OK]
[OK] [OK] [OK] [OK] [N/A] [OK] [OK] [OK] [OK] [OK] [OK]
nat_traversal=yes virtual_private=%v4:10.0.0.0/8,%v4:192.168.0.0/16,%v4:172.16.0.0/12,%v4 :25.0.0.0/8,%v4:100.64.0.0/10,%v6:fd00::/8,%v6:fe80::/10 # For example connections, see your distribution's documentation directory, # or https:///wiki/ # # There is also a lot of information in the manual page, "man ipsec.conf" # # It is best to add your IPsec connections as separate files in /etc/ipsec. d/ include /etc/ipsec.d/*.conf
IPSec使用方法:配置和启用IPSec的步骤详解(三)

IPSec使用方法:配置和启用IPSec的步骤详解IPSec(Internet Protocol Security)是一种常用的网络安全协议,用于保护网络通信的安全性和完整性。
通过对数据进行加密和认证,IPSec确保了数据在网络传输过程中的保密性和防篡改能力。
本文将详细介绍IPSec的配置和启用步骤,帮助读者了解如何使用IPSec 来保护网络通信的安全。
一、IPSec的概述IPSec协议是在网络层实现的安全协议,它通过对IP数据包进行加密和认证,确保数据在传输过程中的安全性。
IPSec使用了多种加密和认证算法,如DES、3DES、AES等,同时还支持两种模式:传输模式和隧道模式。
传输模式适用于通信双方在同一网络中,而隧道模式则适用于需要跨越不同网络的通信。
二、IPSec的配置步骤以下是IPSec的配置步骤:1. 确定加密和认证算法:首先,需要确定使用哪种加密和认证算法来保护通信。
常用的算法有DES、3DES和AES,认证算法可以选择MD5或SHA。
2. 配置密钥管理:IPSec需要使用密钥来进行加密和认证,因此需要配置密钥管理。
可以选择手动配置密钥,也可以使用自动密钥交换协议(IKE)来自动分发密钥。
3. 配置安全策略:安全策略定义了哪些流量需要被保护,以及如何进行保护。
可以根据需要定义多个安全策略,每个策略可以有不同的加密和认证算法。
4. 配置IPSec隧道:如果需要跨越不同网络的通信,需要配置IPSec隧道。
隧道配置包括隧道模式、本地和远程网关地址,以及相应的加密和认证算法。
5. 启用IPSec:完成配置后,需要启用IPSec来保护通信。
启用IPSec的方式可以是在路由器或网络防火墙上配置相应的规则,也可以在主机上使用IPSec客户端软件。
三、IPSec的启用步骤以下是IPSec的启用步骤:1. 检查设备支持:首先,需要检查网络设备是否支持IPSec。
大多数现代路由器、防火墙和操作系统都已经支持IPSec,但仍需确保设备支持。
centos ipsec 参数

centos ipsec 参数CentOS IPsec 参数IPsec是一种网络协议,用于在互联网上提供安全的数据传输。
CentOS是一种常用的Linux操作系统,支持IPsec协议。
本文将介绍CentOS上IPsec的参数设置。
1. IPsec简介IPsec是Internet Protocol Security的缩写,是一种用于保护网络通信安全的协议。
它通过对通信数据进行加密和认证来防止数据在传输过程中被窃听、篡改或伪造。
2. 安装IPsec在CentOS上安装IPsec,可以使用以下命令:```sudo yum install -y libreswan```这将安装libreswan软件包,它是一个开源的IPsec实现。
3. IPsec参数配置IPsec的参数配置文件位于/etc/ipsec.d/目录下。
可以使用文本编辑器打开该目录下的ipsec.conf文件进行配置。
3.1 配置连接在ipsec.conf文件中,可以配置多个连接。
每个连接的配置以conn开头,后面跟着连接的名称。
例如:```conn myvpn```可以使用不同的名称来区分不同的连接。
3.2 配置本地和远程地址在连接配置中,需要指定本地和远程的IP地址。
例如:```left=192.168.1.100right=203.0.113.10```其中left表示本地地址,right表示远程地址。
3.3 配置加密算法IPsec支持多种加密算法。
可以在连接配置中指定加密算法。
例如:```ike=aes256-sha256-modp2048esp=aes256-sha256```其中ike表示IKE阶段的加密算法,esp表示ESP阶段的加密算法。
3.4 配置预共享密钥预共享密钥用于进行身份验证和密钥交换。
可以在连接配置中指定预共享密钥。
例如:```authby=secret```然后在/etc/ipsec.d/目录下创建一个名为ipsec.secrets的文件,其中包含预共享密钥的配置。
Linux系统的虚拟私有网络(VPN)配置指南

Linux系统的虚拟私有网络(VPN)配置指南虚拟私有网络(Virtual Private Network,简称VPN)是一种在公共网络上建立安全连接的技术,它可以在不安全的网络中创建一个安全的通信通道,用于保护数据传输的安全性和隐私。
在Linux系统中配置VPN可以实现远程访问、跨网络访问等功能。
本文将介绍Linux系统中配置VPN的步骤和方法。
1. 选择合适的VPN协议VPN协议有多种选择,常见的有OpenVPN、PPTP、L2TP等。
在选择协议时需考虑网络环境和安全性需求。
本文以OpenVPN为例进行配置。
2. 安装和配置VPN服务器a. 在Linux系统上安装OpenVPN软件:打开终端,输入以下命令安装OpenVPN软件。
```$ sudo apt-get update$ sudo apt-get install openvpn```b. 配置OpenVPN服务器:创建一个新的配置文件,例如“server.conf”。
```$ sudo nano /etc/openvpn/server.conf```c. 在配置文件中添加以下内容:```port 1194 # VPN服务器监听端口号proto udp # 使用UDP协议dev tun # 使用虚拟隧道设备ca /etc/openvpn/ca.crt # VPN服务器的CA证书cert /etc/openvpn/server.crt # VPN服务器的证书key /etc/openvpn/server.key # VPN服务器的私钥dh /etc/openvpn/dh2048.pem # Diffie-Hellman密钥交换server 10.8.0.0 255.255.255.0 # VPN虚拟IP地址段ifconfig-pool-persist ipp.txt # IP地址保存文件路径push "redirect-gateway def1 bypass-dhcp" # 所有客户端的网络流量通过VPNpush "dhcp-option DNS 8.8.8.8" # DNS解析使用Google Public DNS push "dhcp-option DNS 8.8.4.4"keepalive 10 120 # 心跳包设置comp-lzo # 数据压缩user nobody # 以nobody用户运行group nogroup # 以nogroup组运行persist-key # 保存密钥persist-tun # 保存虚拟隧道status openvpn-status.log # 日志文件路径verb 3 # 日志输出级别```d. 保存并退出配置文件。
IPSec使用教程:保护网络通信的逐步指南
IPSec使用教程:保护网络通信的逐步指南随着互联网的普及和依赖程度的提高,网络通信的安全性变得愈发重要。
IPSec(Internet Protocol Security)作为一种常用的网络加密和认证协议,可以有效保护网络通信的安全。
本文将为读者提供一份IPSec的使用教程,帮助大家逐步了解和部署IPSec,保护网络通信的隐私和完整性。
1. IPsec的概述IPSec是一种在网络层实现的安全协议,为数据包提供了保密性、完整性和认证等服务。
它通过对网络数据进行加密和认证,在数据传输过程中保护数据的安全。
IPSec由两个主要部分组成:认证头(AH)和封装安全负载(ESP),它们可以用于分别提供网络层的数据完整性和数据加密。
2. 确定网络安全需求在开始使用IPSec之前,我们首先需要确定我们的网络安全需求。
这包括确定我们需要保护的数据、需要提供的服务(如完整性、保密性、认证)以及可能的攻击方式。
只有了解了这些需求,才能更好地配置和使用IPSec来保护网络通信。
3. IPSec组件的部署在使用IPSec之前,我们需要部署IPSec的各个组件。
首先,我们需要选择和配置IPSec协议的实现。
常见的实现方式包括在操作系统级别进行部署,如Windows和Linux系统的内置IPSec支持,或者使用第三方软件和设备来实现IPSec功能。
其次,我们需要选择恰当的认证和加密算法,以及密钥管理机制。
这些组件的部署将决定IPSec 在网络通信中的具体效果和安全性。
4. 配置IPSec策略一旦IPSec组件部署完毕,我们就可以开始配置IPSec的策略。
IPSec策略决定了哪些网络流量需要被保护,以及如何保护这些流量。
通过定义IPSec策略,我们可以指定源和目标地址、协议类型、认证和加密算法等参数,使得IPSec根据这些规则对流量进行身份验证、加密和解密。
策略的配置既可以在每台参与通信的主机上进行,也可以在网络设备(如路由器或防火墙)上进行。
Linux2.6下ESP包解析流程
1. 前言在Linux2.6中自带了ipsec的实现,可以不再使用freeswan及其变种了,freeswan通过建立ipsec*的虚拟网卡来将发送和接收ipsec数据包,通过ipsec*网卡看到的数据是明文数据,而2.6中的ipsec实现是不建立ipsec*虚拟网卡的,本文分析一下ESP包进入系统协议栈的处理流程。
以下Linux内核代码版本为2.6.19.2。
2. 流程分析2.1 esp协议结构esp协议结构定义,对于每个IPv4上层的协议,如TCP、UDP、ICMP、IGMP、ESP、AH等都需要定义这个结构挂接到IPv4的协议链表中,当接收到IP数据包时,会根据包中定义的IP协议号找到该结构,然后调用其成员handler函数进行处理。
/* net/ipv4/esp4.c */static struct net_protocol esp4_protocol = {.handler = xfrm4_rcv,.err_handler = esp4_err,.no_policy = 1,};esp协议的handler函数是xfrm4_rcv()2.2 xfrm4_rcv/* net/ipv4/xfrm4_input.c */int xfrm4_rcv(struct sk_buff *skb){return xfrm4_rcv_encap(skb, 0);}实际就是xfrm4_rcv_encap,封装类型参数设置为0,即没封装数据2.3 xfrm4_rcv_encap/* net/ipv4/xfrm4_input.c */int xfrm4_rcv_encap(struct sk_buff *skb, __u16 encap_type){int err;__be32 spi, seq;struct xfrm_state *xfrm_vec[XFRM_MAX_DEPTH];struct xfrm_state *x;int xfrm_nr = 0;int decaps = 0;// 获取skb中的spi和序列号信息if ((err = xfrm4_parse_spi(skb, skb->nh.iph->protocol, &spi, &seq)) != 0) goto drop;// 进入循环进行解包操作do {struct iphdr *iph = skb->nh.iph;// 循环解包次数太深的话放弃if (xfrm_nr == XFRM_MAX_DEPTH)goto drop;// 根据地址, SPI和协议查找SAx = xfrm_state_lookup((xfrm_address_t *)&iph->daddr, spi, iph->protocol, AF_INET);if (x == NULL)goto drop;// 以下根据SA定义的操作对数据解码spin_lock(&x->lock);if (unlikely(x->km.state != XFRM_STATE_VALID))goto drop_unlock;// 检查由SA指定的封装类型是否和函数指定的封装类型相同if ((x->encap ? x->encap->encap_type : 0) != encap_type)goto drop_unlock;// SA重放窗口检查if (x->props.replay_window && xfrm_replay_check(x, seq))goto drop_unlock;// SA生存期检查if (xfrm_state_check_expire(x))goto drop_unlock;// type可为esp,ah,ipcomp, ipip等, 对输入数据解密if (x->type->input(x, skb))goto drop_unlock;/* only the first xfrm gets the encap type */encap_type = 0;// 更新重放窗口if (x->props.replay_window)xfrm_replay_advance(x, seq);// 包数,字节数统计x->curlft.bytes += skb->len;x->curlft.packets++;spin_unlock(&x->lock);xfrm_vec[xfrm_nr++] = x;// mode可为通道,传输等模式, 对输入数据解封装if (x->mode->input(x, skb))goto drop;// 如果是IPSEC通道模式,将decaps参数置1,否则表示是传输模式if (x->props.mode == XFRM_MODE_TUNNEL) {decaps = 1;break;}// 看内层协议是否还要继续解包, 不需要解时返回1, 需要解时返回0, 错误返回负数// 协议类型可以多层封装的,比如用AH封装ESP, 就得先解完AH再解ESPif ((err = xfrm_parse_spi(skb, skb->nh.iph->protocol, &spi, &seq)) < 0)goto drop;} while (!err);/* Allocate new secpath or COW existing one. */// 为skb包建立新的安全路径(struct sec_path)if (!skb->sp || atomic_read(&skb->sp->refcnt) != 1) {struct sec_path *sp;sp = secpath_dup(skb->sp);if (!sp)goto drop;if (skb->sp)secpath_put(skb->sp);skb->sp = sp;}if (xfrm_nr + skb->sp->len > XFRM_MAX_DEPTH)goto drop;// 将刚才循环解包用到的SA拷贝到安全路径// 因此检查一个数据包是否是普通明文包还是解密后的明文包就看skb->sp参数是否为空 memcpy(skb->sp->xvec + skb->sp->len, xfrm_vec,xfrm_nr * sizeof(xfrm_vec[0]));skb->sp->len += xfrm_nr;nf_reset(skb);if (decaps) {// 通道模式if (!(skb->dev->flags&IFF_LOOPBACK)) {dst_release(skb->dst);skb->dst = NULL;}// 重新进入网卡接收函数netif_rx(skb);return 0;} else {// 传输模式#ifdef CONFIG_NETFILTER// 如果定义NETFILTER, 进入PRE_ROUTING链处理,然后进入路由选择处理// 其实现在已经处于INPUT点, 但解码后需要将该包作为一个新包看待// 可能需要进行目的NAT操作, 这时候可能目的地址就会改变不是到自身// 的了, 因此需要将其相当于是放回PRE_PROUTING点去操作, 重新找路由// 这也说明可以制定针对解码后明文包的NAT规则,在还是加密包的时候不匹配// 但解码后能匹配上__skb_push(skb, skb->data - skb->nh.raw);skb->nh.iph->tot_len = htons(skb->len);ip_send_check(skb->nh.iph);NF_HOOK(PF_INET, NF_IP_PRE_ROUTING, skb, skb->dev, NULL,xfrm4_rcv_encap_finish);return 0;#else// 内核不支持NETFILTER, 该包肯定就是到自身的了// 返回IP协议的负值, 表示重新进行IP层协议的处理// 用解码后的内层协议来处理数据return -skb->nh.iph->protocol;#endif}drop_unlock:spin_unlock(&x->lock);xfrm_state_put(x);drop:while (--xfrm_nr >= 0)xfrm_state_put(xfrm_vec[xfrm_nr]);kfree_skb(skb);return 0;}最后说一下返回负协议值的处理, IP上层协议的handler是在ip_local_deliver_finish()函数中调用的:/* net/ipv4/ip_input.c */static inline int ip_local_deliver_finish(struct sk_buff *skb){int ihl = skb->nh.iph->ihl*4;__skb_pull(skb, ihl);/* Point into the IP datagram, just past the header. */skb->h.raw = skb->data;rcu_read_lock();{/* Note: See raw.c and net/raw.h, RAWV4_HTABLE_SIZE==MAX_INET_PROTOS */ int protocol = skb->nh.iph->protocol;int hash;struct sock *raw_sk;struct net_protocol *ipprot;resubmit:// 协议hash值, IPv4最大支持255种协议hash = protocol & (MAX_INET_PROTOS - 1);raw_sk = sk_head(&raw_v4_htable[hash]);/* If there maybe a raw socket we must check - if not we* don't care less*/if (raw_sk && !raw_v4_input(skb, skb->nh.iph, hash))raw_sk = NULL;// 直接在协议数组中获取协议指针if ((ipprot = rcu_dereference(inet_protos[hash])) != NULL) { int ret;if (!ipprot->no_policy) {if (!xfrm4_policy_check(NULL, XFRM_POLICY_IN, skb)) {kfree_skb(skb);goto out;}nf_reset(skb);}// 调用协议handlerret = ipprot->handler(skb);if (ret < 0) {// 如果返回值为负, 取反后重新跳回resubmit点进行选协议处理 protocol = -ret;goto resubmit;}IP_INC_STATS_BH(IPSTATS_MIB_INDELIVERS);} else {if (!raw_sk) {if (xfrm4_policy_check(NULL, XFRM_POLICY_IN, skb)) {IP_INC_STATS_BH(IPSTATS_MIB_INUNKNOWNPROTOS); icmp_send(skb, ICMP_DEST_UNREACH,ICMP_PROT_UNREACH, 0);}} elseIP_INC_STATS_BH(IPSTATS_MIB_INDELIVERS);kfree_skb(skb);}}out:rcu_read_unlock();return 0;}3. 结论虽然在2.6的native ipsec中没支持虚拟网卡,但在通道模式下也用到了netif_rx函数将解码后的数据包重新接收处理的过程,并没有改变skb包的dev网卡参数,因此如果在该网卡上抓包,就会同时抓到最初的加密包和解码后的明文包;而用freeswan的实现,在普通网卡上抓包抓到的是加密包,由于freeswan在解码后将skb包的dev参数改为了ipsec*,因此是通过在ipsec*网卡上能抓到解密包。
Linux IPSec(Internet 协议安全性)
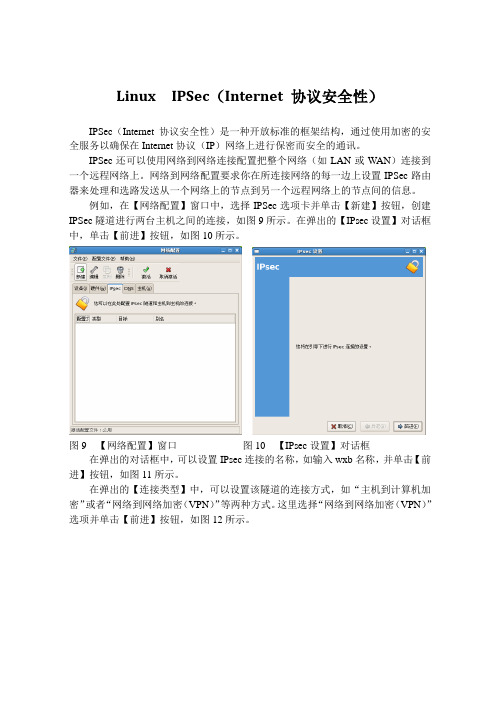
Linux IPSec(Internet 协议安全性)IPSec(Internet 协议安全性)是一种开放标准的框架结构,通过使用加密的安全服务以确保在Internet协议(IP)网络上进行保密而安全的通讯。
IPSec还可以使用网络到网络连接配置把整个网络(如LAN或WAN)连接到一个远程网络上。
网络到网络配置要求你在所连接网络的每一边上设置IPSec路由器来处理和选路发送从一个网络上的节点到另一个远程网络上的节点间的信息。
例如,在【网络配置】窗口中,选择IPSec选项卡并单击【新建】按钮,创建IPSec隧道进行两台主机之间的连接,如图9所示。
在弹出的【IPsec设置】对话框中,单击【前进】按钮,如图10所示。
图9 【网络配置】窗口图10 【IPsec设置】对话框在弹出的对话框中,可以设置IPsec连接的名称,如输入wxb名称,并单击【前进】按钮,如图11所示。
在弹出的【连接类型】中,可以设置该隧道的连接方式,如“主机到计算机加密”或者“网络到网络加密(VPN)”等两种方式。
这里选择“网络到网络加密(VPN)”选项并单击【前进】按钮,如图12所示。
图11 设置别名 图12 设置连接类型在弹出的【加密模式】对话框中,可以设置两台计算机之间的加密方式,如包含有“使用固定钥匙手工加密”或“通过IKA (racoon )的自动加密模式选择”等两种方式。
这里,选择“通过IKA (racoon )的自动加密模式选择”选项,并单击【前进】按钮,如图13所示。
在弹出的【本地网络】对话框中,可以分别设置本地网络的地址、子网掩码、网络网关等内容,图14所示。
图13 加密模式 图14 本地网络设置在【远程网络】对话框中,用户需要输入需要连接的主机的IP 地址、远程网络地址、子网掩码和网关等信息,并单击【前进】按钮,如图15所示。
在【钥匙】对话框中,可以单击【生成】按钮,即可生成一个两台计算机之间的密钥信息,并单击【前进】按钮,如图16所示。
IPSec使用方法:配置和启用IPSec的步骤详解(二)

IPSec使用方法:配置和启用IPSec的步骤详解随着互联网的快速发展,网络安全问题也成为人们关注的焦点。
在保护数据传输过程中,IPSec(Internet Protocol Security)成为一种重要的加密协议,用于实现虚拟私人网络(Virtual Private Network,VPN)的安全通信。
本文将详细介绍IPSec的配置和启用步骤,帮助读者了解如何使用IPSec保护数据的安全传输。
第一步:了解IPSec的基本原理在介绍IPSec的配置步骤之前,我们需要先了解IPSec的基本原理。
IPSec通过对IP数据包的加密、认证和完整性检查,确保网络通信的安全性和机密性。
它使用安全参数索引(Security Parameter Index,SPI)来唯一标识安全传输的流,并使用密钥交换协议(Key Exchange Protocol)来协商通信双方的加密密钥。
第二步:准备IPSec的配置环境在配置IPSec之前,需要准备一些必要的工具和环境。
首先,确保计算机上已经安装了支持IPSec的操作系统和网络设备驱动程序。
其次,确保计算机上具备足够的处理能力和存储资源,以支持IPSec 的运行。
最后,准备一份IPSec的配置文件,用于定义各种安全策略和参数。
第三步:配置IPSec的基本参数在配置IPSec之前,需要先进行一些基本参数的设置。
首先,确定IPSec的安全策略,包括加密算法、认证算法、密钥长度等。
其次,生成安全参数索引(SPI),并为每个需要保护的流分配唯一的SPI。
然后,配置密钥交换协议,选择适合的密钥交换算法和密钥协商模式。
最后,配置隧道模式(Tunnel Mode)或传输模式(Transport Mode),以确定IPSec是在IP数据包的整个负载(Payload)中加密还是仅在IP头(Header)中加密。
第四步:配置IPSec的策略规则配置好IPSec的基本参数后,需要设置策略规则来控制IPSec的具体应用。
LINUX系统VPN(L2TPIPSec)模块移植——IPSec模块设计毕业论文
本科毕业论文题目:LINUX系统VPN(L2TP+IPSec)模块移植——IPSec模块设计姓名:学院:软件学院系:软件工程专业:软件工程年级:学号:指导教师:职称:年月LINUX系统VPN(L2TP+IPSec)模块移植—— IPSec模块设计[摘要]虚拟专网是指在公共网络中建立专用网络,数据通过安全“管道”在公共网络中传播。
使用VPN有节省成本、提供远程访问、扩展性强、便于管理和实现全面控制等好处,是目前和今后网络服务的重点项目。
因此必须充分认识虚拟专网的技术特点,建立完善的服务体系。
目前建造虚拟专网的国际标准有IPsec和L2TP。
其中L2TP是虚拟专用拨号网络协议,是IETF根据各厂家协议进行起草的,目前尚处于草案阶段。
IPSEC是一系列基于IP网络(包括Intranet、Extranet和Internet)的,由IETF正式定制的开放性IP安全标准,是虚拟专网的基础,已经相当成熟可靠。
L2TP协议草案中规定它(L2TP标准)必须以IPSEC为安全基础。
IPSec在Linux支持方面有两个主要的分类,一为Frees/WAN,已经分裂为两个项目,Openswan与 Strongswan。
本文使用Frees/WAN实现IPSec的功能,并详细分析了IPSec的工作原理,配置方法以及配置过程。
最终把Frees/WAN移植到路由器的μCLINUX系统中,使得移植后的系统稳定、功能完善,并且和LINUX操作系统以及CISCO的路由器VPN(L2TP+IPSEC)相兼容。
最终保证通信加密,实现网络通信安全。
[关键字]虚拟专用网;IPSec;Frees/WAN;μCLINUXLINUX system VPN (L2TP + IPSec) module transplant—— IPSec module design[Abstract]Virtual Private Network is the private network that established in the public network, data is transmitting through the channel in the public network. There are advantages of cost savings, providing remote access, strong expansion, convenient to control, and other benefits when using a VPN. It is the key projects for current and future network services. Therefore we must fully understand the technical characteristics of virtual private network, establish, and improve the service system.At present, IPsec and L2TP are two international standards of constructing a virtual private network. L2TP, which is a virtual private dial-up network protocols and drafted according to the agreement of the manufacturers by IETF, is now at a draft stage. IPSEC is a series of open standard that for IP security basing on IP network (including the Intranet, Extranet and Internet), and is drafted by IETF. IPSEC is the foundation of virtual private network, and is quite mature and reliable. L2TP must be based on IPSEC ordained by L2TP draft agreement.There are two main classifications of IPSec supporting on LINUX. One is Frees / WAN, divided into two projects, Openswan and Strongswan. In this paper, we use Frees/WAN to realize IPSec, and furthermore it will analyze through about the working principle, the targeting methods and configuration process about IPSec. Frees/WAN will be eventually migrated to μCLINUX system of the router. After the transplant, system should be stable, comprehensive, and make LINUX operating systems, routers and CISCO VPN (L2TP + IPSEC) compatible. Eventually make sure that the communication is encrypted, the network is secure.[Key words] Virtual Private Network; IPSec; Frees/WAN; μCLINUX目录引言 (1)第一章 IPSec基本思想 (2)IPSec基本原理 (2)1.1.1 IPSec基本组件 (2)1.1.2 IPSec概念划分 (3)1.1.3 IPSec保护机制 (4)1.1.4 IPSec加密技术 (4)IPSec工作模式 (6)IPSec体系模型 (7)IPSec 配置步骤 (7)IPSec工作过程 (7)第二章 Openswan 构建思想 (10)Openswan 概述 (10)Openswan 的连接方式 (10)Openswan 的认证方式 (10)Openswan 的环境配置 (11)2.4.1安装内核源代码 (11)2.4.2下载Openswan及相关补丁 (11)2.4.3选择需要的内核选项 (11)2.4.4编译安装内核 (12)第三章 Openswan 构建过程 (13)安装Openswan (13)NET-TO-NET方式配置Openswan (13)Road Warrior方式配置Openswan (15)安装监听网络 (16)几种捕获包格式 (17)第四章建立编译环境与内核移植 (20)建立编译环境 (20)BLOB移植 (21)uClinux针对硬件的改动 (22)uClinux的移植 (24)网络监听分析 (30)结论 (34)致谢 (35)参考文献 (37)Contents引言 (1)第一章 IPSec基本思想 (2)IPSec基本原理 (2)1.1.1 IPSec基本组件 (2)1.1.2 IPSec概念划分 (3)1.1.3 IPSec保护机制 (4)1.1.4 IPSec加密技术 (4)IPSec工作模式 (6)IPSec体系模型 (7)IPSec 配置步骤 (7)IPSec工作过程 (7)第二章 Openswan 构建思想 (10)Openswan 概述 (10)Openswan 的连接方式 (10)Openswan 的认证方式 (10)Openswan 的环境配置 (11)2.4.1安装内核源代码 (11)2.4.2下载Openswan及相关补丁 (11)2.4.3选择需要的内核选项 (11)2.4.4编译安装内核 (12)第三章 Openswan 构建过程 (13)安装Openswan (13)NET-TO-NET方式配置Openswan (13)Road Warrior方式配置Openswan (15)安装监听网络 (16)几种捕获包格式 (17)第四章建立编译环境与内核移植 (20)建立编译环境 (20)BLOB移植 (21)uClinux针对硬件的改动 (22)uClinux的移植 (24)网络监听分析 (30)结论 (34)致谢 (35)参考文献 (37)引言IPSec(IP Security)是一种较老的也是采用的最为广泛的VPN技术,IPSec可以让我们在不改变外部防火墙规则的情况下,在内核级别相当容易地做出安全处理,确保什么能通过隧道或什么不能;其在实现NET-TO-NET以及HOST-TO-NET的配置方面也表现出了很大的灵活性。
IPSec使用方法:配置和启用IPSec的步骤详解(一)

IPSec使用方法:配置和启用IPSec的步骤详解IPSec(Internet Protocol Security)是一种网络安全协议,用于保护IP通信的安全性和完整性。
在互联网时代,网络安全愈发重要,因此了解和掌握IPSec的使用方法是至关重要的。
本文将详细介绍IPSec的配置和启用步骤,帮助读者更好地了解和应用IPSec。
第一步:了解IPSec的原理与工作方式IPSec是一种VPN(Virtual Private Network)技术,通过加密和认证保护IP通信的安全性。
它利用加密算法对数据进行加密,确保数据在传输过程中不被窃取或篡改。
同时,通过认证机制,确保通信双方的身份可信。
第二步:理解IPSec的组成部分IPSec由两个主要的协议组成:认证头(AH)和封装安全载荷(ESP)。
AH提供数据的完整性和防篡改功能,而ESP则提供加密和认证功能。
另外,IPSec还可以与其他协议结合使用,如IKE(Internet Key Exchange)用于建立安全通信的密钥交换。
第三步:选择合适的IPSec实现根据具体需求和操作系统环境,选择合适的IPSec实现是很重要的。
目前,有许多IPSec实现可供选择,如StrongSwan、OpenSwan和LibreSwan等。
不同实现可能在功能、性能和易用性方面有所差异,因此需根据实际情况进行选择。
第四步:进行IPSec配置在进行IPSec配置之前,需先对网络拓扑进行规划。
确定需要保护的通信通道和通道两端的设备。
配置过程中,需要设定加密算法、认证算法、预共享密钥等参数。
此外,还需确定安全策略,如允许的通信协议、端口范围等。
第五步:启用IPSec服务完成配置后,需要启用IPSec服务。
具体操作因实现方式而异。
对于某些实现,需在操作系统中启用相关服务(如StrongSwan);而对于其他实现,可能需要在防火墙配置中添加规则以启用IPSec。
第六步:测试IPSec连接在配置和启用IPSec后,进行连接测试是很重要的。
IPSec使用方法:配置和启用IPSec的步骤详解(七)

IPSec(Internet Protocol Security)是一种网络安全协议,用于保护网络通信中的数据传输安全性。
通过使用IPSec,我们可以在公共网络上建立安全的虚拟专用网络(VPN)连接,确保数据传输的机密性、完整性和可用性。
本文将详细介绍IPSec的配置和启用步骤。
第一部分:IPSec的基本概念IPSec是一种在网络层提供安全服务的协议,它通过对IP数据包进行加密和认证,保护数据在网络中的传输安全。
IPSec的工作方式包括两个主要组件:认证头(AH)和封装安全负载(ESP)。
认证头用于对数据进行认证,确保数据的完整性和真实性;封装安全负载则负责对数据进行加密,确保数据的机密性。
第二部分:IPSec的配置步骤1. 配置IPSec策略在开始配置IPSec之前,我们需要首先定义一个IPSec策略。
IPSec策略用于确定哪些流量应该被保护,以及应该使用哪种加密和认证算法。
我们可以定义多个IPSec策略,根据实际需要进行灵活配置。
在定义IPSec策略时,需要考虑到系统资源和性能的限制。
2. 配置IKE策略IKE(Internet Key Exchange)是IPSec中用于建立安全连接的协议。
在配置IKE策略之前,我们需要定义预共享密钥或者使用证书进行身份认证。
IKE策略包括了加密算法、认证算法、密钥交换方法等内容。
根据不同的安全需求,我们可以配置多个IKE策略,以适应不同的场景。
3. 配置IPSec隧道IPSec隧道是指通过IPSec建立的安全连接。
在配置IPSec隧道时,我们需要设置隧道的源地址和目的地址,以及加密和认证算法、会话密钥等参数。
配置IPSec隧道时,还需要注意选择合适的传输模式,包括隧道模式和传输模式,以满足不同的网络需求。
第三部分:IPSec的启用步骤1. 安装IPSec软件在启用IPSec之前,我们需要先在系统上安装相应的IPSec软件。
常用的IPSec软件包括StrongSwan、OpenSwan等。
linux操作手册(中文)

001、日常维护常用查询命令#top 显示系统进程#clear 清理屏幕信息#cat /etc/redhat-release 查看系统版本信息#cat /proc/version 查看系统内核版本等信息#uname -a 查看系统内核等信息#cat /proc/cpuinfo 查看CPU信息#cat /proc/meminfo 查看内存信息#cat /proc/swaps 查看交换空间信息#getconf LONG_BIT 查看CPU是32位还是64位#dmidecode|more 如何查看BIOS信息等。
#grep MemTotal /proc/meminfo 查看物理内存信息#grep SwapTotal /proc/meminfo 查看交换空间的大小#cat /etc/passwd 查看账户信息#cat /etc/shadow 查看密码信息#cat /etc/group 查看都有哪些组,每个组包含哪些用户,或#vigr #groups username 查看用户属于哪一个组#ps -aux 显示终端上的所有进程,包括其他用户的进程。
#ps -x 显示没有控制终端的进程。
#ps -e 显示所有进程。
#ps -r 只显示正在运行的进程。
free命令可以查看内存使用率top -n1命令中有CPU使用率信息002、修改启动界面为文本模式(命令模式)3为文本模式,5为图形模式。
#vi /etc/inittab修改id:5:initdefault:为id:3:initdefault:003、修改远程管理时命令行下中文乱码问题Red Hat Enterprise Linux默认的语言编码是“zh_CN.UTF-8”,在X-Window桌面环境下能正常显示汉字,但如果通过SSH或Telnet等方式进行远程管理时,就会发现所有的汉字变成乱码了。
#vi /etc/sysconfig/i18n将LANG="zh_CN.UTF-8"改为LANG="zh_CN.GB18030",重新登录后即可正常显示汉字。
IPSec使用方法:配置和启用IPSec的步骤详解(五)

IPSec使用方法:配置和启用IPSec的步骤详解引言:随着互联网的快速发展,网络安全问题日益突出。
为了保护网络通信的隐私性和完整性,IPSec(Internet Protocol Security)成为一种常见的网络安全协议。
IPSec提供了加密和验证的功能,确保数据的安全传输。
本文将详细介绍IPSec的配置和启用步骤,帮助读者理解和使用IPSec。
一、基础知识在开始配置和启用IPSec之前,有一些基础知识需要了解。
首先,IPSec由两个重要的协议组成:AH(Authentication Header)和ESP (Encapsulating Security Payload)。
AH提供数据的完整性和源认证,而ESP提供数据的加密。
其次,IPSec可以应用在两个主要的模式下:传输模式和隧道模式。
传输模式只对数据报进行加密和验证,而隧道模式对整个IP包进行加密和验证。
最后,IPSec通常需要使用密钥来加密和解密数据,这些密钥可以通过预共享密钥、证书或Internet密钥交换(IKE)协议来生成。
二、配置IPSec下面是配置IPSec的步骤:1. 确认操作系统支持IPSec:首先,需要确保你正在使用的操作系统支持IPSec协议。
大多数现代操作系统都支持IPSec,如Windows、Linux和macOS等。
2. 安装IPSec软件:如果你的操作系统没有预先安装IPSec软件,你需要手动安装它。
IPSec软件有很多选择,如StrongSwan、OpenSwan和Libreswan等。
从官方网站下载并按照说明进行安装。
3. 配置IPSec策略:在安装完成后,需要配置IPSec的策略。
策略包括加密算法、身份验证方法和网络拓扑等。
请根据你的需求进行配置。
4. 生成密钥:IPSec需要使用正确的密钥来加密和解密数据。
你可以选择使用预共享密钥、证书或IKE协议来生成密钥。
确保生成的密钥足够安全并妥善保存。
三、启用IPSec下面是启用IPSec的步骤:1. 启动IPSec服务:在配置完成后,需要启动IPSec服务。
- 1、下载文档前请自行甄别文档内容的完整性,平台不提供额外的编辑、内容补充、找答案等附加服务。
- 2、"仅部分预览"的文档,不可在线预览部分如存在完整性等问题,可反馈申请退款(可完整预览的文档不适用该条件!)。
- 3、如文档侵犯您的权益,请联系客服反馈,我们会尽快为您处理(人工客服工作时间:9:00-18:30)。
IPSec操作手册
第一部分: OpenSSL生成证书
首先需要一个根证书,然后用这个根证书来下发“子证书”。
1,找一台Linux PC, 首先切换目录,到/etc/pki/tls/misc,openssl的脚本在这里。
2,生成根证书:
./CA -newca
输入pass phrase,后面签发的时候会用到,类似一个密码
CA证书的路径在/etc/pki/CA/cacert.pem
3,生成server私有密钥:
openssl genrsa -out server.key 2048
4,生成服务器证书请求:
openssl req -new -key server.key -out server.csr
5,把server.crt文件改名成newreq.pem,然后用CA来签证就可以了
mv server.csr newreq.pem
./CA –sign
6,把newcert.pem改名成server.pem
mv newcert.pem server.pem
这就是server的证书。
7,重复3-6步,生成client的证书和私钥。
8,将server.key 和server.pem 和cacert.pem复制到FC1080,其中server.key和server.pem import到Local Certificates中,cacert.pem import到Trusted CA 中(只需导入证书部分,描述部分不用导入)
在Linux PC上,新建/var/cert 目录,将client.pem, client.key, cacert.pem复制到
/var/cert/目录下。
9,在Linux PC的/var/cert/目录下执行下列命令:
ln -s cacert.pem $(openssl x509 -noout -hash -in cacert.pem).0
这个命令是生成一个hash link,如果没有此hash link,后面将无法建立IPSec通道
至此两台主机的证书分发工作已经完成。
下面开始配置setkey和racoon的工作。
第二部分:配置racoon.conf和setkey.conf.
PC1的setkey.conf
flush;
spdflush;
spdadd 172.16.12.164/32 172.16.12.169/32 any -P out ipsec esp/transport/172.16.12.164-172.16.12.169/require;
spdadd 172.16.12.169/32 172.16.12.164/32 any -P in ipsec esp/transport/172.16.12.169-172.16.12.164/require;
PC1的racoon.conf
path pre_shared_key "/var/psk.txt";
path certificate "/var/cert";
remote 172.16.12.169 {
exchange_mode main;
lifetime time 3600 sec;
proposal_check obey;
verify_cert on;
my_identifier asn1dn;
peers_identifier asn1dn;
certificate_type x509 "server.cert" "server.priv";
proposal {
encryption_algorithm 3des;
hash_algorithm md5;
authentication_method rsasig;
dh_group modp1024;
}
}
sainfo address 172.16.12.164/32 any address 172.16.12.169/32 any {
lifetime time 3600 sec;
encryption_algorithm 3des;
authentication_algorithm hmac_md5;
compression_algorithm deflate;
}
PC2的setkey.conf
flush;
spdflush;
spdadd 172.16.12.169/32 172.16.12.164/32 any -P out ipsec esp/transport/172.16.12.169-172.16.12.164/require;
spdadd 172.16.12.164/32 172.16.12.169/32 any -P in ipsec esp/transport/172.16.12.164-172.16.12.169/require;
PC2的racoon.conf
path pre_shared_key "/var/psk.txt";
path certificate "/var/cert";
remote 172.16.12.169 {
exchange_mode main;
lifetime time 3600 sec;
proposal_check obey;
verify_cert on;
my_identifier asn1dn;
peers_identifier asn1dn;
certificate_type x509 "client.pem" "client.key";
proposal {
encryption_algorithm 3des;
hash_algorithm md5;
authentication_method rsasig;
dh_group modp1024;
}
}
sainfo address 172.16.12.164/32 any address 172.16.12.169/32 any {
lifetime time 3600 sec;
encryption_algorithm 3des;
authentication_algorithm hmac_md5;
compression_algorithm deflate;
}
第三部分:防火墙规则,这里指的是tunnel方式需要的防火墙规则(上面两部分是点对点方式的配置),其中tunnel的local subnet为192.168.1.0/24, remote subnet为192.168.2.0/24 iptables –I INPUT -p esp -j ACCEPT #接受ESP包
iptables –I INPUT -p udp --dport 500 -j ACCEPT #接受racoon的listening port进包
iptables –I INPUT -p udp --dport 4500 -j ACCEPT #接受racoon的listening port进包iptables -t nat -I POSTROUTING -s 192.168.1.0/24 -d 192.168.2.0/24 -j ACCEPT #进入tunnel的数据不进行NAT转换
iptables –I FORWARD -s 192.168.2.0/24 -d 192.168.1.0/24 -j ACCEPT #tunnel中的回包需要ACCEPT
FAQ
1. 17 (modp6144), or 18 (modp8192) 会失败的原因
Timing is Everything
ISAKMP errors like "phase2 negotiation failed due to time up waiting for phase1" or "phase1 negotiation failed due to time up" could be caused by long cipher initialization times, especially on older hardware.
2. pre-shared-key 会失败的原因
很大可能是key文件的权限不是600造成的。
可以用racoon –F –f raccoon.conf前台运行看看原因
3.其他会失败的原因
注意设备的当前时间,如果时间不对,很可能会导致证书失效。